

Page 1

IP Office 3.2
Phone Manager User Guide
15-600988 Issue 14b (14th June 2006)
Page 2

Introduction
Page ii Phone Manager User Guide
15-600988 Issue 14b (14th June 2006) IP Office 3.2
© 2006 Avaya Inc. All Rights Reserved.
Notice
While reasonable efforts were made to ensure that the information in this document was complete and accurate at the time of
printing, Avaya Inc. can assume no liability for any errors. Changes and corrections to the information in this document may be
incorporated in future releases.
Documentation Disclaimer
Avaya Inc. is not responsible for any modifications, additions, or deletions to the original published version of this documentation
unless such modifications, additions, or deletions were performed by Avaya.
Link Disclaimer
Avaya Inc. is not responsible for the contents or reliability of any linked Web sites referenced elsewhere within this
Documentation, and Avaya does not necessarily endorse the products, services, or information described or offered within
them. We cannot guarantee that these links will work all of the time and we have no control over the availability of the linked
pages.
License
USE OR INSTALLATION OF THE PRODUCT INDICATES THE END USER’S ACCEPTANCE OF THE TERMS SET FORTH
HEREIN AND THE GENERAL LICENSE TERMS AVAILABLE ON THE AVAYA WEBSITE AT
http://support.avaya.com/LicenseInfo/ (“GENERAL LICENSE TERMS”). IF YOU DO NOT WISH TO BE BOUND BY THESE
TERMS, YOU MUST RETURN THE PRODUCT(S) TO THE POINT OF PURCHASE WITHIN TEN (10) DAYS OF DELIVERY
FOR A REFUND OR CREDIT.
Avaya grants End User a license within the scope of the license types described below. The applicable number of licenses and
units of capacity for which the license is granted will be one (1), unless a different number of licenses or units of capacity is
specified in the Documentation or other materials available to End User. “Designated Processor” means a single stand-alone
computing device. “Server” means a Designated Processor that hosts a software application to be accessed by multiple users.
“Software” means the computer programs in object code, originally licensed by Avaya and ultimately utilized by End User,
whether as stand-alone Products or pre-installed on Hardware. “Hardware” means the standard hardware Products, originally
sold by Avaya and ultimately utilized by End User.
License Type(s): Designated System(s) License (DS).
End User may install and use each copy of the Software on only one Designated Processor, unless a different number of
Designated Processors is indicated in the Documentation or other materials available to End User. Avaya may require the
Designated Processor(s) to be identified by type, serial number, feature key, location or other specific designation, or to be
provided by End User to Avaya through electronic means established by Avaya specifically for this purpose.
Copyright
Except where expressly stated otherwise, the Product is protected by copyright and other laws respecting proprietary rights.
Unauthorized reproduction, transfer, and or use can be a criminal, as well as a civil, offense under the applicable law.
Third-Party Components
Certain software programs or portions thereof included in the Product may contain software distributed under third party
agreements (“Third Party Components”), which may contain terms that expand or limit rights to use certain portions of the
Product (“Third Party Terms”). Information identifying Third Party Components and the Third Party Terms that apply to them is
available on Avaya’s web site at: http://support.avaya.com/ThirdPartyLicense/
Avaya Fraud Intervention
If you suspect that you are being victimized by toll fraud and you need technical assistance or support, call Technical Service
Center Toll Fraud Intervention Hotline at +1-800-643-2353 for the United States and Canada. Suspected security vulnerabilities
with Avaya Products should be reported to Avaya by sending mail to: [email protected].
For additional support telephone numbers, see the Avaya Support web site (http://www.avaya.com/support).
Trademarks
Avaya and the Avaya logo are registered trademarks of Avaya Inc. in the United States of America and other jurisdictions.
Unless otherwise provided in this document, marks identified by “®,” “™” and “
SM”
are registered marks, trademarks and service
marks, respectively, of Avaya Inc. All other trademarks are the property of their respective owners.
Documentation information
For the most current versions of documentation, go to the Avaya Support web site (http://www.avaya.com/support) or the IP
Office Knowledge Base (http://marketingtools.avaya.com/knowledgebase/).
Avaya Support
Avaya provides a telephone number for you to use to report problems or to ask questions about your contact center. The
support telephone number is 1- 800- 242- 2121 in the United States. For additional support telephone numbers, see the Avaya
Web site: http://www.avaya.com/support.
Page 3

Phone Manager User Guide Page iii
IP Office 3.2 15-600988 Issue 14b (14th June 2006)
Table Of Contents
Introduction................................................................................................................................1
About this Guide.......................................................................................................................................1
What's New..............................................................................................................................................2
Phone Manager Feature Comparison.......................................................................................................3
Starting Phone Manager...........................................................................................................................4
Logging in to Phone Manager..............................................................................................................4
Logging in as an Agent........................................................................................................................5
The User List Window..........................................................................................................................6
Selecting a Different IP Office Control Unit...........................................................................................7
Main Window..............................................................................................................................9
Overview..................................................................................................................................................9
The Call Details Area..............................................................................................................................11
The Call History Panel............................................................................................................................12
Overview............................................................................................................................................12
The In Tab.........................................................................................................................................14
The Out Tab.......................................................................................................................................15
The Missed Tab.................................................................................................................................16
The All Tab ........................................................................................................................................17
The Door Tab.....................................................................................................................................18
Call Handling............................................................................................................................19
Overview................................................................................................................................................19
Answering a Call ....................................................................................................................................20
The Status Tab..................................................................................................................................21
Making a Call.....................................................................................................................................22
Call Back a Missed Call.....................................................................................................................22
Using the Call Window.......................................................................................................................23
Ending a Call .....................................................................................................................................24
Transferring a Call..................................................................................................................................25
Making a Consultation Call ................................................................................................................25
Transferring a Call Unsupervised.......................................................................................................26
Transferring a Caller to Voicemail......................................................................................................27
The Transfer Window.........................................................................................................................27
Reclaiming a Call...............................................................................................................................28
Holding a Call ....................................................................................................................................29
Parking a Call.........................................................................................................................................30
Recording a Call.....................................................................................................................................31
Using the Conference Feature................................................................................................................32
Overview............................................................................................................................................32
Creating a Conference Call................................................................................................................32
The Conference Tab..........................................................................................................................33
Phone Manager and Conferencing Center.........................................................................................33
Account Codes and PIN Restrictions......................................................................................................34
Using Account Codes ........................................................................................................................34
The Account Codes Tab....................................................................................................................35
Creating an Account Code Speed Dial...................................................................................................36
Working with PIN Restrictions ................................................................................................................37
Working with Queues .............................................................................................................................39
The Queue Tab..................................................................................................................................40
Voicemail..................................................................................................................................41
Overview................................................................................................................................................41
Listening to your Messages....................................................................................................................42
The Messages Tab............................................................................................................................43
The Voicemail Tab.............................................................................................................................43
Personal Greetings.................................................................................................................................44
Page 4

Phone Manager Users Guide
Page iv Phone Manager User Guide
15-600988 Issue 14b (14th June 2006) IP Office 3.2
Overview............................................................................................................................................44
Recording Greetings..........................................................................................................................45
Using Personal Greetings..................................................................................................................47
Assigning a Temporary Greeting........................................................................................................49
Assigning Personal Greetings............................................................................................................50
Entering Transfer Options..................................................................................................................52
Personal Distribution Lists......................................................................................................................53
Overview............................................................................................................................................53
Viewing a Personal Distribution List...................................................................................................53
Editing a Personal Distribution List.....................................................................................................54
Creating a Personal Distribution List..................................................................................................55
Using a Personal Distribution List......................................................................................................57
Deleting a Personal Distribution List...................................................................................................59
Features....................................................................................................................................61
Overview................................................................................................................................................61
Managing Directories..............................................................................................................................62
Overview............................................................................................................................................62
Creating a Personal Directory............................................................................................................62
Adding a Directory Entry....................................................................................................................63
Creating a Directory Entry from an Existing Call ................................................................................64
Editing a Directory Entry....................................................................................................................64
The Script Tab...................................................................................................................................65
Creating and Using Speed Dials.............................................................................................................66
Viewing Speed Dials..........................................................................................................................66
The Speed Dials Tab.........................................................................................................................68
Using a Speed Dial............................................................................................................................69
Create a Speed Dial Group................................................................................................................70
Creating a Speed Dial........................................................................................................................71
Editing a Speed Dial ..........................................................................................................................73
Deleting a Speed Dial........................................................................................................................73
Setting an Absent Message....................................................................................................................74
Getting Help.......................................................................................................................................75
Configuring Phone Manager...................................................................................................77
Changing Phone Manager Settings........................................................................................................77
Overview............................................................................................................................................77
Configuring Agent Mode....................................................................................................................78
Changing the Audio Codec Settings ..................................................................................................79
Changing the Clock Format ...............................................................................................................80
Viewing Phone Manager in Compact Mode.......................................................................................81
Changing the Date Settings...............................................................................................................82
Setting Do Not Disturb.......................................................................................................................83
Activating the Door Release Buttons..................................................................................................84
Setting your Forwarding Options........................................................................................................85
Enabling Instant Messaging...............................................................................................................88
Creating Personal Park Slots.............................................................................................................89
Changing General Phone Manager Settings......................................................................................90
Selecting Queues to Monitor..............................................................................................................92
Changing Short Cut Keys...................................................................................................................93
Configuring Screen Pop.....................................................................................................................94
Selecting Telephone Controls............................................................................................................96
Configuring USB Settings..................................................................................................................97
Configuring the Voicemail Options.....................................................................................................98
Setting your Preferences........................................................................................................................99
Overview............................................................................................................................................99
Turning Voicemail On or Off...............................................................................................................99
Turning Voicemail Ringback On or Off...............................................................................................99
Taking Your Calls at another Extension...........................................................................................100
Page 5

Table Of Contents
Phone Manager User Guide Page v
IP Office 3.2 15-600988 Issue 14b (14th June 2006)
Transfering Back to Forwarded Extension .......................................................................................100
Setting Do Not Disturb (DND)..........................................................................................................101
Setting a Do Not Disturb Exception Number....................................................................................101
Turning Call Waiting On/Off.............................................................................................................102
Turning Off Hook Operation On/Off..................................................................................................102
Selecting the Tabs to Show in Call History.......................................................................................103
Saving your Preferences..................................................................................................................104
Using the Phone Manager Pro Versions...............................................................................................105
Hands Free Operation .....................................................................................................................105
Agent Mode Operation.....................................................................................................................105
PC Softphone Operation..................................................................................................................106
Changing the Look of Phone Manager.................................................................................................107
Using Phone Manager in Compact Mode.........................................................................................107
Loading a Skin.................................................................................................................................109
Default Sizing...................................................................................................................................109
Appendix.................................................................................................................................111
Hints & Tips..........................................................................................................................................111
Tool Bar Icons......................................................................................................................................112
Short Cut Keys.....................................................................................................................................114
Glossary..................................................................................................................................115
Index........................................................................................................................................119
Page 6

Page 7

Phone Manager User Guide Page 1
IP Office 3.2 15-600988 Issue 14b (14th June 2006)
Introduction
About this Guide
This guide describes how to receive and make calls using the IP Office Phone Manager application.
IP Office Phone Manager is a single application that can be run in three different versions. The versions
available are controlled by licences entered into the IP Office configuration. The version for each user is
set through the IP Office configuration. For more information on the features that are available in each
version see the Phone Manager Feature Comparison.
The Phone Manager version is shown in the title bar of the program. The version is Phone Manager Lite
unless suitable licences are entered on the telephone system.
Phone Manager Lite
No license required.
Phone Manager Pro
A 'Phone Manager Pro' license key is required for each Phone Manager Pro user. If insufficient
licences are available Phone Manager operates in Lite mode.
Agent Mode
This mode is a selectable option available to a Phone Manager Pro user. In this mode the Phone
Manager user has access to several agent related functions as toolbar icons.
Login Mode (Hot Desking)
This mode is a selectable option available to a Phone Manager Pro user. Starting or stopping
Phone Manager logs the user on or off an extension. The extension is specified when starting
Phone Manager. While logged on, the Phone Manager extension number overrides the physical
extension number.
Phone Manager Pro PC Softphone
Conversations take place through a sound card or USB headset / handset. Both a 'Phone
Manager Pro' and a 'Phone Manager Pro IP Audio Enabled' license key are required for each
user. If insufficient licences are available Phone Manager operates in Lite mode.
Any reference in the guide that indicates a feature is only available for Phone Manager Pro then the
feature is also available for Phone Manager PC Softphone.
Further information about Avaya IP Office is available from www.avaya.com/support and also from
www.avaya.com/ipoffice/knowledgebase.
Page 8

Phone Manager Users Guide
Page 2 Phone Manager User Guide
15-600988 Issue 14b (14th June 2006) IP Office 3.2
What's New
The following features were added to version 3.2.
Drag & Drop
Calls can be transferred using the drag and drop action. For more information, see Transferring a
Call Unsupervised.
Voicemail Greetings
You can record 9 personal greetings and select when the greetings are used. A personal greeting
can be used as a temporary greeting. For more information, see Using Personal Greetings.
User Rights Template
Some Phone Manager options are only available if set by your system administrator. User rights are
controlled in IP Office Manager. For more information, see your system administrator.
Voicemail Messages
Phone Manager lists all your voicemail messages, without you having to connect to voicemail. For
more information, see Listening to Messages.
Voicemail Transfer Numbers.
You can configure up to three numbers that a caller can transfer to when they reach your voicemail.
For more information, see Entering Transfer Options.
Speed Dial Add User
When creating a new speed dial the user to be associate with the speed dial can be selected from a
directory. For more information, see Creating a Speed Dial.
Screen Pop
Configuring Phone Manager to use the screen pop feature has been simplified. For more
information, see Configuring Screen Pop.
Forwarding
There are more options on when and where to forward your calls. For more information, see Setting
your Forwarding Options.
Screen buttons
The menu buttons Configure and Functions have been replaced with the File, View and Actions
menu buttons.
Page 9
Introduction
Phone Manager User Guide Page 3
IP Office 3.2 15-600988 Issue 14b (14th June 2006)
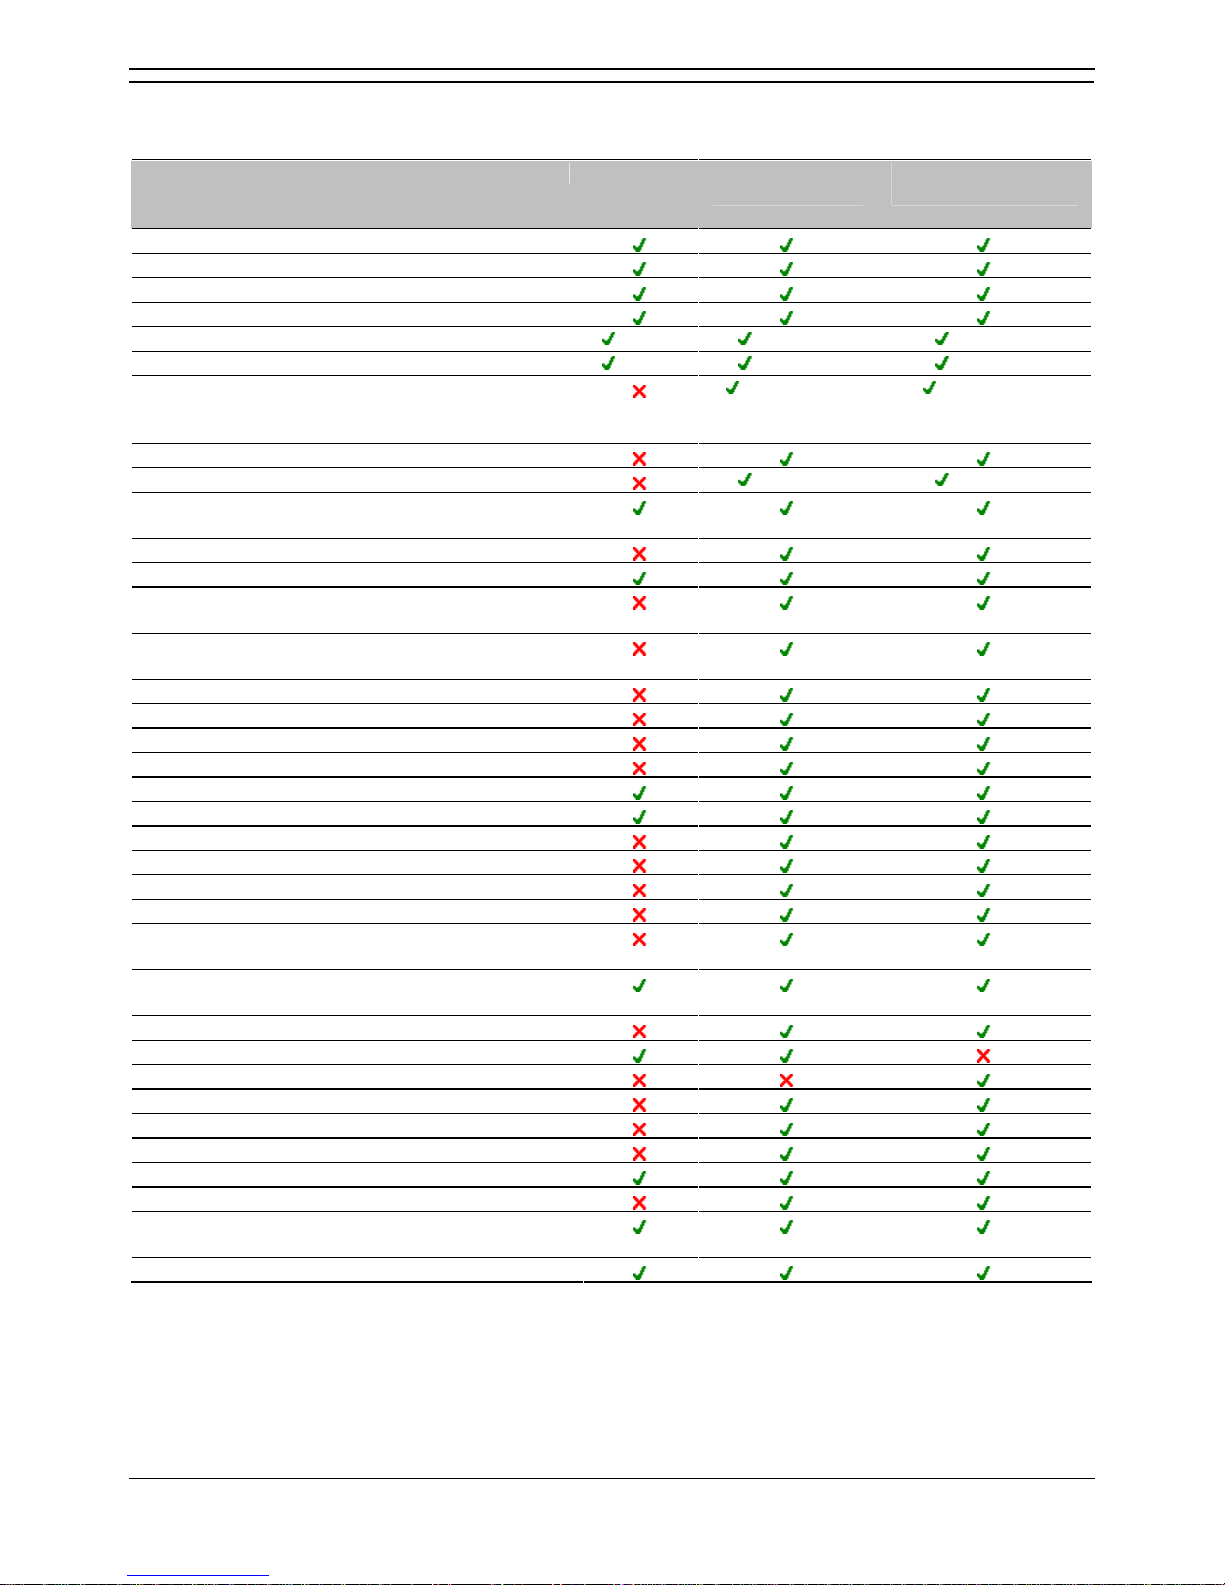
Phone Manager Feature Comparison
The table highlights the differences when running Phone Manager in each version.
Feature Phone
Manager
Lite
Phone Manager
Pro
Phone Manager PC
Softphone
Make and receive calls through the application
Configure telephone preferences
Configure keyboard shortcuts
Show the Caller ID / Name
Create Speed Dials 15 max 1000 max 1000 max
Create Busy Lamp fields using speed dials 15 max 1000 max 1000 max
Create multiple speed dial tabs to group busy
lamp field icons
10 tabs max.
100 speed dials
per tab.
10 tabs max.
100 speed dials per
tab.
View the application in Compact Mode
Create a local phone directory
1000 max 1000 max
View the call history log for all and missed
messages
View a separate incoming and outgoing call log
Collect new voicemail messages
Have voicemail box control from the application.
(Intuity and IP Office modes)
Create a Personal Distribution List
(Intuity mode only)
Assign incoming call scripting
Show the length of time spent on a call
Door opening control
Monitor queues
Conference control display
Conferencing Center action buttons
Screen Pop contacts
Simple Outlook contact record creation
Agent mode
Distinctive ringing (.WAV file)
Advice of charge indication
(only supported in Greece and Germany)
Post connect dial
(sending DTMF when connected to another party)
Requires licence key on PBX to operate
Identify a call by giving it a descriptive tag
Amend the audio codec
Set voicemail transfer numbers
Create voicemail greeting messages
Apply PIN restrictions
Use Account Codes
Transfer calls using drag and drop.
*View the status of an internal user, for example
online
*Send Instant Messages (IM) to an internal user.
* These features are only available when Microsoft Live Communications Server (LCS) is also available.
Page 10
Phone Manager Users Guide
Page 4 Phone Manager User Guide
15-600988 Issue 14b (14th June 2006) IP Office 3.2
Starting Phone Manager
Logging in to Phone Manager
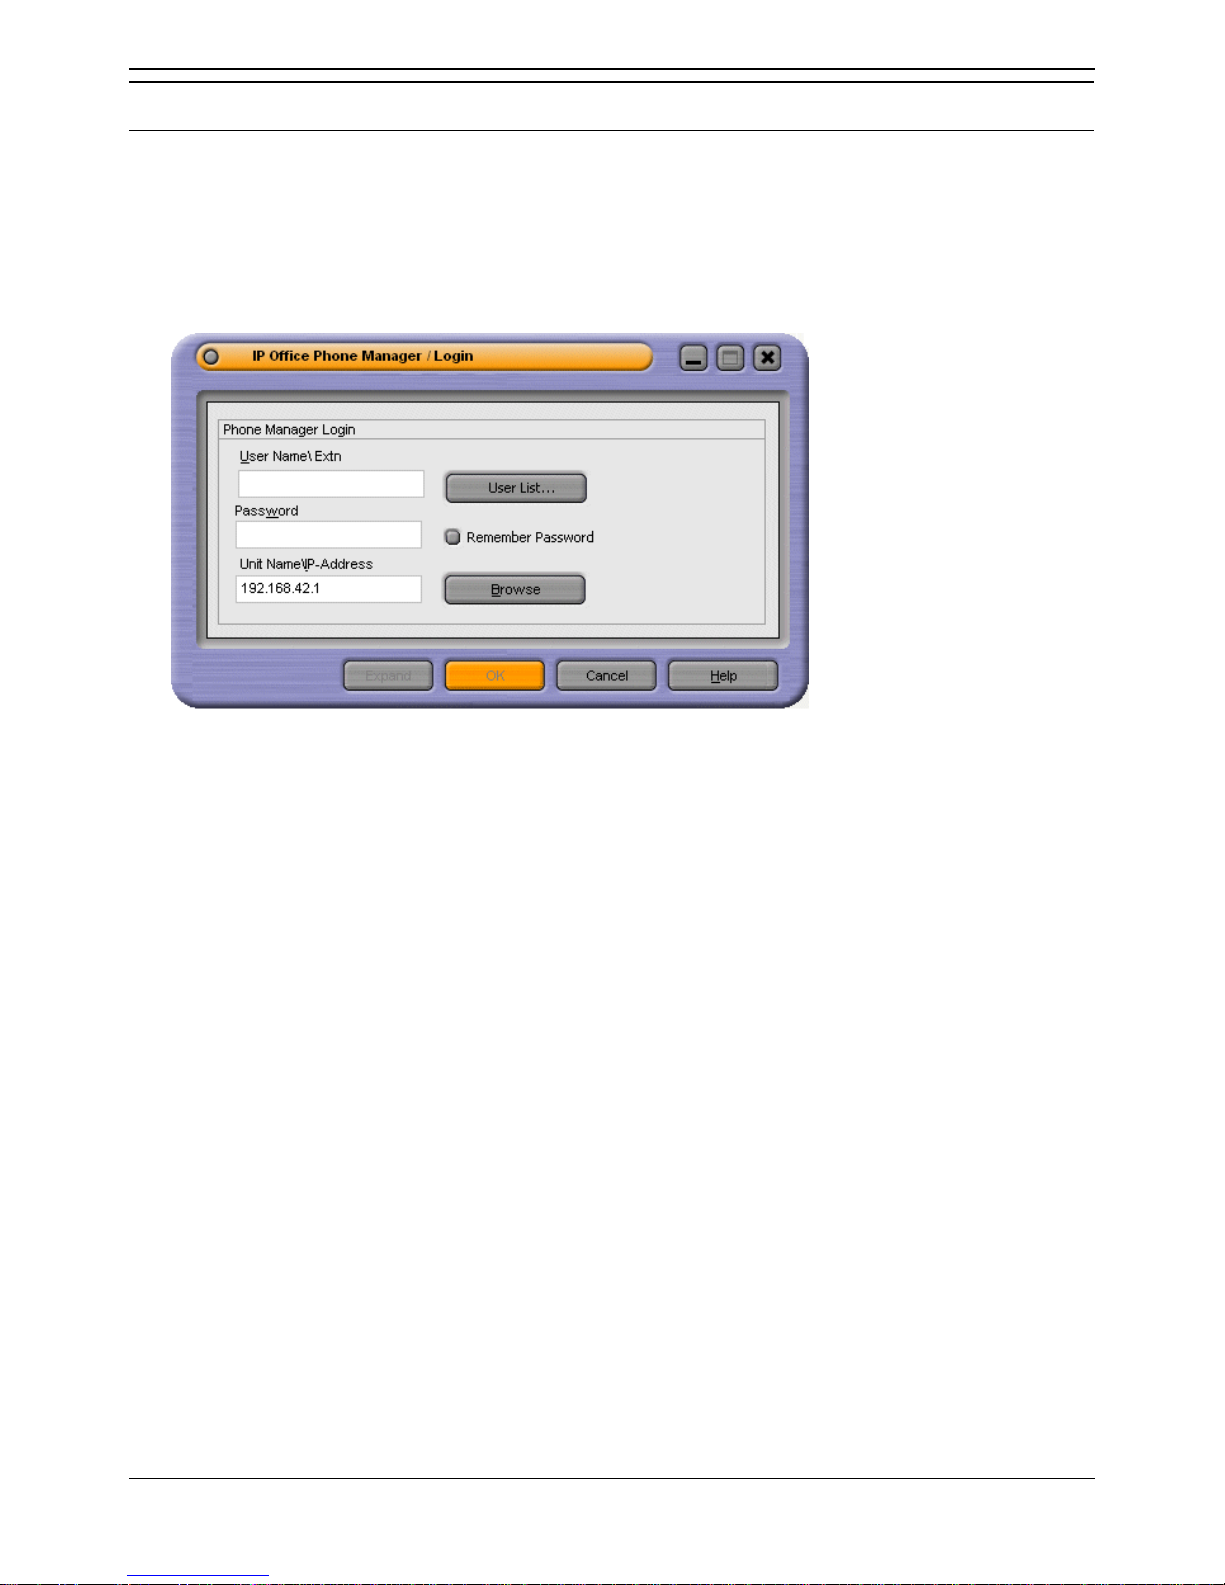
You must login to Phone Manager before you can use the application. The Login window contains
details so that Phone Manager can communicate with the telephone system. If you are unable to login,
see your system administrator.
To start Phone Manager:
1. Click Start > Programs > IP Office > Phone Manager. The IP Office Phone Manager Login window
opens.
2. In the User Name\Extn field, type your extension number or user name. The user name is case
sensitive. Alternatively, select the details from the User List window.
Make sure that the Unit Name\IP-Address field contains a valid name or address of an IP Office
unit.
Click User List to open the User List window. For more information, see The User List Window.
3. (Optional) In the Password field, type your password. This is given to you by your system
administrator and is case sensitive.
4. (Optional) If you want Phone Manager to automatically log in when started, check Remember
Password. The last saved user's configuration will be used to log in to Phone Manager.
5. (Optional) The field Unit Name\IP Address contains the IP Address of the IP Office System. Click
Browse to select a different IP Address. For more information, see Selecting a Different IP Office
Control Unit.
6. Click OK. The Phone Manager main window opens. For more information, see Main Window
Overview.
Note
If the OK button is unavailable, there are several possible reasons:
There is an incorrect IP Office IP Address. Click Browse and select the IP Office Control Unit from
the list. For more information, see Selecting a Different IP Office Control Unit.
There is an invalid user name or password. Enter your details again. Remember that both the user
name and password is case sensitive. You can select the user name from the User List window. For
more information, see The User List Window.
There might be network problems. For more information, see your system administrator.
Your telephone might not be connected to or logged on to the telephone system.
Page 11
Introduction
Phone Manager User Guide Page 5
IP Office 3.2 15-600988 Issue 14b (14th June 2006)
Logging in as an Agent
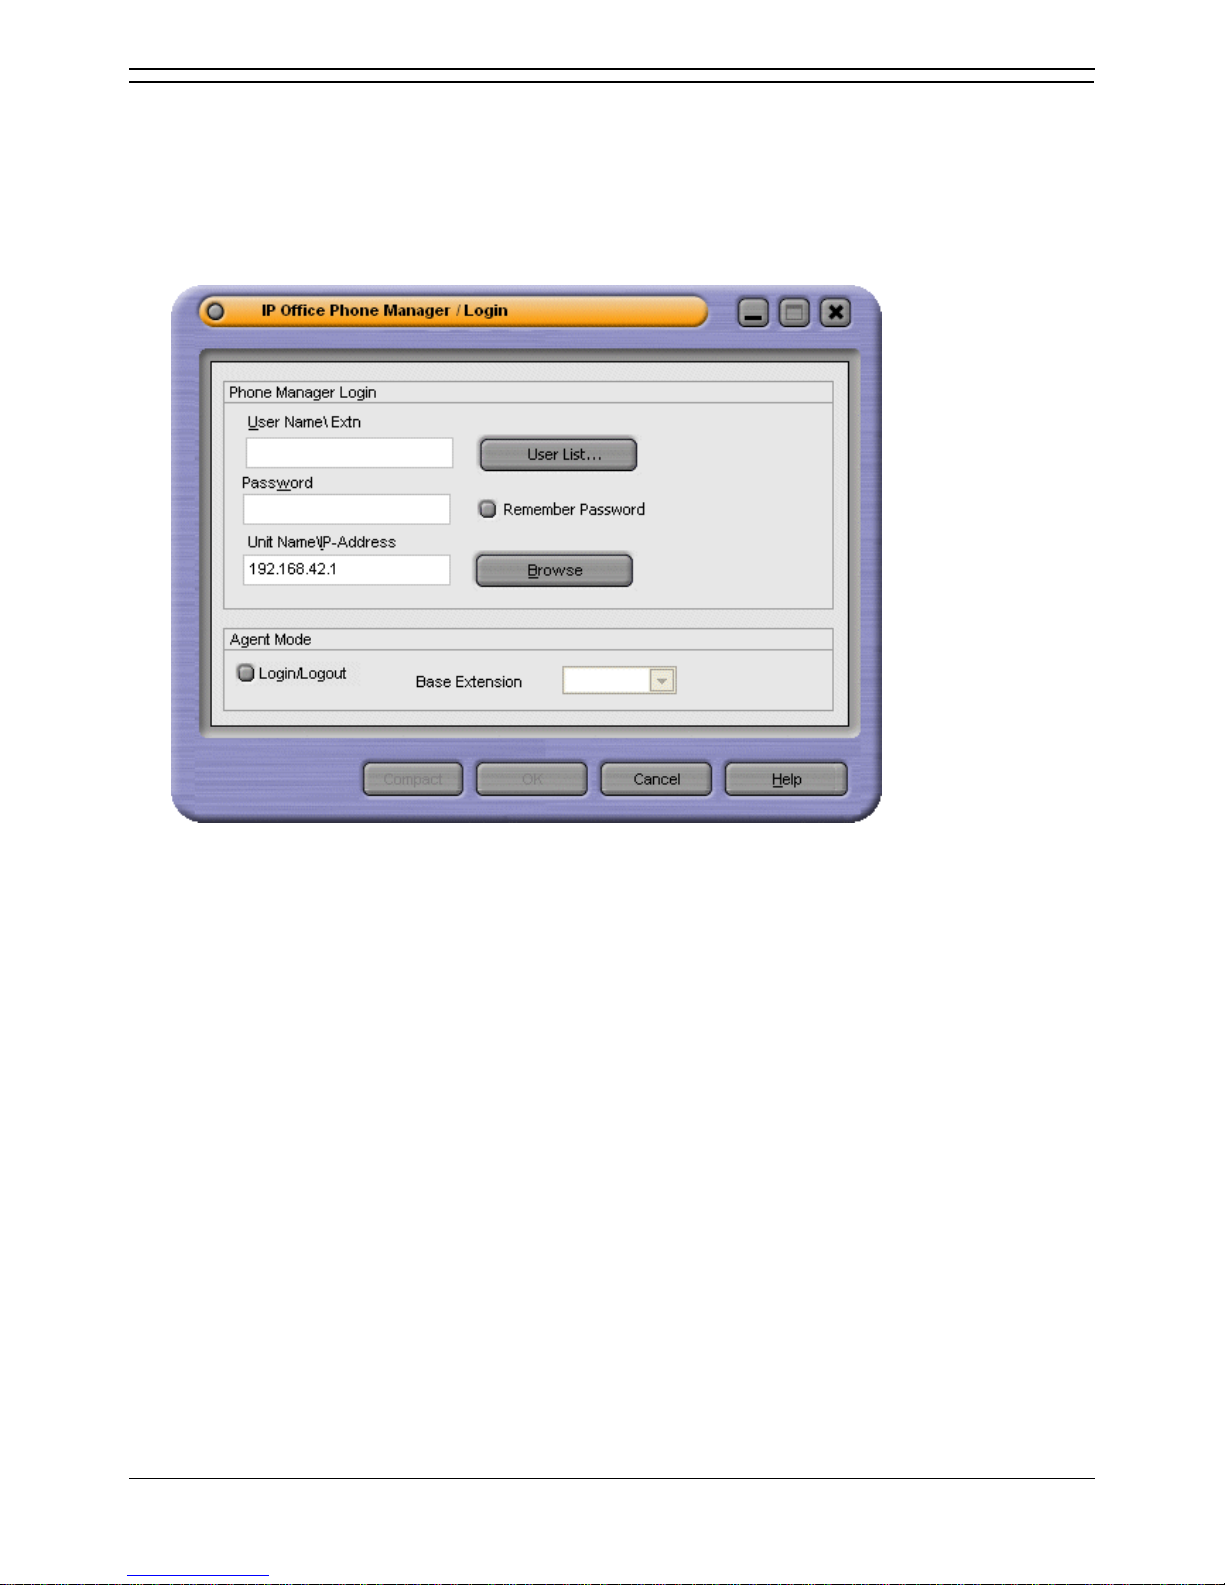
If you are working in Agent Mode you might need to login with a different extension number from that of
your physical extension. When you close Phone Manager you are logged off and the telephone reverts
to its base extension number.
To start Phone Manager when working in Agent Mode:
1. Click Start > Programs > IP Office > Phone Manager. The IP Office Phone Manager Login window
opens.
2. In the User Name\Extn field, type your extension number or user name. The user name is case
sensitive. Alternatively, select the details from the User List window.
Make sure that the Unit Name\IP-Address field contains a valid name or address of an IP Office
unit.
Click User List to open the User List window. For more information, see The User List Window.
3. (Optional) In the Password field, type your password. This is given to you by your system
administrator and is case sensitive.
4. (Optional) The field Unit Name\IP Address contains the IP Address of the IP Office System. Click
the Browse button to select another IP Office system. For more information, see Selecting a
Different IP Office Control Unit.
5. Click Expand to view the Agent Mode details.
6. If you want to login with a different extension number from that of your physical extension check
Login/Logout.
7. Select the base extension number that you want Phone Manager to be associated with.
8. Click OK to open Phone Manager
Page 12
Phone Manager Users Guide
Page 6 Phone Manager User Guide
15-600988 Issue 14b (14th June 2006) IP Office 3.2
The User List Window
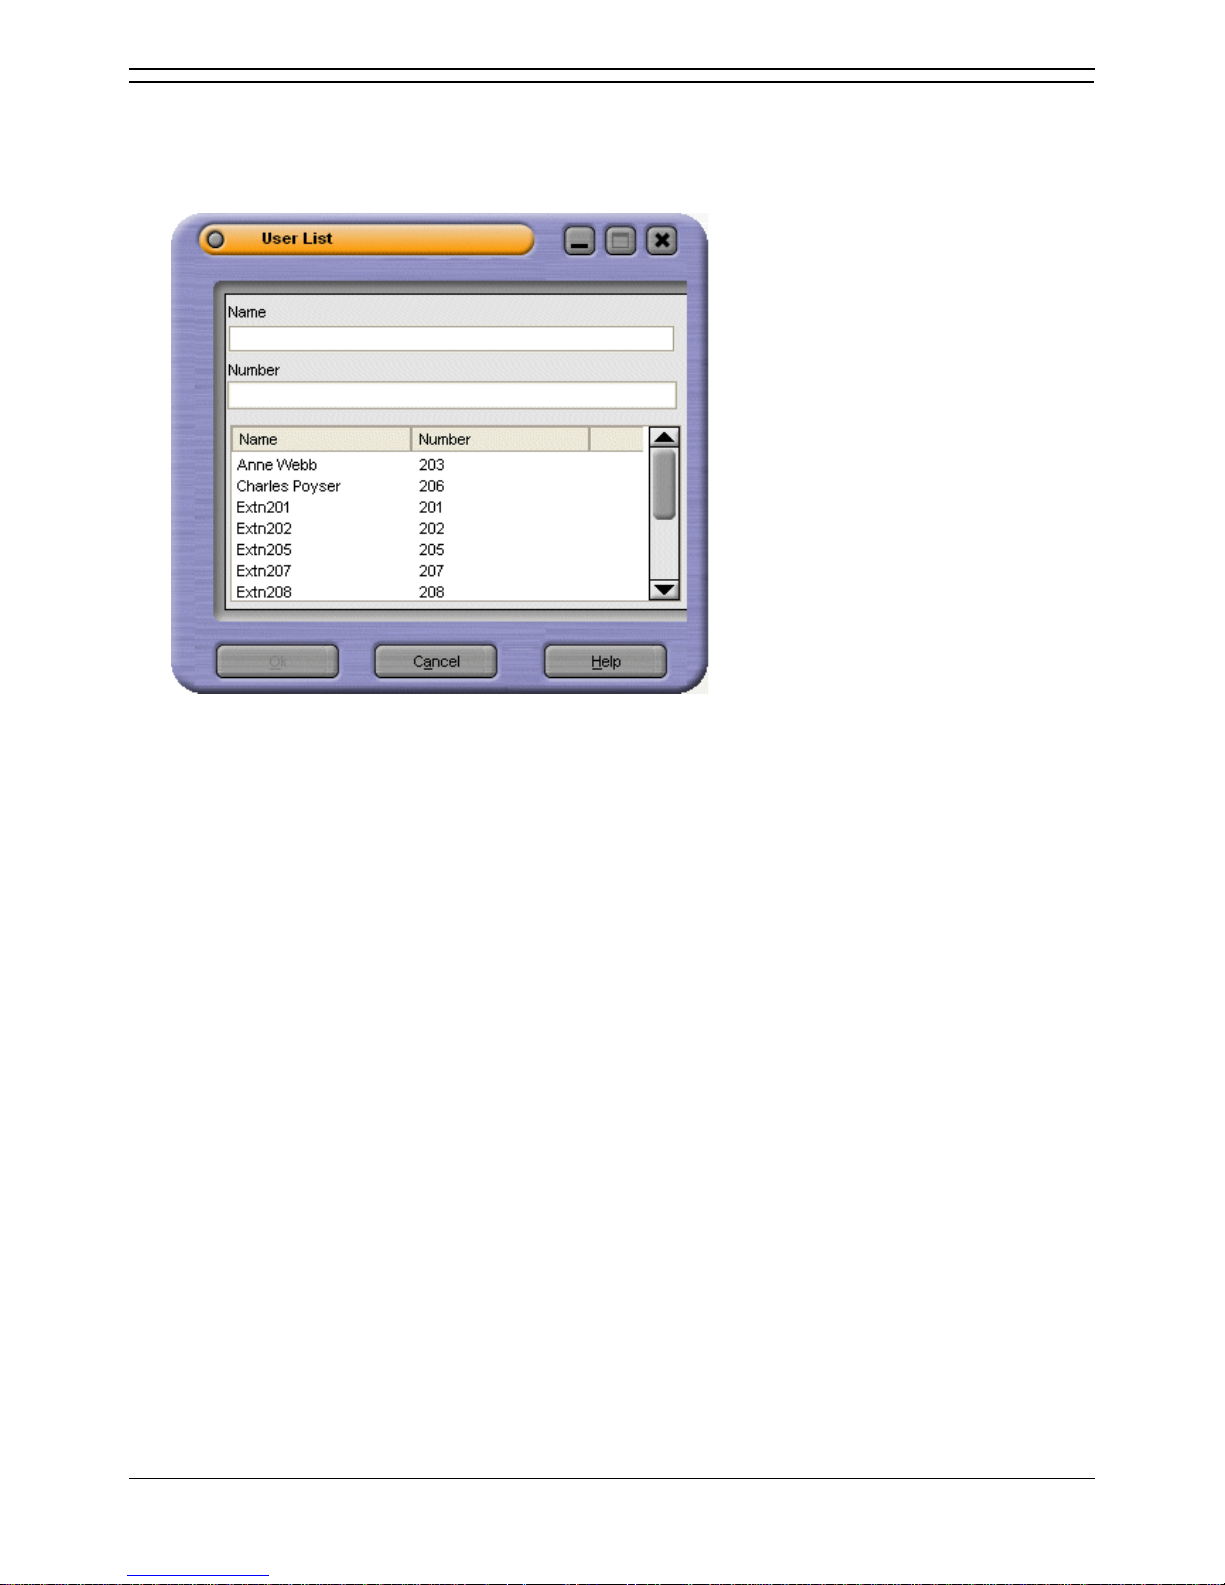
The User Name\Extn field in the Login window can be completed by selecting the details from a list.
To open the User List window:
1. At the Login window click User List. The User List window opens.
2. Start typing the name. Only the matching entries are listed.
3. Click the required entry. The Name and Number fields are completed.
4. Click OK to return to the Login window. The details you selected are entered in the User Name\Extn
field.
Page 13
Introduction
Phone Manager User Guide Page 7
IP Office 3.2 15-600988 Issue 14b (14th June 2006)
Selecting a Different IP Office Control Unit
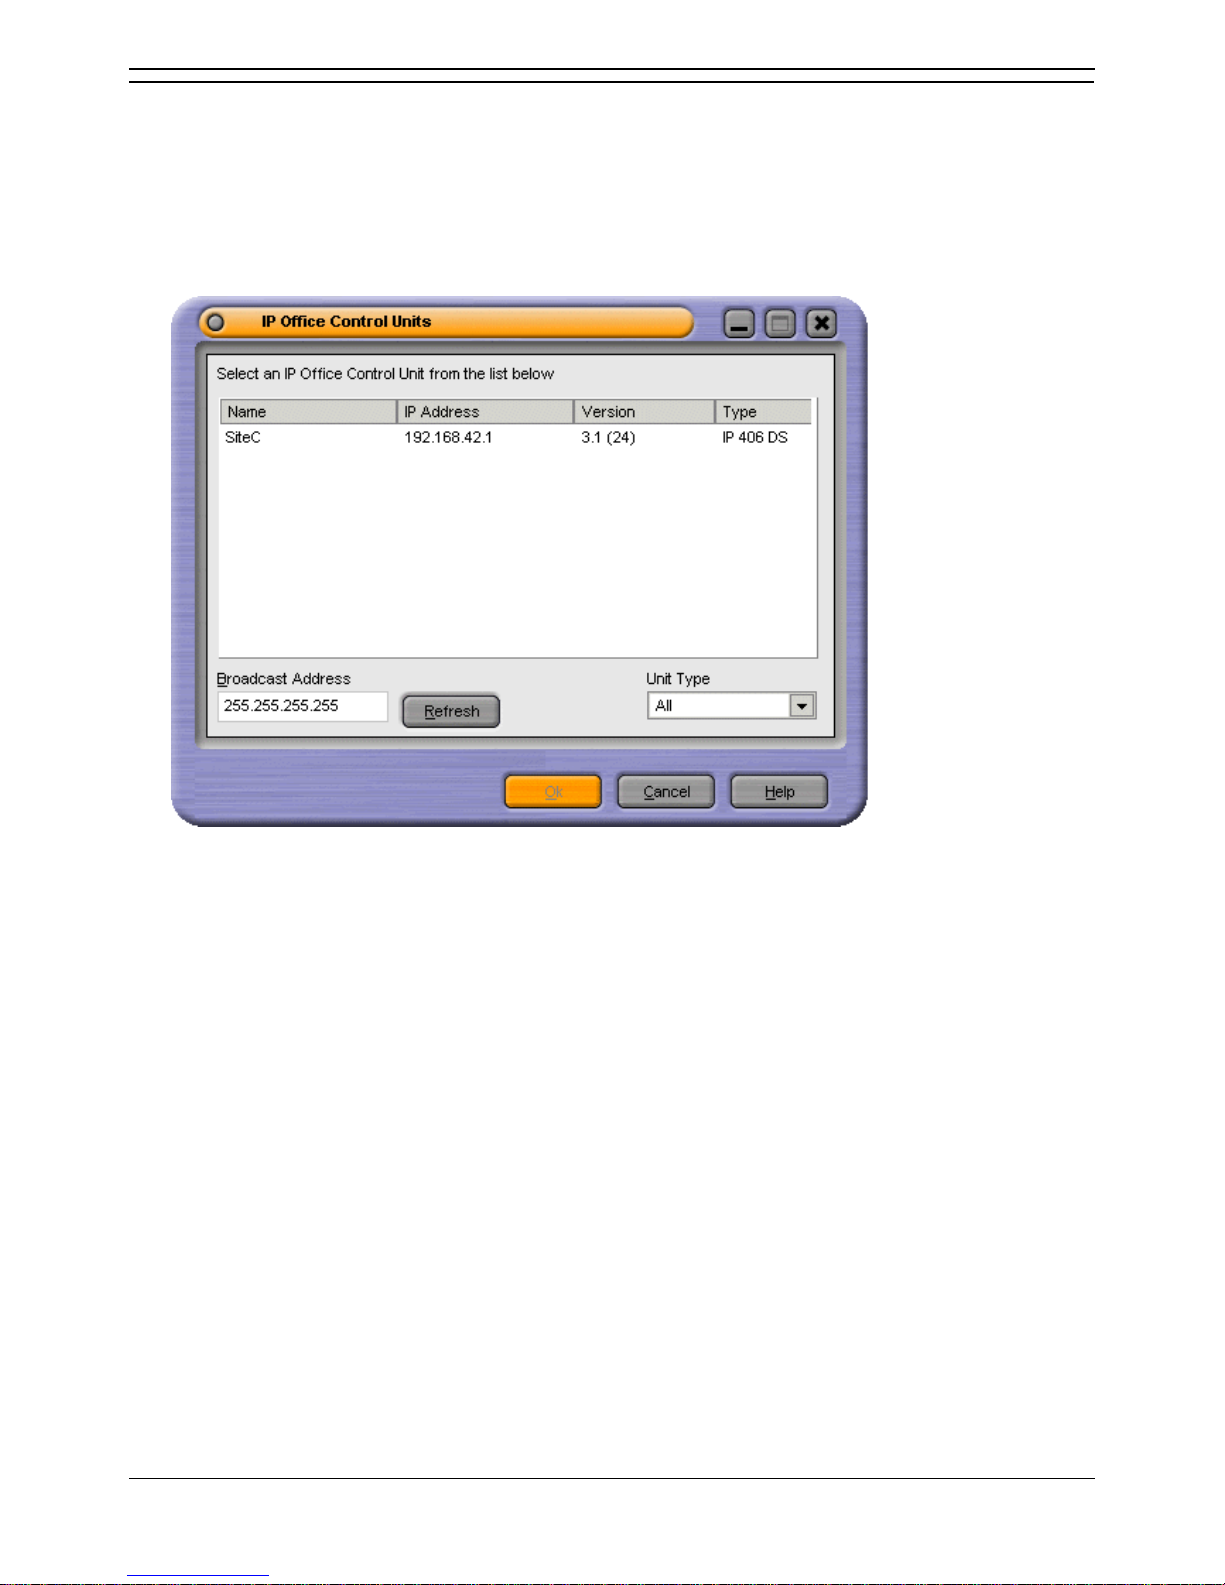
When the Browse button is clicked in the Login window the IP Office Control Units window opens. If
there is more than one IP Office system available you can select the control unit to be used.
To select a different IP Office Control Unit:
1. Click the IP Office Control Unit in the listing.
2. Click OK. If the required IP Office system is not listed contact your system administrator.
Page 14

Page 15
Phone Manager User Guide Page 9
IP Office 3.2 15-600988 Issue 14b (14th June 2006)
Main Window
Overview
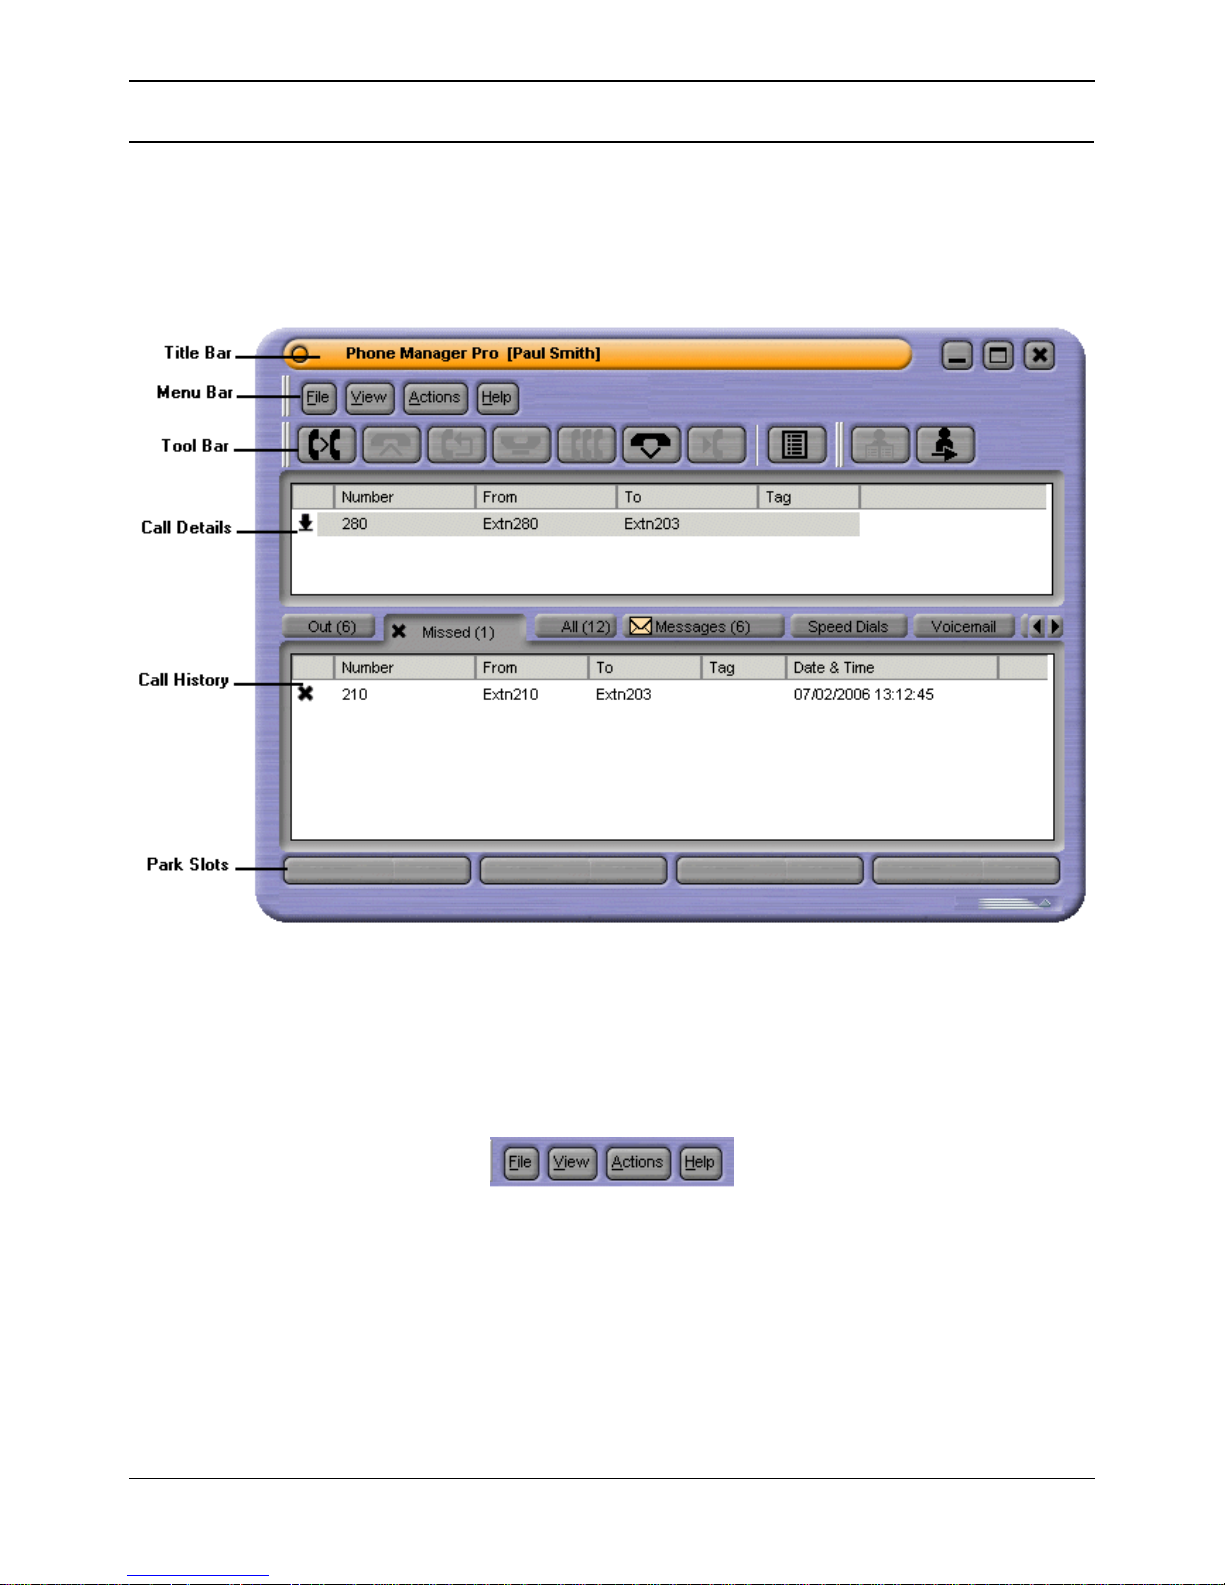
The appearance of the main window depends on the licencing and configuration settings applied. The
Title Bar indicates which version of Phone Manager is being used. In the example the version being
used is Phone Manager Pro. In each Phone Manager version the basic areas are the same. For more
information, see Phone Manager Feature Comparison.
The Phone Manager main screen is divided into the follow areas:
Title Bar
The Title Bar contains the Phone Manager version. The name of the user is inside a pair of square
brackets. If the title bar only contains the words 'Phone Manager' it is not connected to the IP Office.
Menu Bar
At the top of the screen is the main menu bar. Each menu contains commands and actions, some items
only accessible when the right conditions occur.
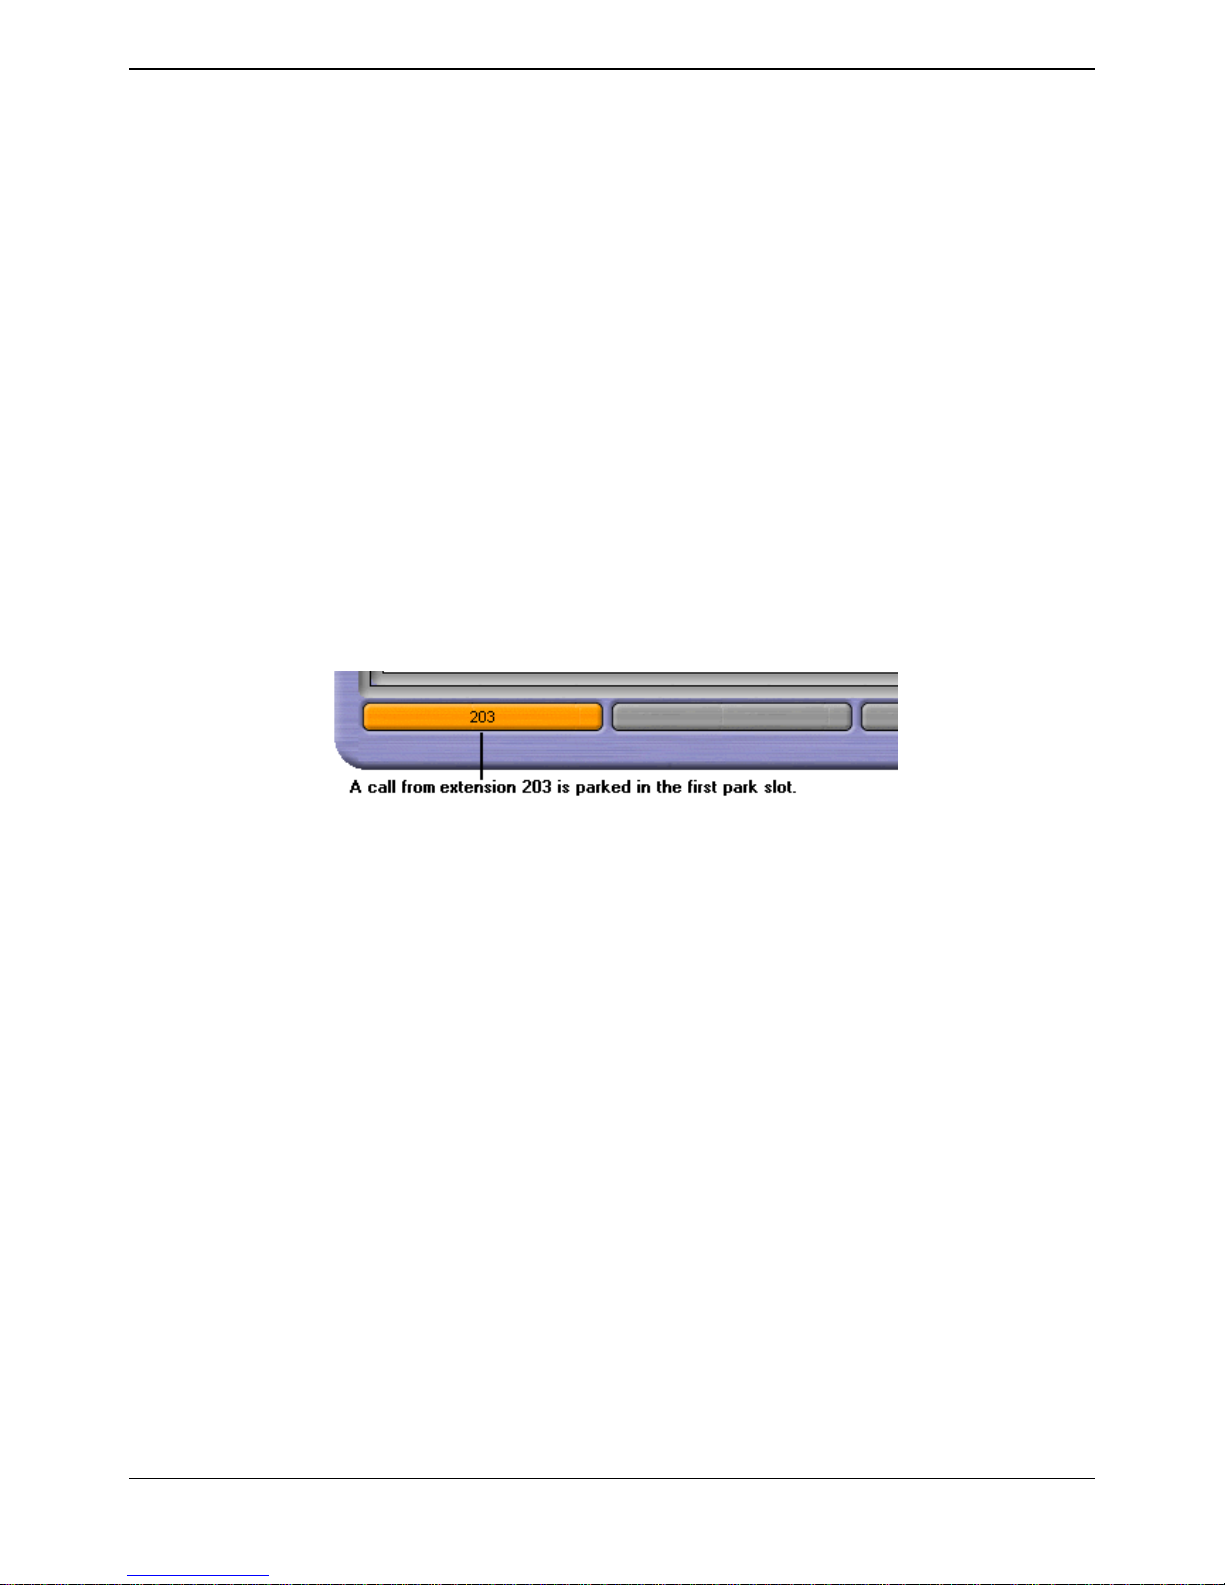
Each menu can be opened by clicking the menu button. You can also open the menu by pressing ALT
and the underlined letter for the required menu. For example, press ALT+A to open the Actions menu.
The options available in each menu are:
File
From the File menu you can save or load a personal profile, login as a different user, configure your
directory or exit Phone Manager.
View
Select to run Phone Manager in full or compact mode. Also select the display language and whether
to show or hide the tool bar. The Phone Manager skin can be changed from this menu and access
to the preferences.
Page 16
Phone Manager Users Guide
Page 10 Phone Manager User Guide
15-600988 Issue 14b (14th June 2006) IP Office 3.2
Actions
The Actions menu contains actions for call handling. Those that are unavailable can not be used in
the current call situation. Keyboard shortcuts for the functions are also shown.
Help
Access the help system and details about Avaya IP Office Phone Manager. For more information,
see Getting Help.
Tool Bar
The icons on the tool bar provide short cuts for options that are frequently used. For more information,
see Tool Bar Icons in the Appendix.
Call Details
The Call Details area shows the current state of all active calls. For more information, see The Call
Details Area.
Call History
A variety of information is shown in the Call History area. It is divided into different tabs. The tabs that
are available depend on the configuration of your Phone Manager. For more information, see Call
History.
Park Slots
There are four slots available for parking calls. You might need to temporarily "park" a call to handle
some other task, for example, receive a new call or deal with an interruption.
For more information, see Parking a Call.
Page 17
Main Window
Phone Manager User Guide Page 11
IP Office 3.2 15-600988 Issue 14b (14th June 2006)
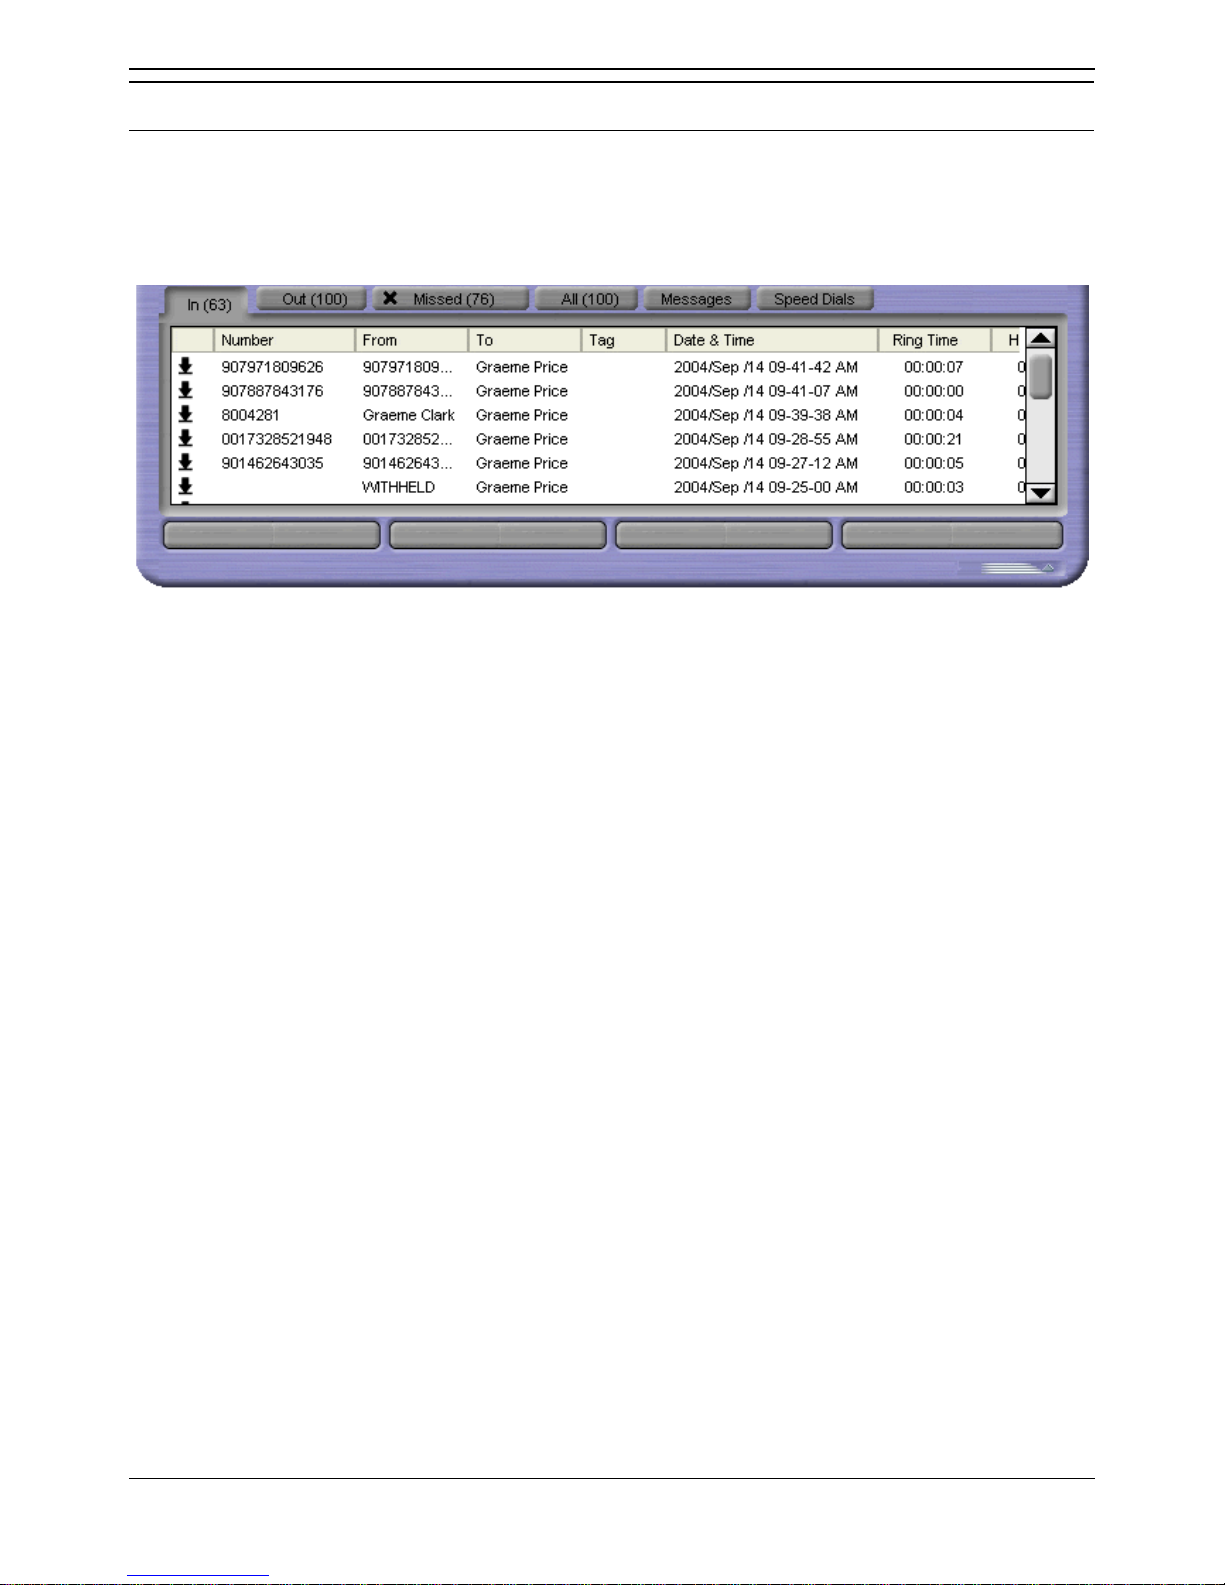
The Call Details Area
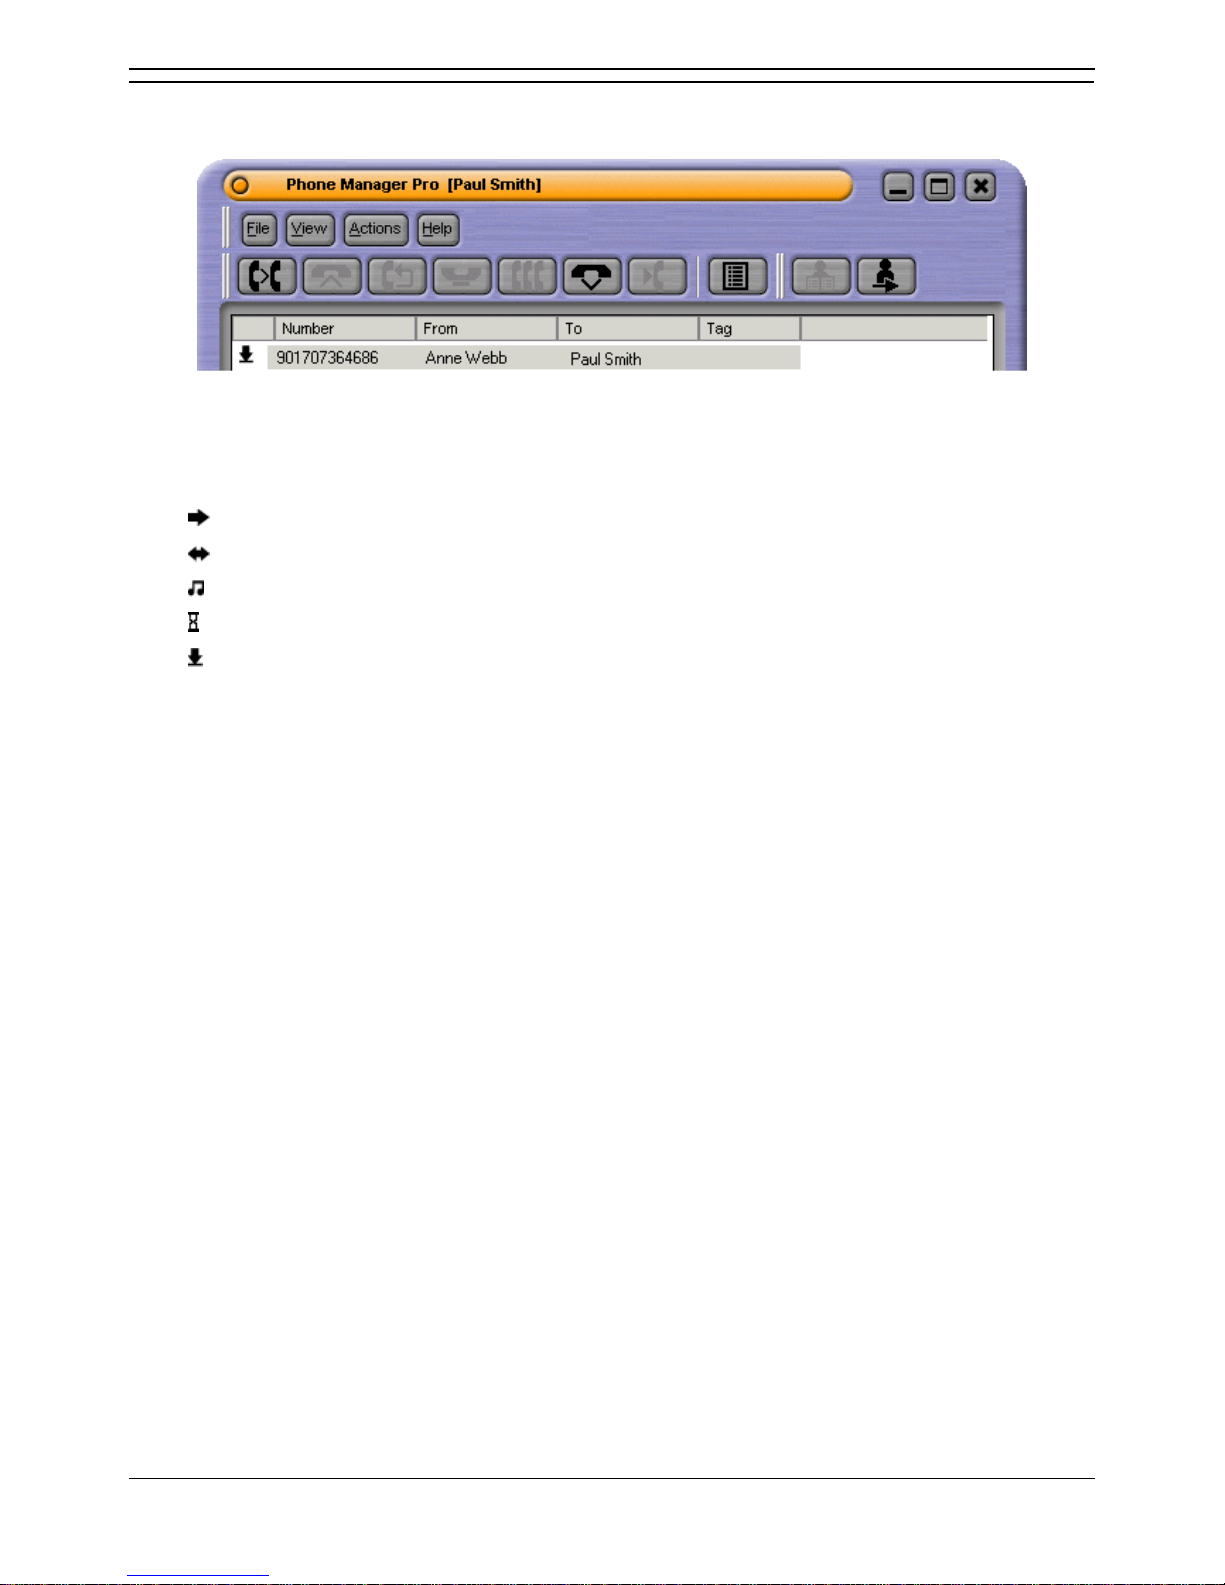
The Call Details pane contains details about the current state of all active calls.
The details shown are:
Call Status Icon
The icons in the Call Status area indicate the status of a call at your extension. The Call Status display
might not always match the display on the telephone.
Your telephone is off hook.
The call that you are currently connected to.
The call is on hold.
The number you are trying to ring is engaged.
Indicates an incoming call to your extension.
Number
Either the incoming telephone number or the telephone number being called is shown. In the example
the external telephone number is shown. If the call is an internal call just the extension number is shown.
From
This column shows the name that is associated with the number in the directory on the main system or
your local directory. The local directory is only available in Phone Manager Pro.
To
This column shows the name that is associated with the called number in the directory on the main
system or your local directory. The Local Directory is only available in Phone Manager Pro.
Tag
Text that was entered to identify the call.
Page 18
Phone Manager Users Guide
Page 12 Phone Manager User Guide
15-600988 Issue 14b (14th June 2006) IP Office 3.2
The Call History Panel
Overview
The Call History area of the Phone Manager can show a variety of information. You can configure what
is shown by changing your preferences. For more information, see Changing General Phone Manager
Settings.
The Call History tabs that are available to all Phone Manager versions are:
Missed - Lists unanswered calls to your extension. For more information, see The Missed Tab.
All - List of all incoming, outgoing and missed calls. For more information, see The All Tab.
Messages - Displays the number of new messages in your voicemail box. For more information, see
The Messages Tab.
Speed Dials - To store and create speed dial icons. For more information, see The Speed Dials
Tab.
Conference - Lists the members of a conference. For more information, see The Conference Tab.
For Phone Manager Pro, the following tabs also appear in the Call History pane:
In - Lists all calls received at your extension. For more information, see The In Tab.
Out - Lists all calls made from your extension. For more information, see The Out Tab.
Status - The tab appears when a call is in progress or you are in Busy Wrap Up/Busy Not available.
For more information, see The Status Tab.
Voicemail - During a call to your voicemail box, a tab shows all your messages. For more
information, see The Voicemail Tab.
Queue - Used to monitor hunt group queues. For more information, see The Queue Tab.
Door - Used to activate a door release. For more information, see The Door Tab.
Script - Displays the text configured in the script file field in a directory entry. For more information,
see The Script Tab.
Account Codes - Displays icons for calls with accounts codes. For more information, see The
Account Codes Tab.
Page 19

Main Window
Phone Manager User Guide Page 13
IP Office 3.2 15-600988 Issue 14b (14th June 2006)
The In, Out, Missed and All tabs contain information about calls. The following options are available
when you right-click a call:
Call Number Back - Call the selected number. If the outbound prefix, for example 9, is not shown
contact your system administrator.
Add to Directory - Automatically create a directory entry from the call information. For more information,
see Managing Directory Entries Overview.
Add to Speed Dial - Automatically create a speed dial from the call information. For more information,
see Viewing Speed Dials.
Add to Outlook - Automatically add the call information to the Outlook contacts folder. The 'Add to
Outlook' option requires Microsoft Outlook to be installed on your computer and the correct configuration
of MAPI. For more information, see your system administrator.
Copy - The 'Number' from the selected call is copied in to the clipboard.
Delete Entry - The currently selected call is deleted from the call history.
Clear - All the call information listed in the current tab is cleared.
Clear All tabs - All the call information listed in the In, Out, Missed and All tabs is cleared.
Page 20

Phone Manager Users Guide
Page 14 Phone Manager User Guide
15-600988 Issue 14b (14th June 2006) IP Office 3.2
The In Tab
Only available in Phone Manager Pro versions.
If the In tab is not visible and you are using Phone Manager Pro, you need to select to show incoming
calls. For more information, see Changing General Phone Manager Options.
The In tab lists the calls received at your extension. A maximum of a 100 calls can be listed. When the
maximum capacity is reached the oldest record is deleted when a new record is added.
Right-click a call to view a list of options. For more information, see Call History Panel Overview.
Double-click a call to return a call.
The details that are shown in the In tab are:
FIELD DESCRIPTION
Call Status
Icon
The icon shows the type of call.
Number
The incoming telephone number. If the call was an internal call the extension
number is listed.
From
The name that is associated with the number in the directory in the main system
or your local directory.
To
The name that is associated with the called number in the directory on the main
system or your local directory.
Tag
Text that was entered to identify the call. Any calls that you annotate have the text
recorded in this area.
Date & Time
The date and time that the call happened.
Ring Time
The length of time that the call rang.
Hold Time
The length of time that the call was on hold.
Call Duration
The total length of time that the call lasted.
Page 21

Main Window
Phone Manager User Guide Page 15
IP Office 3.2 15-600988 Issue 14b (14th June 2006)
The Out Tab
Only available in Phone Manager Pro versions.
If the Out tab is not visible and you are using Phone Manager Pro, you need to select to show outgoing
calls. For more information, see Changing General Phone Manager Options.
The Out tab lists all the calls made from your extension. This might be a call manually dialed using the
handset or dialed using Phone Manager. The Out tab lists a maximum of 100 calls. When the maximum
capacity is reached the oldest record is deleted when a new record is added.
Right-click a call to view a list of options. For more information, see Call History Panel Overview.
Double-click a call to re-dial the number.
The details that are shown in the Out tab are:
FIELD DESCRIPTION
Call Status Icon
The icon shows the type of call.
Number
The telephone number that was dialed. If the call was an internal call the
extension number is listed.
From
The name that is associated with the number in the directory in the main system
or your local directory.
To
The name that is associated with the called number in the directory on the main
system or your local directory.
Tag
Text that was entered to identify the call. Any calls that you annotate have the
text recorded in this area.
Date & Time
The date and time that the call happened.
Hold Time
The length of time that the call was on hold.
Call Duration
The total length of time that the call lasted.
Page 22

Phone Manager Users Guide
Page 16 Phone Manager User Guide
15-600988 Issue 14b (14th June 2006) IP Office 3.2
The Missed Tab
The Missed tab is available to all versions of Phone Manager. If the tab is not visible you need to select
to show missed calls. For more information, see Changing General Phone Manager Options.
The Missed tab lists the unanswered incoming calls to your extension. A maximum of 100 calls are
listed. When the maximum capacity is reached the oldest record is deleted when a new record is added.
Right-click a call to view a list of options. For more information, see Call History Panel Overview.
Double-click a call to make return a missed call.
The details that are shown in the Missed tab are:
FIELD DESCRIPTION
Call Status
Icon
The icon shows the type of call.
Number
The incoming telephone number. If the call was an internal call the extension
number is listed.
From
The name that is associated with the number in the directory on the main system
or your local directory.
To
The name that is associated with the called number in the directory on the main
system or your local directory.
Tag
Text that was entered to identify the call. Any calls that you annotate have the text
recorded in this area.
Date & Time
The date and time that the call happened.
Page 23

Main Window
Phone Manager User Guide Page 17
IP Office 3.2 15-600988 Issue 14b (14th June 2006)
The All Tab
The All tab is available to all versions of Phone Manager. If the tab is not visible you need to select to
show your calls. For more information, see Changing General Phone Manager Options.
The All tab gives a list of all incoming, outgoing and missed calls at your extension. The tab lists
information on a maximum of 100 calls. When the maximum capacity is reached the oldest record is
deleted when a new record is added. If you are using Phone Manager Pro, the In and Out tabs might
contain details about calls that were deleted from the All tab.
Right-click a call to view a list of options. For more information, see Call History Panel Overview.
Double-click a call to make a call to the telephone number listed.
The details that are shown in the All tab are:
FIELD DESCRIPTION
Call Status Icon
The icon shows the type of call.
Number
Either the incoming telephone number or the telephone number that was called.
If the call was an internal call the extension number is listed.
From
The name that is associated with the number in the directory in the main system
or your local directory.
To
The name that is associated with the called number in the directory on the main
system or your local directory.
Tag
Text that was entered to identify the call. Any calls that you annotate have the
text recorded in this area.
Date & Time
The date and time that the call happened.
Page 24
Phone Manager Users Guide
Page 18 Phone Manager User Guide
15-600988 Issue 14b (14th June 2006) IP Office 3.2
The Door Tab
Only available in Phone Manager Pro versions.
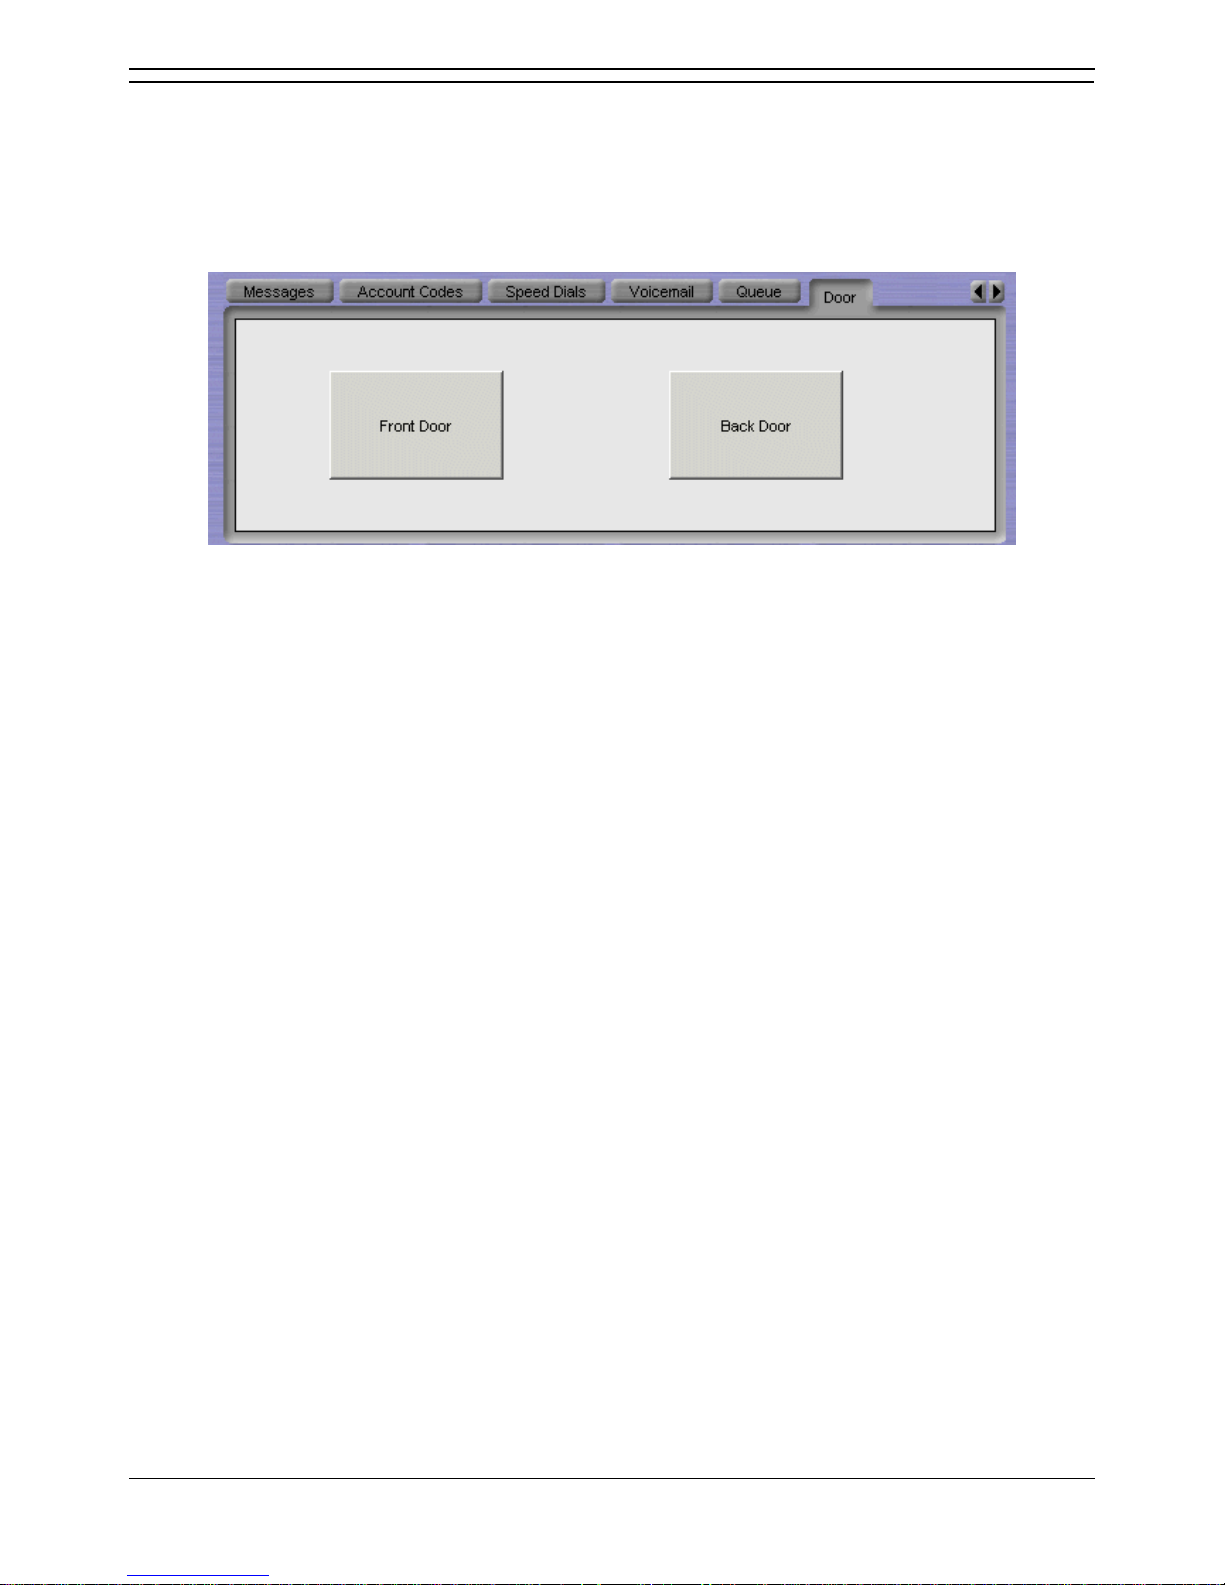
If the Door tab is available in the Call History area you can 'unlock' a door by clicking the relevant door
button. The relay is pulsed open for 5 seconds. The door buttons are only available when they have
been configured. For more information, see Activating the Door Release Buttons.
Page 25

Phone Manager User Guide Page 19
IP Office 3.2 15-600988 Issue 14b (14th June 2006)
Call Handling
Overview
You can use Phone Manager to handle incoming and outgoing telephone calls. This section of the guide
explains the way telephone calls can be handled.
The call handling areas covered are:
How to know that there is an incoming call to be answered and what can happen in Phone Manager
when you answer a call. For more information, see Answering a Call.
How to use the available telephone directories or return a missed call. For more information, see
Making a Call.
How to transfer a caller to another person or to voicemail. For more information, see Making a
Consultation Call and Transferring a Caller to Voicemail.
How to put a call on hold and how to pick up a call was being held. For more information, see
Holding a Call.
How to park a call and mark the park slot with details of the call. For more information, see Parking a
Call.
How to record a telephone conversation. For more information, see Recording a Call.
How to create a call between more than 2 people. For more information, see Creating a Conference
Call.
How to make calls with account codes or PIN restrictions. For more information, see Using Account
Codes and Working with PIN Restrictions.
How to see the number of calls that are held in a queue and answer a queued call. For more
information see Working with Queues.
Page 26
Phone Manager Users Guide
Page 20 Phone Manager User Guide
15-600988 Issue 14b (14th June 2006) IP Office 3.2
Answering a Call
You are notified that there is an incoming call to be answered by:
Phone Manager Pro pops to the front of your screen.
There is a ringing sound from your PC speakers.
The Phone Manager Pro Task Bar Icon is flashing.
Your telephone is ringing.
There are several ways to answer the call.
To answer a call:
Pick up the handset on your telephone.
The following ways to answer a call are only available if Phone Manager is configured for Off Hook
Operation. For more information, see Selecting Telephone Controls.
Click . The button is labelled 'Answer Incoming \ Waiting Call'.
Press Enter on your keyboard.
Click Actions > Answer.
When a call is answered the call is shown in the Call Details panel. The call status is shown as .
During a call the Status tab might show. For more information, see The Status Tab.
When you are on a call you are notified that there is a call waiting if the Call Waiting option is active. For
more information, see Selecting Telephone Controls.
To answer a waiting call:
1. To answer the waiting call click . You are connected to the new caller. The original caller is put
on hold.
2. When you have finished the call click .
3. Your original call is still being held. To return to the original call click the call in the Call Details area.
Page 27
Call Handling
Phone Manager User Guide Page 21
IP Office 3.2 15-600988 Issue 14b (14th June 2006)
The Status Tab
Only available in Phone Manager Pro versions.
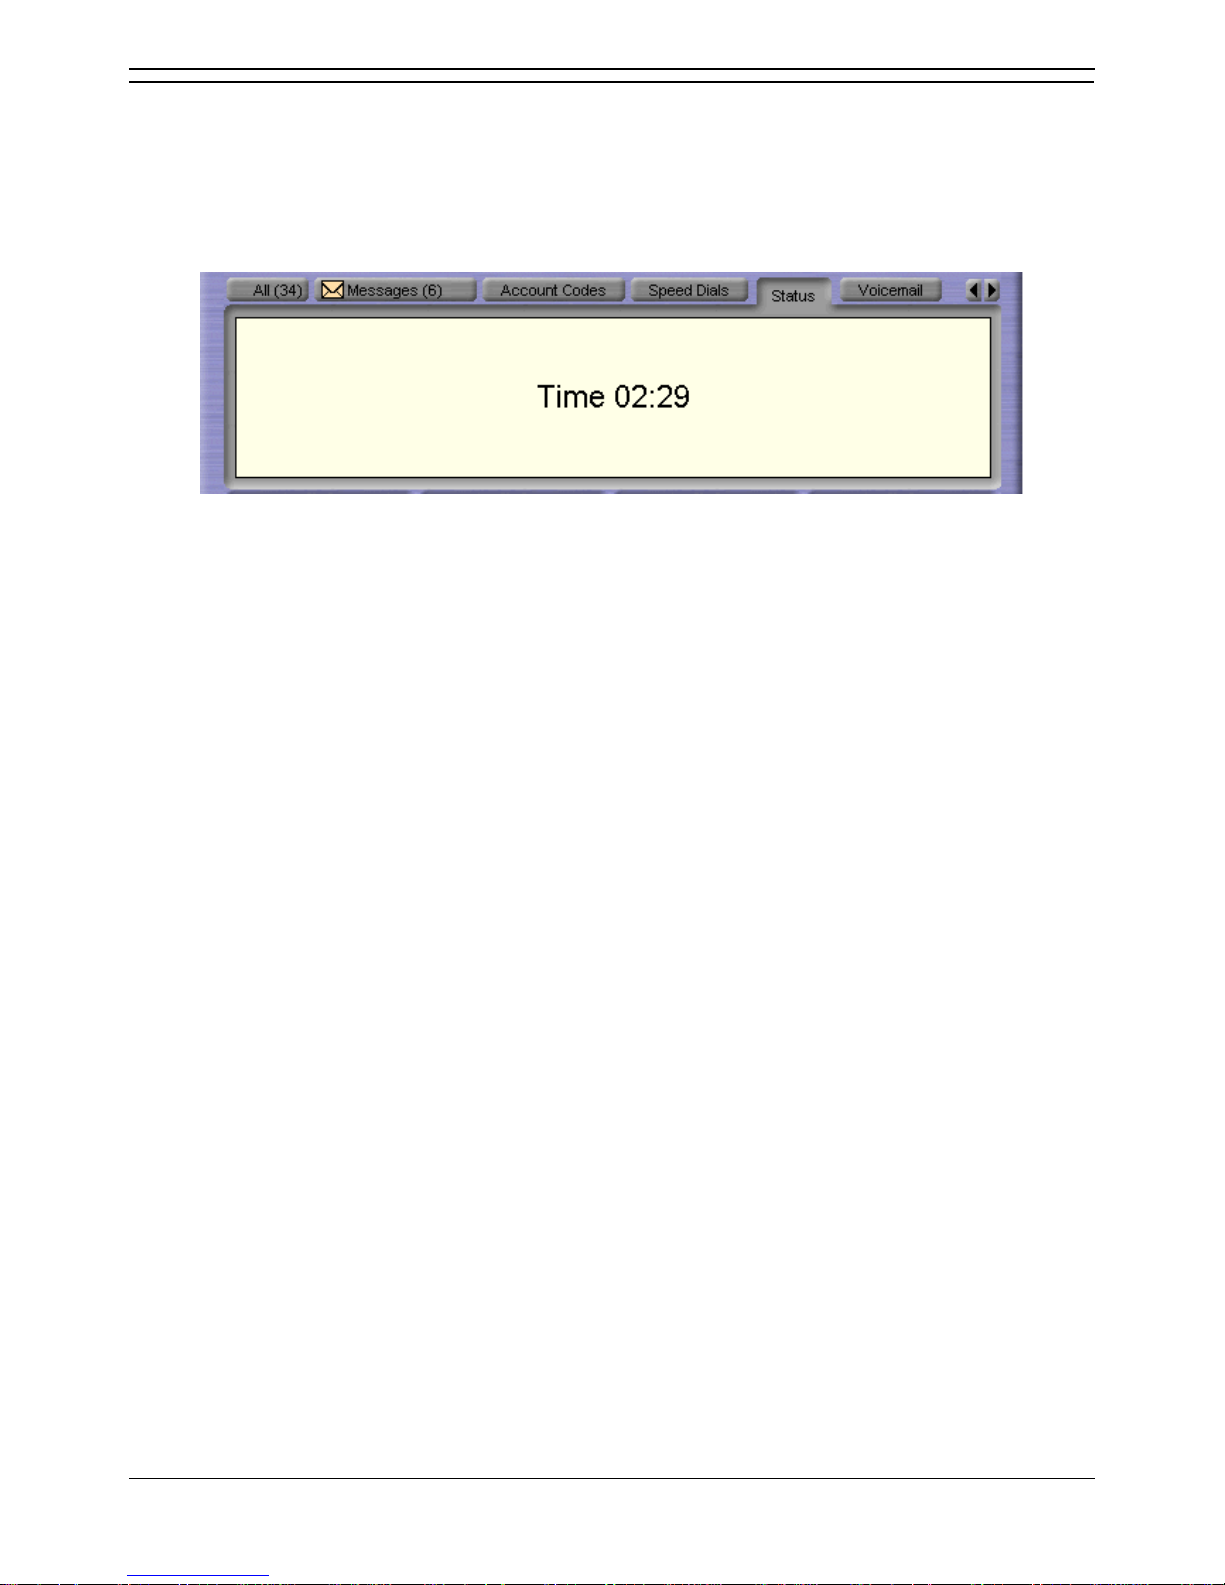
The Status tab appears when you are on a call. It contains a call timer. When an incoming call has a
script file configured the Script tab shows for the first 15 seconds after connection. If working in Agent
Mode, the Status tab also appears when you go into Busy Wrap Up or Busy Not Available state.
Note
If the Status tab does not come to the front when a call is answered, the Phone Manager settings
need to be changed. For more information, see Changing General Phone Manager Options.
Page 28

Phone Manager Users Guide
Page 22 Phone Manager User Guide
15-600988 Issue 14b (14th June 2006) IP Office 3.2
Making a Call
You can make a call from the associated physical telephone. When you use Phone Manager to make a
call, there are several methods.
To make a call using Phone Manager:
Dial the number required using the phone dialer section in the Speed Dial tab. For more information,
see The Speed Dials Tab.
Pick up the handset and then double-click a speed dial icon. For more information, see Using a
Speed Dial.
Click and use the Call window. For more information, see Using the Call Window.
Press F1 and use the Call window. For more information, see Using the Call Window.
Click Actions > Call and use the Call window. For more information, see Using the Call Window.
Notes
1. If a call to an internal user is not answered within the No Answer Time, and the user has Voicemail
enabled, you are prompted to leave a message. When you have finished the call, the call
information is listed in Call History under the Out tab. Double-click the call information to redial the
number.
2. If you are dialling a busy extension from your handset and your call does not go through to
Voicemail the Ringback icon is available. Click to set Ringback When Free.
3. Do not use spaces when typing the telephone number. For example, type 123456 not 123 456.
Call Back a Missed Call
If a call is not answered within the No Answer Time, the incoming call is shown in Call History under the
Missed tab. For more information, see The Missed Tab.
To callback a missed call:
1. Click the Missed tab.
2. Double-click the call to return the call.
If the outbound prefix is not shown contact your system administrator.
If the caller has left a voicemail message, the Messages tab in the Call History pane indicates you have
a new message. For more information, see Listening to your Messages.
Page 29
Call Handling
Phone Manager User Guide Page 23
IP Office 3.2 15-600988 Issue 14b (14th June 2006)
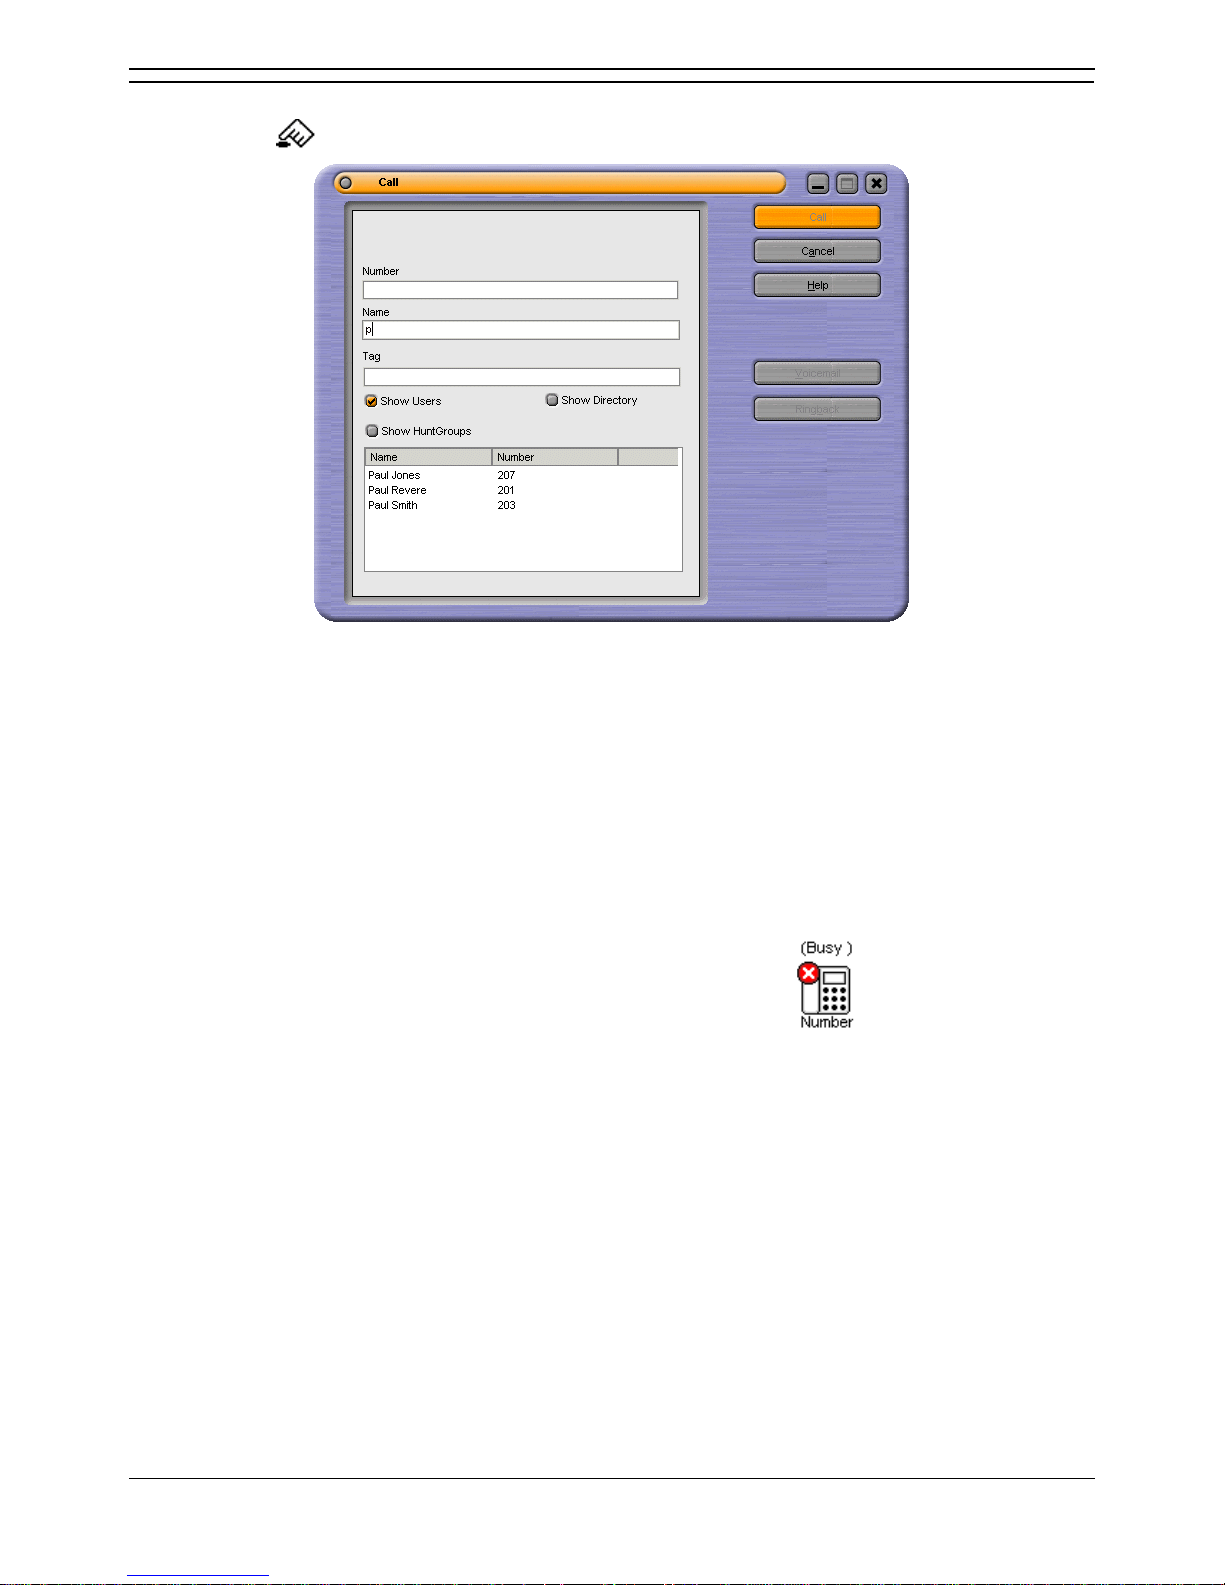
Using the Call Window
When you click , press F1 or click Actions > Call, the Call window opens.
To use the Call screen:
1. Select the directory you want to search.
You can select more than one directory. The directories are a list of names and numbers configured
on the IP Office. If you are using Phone Manager Pro the directories contain the names and
numbers configured in your own personal directory.
2. Start typing the name in the Name field.
The entries that match the text entered are shown. When the required number can be seen in the
listing, click the number once. The number is transferred to the Number field.
3. (Optional) Type a Tag message.
Text entered in the Tag Field is added to the outgoing call. The Tag feature is only available for
internal calls and is not supported for VoIP extensions.
4. (Optional) Verify that the internal number is available. The Busy icon shows if an internal
number is unavailable. If an internal number is unavailable select either:
Cancel
The Call screen is closed and you are returned to the main window.
Ringback
The Ringback button sets Ring Back When Free on the destination extension. When the
destination becomes free your telephone will be called back. If the Ringback call is answered a
new call is automatically placed on the destination extension. If the Ringback is not answered the
call is cancelled.
Voicemail
The Voicemail button calls the voicemail of the user rather than calling the user direct.
5. If the number is available, click Call. The telephone number entered is called.
Note
The Tag feature is only available for internal calls and is not supported for VoIP extensions.
Page 30

Phone Manager Users Guide
Page 24 Phone Manager User Guide
15-600988 Issue 14b (14th June 2006) IP Office 3.2
Ending a Call
When you have finished your conversation or left a Voicemail message you need to end the call. There
are several ways to end a call.
To end a call:
Click .
Replace the handset.
Press End on your keyboard.
Page 31
Call Handling
Phone Manager User Guide Page 25
IP Office 3.2 15-600988 Issue 14b (14th June 2006)
Transferring a Call
Making a Consultation Call
You can transfer a call to an internal or external telephone number. When you need to talk to a user to
verify that they are free to accept a transferred call, you need to make a consultation call. This is called a
supervised transfer. You can only use this method to transfer calls you have answered.
To make a consultation call:
1. Click or press F2. The Transfer window opens. For more information, see The Transfer Window.
2. Type the transfer number into the Number box.
3. Click Transfer or press Enter. The original call is put on hold. Once the call is answered you can
talk with the transfer target.
You can toggle between the two calls.
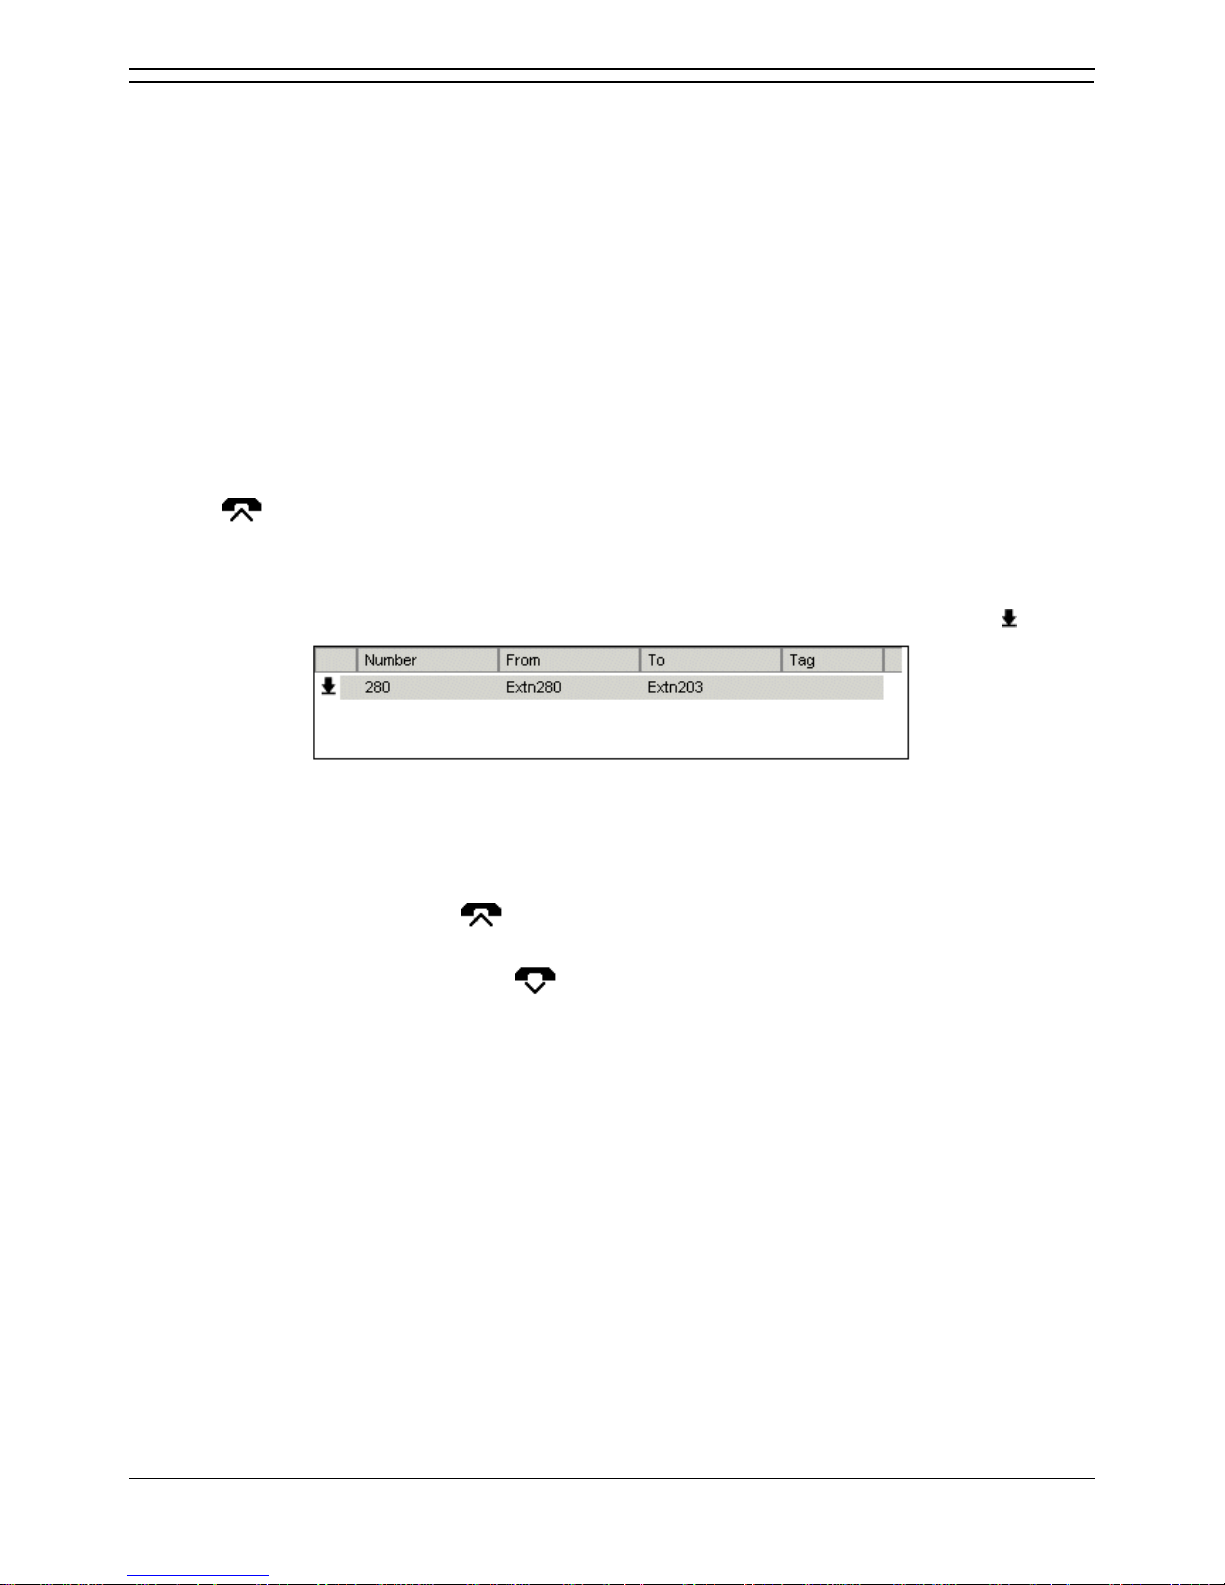
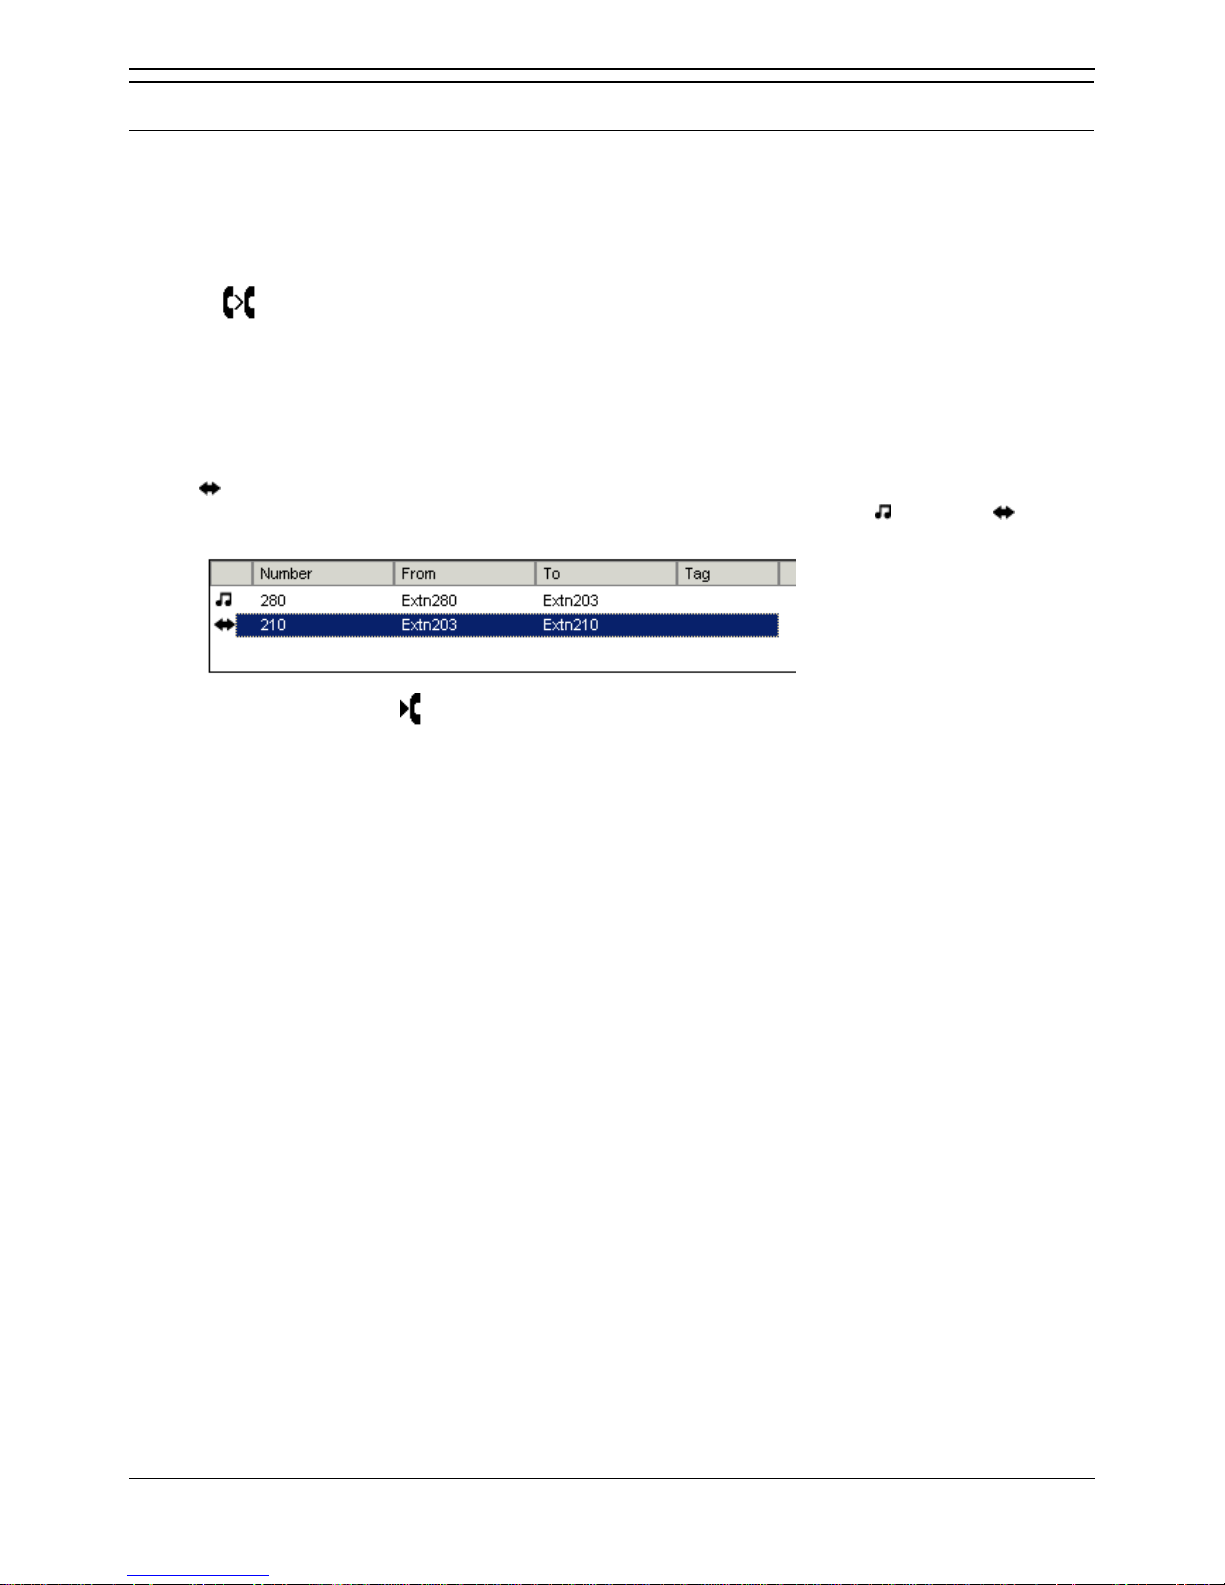
In the Call Details area of the main window both calls can be seen, as shown in the example. The
call status icon shows the call that you are currently connected to. To talk to the other caller,
double-click their extension number. Their call status changes from being on hold to being
your current call.
4. To transfer the call, click .
Alternatively, you can press Home or replace the handset.
Page 32
Phone Manager Users Guide
Page 26 Phone Manager User Guide
15-600988 Issue 14b (14th June 2006) IP Office 3.2
Transferring a Call Unsupervised
You can transfer a call without waiting for a response from the destination number. Calls can be
answered and then transferred or you can transfer a call without answering it. You can only transfer a
call without answering the call if you are using Phone Manager Pro.
To transfer a call unsupervised:
1. Answer the incoming call.
2. Click .
Alternatively, press F2 or click Actions > Transfer. The Transfer window opens. For more
information, see The Transfer Window.
3. Type the transfer number into the Number box.
4. Click the Blind Transfer button before the call is answered.
If you use Phone Manager Pro you can use the Drag and Drop feature to transfer calls. You can answer
the call and then transfer it or you can transfer the call without answering it. You must have a speed dial
associated with the destination number before you can use either method to transfer a call. For more
information, see Creating a Speed Dial.
To transfer a call using drag and drop:
1. Answer the incoming call.
2. Click the Speed Dial Tab in the Call History area.
3. Drag the call from the Call Details area and drop it on the destination speed dial.
If you recognize a calling name or number of an incoming call you can transfer the call without answering
the call. You must have a speed dial associated with the destination number. For more information, see
Creating a Speed Dial.
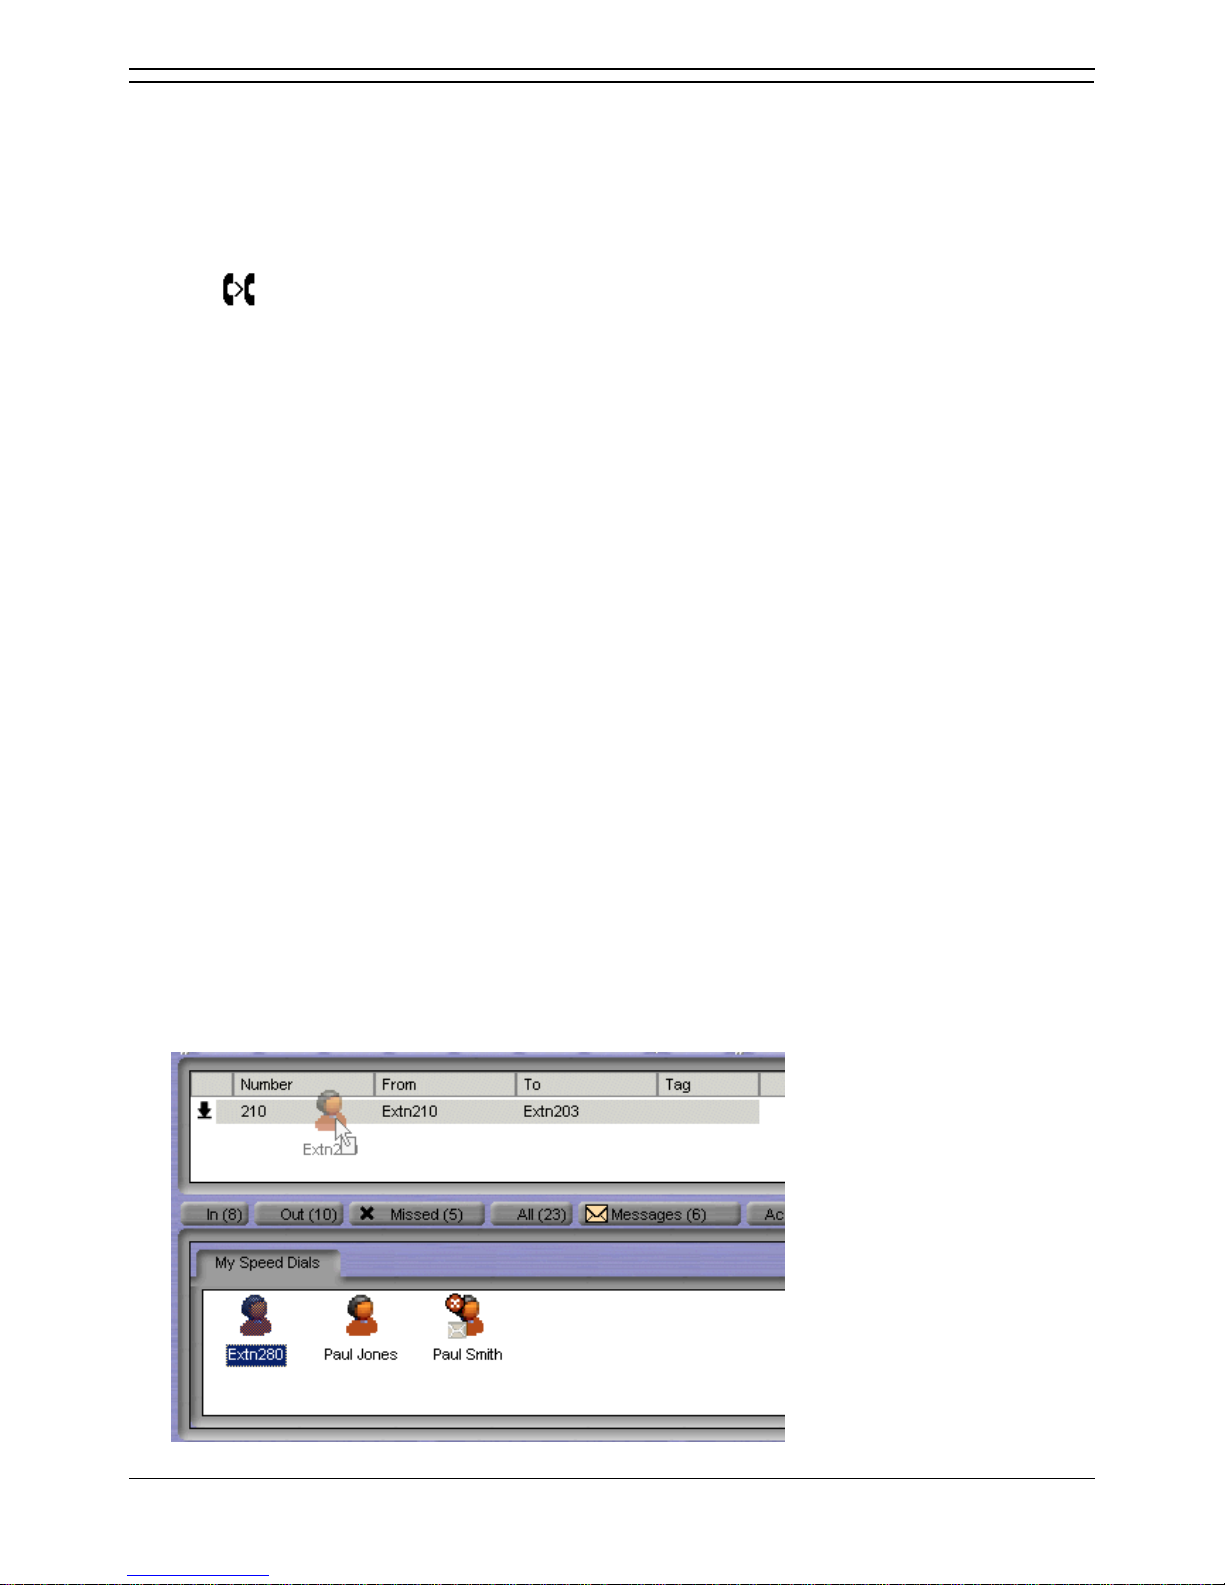
To transfer a call without answering the call:
1. Click the Speed Dial tab.
2. Drag and drop the speed dial associated with the destination number over the incoming call. In the
example the incoming call from extension 210 has not been answered. The speed dial associated
with extension 280 is dragged over the incoming call. When the speed dial is dropped, extension
210 is connected to extension 280.
Page 33
Call Handling
Phone Manager User Guide Page 27
IP Office 3.2 15-600988 Issue 14b (14th June 2006)
Transferring a Caller to Voicemail
If a caller wants to leave a message for a user, you can transfer the caller directly to voicemail.
To transfer a call to Voicemail:
1. Click .
Alternatively, press F2 or click Actions > Transfer. The Transfer window opens. For more
information, see The Transfer Window.
2. Type the transfer number or select from the directory.
3. Click the Voicemail button. The caller is transferred to voicemail.
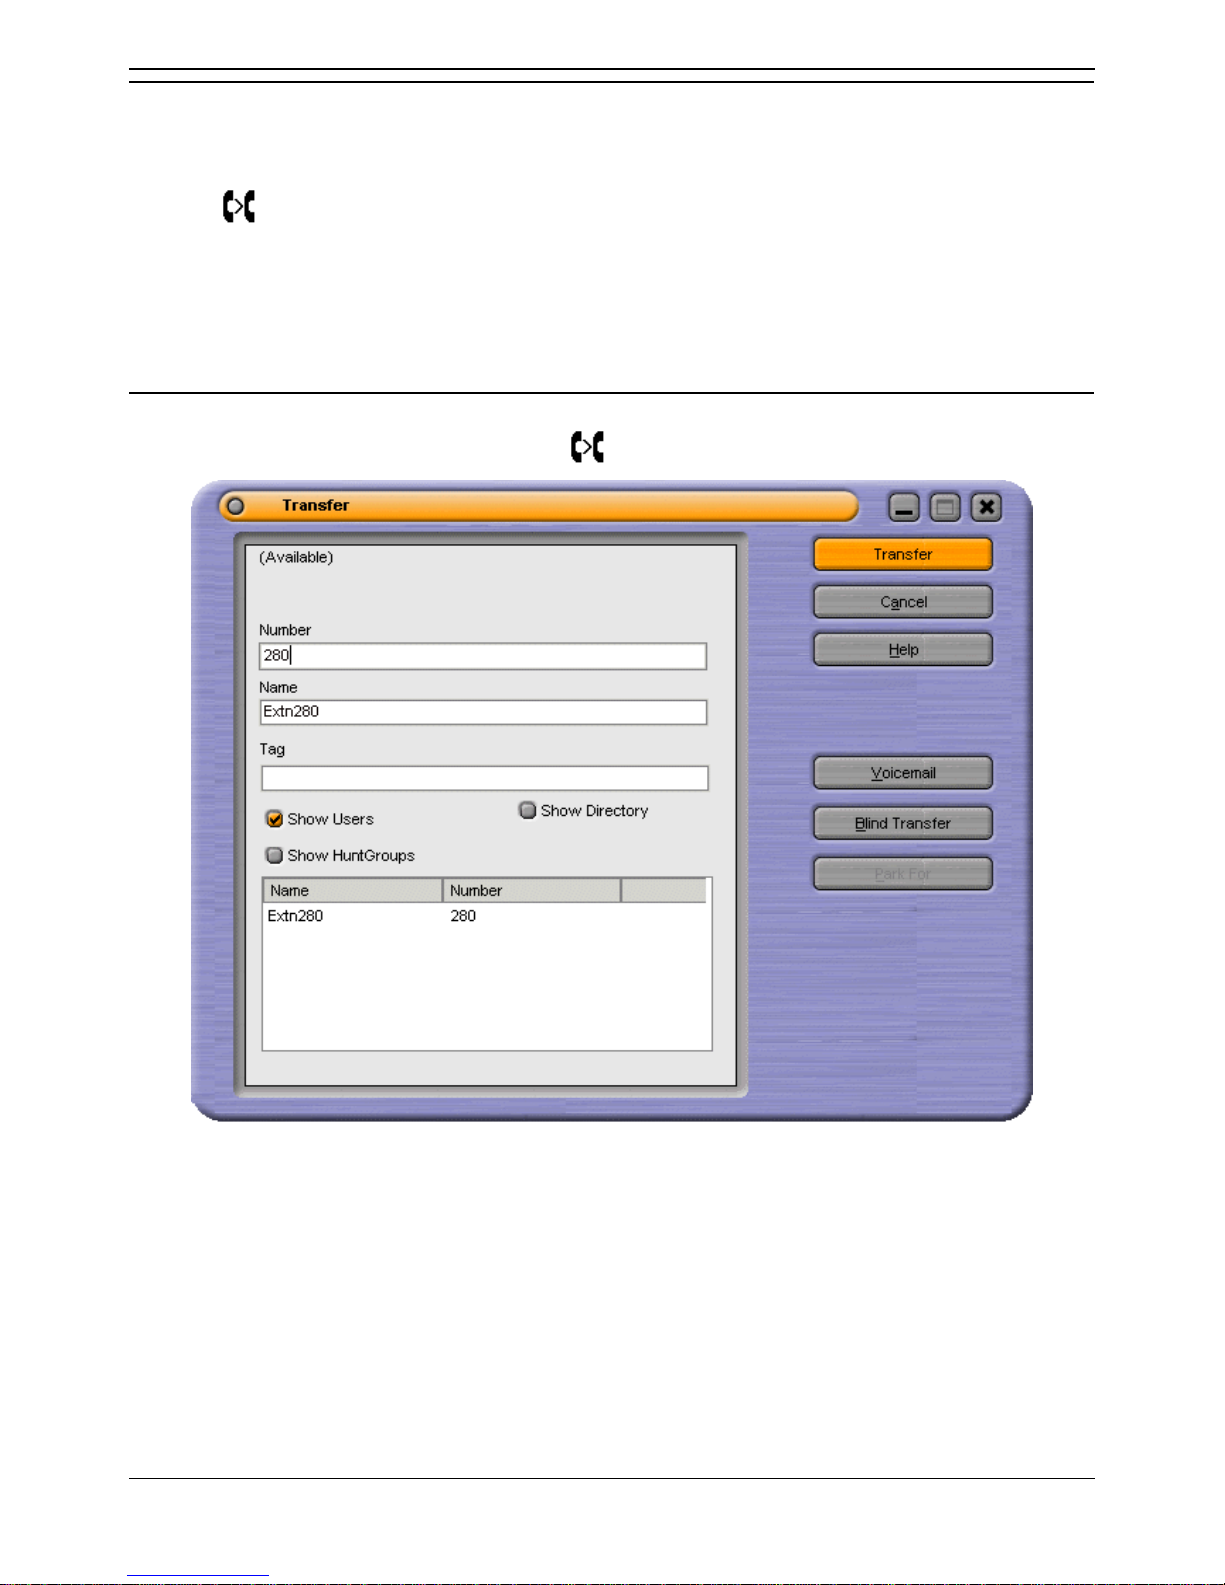
The Transfer Window
When you are connected to a call and you click or press F2, the Transfer window opens.
Enter the telephone number of the person you want to call into the Number field and click the Transfer
button. The number is called.
The fields available are:
Number
The telephone number or short code that is dialed when the Transfer button is selected. If the call is an
internal call, the status of the target extension or user is shown above the number field.
Name
This is the name associated with number to be called. The name might be a user, hunt group or directory
entry. The name is automatically entered when a match is found with the digits entered in the Number
field. Alternatively, type the name in the Name field and if a match is found the number required is
automatically entered. As you type each letter of the name the directory list is automatically truncated to
show only those names that match the letters typed in the Name field.
Page 34

Phone Manager Users Guide
Page 28 Phone Manager User Guide
15-600988 Issue 14b (14th June 2006) IP Office 3.2
Tag
You can use the Tag field to add messages to the outgoing call to internal extensions only. The Tag
feature is not supported for VoIP extensions.
Directory List
The Directory List contains details of names and numbers configured on the IP Office and in your own
personal directory. A personal directory is only available to Phone Manager Pro users. You can select
whether to display or search users, hunt groups or directory entries by checking the Show Users, Show
Hunt Groups or Show Directory check boxes. Phone Manager directory entries are always shown.
Transfer
Click this button to transfer the call to the number entered.
Cancel
On selecting Cancel all the information entered is lost and you are returned to the Main Window.
Help
Click to show help for Phone Manager.
Voicemail
The Voicemail button calls voicemail rather then calling the user direct.
Blind Transfer
The Blind Transfer button transfers the call to the destination entered in the Number field without waiting
for the destination to be answered.
Park For
If the extension called is busy, the caller can be put on hold against the busy extension. The call is
automatically presented after the hold time expires or when the busy extension becomes free. Details of
the returned call, (Timeout) or (Free), appear in the Tag field. The time a call is held is controlled by the
IP Office Manager application. By default the hold time is 15 seconds. For more information, see your
system administrator.
Reclaiming a Call
After you have transferred a call to another number you can reclaim the call back to your own telephone.
You can only reclaim a call that is presented to a Phone Manager user but not answered.
To reclaim a call:
Click Actions > Reclaim.
Alternatively, press Subtract on your keyboard.
Page 35
Call Handling
Phone Manager User Guide Page 29
IP Office 3.2 15-600988 Issue 14b (14th June 2006)
Holding a Call
A call can be put on hold so that you can perform another task.
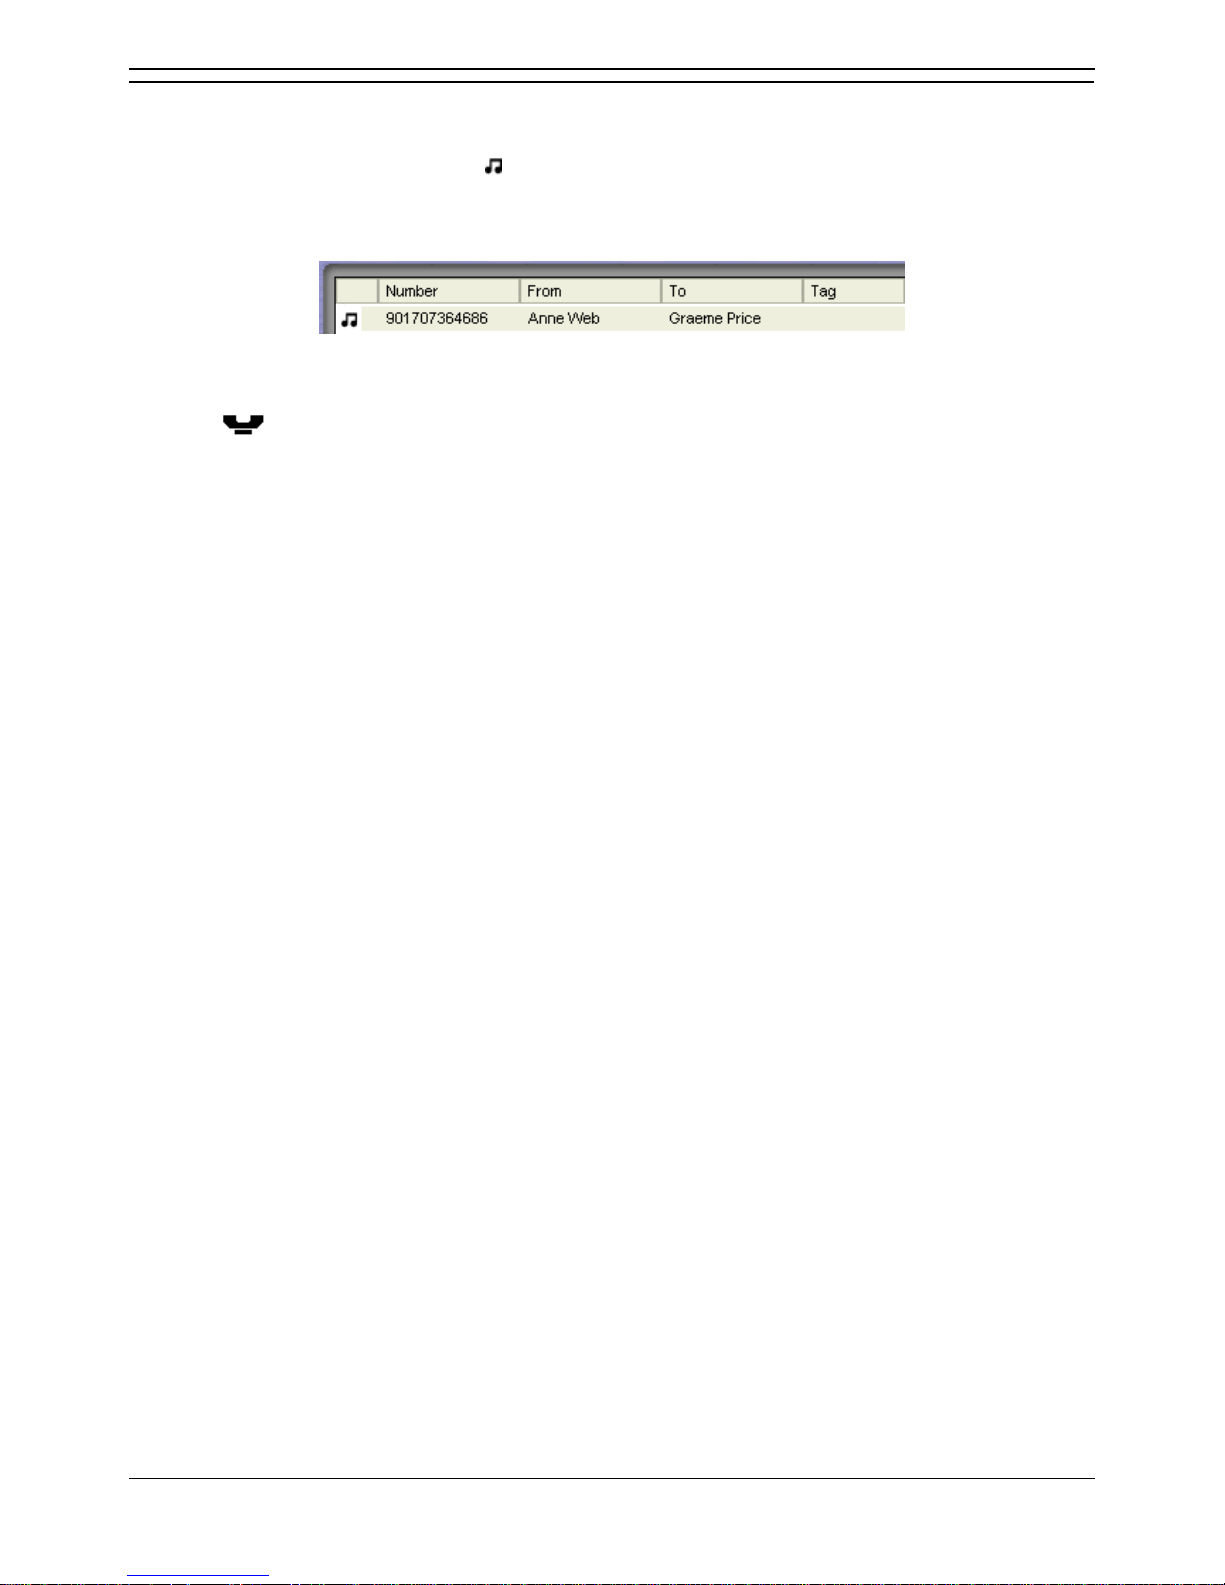
When a call is on hold the call has the call status icon next to the number, as shown in the example.
The time a call remains on hold if you are free, is controlled by the telephone system. The default setting
is 15 seconds. For more information on how to configure this option see your system administrator.
To place the current connected call on hold:
Click .
Alternatively, press F4.
To take a call off hold:
Click the call in the Call details area.
If you have a call on hold and start to make another call and change your mind, you can use Clear to
cancel the outgoing call.
To Clear a Call:
Click Actions > Clear
Alternatively, press ESC on your keyboard.
Page 36
Phone Manager Users Guide
Page 30 Phone Manager User Guide
15-600988 Issue 14b (14th June 2006) IP Office 3.2
Parking a Call
You might need to temporarily "park" a call to handle some other task. For example, an incoming caller
needs to speak to someone urgently but they cannot be found. The call can be parked, the person found
and the call can then be transferred. To help control this scenario efficiently there are four park slots that
can be used by any user on the system. When a caller is "parked" the call is put on hold.
You can park a call or you can tag a park slot and then park a call. When a call is parked you can not
add a tag to the park slot.
To park a call:
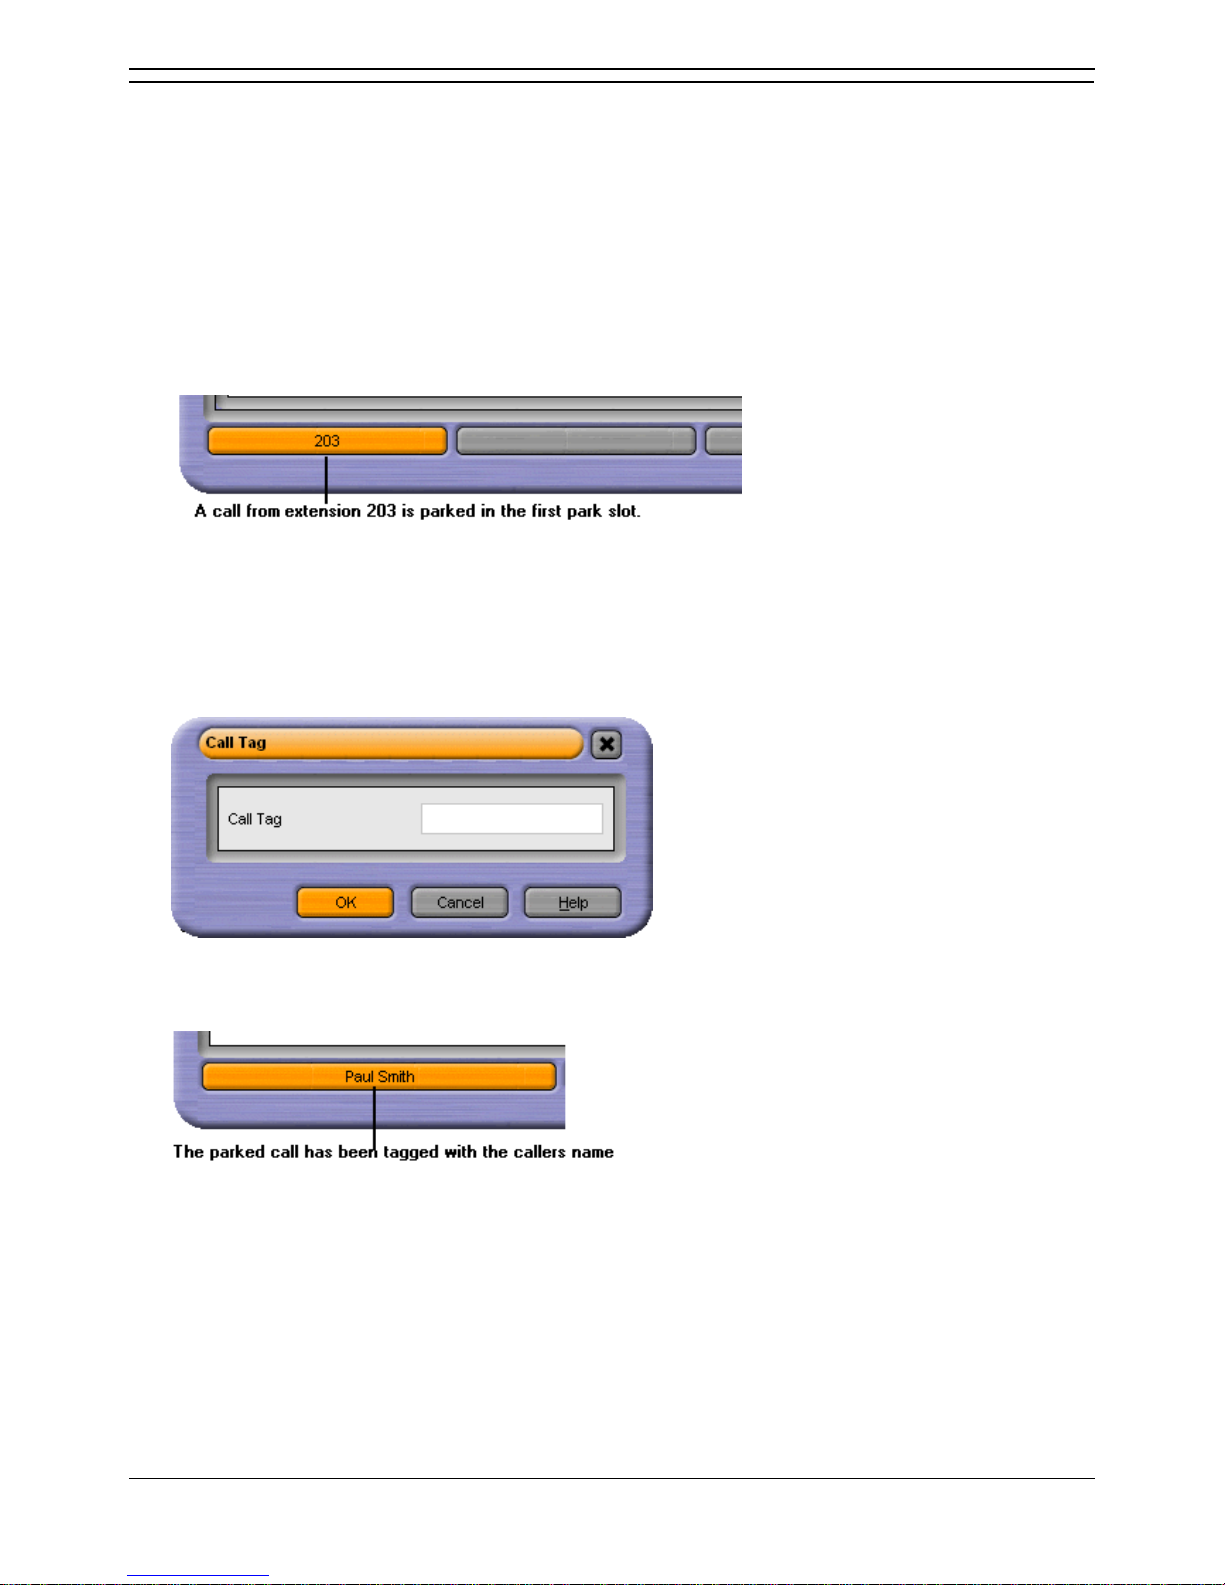
Click a vacant park slot button to park the call. The parked call is highlighted and contains
information regarding the call, for example the source number of the call.
You can identify a parked call with a text description. The description is shown instead of the call's
source number. This is known as tagging.
To tag and park a call:
1. Right-click a vacant park slot button. The Call Tag window opens.
2. Type the description.
3. Click OK. The call is parked and the description appears on the Park button.
To collect a parked call:
1. Click the park button displaying the parked call in the Call Park area.
Alternatively, click Actions > Park/Unpark.
2. You are connected to original caller.
Page 37

Call Handling
Phone Manager User Guide Page 31
IP Office 3.2 15-600988 Issue 14b (14th June 2006)
Recording a Call
Recordings are only supported when Voicemail Pro is installed and you are operating in Agent Mode.
For more information, see Agent Mode Operation.
You can record your calls, either the complete call or just part of the call. When you start to record your
conversation a warning that the call is being recorded might be played before the start of the recording. If
Advice of Call Recording is required, consult your system administrator. Recordings stop when you put
the call on hold or you end the call. If you are recording a conference call, the recording is stopped when
another caller is added to the conference.
Call recordings are saved in a voicemail box. The mailbox can be either your own or one that is specified
in IP Office Manager. For more information, see your system administrator.
To record the current call conversation:
Click Start Recording.
Alternatively, click Actions > Start Recording or press F5.
To finish recording:
Click Stop Recording.
Alternatively, click Actions > Stop Recording or press F5.
Warning - Refer to your local regulations in relation to recording calls. If Advice of Call
Recording (AOCR) is required, see your system administrator.
Page 38

Phone Manager Users Guide
Page 32 Phone Manager User Guide
15-600988 Issue 14b (14th June 2006) IP Office 3.2
Using the Conference Feature
Overview
As a Phone Manager user you can create conferences. If you have access to IP Office Conferencing
Center you can start Conferencing Scheduler from within Phone Manger. For more information, see
Phone Manager and Conferencing Center.
Creating a Conference Call
You can create a conference call between callers and yourself.
To create a conference call:
1. Make an outgoing call or answer an incoming call.
2. Click to place the call on hold.
3. Make a call to a third party or answer another incoming call.
4. Place the current caller on hold.
5. Repeat steps 3 and 4 until all people that are to join the conference are on hold.
6. Click .
Alternatively, select Actions > Conference.
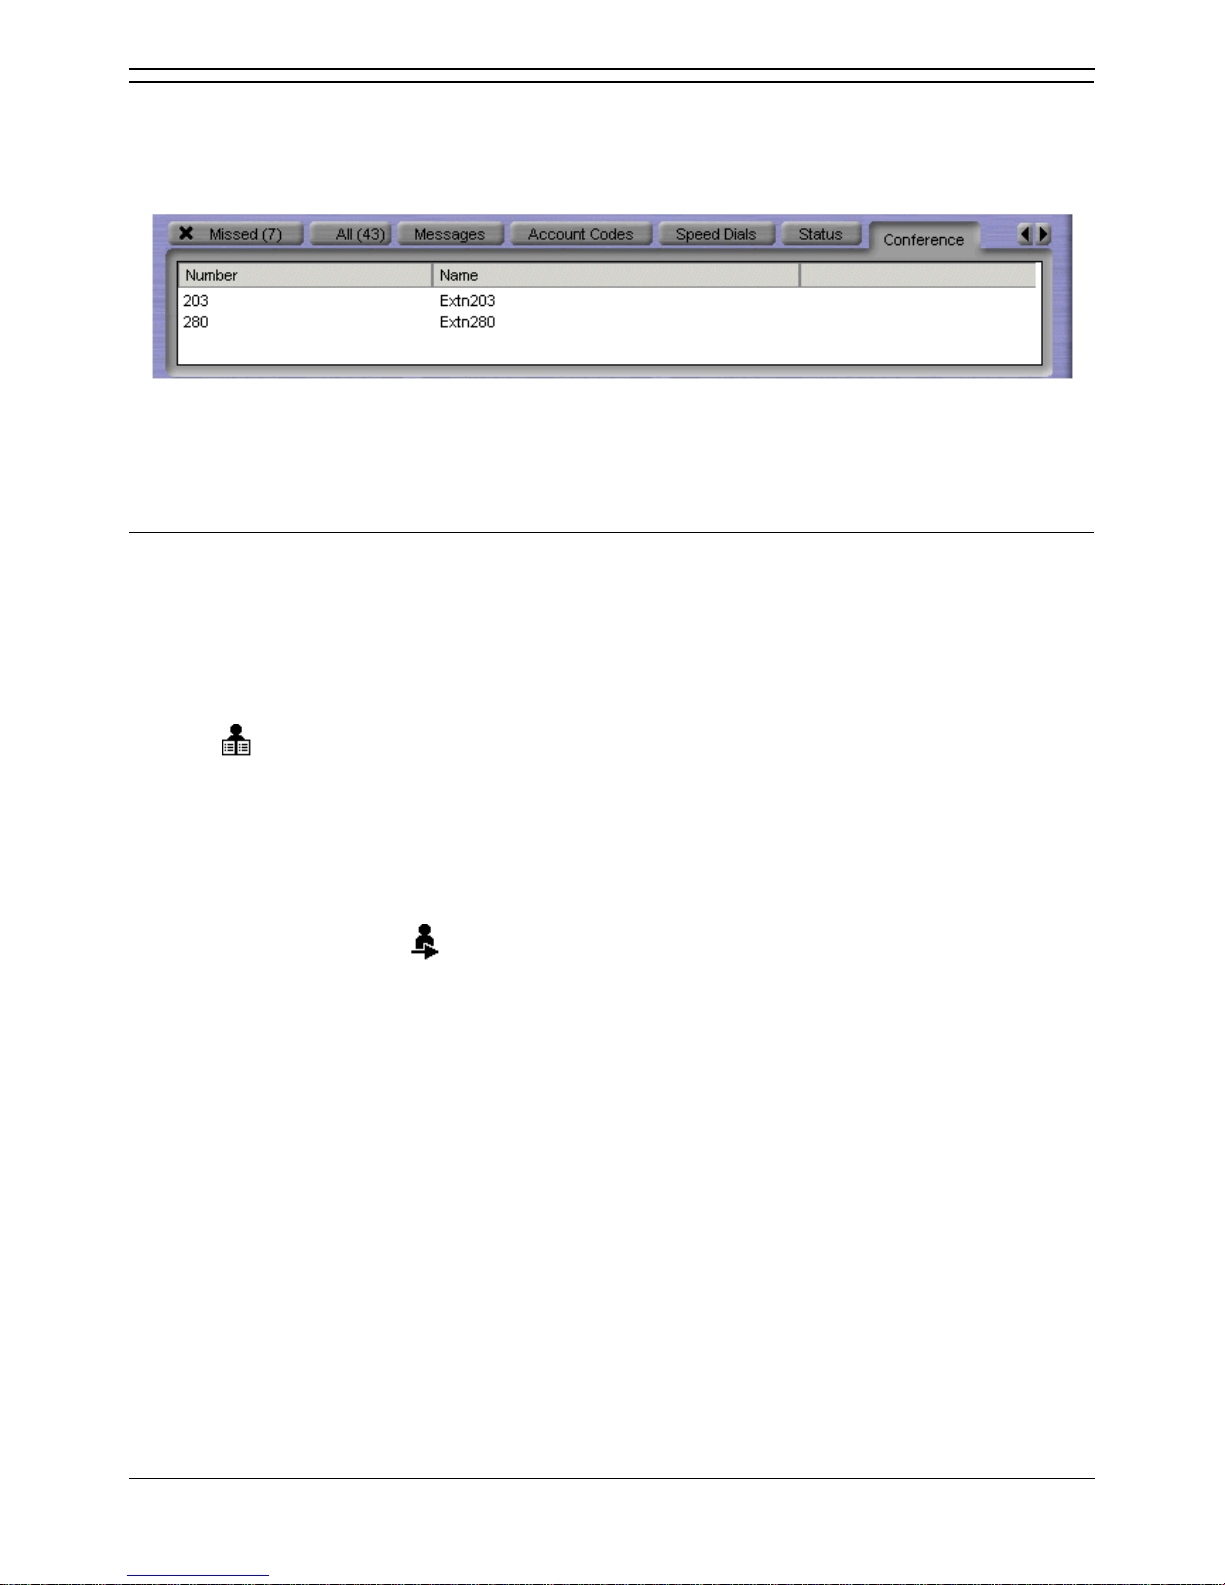
7. The Conference tab appears in the Call History pane. For more information, see The Conference
Tab.
To create a conference call using Drag and drop:
1. Make an outgoing call or answer an incoming call.
2. Select the Speed Dial user you want to create a conference with.
3. Drag the Speed Dial to the Call Status area of Phone Manager.
4. The Conference tab appears in the Call History pane and all parties are connected together. For
more information, see The Conference Tab.
During a conference call you might want to include another person in the conference.
To add a caller to a conference:
1. When in a conference click to put the conference on hold.
2. Make a call to the person who you want to include in the conference.
3. When the call is answered, click to place the caller on hold.
4. Click to re-join the conference and add the new person to the conference call.
To remove a member from a conference:
1. Click the Conference tab in the Call History area.
2. Right-click the conference member.
3. Select Hang-up.
Page 39
Call Handling
Phone Manager User Guide Page 33
IP Office 3.2 15-600988 Issue 14b (14th June 2006)
The Conference Tab
After creating a conference from your telephone, the Conference tab is available. The tab contains a
listing of all the members of the conference. For more information, see Creating a Conference Call.
To remove a member from the conference:
Right-click the name and select Hang Up.
Phone Manager and Conferencing Center
Phone Manager can be integrated with IP Office Conferencing Center. You can book a conference and
join a web conference when the applications are integrated.
To use the IP Office Conferencing Center system Internet Explorer 6.0 or above is required. It is only
available if permission is specified by your system administrator.
To book a Conferencing Center conference:
1. Click . This automatically opens Internet Explorer.
2. Type your user ID and Password.
3. Click Login.
To join a Conferencing Center conference:
1. To join a conference click . This automatically opens Internet Explorer.
2. Type the Conference ID and PIN No as supplied by the host who booked the conference.
3. Click Login.
Page 40
Phone Manager Users Guide
Page 34 Phone Manager User Guide
15-600988 Issue 14b (14th June 2006) IP Office 3.2
Account Codes and PIN Restrictions
Using Account Codes
Account codes can be used to track calls to specific external numbers. For example, a solicitor's office
might want to record the amount of time spent on calls to a client for billing purposes. Each client is given
an account code and that code is used when making a call.
A key feature of Phone Manager is that you can use text account codes rather than just numbers.
Account codes entered with calls are only recorded by the system if they match an account code already
configured on the system. For a list of valid account codes see your system administrator.
To make a call using an account code:
1. Click Actions > Account Code.
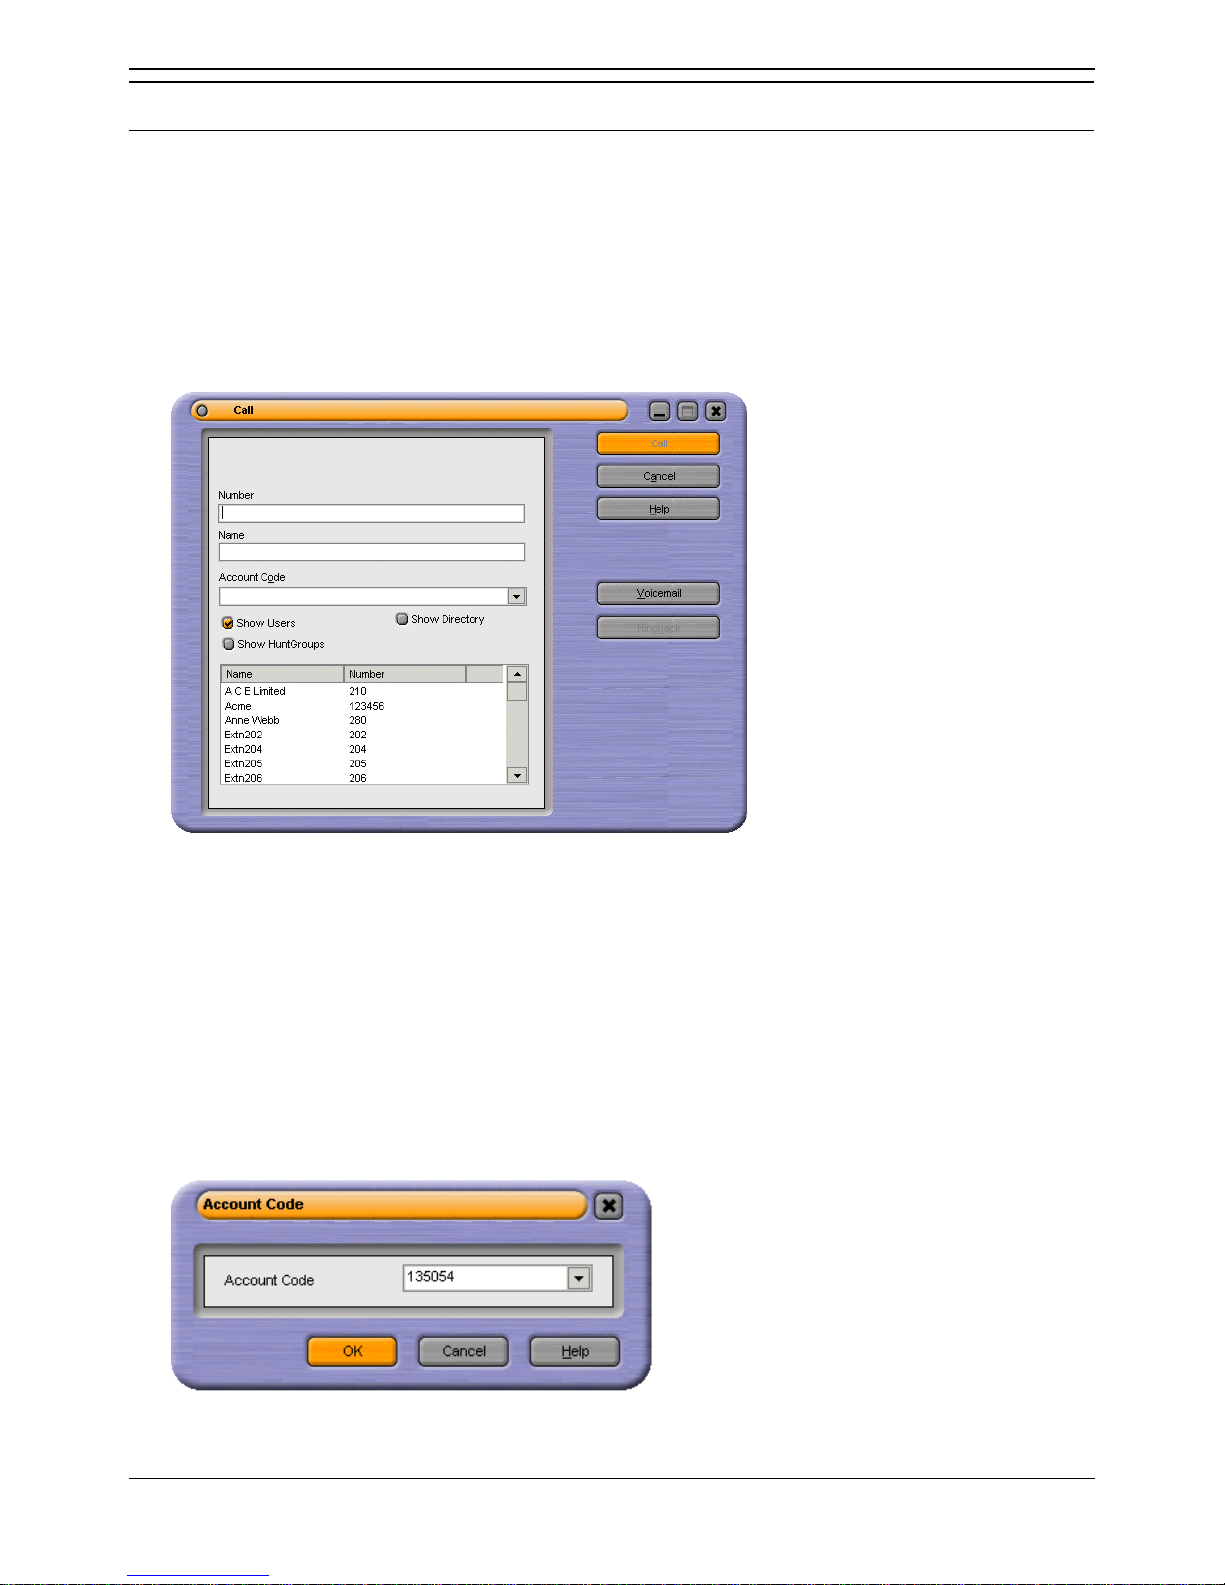
2. In the Account Code field select the code from the drop down list to be assigned to the call. See your
system administrator for a list of valid account codes.
3. Select the external number to call
4. Click Call. The call is made.
If you receive the "Call Failed - Account Code Required" message whenever you make an outgoing call
without an Account Code this means your user account is configured to ensure that you always assign
an account code to an outgoing call. For more information, see your system administrator.
If the wrong account code is entered a warning message is given. The call continues to be processed
without an account code. You can assign an account code during a call.
To assign an account code during a call:
1. During the call click Actions > Account Code. The Account Code window opens.
2. Select the appropriate account code.
3. Click OK.
Page 41
Call Handling
Phone Manager User Guide Page 35
IP Office 3.2 15-600988 Issue 14b (14th June 2006)
The Account Codes Tab
Only available in Phone Manager Pro versions.
You can assign system account codes to calls, either when making the call or during existing calls. Each
icon on the tab can store a name, an account code and an optional telephone number. The account
codes are selected from those available on the telephone system.
If the Account Codes tab is not visible and you are using Phone Manager Pro, you need to select to
show account codes. For more information, see Changing General Phone Manager Settings.
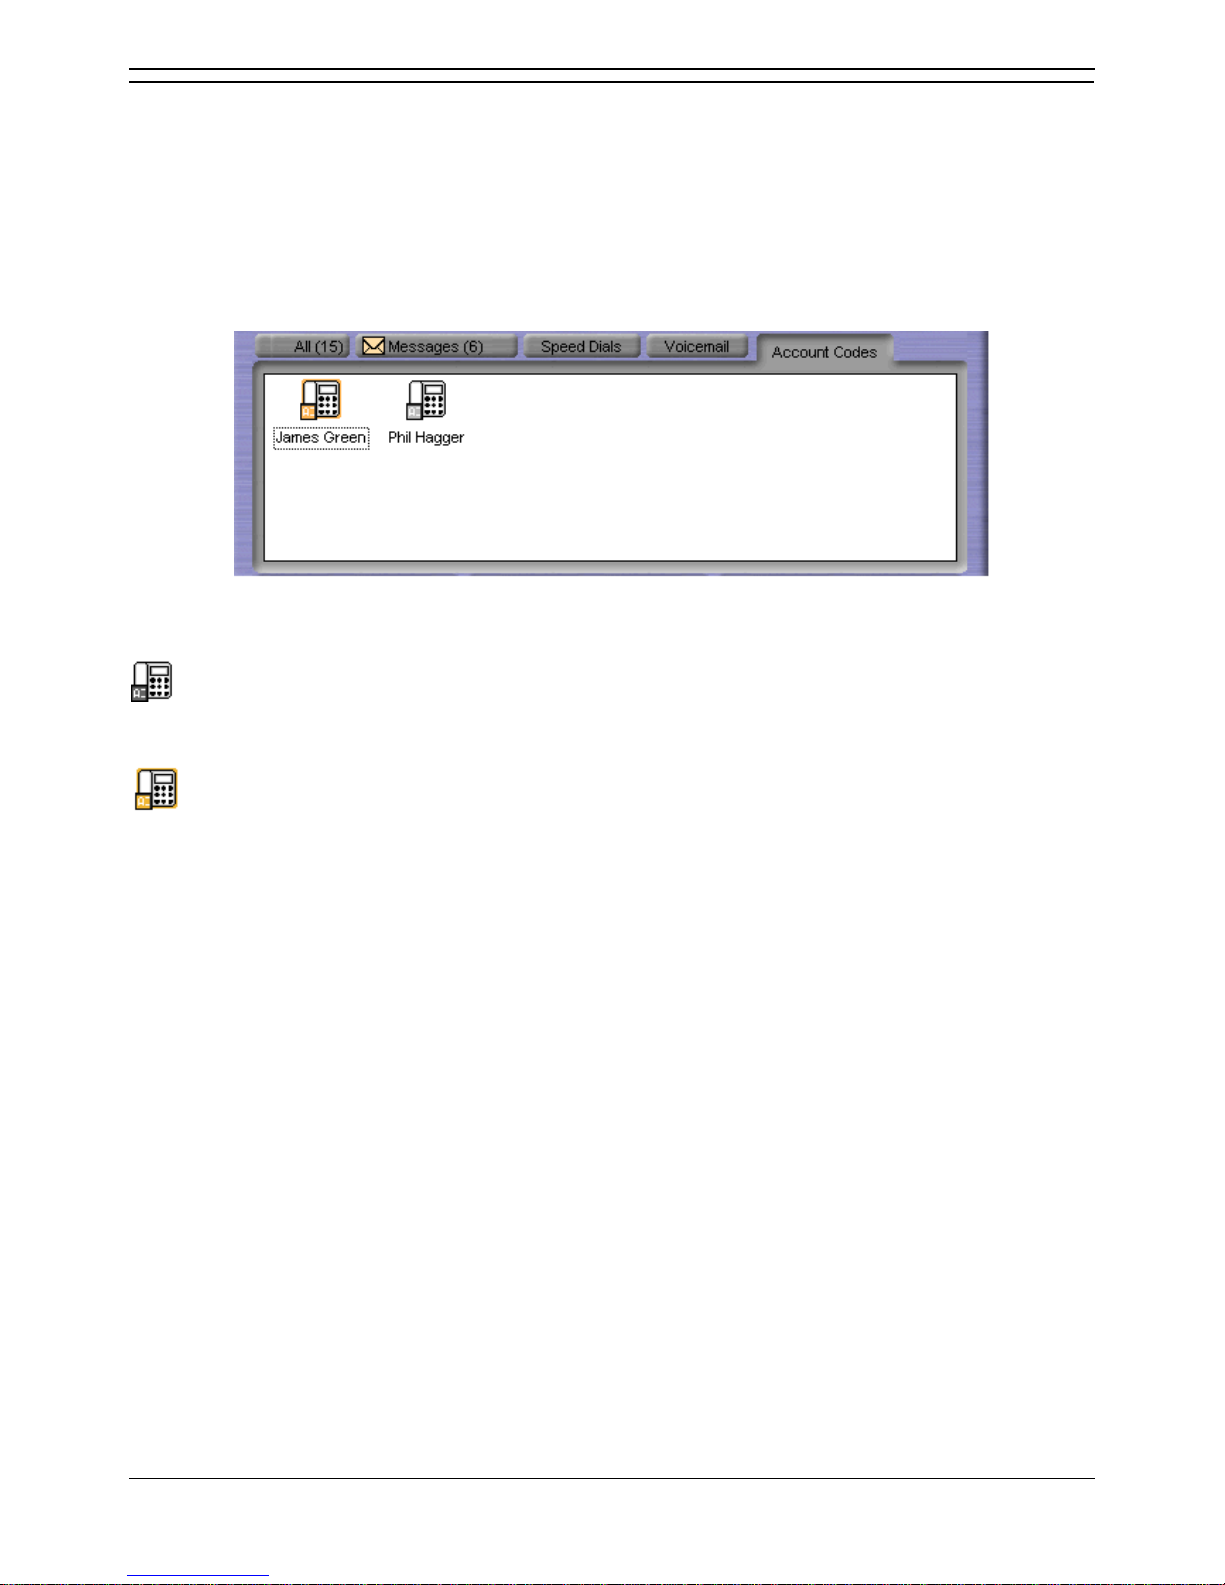
The tab shows two types of icon:
Account Code Without Number
An account code speed dial without a telephone number. Double-click to apply the associated account
code to a call when the call is active. For more information, see Creating an Account Code Speed Dial.
Account Code With Number
An account code speed dial with a telephone number. Double-click to make a call to the stored number
or to apply the associated account code to an existing call. For more information, see Creating an
Account Code Speed Dial.
The following options are then available when you right-click on the tab or over a particular icon:
Call - Call the number stored in the icon.
Select - Apply the account code stored in the icon to the current call. When selected a window
opens asking 'Associate Account Code **** with current call?' If the account code is the correct one,
click Yes to assign the account code.
New - Create a new icon. For more information, see Creating an Account Code Speed Dial.
Edit - Edit an existing icon. The Account Code Speed Dial window opens. Make the required
changes and press OK to save the changes.
Delete - Delete an existing icon. The delete option is only available when you right-click over an
icon. The selected icon is deleted when the delete option is selected.
Small - Display the icons in small or large form.
Export - Export the account code speed dials icons.
The speed dials are saved in a file called AccountCodeSpeeddials.CSV. The file location is My
Documents\Avaya\IP 400\PhoneManager. The file name and location can be changed if required.
Import - Import the account code speed dial icons.
Page 42
Phone Manager Users Guide
Page 36 Phone Manager User Guide
15-600988 Issue 14b (14th June 2006) IP Office 3.2
Creating an Account Code Speed Dial
Only available in Phone Manager Pro versions.
Account code speed dials are grouped in the Call History panel in the Account Codes tab. For more
information, see The Account Codes Tab. If the Account Code tab is not visible, Phone Manager needs
to be configured. For more information, see Changing General Phone Manager Settings.
To create an Account Code Speed Dial:
1. Click the Account Codes tab in the Call History area.
2. Right-click within the window.
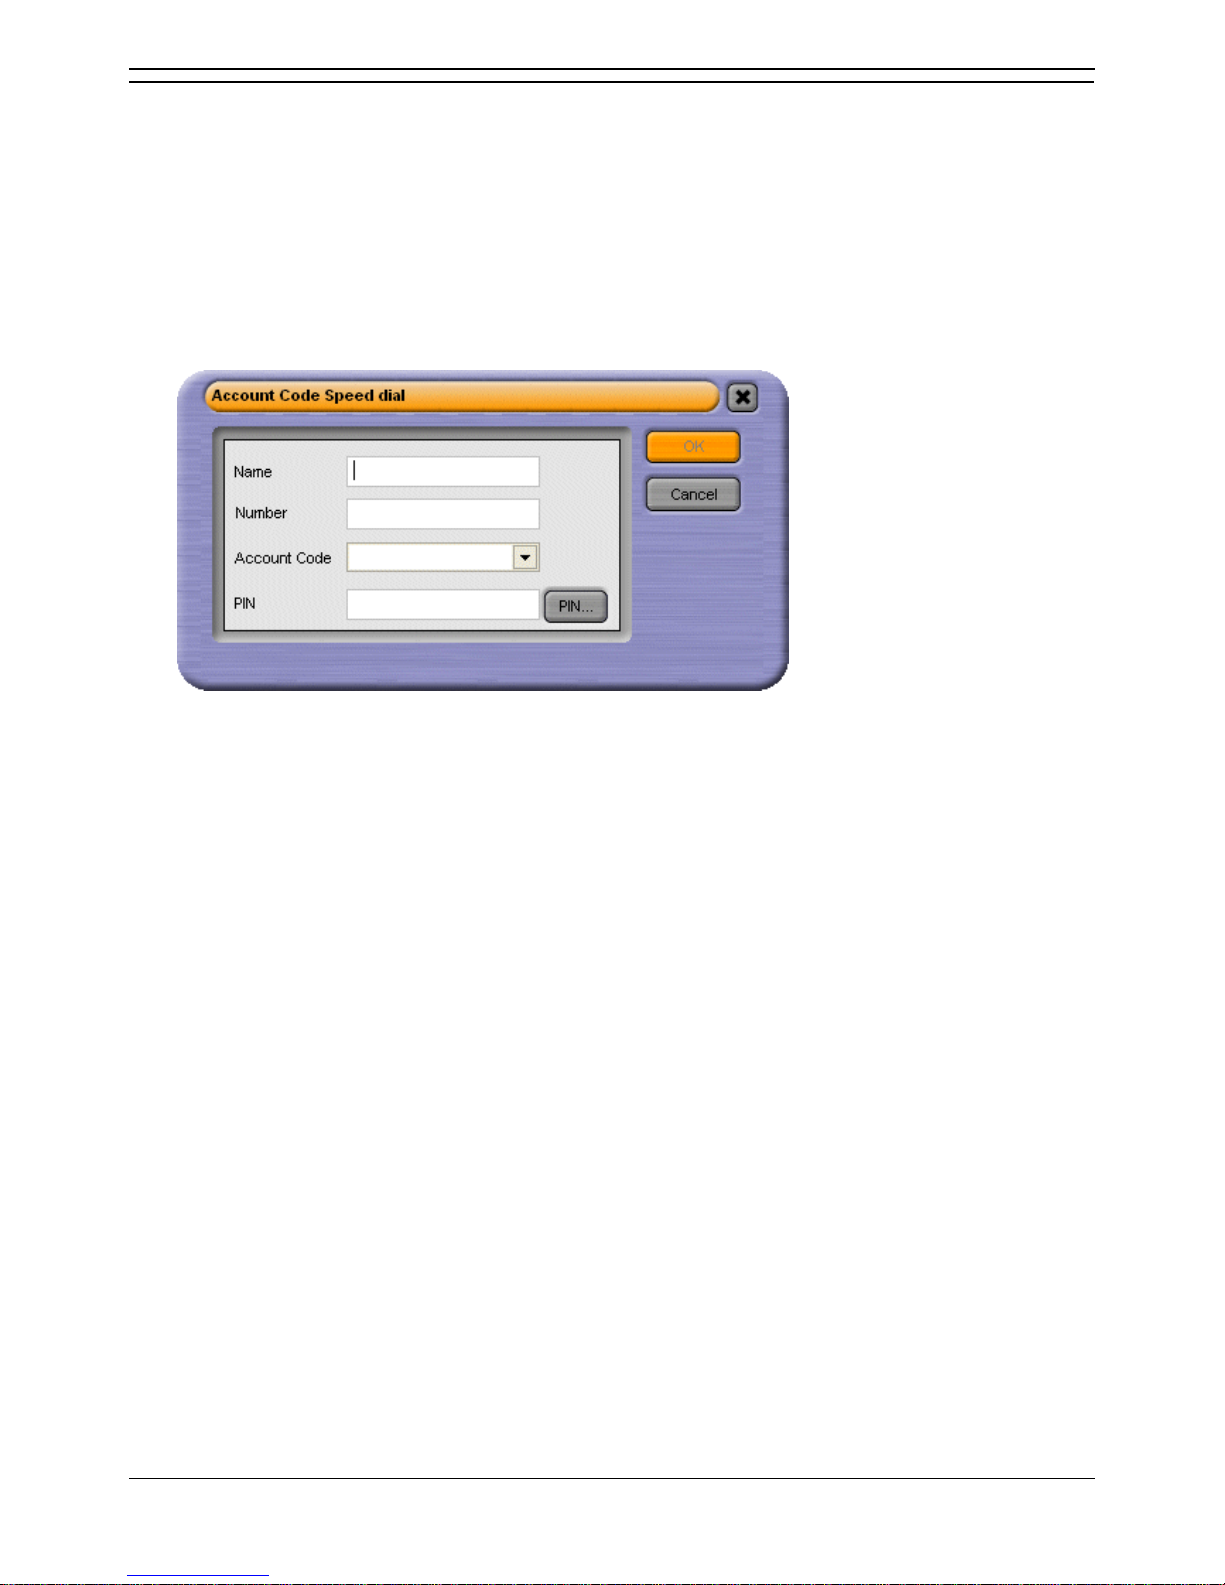
3. Select New. The Account Code Speed Dial window opens
.
4. Type the Name
5. (Optional) Type the telephone Number to be stored in the speed dial. If a telephone number is not
entered you can use the icon to apply the account code during a call.
6. Select the Account Code to be associated with the telephone number from the drop down list.
This option is unavailable if PIN restrictions are used.
7. Click OK.
Page 43
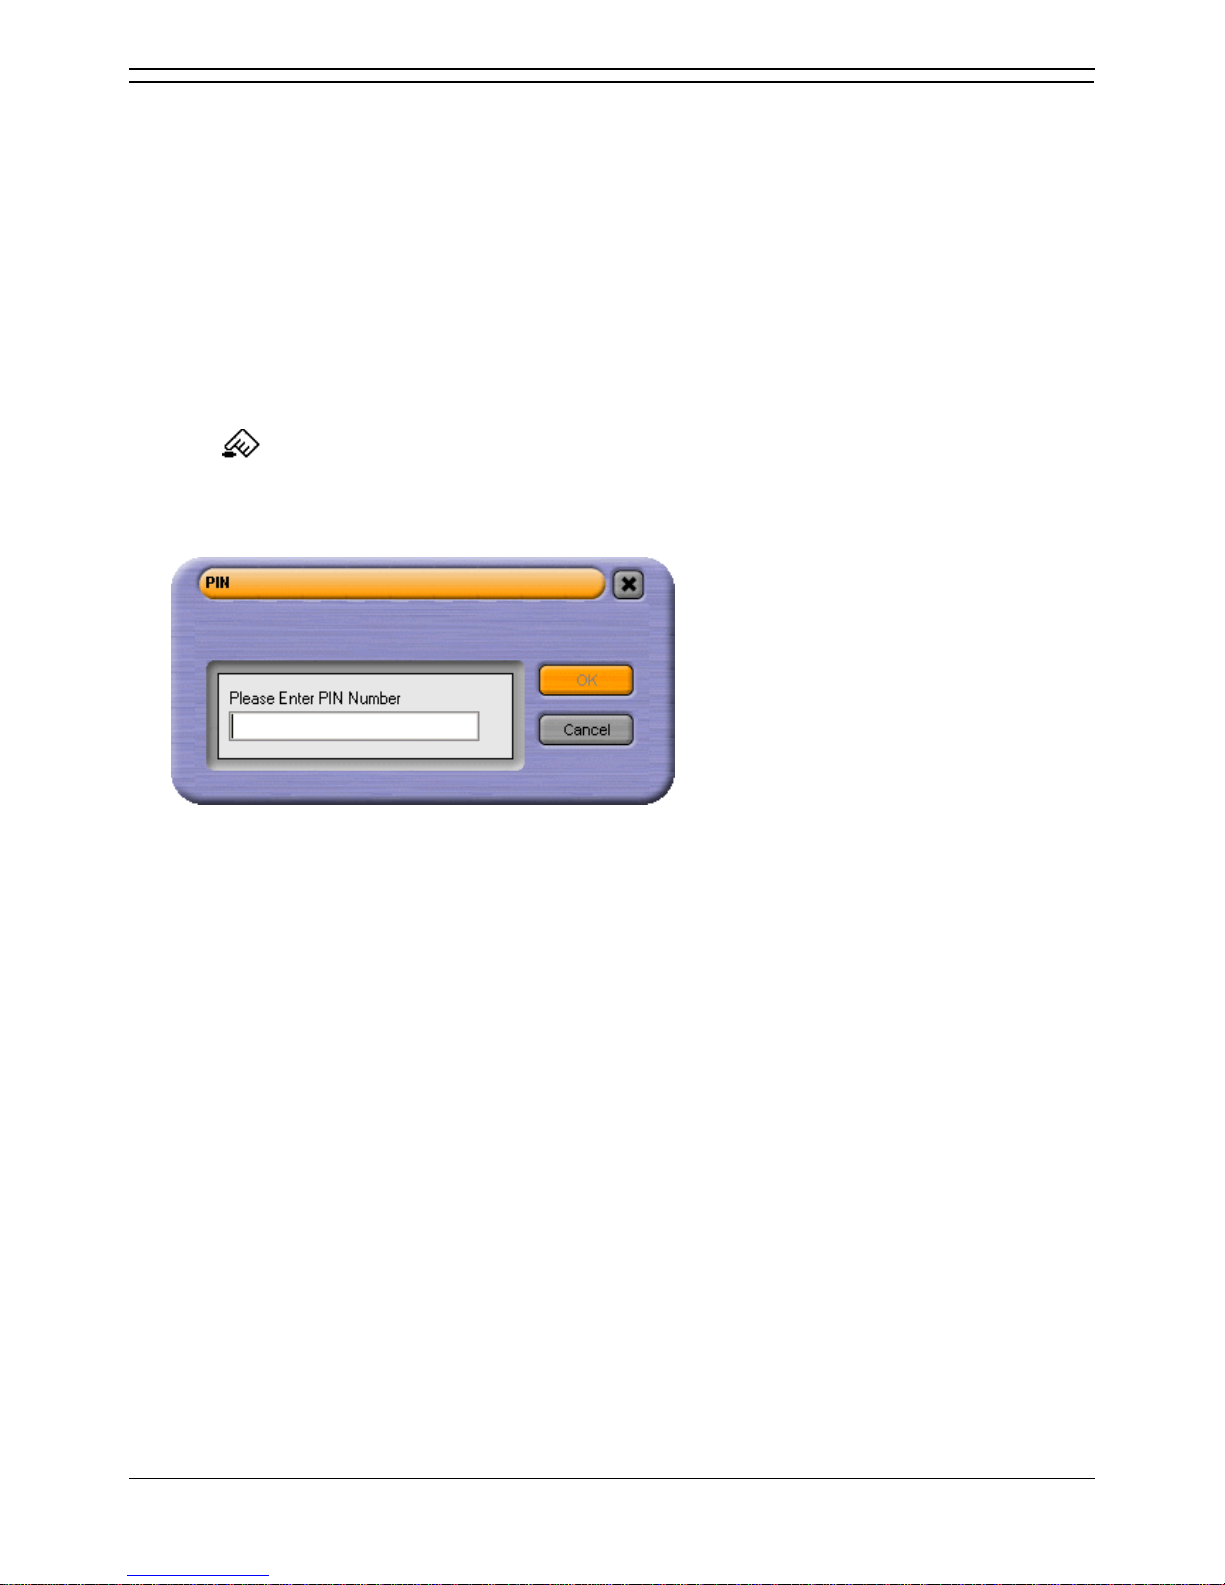
Call Handling
Phone Manager User Guide Page 37
IP Office 3.2 15-600988 Issue 14b (14th June 2006)
Working with PIN Restrictions
Phone Manager contains a feature called PIN Restrictions (Personal Identification Number). PIN
restrictions work by making the caller enter a PIN before the call is connected. PIN restrictions can be
associated with types of numbers being dialed, for example International numbers. PIN restrictions are
set by the system administrator through IP Office Manager. If PIN restrictions are applied, the account
code features are unavailable.
PIN restrictions are performed from:
Making a call
Speed dials
Account code speed dials
To make a call:
1. Click .
Alternatively, click Actions > Call.
2. Type the telephone number or extension in the Call screen.
3. Click the Call button. The PIN window opens.
4. Type your PIN. When a valid PIN is entered the call is connected. If an invalid PIN is entered an
error message is shown. Re-enter the PIN as prompted. If the problem persists contact your system
administrator.
Note
If you need to re-dial the number, you need to re-enter the valid PIN.
Page 44
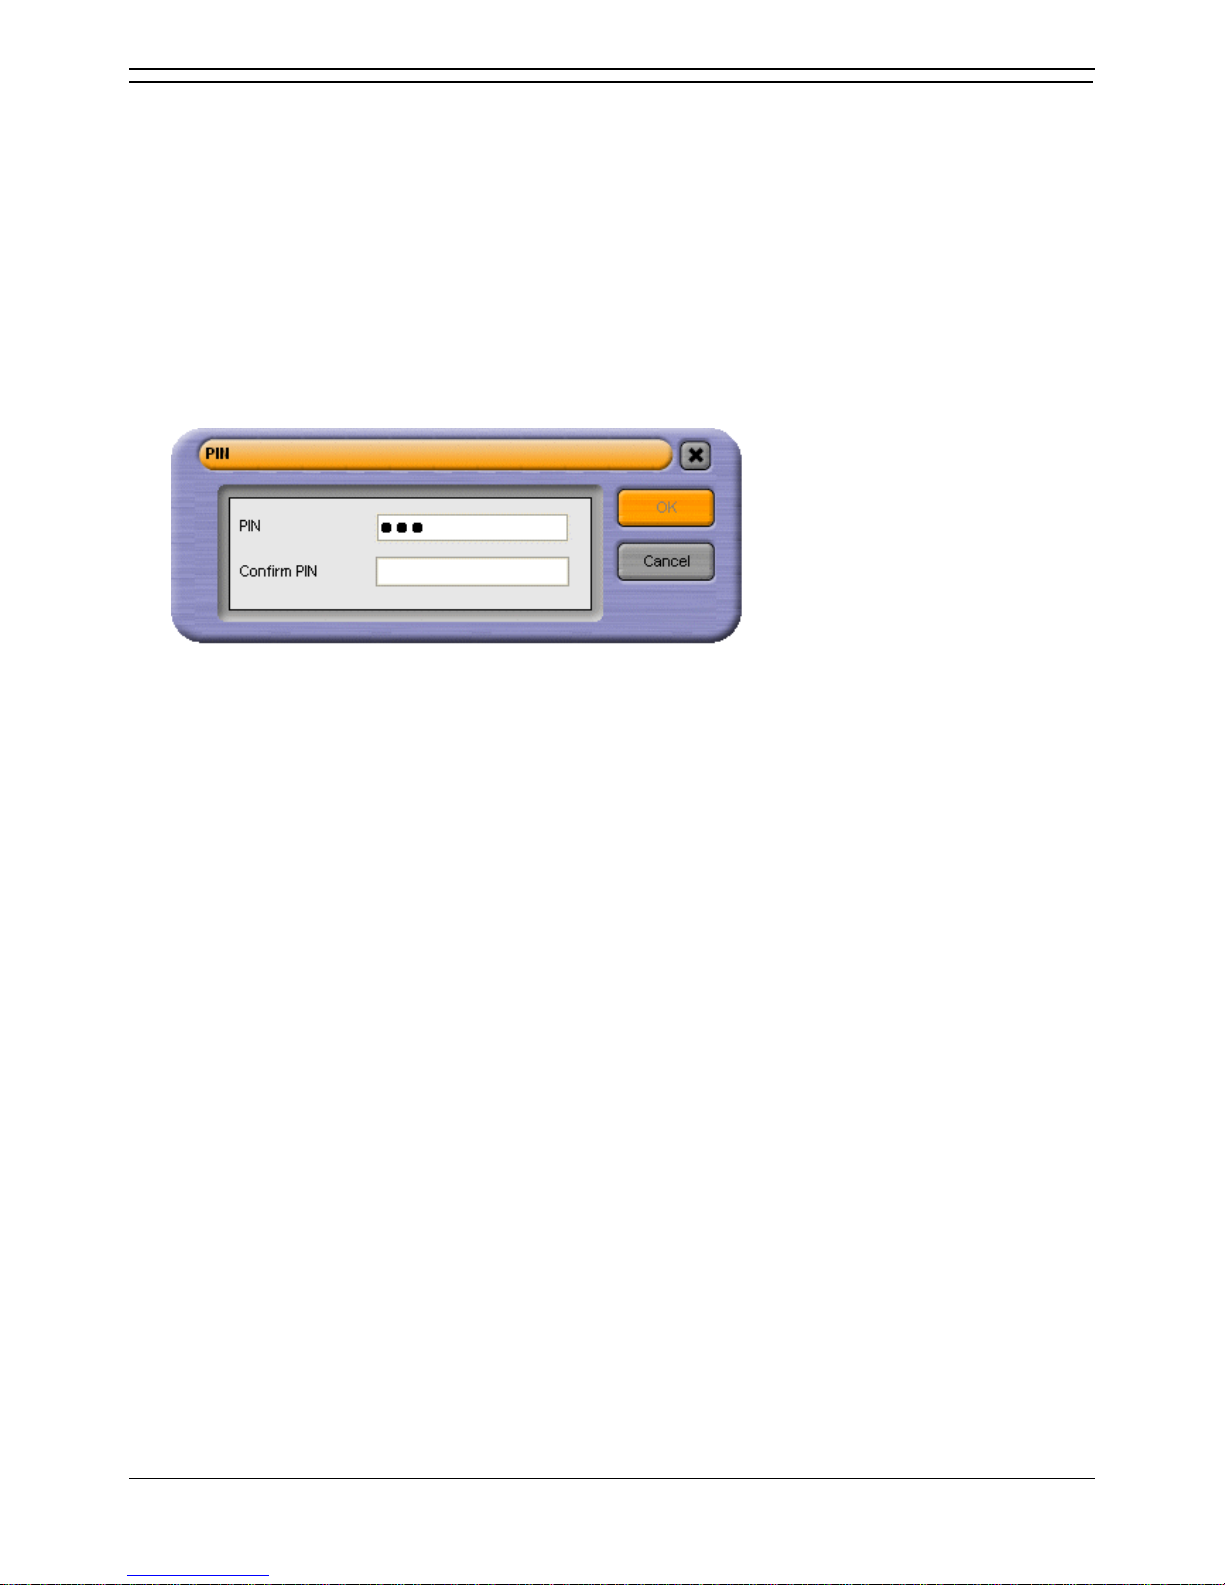
Phone Manager Users Guide
Page 38 Phone Manager User Guide
15-600988 Issue 14b (14th June 2006) IP Office 3.2
Speed Dial with PIN Restrictions.
You can create a speed dial with a PIN. When the speed dial is used if the PIN is valid the call is
connected. When an invalid PIN is entered an error message is shown and you are prompted to re-enter
the PIN.
To create a Speed Dial:
1. Click the Speed Dials tab in the Call History area.
2. Select the Speed Dial Group to add the Speed Dial to.
3. Right-click within the selected Speed Dial Group window.
4. Select New > Speed Dial Group Member. The Speed Dial window opens.
5. Type the Name and required telephone numbers.
6. Click PIN. The PIN window opens.
7. Type the PIN to be associated with the telephone number. Confirm the PIN then click OK. The
speed dial type is set as External.
8. Click OK.
9. Test the speed dial. If an invalid PIN was entered the message 'Call Failed - Account Code
Required' is shown.
Page 45
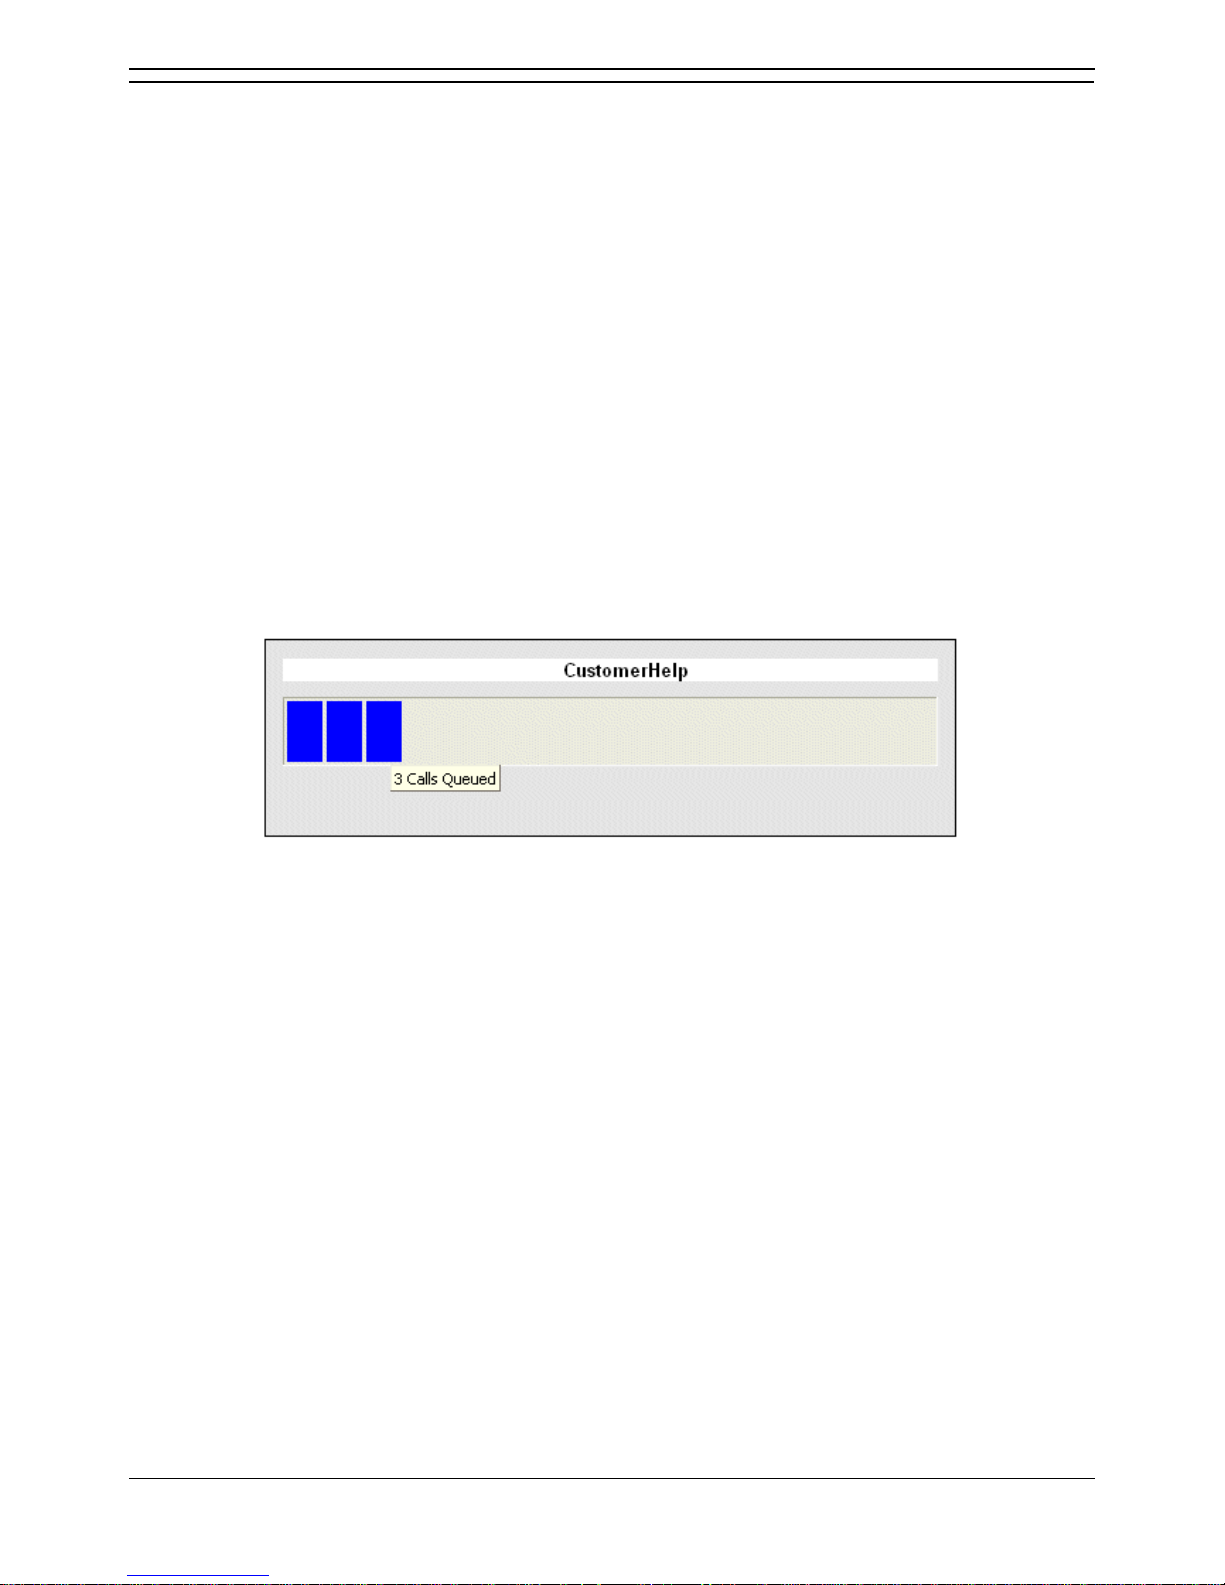
Call Handling
Phone Manager User Guide Page 39
IP Office 3.2 15-600988 Issue 14b (14th June 2006)
Working with Queues
Phone Manager Pro only.
Calls to a hunt group are held in a queue when all available extensions that are members of the hunt
group are busy or ringing. If you are a member of a hunt group you are automatically presented with
calls to the group. The name of the hunt group is shown in the To field in Call Status.
For example, a company provides a customer query number. There are 4 people who answer customer
queries. A hunt group is created called 'CustomerHelp' containing the 4 extension numbers. All calls to
the customer query number are presented to the CustomerHelp hunt group. A caller using the customer
query number rings any free extension in the hunt group. If all 4 extensions are already ringing or on a
call, the incoming call is put into a queue. When any extension in the CustomerHelp hunt group becomes
free, the longest held queued call is presented to the free extension.
In Phone Manager Pro you can also monitor the number of calls being held in a queue for a particular
hunt group. You do not have to be a member of the hunt group to monitor the number of calls being held
in a queue. You can select two hunt groups to monitor. The hunt group must already exist on the System
and must have queuing enabled. For more information, see Selecting Queues to Monitor.
When you have selected the queues that you want to monitor the Queue tab appears in the Call History
panel. The monitors are used to indicate the number of calls currently queued for the configured hunt
groups. Each call held in a queue is indicated by a blue box. When the mouse pointer is moved over a
Queue monitor the number of calls in the queue is displayed in the tool tip. In the example there are 3
calls in a queue for the hunt group called CustomerHelp.
If you are a member of a Hunt Group a queued call is automatically presented in Call Status. The name
of the Hunt Group is shown in the To field. The call can be answered in the normal way.
To answer a call in a specific queue:
1. Click the Queue tab in the Call History panel. The queues that you are monitoring are visible.
2. Double-click on the Queue name to answer a call that the queue.
Note
You can also answer a queued call by selecting either PickupQueue1 or PickupQueue2 from the
Actions menu.
To refuse a queued call:
If you double-click on the wrong Queue or are presented with a queued call that you cannot deal
with you can use the Clear (Esc) function to refuse the call and return it to the queue.
Page 46
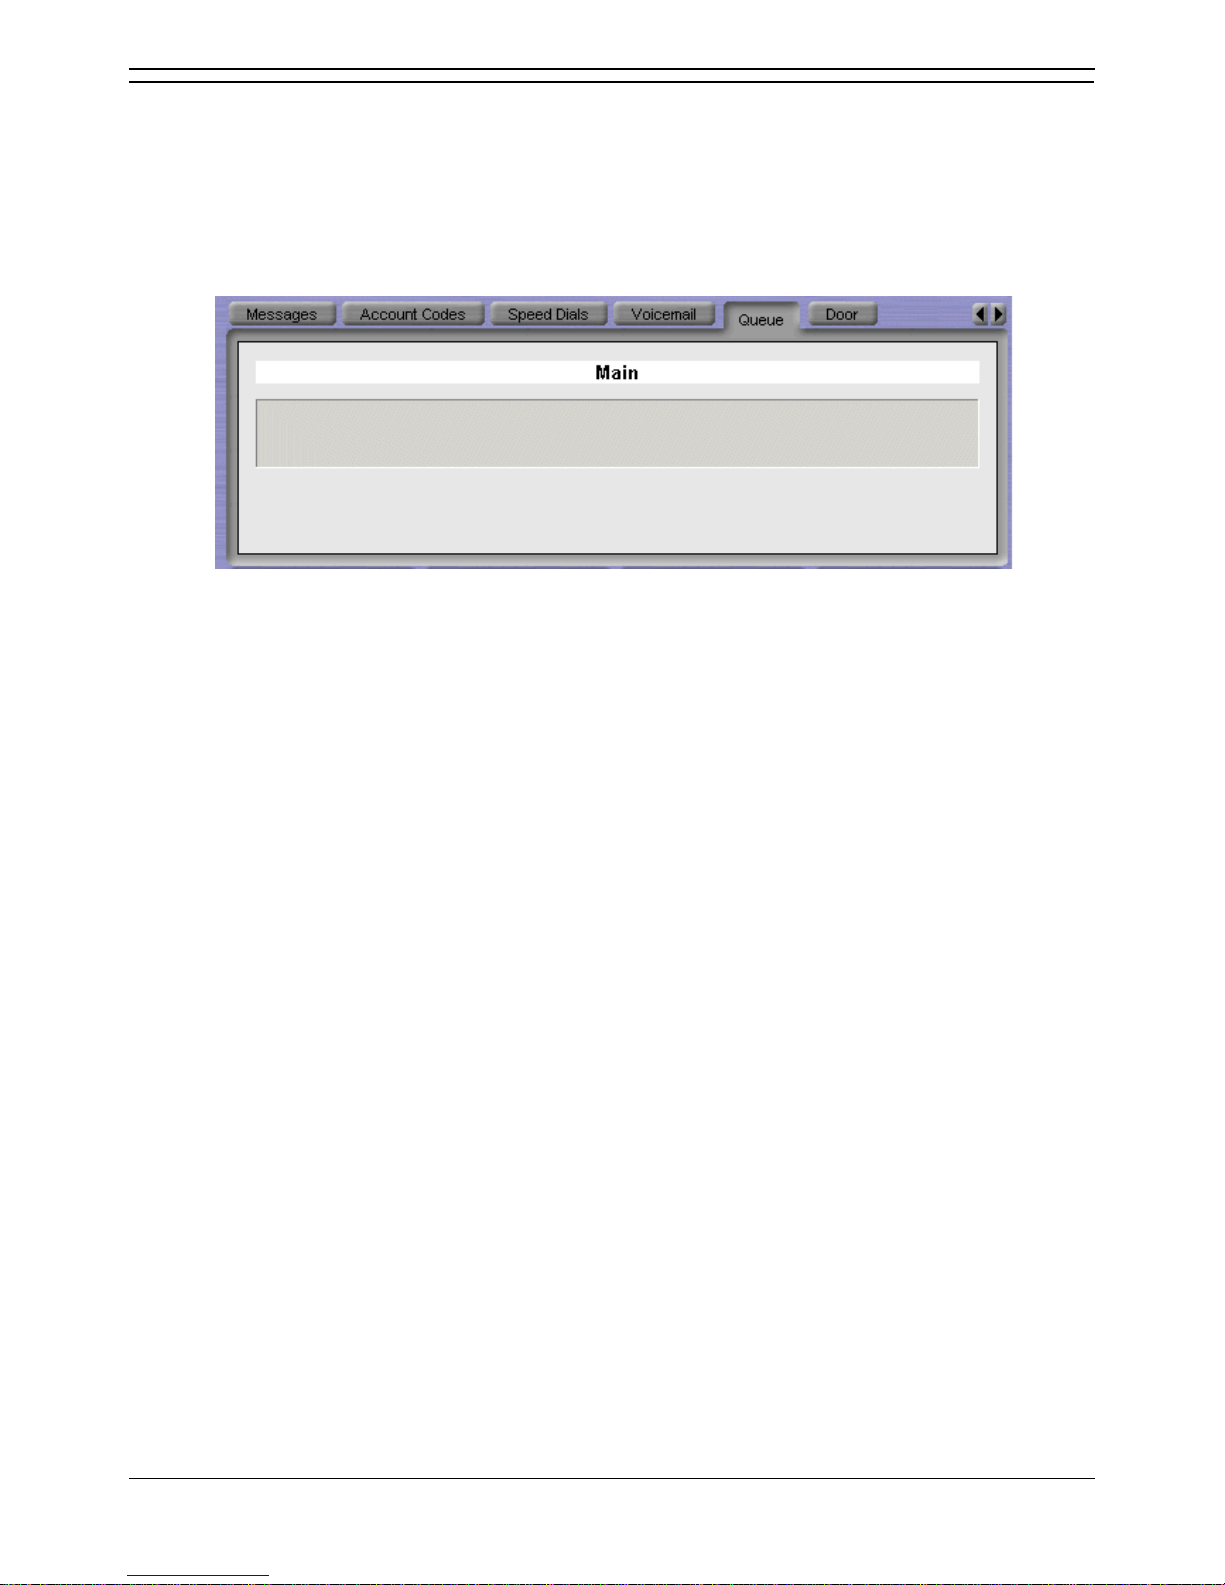
Phone Manager Users Guide
Page 40 Phone Manager User Guide
15-600988 Issue 14b (14th June 2006) IP Office 3.2
The Queue Tab
Phone Manager Pro only.
When configured the Queue tab is available in the Call History area. Up to two queues can be
monitored. The monitors indicate the number of calls currently queued for that hunt group. Each call held
in a queue is indicated by a blue box. When the mouse pointer is moved over a Queue monitor the
number of calls in the queue is displayed in the tool tip. For more information, see Working with Queues.
You can select the hunt groups that you want to monitor. The hunt group must already exist on the
system and must have queuing enabled. For more information, see Selecting Queues to Monitor.
Page 47

Phone Manager User Guide Page 41
IP Office 3.2 15-600988 Issue 14b (14th June 2006)
Voicemail
Overview
The Message tab in the Call History pane lists the mailboxes you have access to. The number of new,
old and saved messages is shown for each mailbox. For more information, see The Messages Tab.
The Voicemail tab in the Call History pane lists each voicemail message in your mailbox. You can select
a specific message to be played. For more information, see Listening to your Messages.
You can give a caller to your voicemail a choice of transferring to another telephone number or to leave
a message. Callers can be given up to 3 transfer locations. For example, you might record a message
saying that if the caller presses 1 they are transferred to your mobile number. For more information, see
Entering Transfer Options.
In Phone Manager you can record up to 9 Voicemail greetings. Specific greetings can be played
depending on the call type. For example when your extension is busy a caller can hear a specific
message that you have recorded. For more information, see Using Personal Greetings Overview.
Note
If voicemail is unavailable on your extension, ensure that the voicemail option is selected. For more
information, see Configuring the Voicemail Options.
Page 48
Phone Manager Users Guide
Page 42 Phone Manager User Guide
15-600988 Issue 14b (14th June 2006) IP Office 3.2
Listening to your Messages
You can listen to your messages using Phone Manager. Each message starts with a header, which
contains details about who the message is from and when it was left.
To collect your messages:
1. Click the Messages tab in the Call History pane.
The number of new, old and saved messages for each mailbox is listed. The message boxes listed
can be your personal voicemail box and, if available, the voicemail box for the hunt group of which
you are a member. For more information, see The Messages Tab.
2. Double-click on the message box you want to access. Alternatively, right-click the message box and
select Call Voicemail.
If your telephone is on-hook it rings when the voicemail server is contacted. Pick up your
telephone handset. Depending on how your telephone is configured the speaker phone might
automatically come on.
If your telephone is in the Off-Hook state you are connected to the Voicemail server as soon as it
is located.
3. If you are using your own extension, press #. Otherwise enter your extension number and press #.
4. Enter your voicemail password and press #.
The Voicemail tab might come to the front of the Call History pane when you connect to your
mailbox. For more information, see The Voicemail Tab.
5. When you have successfully logged in to your mailbox, you hear an announcement to tell you about
the messages that you have. Press 2 to receive your messages. Follow the voice prompts to listen,
save or delete your messages.
Note
You might not need to enter your voicemail password. Your user details in IP Office Manager can be
configured so you do not have to enter a voicemail password when opening your mailbox using
Phone Manager. For more information, see your system administrator.
If you are using Phone Manager Pro with Voicemail Pro in IP Office or Intuity mode you can use the
control buttons to navigate through the messages. The control buttons are on the Voicemail Tab. The
Voicemail tab comes to the front of the Call History pane when you connect to your mailbox.
When you listen to a message you have the options to:
Play Saved Messages
Message Back
Pause selected message
Skip Back
Un-pause selected message
Message Forward
Delete selected message
Skip Forward
Save selected message
If you are using Phone Manager Pro with Voicemail Pro in IP Office or Intuity mode you can listen to a
specific message.
To Listen to a specific message:
1. Click the Voicemail tab. All your messages are listed.
2. Double-click the message that you want to listen to.
Page 49
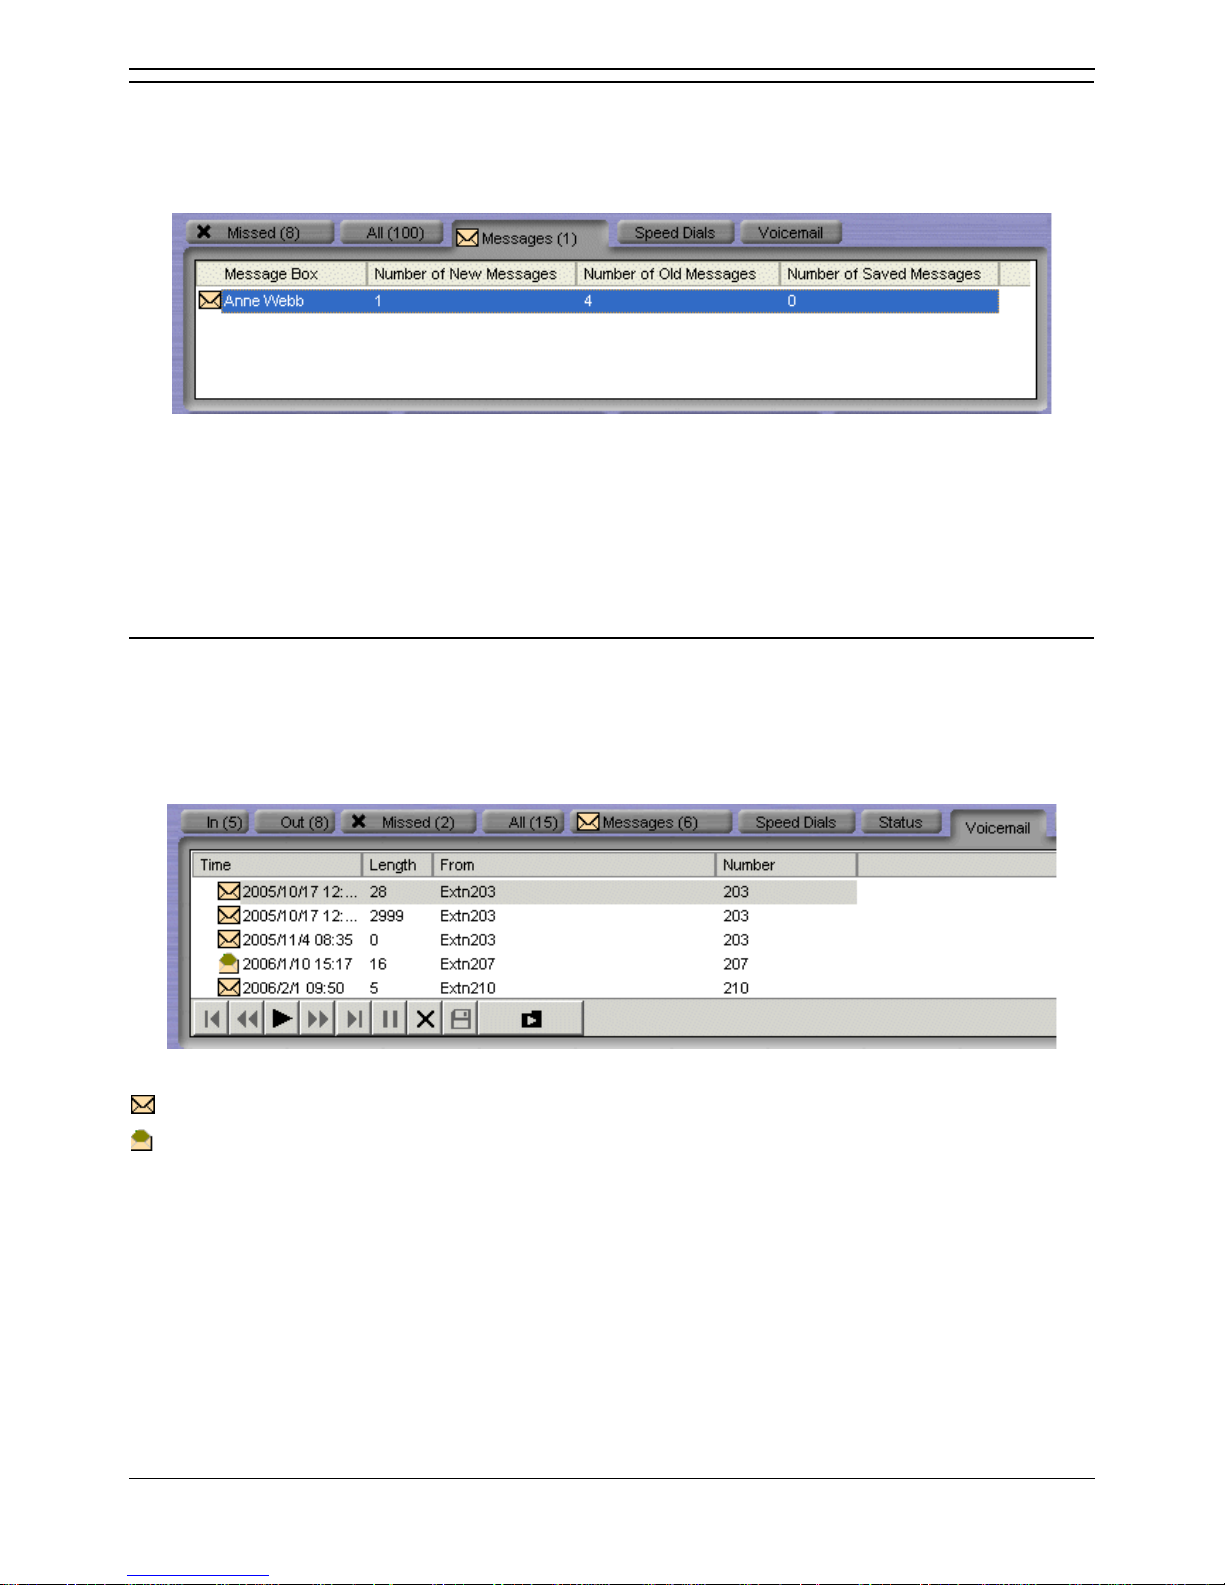
Voicemail
Phone Manager User Guide Page 43
IP Office 3.2 15-600988 Issue 14b (14th June 2006)
The Messages Tab
The Messages tab indicates the number of new messages in your voicemail box. The Messages tab also
lists messages for any hunt group from which you receive voicemail ringback.
The number of new, old and saved messages for each mailbox is listed. The message boxes listed can
be your personal voicemail box and, if available, the voicemail box for the hunt group of which you are a
member.
You can open a message box by double-clicking the mailbox name. For more information, see Listening
to your Messages.
The Voicemail Tab
Only available in Phone Manager Pro versions with Voicemail Pro.
The Voicemail tab lists all new, old and saved messages. For more information, see Listening to your
Messages.
indicates that the message has not been listened to.
indicates that the message has been listened to.
Page 50

Phone Manager Users Guide
Page 44 Phone Manager User Guide
15-600988 Issue 14b (14th June 2006) IP Office 3.2
Personal Greetings
Overview
Only available in Phone Manager Pro versions with IP Office Voicemail Pro.
In Phone Manager you can record up to 9 personal greetings. You can select the greeting to be played
depending on the call type. For example, when your extension is busy a caller can hear a specific
message. By default, callers who are directed to your mailbox hear the system greeting - "Your call is
being answered by IP Office. <Name> is not available. To leave a message wait for the tone, ...".
You can use Personal greetings to tell callers of the transfer options available. In Phone Manager you
can set up to three transfer options. For more information, see Entering Transfer Options. You can not
modify the transfer options if you do not have permission to configure voicemail. For more information,
see your system administrator.
There are two steps in using personal greetings:
1. Record the personal greeting. For more information, see Recording Greetings.
2. Assign the greeting. For more information, see Using Personal Greetings.
Note
Not all options are configurable by all users. For more information, see your system administrator.
Page 51
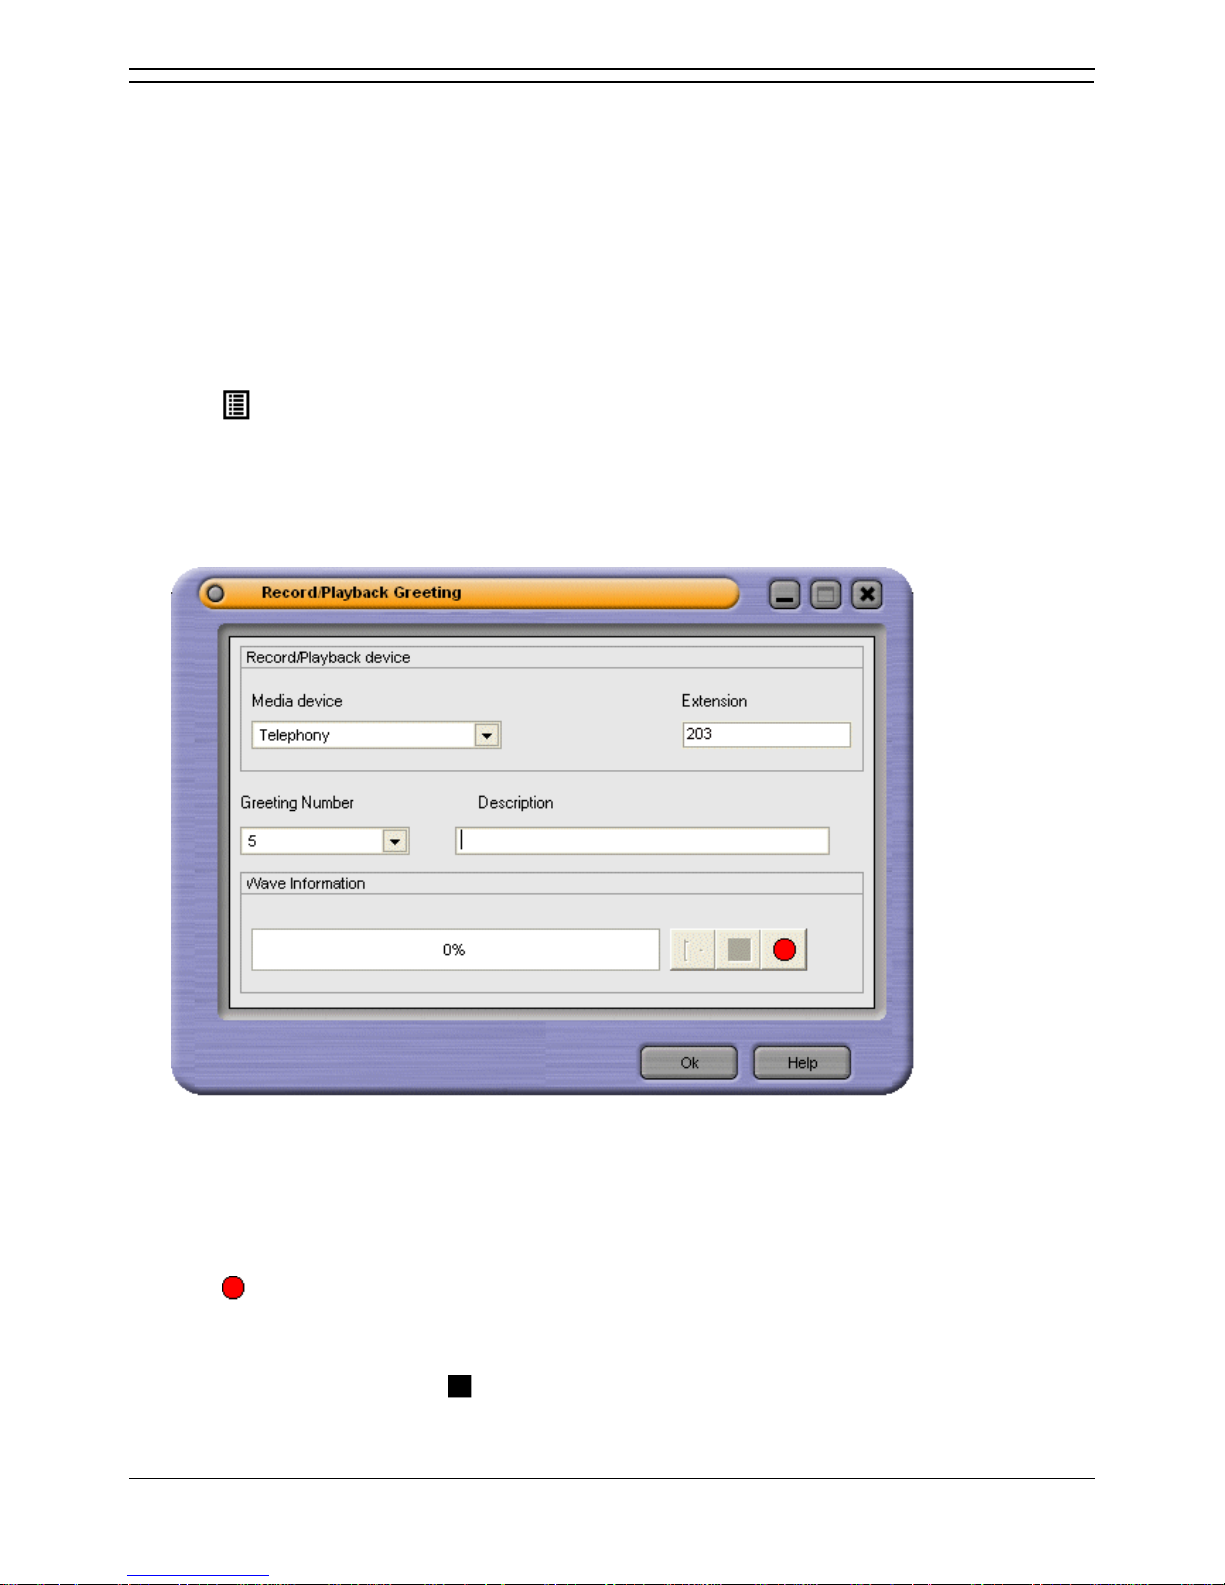
Voicemail
Phone Manager User Guide Page 45
IP Office 3.2 15-600988 Issue 14b (14th June 2006)
Recording Greetings
You can record a library of up to 9 of your own personal greetings. These are the greeting messages
heard by callers when they are directed to your voicemail. You can then select which greeting to apply to
different call types. You can listen to a greeting message that you have recorded and re-record the
message at any time.
Note
A greeting must be longer than 3 seconds. The maximum length of a greeting is 120 seconds by
default.
To record a new personal greeting:
1. Click > Voicemail.
Alternatively, click View > Preferences > Voicemail.
2. Click Configure Personal Greetings. The Configure Personal Greetings window opens.
3. The greetings are listed in the Available Greetings section.
Click any greeting button where there is no description or duration. The Record/Playback Greeting
window opens.
4. You will record your message using your telephone handset. The extension field is automatically
entered with the extension number that you used to log in to Phone Manager. Select the media type
Telephony.
5. The greeting number is the greeting number you selected in the Personal Greetings window. Type a
name for the recording in the Description field. A maximum of 20 characters can be entered as a
description.
6. Click to start recording your greeting. Your telephone rings once.
7. Pick up your telephone handset. A message is played 'record at the tone'. Start speaking your
greeting at the tone.
8. Replace your handset or click when you have finished recording.
Page 52

Phone Manager Users Guide
Page 46 Phone Manager User Guide
15-600988 Issue 14b (14th June 2006) IP Office 3.2
When you have recorded a greeting you can listen to the recording and re-recorded the greeting.
To listen to a greeting:
1. Open the Configure Personal Greetings window.
2. Click the Greeting button for the greeting that you want to listen to. The Record/Playback Greeting
window opens.
3. Click to start playing the greeting.
4. Pick up your telephone handset when it rings. The greeting that you selected is played.
5. Replace your telephone handset when the greeting message finishes.
To re-record a greeting:
1. Open the Configure Personal Greetings window.
2. Click the Greeting button for the greeting that you want to re-record.
3. Click to start recording. Your telephone rings once.
4. Pick up your telephone handset. A message is played 'record at the tone'. Start speaking your new
greeting at the tone.
5. Replace your handset or click when you have finished recording.
6. To listen to your new greeting click to play the recording.
7. Pick up your telephone handset when it rings. The greeting that you selected is played.
8. Replace your telephone handset when the greeting message finishes.
Page 53
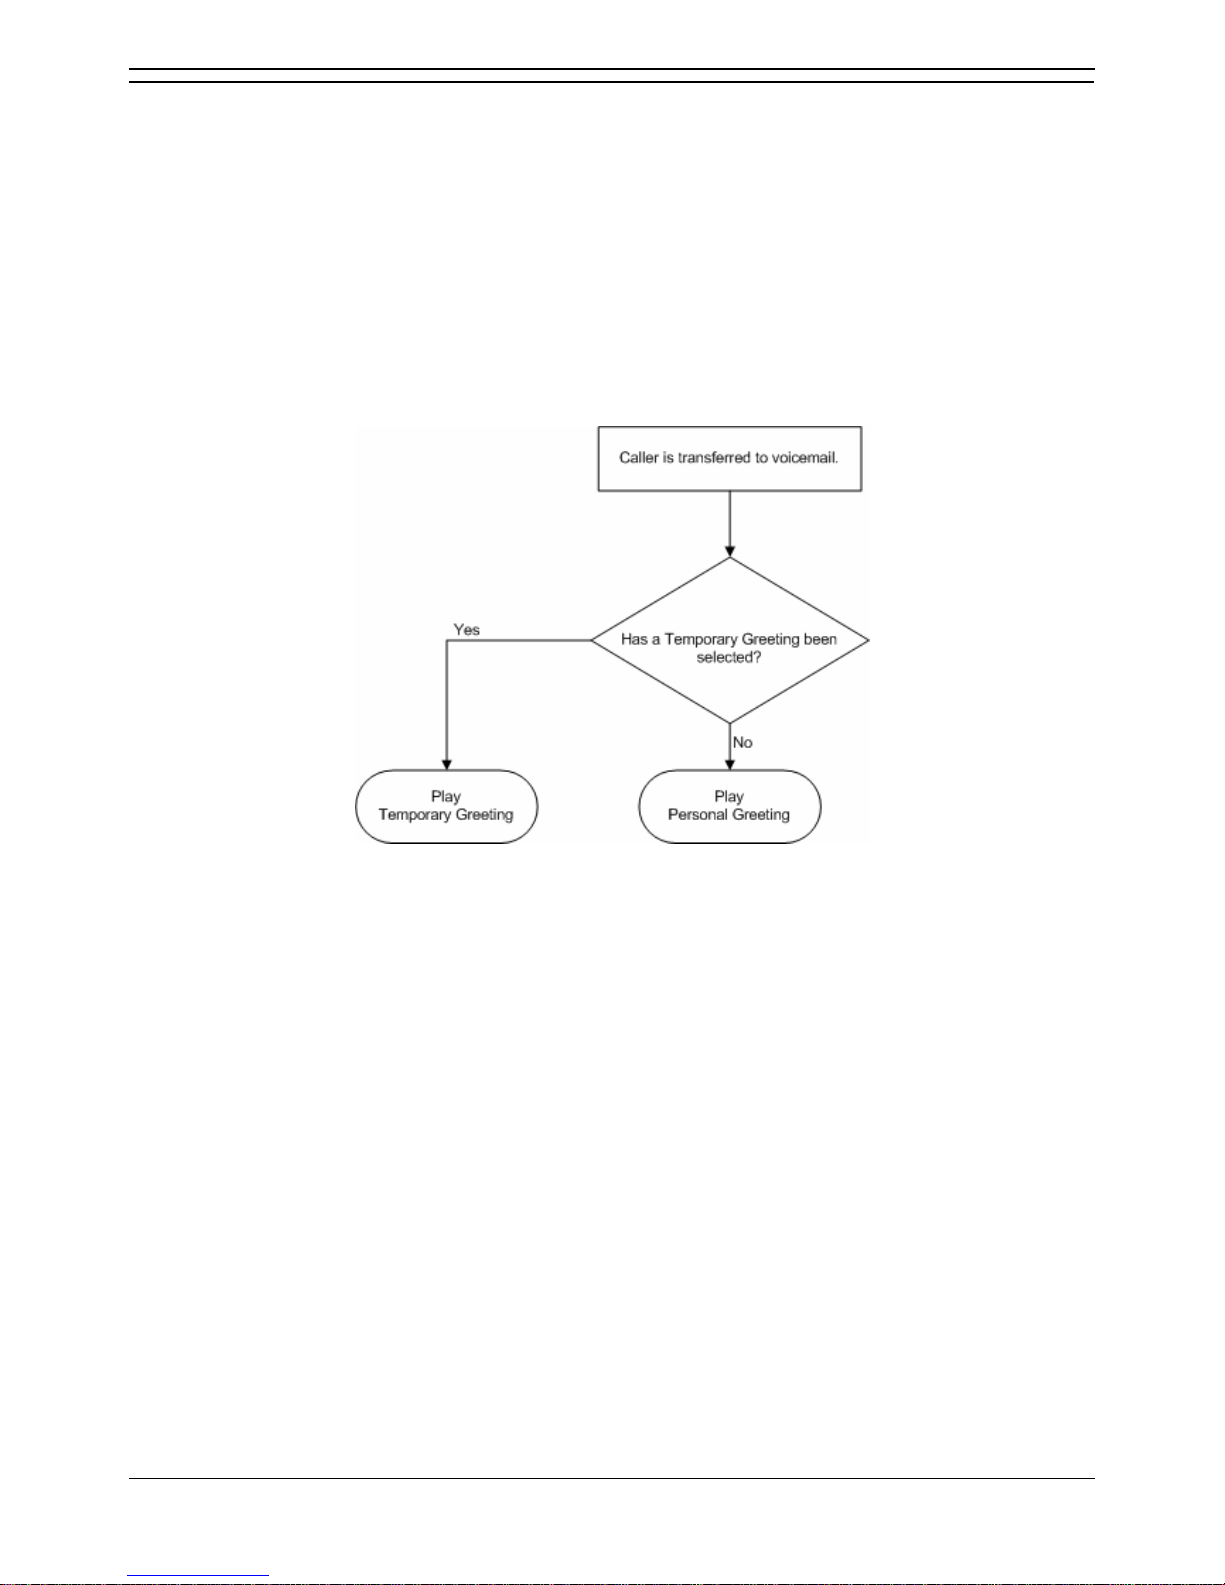
Voicemail
Phone Manager User Guide Page 47
IP Office 3.2 15-600988 Issue 14b (14th June 2006)
Using Personal Greetings
You can create up to nine personal greetings. These are the greeting messages heard by callers when
they are directed to your voicemail. You can assign a different greeting for specific call situations. For
example, you can assign different voicemail messages for calls received internally to those received
from outside the company. When a personal greeting is recorded the description and recording length
are listed in the available greetings area. For more information, see Recording Greetings.
Note
If you have recorded any greetings from an IP Office Intuity mode mailbox the greetings are listed
with their duration but no description.
The greeting can be used as a temporary greeting or personal greeting. A combination of greetings can
be selected for specific call types. When you assign greetings, the greeting used for a call type is
decided using an order of priority. The priority order is shown in the flow chart.
If a temporary greeting is selected the greeting is played for all call types. For example, a temporary
greeting might be used when you are away from the office, giving the caller an alternative contact
person. For more information, see Assigning a Temporary Greeting.
Personal greetings can be created for certain call types. For example, if you are busy on a call anyone
calling your extension can hear a personalised greeting stating that you are on a call, but are in the
office. For more information, see Assigning Personal Greetings.
Page 54
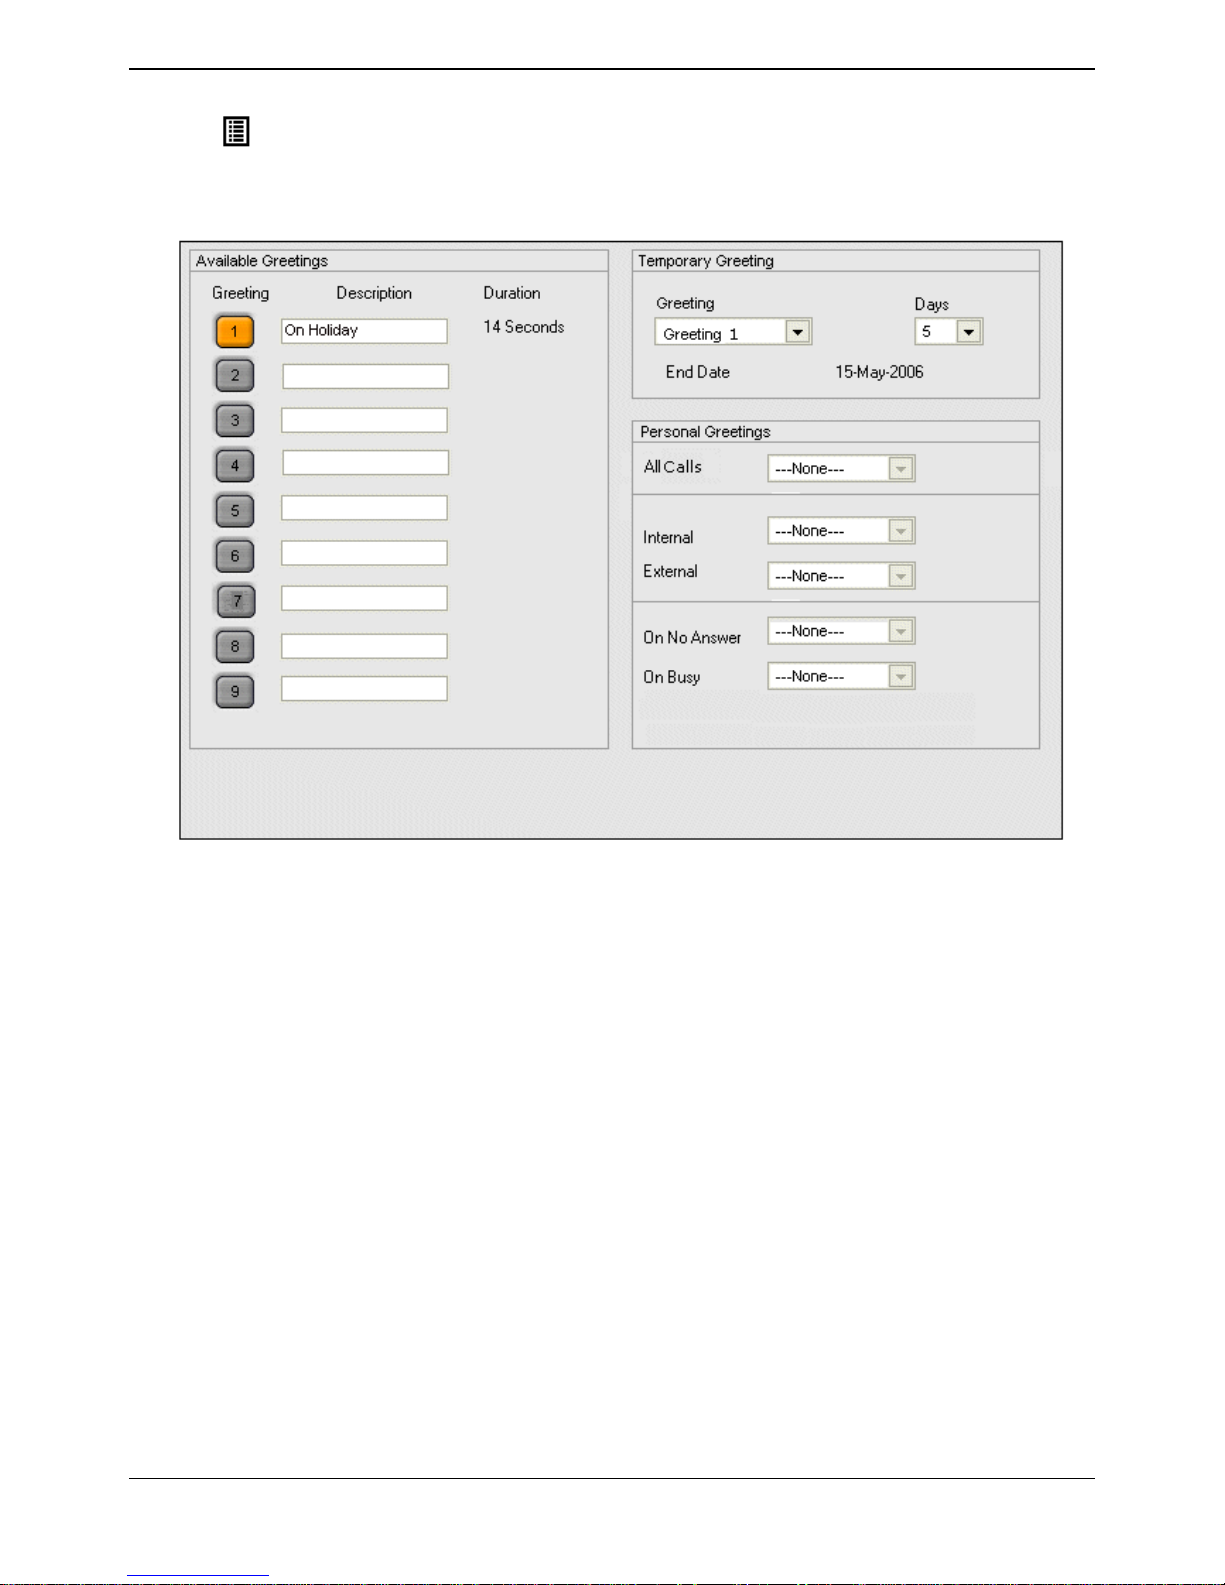
Phone Manager Users Guide
Page 48 Phone Manager User Guide
15-600988 Issue 14b (14th June 2006) IP Office 3.2
To assign a greeting:
1. Click > Voicemail.
Alternatively, click View > Preferences > Voicemail.
2. Click Configure Personal Greeting. The Personal Greetings window opens.
3. Assign the greetings that you have recorded. Greetings can be:
Temporary. For more information, see Assigning a Temporary Greeting.
Personal. For more information, see Assigning Personal Greetings.
Page 55

Voicemail
Phone Manager User Guide Page 49
IP Office 3.2 15-600988 Issue 14b (14th June 2006)
Assigning a Temporary Greeting
If you have recorded a greeting you can assign the greeting as a temporary voicemail greeting. For
example, a temporary greeting might be used when you are away from the office, giving the caller an
alternative contact person. For more information, see Recording Greetings.
When a temporary greeting is being used, no other greetings are active.
A temporary greeting can be selected for a certain number of days, the maximum number of days being
30. When you enter the number of days the end date is calculated and shown.
If the number of days selected is between 1 and 30, the greeting is active for the selected number of
days. When the number of days has expired your temporary greeting no longer works.
If the number of days selected is 0, the selected greeting is your permanent greeting for all voicemail
calls. The temporary greeting replaces the system default greeting.
To set a temporary greeting:
1. Click > Voicemail.
Alternatively, click View > Preferences > Voicemail.
2. Click Configure Personal Greetings. The Personal Greetings window opens.
3. Select the required temporary greeting from the list.
4. Select the number of days that the greeting is to be used.
5. Click OK to save your changes.
Page 56
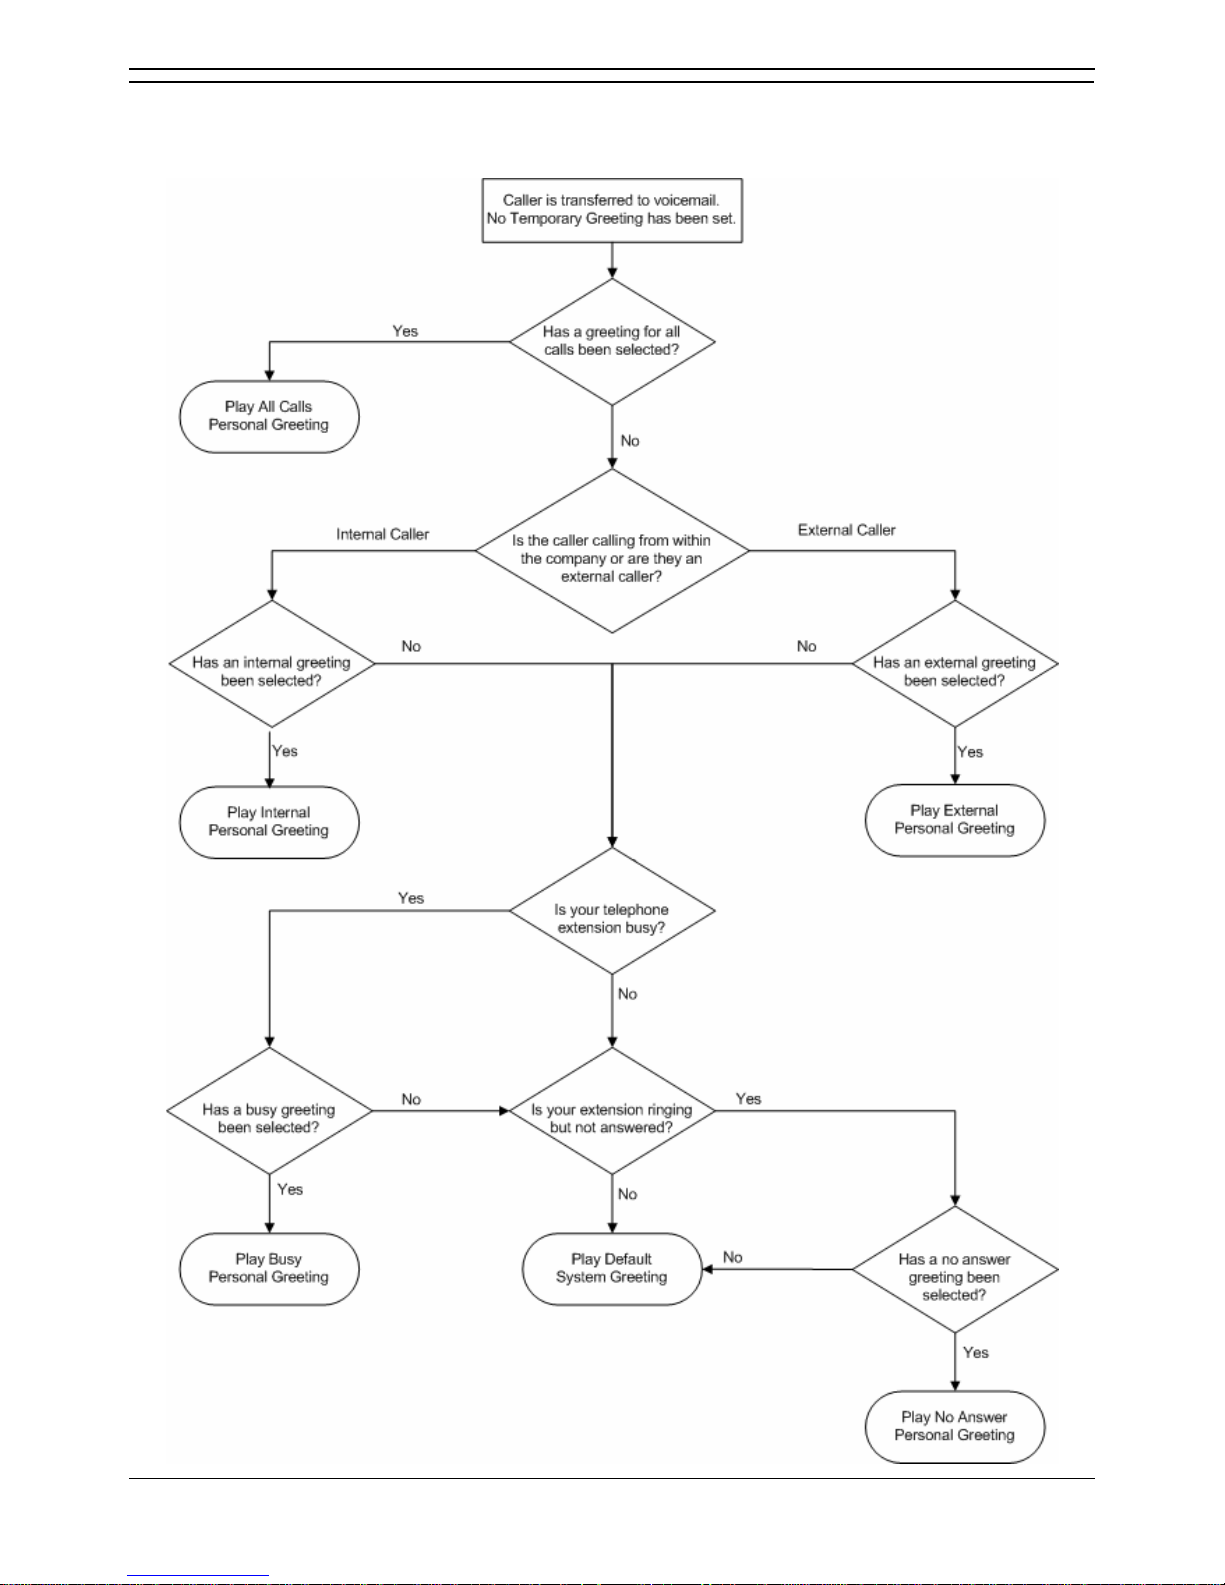
Phone Manager Users Guide
Page 50 Phone Manager User Guide
15-600988 Issue 14b (14th June 2006) IP Office 3.2
Assigning Personal Greetings
When you assign a personal greeting for more than one call type, the greeting used for any call is
decided using an order of priority. The priority order is shown in the flow chart.
Page 57

Voicemail
Phone Manager User Guide Page 51
IP Office 3.2 15-600988 Issue 14b (14th June 2006)
Personal greetings are played when the temporary is not being used. If no personal greetings are
applied callers who are directed to your mailbox hear the default system greeting - "Your call is being
answered by IP Office. <Name> is not available. To leave a message wait for the tone, ...".
Personal greetings can be created for the call types:
All Calls
Internal
External
No Answer
Busy.
To assign your personal greetings:
1. Click > Voicemail.
Alternatively, click View > Preferences > Voicemail.
2. Click Configure Personal Greetings. The Personal Greetings window opens.
3. Select the required greeting from the list for the different call types.
4. Click OK to save your changes.
Page 58
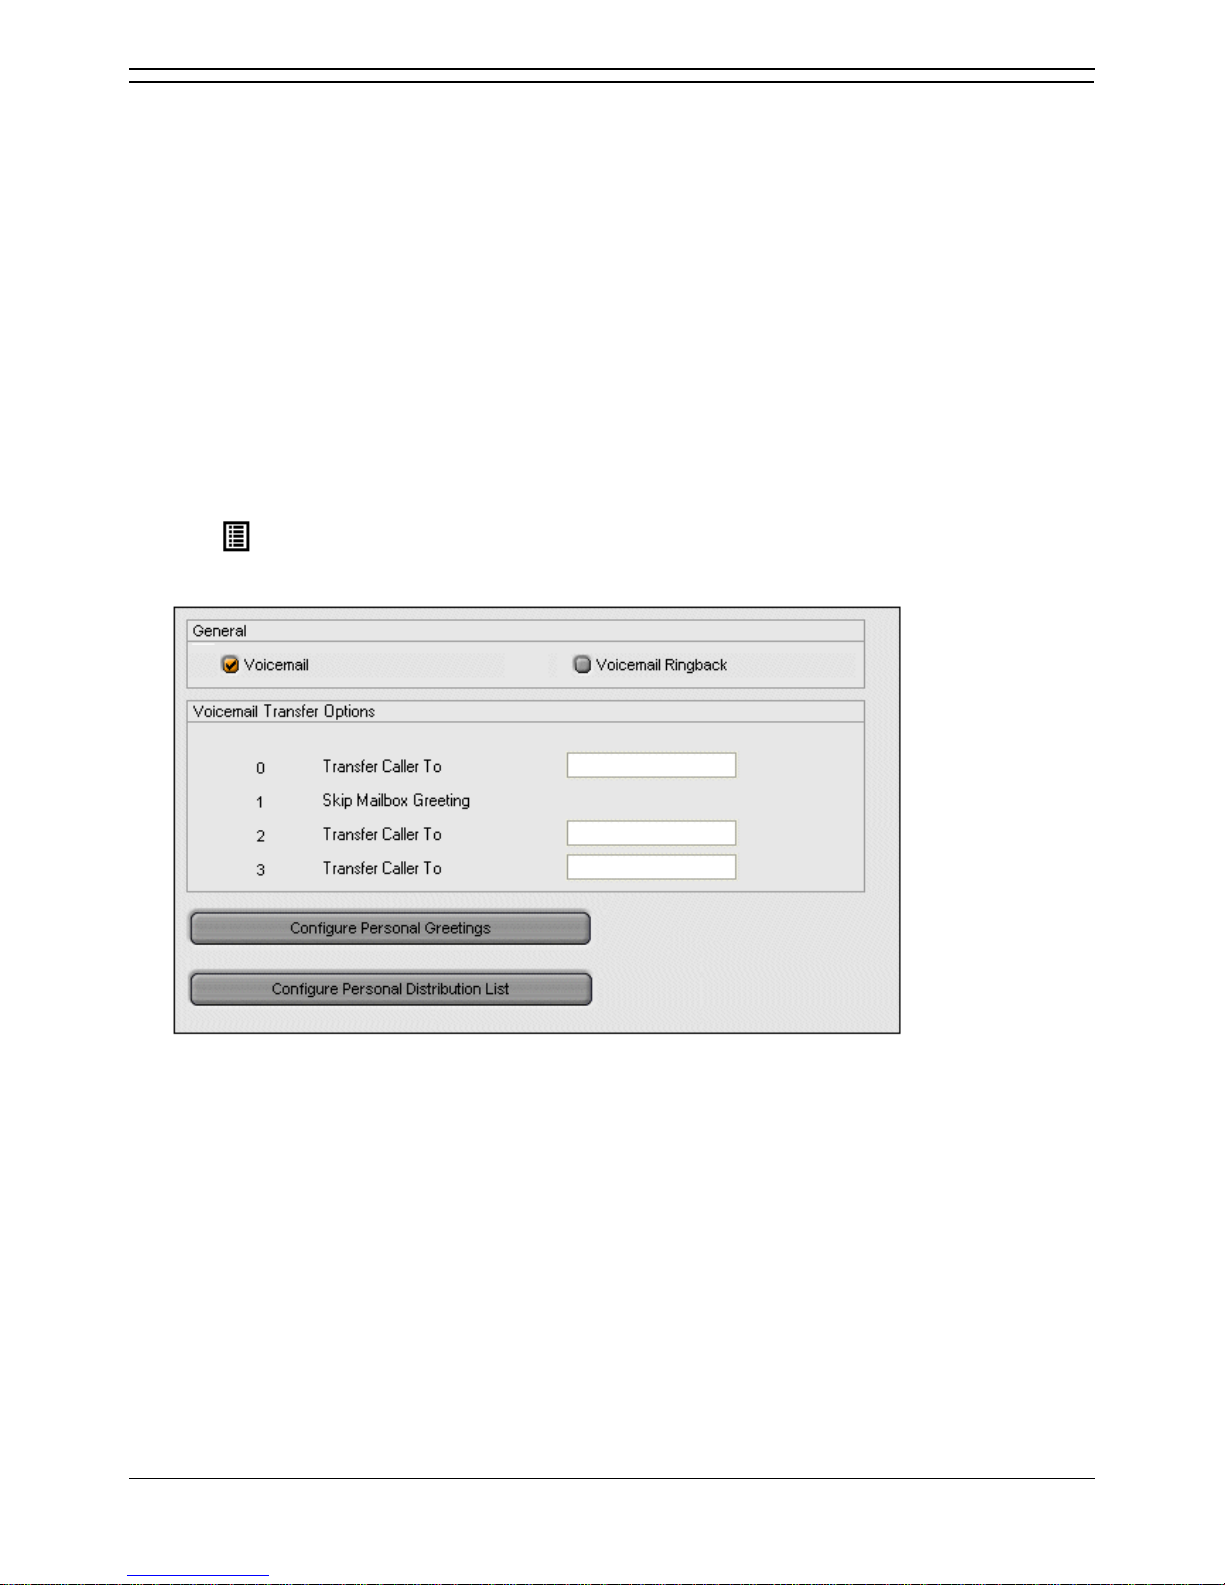
Phone Manager Users Guide
Page 52 Phone Manager User Guide
15-600988 Issue 14b (14th June 2006) IP Office 3.2
Entering Transfer Options
You can give a caller to your mailbox an option of transferring to another telephone number or to leave a
message. Breakout numbers are extension numbers that the caller is transferred to when they press the
associated number on their keypad.
To inform a caller of the numbers that they can be transferred to you need to record a personal greeting
containing the information. For example, you might record a message saying that if the caller presses 1
they are transferred to your mobile number. Your mobile number is entered as the telephone number to
transfer the caller to. However, the caller is not given your mobile number, just the option number to
press. When the caller is transferred they are played the message 'please wait while we try to connect
you'. For more information, see Recording Greetings.
Note
You can not modify the transfer options if you do not have permission to configure voicemail. For
more information, see your system administrator.
To enter your transfer options:
1. Click > Voicemail.
Alternatively, click View > Preferences > Voicemail. The Voicemail preferences window opens.
2. Type the telephone numbers that callers to your mailbox can be transferred to. You can enter up to
3 telephone numbers.
3. Click OK to save the information.
4. Record a greeting to inform a caller about the transfer options available. For more information, see
Recording Greetings.
Page 59
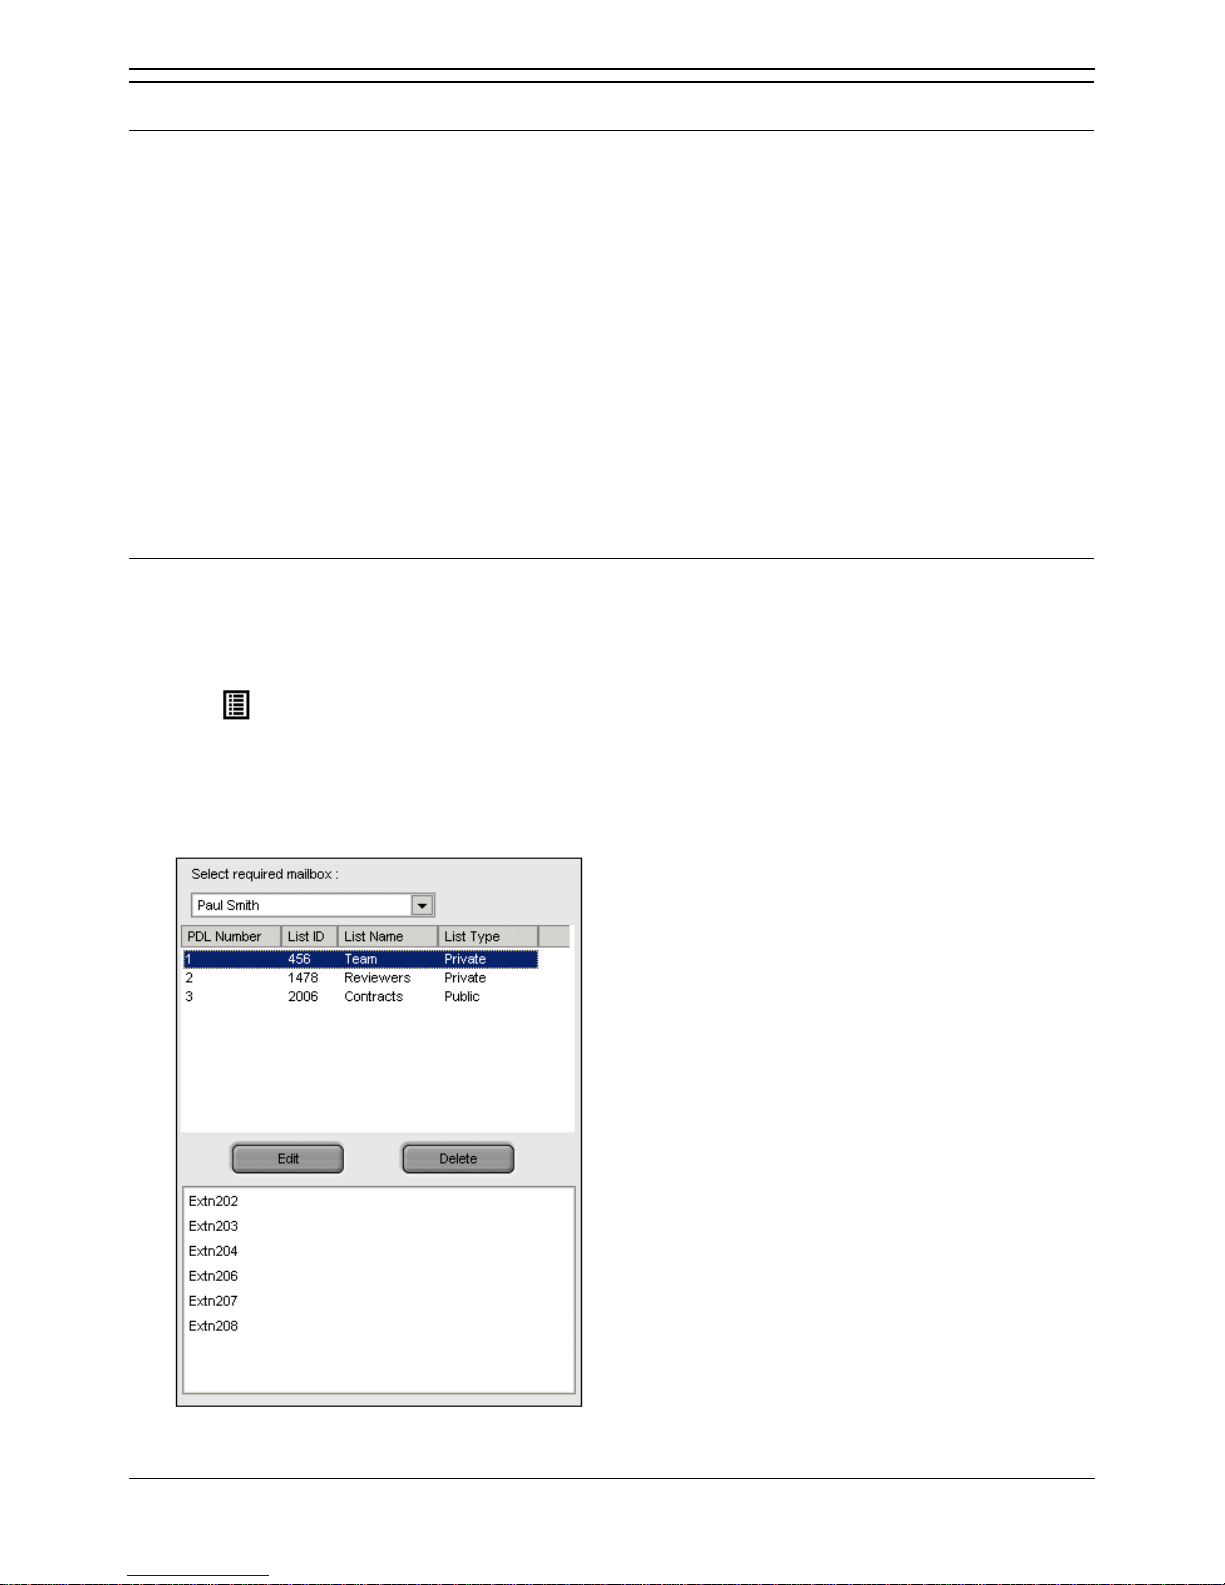
Voicemail
Phone Manager User Guide Page 53
IP Office 3.2 15-600988 Issue 14b (14th June 2006)
Personal Distribution Lists
Overview
A Personal Distribution List or PDL can only be used if your voicemail is in Intuity mode. A PDL is also
known as a mailing list.
A Personal Distribution list is used to store a set of mailbox numbers so that you can send a voice
message to several recipients at the same time. This is useful if you often send messages to the same
people, for example the members of your team. For more information, see Using a PDL.
Your mailbox can have up to 20 PDLs associated with it. Each list can contain up to 360 mailbox
numbers. Lists can be private or public. Private lists can be used only by you. Public lists can be used by
other mailbox users when they forward a message. However, public lists can not be modified by other
users. For more information, see Creating a PDL.
You can view your PDLs and check how many members (mailbox numbers) each contains. You can
modify your own lists by deleting or adding members. For more information, see Editing a PDL. You can
also create your own list by importing the contents of a public list from another mailbox. For more
information, see Creating a PDL.
Viewing a Personal Distribution List
When a PDL is created you can view the members of the list. You can view your own PDLs and any
public lists that were created by other people.
To view the members of a PDL:
1. Click > Voicemail tab.
2. Click Configure Personal Distribution List button.
3. In the Select required mailbox field, click the mailbox that you want to view.
4. Click the PDL that you want to see the members of. The extension numbers are shown in the panel
under the lists of PDLs.
Page 60
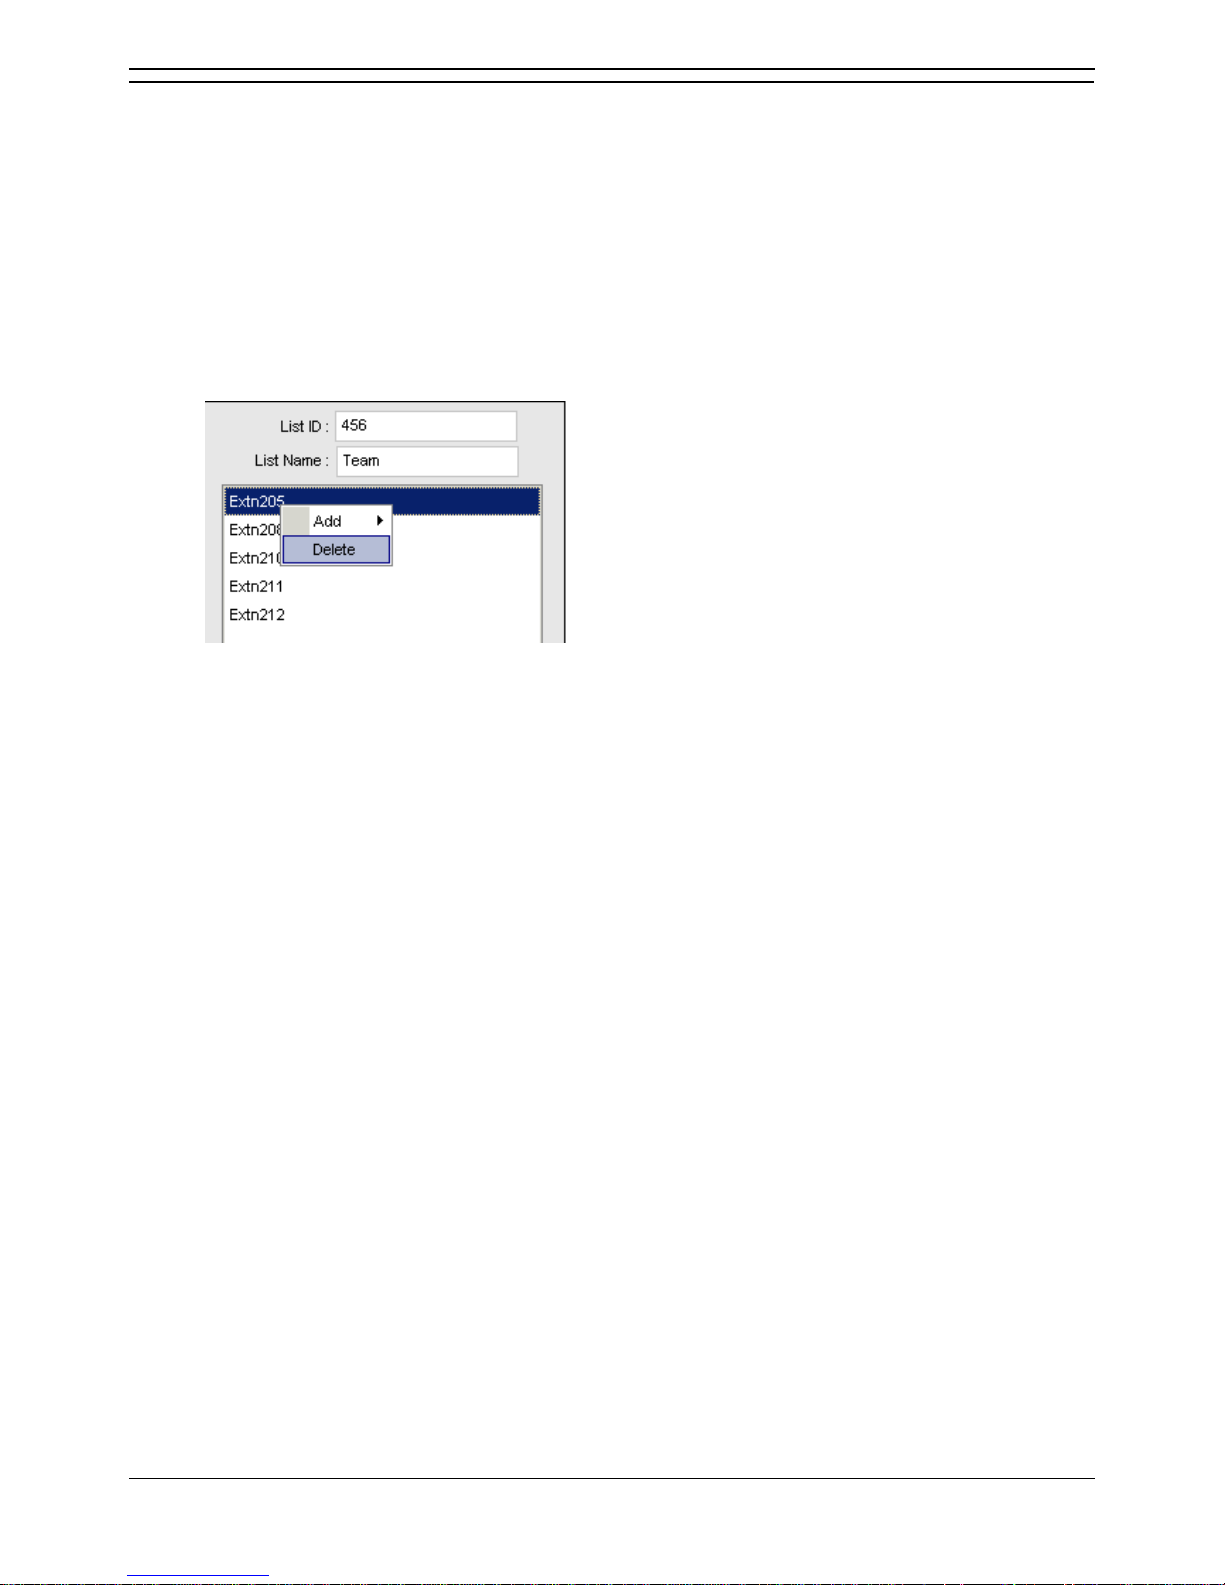
Phone Manager Users Guide
Page 54 Phone Manager User Guide
15-600988 Issue 14b (14th June 2006) IP Office 3.2
Editing a Personal Distribution List
When you have created a PDL you can amend it at any time. New members can be added and
members can be removed from the list. A public list created by someone else can only be changed by
the person who created the list.
To amend the members of a PDL:
1. View the members of the PDL. For more information, see Viewing a Personal Distribution List.
2. Click Edit. The PDL members are copied to the panel on the right.
3. Members can be removed from the list.
Right-click the extension number that you want to remove.
Click Delete.
4. Members can be added to the list.
Right-click in the blank area beneath the List name.
Click Add.
Click an extension number or name.
5. Click Update to save all your changes.
Page 61
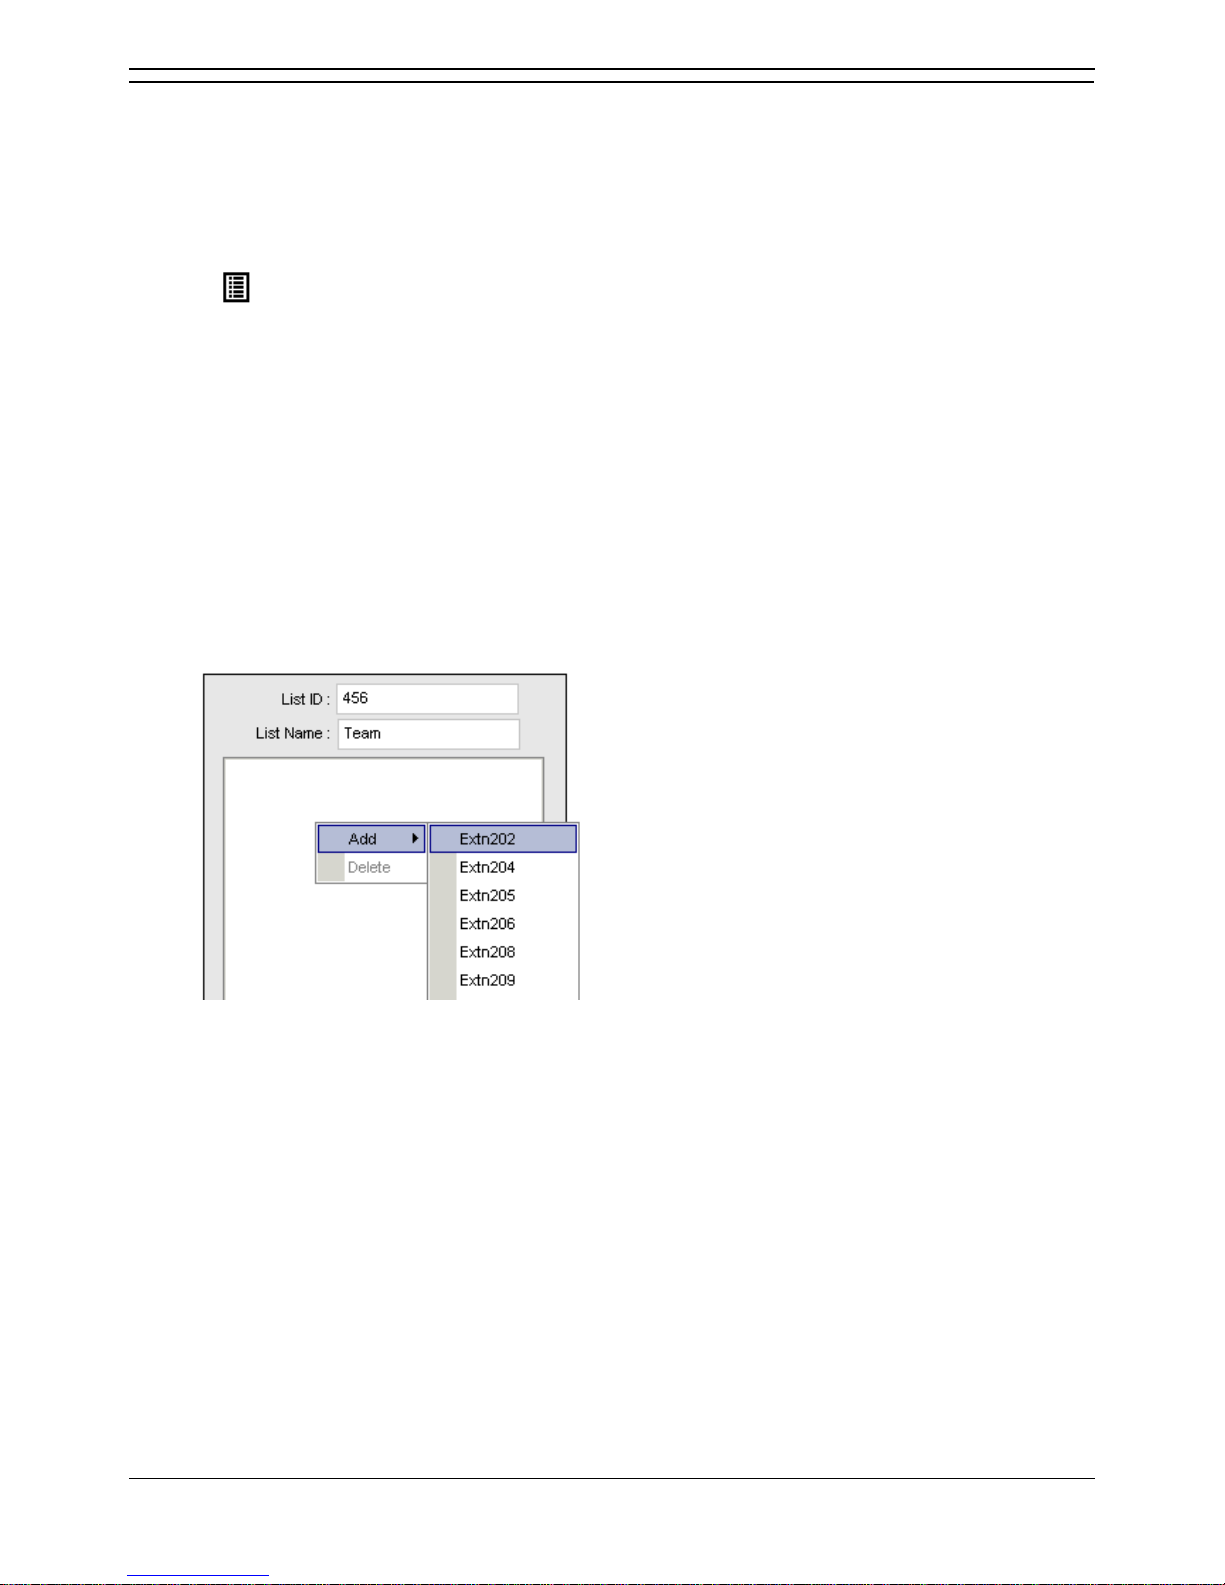
Voicemail
Phone Manager User Guide Page 55
IP Office 3.2 15-600988 Issue 14b (14th June 2006)
Creating a Personal Distribution List
Phone Manager Pro Only.
A Personal Distribution List (PDL) is a list of mailbox numbers that you can use to distribute messages to
groups of mailboxes. You can create a private list or create a list that is available to other users by
making the list Public. Up to 20 lists can be created with a maximum of 360 members per list.
To create a PDL:
1. Click > Voicemail tab.
2. Click Configure Personal Distribution List button.
3. From the drop down list at the top left in the window, select your mailbox.
4. Type a List ID. The List ID is a number that you choose. The List ID is used to identify the PDL
when sending a message. For more information, see Using a Personal Distribution List.
5. Type a List Name. A descriptive name that will help you to identify the members of the PDL.
6. The mailbox extension numbers need to be added to the list.
Right-click in the blank area beneath the List name.
Click Add.
Click an extension number or name.
Repeat until all the members of the list are added.
7. (Optional) Click Public.
Check this box to make the selected list public. A public list can be viewed and used by any other
Phone Manager user.
8. Click Create.
Details of your PDL are shown in the left panel.
If the message 'You can only create your own lists' is shown, click OK. Select your mailbox from the
drop down list in the top left of the window and click Create.
Page 62

Phone Manager Users Guide
Page 56 Phone Manager User Guide
15-600988 Issue 14b (14th June 2006) IP Office 3.2
Creating a PDL from an existing PDL
You can add members from an existing list. This can either be all members from an existing list or
individual members mailboxes. You can use a private PDL or a public PDL to create a new list.
To create a new PDL from an existing PDL:
1. Click > Voicemail tab.
2. Click Configure Personal Distribution List button.
3. Select your mailbox from the drop down list at the top left in the window if you are using a private
PDL. If you are using a Public PDL, select the mailbox associated with the required PDL.
4. Click the PDL to be used. The members of the PDL are listed in the panel beneath the PDL lists.
5. Type a number in the List ID field for the PDL.
6. Type a name in the List Name field for the PDL.
7. Click to copy all the mailbox extension numbers to your new list
Individual members from an existing list can be added to the new list. Select the member from
the existing list and use the adjacent to the member list window.
8. (Optional) Click Public.
A public list can be viewed and used by any other (PDL) user. Select to make the list public.
9. Click Create.
Your PDL is shown in the left panel. If the message 'You can only create your own lists' is shown,
click OK. Select your mailbox from the drop down list in the top left of the window and click Create.
Page 63

Voicemail
Phone Manager User Guide Page 57
IP Office 3.2 15-600988 Issue 14b (14th June 2006)
Using a Personal Distribution List
When you have created a Personal Distribution List (PDL) you can use it to send a voice message to
several recipients at the same time. Before you send the message make a note of the list ID number that
you want to use. If you are using a public PDL make a note of the extension number of the PDL owner
and the List ID.
To use a PDL you need to log in to your mailbox using your telephone.
To log in to your mailbox:
1. Pick up your telephone handset and dial *17 or use an alternative short code that is configured for
your telephone system.
2. If you are dialling from your extension, press #. Otherwise enter your extension number and press #.
3. Enter your voicemail password and press #.
When you are logged in to your mailbox you can record a message and send it to the mailboxes that are
listed in the PDL.
To send a message to the members of a private PDL:
1. Press 1 to record the message that you want sent to every one in the list.
2. After the tone, start recording your message.
3. Press # to finish recording. You are prompted to enter the extensions to send the message to. You
are going to use a PDL that contains all the extensions.
4. Press *5. You are going to use a private PDL that you created.
5. Press #. Your name is announced and you are asked to enter the list identification.
6. Enter the List ID and press #. You are told the list number and the number of members in the list.
You are prompted to enter the extension numbers. You are using a PDL that contains all the
extensions.
7. Press #.
8. Press # to send the message. You hear a confirmation message that the delivery is scheduled. Your
message is sent to all the extensions in the PDL.
Page 64

Phone Manager Users Guide
Page 58 Phone Manager User Guide
15-600988 Issue 14b (14th June 2006) IP Office 3.2
To send a message to the members of a public PDL:
1. Press 1 to record the message that you want sent to every one in the list.
2. After the tone, start recording your message.
3. Press # to finish recording. You are prompted to enter the extensions to send the message to. You
are going to use a PDL that contains all the extensions.
4. Press *5. You are going to use a public PDL that you did not created.
5. Enter the extension number of the Public PDL owner and press #. You hear the name of the mailbox
owner and you are asked to enter the list identification.
6. Enter the list ID and press #. You are told the list number and the number of members in the list.
You are prompted to enter the extension numbers. You are using a PDL that contains all the
extensions.
7. Press #.
8. Press # to send the message. You hear a confirmation message that the delivery is scheduled. Your
message is sent to all the extensions in the PDL.
You can forward a message to the several mailboxes at the same time using a PDL. If you forward a
message, you can choose to add a comment to the start or end of the message. Messages marked as
private by the sender cannot be forwarded.
To forward a message to the members of a PDL
1. While you listen to the message, press 1.
2. Select the forwarding method to use:
Forward the message with a comment at the start: Press 2.
Forward the message with a comment at the end: Press 3.
You are prompted to record your comment after the tone.
3. Record your comment and press # to finish recording. You are prompted to enter the extensions to
send the message to. You are going to use a PDL that contains all the extensions.
4. Press *5. You are going to use a PDL that you created.
5. Press #. Your name is announced and you are asked to enter the list identification.
6. Enter the List ID and press #. You are told the list number and the number of members in the list.
You are prompted to enter the extension numbers. You are using a PDL that contains all the
extensions.
7. Press #.
8. Press # to send the message. You hear a confirmation message that the delivery is scheduled. Your
message is sent to all the extensions in the PDL.
Page 65

Voicemail
Phone Manager User Guide Page 59
IP Office 3.2 15-600988 Issue 14b (14th June 2006)
Deleting a Personal Distribution List
A Personal Distribution List might no longer be used and needs to be removed from the listing.
To delete a PDL:
1. Click > Voicemail tab.
2. Click Configure Personal Distribution List button.
3. Select your mailbox from the drop down list at the top left in the window.
4. Select the PDL to be deleted.
5. Click Delete.
Page 66

Page 67

Phone Manager User Guide Page 61
IP Office 3.2 15-600988 Issue 14b (14th June 2006)
Features
Overview
This section of the guide explains:
Managing directories
Directory Entries store regularly dialed internal or external numbers. Directory Entries appear in the
Call screen for quick dialling. For more information, see Managing Directories Overview.
Creating and using speed dials
You can use speed dials to save regularly dialed internal and external numbers for future use. There
are two types of Speed Dials: Internal where Tool Tips are shown and External. For more
information, see Viewing Speed Dials.
Setting an absent message
The Absent Status feature assists internal callers when you are not at your desk. The information
entered is shown on their Call screen when a call is made to your extension. For more information,
see Setting an Absent Message.
Finding out more about Phone Manager.
You can use the help files and learn more about using Phone Manager by viewing the tutorials. For
more information, see Getting Help.
Page 68
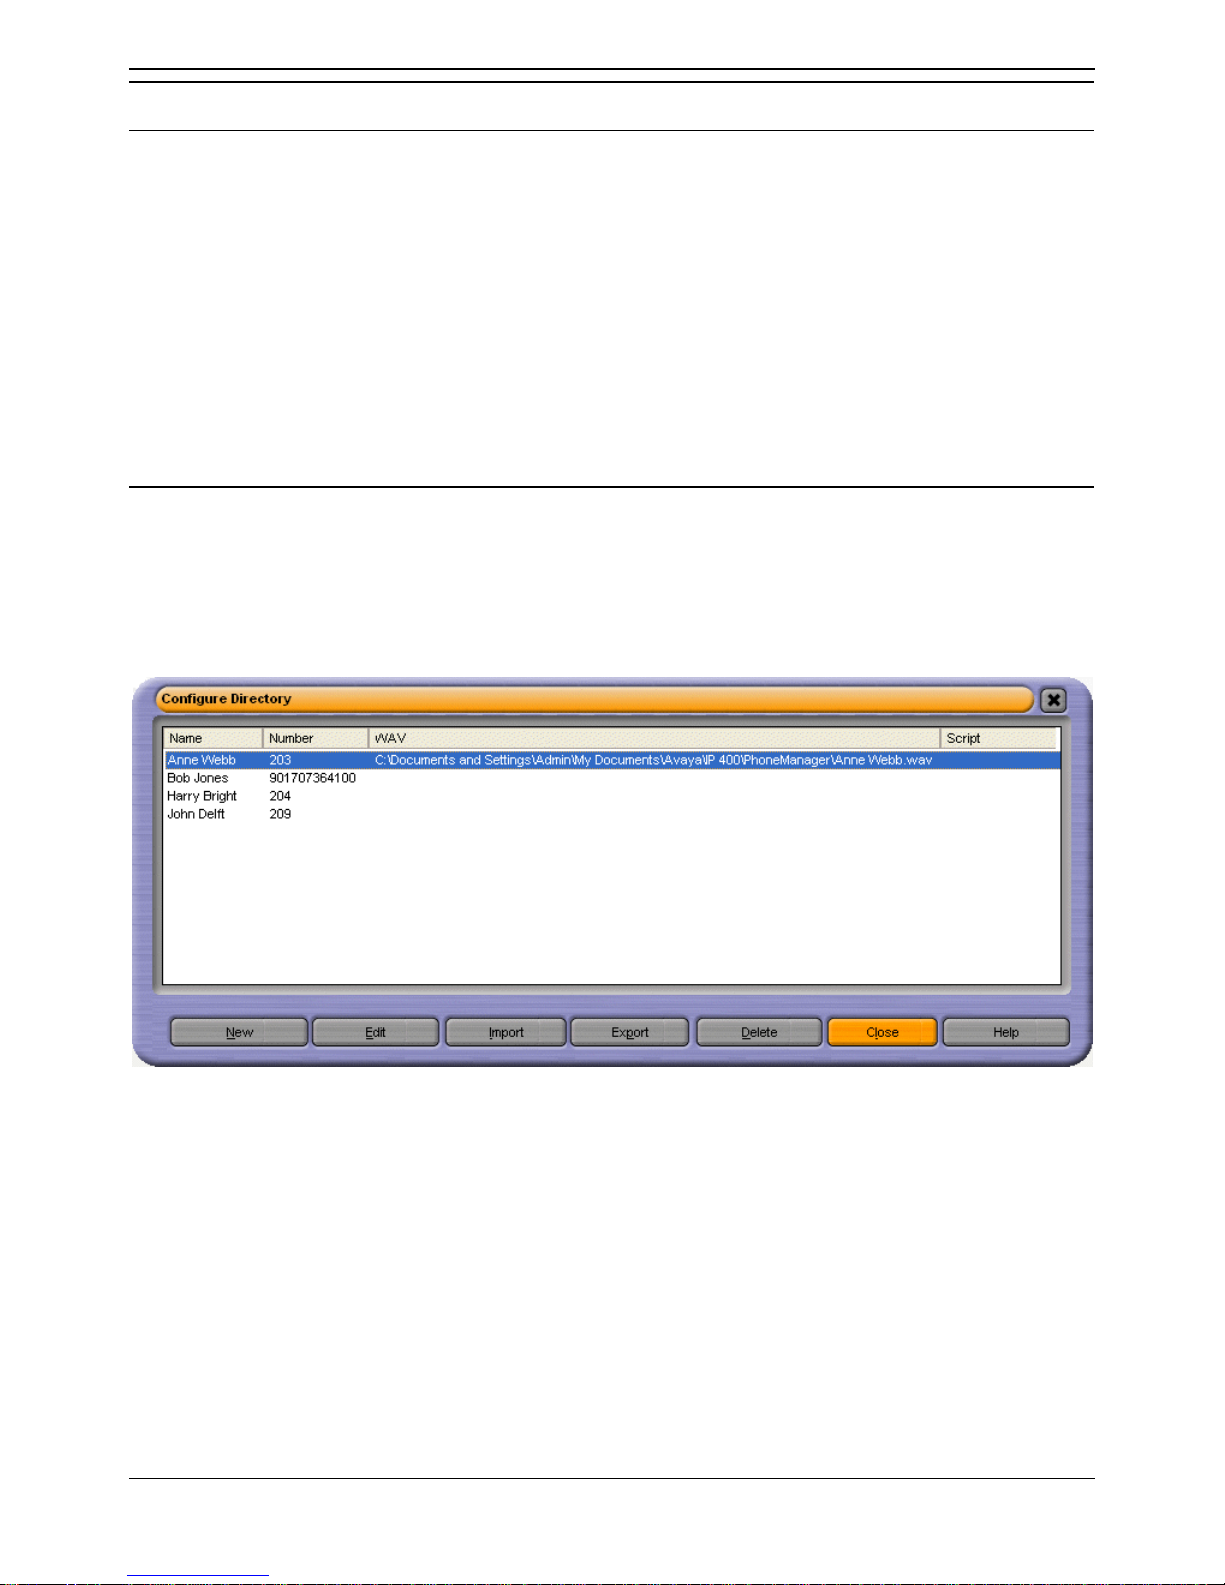
Phone Manager Users Guide
Page 62 Phone Manager User Guide
15-600988 Issue 14b (14th June 2006) IP Office 3.2
Managing Directories
Overview
Only available in Phone Manager Pro versions.
Directory Entries store regularly dialed internal or external numbers for quick dialling. When you use the
Call window you can select to show the directory entries. For more information, see Using the Call
Window.
Directory Entries can be used to match the Caller ID or DID of incoming calls to a name. When there is a
match a media file can be played or a text file displayed. A text file is shown in the script Tab. Phone
Manager attempts to match the incoming Caller ID first. If no match exists Phone Manager looks for a
match to the DID. For more information, see The Script Tab.
Any call you receive can be added to your personal directory. For more information, see Creating a
Directory Entry from an Existing Call.
Creating a Personal Directory
You can create a personal directory of frequently used numbers. Each directory entry appears in the Call
window for quick dialling. A maximum of 1000 entries can be added to the Directory.
To open the Directory Configuration:
Click File > Directory.
These fields control the PBX Configuration.
New - Click to create a new directory entry. For more information, see Adding a Directory Entry.
Edit - Click to edit the selected directory entry.
Import - Click this option to import an exported directory entry or correctly formatted CSV file.
Export - Click this option to export your directory.
Delete - Click a directory entry then click Delete. The directory entry selected is removed.
Close - The Configure Directory Window is closed. Any changes made since the Configure Directory
Window was opened are saved.
Page 69
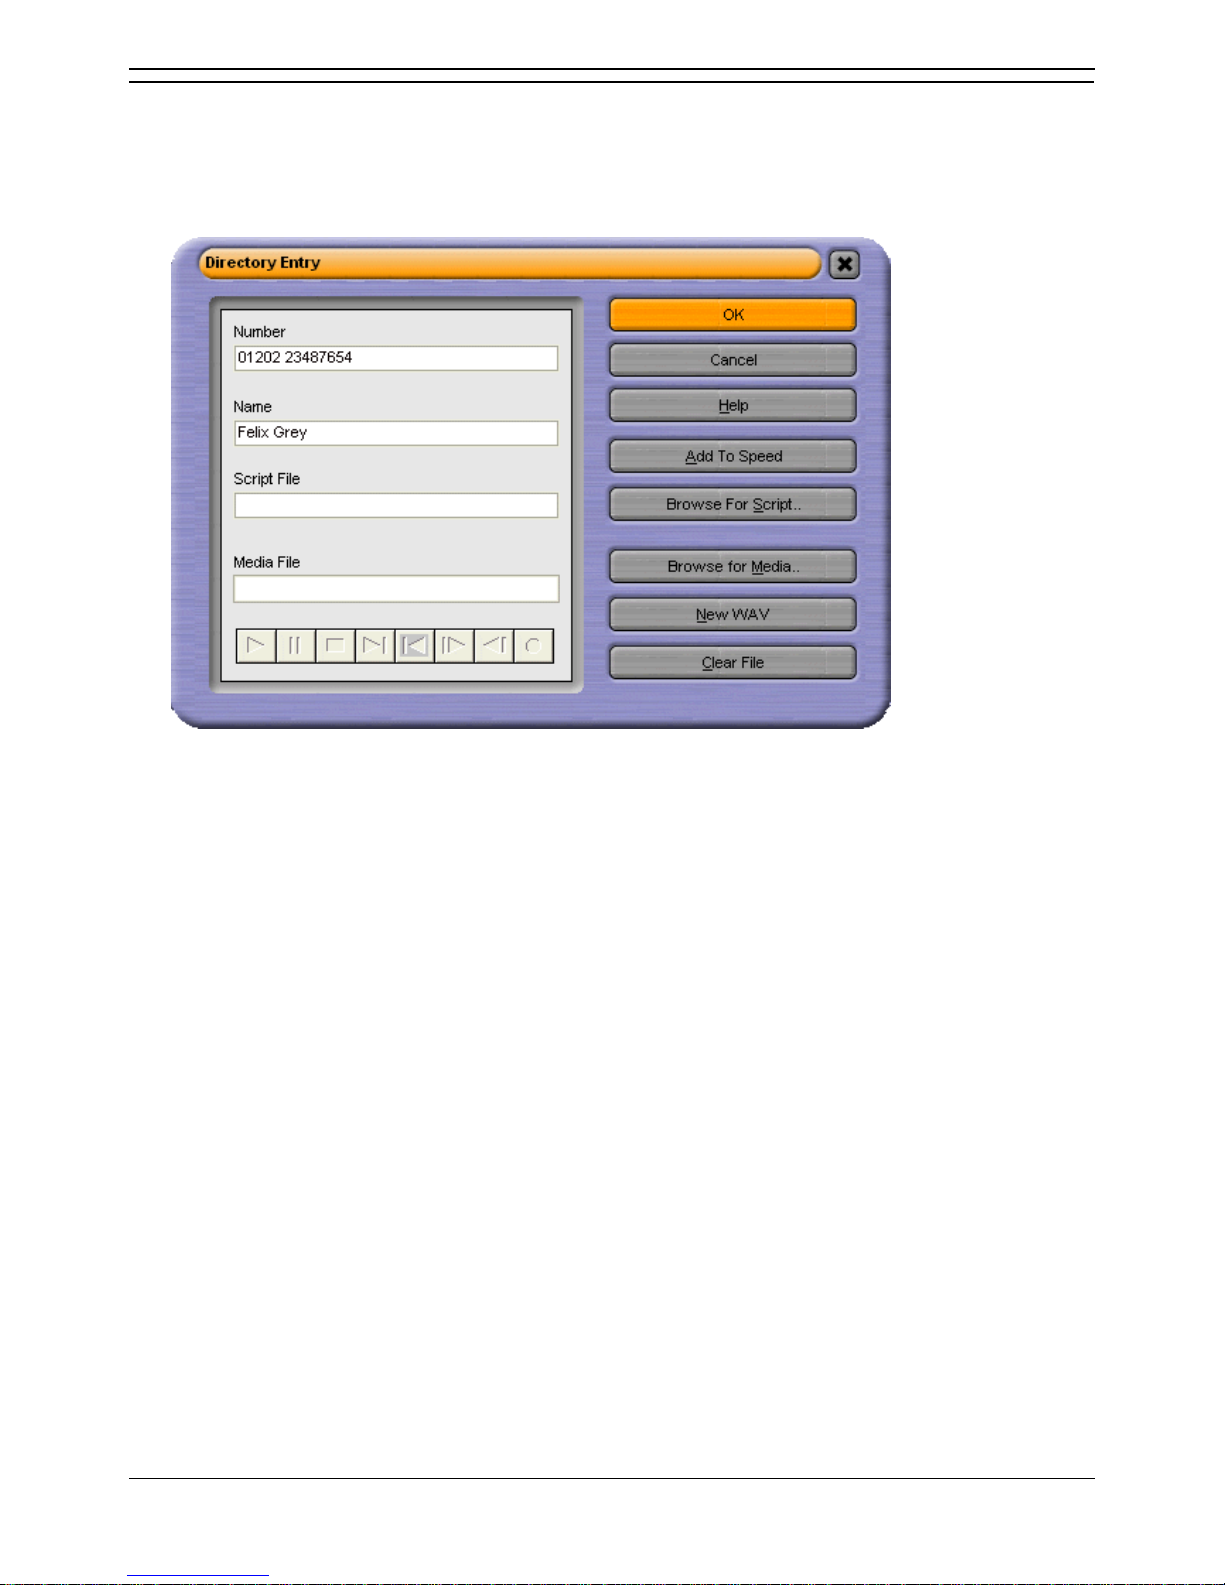
Features
Phone Manager User Guide Page 63
IP Office 3.2 15-600988 Issue 14b (14th June 2006)
Adding a Directory Entry
A new directory entry can be created. The entry is shown in the Call window when the Show Directory
option is selected. For more information, see Using the Call Window.
To create a new directory entry:
1. Click File > Directory > New. The Directory Entry window opens.
2. Enter the telephone or extension number into the Number box.
3. Enter the name to be associated with the number into the Name box.
4. (Optional) Click Browse For Script to select a .txt or .rtf file. The file is shown when a call is made
to the number entered in the Number field. The text file shows in the Script tab when the Caller ID
matches an incoming caller name. For more information, see The Script Tab.
5. (Optional) Click Browse for Media to select a media file. The file is played when a call is received
from the number entered. Phone Manager must be configured to play sounds. For more information,
see Changing General Phone Manager Settings.
6. (Optional) Click Add to Speed to create a speed dial entry. Creating a Speed Dial with this method
always adds the Speed Dial to the My Speed Dial Group. For more information, see Creating a
Speed Dial.
7. (Optional) Click New WAV to create a .WAV file in the Phone Manager Pro default directory. You
need to have Multi Media configured for your PC complete with a sound card installed complete with
speakers and a microphone to record a media file.
8. Click OK.
9. Click Close to exit the Configure Directory window. A new entry is not saved until you exit the
Configure Directory window.
Page 70

Phone Manager Users Guide
Page 64 Phone Manager User Guide
15-600988 Issue 14b (14th June 2006) IP Office 3.2
Creating a Directory Entry from an Existing Call
Any call that is shown in the Call History area can be used to create a directory entry. Calls in the In,
Out, Missed and All panes all contain information about calls.
To create a directory entry from an existing call:
1. Right-click the call in the Call History pane.
2. Click Add to Directory. The Directory Entry window opens.
3. (Optional) Make any changes required. You can also associate a script or media file to the directory
entry.
4. Click OK.
5. Click Close to exit the Configure Directory window and save your changes.
Editing a Directory Entry
A directory entry can be changed.
To edit a directory entry:
1. Click File > Directory > Edit. The Directory Entry window opens.
2. Edit the directory entry as required.
3. Click OK.
4. Click Close to exit the Configure Directory window.
Page 71
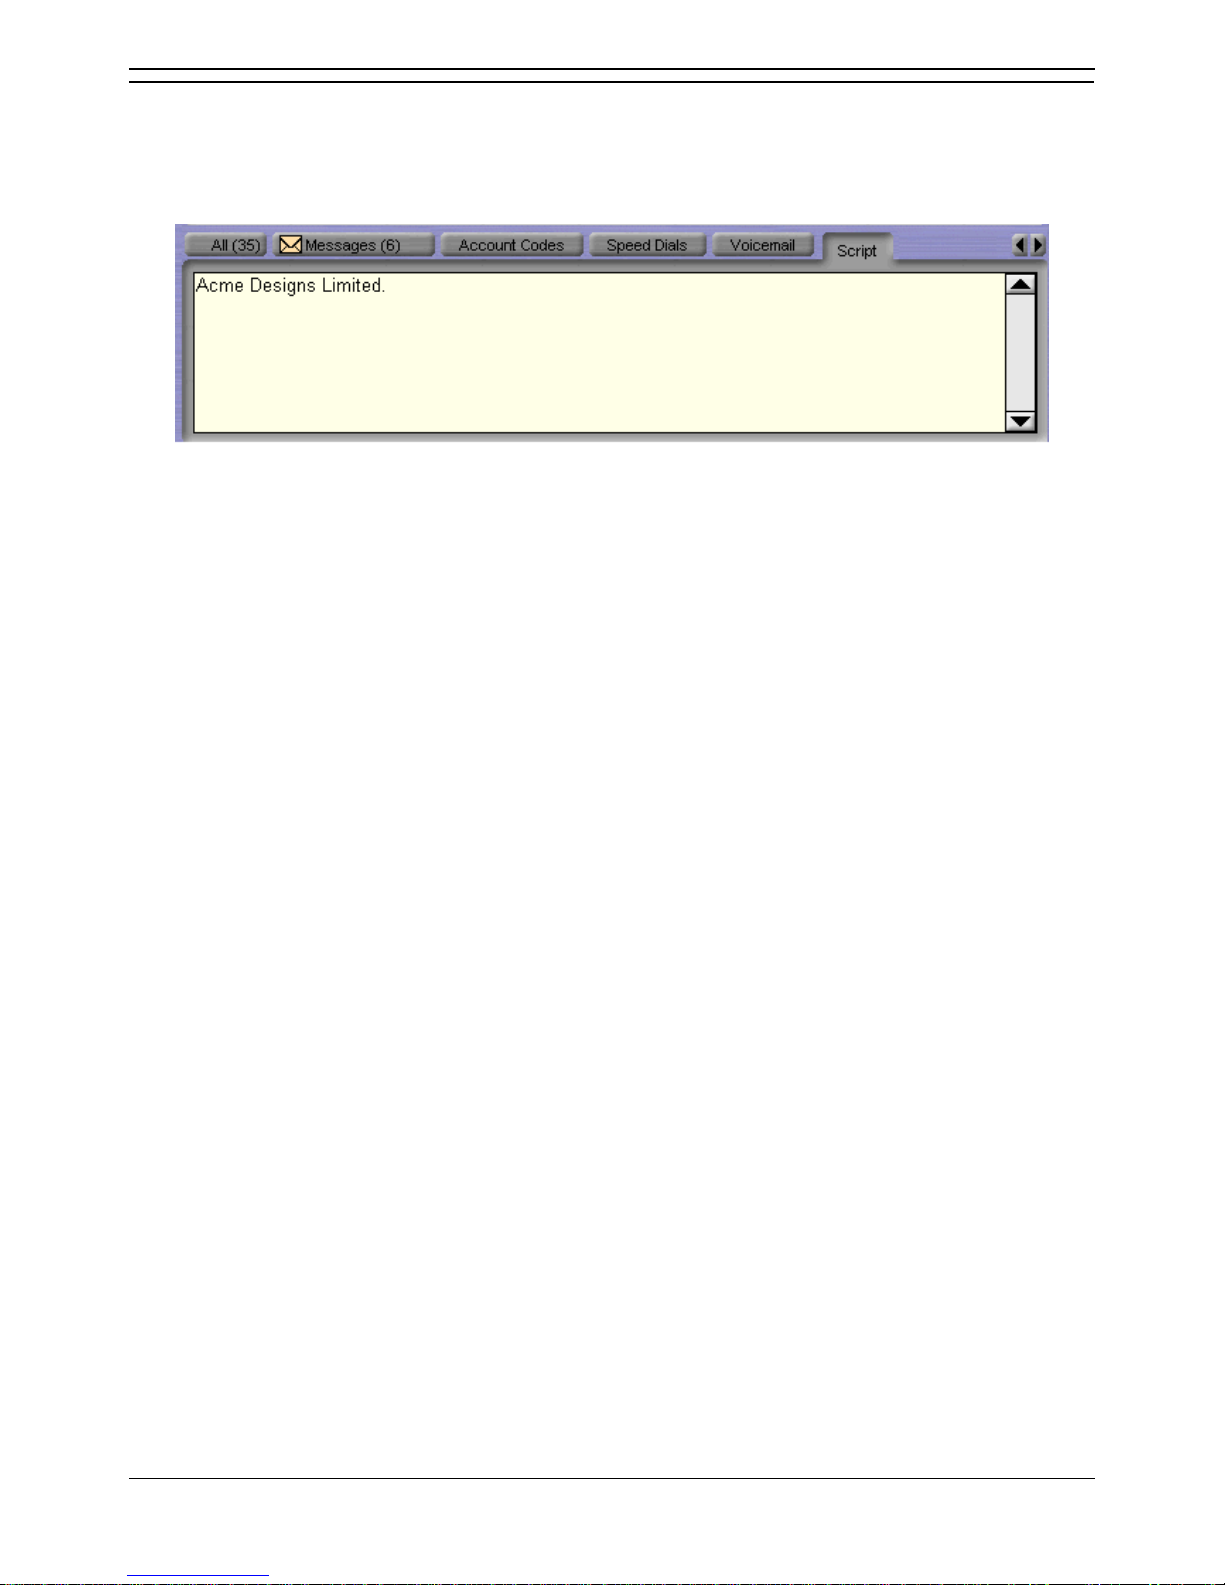
Features
Phone Manager User Guide Page 65
IP Office 3.2 15-600988 Issue 14b (14th June 2006)
The Script Tab
Only available in Phone Manager Pro versions.
The Script tab appears when a Directory Entry matching the called number has a Script file associated.
The example shown only contains a company name, more information can be included. For example, a
receptionist might be answering calls on behalf of more than one company. To ensure that the call is
answered with the correct company name a text file can be created with the company name and details.
Phone Manager Pro can be configured to display this text file whenever a call is received for that
company.
To associate a script with an incoming number:
1. Create a .TXT file containing the information to be shown when the script is displayed. A script file
can be created using the application Notepad.
2. In Phone Manager click File > Directory > New. The Directory Entry window opens.
3. Type the telephone or extension number in the Number field.
4. Type the name associated with the number in the Name field.
5. Click Browse for Script.
6. Select the required .TXT file and click Open. The file location is entered in the Script field.
7. Click OK.
8. Click Close. When a call is received on the number associated with the script, the Script tab opens
in the Call History pane. The text within the script is displayed.
Note
The Status tab automatically comes to the front 15 seconds after displaying the Script tab. If you
want the script to remain in view, clear the Show Status option. For more information, see Changing
General Phone Manager Settings.
Page 72

Phone Manager Users Guide
Page 66 Phone Manager User Guide
15-600988 Issue 14b (14th June 2006) IP Office 3.2
Creating and Using Speed Dials
Viewing Speed Dials
Speed dials save regularly used internal and external numbers for future use. For more information, see
Using a Speed Dial. There are two types of speed dials: Internal where Tool Tips are shown and
External.
Internal Speed Dials
An internal speed dial can also act as a busy lamp field, allowing you to see the status of your speed dial
user.
An internal speed dial icon.
An internal speed dial icon where the user/extension is configured for Instant Messaging.
An internal speed dial icon where the user/extension is Busy.
The icon has a red circle with a white cross on it in the top left corner.
An internal speed dial icon where the user/extension has Do Not Disturb set.
The icon has a blue circle with a white cross on it in the bottom right corner.
An internal speed dial icon where the user/extension has Divert set.
The speed dial has a green circle with a white arrow on the top right corner.
An internal speed dial icon where the user/extension has a Voicemail message.
The icon has an envelope in the bottom left corner.
A Speed Dial icon can show multiple busy messages. The examples show 2 instances, although more
are possible.
An internal speed dial where the user/extension is Busy and has a Voicemail message.
An internal speed dial where the user/extension is Busy, Do Not Disturb is on and the
user/extension has a Voicemail message.
Page 73
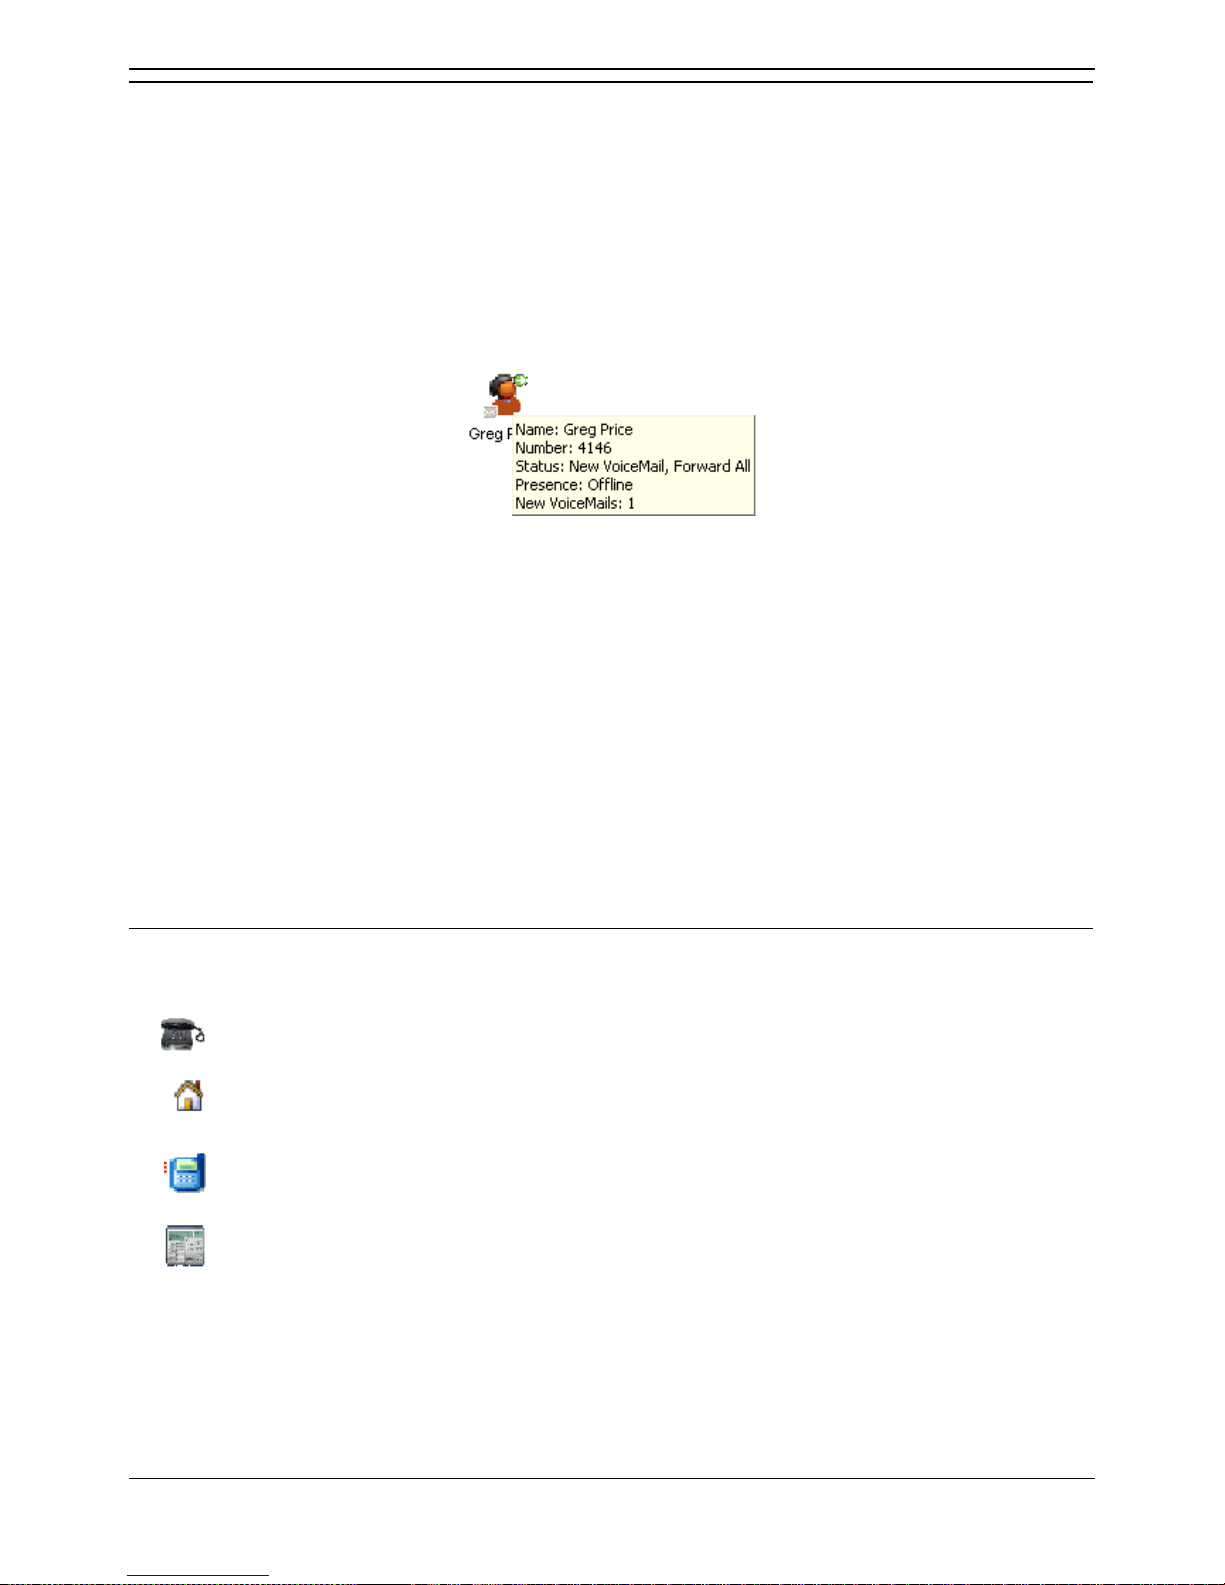
Features
Phone Manager User Guide Page 67
IP Office 3.2 15-600988 Issue 14b (14th June 2006)
Internal Speed Dial Tool Tips
In addition to speed dials being used as busy lamp fields, internal speed dials have tooltips that provide
status information about a speed dial user. The information displayed changes automatically depending
on the status of the user/extension.
Note
1. If more than one speed dial is created for the same internal user, only one speed dial acts as a busy
lamp field.
2. In order for the busy lamp field feature to operate, your PC must be on the same physical LAN as
the PBX. For more information, see your system administrator.
Name
The name of the user associated with the speed dial.
Number
The number of the user associated with the speed dial. If an internal user is added from the IP Office
Directory a name is shown.
Status
The current status of the user. The status can be Idle, New Voicemail, Busy, DND, or Forward All.
Multiple statuses can be shown.
Presence
The presence of a user in relation to a connection to the Instant Messaging. The status changes
between Online and Offline to reflect the user's state and settings on the Microsoft Live Server.
New VoiceMails
The number of new messages received by the speed dial user.
External Speed Dials
There are four types of external speed dials - Work Phone, Home Phone, Mobile and Fax. The speed
dial shown changes based on the default number selected.
This icon is shown if the Work Phone is recognized as an external speed dial and is set
as the default number.
This icon is shown if the Home Phone is selected as the default number.
This icon is shown if the Mobile is selected as the default number.
This icon is shown if the Fax is selected as the default number.
Page 74
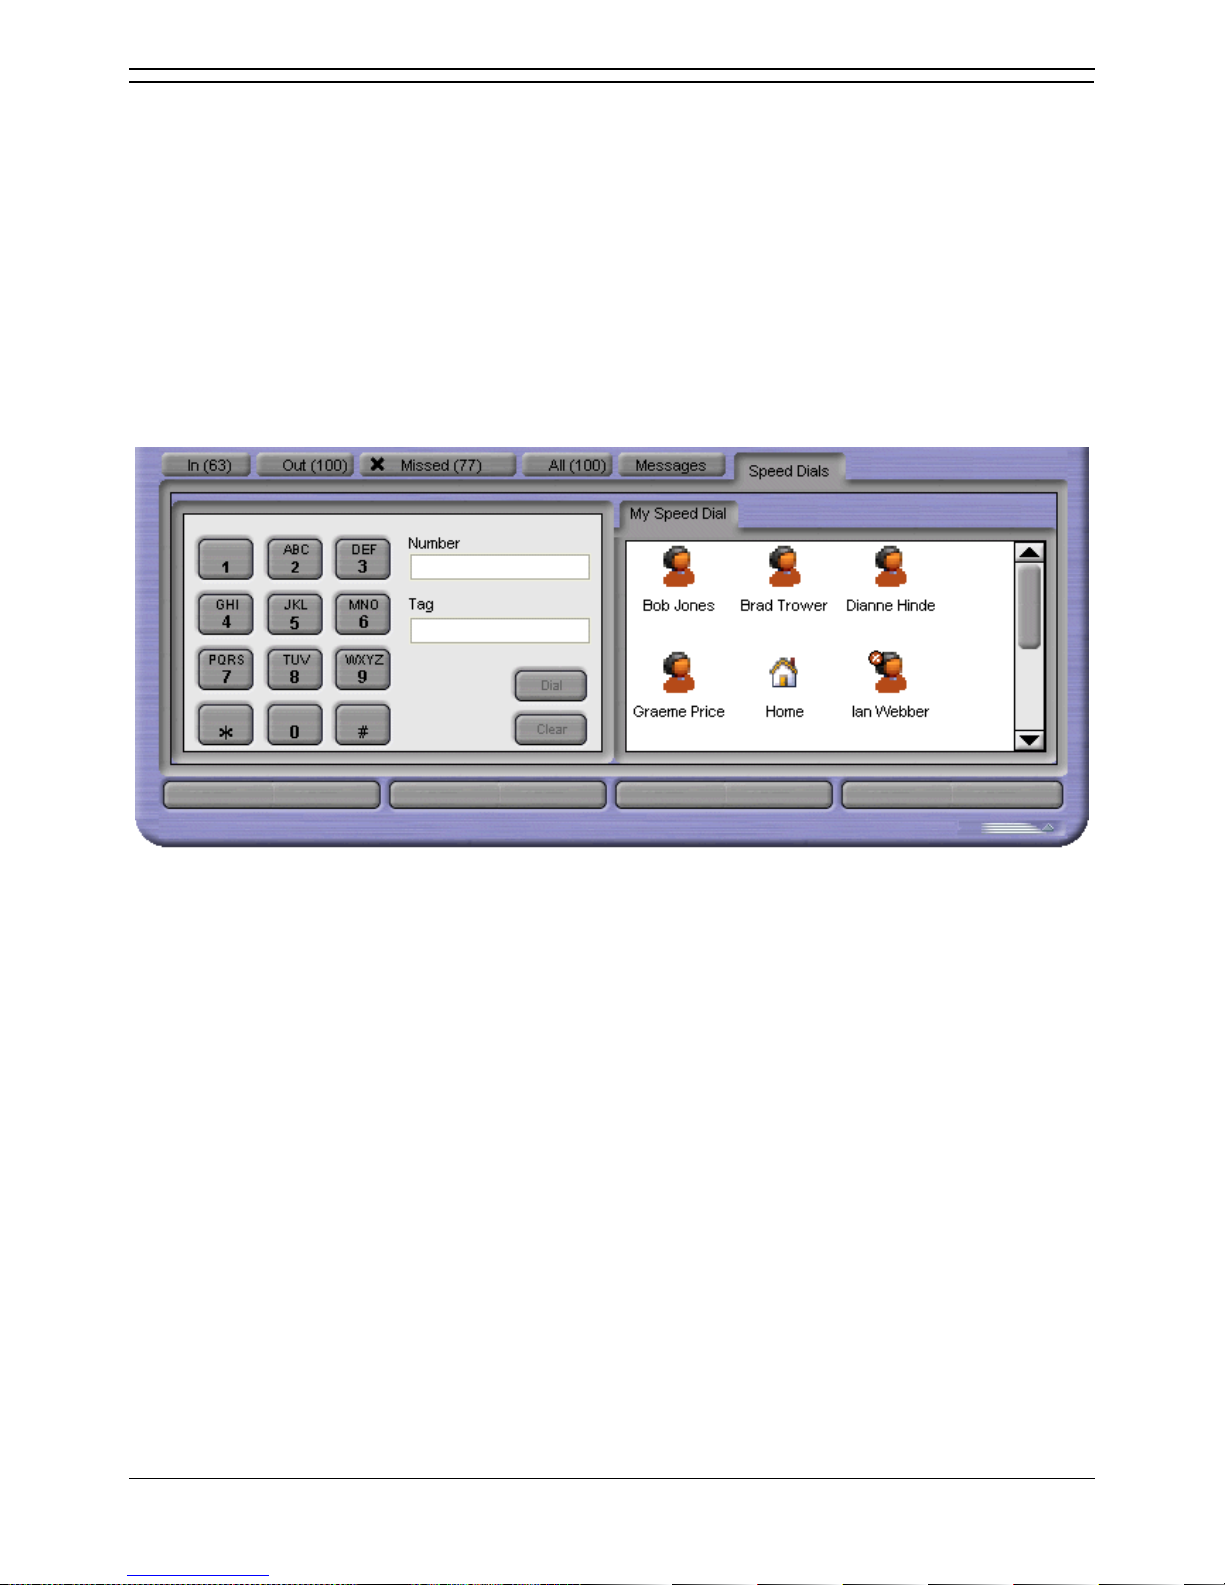
Phone Manager Users Guide
Page 68 Phone Manager User Guide
15-600988 Issue 14b (14th June 2006) IP Office 3.2
The Speed Dials Tab
The Speed Dials tab is used to save regularly used internal and external numbers for future use. For
more information, see Using a Speed Dial.
The Speed Dial tab also contains the Phone Dialer. The Phone Dialer is used to dial from the Phone
Manager application.
To make a call using the Phone Dialer:
1. Click in the Number field and enter the telephone number by:
using your keyboard.
clicking the numbered button in the Phone Dialer.
2. Click Dial and pick up your telephone handset.
To turn the Phone Dialer off:
Right-click in the Phone Dialer window and selecting Hide Phone Dialer.
The following options are available when you right-click within the Speed Dial window part of the tab:
Call
Select the number from the speed dial entry you want to call. You can select from Work Phone, Home
Phone, Mobile or Fax.
Default Number
Allows you to select the default number called when the speed dial is double-clicked. This icon changes
to reflect the default number selected. This option is only available for external speed dials. If the
outbound prefix, for example 9, is not shown contact your system administrator.
Park For
The option only becomes active when an extension dialed is busy. Once the busy speed dial extension
dialed is free a callback is made to the Phone Manager and the call is tagged as (free).
New
Create your own speed dial. For more information, see Creating a Speed Dial.
Add user
Automatically creates a speed dial from an IP Office Directory on your system. When you select Add
User, the Speed Dial Add User window opens. For more information, see Creating a Speed Dial.
Page 75

Features
Phone Manager User Guide Page 69
IP Office 3.2 15-600988 Issue 14b (14th June 2006)
Edit
Amend the details in an existing speed dial. For more information, see Editing a Speed Dial.
Delete
Removes the selected speed dial.
Call
Make a call to the number configured in the speed dial icon.
View
Allows you to change the size of the speed dial icons.
Show Phone Dialer
If the Phone Dialer is unavailable you can show the Phone Dialer by selecting this option. To hide the
Phone Dialer, right-click in the Phone Dialer part of the tab and select Hide Phone Dialer.
Using a Speed Dial
You can use a speed dial to make a call to both internal and external numbers.
To use a Speed Dial to make a call:
1. Click the Speed Dials tab in the Call History area.
2. Make a call by double-click the required speed dial.
Alternatively, drag the speed dial icon onto the call status area.
3. The call shows in the call status area of the screen.
You can use a speed dial to make a call to a telephone number which is not the default speed dial
number.
To select an alternative number:
1. Click the Speed Dials tab in the Call History area.
2. Right-click the speed dial.
3. Click Call
4. Select the alternative number required - Work Phone, Home Phone, Mobile or Fax. Internal
numbers cannot dial a fax number.
Page 76
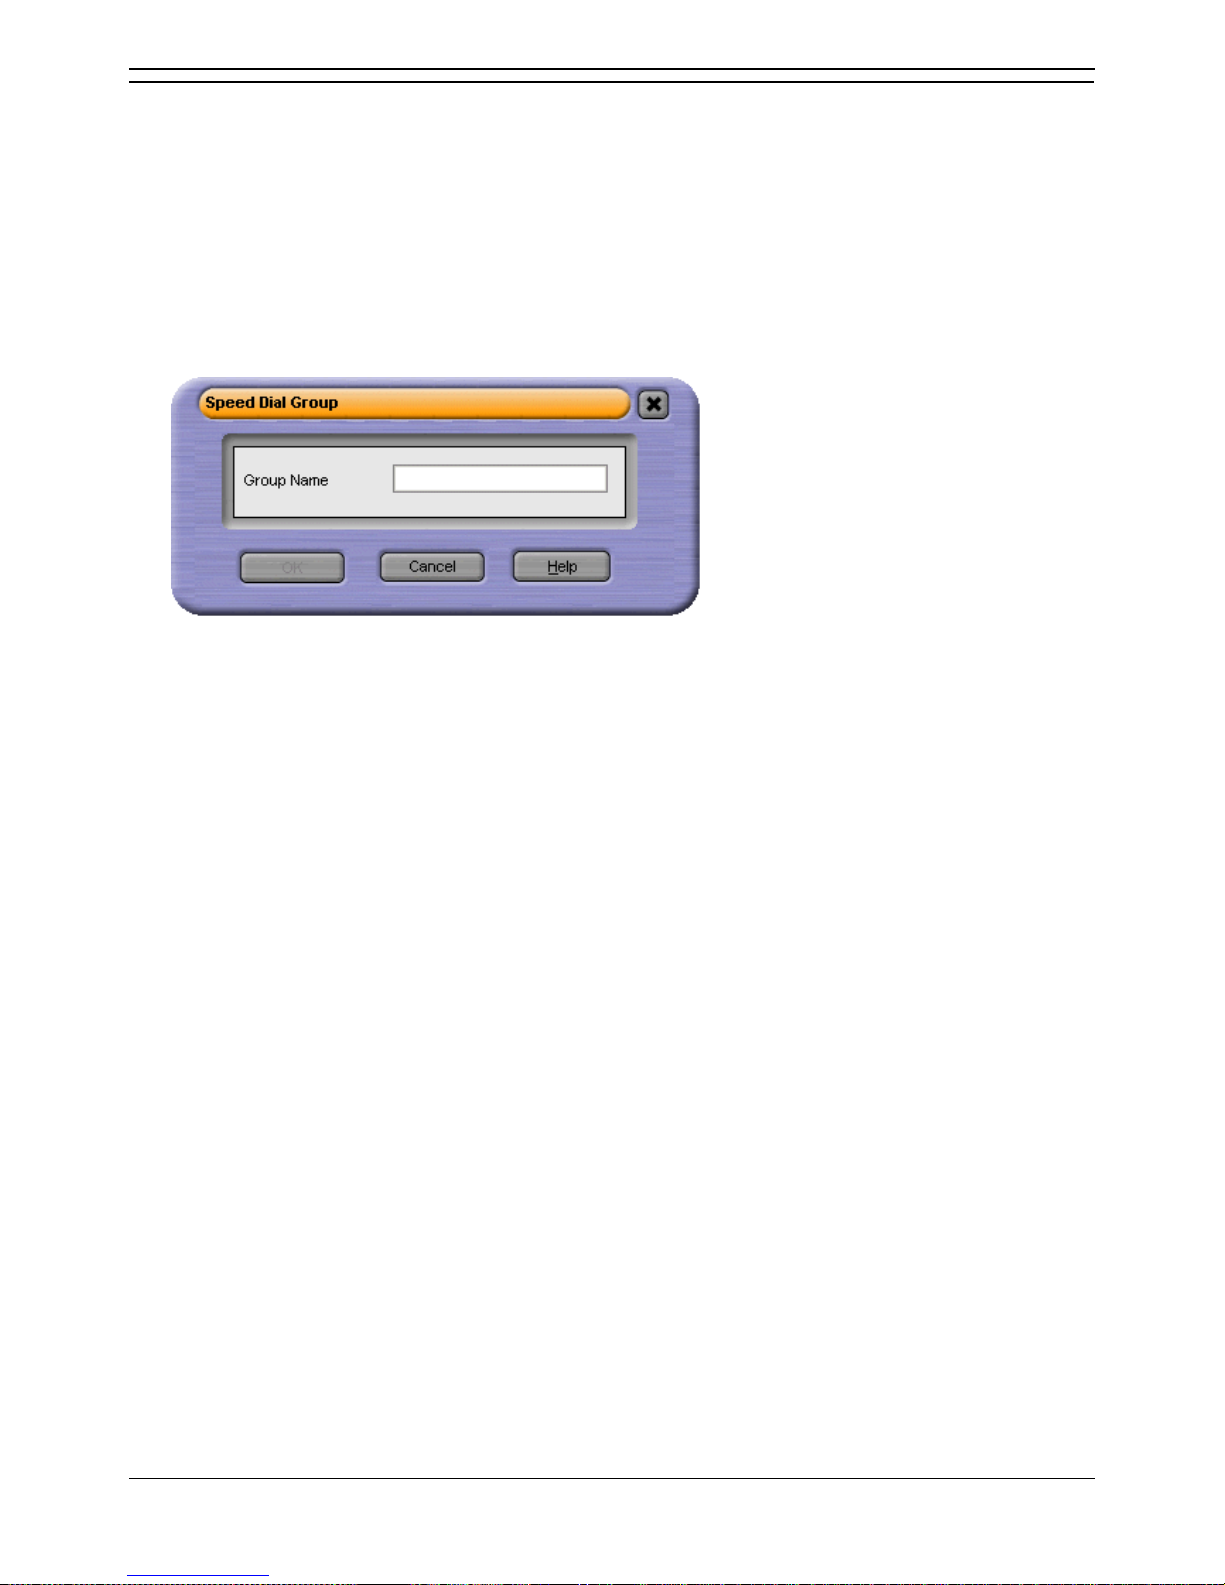
Phone Manager Users Guide
Page 70 Phone Manager User Guide
15-600988 Issue 14b (14th June 2006) IP Office 3.2
Create a Speed Dial Group
Only available in Phone Manager Pro versions.
Speed dials can be organized into groups. There can be a maximum of 10 speed dial groups. Each
group can contain a maximum of 100 speed dials.
To create a Speed Dial group:
1. Click the Speed Dials tab in the Call History area.
2. Right-click in a speed dial tab.
3. Select New > Speed Dial Group.
4. Enter a name for the group in the Speed Dial Group window.
5. Click OK. A new speed dial group tab is created.
Page 77
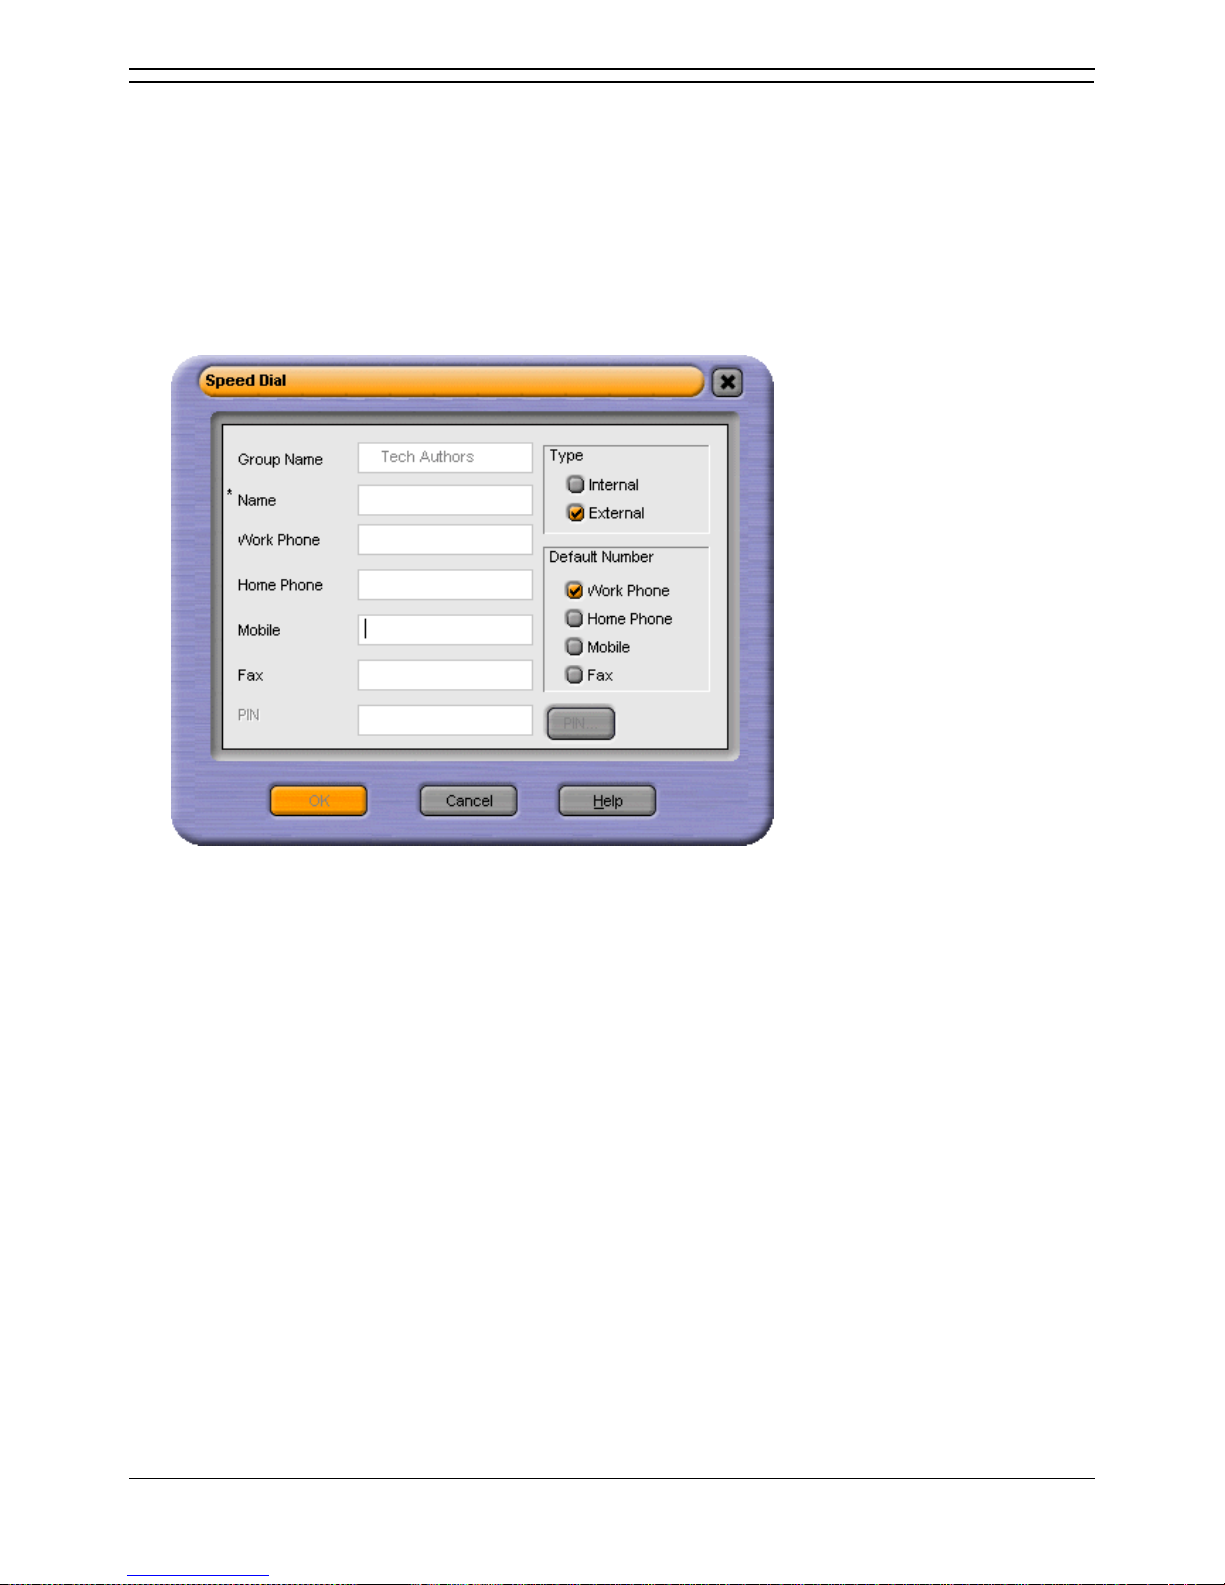
Features
Phone Manager User Guide Page 71
IP Office 3.2 15-600988 Issue 14b (14th June 2006)
Creating a Speed Dial
There are several ways to create a speed dial in Phone Manager. You can add a new Speed Dial Group
member or add an internal user from the IP Office Directory. The directory lists all users connected to
your IP Office telephone system.
To create a Speed Dial Group Member:
1. Click Speed Dials tab in the Call History area and select the Speed Dial Group to add the speed
dial to.
2. Right-click within the selected speed dial group window.
3. Select New > Speed Dial Group Member. The Speed Dial window opens.
4. Enter a name into the Name field.
5. Enter the required telephone number in the Work Phone, Home Phone, Mobile and Fax fields. The
fax field is only available when the speed dial type is external.
6. Check the Type of speed dial is correct.
When Phone Manager recognizes a number as being internal, the speed dial type is automatically
set as internal. If the number is recognized as external the speed dial is set as external. For
example, the number would be recognized as being an external number if a 9 for external access
was entered.
7. Select the Default Number for the speed dial.
The option is only available if the type is external. The default number is the number dialed when the
Speed Dial is double-clicked.
8. (Optional) Enter a PIN. For more information see the section Pin Restrictions.
9. Click OK.
The new speed dial icon is added to the speed dial group tab selected.
Page 78
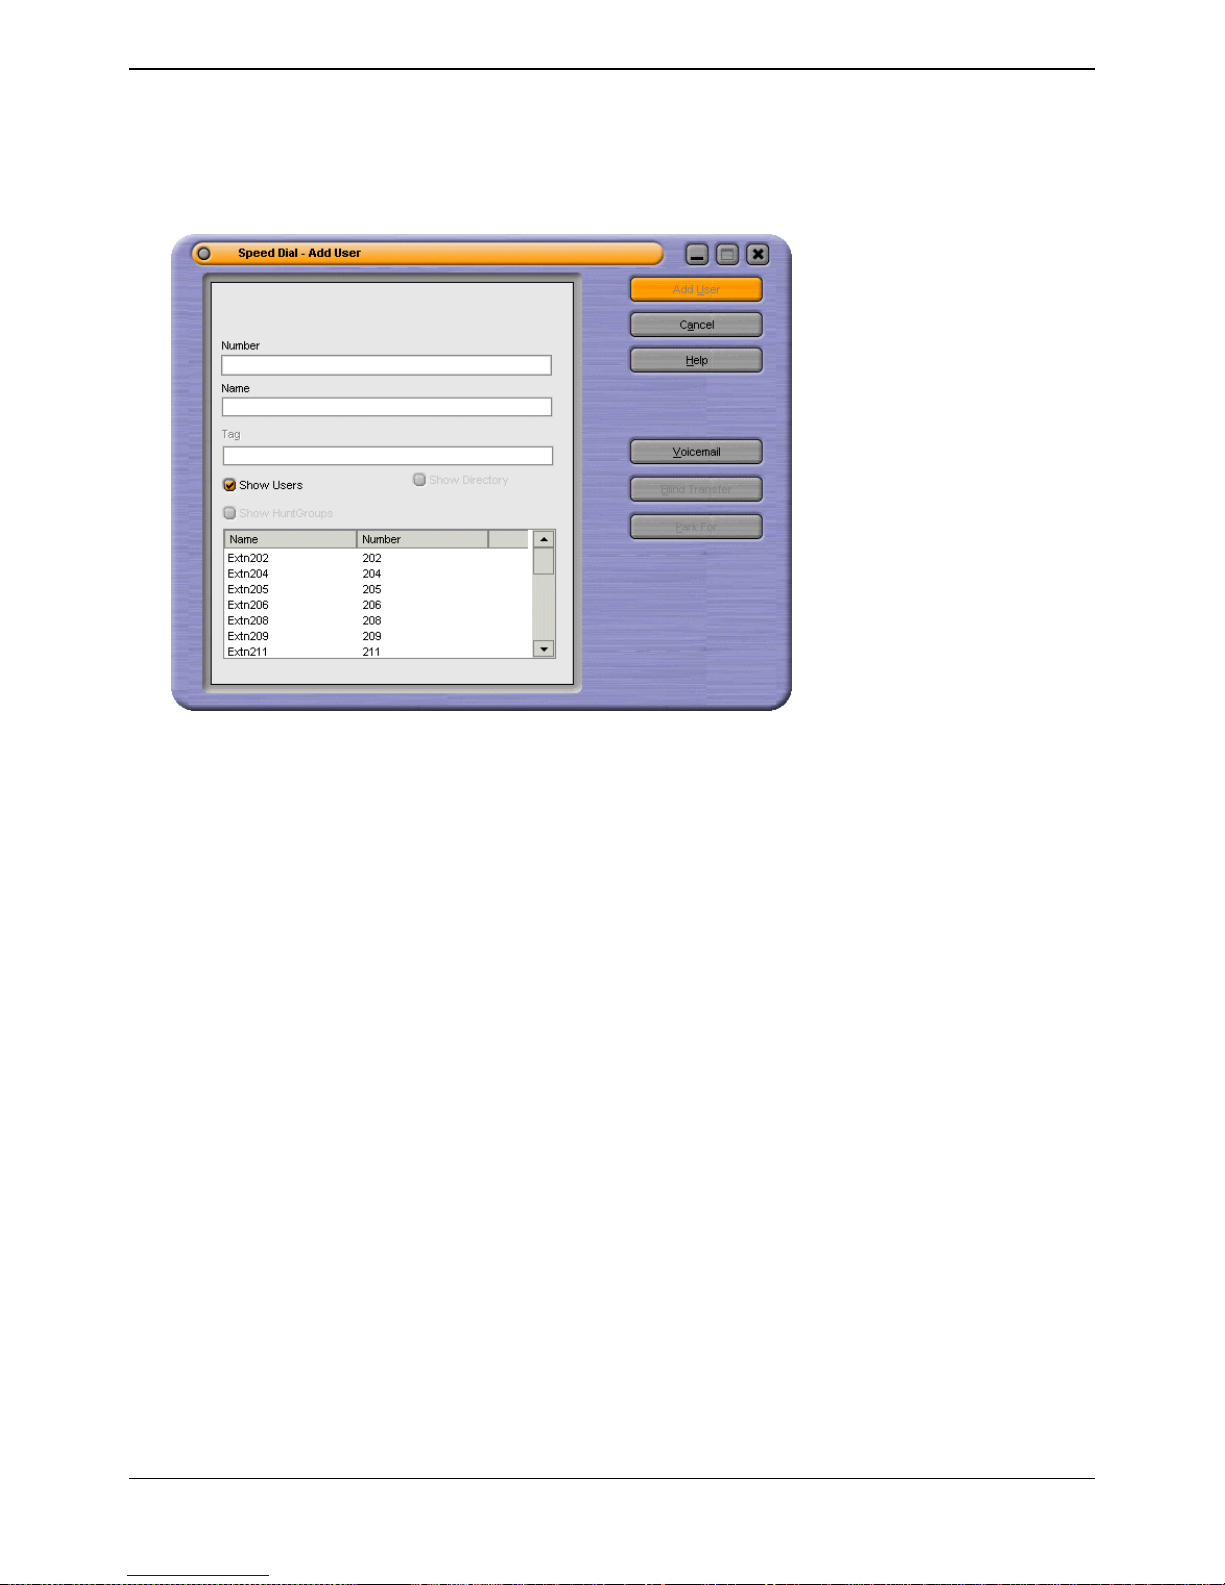
Phone Manager Users Guide
Page 72 Phone Manager User Guide
15-600988 Issue 14b (14th June 2006) IP Office 3.2
To add an internal user to a speed dial:
1. Click Speed Dials tab in the Call History area and select the Speed Dial Group to add the speed
dial to.
2. Right-click within the selected speed dial group window.
3. Select New > Add user. The Speed Dial Add user window opens.
4. Start entering either the user name or extension number in the relevant field. Only the entries in the
in the IP Office directory that match your input are shown. When you can see the user required, click
the name. The name and number fields are completed.
5. Click Add User.
The new speed dial icon is added to the speed dial group tab you selected. The speed dial icon
uses the name rather than the extension number.
Note
If the user is configured for Instant Messaging, the speed dial icon is green. You have to restart
Phone Manager for the Instant Messenger Speed Dial to take effect.
Page 79
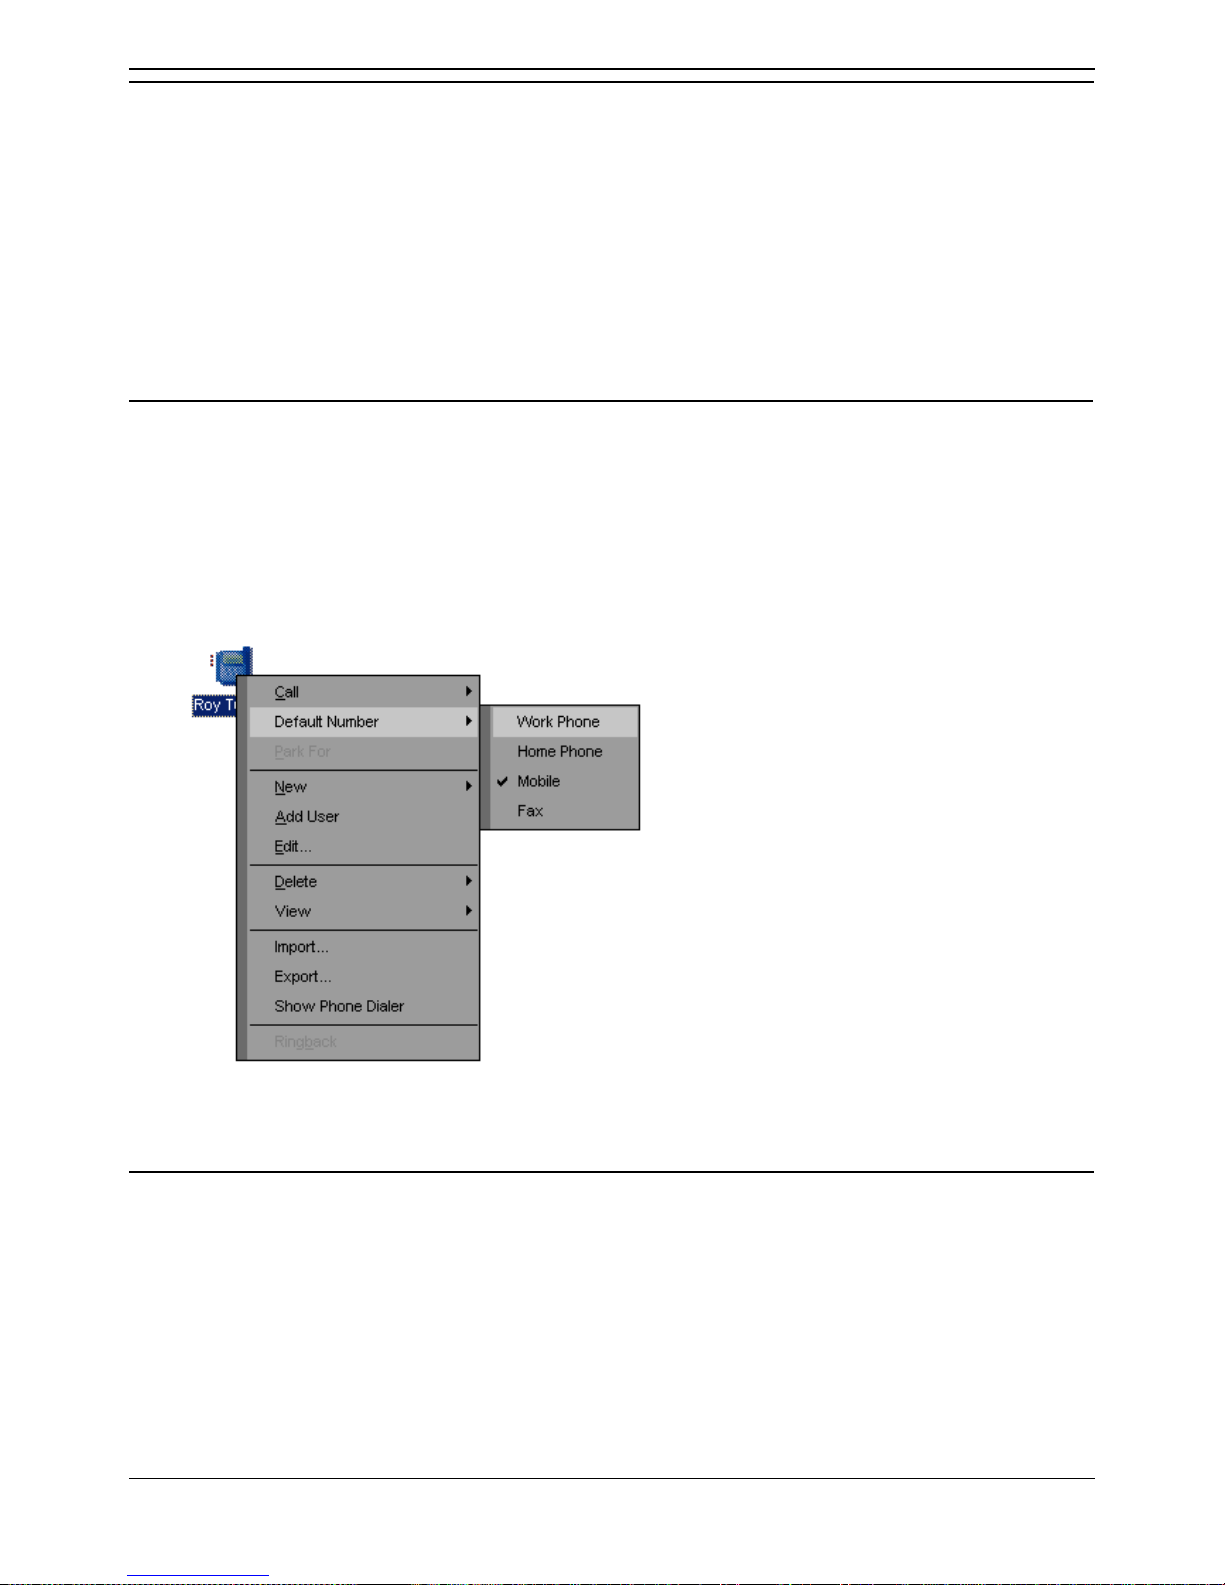
Features
Phone Manager User Guide Page 73
IP Office 3.2 15-600988 Issue 14b (14th June 2006)
Editing a Speed Dial
Speed dial details can be edited.
To edit a Speed Dial:
1. Click the Speed Dials tab in the Call History area.
2. Select the Speed Dial Group that contains the speed dial.
3. Right-click the speed dial icon and select Edit. The speed dial window opens.
4. Make the changes as required.
5. Click OK.
Changing a Default Number
For external speed dial icons you can change the default number. The speed dial icon changes to
indicate the new default number type.
To change the default number:
1. Click Speed Dials tab in the Call History area.
2. Right-click the speed dial containing the default number that you want to change.
3. Select Default Number. The current default number type is ticked. Select the new default number
type for the Speed Dial.
4. The speed dial icon changes. The speed dial uses the default number associated with the number
selected. For more information, see Viewing Speed Dials.
Deleting a Speed Dial
Speed dials that are no longer required can be removed.
To delete a Speed Dial:
1. Click the Speed Dials tab in the call history area.
2. Select the Speed Dial Group that contains the speed dial.
3. Right-click the speed dial icon.
4. Select Delete.
Page 80
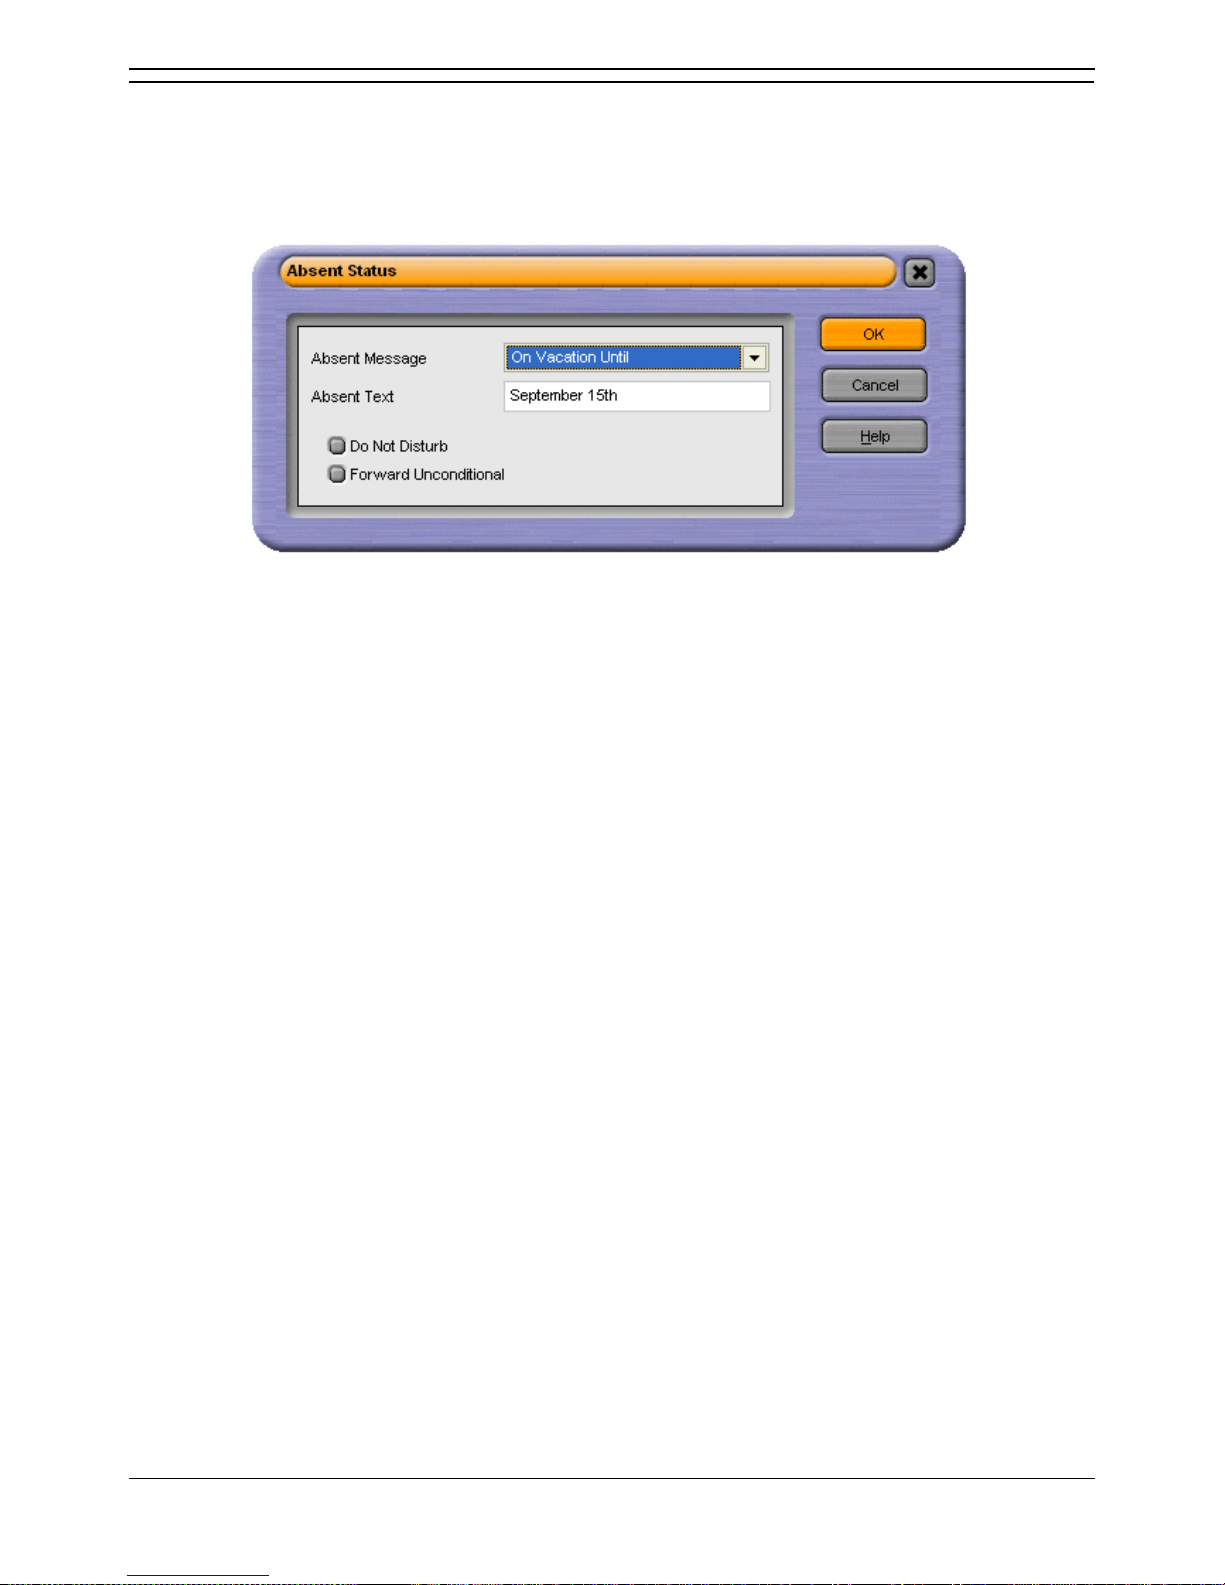
Phone Manager Users Guide
Page 74 Phone Manager User Guide
15-600988 Issue 14b (14th June 2006) IP Office 3.2
Setting an Absent Message
The Absent Status feature assists internal callers when you are not at your desk. The information you
enter appears on their screen in the tag field when they make a call to your extension.
For telephones with suitable displays, the text is shown on the display of your telephone and on an
internal caller's telephone.
To set an Absent Status:
1. Click Actions > Absent.
Alternatively, press F6. The Absent Status window opens.
2. Select an Absent Message from the list. The options are:
On holiday until / On Vacation Until
Will be back
At lunch until
Meeting until
Please call
Dont disturb
With visitors until
With Cust. til
Back soon
Back tomorrow
Custom
3. With the exception of Back soon and Back tomorrow, additional text is required. For example, if the
absent message "On Holiday until" is selected you must add when you are back from holiday. Enter
the text in the Absent Text field.
4. (Optional) Select the option Do Not Disturb or Forward Unconditional.
If either of the options are selected the number that your calls are forwarded to must be configured.
For more information, see Setting you Forwarding Options.
5. Click OK.
The Absent Message appears in the title bar of your Phone Manager. The message is also shown in
the Call screen when a call is made to your extension.
Page 81

Features
Phone Manager User Guide Page 75
IP Office 3.2 15-600988 Issue 14b (14th June 2006)
Getting Help
The Help menu gives access to several help options:
Contents
This function opens the Phone Manager help system at the contents page.
Index
This function opens the search tool within the Phone Manager help system.
About Phone Manager
This displays the version of the Phone Manager application.
Product Tour
This option starts an interactive product tour. You can investigate and learn more about the Phone
Manager application.
Video Tutorials
This function lists several video tutorials. Each tutorial provides an interactive demonstration of the
capabilities of the Phone Manager application.
Check for Updates
This option is used to check for the latest updates for Phone Manager. The Check for Updates
option is only available if configured by your system maintainer. For more information, see your
system administrator.
Further information about Avaya IP Office is available from www.avaya.com/support and also from
www.avaya.com/ipoffice/knowledgebase.
Page 82

Page 83

Phone Manager User Guide Page 77
IP Office 3.2 15-600988 Issue 14b (14th June 2006)
Configuring Phone Manager
Changing Phone Manager Settings
Overview
The Configuring Preference windows are used to change your personal settings. The preference tabs
that are available depend on the Phone Manager version that you are using.
Note
Not all options are configurable by all users, some might be unavailable. For more information, see
your system administrator.
Preference tabs that are available to all users of all versions are:
Forwarding. For more information, see Setting your Forwarding Options.
Do Not Disturb. For more information, see Setting Do Not Disturb.
Voicemail. For more information, see Configuring the Voicemail Options.
Telephone. For more information, Selecting Telephone Controls.
Phone Manager. For more information, see Changing General Phone Manager Settings.
Park ID. For more information, see Creating Personal Park Slots.
Short Cut Keys. For more information, see Changing Short Cut Keys.
Instant Messaging. For more information, see Enabling Instant Messaging.
The extra preference tabs available for users of Phone Manager Pro are:
Compact Mode. For more information, see Viewing Phone Manager in Compact Mode.
Date and Time Setting. For more information, see Changing the Date Settings.
Clock Type. For more information, see Changing the Clock Format.
Queue ID. For more information, see Selecting Queues to Monitor.
Door Release. For more information, see Activating the Door Release Buttons.
Agent Mode. For more information, see Configuring Agent Mode.
Screen Pop. For more information, see Configuring Screen Pop.
Users of Phone Manager PC Softphone & VoIP extension users see extra preference tabs:
Audio Codec. For more information, see Changing the Audio Codec Settings.
USB Settings. For more information, see Configuring USB Settings.
Page 84
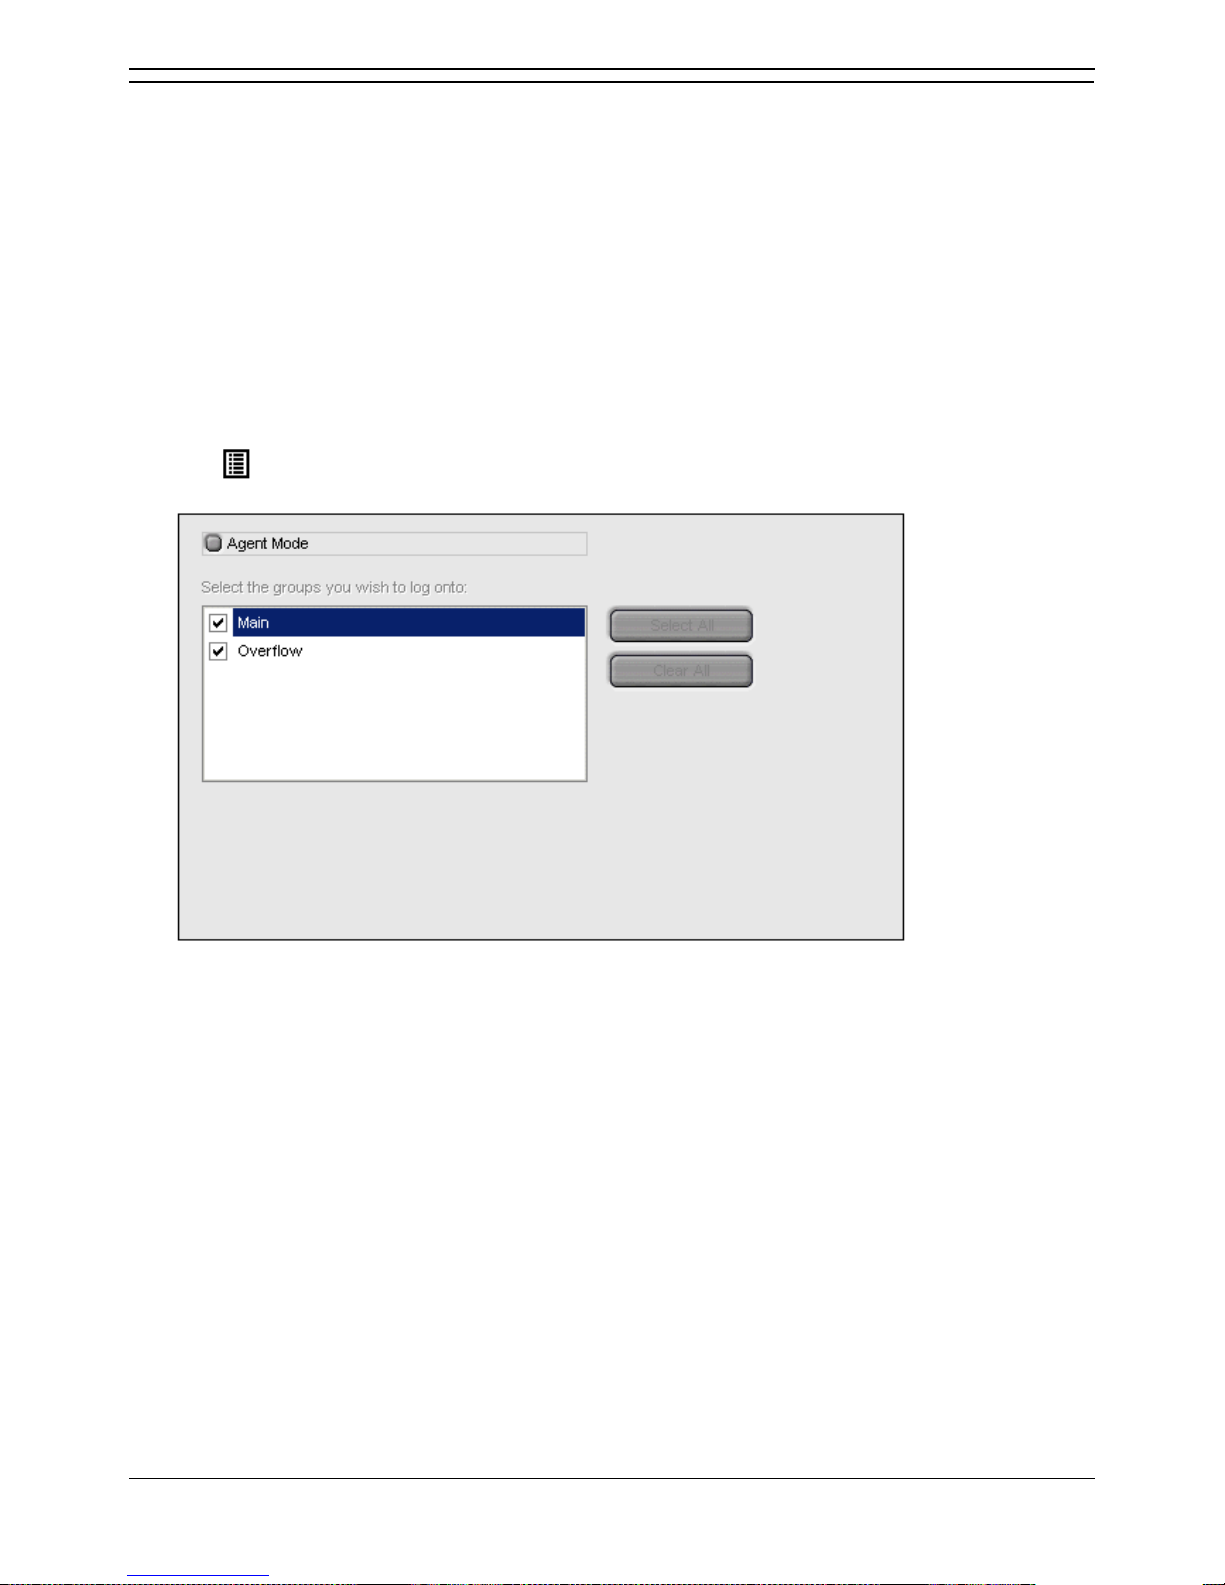
Phone Manager Users Guide
Page 78 Phone Manager User Guide
15-600988 Issue 14b (14th June 2006) IP Office 3.2
Configuring Agent Mode
The Agent Mode settings are only available in Phone Manager Pro.
Agent Mode preferences control the operation of Phone Manager when Agent Mode operation is used. If
the Agent Mode check box is selected you are in Agent Mode. When in Agent Mode additional icons are
shown in the Phone Manager toolbar. For more information, see Agent Mode Operation.
The list shows the groups of which you are a member. The checked groups are those for which you
receive calls when you are not in a Busy Wrap Up or Busy Not Available state. The unchecked groups
are those for which your membership is currently disabled.
Note
If the Agent Mode options are unavailable, you are unable to change the settings. For more
information, see your system administrator.
To configure the Agent Mode settings:
1. Click > Agent Mode.
Alternatively, click View > Preferences > Agent Mode. The Agent Mode window opens.
2. Check or un-check the required options.
Select All - This selects all the groups in the list.
Clear All - This clears you from all groups in the list.
3. Click OK to save your changes.
Note
1. If you use a group key or function on your telephone to go in or out of group, it will do so for all
groups of which you are a member rather than just those selected in the Agent Mode tab.
2. In Agent Mode, the functions of the F1 and F3 keys are swapped. F1 becomes 'account code' and
F3 becomes 'call'.
Page 85
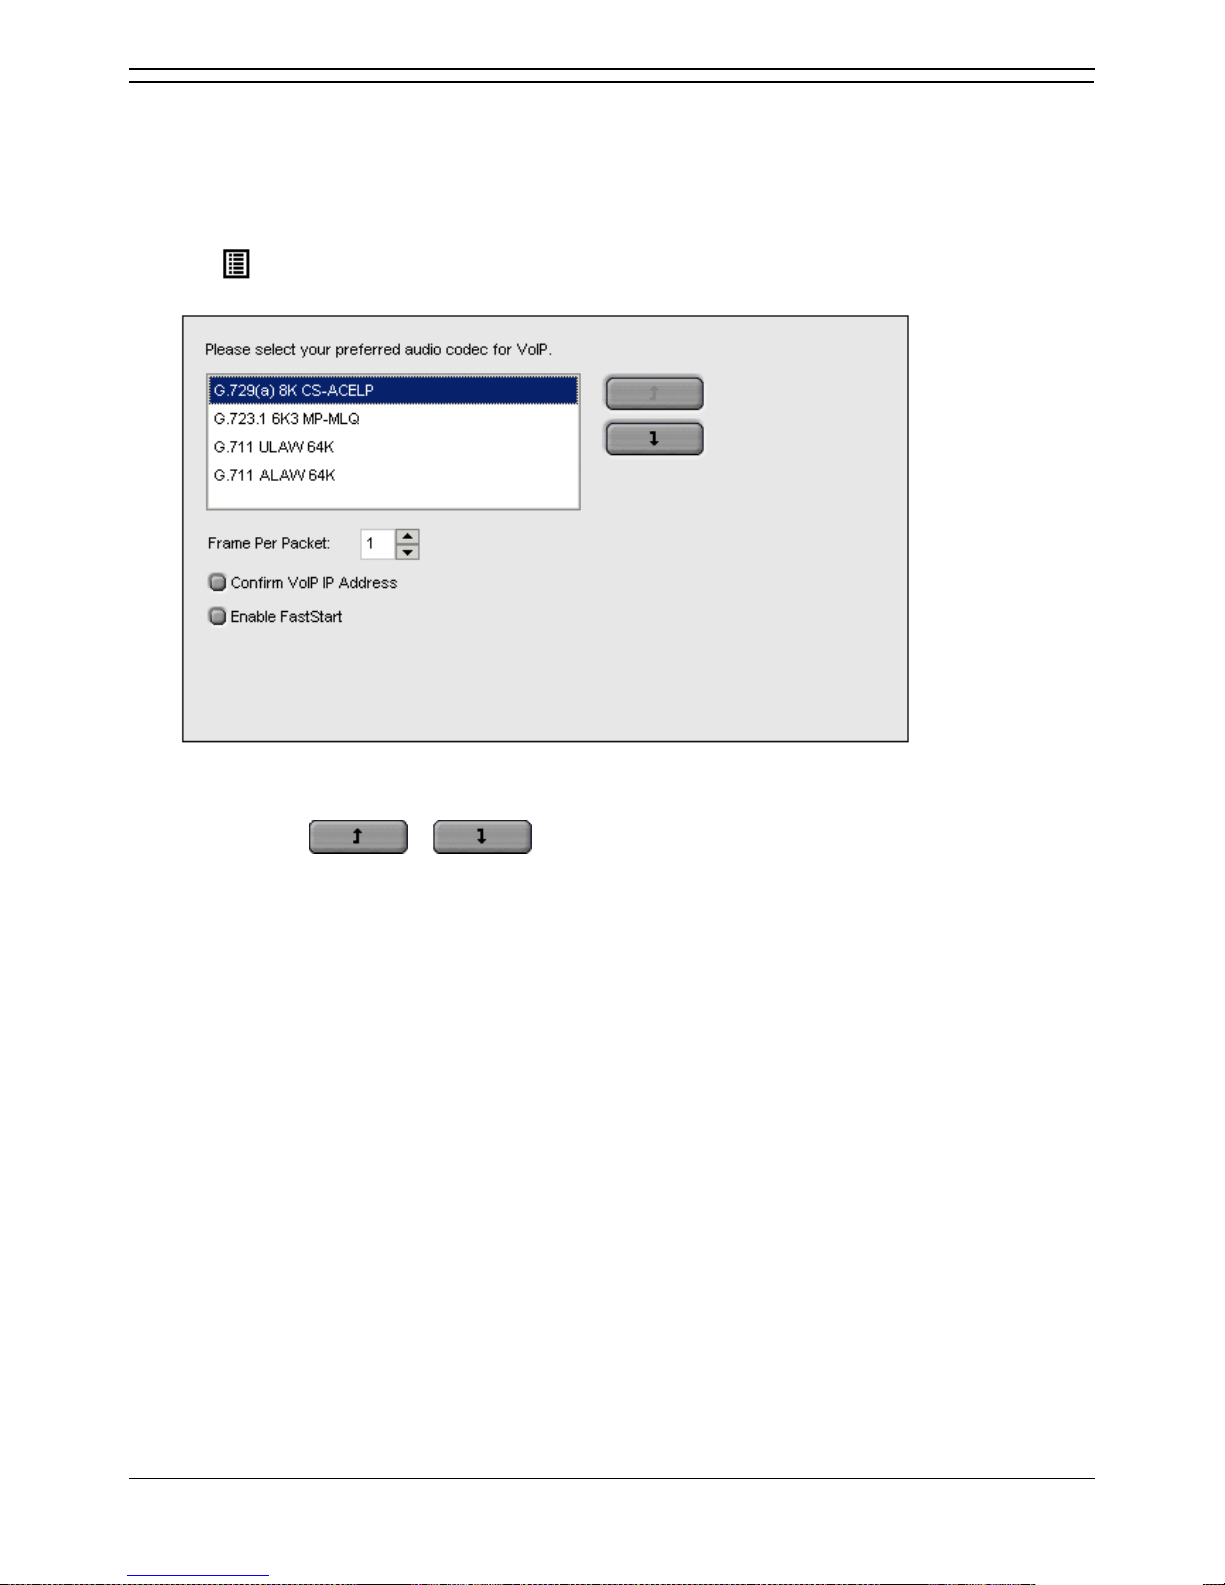
Configuring Phone Manager
Phone Manager User Guide Page 79
IP Office 3.2 15-600988 Issue 14b (14th June 2006)
Changing the Audio Codec Settings
The USB settings are only available for Phone Manager PC Softphone and VoIP extension users.
The details entered are used to configure the audio codec of the Phone Manager and to configure the
Phone Manager for VoIP operation.
To change the Audio Codec settings:
1. Click > Audio Codec
Alternatively, click View > Preferences > Audio Codec. The Audio Codec window opens.
2. Select one of the four industry standard audio codecs, as the preferred audio codec for VoIP
communication.
Use & to select the audio codec required.
3. (Optional) If you are using a low bandwidth connection for example a dial Up Modem, increasing the
Frames per packet to 2 might improve the quality of the VoIP communication. However this is not
guaranteed. If you are not using a low bandwidth connection it is recommended you use the default
value of 1.
4. (Optional) If you have multiple IP connections select Confirm VoIP IP Address. Prompts you to
select the IP address for VoIP communication.
5. (Optional) Select Enable FastStart to provide the caller with a ring tone. If it is not checked the
caller does not hear ring tone, but the call is connected faster.
6. Click OK to save the changes.
7. Close Phone Manager. When you next start Phone Manager the options selected will be active.
Page 86
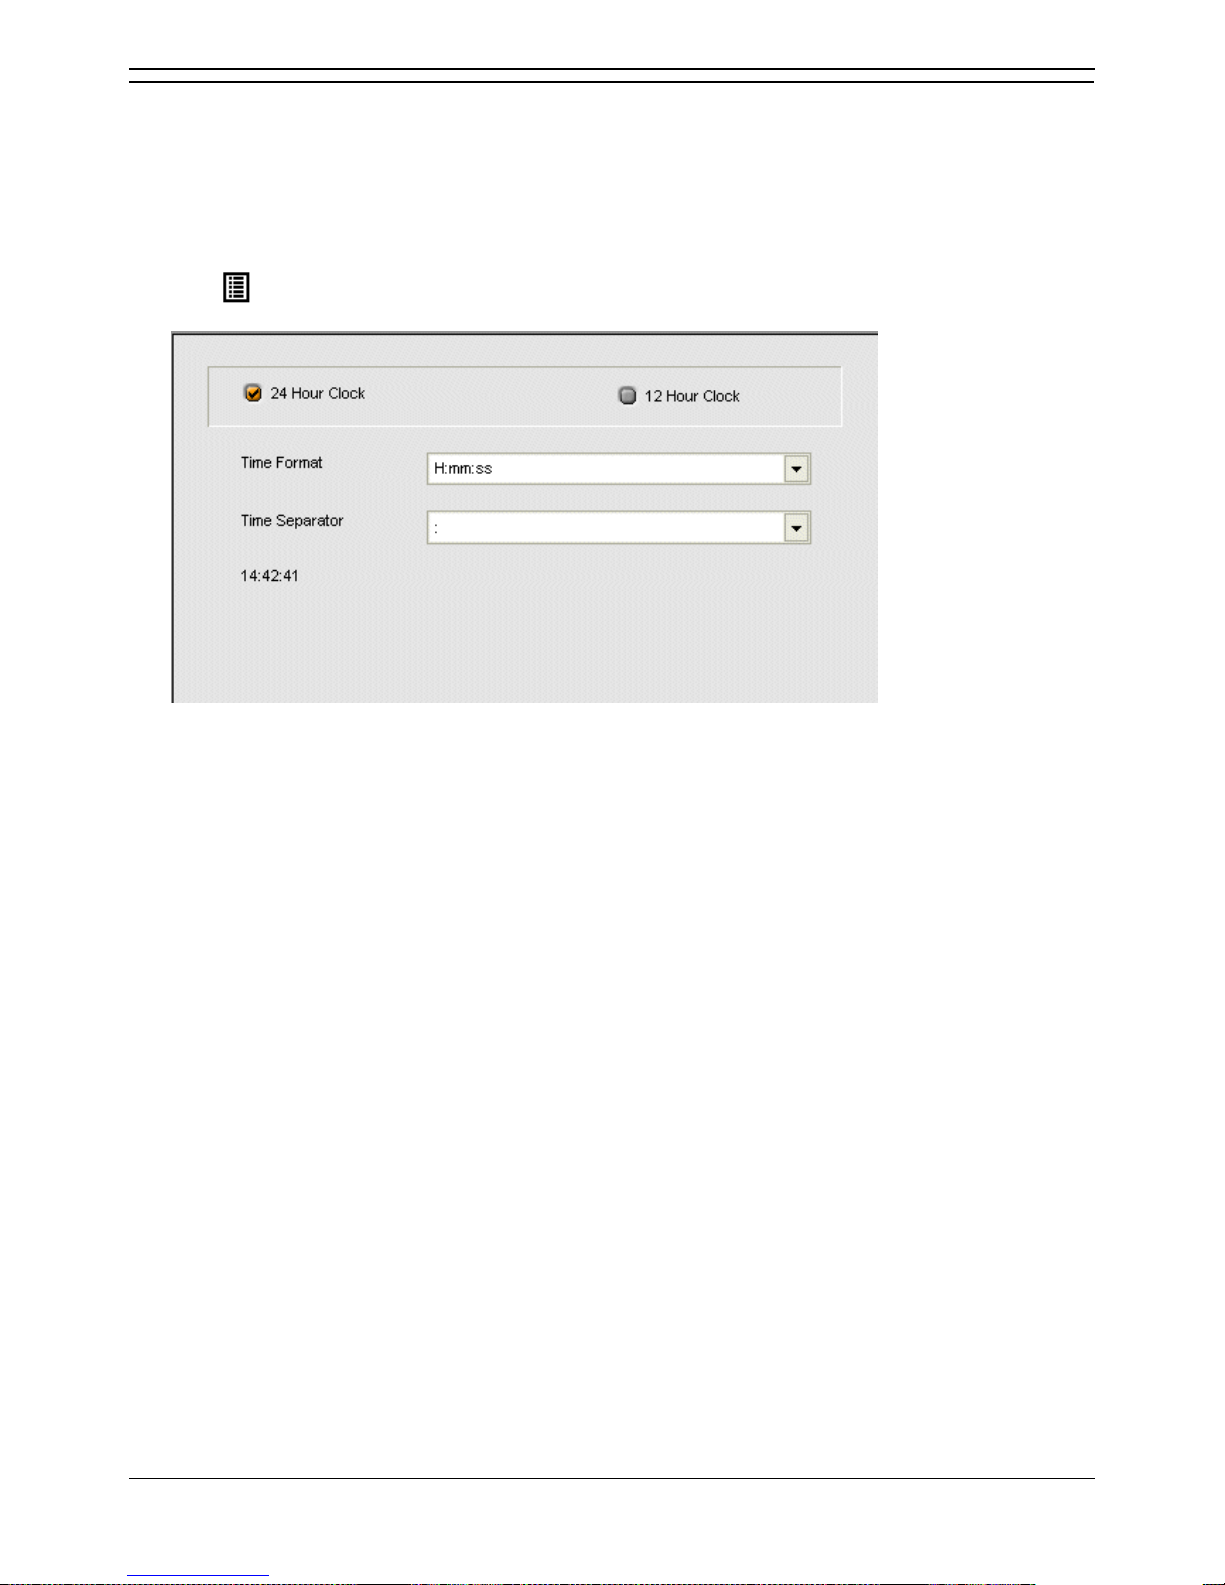
Phone Manager Users Guide
Page 80 Phone Manager User Guide
15-600988 Issue 14b (14th June 2006) IP Office 3.2
Changing the Clock Format
The clock type settings are only available in Phone Manager Pro.
You can customize the time shown in the Phone Manager Call History pane. Formats can be specified to
alter the presentation for all calls listed in the Call History pane. A visual representation of the time can
be seen in the bottom left of the Clock Type tab.
To change the clock settings:
1. Click > Clock Type.
Alternatively, click View > Preferences > Clock Type. The Clock Type window opens.
2. Select 12 Hour Clock or 24 Hour Clock.
3. Select the Time Format. The options in this drop down box alter depending on the time format
(12/24 hour) and the time separator (: / - .) selected.
4. Select the Time Separator.
5. After making your selection you can see an example in the bottom left side of the Clock Type tab.
6. Click OK to save your changes. The Phone Manager Call History pane updates all the calls listed.
Page 87
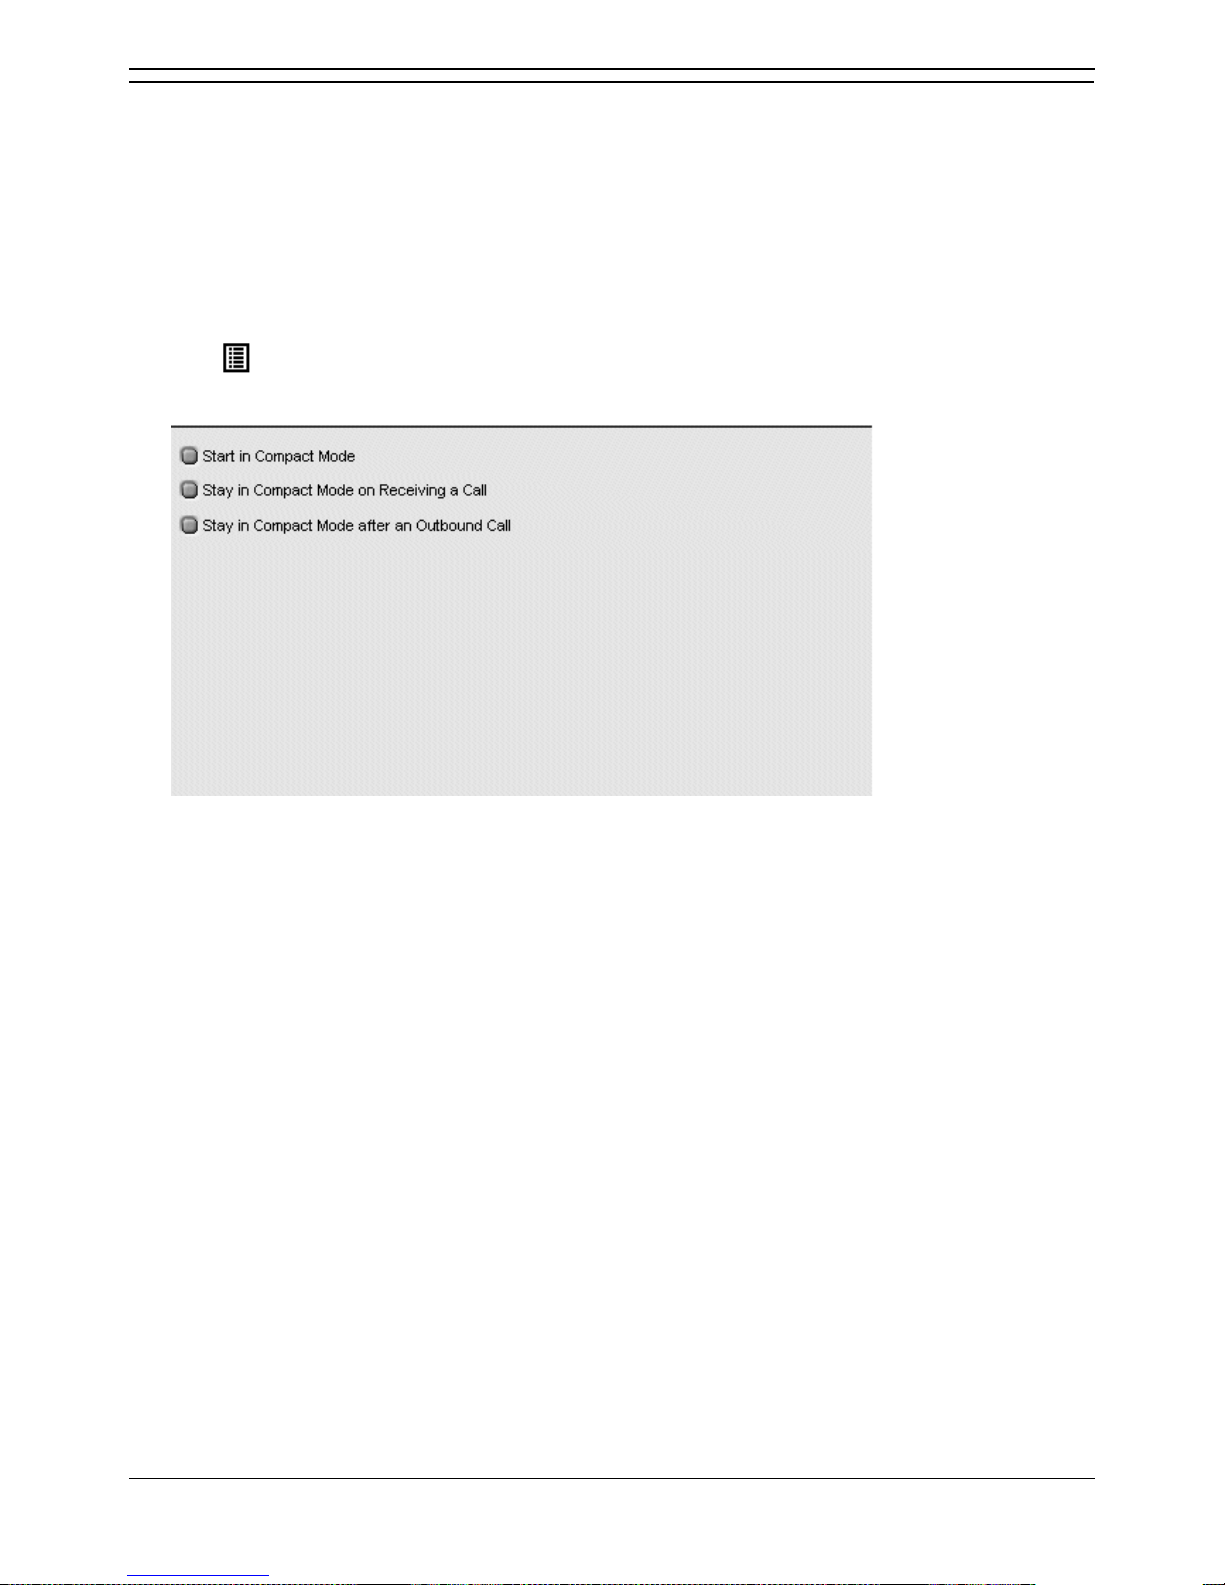
Configuring Phone Manager
Phone Manager User Guide Page 81
IP Office 3.2 15-600988 Issue 14b (14th June 2006)
Viewing Phone Manager in Compact Mode
The Compact Mode settings are only available in Phone Manager Pro.
You can configure several options in relation to compact mode. For more information, see Using Phone
Manager in Compact Mode.
Note
If the Compact Mode options are unavailable, you are unable to change the settings. For more
information, see your system administrator.
To configure Compact Mode:
1. Click > Compact Mode.
Alternatively, click View > Preferences > Compact Mode. The Compact Mode configuration
window opens.
2. (Optional) Start in Compact Mode - Check to start Phone Manager in Compact mode by default.
3. (Optional) Stay in Compact Mode on Receiving a Call - Check to enable the Phone Manager to
remain in Compact mode when receiving a call. If not checked when a call is received, Phone
Manager reverts to full Phone Manager mode.
4. (Optional) Stay in Compact Mode after an Outbound Call - Check to enable the Phone Manager
to remain in Compact mode when making a call.
5. Click OK to save the changes.
Page 88
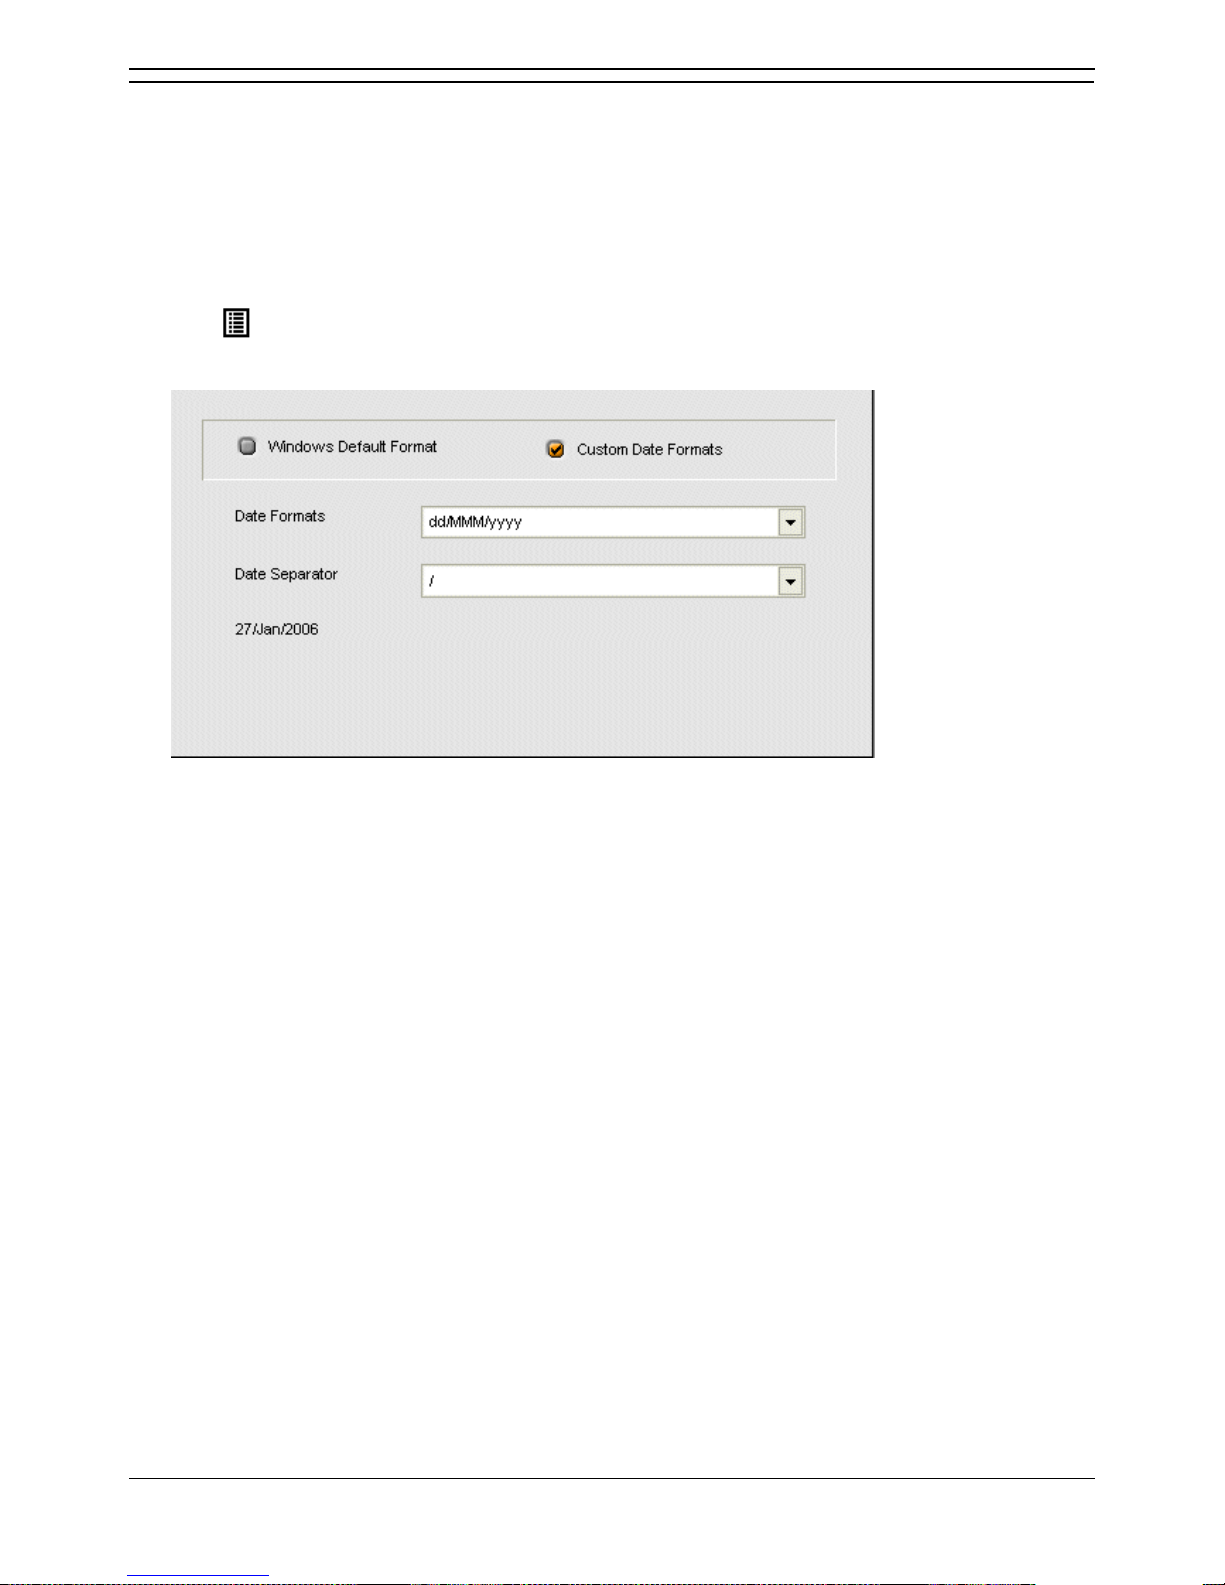
Phone Manager Users Guide
Page 82 Phone Manager User Guide
15-600988 Issue 14b (14th June 2006) IP Office 3.2
Changing the Date Settings
The date and time settings are only available in Phone Manager Pro.
The date shown in the Phone Manager Call History pane can be customized. You can specify between
the Windows Default Format for your operating system and region or choose a Custom Date Formats.
Windows Default Format
Phone Manager gets the date format from your computer operating system if this box is checked.
To change the date settings:
1. Click > Date & Time Setting
Alternatively, click View > Preferences > Date & Time Setting. The Date and Time settings window
opens.
2. Check Custom Date Formats to configure your date format.
3. In the Date Formats field, click the type of format that you want the date to be shown in.
4. In the Date Separator field, click the type of separator to be used between the date denominations.
After making your selection you can see an example in the bottom left of the window.
5. Click OK to save your changes. The Phone Manager Call History pane updates all the calls listed.
Page 89
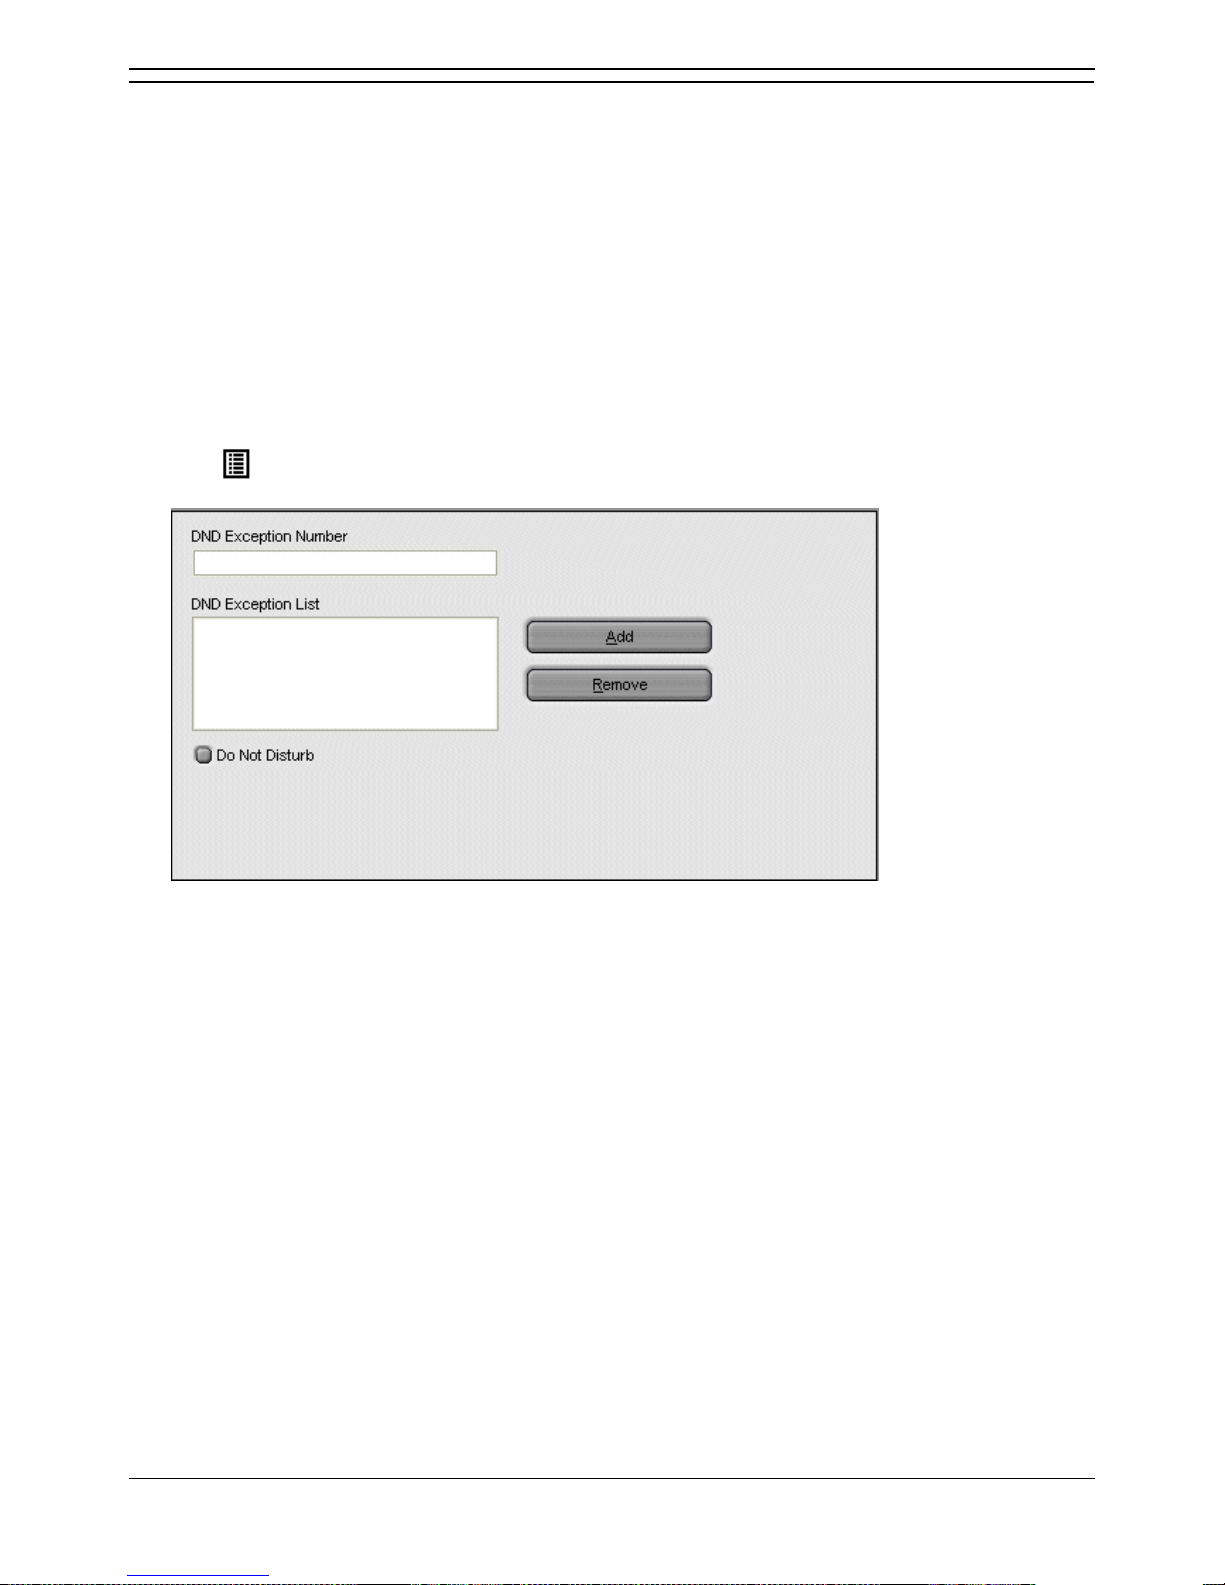
Configuring Phone Manager
Phone Manager User Guide Page 83
IP Office 3.2 15-600988 Issue 14b (14th June 2006)
Setting Do Not Disturb
The Do Not Disturb (DND) function forces the telephone system to think that your extension is busy.
There might be times when you want to receive calls from specific users. To receive calls the users
telephone number must be added to the Do Not Disturb Exception List.
The DND exception number can be an internal extension or an external number. If you want to allow a
range of numbers through the DND wall, you can either enter each number separately or make use of
the variables "N" or "X" in the number. For example, to allow all numbers from 01923699000 to
01923699099 the DND Exception number can be entered as either 019236990XX or 019236990N.
Note
If the DND options are unavailable, you are unable to change the settings. For more information, see
your system administrator.
To set DND:
1. Click > Do Not Disturb.
Alternatively, click View > Preferences > Do Not Disturb. The Do Not Disturb window opens.
2. To activate DND, check Do Not Disturb.
3. (Optional). To receive calls from a specific extension:
Enter the extension number in the DND Exception Number field.
Click Add. The extension number is added to the DND Exception List.
4. Click OK to save your changes.
Note
Any extension number in the DND Exception List can be removed. Select the extension number to
be removed and click Remove. The selected extension number is deleted from the list.
Page 90
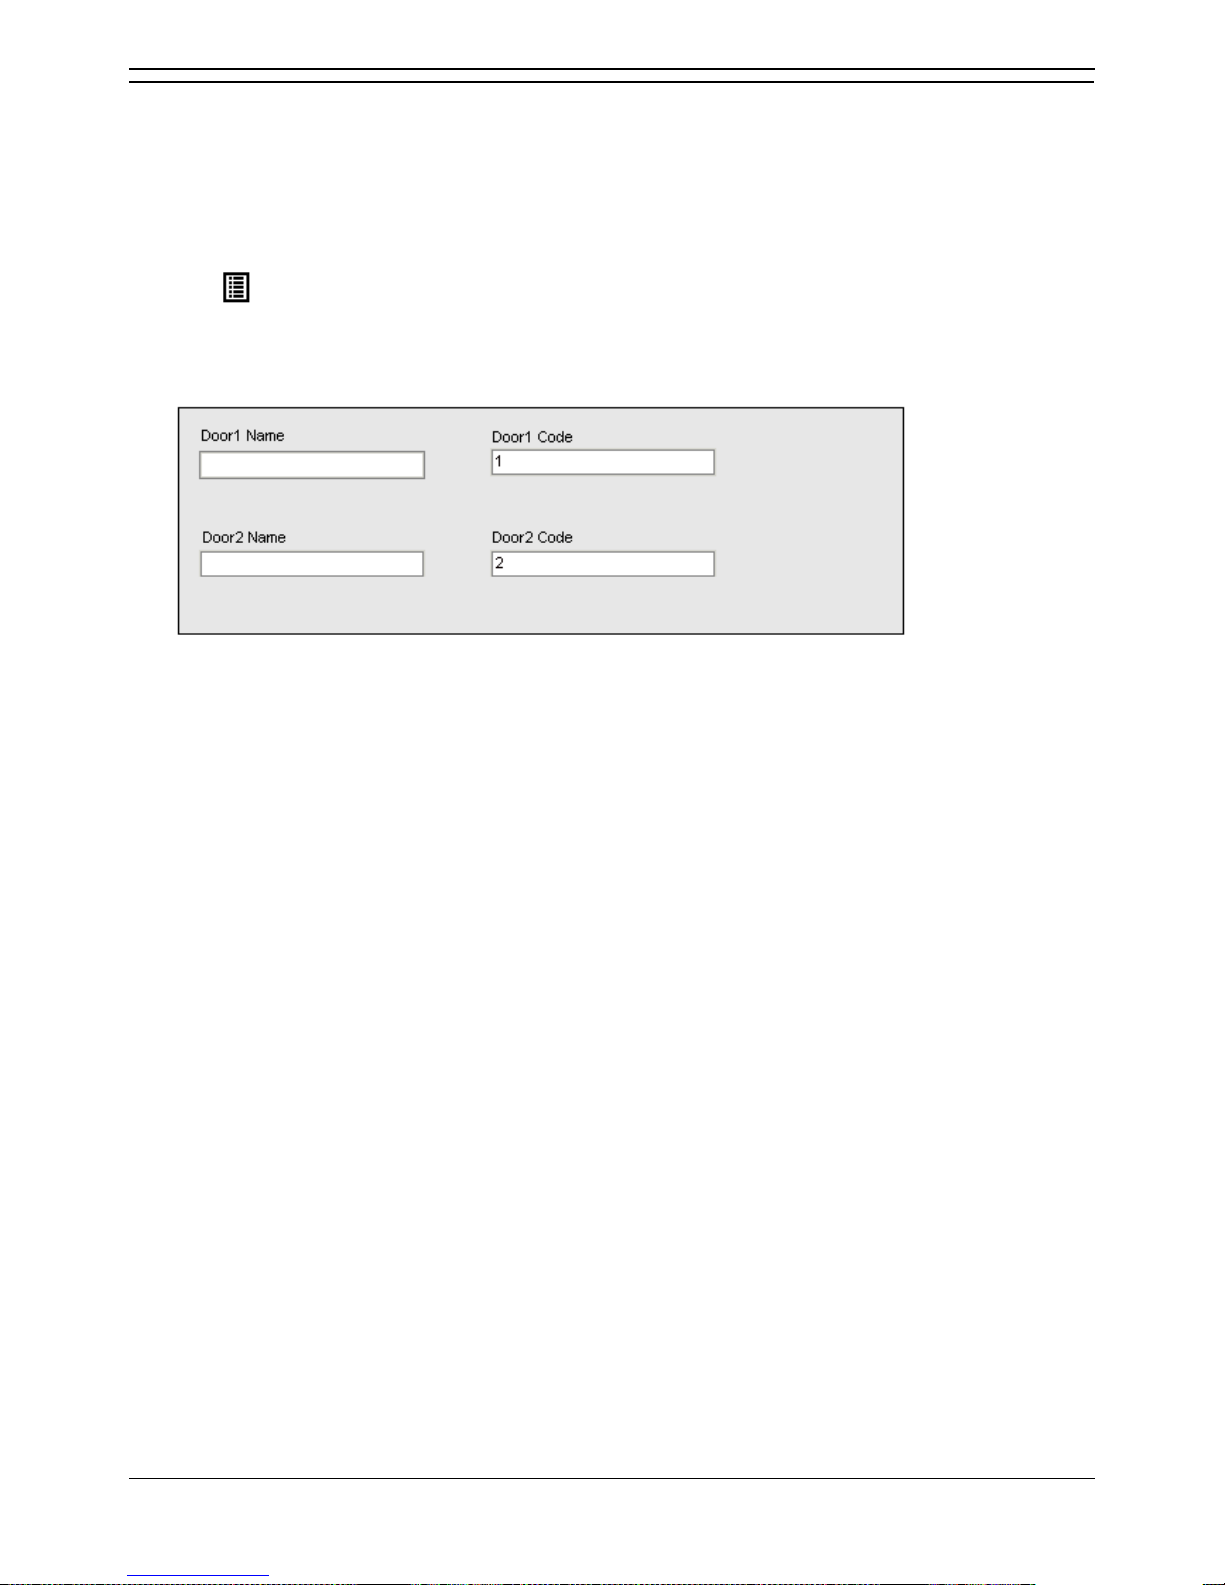
Phone Manager Users Guide
Page 84 Phone Manager User Guide
15-600988 Issue 14b (14th June 2006) IP Office 3.2
Activating the Door Release Buttons
The Door Release settings are only available in Phone Manager Pro.
The Door names must be entered before you can use Phone Manager Pro to control a door. When the
names have been entered you can control the door using Phone Manager. You can release a door using
the Door tab in the Call History pane. For more information, see The Door Tab section.
To enter the door names:
1. Click > Door Release.
Alternatively, click View > Preferences > Door Release. The Door Release window opens. The
Door Code field contains the number of the door relay to activate, either 1 or 2. The door codes can
not be changed.
2. In the Door Name field enter the name you want to appear on the door button. For example, the
door for the Loading Bay might be entered as 'Loading Bay'.
3. Click OK to save your changes. The Door Tab is available in the Call History pane with door buttons
labeled with the door names you entered.
Page 91

Configuring Phone Manager
Phone Manager User Guide Page 85
IP Office 3.2 15-600988 Issue 14b (14th June 2006)
Setting your Forwarding Options
Calls to your extension can be diverted to a different telephone number either internal or external. You
can enter the destination telephone number and select whether all calls are redirected or only external
calls.
You can set Mobile Twinning which will send internal or external calls to an external telephone number.
The call will ring at your extension and the specified external number. If you do not answer the call at
either telephone the caller is able to leave a message when they are transferred to voicemail.
The types of forwarding that can be selected are:
Follow Me
When selected ALL your calls are forwarded to the entered 'Follow Me' extension number. This is used
for temporary redirection when you are away from your own extension but are available on another
extension. You must enter an internal extension number as the Follow Me destination.
If the number at the forwarded location is busy, the call is forwarded to the number set as your
Forward on Busy/No Answer number.
If the number at the forwarded location is not answered, the call is forwarded to the number set as
the Forward on Busy/No Answer number.
If you have 'Forward Unconditional' selected, the setting is ignored when 'Follow Me' is selected.
You can make calls from your original extension.
Any Speed Dial associated with the original extension number does not indicate that your calls are
being forwarded to another number.
Forward Unconditional
If Forward Unconditional is selected and a number entered, ALL your calls are redirected.
All incoming calls to your extension are immediately forwarded to this number.
You can still make outgoing calls from your extension.
The options 'Forward on Busy' and 'Forward On No Answer' are unavailable.
External and Internal calls are forwarded to the number. When 'Forward Unconditional' is selected,
the option 'Forward Internal Calls' is automatically selected.
If the option Forward Internal Calls is selected ALL calls are redirected. If 'Forward Internal Calls' is
not selected, external calls are forwarded and internal calls are presented to your extension.
Calls to a Hunt Group of which you are a member are only forwarded if you selected 'Forward Hunt
Group Calls'.
If the option Forward Hunt Group Calls is selected, hunt group calls received by your extension are
forwarded to the 'Forward number'. This only applies to hunt groups that are configured for hunt
(linear) or rotary (circular) ringing mode. For more information, see your system administrator.
Forward On Busy/No Answer
When selected your calls are redirected to the number entered in the forward on Busy/No Answer field.
The same number is used for calls forwarded when your extension is busy or not answered.
When Forward on Busy is selected calls are forwarded to this number when your extension is busy .
If either the Forward on Busy or Forward on No Answer options are selected and no forward number
entered, the calls are forwarded to the number set in the forward unconditional section.
When Forward On No Answer is selected calls are forwarded to this number when your extension is
not answered
Page 92
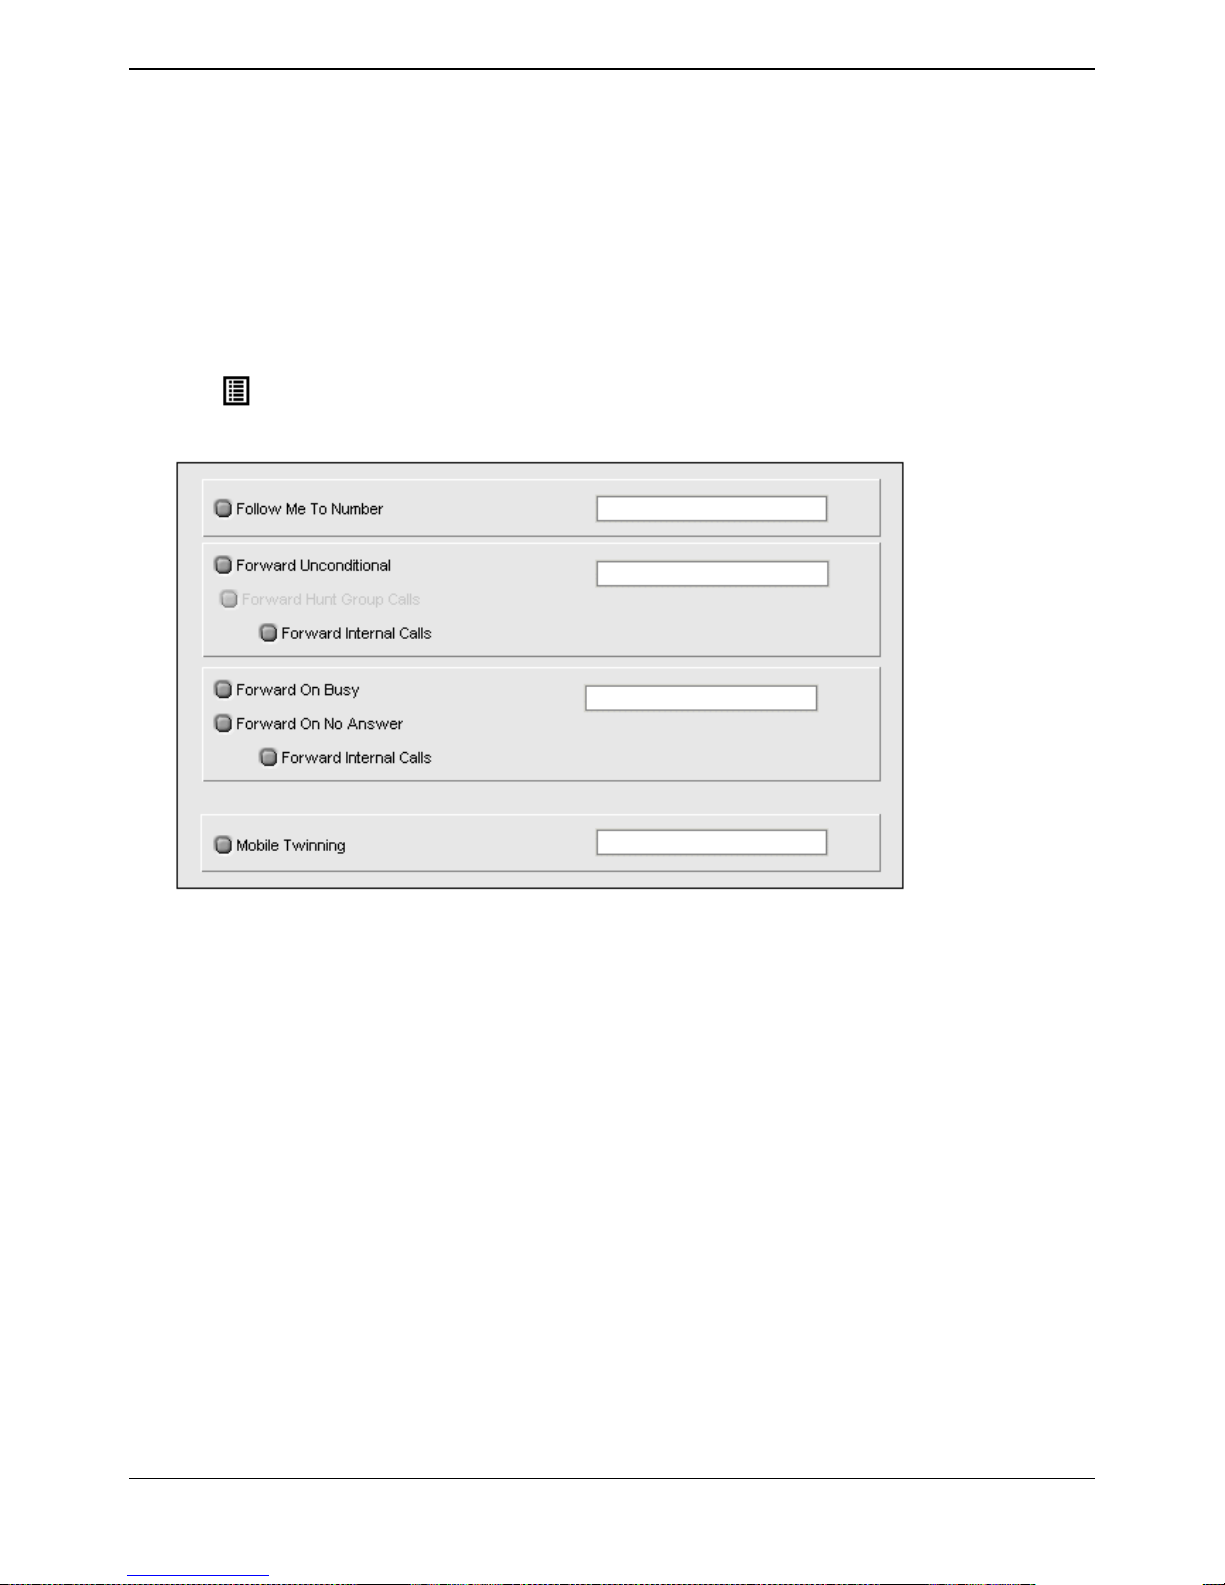
Phone Manager Users Guide
Page 86 Phone Manager User Guide
15-600988 Issue 14b (14th June 2006) IP Office 3.2
If the option Forward Internal Calls is selected ALL calls are redirected. If Forward Internal Calls is
not selected, external calls are forwarded and internal calls are presented to your extension. This
option applies to both Forward on Busy and Forward on No Answer.
The first time Forward on No Answer is selected, the option Forward Internal Calls is automatically
selected.
Note
If Forward Internal Calls and Forward On No Answer are de-selected, the next time Forward On
No Answer is selected, the option Forward Internal Calls is not automatically selected.
To configure the forwarding options:
1. Click > Forwarding
Alternatively click View > Preferences > Forwarding. The Forwarding window opens.
2. Type the destination telephone numbers in to the appropriate fields. Available numbers can also be
selected from your directory list.
Right-click in a number field. The Forward Follow-me Number window opens.
Select the telephone number required from the listing.
Click Add.
3. Click OK to save your changes.
Note
1. For call appearance users 'Forward On Busy' is only used when all your call appearance buttons are
busy.
2. Some forwarding options require configuration within IP Office Manager. For example, for a user to
set an external number. For more information, see your system administrator.
Page 93

Configuring Phone Manager
Phone Manager User Guide Page 87
IP Office 3.2 15-600988 Issue 14b (14th June 2006)
Mobile Twinning
If Twinning is enabled in IP Office Manager the Phone Manager user can send internal and external calls
to an external number, for example their mobile telephone. Both your internal and external telephones
ring when a call is received. The call can be answered from either telephone. For more information, see
your system administrator.
Notes
1. If you use account codes, you can not enter an account code when you answer a call at the external
telephone.
2. If the feature Do Not Disturb (DND) is selected any callers to your internal extension hear the busy
tone. Your external telephone will not ring. If a caller is entered in to the DND exception list only your
internal telephone rings
3. If you have selected any of the forward options, both the external telephone and the telephone
where the calls are forwarded to ring.
4. If you have selected the option Follow Me only the telephone that your calls are forwarded to rings.
The external telephone number will not ring.
To set mobile twinning:
1. Click > Forwarding
Alternatively click View > Preferences > Forwarding. The Forwarding window opens.
2. Select Mobile Twining.
3. In the Mobile Twinning field, enter the telephone number that you want to 'twin' to your extension.
Telephone numbers must be entered with no spaces.
4. Click OK to save your changes.
Page 94
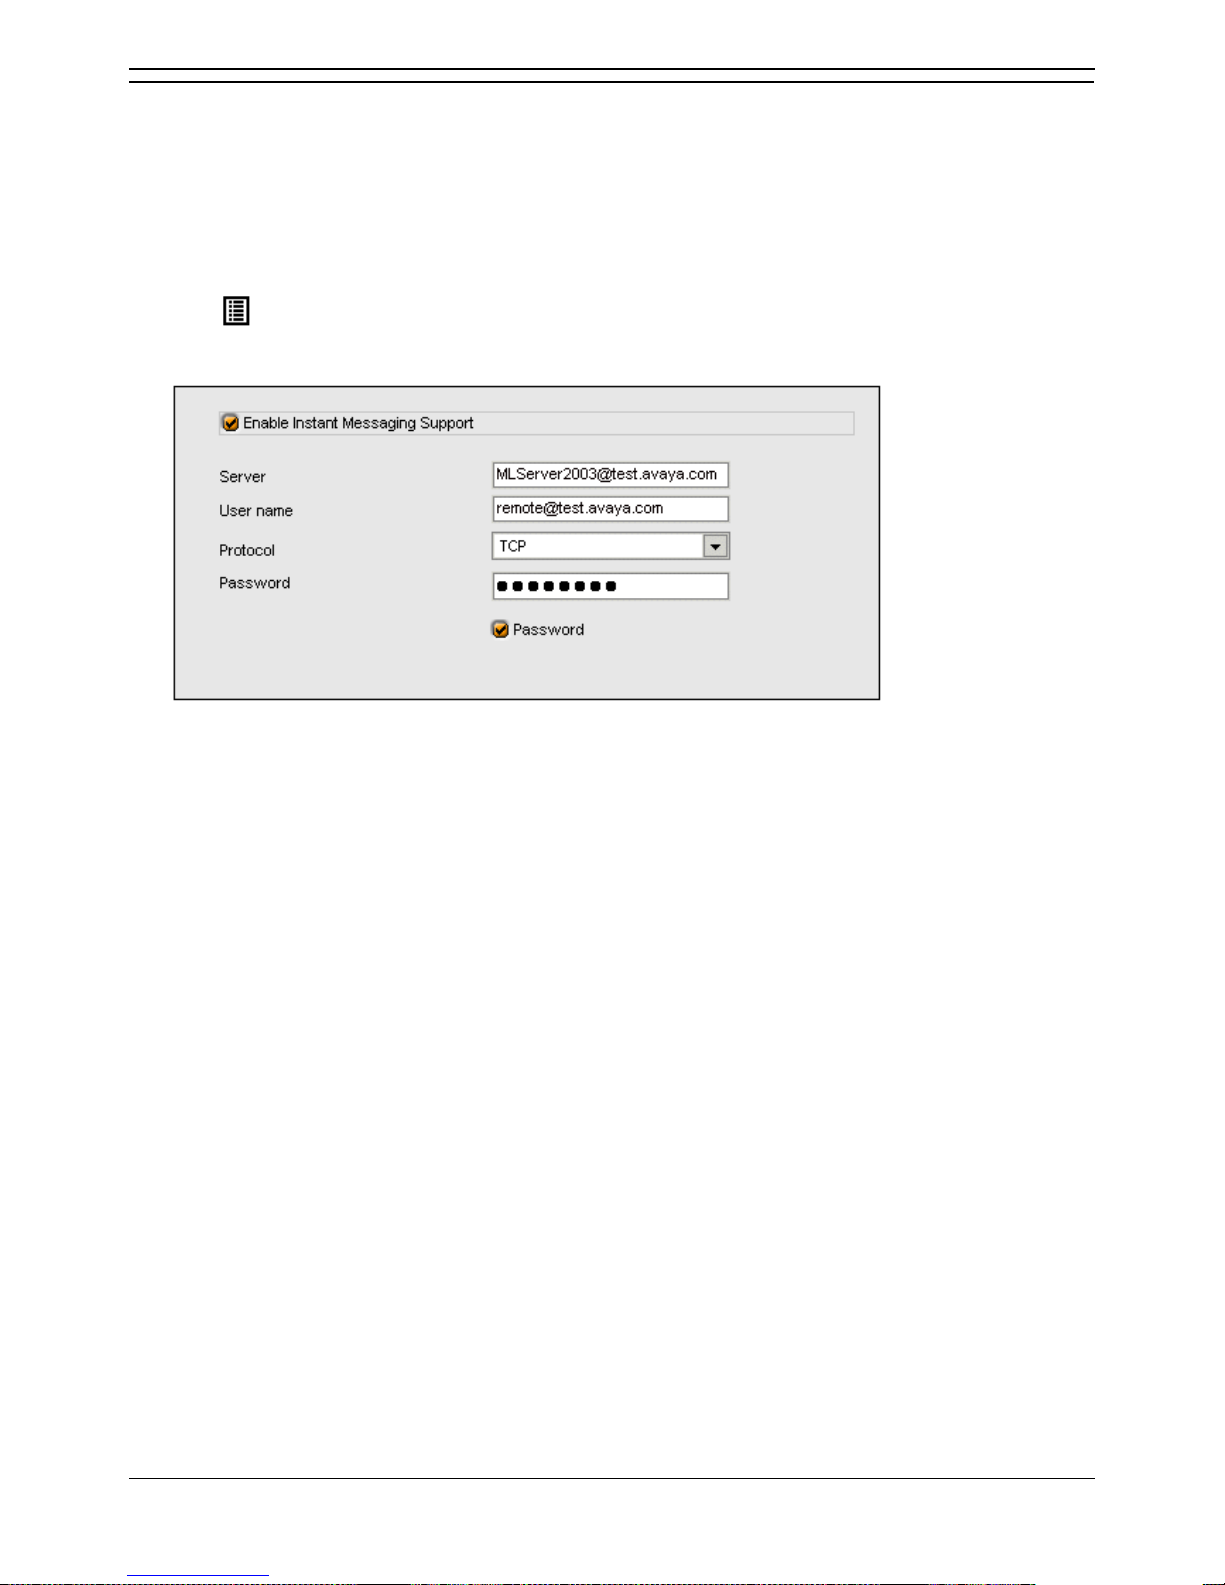
Phone Manager Users Guide
Page 88 Phone Manager User Guide
15-600988 Issue 14b (14th June 2006) IP Office 3.2
Enabling Instant Messaging
Phone Manager provides support for Instant messaging with the Microsoft Live Communication Server
(LCS). Instant messaging can occur between internal contacts that use the Microsoft Live
Communication Server. For more information, see your system administrator.
When you have enabled instant messaging you can send an instant message using the a speed dial
icon.
To enable instant messaging:
1. Click > Instant Messaging.
Alternatively, click View > Preferences > Instant Messaging. The Instant Messaging window
opens.
2. To turn instant messaging on check Enable Instant Messaging Support. If you have connection to
a Microsoft Live Communication Server you need to check this box for other users to add you as an
Instant Message user.
3. In the Server field, enter the name of the Microsoft Live Communication Server.
4. In the user name field, enter your e-mail account and domain as configured on the Microsoft Live
Communication Server. For example [email protected].
5. In the Protocol field, click the type of protocol you are using to connect to the Microsoft Live
Communication Server. You can choose from TCP, UDP and TLS.
6. In the Password field, enter the password associated with your Instant Message profile.
7. (Optional) For Phone Manager to remember your password check Password. You do not have to
re-enter your password if this box is checked.
8. Click OK to save your changes.
Page 95
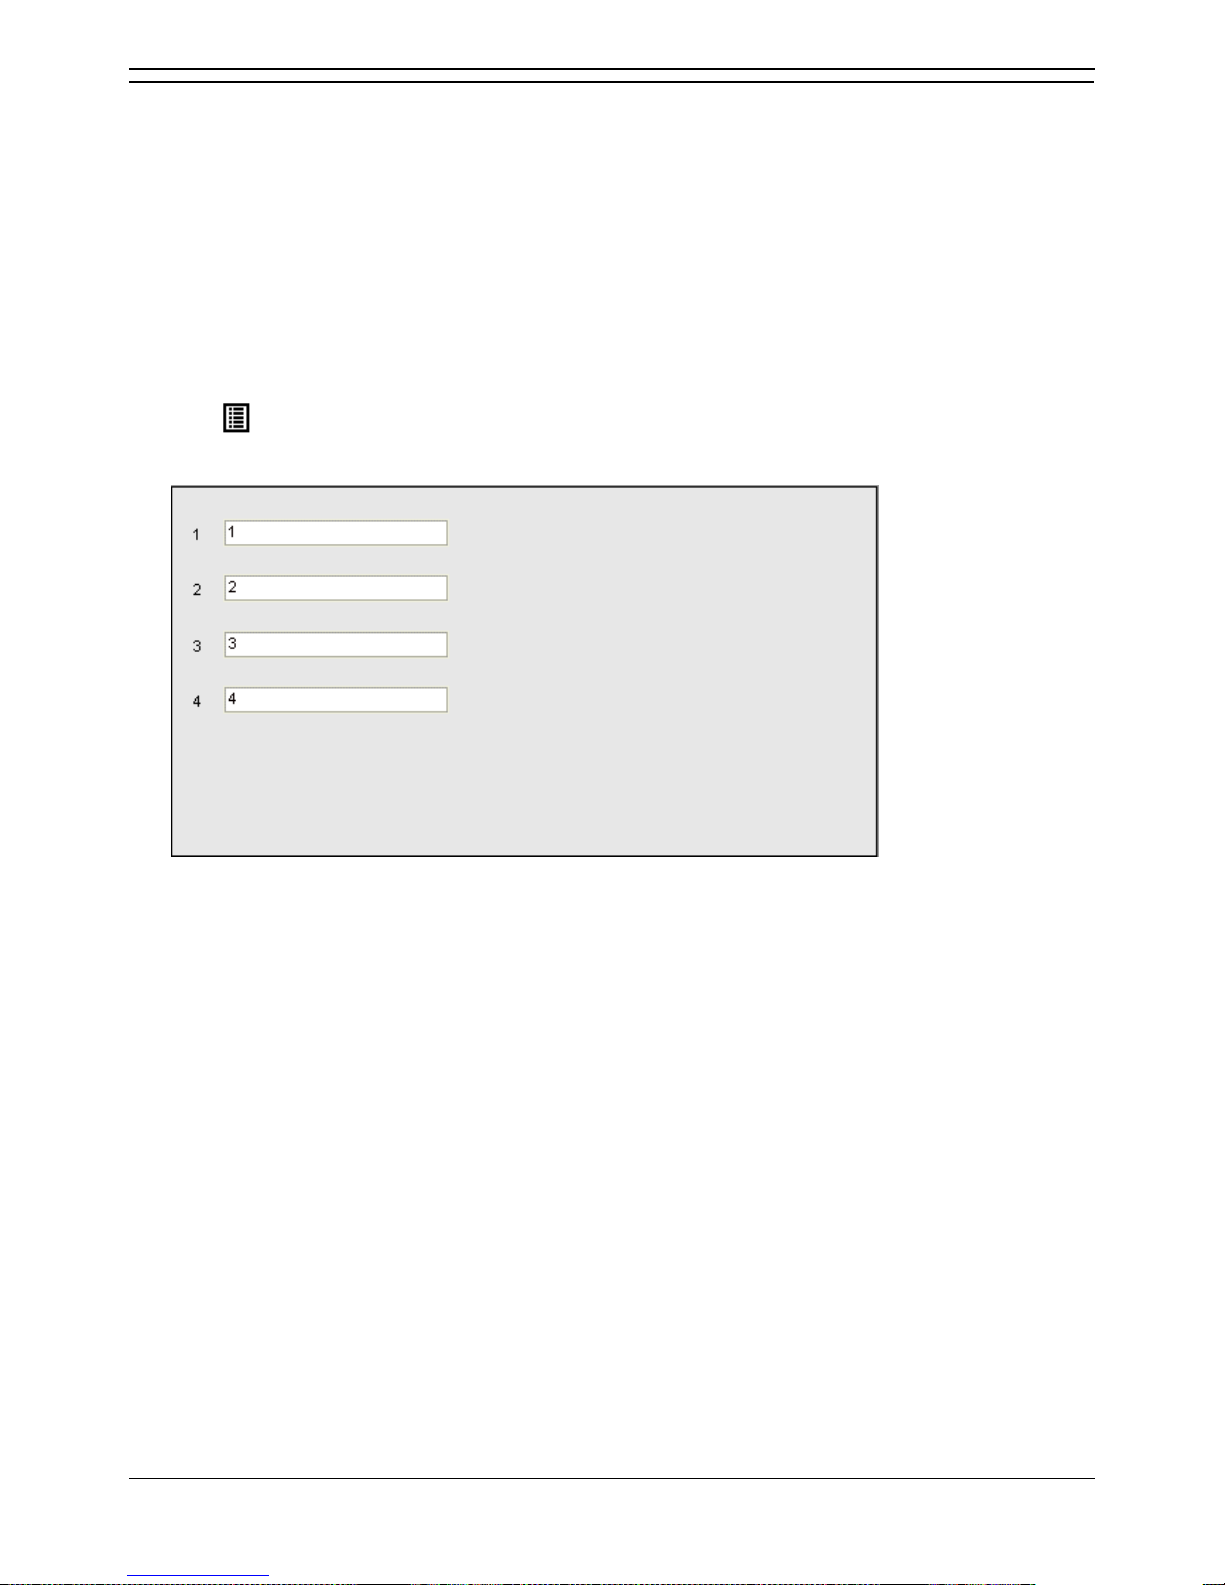
Configuring Phone Manager
Phone Manager User Guide Page 89
IP Office 3.2 15-600988 Issue 14b (14th June 2006)
Creating Personal Park Slots
By default each Park button in the Call Park area is configured for the four system park areas so a
parked call can be picked up at any extension. For more information, see The Call Park Area.
You can create a personal or a group park area where a call can only be picked by a user who knows
the park ID. For example, a park button might have the ID 55. Other Phone Manager users who want to
pick up a call parked in that park area can configure one of their own park IDs as 55 or use a short code.
For example, the short code *38*55# might be used. For more information about short codes, see your
system administrator.
You can also create a private park slot by using text in a Park ID. Other Phone Manager users can not
pick up the call using a short code.
To create a personal park slot:
1. Click > Park ID.
Alternatively, click View > Preferences > Park ID. The Park ID window opens.
2. In a park slot field, enter a park ID. A Park ID can contain a maximum of 9 numeric or text
characters. If the ID contain text other Phone Manager users can not pick up the call using a short
code.
3. Click OK to save your changes.
Page 96
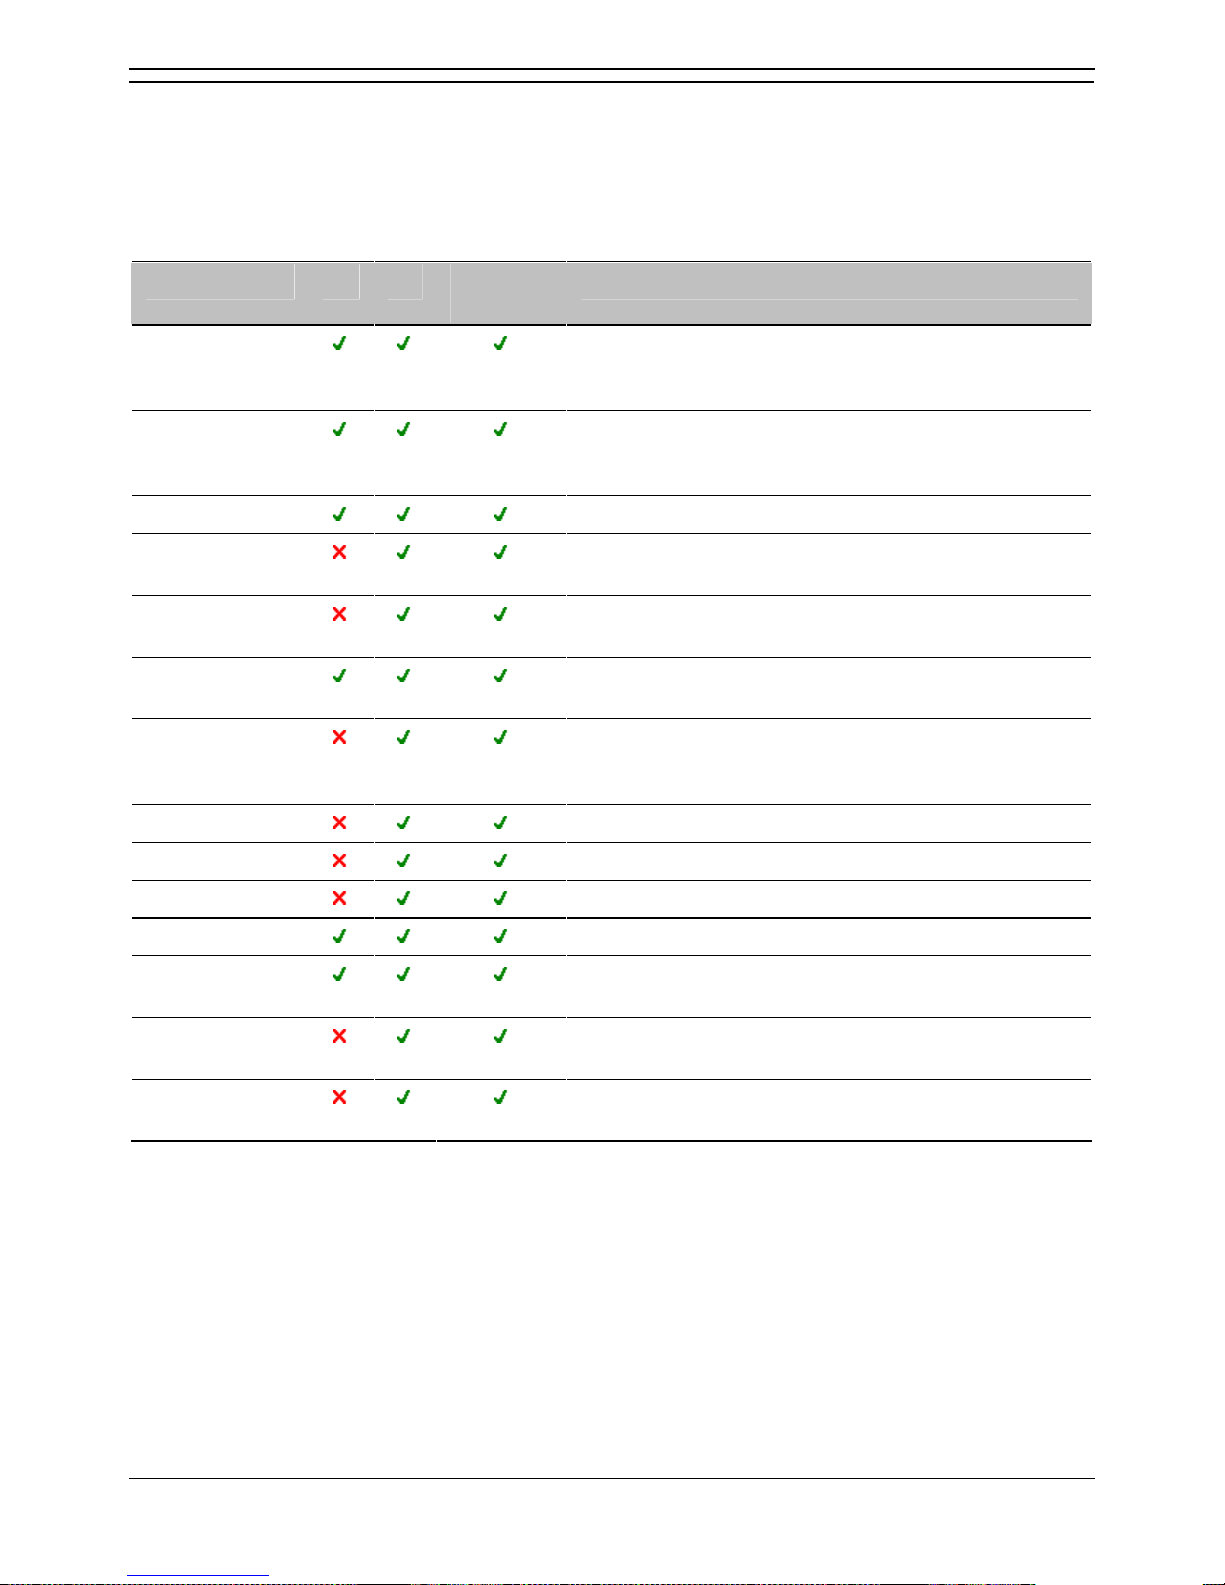
Phone Manager Users Guide
Page 90 Phone Manager User Guide
15-600988 Issue 14b (14th June 2006) IP Office 3.2
Changing General Phone Manager Settings
You can control the features of Phone Manager by setting your preferences. Not all options are
configurable by all users, some might be unavailable. For more information, see your system
administrator.
Some fields are unavailable when using Phone Manager Lite. The table describes the features and
indicates in which version of Phone Manager they are available.
Option Lite Pro PC
Softphone
Description
Pop Phone
Manager
When an incoming call is received or answered, the
Phone Manager application 'Pops' to the front and
becomes the foreground application.
Hide on Close
Phone Manager is minimized to the System tray on
the Windows Taskbar when you close the application
rather than exiting.
Play Sounds
Incoming calls are alerted by playing a sound.
Hide on no calls
Phone Manager Pro automatically minimizes when
you have finished all calls.
Pop on Answer
Phone Manager Pro only pops when an incoming call
is answered.
Pop on Page
Call
Phone Manager pops when a page call is received.
Enable VoIP
If the user Name you have associated the Phone
Manager with is a VoIP extension you must check this
option.
Show All
Display the All tab in the Call History panel.
Show In
Display the In tab in the Call History panel.
Show Out
Display the Out tab in the Call History panel.
Show Missed
Display the Missed tab in the Call History panel.
Show
Messages
Display the Messages tab in the Call History panel.
Show Status
Controls whether the Status pane comes to the front
when a call is answered.
Show Account
Codes
Shows the account code available.
Page 97
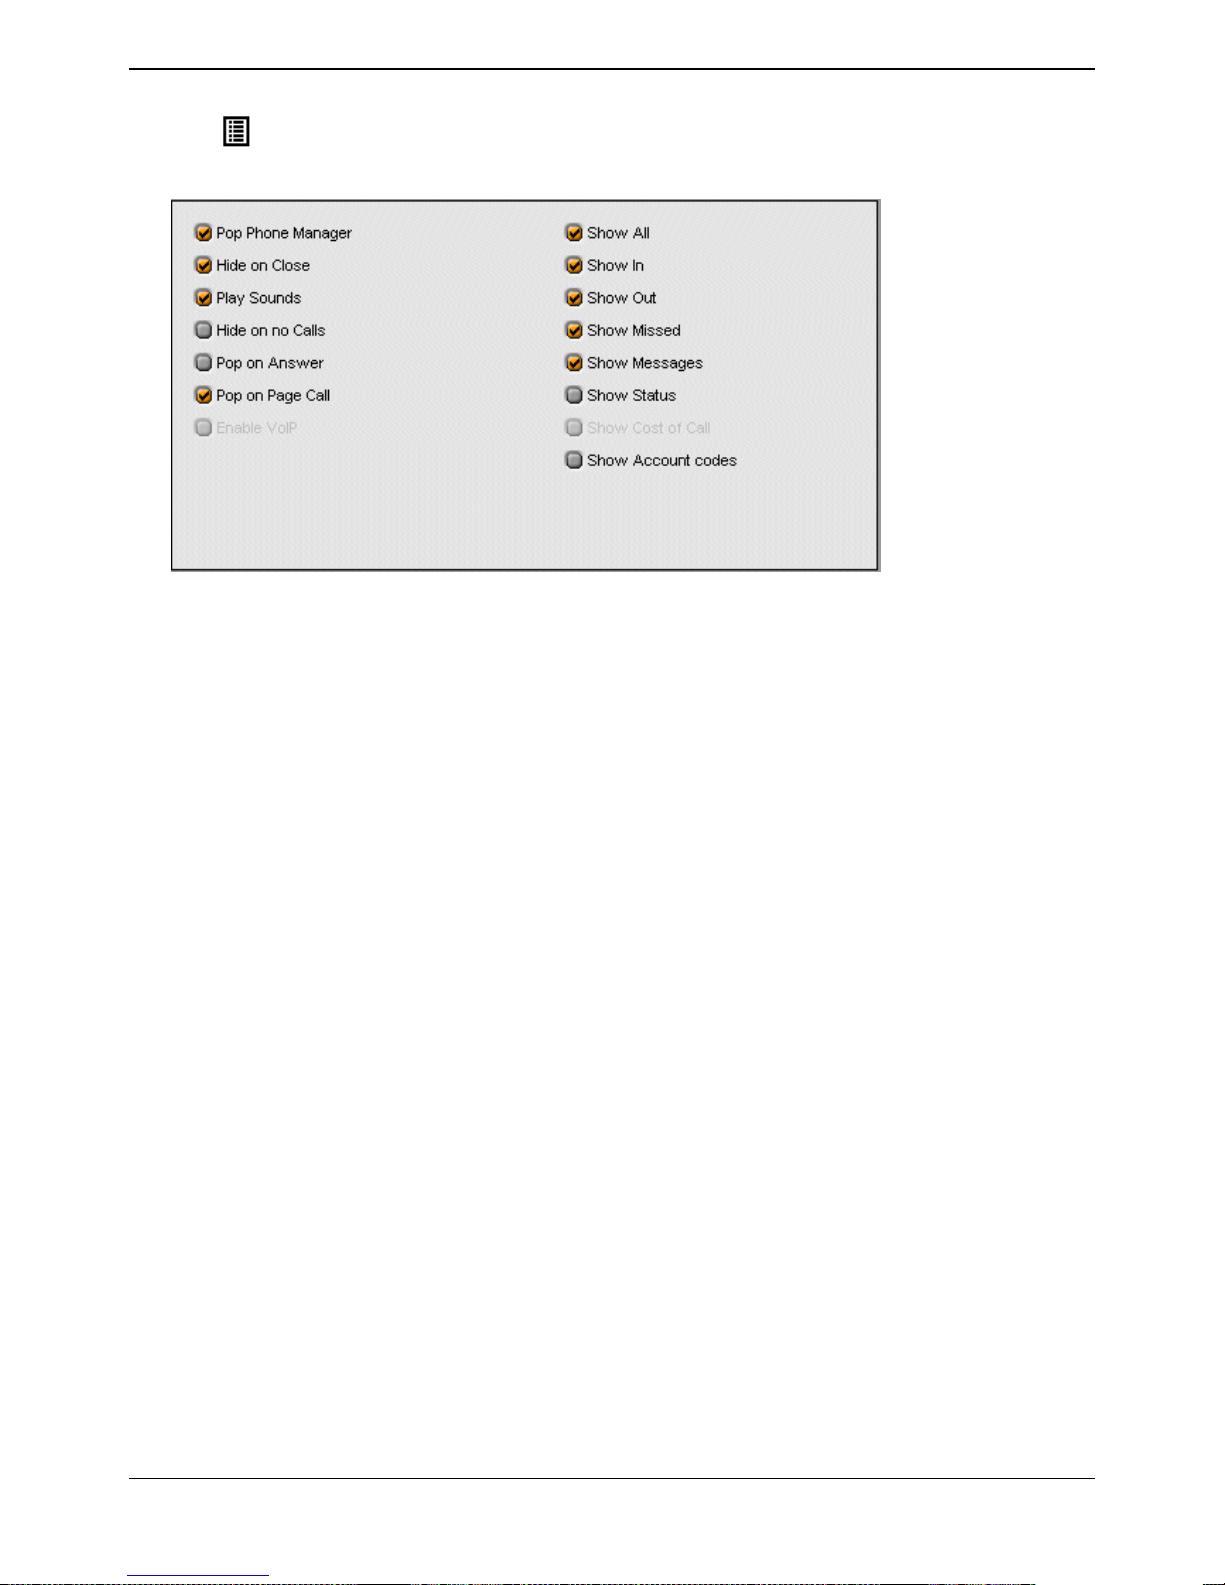
Configuring Phone Manager
Phone Manager User Guide Page 91
IP Office 3.2 15-600988 Issue 14b (14th June 2006)
To change Phone Manager options:
1. Click > Phone Manager.
Alternatively, click View > Preferences > Phone Manager. The Phone Manager window opens.
2. Check the required options and clear the options that you do not require.
3. Click OK to save your changes.
Page 98
Phone Manager Users Guide
Page 92 Phone Manager User Guide
15-600988 Issue 14b (14th June 2006) IP Office 3.2
Selecting Queues to Monitor
The Queue ID settings are only available in Phone Manager Pro.
You can select up to two Hunt Groups. You can then monitor the number of calls being held in each
queue. The Hunt Group must already exist on the System and must have Queuing enabled. For more
information, see your system administrator. Each drop down box gives a list of valid Hunt Groups.
When the hunt groups are selected the Queue tab is available in the Call History area. On the Queue tab
the monitors indicate the number of calls currently queued for the specified Hunt Groups. Each call held
in a queue is indicated by a blue box. If the mouse pointer is moved over a Queue monitor the number of
calls in the queue is indicated. For more information, see Working with Queues.
To select the queues to monitor:
1. Click > Queue ID.
Alternatively, click View > Preferences > Queue ID. The Queue ID window opens.
2. In the Queue 1 field, click the name of the hunt group that you want to monitor.
3. (Optional) In the Queue 2 field, click the name of the hunt group that you want to monitor.
4. Click OK to save your changes.
Page 99
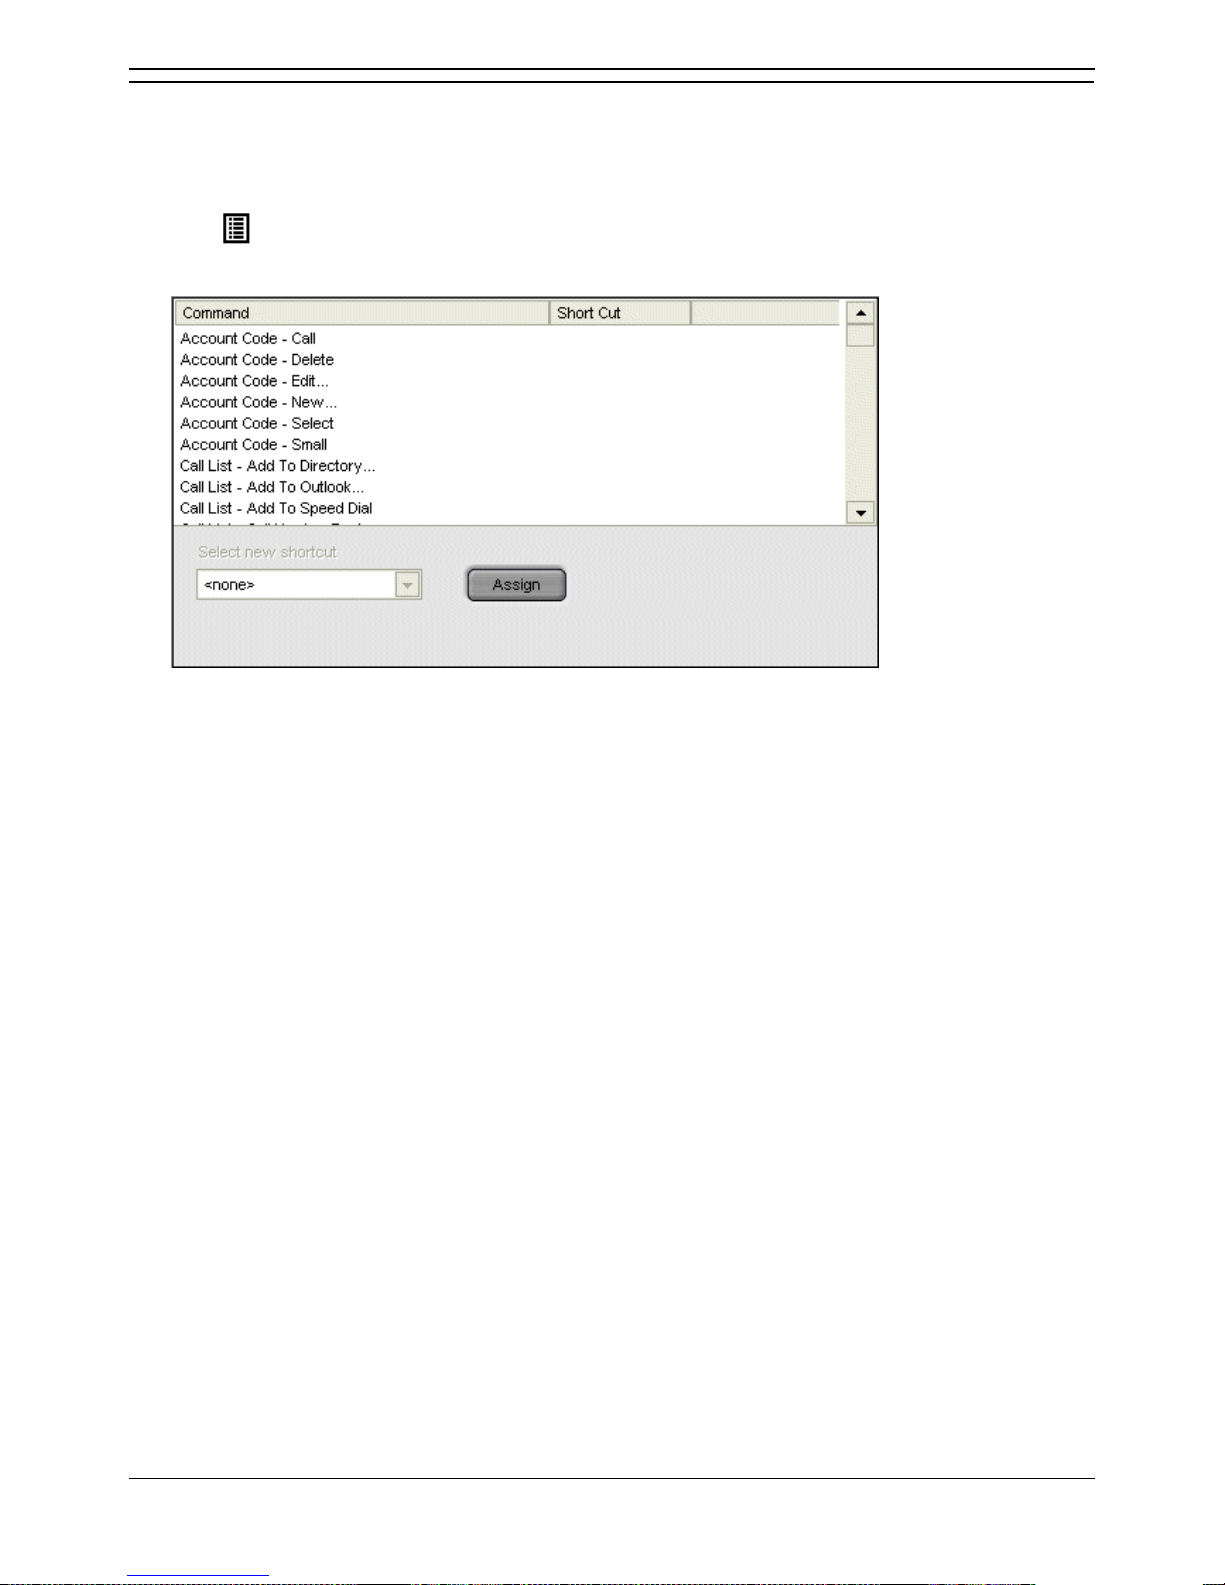
Configuring Phone Manager
Phone Manager User Guide Page 93
IP Office 3.2 15-600988 Issue 14b (14th June 2006)
Changing Short Cut Keys
You can change the short cuts assigned to specific features or functions. For more information, see
Short Cut Keys.
To open the Short Cut Keys Preferences:
1. Click > Short Cut Keys.
Alternatively, click View > Preferences > Short Cut Keys. The Short Cut Keys window opens.
2. Click the Command you want to change.
3. Select the Short Cut Key from Select new shortcut drop down box.
4. Click Assign.
5. Click OK to save your changes.
Page 100
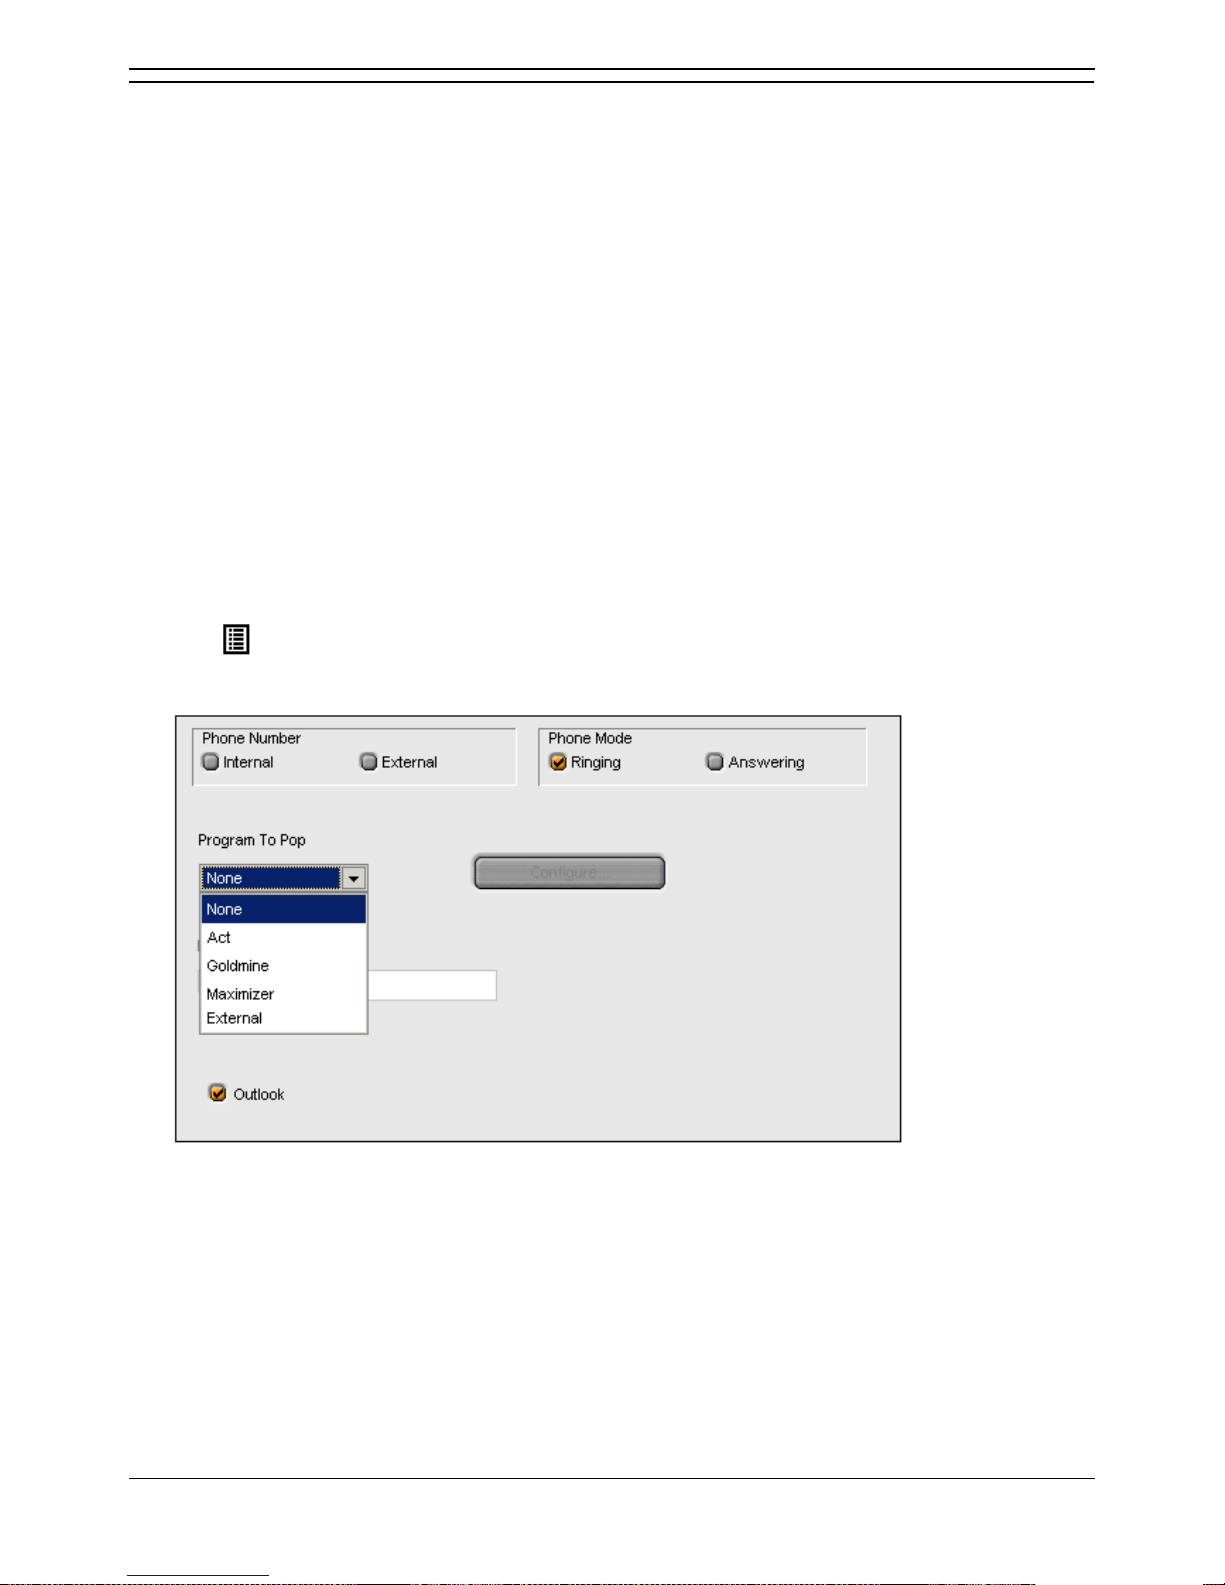
Phone Manager Users Guide
Page 94 Phone Manager User Guide
15-600988 Issue 14b (14th June 2006) IP Office 3.2
Configuring Screen Pop
The screen pop settings are only available in Phone Manager Pro.
The screen pop window is used to enable integration to contact management packages so that Phone
Manager can screen pop contact details. The screen pop options are only available when the content
management packages are installed and are detected by Phone Manager.
Note
1. The ACT!, Goldmine or Maximizer database needs to be open on your desktop. The record of the
caller pops in receipt of the call.
2. If the screen pop options are unavailable, you are unable to change the settings. For more
information, see your system administrator.
The content management packages that have been tested are:
ACT! 6.0 and 7.0
Goldmine 6.0 and 6.7
Maximizer 7.5 Enterprise
Microsoft Outlook (2000, 2003 and XP).
To configure screen popping:
1. Click > Screen Pop.
Alternatively, click View > Preferences > Screen Pop. The Screen Pop window opens.
2. Select the Phone Number option.
Internal - Check this box to pop the Phone Manager for internal numbers.
External - Check this box to pop the Phone Manager for external numbers.
3. Select the Phone Mode option:
Ringing - Check this box to pop Phone Manager when the telephone rings.
Answering - Check this box to pop Phone Manager when you answer the telephone.
4. In the Program to Pop field, enter the content management package that you want to use.
5. The content management package must be configured. Click Configure.
 Loading...