

Avaya IP Office D100, IP Office D160 User Manual

Using IP Office D100 SIP Wireless
Terminal
Issue 2.3
January 2016

©
2013-2016, Avaya, Inc.
All Rights Reserved.
Notice
While reasonable efforts have been made to ensure that the
information in this document is complete and accurate at the time of
printing, Avaya assumes no liability for any errors. Avaya reserves
the right to make changes and corrections to the information in this
document without the obligation to notify any person or organization
of such changes.
Documentation disclaimer
“Documentation” means information published by Avaya in varying
mediums which may include product information, operating
instructions and performance specifications that Avaya may generally
make available to users of its products and Hosted Services.
Documentation does not include marketing materials. Avaya shall not
be responsible for any modifications, additions, or deletions to the
original published version of documentation unless such
modifications, additions, or deletions were performed by Avaya. End
User agrees to indemnify and hold harmless Avaya, Avaya's agents,
servants and employees against all claims, lawsuits, demands and
judgments arising out of, or in connection with, subsequent
modifications, additions or deletions to this documentation, to the
extent made by End User.
Link disclaimer
Avaya is not responsible for the contents or reliability of any linked
websites referenced within this site or documentation provided by
Avaya. Avaya is not responsible for the accuracy of any information,
statement or content provided on these sites and does not
necessarily endorse the products, services, or information described
or offered within them. Avaya does not guarantee that these links will
work all the time and has no control over the availability of the linked
pages.
Warranty
Avaya provides a limited warranty on Avaya hardware and software.
Refer to your sales agreement to establish the terms of the limited
warranty. In addition, Avaya’s standard warranty language, as well as
information regarding support for this product while under warranty is
available to Avaya customers and other parties through the Avaya
Support website:
https://support.avaya.com/helpcenter/
getGenericDetails?detailId=C20091120112456651010 under the link
“Warranty & Product Lifecycle” or such successor site as designated
by Avaya. Please note that if You acquired the product(s) from an
authorized Avaya Channel Partner outside of the United States and
Canada, the warranty is provided to You by said Avaya Channel
Partner and not by Avaya.
Licenses
THE SOFTWARE LICENSE TERMS AVAILABLE ON THE AVAYA
WEBSITE,
HTTPS://SUPPORT.AVAYA.COM/LICENSEINFO,
UNDER THE LINK “AVAYA SOFTWARE LICENSE TERMS (Avaya
Products)” OR SUCH SUCCESSOR SITE AS DESIGNATED BY
AVAYA, ARE APPLICABLE TO ANYONE WHO DOWNLOADS,
USES AND/OR INSTALLS AVAYA SOFTWARE, PURCHASED
FROM AVAYA INC., ANY AVAYA AFFILIATE, OR AN AVAYA
CHANNEL PARTNER (AS APPLICABLE) UNDER A COMMERCIAL
AGREEMENT WITH AVAYA OR AN AVAYA CHANNEL PARTNER.
UNLESS OTHERWISE AGREED TO BY AVAYA IN WRITING,
AVAYA DOES NOT EXTEND THIS LICENSE IF THE SOFTWARE
WAS OBTAINED FROM ANYONE OTHER THAN AVAYA, AN
AVAYA AFFILIATE OR AN AVAYA CHANNEL PARTNER; AVAYA
RESERVES THE RIGHT TO TAKE LEGAL ACTION AGAINST YOU
AND ANYONE ELSE USING OR SELLING THE SOFTWARE
WITHOUT A LICENSE. BY INSTALLING, DOWNLOADING OR
USING THE SOFTWARE, OR AUTHORIZING OTHERS TO DO SO,
YOU, ON BEHALF OF YOURSELF AND THE ENTITY FOR WHOM
YOU ARE INSTALLING, DOWNLOADING OR USING THE
SOFTWARE (HEREINAFTER REFERRED TO
INTERCHANGEABLY AS “YOU” AND “END USER”), AGREE TO
THESE TERMS AND CONDITIONS AND CREATE A BINDING
CONTRACT BETWEEN YOU AND AVAYA INC. OR THE
APPLICABLE AVAYA AFFILIATE (“AVAYA”).
Avaya grants You a license within the scope of the license types
described below, with the exception of Heritage Nortel Software, for
which the scope of the license is detailed below. Where the order
documentation does not expressly identify a license type, the
applicable license will be a Designated System License. The
applicable number of licenses and units of capacity for which the
license is granted will be one (1), unless a different number of
licenses or units of capacity is specified in the documentation or other
materials available to You. “Software” means computer programs in
object code, provided by Avaya or an Avaya Channel Partner,
whether as stand-alone products, pre-installed on hardware products,
and any upgrades, updates, patches, bug fixes, or modified versions
thereto. “Designated Processor” means a single stand-alone
computing device. “Server” means a Designated Processor that
hosts a software application to be accessed by multiple users.
“Instance” means a single copy of the Software executing at a
particular time: (i) on one physical machine; or (ii) on one deployed
software virtual machine (“VM”) or similar deployment.
License types
Designated System(s) License (DS). End User may install and use
each copy or an Instance of the Software only on a number of
Designated Processors up to the number indicated in the order.
Avaya may require the Designated Processor(s) to be identified in
the order by type, serial number, feature key, Instance, location or
other specific designation, or to be provided by End User to Avaya
through electronic means established by Avaya specifically for this
purpose.
Concurrent User License (CU). End User may install and use the
Software on multiple Designated Processors or one or more Servers,
so long as only the licensed number of Units are accessing and using
the Software at any given time. A “Unit” means the unit on which
Avaya, at its sole discretion, bases the pricing of its licenses and can
be, without limitation, an agent, port or user, an e-mail or voice mail
account in the name of a person or corporate function (e.g.,
webmaster or helpdesk), or a directory entry in the administrative
database utilized by the Software that permits one user to interface
with the Software. Units may be linked to a specific, identified Server
or an Instance of the Software.
Database License (DL). End User may install and use each copy or
an Instance of the Software on one Server or on multiple Servers
provided that each of the Servers on which the Software is installed
communicates with no more than one Instance of the same
database.
CPU License (CP). End User may install and use each copy or
Instance of the Software on a number of Servers up to the number
indicated in the order provided that the performance capacity of the
Server(s) does not exceed the performance capacity specified for the
Software. End User may not re-install or operate the Software on
Server(s) with a larger performance capacity without Avaya’s prior
consent and payment of an upgrade fee.
Named User License (NU). You may: (i) install and use the Software
on a single Designated Processor or Server per authorized Named
User (defined below); or (ii) install and use the Software on a Server
so long as only authorized Named Users access and use the
Software. “Named User”, means a user or device that has been
expressly authorized by Avaya to access and use the Software. At
Avaya’s sole discretion, a “Named User” may be, without limitation,
designated by name, corporate function (e.g., webmaster or
helpdesk), an e-mail or voice mail account in the name of a person or
corporate function, or a directory entry in the administrative database
utilized by the Software that permits one user to interface with the
Software.
Shrinkwrap License (SR). You may install and use the Software in
accordance with the terms and conditions of the applicable license
agreements, such as “shrinkwrap” or “clickthrough” license
accompanying or applicable to the Software (“Shrinkwrap License”).
Heritage Nortel Software
“Heritage Nortel Software” means the software that was acquired by
Avaya as part of its purchase of the Nortel Enterprise Solutions
Business in December 2009. The Heritage Nortel Software is the
software contained within the list of Heritage Nortel Products located
https://support.avaya.com/LicenseInfo under the link “Heritage
at
Nortel Products” or such successor site as designated by Avaya. For
Heritage Nortel Software, Avaya grants Customer a license to use
Heritage Nortel Software provided hereunder solely to the extent of
the authorized activation or authorized usage level, solely for the

purpose specified in the Documentation, and solely as embedded in,
for execution on, or for communication with Avaya equipment.
Charges for Heritage Nortel Software may be based on extent of
activation or use authorized as specified in an order or invoice.
Copyright
Except where expressly stated otherwise, no use should be made of
materials on this site, the Documentation, Software, Hosted Service,
or hardware provided by Avaya. All content on this site, the
documentation, Hosted Service, and the product provided by Avaya
including the selection, arrangement and design of the content is
owned either by Avaya or its licensors and is protected by copyright
and other intellectual property laws including the sui generis rights
relating to the protection of databases. You may not modify, copy,
reproduce, republish, upload, post, transmit or distribute in any way
any content, in whole or in part, including any code and software
unless expressly authorized by Avaya. Unauthorized reproduction,
transmission, dissemination, storage, and or use without the express
written consent of Avaya can be a criminal, as well as a civil offense
under the applicable law.
Third Party Components
“Third Party Components” mean certain software programs or
portions thereof included in the Software or Hosted Service may
contain software (including open source software) distributed under
third party agreements (“Third Party Components”), which contain
terms regarding the rights to use certain portions of the Software
(“Third Party Terms”). As required, information regarding distributed
Linux OS source code (for those products that have distributed Linux
OS source code) and identifying the copyright holders of the Third
Party Components and the Third Party Terms that apply is available
in the products, Documentation or on Avaya’s website at:
support.avaya.com/Copyright or such successor site as designated
by Avaya. The open source software license terms provided as Third
Party Terms are consistent with the license rights granted in these
Software License Terms, and may contain additional rights benefiting
You, such as modification and distribution of the open source
software. The Third Party Terms shall take precedence over these
Software License Terms, solely with respect to the applicable Third
Party Components to the extent that these Software License Terms
impose greater restrictions on You than the applicable Third Party
Terms.
Preventing Toll Fraud
“Toll Fraud” is the unauthorized use of your telecommunications
system by an unauthorized party (for example, a person who is not a
corporate employee, agent, subcontractor, or is not working on your
company's behalf). Be aware that there can be a risk of Toll Fraud
associated with your system and that, if Toll Fraud occurs, it can
result in substantial additional charges for your telecommunications
services.
Avaya Toll Fraud intervention
If You suspect that You are being victimized by Toll Fraud and You
need technical assistance or support, call Technical Service Center
Toll Fraud Intervention Hotline at +1-800-643-2353 for the United
States and Canada. For additional support telephone numbers, see
the Avaya Support website:
successor site as designated by Avaya.
Trademarks
The trademarks, logos and service marks (“Marks”) displayed in this
site, the Documentation, Hosted Service(s), and product(s) provided
by Avaya are the registered or unregistered Marks of Avaya, its
affiliates, or other third parties. Users are not permitted to use such
Marks without prior written consent from Avaya or such third party
which may own the Mark. Nothing contained in this site, the
Documentation, Hosted Service(s) and product(s) should be
construed as granting, by implication, estoppel, or otherwise, any
license or right in and to the Marks without the express written
permission of Avaya or the applicable third party.
Avaya is a registered trademark of Avaya Inc.
All non-Avaya trademarks are the property of their respective owners.
Linux® is the registered trademark of Linus Torvalds in the U.S. and
other countries.
https://support.avaya.com or such
https://
Downloading Documentation
For the most current versions of Documentation, see the Avaya
Support website: https://support.avaya.com, or such successor site
as designated by Avaya.
Contact Avaya Support
See the Avaya Support website: https://support.avaya.com for
product or Hosted Service notices and articles, or to report a problem
with your Avaya product or Hosted Service. For a list of support
telephone numbers and contact addresses, go to the Avaya Support
website:
designated by Avaya), scroll to the bottom of the page, and select
Contact Avaya Support.
https://support.avaya.com (or such successor site as

Contents
Chapter 1: Avaya D100 overview............................................................................................. 6
Phone functionality.................................................................................................................. 6
Capacity and performance....................................................................................................... 7
Chapter 2: D160 handset overview......................................................................................... 8
D160 handset......................................................................................................................... 8
Charge unit............................................................................................................................. 9
Headset................................................................................................................................ 10
Display properties.................................................................................................................. 10
Chapter 3: Setup..................................................................................................................... 13
Powering the handset............................................................................................................ 13
Logging in and out................................................................................................................. 13
User login....................................................................................................................... 13
User logout..................................................................................................................... 14
Chapter 4: Configuration........................................................................................................ 15
Configuration overview.......................................................................................................... 15
Changing the ring tone..................................................................................................... 15
User settings................................................................................................................... 16
Administrator settings...................................................................................................... 19
Network.......................................................................................................................... 19
Phone information........................................................................................................... 20
Logout............................................................................................................................ 21
Chapter 5: Call operation....................................................................................................... 22
Call operation overview.......................................................................................................... 22
Emergency calls.............................................................................................................. 22
Making calls.................................................................................................................... 23
Receiving calls................................................................................................................ 23
Holding calls................................................................................................................... 24
Handling multiple calls..................................................................................................... 24
Transferring calls............................................................................................................. 25
Speed dialing.................................................................................................................. 26
Hot desking..................................................................................................................... 27
Conference calls............................................................................................................. 27
Operating calls on the charger.......................................................................................... 27
Dialing the previous call................................................................................................... 28
Voicemail........................................................................................................................ 28
Chapter 6: Miscellaneous options......................................................................................... 30
Mute..................................................................................................................................... 30
Time display......................................................................................................................... 30
Handsfree............................................................................................................................. 30
January 2016 Using IP Office D100 SIP Wireless Terminal 4

Contents
Speaker volume.................................................................................................................... 31
Ringer volume....................................................................................................................... 31
Chapter 7: Call logs................................................................................................................ 32
Viewing the call log................................................................................................................ 32
Making a call from the call log................................................................................................ 33
Saving a contact from the call log........................................................................................... 33
Deleting call logs................................................................................................................... 34
Chapter 8: Directory............................................................................................................... 35
Contact list............................................................................................................................ 35
Making a call from the directory.............................................................................................. 36
Adding contacts.................................................................................................................... 36
Deleting contacts................................................................................................................... 37
Editing a contact.................................................................................................................... 37
Searching the directory.......................................................................................................... 38
Chapter 9: Features................................................................................................................ 39
Button programming.............................................................................................................. 41
Configuring speed dials......................................................................................................... 43
Using function keys............................................................................................................... 44
Busy Lamp Field (BLF).......................................................................................................... 44
Avaya one-X® Portal feature support....................................................................................... 45
January 2016 Using IP Office D100 SIP Wireless Terminal 5

Chapter 1: Avaya D100 overview
This document describes the features and settings available on your Avaya D100 SIP Wireless
Terminal.
The D160 handset is feature-rich with telephony, voicemail, button programming, and conference
functionality. The D160 delivers high-quality wireless voice communications to employees who roam
within a building or campus. It is suitable for users dependent on being reachable and/or having a
need for mobile voice and messaging features. The handsets offer multiple soft keys, an integrated
speakerphone, headset support, and advanced audio-quality technology for crystal-clear
conversations.
Each handset registers to a base station that can support up to eight handsets. The base station
has a cell radius of up to 350 feet (100 metres) indoors that you can extend using a repeater, which
has an equivalent cell radius.
The following sections contain information on D100 phone functionality, feature support, and
capacity and performance.
Related links
Phone functionality on page 6
Capacity and performance on page 7
Phone functionality
The following table summarizes the phone functions available on the D100.
Category Support
Telephony
• Account Code Entry
• Automatic Callback
• Automatic Intercom - Dial voice call
• After Call Work
• Button Programming
• Call Forward
• Call Log
• Call Pickup Any
• Follow Me Here/To
• Forward All
• Group Page
• Group Pickup
• Hot Desking
• Make and drop call
• Mute
• Private Call
• Relay On/Pulse
January 2016 Using IP Office D100 SIP Wireless Terminal 6
Category Support
• Call Park
Capacity and performance
• Redial
• Call Record
• Conference
• Conference Meet Me
• Directed Call Pickup
• Do Not Disturb
• Emergency call
• Extension Login/Logout
Language
• English
• French
• Italian
Related links
Avaya D100 overview on page 6
Capacity and performance
• Remote Park
• Retrieve Call
• Speed Dial
• Stamp Log
• Transfer
• Twinning
• Voicemail
• German
• Spanish
Capacity and performance specifications for the D100 appear below.
Handset capacity and performance
Item
Maximum simultaneous calls per handset 5 calls
Average talk time (with new battery) 16 hours
Average standby time (with new battery) 168 hours
Related links
Avaya D100 overview on page 6
Value
January 2016 Using IP Office D100 SIP Wireless Terminal 7

Chapter 2: D160 handset overview
D160 handset
No. Label Description
1 Up/Down keys Control the speaker and ringer volume.
Also allows correction of name and number entry when
programming a speed dial button.
2 Mute key Mute the handset microphone.
3 Soft keys (S1–S4) Activate the option listed directly above it on the display. The
handset contains four soft keys.
Table continues…
January 2016 Using IP Office D100 SIP Wireless Terminal 8

No. Label Description
4 Off-Hook/Handsfree key Answer a call or enter handsfree mode.
5 On-Hook key End a call or exit a menu.
6 Dialpad Use the dialpad to make calls, to enter contact phone numbers and
names, and to navigate through contacts and call logs. Note that
pressing any key on the dialpad will answer an alerting call.
7 Function keys (F1–F8) Use the appropriate function key to activate the feature assigned to
that key. There are eight configurable function keys.
The telephone keypad cannot be locked, it is active all the time the telephone is powered on. For
more information, see the following:
•
Capacity and performance on page 7
• Powering the handset on page 13
Charge unit
Charge unit
The following image shows the charge unit from three different angles. Note that you can leave the
handset in the charge unit when it is not in use.
No. Label Description
1 Rechargeable battery slot To recharge a spare D100 battery.
2 Cradle To hold the handset upright while it charges.
3 Blue handset LED To indicate when the handset is placed in the charge unit.
4 Blue battery LED To indicate when the battery slot is in use.
Table continues…
January 2016 Using IP Office D100 SIP Wireless Terminal 9
D160 handset overview
No. Label Description
5 Battery slot tab To lock the rechargeable battery in place. Press down on this tab to
unlock and remove the battery.
Headset
To use a headset, plug the headset into the headset jack during the talk or handsfree modes. While
using a headset, you can switch between the talk mode and the handsfree mode, but the headset
mode remains active until you unplug the headset.
Display properties
The following sections describe the display properties for the handset LCD as well as the base
station, charger, and repeater LEDs.
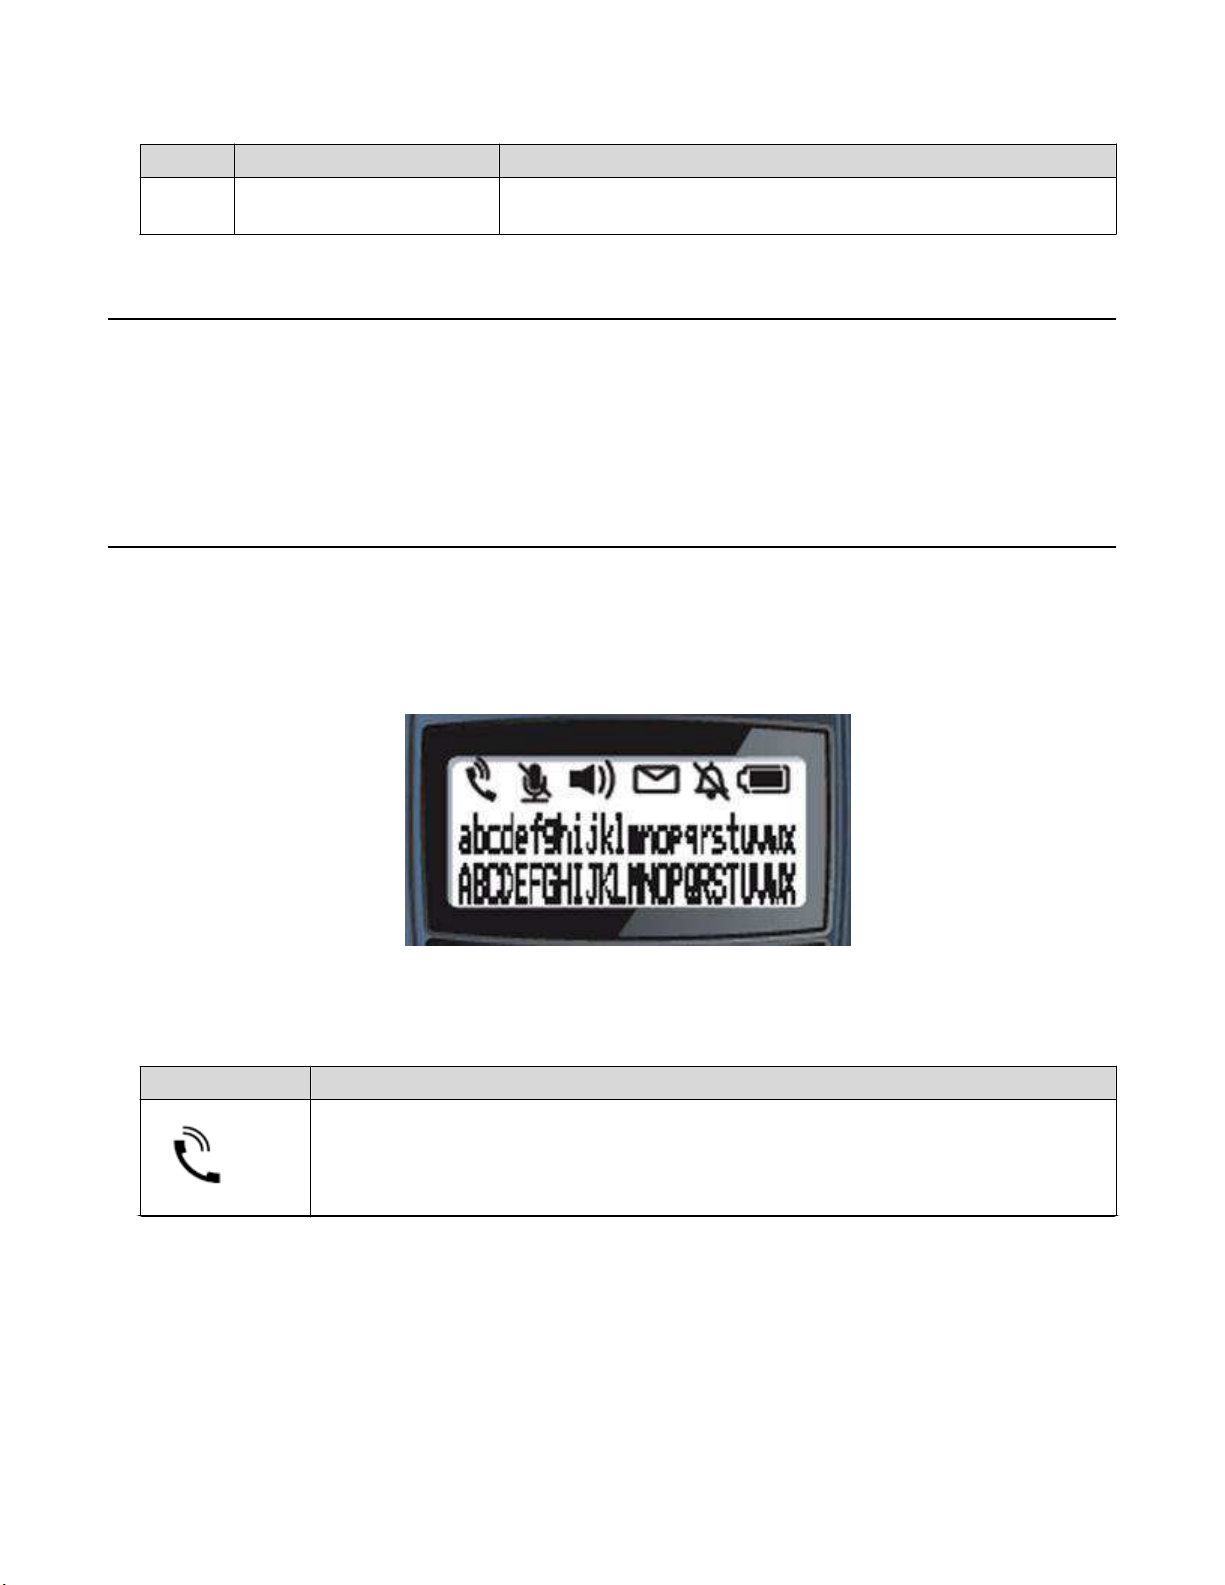
Handset LCD
The handset LCD consists of three rows. The top row consists of six icons while the remaining two
rows consist of 24 alphanumeric characters.
The following tables describe the icons and soft key options visible on the handset LCD.
Status icon
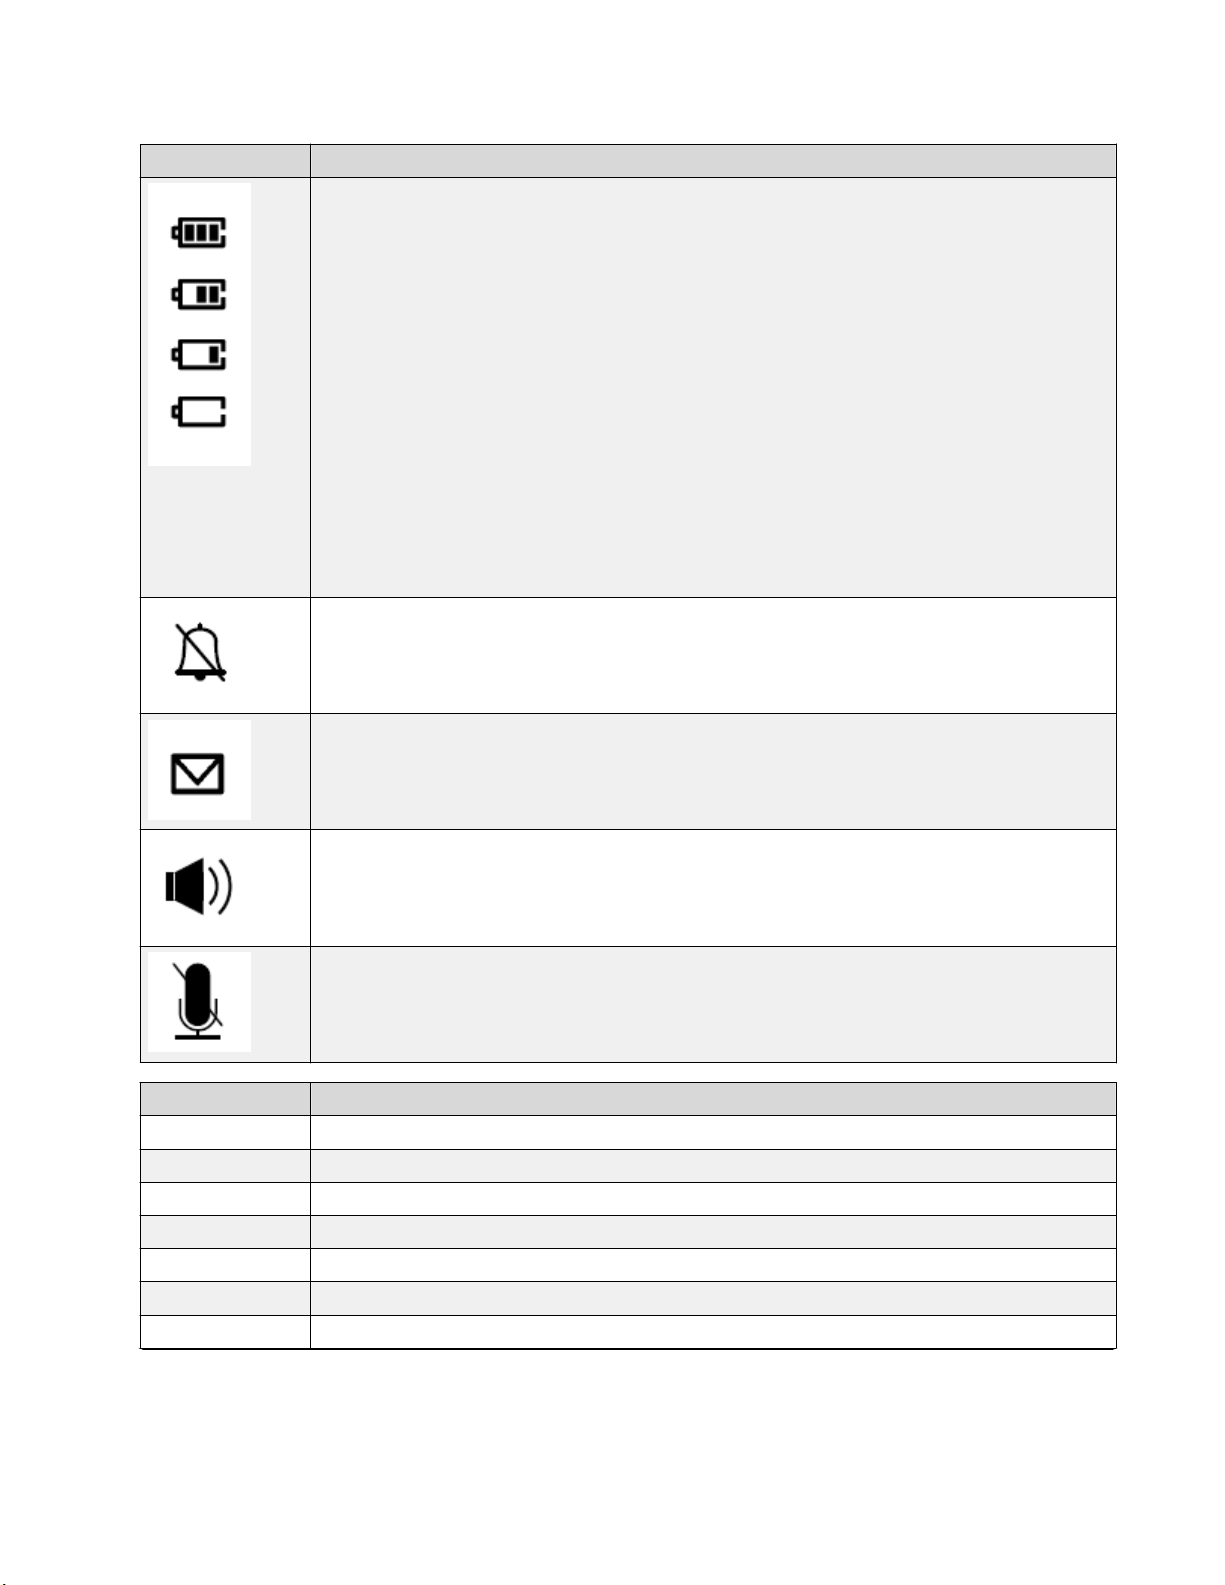
Description
The handset talk mode icon.
This icon is on during an active call and flashes when a call is on hold.
Table continues…
January 2016 Using IP Office D100 SIP Wireless Terminal 10
Status icon Description
The battery status icon. The number of bars visible on the icon indicates the power level
of the battery.
When the handset is on the charger, the battery status icon cycles through each icon
level from Low to Full until the phone is fully charged.
• Battery Full = Three bars indicate that the remaining capacity is between 70 and
100%.
• Battery Level 2 = Two bars indicate that the remaining capacity is between 40 and
70%.
• Battery Level 1 = One bar indicates that the remaining capacity is between 15 and
40%.
• Battery Low = Zero bars indicate that the remaining capacity is between 5 and 15%.
The icon flashes intermittently.
• “Change Battery” Message = The phone is not functional. The remaining capacity is
between 0 and 5%.
The mute icon. Indicates that the ringer is set to Off. In the Vibrate mode, the mute icon
is not visible.
Display properties
The mail icon. Indicates a new voicemail message.
The speaker icon. Indicates that the phone is in the handsfree mode.
The mute icon. Indicates that the microphone is muted.
Soft key Description
Featur To access the Feature mode.
Msgs To access the Voicemail feature.
Redial To call the most recently called number.
More.. To access more soft key item lists (see below).
CLog To access the Call Log page.
Dir To display the system and local phone directories.
Time To display the current time, accessed using the More.. soft key.
Table continues…
January 2016 Using IP Office D100 SIP Wireless Terminal 11

D160 handset overview
Soft key Description
Config To access the configuration menus, such as “User Settings”. See Configuration
overview on page 15 for more information.
Use the More.. soft key to access the Config option.
123 To switch to numeric input mode, accessed using the More.. soft key.
abc To switch to alphabetic input mode (the default), accessed using the More.. soft key.
January 2016 Using IP Office D100 SIP Wireless Terminal 12

Chapter 3: Setup
Powering the handset
Insert the D160 battery into the handset to begin handset operation.
• Use only the D160–compatible battery.
• Fully charge the battery upon receipt to prolong battery life.
The D160 battery will last approximately 12–13 months with normal usage. Note that unused
batteries will slowly lose their charge.
• When the battery no longer holds a charge, dispose of the battery responsibly.
Logging in and out
Only one user can log into a handset at any given time. Use the following methods for logging in to
and out of the handset.
Related links
User login on page 13
User logout on page 14
User login
Before you begin
You must be logged out before you can log in. When no users are logged in, the handset display
reads Login | Config.
Note that you can press the On-Hook key at any time to exit the menu and cancel the login attempt.
Procedure
1. Press the Login soft key.
2. At the prompt, enter the extension number provided by your administrator for that device and
press the OK soft key. Use the Del soft key to make corrections. Press Cancel to return to
the Idle state.
January 2016 Using IP Office D100 SIP Wireless Terminal 13

Setup
If you do not enter a number within 30 seconds, the handset returns to the Idle state.
3. The handset then prompts you to enter the password provided by your administrator for that
extension number. Use the >> soft key to move the cursor to the right, or wait two seconds
for the cursor to progress automatically. Note that the password length is limited to seven
characters.
If you enter an invalid extension or password, the display reads Login Failed for three
seconds and then the handset returns to the logged-out state.
Once authorized, the handset returns to an Idle state, but with the user logged in. The
handset is now ready for use.
Related links
Logging in and out on page 13
User logout
Use the following procedure to log a user out of IP Office using the D160 handset.
Before you begin
You must be logged in before you can log out. Note that you can press the On-Hook key at any
time to exit the menu and cancel the logout attempt.
Procedure
1. In the Idle state, press the Config soft key to access the configuration menu list.
2. Use the Next or Prev soft keys to scroll the menu list to Logout and select it.
The display shows a confirmation message that reads Logout?
3. Press the Back soft key to cancel the logout. Press OK to proceed.
4. If you selected OK, the handset prompts you to enter the password for that extension.
If you enter an invalid password, the display reads Logout Failed for three seconds and
then the handset returns to the logged-in, Idle state.
If you enter a valid password, logout completes and the display reads Login | Config.
Related links
Logging in and out on page 13
January 2016 Using IP Office D100 SIP Wireless Terminal 14

Chapter 4: Configuration
Configuration overview
Access the configuration menu by pressing the Config soft key. You can navigate the menu lists
using the More.. soft key in conjunction with the Next, Prev, Back, and Select soft keys.
The first line on the display indicates the status of the current configuration. The second line
displays the soft key options.
Note that some menu items require a password in order to gain access. Depending on the menu
option, you will require either the DECT PIN ID, the administrator password, or the login/logout
password.
If you fail to operate a menu prior to the menu auto timeout, you automatically exit the menu mode.
Related links
Changing the ring tone on page 15
User settings on page 16
Administrator settings on page 19
Network on page 19
Phone information on page 20
Logout on page 21
Changing the ring tone
If ring tone volume is turned off or set to vibrate, you will not hear the ring tone. You can adjust the
volume of the ring tone using the Up or Down keys on the side of the handset.
The following procedure describes how to change the ring tone type, not the volume.
Procedure
1. Press the More.. soft key and navigate to and press the Config soft key.
2. Navigate to Ring Tone and press Select.
The handset lists the current available tone types, identified from Tone A to Tone F.
3. Navigate the list of tone types using the Next and Prev soft keys and select one using the
Select soft key.
Select Back if you want to return to the previous menu.
January 2016 Using IP Office D100 SIP Wireless Terminal 15
 Loading...