

Avaya H.323 9608, H.323 9611G, H.323 9608G, H.323 9641G, H.323 9621G Installation And Management Manual
Page 1

Installing and maintaining Avaya IP
Deskphone H.323 9608, 9608G, 9611G,
9621G, and 9641G
Release 6.3.1
16-603603
January 2014
Issue 9
Page 2

©
2013 Avaya Inc.
All Rights Reserved.
Notice
While reasonable efforts have been made to ensure that the
information in this document is complete and accurate at the time of
printing, Avaya assumes no liability for any errors. Avaya reserves the
right to make changes and corrections to the information in this
document without the obligation to notify any person or organization of
such changes.
Note
Using a cell, mobile, or GSM phone, or a two-way radio in close
proximity to an Avaya IP telephone might cause interference.
Documentation disclaimer
“Documentation” means information published by Avaya in varying
mediums which may include product information, operating instructions
and performance specifications that Avaya generally makes available
to users of its products. Documentation does not include marketing
materials. Avaya shall not be responsible for any modifications,
additions, or deletions to the original published version of
documentation unless such modifications, additions, or deletions were
performed by Avaya. End User agrees to indemnify and hold harmless
Avaya, Avaya's agents, servants and employees against all claims,
lawsuits, demands and judgments arising out of, or in connection with,
subsequent modifications, additions or deletions to this documentation,
to the extent made by End User.
Link disclaimer
Avaya is not responsible for the contents or reliability of any linked
websites referenced within this site or documentation provided by
Avaya. Avaya is not responsible for the accuracy of any information,
statement or content provided on these sites and does not necessarily
endorse the products, services, or information described or offered
within them. Avaya does not guarantee that these links will work all the
time and has no control over the availability of the linked pages.
Warranty
Avaya provides a limited warranty on its hardware and Software
(“Product(s)”). Refer to your sales agreement to establish the terms of
the limited warranty. In addition, Avaya’s standard warranty language,
as well as information regarding support for this Product while under
warranty is available to Avaya customers and other parties through the
Avaya Support website:
you acquired the Product(s) from an authorized Avaya reseller outside
of the United States and Canada, the warranty is provided to you by
said Avaya reseller and not by Avaya. “Software” means computer
programs in object code, provided by Avaya or an Avaya Channel
Partner, whether as stand-alone products or pre-installed on hardware
products, and any upgrades, updates, bug fixes, or modified versions.
Licenses
THE SOFTWARE LICENSE TERMS AVAILABLE ON THE AVAYA
WEBSITE,
APPLICABLE TO ANYONE WHO DOWNLOADS, USES AND/OR
INSTALLS AVAYA SOFTWARE, PURCHASED FROM AVAYA INC.,
ANY AVAYA AFFILIATE, OR AN AUTHORIZED AVAYA RESELLER
(AS APPLICABLE) UNDER A COMMERCIAL AGREEMENT WITH
AVAYA OR AN AUTHORIZED AVAYA RESELLER. UNLESS
OTHERWISE AGREED TO BY AVAYA IN WRITING, AVAYA DOES
NOT EXTEND THIS LICENSE IF THE SOFTWARE WAS OBTAINED
FROM ANYONE OTHER THAN AVAYA, AN AVAYA AFFILIATE OR
AN AVAYA AUTHORIZED RESELLER; AVAYA RESERVES THE
RIGHT TO TAKE LEGAL ACTION AGAINST YOU AND ANYONE
ELSE USING OR SELLING THE SOFTWARE WITHOUT A LICENSE.
BY INSTALLING, DOWNLOADING OR USING THE SOFTWARE, OR
AUTHORIZING OTHERS TO DO SO, YOU, ON BEHALF OF
YOURSELF AND THE ENTITY FOR WHOM YOU ARE INSTALLING,
DOWNLOADING OR USING THE SOFTWARE (HEREINAFTER
HTTP://SUPPORT.AVAYA.COM/LICENSEINFO ARE
http://support.avaya.com. Please note that if
REFERRED TO INTERCHANGEABLY AS
AGREE TO THESE TERMS AND CONDITIONS AND CREATE A
BINDING CONTRACT BETWEEN YOU AND AVAYA INC. OR THE
APPLICABLE AVAYA AFFILIATE (“AVAYA”).
Avaya grants you a license within the scope of the license types
described below, with the exception of Heritage Nortel Software, for
which the scope of the license is detailed below. Where the order
documentation does not expressly identify a license type, the
applicable license will be a Designated System License. The applicable
number of licenses and units of capacity for which the license is granted
will be one (1), unless a different number of licenses or units of capacity
is specified in the documentation or other materials available to you.
“Designated Processor” means a single stand-alone computing device.
“Server” means a Designated Processor that hosts a software
application to be accessed by multiple users.
License types
Designated System(s) License (DS). End User may install and use
each copy of the Software only on a number of Designated Processors
up to the number indicated in the order. Avaya may require the
Designated Processor(s) to be identified in the order by type, serial
number, feature key, location or other specific designation, or to be
provided by End User to Avaya through electronic means established
by Avaya specifically for this purpose.
Shrinkwrap License (SR). You may install and use the Software in
accordance with the terms and conditions of the applicable license
agreements, such as “shrinkwrap” or “clickthrough” license
accompanying or applicable to the Software (“Shrinkwrap License”).
Copyright
Except where expressly stated otherwise, no use should be made of
materials on this site, the Documentation, Software, or hardware
provided by Avaya. All content on this site, the documentation and the
Product provided by Avaya including the selection, arrangement and
design of the content is owned either by Avaya or its licensors and is
protected by copyright and other intellectual property laws including the
sui generis rights relating to the protection of databases. You may not
modify, copy, reproduce, republish, upload, post, transmit or distribute
in any way any content, in whole or in part, including any code and
software unless expressly authorized by Avaya. Unauthorized
reproduction, transmission, dissemination, storage, and or use without
the express written consent of Avaya can be a criminal, as well as a
civil offense under the applicable law.
Third Party Components
“Third Party Components” mean certain software programs or portions
thereof included in the Software that may contain software (including
open source software) distributed under third party agreements (“Third
Party Components”), which contain terms regarding the rights to use
certain portions of the Software (“Third Party Terms”). Information
regarding distributed Linux OS source code (for those Products that
have distributed Linux OS source code) and identifying the copyright
holders of the Third Party Components and the Third Party Terms that
apply is available in the Documentation or on Avaya’s website at:
support.avaya.com/Copyright. You agree to the Third Party Terms for
any such Third Party Components.
Preventing Toll Fraud
“Toll Fraud” is the unauthorized use of your telecommunications
system by an unauthorized party (for example, a person who is not a
corporate employee, agent, subcontractor, or is not working on your
company's behalf). Be aware that there can be a risk of Toll Fraud
associated with your system and that, if Toll Fraud occurs, it can result
in substantial additional charges for your telecommunications services.
Avaya Toll Fraud intervention
If you suspect that you are being victimized by Toll Fraud and you need
technical assistance or support, call Technical Service Center Toll
Fraud Intervention Hotline at +1-800-643-2353 for the United States
and Canada. For additional support telephone numbers, see the Avaya
“YOU” AND “END USER”),
http://
2 Installing and maintaining Avaya IP Deskphone H.323 9608, 9608G, 9611G, 9621G, and 9641GJanuary 2014
Comments? infodev@avaya.com
Page 3

Support website: http://support.avaya.com. Suspected security
vulnerabilities with Avaya products should be reported to Avaya by
sending mail to: securityalerts@avaya.com.
Trademarks
All non-Avaya trademarks are the property of their respective owners,
and “Linux” is a registered trademark of Linus Torvalds.
Downloading Documentation
For the most current versions of Documentation, see the Avaya
Support website:
Contact Avaya Support
See the Avaya Support website: http://support.avaya.com for product
notices and articles, or to report a problem with your Avaya product.
For a list of support telephone numbers and contact addresses, go to
the Avaya Support website: http://support.avaya.com, scroll to the
bottom of the page, and select Contact Avaya Support.
Federal Communications Commission (FCC) Interference
Statement
This equipment has been tested and found to comply with the limits for
a Class B digital device, pursuant to Part 15 of the FCC rules. These
limits are designed to provide reasonable protection against harmful
interference in a residential installation. This equipment generates,
uses, and can radiate radio frequency energy and, if not installed and
used in accordance with the instructions, may cause harmful
interference to radio communications. However, there is no guarantee
that interference will not occur in a particular installation. If this
equipment does cause harmful interference to radio or television
reception, which can be determined by turning the equipment off and
on, the user is encouraged to try to correct the interference by one of
the following measures:
• Reorient or relocate the receiving antenna.
• Increase the separation between the equipment and receiver.
• Connect the equipment into an outlet on a circuit different from
that to which the receiver is connected.
• Consult the dealer or an experienced radio/TV technician for
help.
This device complies with Part 15 of the FCC Rules. Operation is
subject to the following two conditions: (1) This device may not cause
harmful interference, and (2) this device must accept any interference
received, including interference that may cause undesired operation.
FCC Caution: Any changes or modifications not expressly approved by
the party responsible for compliance could void the user's authority to
operate this equipment.
FCC/Industry Canada Radiation Exposure Statement
This device complies with the FCC's and Industry Canada's RF
radiation exposure limits set forth for the general population
(uncontrolled environment) and must not be co-located or operated in
conjunction with any other antenna or transmitter.
Warning
The handset receiver contains magnetic devices that can attract small
metallic objects. Care should be taken to avoid personal injury.
Power over Ethernet (PoE) warning
This equipment must be connected to PoE networks without routing to
the outside plant.
http://support.avaya.com.
Installing and maintaining Avaya IP Deskphone H.323 9608, 9608G, 9611G, 9621G, and 9641GJanuary 2014 3
Page 4

4 Installing and maintaining Avaya IP Deskphone H.323 9608, 9608G, 9611G, 9621G, and 9641GJanuary 2014
Comments? infodev@avaya.com
Page 5

Contents
Chapter 1: Overview...........................................................................................................
Deskphone models relevant to this guide.................................................................................................
Change history..........................................................................................................................................
New in this release....................................................................................................................................
Changes in Release 6.3............................................................................................................................
Enhancements in H.323 Release 6.2 Service Pack 4..............................................................................
Enhancements in H.323 Release 6.2 Service Pack 3..............................................................................
Enhancements in H.323 Release 6.2 Service Pack 2..............................................................................
Features introduced in H.323 Release 6.2 Service Pack 1......................................................................
New features in Release 6.2.....................................................................................................................
Chapter 2: Installing the Deskphone.................................................................................
Avaya IP Deskphones...............................................................................................................................
Updating phone software for installation...................................................................................................
Creating the pre-installation checklist.......................................................................................................
Plugging in the deskphone........................................................................................................................
Completing the power connection.............................................................................................................
Installing a Dual Headset Adapter (DHA).................................................................................................
9641G Call Center faceplate installation...................................................................................................
Plugging in and resetting the deskphone using the Dynamic Addressing Process..................................
Phone initialization....................................................................................................................................
Understanding the plug in and reset process...........................................................................................
Understanding unnamed registration........................................................................................................
Chapter 3: Using local Administrative Menu procedures...............................................
About local Craft procedures.....................................................................................................................
Accessing local Craft procedures..............................................................................................................
Running Craft procedures.........................................................................................................................
Accessing Craft procedures during normal operation...............................................................................
Entering data for administrative options....................................................................................................
Entering and validating IPv4 and IPv6 addresses....................................................................................
Local administrative Craft procedures menu............................................................................................
Setting the operational mode to 802.1X....................................................................................................
Using the preinstallation checklist.............................................................................................................
Changing IP address information..............................................................................................................
Calibrating the touch screen.....................................................................................................................
Disabling or enabling automatic gain control............................................................................................
Clearing the phone settings......................................................................................................................
Adjusting contrast on button modules and non-color deskphones...........................................................
Debug mode..............................................................................................................................................
Changing the group identifier....................................................................................................................
Setting handset audio equalization...........................................................................................................
Changing Ethernet interface control.........................................................................................................
Disabling and enabling event logging.......................................................................................................
Logging off from the phone.......................................................................................................................
Viewing multilanguage strings..................................................................................................................
7
7
7
8
8
10
10
10
11
11
13
13
13
14
16
21
21
26
27
27
29
34
37
37
38
39
39
40
41
43
45
46
47
49
50
51
53
54
55
55
56
57
58
59
Installing and maintaining Avaya IP Deskphone H.323 9608, 9608G, 9611G, 9621G, and 9641GJanuary 2014 5
Page 6

Resetting system values...........................................................................................................................
Restarting the phone.................................................................................................................................
Setting or changing the signaling protocol................................................................................................
Changing SSON settings..........................................................................................................................
Performing a self-test................................................................................................................................
Chapter 4: Maintaining 9600 Series IP Deskphones........................................................
About software distribution packages.......................................................................................................
Downloading software packages..............................................................................................................
Contents of the settings file.......................................................................................................................
Downloading text language files...............................................................................................................
Changing the signaling protocol................................................................................................................
Applying settings to logical groups............................................................................................................
Chapter 5: Troubleshooting...............................................................................................
Resolving error conditions.........................................................................................................................
Failure to hear DTMF tones......................................................................................................................
Correcting a power interruption.................................................................................................................
Using the VIEW procedure for troubleshooting.........................................................................................
Installation error and status messages.....................................................................................................
Operational errors and status messages..................................................................................................
LLDP Troubleshooting..............................................................................................................................
Proposed Solution............................................................................................................................
LLDP setup and troubleshooting steps.....................................................................................................
Proposed solution for DHCP configured deskphones......................................................................
Proposed solution for script-configured deskphones.......................................................................
Proposed solution for LLDP-configured deskphones.......................................................................
Secure Shell Support................................................................................................................................
Chapter 6: Glossary............................................................................................................
Index.....................................................................................................................................
60
61
62
63
63
65
65
66
67
68
69
69
71
71
72
72
72
76
81
86
87
87
88
88
89
89
91
93
6 Installing and maintaining Avaya IP Deskphone H.323 9608, 9608G, 9611G, 9621G, and 9641GJanuary 2014
Page 7

Chapter 1: Overview
Deskphone models relevant to this guide
This guide describes only five models: 9608, 9608G, 9611G, 9621G, and 9641G. For
information about the other models, see Avaya IP Deskphone H.323 9608, 9608G, 9611G,
9621G, and 9641G Administrator Guide,16-300694.
The phones have an Ethernet switch with which the phone and a PC can share the same LAN
connection, if appropriate. Thus, these models do not work with the 30A switched hub interface.
The 9608G, 9611G, 9621G, and 9641G models have a gigabit Ethernet (GigE) interface, which
speeds data transmission. The 9641G phone also has an integrated Bluetooth™ interface. For
information about the setup of a Bluetooth device, see Using Avaya IP Deskphone H.323 9621
and 9641,16-602638.
This document describes the installation of the 9608, 9608G, 9611G, 9621G, and 9641G
deskphones and post-installation maintenance issues for the phones. For information about
using phone features, see the user documentation for each phone. For information about desk
mounting or wall mounting, see the instructions boxed with the phone. For instructions about
wall mounting or desk mounting, see the Avaya Support website at
support.
http://www.avaya.com/
Change history
Issue 1 Issued in August, 2010. This release supported 9600 Series IP deskphone
Software Release 6.0 and the addition of four new deskphone models: 9608,
9611G, 9621G, and 9641G. Release 6.0 is compatible with Release 6.0 of Avaya
Aura® Communication Manager. 9600 Series IP deskphone software Release
6.0 is only supported on the 9608, 9611G, 9621G, and 9641G deskphones.
Issue 2 Issued in April, 2011. This release supported enhancements to the 9608, 9611G,
9621G, and 9641G deskphones.
Issue 3 Issued in February, 2012. This release supported enhancements to the 9608,
9611G, 9621G, and 9641G deskphones.
For other 9600 Series IP deskphones, see Software Release 3.1 that was issued
in November 2009.
Installing and maintaining Avaya IP Deskphone H.323 9608, 9608G, 9611G, 9621G, and 9641GJanuary 2014 7
Page 8
Overview
Issue 4 Updated and revised version of the document issued in June 2012 to support
Avaya 9608, 9611, 9621 and 9641 Series IP deskphones Software Release 6.2
Service Pack 1.
This release supports ringing on select wireless headsets from Jabra and
Plantronics and the new parameters AGTACTIVESK, and
AGTGREETLOGOUTDEL for the Call Center environment..
Issue 5 Updated version of document released in July 2012 to support Avaya 9608, 9611,
9621 and 9641 Series IP deskphones and content of software Release 6.2
Service Pack 2. This release supports Auto-answer from deskphone and user
based activation of bidirectional headset setting.
Issue 6 Version of document released in January 2013, to support the Agent ID query
feature and a feature for muting the deskphone when used in shared control
configuration with one-X Communicator.
Issue 7 Version of the document released in May 2013 to include the support for Jabra
firmware and the Debug feature modified to allow access only after the default
password is changed.
Issue 8 Version of the document released in May 2013 to include the enhancement for
EAP-TLS, IP redirect feature, support for SCEP, SSO logon, the inclusion of the
parameters SYSAUDIOPATH, CCLOGOUTIDLESTAT, SSO_ENABLED, and
support for a configurable headset.
Issue 9 Latest version of the document released in January 2014 to document the
addition of Gigabit switch to the Avaya 9608 deskphone.
New in this release
With Release 6.3.1, Avaya introduced the 9608G Gigabit IP Deskphone. The 9608G offers all
of the features of the 9608 IP deskphone, and adds Gigabit network connectivity and an
Ethernet activity LED.
Changes in Release 6.3
Avaya 9600 Series H.323 IP deskphones Release 6.3 has the following enhancements and
features.
Enhancement Description
New parameters SYSAUDIOPATH: To set the default audio path to the
speaker or the headset, or allow the call center agent to
select the audio path.
8 Installing and maintaining Avaya IP Deskphone H.323 9608, 9608G, 9611G, 9621G, and 9641GJanuary 2014
Comments? infodev@avaya.com
Page 9
Enhancement Description
CCLOGOUTIDLESTAT: To configure the headset LED to
Note:
For more information on the
new parameters, see 9600
Series H.323 customizable
system parameters.
remain on after the call center agent logs out.
SSO_ENABLED: To implement the Single Sign On
feature.
Additional related parameters added are –
SSO_REGISTERED_MODE,
SSO_LOCK_SYNC,SSO_DISCONNECT_ACTION,
SSO_DISCONNECT_FACS, SSO_CLIENT_CERT. For
more information on Single Sign On refer the application
note on the Avaya support site.
AGTSPKRSTAT: Modified to allow the call center agent to
use the SPEAKER button to release an ongoing call.
LOCALZIPTONEATT: To control the volume of local phone
ziptone heard when using AUTOANSSTAT= 1.
PHY2_AUTOMDIX_ENABLED: To configure automatic
recognition of crossover or straight Ethernet cables on the
deskphone PC port (Auto MDIX).
Changes in Release 6.3
LEDMODE: To support different LED behaviors. Old
behavior is maintained as default (LEDMODE 0).
DOT1XWAIT: To specifiy whether the telephone will wait
for 802.1X to complete before proceeding with startup and
initiating DHCP.
Single Sign on To allow a PC user to control the login and locked status of
a telephone from the PC.
Note:
Contact DevConnect for more information on obtaining
the API and developing PC client applications.
Identity Certificate (SCEP)
support
Authentication using EAPTLS
HTTP redirect The HTTP redirect feature directs IP phones to download
To perform secure backup of agent greetings.
To authenticate the users using the EAP-TLS mode of
secure authentication.
software from the nearest server on the network, thereby
reducing download time.
See HTTP Redirect feature.
Note:
Voice Initiated Dialing (VID) is no longer supported on the H.323 9600 Series IP
deskphones.
Installing and maintaining Avaya IP Deskphone H.323 9608, 9608G, 9611G, 9621G, and 9641GJanuary 2014 9
Page 10

Overview
Enhancements in H.323 Release 6.2 Service Pack 4
H.323 Release 6.2 Service Pack 4 has the following enhancements:
• Debug feature is accessible only if you have changed the default password for the craft
menu.
• Support for Wireless (Jabra/Plantronics) EHS cable firmware.
Enhancements in H.323 Release 6.2 Service Pack 3
H.323 Release 6.2 Service Pack 3 included the following enhancements:
• Agent ID query feature that the deskphone uses to send a query to the CM for the agent
ID and use the response from CM accordingly.
• A feature for muting the deskphone when used in shared control configuration with oneX Communicator.
Enhancements in H.323 Release 6.2 Service Pack 2
This release included the following features and enhancements:
• Bi-directional headset feature configurable by user
In Release 6.2, only the administrator could switch on the bi-directional feature for the
user's headset through the settings file parameter HEADSETBIDIR. In this release
onwards, the user can activate or de-activate this feature through the deskphone.
• Phone-based conditional auto-answer
Using this feature, you can configure the deskphone to automatically answer incoming
calls, or a subset of incoming calls, independently of the auto-answer setting on the
Communication Manager.
• The AGTIDVUSTAT parameter, introduced in Release 6.2, is renamed in Service Pack
2 to AGTVUSTATID.
10 Installing and maintaining Avaya IP Deskphone H.323 9608, 9608G, 9611G, 9621G, and 9641GJanuary 2014
Comments? infodev@avaya.com
Page 11

Features introduced in H.323 Release 6.2 Service Pack 1
Features introduced in H.323 Release 6.2 Service Pack 1
• A feature to enable ringing on wireless headsets from Jabra and Plantronics and the ability
to activate and deactivate the wireless headset from the headset button.
• A new parameter AGTACTIVESK that you can use in the Call center environment to
control the softkeys that are available to the agents.
• A new parameter AGTGREETLOGOUTDEL that you can use to keep or remove agent
greeting upon agent logout.
• The HEADSYS parameter that you can use to specify whether the deskphone will go onhook if the headset is active when a Disconnect message is received. This feature has
been reintroduced.
Note:
The default value of HEADSYS is related to the value of CALLCTRSTAT. If the value
of CALLCTRSTAT is 1, then the default of HEADSYS is 1.
If value of CALLCTRSTAT is 0, then the default of HEADSYS is also 0.
In either case, the administrator can override defaults by explicitly setting HEADSYS
in the 46xxsettings file.
Customers using Call center features without configuring CALLCTRSTAT, must have
the HEADSYS parameter set to 1.
New features in Release 6.2
Release 6.2 introduced the following features and functionality:
• The Debug procedure has been expanded to allow technicians to send immediate debug
reports to specified servers.
• A version of software that disables VPN and media encryption. To download this software,
go to the Avaya Support website
version on the About Avaya IP Deskphone screen on the deskphone with a “U” appended
to the software release.
• Support for Secure Shell (SSH). This protocol is intended to help Avaya Services monitor
deskphone performance.
http://www.avaya.com/support. You can identify this
• Extensible Authentication Protocol with TLS authentication (EAP-TLS ) is supported, in
part using the DOT1XEAPS parameter.
Installing and maintaining Avaya IP Deskphone H.323 9608, 9608G, 9611G, 9621G, and 9641GJanuary 2014 11
Page 12

Overview
• The AGTIDVUSTAT parameter. Call center agents who do not log in from a telephone,
for example, logging in from a personal computer, can use the AGTIDVUSTAT parameter
to specify a VuStats format number. With the VuStats format number, the telephone can
determine the Agent ID of the call center agent, which is essential to administer Agent
Greetings.
• A software application watchdog that automatically monitors other software processes.
The software application also determines whether the software processes have become
unresponsive. If processes have become unresponsive, the software application
generates a log event and either ends the process or resets the telephone. To disable or
re-enable this application watchdog, use the APPLICATIONWD parameter.
• Bluetooth functionality. To disable this functionality, use the BLUETOOTHSTAT
parameter in the settings file.
• A recording tone that can be played when the user is on a call that is being recorded. To
play this tone, use the RECORDINGTONE parameter. This feature would be relevant to
sites where a recording device is connected to the telephone and legal requirements
mandate warning both parties of the call to that fact.
• Users have a new option under Call Settings called ‘Audible Headset Alerting’ that, when
enabled, allows alerting through an attached headset in addition to the telephone’s
speaker.
• Support for control of handset audio equalization, also known as Hearing Aid
Compatibility (HAC). This feature is available through the settings file administration, end
user option, and Local Procedure. Equalization is available to optimize the audio for
telecoil or T-coil Hearing Aid operation, or for acoustic performance. This feature is
applicable only in North America,
• Sidetone values for headset and handset administration that are consistent between
intervals.
• A functionality for Call Center agents to store greetings on the telephone between logins
in addition to storage on a file server.
• The default value of HEADSYS has changed. The new default is tied to the current value
of CALLCTRSTAT. If CALLCTRSTAT has value “1”, HEADSYS has default value “1”.
Otherwise, CALLCTRSTAT has value “0”, and the default value of HEADSYS is likewise
0. In either case, though, you have the normal ability to override defaults by explicitly
setting HEADSYS in the settings file.
Note:
This release does not support Converged Network Analyzer (CNA). Any applicable
administration is ignored as of Release 6.2.
12 Installing and maintaining Avaya IP Deskphone H.323 9608, 9608G, 9611G, 9621G, and 9641GJanuary 2014
Comments? infodev@avaya.com
Page 13

Chapter 2: Installing the Deskphone
Avaya IP Deskphones
The Avaya 9600 Series IP Deskphones product line uses Internet Protocol (IP) technology
with Ethernet interfaces.
The 9608, 9611G, 9621G, and 9641G deskphones introduced in Release 6.0 supplement the
existing Avaya IP Solutions platform.
The 9600 Series IP deskphones introduced in Release 6.0 support DHCP and HTTP/HTTPS
over IPv4/UDP and IPv6/UDP including Internet Control Message Protocol (ICMP) and Internet
Group Management Protocol (IGMP). Both the protocols enhance deskphone administration
and servicing.
These deskphones use DHCP to get dynamic IP Addresses and HTTP or HTTPS to download
new software versions or customized settings.
With all 9600 Series IP deskphones, you need only one IP connection on the desktop for both
a deskphone set and a personal computer using an Ethernet switch.
The following information pertains to Australian law:
This equipment must be installed and maintained by trained service personnel. All input/output
ports are classified as Safety Extra Low Voltage (SELV, in the meaning of IEC 60950). To
maintain safety compliance when connecting the equipment electrically to other equipment,
the interconnecting circuits shall be selected to provide continued conformance of clause 2.3
for SELV circuits (generally, double/reinforced insulation to 240 Vac rms to any primary/mains
circuitry and 120 Vac rms to any telecommunications network circuitry). To ensure that these
conditions are adhered to, interconnect the equipment only with the already approved/certified
equipment.
Updating phone software for installation
About this task
A phone that is shipped from the factory might not contain the most up-to-date software for
registration and operation. When you first plug in the phone, a software download from an
HTTP server might be initiated. The software download provides the phone upgraded
functionality.
Installing and maintaining Avaya IP Deskphone H.323 9608, 9608G, 9611G, 9621G, and 9641GJanuary 2014 13
Page 14
Installing the Deskphone
For subsequent downloads of software upgrades, the media server provides the capability for
a remote restart of the IP phone. When you restart the phone, the phone automatically restarts
and performs a download if new software is available. For more information, see About
software distribution packages on page 65 and Downloading software packages on
page 66.
Creating the pre-installation checklist
Before plugging in a 9608, 9608G, 9611G, 9621G, or 9641G , verify the following requirements.
If you fail to meet the requirements, the phone might not funtion properly and can negatively
impact the network. Print copies of this checklist for each server and deskphone.
Requirements for your network:
1. The LAN uses Ethernet Category 5e cable to run the IPv4 or IPv6 version of
Internet Protocol.
2.
Your call server must haveAvaya Aura®Communication Manager Release 6.0 or
later version installed.
Avaya only supports 9608, 9608G, 9611G, 9621G, and 9641G deskphones
running on Communication Manager 6.0 or later.
3. Verify that you have installed the following circuit packs on the switch:
• TN2602 or TN2302IP Media Processor circuit pack. Avaya recommends that
sites with a TN2302 IP Media Processor circuit pack must install a TN2602 circuit
pack to benefit from increased capacity.
• TN799C or D Control-LAN (C-LAN) circuit pack.
Important:
Release 6.0 or later requires TN799C V3 or greater C-LAN circuit pack(s). For
more information, see the Communication Manager Software and Firmware
Compatibility Matrix on the
4. Verify that you have configured the Avaya call server correctly.
For more information, see Administering Avaya IP Deskphone H.323 9608,
9608G, 9611G, 9621G, and 9641G and Communication Manager documentation
on the Avaya Support website.
5. Verify that you have administered the DHCP server and application correctly.
See Administering Avaya IP Deskphone H.323 9608, 9608G, 9611G, 9621G, and
9641G.
6. Verify that you have administered the HTTP/HTTPS server and application
correctly.
See Administering Avaya IP Deskphone H.323 9608, 9608G, 9611G, 9621G, and
9641G.
Avaya Support website.
14 Installing and maintaining Avaya IP Deskphone H.323 9608, 9608G, 9611G, 9621G, and 9641GJanuary 2014
Comments? infodev@avaya.com
Page 15

Creating the pre-installation checklist
Requirements for your network:
7. Verify that you have loaded the upgrade script and application files from the Avaya
Support website correctly on the HTTP/HTTPS server.
8. If applicable, administer the DNS server as described in Administering Avaya IP
Deskphone H.323 9608, 9608G, 9611G, 9621G, and 9641G.
9. If applicable, administer the WML server as described in Administering Avaya IP
Deskphone H.323 9608, 9608G, 9611G, 9621G, and 9641G.
Note:
All server applications mentioned in items 5 -9 can co-reside on the same hardware, subject
to the specific restrictions of each individual application. For more information about
administering other network equipment, administering applications, for example, firewalls,
and information about topics like port utilization, see Administering Avaya IP Deskphone
H.323 9608, 9608G, 9611G, 9621G, and 9641G.
Requirements for each deskphone:
10. Verify that you have an extension number and an Communication Manager
security code (password) for each applicable IP deskphone. If your call server and
the phone settings file support unnamed registration, you do not need an
extension or password. However, without an extension or password, the phone
has limited functionality. For information about unnamed registration, see About
unnamed registration on page 34.
11. Verify that a Category 5e LAN jack is available at each phone site and a Category
5 modular line cable that connects the deskphone to the LAN jack. Cat 5 cables
with an RJ45 plug have a plug size restriction of 36 mm.
12. Verify that each deskphone receives power through a Telephone Power Module,
which you must order separately. For PoE Input connection, use only with UL
listed I.T.E. equipment with PoE output. If LAN supplies IEEE-standard power, or
Power over Ethernet, to the deskphone, the phone does not require a power
module.
13. One Category 5e modular line cord to connect the IP deskphone and the
computer, if applicable.
14. Verify that the deskphone set package includes the following components:
• One phone set with dual position flip-stand or clip-stand
• One wideband handset capable of transmitting and receiving 7 KHz audio.
• One H4DU 9-foot long 4-conductor coiled handset cord, plugged into the phone
and the handset.
• A “Important Notice and Warning” page which provides the URL for the Avaya
Support website to download all other documentation.
• To use 9641G in a call center environment: a 9600 Dual Headset Adapter Kit
(PK25) (Comcode: 700500729) and 9641G Call Center Faceplate Kit (PK25)
Installing and maintaining Avaya IP Deskphone H.323 9608, 9608G, 9611G, 9621G, and 9641GJanuary 2014 15
Page 16
Installing the Deskphone
(Comcode: 700500728) that contains 25 Dual Headset Adapter (DHA) units and
25 9641G removable CC-faceplate units respectively.
If applicable, verify that the you have staged the phone administered the phone
with applicable VPN settings. For information on the VPN settings, see VPN Setup
Guide for 9600 Series IP Telephones, 16-602968.
Note:
For sites using wired headsets, the 9600 Series IP deskphones support only the Jabra
GN1216 Headset cord and the Plantronics HIS headset cord. For more information, contact
your Avaya representative.
Plugging in the deskphone
About this task
Caution:
Use the correct jack when you plug in the deskphone. You can find the jacks at the rear of
the telephone housing. Icons on the side of the jacks represent the correct use of each
jack.
You can only provide power to the 9608, 9608G, 9611G, 9621G, and 9641G deskphoneswith
the IP Phone Single Port PoE Injector (SPPOE-xx), the new Telephone Power Module (DC
power jack) which is available separately (Comcode 700500725). In addition, all deskphones
support IEEE 802.3af-standard LAN-based power. Before you install a deskphone, verify with
the LAN administrator whether the LAN supports IEEE 802.3af, and if so, whether the
deskphone should be powered locally or by means of the LAN.
When you add devices like multiple button modules or a USB device to applicable IP
deskphones, the power class might change. Ensure that all the button modules are of the same
model type.
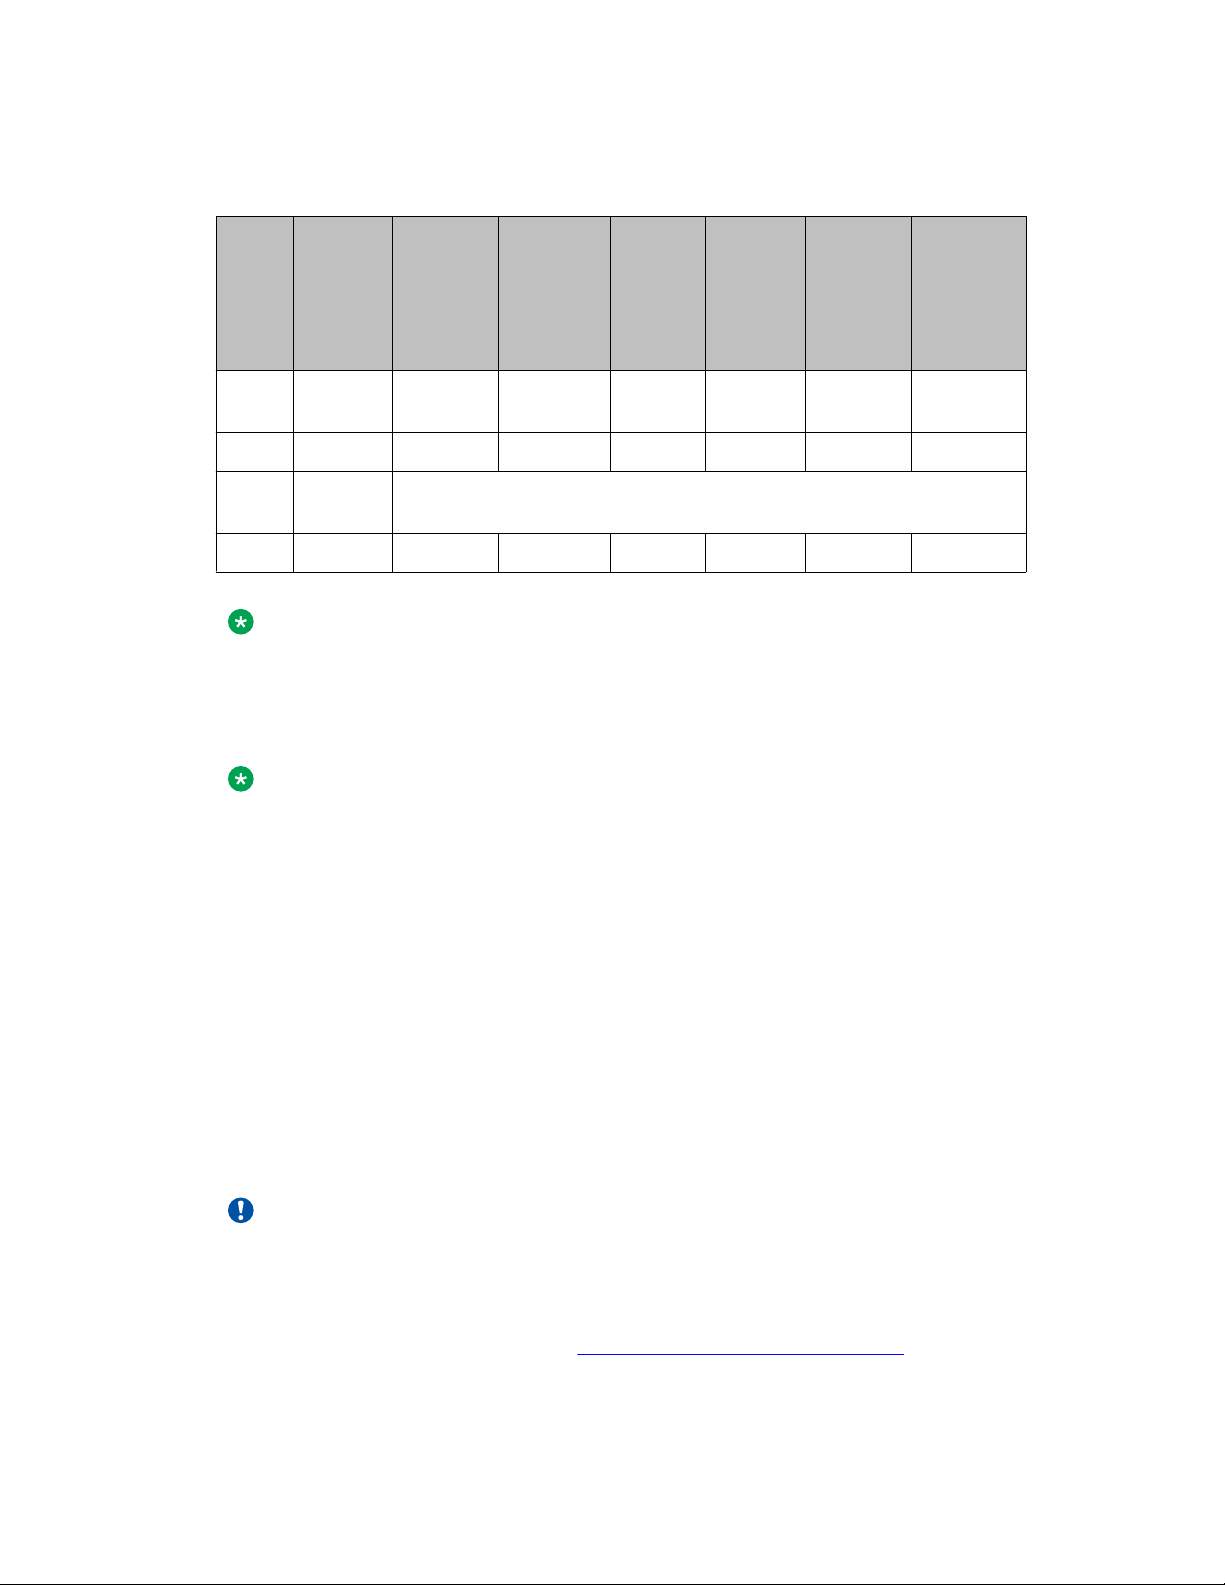
The table Impact of Additional Devices on Telephone Power over Ethernet
Power Class on page 17 shows the effect of such additions on the power class and indicates
how to set the IEEE power switch on the back of the deskphone to accommodate different
power needs. When you add USB devices, the telephone displays instructions for any
additional power needs.
Note:
The 9621G is a PoE Class 2 device with a 10/100/1000 switch and does not have an IEEE
power switch.
Note:
If you set the IEEE switch on the back of the deskphone to H, the telephone registers as a
Class 3 device, even if the actual power usage is applicable to Class 1 or 2.
16 Installing and maintaining Avaya IP Deskphone H.323 9608, 9608G, 9611G, 9621G, and 9641GJanuary 2014
Comments? infodev@avaya.com
Page 17
Plugging in the deskphone
Table 1: The impact of additional devices on power requirements over Ethernet Power
Class
Phone
Model
9608/
9608G
9611G Class 1 H H H H H H
9621G
9641G Class 2 H H H H H H
Default
PoE
(Class
“L” on
IEEE
switch)
Class 1
Class 2 Not applicable; the 9621G does not support button modules or USB
One
BM12
(IEEE
switch
setting)
H H H H H H
devices.
Two
BM12s
(IEEE
switch
setting)
Three
BM12s
(IEEE
switch
setting)
One
SBM24
(IEEE
switch
setting)
Two
SBM24s
(IEEE
switch
setting)
Three
SBM24s
(IEEE
switch
setting)
Note:
The deskphone monitors power consumption to conform to the IEEE 802.3af specifications. If
you connect a Dual Headset Adapter (DHA), the power classification might change and you
must then change the switch setting as well.
Note:
In 9611G and 9641G, the USB interface supports USB login, use of digital pictures from a
USB device as a screensaver, and import or export of contact lists by a Flash drive. The
9608 does not support USB devices, and the 9621G model does not have a USB jack. Since
the power consumption of the drive varies from product to product, you cannot state how a
USB will impact PoE power class. When the drive attempts to register with the deskphone,
the deskphone determines if its current power class setting is adequate to support the drive.
If power is adequate, the deskphone lets the drive register. If the power is not adequate, the
deskphone will alert the user to change the power class by changing the IEEE power switch
setting from L to H. In extreme situations, the total power consumption with the addition of
a USB device may be greater than what the Class 3 power source can provide. In that case,
the deskphone detects this and instructs the user to use an auxiliary power supply or to
temporarily disconnect one or more of the modules while the USB device is in use. The
system parameter USBPOWER determines for which power class or classes to enable
power to the USB interface. For more information, see Chapter 7 in the Administering Avaya
IP Deskphone H.323 9608, 9608G, 9611G, 9621G, and 9641G.
Important:
The last step in assembling the 9600 Series IP Deskphone is to plug in the deskphone with
any modules or adapters or both but without attachments such as USB devices and
headsets. Plug in the deskphone to a power source either by plugging the power cord into
the power source (local power) or plug the modular line cord into the Ethernet wall jack (IEEE
power). For more information, see
Installing and maintaining Avaya IP Deskphone H.323 9608, 9608G, 9611G, 9621G, and 9641GJanuary 2014 17
Completing the power connection on page 21 .
Page 18

Installing the Deskphone
Caution:
Failure to connect the proper cables with the proper jacks might result in an outage in part
of your network.
To learn how to connect cords to the jacks on the four deskphones:
Telephone Model: See:
9608G or 9611G Connection jacks on a 9608G or 9611G
9621G or 9641G Connection jacks on a 9621G or 9641G
deskphone on page 19
deskphone on page 19
18 Installing and maintaining Avaya IP Deskphone H.323 9608, 9608G, 9611G, 9621G, and 9641GJanuary 2014
Comments? infodev@avaya.com
Page 19
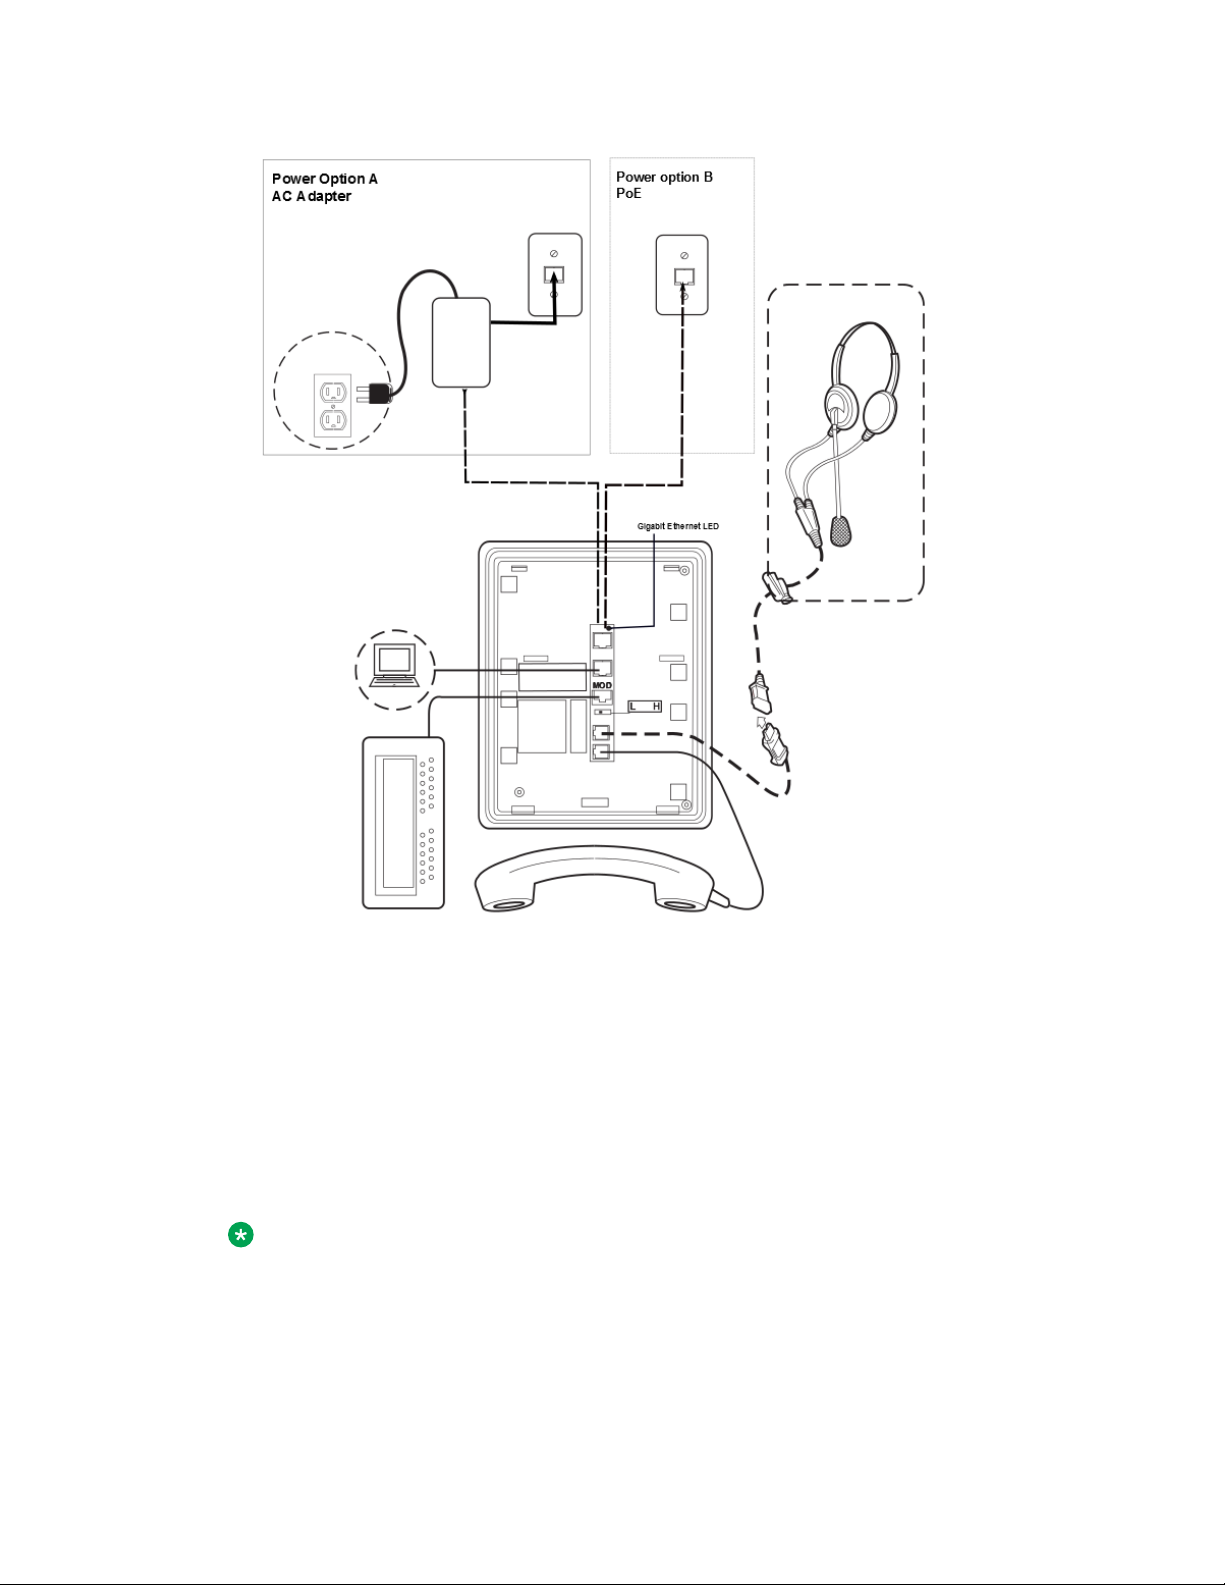
Plugging in the deskphone
Figure 1: Connection jacks on a 9608G or 9611G deskphone
Note:
The Gigabit Ethernet LED indicator is applicable only to the 9608G IP deskphone. This
indicator lights up steady green when a link of any speed is established, blinks with any
network activity, and turns off upon the loss of network connectivity.
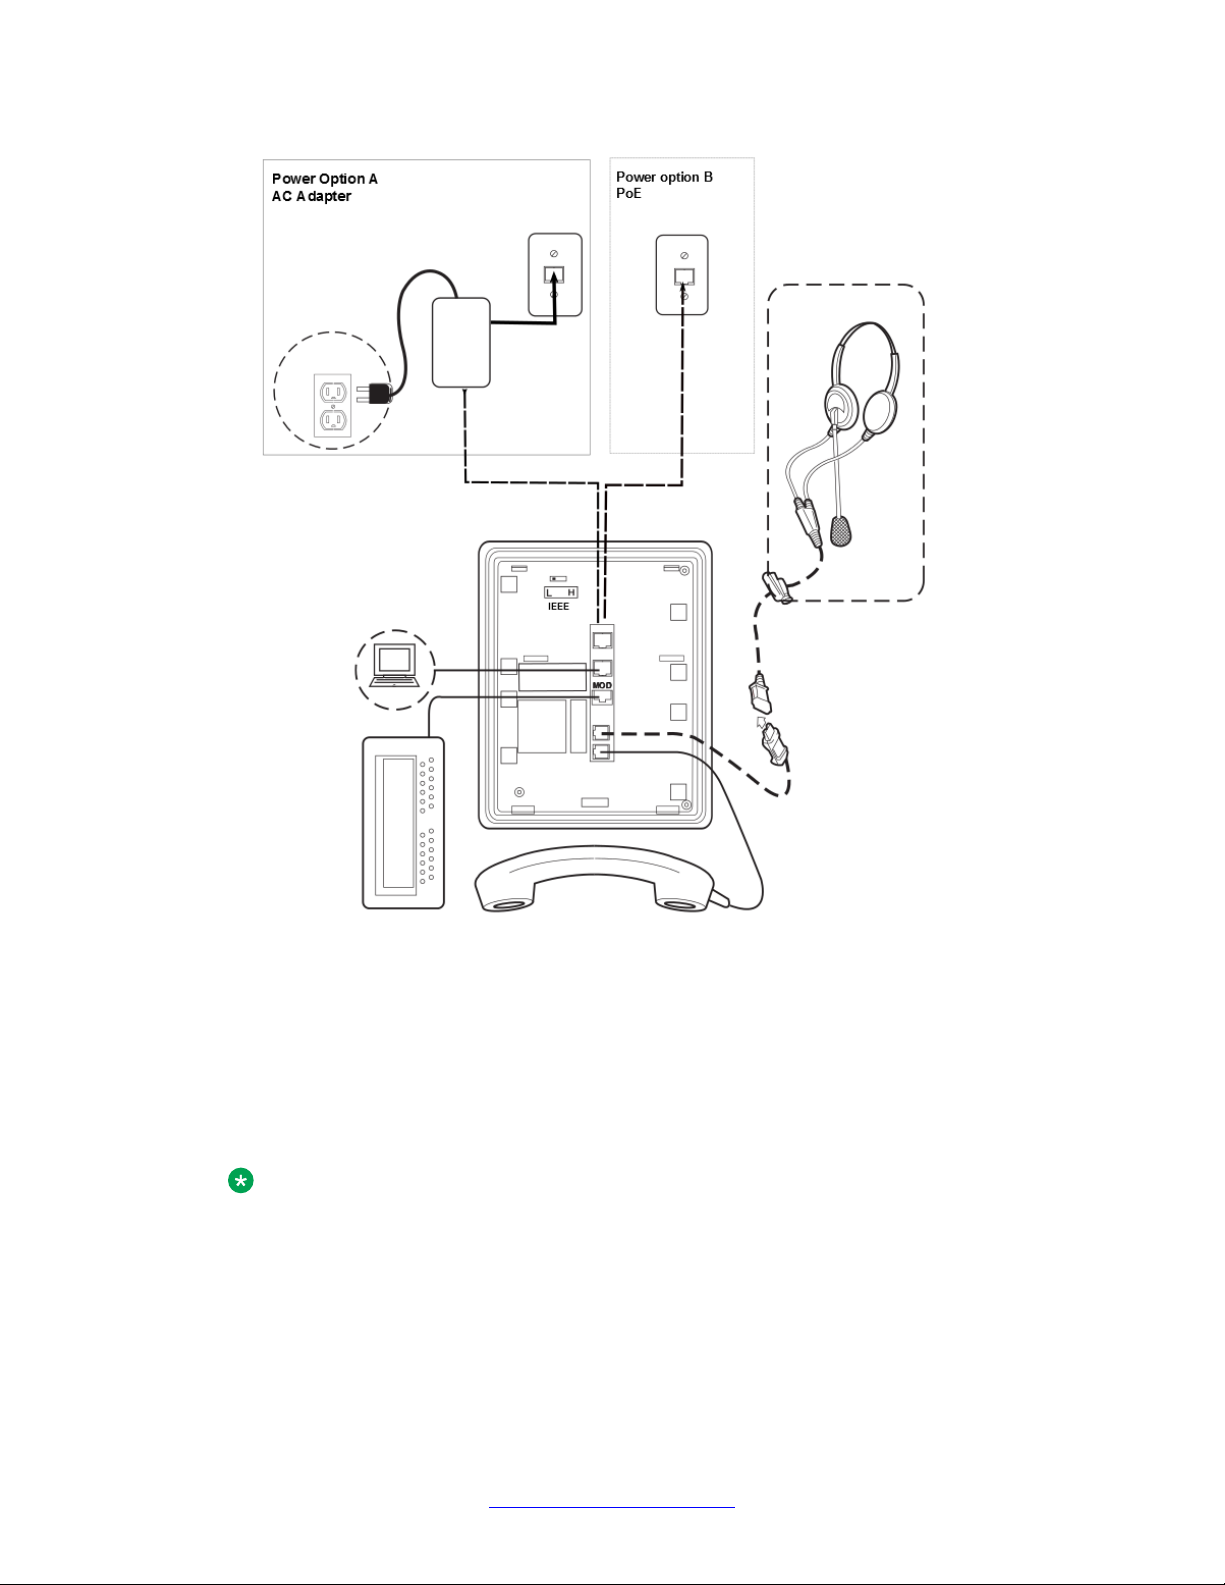
Figure 2: Connection jacks on a 9621G or 9641G deskphone
Installing and maintaining Avaya IP Deskphone H.323 9608, 9608G, 9611G, 9621G, and 9641GJanuary 2014 19
Page 20
Installing the Deskphone
Note:
Note that the 9621G does not support a button module, USB device, or a Dual Headset
Adapter.
20 Installing and maintaining Avaya IP Deskphone H.323 9608, 9608G, 9611G, 9621G, and 9641GJanuary 2014
Comments? infodev@avaya.com
Page 21

Completing the power connection
Procedure
1. Plug one end of the H4DU 4-conductor coiled handset cord into the phone and the
other end into the handset.
2. Plug one end of the first Category 5 modular line cord into the Ethernet jack of the
PC and the other end into the secondary Ethernet jack on the phone, if
appropriate.
3. For an IEEE-powered deskphone, plug one end of the second Category 5 modular
line cord into the Ethernet jack on the phone. Plug the other end of this cord into
the Ethernet wall jack.
4. For a locally powered deskphone, connect the Category 5 modular line cord
provided with the IP Phone Single Port PoE Injector SPPOE-xx, where xx
represents the model number into the Ethernet jack on the phone. Plug the femite
end of this cord into the deskphone. Plug the other end of this cord into the SPPOExx power injector jack labeled DATA & POWER OUT. Plug another Category 5 cord
into the SPPOE-xx power injector jack labeled DATA IN. Plug the other end of this
cord into the Ethernet wall jack. Finally, connect the SPPOE-xx to an AC power
source.
Completing the power connection
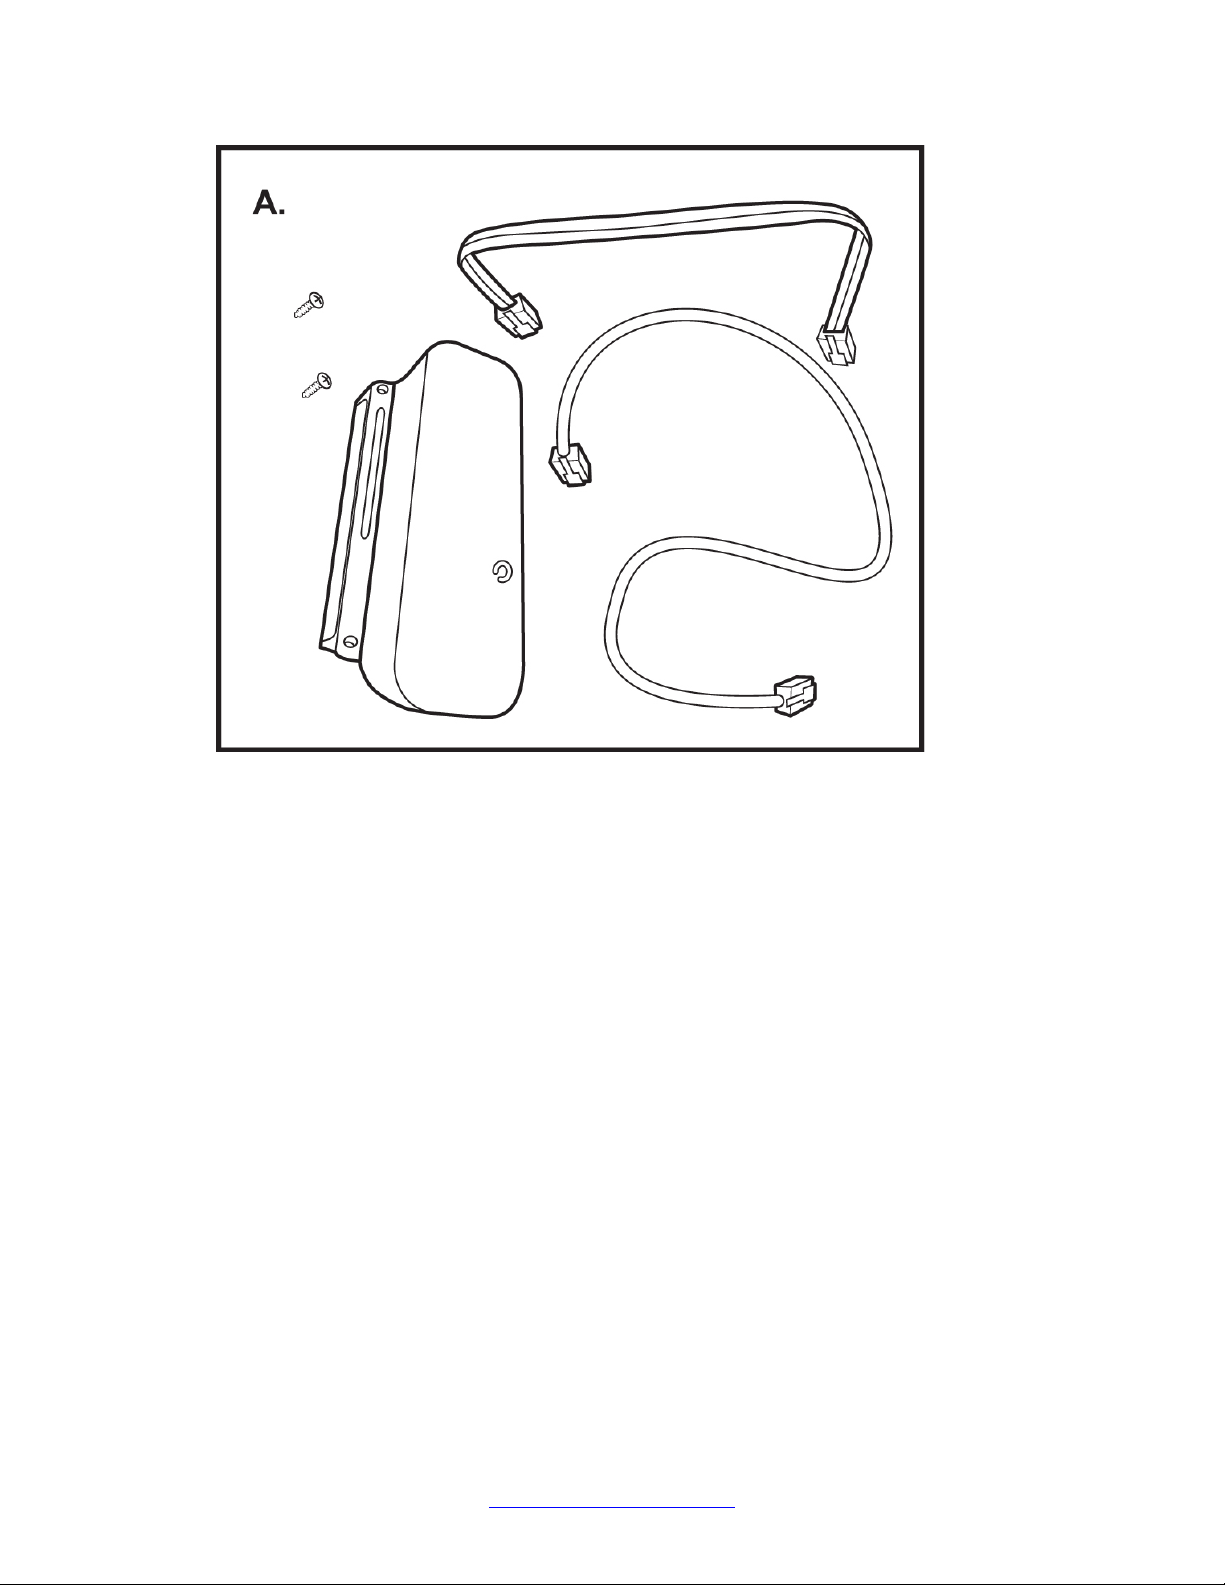
Installing a Dual Headset Adapter (DHA)
About this task
In Release 6.1, you can install a Dual Headset Adapter (DHA) on call center deskphones. The
supervisor can monitor calls in progress by attaching a DHA directly to a 9641G, 9611G, 9608
or 9608G, deskphone or to an attached button module. The 9621G does not support a DHA.
Order the 9600 Dual Headset Adapter Kit (PK25) (Comcode 700500729), which includes dual
headset adapters and required cables for 25 deskphones.
Installing and maintaining Avaya IP Deskphone H.323 9608, 9608G, 9611G, 9621G, and 9641GJanuary 2014 21
Page 22
Installing the Deskphone
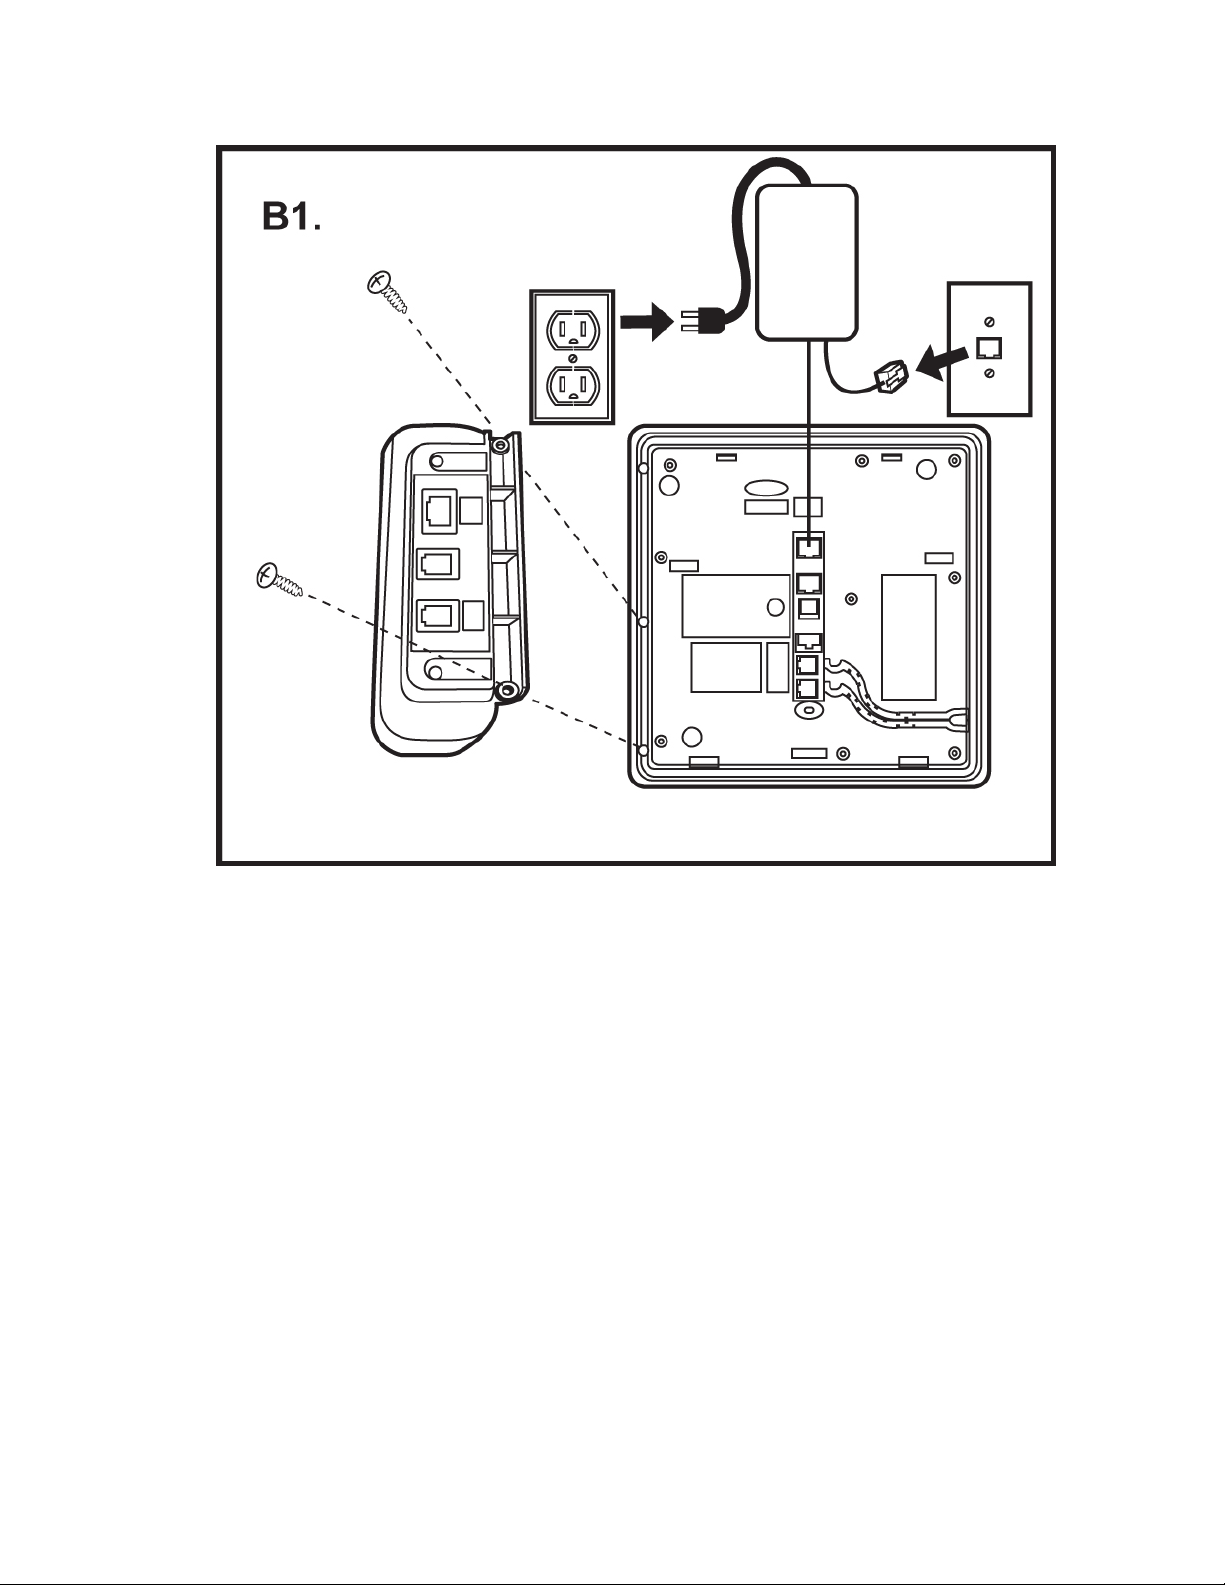
Figure A shows the DHA Package Contents.
To install a DHA directly to the deskphone and alternatively to an attached button module, see
the following figure.
22 Installing and maintaining Avaya IP Deskphone H.323 9608, 9608G, 9611G, 9621G, and 9641GJanuary 2014
Comments? infodev@avaya.com
Page 23
Installing a Dual Headset Adapter (DHA)
Figure B1 :Attaching the DHA to a deskphone.
Installing and maintaining Avaya IP Deskphone H.323 9608, 9608G, 9611G, 9621G, and 9641GJanuary 2014 23
Page 24
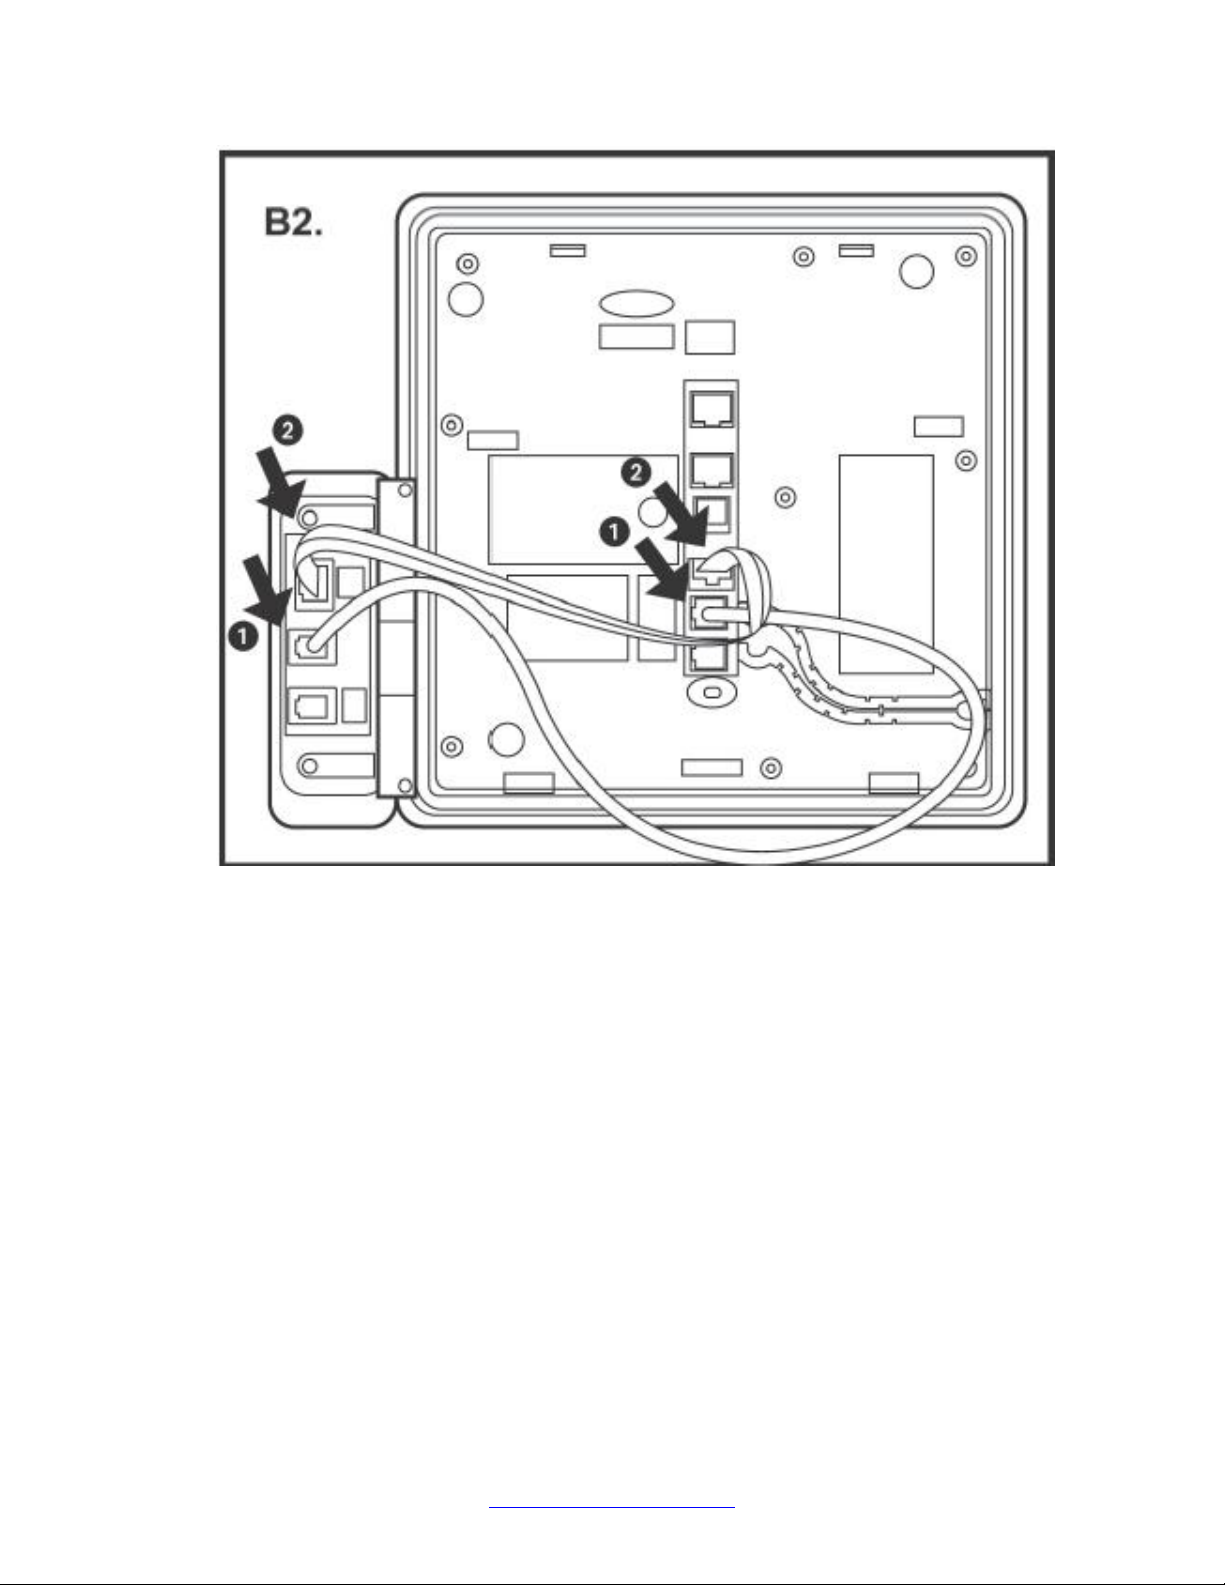
Installing the Deskphone
Figure B2 : Attaching the DHA to the phone power and audio cables.
24 Installing and maintaining Avaya IP Deskphone H.323 9608, 9608G, 9611G, 9621G, and 9641GJanuary 2014
Comments? infodev@avaya.com
Page 25
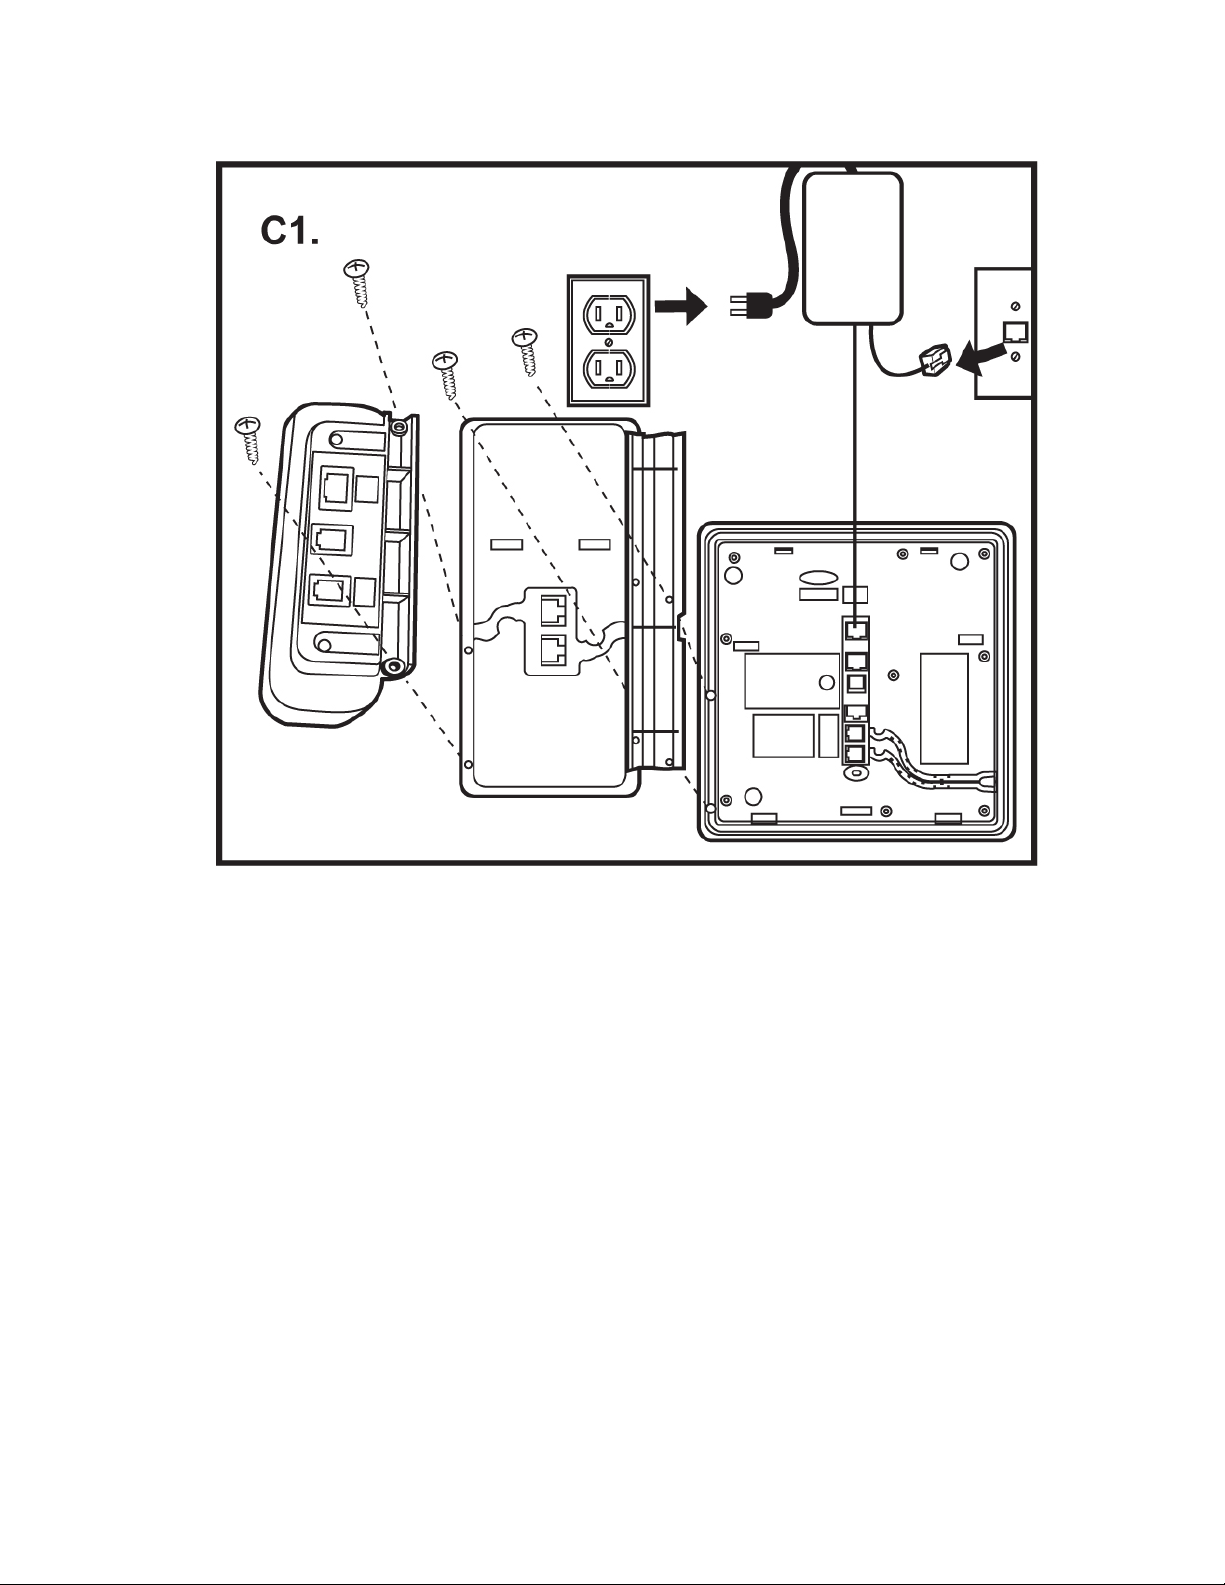
Installing a Dual Headset Adapter (DHA)
Figure C1: Attaching the DHA to an (optional) button module.
Installing and maintaining Avaya IP Deskphone H.323 9608, 9608G, 9611G, 9621G, and 9641GJanuary 2014 25
Page 26
Installing the Deskphone
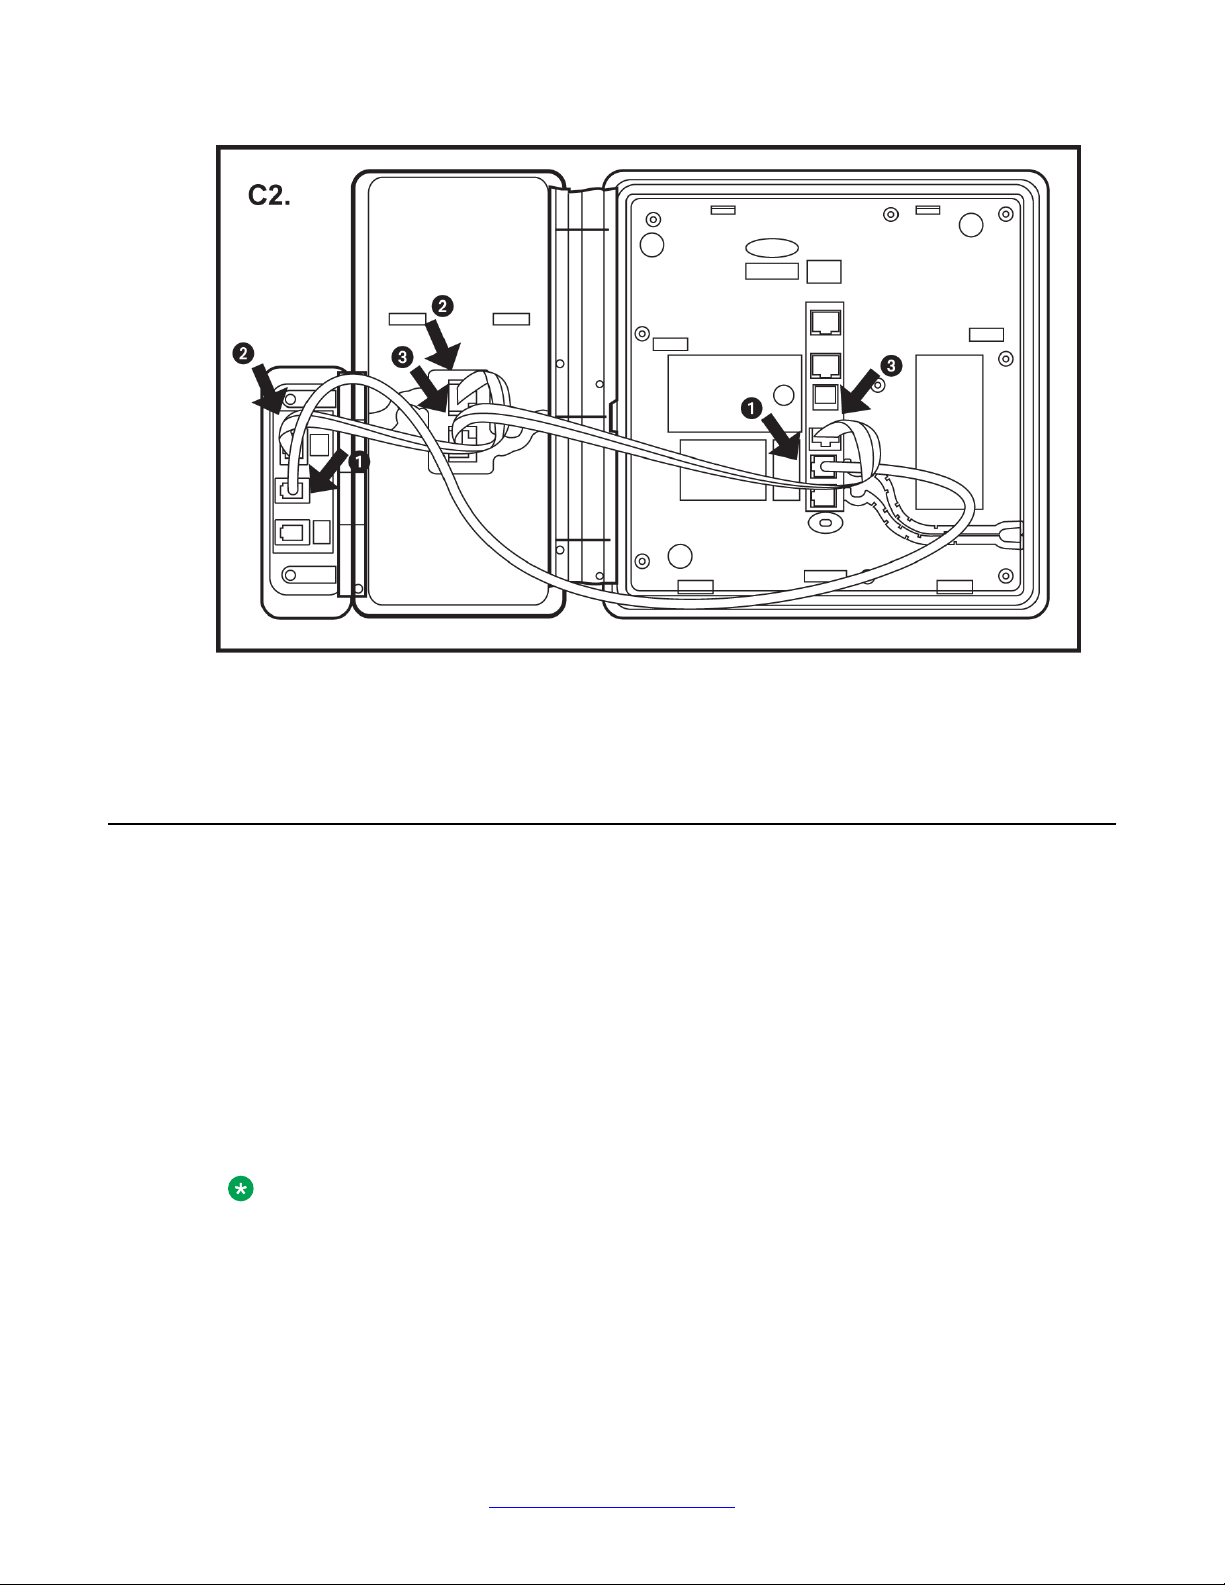
Figure C2: Attaching cable connection of the DHA to an optional button module and the
deskphone.
9641G Call Center faceplate installation
About this task
The 9641G IP deskphones used in a call center come with special faceplate kits: 9641G Call
Center Faceplate Kit (PK25) (Comcode 700500728). The removeable faceplate has the
following features:
• Covers the handset pockets
• Maintains the switch hook “down” position
• Covers the Forward and Headset buttons
• Relabels the Speaker button as the Release button to facilitate ending calls
Note:
To allow Release button operation for 9641G deskphones, administer the Release button
with the AGTSPKRSTAT parameter set to 2 and the CALLCTRSTAT parameter set to 1.
To install the 9641G Call Center faceplate:
26 Installing and maintaining Avaya IP Deskphone H.323 9608, 9608G, 9611G, 9621G, and 9641GJanuary 2014
Comments? infodev@avaya.com
Page 27

Plugging in and resetting the deskphone using the Dynamic Addressing Process
Procedure
1. If already connected, remove the HAC cord from the underside of the phone.
2. With the phone facing up and resting flat on a hard surface, pry up a corner of the
standard faceplate. Use your fingers, a flat screwdriver, or other non-sharp device.
Continue prying around the edge of the standard faceplate until the faceplate is
released from the phone.
3. Align the tabs on the 9641G Call Center faceplate with the slots on the outer edges
of the deskphone and push down to lock the tabs into the slots.
4. Ensure that the display bezel surrounding the screen is in proper position.
5. Plug the HAC cord back into the underside of the phone.
Plugging in and resetting the deskphone using the Dynamic
Addressing Process
Note:
Before you start this process you must have an extension number for the IP deskphone and
the Communication Manager security code (password) for that extension, unless you intend
to use the deskphone with unnamed registration. For more information, see
registration on page 34. Any reference to the HTTP server applies equally to an HTTPS
server. You can run the plug in and reset process successfully using the following
description. If you see error messages, see
As the deskphone initializes, you see messages, some of which are part of DHCP process,
with a power on indication and dynamic feedback. These messages indicate that the phone is
active and not locked. You also receive useful information, about the status of the network, the
server, or the downloading operations, before the dial tone.
Phone initialization
This section description describes the software architecture on which the requirements are
based and provides an overview of how you can expect the phone to operate during startup
and software upgrades. This description is not a comprehensive description of all internal tasks
performed during startup.
About unnamed
Chapter 5: Troubleshooting on page 71.
Installing and maintaining Avaya IP Deskphone H.323 9608, 9608G, 9611G, 9621G, and 9641GJanuary 2014 27
Page 28

Installing the Deskphone
The system stores the files in five areas of reprogrammable nonvolatile or flash memory in the
phones:
• A boot program area
• Two Kernel/Root File Systems
• One Application File System
• One Temporary Storage area
The phone supports two Kernel or Root File Systems for backup if one file system is corrupted
but activates only one file system when the phone starts or resets. Temporary Storage stores
a new Signed Application or Library Software Package that the current application downloads.
You can then install the package in the active Kernel or Root File System after the next
reset.
When a phone starts, the boot programs check the Kernel or Root File System that was marked
as the one to be activated. If this file system is not corrupted, the boot program transfers control
to a process in that file system. If that file system is corrupted, the boot program checks the
other Kernel/Root File System.
If that file system is not corrupted, the system:
• Marks that file system as the file system to be activated
• Sets the value of RFSINUSE to the name of the Signed Kernel or Root Software Package
that was used to install that file system
• Transfers control to a process in the file system
If both Kernel/Root File Systems are corrupted, the phone becomes nonfunctional and you
must return the phone for repairs.
A process in the active Kernel/Root File System first checks whether a Signed Application or
a Library Software Package is stored in Temporary Storage. If yes, the process installs the
Application Software Package or the Library Software Package. The system installs both if
either software package has a different file name than the currently installed version and
replaces the existing corresponding files in the Application File System. The process then
deletes the copy of the Signed Application or Library Software Package stored in Temporary
Storage. If the process does not find a Signed Application or Library Software Package in
Temporary Storage, the process checks the integrity of the application files. If the files are
corrupted, the process installs files from the Backup Package and replaces the corrupted
application files in the Application File System. Each time an Application Software Package or
a Library Software Package is installed, the system sets the value of the persistent parameter
APPINUSE to the file name of the Signed Application or Library Software Package from which
the package was installed. If the application files are not corrupted, or after the Backup
Package has been installed, the system transfers control to the application installed in the
Application File System. Note that the processes in the Kernel/Root File System do not connect
to the network or download files.
The application then connects to the network, obtains any necessary IP address information,
and download files. The file download begins with the upgrade and settings configuration files,
and including Signed Software Packages and other separately downloaded files such as
28 Installing and maintaining Avaya IP Deskphone H.323 9608, 9608G, 9611G, 9621G, and 9641GJanuary 2014
Comments? infodev@avaya.com
Page 29

Understanding the plug in and reset process
Language Files and Certificate Files. When the phone downloads a Signed Software Package
which can contain either Kernel and Root Software Packages or Application and Library
Software Packages, it is initially stored in volatile memory (RAM). The system installs the other
downloaded files such as Language Files and Certificate Files directly in the Application File
System.
When either type of Signed Software Package is downloaded, the Signing Authority Certificate
is extracted from the package and is validated using a copy of the Avaya Product Root
Certificate Authority Certificate that is contained in the existing application software files. If the
Signing Authority Certificate is invalid, the package is deleted. If the Signing Authority
Certificate is valid, the Hardware Version File in the package is validated using the
corresponding Signature File in the package and the Signing Authority Certificate. If the
signature is invalid, the package is deleted. If the signature is valid, the Hardware Version File
is used to validate whether the package is valid for the model and hardware version of the
phone. If the package is invalid, the package is deleted. If the package is valid, the signature
of the software package is validated using the corresponding Signature Files in the package
and the Signing Authority Certificate. If either signature is invalid, the package is deleted.
If the signatures are valid and the signed software package is a Signed Application/Library
Software Package, the package is stored in Temporary Storage. If the Backup Flag is set in
the Hardware Version File, a copy of the Signed Application / Library Software Package is also
stored as the Backup Package, replacing the previous Backup Package.
If the signatures are valid and the Signed Software Package is a Signed Kernel or a Root
Software Package, the system installs the Kernel Software Package or the Root File System
Software Package or both, if either has a different file name than the currently installed version.
The system replaces the existing corresponding files in the Kernel/Root File System that was
not active during startup. A Root File System Software Package might also install new boot
programs in the boot program area. The system then marks the Kernel or the Root File System
as the one to be activated after the next power-up or reset. The system then sets the value of
the persistent parameter RFSINUSE to the file name of the Signed Kernel/Root Software
Package that was installed.
If a new Signed Kernel or Root Software Package was installed, the phone activates the new
Kernel or Root File System that will install the new Signed Application or Library Software
Package stored in Temporary Storage. If a new Signed Kernel or Root Software Package was
not installed, the phone application registers with a call server.
Understanding the plug in and reset process
Plug the phone into the Ethernet wall jack. The phone receives power from the port and
performs the following processes:
Installing and maintaining Avaya IP Deskphone H.323 9608, 9608G, 9611G, 9621G, and 9641GJanuary 2014 29
Page 30

Installing the Deskphone
Note:
Do not unplug the phone during the download process. Wait for the download process to
complete. If the application was downloaded earlier, the whole process takes approximately
1 to 2 minutes after the phone is plugged in. For software upgrades, including the boot file
and application file download, the process might take 5 to 10 minutes. The duration depends
on factors such as LAN loading and the number of phones being installed.
During hardware initialization, the system initialization values NVCONTRAST and
NVBRIGHTNESS are checked for non-null values, and set accordingly. phones with bitmapped display screens show the Avaya IP phone name and logo.
1. The system checks the system initialization value for the language file in use
2. The boot programs check the Kernel or the Root File System that has previously
(NVLANGFILE) for a non-null value, in which case the text strings in that language
file are used for text display. Otherwise, the display shows English text strings.
been marked as the one to be activated to ensure that it has not become corrupted.
If the Kernel or the Root File System is not corrupted, the system transfers control
to a process in that file system. If that file system is corrupted, the boot program
checks the other Kernel/Root File System. If that file system is not corrupted, the
file system is marked as the one to be activated. The system then sets the value of
RFSINUSE to the name of the Signed Kernel or Root Software Package that was
used to install that file system, and the control is transferred to the Signed Kernel
or Root Software Package. If both Kernel and Root File Systems are corrupted, the
system halts the processing. The software checks whether a Signed Application or
Library Software Package has been previously downloaded. If the system finds the
Application Software Package or the Library Software Package the Application
Software Package or the Library Software Package is installed. If either the
Application Software Package or the Library Software Package has a different file
name than the currently installed version, the system replaces the existing
corresponding files in the Application File System. The system then deletes the
downloaded Signed Application or Library Software Package. If a new Signed
Application or Library Software Package is not found, the integrity of the application
files is checked. If the files are corrupted, the system installs the files from the
Backup Package, replacing the corrupted files in the Application File System. Each
time an Application Software Package or a Library Software Package is installed,
the system sets the value of the persistent parameter APPINUSE to the file name
of the Application Software Package that was installed. If the application files are
not corrupted, or after the Backup Package has been installed, control is transferred
to the application installed in the Application File System. While the system loads
the application files into volatile memory and transfers control is transferred to the
application files, the bottom text line shows the value of the APPINUSE
parameter.
3. The system starts and sets the internal clock/calendar is set to 0:00:00 Saturday,
January 1, 2000.
30 Installing and maintaining Avaya IP Deskphone H.323 9608, 9608G, 9611G, 9621G, and 9641GJanuary 2014
Comments? infodev@avaya.com
Page 31

Understanding the plug in and reset process
4. The phone activates the Ethernet line interface , the PC Ethernet jack, and dial pad
input to allow the start of procedures. The activation occurs soon after power-up or
a reset.
The phone displays the speed of the Ethernet interface in Mbps, that is, 10, 100, or
1000. The phone then displays the message No Ethernet * to program until
the software determines whether the interface is 10 Mbps, 100 Mbps, or 1000
Mbps.
Note:
The Ethernet speed is the LAN interface speed for both the phone and any
attached computer, if the administrator has not disabled the latter interface by a
PHY2STAT setting.
Important:
When you press the star (*) after the system displays a * to program message.
The initialization process can support an interrupt that invokes the Craft Access
entry procedure to allow manual settings, only if the local dialpad procedure
status (PROCSTAT) system value is 0. The zero PROCSTAT value provides full
access to local procedures. If PROCSTAT is 1 the Craft Access entry procedure
can be invoked only when a * to program message displays, but only the VIEW
procedure is available. For information, see
Chapter 5: Using Local
Administrative (Craft) Options. on page 37
5. The IP phone sends a request to the DHCP server and invokes the DHCP
process.
The phone displays one of the following messages:
• DHCP: s secs * to program
• DHCP: s secs VLAN ID = n
where s is the number of seconds that have elapsed after the DHCP process was
started. The phone displays the first message if 802.1Q tagging is off and access
to local programming procedures is not disabled or restricted. For more information,
see
Chapter 3: Using Local Administrative (Craft) Options . on page 37 The phone
displays the second message if 802.1Q tagging is on and access to local
programming procedures is disabled or restricted. If the first and second message
alternate every 2 seconds, 802.1Q tagging is on. When the phone displays both
messages alternately, access to local programming procedures is not disabled or
restricted. Finally, the phone displays the third message if 802.1Q tagging is off and
access to local programming procedures is disabled or restricted.
6. The system determines the DHCP protocol , IPv4 or IPv6 protocol, and the
applicable parameters that are enabled.
Installing and maintaining Avaya IP Deskphone H.323 9608, 9608G, 9611G, 9621G, and 9641GJanuary 2014 31
Page 32

Installing the Deskphone
7. Using the list of gateway IP addresses provided by the DHCP server, the phone
Important:
IPv6 operation is limited to a specific customer set and not for general use.
Note:
The IPV6STAT parameter overrides both the DHCPSTAT parameter setting and
manual programming. If DHCPSTAT is set to enable DHVPv6, DHCPSTAT is
disabled if IPV6STAT is 0 and disabled. Manual programming overrides
DHCPSTAT, therefore even if DHCPSTAT is set to enable DHCPv4 or DHCPv6,
the DoDHCPV4 or DoDHCPV6 will be set to 0 and disabled if an IP address of
the corresponding type has been manually programmed.
The DHCP server provides the IP addresses for the following hardware:
• The phone
• The HTTP/HTTPS server
• The TN799C or D Control-LAN (C-LAN) circuit pack on the media server
performs a router check. The phone cycles through the gateway IP addresses with
ARPs or pings until it receives a response. When the router is located, the router
processes the received LLDP TLVs. Then the HTTP process starts.
8. While the IP phone connects to the HTTP server, the phone displays one of the
following messages:
HTTP: n ipadd
or HTTP: n ipadd * to program
or HTTP: n ipaddProgram
where n is the number of the IP address obtained from the HTTP server and ipadd
is the IP address.
Important:
Pressing star (*) at this time invokes the Craft Access entry procedure to allow
manual settings. For information, see Chapter 3: Using Local Administrative
(Craft) Options. on page 37
9. When connected, the phone looks for an upgrade script file.
10. The HTTP server sends and identifies an upgrade script.
The phone might send the GET message several times. Each time the GET
message is sent, all IP phones display the following message: HTTP: n uri
For HTTP, n is the number of HTTP requests made by the phone and uri is the URI
for the current HTTP request.
32 Installing and maintaining Avaya IP Deskphone H.323 9608, 9608G, 9611G, 9621G, and 9641GJanuary 2014
Comments? infodev@avaya.com
Page 33

Understanding the plug in and reset process
Note:
The SIG parameter value determines the signaling protocol whether H.323 or
SIP, and is used to determine the proper upgrade file that is downloaded. If you
set the SIG parameter manually using the local administrative Craft SIG
procedure, that value takes precedence over a SIG setting in a configuration file.
A change in the SIG value might require a reset to the phone so that a new or
different upgrade file can be downloaded to the phone.
11. While the upgrade script file is being downloaded, all IP phones display the following
message: HTTP: n sc etag
where n is the number of the IP address obtained from the HTTP server, sc is the
status code of the HTTP response, and etag is the value of the ETag header.
12. When the phone establishes the validity of the application file received, the phone
displays the following message: File Obtained; please wait...... s secs
where s is the number of seconds that elapse while non-volatile memory is
erased.
13. While the application file is saved in flash memory, all IP phones display the
following message: Saving to flash 1% 1 secs
where the percentage of the file and the number of elapsed seconds increase as
the application file is stored in flash memory.
14. The phone contacts the Avaya Media Server and displays a login screen that
displays the following:
Login, Enter Extension, or Enter Extension and press Enter or OK.
Steps to be performed by user after phone displays login and extension prompts:
1. Enter a new extension and press OK. To register the phone without the extension
or password (unnamed), press only OK or make no entry and wait 60 seconds.
Note:
Unnamed registration is registering a phone with the call server without entry of
an extension or password. You must set the UNNAMEDSTAT parameter to
enable unnamed registration. phones that are registered unnamed have limited
functionality. For more information, see
About unnamed registration on
page 34.
All IP phones display the following:
Login
Enter Password
Installing and maintaining Avaya IP Deskphone H.323 9608, 9608G, 9611G, 9621G, and 9641GJanuary 2014 33
Page 34

Installing the Deskphone
Enter Password and press Enter or OK
2. Enter the extension number and password and press OK. To register the phone
without the extension or password (unnamed), press OK or make no entry and wait
60 seconds.
To register the phone without the extension or password (unnamed), press Log In
or make no entry and wait 60 seconds.
You can see the extension as you enter the extension, but the password is displayed
as stars (*). The system determines whether the extension is in use.
When this process is complete, you can hear a dial tone when you press the
Speaker button or lift the handset. The dial tone indicates that the IP phone was
installed successfully.
Understanding unnamed registration
In an IP phone, when you register with a call server, and receive limited service, without
requiring an extension and password entry, this functionality is called as Unnamed registration.
Unnamed registration is useful in the following environments:
• “Hot-desking” environments where a time gap exists between one user logging out and
another user logging in on the same deskphone.
• Road warrior mode of use where a traveller can run the telephony features and
functionality by taking over the office deskphone extension.
In both examples, the user unregisters the deskphone by logging off or by taking the office
deskphone extension over to another deskphone. Without unnamed registration, the
deskphone in the first example will wait for an extension and password entry and the
deskphone in the second example will continue attempting to register at regular intervals. The
disadvantage of a unregistered deskphone is that no one can use the deskphone, for example,
to report a building emergency like a fire.
In Unnamed registration, the deskphone registers without an extension and password.
Because there is no extension, telephony functionality is limited, specifically:
• The user has only one call appearance, and hence, cannot transfer or conference calls.
• The user has no administered feature buttons, and cannot invoke on-hook dialing.
• The user cannot reach extension-based information, such as the Contacts data of a given
user or Option settings.
• The user is limited to the calling capability administered for PSA (Personal Station Access)
on the call server, for example, access to an emergency number.
• The deskphone cannot receive any outside calls.
Unless otherwise disabled, the deskphone automatically attempts to register unnamed if no
action is taken on the deskphone Extension entry screen within 60 seconds. To disable and
34 Installing and maintaining Avaya IP Deskphone H.323 9608, 9608G, 9611G, 9621G, and 9641GJanuary 2014
Comments? infodev@avaya.com
Page 35

Understanding unnamed registration
prevent unnamed registration, enter an ID or password. The system ignores unnamed
registration after any dialpad entry.
Administrators can disable unnamed registration by appropriately administering the system
parameter UNNAMEDSTAT. For more information, see Administering Avaya IP Deskphone
H.323 9608, 9608G, 9611G, 9621G, and 9641G. Unnamed registration appears to the end
user like Communication Manager TTI Mode and is similar from an administration perspective.
For more information about TTI, see your Communication Manager documentation.
Installing and maintaining Avaya IP Deskphone H.323 9608, 9608G, 9611G, 9621G, and 9641GJanuary 2014 35
Page 36

Installing the Deskphone
36 Installing and maintaining Avaya IP Deskphone H.323 9608, 9608G, 9611G, 9621G, and 9641GJanuary 2014
Comments? infodev@avaya.com
Page 37

Chapter 3: Using local Administrative Menu
procedures
About local Craft procedures
During or after you successfully install an IP phone, a system message might instruct you to
administer one of the manual procedures described in this chapter. These local administrative
procedures are also referred to as Craft procedures.
Local Administrative Options has two forms: One provides access to all the capabilities and
functions described in this chapter.
The other provides access only to an administrable level of VPN capabilities and functions.
Using the VPN-specific option, the administrator can grant VPN users access to the VPN
procedure itself, while preventing these users from gaining access to any other Local
Administrative Procedure. The administrator may grant the VPN user permission to change
VPN settings or only to view the settings. For more information about access to VPN-only Local
Administrative Options, see the VPN Setup Guide for 9600 Series IP Telephones,
16-602968.
Note:
You can modify the settings file to set parameters for any IP phones that download their
upgrade script and application files from the same HTTP server. For more information, see
Administering Avaya IP phone H.323 9608, 9608G, 9611G, 9621G, and 9641G.
Caution:
Only trained installers or technicians should perform local administrative procedures.
Perform these procedures only if instructed to do so by the system or LAN administrator.
Static administration of these options causes upgrades to work differently with static
administration of these options than by dynamic administration. Values assigned to options
in static administration do not change with upgrade scripts. These values remain stored in
the phone until one of the following happens:
• You download a new boot file
• You reset the IP phone. See
Installing and maintaining Avaya IP Deskphone H.323 9608, 9608G, 9611G, 9621G, and 9641GJanuary 2014 37
Resetting system values on page 60.
Page 38

Using local Administrative Menu procedures
Use these option-setting procedures only with static addressing and, as always, only if
instructed by the system or LAN administrator. Do not use these option-setting
procedures if you are using DHCP. DHCP is the Dynamic Addressing Process, as
indicated in
Powering-up and resetting the phone (Dynamic Addressing Process) on
page 27.
Accessing local Craft procedures
Note:
In addition to the procedures listed here, the administrator may allow access to only the VPN
procedure, by setting the VPNCODE parameter in the settings file. For more information on
access to VPN-only Local Administrative Options, see VPN Setup Guide for 9600 Series IP
Telephones, 16-602968.
When you set PROCSTAT to 0, you have full access to local Craft procedures and you can
invoke local craft procedures during initialization or whenever the deskphone displays this
message:
* to program
You can also initiate the Craft procedure at any other time the initialization process can support
a processing interrupt. If you set PROCSTAT to 1, the system allows access only to the VIEW
craft procedure for debugging purposes. You can invoke local Craft procedures only when the
“* to program” message displays during initialization.
Note:
The system supports the * to program message is supported even if the value of
PROCSTAT is 1, when the messages Address conflict, Subnet conflict, Bad
router? and Bad FileSv address display. You can gain execute the Craft procedures in
response to these messages as the situations requires corrective input.
Note:
The factory-set default Craft Access Code (PROCPSWD) is 27238.
38 Installing and maintaining Avaya IP Deskphone H.323 9608, 9608G, 9611G, 9621G, and 9641GJanuary 2014
Comments? infodev@avaya.com
Page 39

Running Craft procedures
Procedure
1. Press * to display the Craft Access Code Entry screen during deskphone startup
and start local procedures:
Enter code:__
# = OK
2. Enter the local dialpad procedure password that can be composed of any numeric
digits fro zero to seven, as specified by the system administrator in the system value
PROCPSWD.
For security purposes, the deskphone displays a star (*) for each numeric dialpad
press. If you are using a touch screen deskphone, and need to go back one space
during password entry, use the Contacts button. You can use the left arrow button
or the designated softkey for non-touch screen phones.
Running Craft procedures
3. Press # when the password entry is complete.
The entry is compared to the PROCPSWD value. If they match, the deskphone
displays the Craft Local Procedure screen, and the message Select procedure and
press Start.
4. For all non-touch screen phones, use the navigation arrows to scroll to and highlight
the local procedure you want, then press Start or OK.
You can also scroll to the procedure you want and press the corresponding line
button. For touch screen phones, scroll to the local procedure you want if it not
already displayed then touch the line on which the local procedure you want
appears.
Accessing Craft procedures during normal operation
Procedure
1. To run the local procedures, press the Mute button, enter the password using the
designated digits from zero to seven, then press the pound (#) key.
If you are using a touch screen phone and need to move one space back during
password entry, use the Contacts button. In case of non-touch screen phones, use
the left arrow button or the designated softkey.
A six second time-out is in effect between button presses after you press the Mute
button. If you do not press a valid button within 6 seconds of pressing the previous
Installing and maintaining Avaya IP Deskphone H.323 9608, 9608G, 9611G, 9621G, and 9641GJanuary 2014 39
Page 40

Using local Administrative Menu procedures
button, the phone discards the collected digits. In this case, no administrative option
is run.
The system compares the entry to the PROCPSWD value. If the entries match, the
deskphone displays the Craft Local Procedure screen, and prompts Select
procedure and press Start.
2. For non-touch screen phones, use the navigation arrows to scroll to and highlight
the local procedure you want, then press Start or OK.
You can also scroll to the procedure you want, then press the corresponding line
button. For touch screen phones, scroll to the local procedure you want if it not
already displayed then touch the line on which the phone displays the local
procedure that you want to select.
Note:
As of Release 6.3, you can also enter the craft menu when the deskphone is in
off-hook idle state and the user has logged out.
Entering data for administrative options
About this task
This section applies to all 9600 Series IP deskphones and describes how to enter data for
administrative options.
Procedure
1. With the exception of a touch screen deskphone, the first application line on any
screen is automatically highlighted selected when the phone displays the screen.
To select an item, press the appropriate softkey at the bottom of the screen, for
example, Change or Save, or OK . To select a different line, use the down or up
navigation arrows to change the line focus. When the desired line is highlighted,
then press a softkey or OK to select that line. For a touch screen deskphone,
touching the desired line produces the same result.
Note:
The deskphone emits an error beep if you attempt to enter invalid data.
2. If you enter a numeric digit that exceeds the maximum field value of the IP Address
or subnet mask value, that is exceeds 255, the phone emits an error beep tone. The
system ignores the digit, and the cursor does not move forward.
3. If you enter a zero followed by a numeric digit for a value, an IP Address, or a subnet
mask field, the new digit replaces the zero.
40 Installing and maintaining Avaya IP Deskphone H.323 9608, 9608G, 9611G, 9621G, and 9641GJanuary 2014
Comments? infodev@avaya.com
Page 41

Entering and validating IPv4 and IPv6 addresses
If you press star (*) and enter an IPv4 address, the system inserts a decimal point
into the input buffer and moves the cursor to the next character location. If the star
(*) button is pressed and the user is entering an IPv6 address, the system inserts
a colon into the input buffer and the cursor is moved to the next character
location.
For more information on IPv4 and IPv6 format, see
IPv6 addresses on page 41
4. To go back one space on non-touch screen phones, press the leftmost softkey. In
case of a touch screen deskphone, use the Bksp softkey instead.
When you press the applicable button or key to backspace, the most recently
entered digit or period is erased from the display. The cursor remains in the erased
character’s former position.
5. Press Exit or tap the softkey for a touch screen deskphone to exit the local
procedures.
Important:
If any changes were made using the 802.1X procedure or the ADDR procedure,
if the value of SIG was changed to SIP or if the Crafts Entry screen was invoked
during startup, the deskphone immediately resets when you press or touch
Exit. If no 802.1X, SIG, or ADDR changes were made, or if the local procedures
were invoked post-startup, the deskphone redisplays the screen or other display
that was effective when the craft options was invoked.
Note:
If PROCSTAT has been administered to 1, you will not be able to invoke any
administrative options other than VIEW.
Entering and validating IPv4 and
Note:
Some touch screen deskphones present an onscreen keyboard with which you
can type the data that you want to enter on the display. See the applicable user
guide for information about using the onscreen keyboard.
Entering and validating IPv4 and IPv6 addresses
The dial pad uses numeric-only entry when an IPv4 address or the subnet mask is entered.
On a touch screen use a single tap. Use an asterisk to place a period within the address being
entered.
Installing and maintaining Avaya IP Deskphone H.323 9608, 9608G, 9611G, 9621G, and 9641GJanuary 2014 41
Page 42

Using local Administrative Menu procedures
When you press star (*) on the dial pad with the cursor in one of the three fields towards the
left of the display, the following happens:
• The field where you are trying to enter a value displays a zero if no value is entered.
• If you enter a valid value a period displays. The space after the field displays a period.
• The cursor moves to the next space.
When you press star (*) with the cursor in one of the three fields to the right side of the display,
the system beeps to inidicate an error and the cursor remains in the field to the right. Pressing
the “*” button while the cursor is in the last (right most) field results in an error beep and the
cursor being left where it is. If you enter all three dots that separate the fields and if the value
of each field is valid, the IPv4 address or subnet mask is complete.
The value of a given field might be invalid when you:
• Enter a digit that makes the value of the first field of an IPv4 address exceed 223.
• Enter a digit that makes the value of the last three fields of an IPv4 address exceed
255.
• Enter a digit that makes the value of any field of a subnet mask exceed 255.
Enter an IPv6 address using only numbers on the dial pad. Use single tap for touch screen
telephones, except for 2 and 3 which are alphanumeric multitap fields. When you press 2 the
deskphone initially enters a 2, followed by A, B, C, and back to 2. When you press 3 the
deskphone initially enters a 3, followed by D, E, and back to 3. While the cursor is in any of
the leftmost seven fields, when you press the star (*) button makes the value for the field being
entered to be terminated (a zero is displayed if nothing else is), a colon to be displayed in the
space after the field, and the cursor to move to the next space. Pressing “*” while the cursor
is in the last (right most) field results in an error beep and the cursor being left where it is. An
IPv6 address is considered to be complete only if all the following conditions are met:
• All seven colons that separate the fields are entered OR the text input field contains at
most one pair of consecutive colons
• If one pair of consecutive colons is present, the final field is not “1” or “01”.
• If one pair of consecutive colons is present, the address format is not
“::FFFF:hhhh;hhhh”.
• The value of each field is valid. The following actions cause the value of a given field to
be considered invalid:
- Entering a digit that would cause the value of the first field of an IPv6 address to
exceed FD.
- Entering a third consecutive colon.
- Entering a second pair of consecutive colons.
In a given text entry field, if the either an IPv4 or an IPv6 address can be specified, the initial
field can be ambiguous with respect to whether the entry is an IPv4 or IPV6 address, for
example, 123 might be an IPv4 123 decimal or an IPv6 0123 hex. In such cases, text entry
follows the IPv6 rules that hexadecimal characters are allowed and the “*” key inserts a colon
42 Installing and maintaining Avaya IP Deskphone H.323 9608, 9608G, 9611G, 9621G, and 9641GJanuary 2014
Comments? infodev@avaya.com
Page 43

Local administrative Craft procedures menu
character. If the entry is a hex character (A-F) or a fourth character is entered in the field, the
telephone accepts the input is IPv6 format. Otherwise, the telephone makes the initial validity
check when you enter a field boundary, a colon or decimal point. This initial typographic
character determines whether the overall address must be in IPv4 format with a decimal point
or in IPv6 format with a colon. Once this character is entered, the telephone examines the
contents of the first field to ensure consistency with the field boundary. That is the absence of
hex characters, and at most three characters of value 255 or less, in the first field if the field
boundary is a decimal point. If the first field contains any content inappropriate for the entered
field boundary, an error beep is generated. You cannot enter more content until the
contradiction in the text string is deleted, meaning either the field boundary is deleted or the
cursor is moved back and the field contents edited). After you enter content that identifies the
format of the IP address appropriate to IPv4 or IPv6, the rest of the address entry conforms to
that format.
Local administrative Craft procedures menu
Using the administrative procedures, you can customize the IP deskphone installation for your
specific operating environment. This section provides a description of each local administrative
option covered in this guide, with references to the pages on which the option appears.
Note:
For touch screen-based deskphones, simply touching a line or a softkey produces the same
result as selecting a line or a softkey on non-touchscreen or button-based IP deskphones.
Depending upon the privileges assigned to the user by administrator, an end user can view
but cannot change most of the parameters associated with Craft procedures. For more
information, see the applicable user guides.
Administrativ
e Procedure
value (in
English)
8021X Set 802.1X operational mode Setting the Operational Mode to
ADDR Address information
programming
AGC Enable/disable Automatic Gain
Control
Purpose See
802.1X on page 45.
Using The pre-installation checklist on
page 46 and Changing IP address
information on page 47.
Disabling/enabling automatic gain
control on page 50.
CALIBRATE
SCREEN
Installing and maintaining Avaya IP Deskphone H.323 9608, 9608G, 9611G, 9621G, and 9641GJanuary 2014 43
Calibrate the touch screen Calibrating The Touch Screen on
page 49.
Page 44

Using local Administrative Menu procedures
Administrativ
Purpose See
e Procedure
value (in
English)
CLEAR Clear all values to factory
defaults
CONT Adjust the contrast of any
Button Modules and any noncolor deskphones
Clearing the deskphone settings on
page 51.
Adjusting contrast on button modules
and non-color deskphones on
page 53.
DEBUG Enable/disable Debug Mode Disabling/enabling debug mode on
page 54.
GROUP Set the Group Identifier Changing The group identifier on
page 55.
HSEQUAL Handset audio equalization Setting handset audio equalization on
page 55
INT Interface Control Changing Ethernet interface control on
page 56.
LOG Enable/disable Event Logging Disabling/enabling event logging on
page 57.
LOGOUT Log off the deskphone Loging off The deskphone on
page 58.
MLS View Multi-Language text
Strings
RESET
VALUES
RESTART
Reset system initialization
values to defaults
Restart the deskphone Restarting The deskphone on
PHONE
SIG Set the signaling protocol
download flag
SSON Set the Site-Specific Option
Viewing multi-language strings on
page 59.
Resetting system values on page 60.
page 61.
Changing The signaling protocol on
page 62.
Changing SSON settings on page 63.
Number
TEST Initiate a self-test Performing a self-test on page 63.
VIEW View current parameter values
and file names
VPN Administer and view Virtual
Private Network (VPN) settings
Using The VIEW craft procedure for
troubleshooting on page 72.
VPN Setup Guide for 9600 Series IP
Telephones, 16-602968.
44 Installing and maintaining Avaya IP Deskphone H.323 9608, 9608G, 9611G, 9621G, and 9641GJanuary 2014
Comments? infodev@avaya.com
Page 45

Note:
1. A 9608 and 9608G deskphone always lists the CONT procedure. Other color
deskphones list the CONT only if the deskphone has at least one button module
attached.
2. If the deskphone software has VPN and media encryption disabled, VPN will not
appear on the Craft procedures menu list. To determine if this applies to the
deskphone, go to the About Avaya IP Deskphone screen through the Avaya (A)
Menu or Home screen as applicable to the phone, and select the Settings list.
The About Avaya IP Deskphone screen with a U appended to the software
release indicates the phone has VPN and media encryption disabled.
Setting the operational mode to 802.1X
About this task
Setting the operational mode to 802.1X
Use the following procedure to set or change the operational mode.
Note:
When updating local Craft procedures from a touch screen deskphone, touching the line
you want to change or the applicable softkey produces the same result as selecting a line
and pressing the applicable softkey on a non-touch screen IP deskphone.
Procedure
1. When you select 802.1X from the Craft Procedures screen, the deskphone
displays the following:
Supplicant:
Pass-thru:
where the Supplicant line is the text string associated with the current system value
of DOTIXSTAT. The DOTIXSTAT parameter configures the 802.1X Supplicant
Mode operation control, defined as:
The options that are displayed depend on the following parameters as set in the
settings file:
• Disabled if DOT1XSTAT = 0
• Unicast-only if DOT1XSTAT = 1
• Unicast/multicast if DOT1XSTAT = 2
and the Pass-thru line is a text string associated with the current system value
of DOT1X where:
Installing and maintaining Avaya IP Deskphone H.323 9608, 9608G, 9611G, 9621G, and 9641GJanuary 2014 45
Page 46

Using local Administrative Menu procedures
• Enabled mode if DOT1X = 0
• Enabled w/Logoff if DOT1X = 1
• Disabled if DOT1X = 2
2. Select the line you want to change.
Depending on which line you selected to change, the phone displays the following
text:
Current setting:
New Setting:
3. To change the setting, press the Right or Left navigation arrow to navigate through
the applicable settings .
Depending on the current value, the deskphone selects the next sequential text
string displays it as the New setting. For example when you change the Pass-thru
mode, if the current value is Pass-thru mode, pressing the Choice Selector causes
the deskphone to display P-t w/Logoff. If the current setting is disabled, pressing
the Choice Selector changes the new setting to Pass-thru mode.
4. Press Save to store the new setting and redisplay the Craft Procedures screen.
Using the preinstallation checklist
Before performing static programming of address information, verify that the call system meets
all the requirements listed in the Requirements to verify for your network section of the
the pre-installation checklist on page 14. You can skip item 4., as it refers to the DHCP server.
In addition, you must have the values for the following parameters. To prevent data entry errors
that have a negative impact on your network, obtain and print copies of the following
parameters for each subnet:
• The IP Address of the call server.
• The IP Address of the gateway or the router.
• The IP netmask.
• The IP Address of the HTTP server.
Creating
46 Installing and maintaining Avaya IP Deskphone H.323 9608, 9608G, 9611G, 9621G, and 9641GJanuary 2014
Comments? infodev@avaya.com
Page 47

Changing IP address information
About this task
Changing IP address information
To assign IP addresses to IP phones, use the automatic method described in
Powering-up
and resetting the phone (Dynamic Addressing Process) on page 27. There might be times,
however, when manual assignment of IP addresses is required.
Caution:
Static addressing is necessary when a DHCP server is unavailable. But static addressing
has room for text entry errors. So Avaya recommends that you install a DHCP server and
do not use static addressing.
Important:
IPv6 operation is limited to a specific customer set and is not for general use.
Note:
When updating Local Craft procedures from a touch screen phone, touching the line you
want to change or the applicable softkey produces the same result as selecting a line and
pressing the applicable softkey on a non-touch screen IP phone.
Use the following procedure to invoke manual address information programming.
Procedure
1. Select ADDR from the Craft Procedures screen. The next screen displays the
following fields with the prompt Select address to change.
Static addressing
field
Phone (IPv4) nnn.nnn.nnn.nnn phone IP address (IPADD)
Phone (IPv6) hhhh:hhhh::hhhh:hhhh:hhhhphone IP address
Call Server nnn.nnn.nnn.nnn or
Router (IPv4) nnn.nnn.nnn.nnn Router in use; gateway/
Mask (IPv4) nnn.nnn.nnn.nnn IP network mask
Installing and maintaining Avaya IP Deskphone H.323 9608, 9608G, 9611G, 9621G, and 9641GJanuary 2014 47
Field value Description
(NVIPADDV6)
Call Server in use; media
hhhh:hhhh::hhhh:hhhh:hh
hh
server IP address
router IP address
(NETMASK)
Page 48

Using local Administrative Menu procedures
Static addressing
field
HTTP Server nnn.nnn.nnn.nnn or
HTTPS Server nnn.nnn.nnn.nnn or
802.1Q L2Q text string L2Q setting text
VLAN ID dddd NVL2QVLAN
VLAN Test ddd VLANTEST
Field value Description
IP address of HTTP File
hhhh:hhhh::hhhh:hhhh:hh
hh
hhhh:hhhh::hhhh:hhhh:hh
hh
Server in use
IP address of HTTPS
(TLS) File Server in use
description
where:
• nnn.nnn.nnn.nnn is the current IP address in IPv4 format associated with the
specific address information on the left side, which could be either a value
previously set by a technician, or the original value of NVIPADD if no previous
change was made,
• hhhh:hhhh:hhhh:hhhh:hhhh is the current IP address in IPv6 format
associated with the specific address information on the left side, which could
be either a value previously set by a technician, or the original value of
NVIPADD if no previous change was made,
• L2Q text string is the text string associated with the current system value of
L2Q where Auto = an L2Q value of 0, On = an L2Q value of 1, and Off = an
L2Q value of 2, and
• dddd is the current value of NVL2QVLAN and ddd is the current value of
NVVLANTEST, respectively.
2. Use the navigation arrows to scroll to and highlight the address you want to change,
then press Change to display the change screen for that specific address value.
3. Select one of the following as appropriate to the item you selected:
Task Steps
To change any of the
IP address values
such as Phone, Call
Server, Router, Mask,
and File Server
Use the dial pad to enter the new IP address. IP
addresses have three sets of three digits followed by a
period. Pressing star (*) following entry of three digits
causes a period to be placed in the next position, and
the cursor to advance one position to the right. If you
press the star (*) and enter an IPv6 address, a colon is
inserted into the input buffer and the cursor is moved to
the next character location. The exceptions are entry of
a Router or Mask address, which follows the IPv4
method of inserting a period rather than a colon. For
48 Installing and maintaining Avaya IP Deskphone H.323 9608, 9608G, 9611G, 9621G, and 9641GJanuary 2014
Comments? infodev@avaya.com
Page 49

Calibrating the touch screen
information on entry and validation of addresses in either
format, see Entering and validating IPv4 and IPv6
addresses on page 41. For example, to enter the IP
address 111.222.333.444 in IPv4 format, press the
number 1 on the dial pad three times then press *, press
the number 2 on the dial pad three times then press *,
press the 3 on the dial pad three times then press *, then
press the 4 on the dial pad three times.
To enter an IP address in IPv6 format, use the dial pad
in numeric-only mode entry. Tap the desired dial pad key
once for touch screen phones, except for 2 and 3 which
are alphanumeric. Use multi-tap for touch screen
phones. For example, pressing button 2 initially enters a
2, followed by A, B, C, and back to 2. Pressing button 3
initially enters a 3, followed by D, E, F, and back to 3.
Proceed to the next step.
To change the 802.1Q
value
To change the VLAN
ID value
To change the
VLANTEST value
Use the Right navigation arrow to navigate through the
text strings corresponding to the L2Q values defined as
Auto if L2Q=0, On if L2Q=1, and Off if L2Q= 2 until the
text string of the value you want to change to displays.
Proceed to the next step.
Use the dial pad to enter the new static VLAN ID of from
0 to 4094, inclusive. Proceed to the next step.
Use the dial pad to enter the new value of the
DHCPOFFER wait period of from 0 to 999. Proceed to
the next step.
4. Press Save to store the new setting and redisplay the Craft Procedures screen or
Cancel to return to theCraft Procedures screen without saving the value entered.
Once the new values are stored, the phone resets automatically.
Calibrating the touch screen
About this task
Use screen calibration for proper alignment of the touch screen if a significant problem with
the touch screen arises.
Important:
Use a stylus instead of your finger to touch the calibration points precisely.
Note:
The CLEAR Craft procedure clears any calibration data set using the CALIBRATE SCREEN
Craft procedure, but does not change factory settings of calibration data. Use the Default
Installing and maintaining Avaya IP Deskphone H.323 9608, 9608G, 9611G, 9621G, and 9641GJanuary 2014 49
Page 50

Using local Administrative Menu procedures
softkey to restore factory-set calibration. You cannot save calibration results as part of a
backup operation.
Perform the following procedure to calibrate the touch screen:
Procedure
1. When you select CALIBRATE SCREEN from the Craft Local Procedure Screen,
the telephone displays three softkeys - Start, Default, and Cancel.
2. Perform one of the following actions:
• Touch Cancel to return to the Craft Local Procedure screen without calibrating
the screen.
• Touch Default to reset the calibration parameters to the factory-set values.
The system plays a confirmation tone and displays the Craft Local Procedure
screen.
• Touch Start to calibrate the screen. The screen displays a calibration target
with a plus sign (+) at a particular point. Proceed to the next step.
3. Touch the center of the target with the stylus as soon as the target appears.
The target disappears, and a new target appears in a different part of the screen.
4. Touch the center of each target with the stylus within 10 seconds of its
appearance.
After you touch all four targets, the system plays a confirmation tone sounds
displays a Calibration successful message.
5. Touch Save to return to the Craft Local Procedure screen. The system stores the
calibration results in the nonvolatile memory of the telephone.
6. Touch Cancel at any time to return to the Craft Local Procedure screen without
completing the touch screen calibration.
Disabling or enabling automatic gain control
About this task
Use the following procedure to turn automatic gain control for the handset, headset, or the
Speaker to on or off.
Note:
When updating local Craft procedures from a touch screen deskphone, touching the line
you want to change or the applicable softkey produces the same result as selecting a line
and pressing the applicable softkey on a non-touch screen IP deskphone.
50 Installing and maintaining Avaya IP Deskphone H.323 9608, 9608G, 9611G, 9621G, and 9641GJanuary 2014
Comments? infodev@avaya.com
Page 51

Clearing the phone settings
Note:
The user can potentially override the AGC local procedure settings. For more information,
see Avaya 9600 IP Deskphone H.323 9608, 9608G, and 9611 User Guide and the Avaya
9600 Series IP Deskphone H.323 9621 and 9641 User Guide. If the values are changed,
the backup file stores the AGC values set by the user and does not save any setting
established using this local procedure.
Procedure
1. When you select AGC from the Craft Local Procedure Screen, the phone displays
the options in the following table. Select the appropriate line and press Change to
toggle it to On or Off as required.
Options available under AGC
Handset Automatic Gain control On
Headset Auto Gain Control On
Speaker Auto Gain Control On
where the setting is the text string associated with the current system value of
NVAGCHAND, NVAGCHEAD, or NVAGCSPKR, defined as:
• On if the respective NVAGCXXXX system value is 1.
• Off if the respective NVAGCXXXX system value is 0.
2. Press Save to store the new setting, update the associated system value, and
redisplay the Craft Local Procedure screen.
Clearing the phone settings
About this task
Sometimes, you might want to remove all administered values, user-specified data, and option
settings and return a phone to its factory settings. You might have to remove all administered
values when you give a phone to a new, dedicated user and when the LOGOFF option is not
sufficient. For example, a new user is assigned the same extension, but requires different
permissions than the previous user.
The CLEAR option erases all administered data—static programming, HTTP and HTTPS
server programming, and user settings including Contact button labels and locally programmed
Feature button labels, and restores all such data to default values. Using the CLEAR option
does not affect the software load itself. If you upgrade the phone, the phone retains the latest
software. After you clear a phone of the settings, you can administer the phone normally.
Installing and maintaining Avaya IP Deskphone H.323 9608, 9608G, 9611G, 9621G, and 9641GJanuary 2014 51
Page 52

Using local Administrative Menu procedures
Caution:
This procedure erases all administered data without any possibility of recovering the data.
Neither the boot code nor the application code is affected by this procedure.
Note:
When updating Craft procedures from a touch screen phone, touching the line you want to
change or the applicable softkey produces the same result as selecting a line and pressing
the applicable softkey on a non-touch screen IP phone.
Use the following procedure to clear the phone of the administrative, user-assigned, and
options values.
Procedure
1. Tap Select CLEAR from the Craft Procedures screen. The phone displays the
Press Clear again to confirm. message.
2. Tap Press Clear to clear all values to use initial default values.
Tap Press Cancel. If you do not want to clear all values and to terminate the
procedure and retain the current values.
The phone displays the following text:
Clearing values...
The phone is reset to the default factory settings.
• All system values and system initialization values.
• 802.1X identity and password.
• User options, parameter settings, identifiers, and password.
• Any user data like Contact Lists or Call Logs are deleted.
After clearing the values, the phone resets.
52 Installing and maintaining Avaya IP Deskphone H.323 9608, 9608G, 9611G, 9621G, and 9641GJanuary 2014
Comments? infodev@avaya.com
Page 53

Adjusting contrast on button modules and non-color deskphones
Adjusting contrast on button modules and non-color
deskphones
About this task
Note:
When updating local or Craft procedures from a touch screen deskphone, touching the line
you want to change or the applicable softkey produces the same result as selecting a line
and pressing the applicable softkey on a non-touch screen IP deskphone.
bar
Use the following procedure to adjust the contrast of any button module when attached to any
9600 Series IP deskphone or any non-color IP deskphone. The 9611G, 9621G, and 9641G
each have a color display, and contrast adjustment is not applicable. Fifteen contrast levels
are available.
Procedure
1. When you select CONT from the Craft Local Procedure Screen, the deskphone
2. To change the setting, press the Right or Left navigation arrow to navigate through
3. If more than one button module is attached, scroll down to that line, for example, to
4. Press Save to store the new contrast settings and redisplay the Craft Local
prompts you to use the Right and Left navigation arrows to change the contrast for
button module shown as Module: 1 or the contrast for the deskphone shown as
Phone: contrast.
the settings.
By default, the contrast button is set to the middle of the contrast setting.
As you press the navigation arrow, the next higher or lower contrast level is selected
and displayed as the setting.
Module: 2 and repeat Step 2 to change the contrast.
Procedure screen.
Installing and maintaining Avaya IP Deskphone H.323 9608, 9608G, 9611G, 9621G, and 9641GJanuary 2014 53
Page 54

Using local Administrative Menu procedures
Debug mode
About this task
You can use the debug mode to send all your debug data in a file, nnn_report.gz where you
replace nnn by the deskphone extension as specified by the user during registration.
Note:
The DEBUG option is available for use only if you change the default password to the craft
menu through the PROCPSWD parameter.
The new value of the PROCPSWD parameter must be 4 to 7 numeric digits, "0000" through
"9999999". However if value of PROCPSWD is less than 4 digits after you install Release
6.2.4 or later, the value will be changed back to the default value of 27238.
Procedure
1. Scroll and select DEBUG from the Craft Local Procedure Screen. Press Start. The
deskphone displays, the following text:
Setting Options available
Serial Port Adjunct/CLI
Log to file On/Off
Phone Report Pressing Change when you select the
Phone Report option results in a Create
option displayed on the phone screen.
Press Create to send the report to the
backup folder specified by BRURI.
Note:
The Phone Report option is
available only if backup and restore
is enabled.
Port Mirroring On/Off
2. Scroll to the option that you want to change and press Change or touch OK to toggle
the selected setting from the available options. The deskphone displays the softkeys
Save, Change, and Cancel.
3. If you have made any changes to the Debug Mode option, then you must press or
touch the Save option. This action resets the phone and saves the changes to the
debug screen.
54 Installing and maintaining Avaya IP Deskphone H.323 9608, 9608G, 9611G, 9621G, and 9641GJanuary 2014
Comments? infodev@avaya.com
Page 55

Changing the group identifier
About this task
Note:
When updating Craft procedures from a touch screen deskphone, touching the line you want
to change or the applicable softkey produces the same result as selecting a line and pressing
the applicable softkey on a non-touch screen IP deskphone.
Use the following procedure to set or change the group identifier.
Note:
Perform this procedure only if the LAN Administrator instructs you to do so. For more
information about groups, see
Procedure
Applying settings to logical groups on page 69.
Changing the group identifier
1. When you select GROUP from the Craft Procedures screen, the following text
displays:
Current Setting:
New Setting:
where the setting is the current system value of NVGROUP.
2. In the Group text box, enter a valid Group value from 0 to 999.
3. Press Save to store the new setting. The deskphone displays the Craft Procedures
screen.
Setting handset audio equalization
About this task
Note:
Use the following procedure to set or change the handset audio equalization value.
Procedure
1. When you select HSEQUAL from the Craft Procedures screen, the following
displays:
Installing and maintaining Avaya IP Deskphone H.323 9608, 9608G, 9611G, 9621G, and 9641GJanuary 2014 55
Page 56

Using local Administrative Menu procedures
• Current Setting:
• New Setting:
Where the Current Setting is the current value of HSEQUALIZATION, an internal
parameter that combines the audio equalization specifications of the settings file,
user option, and Local Procedure.
The values are Default TIA-810/920 and S004 is used, Audio Opt TIA-810/920 and
S004 is used, or HAC Opt HAC is used. The only difference between Default and
Audio Opt is that in the second case, either the settings file, the user option, or the
Local Procedure has explicitly selected TIA-810/920 and S004.
2. Press Save to store the new setting and redisplay the Craft Procedures screen.
Changing Ethernet interface control
About this task
Note:
When updating Craft Procedures from a touch screen phone, tapping the line you want to
change or the applicable softkey produces the same result as selecting a line and pressing
the applicable softkey on a non-touch screen IP phone.
Use the following procedure to set or change the interface control value.
Procedure
1. When you select INT from the Craft Procedures screen, the phone displays the
following options with a prompt to use the Right and Left navigation arrows to select
a setting:
Ethernet Choice Selector
PC Ethernet Choice Selector
The options that are displayed are the text strings associated with the current
PHY1STAT on the Ethernet line and the current PHY2STAT system value on the
PC Ethernet line.
• Auto when PHY1STAT = 1
• 10 Mbps half when PHY1STAT = 2
• 10 Mbps full when PHY1STAT = 3
• 100 Mbps half when PHY1STAT = 4
56 Installing and maintaining Avaya IP Deskphone H.323 9608, 9608G, 9611G, 9621G, and 9641GJanuary 2014
Comments? infodev@avaya.com
Page 57

Disabling and enabling event logging
• 100 Mbps full when PHY1STAT = 5
• 1000 Mbps full when PHY1STAT = 6
The PHY2STAT text strings are:
• Disabled when PHY2STAT = 0
• Auto when PHY2STAT = 1
• 10 Mbps half when PHY1STAT = 2
• 10 Mbps full when PHY1STAT = 3
• 100 Mbps half when PHY1STAT = 4
• 100 Mbps full when PHY1STAT = 5
• 1000 Mbps full when PHY1STAT = 6
2. To change the Ethernet setting, press the Right navigation arrow to navigate
through the possible settings.
Depending on the current value, the next sequential text string is selected and
displayed as the setting. For example, if the current value is 10 Mbps half (2) and
if you press the Right navigation arrow, the value changes to 10 Mbps full (3). If the
current value is 1000 Mbps full (6) and if you press the navigation arrow, the value
changes to Auto (1).
3. To change the PC Ethernet setting, select that line and press the Right navigation
arrow to navigate through the possible settings.
4. Press Save to store the new settings and redisplay theCraft Procedures screen.
Disabling and enabling event logging
About this task
Note:
When updating local Craft procedures from a touch screen deskphone, touching the line
you want to change or the applicable softkey produces the same result as selecting a line
and pressing the applicable softkey on a non-touch screen IP deskphone.
Use the following procedure to enable or disable logging of system events.
Installing and maintaining Avaya IP Deskphone H.323 9608, 9608G, 9611G, 9621G, and 9641GJanuary 2014 57
Page 58

Using local Administrative Menu procedures
Procedure
1. When you select LOG from the Craft Local Procedure Screen, the deskphone
prompts you to use the Right and Left navigation arrows to select a setting and
displays the following text:
Log: text string Choice Selector
where the text string is the wording associated with the current system value of
NVLOGSTAT, defined as:
• Disabled when NVLOGSTAT = 0
• Emergencies when NVLOGSTAT = 1
• Alerts when NVLOGSTAT = 2
• Critical when NVLOGSTAT = 3
• Errors when NVLOGSTAT = 4
• Warnings when NVLOGSTAT = 5
• Notices when NVLOGSTAT = 6
• Information when NVLOGSTAT = 7
• Debug when NVLOGSTAT = 8
2. To change the setting, press the Right or Left navigation arrow to navigate through
the settings.
Depending on the current value, the next sequential text string is selected and
displayed as the setting. For example, if the current value is Alerts (2), pressing the
Right navigation arrow changes the value to Critical (3). If the current value is Debug
(8), pressing the Right navigation arrow changes the value to Disabled (0).
3. Press Save to store the new setting and redisplay the Craft Local Procedure
screen.
Logging off from the phone
About this task
Use the following procedure to log off from a phone.
58 Installing and maintaining Avaya IP Deskphone H.323 9608, 9608G, 9611G, 9621G, and 9641GJanuary 2014
Comments? infodev@avaya.com
Page 59

Viewing multilanguage strings
Note:
If a user registered has logged in through a USB device, the following procedure is not
applicable. The only way to log off a phone registered with a USB device is by removing the
device.
Note:
When updating lLocal Craft Procedures from a touch screen phone, touching the line you
want to change or the applicable softkey produces the same result as selecting a line and
pressing the applicable softkey on a non-touch screen IP phone.
Caution:
Once you are logged off from a phone, you might need a password and extension to log
back in.
Procedure
1. When you select LOGOUT from the Local Craft Procedures screen, the phone
displays the following text:
Press Log Out again to confirm.
2. Press or tap Log Out to log off from the phone.
Press or tap Cancel to return to the Local Craft Procedures screen without logging
off the phone.
Viewing multilanguage strings
About this task
Note:
When updating local Craft procedures from a touch screen deskphone, touching the line
you want to change or the applicable softkey produces the same result as selecting a line
and pressing the applicable softkey on a non-touch screen IP deskphone.
Use this procedure to view the language strings available on the deskphone. A language string
is any set of words or phrases on the IP deskphone user interface in the currently active
language.
Installing and maintaining Avaya IP Deskphone H.323 9608, 9608G, 9611G, 9621G, and 9641GJanuary 2014 59
Page 60

Using local Administrative Menu procedures
Procedure
1. Select MLS from the Craft Procedures screen. The deskphone displays the
following text:
Tag # N
Text string for tag # N text string
where N is the label associated with a specific language in the downloaded
language file and text string is the wording associated with that Tag number.
2. Use the Up and Down navigation arrows to scroll through the list of text strings.
Use the Right and Left navigation arrows to scroll right or left one character at a
time to view the entire text string, if it exceeds the available display line space.
3. Press Back to return to the Craft Procedures screen.
Resetting system values
About this task
Note:
When updating Craft procedures from a touch screen deskphone, touching the line you want
to change or the applicable softkey produces the same result as selecting a line and pressing
the applicable softkey on a non-touch screen IP deskphone.
Use the following procedure to reset all system initialization values to the application software
default values.
Caution:
This procedure erases all static information, without any possibility of recovering the data.
Procedure
1. Select RESET VALUES from the Craft Procedures screen. The deskphone displays
the following text:
Press Reset to confirm.
2. Press Cancel to return to the Craft Procedures screen without resetting the
deskphone.
Press Reset to start the deskphone reset.
60 Installing and maintaining Avaya IP Deskphone H.323 9608, 9608G, 9611G, 9621G, and 9641GJanuary 2014
Comments? infodev@avaya.com
Page 61

The deskphone resets from the beginning of registration, which might take a few
minutes. The deskphone resets:
• All system values and system initialization values except AUTH and NVAUTH
to default values.
• The 802.1X ID and Password to their default values.
• Call server values to their defaults.
• Any entries in the Redial buffer.
• Do not affect user-specified data and settings like Contacts data or the
deskphone login and password. To remove this type of data, see
deskphone settings on page 51.
Restarting the phone
Restarting the phone
Clearing the
About this task
Note:
When updating local Craft Administration Menu procedures from a touch screen phone,
touching the line you want to change or the applicable softkey produces the same result as
selecting a line and pressing the applicable softkey on a non-touch screen IP phone.
Use the following procedure to restart the phone.
Procedure
1. Select RESTART PHONE from the Craft Procedures screen. The phone displays
the following text:
Press Restart to confirm.
2. PressCancel to return to the Craft Procedures screen without restarting the
phone.
Press Restart to proceed with the registration steps. For more information, see
Powering-up and resetting the phone (Dynamic Addressing Process) on page 27.
A restart does not affect user-specified data and settings like Contacts data or the
phone login and password.
The completion of the restart procedure depends on the status of the boot and
application files.
Installing and maintaining Avaya IP Deskphone H.323 9608, 9608G, 9611G, 9621G, and 9641GJanuary 2014 61
Page 62

Using local Administrative Menu procedures
Setting or changing the signaling protocol
About this task
Note:
When updating local Craft procedures from a touch screen deskphone, touching the line
you want to change or the applicable softkey produces the same result as selecting a line
and pressing the applicable softkey on a non-touch screen IP deskphone.
Use the following procedure to set or change the Signaling Protocol Identifier. A valid SIG
Protocol Identifier is either 0 (default), 1 (H.323), or 2 (SIP).
Note:
Perform this procedure only if the LAN Administrator instructs you to do so.
Procedure
1. Select SIG from the Craft Local Procedures screen. The deskphone prompts you
to use the Right and Left navigation arrows to select a setting and displays the
following text:
Sig: text string Choice Selector
where the text string is the wording associated with the current system value of
NVSIG, defined as:
• Default when NVSIG = 0
• H.323 when NVSIG = 1
• SIP when NVSIG = 2
2. Press the Right or Left navigation arrow to navigate through the settings to change
the setting.
Depending on the current value, the next sequential text string is selected and
displayed as the setting. For example, if the current value is SIP (2), pressing the
Right arrow changes the value to 0 (default). If the current value is H.323 (1),
pressing the Right arrow changes the value to 2 (SIP).
3. Press Save to store the new setting and redisplay the Craft Procedures screen.
The remainder of this procedure depends on the status of the boot and application
files.
62 Installing and maintaining Avaya IP Deskphone H.323 9608, 9608G, 9611G, 9621G, and 9641GJanuary 2014
Comments? infodev@avaya.com
Page 63

Changing SSON settings
About this task
Caution:
Do not perform this procedure if you are using static addressing. Perform this procedure
only if you are using DHCP and the LAN administrator instructs you to do this.
Note:
When updating Craft Procedures from a touch screen phone, touching the line you want to
change or the applicable softkey produces the same result as selecting a line and pressing
the applicable softkey on a non-touch screen IP phone.
Use the following procedure to set the Site-Specific Option Number (SSON).
Procedure
Changing SSON settings
1. Select SSON from the Craft Procedures screen.
The phone displays the following text:
Current setting:
New Setting:
where the setting is the current system value of NVSSON.
2. To change the setting, use the dial pad to enter a valid SSON value between 128
and 255.
3. PressSave to store the new setting and redisplay the Craft Procedures screen.
Performing a self-test
About this task
Note:
9600 series IP deskphone stores two software code images in reprogrammable non-volatile
memory. The primary image, called the “big app” must be running to perform a self-test. The
backup image, called the “little app” does not support the self-test.
Installing and maintaining Avaya IP Deskphone H.323 9608, 9608G, 9611G, 9621G, and 9641GJanuary 2014 63
Page 64

Using local Administrative Menu procedures
Note:
When updating localCraft Procedures from a touch screen deskphone, touching the line you
want to change or the applicable softkey produces the same result as selecting a line and
pressing the applicable softkey on a non-touch screen IP deskphone.
Use the following procedure to perform self-testing:
Procedure
1. Tap or select TEST from the Craft Procedures screen. The phone displays the
following text:
Press Test to confirm.
2. Tap or press Test to start phone testing.
Tap or press Cancel to return to the Craft Procedures screen without testing the
phone.
The test performs the following actions:
• Removes labels on all softkeys .
• Illuminates groups of LEDs at a time on the phone and any attached button
modules sequentially for about a half second. Illumination starts with the upper
half of the phone and continues through the lower half of any attached button
module in a repeating cycle.
• Shows pixels on the display with highest intensity.
After approximately 5 seconds, the top phone screen displays either Self-test
passed or Self-test failed.
3. Press or tap Back to return to the Craft Procedures screen.
64 Installing and maintaining Avaya IP Deskphone H.323 9608, 9608G, 9611G, 9621G, and 9641GJanuary 2014
Comments? infodev@avaya.com
Page 65

Chapter 4: Maintaining 9600 Series IP
Deskphones
About software distribution packages
Important:
For any new software release, download the latest software distribution package and read any
Product Support Notices (PSNs) associated with the new release. Both are available on the
Avaya support site at
From H.323 software Release 6.0 and later, Software Distribution Packages containing the
files needed to operate the 9600 Series IP phones are packaged together in either a Zip format
or an RPM/Tar format distribution package. You download the package appropriate to your
operating environment to your file server from the Avaya support site at
support based on the protocol you are using either H.323 or SIP for all or the majority of your
phones.
www.avaya.com/support.
www.avaya.com/
The software distribution packages contain the following:
• One or more software files.
• One upgrade file such as 96x1Hupgrade.txt.
• All the display text language files. For example, mlf_SB189_v78_korean.txt
• A file named av_prca_pem_2033.txt that contains a copy of the Avaya Product Root
Certificate Authority certificate in PEM format. You can downloaded this file to the phones
based on the value of the TRUSTCERTS parameter.
• A file named release.xml that is used by the Avaya Software Update Manager
application.
Release 6.0 software distribution packages in Zip format also contain a signatures directory
containing signature files and a certificate file that the Avaya file server application will use on
the Utility server. Customers using their own HTTP server can ignore or delete this directory.
Note:
The H.323 software Release 6.0 upgrade script file is not the same upgrade script file that
is used for the 9600 series IP phones running software Release 3.1.
Installing and maintaining Avaya IP Deskphone H.323 9608, 9608G, 9611G, 9621G, and 9641GJanuary 2014 65
Page 66

Maintaining 9600 Series IP Deskphones
Note:
When you download the application file from the Avaya support Web site, ensure you are
downloading the correct version. One version enables VPN and media encryption
functionality, while the other disables those functions.
Note:
Settings files are not included in the software distribution packages because the files
overwrite the existing file and settings.
Two configuration files are:
• The upgrade file, that notifies the phone to upgrade software. The phone attempts to read
this file after a reset. The upgrade file also contains directions to the settings file.
• The settings file contains the option settings that enable, disable, or otherwise customize
the settings you might need to tailor the Avaya IP phones for your enterprise.
Note:
You can use one settings file for all your Avaya IP phones including the 9600 Series
IP phones covered in this document and in the Administering Avaya IP phone H.323
9608, 9608G, 9611G, 9621G, and 9641G, and 4600 Series IP phones, as covered in
the 4600 Series IP Telephone LAN Administrator Guide, 555-233-507.
Downloading software packages
You can use the upgrade file and the application files included in the Software Distribution
Package that Avaya provides to upgrade the phones. Do not modify the upgrade files. You
must save all the essential files on your file server. When you download a new release onto a
file server that has an existing release:
1. Stop the file server.
2. Administer the required port setting in HTTPPORT or TLSPORT for HTTP or TLS,
respectively if you want to specify a port the phones must use to communicate with
the file server.
3. Back up all the current file server directories as applicable.
4. Copy the 46xxsettings.txt file to a backup location.
5. Remove all the files in the download directory. This ensures that you do not have
an inappropriate binary or configuration file on the server. The only system values
that can be used in the Conditional statement are: BOOTNAME, GROUP,
MACADDR, MODEL, and SIG.
66 Installing and maintaining Avaya IP Deskphone H.323 9608, 9608G, 9611G, 9621G, and 9641GJanuary 2014
Comments? infodev@avaya.com
Page 67

Contents of the settings file
6. Download the self-extracting executable file or the corresponding zip file.
7. Extract all the files.
8. Copy the 46xxsettings.txt file back into the download directory.
9. Check the Readme file for release-specific information.
10. Modify the 46xxsettings.txt file as required.
11. Restart the HTTP and the HTTPS server.
12. Reset your phones.
You can download the default upgrade file from
the phone uses default settings for customer-definable options.
These settings can also be changed with DHCP or in some cases, from the dial pad of the
phone.
You might want to open the default file and administer the options to add useful functionality
to your Avaya IP phones. Ensure that the file resides in the same directory as the upgrade file,
and name the file as 46xxsettings.scr or 46xxsetting.txt. The Avaya IP phones can operate
without this file.
Note:
Most Windows systems interpret the file extension *.scr as a screen saver. The 4600 IP
phones originally used *.scr to indicate a script file. The settings file must have the extension
*.txt.
Contents of the settings file
The settings file can include any of six types of statements, one per line:
http://www.avaya.com/support. With this file,
• Tags that are lines that begin with a single pound (#) character followed by a single space
character and a text string with no spaces.
• Goto commands, of the form GOTO tag. Goto commands cause the phone to continue
interpreting the settings file at the next line after a #tag statement. If such a statement
does not exist, the rest of the settings file is ignored.
• Conditionals, of the form IF $parameter_name SEQ string GOTO tag. Conditionals
cause the Goto command to be processed if the value of the parameter named
parameter_name exactly matches string. If no such parameter named parameter_name
exists, the entire conditional is ignored. You can use the following parameters in a
conditional statement: GROUP, MACADDR, MODEL and MODEL4. In pre-6.0 software
releases, you could use the BOOTNAME and SIG. In software release 3.1 and later, you
can use VPNACTIVE. In software release 6.0 and later, you can use SIG_IN_USE.
Installing and maintaining Avaya IP Deskphone H.323 9608, 9608G, 9611G, 9621G, and 9641GJanuary 2014 67
Page 68

Maintaining 9600 Series IP Deskphones
• SET commands, of the form SET parameter_name value. The system ignores any
invalid values for the associated parameter_name so the default or previously
administered value is retained. All values must be text strings, even if the value itself is
numeric or a dotted decimal IP Address.
• Comments, which are statements with a pound (#) character in the first column.
Note:
Enclose all data in quotation marks for proper interpretation.
• GET commands, of the form GET filename . If the phone downloads the file named as
filename, the phone interprets the file as an additional settings file and does not interpret
additional lines in the original file. If the phone cannot obtain the file, the telephone
continues to interpret the original file.
The Avaya-provided upgrade file includes lines that direct the phone to GET
46xxsettings.txt and 46xxsettings.scr. These lines cause the phone to use HTTP/
HTTPS to attempt to download the file specified in the GET command. If the phone obtains the
file, its contents are interpreted as an additional script file. If the file cannot be obtained, the
phone continues processing the upgrade script file. The phone processes the upgrade script
file so that if there is no 46xxsettings.scr file, the phone looks for a 46xxsettings.txt file. If the
phone obtains the settings file successfully but does not include any setting changes the phone
stops using HTTP. This process happens when you initially download the script file template
from the Avaya support Web site, before you make any changes. When the settings file
contains no setting changes, the phone does not go back to the upgrade script file.
You can customize the settings file and identify non-default option settings, application-specific
parameters, and other settings. You can download a template for this file from the Avaya
Support website.
For details about specific parameter values, see Chapter 7 in the Administering Avaya IP phone
H.323 9608, 9608G, 9611G, 9621G, and 9641G. Specify settings that are different from default
values, although you can also specify default values.
Downloading text language files
About this task
You must save the language files used for text entry and display purposes in the same location
as the 46xxsettings file or in the HTTP Server directory. The HTTP Server directory is defined
using the SET HTTPDIR HTTP server directory path command.
You can download a new language file version only if the filename differs from the language
file previously downloaded. Alternately, you can remove the old language file using an empty
SET LANGxFILE command in the 46xxsettings file before downloading a language file with the
same filename.
68 Installing and maintaining Avaya IP Deskphone H.323 9608, 9608G, 9611G, 9621G, and 9641GJanuary 2014
Comments? infodev@avaya.com
Page 69

Changing the signaling protocol
About this task
For enterprises requiring both H.323 and SIP-based protocols, you can specify the protocol
for all or specific deskphones in the following two ways:
Procedure
1. As of Release 6.0, you can set the SIG parameter in DHCP Option 242 (SiteSpecific Option Number) or in the 46xxsettings.txt file.
This setting will apply to all telephones except those for which SIG has been
manually configured to a value of H.323 or SIP using the SIG Craft procedure.
2. You can set the SIG parameter on a per-phone basis using the SIG Craft procedure.
For more information, see
page 62.
Changing the signaling protocol on page 45 on
Changing the signaling protocol
Applying settings to logical groups
You might have different communities of end users with the same phone model but requiring
different administered settings. For example, you might want to restrict Call Center agents from
logging out, an essential capability for hot-desking associates. This section provides examples
of the group settings for each of these situations.
You can separate groups of users is to associate each of them with a number. Use the GROUP
parameter for this purpose. You cannot set GROUP system value in the 46xxsettings file. The
GROUP parameter can only be set on a phone-by-phone basis. To set the GROUP parameter,
first identify which phones are associated with which group, and designate a number for each
group. The number can be any integer from 0 to 999, with 0 as the default. The largest group
is assigned as Group 0.
Then, at each phone that does not have default parameters, instruct the installer or end-user
to invoke the GROUP Local Administrative Craft procedure. For more information, see
local Craft procedures on page 37 and specify which GROUP number to use. After the GROUP
assignments are in place, edit the configuration file to allow each phone of the appropriate
group to download its proper settings.
Here is an illustration of a possible settings file for the example of a Call Center with hot-desking
associates at the same location:
About
Installing and maintaining Avaya IP Deskphone H.323 9608, 9608G, 9611G, 9621G, and 9641GJanuary 2014 69
Page 70

Maintaining 9600 Series IP Deskphones
IF $GROUP SEQ 1 goto CALLCENTER IF $GROUP SEQ 2 goto HOTDESK {specify
settings unique to Group 0} goto END
# CALLCENTER {specify settings unique to Group 1} goto END
# HOTDESK {specify settings unique to Group 2}
# END {specify settings common to all Groups}
70 Installing and maintaining Avaya IP Deskphone H.323 9608, 9608G, 9611G, 9621G, and 9641GJanuary 2014
Comments? infodev@avaya.com
Page 71

Chapter 5: Troubleshooting
Resolving error conditions
About this task
Installers can troubleshoot problems before seeking assistance from the system or LAN
administrator in four areas:
Procedure
1. Check both the power and Ethernet wiring for the following conditions:
• Check whether all components are plugged in correctly.
• Check LAN connectivity in both directions to all servers - DHCP, HTTP,
HTTPS, DEFINITY®/MultiVantage™.
• If the deskphone is powered from the LAN, ensure that the LAN is properly
administered and is compliant with IEEE 802.3af.
2. If you use static addressing:
• Use the VIEW option to find the names of the files being used and verify that
these filenames match those on the HTTP/HTTPS server. For more
information, see Using the VIEW craft procedure for troubleshooting on
page 72. Check the Avaya Support site at www.support.avaya.com to verify
whether the correct files are being used.
• Use the ADDR option to verify IP addresses. For more information, see
Changing IP address information on page 47.
3. If the deskphone is not communicating with the system, DHCP, HTTP, or Avaya
Media Server, make a note of the last message displayed. For more information,
see Installation error and status messages on page 76 and Operational errors
and status messages on page 81.
Consult the system administrator. Sometimes, you can correct problems relating to
Communication Manager and HTTP communications by setting the HTTPPORT
value to 81.
4. If you want the deskphone to be IEEE-powered, verify with the LAN administrator
that IEEE power is indeed supported on the LAN.
Installing and maintaining Avaya IP Deskphone H.323 9608, 9608G, 9611G, 9621G, and 9641GJanuary 2014 71
Page 72

Troubleshooting
Failure to hear DTMF tones
As H.323 telephones do not send DTMF tones to non-H.323 telephones, the user need not
perform troubleshooting for failure to hear DTMF tones from a 9600 Series IP phone. The
TN2302AP board does not pass in-band DTMF tones.
Correcting a power interruption
If power to a 9600 Series IP deskphone is interrupted while the phone is saving the application
file, the HTTP/HTTPS application can stop responding. If this occurs, restart the phone.
Using the VIEW procedure for troubleshooting
About this task
Use the following procedure to verify the current values of system parameters and file
versions.
Note:
If administered through OPSTAT, end users can gain access to the Network Information
option from the Phone Settings option of Avaya Menu to view but not change most of the
parameters associated with Craft Local Procedures.. For more information about this option,
see the applicable user guides.
Important:
IPv6 operation is limited to a specific customer set and is not available for general use.
Note:
You can use the ADDR option to view IP addresses if needed. For more information on using
the ADDR option, see
have been entered incorrectly. Verify whether you were provided with correct IP
addresses.
Procedure
Changing IP address information on page 47. The IP addresses might
1. Select VIEW from the Craft Local Procedure Screen.
72 Installing and maintaining Avaya IP Deskphone H.323 9608, 9608G, 9611G, 9621G, and 9641GJanuary 2014
Comments? infodev@avaya.com
Page 73

Using the VIEW procedure for troubleshooting
The phone displays the following options: IP Parameters, Quality of Service, and
Miscellaneous.
2. Tap the category that you want to see.
The information for that category is displayed.
Note:
Use the Right navigation arrow to scroll through the viewable information. For
more information on system parameters, see
Table 1 Parameter Values on
page 73.
Table 2: Parameter Values
Name System Value Format
Phone (IPv4) nnn.nnn.nnn.nnn Phone IP address, IPADD
value.
Phone (IPv6) hhhh:hhhh::hhhh:hhhh:hhhh Phone IP address,
NVIPADDV6 value.
Phone (IPv6LL) hhhh:hhhh::hhhh:hhhh:hhhh Phone IP address,
IPADDV6LL value.
Call Server nnn.nnn.nnn.nnn IP address of the call server
currently in use, otherwise
0.0.0.0.
Supplicant ccccccccccccccccc Text equivalent of
DOT1XSTAT. If 0, Disabled;
if 1, Unicast-only; if 2,
Unicast/multicast.
Pass-thru ccccccccccccccccc Text equivalent of DOT1X. If
0, Enabled; if 1, Enabled w/
Logoff; if 2, Disabled.
Router (IPv4) nnn.nnn.nnn.nnn Up to 15 ASCII characters,
the IP address of the router in
use.
Mask (IPv4) nnn.nnn.nnn.nnn Up to 15 ASCII characters,
NETMASK value.
HTTP server nnn.nnn.nnn.nnn IP address of last HTTP
server used successfully
during initialization or
0.0.0.0. if no file server was
used successfully.
HTTPS server nnn.nnn.nnn.nnn IP address of last HTTPS
server used successfully
during initialization or
Installing and maintaining Avaya IP Deskphone H.323 9608, 9608G, 9611G, 9621G, and 9641GJanuary 2014 73
Page 74

Troubleshooting
Name System Value Format
0.0.0.0. if no file server was
used successfully.
802.1Q cccc Text string corresponding to
the L2Q value.
VLAN ID cccc Up to 4 ASCII characters.
Value is L2QVLAN text Auto
if 802.1Q tagging is 0 or On if
802.1Q tagging is 1. If
802.1Q tagging is off (2), this
line is not displayed.
VLAN Test ccc Up to 3 ASCII characters.
Value is VLANTEST value if
802.1Q tagging is 0 or 1. If
802.1Q tagging is off (2), this
line is not displayed.
Scroll Right to see the following additional parameters/values:
L2 Audio n L2QAUD,layer 2 audio
priority value.
L2 Signaling n L2QSIG,layer 2 signaling
priority value.
L3 Audio nn DSCPAUD, Differentiated
Services Code Point for
audio.
L3 Signaling nn DSCPSIG, Differentiated
Services Code Point for
signaling.
Scroll Right to see the following additional parameters/values:
Ethernet Text string corresponding to
PHY1STAT value, for
example,auto 100 Mbps
HDX, 1000 Mbps FDX.
PC Ethernet Test string corresponding to
PHY2STAT value, for
example, disabled, 100
Mbps HDX, 1000 Mbps
FDX.
Scroll Right to see the following additional parameters/values:
Model 96ccDccc Up to 8 ASCII characters,
MODEL serial number.
Phone SN cccccccccccccccccc Phone Serial Number, up to
18 ASCII characters.
74 Installing and maintaining Avaya IP Deskphone H.323 9608, 9608G, 9611G, 9621G, and 9641GJanuary 2014
Comments? infodev@avaya.com
Page 75

Using the VIEW procedure for troubleshooting
Name System Value Format
PWB SN cccccccccccccccccc Printed Circuit board Serial
Number, up to 18 ASCII
characters. Applies only to
96xx IP phones that have a
software-readable PWB
serial number and
Comcode.
Note:
This parameter is not
supported in Release 6.3
and later.
PWB comcode nnnnnnnnn Nine ASCII numeric
characters. Applies only to
96xx IP phones that have a
software-readable PWB
serial number and
Comcode.
Note:
This parameter is not
supported in Release 6.3
and later.
MAC address hh:hh:hh:hh:hh:hh Each octet of the MAC
address displays as a pair of
hexadecimal numbers.
Group nnn Up to three ASCII numeric
characters: GROUP value.
Protocol: cccccccc Up to eight ASCII characters,
currently only H.323
Application File filename.ext Four to 32 ASCII characters
as primary application.
Ethernet cccccccc Ethernet Two to eight ASCII
characters, either 1000
Mbps, 100 Mbps, 10 Mbps,
or No.
Kernel/RFS file bootcodename One to 32 ASCII characters
(backup image name).
Backup App File filename.ext Four to 32 ASCII characters
(backup application).
Button Module 1 cccccccccccccc 14 ASCII characters. Version
identifier of the software in
the first attached Button
Module, if applicable.
Installing and maintaining Avaya IP Deskphone H.323 9608, 9608G, 9611G, 9621G, and 9641GJanuary 2014 75
Page 76

Troubleshooting
Name System Value Format
Button Module 2 cccccccccccccc 14 ASCII characters. Version
identifier of the software in
the second attached button
module, if applicable.
Button Module 3 cccccccccccccc 14 ASCII characters. Version
identifier of the software in
the third attached button
module, if applicable.
Proxy Server WMLPROXY Proxy server used for WML
functions.
Voice Language
File
NVVOXFILE Language file (NVVOXFILE)
3. Use the Right navigation arrow to scroll through the information shown in the
table.
4. Press Back at any time to return to the Craft Procedures screen.
Installation error and status messages
9600 Series IP phones display messages in the currently selected language or in the language
specified by the LANGSYS parameter value, if the phone is logged off. If English is not the
selected language, the phone displays messages in English only when the message are
associated with local procedures, for example, MUTE VIEW.
The phone displays most of the messages for only about 30 seconds, and then the phone is
reset. The most common exception is Extension in Use, display more than 30 seconds and
which remains until you perform any further action on the phone.
designated for voice-initiated
dialing. Not applicable for
software Release 6.0.
Note:
For VPN-related error and status messages, see the VPN Setup Guide for 9600 Series IP
Telephones, 16-602968.
Table 3: Possible error and status messages during installation of 9600 Series IP phones
Message
802.1X Failure
76 Installing and maintaining Avaya IP Deskphone H.323 9608, 9608G, 9611G, 9621G, and 9641GJanuary 2014
CAUSE: Incorrect credentials provided for authentication or
credentials not provided at all.
Comments? infodev@avaya.com
Cause/Resolution
Page 77

Installation error and status messages
Message Cause/Resolution
RESOLUTION: Follow the display prompts and reenter the 802.1X ID
and password.
IPv4 or IPv6
address
Conflict
Authentication
Error
Bad FileSv
address
Bad Router?
Call Error
CAUSE: The phone has detected an IP address conflict.
RESOLUTION: Verify administration settings to identify duplicate IP
addresses.
CAUSE: The call server does not recognize the extension entered.
RESOLUTION: Confirm the extension is correct and is correctly
administered on the switch. Then try registration again, and enter the
extension accurately.
CAUSE: The HTTP/HTTPS server IP address in the IP phone’s
memory is all zeroes.
RESOLUTION: Depending on the specific requirements of your
network, this may not be an error. If appropriate, either administer the
DHCP server with the proper address of the HTTP/HTTPS server, or
administer the phone locally using the ADDR option. For details on
the ADDR option, see
page 37.
CAUSE: The phone cannot find a router based on the information in
the DHCP file for GIPADD.
RESOLUTION: Use static addressing to specify a router address, or
change administration on DHCP.
For deails, seeAdministering Avaya IP phone H.323 9608,9608G,
9611G, 9621G, and 9641G.
CAUSE: The user was on a call when the connection to the
gatekeeper went down due to a network outage or a gatekeeper
problem. The phone attempted to automatically register with the same
or another gatekeeper, but the responding gatekeeper had no record
of the call.
RESOLUTION: Wait for the call to end, and if the phone does not
automatically register, restart the phone.
Using Local Administrative (Craft) Options on
Connecting...
Contacting
call server...
DHCP: CONFLICT
* to program
Installing and maintaining Avaya IP Deskphone H.323 9608, 9608G, 9611G, 9621G, and 9641GJanuary 2014 77
CAUSE: The phone is attempting to establish a TCP connection with
the call server. A resource needed to establish the connection might
not be available or the 10 second buffer on switch-related actions
might have expired.
RESOLUTION: Allow the phone to continue attempts to connect to
TCP.
CAUSE: The phone has rebooted successfully and is attempting to
register with the call server.
RESOLUTION: Allow the phone to continue.
CAUSE: At least one of the IP address offered by the DHCP server
conflicts with another address.
RESOLUTION: Review DHCP server administration to identify
duplicate IP address(es).
Page 78

Troubleshooting
DHCPv6
Failure: (with
message)
Message Cause/Resolution
CAUSE: The phone receives a reply message with a Status Code
option that contains a status-code of 1 which means UnspecFail or a
reply in response to a Renew or Rebind message with a Status Code
option containing a status-code value other than 0 that indicates
Success or 5 which indicates UseMulticast.
RESOLUTION: In the first case, DHCPv6 will be restarted. If this
message is the result of a status-code value other than 1 or 5,
IPADDV6 will be set to null; if dual-stack operation is enabled the
phone will also cease use of its IPv4 address and IPADD will be set
to null, and DHCP operation will proceed.
Discover
aaa.bbb.ccc.ddd
CAUSE: The phone is attempting to find a DHCP server, and the user
can view the IP addresses.
RESOLUTION: If this message appears for more than a few seconds,
verify with the LAN Administrator that a DHCP server is appropriately
administered on the network. If a DHCP server is not present, you
must interrupt the Discovering process and use static addressing. For
details on configuring a static address, see
Changing IP address
information on page 47. To interrupt the Discovering process, press
the # button, and when you see the 100 Mbs or10 Mbs message,
quickly press the star (*) button.
Discovering... CAUSE: The phone is attempting to find a DHCP server and the user
is not allowed to view IP addresses.
RESOLUTION: If this message appears for more than a few seconds,
verify with the LAN Administrator that a DHCP server is appropriately
administered on the network. If a DHCP server is not available, you
must interrupt the Discovering process and use static addressing. For
information, see
Changing IP address information on page 47. To
interrupt the Discovering process, press the pound (# )button, and
when you see the 1000 Mbps , 100 Mbps or 10 Mbps message,
quickly press the star (*) button.
EEPROM error,
repair
required
CAUSE: Application file was not downloaded or saved correctly.
RESOLUTION: The phone automatically resets and attempts to reinitialize.
Emergency
Option
Extension in
Use
Extension in
use: <NNNN>
Press continue
to take over
CAUSE: Incompatible emergency option.
RESOLUTION: This must not happen. Contact Avaya support.
CAUSE: The call server detects an extension conflict with an existing
set or Softphone.
RESOLUTION: By pressing Continue, you can force the current
phone to register and thereby disconnect the other user. When Login
is selected instead, the phone re-prompts for entry of a different
extension and password.
this extension
Login|Continue
Finding
router...
CAUSE: This phone is proceeding through boot-up.
RESOLUTION: Allow the phone to continue.
78 Installing and maintaining Avaya IP Deskphone H.323 9608, 9608G, 9611G, 9621G, and 9641GJanuary 2014
Comments? infodev@avaya.com
Page 79

Message Cause/Resolution
Gatekeeper
Error
CAUSE: The gatekeeper rejects the registration attempt for an
unspecified reason.
RESOLUTION: Review gatekeeper and call server administrations,
including IP network parameters.
Installation error and status messages
Gateway Error
Incompatible
Invalid file
IP address
Error
License Error
Limit Error
CAUSE: DEFINITY Release 8.4 does not have an H.323 station
extension for this phone.
RESOLUTION: On the station administration screen, ensure the DCP
set being aliased for this IP phone has an H.323 station extension
administered, in accordance with switch administration instructions.
Since the 9600 Series IP phones are not supported on DEFINITY
Release 8.4, you must upgrade to a release that supports these
phones.
CAUSE: This release of the call server does not support the current
version of the IP phone.
RESOLUTION: Upgrade to the current version of Communication
Manager (3.0 or greater) software.
CAUSE: The phone does not have sufficient room to store the
downloaded file.
RESOLUTION: Verify that the proper filename is administered in the
script file, and the correct application file is located in the appropriate
location on the HTTP or HTTPS server.
CAUSE: The gatekeeper reports an invalid IP address.
RESOLUTION: This must not happen. Contact Avaya support.
CAUSE: The call server does not support IP telephony.
RESOLUTION: Contact Avaya to upgrade your license.
CAUSE: The call server has reached its limit of IP stations.
RESOLUTION: Un-register phones that are not in use, or contact
Avaya to upgrade your license.
NAPT Error
No Ethernet
Packet Error
Password Error
Installing and maintaining Avaya IP Deskphone H.323 9608, 9608G, 9611G, 9621G, and 9641GJanuary 2014 79
CAUSE: A device between the phone and the call server is invoking
Network address Port Translation (NAPT), which the 9600 Series IP
phones do not support.
RESOLUTION: Contact the System Administrator to remove or readminister the device.
CAUSE: When first plugged in, the IP phone is unable to communicate
with the Ethernet.
RESOLUTION: Verify the connection to the Ethernet jack, verify if the
jack is Category 5, verify if power is applied on the LAN to that jack.
CAUSE: Protocol timeout error.
RESOLUTION: Reenter the correct extension and password. If the
condition persists, contact the system administrator.
CAUSE: The call server does not recognize the password entered and
displays the Login Error screen.
Page 80

Troubleshooting
Message Cause/Resolution
RESOLUTION: Confirm whether the password is correct, then try
registering again, and enter the password accurately.
Request Error
Restarting...
Subnet
conflict * to
program
System busy
CAUSE: The gatekeeper does not accept the registration request sent
by the phone as the request is not formatted properly.
RESOLUTION: The phone will automatically attempt to register with
the next gatekeeper on its list. If the problem persists, reboot the
phone.
CAUSE: The phone is in the initial stage of rebooting.
RESOLUTION: Allow the phone boot process to continue.
CAUSE: The phone is not on the same VLAN subnet as the router.
RESOLUTION: Press star (*) to administer an IP address on the
phone. For information on configuring an IP address, see Changing
IP address information on page 47, or administer network equipment
to administer the phone appropriately.
CAUSE: Most likely, the number of IP endpoints on the call server is
already at maximum capacity. Network resource may not be
unavailable.
RESOLUTION: The phone attempted to access a network resource
such as DHCP server, HTTP server, or the call server and was not
successful. Check the resource being called upon for its availability.
If the resource appears operational and is properly linked to the
network, verify that the addressing is accurate and that a
communication path exists in both directions between the phone and
the resource.
System Error
Undefined
Error
Updating: DO
NOT UNPLUG THE
phone
Waiting for
LLDP
Wrong Set Type
CAUSE: The call server has an unspecified problem.
RESOLUTION: Consult your Avaya Media Server administration and
troubleshooting documentation.
CAUSE: The call server has rejected registration for an unspecified
reason.
RESOLUTION: Consult your Avaya Media Server administration and
troubleshooting documentation.
CAUSE: The phone is updating its software image.
RESOLUTION: The phone update process must be continued.
CAUSE: No File Server or Call Server has been administered, so the
phone is expecting to get the missing data through LLDP.
RESOLUTION: Administer the missing data by one of the following
methods: Statically, dynamically in DHCP, in the 46xxsettings file for
Call Server addresses, or by LLDP. For more information, see LLDP
Troubleshooting on page 86.
CAUSE: The call server does not recognize the set type.
RESOLUTION: Ensure the call server is properly administered to
register a compatible phone for the IP address and extension.
80 Installing and maintaining Avaya IP Deskphone H.323 9608, 9608G, 9611G, 9621G, and 9641GJanuary 2014
Comments? infodev@avaya.com
Page 81

Operational errors and status messages
Operational errors and status messages
The following table identifies some of the possible operational problems that might be
encountered after successful 9600 Series IP phone installation. The user guide for a specific
phone model also contains troubleshooting for users having problems with specific IP phone
applications. Most of the problems reported by phone users are LAN-based, where Quality of
Service, server administration, and other issues can impact end-user perception of IP phone
performance.
Table 4: Operational error conditions for 9600 Series IP Phones
Condition Cause/Resolution
The phone continually reboots, or reboots
continuously about every 15 minutes.
The message light on the phone turns on
and off intermittently, but the phone never
registers.
The phone stops
working in the
middle of a call,
AND no lights are lit
on the phone and the
display is not lit.
AND power to the
phone is normal and
the phone might have
gone through the
restarting sequence.
CAUSE: The phone cannot find the HTTP/
HTTPS server and/or call server.
RESOLUTION: Ensure that MCIPADD is
administered either manually or through DHCP
or HTTP, as appropriate. Alternately, this might
be a firmware fault because the MAC address
in memory is corrupted; in this case, you must
return the phone to Avaya for repair.
CAUSE: This is a hardware fault.
RESOLUTION: You must return the phone to
Avaya for repair.
CAUSE: Loss of power.
RESOLUTION: Check the connections
between the phone, the power supply, and the
power jack. For example, verify whether static
addressing was not used or that any changes
to static addresses were entered correctly.
Follow POE guidelines to troubleshoot POE
related problems.
Loss of path to the Avaya call server, expiry of
DHCP lease, or unavailable DHCP server
when telephone attempts to renegotiate DHCP
lease.
RESOLUTION: As above.
The phone was
working, but does
not work now,
Installing and maintaining Avaya IP Deskphone H.323 9608, 9608G, 9611G, 9621G, and 9641GJanuary 2014 81
AND no lights are lit
on the phone and the
display is not lit.
AND power to the
phone is normal, but
there is no dial tone.
CAUSE: Loss of power.
RESOLUTION: Check the connections
between the phone, the power supply, and the
power jack. Follow POE guidelines to
troubleshoot POE related problems.
CAUSE: Loss of communication with the call
server.
Page 82

Troubleshooting
Condition Cause/Resolution
The display might
show “System Busy.”
AND the phone was
recently moved.
AND the network was
recently changed to
upgrade or replace
servers, readminister the Avaya
Media Server, add or
change NAT, etc.
RESOLUTION: Check LAN continuity from the
call server to the phone using ARP or traceroute and from the phone to the call server by
invoking a Feature button. Verify that LAN
administration has not changed for the
Gatekeeper, TN 2302AP boards, or the LAN
equipment (routers, servers, etc.) between the
switch and the phone.
Verify that telephone settings are not changed
locally using VIEW and ADDR information, as
described earlier in this guide. Verify that the
telephone volume is set high. Finally, conduct
a self-test.
CAUSE: Loss of communication with the call
server.
RESOLUTION: As above, but verify whether
the phone is being routed to a different DHCP
server, or even a different call server switch. If
so, the new server or switch might need to be
administered to support the phone.
CAUSE: Loss of communication with the call
server.
RESOLUTION: As above.
The phone works, but the audio quality is
poor, specifically:
the user hears echo
when speaking on a
handset.
the user hears an
echo on a headset,
but not on a handset.
the user is on
Speaker and hears
no echo, but the farend hears echo.
the user experiences
sudden silences such
CAUSE: Echo from digital-to-analog
conversion on your Avaya Media Server
trunk.
RESOLUTION: Identify the trunk that is
causing the echo, and swap the Trunk
Termination parameter for that trunk on the call
server.
CAUSE: Improper headset cord.
RESOLUTION: Ensure that an headset cord
approved by Avaya is being used.
CAUSE: Room acoustics.
RESOLUTION: Ensure that there are six
inches or so of blank space to the right of the
phone. If that is insufficient, use the handset.
CAUSE: Jitter, delay, dropped packets, etc.
82 Installing and maintaining Avaya IP Deskphone H.323 9608, 9608G, 9611G, 9621G, and 9641GJanuary 2014
Comments? infodev@avaya.com
Page 83

Operational errors and status messages
Condition Cause/Resolution
as gaps in speech, or
static, clipped or
garbled speech, etc.
the user hears
fluctuations in the
volume level which
are worse when the
Speaker is on, or at
the beginning of a
call, or when a call
goes from no one
talking abruptly to a
loud voice.
The phone works properly except for the
Speaker.
RESOLUTION: You can have the user provide
diagnostic data to Avaya support by invoking
the Network Information feature under the A
(Avaya Menu) or Home button on the phone.
One or more Quality of Service (QoS) features
should be implemented in the network. For
information on QoS, see
Administrative (Craft) Options on page 37.
CAUSE: Improper non-Category 5 wiring.
RESOLUTION: Replace non-Category 5
wiring with Category 5 wiring.
CAUSE: The user has changed the Automatic
Gain Control (AGC) or environmental
acoustics are not consistent with the current
audio settings.
RESOLUTION: Try different On or Off settings
for the AGCHAND, AGCHEAD, and
AGCSPKR parameters.
CAUSE: The Speaker was turned off at the call
server.
RESOLUTION: Administer the call server to
allow that station’s Speaker to operate. If that
does not work, do a self-test on the phone, as
explained in
page 63.
Performing a self-test on
Using Local
The phone works properly, but you cannot
hear incoming DTMF tones.
The phone works properly, but you cannot
hear incoming DTMF tones.
Hands-Free Answer (HFA) is administered
but the phone did not automatically answer
a call.
CAUSE: The TN2302AP board does not pass
in-band DTMF tones.
RESOLUTION: None; the board is operating
as designed.
CAUSE: Call server suppresses sidetone
DTMF.
RESOLUTION: After completing call server
administration, enable On-Hook Dialing on the
Change-System-Parameters screen. If the
user has enabled Hands-Free Answer (HFA),
answers a call using the Speaker, switches to
the handset, and presses dialpad buttons, the
phone does not transmit DTMF tones. Disable
HFA to hear DTMF tones.
CAUSE: HFA only works if the phone is idle.
The phone ignores a second call if a call,
including the ringing tone is in progress.
RESOLUTION: None.
Installing and maintaining Avaya IP Deskphone H.323 9608, 9608G, 9611G, 9621G, and 9641GJanuary 2014 83
Page 84

Troubleshooting
Condition Cause/Resolution
The phone does not use and ignores the
HTTP or HTTPS script file and settings
file.
The HTTP or
HTTPS script file is
ignored or not
used by the
AND the HTTP or
HTTPS server is a
LINUX or UNIX
system.
phone,
CAUSE: The system value AUTH is set to 1
which indicates that HTTPS is required but no
valid address is specified in TLSSRVR.
RESOLUTION: Change AUTH to 0 (zero), or
enter a valid address for TLSSRVR.
CAUSE: The phone expects lines of the script
file to terminate with a <Carriage
Return> <Line Feed>. Some UNIX
applications only terminate lines with <Line
Feed>. Editing the script file with a UNIX-
based editor can strip a<Carriage
Return> from the file. Doing so causes the
entire file to be treated as a comment, and thus
be ignored.
RESOLUTION: Edit the script file with a
®
Windows
—based editor, or another editor
that does not strip out the <Carriage
Return>.
CAUSE: UNIX and LINUX systems use casesensitive addressing and file labels.
RESOLUTION: Verify the file names and path
in the script file are accurately specified.
AND phone
administration
recently changed.
The system ignores some settings in the
settings file while other settings are being
used properly.
The system
ignores some
settings in the
settings file while
AND the setting being
ignored is one or
more of the AGC
settings.
other settings are
being used
properly,
Telephone power is interrupted while the
phone is saving the application file and the
CAUSE: The 96xxupgrade.txt file was edited
incorrectly, renamed, etc.
RESOLUTION: Download a clean copy of the
96xxupgrade.txt file from the Avaya support
web site at http://www.avaya.com/support, and
do not edit or rename the file. Customize or
change only the 46xxsettings file as required.
For more information, see
Maintaining 9600
Series IP phones on page 65.
CAUSE: Improper administration of settings
file.
RESOLUTION: Verify that customized settings
are correctly spelled and formatted.
CAUSE: The user changed the AGC settings,
which were placed in the backup or restore file
of the user.
RESOLUTION: The user can reset the AGC
values back to the required settings, or the
backup file can be edited to delete the custom
AGC settings.
CAUSE: The HTTP or HTTPS server stops
responding if power is interrupted while a
phone is saving the application file.
84 Installing and maintaining Avaya IP Deskphone H.323 9608, 9608G, 9611G, 9621G, and 9641GJanuary 2014
Comments? infodev@avaya.com
Page 85

Operational errors and status messages
Condition Cause/Resolution
HTTP/HTTPS application stops
responding.
The user indicates an application or option
is not available.
User data disappeared when the user
logged out of one phone and logged in to
another phone.
RESOLUTION: Restart the phone
CAUSE: The 46xxsettings script file is not
pointed to accurately, or is not properly
administered to allow the application.
RESOLUTION: Verify that the 46xxsettings
script file is properly specified for your system,
verify that the file server is UNIX or LINUX, and
verify the extension.
Then verify that all the relevant parameters
indicated in Chapter 7 of the Administering
Avaya IP phone H.323 9608, 9608G ,9611G,
9621G, and 9641G, are accurately specified in
the 46xxsettings file.
CAUSE: The second phone is unable to gain
access to the backup file.
RESOLUTION: Verify that the first phone
creates a backup file.
Verify whether appropriate administration was
done in accordance with Chapter 7 of the
Administering Avaya IP phone H.323 9608,
9608G,9611G, 9621G, and 9641G. Then
verify that the second phone is administered to
retrieve data from the same location as the first
phone.
Then verify that all the relevant parameters
indicated in Chapter 7 of the Administering
Avaya IP phone H.323 9608,9608G, 9611G,
9621G, and 9641G, are accurately specified in
the 46xxsettings file.
Finally, verify that the HTTP and HTTPS server
on which the backup file is located is
operational and accessible from the second
phone.
The user reports that button module
buttons are not labeled properly.
The user reports
that personalized
labels cannot be
placed on the
button module’s
buttons,
Installing and maintaining Avaya IP Deskphone H.323 9608, 9608G, 9611G, 9621G, and 9641GJanuary 2014 85
AND the user has
tried using the
Program AD button
feature.
AND the user has
tried using the
CAUSE: Improper administration on the call
server.
RESOLUTION: Verify correct administration.
CAUSE: Improper administration on the call
server.
RESOLUTION: Verify correct administration.
CAUSE: The user pressed the button module
button to indicate which button to relabel.
Page 86

Troubleshooting
Condition Cause/Resolution
Personalize Labels
option on the phone.
The user reports
inability to gain
access to Contacts
or backed-up Call
Log entries, or
user options.
The user reports
that pressing My
Pictures causes
the default Avaya
or administered
custom
screensaver to
appear.
Touchscreen phones only. User gets
Could Not Access Internet Service
message from the World Clock or Weather
application.
AND the user is
registered via a USB
login.
AND the user is
registered via a USB
login.
RESOLUTION: The user should use the list
displayed on the phone, scroll to highlight the
desired button label, and press either OK or the
corresponding line button.
CAUSE: The phone is working as designed.
RESOLUTION: Remove the USB device and
log in locally.
CAUSE: One or more files in the USB pictures
directory are not in proper .jpg format or are too
large for the given phone to display.
RESOLUTION: Check the file format and verify
that height/width limits as specified in the User
Guide are followed.
CAUSE: WMLPROXY and or WMLPORT
have not been properly administered.
RESOLUTION: Administer the missing data in
the 46xxsettings file.
For more information on the settings file, see
the Administering Avaya IP phone H.323 9608,
9608G, 9611G, 9621G, and 9641G.
LLDP Troubleshooting
If the Waiting for LLDP message appears for more than a few seconds, the message generally
indicates a problem with getting a value for the call server IP address. This error can occur
due to incorrect settings in script files or in the way the network is configured.
On booting, the phone must obtain a valid IP address for the call cerver. The phone can obtain
the value, known as MCIPADD, from several sources:
• A static or manually programmed address on the phone.
• The 46xxsettings.txt file MCIPADD setting.
• A DHCP offer using option 242 that includes the MCIPADD setting.
• Link Layer Discovery Protocol or LLDP.
If the phone cannot find MCIPADD through any of these means, it will fail to register with the
Call Server and will display the Waiting for LLDP message several times before rebooting. For
example, if the MCIPADD value was specified in the 46xxssetting file and the network file
86 Installing and maintaining Avaya IP Deskphone H.323 9608, 9608G, 9611G, 9621G, and 9641GJanuary 2014
Comments? infodev@avaya.com
Page 87

server fails, the phone will not be able to read the MCIPADD value or any of the 46xxsettings
file parameters. Therefore, do not use this method of providing MCIPADD.
Proposed Solution
Procedure
1. A more robust way to provide this value is to use DHCP. You can administer the
DHCP server to provide MCIPADD using DHCP Option 242. You can also
administer the TLSSRVR, HTTPSRVR and L2QVLAN parameters using this option.
phones using non-static addressing automatically use the DHCP request method.
Option 242 is the default DHCP offer and may get MCIPADD and other addresses
using this way.
2. The phone displays the Waiting for LLDP message when both the HTTP and
HTTPS Server IP address are not administered. To administer the HTTP and/or
HTTPS server, use the Craft ADDR procedure and enter the correct HTTP and or
HTTPS File Server IP address in the File Server field.
LLDP setup and troubleshooting steps
3. An alternative protocol known as LLDP can also supply call server, and file server
with HTTP and HTTPS IP addresses. This IETF standard protocol requires the
network to be equipped and configured to support LLDP. You can provide HTTP
and the HTTPS Server and call server IP addresses with LLDP in the network using
proprietary Transport Layer Values (TLVs) to pass information to the phones.
For more information about LLDP processing, see Administering Avaya IP phone
H.323 9608, 9611G, 9621G, and 9641G.
LLDP setup and troubleshooting steps
Note:
If system value
file might overwrite the static addresses.
Note:
See Administering Avaya IP Deskphone H.323 9608, 9608G, 9611G, 9621G, and 9641G
for details on how to set “STATIC” to use manually programmed IP addresses.
STATIC is set to 0 which is the default setting, the DHCP or the 46xxsettings
Installing and maintaining Avaya IP Deskphone H.323 9608, 9608G, 9611G, 9621G, and 9641GJanuary 2014 87
Page 88

Troubleshooting
Proposed solution for DHCP configured deskphones
Procedure
1. Using the Craft ADDR procedure, set Phone to 0.0.0.0.
2. Verify or set SSON to 242 which is the default value.
3. Administer the DHCP server option 242 to include MCIPADD=xxx.xxx.xxx.xxx where
xxx.xxx.xxx.xxx is the call server IP address.
4. Verify that the DHCP server and the deskphone are on the same VLAN.
5. Verify the DHCP server port 67 and or the DHCP client port 68 are not blocked on
the switch.
6. Verify the configuration of the DHCP Relay Agent on the switch or on a separate
PC, for example, MS Windows Server 2000/2003 whether the deskphones and
DHCP Server are placed on different networks or subnets. DHCP broadcast
messages do not, by default, cross the router interface.
Note:
Do not embed spaces in DHCP Option 242 strings. For more information, see
DHCP Server Administration in Chapter 5 of Administering Avaya IP Deskphone
H.323 9608, 9608G,9611G, 9621G, and 9641G.
Proposed solution for script-configured deskphones
Procedure
1. Edit the 46xxsettings.txt file to contain a valid Call Server IP address with the line
SET MCIPADD xxx.xxx.xxx.xxx where xxx.xxx.xxx.xxx is the Call Server IP
address.
2. Verify that the 96xxupgrade.txt file contains the line GET 46xxsettings.txt as
the last command line of the upgrade file.
3. Verify that the deskphone can reach the HTTP server and whether the HTTP server
is activated.
4. Verify that the 96xxupgrade.txt and 46xxsettings.txt files are placed in the proper
directory of the HTTP server to access these files.
For more information, see Administering Avaya IP Deskphone H.323 9608,9608G,
9611G, 9621G, and 9641G.
88 Installing and maintaining Avaya IP Deskphone H.323 9608, 9608G, 9611G, 9621G, and 9641GJanuary 2014
Comments? infodev@avaya.com
Page 89

Proposed solution for LLDP-configured deskphones
About this task
For LLDP-configured deskphones, activate the switch the deskphone is connected to for LLDP.
This is currently only possible with Extreme switches. Activating the switch for LLDP enables
the switch to send appropriate IP addresses using Avaya/Extreme Proprietary HTTP and/or
HTTPS Server and/or Call Server TLVs.
Note:
The deskphone obtains the HTTP and or HTTPS Server and Call Server IP addresses from
LLDP only if the addresses were not configured through other means such as DHCP Server,
Script File, or statically.
Note:
Set the switch LLDP repeat timer to less than 30 seconds.
Secure Shell Support
Note:
For more information, see Administering Avaya IP Deskphone H.323 9608, 9608G,9611G,
9621G, and 9641G.
Secure Shell Support
Secure Shell (SSH) protocol is a tool that the Avaya Services organization can use to remotely
connect to IP deskphones to monitor, diagnose, or debug deskphone performance. Release
6.2 supports only the SSHv2 version. Because of the sensitive nature of remote access, you
can disable permission with the SSH_ALLOWED parameter. Even if permission is given, the
deskphone has several inbuilt security features.
The deskphone displays a security warning message at start of the session. You can specify
your own file using SSH_BANNER_FILE, or the deskphone will use the following default file:
This system is restricted solely to authorized users for legitimate business purposes
only. The actual or attempted unauthorized access, use, or modification of this
system is strictly prohibited. Unauthorized users are subject to company
disciplinary procedures and or criminal and civil penalties under state, federal, or
other applicable domestic and foreign laws. The use of this system may be monitored
and recorded for administrative and security reasons. Anyone accessing this system
expressly consents to such monitoring and recording, and is advised that if it
reveals possible evidence of criminal activity, the evidence of such activity may be
provided to law enforcement officials. All users must comply with all corporate
instructions regarding the protection of information assets.
Installing and maintaining Avaya IP Deskphone H.323 9608, 9608G, 9611G, 9621G, and 9641GJanuary 2014 89
Page 90

Troubleshooting
If you require a custom warning message, you can set SSH_BANNER_FILE to an absolute
URL, or the name of the file on the standard file server such as HTTPSRVR.
You can also administer the following parameters:
• The amount of inactivity time that will disable SSH with SSH_IDLE_TIMEOUT
90 Installing and maintaining Avaya IP Deskphone H.323 9608, 9608G, 9611G, 9621G, and 9641GJanuary 2014
Comments? infodev@avaya.com
Page 91

Chapter 6: Glossary
Glossary
Terms
802.1D 802.1Q defines a layer-2 frame structure that supports VLAN identification
802.1Q QoS mechanism is usually referred to as 802.1D.
802.1X Authentication method for a protocol requiring a network device to authenticate with a
Application specific
ARP Address Resolution Protocol that you can use to verify that the IP address that the
CLAN Control LAN, a type of Gatekeeper circuit pack.
CNA Converged Network Analyzer.
DHCP Dynamic Host Configuration Protocol, an IETF protocol used to automate IP Address
Description
back-end Authentication Server before gaining network access. Applicable 9600
Series IP deskphones support IEEE 802.1X for pass-through and for Supplicant
operation with the EAP-MD5 authentication method.
Specific to a particular “application” running inside the deskphone. For example,
configuration file downloading, backup and restore of user data, HTTP push, and the
Web browser are all internal applications that use the HTTP protocol. Similarly, the
RTCP and CNA clients are internal applications that can invoke traceroute. This term
does not include Web page-based “applications” rendered in the Web browser.
DHCP server provides is not in use by another IP deskphone.
allocation and management.
DiffServ Differentiated Services, an IP-based QoS mechanism.
DNS Domain Name System, an IETF standard for ASCII strings to represent IP Addresses.
DNS is a distributed Internet directory service that translates domain names and IP
Addresses. For example, 9600 Series IP Deskphones use DNS to resolve names into
IP Addresses. DHCP, TFTP, and HTTP files use DNS names wherever IP addresses
are available and a valid DNS server exists.
Gatekeeper H.323 application that performs essential control, administrative, and managerial
functions in the media server. Sometimes called CLAN in Avaya documents.
H.323 A TCP/IP-based protocol for VoIP signaling.
HTTP Hypertext Transfer Protocol, used to request and transmit pages on the World Wide
Web.
HTTPS A secure version of HTTP.
IEEE Institute of Electrical and Electronics Engineers, an organization that, among other
things, produces standards applicable to Local Area Network equipment.
Installing and maintaining Avaya IP Deskphone H.323 9608, 9608G, 9611G, 9621G, and 9641GJanuary 2014 91
Page 92

Glossary
IETF Internet Engineering Task Force, the organization that produces standards for
communications on the internet.
LAN Local Area Network.
MAC Media Access Control, the ID of an endpoint.
QoS Quality of Service, mechanisms that improve audio quality over packet-based
networks.
RTCP Real-time Transport Control Protocol.
RTP Real-time Transport Protocol.
SRTCP Secure Real-time Transport Control Protocol.
SRTP Secure Real-time Transport Protocol.
System specific
Specific to a particular type of call server, for example, Communication Manager.
“System-specific signaling” refers to messages specific to the signaling protocol used
by the system, for example, H.323 or CCMS messages or both messages used by
Communication Manager and IP Office. “System-specific procedures” refers to
deskphone software procedures that are specific to the call server with which the
software is intended to be used.
TCP Transmission Control Protocol, a connection-oriented transport-layer protocol.
TLS Transport Layer Security, an enhancement of Secure Sockets Layer (SSL) that is
compatible with SSL 3.0. Using TLS, you can ensure privacy and data integrity
between two communicating applications.
UDP User Datagram Protocol, a connectionless transport-layer protocol.
Unnamed
Registration
A type of registration with Communication Manager in which the IP deskphone does
not need an extension. This type of IP deskphone has limited outgoing calling
facility.
URI & URL Uniform Resource Identifier and Uniform Resource Locator. Names for the strings
used to reference resources on the Internet (for example, HTTP://....). URI is the newer
term.
USB Universal Serial Bus. An industry standard used by PCs and various devices for
communication.
VLAN Virtual LAN.
VoIP Voice over IP, a class of technology for sending audio data and signaling over LANs.
92 Installing and maintaining Avaya IP Deskphone H.323 9608, 9608G, 9611G, 9621G, and 9641GJanuary 2014
Comments? infodev@avaya.com
Page 93

Index
Numerics
802.1X operational mode, setting the .........................45
9600 Series IP Deskphone .........................................16
powering the ........................................................ 16
A
accessing ................................................................... 38
local craft procedures ...........................................38
Administrative Options ............................................... 40
Entering Data for ..................................................40
AGC ............................................................................50
Automatic Gain Control, Disable/Enable .................... 50
C
Calibrating the Touch Screen .....................................49
Call Center faceplate installation (9641G) ..................26
Change History ............................................................ 7
Changing the Signaling Protocol ................................ 69
clearing the phone settings ........................................ 51
connecting the deskphone ......................................... 21
Connection Jacks for 9621G/9641G Models ..............16
Connection Jacks on 9608 or 9611G Models ............ 16
Contrast, Adjusting for Button Modules or Non-Color IP
deskphones ................................................... 53
craft procedure ........................................................... 72
craft procedures ....................................................38, 39
accessing .............................................................38
running .................................................................39
D
Disable Event Logging ............................................... 57
disable/enable Automatic Gain Control (AGC) ...........50
Document Organization ............................................... 7
download file content ..................................................65
downloading software upgrades .................................65
Downloading Text Language Files ............................. 68
DTMF Tones .............................................................. 72
Dual Headset Adapter, installing ................................ 21
dynamic addressing process ......................................27
Enable Event Logging ................................................ 57
Enhancements ........................................................... 10
Entering Data for Administrative Options ................... 40
Error Conditions ......................................................... 71
error messages .......................................................... 76
Event Logging ............................................................ 57
F
Faceplate installation, for 9641G use in call center ....26
G
Gigabit ethernet ............................................................8
Group Identifier ...........................................................55
GROUP Parameter .................................................... 69
H
Handset audio equalization ........................................ 55
Setting ..................................................................55
I
Initialization .................................................................27
Installing a Dual Headset Adapter ..............................21
Interface Control .........................................................56
IP Deskphone .............................................................14
Requirements .......................................................14
IP deskphone models ...................................................7
L
Language Files for text entry, Downloading ............... 68
legal notices ................................................................. 2
LLDP troubleshooting .................................................86
Local administrative procedures .................................43
local craft procedures ................................................. 37
LOG Procedure .......................................................... 57
logoff procedure ......................................................... 58
E
enable Automatic Gain Control (AGC) ....................... 50
Installing and maintaining Avaya IP Deskphone H.323 9608, 9608G, 9611G, 9621G, and 9641GJanuary 2014 93
M
models ..........................................................................7
Page 94

N
new features ...............................................................10
O
operation errors .......................................................... 81
overview ..................................................................... 13
P
phone ......................................................................... 61
restarting ..............................................................61
power interruption .......................................................72
power-up and reset process .......................................29
powering .....................................................................16
Pre-Installation Checklist ............................................14
Pre-Installation Checklist for Static Addressing ..........46
R
Requirements, for each IP Deskphone ...................... 14
Reset System Values ................................................. 60
resetting the phone .....................................................27
self-test .......................................................................63
settings file, contents ..................................................67
SIG Procedure ............................................................62
Signaling Protocol Identifier ........................................62
Signaling Protocol, Changing ..................................... 69
Site-Specific Option Number Setting ..........................63
Software ..................................................................... 13
software upgrades, downloading ................................65
SSON Procedure ........................................................63
Static Addressing ....................................................... 46
Pre-Installation Checklist ..................................... 46
status messages ...................................................76, 81
System Values, Reset ................................................ 60
T
Touch Screen, Calibrating ..........................................49
troubleshooting ...........................................................72
DTMF tones ......................................................... 72
power interruption ................................................ 72
Troubleshooting ..........................................................71
Error Conditions ................................................... 71
troubleshooting LLDP .................................................86
S
Secure Shell Support ................................................. 89
U
Unnamed Registration ................................................34
94 Installing and maintaining Avaya IP Deskphone H.323 9608, 9608G, 9611G, 9621G, and 9641GJanuary 2014
 Loading...