

Page 1

Installing and Administering the Avaya
H229 Phone
Release 1.0
Issue 3
October 2019
Page 2

©
2018-2019, Avaya Inc.
All Rights Reserved.
Note
Using a cell, mobile, or GSM phone, or a two-way radio in close
proximity to an Avaya IP telephone might cause interference.
Documentation disclaimer
“Documentation” means information published in varying mediums
which may include product information, operating instructions and
performance specifications that are generally made available to users
of products. Documentation does not include marketing materials.
Avaya shall not be responsible for any modifications, additions, or
deletions to the original published version of Documentation unless
such modifications, additions, or deletions were performed by or on
the express behalf of Avaya. End User agrees to indemnify and hold
harmless Avaya, Avaya's agents, servants and employees against all
claims, lawsuits, demands and judgments arising out of, or in
connection with, subsequent modifications, additions or deletions to
this documentation, to the extent made by End User.
Link disclaimer
Avaya is not responsible for the contents or reliability of any linked
websites referenced within this site or Documentation provided by
Avaya. Avaya is not responsible for the accuracy of any information,
statement or content provided on these sites and does not
necessarily endorse the products, services, or information described
or offered within them. Avaya does not guarantee that these links will
work all the time and has no control over the availability of the linked
pages.
Warranty
Avaya provides a limited warranty on Avaya hardware and software.
Refer to your sales agreement to establish the terms of the limited
warranty. In addition, Avaya’s standard warranty language, as well as
information regarding support for this product while under warranty is
available to Avaya customers and other parties through the Avaya
Support website:
https://support.avaya.com/helpcenter/
getGenericDetails?detailId=C20091120112456651010 under the link
“Warranty & Product Lifecycle” or such successor site as designated
by Avaya. Please note that if You acquired the product(s) from an
authorized Avaya Channel Partner outside of the United States and
Canada, the warranty is provided to You by said Avaya Channel
Partner and not by Avaya.
“Hosted Service” means an Avaya hosted service subscription that
You acquire from either Avaya or an authorized Avaya Channel
Partner (as applicable) and which is described further in Hosted SAS
or other service description documentation regarding the applicable
hosted service. If You purchase a Hosted Service subscription, the
foregoing limited warranty may not apply but You may be entitled to
support services in connection with the Hosted Service as described
further in your service description documents for the applicable
Hosted Service. Contact Avaya or Avaya Channel Partner (as
applicable) for more information.
Hosted Service
THE FOLLOWING APPLIES ONLY IF YOU PURCHASE AN AVAYA
HOSTED SERVICE SUBSCRIPTION FROM AVAYA OR AN AVAYA
CHANNEL PARTNER (AS APPLICABLE), THE TERMS OF USE
FOR HOSTED SERVICES ARE AVAILABLE ON THE AVAYA
WEBSITE,
HTTPS://SUPPORT.AVAYA.COM/LICENSEINFO UNDER
THE LINK “Avaya Terms of Use for Hosted Services” OR SUCH
SUCCESSOR SITE AS DESIGNATED BY AVAYA, AND ARE
APPLICABLE TO ANYONE WHO ACCESSES OR USES THE
HOSTED SERVICE. BY ACCESSING OR USING THE HOSTED
SERVICE, OR AUTHORIZING OTHERS TO DO SO, YOU, ON
BEHALF OF YOURSELF AND THE ENTITY FOR WHOM YOU ARE
DOING SO (HEREINAFTER REFERRED TO INTERCHANGEABLY
AS “YOU” AND “END USER”), AGREE TO THE TERMS OF USE. IF
YOU ARE ACCEPTING THE TERMS OF USE ON BEHALF A
COMPANY OR OTHER LEGAL ENTITY, YOU REPRESENT THAT
YOU HAVE THE AUTHORITY TO BIND SUCH ENTITY TO THESE
TERMS OF USE. IF YOU DO NOT HAVE SUCH AUTHORITY, OR IF
YOU DO NOT WISH TO ACCEPT THESE TERMS OF USE, YOU
MUST NOT ACCESS OR USE THE HOSTED SERVICE OR
AUTHORIZE ANYONE TO ACCESS OR USE THE HOSTED
SERVICE.
Licenses
THE SOFTWARE LICENSE TERMS AVAILABLE ON THE AVAYA
WEBSITE, HTTPS://SUPPORT.AVAYA.COM/LICENSEINFO,
UNDER THE LINK “AVAYA SOFTWARE LICENSE TERMS (Avaya
Products)” OR SUCH SUCCESSOR SITE AS DESIGNATED BY
AVAYA, ARE APPLICABLE TO ANYONE WHO DOWNLOADS,
USES AND/OR INSTALLS AVAYA SOFTWARE, PURCHASED
FROM AVAYA INC., ANY AVAYA AFFILIATE, OR AN AVAYA
CHANNEL PARTNER (AS APPLICABLE) UNDER A COMMERCIAL
AGREEMENT WITH AVAYA OR AN AVAYA CHANNEL PARTNER.
UNLESS OTHERWISE AGREED TO BY AVAYA IN WRITING,
AVAYA DOES NOT EXTEND THIS LICENSE IF THE SOFTWARE
WAS OBTAINED FROM ANYONE OTHER THAN AVAYA, AN AVAYA
AFFILIATE OR AN AVAYA CHANNEL PARTNER; AVAYA
RESERVES THE RIGHT TO TAKE LEGAL ACTION AGAINST YOU
AND ANYONE ELSE USING OR SELLING THE SOFTWARE
WITHOUT A LICENSE. BY INSTALLING, DOWNLOADING OR
USING THE SOFTWARE, OR AUTHORIZING OTHERS TO DO SO,
YOU, ON BEHALF OF YOURSELF AND THE ENTITY FOR WHOM
YOU ARE INSTALLING, DOWNLOADING OR USING THE
SOFTWARE (HEREINAFTER REFERRED TO
INTERCHANGEABLY AS “YOU” AND “END USER”), AGREE TO
THESE TERMS AND CONDITIONS AND CREATE A BINDING
CONTRACT BETWEEN YOU AND AVAYA INC. OR THE
APPLICABLE AVAYA AFFILIATE (“AVAYA”).
Avaya grants You a license within the scope of the license types
described below, with the exception of Heritage Nortel Software, for
which the scope of the license is detailed below. Where the order
documentation does not expressly identify a license type, the
applicable license will be a Designated System License as set forth
below in the Designated System(s) License (DS) section as
applicable. The applicable number of licenses and units of capacity
for which the license is granted will be one (1), unless a different
number of licenses or units of capacity is specified in the
documentation or other materials available to You. “Software” means
computer programs in object code, provided by Avaya or an Avaya
Channel Partner, whether as stand-alone products, pre-installed on
hardware products, and any upgrades, updates, patches, bug fixes,
or modified versions thereto. “Designated Processor” means a single
stand-alone computing device. “Server” means a set of Designated
Processors that hosts (physically or virtually) a software application
to be accessed by multiple users. “Instance” means a single copy of
the Software executing at a particular time: (i) on one physical
machine; or (ii) on one deployed software virtual machine (“VM”) or
similar deployment.
License types
Designated System(s) License (DS). End User may install and use
each copy or an Instance of the Software only: 1) on a number of
Designated Processors up to the number indicated in the order; or 2)
up to the number of Instances of the Software as indicated in the
order, Documentation, or as authorized by Avaya in writing. Avaya
may require the Designated Processor(s) to be identified in the order
by type, serial number, feature key, Instance, location or other
specific designation, or to be provided by End User to Avaya through
electronic means established by Avaya specifically for this purpose.
Shrinkwrap License (SR). You may install and use the Software in
accordance with the terms and conditions of the applicable license
agreements, such as “shrinkwrap” or “clickthrough” license
accompanying or applicable to the Software (“Shrinkwrap License”).
Heritage Nortel Software
“Heritage Nortel Software” means the software that was acquired by
Avaya as part of its purchase of the Nortel Enterprise Solutions
Business in December 2009. The Heritage Nortel Software is the
software contained within the list of Heritage Nortel Products located
https://support.avaya.com/LicenseInfo under the link “Heritage
at
Nortel Products” or such successor site as designated by Avaya. For
Heritage Nortel Software, Avaya grants Customer a license to use
Heritage Nortel Software provided hereunder solely to the extent of
the authorized activation or authorized usage level, solely for the
purpose specified in the Documentation, and solely as embedded in,
for execution on, or for communication with Avaya equipment.
Charges for Heritage Nortel Software may be based on extent of
activation or use authorized as specified in an order or invoice.
Page 3

Copyright
Except where expressly stated otherwise, no use should be made of
materials on this site, the Documentation, Software, Hosted Service,
or hardware provided by Avaya. All content on this site, the
documentation, Hosted Service, and the product provided by Avaya
including the selection, arrangement and design of the content is
owned either by Avaya or its licensors and is protected by copyright
and other intellectual property laws including the sui generis rights
relating to the protection of databases. You may not modify, copy,
reproduce, republish, upload, post, transmit or distribute in any way
any content, in whole or in part, including any code and software
unless expressly authorized by Avaya. Unauthorized reproduction,
transmission, dissemination, storage, and or use without the express
written consent of Avaya can be a criminal, as well as a civil offense
under the applicable law.
Virtualization
The following applies if the product is deployed on a virtual machine.
Each product has its own ordering code and license types. Note,
unless otherwise stated, that each Instance of a product must be
separately licensed and ordered. For example, if the end user
customer or Avaya Channel Partner would like to install two
Instances of the same type of products, then two products of that
type must be ordered.
Third Party Components
“Third Party Components” mean certain software programs or
portions thereof included in the Software or Hosted Service may
contain software (including open source software) distributed under
third party agreements (“Third Party Components”), which contain
terms regarding the rights to use certain portions of the Software
(“Third Party Terms”). As required, information regarding distributed
Linux OS source code (for those products that have distributed Linux
OS source code) and identifying the copyright holders of the Third
Party Components and the Third Party Terms that apply is available
in the products, Documentation or on Avaya’s website at:
support.avaya.com/Copyright or such successor site as designated
by Avaya. The open source software license terms provided as Third
Party Terms are consistent with the license rights granted in these
Software License Terms, and may contain additional rights benefiting
You, such as modification and distribution of the open source
software. The Third Party Terms shall take precedence over these
Software License Terms, solely with respect to the applicable Third
Party Components to the extent that these Software License Terms
impose greater restrictions on You than the applicable Third Party
Terms.
T9 Text Input and other products are covered by one or more of the
following patents: U.S. Pat. Nos. 5,187,480,5,818,437, 5,945,928,
5,953,541, 6,011,554, 6,286,064, 6,307,548, 6,307,549, and
6,636,162,6,646,573, 6,970,599; Australia Pat. Nos. 727539,
746674, 747901; Austria Pat. Nos. AT225534, AT221222; Brazil P.I.
No. 9609807-4; Canada Pat. Nos. 1,331,057, 2,227,904,2,278,549,
2,302,595; Japan Pat. Nos. 3532780, 3492981; United Kingdom Pat.
No. 2238414B; Hong Kong Standard Pat. No. HK1010924; Republic
of Singapore Pat. Nos. 51383, 66959, 71979; European Pat. Nos. 1
010 057 (98903671.0), 1 018 069 (98950708.2); Republic of Korea
Pat. Nos. KR201211B1, KR226206B1, 402252; People's Republic of
China Pat. No. ZL96196739.0; Mexico Pat. Nos. 208141, 216023,
218409; Russian Federation Pat. Nos. 2206118, 2214620, 2221268;
additional patent applications are pending
The following applies only if the H.264 (AVC) codec is distributed with
the product. THIS PRODUCT IS LICENSED UNDER THE AVC
PATENT PORTFOLIO LICENSE FOR THE PERSONAL USE OF A
CONSUMER OR OTHER USES IN WHICH IT DOES NOT RECEIVE
REMUNERATION TO (i) ENCODE VIDEO IN COMPLIANCE WITH
THE AVC STANDARD (“AVC VIDEO”) AND/OR (ii) DECODE AVC
VIDEO THAT WAS ENCODED BY A CONSUMER ENGAGED IN A
PERSONAL ACTIVITY AND/OR WAS OBTAINED FROM A VIDEO
PROVIDER LICENSED TO PROVIDE AVC VIDEO. NO LICENSE IS
GRANTED OR SHALL BE IMPLIED FOR ANY OTHER USE.
ADDITIONAL INFORMATION MAY BE OBTAINED FROM MPEG LA,
L.L.C. SEE
Service Provider
THE FOLLOWING APPLIES TO AVAYA CHANNEL PARTNER’S
HOSTING OF AVAYA PRODUCTS OR SERVICES. THE PRODUCT
OR HOSTED SERVICE MAY USE THIRD PARTY COMPONENTS
HTTP://WWW.MPEGLA.COM.
https://
SUBJECT TO THIRD PARTY TERMS AND REQUIRE A SERVICE
PROVIDER TO BE INDEPENDENTLY LICENSED DIRECTLY FROM
THE THIRD PARTY SUPPLIER. AN AVAYA CHANNEL PARTNER’S
HOSTING OF AVAYA PRODUCTS MUST BE AUTHORIZED IN
WRITING BY AVAYA AND IF THOSE HOSTED PRODUCTS USE
OR EMBED CERTAIN THIRD PARTY SOFTWARE, INCLUDING
BUT NOT LIMITED TO MICROSOFT SOFTWARE OR CODECS,
THE AVAYA CHANNEL PARTNER IS REQUIRED TO
INDEPENDENTLY OBTAIN ANY APPLICABLE LICENSE
AGREEMENTS, AT THE AVAYA CHANNEL PARTNER’S EXPENSE,
DIRECTLY FROM THE APPLICABLE THIRD PARTY SUPPLIER.
WITH RESPECT TO CODECS, IF THE AVAYA CHANNEL
PARTNER IS HOSTING ANY PRODUCTS THAT USE OR EMBED
THE G.729 CODEC, H.264 CODEC, OR H.265 CODEC, THE
AVAYA CHANNEL PARTNER ACKNOWLEDGES AND AGREES
THE AVAYA CHANNEL PARTNER IS RESPONSIBLE FOR ANY
AND ALL RELATED FEES AND/OR ROYALTIES. THE G.729
CODEC IS LICENSED BY SIPRO LAB TELECOM INC. SEE
WWW.SIPRO.COM/CONTACT.HTML. THE H.264 (AVC) CODEC IS
LICENSED UNDER THE AVC PATENT PORTFOLIO LICENSE FOR
THE PERSONAL USE OF A CONSUMER OR OTHER USES IN
WHICH IT DOES NOT RECEIVE REMUNERATION TO: (I) ENCODE
VIDEO IN COMPLIANCE WITH THE AVC STANDARD (“AVC
VIDEO”) AND/OR (II) DECODE AVC VIDEO THAT WAS ENCODED
BY A CONSUMER ENGAGED IN A PERSONAL ACTIVITY AND/OR
WAS OBTAINED FROM A VIDEO PROVIDER LICENSED TO
PROVIDE AVC VIDEO. NO LICENSE IS GRANTED OR SHALL BE
IMPLIED FOR ANY OTHER USE. ADDITIONAL INFORMATION
FOR H.264 (AVC) AND H.265 (HEVC) CODECS MAY BE
OBTAINED FROM MPEG LA, L.L.C. SEE
WWW.MPEGLA.COM.
Compliance with Laws
You acknowledge and agree that it is Your responsibility for
complying with any applicable laws and regulations, including, but not
limited to laws and regulations related to call recording, data privacy,
intellectual property, trade secret, fraud, and music performance
rights, in the country or territory where the Avaya product is used.
Preventing Toll Fraud
“Toll Fraud” is the unauthorized use of your telecommunications
system by an unauthorized party (for example, a person who is not a
corporate employee, agent, subcontractor, or is not working on your
company's behalf). Be aware that there can be a risk of Toll Fraud
associated with your system and that, if Toll Fraud occurs, it can
result in substantial additional charges for your telecommunications
services.
Avaya Toll Fraud intervention
If You suspect that You are being victimized by Toll Fraud and You
need technical assistance or support, call Technical Service Center
Toll Fraud Intervention Hotline at +1-800-643-2353 for the United
States and Canada. For additional support telephone numbers, see
the Avaya Support website:
successor site as designated by Avaya.
Security Vulnerabilities
Information about Avaya’s security support policies can be found in
the Security Policies and Support section of
support.avaya.com/security.
Suspected Avaya product security vulnerabilities are handled per the
Avaya Product Security Support Flow (
support.avaya.com/css/P8/documents/100161515).
Downloading Documentation
For the most current versions of Documentation, see the Avaya
Support website:
as designated by Avaya.
Contact Avaya Support
See the Avaya Support website:
product or Hosted Service notices and articles, or to report a problem
with your Avaya product or Hosted Service. For a list of support
telephone numbers and contact addresses, go to the Avaya Support
website: https://support.avaya.com (or such successor site as
designated by Avaya), scroll to the bottom of the page, and select
Contact Avaya Support.
https://support.avaya.com, or such successor site
https://support.avaya.com or such
https://support.avaya.com for
HTTP://
https://
https://
Page 4
Regulatory Statements
Australia Statements
Handset Magnets Statement:
Danger:
The handset receiver contains magnetic devices that can
attract small metallic objects. Care should be taken to avoid
personal injury.
Industry Canada (IC) Statements
This Class B digital apparatus complies with Canadian ICES-003.
Cet appareil numérique de la classe B est conformeà la norme
NMB-003 du Canada.
This product meets the applicable Innovation, Science and Economic
Development Canada technical specifications.
Japan Statements
Class B Statement
This is a Class B product based on the standard of the VCCI Council.
If this is used near a radio or television receiver in a domestic
environment, it may cause radio interference. Install and use the
equipment according to the instruction manual.
Denan Power Cord Statement
Danger:
Please be careful of the following while installing the
equipment:
• Please only use the connecting cables, power cord, and
AC adapters shipped with the equipment or specified by
Avaya to be used with the equipment. If you use any
other equipment, it may cause failures, malfunctioning,
or fire.
• Power cords shipped with this equipment must not be
used with any other equipment. In case the above
guidelines are not followed, it may lead to death or
severe injury.
本製品を安全にご使用頂くため、以下のことにご注意ください。
• 接続ケーブル、電源コード、AC アダプタなどの部品は、必ず
製品に同梱されております添付品または指定品をご使用くだ
さい。添付品指定品以外の部品をご使用になると故障や動作
不良、火災の原因となることがあります。
• 同梱されております付属の電源コードを他の機器には使用し
ないでください。上記注意事項を守らないと、死亡や大怪我
など人身事故の原因となることがあります。
México Statement
The operation of this equipment is subject to the following two
conditions:
1. It is possible that this equipment or device may not cause
harmful interference, and
2. This equipment or device must accept any interference,
including interference that may cause undesired operation.
La operación de este equipo está sujeta a las siguientes dos
condiciones:
1. Es posible que este equipo o dispositivo no cause
interferencia perjudicial y
2. Este equipo o dispositivo debe aceptar cualquier
interferencia, incluyendo la que pueda causar su operación
no deseada.
Power over Ethernet (PoE) Statement
This equipment must be connected to PoE networks without routing
to the outside plant.
U.S. Federal Communications Commission (FCC) Statements
Class B Part 15 Statement
For product available in the USA/Canada market, only channel 1~11
can be operated. Selection of other channels is not possible.
This equipment has been tested and found to comply with the limits
for a Class B digital device, pursuant to Part 15 of the FCC Rules.
These limits are designated to provide reasonable protection against
harmful interferences in a residential installation. This equipment
generates, uses and can radiate radio frequency energy and, if not
installed and used in accordance with the instructions, may cause
harmful interference to radio communications. However, there is no
guarantee that interference will not occur in a particular installation. If
this equipment does cause harmful interferences to radio or
television reception, which can be determined by turning the
equipment off and on, the user is encouraged to try to correct the
interference by one or more of the following measures:
• Reorient or relocate the receiving antenna.
• Increase the separation between the equipment and receiver.
• Connect the equipment into an outlet on a circuit different from
that to which the receiver is connected.
• Consult the dealer or an experienced radio/TV technician for
help.
EU Countries
This device when installed complies with the essential requirements
and other relevant provisions of the EMC Directive 2014/30/EU,
Safety LV Directive 2014/35/EU, and Radio Equipment Directive
2014/53/EU. A copy of the Declaration may be obtained from
support.avaya.com or Avaya Inc., 4655 Great America Parkway,
Santa Clara, CA 95054–1233 USA.
General Safety Warning
• Use only the Avaya approved Limited Power Source power
supplies specified for this product.
• Ensure that you:
- Do not operate the device near water.
- Do not use the device during a lightning storm.
- Do not report a gas leak while in the vicinity of the leak.
Trademarks
The trademarks, logos and service marks (“Marks”) displayed in this
site, the Documentation, Hosted Service(s), and product(s) provided
by Avaya are the registered or unregistered Marks of Avaya, its
affiliates, its licensors, its suppliers, or other third parties. Users are
not permitted to use such Marks without prior written consent from
Avaya or such third party which may own the Mark. Nothing
contained in this site, the Documentation, Hosted Service(s) and
product(s) should be construed as granting, by implication, estoppel,
or otherwise, any license or right in and to the Marks without the
express written permission of Avaya or the applicable third party.
Avaya is a registered trademark of Avaya Inc.
All non-Avaya trademarks are the property of their respective owners.
Linux® is the registered trademark of Linus Torvalds in the U.S. and
other countries.
http://
Page 5

Contents
Chapter 1: Introduction............................................................................................................ 7
Purpose.................................................................................................................................. 7
Change history........................................................................................................................ 7
Chapter 2: Overview................................................................................................................. 9
Chapter 3: Initial setup and connectivity.............................................................................. 10
Device connections............................................................................................................... 10
Dimensions........................................................................................................................... 11
Mounting the phone on the wall.............................................................................................. 11
Chapter 4: Phone settings configuration and management............................................... 12
IP address configuration........................................................................................................ 12
Verifying IP address information....................................................................................... 12
Configuring automatic phone provisioning............................................................................... 13
Accessing the web portal....................................................................................................... 14
Configuring the phone using the DHCP or static provisioning server.......................................... 15
Configuring phone provisioning by using Plug and Play............................................................ 16
Managing phone reboots....................................................................................................... 17
Avaya Aura® configuration for failover..................................................................................... 17
Chapter 5: Web portal navigation.......................................................................................... 18
Accessing the web portal....................................................................................................... 18
System tab........................................................................................................................... 19
Information page............................................................................................................. 19
Account page.................................................................................................................. 19
Configurations page........................................................................................................ 20
Restoring factory default settings...................................................................................... 20
Upgrade page................................................................................................................. 20
Auto provision page......................................................................................................... 21
Tools page...................................................................................................................... 21
Network tab.......................................................................................................................... 21
Basic page...................................................................................................................... 21
Service port page............................................................................................................ 21
Advanced page............................................................................................................... 22
VPN page....................................................................................................................... 22
Line tab................................................................................................................................ 23
SIP page........................................................................................................................ 23
Dial peer page................................................................................................................ 29
Dial plan page................................................................................................................. 32
Global settings page........................................................................................................ 32
SIP Hotspot page............................................................................................................ 33
Configuring the SIP hotspot server and phone client.......................................................... 33
October 2019 Installing and Administering the Avaya H229 Phone 5
Comments on this document? infodev@avaya.com
Page 6

Contents
Phone Settings tab................................................................................................................ 34
Features page................................................................................................................. 34
Audio page..................................................................................................................... 37
MCAST page.................................................................................................................. 39
Time/Date page............................................................................................................... 39
Advanced page............................................................................................................... 40
Trusted certificates page.................................................................................................. 40
Device certificates page................................................................................................... 41
Call logs tab.......................................................................................................................... 41
Chapter 6: Troubleshooting................................................................................................... 42
No audio during calls............................................................................................................. 42
No access to the web portal................................................................................................... 42
IP address issue.................................................................................................................... 42
Calls cannot be made............................................................................................................ 43
Cannot receive incoming calls after failover occurs.................................................................. 43
Chapter 7: Resources............................................................................................................. 44
Documentation...................................................................................................................... 44
Support................................................................................................................................ 44
Using the Avaya InSite Knowledge Base........................................................................... 44
October 2019 Installing and Administering the Avaya H229 Phone 6
Comments on this document? infodev@avaya.com
Page 7
Chapter 1: Introduction
Purpose
This document provides procedures for installing, configuring, administering, and troubleshooting
the Avaya H229 phone. This document is primarily intended for implementation engineers and
administrators.
Change history
This section describes the key changes since the first issue of this document. This section is not
included in new documents that have not been updated since the first issue.
Issue Date Summary of changes
Issue 1 April 2018 First issue of this document for the initial release.
Issue 2 September 2018 • Updated Verifying IP address information on page 12.
• Added more information about DHCP options in Configuring the
phone using the DHCP or static provisioning server on page 15.
• Updated Configuring automatic phone provisioning on page 13.
• Added Avaya Aura configuration for failover on page 17.
• Updated SIP page on page 23.
• Minor rephrasing in Features page on page 34.
• Updated Audio page on page 37.
• Added Cannot receive incoming calls after failover occurs on
page 43.
Table continues…
October 2019 Installing and Administering the Avaya H229 Phone 7
Comments on this document? infodev@avaya.com
Page 8

Introduction
Issue Date Summary of changes
Issue 3 October 2019 • Added Dimensions on page 11.
• Updated Configuring automatic phone provisioning on page 13.
• Renamed the section about manual phone provisioning. The
updated section is Configuring the phone using the DHCP or static
provisioning server on page 15.
• Added Configuring phone provisioning by using Plug and Play on
page 16.
• Added Managing phone reboots on page 17.
• Moved Web portal navigation on page 18 to a separate chapter.
• Updated Configurations page on page 20.
• Added Service port page on page 21.
• Updated VPN page on page 22.
• Added Device certificates page on page 41.
October 2019 Installing and Administering the Avaya H229 Phone 8
Comments on this document? infodev@avaya.com
Page 9

Chapter 2: Overview
The Avaya H229 phone is a SIP-based phone, intended to be used in hotels. The phone supports a
variety of telephony operations, including making and answering a call, transferring a call, placing a
call on hold, and accessing voice mail messages.
October 2019 Installing and Administering the Avaya H229 Phone 9
Comments on this document? infodev@avaya.com
Page 10
Chapter 3: Initial setup and connectivity
Device connections
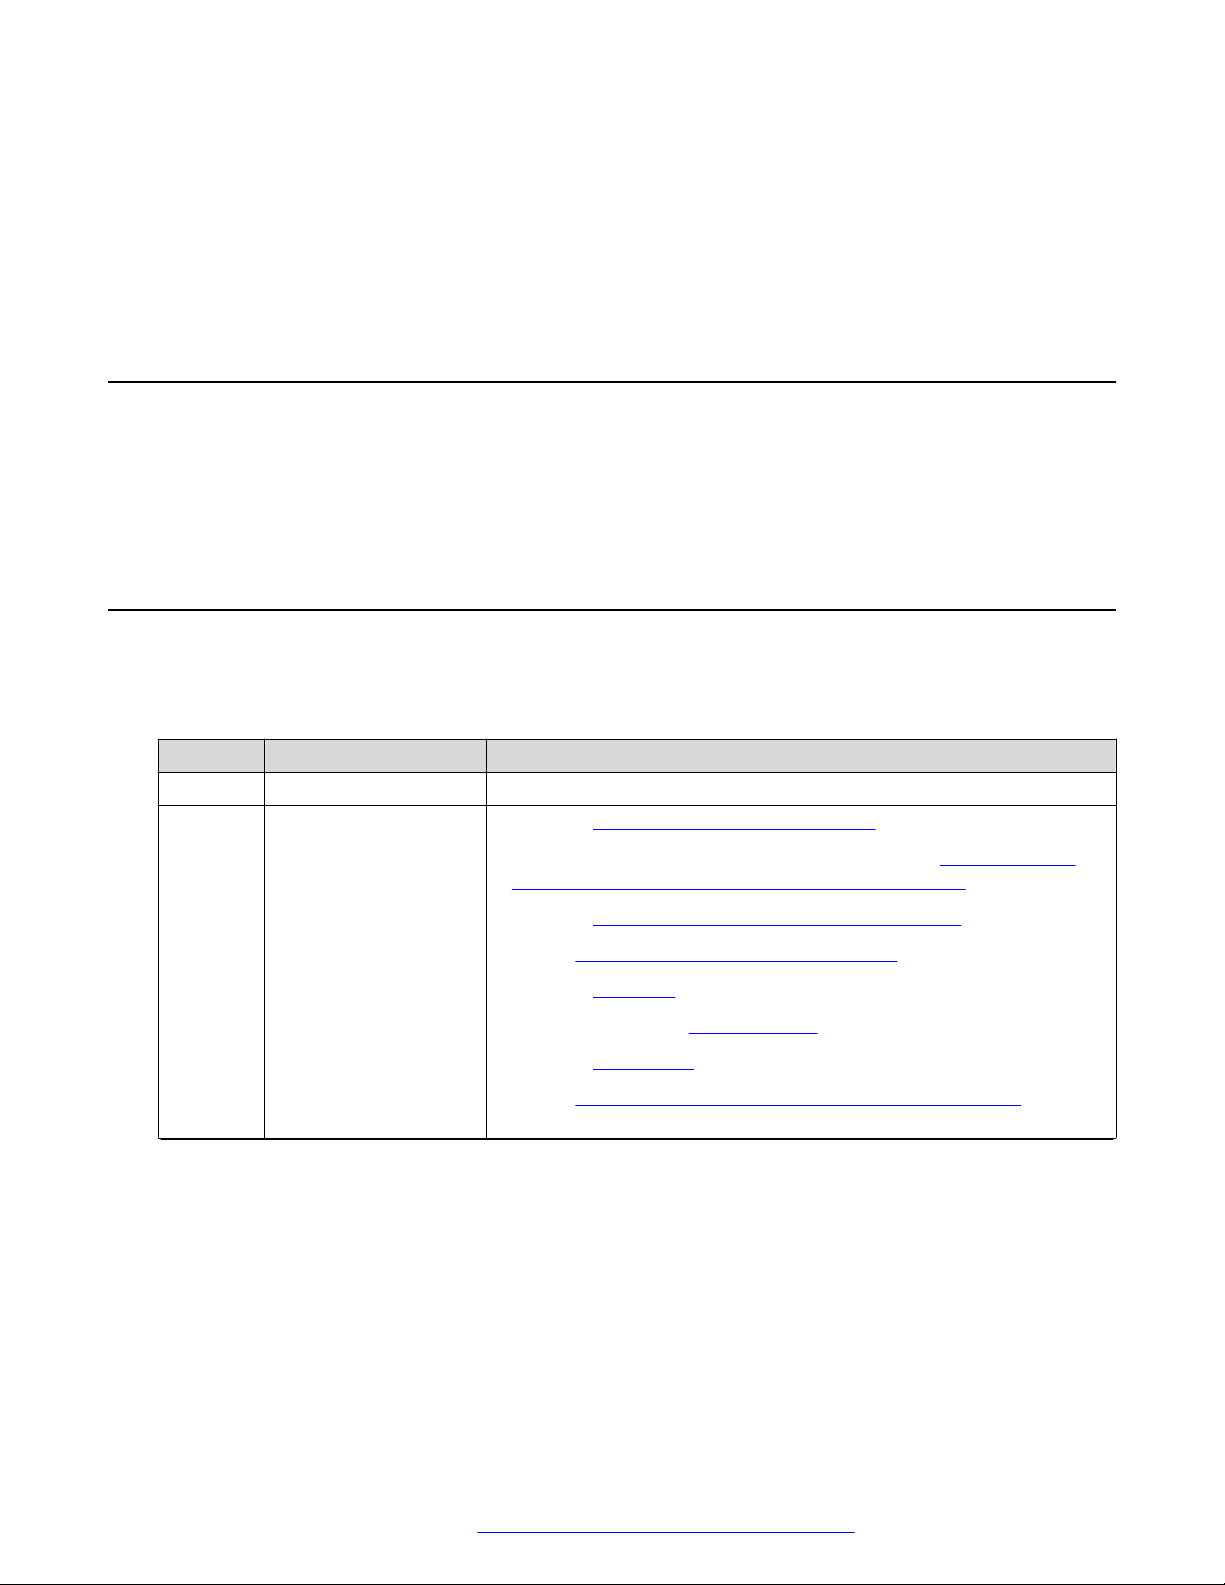
The following images show the connectors and ports available on the Avaya H229 phone:
Callout Description
A Cable trough.
B WAN port.
C Headset port for connecting the headset cord.
D Handset wire trough.
E Wall mount holes.
F Power port. If the power port is not used, put a PVC plate on it to protect it from
dirt or debris.
G PVC plate.
October 2019 Installing and Administering the Avaya H229 Phone 10
Comments on this document? infodev@avaya.com
Page 11
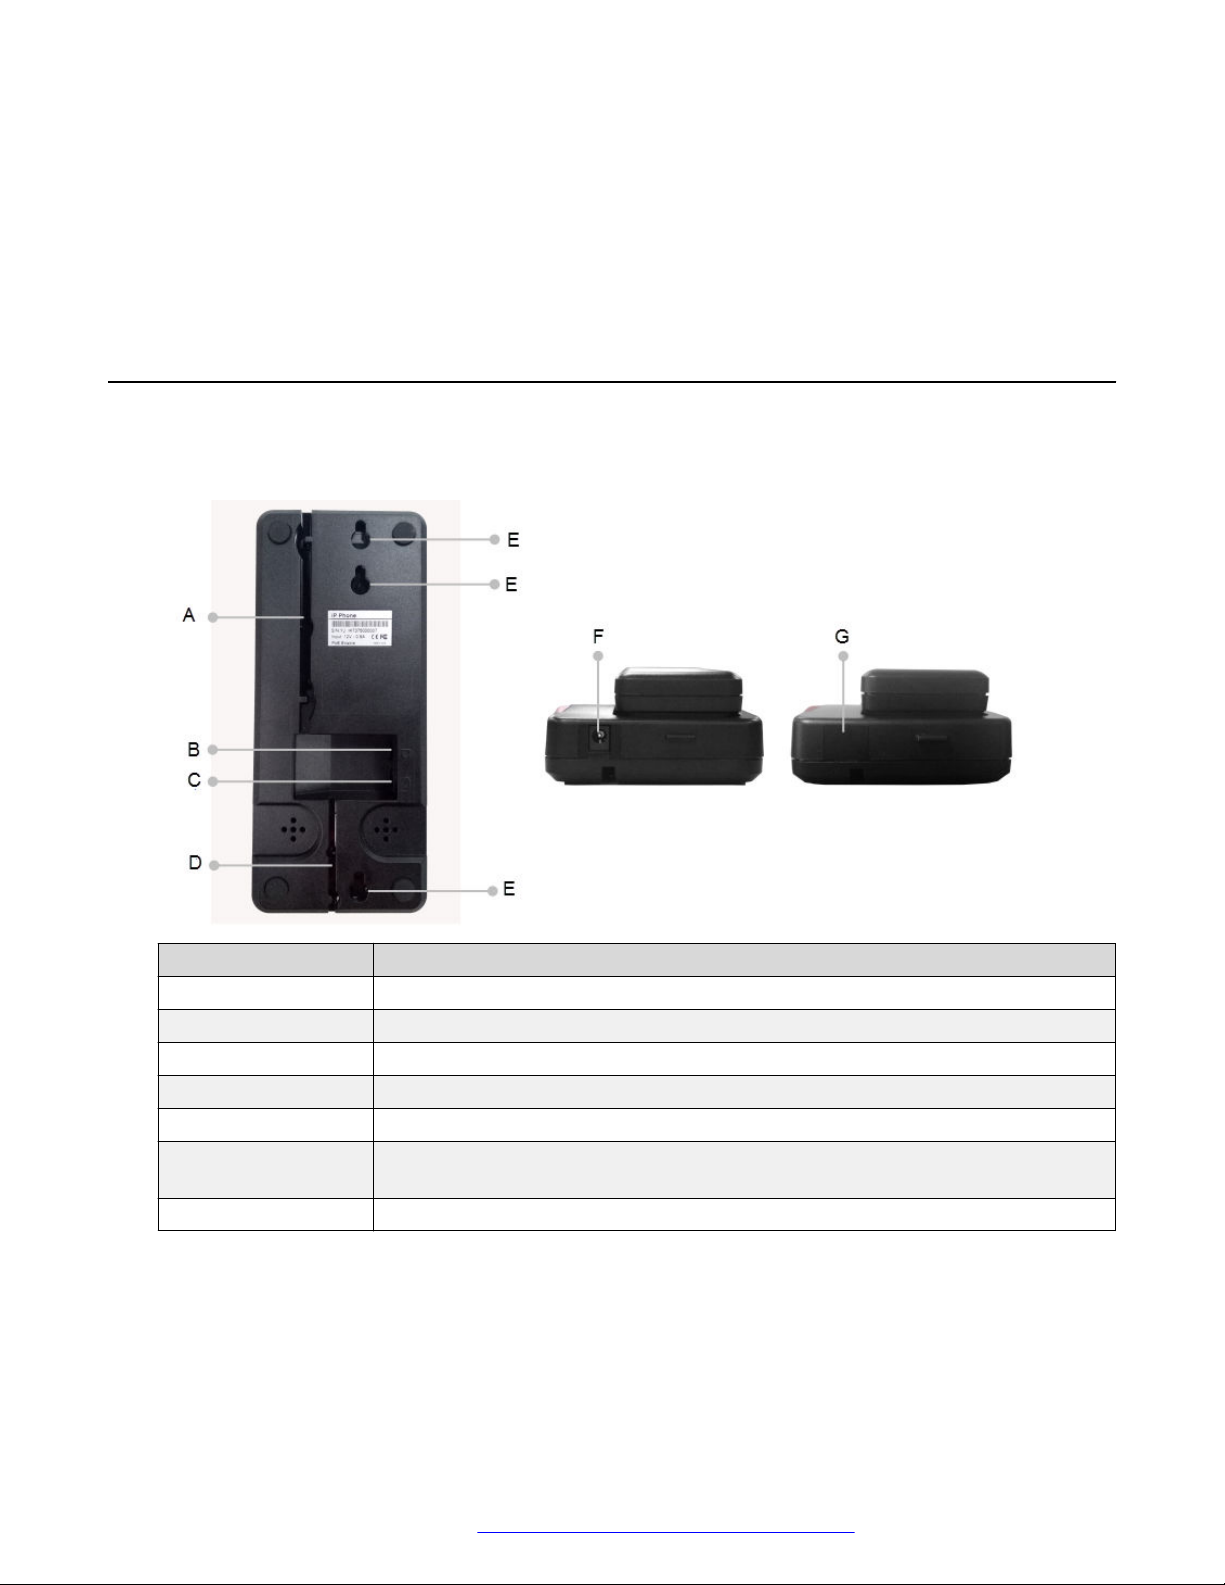
Dimensions
13.2cm
10.7cm
5.8cm
Screw
Wall
Screw
Embedded junction
box 8.5cm*8.5cm
The following table shows the dimensions of the Avaya H229 phone.
Parameter Dimension
Width 95 mm
Length 220 mm
Mounting the phone on the wall
Procedure
1. Screw the embedded junction box onto the wall.
Use the following dimensions when screwing the embedded junction box onto the wall:
Dimensions
2. Connect the cable from the embedded junction box to the phone.
3. Hitch the phone on the screw.
October 2019 Installing and Administering the Avaya H229 Phone 11
Comments on this document? infodev@avaya.com
Page 12

Chapter 4: Phone settings configuration
and management
You must configure the phone before it can be used. Mandatory configuration tasks include
configuring the IP address, and using the web portal to set up SIP settings.
You can also perform other configuration and management tasks on the web portal.
IP address configuration
By default, the phone will obtain its IP address from the DHCP server after the line is connected.
Other methods of configuring the IP address are:
• Static IP configuration: This option allows users to manually configure parameters, including
the IP address, subnet mask, default gateway, and DNS servers. This method can be used in
an office environment or by power users.
• Point-to-Point Protocol over Ethernet (PPPoE): You can use this option if you connect the
device to a broadband modem or router. To establish the PPPoE connection, configure the
username and password provided by the service provider
Verifying IP address information
About this task
Use this procedure to verify the IP address settings.
Procedure
1. Pick up the handset.
2. Press and hold # for approximately three seconds to hear information about the IP
address.
October 2019 Installing and Administering the Avaya H229 Phone 12
Comments on this document? infodev@avaya.com
Page 13
Configuring automatic phone provisioning
Configuring automatic phone provisioning
About this task
Automatic provisioning is useful for configuring firmware for a large number of phones.
Before you begin
Ensure that the file server is set up.
Procedure
1. From the Avaya Support website, download the latest firmware file for your phone.
2. Copy the downloaded firmware file to the file server.
3. From the Avaya Support website, download the configuration file template.
The file name is f0H2xxhw1.100.cfg, where H2xx is the phone model.
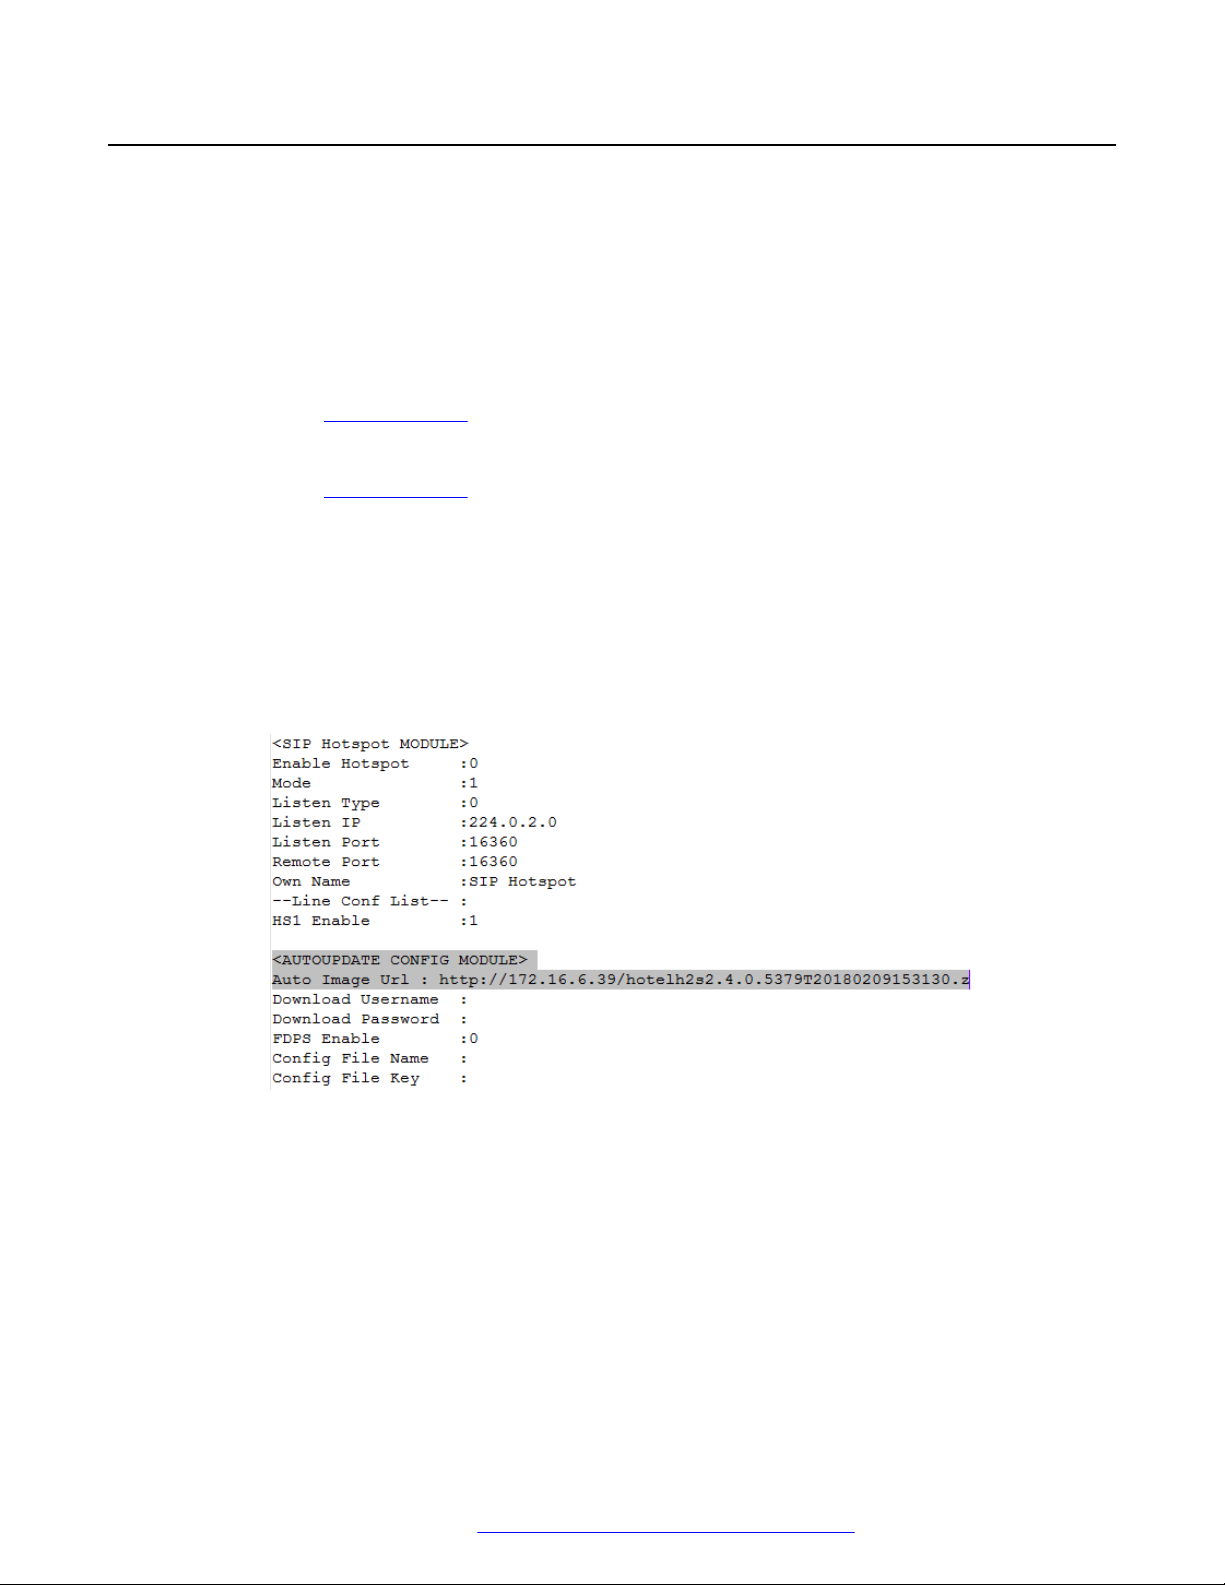
4. In the AUTOUPDATE CONFIG MODULE section of the configuration file template, add
Auto Image Url with the path of the firmware file.
For example: Auto Image Url: http://172.16.6.39/
hotelh2s2.4.0.5379T20180209153130.z
5. Update the following common SIP settings in the Basic settings section:
• SIP Proxy Port
• SIP Proxy Address
6. (Optional) Configure other settings, such as font, icons, and background images.
7. Copy the configuration file.
8. For each SIP account, change the file name to match each phone's MAC address.
October 2019 Installing and Administering the Avaya H229 Phone 13
Comments on this document? infodev@avaya.com
Page 14

Phone settings configuration and management
For example, if the MAC address on the phone's label is C81FEA810FC1, then change the
file name to C81FEA810FC1.cfg.
9. Upload the configuration file on the file server and save the path.
10. Configure Option 66 on the DHCP server with the path to the file server where the
configuration files are uploaded.
For example: http://172.18.1.9/config/$mac.cfg
11. Plug in the phone.
The phone, upon plug in, will look for the configuration file with it’s own mac address, and
performs the configuration.
Result
Your phone will be automatically configured after you plug it in.
Accessing the web portal
About this task
Use this procedure to log in to the web portal to manage phone settings.
Before you begin
• The phone and the computer you are using to access the web portal must be connected to
the same LAN.
• Obtain the IP address for the phone.
Procedure
1. In your browser, enter https://<IP address of the phone> or http://<IP
address of the phone> and press Enter.
HTTPS is selected by default.
2. On the Login page, do the following:
• In the User field, type admin.
• In the Password field, type admin.
• In the Language field, select the appropriate language.
3. Click Logon.
Important:
Change the password after logging in for the first time.
Related links
Guidelines for changing passwords on page 19
Web portal navigation on page 18
October 2019 Installing and Administering the Avaya H229 Phone 14
Comments on this document? infodev@avaya.com
Page 15

Configuring the phone using the DHCP or static provisioning server
Configuring the phone using the DHCP or static
provisioning server
About this task
With this manual provisioning process, phones can upgrade their firmware, obtain the
configuration file, and register to Avaya Aura® or IP Office.
Procedure
1. On the web portal, navigate to System > Upgrade.
2. From the Software upgrade section, click Select to browse for the system image file and
then click Upgrade.
3. Navigate to System > Auto Provision and determine whether you want to use DHCP or
the static provisioning server to obtain the configuration file.
4. If you are using the DHCP option to obtain the configuration file, do the following:
a. Navigate to DHCP Option.
b. From Option Value, select a DHCP value.
Option 66 is selected by default. You can also select another DHCP option if
required. For example, you can select Option 43 or enter a custom DHCP value. For
the custom DHCP option, the supported setting range is 128 to 254.
c. Click Apply when you are ready to apply your changes.
5. If you are using the static provisioning server to obtain the configuration file, do the
following:
a. Navigate to DHCP Option.
b. From Option Value, select Disabled.
c. Navigate to Static Provisioning Server.
d. In Server Address, enter the server IP address.
e. In Configuration File Name, enter $mac.cfg or <real mac>.cfg.
f. From Protocol Type, select the appropriate protocol.
g. From Update Mode, select Update After Reboot or Update at Time Interval.
If you select Update at Time Interval, you must also specify an update interval
period.
For example: If you set the Update Interval to 1 hour, then the phone automatically
checks if there is a configuration file on the server and compare with its own profile
every hour. If the configuration file on the server is same then it wont update.
h. Click Apply when you are ready to apply your changes.
i. Open the configuration file.
October 2019 Installing and Administering the Avaya H229 Phone 15
Comments on this document? infodev@avaya.com
Page 16

Phone settings configuration and management
j. In the AUTOUPDATE CONFIG MODULE section of the configuration file template, set
Download Mode to 2 and Download Interval to 1.
k. Upload the configuration file on the file server.
6. Navigate to Line > SIP > Basic Settings to configure the SIP server settings, which are
described in
7. Navigate to Line > SIP > Advanced Settings > Transport Protocol to select the protocol
for SIP transmission.
The line can use TCP, UDP, or TLS for SIP transmission.
Related links
Managing phone reboots on page 17
SIP page on page 23.
Configuring phone provisioning by using Plug and Play
About this task
Use this procedure to enable SIP Plug and Play.
Procedure
1. On the web portal, navigate to System > Auto Provision.
2. In SIP Plug and Play section, do the following:
a. Select the Enable SIP PnP checkbox.
b. In Server Address field, enter the server IP address.
c. In Server Port field, enter the port number.
d. From Transportation Protocol drop down, select the appropriate protocol.
e. In Update Interval field, enter an update interval period in hours.
You can enter a value from 1 to 99 hours.
For example: If you set the Update Interval to 1 hour, then the phone automatically
checks the configuration file for updates every hour.
f. Click Apply when you are ready to apply your changes.
3. Open the configuration file.
4. In the AUTOUPDATE CONFIG MODULE section of the configuration file template, set PNP
Interval to 1.
5. Upload the configuration file on the file server.
Related links
Managing phone reboots on page 17
October 2019 Installing and Administering the Avaya H229 Phone 16
Comments on this document? infodev@avaya.com
Page 17

Managing phone reboots
Managing phone reboots
About this task
By default, the phone reboots every time the upgrade file is updated. Use this procedure if you do
not want the phone to reboot after every update. When you perform this procedure, the phone
only reboots after a major configuration change. If you update the configuration file during a call,
the change takes effect after the call ends.
Procedure
1. Open the configuration file template that you downloaded from the Avaya Support website.
2. In the AUTOUPDATE CONFIG MODULE section, add the following line:
CFG Update Realtime:1
3. Save your changes and upload the file to the file server.
Avaya Aura® configuration for failover
About this task
Failover occurs when the primary server goes down and the phone registers to the secondary
Session Manager. If you end an active call after failover occurs, the line on Communication
Manager might remain busy. If this occurs, you will not be able to receive incoming calls. Use this
procedure to modify the configuration on Avaya Aura® to prevent this issue from happening.
Procedure
Do one of the following:
• Increase the number of lines in the profile configuration on System Manager.
By default, the profile has three lines configured for the extension. Increase it to five lines or
more.
Tip:
Increase the number by two lines at a time. For example, if you have three lines, you can
increase to five, and if you have five lines, you can increase to seven.
For more information about endpoint configuration on System Manager, see Administering
Avaya Aura® System Manager.
• Modify the Communication Manager configuration to allow the phone to receive a call on the
last available line if the first two are busy.
For more information, see Administering Avaya Aura® Communication Manager.
October 2019 Installing and Administering the Avaya H229 Phone 17
Comments on this document? infodev@avaya.com
Page 18

Chapter 5: Web portal navigation
This chapter describes the options available on the web portal. Initial configuration that you can
perform using the web portal is described in the previous chapter. You can also use the web portal
to manage other phone settings or to restore the phone to its factory default settings.
Accessing the web portal
About this task
Use this procedure to log in to the web portal to manage phone settings.
Before you begin
• The phone and the computer you are using to access the web portal must be connected to
the same LAN.
• Obtain the IP address for the phone.
Procedure
1. In your browser, enter https://<IP address of the phone> or http://<IP
address of the phone> and press Enter.
HTTPS is selected by default.
2. On the Login page, do the following:
• In the User field, type admin.
• In the Password field, type admin.
• In the Language field, select the appropriate language.
3. Click Logon.
Important:
Change the password after logging in for the first time.
Related links
Guidelines for changing passwords on page 19
Web portal navigation on page 18
October 2019 Installing and Administering the Avaya H229 Phone 18
Comments on this document? infodev@avaya.com
Page 19

System tab
The following sections describe the options that you can access from the System tab.
Information page
To access this page, click the System tab and then click Information.
From this page, you can access the following system and network information about the device:
• Device model.
• Hardware version.
• Software version.
• Uptime.
• Last uptime.
• Memory information.
System tab
• Network mode.
• MAC address.
• IP address.
• Subnet mask.
• Default gateway.
• SIP account including SIP account status.
Account page
To access this page, click the System tab and then click Account.
From this page, you can manage user accounts, assign privileges, and change the web portal
password.
The user account is used to access the web portal.
There are two types of user privileges: Administrators and Users. The Users privilege provides
limited access and does not enable you to modify all settings. Administrators have full access to
the web portal and they can also manage user accounts.
Guidelines for changing passwords
For security reasons, Avaya recommends that you update your password from time to time. You
should also change your password after logging in to the web portal for the first time.
October 2019 Installing and Administering the Avaya H229 Phone 19
Comments on this document? infodev@avaya.com
Page 20

Web portal navigation
You can use the Account page on the System tab to modify the password. The following are
guidelines for creating passwords:
• The minimum password length is 8 characters by default.
• You can use the following character types:
- Lowercase letters.
- Capital letters.
- Numeric characters.
- Non-alphanumeric special characters, such as !, @, #, $, %, ^, &, *, (, ), -, +.
• Avoid creating a password that is the same as previous passwords.
• Do not use repeated or sequential characters. You can enable or disable this setting.
Examples of repeated or sequential characters are 12345678, abcdefgh, or bbbbbbbb.
Configurations page
To access this page, click the System tab and then click Configurations.
As an administrator, you can use this page to import or export the device configuration file and
reset the device to its factory default settings. By default, the phone reboots every time the
configuration file is updated. To change this default setting, see
page 17.
Managing phone reboots on
Restoring factory default settings
About this task
Use this procedure to restore the device to its original factory settings. When you perform this
procedure, all user settings and data will be removed and cannot be recovered.
Procedure
1. On the web portal, navigate to System > Configurations > Reset to factory defaults.
2. (Optional) Select the Clear ETC File check box.
3. (Optional) Select the Clear Call Records check box.
4. Click Reset and then click OK to confirm.
Upgrade page
To access this page, click the System tab and then click Upgrade.
From this page, you can configure settings for upgrades. You can also manually upgrade firmware
by navigating to the latest firmware file and then click Upgrade.
October 2019 Installing and Administering the Avaya H229 Phone 20
Comments on this document? infodev@avaya.com
Page 21

You should upgrade software for the Avaya H229 phone to keep the devices up-to-date, to gain
access to new features, and to enhance stability and security.
You can configure manual or automatic provisioning for the phones. For more information, see
Configuring manual phone provisioning on page 15 and Configuring automatic phone
provisioning on page 13.
Auto provision page
To access this page, click the System tab and then click Auto Provision.
From this page, you can deploy and manage the devices in bulk. You can also use this page to
define the method to use for obtaining the configuration file, as described in Configuring automatic
phone provisioning on page 13.
Tools page
To access this page, click the System tab and then click Tools. From this page, you can set up
settings to identify issues at troubleshooting, and reboot the phone.
Network tab
Network tab
The following sections describe the options that you can access from the Network tab.
Basic page
To access this page, click the Network tab and then click Basic.
This page displays network status information, including the IP address, subnet mask, default
gateway, and MAC address.
From this page, you can configure network settings. For information about configuring the IP
address, see IP address configuration on page 12.
Service port page
To access this page, click the Network tab and then click Service Port.
From this page, you can configure service port settings, such as the web server type, HTTP port,
HTTPS port, RTP port range, and RTP port quantity.
October 2019 Installing and Administering the Avaya H229 Phone 21
Comments on this document? infodev@avaya.com
Page 22

Web portal navigation
Advanced page
To access this page, click the Network tab and then click Advanced.
From this page, you can configure the following advanced settings:
• Link Layer Discovery Protocol (LLDP) settings.
• WAN VLAN settings.
• LAN port VLAN settings.
• Quality of Service (QoS) settings.
• 802.1X settings.
Using DHCP when VLAN is enabled
About this task
To get DHCP, after enabling VLAN, the switch port that uses VLAN must be in trunk mode.
Procedure
1. Use the switch port IP address to access the VLAN interface.
2. From the VLAN tab, set Tagging to tagAll(trunk).
VPN page
To access this page, click the Network tab and then click VPN. From this page, you can configure
a Virtual Private Network (VPN) connection and view information about the VPN status.
VPN connections
With VPN, the device can create a tunneling connection to a server and become part of the
server’s network. The network transmission of the device can be routed through the VPN server.
October 2019 Installing and Administering the Avaya H229 Phone 22
Comments on this document? infodev@avaya.com
Page 23

In certain cases, a VPN connection might need to be established before activating a line
registration.
When the VPN connection is established, the VPN IP address is displayed with the VPN status.
There might be a delay in establishing the connection. If this occurs, you can refresh the page to
update the status.
Once the VPN is configured, the device will try to connect to the VPN automatically every time the
device boots up until disabled. If the VPN connection is not established immediately, you can
reboot the device and check if the VPN connection established after reboot.
Line tab
The following sections describe the options that you can access from the Line tab.
SIP page
Line tab
To access this page, click the Line tab and then click SIP.
The following table describes SIP parameters to be configured for the Avaya H229 phone:
Option
Basic settings
Line Status Current line status at
Username User name of the service
Display Name Display name to be sent
Authentication Name Authentication name of
Authentication
Password
Description Option Description
page loading. You must
refresh the page
manually to get the up to
date line status.
account.
in a call request.
the service account.
Authentication password
of the service account.
SIP Proxy Server
Address
SIP Proxy Server Port SIP proxy server port.
Backup Proxy Server
Address
Backup Proxy Server
Port
Outbound Proxy
Address
IP address or FQDN of
the SIP proxy server.
The default is 5060.
The address for the
backup proxy server.
The port for the backup
proxy server.
IP or FQDN address of
outbound proxy server
provided by the service
provider.
Table continues…
October 2019 Installing and Administering the Avaya H229 Phone 23
Comments on this document? infodev@avaya.com
Page 24

Web portal navigation
Option Description Option Description
Realm SIP domain if requested
Outbound Proxy Port Outbound proxy port.
by the service provider.
Note:
To register to SIP
though FQDN when
the SIP proxy
server address is
the same as the
FQDN address,
enter the full
domain in this field.
For example:
hcm.com
Activate Select this check box to activate service for the line.
Codecs Settings Use this section to move codecs from Disabled
Codecs list to the Enabled Codecs list.
Advanced Settings
Call Forward
Unconditional
Use this check box to
enable unconditional call
forward: all incoming
calls will be forwarded to
the number specified in
Enable Auto
Answering
Use this check box to
enable auto-answering:
incoming calls will be
answered automatically
after the delay time.
the next field.
Call Forward Number
for Unconditional
Number of unconditional
call forward
Auto Answering Delay Use this option to set the
delay for incoming calls
before the system
automatically answers it.
Table continues…
October 2019 Installing and Administering the Avaya H229 Phone 24
Comments on this document? infodev@avaya.com
Page 25

Line tab
Option Description Option Description
Call Forward on Busy Use this check box to
enable call forwarding
when the line is busy.
When the line is busy,
any incoming call is
forwarded to the number
specified in the next
field.
Note:
Subscribe For Voice
Message
Use this check box to
enable subscribing a
voice message waiting
notification. If enabled,
the device receives
notification from the
server if there is voice
message waiting on the
server.
To enable Call
Forward on Busy,
you need to disable
Call Waiting on the
Features page. The
call waiting feature
is not supported on
the Avaya H229
phone, but it is still
visible in the web
interface on the
Features page.
Call Forward Number
for Busy
Call Forward on No
Answer
Number for forwarding
calls when the line is
busy.
Use this check box to
forward calls when there
is no answer. When an
incoming call is not
answered within the
Voice Message
Number
Voice Message
Subscribe Period
The number for
retrieving voice
messages.
The interval for voice
message notification
subscriptions. You can
enter a value between
60 and 65535 seconds.
configured delay time,
the call is forwarded to
the number specified in
the next field.
Call Forward Number for No Answer Number for call forwarding when there is no answer.
Call Forward Delay for
No Answer
Delay time for
unanswered calls. After
this time elapses, the
call is forwarded.
Enable Hotline Use this check box to
enable hotline
configuration. The
device will call the
hotline number when the
handset is off-hook. You
can also enable speaker
phone or use a headset.
Table continues…
October 2019 Installing and Administering the Avaya H229 Phone 25
Comments on this document? infodev@avaya.com
Page 26

Web portal navigation
Option Description Option Description
Hotline Delay Use this option to set the
Hotline Number The hotline number to be
delay in seconds for the
hotline feature. If you set
this value to 0, the call to
the hotline number is
made immediately.
Enable DND Use this option to enable
Ring Type Select the ring tone type
the Do Not Disturb
status. When DND is
enabled, any incoming
calls to this line will be
rejected automatically.
Blocking Anonymous
Call
Use this option to block
incoming calls that do
Conference Type Select the type of call
not have a caller ID.
dialed.
for the line.
conference:
• Local: set up call
conference by the
device itself, maximum
supports two remote
parties.
• Server: set up call
conference by dialing
to a conference room
on the server.
Server Conference Number Conference room number when conference type is
set to Server.
Anonymous Call
Standard
Use this option to set the
standard to be used for
Transfer Timeout Timeout of call transfer
process.
anonymous calls.
Dial Without
Registered
Use this check box to set
call out by a proxy
without registration.
Enable Long Contact Use this check box to
allow more parameters
in contact field per RFC
3840.
Click To Talk Use this check box to
enable making a call via
a link.
User Agent Use this option to set the
user agent. The default
is Model with Software
Version.
Use Quote in Display
Name
Use this check box to
add quote in display
name.
Enable Use Inactive
Hold
Enable Missed Call
Log
Response Single
Codec
Use this check box to
enable using inactive
hold for transfers.
Use this check box to
enable saving missed
calls into the call history
record.
Use this check box to
enable using a single
codec in response to an
incoming call request.
Table continues…
October 2019 Installing and Administering the Avaya H229 Phone 26
Comments on this document? infodev@avaya.com
Page 27

Line tab
Option Description Option Description
Use feature code When this setting is enabled, the features described
below will not be handled by the device but by the
server. To control enabling of the features, the
device sends feature code to the server by dialing
the number specified in each feature code field.
Enable DND Set the feature code to
dial to the server.
Enable Call Forward
Unconditional
Enable Call Forward on
Busy
Enable Call Forward on
No Answer
Enable Blocking
Anonymous Call
Enable Send
Anonymous
Set the feature code to
dial to the server.
Set the feature code to
dial to the server.
Set the feature code to
dial to the server.
Set the feature code to
dial to the server.
Set the feature code to
dial to the server.
Specific Server Type Use this option to set the
line to collaborate with a
specific server type.
DND disabled Set the feature code to
dial to the server.
Disable Call Forward
Unconditional
Disable Call Forward
on Busy
Disable Call Forward
on No Answer
Disable Blocking
Anonymous Call
Disable Send
Anonymous
Set the feature code to
dial to the server.
Set the feature code to
dial to the server.
Set the feature code to
dial to the server.
Set the feature code to
dial to the server.
Set the feature code to
dial to the server.
Enable DNS SRV Use this check box to
enable using DNS SRV,
which resolves the
FQDN in the proxy
server to a service list.
Registration Expiration Use this option to set the
SIP expiration interval
Keep Alive Type Use this option to set the
line to use dummy UDP
or SIP OPTION packets
to keep the NAT pinhole
opened.
Use VPN Use this check box to
enable using VPN
restrict routing.
Use STUN Use this check box to
enable using STUN for
NAT traversal.
Keep Alive Interval Use this option to set the
keep alive packet
transmission interval.
Sync Clock Time Use this check box to
enable time
synchronization with the
server.
Convert URI Use this check box to
enable converting nondigit and alphabet
characters to %hh hex
code.
Enable Session Timer Use this check box to
enable call ending by
session timer
refreshment. The call
session is ended if there
is no new session timer
event update received
after the timeout period.
Table continues…
October 2019 Installing and Administering the Avaya H229 Phone 27
Comments on this document? infodev@avaya.com
Page 28

Web portal navigation
Option Description Option Description
DTMF Type Use this option to set the
Session Timeout Use this option to set the
DTMF type to be used
for the line.
DTMF SIP INFO Mode Use this option to set the
Enable Rport Use this check box to
SIP INFO mode to send
‘*’ and ‘#’ or ‘10’ and ‘11’.
Transportation
Protocol
Use this option to set the
line to use TCP or UDP
Enable PRACK Use this check box to
for SIP transmission.
SIP Version Use this option to set the
Keep Authentication Use this check box to
SIP version.
Caller ID Header Use this option to set the
Auto TCP Use this check box to
caller ID header.
Enable Strict Proxy Use this check box to
Enable Feature Sync Use this check box to
enable using strict
routing. When the phone
receives packets from
the server, it uses the
source IP address, not
the via address.
Enable user=phone Use this check box to
Enable GRUU Use this check box to
enable user=phone in
SIP messages.
Enable SCA Use this check box to
BLF Server Use this option to set the
enable Shared Call
Appearance (SCA).
session timer timeout
period.
enable adding Rport in
SIP headers.
enable supporting
PRACK SIP messages.
enable keeping the
authentication
parameters from before.
enable using the TCP
protocol to guarantee
usability of transport for
SIP messages above
1,500 bytes.
enable feature
synchronization with the
server.
enable the Globally
Routable User-Agent
URI (GRUU).
BLF server. The
registered server will
receive the subscription
package from the
ordinary application of
the BLF phone. If the
sever does not support
the subscription
package, the registered
server and subscription
server will be separated.
Table continues…
October 2019 Installing and Administering the Avaya H229 Phone 28
Comments on this document? infodev@avaya.com
Page 29

Option Description Option Description
Enable BLF List Use this check box to
enable BLF lists.
SIP Encryption Use this check box to
enable SIP encryption.
The SIP transmission
will be encrypted.
SIP Encryption Key Use this option to set the
pass phrase for SIP
encryption.
TLS Version Use this option to select the appropriate TLS
BLF List Number Use this option to set the
BLF list number. It allows
one BLF key to monitor
the status of a group.
Multiple BLF lists are
supported.
RTP Encryption Use this check box to
enable RTP encryption.
The RTP transmission
will be encrypted.
RTP Encryption Key Use this option to set the
pass phrase for RTP
encryption.
version. Supported versions are TLS 1.0, 1.1, and
1.2.
Line tab
Dial peer page
To access this page, click the Line tab and then click Dial Plan.
From this page, you can create rules to make dialing easier. The following table describes the
fields you can configure to create dialing rules. All of these fields, except Phone Number and Call
Mode, are optional.
Field
Phone Number There are two types of matching: Full matching and prefix
Destination Destination IP address.
Port Signal port. The default is 5060 for SIP.
Description
matching. With full matching, the entire phone number is
entered and then mapped according to the dial peer rules.
With prefix matching, only part of the number is entered
followed by T. The mapping will then take place whenever
these digits are dialed. The prefix mode supports a maximum
of 30 digits.
Note:
Two different special characters are used:
• x -- Matches any single digit that is dialed.
• [ ] -- Specifies a range of numbers to be matched. It
may be a range, a list of ranges separated by commas
or a list of digits.
Table continues…
October 2019 Installing and Administering the Avaya H229 Phone 29
Comments on this document? infodev@avaya.com
Page 30

Web portal navigation
Field Description
Alias The text to be added, replaced, or deleted.
There are four types of aliases:
• all: xxx – xxx will replace the phone number.
• add: xxx – xxx will be dialed before any phone number.
• del –The characters will be deleted from the phone number.
• rep: xxx – xxx will be substituted for the specified
characters.
Call Mode Signal protocol.
Suffix Characters to be added at the end of the phone number.
Deleted Length The number of characters to be deleted. For example, if this is
set to 3, the phone will delete the first 3 digits of the phone
number.
The following examples show know how to use different aliases.
Example 1: Global substitution
This configuration is used for speed dialing. Configure the dial peer settings as follows:
Field
Phone Number
Destination
Port
Alias
Call Mode
Suffix
Deleted Length
Value
32
all:833333
SIP
With this configuration, when you dial 32, the dialed number will be replaced by 833333. However,
if you dial 322, the device sends 322 rather than 8333332. The replacement rules should be
matched globally.
Example 2: Local substitution
To dial a long distance call to Beijing requires dialing area code 010 before the local phone
number. Using this feature, 1 can be substituted for 010. Configure the dial peer settings as
follows:
Field
Phone Number
Destination
Port
Value
1T
Table continues…
October 2019 Installing and Administering the Avaya H229 Phone 30
Comments on this document? infodev@avaya.com
Page 31

Line tab
Field Value
Alias
Call Mode
Suffix
Deleted Length
rep:010
SIP
1
With this configuration, you can dial 162213123 instead of 01062213123.
Example 3: Adding prefixes
If the dialed number starts with the fixed prefix number, the phone sends out your dialed phone
number adding prefix number automatically. Configure the dial peer settings as follows:
Field Value
Phone Number
Destination
Port
Alias
Call Mode
Suffix
Deleted Length
9T
add:007
SIP
With this configuration, when you dial 9312, the device sends 0079312.
Example 4: Adding suffixes
If the dialed number ends with the fixed suffix number, the phone sends out your dialed phone
number adding suffix number automatically. Configure the dial peer settings as follows:
Field
Phone Number
Destination
Port
Alias
Call Mode
Suffix
Deleted Length
Value
138T
SIP
0088
With this configuration, when you dial 1383322, the device sends 13833220088.
Example 5: Deleting prefix numbers
If the dialed number ends with the fixed prefix number, the phone sends out your dialed phone
number deleting the prefix number automatically. Configure the dial peer settings as follows:
October 2019 Installing and Administering the Avaya H229 Phone 31
Comments on this document? infodev@avaya.com
Page 32

Web portal navigation
Field Value
Phone Number
Destination
Port
Alias
Call Mode
Suffix
Deleted Length
9T
del
SIP
1
With this configuration, when you dial 98322, the device sends 8322.
Dial plan page
To access this page, click the Line tab and then click Dial Plan.
The Avaya H229 phone supports the following dialing modes:
Option Description
Press # to Send Use this check box to enable dialing the desired
number ending with # .
Dial Fixed Length Use this option to configure the fixed length to dial
out.
Send after Use this option to specify the time after which the
number is sent to the server.
Press # to Do Blind Transfer Use this check box to enable the blind transfer
onhook option: Press # after entering the target
number for the transfer. The phone transfers the call
to the remote party.
Blind Transfer on Onhook Use this check box to enable the blind transfer
onhook option: Hang up after entering the target
number for the transfer. The phone transfers the call
to the remote party.
Attended Transfer on Onhook Use this check box to enable the attended transfer
onhook option: Hang up after the remote party
answers. The phone transfers the call to the remote
party.
Global settings page
To access this page, click the Line tab and then click Global Settings. From this page, you can
configure global settings for lines and upload the TLS certification file.
The following table describes SIP and STUN settings to be configured for the Avaya H229 phone:
October 2019 Installing and Administering the Avaya H229 Phone 32
Comments on this document? infodev@avaya.com
Page 33

Line tab
Option Description
SIP Settings
Local SIP Port Use this option to set the local Sip port used to send
and receive SIP messages.
Registration Failure Retry Interval Retry interval of SIP registration when registration
fails.
SIP Invite Restrict Use this option to restrict SIP invites.
uaCSTA Enable Use this option to enable uaCSTA.
STUN Settings
STUN NAT Traversal The STUN NAT Traversal estimation. If TRUE,
STUN can penetrate NAT. If FALSE, STUN cannot
penetrate NAT.
Server Address STUN server address.
Server Port STUN server port. The default is 3478.
Binding Period STUN binding period, which can be used to keep
the NAT pinhole opened.
SIP Waiting Time Timeout of STUN binding before sending SIP
messages.
SIP Hotspot page
To access this page, click the Line tab and then click SIP Hotspot. From this page, you can
configure settings for the SIP hotspot function. It is recommended to use hotspot feature in User
Datagram Protocol (UDP) only.
Configuring the SIP hotspot server and phone client
About this task
Use this procedure to configure the SIP hotspot server or client. The hotspot server must be
configured before you configure the client.
Before you begin
Ensure that the SIP account is registered. For information about the SIP parameters to be
configured, see
obtained from the SIP hotspot server.
Procedure
1. On the web portal, navigate to Line > SIP Hotspot.
2. In Enable Hotspot, select Enable.
SIP page on page 23. The SIP account for the SIP hotspot client is automatically
October 2019 Installing and Administering the Avaya H229 Phone 33
Comments on this document? infodev@avaya.com
Page 34

Web portal navigation
3. In Mode, select one of the following:
• To configure the server, select Hotspot.
• To configure the client, select Client.
4. In Monitor Type, select one of the following:
• Multicast: To limit the broadcast packets.
• Broadcast: To send packets to all clients.
5. In Monitor Address, enter the broadcast address.
The monitor address should be the same for the hotspot server and the hotspot client.
6. In Remote Port, enter the remote port number.
7. In Local Port, enter the local port number.
8. In Name, enter the SIP hotspot name.
9. In Line Settings, select Enable and click Apply.
When configuring the SIP hotspot server, in the device table, you can view hotspot client
information, such as the client IP address, MAC address, and the hotspot extension
number.
When configuring the SIP hotspot client, in the device table, you can view hotspot server
information.
Phone Settings tab
The following sections describe the options that you can access from the Phone Settings tab.
Features page
To access this page, click the Phone Settings tab and then click Features.
The following table describes the common configuration settings for the Avaya H229 phone. Only
supported options are described. Some unsupported features are displayed in the web interface,
but they are not described in this table.
Option
Common Settings
Description Option Description
Table continues…
October 2019 Installing and Administering the Avaya H229 Phone 34
Comments on this document? infodev@avaya.com
Page 35

Phone Settings tab
Option Description Option Description
DND Mode Use this option to set the
phone DND. If the
Ban Outgoing Use this check box to
disable dialing out.
Phone DND is enabled,
the phone rejects any
incoming call, and the
caller will automatically
prompt hang up.
Auto HangUp Delay Use this option to set an
auto hangup delay time.
Enable Call
Completion
Use this check box to
enable call completion. If
the dialed line is busy,
the SIP server inspects
the dialed line status at
intervals. If the dialed
line is idle, the server
sends a notify message
to inform the caller to
redial.
Hide DTMF Use this option to set the
hide DTMF mode.
Enable Pre-Dial Use this check box to
enable entering the
number without opening
audio channel. If
disabled, the user enters
number with an audio
channel opened
automatically.
Enable Silent Mode Use this check box to
disable the ring tone for
incoming calls.
Disable Mute for Ring Use this check box to
disable the mute mode
for ring.
Note:
On the H229
phone, the MWI
does not blink when
silent mode is
enabled.
Enable Intercom Use this check box to
enable intercom. The
device will accept the
incoming call request
with a SIP header of
alert-info instruction to
automatically answer the
call after specific delay
time.
Enable Intercom Mute Use this check box to
enable the mute mode
during the intercom call.
Table continues…
October 2019 Installing and Administering the Avaya H229 Phone 35
Comments on this document? infodev@avaya.com
Page 36

Web portal navigation
Option Description Option Description
Enable Intercom Tone Use this check box to
Enable Intercom Barge Use this check box to
enable playing the
intercom tone if the
incoming call is an
intercom call.
Emergency Call
Number
Use this option to set the
emergency call number.
DND Response Code Use this option to set the
If the keypad is locked,
you can dial the
emergency call number.
Enable Password Dial Use this check box to
Busy Response Code Use this option to set the
enable password dialing.
When the number
entered begins with the
password prefix, the
following N numbers
after the password prefix
will be hidden as *. N
stand for the value which
you enter in the
Password Length field.
For example, if you set
the password prefix as 3
and enter 2 in the
Password Length ,
when you enter the
number 34567, it will
display 3**67 on the
screen.
Password Dial Prefix Use this option to set the
Reject Response Code Use this option to set the
prefix of the password
call number.
Enable Phone DND Use this check box to
enable phone DND.
Restrict Active URI
Source IP
Use this option to set IP
address from which the
Encryption Number
Length
Push XML Server Use this option to set the
device accepts active
URI command.
enable auto-answering
an intercom call during a
call. If the current call is
an intercom call, the
phone rejects the
second intercom call.
SIP response code on
call rejection on DND.
SIP response code on
line busy.
SIP response code on
call rejection.
Use this option to set the
encryption number
length. The value must
be from 0 to 31.
push XML server. When
the phone receives
request, it determines
whether to display the
content sent by the
specified server.
Table continues…
October 2019 Installing and Administering the Avaya H229 Phone 36
Comments on this document? infodev@avaya.com
Page 37

Phone Settings tab
Option Description Option Description
Allow IP Call Use this check box to enable dialing out with IP
address.
Play Dialing DTMF Tone Use this check box to enable playing DTMF tone
when the user presses keys at dialing. The default
is enabled.
Play Talking DTMF Tone Use this check box to enable playing DTMF tone
when the user presses keys during taking. The
default is enabled.
Caller ID Display Priority Use this option to set caller ID display priority. The
default priority is Phonebook > SIP Display Name >
SIP URI.
Hotline Number Use this option to set the
hot line number
Hotline Delay Use this option to set the
hot line delay time.
Audio page
To access this page, click the Phone settings tab and then click Audio.
The following table describes the audio configuration settings for the Avaya H229 phone. Only
supported options are described. Some unsupported features are displayed in the web interface,
but they are not described in this table.
Option
First Codec The first preferential
Third Codec The third preferential
Fifth Codec The fifth preferential
Onhook Time The least reflection time
Tone Standard Country standard of call
Description Option Description
Second Codec The second preferential
DSP codec.
Fourth Codec The fourth preferential
DSP codec.
Sixth Codec The sixth preferential
DSP codec.
Handset Volume Use this option to set the
for when the handset is
down. The default is 200
ms.
Default Ring Type If the caller ID of an
progress tones, including
dial tone, busy tone, and
ring-back tone.
DSP codec.
DSP codec.
DSP codec.
handset volume. The
value must be from 1 to
9.
incoming call is not
configured with a
specific ring type, the
default ring is used.
Table continues…
October 2019 Installing and Administering the Avaya H229 Phone 37
Comments on this document? infodev@avaya.com
Page 38

Web portal navigation
Option Description Option Description
Speakerphone Volume Use this option to set the
speakerphone volume.
Speakerphone Ring
Volume
You can enter a value
between 0 to 9.
Region Select You can set one of the following options:
Use this option to set the
ring volume. You can
enter a value between 0
to 9.
Note:
When you receive
an incoming call on
your H229 phone,
the MWI will only
blink if this value is
set to 8 or 9. If you
decrease the ring
volume, the MWI
LED will not light
up. This is because
the MWI LED is lit
based on the
electric current of
the ringing speaker.
If you decrease the
ring volume, the
electric current is
decreased, and the
MWI cannot light
up.
G.729AB Payload
Length
Length of the G729
Payload.
G.722 Timestamps You can select 160/20
ms or 320/20 ms.
• Global: Provides acoustic tuning for use in all
regions.
• North America: Provides a tuning that is
optimized for hearing aid compatibility.
G.723.1 Bit Rate You can select 5.3kb/s
or 6.3kb/s.
DTMF Payload Type Use this option to set the
DTMF payload type. The
value must be from 96 to
127.
Table continues…
October 2019 Installing and Administering the Avaya H229 Phone 38
Comments on this document? infodev@avaya.com
Page 39

Phone Settings tab
Option Description Option Description
Enable VAD Use this check box to
enable the Voice Activity
Detection (VAD). When
enabled, the device
suppresses the audio
transmission with
artificial comfort noise
signal to save the
bandwidth.
Enable MWI Tone Use this check box to
enable playing the MWI
tone when a new MWI
comes.
MCAST page
To access this page, click the Phone Settings tab and then click MCAST.
This feature allows you to make a broadcast call to people who are in a multicast group. You can
configure a multicast DSS Key on the phone to send an RTP stream to the pre-configured
multicast addresses without involving SIP signaling. You can also configure the phone to receive
an RTP stream from pre-configured multicast listening addresses without involving SIP signaling.
You can specify up to 10 multicast listening addresses
The following table describes the MCAST settings to be configured for the Avaya H229 phone:
Option
Priority The priority of the active call: 1 is the highest priority
Enable Page Priority The voice call in progress takes precedence over all
Name Multicast server name.
Host:port Multicast server’s multicast IP address and port.
Description
and 10 is the lowest.
incoming paging calls.
Time/Date page
To access this page, click the Phone settings tab and then click Time/Date.
The following table describes time settings to be configured for the Avaya H229 phone:
Option
Network Time Server Settings
Time Synchronized via SNTP Use this check box to enable time synchronization
Time Synchronized via DHCP Use this check box to enable time synchronization
Primary Time Server Primary time server address.
Description
through the SNTP protocol.
through the DHCP protocol.
Table continues…
October 2019 Installing and Administering the Avaya H229 Phone 39
Comments on this document? infodev@avaya.com
Page 40

Web portal navigation
Option Description
Secondary Time Server Secondary time server address. When the primary
server is not reachable, the device connects to the
secondary time server to get time synchronization.
Time zone Time zone for the device.
Resync Period Time of re-synchronization with the time server.
Time/Date Format
12-Hour Clock Use this check box to enable time display in 12-
hour mode.
Date Format Time/date display format.
Daylight Saving Time Settings
Location The user's time zone specific area.
DST Set Type Type of DST setting:
• Automatic: based on the preset rules of DST.
• Manual: manually input rules.
Fixed Type Use this option to set specific dates for conversion.
In the automatic mode, it is displayed as read-only.
Offset DST offset time.
Month Start/End DST start/end month.
Week Start/End DST start/end week.
Weekday Start/End DST start/end weekday.
Hour Start/End DST start/end time.
You can also set the date and time manually by choosing the desired date and time in the Manual
Time Settings section.
Advanced page
To access this page, click the Phone Settings tab and then click Advanced. From this page, you
can set the clear interval after which the redial records are cleaned.
Trusted certificates page
To access this page, click the Phone Settings tab and then click Trusted Certificates. From this
page, you can update and delete trusted certificates files.
October 2019 Installing and Administering the Avaya H229 Phone 40
Comments on this document? infodev@avaya.com
Page 41

Device certificates page
To access this page, click the Phone Settings tab and then click Device Certificates. From this
page, you can apply and import device certificate files. A phone must device certificate in PEM
format is required for mutual authentication.
Call logs tab
On the Call logs tab, you can access call logs to view detailed information about incoming,
outgoing, and missed calls. You can filter call logs based on the call type. Click on the appropriate
column headings to sort call log entries by the call time, caller ID, contact name, call duration, or
line.
You can also make a web call by clicking on the phone number in a call log.
Note:
Call logs tab
The phone can store approximately 629 call logs in total.
October 2019 Installing and Administering the Avaya H229 Phone 41
Comments on this document? infodev@avaya.com
Page 42

Chapter 6: Troubleshooting
This chapter describes known issues and solutions for these issues.
Before using this chapter, verify that all web portal settings are properly configured. You can use the
System tab in the web portal to obtain network packet dumps, configure upgrades, and reset the
device to its factory settings.
No audio during calls
Condition
When making a call, you get no audio or the other party does not hear you.
Solution
The firewall can block the audio stream. Disable this feature.
No access to the web portal
Condition
You cannot access the web portal.
Solution
1. Verify that the phone and the computer you are using to access the web portal are
connected to the same LAN.
2. Verify the IP address you entered in your browser.
3. After verifying the connections, if necessary, reset the device to its factory default settings.
IP address issue
Condition
The IP address cannot be obtained.
October 2019 Installing and Administering the Avaya H229 Phone 42
Comments on this document? infodev@avaya.com
Page 43

Calls cannot be made
Solution
Verify your network configuration settings.
Calls cannot be made
Condition
The line indicator flashes and an outgoing call cannot be made.
Solution
Check the SIP registration status, and make sure that the registration information is correct.
Cannot receive incoming calls after failover occurs
Condition
While you are on an active call, the primary Session Manager server goes down and failover
occurs. After you end the call, you can no longer receive incoming calls for several hours. You can
still make calls.
Cause
The line on Communication Manager remains busy. You cannot receive calls until the line on
Communication Manager is automatically released based on the timer expiration.
Solution
To prevent this issue from happening, perform the configuration outlined in
configuration for failover on page 17.
Avaya Aura
October 2019 Installing and Administering the Avaya H229 Phone 43
Comments on this document? infodev@avaya.com
Page 44

Chapter 7: Resources
Documentation
See the following related documents at http://support.avaya.com
Title Use this document to: Audience
Deploying
Installing and Administering the
Avaya H229 Phone
Using
Using the Avaya H229 Phone Set up and use the Avaya H229 phone. End users
Install, configure, and maintain the
Avaya H229 phone.
Implementation
personnel and
administrators
Support
Go to the Avaya Support website at http://support.avaya.com for the most up-to-date
documentation, product notices, and knowledge articles. You can also search for release notes,
downloads, and resolutions to issues. Use the online service request system to create a service
request. Chat with live agents to get answers to questions, or request an agent to connect you to a
support team if an issue requires additional expertise.
Using the Avaya InSite Knowledge Base
The Avaya InSite Knowledge Base is a web-based search engine that provides:
• Up-to-date troubleshooting procedures and technical tips
• Information about service packs
• Access to customer and technical documentation
• Information about training and certification programs
• Links to other pertinent information
If you are an authorized Avaya Partner or a current Avaya customer with a support contract, you
can access the Knowledge Base without extra cost. You must have a login account and a valid
Sold-To number.
October 2019 Installing and Administering the Avaya H229 Phone 44
Comments on this document? infodev@avaya.com
Page 45

Use the Avaya InSite Knowledge Base for any potential solutions to problems.
1. Go to http://www.avaya.com/support.
2. Log on to the Avaya website with a valid Avaya user ID and password.
The system displays the Avaya Support page.
3. Click Support by Product > Product Specific Support.
4. In Enter Product Name, enter the product, and press Enter.
5. Select the product from the list, and select a release.
6. Click the Technical Solutions tab to see articles.
7. Select relevant articles.
Support
October 2019 Installing and Administering the Avaya H229 Phone 45
Comments on this document? infodev@avaya.com
Page 46

Index
A
Avaya H229 phone
overview ......................................................................... 9
C
changing password ..............................................................19
configuring phone provisioning
automatic ...................................................................... 13
DHCP or static provisioning server ...............................15
SIP Plug and Play .........................................................16
D
device connections ..............................................................
DHCP ...................................................................................
DHCP with VLAN .................................................................22
Dial peer .............................................................................. 29
document changes ................................................................ 7
10
22
F
failover
Avaya Aura configuration ..............................................17
receiving incoming calls ................................................17
R
related documentation ......................................................... 44
reset a device to factory settings .........................................
20
S
SIP hotspot configuration .....................................................33
support .................................................................................44
T
troubleshooting .................................................................... 42
calls cannot be made ....................................................43
cannot receiving incoming calls ....................................43
failover .......................................................................... 43
incoming calls after failover .......................................... 43
IP address issue ...........................................................
no access to the web portal ..........................................42
no audio during calls .....................................................42
42
V
verifying
IP address .................................................................... 12
VLAN ................................................................................... 22
H
H229 SIP phone
dimensions ....................................................................11
I
InSite Knowledge Base ........................................................44
ip address
configuring ip address .................................................. 12
IP address ............................................................................12
L
legal notices .............................................................................
P
password ............................................................................. 19
phone reboot
stop ...............................................................................17
phone settings configuration ................................................12
W
wall-mount installation ..........................................................11
web portal
log in ....................................................................... 14, 18
web portal navigation ...........................................................18
Call logs tab ..................................................................41
Line tab .......................................................23, 29, 32, 33
Network tab ............................................................ 21, 22
Phone Settings tab ..................................... 34, 37, 39–41
System tab ..............................................................
upgrade ........................................................................ 20
19–21
October 2019 Installing and Administering the Avaya H229 Phone 46
Comments on this document? infodev@avaya.com
 Loading...