

Page 1

MJH; Reviewed:
SPOC 4/15/2015
Solution & Interoperability Test Lab Application Notes
©2015 Avaya Inc. All Rights Reserved.
1 of 25
Grandstream_SM
These Application Notes describe the configuration steps required to integrate Grandstream
GXV3240 and GXV3275 Multimedia IP Phones for Android™ with Avaya Aura® Session
Manager and Avaya Aura® Communication Manager.
Readers should pay attention to Section 2, in particular the scope of testing as outlined in
Section 2.1 as well as the observations noted in Section 2.2, to ensure that their own use cases
are adequately covered by this scope and results.
Information in these Application Notes has been obtained through DevConnect compliance
testing and additional technical discussions. Testing was conducted via the DevConnect
Program at the Avaya Solution and Interoperability Test Lab.
Avaya Solution & Interoperability Test Lab
Application Notes for Configuring Grandstream GXV3240
and GXV3275 Multimedia IP Phones for Android™ with
Avaya Aura® Session Manager and Avaya Aura®
Communication Manager - Issue 1.0
Abstract
Page 2

MJH; Reviewed:
SPOC 4/15/2015
Solution & Interoperability Test Lab Application Notes
©2015 Avaya Inc. All Rights Reserved.
2 of 25
Grandstream_SM
1. Introduction
These Application Notes describe the configuration steps required to integrate Grandstream
GXV3240 and GXV3275 Multimedia IP Phones for Android™ with Avaya Aura® Session
Manager and Avaya Aura® Communication Manager.
2. General Test Approach and Test Results
The interoperability compliance testing included both feature and serviceability testing.
The featured testing focused on verifying the ability of the Grandstream Multimedia IP Phones to
register as SIP endpoints with Avaya Aura® Session Manager, establish voice and point-to-point
video calls, and exercise various telephony features (e.g. hold/resume, transfer, conference, etc.).
The serviceability testing focused on verifying the ability of the Grandstream Multimedia IP
Phones to handle various outages such as network disconnects and server/phone reboots.
DevConnect Compliance Testing is conducted jointly by Avaya and DevConnect members. The
jointly-defined test plan focuses on exercising APIs and/or standards-based interfaces pertinent
to the interoperability of the tested products and their functionalities. DevConnect Compliance
Testing is not intended to substitute full product performance or feature testing performed by
DevConnect members, nor is it to be construed as an endorsement by Avaya of the suitability or
completeness of a DevConnect member’s solution.
2.1. Interoperability Compliance Testing
Interoperability compliance testing covered the following features and functionality:
Successful registration of the Grandstream Multimedia IP Phones with Session Manager.
Voice calls between Grandstream Multimedia IP Phones, Avaya 6200 Series analog
telephone, Avaya 2400 Series digital telephone, Avaya 1600 Series IP Deskphones,
Avaya 9600 Series IP Deskphones (96x1 models, both H.323 and SIP), Avaya E129 SIP
Deskphones, Avaya E169 Media Station, Avaya one-X® Communicator (both H.323 and
SIP), and Avaya Communicator (for Windows, Android, and iPad).
Point-to-Point video calls between the Grandstream Multimedia IP Phones, Avaya one-
X® Communicator (SIP and H.323), and Avaya Communicator (for Windows and iPad).
G.711MU, G.711.A, G.729A, G.722-64k, and G.726A.32K codec support.
Guest login/logout
Caller ID and display updates.
Direct IP-IP Media (i.e. media shuffling).
Proper recognition of DTMF tones by navigating voicemail menus.
Proper operation of voicemail with Message Waiting Indication.
Telephony features including: Mute, Hold/Resume, Transfer, Conference, Music on
Hold, Call Coverage Paths, Call Forwarding (Unconditional, Busy, and No Answer), Call
Park/Answer Back, Call Pickup, and Automatic Redial.
Page 3

MJH; Reviewed:
SPOC 4/15/2015
Solution & Interoperability Test Lab Application Notes
©2015 Avaya Inc. All Rights Reserved.
3 of 25
Grandstream_SM
The serviceability testing focused on verifying the ability of the Grandstream phones to handle
various outages such as network disconnects and server/phone reboots.
The wireless functionality of the Grandstream phones was not tested.
2.2. Test Results
The Grandstream Multimedia IP Phones successfully passed compliance testing with the
following observations:
G.726-32K: G.726-32K codec negotiation failed during compliance testing; however,
Grandstream has delivered a fix for this issue in their system firmware version 1.0.3.25.
Conference URI / display updates: When the conference is established, the endpoints
involved in the conference receive a SIP UPDATE message with a Contact header
containing the “isfocus” feature tag. This feature tag indicates that the URI in the
Contact header field is a conference URI. Avaya phones update their display to show the
conference URI display information (e.g. Conference 2) which indicates the number of
other parties in the conference. The Grandstream phones did not update their display to
show the conference URI display information; however, Grandstream has delivered a fix
for this issue in their system firmware version 1.0.3.25.
Long Hold Recall: The Grandstream phones do not audibly or visually alert the user of
a held call when the Avaya Aura® Communication Manager long hold recall timer
expires.
481 Call Leg/Transaction Does Not Exist: Multiple “481 Call Leg/Transaction Does
Not Exist” SIP messages are generated for transfer/conference scenarios. This is
essentially a race condition. For example, after the REFER for a transfer is sent, both
parties send a BYE for the call leg going away. When each party receives the BYE, it
responds with a 481 Call Leg/Transaction Does Not Exist (since each party has already
sent its own BYE for that call leg).
2.3. Support
Grandstream can be reached using the information provided on the following web sites:
General Contact Information: http://www.grandstream.com/company/contact-us
Support Requests: http://esupport.grandstream.com/support/customerportal/login.php
Page 4
MJH; Reviewed:
SPOC 4/15/2015
Solution & Interoperability Test Lab Application Notes
©2015 Avaya Inc. All Rights Reserved.
4 of 25
Grandstream_SM
3. Reference Configuration
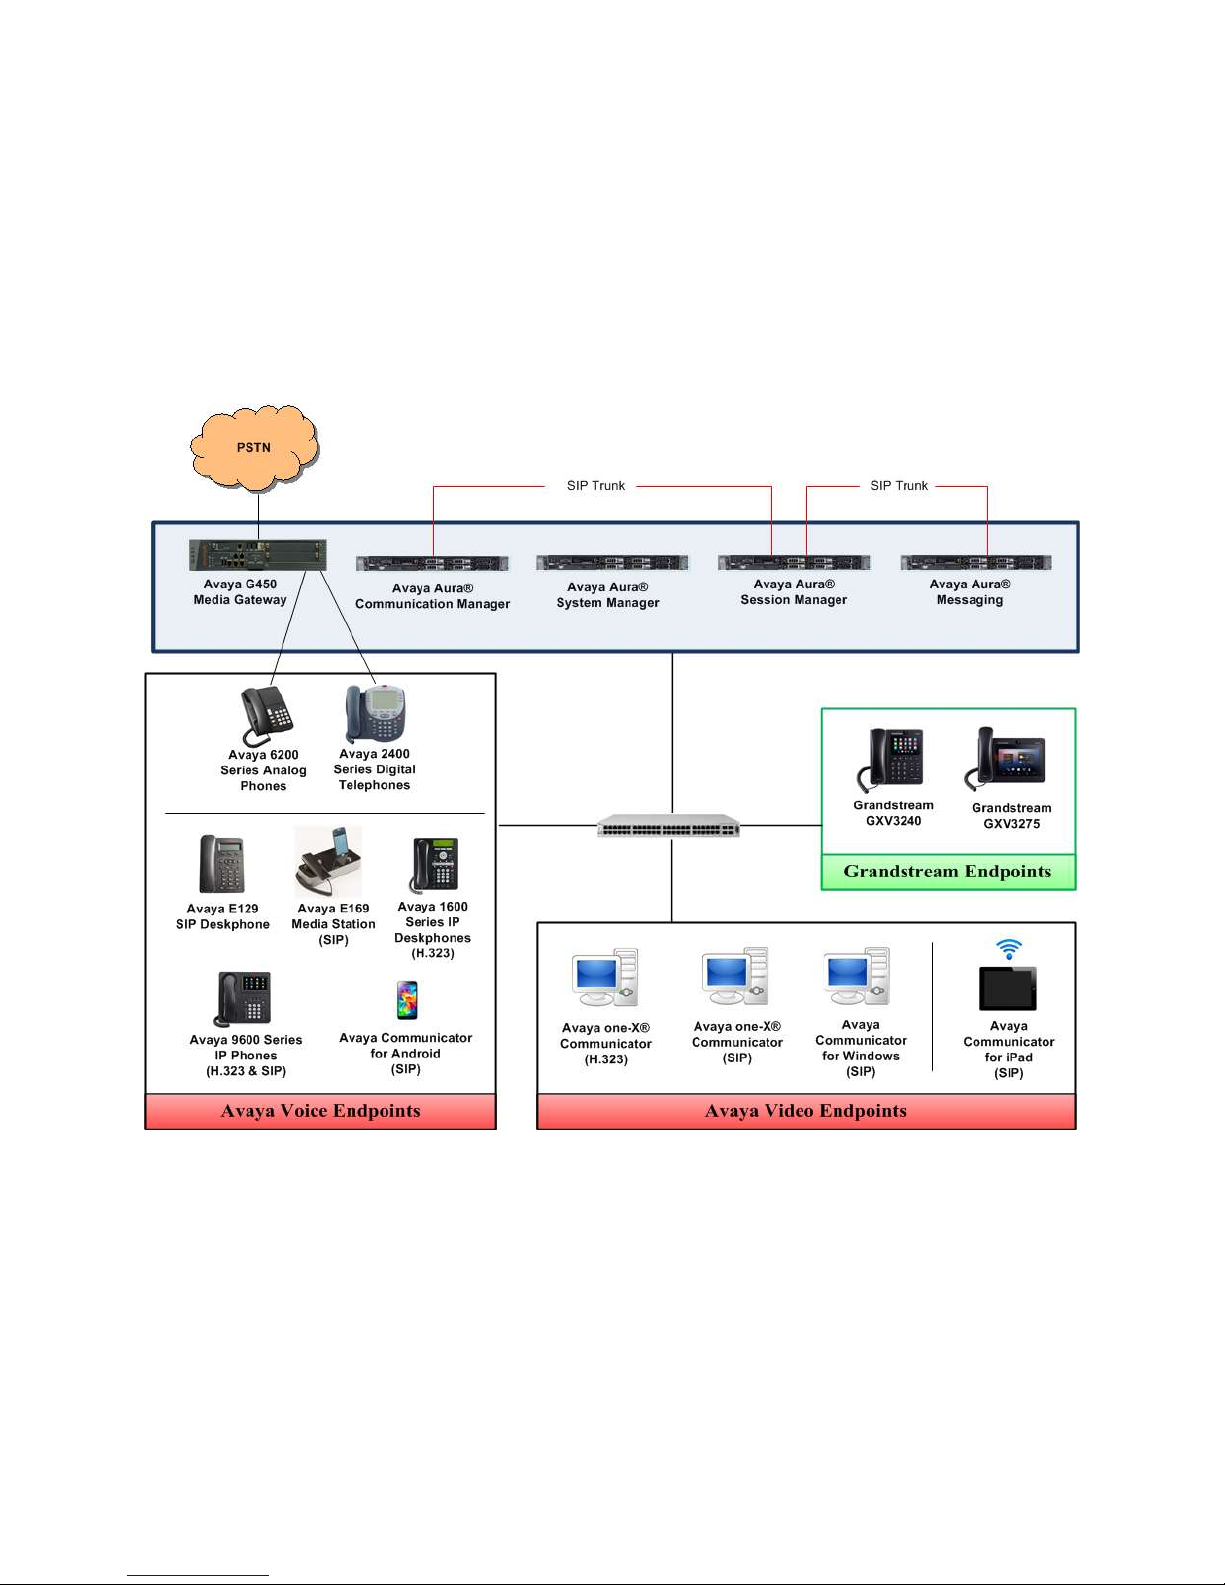
Figure 1 illustrates the test configuration used to verify Grandstream Multimedia IP Phones
integration with Avaya Aura® Session Manager and Avaya Aura® Communication Manager.
The configuration consists of an Avaya Aura® Communication Manager Server with an Avaya
G450 Media Gateway providing connectivity to the PSTN via an ISDN-PRI trunk, Avaya Aura®
System Manager, and Avaya Aura® Session Manager. Avaya Aura® Messaging was used as
the voicemail system. The Grandstream endpoints registered with Session Manager as SIP Users.
Figure 1: Grandstream Multimedia IP Phones
Page 5

MJH; Reviewed:
SPOC 4/15/2015
Solution & Interoperability Test Lab Application Notes
©2015 Avaya Inc. All Rights Reserved.
5 of 25
Grandstream_SM
4. Equipment and Software Validated
Equipment/Software
Release/Version
Avaya Aura® Communication Manager
with an Avaya G450 Media Gateway
R6.3 Update 22098
Avaya Aura® System Manager
R6.3.11
Avaya Aura® Session Manager
R6.3.11
Avaya Aura® Messaging
R6.3
Avaya 6200 Series Analog Phones
-
Avaya 2400 Series Digital Telephones
R6
Avaya 1600 Series IP Deskphones
1.3.6
Avaya E129 SIP Deskphones
1.0
Avaya E169 Media Station
1.1
Avaya 9600 Series IP Deskphone (96x1 –
SIP and H.323)
6.4
Avaya one-X® Communicator (SIP and
H.323)
6.2.5
Avaya Communicator (for Windows,
Android, and iPad)
2.1 (Windows and Android)
2.0.2 (iPad)
Grandstream GXV3240 and GXV3275
Multimedia IP Phones
Hardware Revision: V1.7A (GXV3240)
V1.4B (GXV3275)
System Version: 1.0.3.15
Android Version: 4.2.2
The following equipment and software were used for the sample configuration provided:
Page 6
MJH; Reviewed:
SPOC 4/15/2015
Solution & Interoperability Test Lab Application Notes
©2015 Avaya Inc. All Rights Reserved.
6 of 25
Grandstream_SM
5. Configure Avaya Aura® Communication Manager
These Application Notes assume that basic Communication Manager administration has already
been performed, including the configuration needed to establish a SIP trunk to Session Manager.
Consult Reference [1] for further details if necessary.
All configuration in this section is administered using the System Access Terminal (SAT).
5.1. Configure Video Parameters
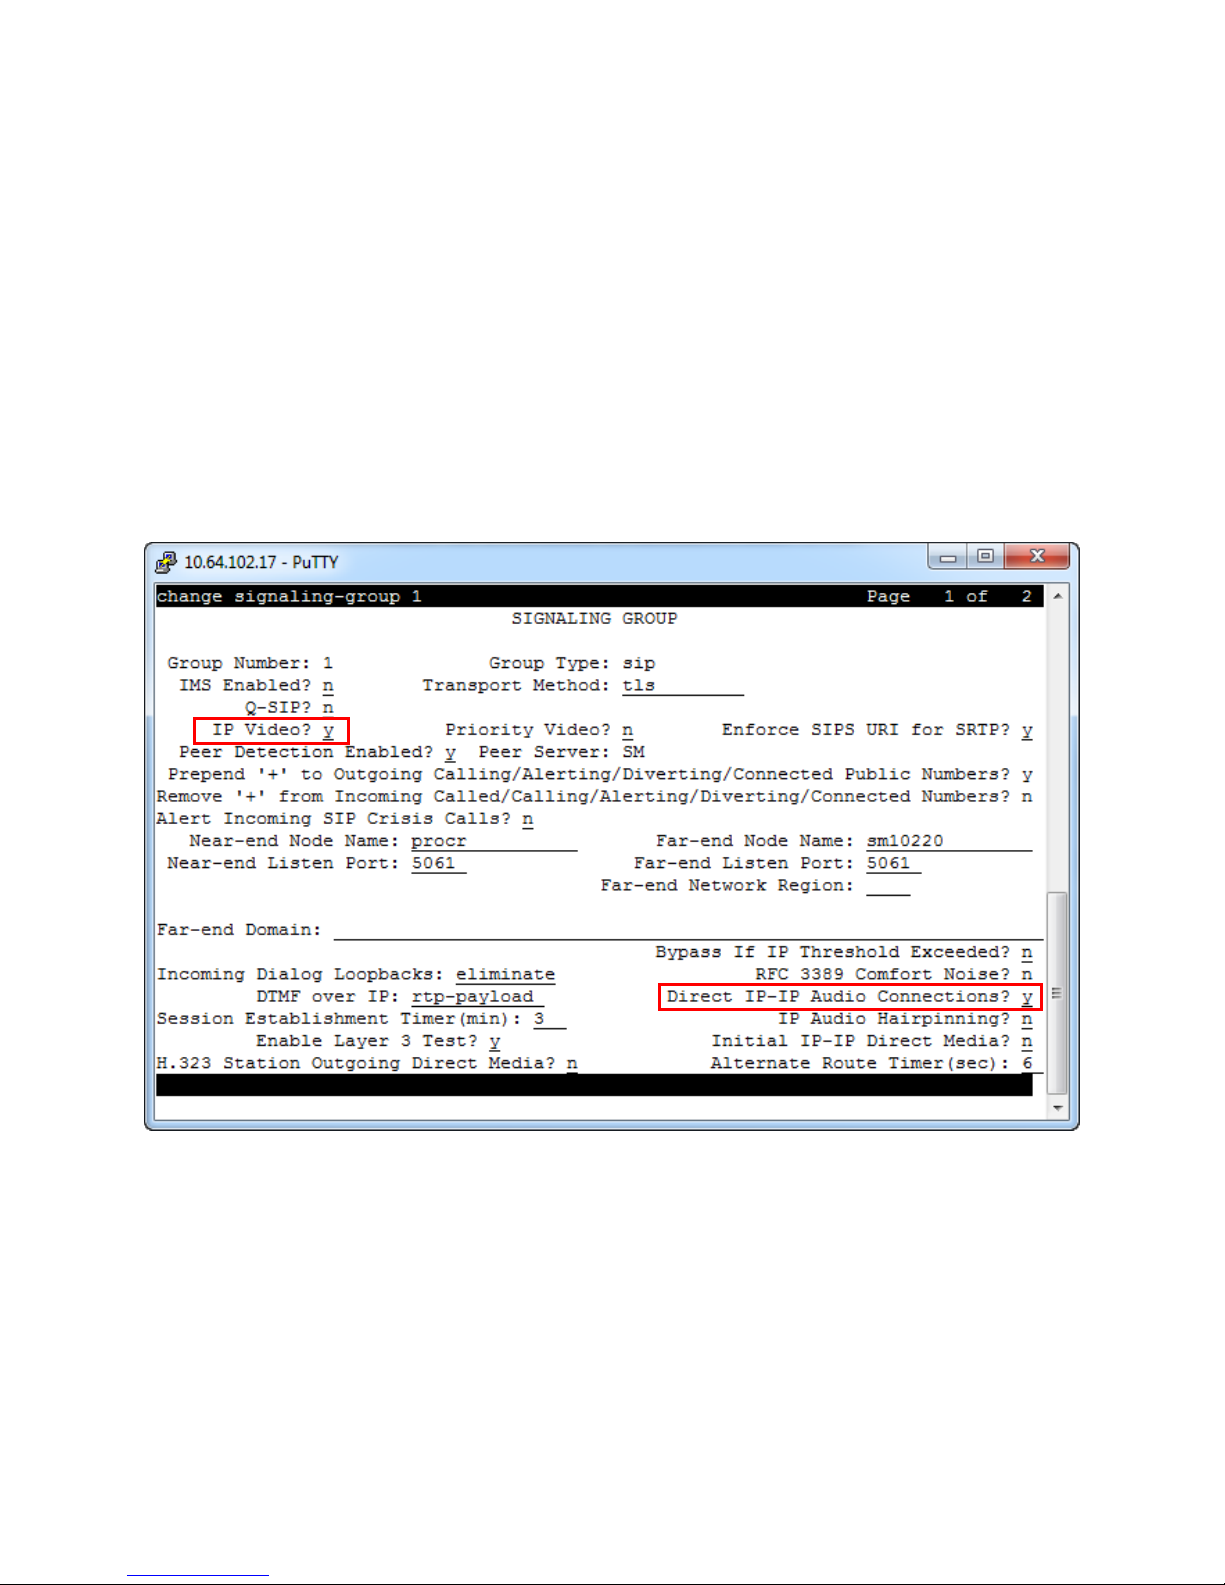
Enable IP Video on the signaling group for the SIP trunk between Communication Manager and
Session Manager. Enter the “change signaling-group” command. Set IP Video to y. By
default, Direct IP-IP Audio Connections is enabled for audio media shuffling.
Page 7
MJH; Reviewed:
SPOC 4/15/2015
Solution & Interoperability Test Lab Application Notes
©2015 Avaya Inc. All Rights Reserved.
7 of 25
Grandstream_SM
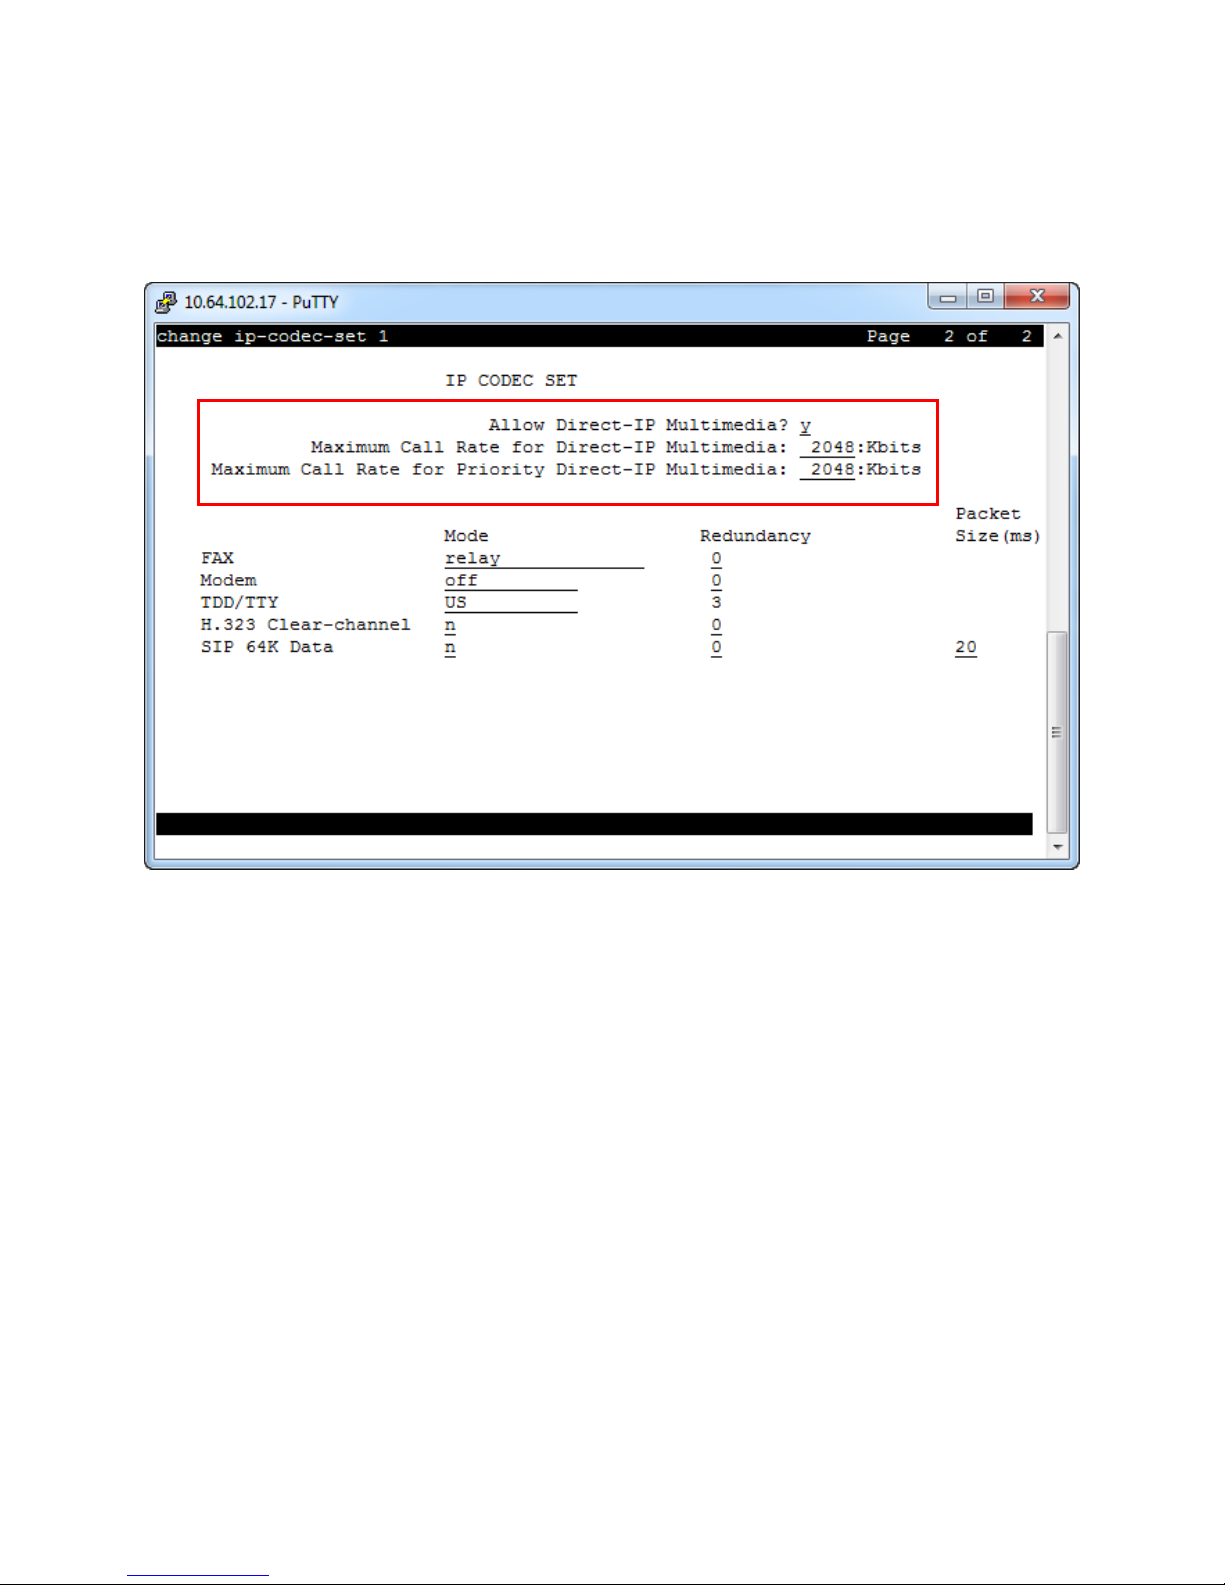
Set the multimedia parameters for the ip-codec-set used by the endpoints. Enter the “change ip-
codec-set” command. Set Allow Direct-IP Multimedia to y. Set the two call rate parameters to
desired values (2048 was used during compliance testing).
Page 8
MJH; Reviewed:
SPOC 4/15/2015
Solution & Interoperability Test Lab Application Notes
©2015 Avaya Inc. All Rights Reserved.
8 of 25
Grandstream_SM
5.2. Verify Station Configuration
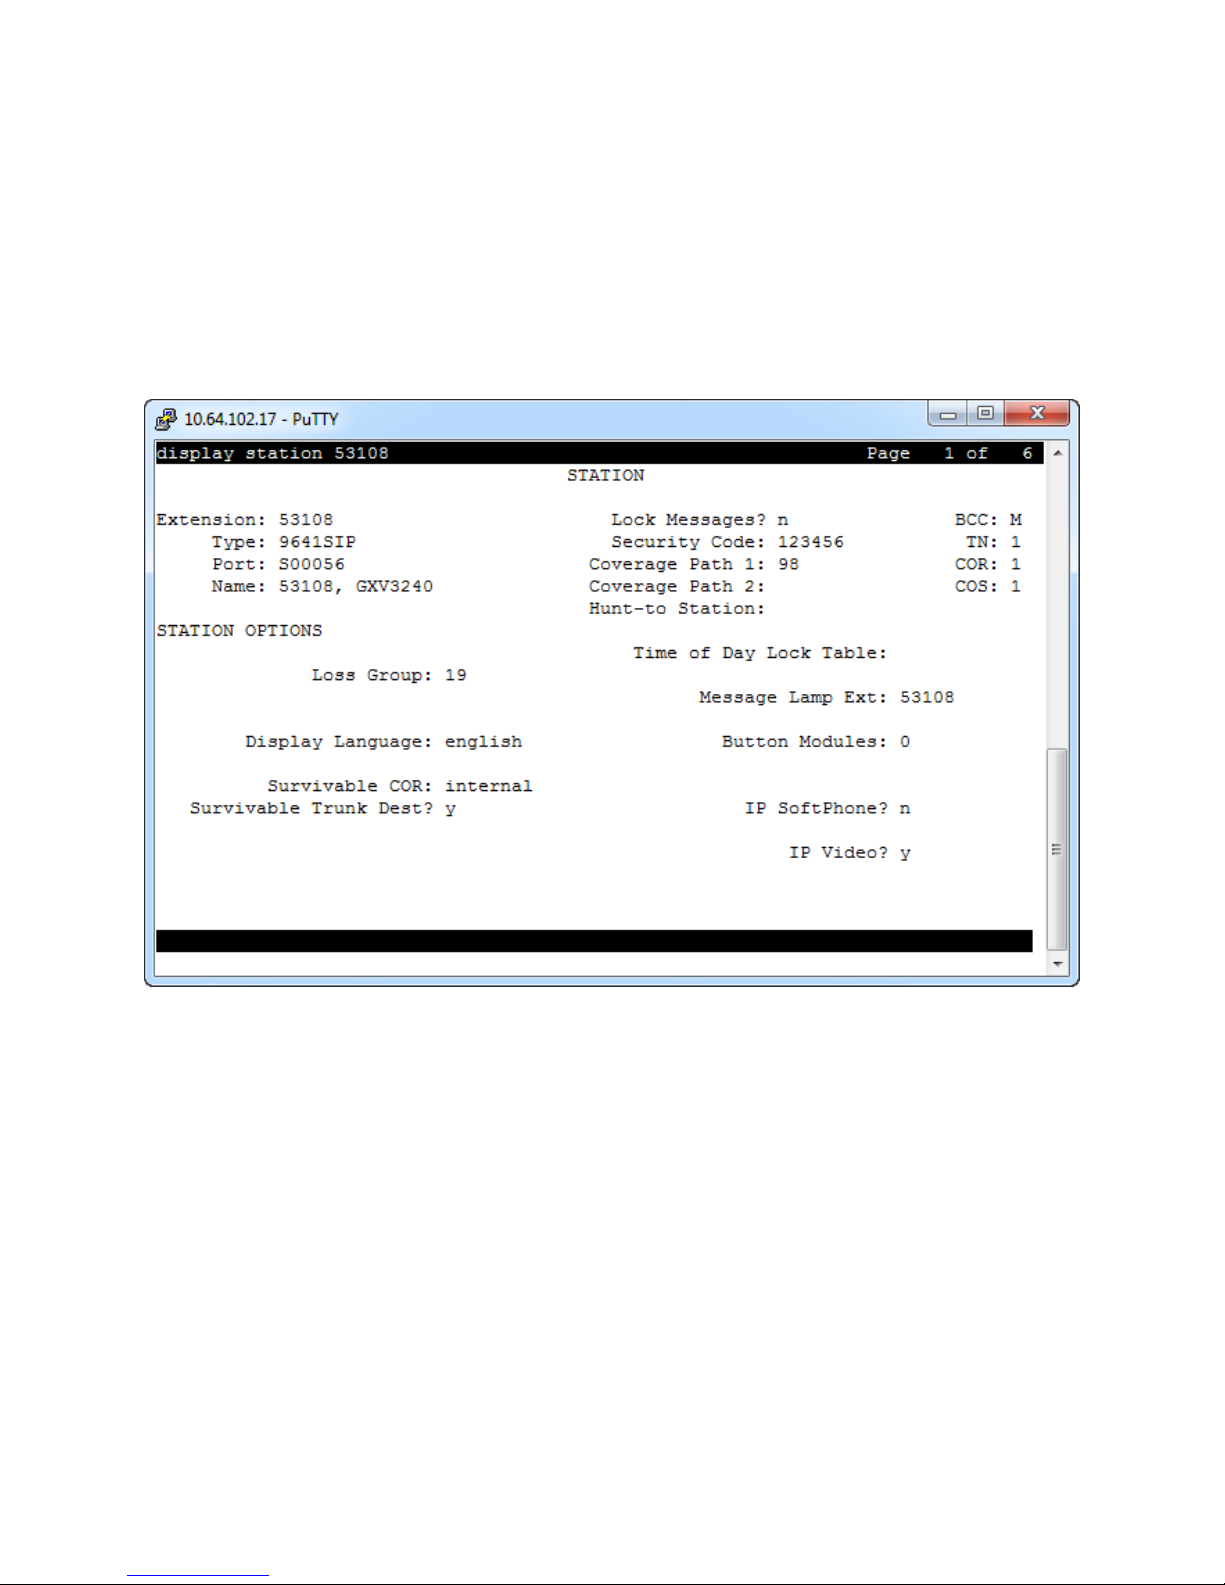
It is assumed all Avaya endpoints have already been configured. The stations used for the
Grandstream endpoints do not need to be configured via the SAT. Rather, stations will be
automatically created in Communication Manager when the SIP Users are added in Section 6.1.
After completing the steps in Section 6.1 to create a SIP User, enter the “display station”
command within the SAT to verify that station was successfully added to Communication
Manager.
Page 9
MJH; Reviewed:
SPOC 4/15/2015
Solution & Interoperability Test Lab Application Notes
©2015 Avaya Inc. All Rights Reserved.
9 of 25
Grandstream_SM
6. Configure Avaya Aura® Session Manager
Configuration of Avaya Aura® Session Manager is performed via Avaya Aura® System
Manager. These Application Notes assume that basic System Manager and Session Manager
administration has already been performed, including the configuration needed to establish a SIP
trunk to Communication Manager. Consult Reference [2] for further details if necessary.
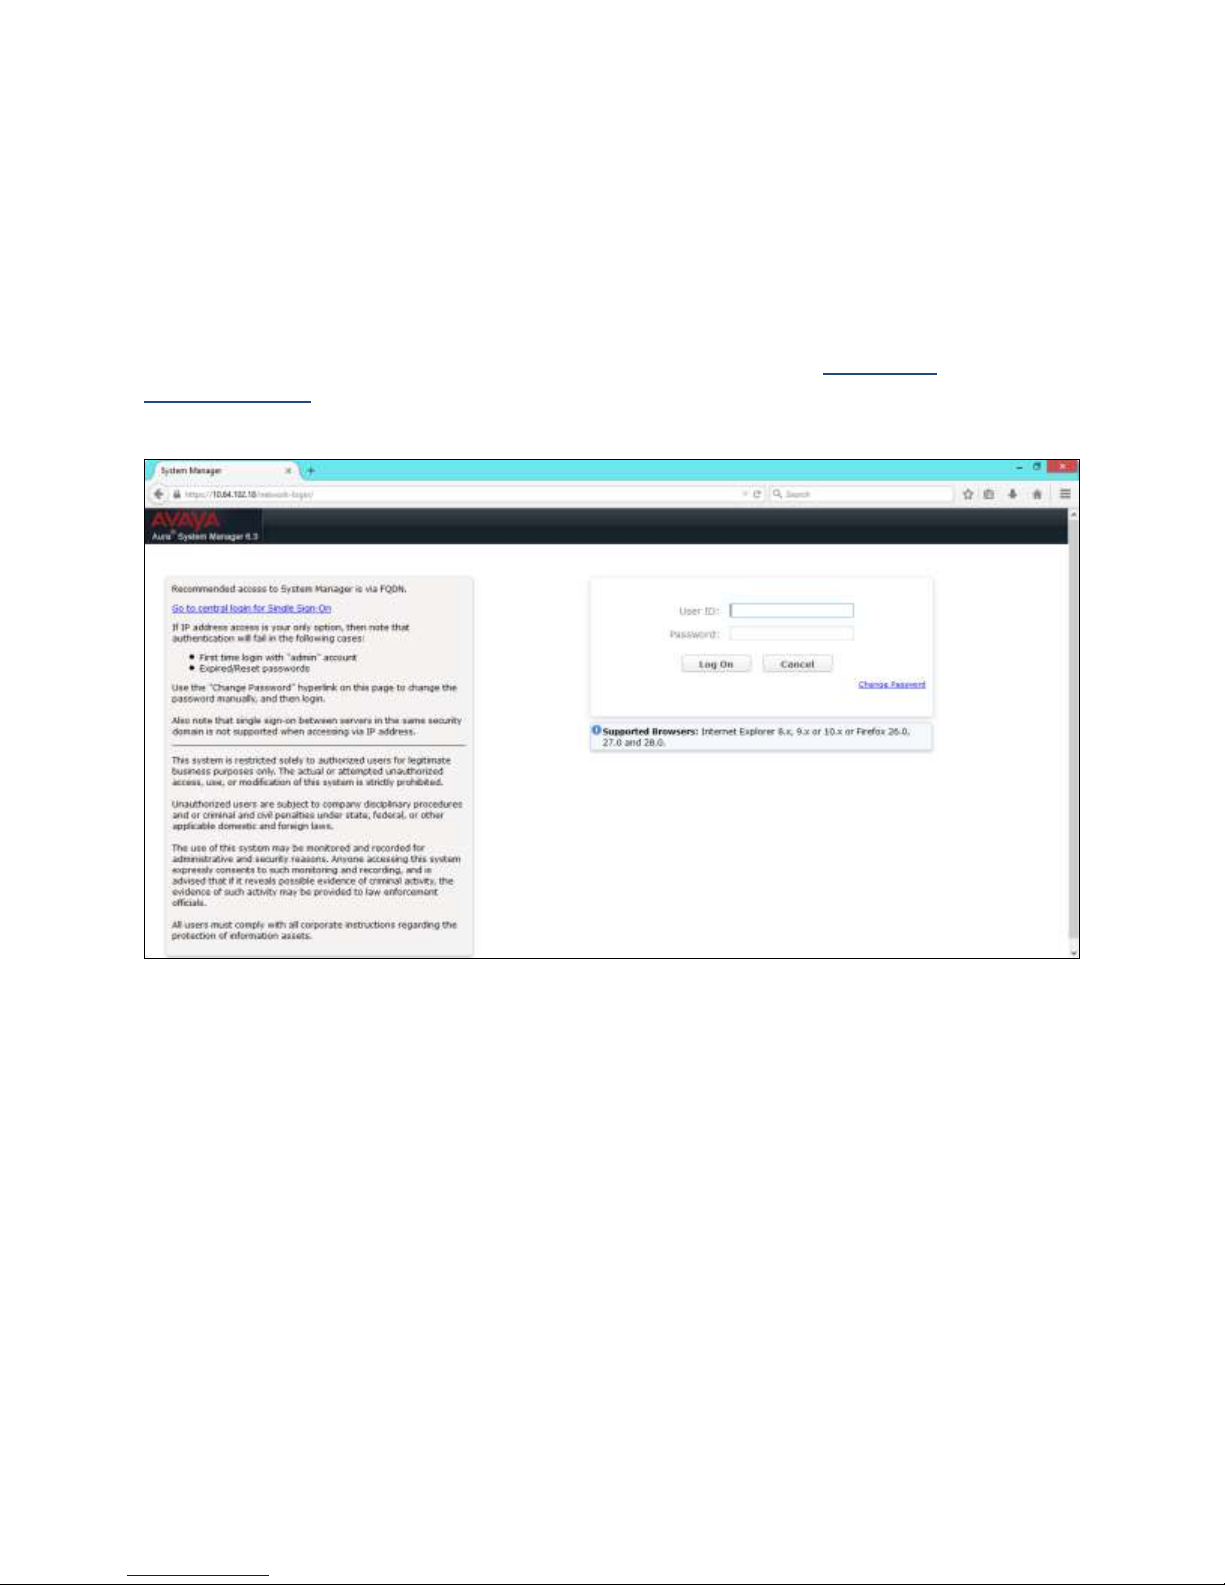
Access the System Manager Administration web interface by entering https://<ip-
address>/SMGR as the URL in a web browser, where <ip-address> is the IP address of System
Manager. Log in using appropriate credentials.
Page 10
MJH; Reviewed:
SPOC 4/15/2015
Solution & Interoperability Test Lab Application Notes
©2015 Avaya Inc. All Rights Reserved.
10 of 25
Grandstream_SM
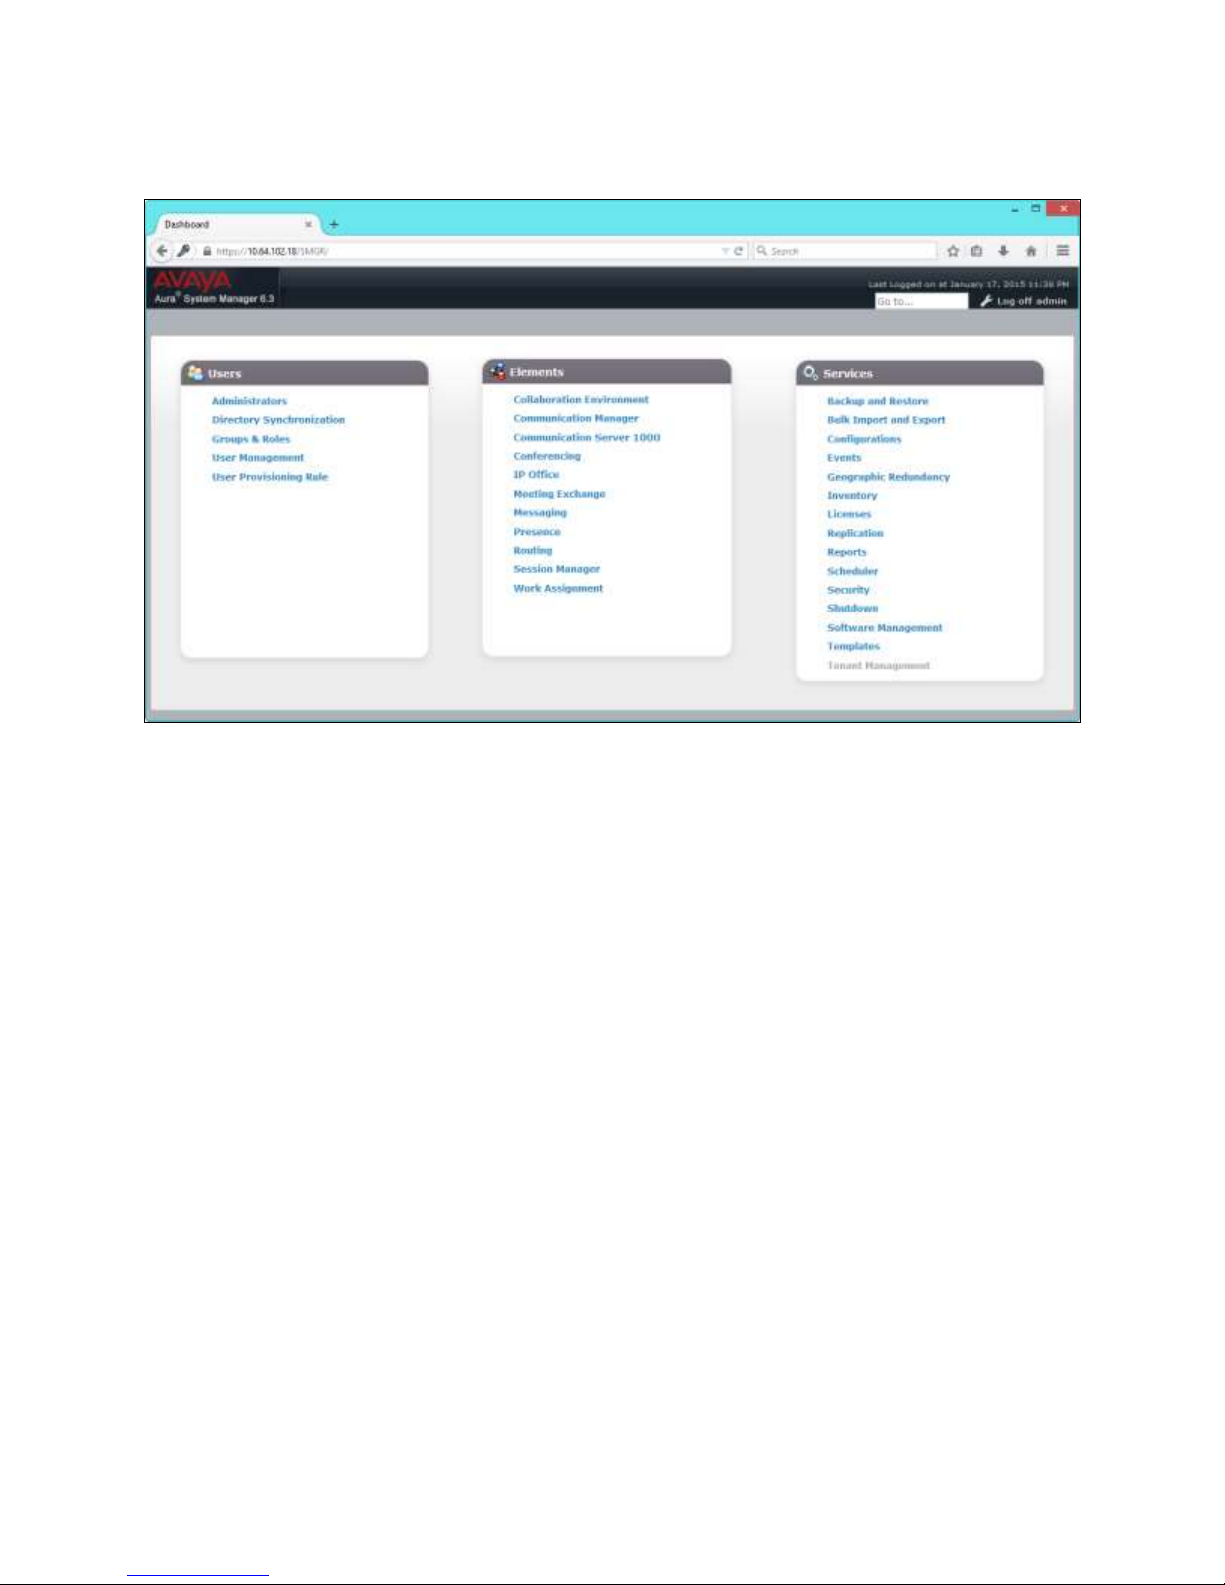
Once logged in, the following screen is displayed.
Page 11
MJH; Reviewed:
SPOC 4/15/2015
Solution & Interoperability Test Lab Application Notes
©2015 Avaya Inc. All Rights Reserved.
11 of 25
Grandstream_SM
6.1. Configure Users
This document assumes all Users for Avaya SIP endpoints have already been provisioned in
System Manager.
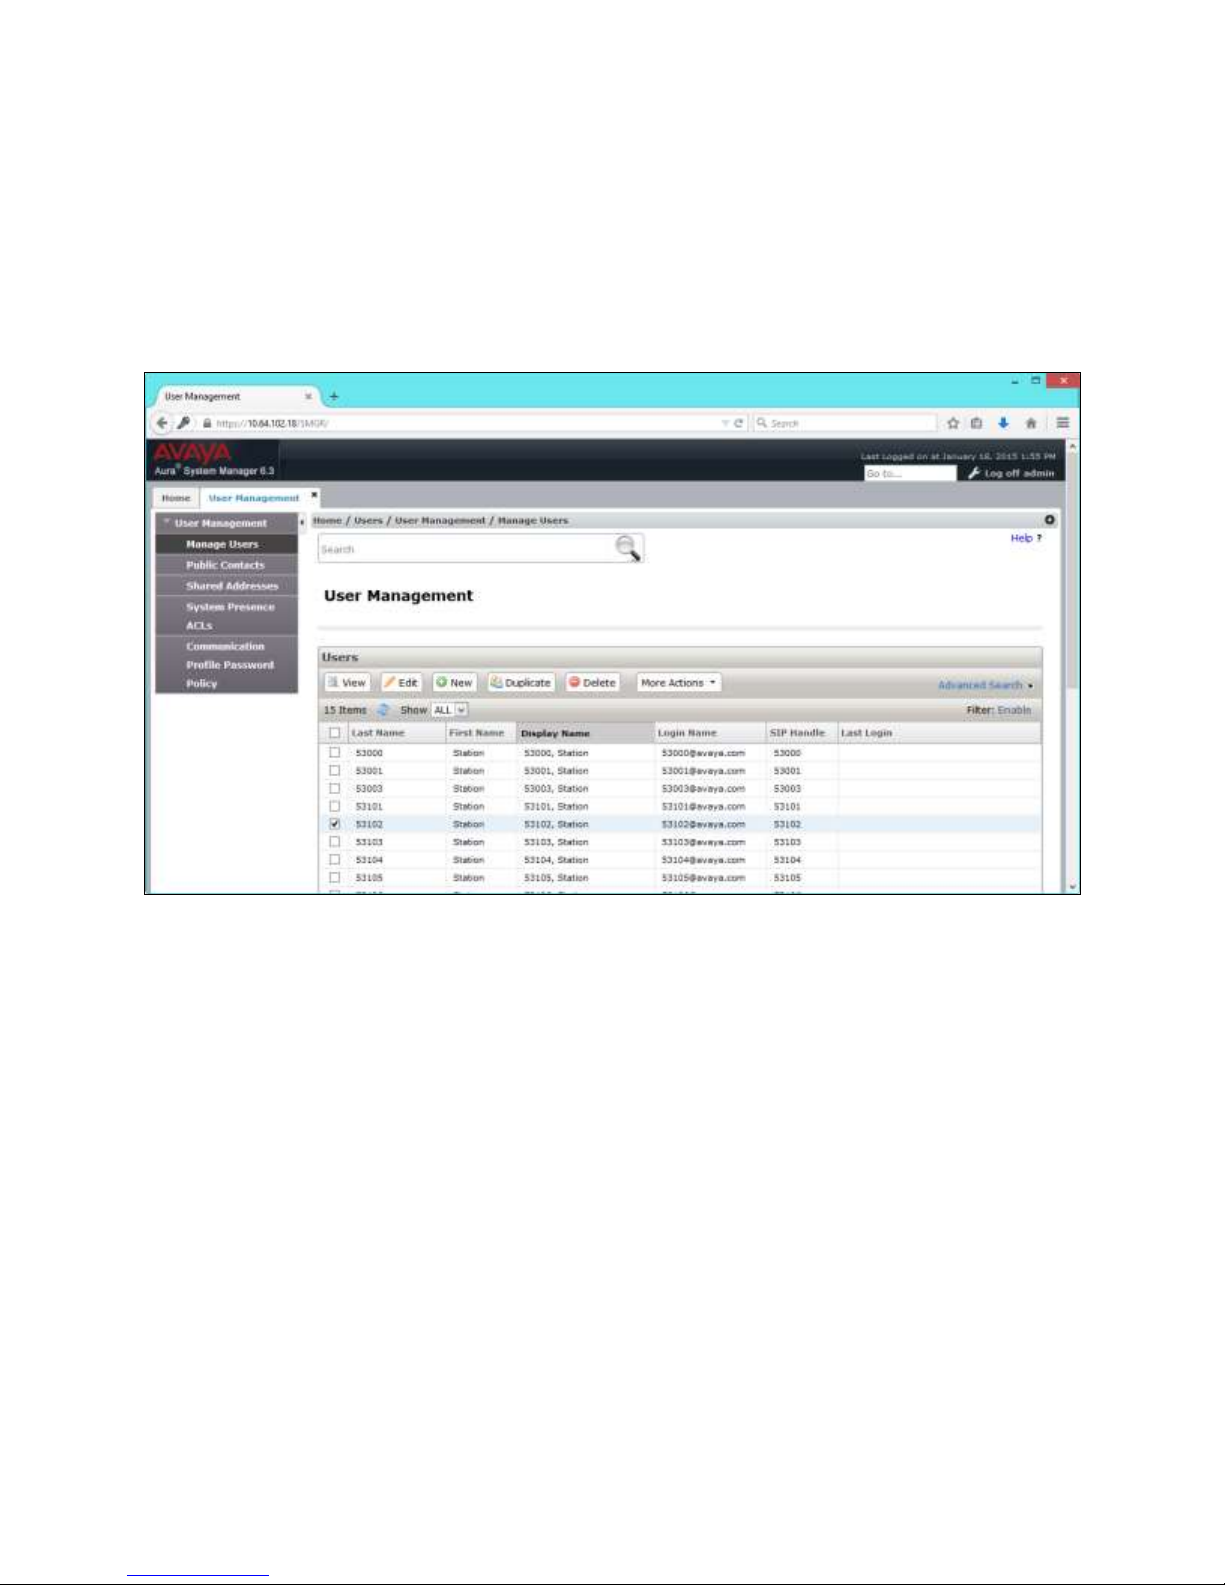
Add a User for each Grandstream phone. Navigate to Home Users User Management
Manage Users. Click the New button.
Page 12
MJH; Reviewed:
SPOC 4/15/2015
Solution & Interoperability Test Lab Application Notes
©2015 Avaya Inc. All Rights Reserved.
12 of 25
Grandstream_SM
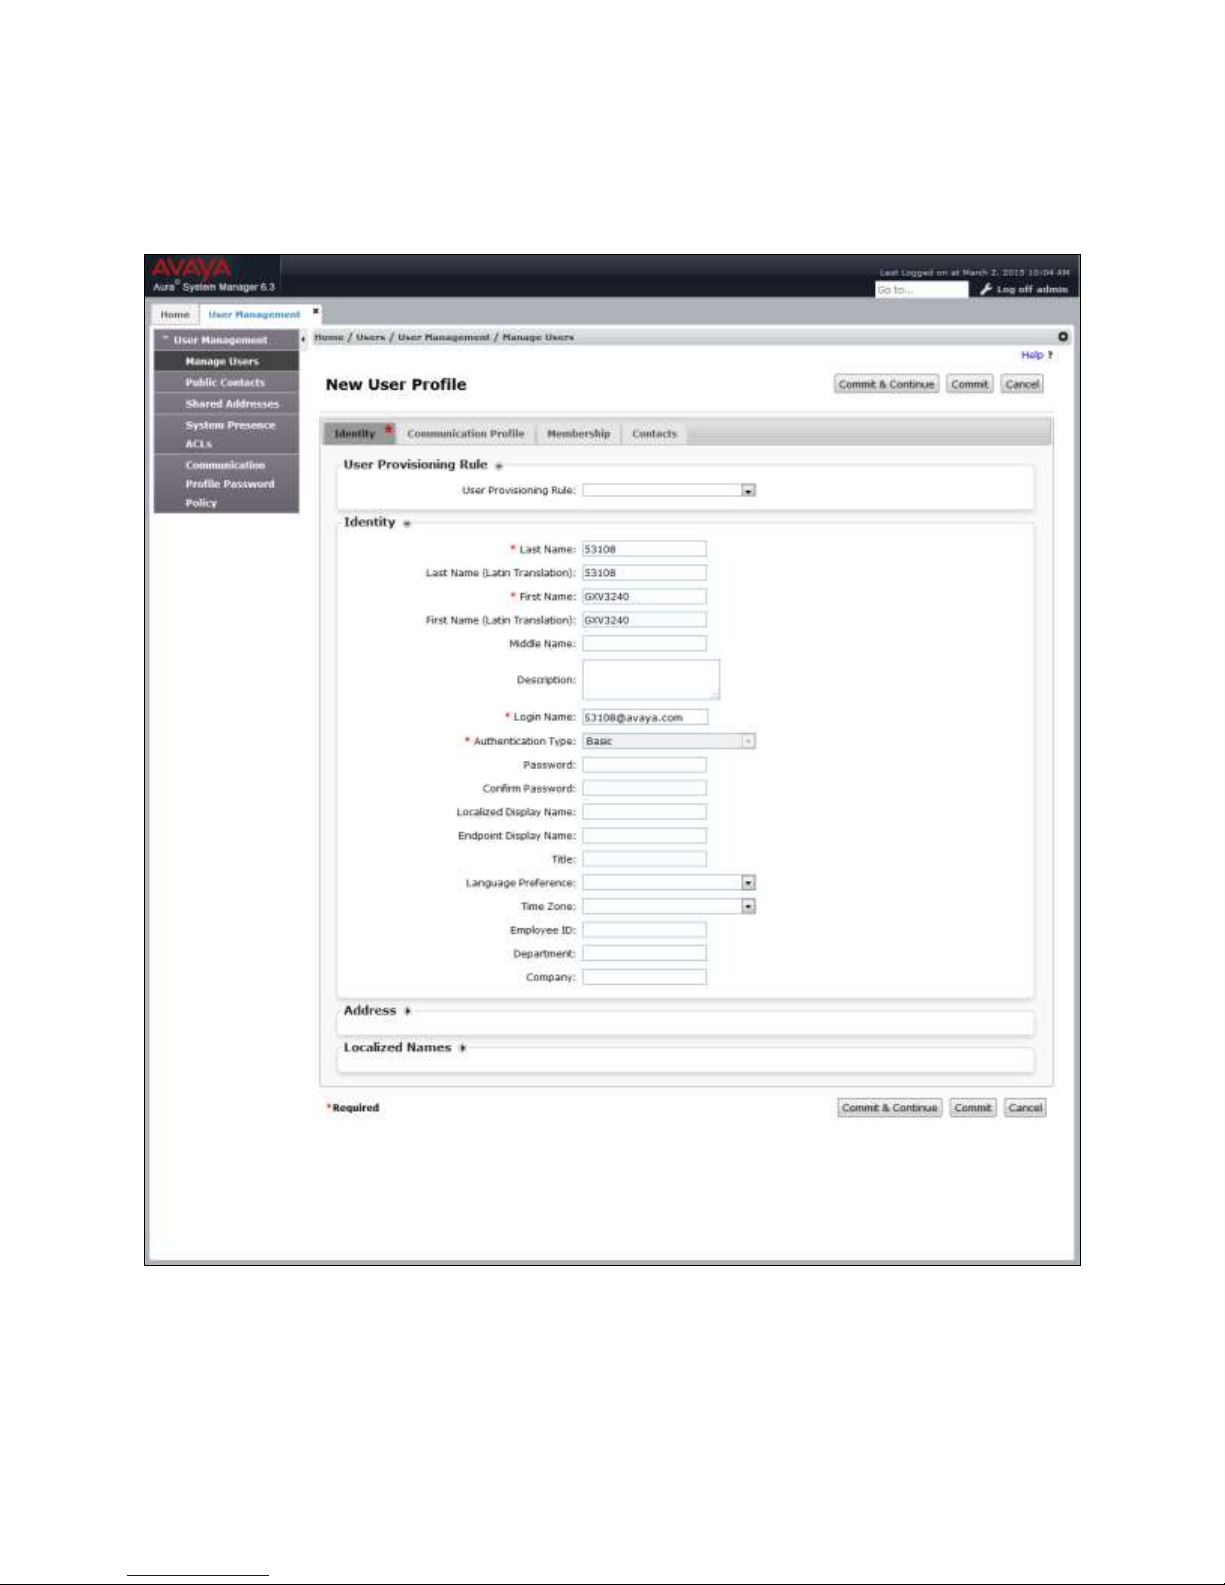
On the Identity tab, enter descriptive values for Last Name and First Name. Enter the Login
Name (e.g. user@sipdomain; this document assumes the SIP domain was previously configured.
Consult Reference [2] for further details if necessary).
Page 13
MJH; Reviewed:
SPOC 4/15/2015
Solution & Interoperability Test Lab Application Notes
©2015 Avaya Inc. All Rights Reserved.
13 of 25
Grandstream_SM
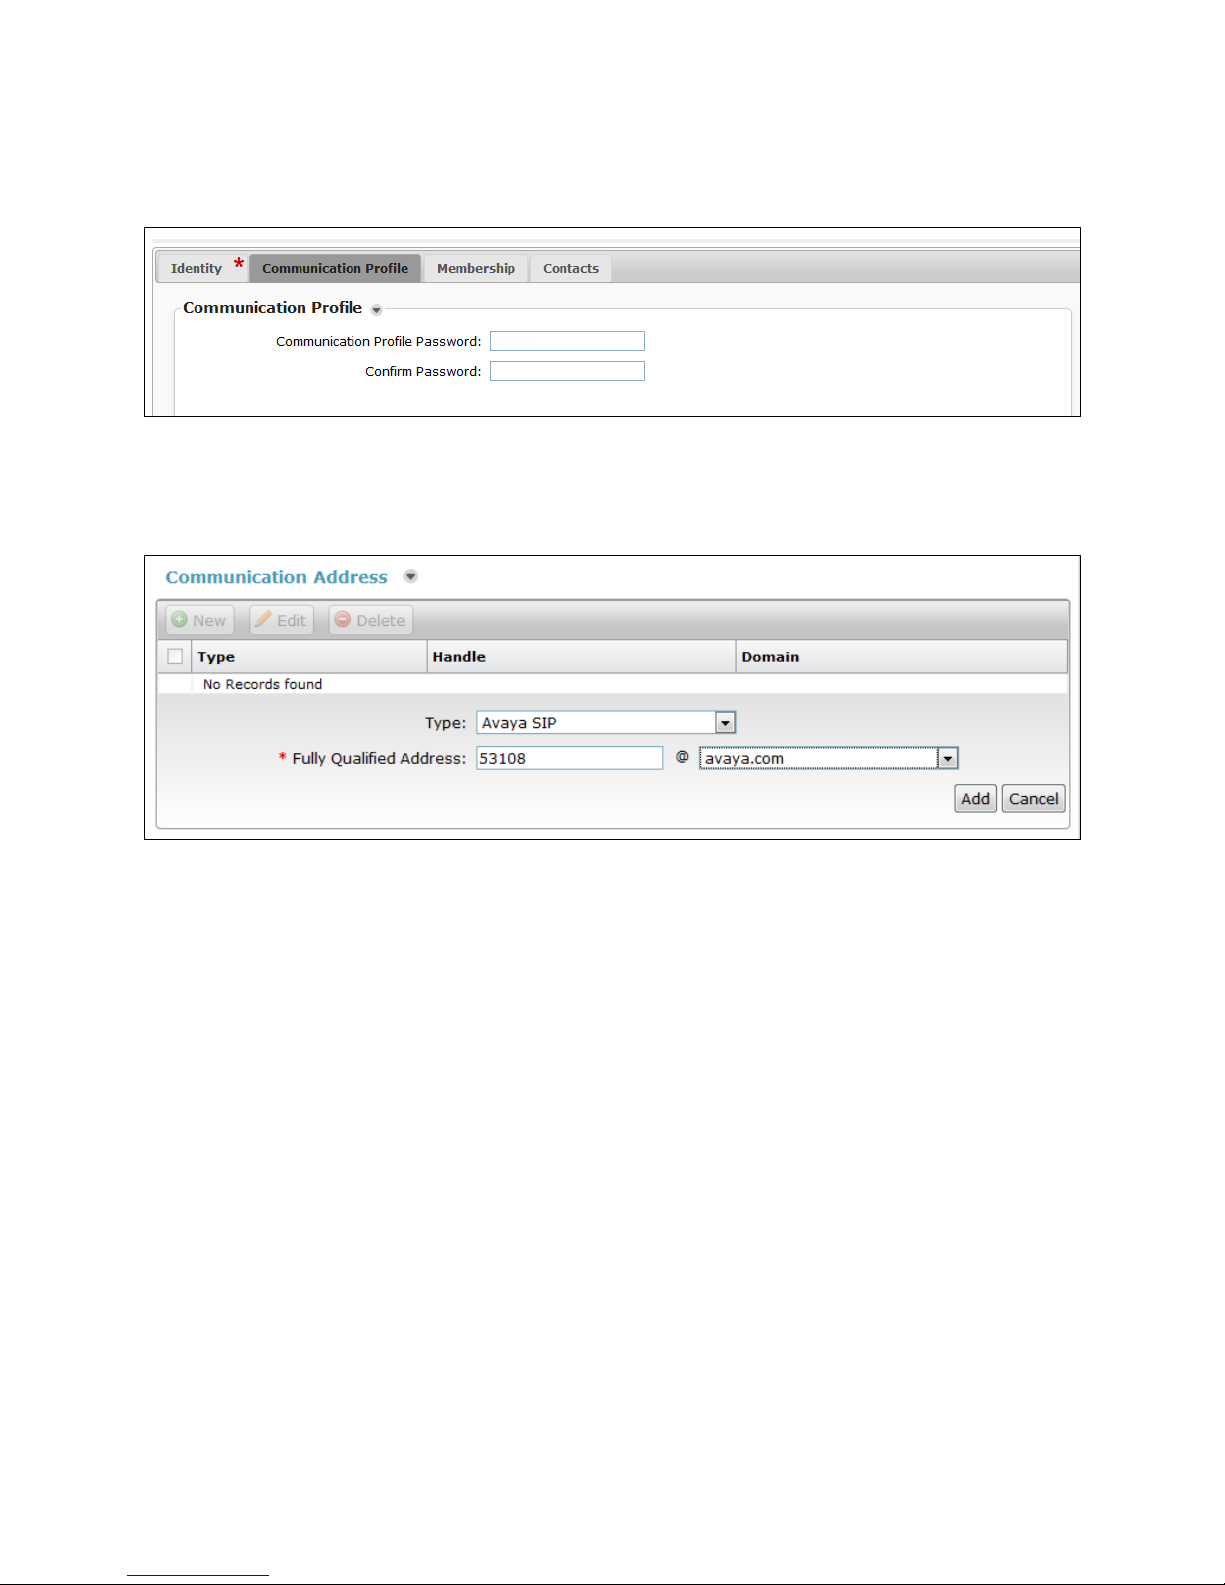
Click the Communication Profile tab. Enter the Communication Profile Password, and then
enter it again in Confirm Password.
Click the New button under Communication Address. Select Avaya SIP for Type. Enter the
Full Qualified Address for the user and then click the Add button.
Page 14
MJH; Reviewed:
SPOC 4/15/2015
Solution & Interoperability Test Lab Application Notes
©2015 Avaya Inc. All Rights Reserved.
14 of 25
Grandstream_SM
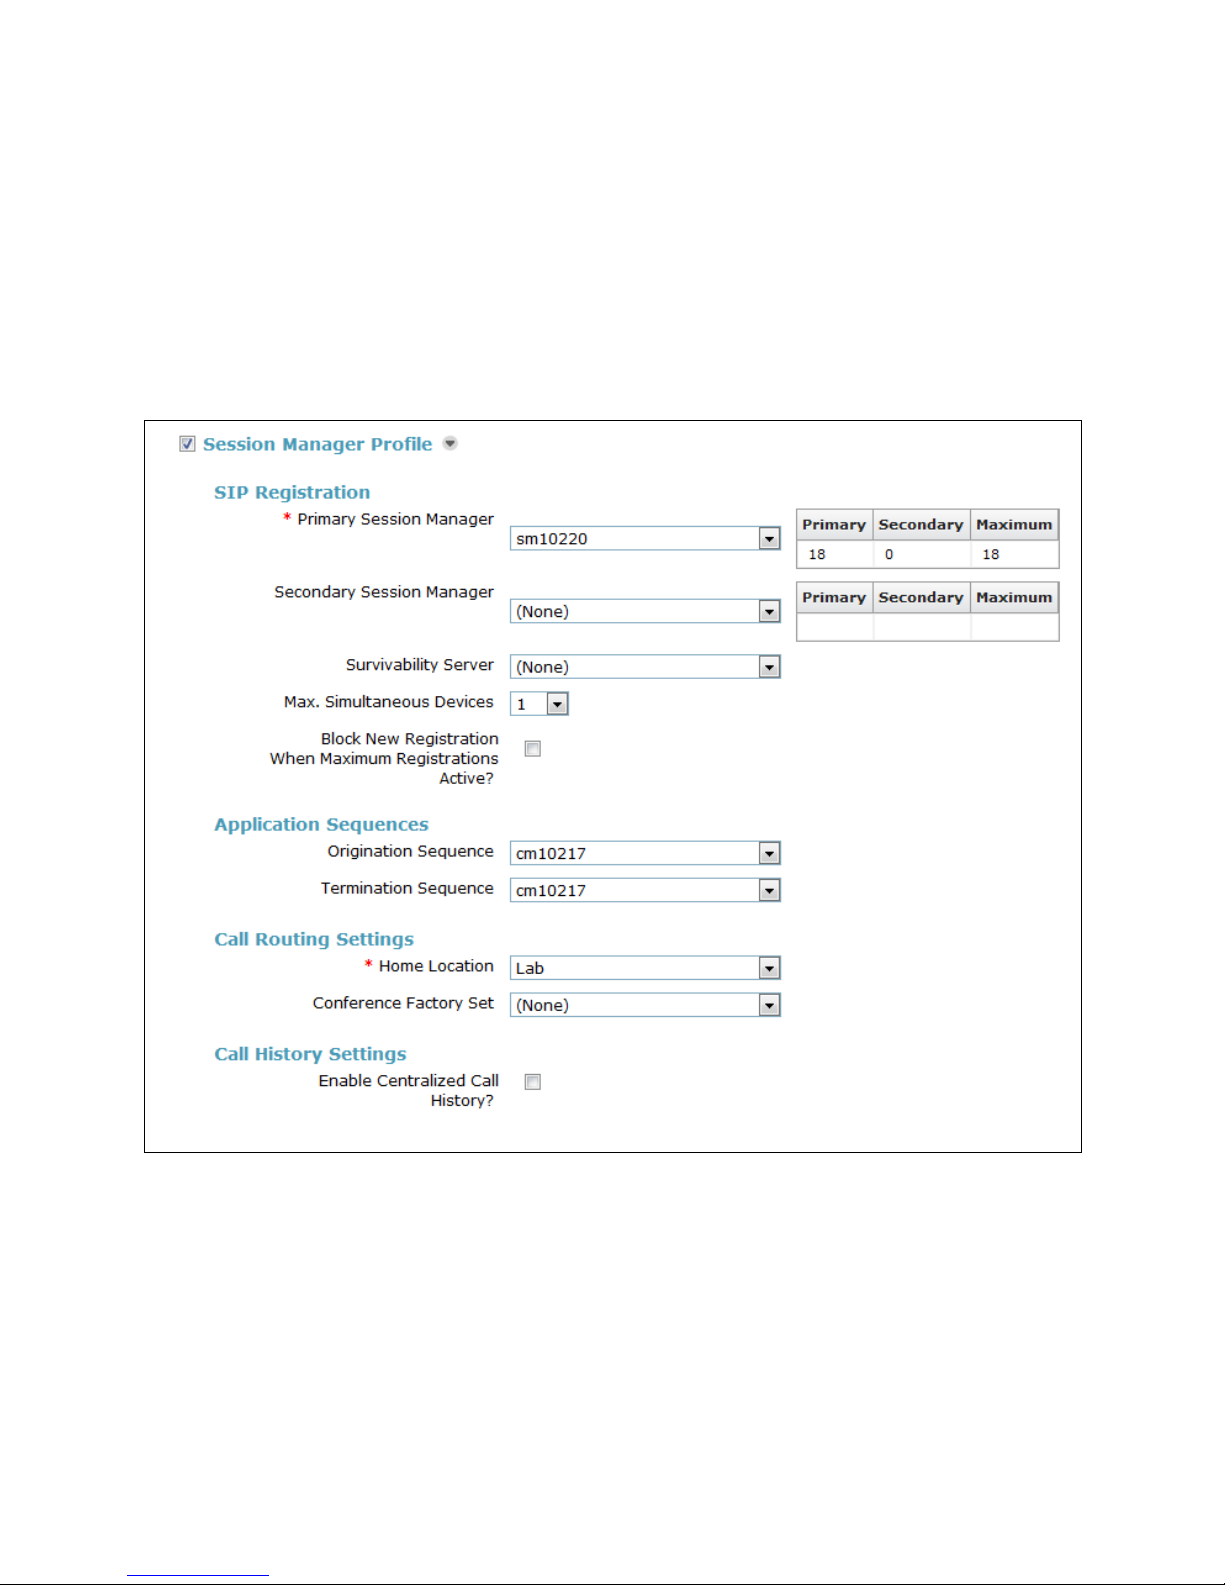
Check the box next to Session Manager Profile. For Primary Session Manager, select the
Session Manager SIP Entity from the drop-down menu.
Under Application Sequences, select the sequence (e.g. cm10217) used to route calls to
Communication Manager from the drop-down menu for the Origination Sequence and
Termination Sequence.
Under Call Routing Settings, select the Home Location (e.g. Lab) from the drop-down menu.
Page 15
MJH; Reviewed:
SPOC 4/15/2015
Solution & Interoperability Test Lab Application Notes
©2015 Avaya Inc. All Rights Reserved.
15 of 25
Grandstream_SM
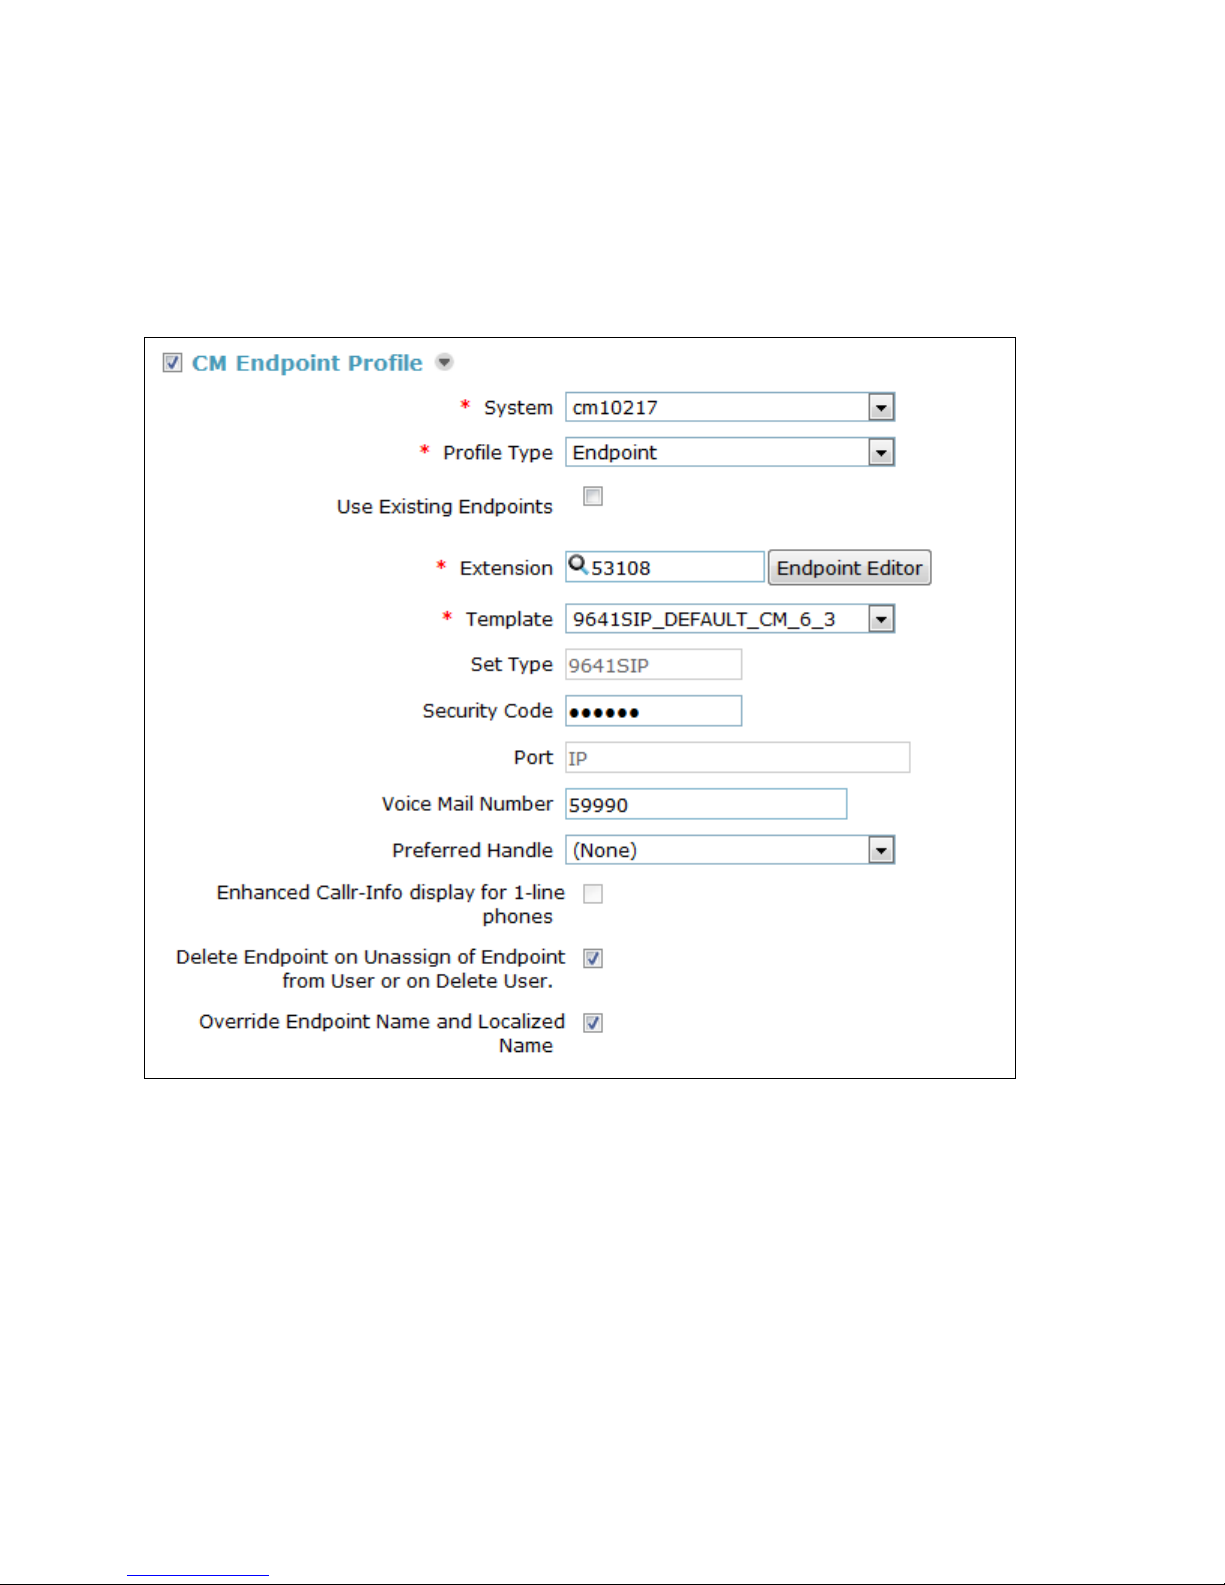
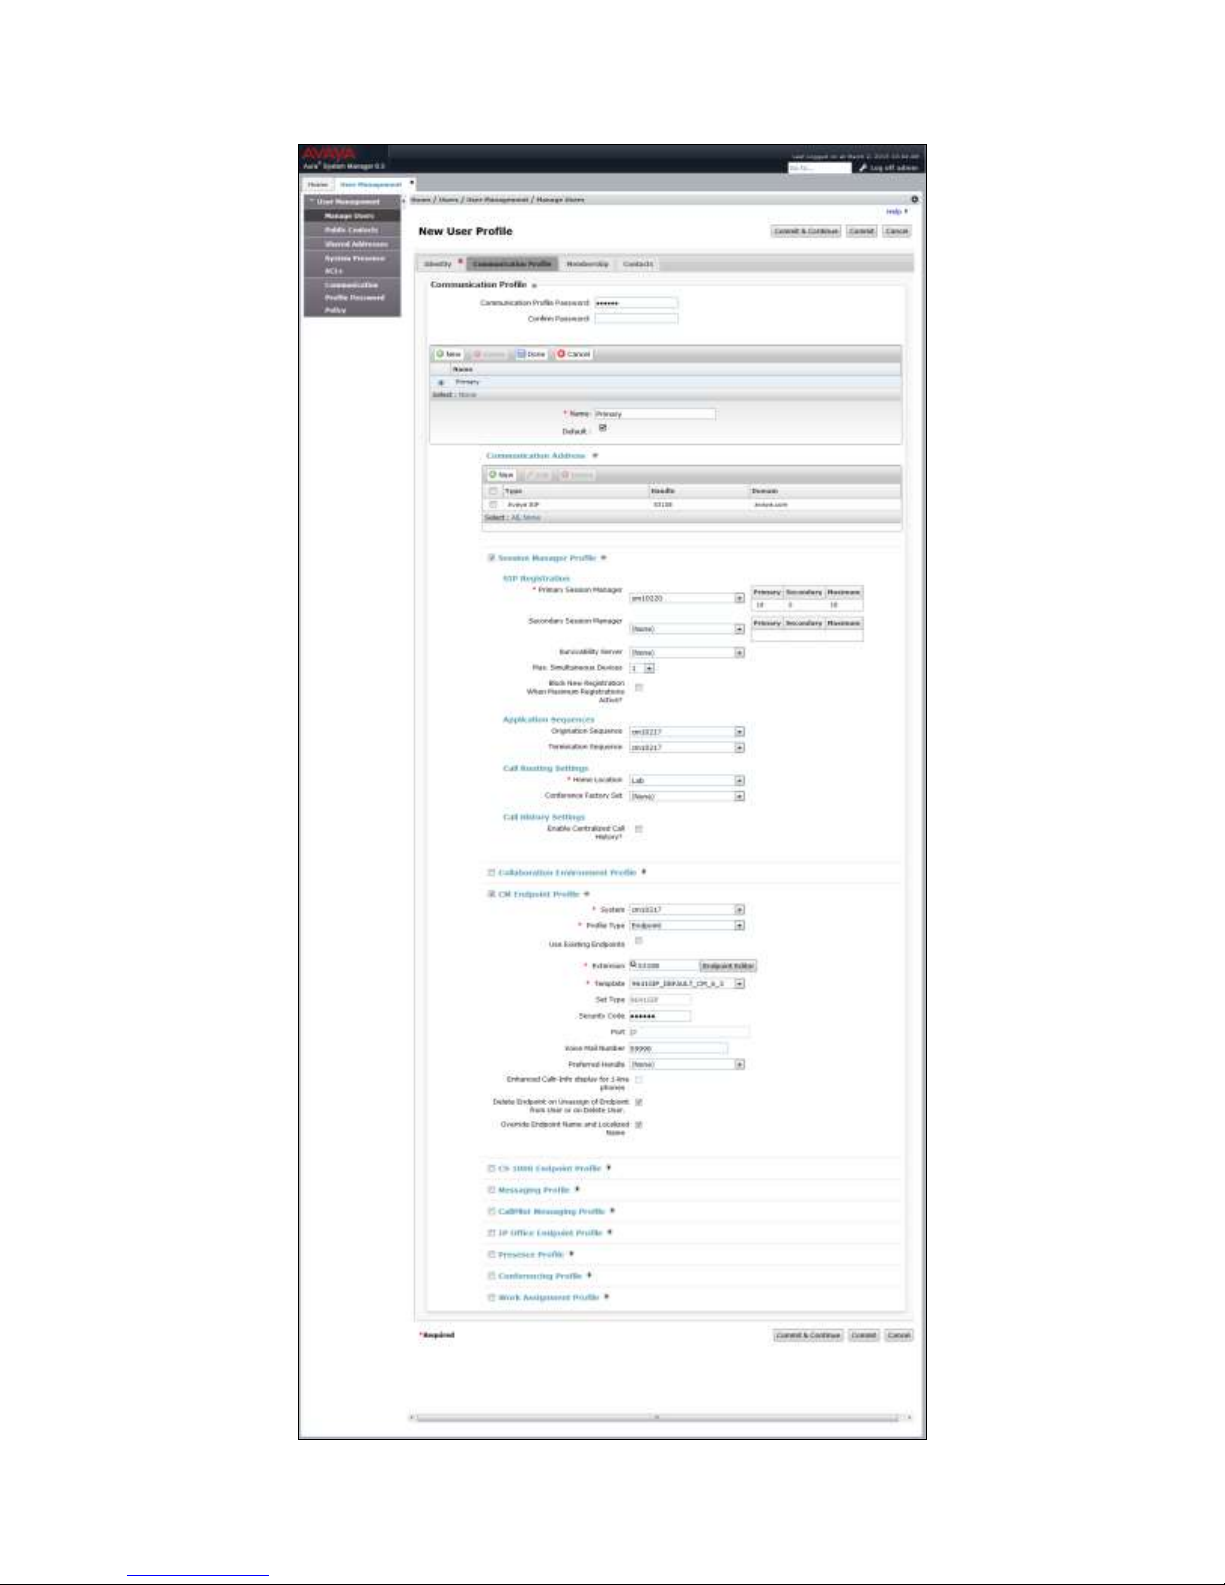
Check the box next to CM Endpoint Profile. Select the Communication Manager SIP Entity
from the System drop-down menu. Select Endpoint for Profile Type. Enter the
Communication Manager station Extension (e.g. 53108). From the Template drop-down menu,
select 9641SIP_DEFAULT_CM_6_3. Enter the desired value for the station Security Code.
For Voice Mail Number, enter the Avaya Aura® Messaging pilot number. Click the Endpoint
Editor button next to Extension field.
Page 16
MJH; Reviewed:
SPOC 4/15/2015
Solution & Interoperability Test Lab Application Notes
©2015 Avaya Inc. All Rights Reserved.
16 of 25
Grandstream_SM
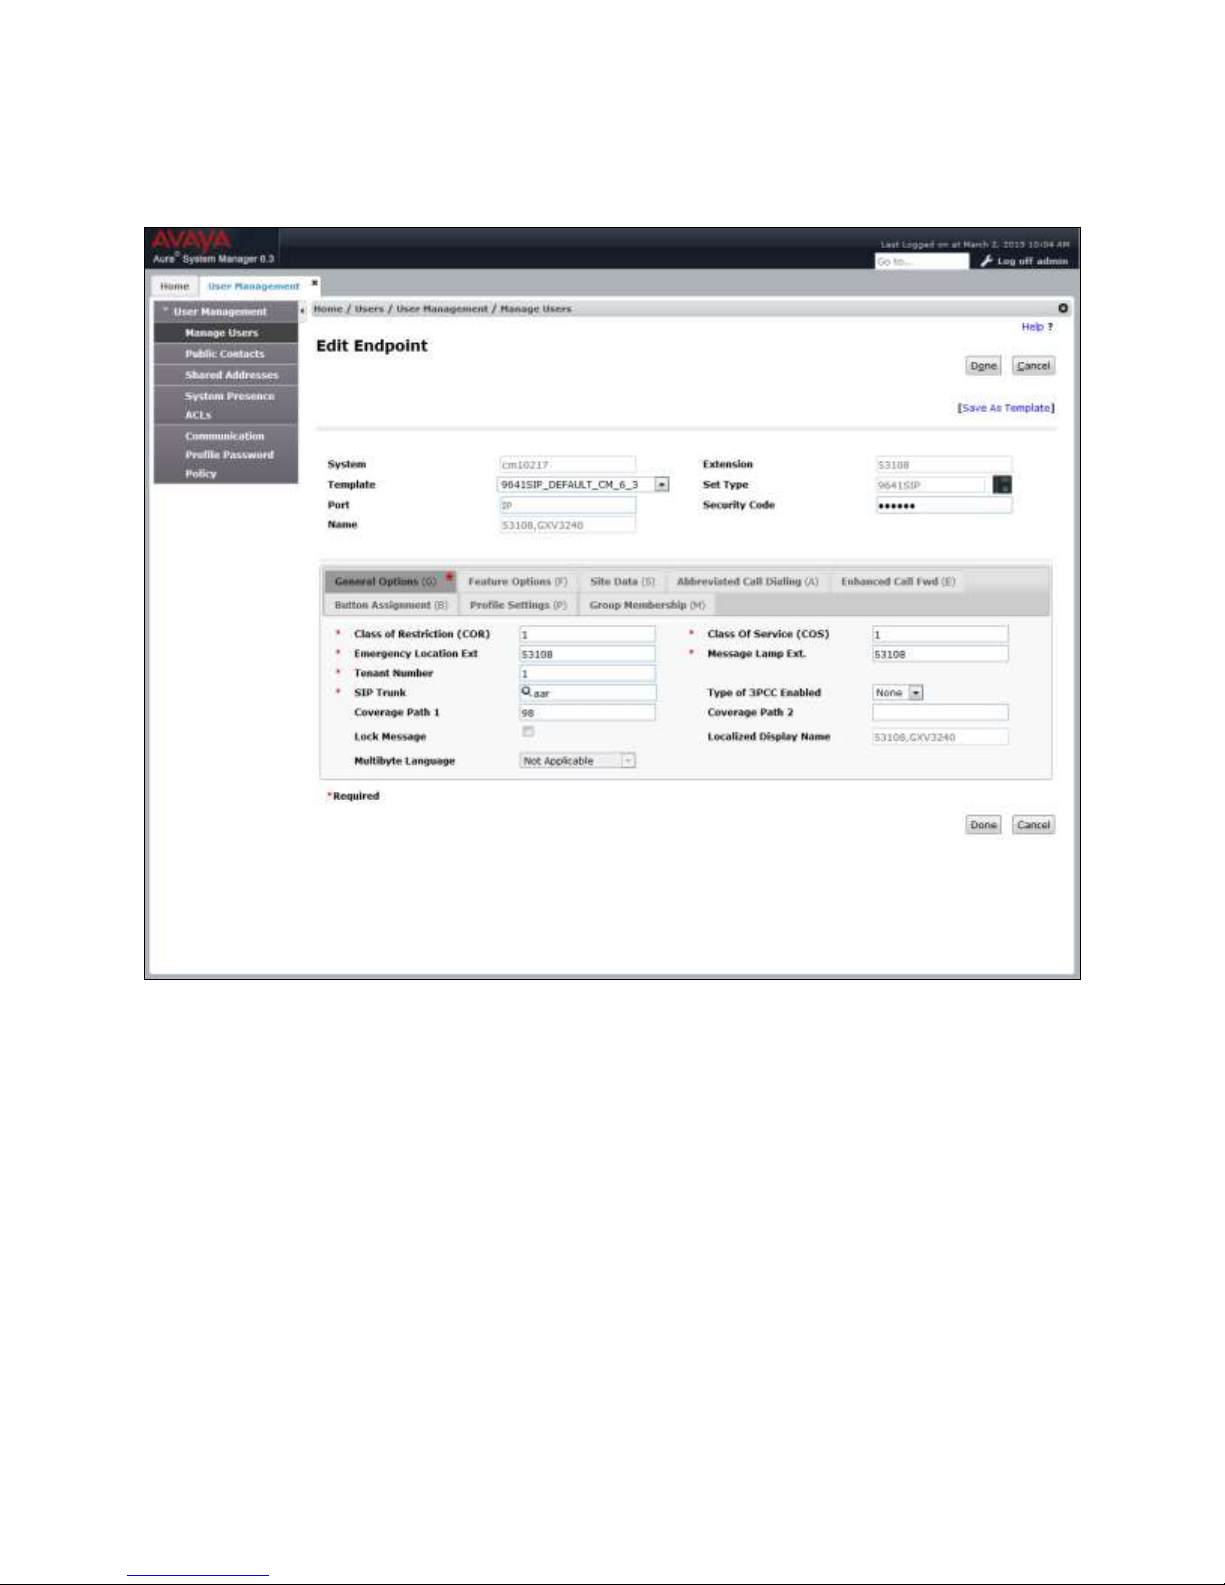
Under the General Options tab, set Coverage Path 1 to the coverage path used for Avaya
Aura® Messaging.
Page 17
MJH; Reviewed:
SPOC 4/15/2015
Solution & Interoperability Test Lab Application Notes
©2015 Avaya Inc. All Rights Reserved.
17 of 25
Grandstream_SM
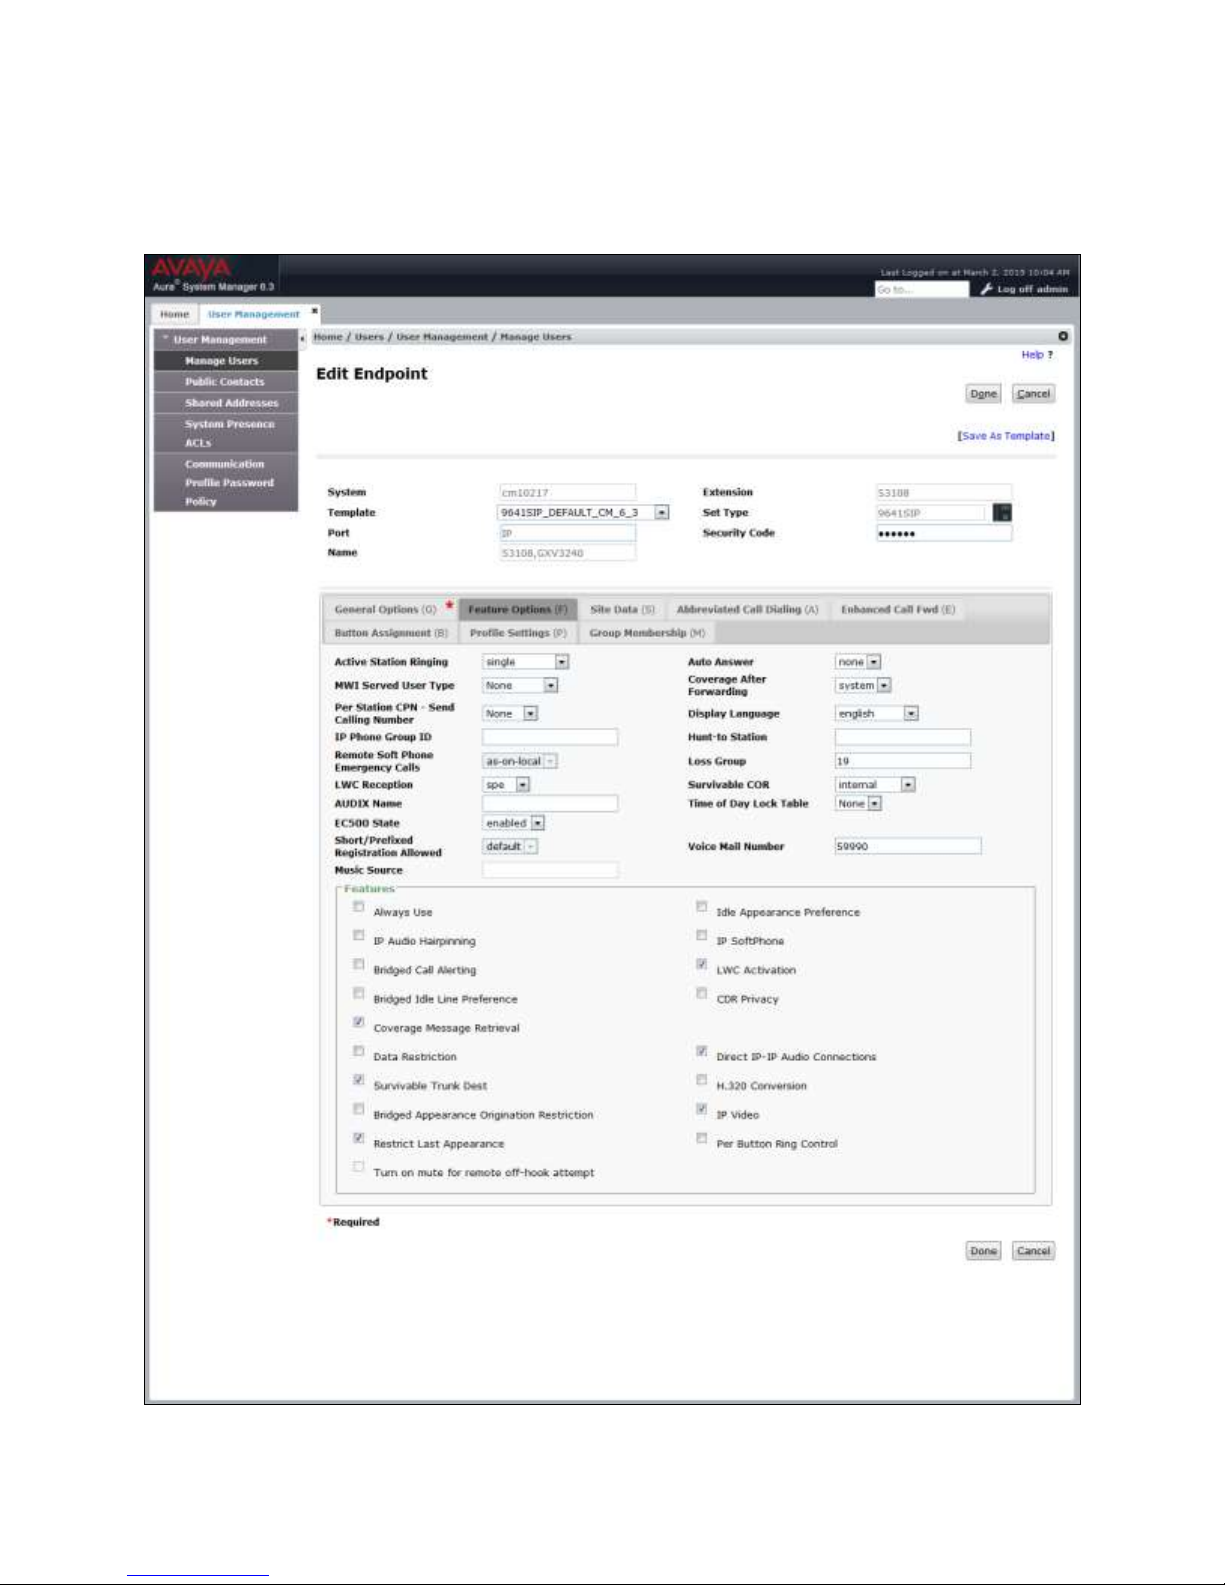
Click the Feature Options tab. Check the box for IP Video and then click the Done button to
return to the user Communication Profile tab as shown on the next page. Click the Commit
button.
Page 18
MJH; Reviewed:
SPOC 4/15/2015
Solution & Interoperability Test Lab Application Notes
©2015 Avaya Inc. All Rights Reserved.
18 of 25
Grandstream_SM
Page 19
MJH; Reviewed:
SPOC 4/15/2015
Solution & Interoperability Test Lab Application Notes
©2015 Avaya Inc. All Rights Reserved.
19 of 25
Grandstream_SM
7. Configure Grandstream GXV3240 and GXV3275
Multimedia IP Phones for Android™
It is assumed that the basic configuration for the Grandstream phones has already been
implemented and that the phones are ready for the integration with Avaya Aura® Session
Manager. The sub-sections below provide only the steps required to configure the Grandstream
to interoperate with Avaya.
Note: Only the configuration steps required to integrate the Grandstream GXV3240 phone
model with Avaya are shown in the sub-sections below; however the same steps are required and
applicable to the Grandstream GXV3275 phone model.
7.1. Web Interface
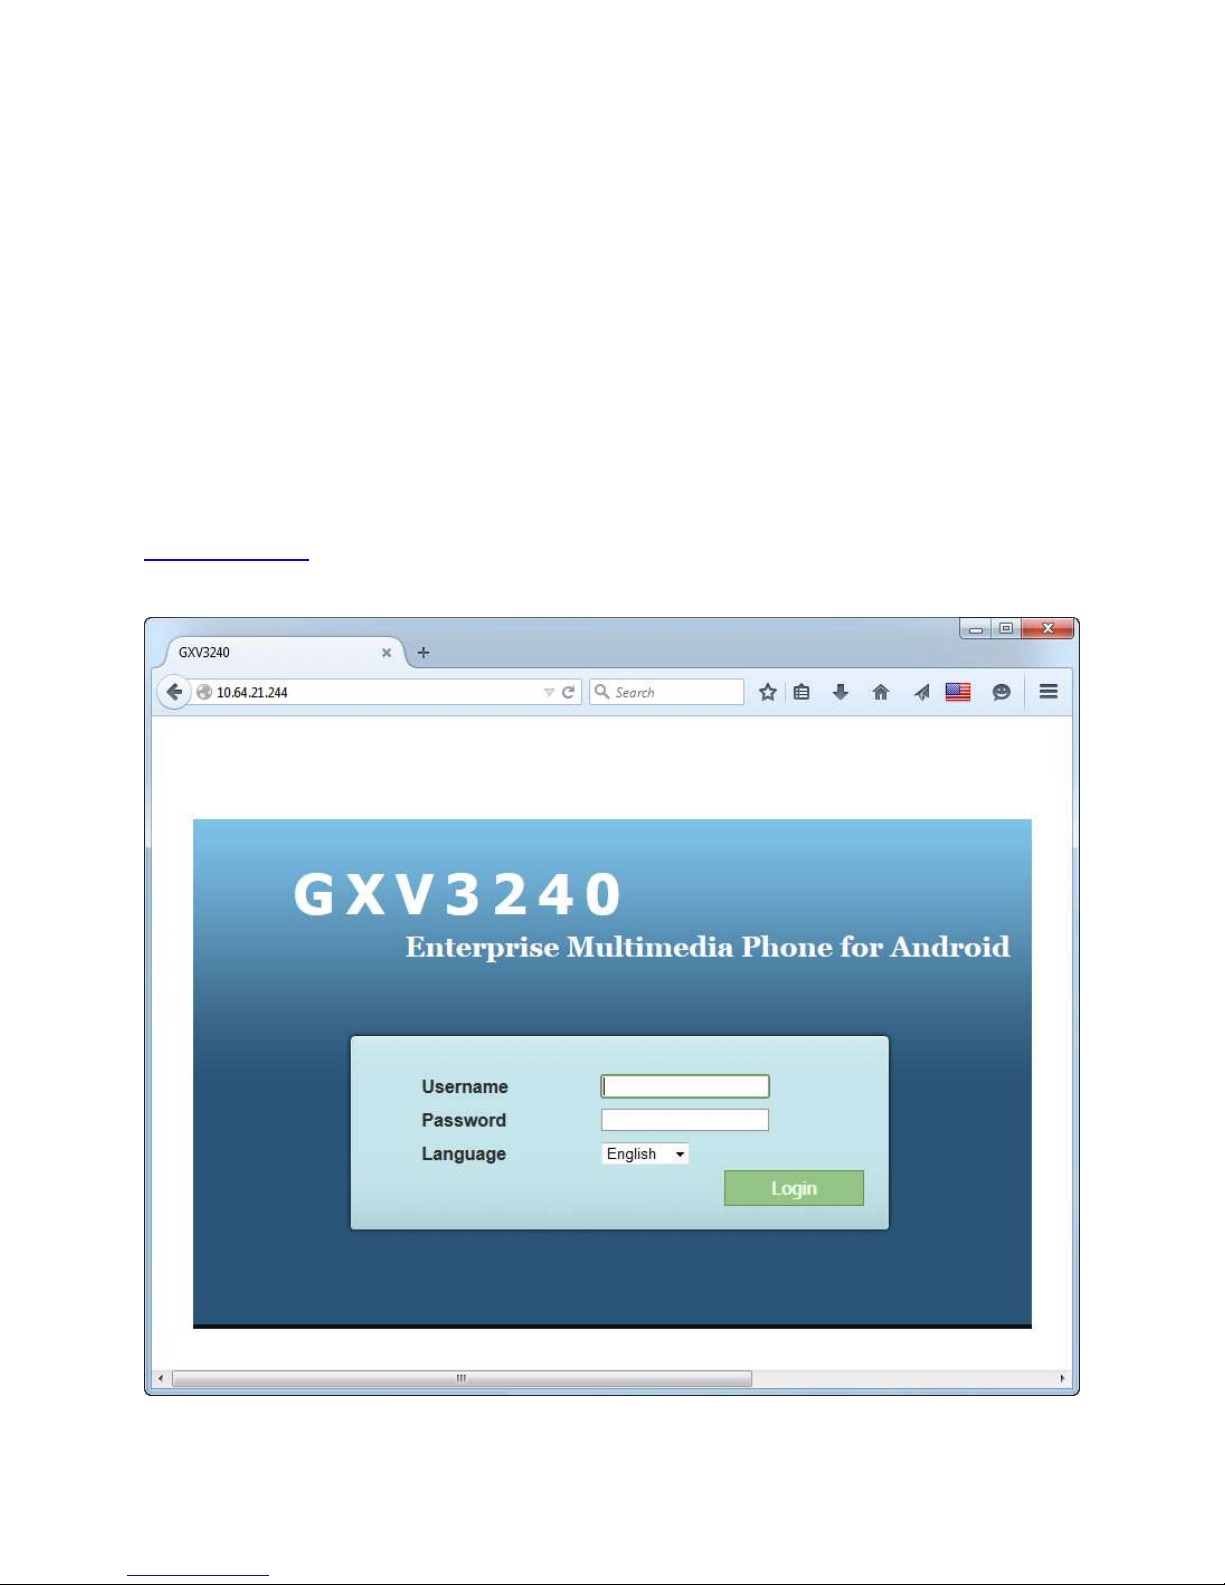
Access the phone web interface by opening a web browser and entering the following URL:
http://ip-address, where ip-address is the IP address of the phone. Log in using appropriate
credentials.
Page 20
MJH; Reviewed:
SPOC 4/15/2015
Solution & Interoperability Test Lab Application Notes
©2015 Avaya Inc. All Rights Reserved.
20 of 25
Grandstream_SM
After making and saving any configuration changes throughout the remainder of Section 7, an
Apply button will appear at the top of the web interface. Click the Apply button (not shown) to
immediately apply the changes.
7.2. Configure General Settings
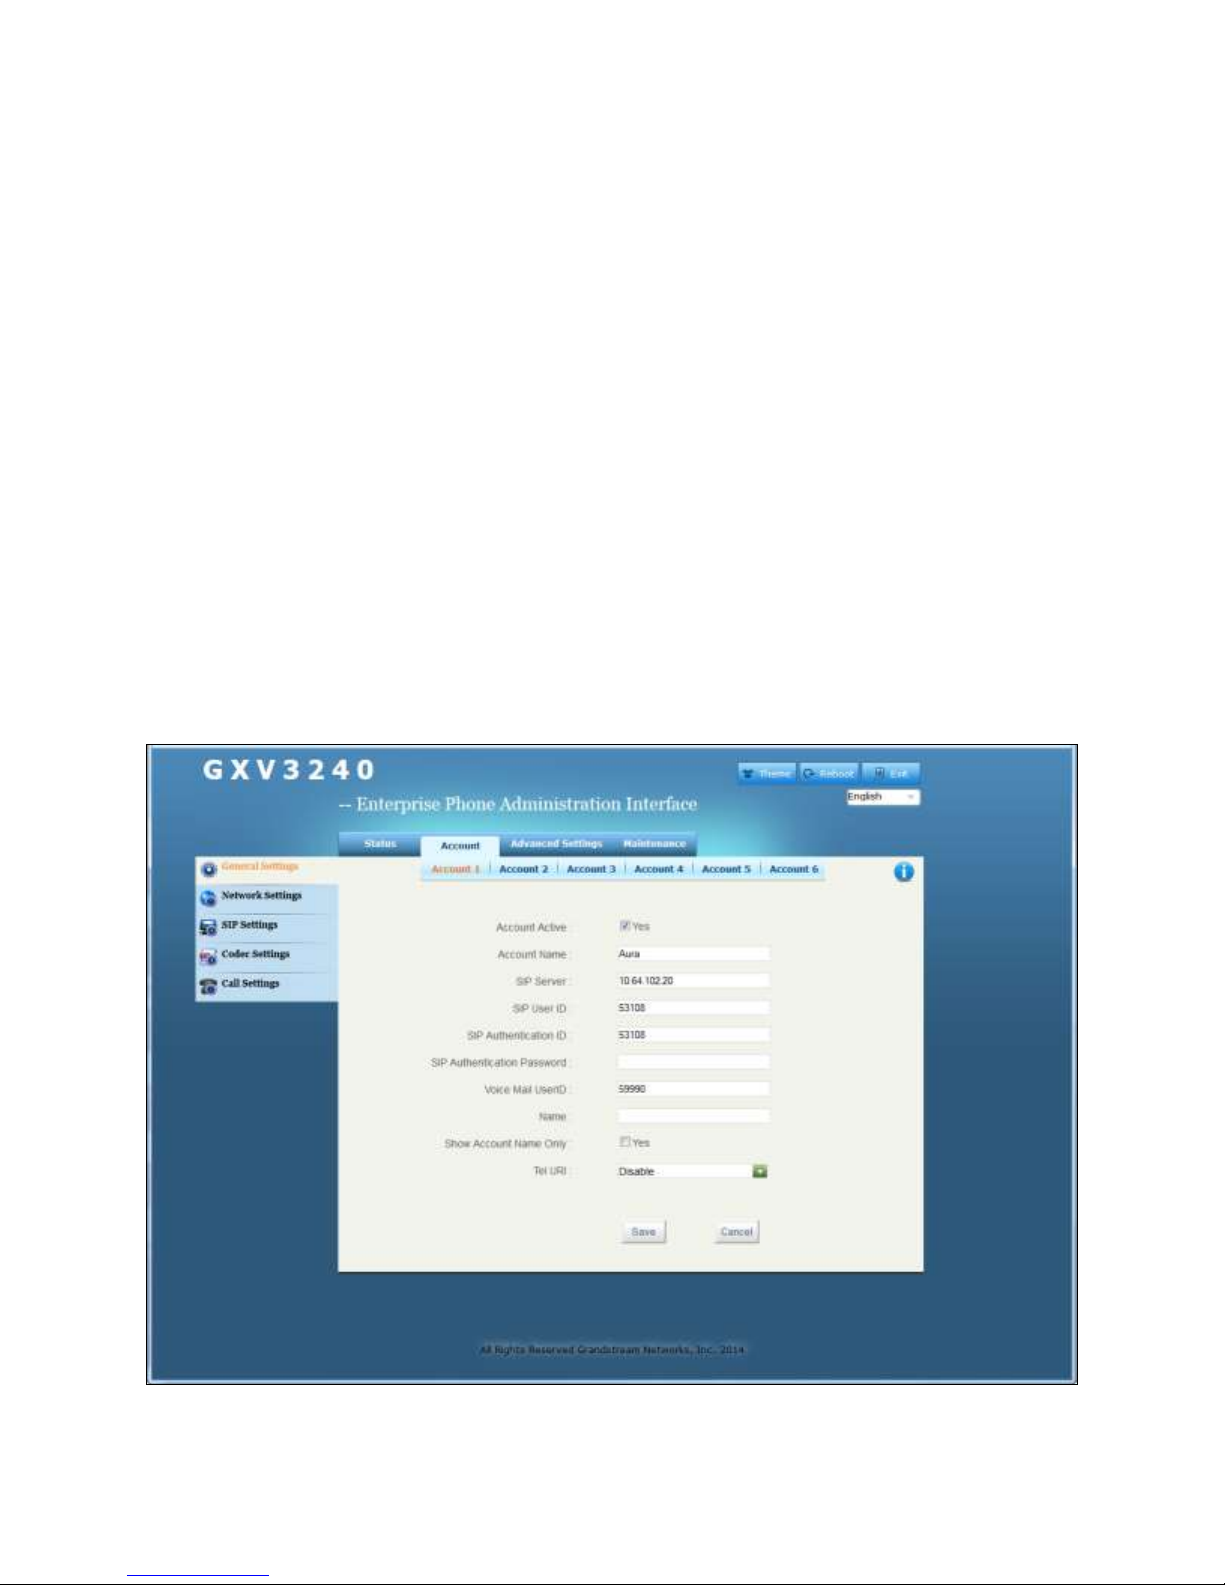
Click the Account tab and select an Account sub-tab to configure (e.g. Account 1). Click
General Settings on the left. Configure the following parameters:
Account Active: check the Yes box.
Account Name: Enter descriptive text.
SIP Server: Enter the Session Manager signaling IP address.
SIP User ID: Enter the SIP User created in Section 6.1.
SIP Authentication ID: Enter the SIP User created in Section 6.1.
SIP Authentication Password: Enter the password for the User created in Section 6.1.
Voice Mail UserID: Enter the Avaya Aura® Messaging pilot number. Configuration of
Avaya Aura® Messaging is outside the scope of this document. The mailboxes for the
Grandstream phones are configured the same and Avaya phones).
Name: Enter descriptive text (optional)
Use the default values for the remaining fields. Click the Save button at the bottom of the
screen.
Page 21
MJH; Reviewed:
SPOC 4/15/2015
Solution & Interoperability Test Lab Application Notes
©2015 Avaya Inc. All Rights Reserved.
21 of 25
Grandstream_SM
7.3. Configure SIP Settings
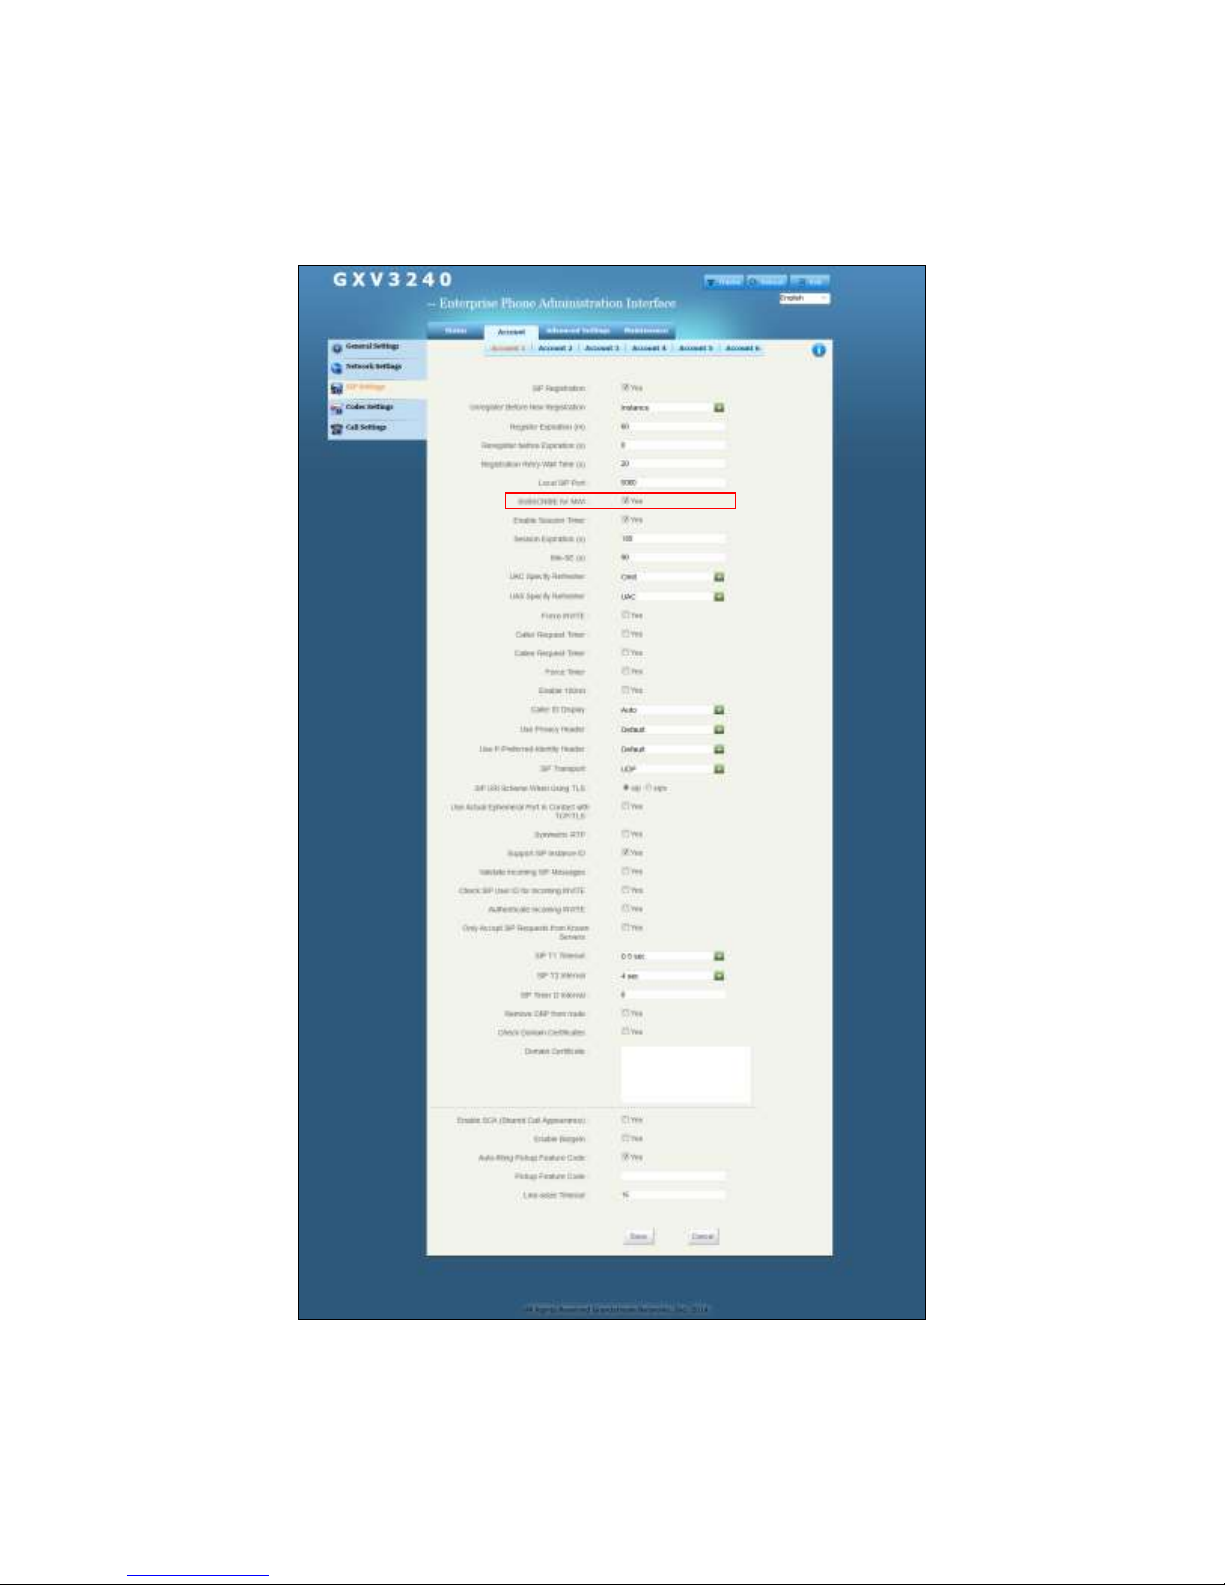
Click the SIP Settings tab on the left. Check the Yes box for SUBSCRIBE for MWI. Use the
default values for the remaining fields. Click the Save button at the bottom of the screen.
Page 22
MJH; Reviewed:
SPOC 4/15/2015
Solution & Interoperability Test Lab Application Notes
©2015 Avaya Inc. All Rights Reserved.
22 of 25
Grandstream_SM
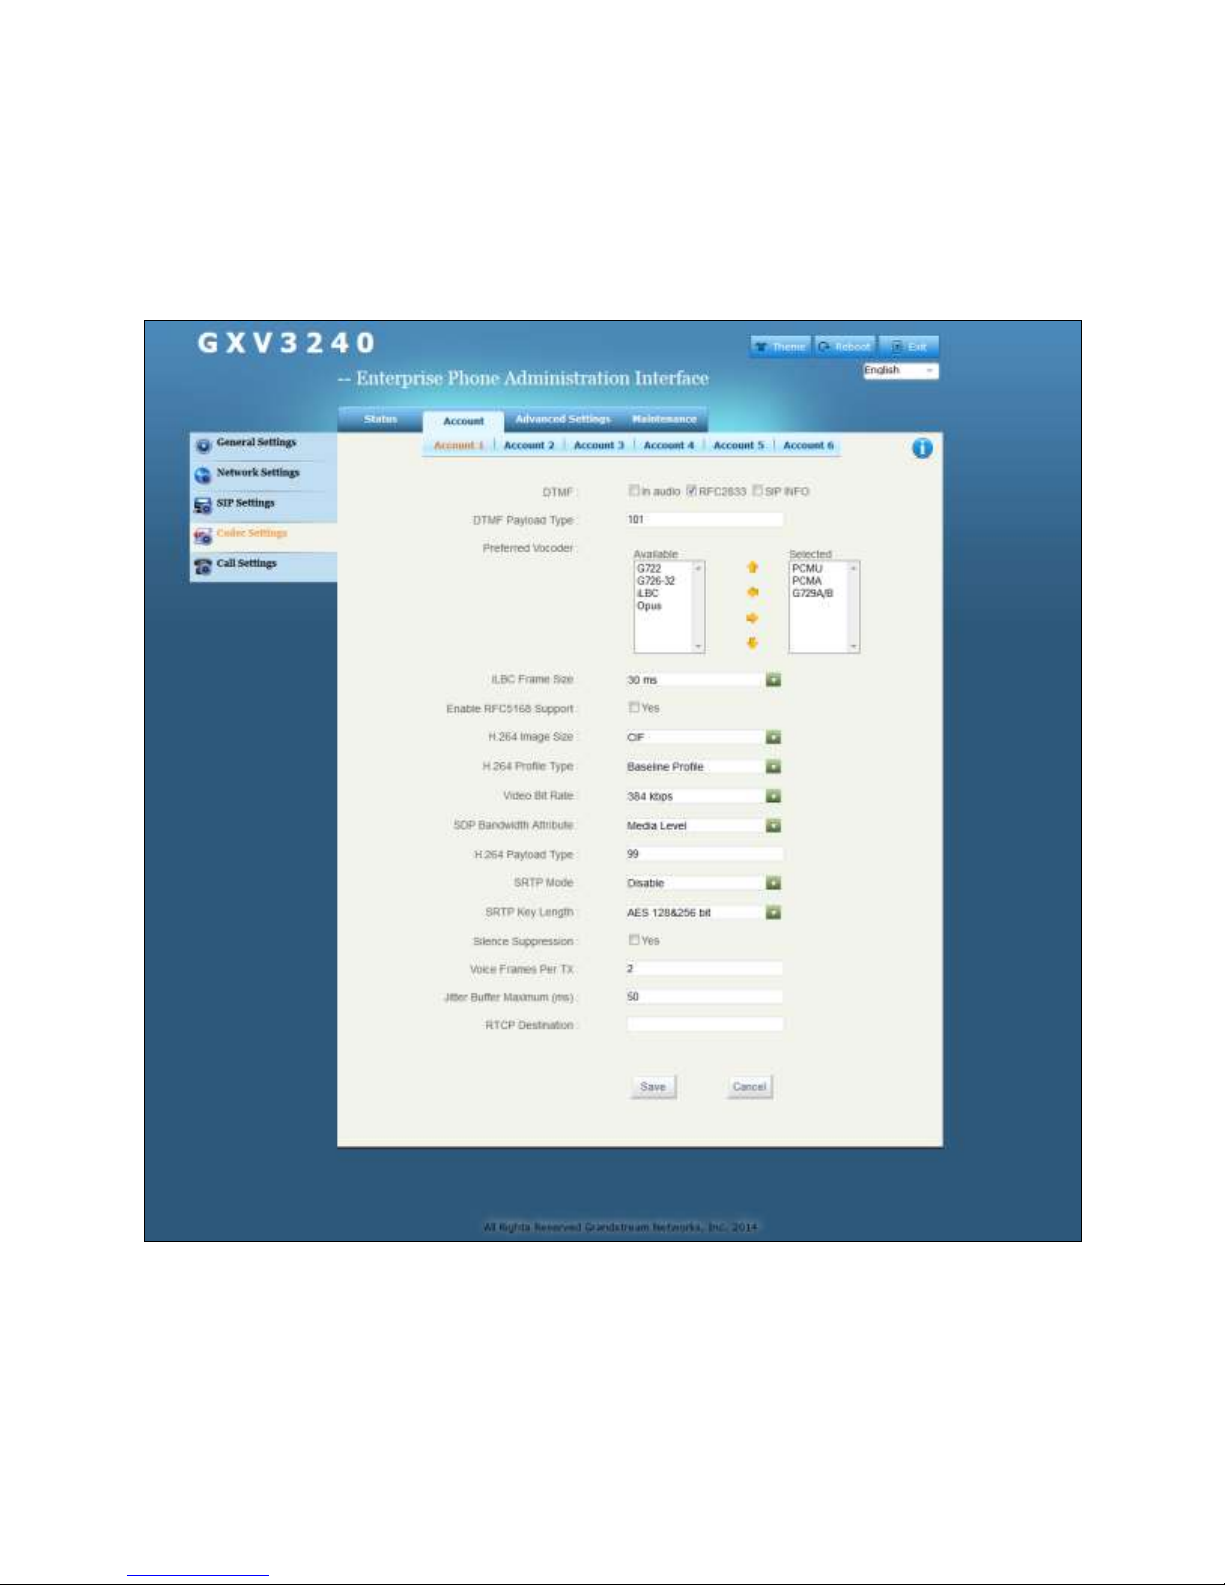
7.4. Configure Code Settings
Click the Codec Settings tab on the left. The settings on the screen below show that values that
were used during compliance testing; however, Preferred Vocoder settings were modified
occasionally during the testing to test various codecs. After making any changes, click the Save
button at the bottom of the screen.
Page 23

MJH; Reviewed:
SPOC 4/15/2015
Solution & Interoperability Test Lab Application Notes
©2015 Avaya Inc. All Rights Reserved.
23 of 25
Grandstream_SM
7.5. Configure Packetization Mode
By default, the Grandstream phones support packetization mode set to 1. At the time of testing,
the Avaya video endpoints did not support packetization mode set to 1. Therefore, the
packetization mode value on the Grandstream phones was changed to 0.
To change the packetization mode value on the Grandstream phone, open a secure shell session
to the phone’s IP address. Log in using appropriate credentials. The commands required to
change the value (and output) are shown below.
GXV3240 > config
CONFIG > get 957
957=1
CONFIG > set 957 0
Set 957=0
CONFIG> commit
nvram commited
CONFIG > exit
GXV3240 > reboot
You have chosen to reboot.
Do you want to continue (y/N)? y
8. Verification Steps
This section includes steps that can be followed to verify the configuration.
8.1. Verify Point to Point Audio and Video Calls
Place point to point audio and video calls between the Grandstream phones and Avaya
endpoints. Verify 2-way audio as well as 2-way video for the video calls.
9. Conclusion
These Application Notes describe the procedures required for the Grandstream Multimedia IP
Phones to interoperate with Avaya Aura® Session Manager and Avaya Aura® Communication
Manager to support the reference configuration shown in Figure 1. Refer to Section 2.2 for
testing results and any observations noted during testing.
Page 24

MJH; Reviewed:
SPOC 4/15/2015
Solution & Interoperability Test Lab Application Notes
©2015 Avaya Inc. All Rights Reserved.
24 of 25
Grandstream_SM
10. Additional References
Product documentation for Avaya products may be found at: http://support.avaya.com.
[1] Administering Avaya Aura® Communication Manager, Release 6.3, Issue 10, June 2014.
[2] Administering Avaya Aura® Session Manager, Release 6.3, Issue 7, September 2014.
[3] Administering Avaya Aura® Messaging, Release 6.3.2, Issue 1, December 2014.
Product documentation for Grandstream products may be found at:
http://www.grandstream.com.
[4] GXV3240 IP Multimedia Phone for Android™ Administration Guide
[5] GXV3275 IP Multimedia Phone for Android™ Administration Guide
Page 25

MJH; Reviewed:
SPOC 4/15/2015
Solution & Interoperability Test Lab Application Notes
©2015 Avaya Inc. All Rights Reserved.
25 of 25
Grandstream_SM
©2015 Avaya Inc. All Rights Reserved.
Avaya and the Avaya Logo are trademarks of Avaya Inc. All trademarks identified by ® and
™ are registered trademarks or trademarks, respectively, of Avaya Inc. All other trademarks
are the property of their respective owners. The information provided in these Application
Notes is subject to change without notice. The configurations, technical data, and
recommendations provided in these Application Notes are believed to be accurate and
dependable, but are presented without express or implied warranty. Users are responsible for
their application of any products specified in these Application Notes.
Please e-mail any questions or comments pertaining to these Application Notes along with the
full title name and filename, located in the lower right corner, directly to the Avaya
DevConnect Program at [email protected].
 Loading...