

Page 1
GPS-DG9208G3 | Vehicle Specifi c Mounting Bracket for Most Portable GPS
A
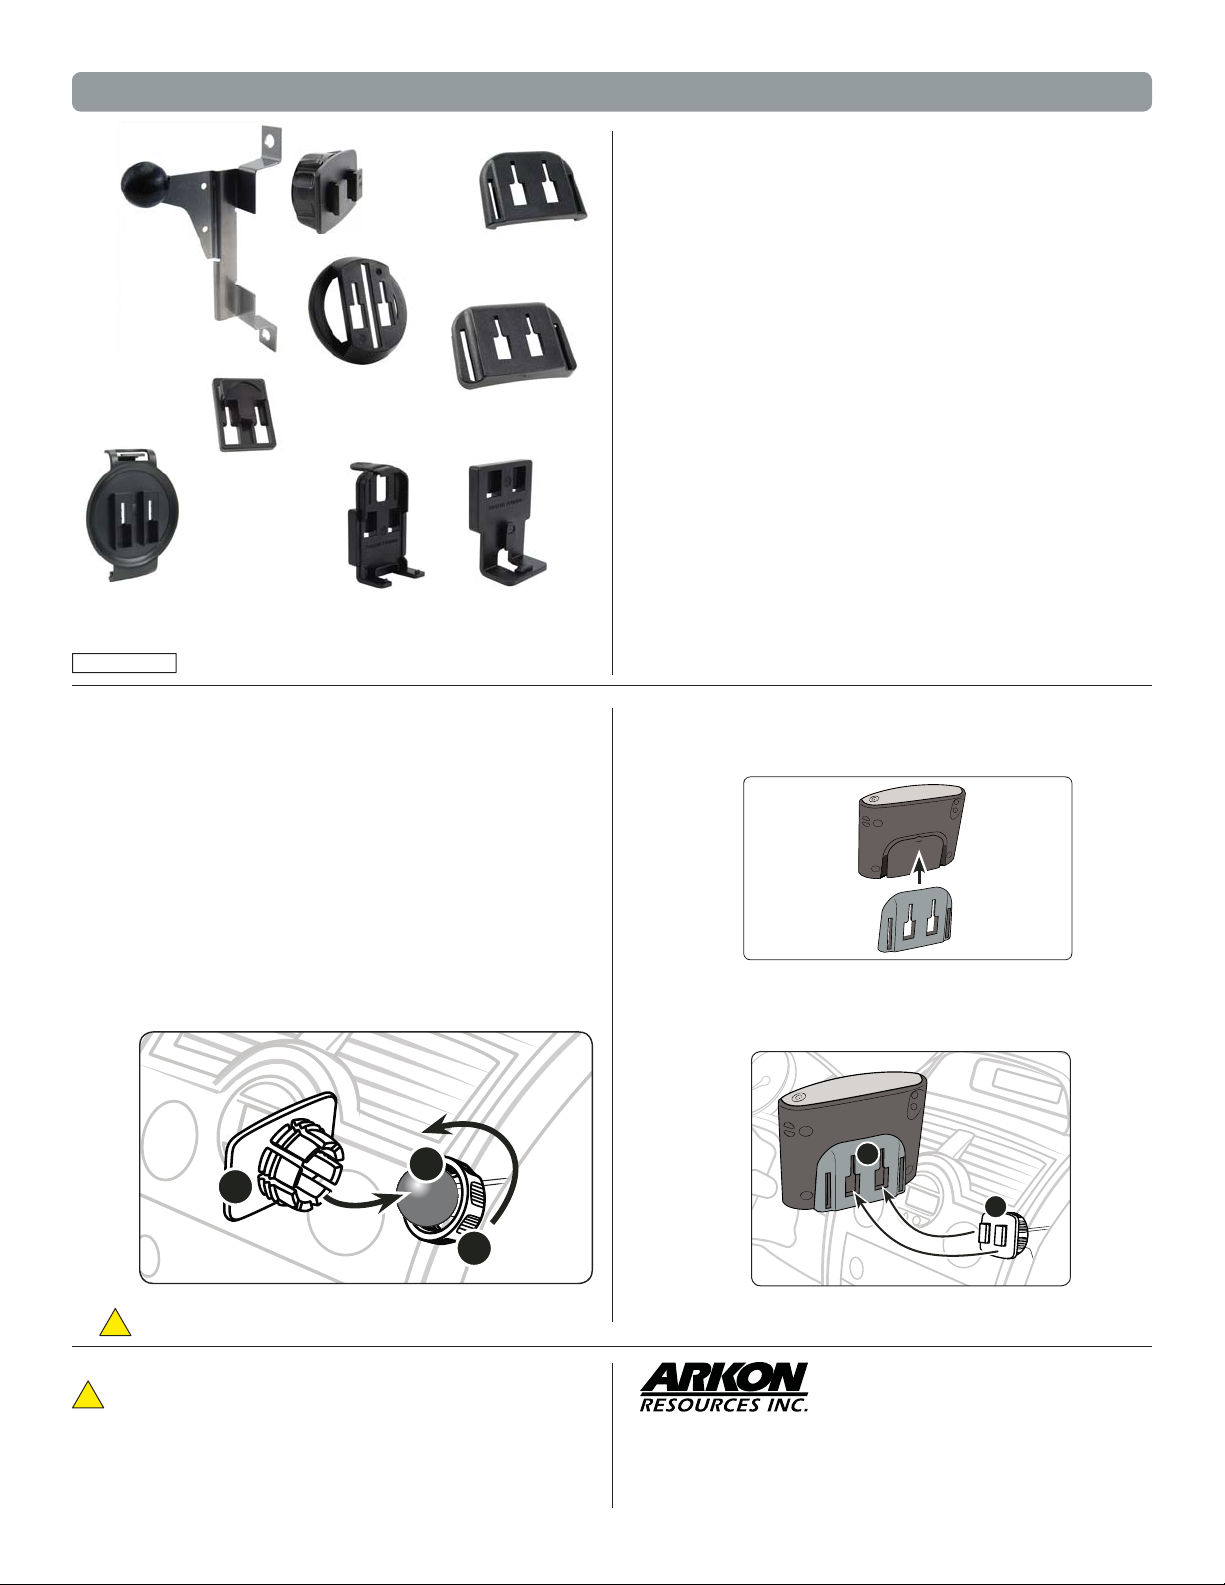
Package Contents:
(1) DG-92-08-G3 - Pro.Fit™ Vehicle Specifi c Mounting Bracket*
(1) SP-SBH-Kit - Dual-T Head with Swivel Ball Socket & Locking Ring
(1) APTTO - Adapter plate for TomTom ONE pattern
(1) APTTOXL - Adapter plate for TomTom ONE XL pattern
(1) APTTGO520 - Adapter plate for TomTom GO pattern
(1) APTTEP - Adapter plate for TomTom EasyPort™ pattern
(1) APTTSE - Adapter plate for TomTom Start™ and Ease™ pattern
(1) APMM200 - Adapter plate for Mio Moov 200 Series pattern
(1) APMM300 - Adapter plate for Mio Moov 300 Series and newer Magellan GPS patterns
TomTo m Dev ice Com patib ili ty:
TomTom ONE 125 (TomTom EasyPort Mo unt)
TomTom ONE 130, ONE 130-S (TomTom EasyPor t Mount)
TomTom ONE 140, ONE 140 -S (TomTom EasyPort Mount)
TomTom XL 325, XL 325-S (TomTom EasyPor t Mount)
TomTom XL 330, XL 330-S ( To mTom Eas yPort Mount)
TomTom XL 340, XL 340-S (TomTom EasyPor t Mount)
TomTom XXL 530-S, XXL 540 -S (TomTom EasyPort Mount)
TomTom ONE (US Edition, US 3rd Edition)
TomTom ONE XL (1st Edition) - TomTom ONE XL-S (1st Edition)
TomTom ONE 22, ON E 22 Regional, ONE 22 R egional Traffi c
TomTom XL 22, XL 22 Regional (TomTom EasyPor t Mount)
TomTom ONE UK / EURO PE (NEW Edition aka 2nd Edi tion, 3rd Edition)
TomTom GO 520 / 530 / 630 / 720 / 730 / 920 / 920T / 930
TomTom Start a nd Ease
Garmin Nuvi Device Compatibi lity - 17mm Ball Patte rn: 200, 200w, 205, 205w, 250, 250w,
255, 255w, 260, 260w, 265T, 265WT, 270, 275T, 285WT, 300, 30 0T, 310, 310T, 350, 360, 360T, 370, 370T, 500,
550, 600, 610, 650, 660, 670, 680, 710, 750, 755T, 760, 760T, 765T, 770, 775T, 780, 785T, 850, 855, 86 0, 880, 885T,
1200, 1250, 1260T, 130 0, 1350, 13 40T, 1350T, 1370T, 1390T, 1450, 1490T, 1690, 5000
Garmi n StreetPi lot Dev ic e Co mp ati bil it y: c310, c340, c510, c530, c550, c580
Magel lan GPS De vi ce C omp at ibi lit y:
Magellan Maestro 3100 , 314 0, 3200, 3210, 3220, 3225, 3250, 4000, 4010, 404 0, 4050, 4210, 4215, 4200, 4220,
4245, 4250, 4350, 4370, 5310, 5340
Magellan RoadMate 300, 360, 5 00, 500 Plus, 700, 760, 80 0, 860T 1200, 1210, 1212, 1215, 1220, 1230, 1340,
1400, 1412, 1430, 1440, 1445T, 1470, 1475T, 2000, 2200T, 2250T, 300 0T, 3050T, 6000T
Magellan Triton 1500, 200, 2000, 30 0, 400, 500
Mio Moov D evi ce Com pat ib ili ty : Mio Moov 200 Ser ies and Mio Moov 30 0, 301, 310, 330, 330
Europe, 36 0, 370 Europe, 380, Mio Kn ight Rider Editio n, Moov 500, S4 01, S501, M300, M400
NAVMAN Devi ce C ompa tib ilit y: S30, S30 3 D, S50, S50 3D, S70, S90i
*See incl uded Pro.Fit maua l for Vehicle Speci fi c Mounting Bracket instructions. For question regarding
install ation, contact Pr o.Fit at 800.38 8.0073.
DG-92-08-G3
Pro.Fit™
Vehicle Specifi c
Mounting Bracket
(See included Pro-Fit
manual fo r instructions
& specifi c car
compatibilit y)
APTTSE
Adapter Plate
for TomTom
Start™ & Ease™
Patent Pending
APTTGO-S20
Adapter Plate for
TomTo m GO
SP-SBH-Kit
Dual-T Tab
Connects to
adapter plates
APTTEP
Adapter Plate
for EasyPort™
APMM200
Adapter Plate
for Mio Moov
200 Series
APTTO
Adapter Plate for
TomTo m ONE
APTTOXL
Adapter Plate for
TomTo m ON E XL / XL • S
APMM300
Adapter Plate
for Mio Moov
300 Series & newer
Magellan GPS
Installing the Vehicle Specifi c Moutning Bracket
Step 1.
See the included ProFit VSM Bracket manual for instructions
on installing the VSM Bracket. Arkon reccomends that you
have the VSM bracket professionally installed. Arkon is
not responsible for any unintended damaged caused by
installation of the VSM Bracket.
*See included Pro.Fit maual for Vehicle Specifi c Mounting Bracket
instructions. For question regarding installation, contact Pro.Fit at
800.388.0073.
Connect Dual-T Head to VSM Mounting Pedestal
Step 1.
Slip the tightening ring (A) over the VSM bracket ball. Snap the
dual-T head adapter plate (B) on to the bracket ball (C). Screw
the tightening ring over the adapter plate until securely holding
the plate. Adjust the angle as needed.
C
B
A
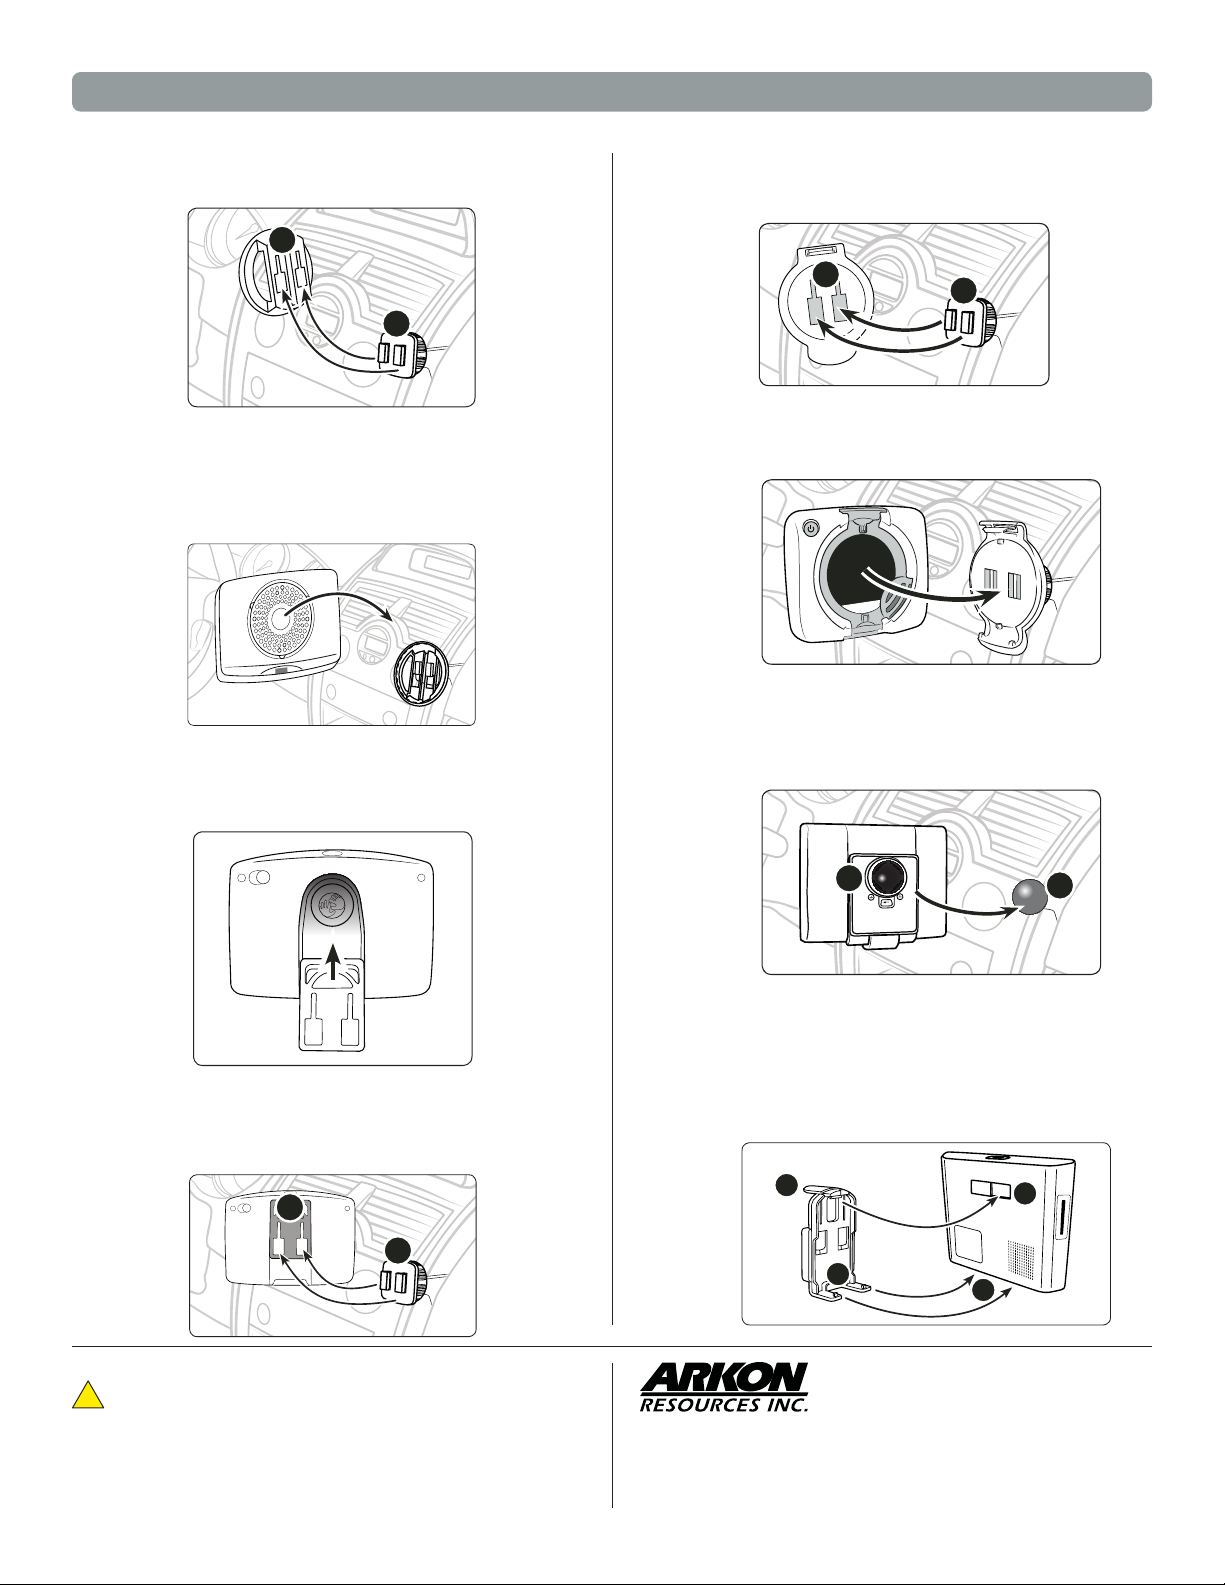
Connect Adapter Plate for TomTom ONE or ONE XL to Device
Step 1.
Slide the adapter plate up into the grooves on the back of the
TomTom ONE, XL, or XL • S device (not included, sold separately).
Connect TomTom ONE, XL, or XL • S Device to Pedestal
Step 1.
Connect the dual T-tabs (A) on the dual-T pedestal to the dual
T-tab slots (B) on the adapter plate.
B
A
!
Do not place mount in or near an air bag deployment zone.
Safety Precautions
!
Do not install Arkon products over an air bag cover or within the air
All brand n ames and produc t names are trade marks or regis tered tradema rks of their resp ective owner s.
The Mobile Mounting Specialists™
bag deployment zone. Arkon Resources, Inc. assumes no responsi-
Continued on other side...
bility of liability for injury or death as a result of car crashes and / or
air bag deployment.
Arkon is not responsible for any damages caused to your car, your
device, or yourself due to the installation or use of this pedestal mount.
Consumer Hotline:
USA (800) 841-0884
INT’L (626) 254-9005
Monday - Frid ay 9 am - 5 pm, PST
Designed in USA | Made in the USA & China
© Copyright 2010 Arkon Resources, Inc.
www.arkon.com
Arcadia, CA 91006 USA
Page 2
GPS-DG9208G3 | Vehicle Specifi c Mounting Bracket for Most Portable GPS
Connect Adapter Plate for TomTom EasyPort™ to Pedestal
Step 1.
Connect the dual T-tabs (A) on the dual-T pedestal to the dual
T-tab slots (B) on the adapter plate.
B
A
Connect TomTom Device to Pedestal with EasyPort™ pattern
Step 1.
Connect Adapter Plate for TomTom GO GPS
Step 1.
While holding the mounted TomTom adapter plate, gently
insert the TomTom device (not included, sold separately) into
the adapter plate until an audible click is heard. The device
can then be rotated into the desired viewing angle.
Slide the adapter plate up into the grooves on the back of the
TomTom GO series device (not included, sold separately).
Connect TomTom Start™ & Ease™ Device to Pedestal
Step 1.
Attach the dual-T adapter plate for TomTom to the pedestal by
inserting the dual-T tabs of the pedestal (A) into the dual T-slots
on the adapter plate (B).
B
A
Step 2.
Connect Garmin Device to 17mm ball head
Step 1.
While holding the mounted TomTom adapter plate, gently insert
the TomTom device (not included, sold separately) into the
adapter plate until an audible click is heard.
Attach Garmin GPS to 17mm ball head by fi rmly pushing the
ball head (A) into the 17mm ball head socket on the back of the
device (B) as pictured below.
Connect TomTom GO GPS to Pedestal
Step 1.
Connect the dual T-tabs (A) on the dual-T pedestal to the dual
T-tab slots (B) on the adapter plate.
B
A
Safety Precautions
!
Do not install Arkon products over an air bag cover or within the air
bag deployment zone. Arkon Resources, Inc. assumes no responsibility of liability for injury or death as a result of car crashes and / or
air bag deployment.
Arkon is not responsible for any damages caused to your car, your
device, or yourself due to the installation or use of this pedestal mount.
B
Connect Mio Moov 200 Series or NAVMAN 530 3D GPS Device
to Pedestal
Step 1.
Connect the adapter plate for Mio Moov to Mio device (not
included, sold separately) by placing the feet (A) of the adapter
into the corresponding notches (B) on the bottom of the device.
Holding the thumb tab down (C), insert the upper tooth (D) into
the recessed slot on the back of the device.
C
A
D
A
B
The Mobile Mounting Specialists™
Consumer Hotline:
USA (800) 841-0884
INT’L (626) 254-9005
Monday - Frid ay 9 am - 5 pm, PST
Designed in USA | Made in the USA & China
© Copyright 2010 Arkon Resources, Inc.
www.arkon.com
Arcadia, CA 91006 USA
Page 3

GPS-DG9208G3 | Vehicle Specifi c Mounting Bracket for Most Portable GPS
Step 2.
Connect Mio Moov 300 Series, NAVMAN S50, S50 3D, 570, S90i or
newer Magellan Devices to Pedestal
Step 1. Insert the power cord (not included, sold separately) into the
Connect the dual T-tabs (E) on the dual-T pedestal to the dual
T-tab slots (F) on the adapter plate.
F
grooved slot in the bottom of the adapter plate.
E
Step 2.
Connect the dual T-tabs (A) on the dual-T pedestal to the dual
T-tab slots (B) on the adapter plate.
B
A
Safety Precautions
!
Do not install Arkon products over an air bag cover or within the air
bag deployment zone. Arkon Resources, Inc. assumes no responsibility of liability for injury or death as a result of car crashes and / or
air bag deployment.
Arkon is not responsible for any damages caused to your car, your
device, or yourself due to the installation or use of this pedestal mount.
The Mobile Mounting Specialists™
Consumer Hotline:
USA (800) 841-0884
INT’L (626) 254-9005
Monday - Frid ay 9 am - 5 pm, PST
www.arkon.com
Arcadia, CA 91006 USA
Designed in USA | Made in the USA & China
© Copyright 2010 Arkon Resources, Inc.
Page 4

Dodge Challenger 2009-2010
DG-92-08-G3
PLEASE READ COMPLETE INSTRUCTIONS BEFORE INSTALLING THIS VSM G3
All instructions assume a drivers seat vantage point. Caution is advised when removing and reassembling
wood or plastic parts of a dash. Applying unnecessary force or pressure may cause a piece to crack or break.
When properly installed, the metal between the ball and 2 small holes is all that is exposed.
(Some exceptions apply).
TOOLS REQUIRED:
PARTS INCLUDED:
LOCATION:
Step 1: Place the DTRT in between the radio
bezel and the dash molding Photo #1. Gently
use the DTRT in a twisting motion around the
radio bezel releasing a series of eight (8)
retainer clips. Do not disconnect any wiring to
the bezel and simply set the radio bezel off to
the side.
Dash Trim Removal Tool (DTRT), Phillips screwdriver
VSM G3, A Plate, J Stem
Right of Radio
Insert DTRT
Here
Page 8
Step 2: Remove the two Phillips screws securing
the right side of the radio to the dash molding
and carefully set them off to the side. Place
the VSM G3 flush to dash molding over the screw
holes and evenly tighten the VSM G3 to the right
side of the radio molding as pictured in Photo
#2.
Step 3: Once the VSM G3 is flush and secured
to the right side of the radio, replace the radio
bezel back into its secured original position.
You have successfully installed your VSM G3!
Note: Note: See the Assembly Instructions for G3
Components for additional information.
1
2
3
Pro.Fit International, Inc.® may not be held liable for any damage to a vehicle before, during or after the installation or removal of this VSM
G3TM. Pro.Fit International may not be held liable for any personal injury resulting from accident or improper installation. Pro.Fit International,
Inc.® 1335 Eagandale Court, Eagan, MN 55121, Ph: 651.688.3588 or 800.388.0073 Fx: 651.688.9876
View Instruction & Updates
Online at
© Pro.Fit International, Eagan, MN 2009
www.pro-fit-intl.com
 Loading...