

Avaya G700+S8300 Hardware Installation

Quick Start
Avaya™ S8300 Media Server and
Avaya™ G700 Media Gateway
Hardware Installation
1 Get License File, Software, and Firmware
2 Conduct Equipment Inventory
3 Mount Media Gateway
4 (Optional) Install Octaplane Stacking Module
5 (Optional) Connect Media Gateways
6 (Optional) Install S8300 Media Server
7 Install Media and Expans ion Modules
8 Install Modem
9 (Optional) Install UPS
10 Apply Power
11 Connect the Laptop
555-233-150
Issue 2
May 2003

All trademarks identified by the ® or ™ are registered trademarks or trademarks,
respectively, of Avaya Inc. All other trademarks are the property of their respective owners.
Copyright 2002, Avaya Inc. All ri ghts reserved.

Safety Instructions
Audience
The intended audience for the documen t ati on for t his produc t is train ed servi ce person nel .
Admonishments
Admonishments used in the documentation for this product have the following meanings:
!
CAUTION:
Indicates the presence of a hazard that will or can cause minor personal injury or property damage if
the hazard is not avoided.
!
WARNING:
Indicates the presence of a haz ard that can ca use dea th or severe personal injury if the hazard
is not avoided.
Power Requirements
The G700 Media Gateway uses an auto-ranging 100-240 VAC power supply, 50 to 60 Hz, 5 A maximum at 100120 VAC and 3 A maximum at 200-240 VAC. The AC power source is to be single phase, 3-conductor (Line,
Neutral and Ground) with a 15 A circuit breaker for 100-120 VAC or a 10 A circuit breaker for 200-240 VAC.
!
WARNING:
Do not overload the power circuit.
Electrical Hazards
!
WARNING:
To prevent access to electrical hazards by unauthorized personnel and to ensure continued
compliance to international radiated emissions requirements, all captive screws must be
securely tightened such that they cannot be loosened without the use of a tool.
The Avaya G 700 Media Gatewa y must not be operate d with any s lot s open. Empty slot s shoul d
be covered with the supplied blank plates.
Grounding
System grounding must comply with the general rules for grounding provided in Article 250 of the
National Electrical Code (NEC), National Fire Protection Agency (NFPA) 70, or the applicable
electrical code in the country of installation.
If the installation loca tion is greater than 50 feet (15 m) from an approved grou nd, do not ins tall
the Avaya G700 Media Gateway until a licensed electrician is present to install a
Supplementary Ground Conductor.
!
WARNING:
!
CAUTION:
!
WARNING:

!
WARNING:
Failure to install both grounds will void the Product Safety certi fica tions (UL and the CE M ark)
on the product and create a hazard that could result in death or severe personal injury.
LASER Product
The equipment described in the documentation for this product may contain Class 1 LASER Device(s). The
LASER devices operate within the following parameters:
• Power output –9.5 dBm to -4 dBm
• Wavelength 1285 nm to 1343 nm
CLASS 1 LASER PRODUCT EN 60825-1:1994 + A11, EN60825-2:194, EN60950:1992 + A1 + A2 + A3.
Laser components used in the G700 are Class 1 Laser Products that comply with 21CFR 1040.10 and CFR
1040.11. Use of controls or adjustments or performance of procedures other than those specified herein may
result in hazardous radiation exposure. Contact your Avaya representative for more laser product information.
Luokan 1 Laserlatte
Klass 1 Laser Apparat
Rack-Mounting
!
WARNING:
Warning: if the rack is not securely fixed in place, do not proceed with the installation.
!
WARNING:
Balancing the G700 Media Gateway requires two people. Use caution to avoid injury.
!
WARNING:
If the G700 Media Gateway is being mounted in a rack with other equipment already installed,
the G700 Media Gateway must be positioned to avoid imbalance.
Technical Specifications
Table 1. Technical Specifications
Chassis Dimensions
Height 2U (3.5 in) 88 mm Depth 17.7 in 450 mm
Width 19 in 482.6 mm Weight empty 22.25 lbs 10 kg
Required Clearances
Front 12 in 30 cm consistent with EIA 464 data rack standards
Rear 18 in 45 cm
Temperature Tolerances
Recommended 65 to 85 deg Farenheit 18 to 29 deg Celsius
!
WARNING:
Installation in a Restricted Access Location is required in Finland and Norway.
Weight (with
media modules)
27-34 lbs 12-16 kg

1 Get License File, Software, and Firmware
1 Get License File, Software, and Firmware
The following activities must take place before you can install an Avaya S8300 Media Server with an
Avaya G700 Media Gateway:
• A meeting is held with the customer to complete the Preinstallation Worksheet. The Preinstallation
Worksheet contains specific information about the customer’s network configuration and
telephony requirements. This information is required to use the Avaya Installation Wizard to
configure the Avaya IP solution.
• The following steps are completed to retrieve the required license files and password files from
Remote Feature Activation (RFA):
1 - For an S8300 Media Server as a primary controller only, one license file with FEAT_DADMIN
on must be retrieved by selecting FEAT_DADMIN on the RFA Features screen.
2 - For an S8300 primary controller installation completed by an Avaya technician (not required
for installations completed by Avaya authorized dealer technicians), a second license file with
FEAT_DADMIN off must be retrieved by clearing the FEAT_DADMIN selection on the RFA
Features screen. The Modify System Record function is used to create the second license file.
This step is not required for installations completed by Avaya authorized dealer technicians.
Note: Each license file must be labeled carefully because the files will be used at different
points in the installation process.
3 - The password file is retrieved.
• The most recent versions of software and firmware are retrieved from the support.avaya.com
website. The firmware updates must be uploaded onto the S8300 Media Server. The Avaya
Communication Manager update can be uploaded onto the S8300 Media Server or can remain on
the laptop PC used for the Avaya Installation Wizard.
Important: To use the Avaya Installation Wizard, Release 1.1.2 or later of the Communication
Manager must be on the S8300 Media Server. If a pre-1.1.2 release of the Communication
Manager is installed on the S8300 Media Server, the software must be upgraded before the
Avaya Installation Wizard can be used.
• If you are using the Avaya Installation Wizard, get the customer’s name and number file and the
customer’s electronic Preinstallation Worksheet from your installation project manager. Copy
these files to your laptop. You may also receive a template for setting up customer telephony
parameters. The Preinstallation Worksheet contains instructions for the worksheet and the Name/
Number Files.
• The technician is advised if ProVision will be used in addition to the Avaya Installation Wizard.
ProVision can be used to upload all of the Communication Manager translations, or a subset of
the translations. Information on the Avaya Installation Wizard options for ProVision is in the
Preinstallation Worksheet.
5

1 Get License File, Software, and Firmware
Once you have verified that all activities are completed, you can begin product hardware installation
following instructions in this Quick Start Avaya™ S8300 Media Server and Avaya™ G700 Media
Gateway Hardware Installation guide.
Note: The laptop PC that you use to launch the Avaya Installation Wizard must meet the following
requirements:
• A minimum display resolution of 800 by 600
• 10/100 ethernet card installed
• Windows 95 or later
• Internet Explorer 5.0 or later
Note: The current release of the Avaya Installation Wizard supports only an English-language
operating system.
Once you complete all Avaya Installation Wizard steps, you can use VisAbility products to further
customize software (optional). The registration file can be sent to the organization that currently
registers this product in lieu of current registration documentation.
6
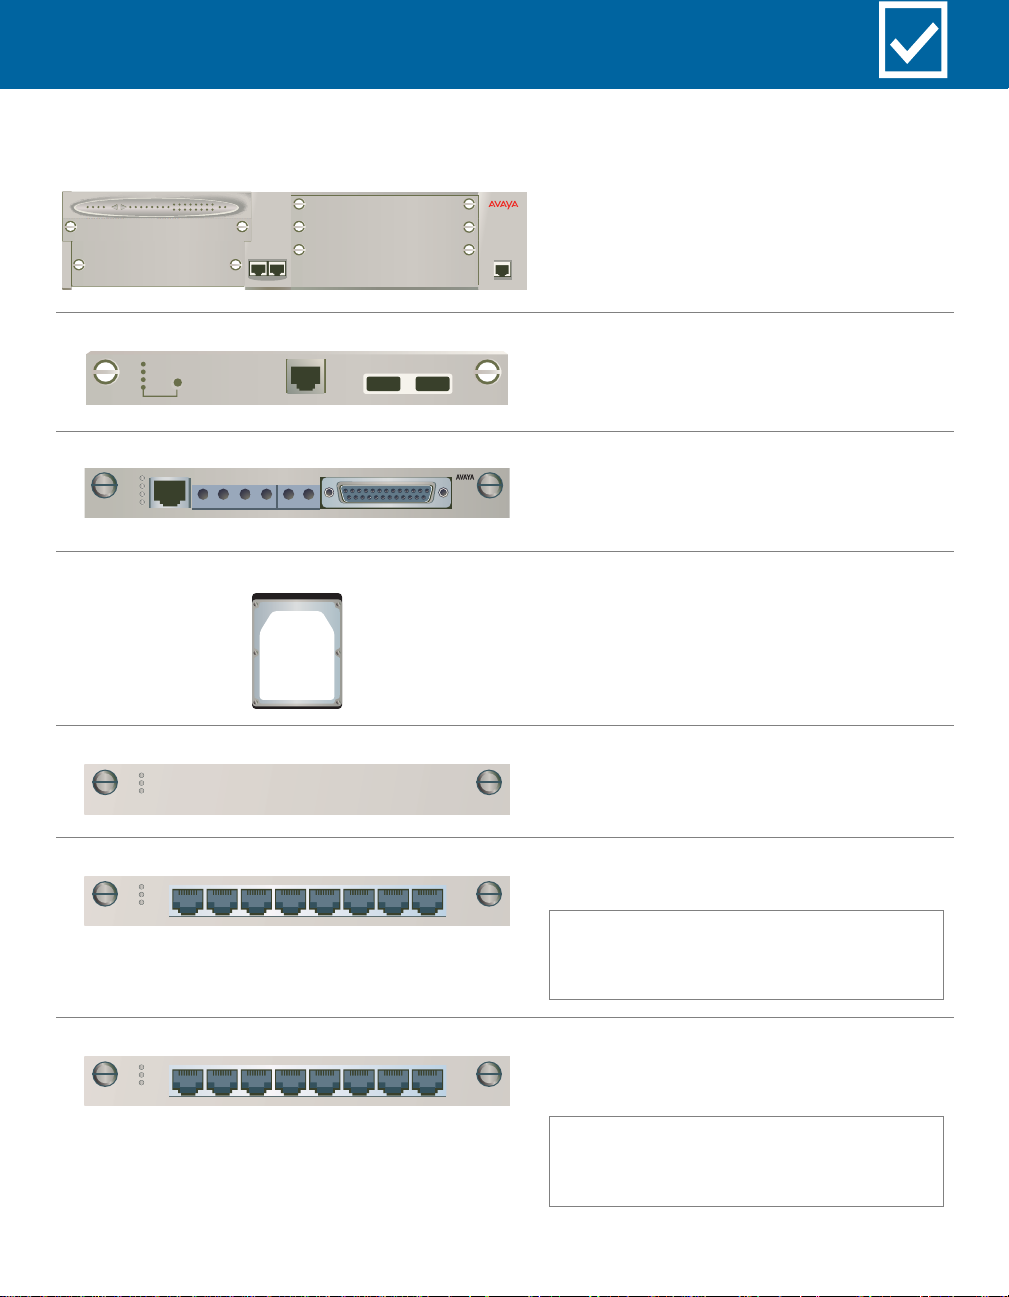
2 Conduct Equipment Inventory
ALM PWR CPU MSTR LNK COL Tx Rx FDX FC Hspd LAG
ALM
TST
ACT
OK TO
REMOVE
ALM
TST
ACT
SIG
ALM
TST
ACT
E1/T1
51 52 53 54 55 56 57 58
59 60 61 62 63 64 65 66
SHUT DOWN
EXT1
V3
V4
EXT1 EXT2
SERVICES USB1 USB2
EOSIEMSMSOEI
EIA 530A DCE
Avaya G700 Media Gatew ay
Avaya S8300 Medi a Server
Avaya MM710 T1/E1 Media
Module
V2
EXT2
Avaya IA770 Messaging
Module
AVAYA
Avaya MM760 VoIP Media
Module
ALM
TST
ACT
12345678
AVAYA
DCP Media Module
Note: The DCP and the Analog media
modules look similar. Check their labels
to verify the module type.
ALM
TST
ACT
12345678
AVAYA
Avaya MM711 Analog Media
Module
Note: The Analog and the DCP media
modules look similar. Check their labels
to verify the module type.
7
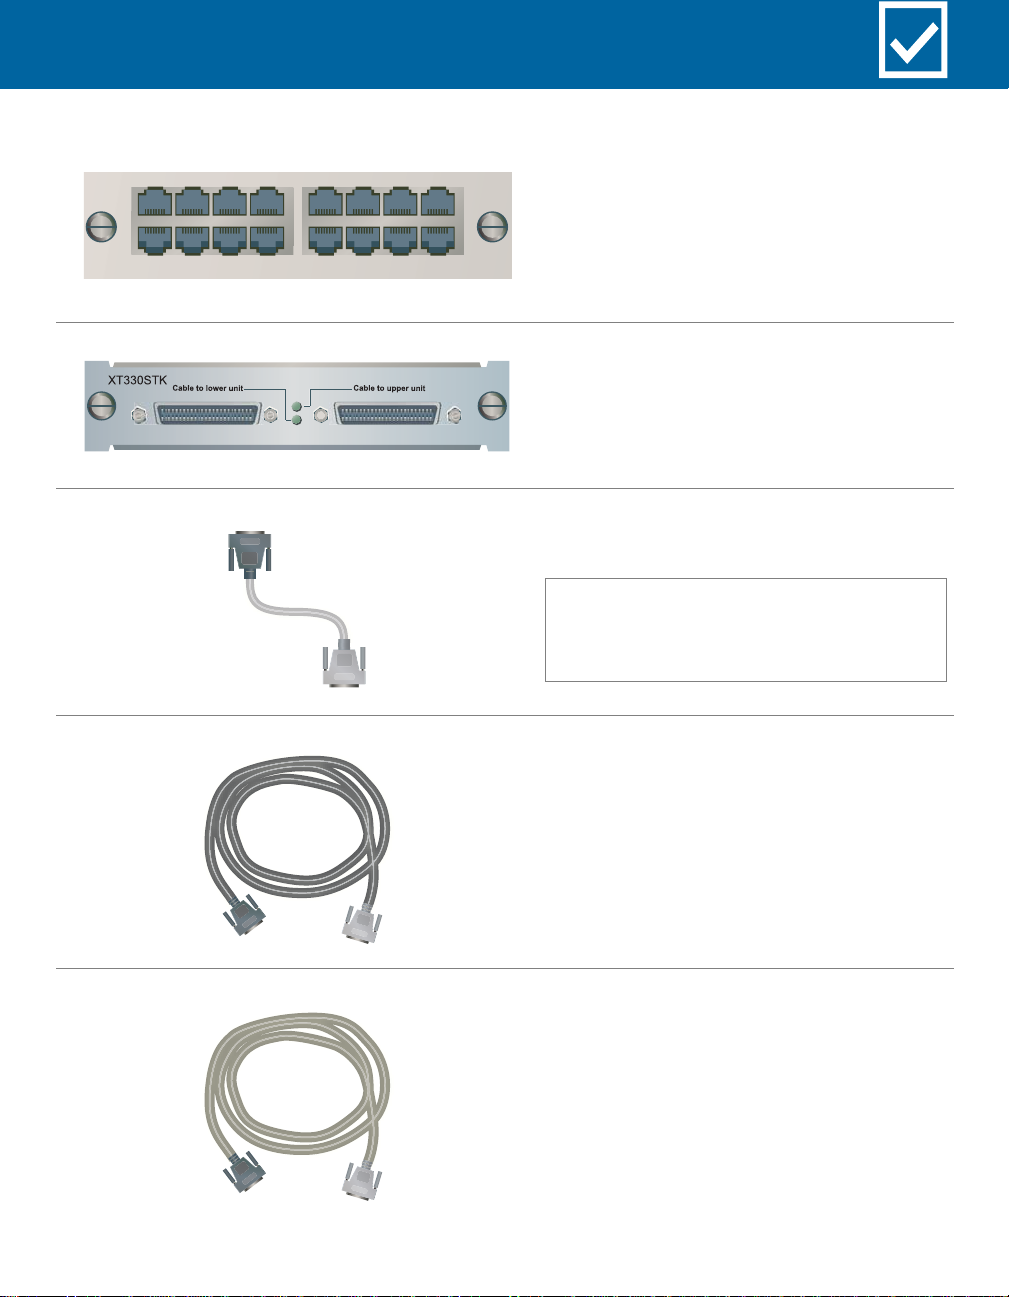
2 Conduct Equipment Inventory
51 52 53 54 55 56 57 58
Expansion Module
X330T16
59 60 61 62 63 64 65 66
X330STK Octaplane
Stacking Module
X330SC Short Cable
Note: The X3300SC Short Cable is
sometimes shipped attached to the
X3300STK Octaplane Stacking Module.
X3300RC Redundancy Cable
X3300 LC Long Cable
8
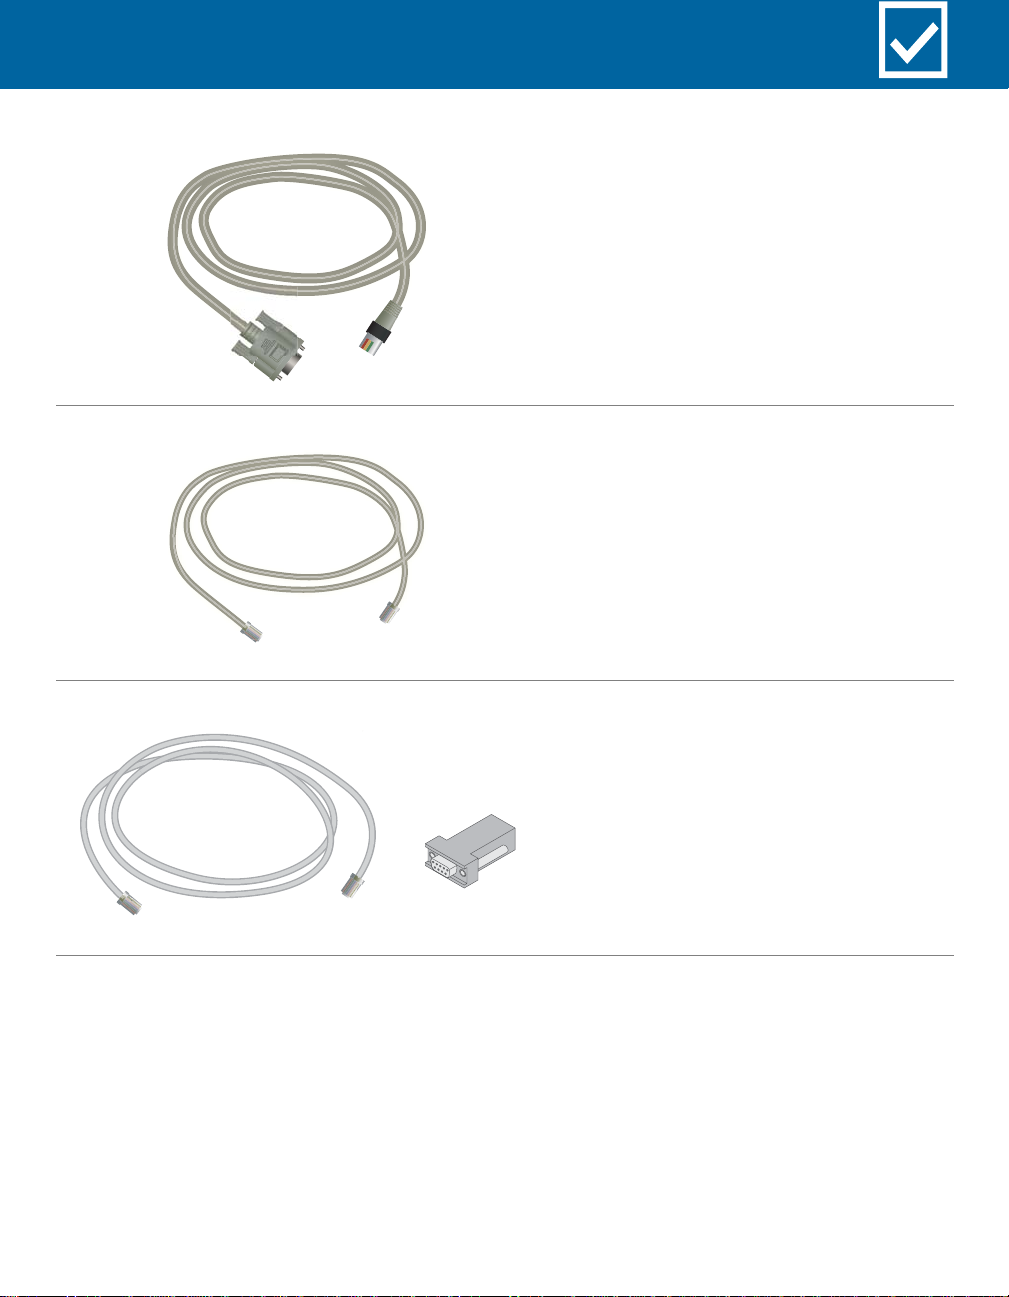
2 Conduct Equipment Inventory
USB Cable and Adapter
Crossover Ethernet Cable
(CAT5)
Serial or "Console" Cable
and Adapter
9
 Loading...