

Page 1

ExpertNet™ Lite Assessment Tool
User Guide
May 2008
Page 2

© 2008 Avaya Inc. All rights reserved.
Notice
While reasonable efforts were made to ensure that the information in this document was complete and
accurate at the time of printing, Avaya Inc. can assume no liability for any errors. Changes and corrections
to the information in this document may be incorporated in future releases.
Documentation disclaimer
Avaya Inc. is not responsible for any modifications, additions, or deletions to the original published vers ion
of this documentation unless such modifications, additions, or deletions were performed by Avaya.
Page 3

ExpertNet Lite Assessment Tool - User Guide
About this guide
This guide is intended for BusinessPartners and Avaya Associates using the
ExpertNet™ Lite Assessment Tool (ELAT) for the first time. It describes how to get
started and how to use ELA T fo r customers purchasing an IP Telephony solution that
requires an IP Network Readiness Assessment.
About the ExpertNet™ Lite Assessment Tool
ELAT is a software application designed to gather information from an IP network. The
data gathered is used to produce a Network Readiness Assessment report. It is
designed to run for an extended period of time (usually 5 days), in order to see trends
in network performance. The data is summarized graphically and can be included in
the report.
Three types of queries are used to perform the measurements: RTP tests, ping probes
and SNMP GET requests.
● ELAT provides RTP test functionality through the use of Traffic Simulators, which
are installed on remote machines on the customer network.
● ELAT supports two ping protocols: UDP (default) and ICMP. On some networks,
the default UDP protocol may not work. (For example, a firewall may be
configured to block traffic to certain ports.) In such cases, the user can switch
the protocol to ICMP.
● ELAT Controller supports SNMPv1 and SNMPv2 protocols. It collects processor
and layer-3 interface utilization variables from devices on network paths. F or the
Controller to be able to retrieve SNMP data, it must be configured with a list of
SNMP community strings.
The ELA T Controller c ollects R ound Trip Time and One Way Delay measurements along
network paths. Network paths can be entered manually by the user, or discovered
automatically. To discover paths automatically, the Controller employs, transparently
to the user, a bundled ExpertNet Discovery Tool. The EDT tool discovers network
topology in a scope configured by the user.
1
Page 4
ExpertNet Lite Assessment Tool - User Guide
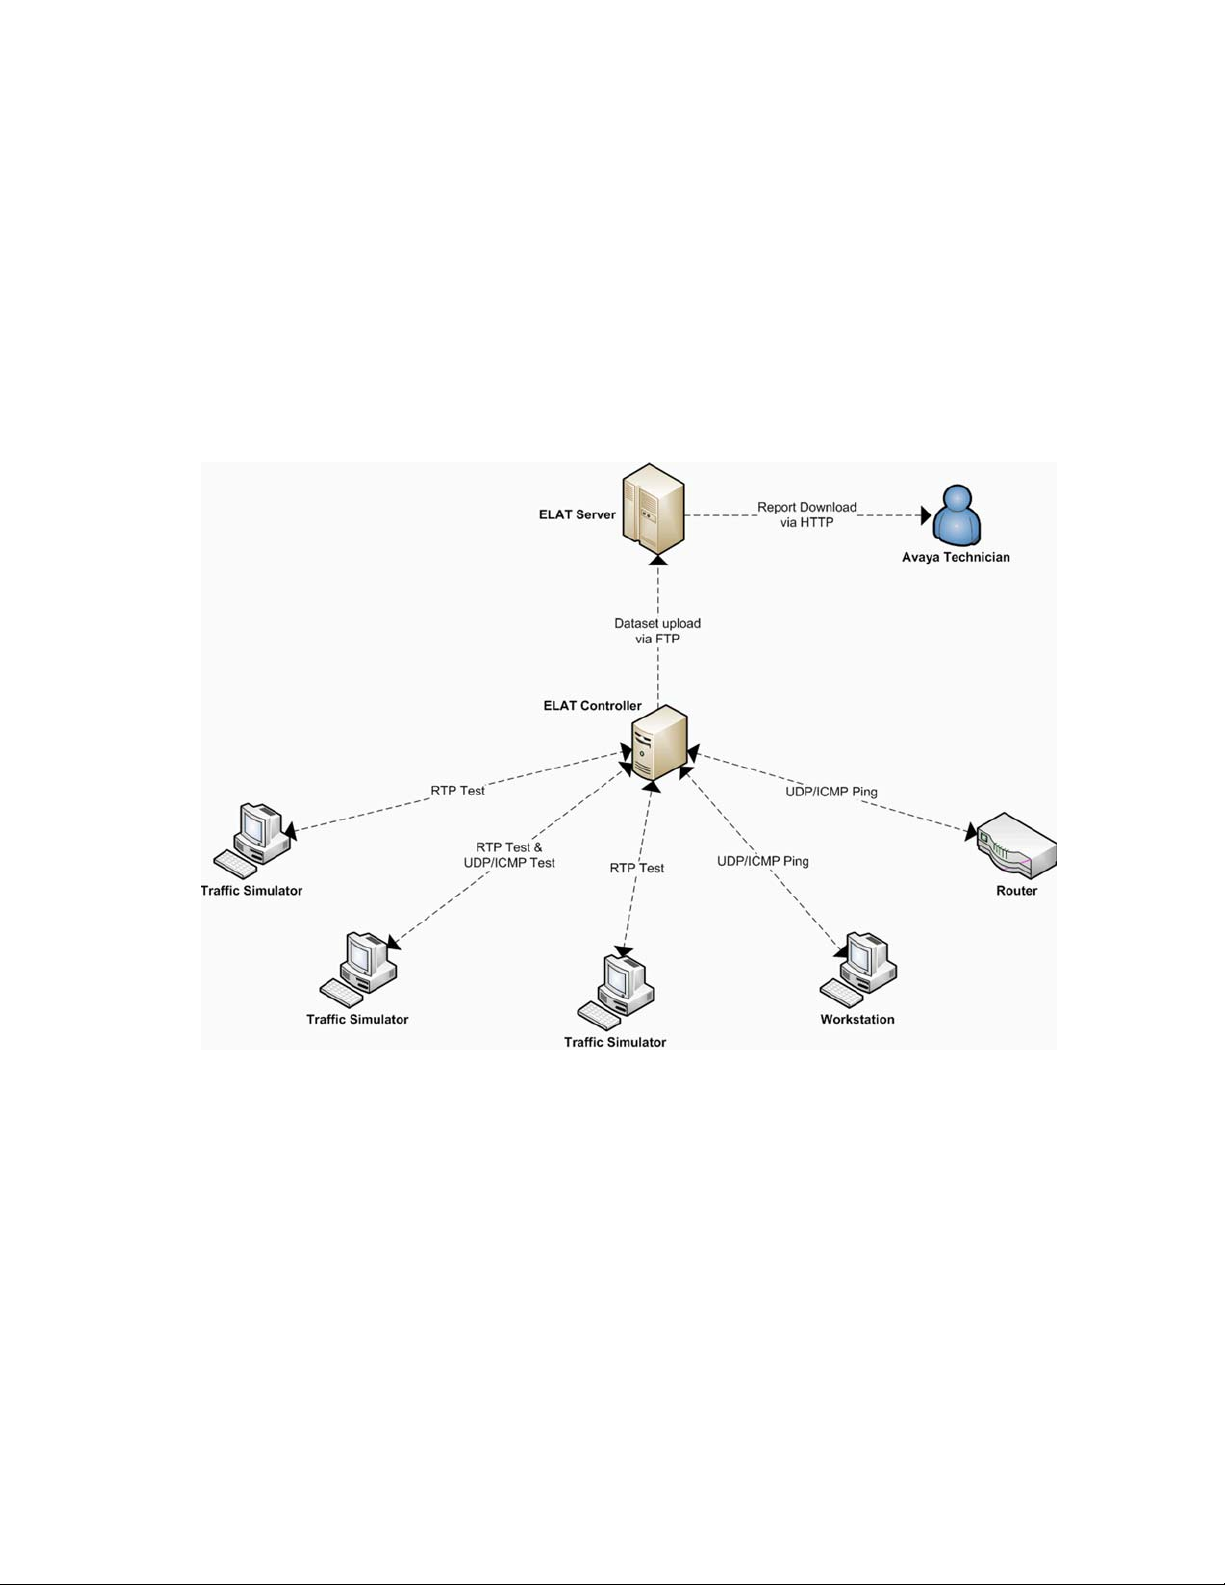
ExpertNet Lite Assessment Tool Architecture
● ExpertNet™ Lite Assessment Tool Controller – Runs on a PC to measure delay
and packet loss and to produce a dataset.
● Avaya Traffic Simulator – A remote agent that is deployed on various PCs on the
customer network to work with the ELAT controller.
● Dataset from the agent in the form of a compressed file is uploaded
automatically or manually to the FTP server.
● ExpertNet™ Lite Assessment Tool Server – Analyzes uploaded datasets to
produce graphical representations that can be browsed or included in the
Network Assessment Report.
2
Page 5

ExpertNet Lite Assessment Tool - User Guide
Requirements for ELAT Controller
Hardware
● Standard IBM PC-compatible
● Intel x86 CPU or compatible, Pentium 1Ghz performance
● 512MB of RAM for Windows XP
● 3GB free disk space.
Operating System
● Windows XPTM Professional Edition with Service Pack 2
● .Net framework 2.0 preferable.
Network
● 100Mb /s (or greater) Ethernet adapter (NOTE: If multiple NIC’s exist, it is
preferable, but not required, to disable all but one)
Requirements for Avaya Traffic Simulator
Hardware
● Standard IBM PC-compatible
● Intel x86 CPU or compatible, Pentium 1Ghz performance
● 512MB of RAM for Windows XP
● 150MB free disk space.
Operating System
● Windows XPTM Professional Edition with Service Pack 2
● .Net framework 2.0
Network
● 100Mb /s (or greater) Ethernet adapter (NOTE: If multiple NIC’s exist, it is
preferable, but not required, to disable all but one)
3
Page 6

ExpertNet Lite Assessment Tool - User Guide
Installing ExpertNet Lite Assessment Tool
Controller
Before installing ELAT, please ensure that all PCs on which ELAT will be installed are
set up as follows:
● Disable screen savers.
● Disable any time synchronization services.
● Check the Power control panel and disable any options that make the PC move
from the active state.
● Verify the current time and date.
● If the Controller PC has time synchronization services enabled, there is a
potential problem of having the Controller PC time roll back to some past time.
To avoid this, disable the time synchronization services during the ELAT run on
the Controller PC.
● Disable virus scan and SMS software.
It is preferable, but not essential, that you:
● Disable all background services, like Office Find, Indexing Service, SETI@home,
etc.
● If you have multiple NICs installed, enable only one NIC and disable all other
NICs.
Obtain the ELAT License File
After purchasing a 30-day ELAT subscription, email the ELAT administrator
(elatadmin@avaya.com
(license.txt), save it in the ELAT config directory (by default it is C:\Program
Files\Avaya\ELAT\config).
BusinessPartners
After you have purchased a 30-day subscription, you can install ELAT on as many
machines as you like at the customer site. Once ins talled, the lic ense permits 30 days
of usage.
) to obtain a license file. When you receive the file
Avaya Engineers
You do not need to purchase a subscription, but can generate one from ESDP directly.
4
Page 7
ExpertNet Lite Assessment Tool - User Guide
Install the Controller
Download the ELAT Controller (a 40Mb binary file) from http://support.avaya.com.
The installation typically takes less than 5 minutes. For more detail about installing
the Controller, refer to Appendix A: Installing the Controller and Test Agents
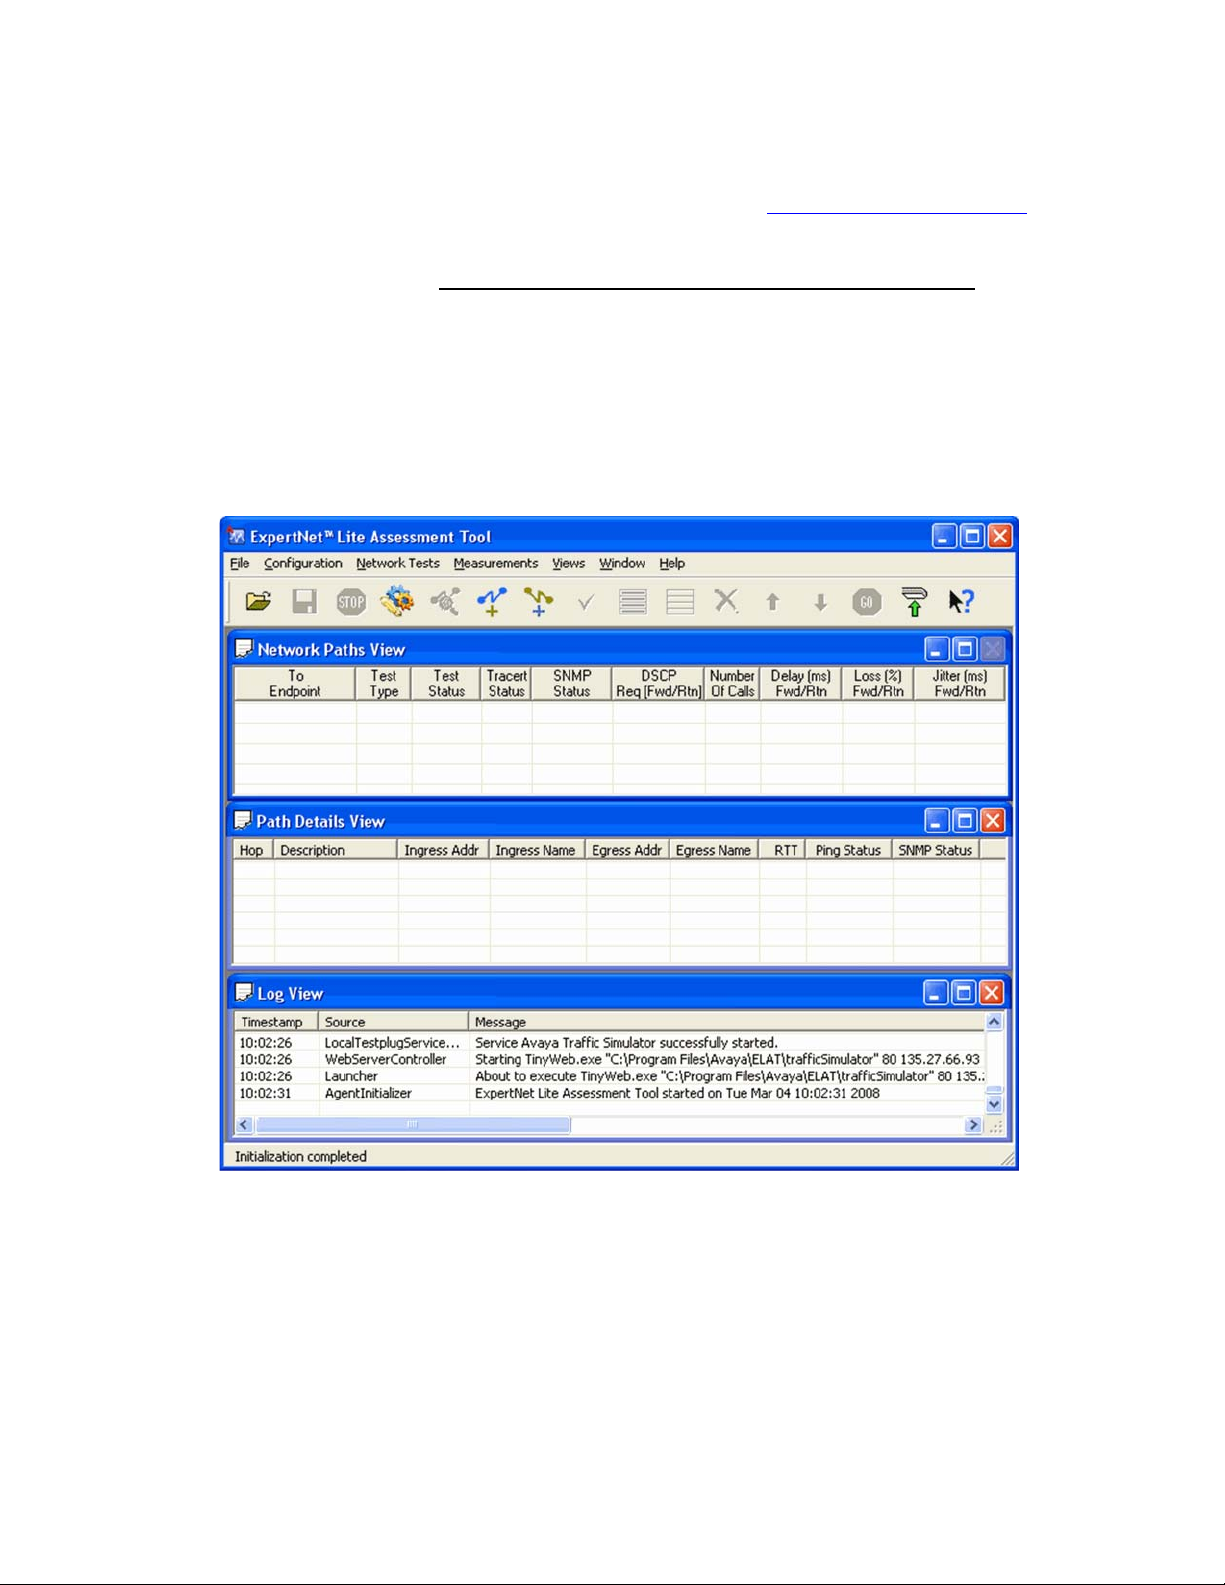
Launch the Program
After you have installed the ELAT Controller application and copied a valid license file
to the config directory, you can launch the ELAT Controller. To launch ELAT select:
Start > All Programs > Avaya > ExpertNet™ Lite Assessment Tool >
ExpertNet™ Lite Assessment Tool > Controller. The main window is displayed:
.
5
Page 8
ExpertNet Lite Assessment Tool - User Guide
Configuring the ELAT Controller
To run the ELAT Controller Configuration wizard, select Configuration > Modify
Configuration. You can review all the parameters and accept the defaults or change
any parameter as per your network needs. The most frequently modified parameters
are:
● Data Collection Interval from the General Settings page.
● Community strings from the Read SNMP Community Strings page. (Without
the SNMP community strings ELAT cannot retrieve CPU and other metrics of
devices and the report will not be as detailed.)
● Topology option from the Network Discovery Options page.
Other configuration parameters rarely require modification.
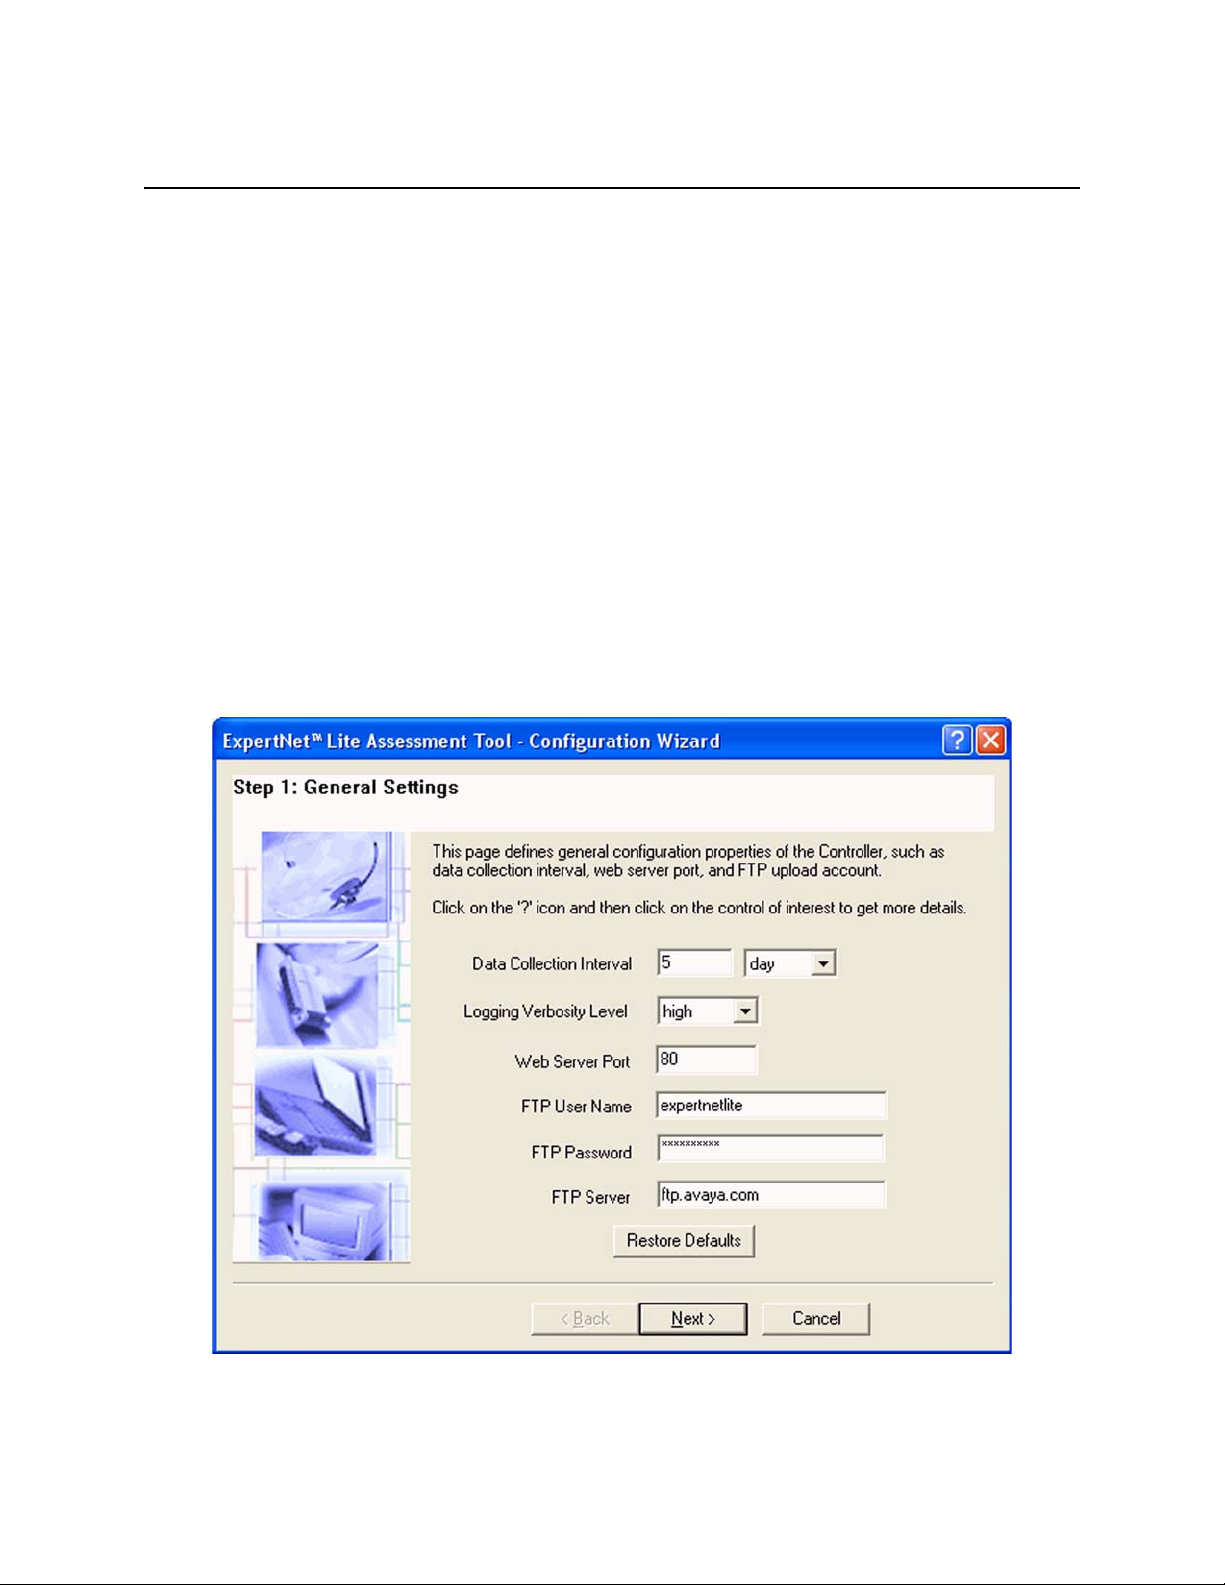
Step 1. General Settings
This page allows to to set up general settings for the tool. Most fields will not need to
be changed.
6
Page 9
ExpertNet Lite Assessment Tool - User Guide
Data Collection
Interval
Logging Verbosity
Level
Web Server Port Enter the port number of the bundled Web Server for downloading the
FTP User Name* Enter the user name of the FTP Server account for uploading data to
FTP Password* Enter the password of the FTP server account for loading data to Avaya.
FTP Server* Enter the name of the FTP Server to which the data is u p loaded.
Specify the period for which the ELAT Controller will collect data. At the
end of this period, ELAT will stop running tests and automatically upload
the data to the Avaya FTP Server. The default interval is 5 days.
Select the level of detail the logging subsystem will store in the log file.
You can select: None, Low, Medium, and High. The default is High.
RTP Traffic Simulator to remote endpoints. To download the Traffic
Simulator, point the Web browser to http://
<controller_IP_address>:<port_number>
Avaya.
* Default values for these fields should never be changed.
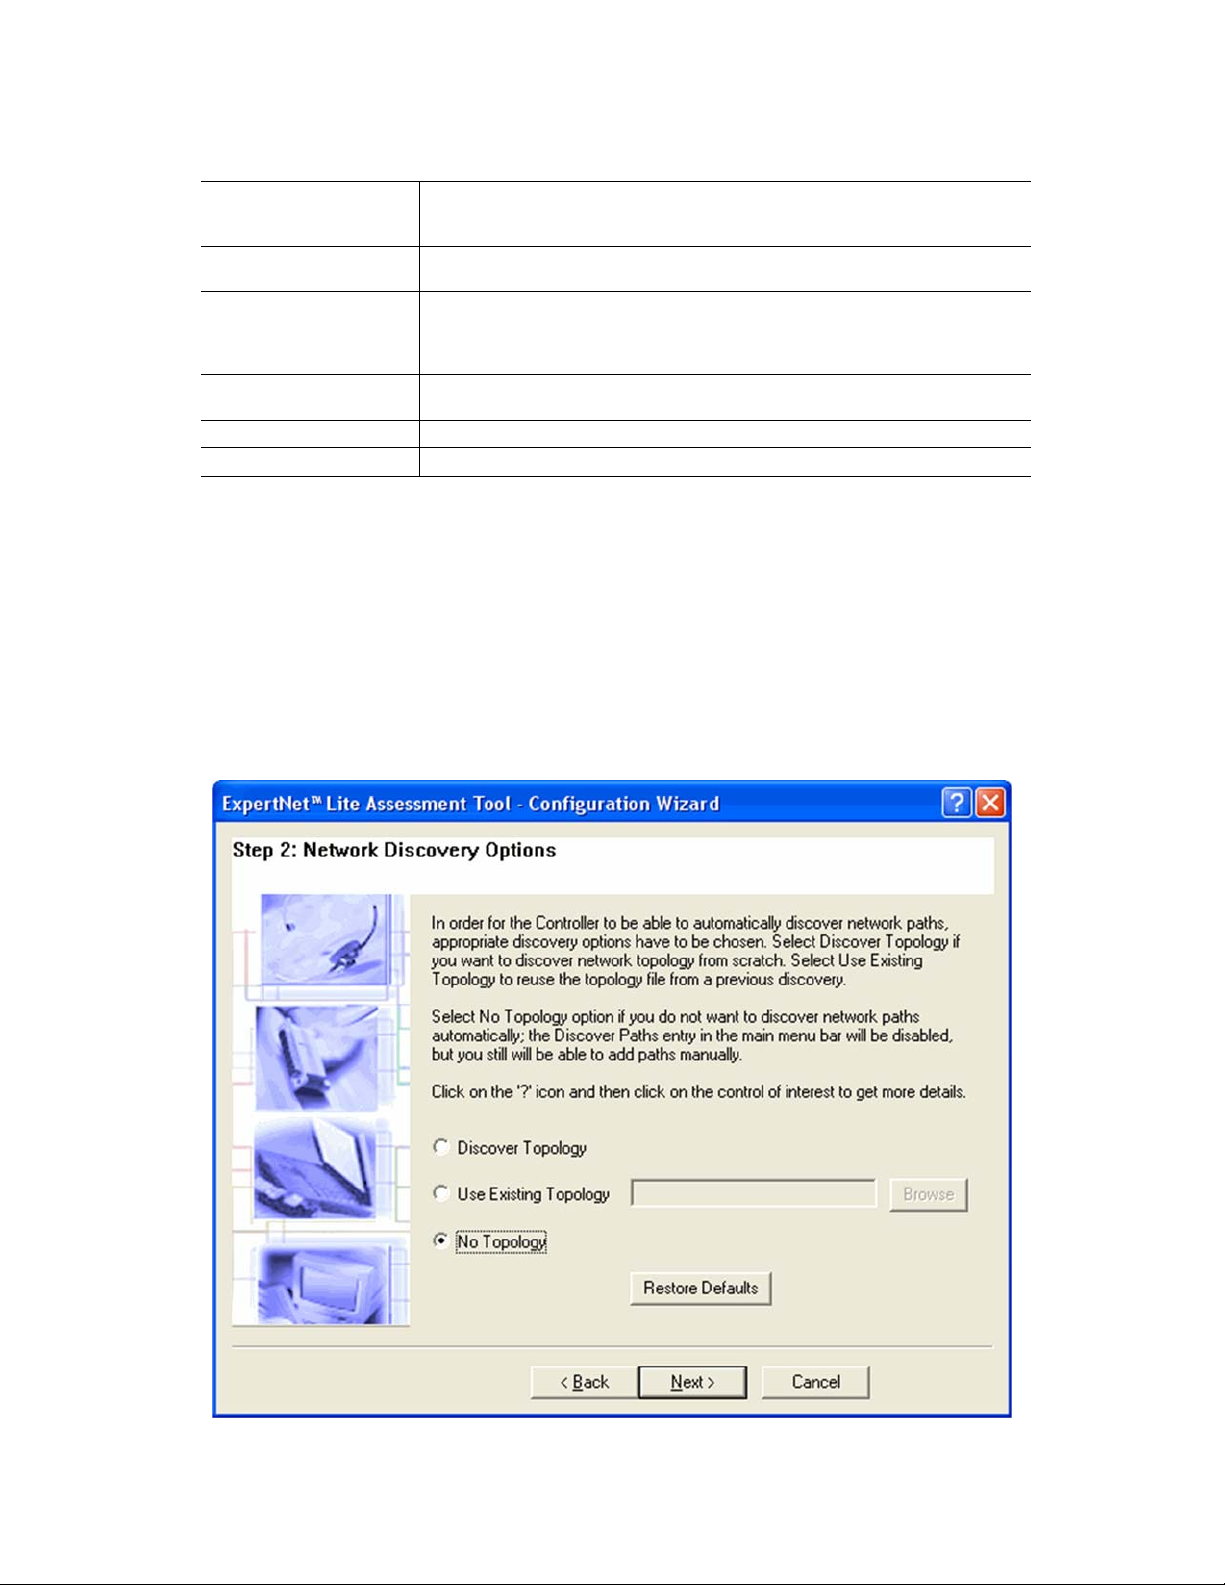
Step 2: Network Discovery Options
Each time the user selects Network Paths > Discover Paths menu item from
ELAT’s main menu, the EDT tool discovers the network and leaves behind a topology
file. (The default location is C:\Documents and Settings\<userid>\My
Documents\Avaya\ExpertNet Discovery Tool\topology_files\ topology.vpa).
This file can be reused next time the user wants to discover paths.
7
Page 10
ExpertNet Lite Assessment Tool - User Guide
Discover Topology Select this option if you want the Controller to discover network
Use Existing Topology Select this option if you want the Controller to reuse the existing
No Topology Select this option if you do not want to (or cannot) discover network
topology from scratch. Steps 2.1 and 2.2 in the Configuration Wizard
are enabled. You must have SNMP access to network routers to use
this option.
topology file from a previous discovery.
paths. The Network Tests > Discover Ping Tests entry in the main
menu bar will be disabled, but you will still be able to add Ping tests
manually. You may want to consider this option if SNMP access to
network routers is not allowed.
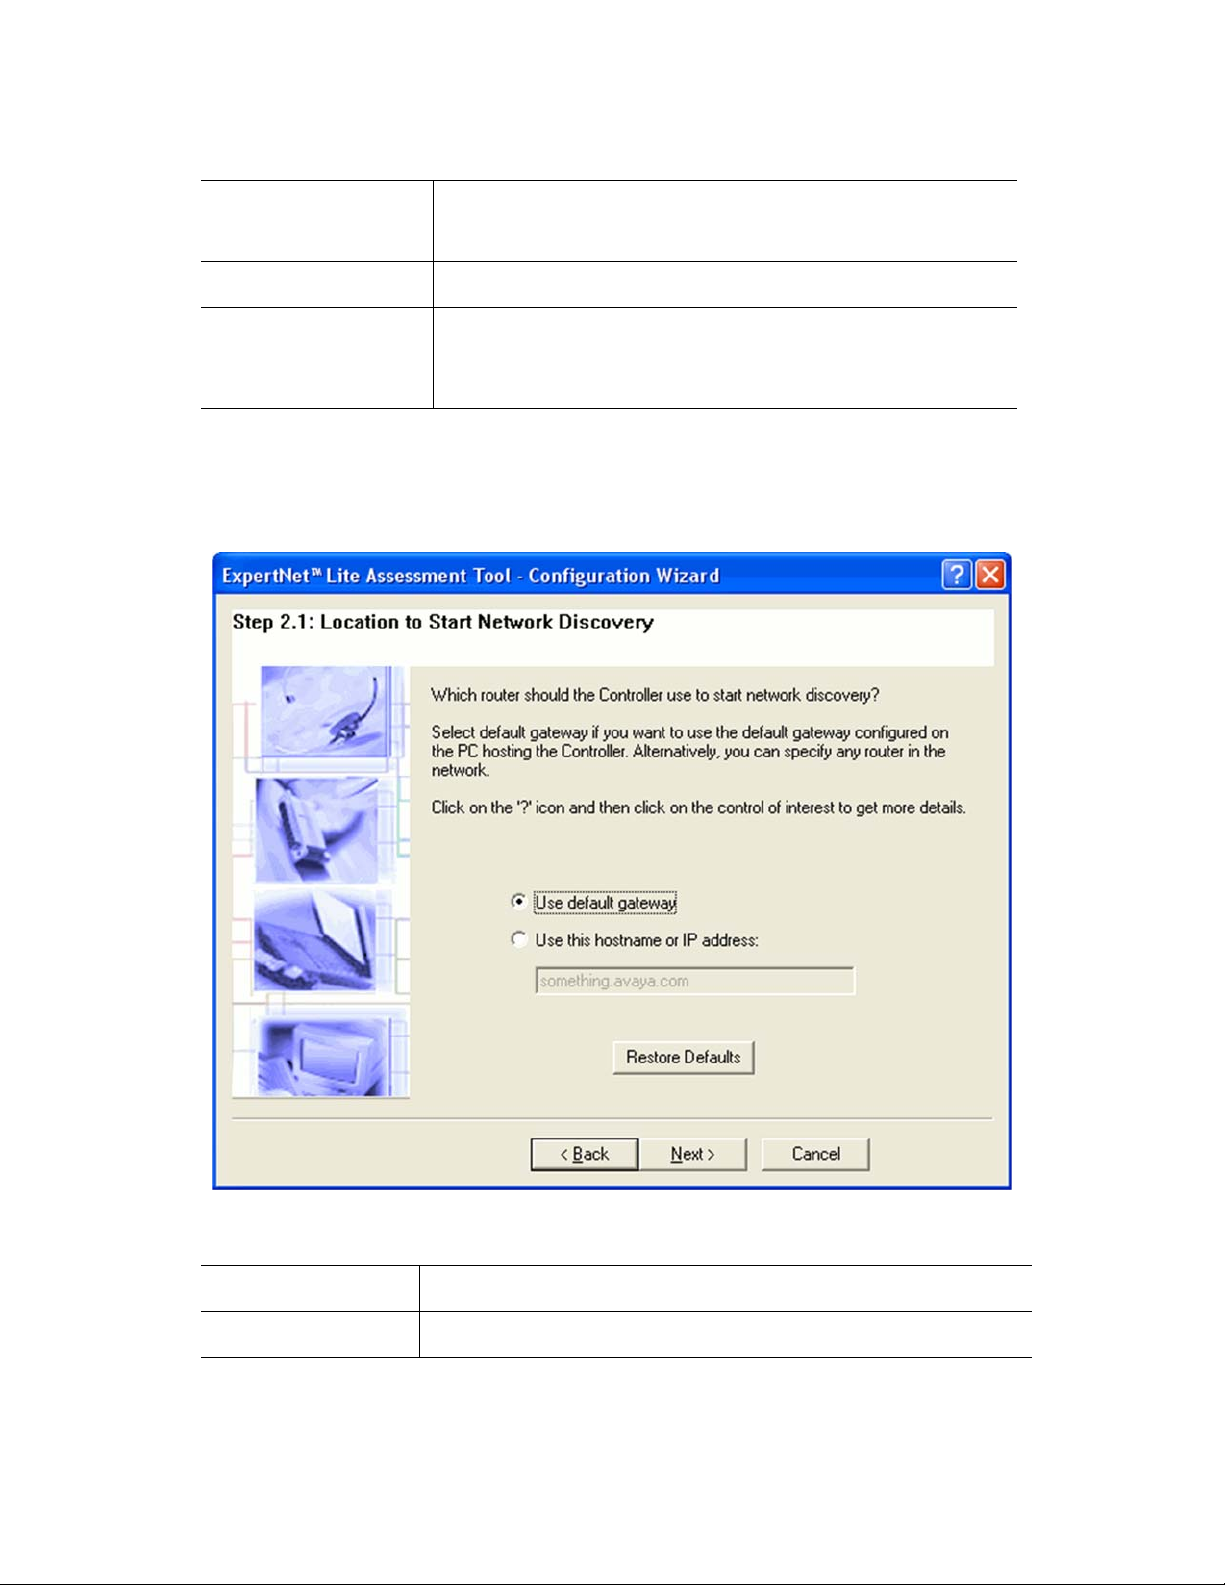
Step 2.1: Location to Start Network Discovery
Steps 2.1 and 2.2 will only display if you selected the Discover Topology option.
Use default gateway Select this option if you want the Controller to use the default gateway
Use this hostname or
IP address
configured on the Controller PC to start network discovery from.
Select this option if you want the Co ntroller to use a specified initial
gateway to start network discovery from.
8
Page 11
ExpertNet Lite Assessment Tool - User Guide
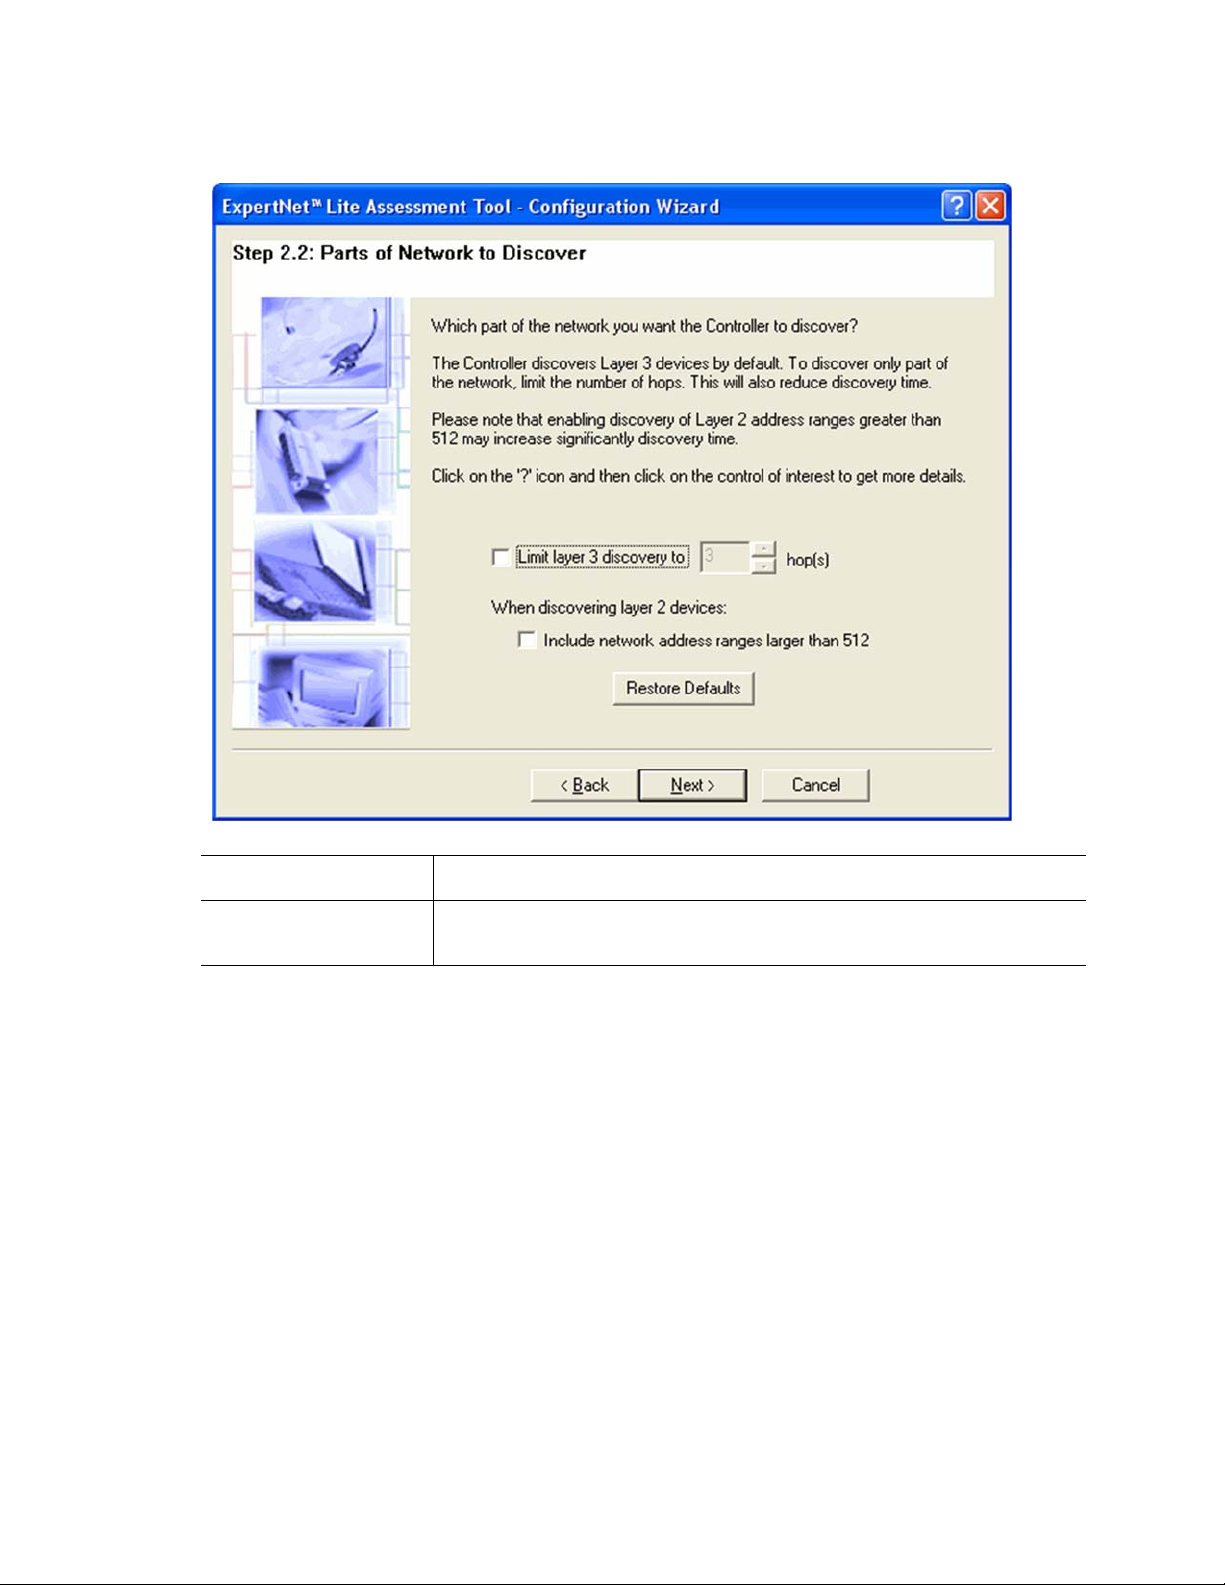
Step 2.2: Parts of Network to Discover
Limit layer 3 discovery
to <n> hops
Include network
address ranges larger
than 512
Select this option if you want to limit the scope of network discovery to a
specified number of hops (routers) on network paths.
Select this option if you want to scan ranges of network addresses greater
than 512 in search of layer 2 devices. Discovery time may increase
significantly if you select this option.
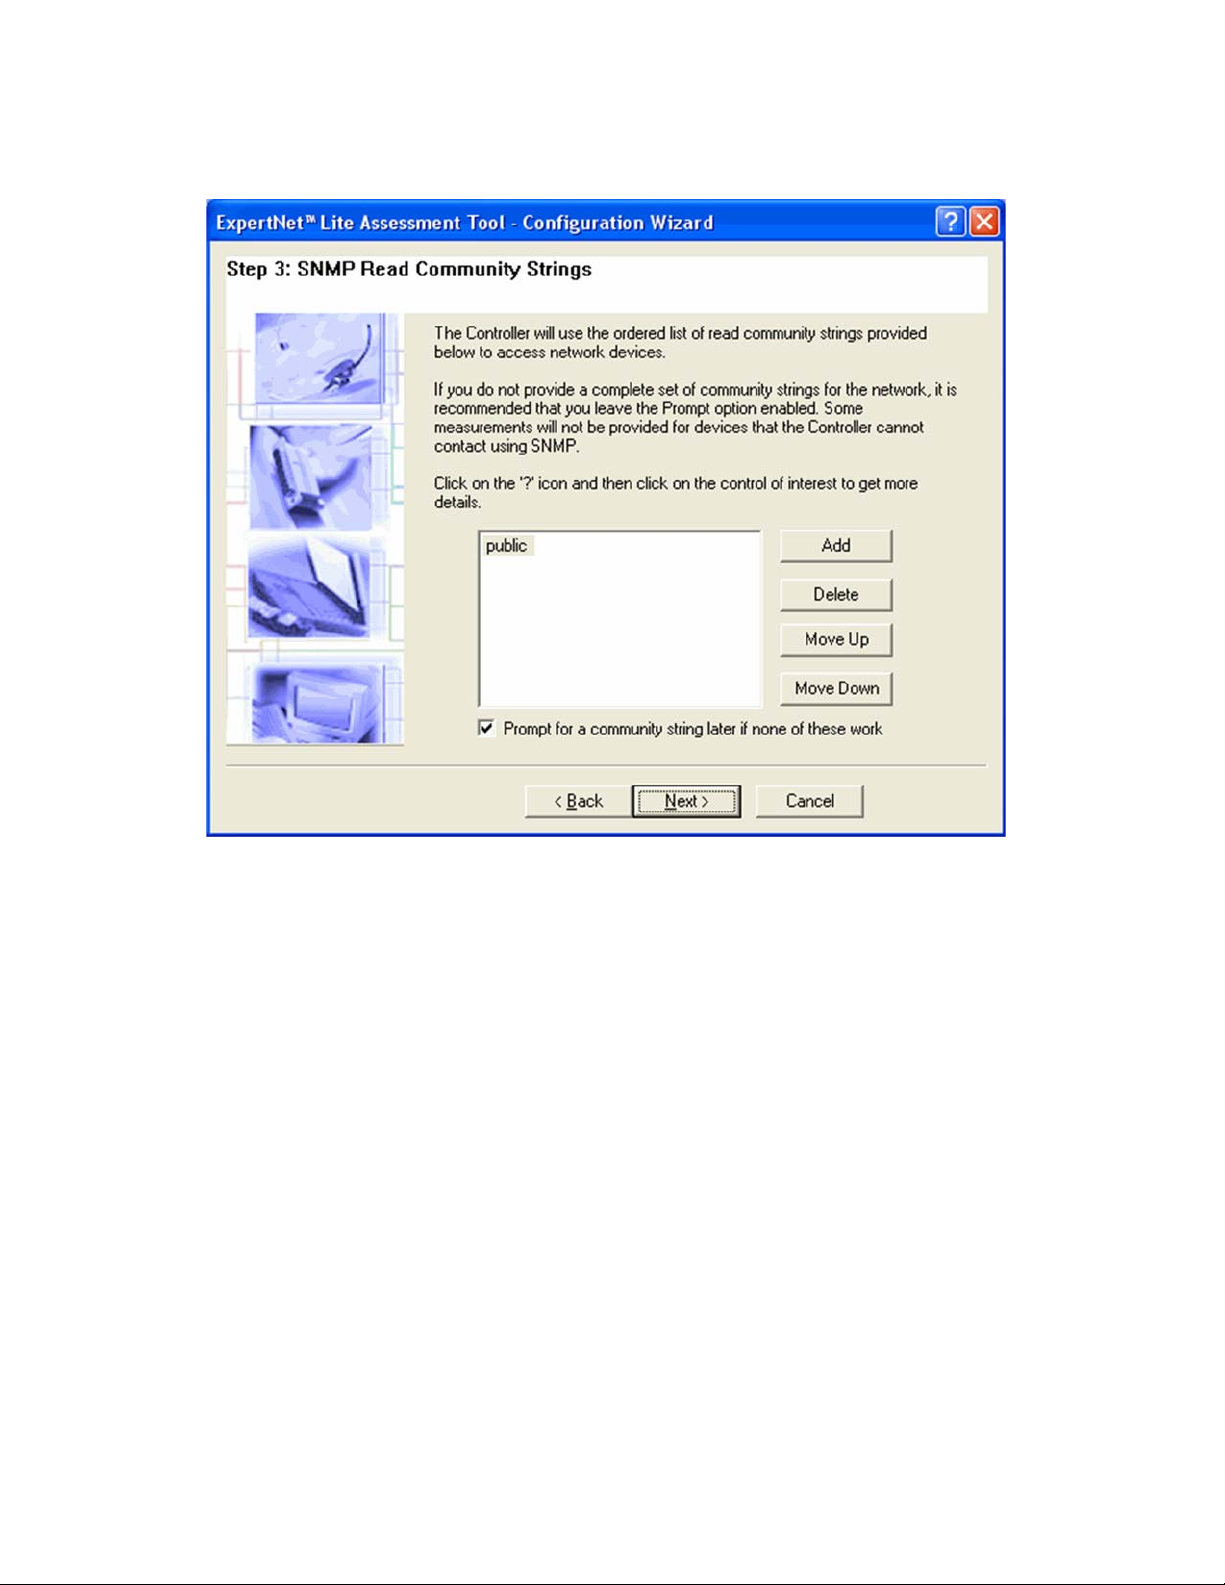
Step 3: SNMP Read Community Strings
Read Community strings are used to retrieve SNMP data from the customer network.
Without the community strings we cannot retrieve retrieve performance criteria (CPU,
interface) from devices.
If your customer does not want to give y ou the community strings, a workaround is to
ask the customer to create temporary Read community strings that expire or will be
deleted when ELAT has concluded data collection. Once the community strings expire
or are deleted, the community strings in the dataset will no longer be valid and wi ll
not compromise the customer’s network. We recommend "public" or "Avaya" as the
Read community strings. Please have the customer v erify that the community strings
will expire after data collection has concluded.
9
Page 12
ExpertNet Lite Assessment Tool - User Guide
If the customer is not willing to allow this level of access you can proceed without read
community strings. Performance criteria data will not be collected.
Add the appropriate SNMP read community strings, and prioritize using Move Up and
Move Down buttons. Select the Prompt for a community string later if none of
these work option if you want a warning to display when a device is discovered that
does not use any of the configured strings.
Deselect this option if the customer has not given you the read community strings.
10
Page 13
ExpertNet Lite Assessment Tool - User Guide
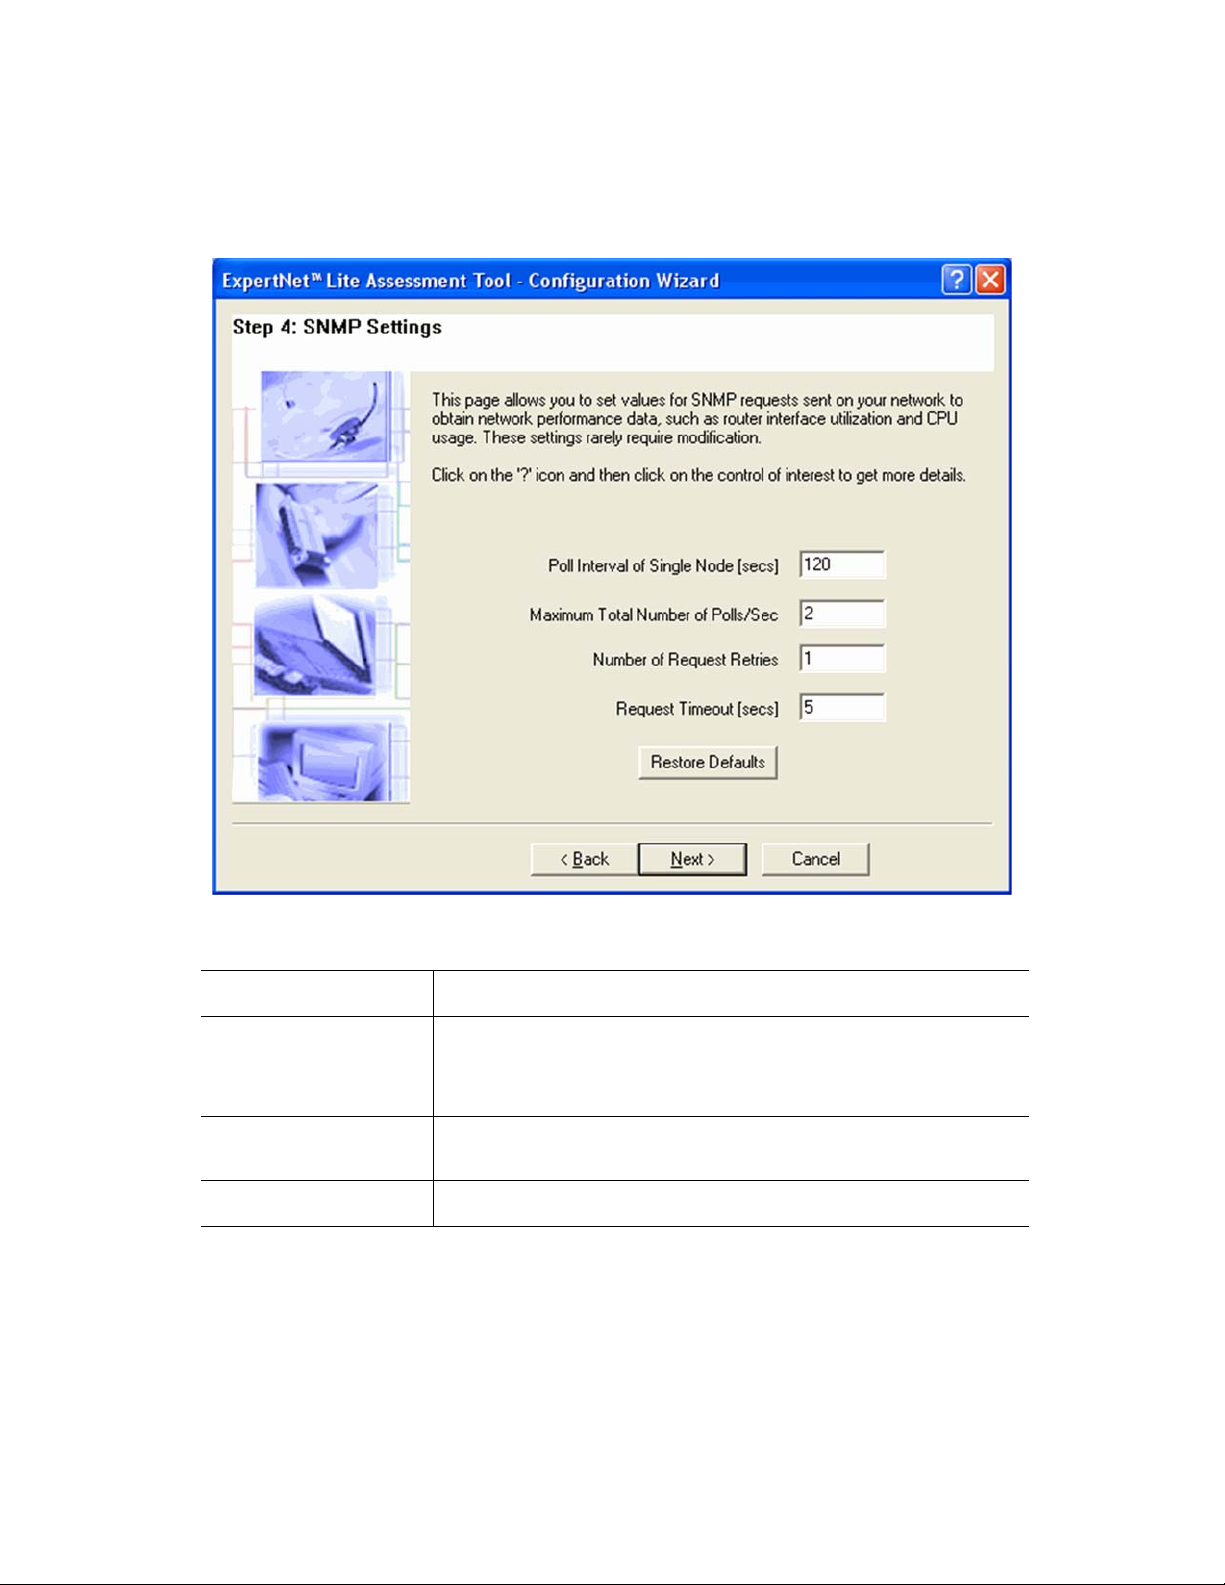
Step 4: SNMP Settings
On this page you can set values for SNMP requests sent on th e ne twork. These
settings rarely need to be changed.
Poll Interval of Single
Node
Maximum Total
Number of Polls/Sec
Number of Request
Retries
Request Timeout
(secs)
Poll interval defines the interval for sending SNMP requests to a single
node on the network. The default Poll Interval is 120 seconds.
Used to set network throttling by limitin g the number of SNMP requests
per second sent to all nodes. This setting takes precedence over Poll
Interval: if Poll Interval is too small, it is automatically recalculated by
the Controller to satisfy the Maximum Total). Default setting is 2 polls
per second.
Defines the number of times the SNMP request i s sent to a network
device if the response does not arrive within the period set in the
Request Timeout field. The default setting is 1.
Defines how many seconds the Control ler will wait for a response to an
SNMP request before sending a retry. The default setting is 5 seconds.
11
Page 14
ExpertNet Lite Assessment Tool - User Guide
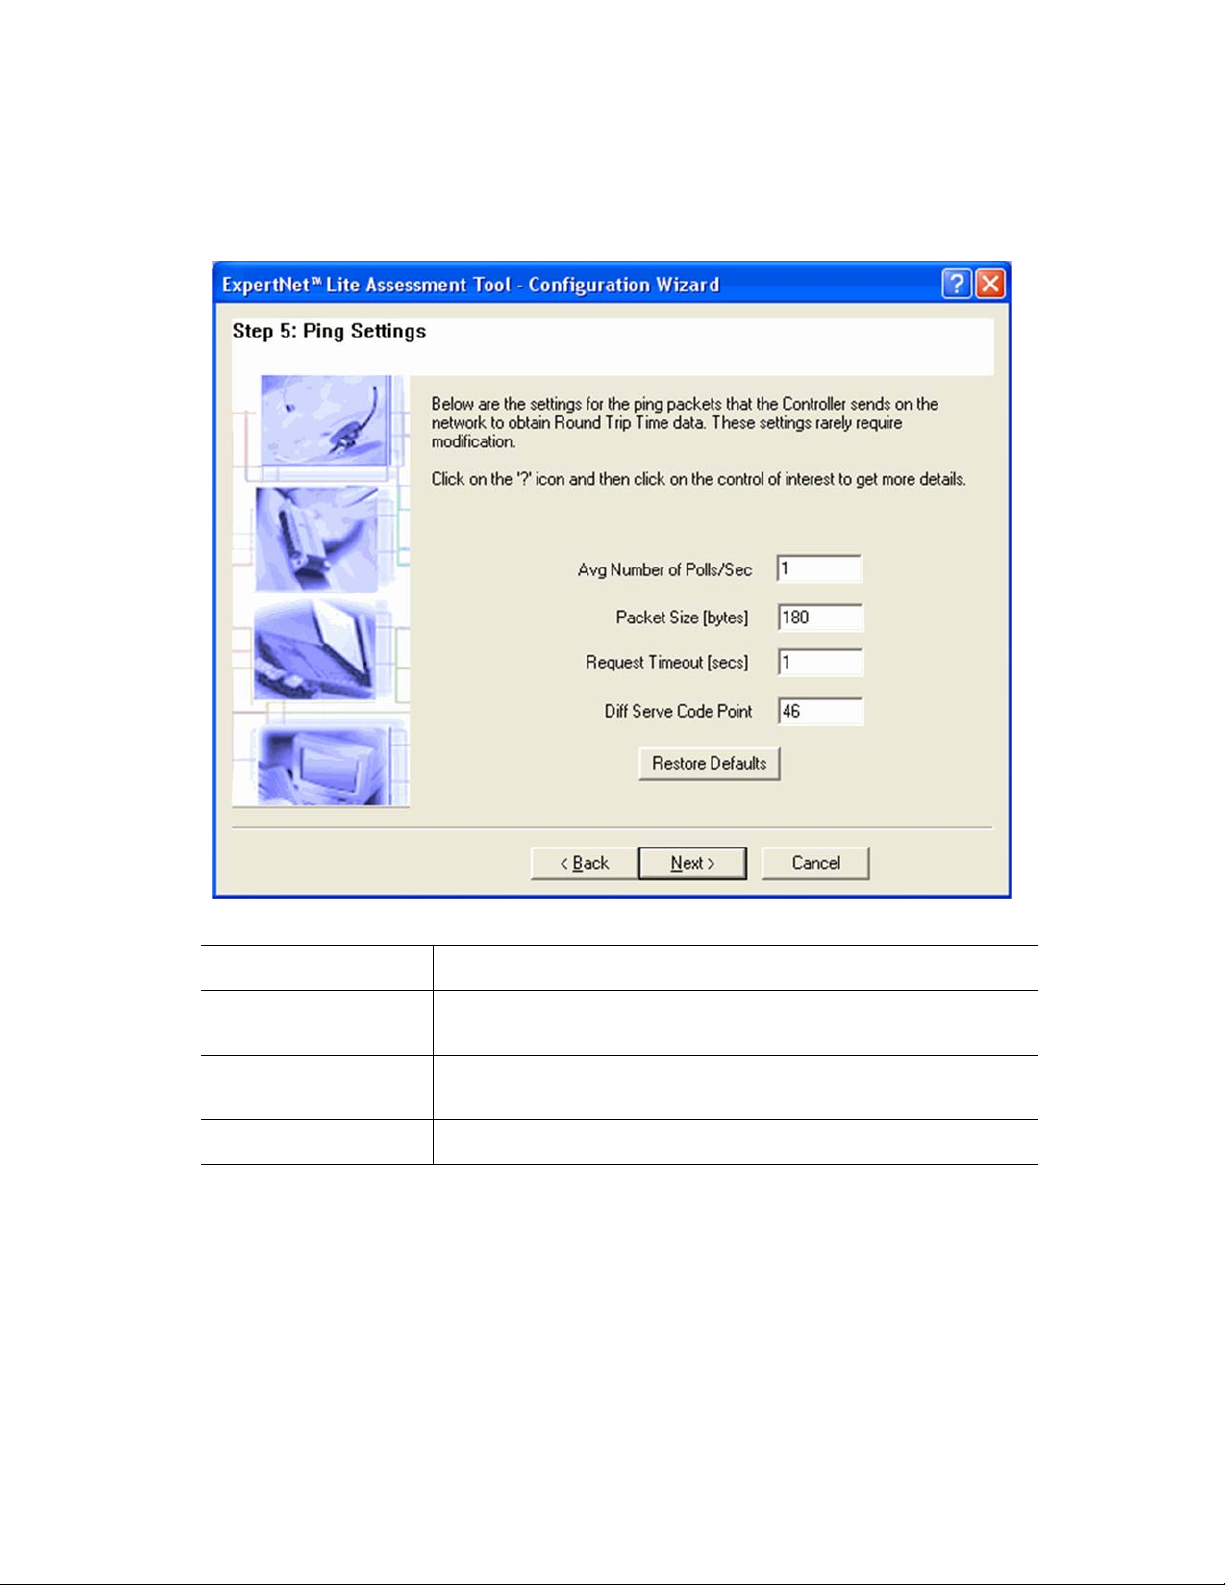
Step 5: Ping Settings
On this page you have the option to change the default settings for Ping tests run on
the network. Again, these settings rarely need to be modified.
Average Number of
Polls/Sec
Packet Size (bytes) Used to set the size of the packets sent by the Controller. The value is in
Request Timeout
(secs)
Diff Serv Code Point Defines the Differentiated Services Code Point of the IP Packet. By
Determines the frequency of sending ping probes to the network. The
default setting is 1 ping per second.
the byte size of the ping packet, without IP and Ethernet headers. The
default setting is 180 bytes.
Defines how many seconds the ELAT Controller will wait for a response
to a ping before it qualifies the packet as lost. The default setting is 1
second.
default this value is 46 (Expedited Forwarding).
12
Page 15
ExpertNet Lite Assessment Tool - User Guide
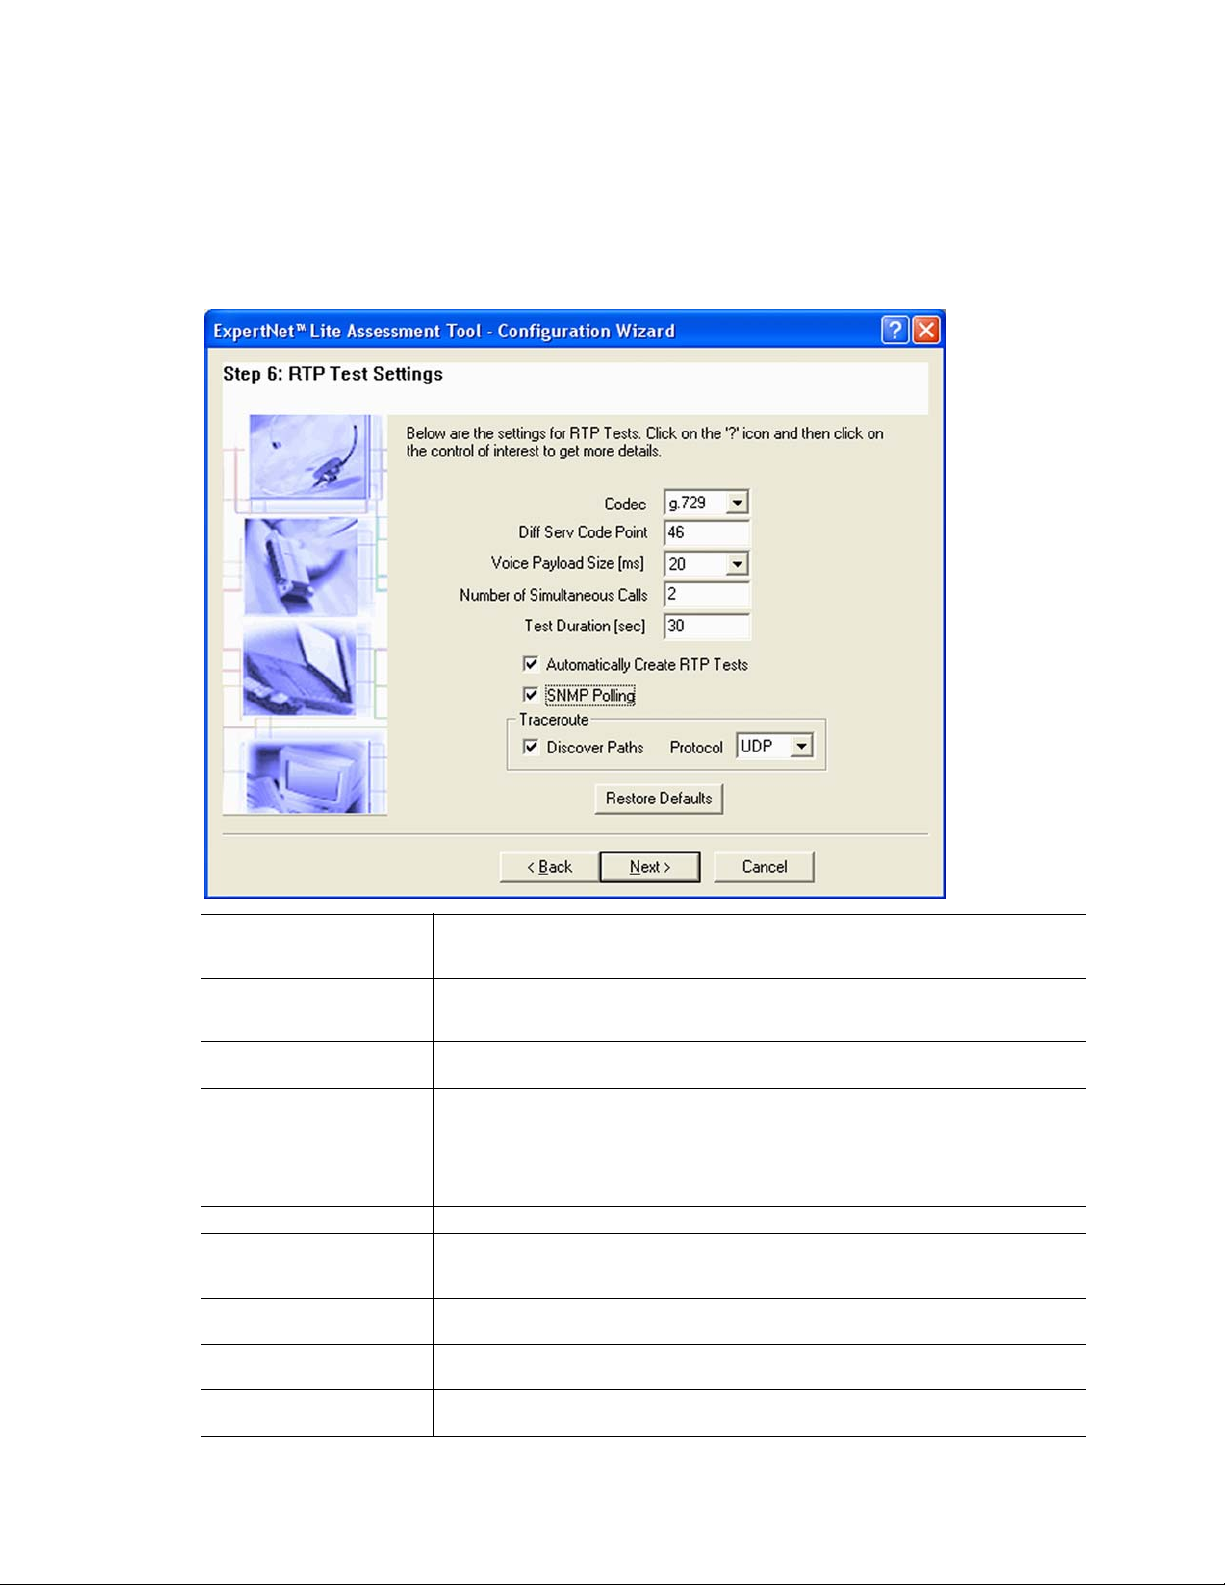
Step 6: RTP General Configuration
On this page you have the option to change the default settings for RTP tests run on
the network. All RTP tests that are added automatically will use these settings. You
can manually add further RTP tests with different settings when the Wizard settings
are configured.
Codec Defines the Codec of the RTP test calls. This will alter the rate and size of
Diff Serv Code Point Defines the Differentiated Services Code Point (DSCP) of the IP Packets of RTP
Voice Payload Size
(ms)
Number of
Simultaneous Calls
Test Duration Defines the duration of each RTP test call (in seconds).
Automatically Create
RTP Tests
SNMP Polling Check this box to allow the Controller to enable SNMP polling for RTP test
Discover Paths Check this box to allow the Controller to use traceroute to discover the paths
Protocol Select a traceroute protocol to be used to discover routers on the test path.
packets being sent between Traffic Simulators in order to emulate the G.711
and G.729 codecs.
test calls. Routers will treat packets differently depending on the DSCP value
set in outgoing packets. By default this value is 46 (Expedited Forwarding).
Defines the Voice Payload size of the RTP packets of a test call (in
milliseconds). Must be a multiple of 10.
Defines the number of RTP test calls to execute simultaneously for a single
test. The default value for this setting is 2. Measurements for each call can
only be taken in one direction. When two or more calls are configured, half of
them originate at the Controller and half at the test agent so data is collected
in both directions providing a more complete assessment of the network than
if a single call were run.
Check this box to allow the Controller to automatically create new RTP test
Calls from the Controller to the RTP Traffic Simulator as the simulato rs
register.
calls.
between the Controller and the Traffic Simulators during RTP test calls.
The default setting is UDP.
13
Page 16

ExpertNet Lite Assessment Tool - User Guide
Step 7: RTP Ports Configuration
In this page you must configure the port settings that will be used against the test
agents.
RTP Ports Range Defines the starting port for the range of ports which can be used for RTP
tests. The typical range for RTP tests used by Avaya is 2048 to 3390, but any
other range between 1024 and 65535 can be used. The range needs at most
100 unobstructed ports to operate correctly.
RTP Ports Range End Defines the ending port in the range used for RTP tests.
Command Port Defines the port used by the Avaya Traffic Simulator to receive commands.
The default is port 50000. If this is changed, the same change must be made
in the Local Command Port field in the Remote Traffic Simulators
14
Page 17

ExpertNet Lite Assessment Tool - User Guide
Install and Configure the Avaya Traffic
Simulator
Installing the Avaya traffic Simulator
Install the Avaya Traffic Simulator on each remote endpoint you want to test. Each
remote endpoint MUST be on the same Voice VLAN on which the VoIP equipment will
be eventually installed. Each Traffic Simulator will take approximately 2 minutes to
install.
See Appendix A: Installing the Controller and Test Agents
the test agents.
for information on installing
Configuring the Avaya Traffic Simulator
When you restart the PC after installing the Traffic Simulator, the application icon will
display in your taskbar. The icon displays in red if the tool is not running and in green
if it is. Configure the test agent using the following process:
1. Double-click the icon in the task bar.
2. Ensure the IP address in the ExpertNet Controller field is the IP address of the
PC with the controller installed.
3. In the Local Command Port field, enter the port number that will be used to
receive commands. This value should match the Command Port value in step 7
of the ELAT Configuration Wizard and should not be changed unless required by
the network or firewall configuration.
4. Adjust the log level as appropriate for your needs. Setting this value to max may
have an adverse effect on the accuracy of results. Setting it to max would only be
required whenever there is a problem that requires debugging by support
engineers for ELAT.
5. Click OK.
When the test agents are configured thay should autmatically register with the
Controller. An RTP test will be automaticall y created for each end-point. These will
display in the network Paths View. This will be explained in detail in the next
section.
15
Page 18

ExpertNet Lite Assessment Tool - User Guide
Adding RTP Tests and Ping Tests Populating the Network Paths View
Add RTP Tests
About RTP Paths
An RTP path is a route from the ELAT controller to an edge PC that has the Avaya
Traffic Simulator installed. RTP paths can optionally be tracerouted. As metrics are
collected for RTP paths, they will be displayed in the Delay, Jitter and Loss columns.
If RTP paths are tracerouted, the routers discovered are represented in the Path
Details View for any selected path. By contrast, an RTP path without traceroute is
a route from the Controller to a target device through a "cloud" of unknown network
nodes.
Adding RTP Tests Automatically
RTP tests can be created for endpoints that have the Traffic Simulator installed,
running, and configured. RTP tests will automa tically be created for these endpoints as
they register if the Automatically Create RTP Tests option is selected in Step 6 of
the Wizard. These RTP tests will use the default settings configured in the Wizard.
Adding RTP Tests Manually
If the Automatically Create RTP Tests option is not selected, or if you want to add
multiple RTP tests with different parameters to the same endpoint, you can you the
Add RTP Tests option to manually add tests.
Creating multiple tests to the same endpoint can be useful for determining if varying
the values can yield dif feren t resu lts. For example adding a test to the same endpoint
and then changing the codec or the DSCP value could improve the RTP test results.
To add a new RTP test, select Add RTP Test item from the Network Paths menu or
click the toolbar icon .
Please follow on-screen instructions and context-sensitive help available in the Add
RTP Test dialog.
16
Page 19

ExpertNet Lite Assessment Tool - User Guide
TProtocolSelect a traceroute protocol to be used to discover intermediate routers on
To Endpoint Select an endpoint to which the RTP test is to be created. If Traffic
Codec Defines the Codec of the RTP test calls. This will alte r th e rate and si ze
Diff Serv Code Point Defines the Differentiated Services Code Point (DSCP) of the IP Packets
Voice Payload Size Defines the Voice Payload size of the RTP packets of a test call (in
Number of
Simultaneous Calls
Test Duration Defines the duration of each RTP test call (in seconds).
Discover Path Check this button if you want the Controller to discover intermediate
Protocol Select a traceroute protocol to be used to discover intermediate routers
SNMP Polling Check this button if you want the Controller to collect SNMP statistics
Simulators are connected and registered with the Controller, they will
be available in the drop-down menu for use in making new RTP tests
of packets being sent between Traffic Simulators in order to emulate
the G.711 and G.729 codecs.
of RTP test calls. Routers will treat packets differently depending on the
DSCP value set in outgoing packets. By default this value is 46
(Expedited Forwarding).
milliseconds). Must be a multiple of 10.
Number of equivalent VoIP calls for a selected codec in a single test.
The default value for this setting is 2. Measurements for each call can
only be taken in one direction. When two or more calls are configured,
half of them originate at the Controller and half at the test agent so
data is collected in both directions providing a more complete
assessment of the network than if a single call were run.
routers on the path to the endpoint.
on the path to the selected endpoint.
for devices on this path.
17
Page 20

ExpertNet Lite Assessment Tool - User Guide
Add Ping Tests
About Ping Paths
A ping path is a route from the ELAT controller to any ed ge device. Ping paths may
optionally be tracerouted.
Like RTP paths, if Ping paths are tracerouted, the routers discovered are represented
in the Path Details View for any selected path. In this displa y it will show their ingress
and egress interfaces along with other information. The last IP address on the path
always belongs to a Layer 2 edge device. By contrast, a ping path without
traceroute is a route from the Controller to a target device through a "cloud" of
unknown network nodes.
Adding Ping Tests Automatically
If routers on your network are SNMP-enabled and you know their read community
strings, the best option is to let the ELAT Controller discover network paths
automatically. To do so, select Discover Ping Tests from the Network Tests menu
or click the toolbar icon .
The Controller discovers all subn ets within a range defined in Parts of Network to
Discover page of the Configuration Wizard. An initial Ping is sent from the Controller
to all end-points in those subnets. When you complete and close the wizard, select
Network Tests > Discover Ping Tests to automatically add Ping tests in the
Network Paths View for all of the endpoints that respond to the initial Ping.
Adding Ping Tests Manually
If you cannot discover paths automatically, or you want to add paths leading to
subnets that could not be discovered, select Add Ping Test item from the Network
Paths menu or click the toolbar icon .
18
Page 21
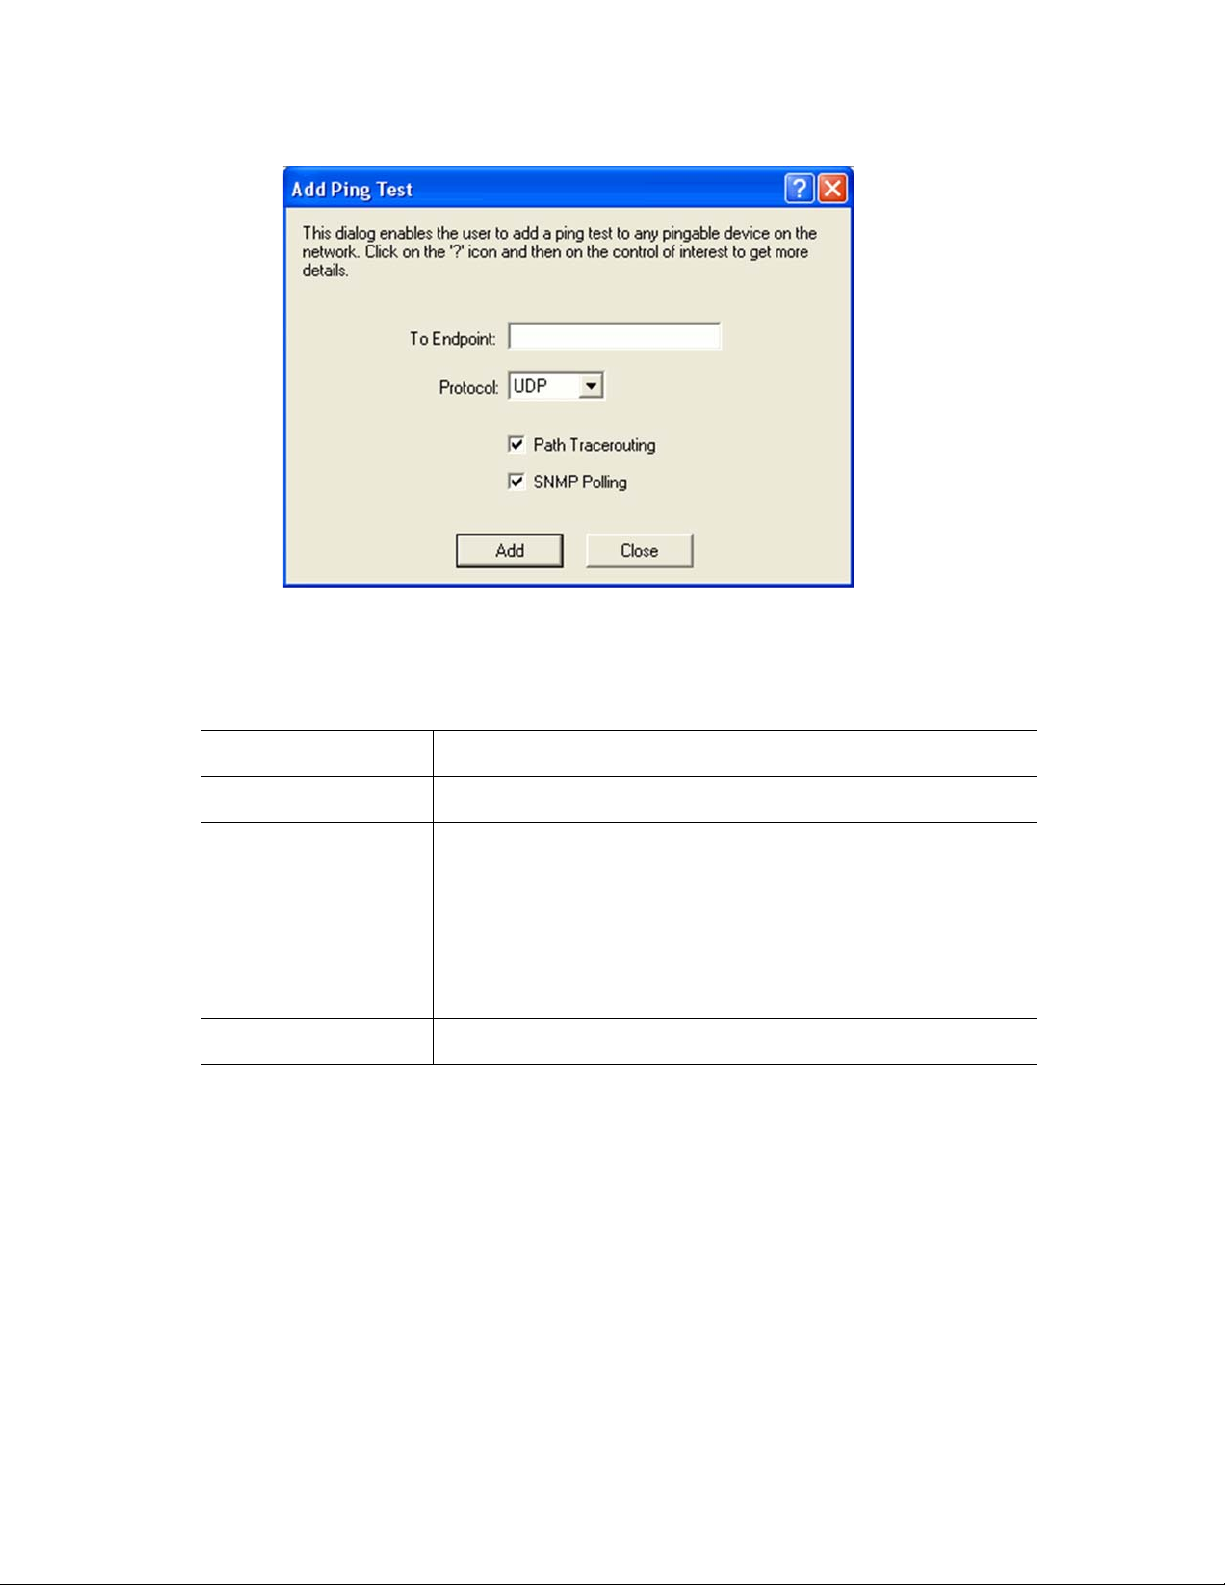
ExpertNet Lite Assessment Tool - User Guide
To Endpoint Host name or IP address of a device that you want to be an edge device
Protocol Select a protocol to discover and ping this path. UDP is the
Path Tracerouting Check this box if you want to use traceroute to discover and ping this
SNMP Polling Check this box if you want the ELAT Controller to collect SNMP statistic s
of the new ping test path.
recommended protocol.
path. If the button is not checked, only the edge device will be pinged.
With Traceroute: The Controller collects Round Trip Time (RTT) data
from ping paths by trace-routing every path periodically. This
information is displayed in the Path Details View. The SNMP statistics
are collected only for ingress and egress interfaces of every router.
Without Traceroute: The Controller collects RTT data from ping
paths with traceroute by pinging every target directly. The SNMP
statistics are collected for all Layer 3 interfaces of the target device.
(CPU and interface utilization) for devices on the test path.
19
Page 22

ExpertNet Lite Assessment Tool - User Guide
Understanding the Network Paths View
All of the Network Paths or Tests that you have created are added in the Network
Paths view. The icon at the beginning of each row indicates the type of t est. The icons
display in red for failed tests. The remaining columns contain further information
about the test parameters and results.
RTP Tests
The below image displays the Network Paths view of an RTP test. All of the columns
contain data when the test is added. When a test is verified or run the results will be
entered in the last three columns, Delay, Loss and Jitter. The test Status may change
depending on the test results. The table below explains all of the columns in detail.
Tests are run from the Controller to the Traffic Simulator, and from the Traffic
Simulator to the Controller. Results are displayed in forward/backward notation. For
example, 30/150 indicates that there was 30ms delay forward and 150ms backwards,
indicating an asymmetrical network path.
ELAT will traceroute ONLY in the forward direction and not the reverse.
20
Page 23

ExpertNet Lite Assessment Tool - User Guide
RTP tests offer more complex settings than ping tests and it maybe worth while having
multiple tests to the same endpoint with different settings to see whether there is an
impact on the metrics gathered. See “Troubleshooting” on page 35 for more
information about RTP tests.
Ping Tests
The following is an example displays two ping tests with different settings. As you
can see only the first 6 columns contain data. QoS data can only be gathered using
RTP tests.
Columns in the Network Path View
The columns in the Network Path View window are as follows:
To Endpoint The endpoint the test is against, typically an edge PC. The icon
Test Type Shows more precisely the type of tests. For RTP tests, this can
Test Status Indicates the last known state of a test. RTP tests can go into the
Tracert Status Indicates whether traceroute is enabled or disabled for a path.
SNMP Status Displays whether there is a router/switch in the path which ca n
indicates the type of test. The phone icon represents an RTP test
and the computer icon represents a ping test.
say G.711 or G.729, representing the different codecs. For ping
tests, this will be ICMP or UDP.
OK, Failed and Timeout categories.
- OK - The endpoint responded successfully.
- Not Pingable - The endpoint is not pingable.
- Timeout - A ping request was sent, but a response was
not received.
- Off Path - A ping response was received from a device
not located on the tracerouted path.
- Failed – No results returned for the RTP test
Will be automatically off if the test is in the same subnet.
be contacted using SNMP.
- OK - SNMP status was successfully obtained.
- Not Contactable - The device cannot be contacted.
- Not Supported - The device does not support SNMP
queries, or the SNMP Polling option has been deselected..
- Timeout - The device did not respond to an SNMP query
in time.
21
Page 24

ExpertNet Lite Assessment Tool - User Guide
DSCP (Differentiated
Services Code Point)
Number of calls Indicates the number of calls that will be run simultaneously on
Delay/Loss/Jitter Each column indicates the QoS metric for that column. These will
This column is useful for determining DSCP problems on the
network. The DSCP is shown in a slash notation. The first value is
the user-requested DSCP that will be injected into the network
with the Ping/RTP packets. The second values show all the DSCP
values that were found in the network in a comma separated
format. For example:
46|46,20/30,0 - means 46 was the priority code of packets sent
into the network. On the forward link, packets were received with
the setting 46 and 20, and on the backward link, it found packets
with the setting 30 and 0. This indicates that the network isn't
preserving the DSCP value.
that link. Can run up to 10 calls on a single network link at the
same time.
only be populated for RTP tests when a result is obtained, which
is at the end of the call length that is configured for that test.
These columns will be blank for ping tests.
The Traffic Simulator will occasionally fail computing a test and
this is represented in the controller as 100% loss and the status
Failure. This does not mean your network actually has 100% loss
on that link and this can be easily confirmed with a ping test.
These results are thrown away for the purposes of graphing so it
will not affect the reports.
When ELAT completes the data collection, it will upload the dataset automatically to
the FTP server as configured in the Configuration Wizard.
22
Page 25

ExpertNet Lite Assessment Tool - User Guide
Verify the Tests
When all of the tests you want to run are co nfigured you shou ld veri fy them to ensu re
that they can be run successfully. It is especially important to verify all RTP tests at
least once as you may have firewall and port related i ssues when the tests are started.
Any failures should be investigated before commencing the week long measurements.
Appendix B: Firewall Configuration
Click the toolbar icon , or right-click and select Verify to verify all selected the
tests.
Use the Select all button on the toolbar to select all of the configured tests.
Alternatively, use Ctrl+click and Shift+click to select multiple tests.
for information on configuring firewalls)
23
Page 26

ExpertNet Lite Assessment Tool - User Guide
Begin Data Collection
At this point the Network Paths View should be populated with tests that provide a
good coverage of your network, and all of these tests should be verified.
Every ping test will collect raw R ound Trip Time (RT T) data for all ingres s interfaces on
the path. Every RTP test will cause a flow of RTP packets through the network and
collect QoS data. In addition, each SNMP-contactable router will be polled to collect
CPU and interface utilization.
To start collecting RTP, Ping and SNMP measurements, select Start Measurements
item from the Measurements menu or click the toolbar icon .
Data is collected for the Data Collection Interval time set in the General Settings
page of the Configuration Wizard or until stopped.
Leave ELA T running until the test period is o ver. A progress bar displa ys at the bottom
of the window.
24
Page 27

ExpertNet Lite Assessment Tool - User Guide
When the tool is finished running a dialog will display giving you the option to upload
the gathered data so that a report can be generated. Click OK to upload.
If the automatic upload fails for any reason, you can you the Upload button to try
again, or email the dataset to the ELAT support team (elatsupport@avaya.com
Automatic Upload Notification
The ELAT server polls the A v ay a external ftp server on a regular basis. Once the ELAT
server finds the dataset automatically uploaded, you will receive the foll owing email.
).
25
Page 28

ExpertNet Lite Assessment Tool - User Guide
Avaya Associates
Avaya Associates should then access the ExpertNet Lite web server and download
their report. For further information see Appendix C: Avaya Associates: Downloading
the Report.
Avaya BusinessPartners
BusinessPartners will receive an email with encrypted version of their report from their
ELAT representative.
When assessments are complete
After assessments are done, it is recommended that you remove the Traffic Simulators
from the PCs they are installed on.
26
Page 29

ExpertNet Lite Assessment Tool - User Guide
Analyzing the Report
Reports are generated in R T F format and can be viewed and edited in Microsoft Word.
All reports contain the following sections:
● Introduction to Avaya Basic Assessment report
● Executive Summary
● Background on data
● Series of charts
● Performance summary – entire network
● Overview – per path or target
● Delay
● Jitter
● Loss
● Ping Response
● CPU – if SNMP data gathered
● Interface – for most devices
● Recommendations and technical i nformati o n on VoIP
27
Page 30

Overview Graphs
ExpertNet Lite Assessment Tool - User Guide
● Overview chart is available per path or target
● Delay and Jitter hav e maximum, aver age, and minimum v alues-max and min are
only in the overview chart
● Average is over a 10 minute period
28
Page 31

ExpertNet Lite Assessment Tool - User Guide
QoS Graphs
Separate graphs displaying Delay Jitter and Loss are available for each target.
29
Page 32
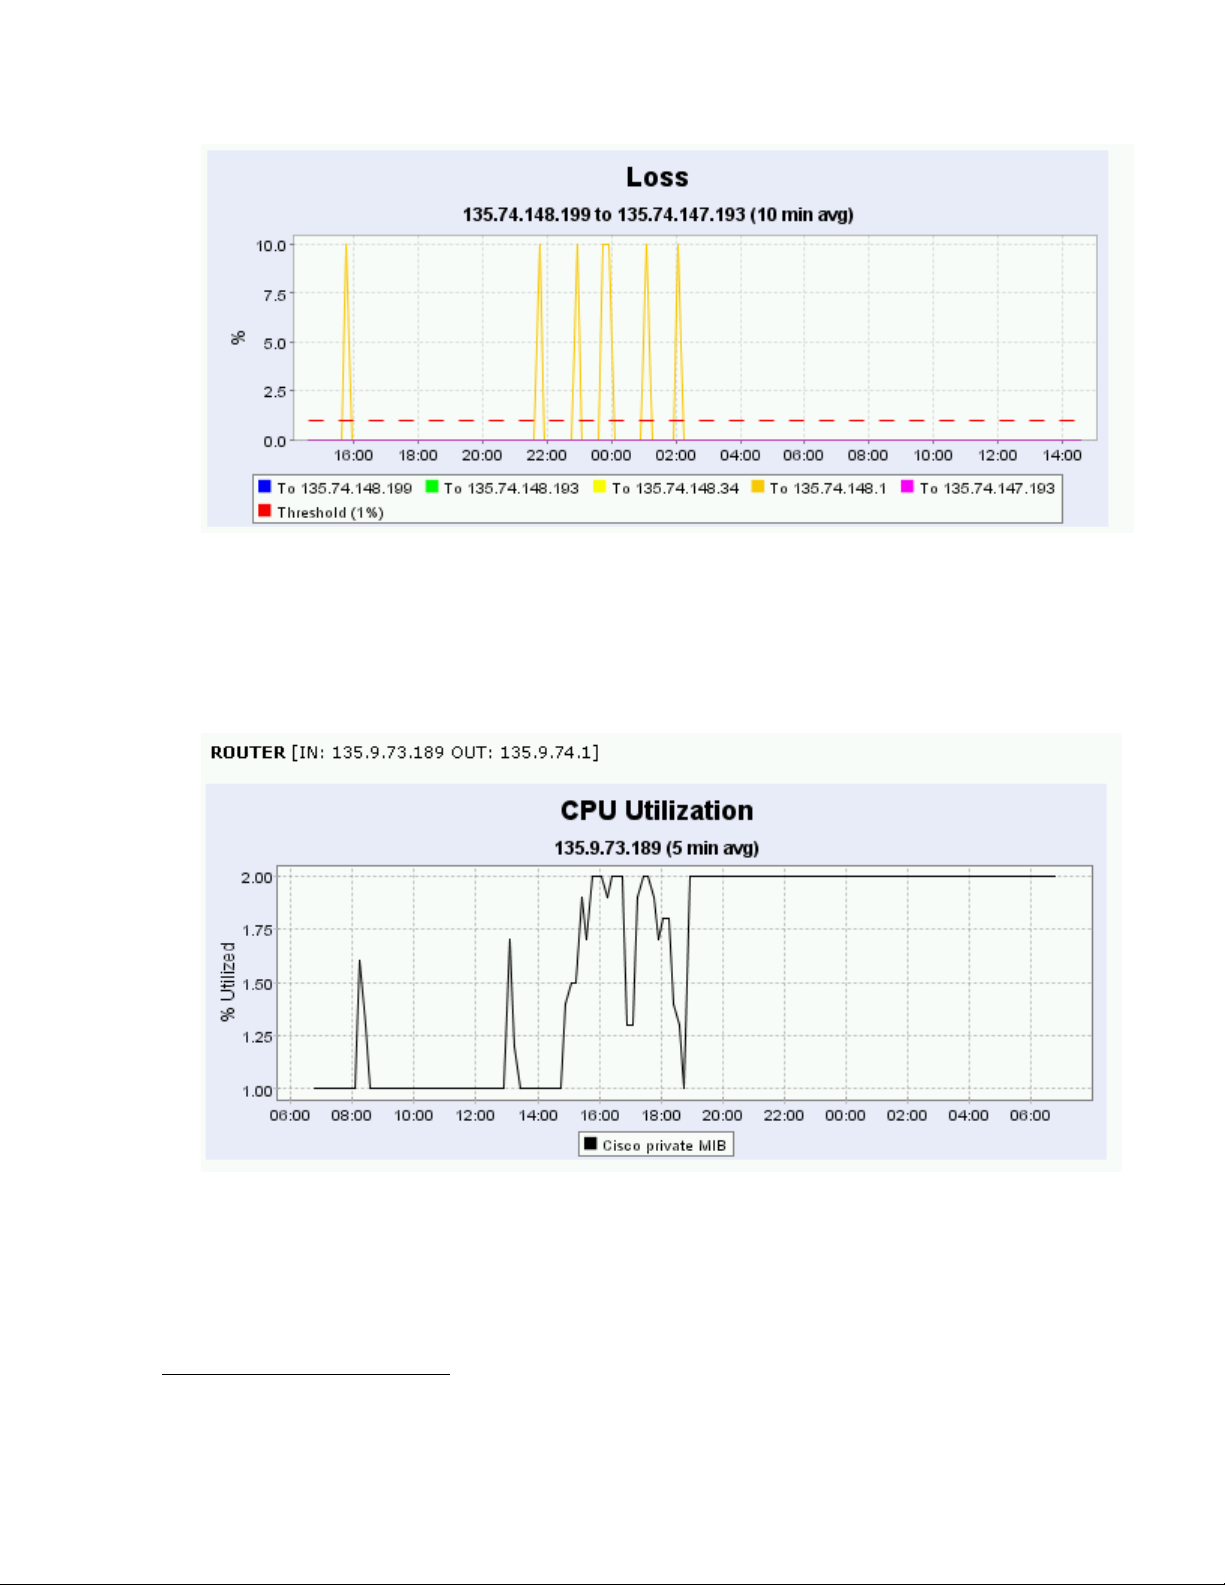
SNMP Data
ExpertNet Lite Assessment Tool - User Guide
If SNMP access to routers is enabled, and read community strings are available graphs
1
displaying performance criteria will also be available.
.
1. This feature is only available for Cisco Routers, Cajun, Extreme, 3Com, Xylogics devices at this time.
30
Page 33

ExpertNet Lite Assessment Tool - User Guide
31
Page 34

ExpertNet Lite Assessment Tool - User Guide
Troubleshooting
Q: My customer does not want to give us the community string. Is there a
workaround to not giving Avaya or its representatives the community
string(s)?
A: Without the community strings we cannot retrieve performance criteria (CPU,
interface) from devices. A workaround is to ask the customer to create temporary
Read community strings that expire or will b e deleted when ELAT has concluded data
collection. Once the community strings expire or are deleted, the community strings in
the dataset will no longer be valid and will not compromise the customer’s network.
We recommend "public" or "Avaya" as the Read community strings. Please have the
customer verify that the community strings wi ll expire after data collection has
concluded.
Q: Why do I not see a path that I was expecting to see?
A: The following are some of the reasons why you do not see the expected path:
● The EDT ma y not discover the desired subnet because, either there is no read
SNMP community string available for any of the devices along the path, or the
sub-network is out of scope limit.
● The ELAT Controller could not complete the "traceroute" to the desired host.
● The expected path is part of another long path, in which case, the expected path
was removed as a Redundant path.
Q: Why do I see 100% packet loss for a given path?
A: The following are some of the reasons:
● Some devices are not responding to UDP ping which will show up as 100%
packet loss. Use the udping utility located in the /bin directory to verify that the
device does respond to UDP ping.
● The Network might have changed during the data collection phase, in which
case, the device is not reachable.
If the device responds to an ICMP, but not a UDP ping, use the ICMP option.
Q: Why are there no interface statistics for one of my routers?
A: Usually this is caused when the device does not support the standard MIB-2
interface counters. This is common for Avay a Cajun devices in particular. Please verify
the inOctets / outOctets and inDiscards / outDiscards are available using MIB browser.
32
Page 35

ExpertNet Lite Assessment Tool - User Guide
Q: Why is there no CPU utilization for one of my routers?
A: There are several reasons why CPU is not being reported:
● CPU is supported for some (not all) devices manufactured by 3Com, Avaya,
Cisco, Extreme, and Xylogics.
● Older devices may not support SNMP
● The community string was not pro vided, or is not correct.
Q: I just created the license file and the customer is receiving a license
expired message-why?
A: The license file is a window to run the ELAT Controller - there is a definitive start
time (when the license was generated) and end time. The start time is the date and
time the license was generated on the ELAT Server. If the customer Windows
computer has a date-time before the license was generated, the ELAT Controller will
report that the license has expired. There are two ways to solve this problem:
● Change the date and time of the Windows computer.
● Wait until the Windows computer date-time passes the license file generated
date-time.
Q: I have multiple routers attached to the Controller PC subnet. Will this
work?
A: Yes it will work as long as the default gateway from the Controller PC is reachable
and SNMP enabled.
Q: Is there a rule to select the edge devices when run in Target mode?
A: The rule is to select any IP device that responds to the udping utility. However, we
have found that Printers and some Sun Servers do not fare well in responding to the
UDP pings.
Q: Why is it that when I attempt to upload a dataset I receive an error?
A: There are two possible scenarios:
● The upload is taking longer than the timeout session for the browser. Verify that
the browser is bypassing the proxy server for local addresses. Try doing the
upload early in the morning or late at night when network traffic is lowest. As a
last case, copy the dataset to the field problems server and open a ticket with
the STARS team at http://gsomissrv2.global.avaya.com/request_system/
request.asp?tools_team=1
● When the dataset was copied from one computer to another it was corrupted.
For example, ELAT is run on a Windows XP box. When it is done running, you ftp
it to another computer. When you use the ftp command, the binary option was
not used, so the file was not transferred in a binary format. When you upload the
file to the ELAT server, there is an error. To correct for this problem, always
transfer the file in binary format.
33
Page 36

ExpertNet Lite Assessment Tool - User Guide
Q: Where are the log files stored?
C:/Program Files/Avaya/E LAT/logs
Q: Can I use network devices as endpoints of a path?
A: No, you should avoid using network devices if at all possible as endpoints. There
are several reasons why this should be avoided:
● The goal of ELAT is to measure the entire path, from where ELAT is deployed to
where an IP phone hypothetically would be located, which include the last
network device on the path. If you use that device as the endpoint, you are no
longer measuring the devices' delay, loss, and jitter, but the path to it. If the
device is saturated on the egress interface(s), you will never know-it's the
endpoint and we don't use the egress interface, only the ingress.
● Some network devices will throttle ICMP responses to a UDP port unreachable,
but will pass-through the pings. Let's say we have a router and the CPU is at a
high utilization and we are using it as the edge host. We do a UDP pi ng - and the
router holds onto it until the utilization drops - and then sends the response. Or
the router just ignores the UDP ping entirely . Either w ay, the results are skewed.
Q: What devices should I use as endpoints?
A: For RTP tests endpoints must be Windowx XP boxes with the Avaya Traffic
Simulator installed.
For Ping tests, PCs or UNIX workstations are preferred. The hardware is typi cally v ery
stable, and many PCs or workstations will respond to pings quite efficiently. Network
hardware (listed above) should be avoided if at all possible. Newer printers may be
used, but ping (UDP and ICM P) them first to ensure that they will respond. If you are
using laptops, verify that the laptops will not hibernate or go into standby mode
during the engagement.
Q: What ports does ELAT use?
A: ELAT uses a range of ports. The ports range between:
24000 - 26000 and 27000 - 34000 with the exception of port 33711 and 33712.
It also uses the port range 2048 to 3389 for RTP Tests. Note that it only requires the
first 100 or so ports in this range to be free.
See: C:/Program Files/Avaya/ELAT/config/config.xml for further details.
Q: How does the SNMP access work? Is it read only? What variables are
retrieved?
A: The SNMP access is read-only. The Controller collects processor and interface
utilization variables. Processor utilization is supported by proprietary OIDs
(cpmCPUTotal5sec and busyPer for Cisco, a3sysCpuUtil for 3Com,
extremeCpuAggregateUtilization for Extreme, genCpuAverag eUtilization for new Cajun
34
Page 37

ExpertNet Lite Assessment Tool - User Guide
devices, cpuUtilization for Xylogic). Interface utilization is retrieved from standard
MIB2 (ifInOctects, ifOutOctets, ifInDiscard, ifOutDiscards). If ifXTable extension MIB is
supported on a device, high-precision values ifHCInOctects and ifHCOutOctets are
retrieved instead of ifInOctets and ifOutOctets.
Q: The Delay graphs show a threshold of 80msec. Is this one way or round
trip?
A: All measurements are in one way delay. RTP tests can determine one way delay
without needing RTT. Ping tests are actually recording RTT and dividing by two.
Q: How long will a dataset remain on the server?
A: Datasets are archived after approximately six months. If this is not convenient, or
will interrupt your project, please let the ELAT team know.
Q: ELAT was not run in the network that it should have been. Can I rerun
ELAT with the same license file and same customer name?
A: License files are valid for a maximum of 30 days. As long as the license has not
expired when ELAT is started it will run.
Q: I need to rerun ELAT with the same customer at the same location. Will
the first dataset be overwritten?
A: No. We do not allow or support overwriting datasets. All datasets are considered
unique and stored separately, irrespective of how many times ELAT has been run at a
customer location.
Q: How much traffic does ELAT create on a network?
A: The ELAT Controller generates very little traffic. Default settings in
<ELATControllerBaseDir>\config\config.xml are:
1. Average number of pings/second is 2.
2. Maximum of 2 SNMP get requests/second. This is a default throttling parameter,
not an average value. SNMP poll interval for each node is by default equal 60
seconds. It means that if there are 10 SNMP-polled nodes, each of them will be
polled every 60 seconds, so there is a SNMP GET request issued to the network
every 6 seconds in equal intervals
Ping datagrams are 180 bytes. SNMP PDU's can vary from about 100 bytes to a few
kilobytes per request, depending on the amount of information per node. RTP traffic
datagrams range in size depending on the payload and can vary between 180 to about
300 bytes.
Q: How much bandwidth does ELAT use?
A: For each simutaneous call in an RTP test ELAT uses the expected bandwidth for a
single actual VoiP call.
35
Page 38

ExpertNet Lite Assessment Tool - User Guide
Q: How does the throttling mechanism work?
A: The throttling mechanism is separate for ping and SNMP polling. F o r SNMP,
configuration wizard in "Step 4: SNMP Settings" exposes Poll Interval of Single
Node[secs] and Maximum Total Number of Polls/Sec parameters. Poll interval defines
a polling frequency of each node. The second parameter limits the total number of
SNMP polls issued to the network. (Maximum Total takes precedence over Poll
Interval: if Poll Interval is too small, it is automatically recalculated by the Controller
to satisfy the Maximum Total). The default Poll Interval is 60 seconds, Maximum Total
is 2.
For ping polling, the configuration wizard in "Step 5: Ping Settings" exposes the 'Avg
Number of Polls/Sec' parameter which determines the frequency of sending pings to
the network. The default value is 2.
Q: There is a Diffserv value in the config.xml file. Does that tag UDP packets?
Is this one direction or both?
A: The ELAT Controller has the ability to tag UDP packets as diffserv. These packets
are outbound only; the response is an ICMP port unreachable, and is not tagged.
Q: Our report shows that the network fails the analysis, but there isn't much
loss and delay and jitter look acceptable. Why the failure?
A: Check to see if there is IPX or raw Netbios (not IP encapsulated) on the network.
These protocols do not respond to IP QOS and will not show up as IP traffic, but will
affect the IP traffic.
Q: I get the following error message on start up.
This is a known bug that occasionally happens on certain machines. It should only
occur once and then you should be able to continue.
Q: Upon start up, ELAT presents an error dialog showing: “Route redirection
is not disabled on this machine...” and then shuts down.
A
:
T
h
i
s
A: Typically the installer will set this registry variable on the controller PC.
Occasionally this will not work and it will have to be set manually.
● Open the registry with START -> RUN -> ‘regedit’.
36
Page 39

ExpertNet Lite Assessment Tool - User Guide
● Navigate to
HKEY_LOCAL_MACHINE\SYSTEM\CurrentControlSet\Services\Tcpip\Parameters\
EnableICMPRedirect and then set the value of this parameter to 0.
Q: The Traffic Simulator is on a machine with dynamic IPs and its IP keeps
changing.
A: The ELAT Controller identifies the Traffic Simulator by IP address and not MAC. If
the IP address does change, then the old entry for the Traffic Simulator needs to be
removed and the Traffic Simulator would need to re-register.
Q: Imported paths fail to run properly during a measurement run.
A: Whenever paths are imported, it is import ant to do a verification test to ensure that
the RTP Traffic Simulators that are indicated are actually registered with this ELAT
Controller and hence can be contacted for doing the test. If the Traffic Simulators do
not respond to the ELAT Controller, they will have to be restarted.
Q: RTP tests fail when used on a machine with an active VPN connection.
A: ELAT cannot run RTP tests if the controller or traffic simulator in question is on a
device with a VPN driver as this causes conflicts with the driver used by ELAT.
37
Page 40

ExpertNet Lite Assessment Tool - User Guide
Appendix A: Installing the Controller and
Test Agents
Installing the ExpertNet™ Lite Assessment Tool Controller
1. Double-click on the installer icon
2. Click Next.
3. The license agreement is presented. Accept the agreement and click Next.
4. Keep the default values and click Next to install all features to the d efault location.
As well as the ELAT Controller, this will install the ELAT Web server. This is a
lightweight application that is only active for the period the ELAT controller is
active. It will enable to to install the Avaya Traffic Simulators more quickly and
easily.
5. You are now ready to install the application, click Next.
6. Click Finish to complete the installation.
7. Now you are presented with the Reboot window. Click Yes to reboot the PC.
8. Y ou are now ready to install the license key. Y ou should have receiv ed the license
key from Avay a (usually via email). It is a file named “license.txt”. Paste the file
into the ELAT config directory. If you installed the device to the default location
the path is C:\Program Files\Avaya\ELAT\config directory. If there is an existing
file with the same name replace it.
9. For information on running ELA T, see the “ExpertNet LiteTM Assessment Tool User
Guide, Version 3.0”.
Installing the Avaya Traffic Simulator™
The Avaya Traffic Simulator has to be installed on remote endpoints in a customer
network. The easiest way to get the application onto customer machines is to
download via the web server onboard the ELAT server.
If you did not select the option to install the Web Server when installing the Controller
you can download the Traffic Simulator from the support.avaya.com portal.
Note: A Traffic Simu la t o r wi ll be installed on the ELAT controller PC by default on an
ELAT installation. This Traffic Simulator can only be uninstalled by uninstalling ELAT.
The remote Traffic Simulators can be uninstalled at any time.
1. Launch the ELAT Controller.
2. On the remote Traffic Simulator PCs, open up a browser window. In the Address
field, enter the IP address of the ELAT controller PC. If y ou have chang ed the W eb
38
Page 41
ExpertNet Lite Assessment Tool - User Guide
Server port from the default value of 80 you need to navigate to http://
<controller_ip_address>:<port_number>
NOTE: To find the IP address of the PC open the Control Panel > Network
Connections > LAN Area Connection dialog and open the Support tab.
3. On the page that displays, c li ck the link to download the test agent.
4. On the dialog that displays, click Run.
5. On the first screen you can see what version of the Traffic Simulator you are
running. Click Next to continue.
39
Page 42

ExpertNet Lite Assessment Tool - User Guide
6. On this page enter the IP Address or hostname of the Controller and click Next.
7. Enter the install location, use the default install location and click Next.
8. You are now ready to begin the installation. Click Nex t .
9. Click Close. The machine’s network connection will be momentarily disrupted.
This disruption will typically take 30 seconds at most.
10. A window displays giving you the option to reboot now or later. Click Yes to
reboot the PC. Rebooting is required to collect DSCP data. Upon start-up the
Traffic Simulator will contact the ELAT controller. The Traffic Simulator Monitor
icon is now available on the system tray for additional configuration if required.
40
Page 43

ExpertNet Lite Assessment Tool - User Guide
Appendix B: Firewall Configuration
If you have installed Avaya ExpertNet Lite Assessment Tool or Avaya Traffic Simulator
on a computer with a firewall installed, you may find that RTP tests fail. This may be
due to the test data being discarded by the firewall. You may configure common
firewalls to allow Avaya ExpertNet Lite Assessment Tool or Avaya Traffic Simulator to
be exempt from the firewall’s usual rules.
To configure Windows Firewall:
1. Open the Windows Firewall Configuration (Control Panel, Windows Firewall)
2. Click the Add Program button found on the Exceptions tab.
3. Click Browse, and select C:\Program Files\Avaya\Traffic
Simulator\TrafficSimulator.exe
4. Click OK.
5. Ensure the Don’t allow exceptions tick box is un-checked in the General tab.
To configure McAfee Personal Firewall:
1. Open McAfee Personal Firewall.
2. Select Personal Firewall Plus along the left side.
3. Click View the Internet Application List.
4. Find Traffic Simulator in the Application Name column.
5. Right-click Traffic Simulator and select Allow Full Access (If you don’t see
Traffic Simulator in the Application Name column, click Allow New Application
and enter C:\Program Files\Avaya\Traffic Simulator\TrafficSimulator.exe
6. Exit McAfee Personal Firewall.
To configure Norton Personal Firewall:
1. Open Norton Personal Firewall.
2. Select Status & Settings from the left menu bar.
3. Choose Personal Firewall from the middle column.
4. Click Configure.
5. In the new window, open the Programs tab.
6. Find Traffic Simulator in the Manual Program Control table.
7. Click the Internet Access column for Traffic Simulator, and select Allow All.
8. Click OK.
41
Page 44

ExpertNet Lite Assessment Tool - User Guide
To configure PC-Cillin Internet Security:
1. Open PC-Cillin Internet Security
2. Click Network Security along the left side.
3. Click Edit.
4. From the Personal Firewall Profile window, open the Exception List.
5. Click Add.
6. Enter the following information in the appropriate fields:
● Description: Avaya Traffic Simulator
● Target: Specified Application (enter C:\Program Files\Avaya\Traffic
Simulator\trafficSimulator.exe)
● Action: Allow
● Ports: All ports.
7. Click Save.
To configure Tiny Personal Firewall:
1. Open Tiny Personal Firewall.
2. Go to the Administrator Center.
3. From the Groups menu, click Trusted.
4. Click Enroll.
5. Enter Traffic Simulator in the application name field, then enter C:\Program
Files\Avaya\Traffic Simulator\TrafficSimulator.exe
6. Click Save.
To configure ZoneAlarm:
1. Open ZoneAlarm
2. Select Program Control along the left side.
3. Find Traffic Simulator, and click each r e d X so they are now green.
4. Select Allow.
5. Exit ZoneAlarm.
42
Page 45

ExpertNet Lite Assessment Tool - User Guide
Appendix C: Avaya Associates:
Downloading the Report
Download Report
Once the dataset is uploaded, you will be able to view and analyze the data by
generating a report.
1. Click on ExpertNet™ Lite Home link. Then click the View Datasets link.
2. Click on Download for the appropriate Customer ID. ELAT partitions datasets to
allow you to view only datasets uploaded by yo u and other members in the group.
The current User ID and the group name that he belongs to, is displayed on the
web page. If the User belongs to multiple groups, all groups are listed.
The ELAT server has functionality to generate a Rich Text Format (RTF) report with
charts. In the default functionality, all paths or targets are selected for inclusion in the
report.
As of ELAT 3.0, reports have been modified to support a new format. Paths may be
described twice if they were given different characteristics, (for example, different
DSCP level, different codec and so on).
The server will process your request, and depending on the siz e of the dataset and the
number of elements may take several minutes. Once processing is complete, you will
be prompted with the following menu.
You may open the file, or save for later use. The report is dynamically gener ated from
a RTF template and an XML data source, so there is no chance of acquiring a virus or
worm from the report.
43
Page 46

ExpertNet Lite Assessment Tool - User Guide
Generate and Download Custom Reports
A custom report that excludes certain targets or paths can also be generated.
1. Select the Generate link in the Custom Report column on the View Datasets page.
2. You will be presented with a graphical representation of the paths.
3. Select or deselect the ch ec kboxes next to path, as shown in the following image.
4. You can get information by hovering the mouse over the object:
5. To generate the RTF report, select the Generate Report link.
44
Page 47

Glossary
ExpertNet Lite Assessment Tool - User Guide
ExpertNet™ Lite
Assessment Tool
ExpertNet™
Discovery Tool
ExpertNet™ VoIP
Assessment Tool
ICMP Internet Control Message Protocol
IP Internet Protocol
MIBs Management Information Bases
OSPF Open Shortest Path First (routing protocol)
PSTN Public Switched Telephone Network
QoS Quality of Service
RTP Real-Time Transport Protocol
RTT Round-trip time
A tool designed to assess whether a customer network is
ready to support VoIP calls
Internet Protocol discovery, visualization, analysis and
disply tool, bundled with the ExpertNet™ Lite
Assessment Tool and not supported as a standalone tool
A more sophisticated Avay a tool for determining whether
a customer network is ready to support VoIP calls. It,
forexample, can simulate higher call volumes than the
ExpertNet™ Lite Assessment Tool
SNMP Simple Network Management Protocol
TCP Transmission Control Protocol
TTL Time-to-live
UDP User Datagram Protocol
VoIP Voice over Internet Protocol
NVQ
Network Voice Quality - an estimate of the Mean Opinion
Score of a call using packet-level measurements
End of Document
45
 Loading...