

Avaya ETR 6, ETR 18D, ETR 34D, ETR 6D, ETR 18 User Manual
...
- Issue 1a - (16 May 2010)
PARTNER Version ETR Phone User
Guide
IP Office Essential Edition

PARTNER Version ETR Phone User Guide Page 2
- Issue 1a (16 May 2010)IP Office Essential Edition
© 2010 AVAYA All Rights Reserved.
Notices
While reasonable efforts have been made to ensure that the information in
this document is complete and accurate at the time of printing, Avaya
assumes no liability for any errors. Avaya reserves the right to make changes
and corrections to the information in this document without the obligation to
notify any person or organization of such changes.
Documentation disclaimer
Avaya shall not be responsible for any modifications, additions, or deletions
to the original published version of this documentation unless such
modifications, additions, or deletions were performed by Avaya.
End User agree to indemnify and hold harmless Avaya, Avaya's agents,
servants and employees against all claims, lawsuits, demands and judgments
arising out of, or in connection with, subsequent modifications, additions or
deletions to this documentation, to the extent made by End User.
Link disclaimer
Avaya is not responsible for the contents or reliability of any linked Web sites
referenced within this site or documentation(s) provided by Avaya. Avaya is
not responsible for the accuracy of any information, statement or content
provided on these sites and does not necessarily endorse the products,
services, or information described or offered within them. Avaya does not
guarantee that these links will work all the time and has no control over the
availability of the linked pages.
Warranty
Avaya provides a limited warranty on this product. Refer to your sales
agreement to establish the terms of the limited warranty. In addition, Avaya’s
standard warranty language, as well as information regarding support for this
product, while under warranty, is available to Avaya customers and other
parties through the Avaya Support Web site: http://www.avaya.com/support.
Please note that if you acquired the product from an authorized Avaya reseller
outside of the United States and Canada, the warranty is provided to you by
said Avaya reseller and not by Avaya.
Licenses
THE SOFTWARE LICENSE TERMS AVAILABLE ON THE AVAYA WEBSITE,
HTTP://SUPPORT.AVAYA.COM/LICENSEINFO/ ARE APPLICABLE TO ANYONE
WHO DOWNLOADS, USES AND/OR INSTALLS AVAYA SOFTWARE,
PURCHASED FROM AVAYA INC., ANY AVAYA AFFILIATE, OR AN AUTHORIZED
AVAYA RESELLER (AS APPLICABLE) UNDER A COMMERCIAL AGREEMENT
WITH AVAYA OR AN AUTHORIZED AVAYA RESELLER. UNLESS OTHERWISE
AGREED TO BY AVAYA IN WRITING, AVAYA DOES NOT EXTEND THIS
LICENSE IF THE SOFTWARE WAS OBTAINED FROM ANYONE OTHER THAN
AVAYA, AN AVAYA AFFILIATE OR AN AVAYA AUTHORIZED RESELLER, AND
AVAYA RESERVES THE RIGHT TO TAKE LEGAL ACTION AGAINST YOU AND
ANYONE ELSE USING OR SELLING THE SOFTWARE WITHOUT A LICENSE. BY
INSTALLING, DOWNLOADING OR USING THE SOFTWARE, OR AUTHORIZING
OTHERS TO DO SO, YOU, ON BEHALF OF YOURSELF AND THE ENTITY FOR
WHOM YOU ARE INSTALLING, DOWNLOADING OR USING THE SOFTWARE
(HEREINAFTER REFERRED TO INTERCHANGEABLY AS “YOU” AND “END
USER”), AGREE TO THESE TERMS AND CONDITIONS AND CREATE A
BINDING CONTRACT BETWEEN YOU AND AVAYA INC. OR THE APPLICABLE
AVAYA AFFILIATE (“AVAYA”).
Avaya grants End User a license within the scope of the license types
described below. The applicable number of licenses and units of capacity for
which the license is granted will be one (1), unless a different number of
licenses or units of capacity is specified in the Documentation or other
materials available to End User. "Designated Processor" means a single
stand-alone computing device. "Server" means a Designated Processor that
hosts a software application to be accessed by multiple users. "Software"
means the computer programs in object code, originally licensed by Avaya
and ultimately utilized by End User, whether as stand-alone products or
pre-installed on Hardware. "Hardware" means the standard hardware
originally sold by Avaya and ultimately utilized by End User.
License types
Designated System(s) License (DS). End User may install and use each copy
of the Software on only one Designated Processor, unless a different number
of Designated Processors is indicated in the Documentation or other materials
available to End User. Avaya may require the Designated Processor(s) to be
identified by type, serial number, feature key, location or other specific
designation, or to be provided by End User to Avaya through electronic means
established by Avaya specifically for this purpose.
Copyright
Except where expressly stated otherwise, no use should be made of materials
on this site, the Documentation(s) and Product(s) provided by Avaya. All
content on this site, the documentation(s) and the product(s) provided by
Avaya including the selection, arrangement and design of the content is
owned either by Avaya or its licensors and is protected by copyright and other
intellectual property laws including the sui generis rights relating to the
protection of databases. You may not modify, copy, reproduce, republish,
upload, post, transmit or distribute in any way any content, in whole or in
part, including any code and software. Unauthorized reproduction,
transmission, dissemination, storage, and or use without the express written
consent of Avaya can be a criminal, as well as a civil, offense under the
applicable law.
Third Party Components
Certain software programs or portions thereof included in the Product may
contain software distributed under third party agreements ("Third Party
Components"), which may contain terms that expand or limit rights to use
certain portions of the Product ("Third Party Terms"). Information regarding
distributed Linux OS source code (for those Products that have distributed the
Linux OS source code), and identifying the copyright holders of the Third
Party Components and the Third Party Terms that apply to them is available
on the Avaya Support Web site: http://support.avaya.com/Copyright.
Preventing toll fraud
"Toll fraud" is the unauthorized use of your telecommunications system by an
unauthorized party (for example, a person who is not a corporate employee,
agent, subcontractor, or is not working on your company's behalf). Be aware
that there can be a risk of toll fraud associated with your system and that, if
toll fraud occurs, it can result in substantial additional charges for your
telecommunications services.
Avaya fraud intervention
If you suspect that you are being victimized by toll fraud and you need
technical assistance or support, call Technical Service Center Toll Fraud
Intervention Hotline at +1-800-643-2353 for the United States and Canada.
For additional support telephone numbers, see the Avaya Support Web site:
http://support.avaya.com
Suspected security vulnerabilities with Avaya products should be reported to
Avaya by sending mail to: securityalerts@avaya.com.
Trademarks
Avaya and Aura are trademarks of Avaya, Inc.
The trademarks, logos and service marks (“Marks”) displayed in this site, the
documentation(s) and product(s) provided by Avaya are the registered or
unregistered Marks of Avaya, its affiliates, or other third parties. Users are
not permitted to use such Marks without prior written consent from Avaya or
such third party which may own the Mark. Nothing contained in this site, the
documentation(s) and product(s) should be construed as granting, by
implication, estoppel, or otherwise, any license or right in and to the Marks
without the express written permission of Avaya or the applicable third party.
Avaya is a registered trademark of Avaya Inc. All non-Avaya trademarks are
the property of their respective owners.
Downloading documents
For the most current versions of documentation, see the Avaya Support Web
site: http://www.avaya.com/support
Contact Avaya Support
Avaya provides a telephone number for you to use to report problems or to
ask questions about your product. The support telephone number is
1-800-242-2121 in the United States. For additional support telephone
numbers, see the Avaya Web site: http://www.avaya.com/support

PARTNER Version ETR Phone User Guide Page 3
- Issue 1a (16 May 2010)IP Office Essential Edition
Contents
Contents
ETR Telephones1.
..................................................................... 91.1 Fixed Buttons
..................................................................... 91.2 Ringing Patterns
..................................................................... 91.3 Dial Tones
..................................................................... 101.4 Light Patterns
..................................................................... 101.5 Adjusting the Telephone Display
Basic Call Handling2.
..................................................................... 122.1 Making Calls
..................................................................... 132.2 Answering Calls
..................................................................... 142.3 Using Handsfree
..................................................................... 142.4 Hands-Free Answer on Intercom
..................................................................... 152.5 Adjusting the Volume
..................................................................... 152.6 Holding Calls
..................................................................... 152.7 Transferring Calls
..................................................................... 162.8 Conferencing Calls
..................................................................... 162.9 Joining Calls
Advanced Features3.
..................................................................... 183.1 Feature and Intercom Codes
..................................................................... 203.2 Naming Your Extension
..................................................................... 213.3 Absent Text Messages
..................................................................... 223.4 Forwarding Calls
..................................................................... 233.5 Call Coverage
..................................................................... 253.6 Auto Dialing
..................................................................... 263.7 Locking Your Extension
..................................................................... 263.8 System Speed Dials
..................................................................... 273.9 Personal Speed Dials
..................................................................... 283.10 Account Codes
..................................................................... 293.11 Parking Calls
..................................................................... 293.12 Call Pickup
..................................................................... 303.13 Do Not Disturb
..................................................................... 313.14 Voice Mailbox Transfer
Using Voicemail4.
..................................................................... 354.1 Accessing Your Mailbox
..................................................................... 364.2 Listening to Your Messages
..................................................................... 374.3 Record Your Name
..................................................................... 384.4 Changing Your Access Code
..................................................................... 394.5 Changing Your Greeting
..................................................................... 404.6 Voicemail Coverage On/Off
..................................................................... 414.7 Forwarding a Message
..................................................................... 414.8 Calling a Message Sender
..................................................................... 424.9 Voicemail Email
...............................................................................45Index


PARTNER Version ETR Phone User Guide Page 5
- Issue 1a (16 May 2010)IP Office Essential Edition
ETR Telephones
Chapter 1.

PARTNER Version ETR Phone User Guide Page 7
- Issue 1a (16 May 2010)IP Office Essential Edition
ETR Telephones:
1. ETR Telephones
The IP Office PARTNER Version supports the ETR Series of Avaya phones. The models supported are the ETR 6D, ETR 18D
and ETR 34D phones.
Feature
ETR 6
ETR 6D
ETR 18
ETR 18D
ETR 34D
Programmable buttons with lights
44161632
Programmable buttons without lights
00444
Intercom Buttons with light
22222
DisplayNoYesNoYes
Yes
Speakerphone
Yes
Yes
Yes
Yes
Yes
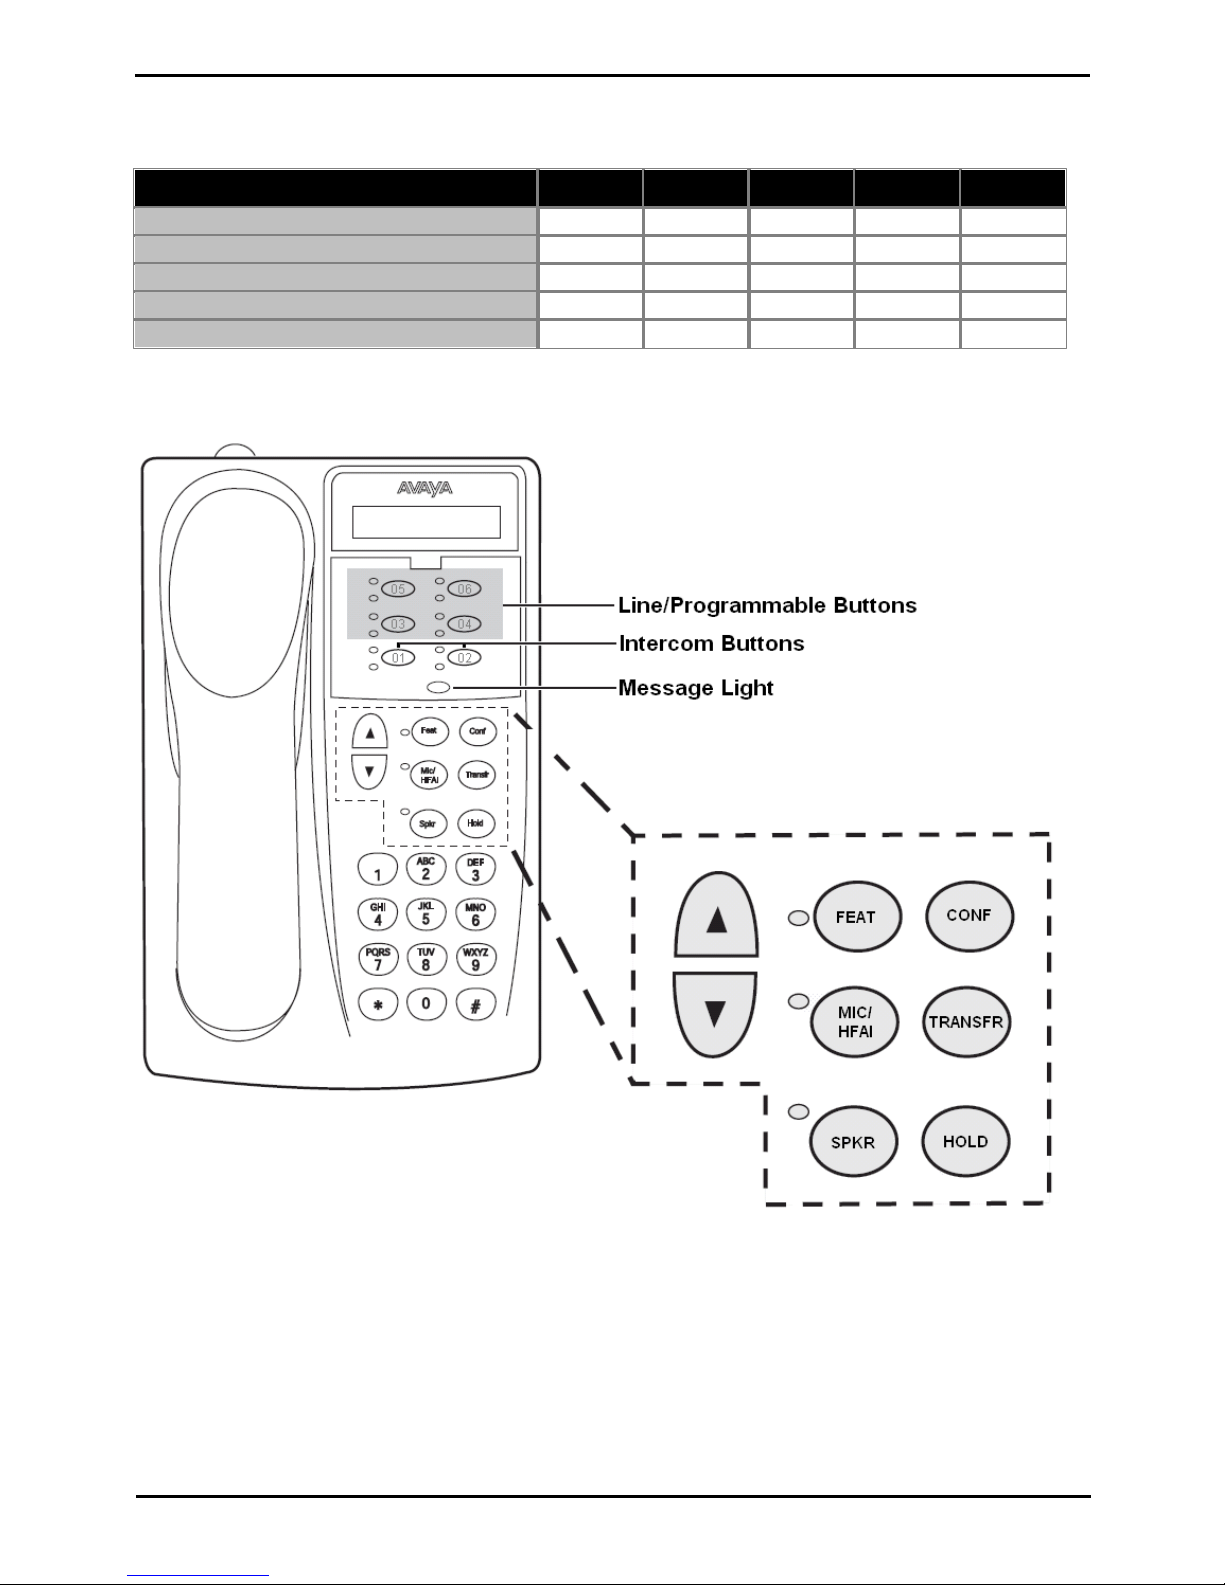
ETR 6/ETR 6D
The ETR 6 does not include a display. The ETR 6D includes the display.
PARTNER Version ETR Phone User Guide Page 8
- Issue 1a (16 May 2010)IP Office Essential Edition
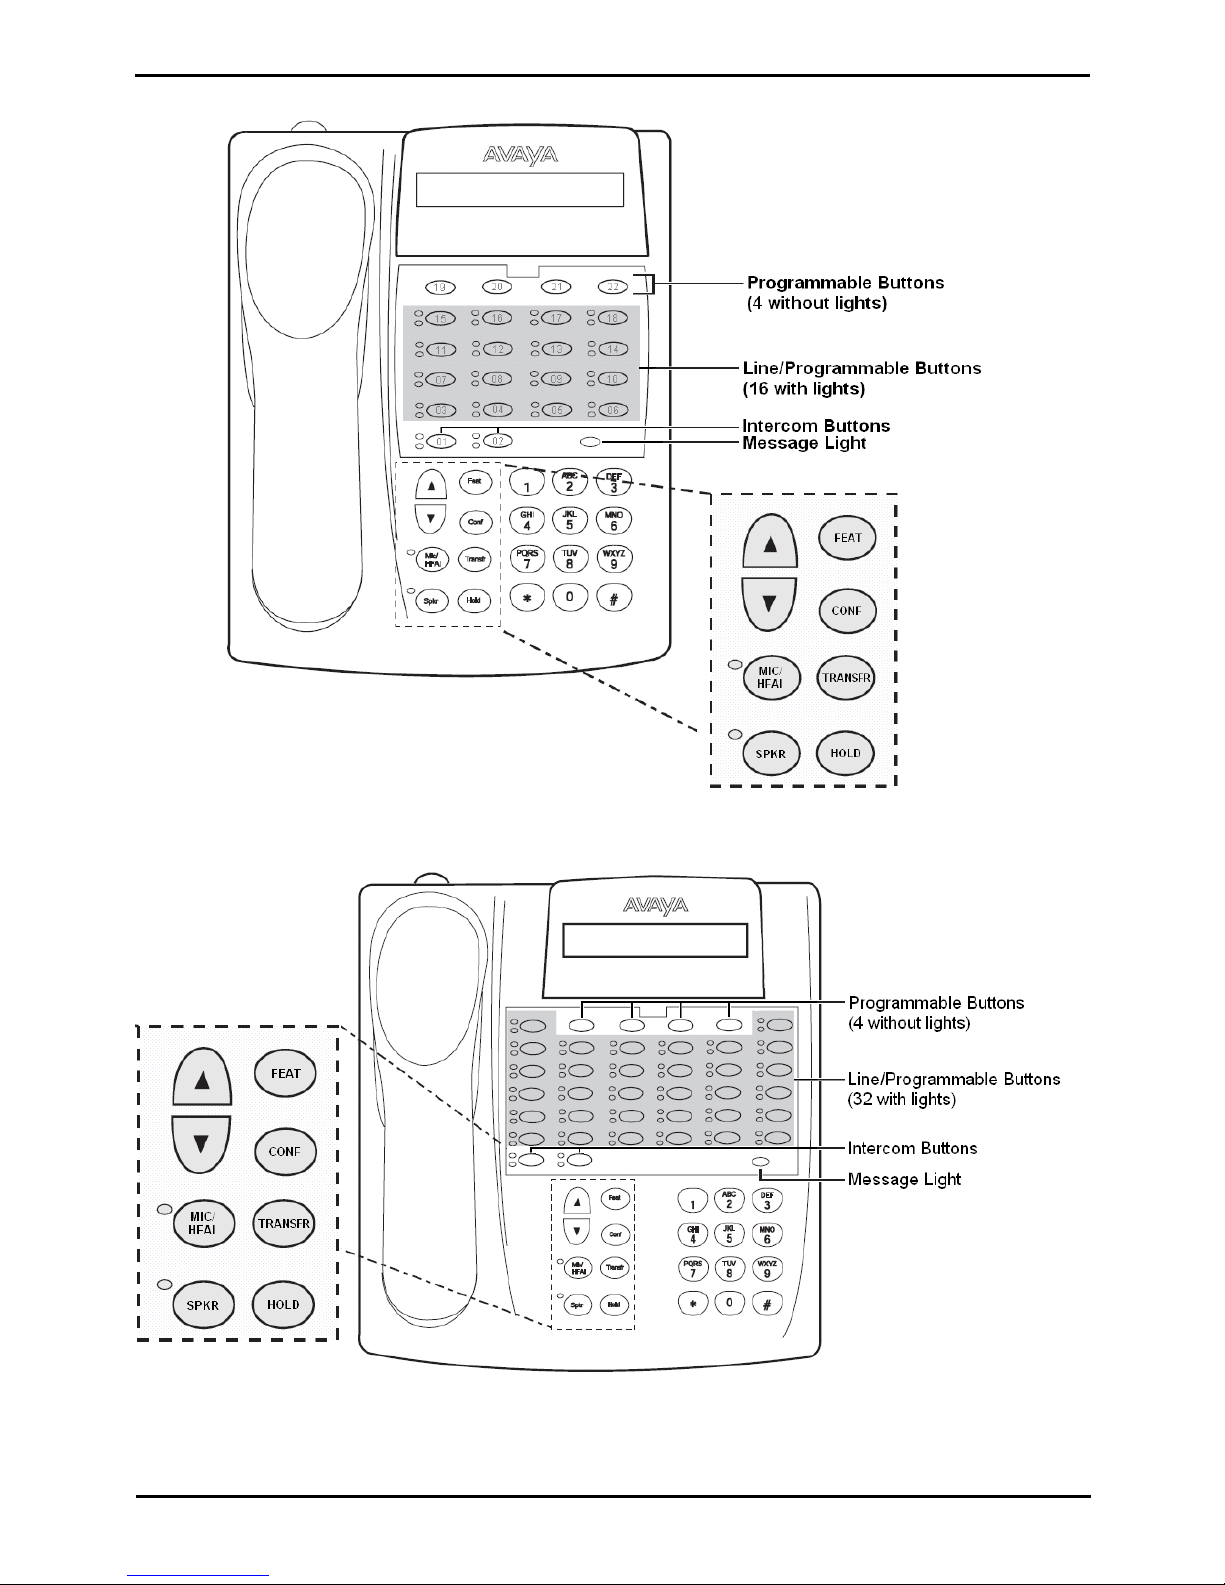
ETR 18/ETR 18D
The ETR 18 does not include a display. The ETR 18D includes the display.
ETR 34D
The number of ETR 34D phones supported is limited to a maximum of 4 (with a maximum of 2 per ETR6 base card).
PARTNER Version ETR Phone User Guide Page 9
- Issue 1a (16 May 2010)IP Office Essential Edition
ETR Telephones:
1.1 Fixed Buttons
In addition to the line buttons, the telephones have some or all of the following fixed buttons, which are already
imprinted:
· INTERCOM (not labeled)
Press to make or answer a call to or from another extension. If you receive a call on a T1 line with Direct Inward
Dialing (DID), and you cannot access that line from a line button, the call will appear on your Intercom button.
· FEATURE
Press to change programmed settings or use system features.
· CONF
Press to add other parties to your call.
· TRANSFER
Press to pass a call to another extension.
· HOLD
Press to put a call on hold.
· SPKR
Press to turn on and off the speaker and microphone (if available), so you can dial and have a conversation without
lifting the handset. The light next to this button shows when the speaker is turned on.
· MIC/HFAI
Press to turn the microphone on and off. The light next to this button shows when the microphone is turned on.
Leave on to use Hands-Free Answer on Intercom (HFAI) feature.
· Volume Control Buttons
Press to decrease or to increase the volume as follows:
· To adjust ringer volume, press while the telephone is idle or ringing and the handset is in the cradle.
· To adjust speaker volume, press while listening to a call through the speaker.
· To adjust handset volume, press while listening through the handset.
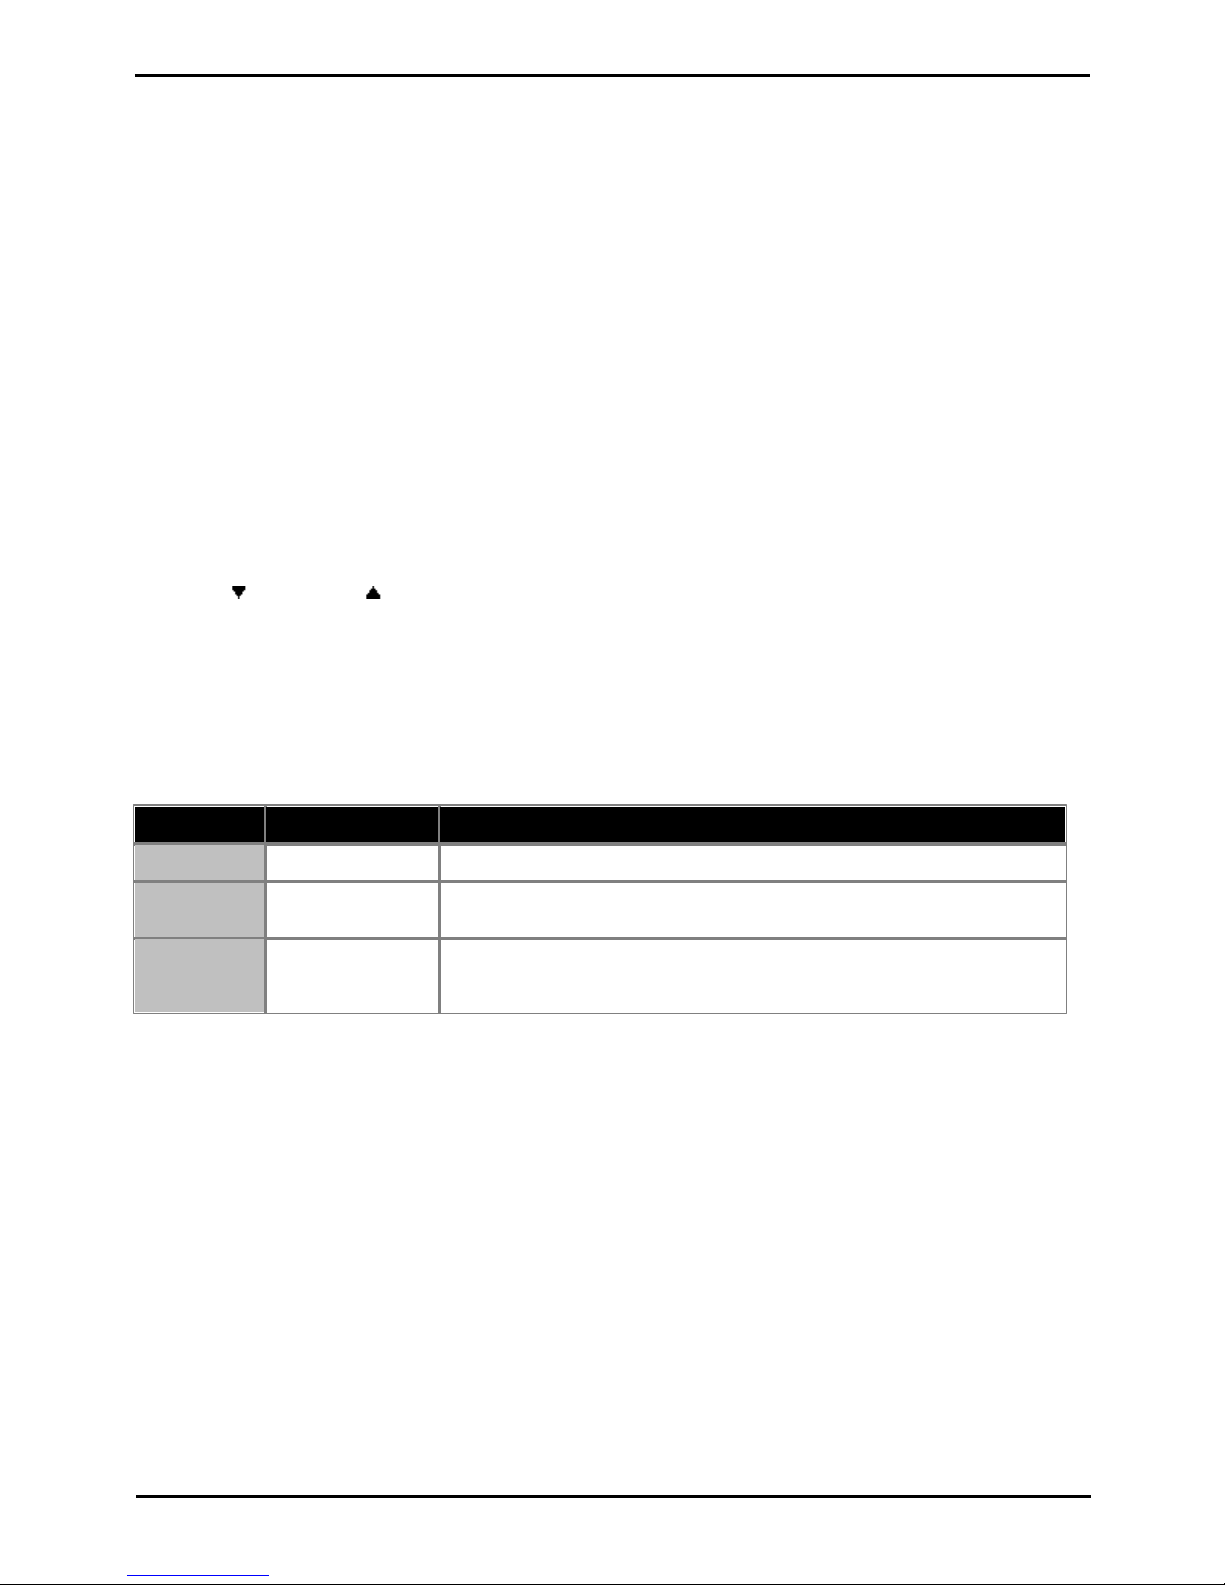
1.2 Ringing Patterns
ETR phones use the following ring patterns:
Call Type
Ring Pattern
Outside Call
ring... ring... ring
Intercom Call
ring BEEP... ring
BEEP... ring BEEP
· If you have a system display telephone, the caller’s extension number (and
name if programmed) appears on the display.
Recalling Call
ring BEEP BEEP... ring
BEEP BEEP... ring
BEEP BEEP.
· A transferred call, or an unanswered transferred or parked call that is ringing
back at your extension
1.3 Dial Tones
There are two different dial tones when you call with a system telephone:
· Outside dial tone is generated by your local telephone company to indicate that you are connected with an outside
line.
· Intercom dial tone is generated by the system to indicate that you are connected with an inside line. You hear this
dial tone when you are making an inside or intercom call.
PARTNER Version ETR Phone User Guide Page 10
- Issue 1a (16 May 2010)IP Office Essential Edition
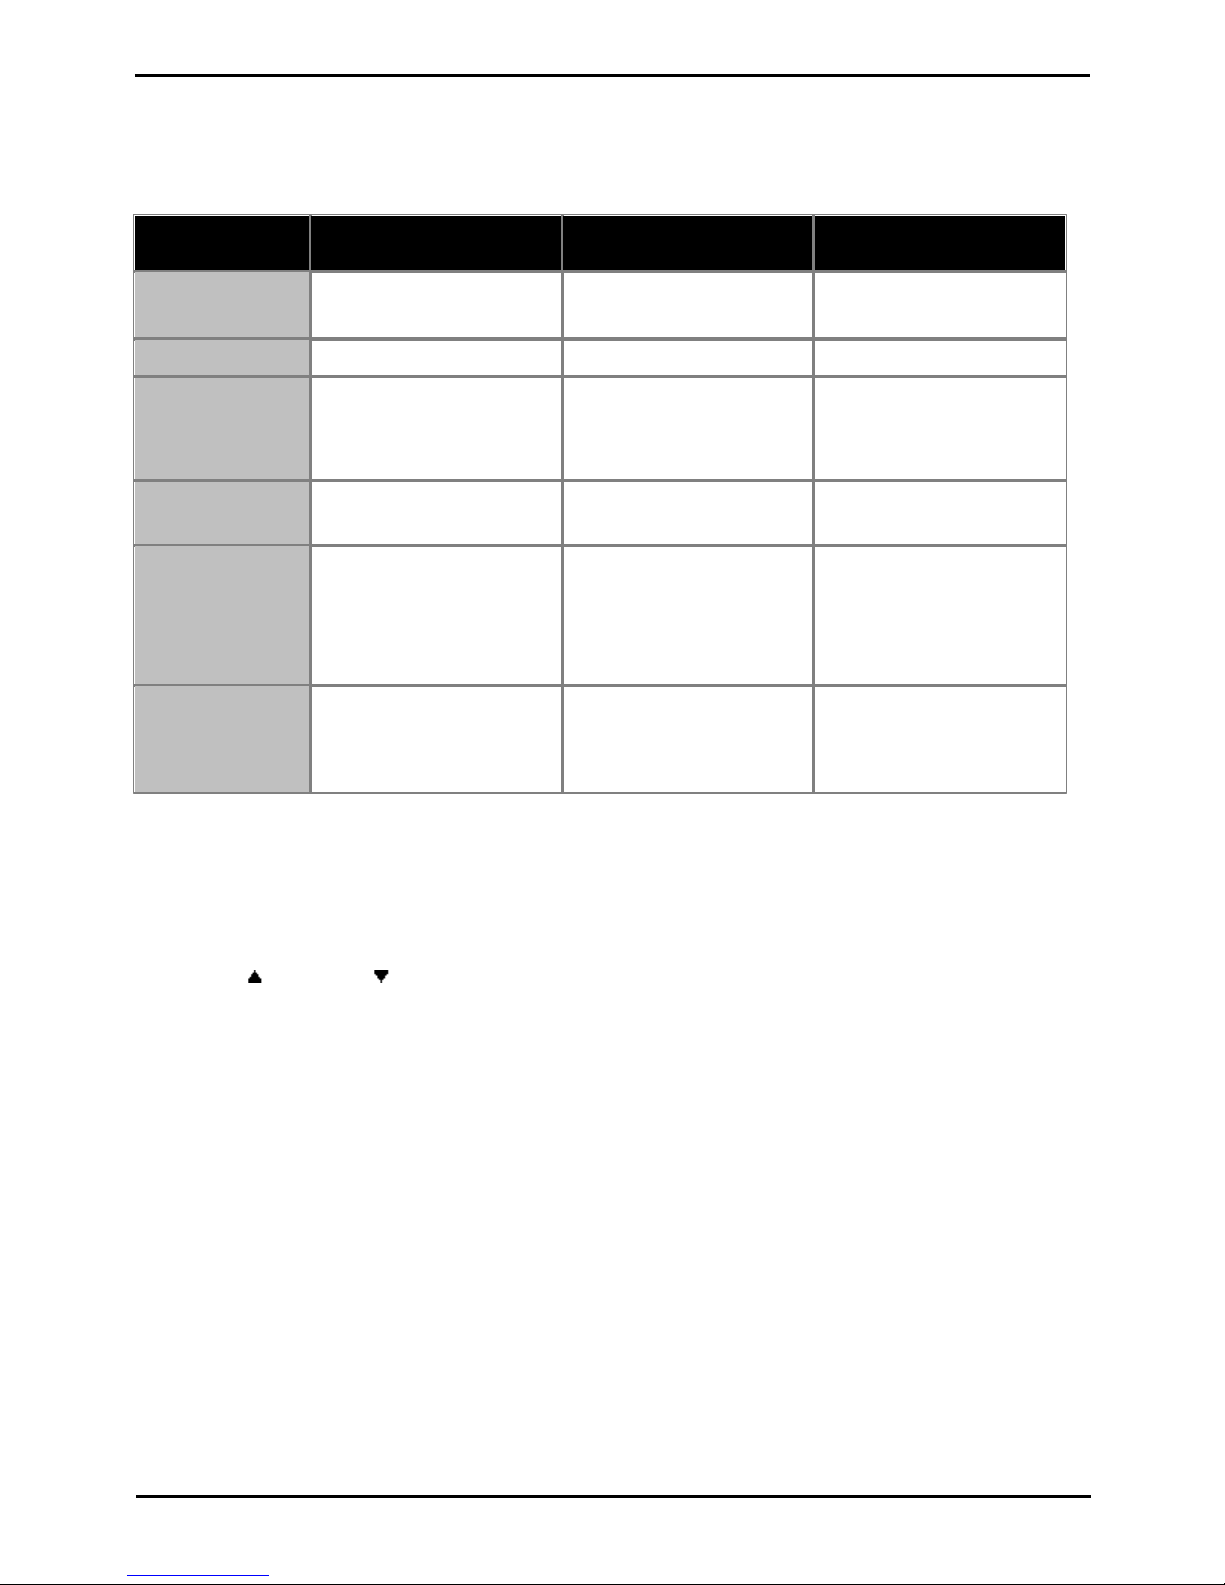
1.4 Light Patterns
Some buttons have a green light and a red light. The meaning of these lights varies depending on whether the button is
used to access an outside line or pool, is programmed with a system feature, or is programmed for Auto Dialing an
extension number (Intercom Auto Dial button).
The meanings of the various light patterns for each possible button assignment are:
Light Pattern
Line Button
Programmable Button
Intercom / Auto Dial Intercom Button
On
Green - You are using the line.
Red - Line in use by another
extension.
Green - Feature is on.
Red - Extension is busy.
Off
Line is idle
Feature is off.
Extension is idle.
Flash
(long on, long off)
Green Flash - A call is ringing
at your extension.
Red Flash - A call is ringing on
the line but not at your
extension.
A user is entering a a four-digit
code to lock or unlock their
extension.
–
Alternating
Red/Green
Alternating green and red flash
appears at both extensions in a
joined call.
–
–
Wink
(long on, short off)
Green Wink - The call is on
hold or parked at your
extension.
Red Wink - Call is on hold or
parked at another extension.
Anyone who has the line can
retrieve the call.
–
–
Green Flutter
(short on, short off)
–
Caller ID Inspect, Call Log or
Absent Msg. is on.
Absent Text Message Mgt. is
active
Call Logs is active
1.5 Adjusting the Telephone Display
The phone must be idle and the handset must be in its cradle when you adjust the display contrast.
To adjust the display brightness
1.
With the extension idle, press *.
2.
Use the up arrow and down arrow keys to change the display brightness.

PARTNER Version ETR Phone User Guide Page 11
- Issue 1a (16 May 2010)IP Office Essential Edition
Basic Call Handling
Chapter 2.

PARTNER Version ETR Phone User Guide Page 12
- Issue 1a (16 May 2010)IP Office Essential Edition
2. Basic Call Handling
2.1 Making Calls
You can make a call by dialing an outside telephone number or an extension number.
· If the telephone number is one that is used frequently called it can be stored and dialed as a personal speed dial or
using an auto dial button.
To make a call to another extension
1.
Pick up the handset and press an idle INTERCOM button. The green light next to the button is on steady and you
will hear the dial tone.
2.
Dial the extension number.
· On 1400 Series phones, if the other extension doesn't answer press AutCB (automatic callback) to have that
extension call you after it is next used and then hangup.
To make an external call
1.
Pick up the handset. The green light next to the button is on steady and you will hear the dial tone.
2.
Dial the telephone number. The dialled number will appear on the display.
Using the last number redial
1400 Series phones users can use the fixed REDIAL button on their phone to view details of previous calls and redial
those number.
1.
Lift the handset.
2.
Press FEATURE 05. The digits are displayed as they are dialed.
To create a last number redial button (ETR 18D/ETR 34D Phone)
1.
At the phone press Feature 00.
2.
Program Extension: is shown on the display.
3.
Press the button that you want to edit or enter a number between 03 to 80 to select a button. The current setting
of the button is displayed.
4.
Dial FEATURE 05.
5.
The current setting of the button will now be set to Last Number Redial.
· Exit programming by pressing Feature 00. You can also exit programming mode by lifting the handset, then place
it back in the cradle.

PARTNER Version ETR Phone User Guide Page 13
- Issue 1a (16 May 2010)IP Office Essential Edition
Basic Call Handling: Making Calls
2.2 Answering Calls
You can answer telephone calls that are ringing your extension or at another extension. If you regularly pick up calls for a
specific extension you can program a call pickup button for that specified extension.
To answer a call ringing at your own extension
1.
Pick up the handset, you are connected to the incoming call. If more than one line is ringing, you are connected to
the line that has been ringing for the longest time.
· To answer a specific line press the button for that line.
· On 1400 Series phones, the press >> to display additional options.
· To VM can be used to send the ringing call to voicemail immediately.
· Ignore can be used to quieten or suppress the ringer.
To answer a call ringing at another extension (call pickup)
1.
Pick up the handset.
2.
Press an INTERCOM button and dial 6 followed by the two-digit number of the extension at which the call is
ringing or parked.
29

PARTNER Version ETR Phone User Guide Page 14
- Issue 1a (16 May 2010)IP Office Essential Edition
2.3 Using Handsfree
The ETR 6D, ETR 18D, ETR 34D telephones each have a speaker and microphone which you can turn on by pressing SPKR
.
· In addition, on the ETR 6D, ETR 16D and ETR 34D telephones, you can turn just the microphone on and off by
pressing MIC/HFAI. When the green light next to MIC/HFAI is on, the microphone is on.
Room acoustics and background noise can affect the proper operation of the speakerphone. To ensure that your
speakerphone works effectively, follow these guidelines:
· Avoid placing your telephone in areas with high background noise caused by sources such as motor vehicles,
manufacturing equipment, loud voices, radios, printers, copiers, typewriters, other noisy office equipment or heater
and air conditioning fans.
· Avoid talking before the other person is finished speaking. When you both talk at the same time, only one person’s
voice comes through.
· Do not use your speaker to make announcements over a loudspeaker paging system connected to your telephone
system.
· When talking, always face your telephone and stay within two feet of it.
· Place your telephone at least six inches (15 cm) away from the edge of your desk.
· If you have difficulty hearing the other party, try increasing the speaker volume. If you have background noise, try
turning off the microphone when the party at the other end is speaking and turning it on when you speak. If the
difficulty persists, lift your handset to continue the conversation.
· In conference rooms, a separate speakerphone is recommended, since the built-in speaker on a system telephone
is designed for individual use.
To make a call without lifting the handset
1.
Press SPEAKER or SPKR to get a dial tone
2.
Dial the number, you hear the call ringing. When the other party answers, you can talk without lifting the handset.
To switch modes
· If you are already on a call, you can switch from the handset to the speakerphone by pressing SPEAKER or SPKR
and then hanging up the handset.
· If you are using the speakerphone and want to switch to the handset, lift the handset. The speaker and microphone
are turned off.
· On ETR phones, to turn off the microphone when you are using the speaker, press MIC/HFAI. This will mute your
voice so the other party cannot hear you. On 1400 Series phones to do this press the MUTE button.
2.4 Hands-Free Answer on Intercom
When you receive a voice-signaled intercom call, your telephone beeps once to indicate that your speaker has been turned
on automatically, and you hear the caller’s voice over your telephone’s speaker. If you leave your microphone on all the
time, you can start talking when you hear the caller, without lifting the handset. This feature is called Hands-Free Answer
on Intercom (HFAI).
Any user in the system can make a voice-signaled call to an idle system telephone by pressing an intercom button and *
and then dialing an extension number.
You cannot make a voice-signaled call to an extension that has the Cell Phone Connect feature active. (The call will not
appear at the extension.)
1.
The HFAI feature can be turned on or off only when your telephone is idle. On ETR phones use the HFAI button, on
1400 Series phones use the MUTE button. Muting your voice while you are on a call only turns off the microphone
for the duration of the call.
2.
If you are already on a call, any additional voice-signaled call to your extension is turned into a normal ringing call
instead.

PARTNER Version ETR Phone User Guide Page 15
- Issue 1a (16 May 2010)IP Office Essential Edition
Basic Call Handling: Hands-Free Answer on Intercom
2.5 Adjusting the Volume
While the phone is idle or ringing, you can adjust the ringer volume. When the phone is connected to a call you can adjust
the speaker or handset volume.
To adjust the ringer volume
1.
Use the up arrow and down arrow keys to change the ringer volume.
To adjust the caller volume
The volume that gets adjusted will depend on whether you are using the handset or speakerphone at the time you use this
process.
1.
Use the up arrow and down arrow keys to change the volume.
2.6 Holding Calls
When a call is on hold you can make and receive other calls on another line.
If a call is left on hold for longer than the specified interval it will recall to the extension that put it on hold.
To place a call on hold
1.
During the call press the HOLD button or the button on which the call is taking place. The Green light next to the
button will wink to show that the call is on hold.
To retrieve a call that you put on hold
1.
Press the button next to the winking Green light. You are reconnected to the call. The green light changes to a
steady green light.
To retrieve a call that somebody else put on hold
1.
Press the button next to the winking Red light. You are reconnected to the call. The Red light changes to a steady
green light.
2.7 Transferring Calls
Transferring a call lets users "pass" a call from one extension to another. Users can transfer both outside and internal calls
to another extension.
To transfer a call
1.
While the call is active press the TRANSFER button. The call is put on hold and the green light next to the line or
intercom button will wink.
2.
When you hear the inside dial tone, dial the number to which the call is to be transferred. Then do one of the
following:
· To transfer the call without announcing it (an unsupervised transfer) hang up or press the transfer button
again as soon as you hear the extension ringing. The transfer is complete. If the call is not answered it will be
returned to your extension. When your extension rings, lift the handset to be reconnected to the caller.
· To announce the call before completing the transfer (a supervised transfer), wait for the call to be answered. If
the called party is willing to accept the call hang up or press the transfer button again to complete the transfer.
If no one answers or the call is refused, press the button next to the winking green light to be reconnected to
the caller.
 Loading...