

Page 1

DEFINITY
®
4630 IP Telephone
Release 1
User’s Guide
555-233-764
Comcode 700198757
Issue 1
December 2001
Page 2

Page 3

Copyright and Legal Notices
Copyright 2001, Avaya, Inc.
All Rights Reserved
Notice
Every effort was made to ensure that the information in this book
was complete and accurate at the time of printing. However,
information is subject to change.
Avaya Web Page
The World Wide Web home page for Avaya is:
http://www.avaya.com
Preventing Toll Fraud
“Toll fraud” is the unauthorized use of your telecommunications
system by an unauthorized party (for example, a person who is not
a corporate employee, agent, subcontractor, or working on your
company’s behalf). Be aware that there may be a risk of toll fraud
associated with your system and that, if toll fraud occurs, it can
result in substantial additional charges for your telecommunications services.
Avaya Fraud Intervention
If you suspect you are being victimized by toll fraud and you need
technical support or assistance, call the appropriate Avaya
National Customer Care Center telephone number. Users of the
MERLIN®, PARTNER®, and System 25 products should call 1
800 628-2888. Users of the System 75, System 85, DEFINITY®
Generic 1, 2 and 3, and DEFINITY® ECS products should call 1
800 643-2353.
Providing Telecommunications Security
Telecommunications security of voice, data, and/or video communications is the prevention of any type of intrusion to, that is,
either unauthorized or malicious access to or use of, your company’s telecommunications equipment) by some party.
Your company’s “telecommunications equipment” includes both
this Avaya product and any other voice/data/video equipment that
could be accessed via this Avaya product (i.e., “networked equipment”).
An “outside party” is anyone who is not a corporate employee,
agent, subcontractor, or working on your company’s behalf.
Whereas, a “malicious party” is anyone, including someone who
may be otherwise authorized, who accesses your telecommunications equipment with either malicious or mischievous intent.
Such intrusions may be either to/through synchronous (time-multiplexed and/or circuit-based) or asynchronous (character-, message-, or packet-based) equipment or interfaces for reasons of:
• Utilization of capabilities special to the accessed equipment
• Theft (such as, of intellectual property, financial assets, or
toll-facility access)
• Eavesdropping (privacy inv asions to humans)
• Mischief (troubling, but apparently innocuous, tampering)
• Harm (such as harmful tampering, data loss or alteration,
regardless of motive or intent)
Be aware that there may be a risk of unauthorized intrusions associated with your system and/or its networked equipment. Also
realize that, if such an intrusion should occur, it could result in a
variety of losses to your company including, but not limited to,
human/data privacy, intellectual property, material assets, financial resources, labor costs, and/or legal costs.
Your Responsibility for Your Company’s Telecommunications
Security
The final responsibility for securing both this system and its networked equipment rests with you – an Avaya customer’s system
administrator, your telecommunications peers, and your managers.
Base the fulfillment of your responsibility on acquired knowledge
and resources from a variety of sources including, but not limited
to:
• Installation documents
• System administration documents
• Security documents
• Hardware-/software-based security tools
• Shared information between you and your peers
• Telecommunications security experts
To prevent intrusions to your telecommunications equipment, you
and your peers should carefully program and configure your:
• Avaya-provided telecommunications systems and their
interfaces
• Avaya-provided software applications, as well as their
underlying hardware/software platforms and interfaces
• Any other equipment networked to your Avaya products
Avaya does not warrant that this product or any of its networked
equipment is either immune from or will prevent either unauthorized or malicious intrusions. Avaya will not be responsible for
any charges, losses, or damages that result from such intrusions.
Federal Communications Commission Statement
Part 15: Class A Statement. This equipment has been tested and
found to comply with the limits for a Class A digital device, pursuant to Part 15 of the FCC Rules. These limits are designed to
provide reasonable protection against harmful interference when
the equipment is operated in a commercial environment. This
equipment generates, uses, and can radiate radio-frequency energy
and, if not installed and used in accordance with the instructions,
may cause harmful interference to radio communications. Operation of this equipment in a residential area is likely to cause harmful interference, in which case the user will be required to correct
the interference at his own expense.
Part 15: Class B Statement. This equipment has been tested and
found to comply with the limits for a Class B digital device, pursuant to Part 15 of the FCC Rules. These limits are designed to provide reasonable protection against harmful interference in a
residential installation. This equipment generates, uses, and can
radiate radio-frequency energy and, if not installed and used in
accordance with the instructions, may cause harmful interference
to radio communications. However, there is no guarantee that
interference will not occur in a particular installation. If this equipment does cause harmful interference to radio or television reception, which can be determined by turning the equipment off and
on, the user is encouraged to try to correct the interference by one
or more of the following measures:
• Reorient the receiving television or radio antenna where
this may be done safely.
• To the extent possible, relocate the receiver with respect to
the telephone equipment.
• Where the telephone equipment requires ac power, plug the
telephone into a different ac outlet so that the telephone
equipment and receiver are on different branch circuits.
Page 4

Part 15: Personal Computer Statement. This equipment
has been certified to comply with the limits for a Class B
computing device, pursuant to Subpart J of Part 15 of FCC
Rules. Only peripherals (computing input/output devices,
terminals, printers, etc.) certified to comply with the Class B
limits may be attached to this computer. Operation with noncertified peripherals is likely to result in interference to radio
and television reception.
Part 68: Network Registration Number. This equipment is
registered with the FCC in accordance with Part 68 of the
FCC Rules.
Part 68: Answer-Supervision Signaling. Allowing this
equipment to be operated in a manner that does not provide
proper answer-supervision signaling is in violation of Part 68
Rules. This equipment returns answer-supervision signals to
the public switched network when:
• Answered by the called station
• Answered by the attendant
• Routed to a recorded announcement that can be
administered by the CPE user
This equipment returns answer-supervision signals on all
DID calls forwarded back to the public switched telephone
network. Permissible exceptions are:
• A call is unanswered
• A busy tone is received
• A reorder tone is received
Industry Canada (IC) Interference Information
This digital apparatus does not exceed the Class A limits for
radio noise emissions set out in the radio interference regulations of Industry Canada.
You can be placed on a standing order list for this and other
documents you may need. For more information on standing
orders, or to be put on a list to receive future issues of this
document, contact the Avaya Publications Center.
Obtaining Products
To learn more about Avaya products and to order products,
contact Avaya Direct, the direct-market organization of
Avaya Inc. Access their web site at www.avayadirect.com.
Or call the following numbers: customers 1 800 451 2100,
account executives 1 888 778 1880 (voice) or 1 888 778
1881 (fax).
Warranty
Avaya provides a limited warranty on this product. Refer to
the “Limited Use Software License Agreement” card provided with your package.
European Union Declaration of Conformity
The “CE” mark affixed to the equipment means that it conforms to the above directives. Avaya Inc. declares that equipment specified in this document conforms to the referenced
European Union (EU) Directives and Harmonized Standards
listed below:
EMC Directive 89/336/EEC
Low-Voltage Directive73/23/EEC
Acknowledgment
This document was prepared by Avaya Inc., Denver, CO.
Le Présent Appareil Nomérique n’émet pas de bruits
radioélectriques dépassant les limites applicables aux appareils numériques de la class A préscrites dans le reglement sur
le brouillage radioélectrique édicté par le Industrie Canada.
Trademarks
All trademarks identified by ®, ™ and
SM
are registered
trademarks, trademarks, or service marks, respectively, of
Avaya Inc. All other trademarks are the properties of their
respective owners.
Ordering Information
Call: Avaya Publications Center
Voice 1 800 457-1235 International Voice +1
317 322-6791
Fax 1 800 457-1764 International Fax +1 317
322-6699
Write: Avaya Publications Center
2855 N. Franklin Road
Indianapolis, IN 46219 USA
Documents may also be ordered from the Customer Information Centre in Malmesbury, England.
Call: 44 1666 83-2900 Fax 44 1666 83-2213
For additional documents, refer to the section in “About This
Document” entitled “Related Resources.”
Page 5

Contents
About This Document
Purpose v
■
Intended Audience v
■
Issue Date v
■
How to Use This Document v
■
Document Organization vi
■
Conventions Used vii
■
Symbolic Conventions vii
Typographic Conventions vii
Related Documentation/Training vii
■
Chapter 1 4630 IP Telephone Description
Introduction 1-1
■
The 4630 IP Phone 1-1
■
Using the Touch Screen 1-4
■
Navigating Application Screens 1-4
4630 IP Telephone Applications 1-5
■
Phone Application 1-6
Speed Dial Application 1-7
Call Log Application 1-8
Directory Application 1-9
Web Access Application 1-10
Chapter 2 Call Handling
■
■
Introduction 2-1
Making Calls 2-1
Manual Dialing 2-1
Direct (Manual) Dialing 2-1
Edit Dialing 2-2
Automatic (Speed) Dialing 2-3
Speed Dialing a party using a Feature button 2-3
Speed Dialing a party on a Group List 2-3
Calling a Party From the Call Log 2-5
Calling a Party from the Directory 2-5
Issue 1 December 2001
i
Page 6

Contents
Call Handling 2-5
■
Conference 2-5
Adding another party to a call 2-5
Adding a held call to the current call 2-6
Dropping the last person added to the call 2-6
Hold 2-6
Placing a call on hold 2-6
Retrieving the held call 2-6
Mute 2-6
Preventing the other person on the line from
hearing you 2-6
Redial 2-7
Redialing the last number called 2-7
Redialing using a list of the last eight numbers
called 2-7
Speakerphone 2-8
Placing or answering a call without lifting the
handset, or using the Speakerphone with
any feature 2-8
Changing from the speakerphone to the handset 2-8
Changing from the handset to the speakerphone 2-8
Turning the speaker on during a call 2-8
Turning the speaker off during a call 2-8
Ending a call while the speaker is active 2-9
Transfer 2-9
Sending a call to another telephone 2-9
Chapter 3 Speed Dialing Application
Introduction 3-1
■
Speed Dial Groups 3-1
■
Activating a Speed Dial Group or Changing a
Group Label 3-1
Deactivating a Speed Dial Group 3-4
Speed Dial Buttons 3-6
■
Adding Speed Dial Buttons to a Group or Updating
Speed Dial Button Information 3-6
Deactivating a Speed Dial Button 3-9
Issue 1 December 2001
ii
Page 7

Contents
Chapter 4 Using the Call Log
Introduction 4-1
■
About the Call Log 4-1
■
Viewing the Call Log 4-2
■
Adding a Call Log Entry to a Speed Dial Group 4-4
■
Removing Call Log Entries 4-5
■
Chapter 5 Using the Directory
Introduction 5-1
■
About the Directory 5-1
■
Locating a Phone Number Using the Directory 5-2
■
Calling a Person Listed in the Directory 5-5
■
Adding a Directory Entry to a Speed Dial Group 5-6
■
Resolving Search- or Directory-Related Problems 5-9
■
Trouble Message Resolution 5-9
Chapter 6 4630 IP Telephone Options
Introduction 6-1
■
Accessing the Options and Preferences Screen 6-1
■
Screen Options 6-2
■
Setting the Keyboard Layout 6-2
Calibrating the Screen 6-3
Cleaning the Screen 6-3
Call Log Options 6-4
■
Setting the Call Log “Go to Phone” Option 6-4
Phone Application Options 6-5
■
Setting Edit Dialing 6-6
Selecting a Personalized Ring 6-7
Selecting a Redial Option 6-8
Setting the “Go to Phone On Answer” Option 6-8
Setting the Call Timer 6-9
Directory Options 6-9
■
Setting the Directory “Go to Phone” Option 6-10
Setting Up or Modifying a Directory User ID and
Password 6-10
Issue 1 December 2001
iii
Page 8

Contents
Speed Dial Options 6-12
■
Setting the Speed Dial “Go to Phone” Option 6-12
Chapter 7 Web Access
Introduction 7-1
■
Navigating Web Pages 7-2
■
Navigating the Home Page and Other Standard-
Size Web Pages 7-2
Navigating Web Pages Larger than the Display Area 7-4
Chapter 8 Using a Headset or Specialized Handset
Introduction 8-1
■
IP Telephone-Compatible Headsets 8-1
■
Operating a Headset 8-2
IP Telephone-Compatible Specialized Handsets 8-2
■
Chapter 9 Troubleshooting
Introduction 9-1
■
Basic Troubleshooting 9-2
■
Troubleshooting 4630 Applications 9-5
■
Resetting and Power Cycling the IP Telephone 9-7
■
Resetting your phone 9-7
Power cycling the phone 9-8
Issue 1 December 2001
iv
Page 9

About This Document
Purpose
The DEFINITY® 4630 IP Telephone User’s Guide describes the 4630 IP
Telephone’s oper ation and functionality.
Intended Audience
This document is intended for IP telephone users who have a 4630 IP Telephone
at their desks. It is not intended to be a technical reference guide for System
Administrators or phone technicians.
Issue Date
This document was issued for the first time in December, 2001.
How to Use This Document
This Guide is organized to help you find topics in a logical manner. Read it from
start to finish to get a thorough understanding of how to use your 4630 IP
Telephone, or revie w the Table of Conten ts to locate information specific to a task
or function you want to perform.
Issue 1 December 2001
v
Page 10

About This Document
Document Organization
This guide contains the following chapters:
Chapter 1, 4630 IP Telephone
Description
Chapter 2, Making Calls Covers all call-related information,
Chapter 3, Speed Dialing Functions Describes how to add, upda te and
Chapter 4, Using the Call Log Describes how to view the log of
Chapter 5, Using the Directory Explains how to search the
Chapter 6, 4630 Telephone Options Provides se tup and maintenance
Describes each element on the face
of the telephone.
such as initiating calls, speed dialing,
conferencing, and transferring calls.
remove single Speed Dial entries,
and add or update Speed Dial
groups.
calls, call a party listed, add a log
entry to a Speed Dial button/group,
and remove log entries.
Corporate Directory, call a person
listed, add a Directory entry to a
Speed Dial Group List, and
troubleshoot directory-related
problems.
procedures for 4630 IP Telephone
preferences and options.
Chapter 7, Web Access Explains how to use the 4630’s web
Chapter 8, Compatible Headsets Provides a list of 4630-compatible
Chapter 9, Troubleshooting Provides basic troubleshooting
Issue 1 December 2001
vi
access functions.
headsets and operation instructions.
actions, if you encounter errors or
experience problems.
Page 11

Conventions Used
Conventions Used
This guide uses the following textual, symbolic, and typographic conventions to
help you interpret information.
Symbolic Conventions
NOTE:
This symbol precedes additional information about a
topic.
Typographic Conventions
This guide uses the following typographic conventions:
Document Underlined type indicates a docu m ent or section in this
document containing additional information about a topic.
“Document” Italic type enclosed in quotes indicates a reference to an
external document.
italics Italic type indicates the result of an action you take or a system
response in step by step procedures.
Call
In step by step procedures, words shown in bold represent a
single telephone button that should be pressed/selected.
Related Documentation/Training
For information related to installing an IP Telephone, see the 4600 Series IP
Telephone Installation Guide (Document Number 555-233-128; Comcode
700213168).
For inf ormation related to mainta ining an IP Telephone System on a Local Area
Network, see the 4600 Series IP Telephone LAN Administrator’s Guide
(Document Number 555-233-507; Comcode 700213150).
Standard DEFINITY
Phone Features” of the Enterprise Communication Server Administrator’s Guide
(Release 8.4 or later).
®
telephone features are described in Chapter 4, “Mana ging
Issue 1 December 2001
vii
Page 12

About This Document
Issue 1 December 2001
viii
Page 13
4630 IP Telephone Description
Introduction
This chapter introduces you to the layout of the 4630 IP Telephone. It provides a
description for the phone screen, each functional button and other phone
characteristics, such as effective use of the touchable display screen. The 4630’s
applications are also introduced in this chapter, as well as how to navigate
application screens.
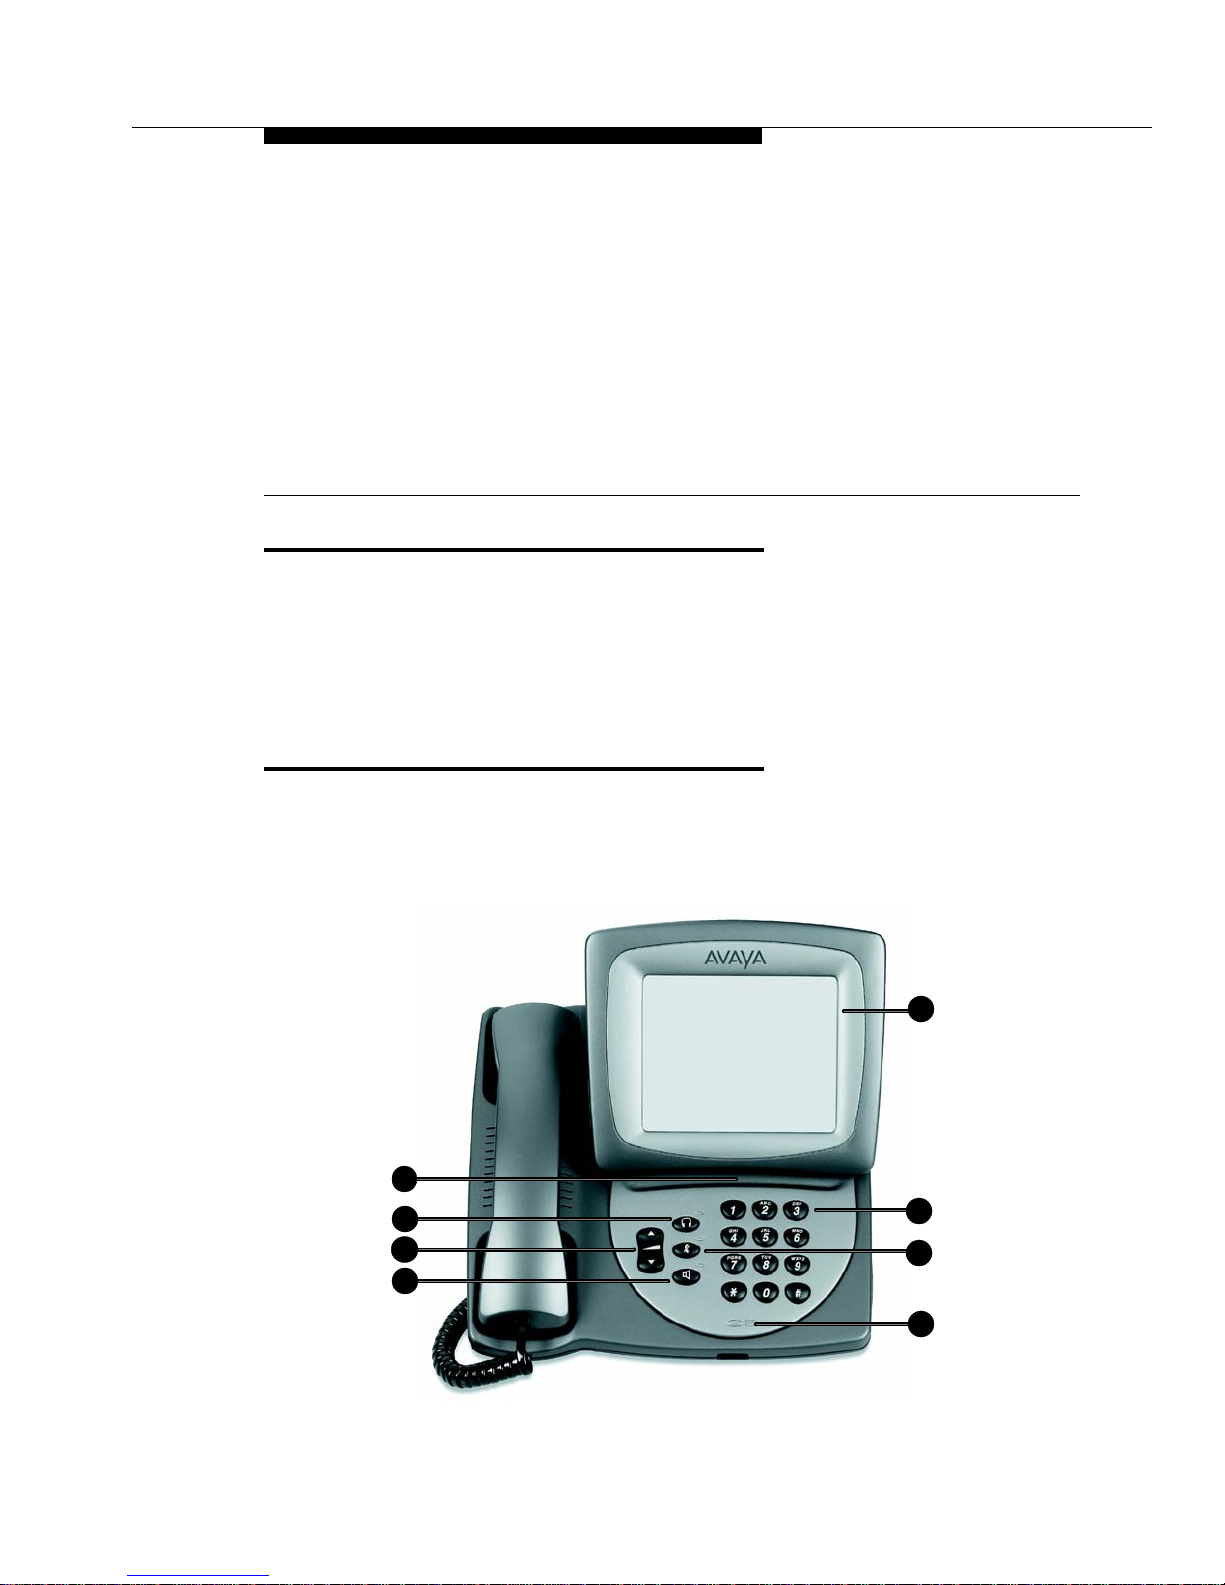
The 4630 IP Phone
1
The 4630 IP telephone is a multi-line phone with from 3 to 5 call appeara nce
(incoming/outgoing) lines, up to 21 administr ab le Feature buttons (as assigned by
your System Administrator and includin g 5 fix ed f eature b uttons), a 4 1/2 inch b y 3
1/3 inch screen display, and a two-way speakerphone.
1
2
3
5
6
7
4
8
Issue 1 December 2001
1-1
Page 14

Match the numbered callouts on the 4630 IP Telephone illustration to the
descriptions below.
1. Display Screen - Most telephone activity takes place on the display
screen. All 4630 applications, presented as tabs across the bottom of the
display, are accessible from this screen. The display’s center portion
presents Feature button s, information and other buttons associated with
specific applications. The display screen’s top line shows the current date
and time, application-specific Help, or feature-specific information provided
by your DEFINITY telephone system. The top line also displays volume
control (when a Volume Control arrow is pressed).
2. Stylus Storage Well - Provides a place to rest the stylus (screen pointer)
when it is not in use.
3. Headset ( ) - Turns the headset on, when one is plugged in. The LED
next to this button lights when a headset is active.
4. Mute ( ) - Turns off the active microphone (handset or speaker), to
prevent the other person from hearing you. The LED next to the Mute
button lights when the microphone is muted.
5. Volume Control ( ) - Adjusts the speaker, h andset or ringer volume,
depending on which item is in use. The display’s top line graphically shows
the volume level as you adjust it.
6. Speaker ( ) - Accesses the built-in, two-way Speakerphone. The
LED next to this button lights when the speakerphone is active.
7. Numeric (Dialing) Pad - Standard 12 button p ad for dialing phone
numbers.
8. Voice Mail Indicator LED - Positioned along the front edge of the phone,
this LED lights when a message has been left in the user’s voice mailbox.
Issue 1 December 2001
1-2
Page 15

The 4630 IP Phone
When the Phone application screen is active, the following Feature buttons may
appear in a panel on the right side of the display screen, depending on how your
System Administrator has configured your phone system:
9. Hold ( ) - Places an active call on hold.
10. Transfer ( ) - Transfers a call to another phone.
11. Conference ( ) - Sets up conference calls with more than on e other
person.
12. Redial ( ) - Redials the last number dialed from the phone.
13. Drop ( ) - Drops a party from an ongoing conference call.
14. More ( ) - Displays the next group of Feature buttons. This button
appears when more than eight Fea tu re buttons are available.
Issue 1 December 2001
1-3
Page 16

Using the Touch Screen
New 4630 IP Telephone users may be u nfamiliar with touching a screen to initiate
an action or feature instead of pressing a button. Once you begin using your
phone on a regular basis, you will find it has been designed for simplicity and ease
of use. Following are some tips for effective use of the touchable display screen:
To initiate an action or select a Feature button, lightly touch the b utton or
■
screen area you wish to activate, then lift.
If you hav e unusually large fingers or do not wish to touch the screen
■
directly, use a pencil eraser or other soft, non-abrasive object; do not use
your fingernails or other sharp objects to make selections.
Do not press and slide your finger (or any other implement being use d for
■
selection) across the display area.
Do not “drag and drop” as you would do with a mouse. One exception is
■
when you’ve selected a button or action in error. If you select a button or
action in error, move your finger away from the button and then lift your
finger; your action will be ignored and you can then make the proper
selection.
If the display screen appears wa vy or if te xt is displa yed off to on e side, use
■
the calibration procedure, described in Chapter 6, to re-orient the display.
Clean the screen on a regular basis using screen wipes or another
■
non-abrasive product designed for this purpose.
The display “times out” (goes blank) after two hours of inactivity. Touch the
■
screen, pick up the handset, or press any button to restore the display.
Navigating Application Screens
Navigate the 4630’s application screens by selecting Feature buttons or
application-specific buttons, depending on the activity you want to perform.
Feature and application b uttons are eithe r enabled (meaning the button is active
and available for selection) or disabled (not active, not available for selection).
When a button is enabled on an application screen, the button’s color matches
that of the application screen’s background color (see Table 1-1 for color
schemes) and its upper left edge is bordered in white, giving it a two-dimensional
appearance.
To initiate an action or select a button, lightly touch the button or screen area you
wish to activate, then lift.
As shown below, the top line of every application screen provides the following
information or options:
Issue 1 December 2001
1-4
Page 17

4630 IP Telephone Applications
Time of Day and Current Date , Help Tips, or switch-generated messages.
■
Checkmark icon ( ). When selected, displays the Preferences and
■
Options menu screen.
4630 IP Telephone Applications
Your phone provides up to five major applications via the screen display, which
replace many of the buttons you may have used on other office telephones.
Each application tab and its associated screen is color-coded, to provide visual
recognition of the application with which you are working. Applications and their
respective color-coding are described in Table 1.1 below.
Table 1-1. Application Tab/Screen Color Coding
Application Tab/Screen Color
Phone Blue
Speed Dial Orange
Call Log Magenta
Directory Green
Web Access Yellow
Issue 1 December 2001
1-5
Page 18
Phone Application
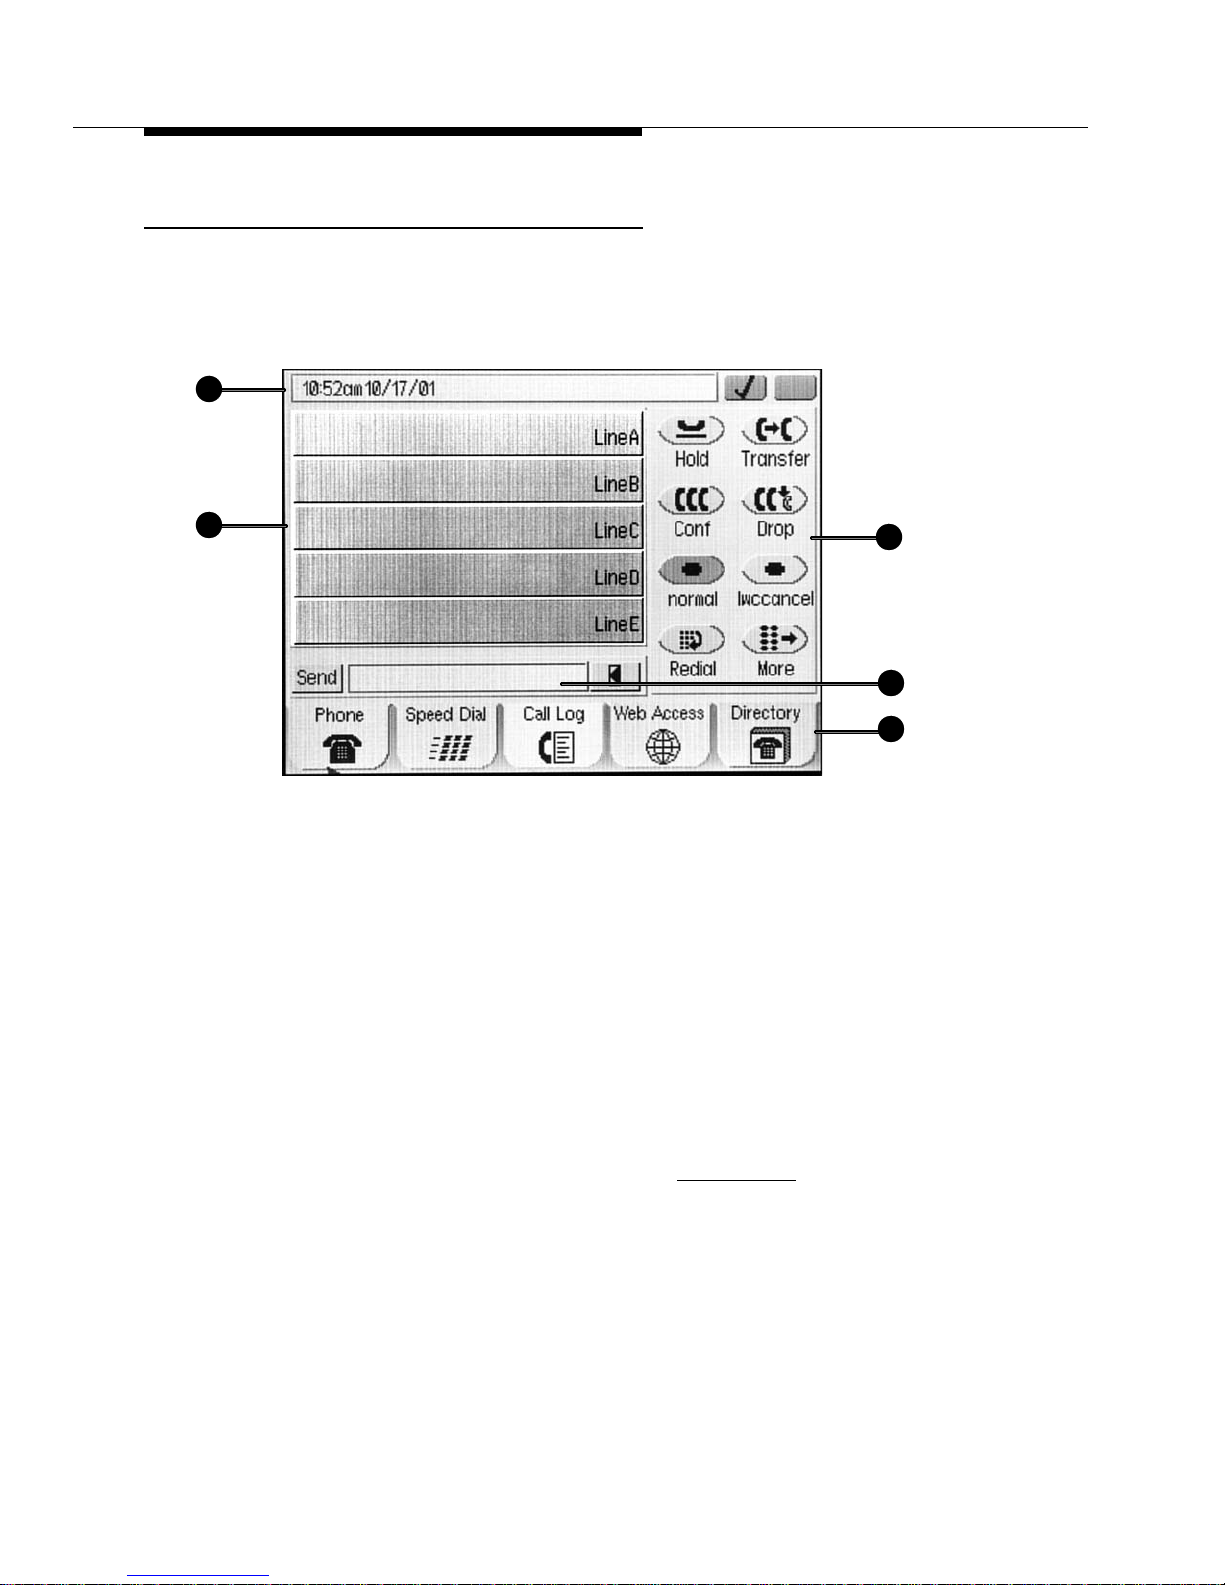
The primary application is the Phone application, through which you can make
calls or select administered Feature buttons from the Feature button panel on the
right side of the screen. When the Phone application is displayed, the phone is in
its “default” state.
1
2
The Phone display screen has five distinct areas, related to the numbered callouts
in the above illustration:
1. Time of Day/Current Date, Volume Control, call/feature information and/or
application screen Help, and access to the Preferences and Options
screen (via the checkmark icon).
2. Call Appearance (incoming/outgoing) lines.
3. Feature buttons.
4. If set on the Preferences and Options screen, an Edit Dialog display panel.
5. Application tabs which provide access to the other 4630 applications. You
can always access the Phone function from any other application screen b y
selecting the Phone application tab .
3
4
5
The Phone application is described in Chapter 2, Call Handling
Issue 1 December 2001
1-6
.
Page 19
4630 IP Telephone Applications
Speed Dial Application
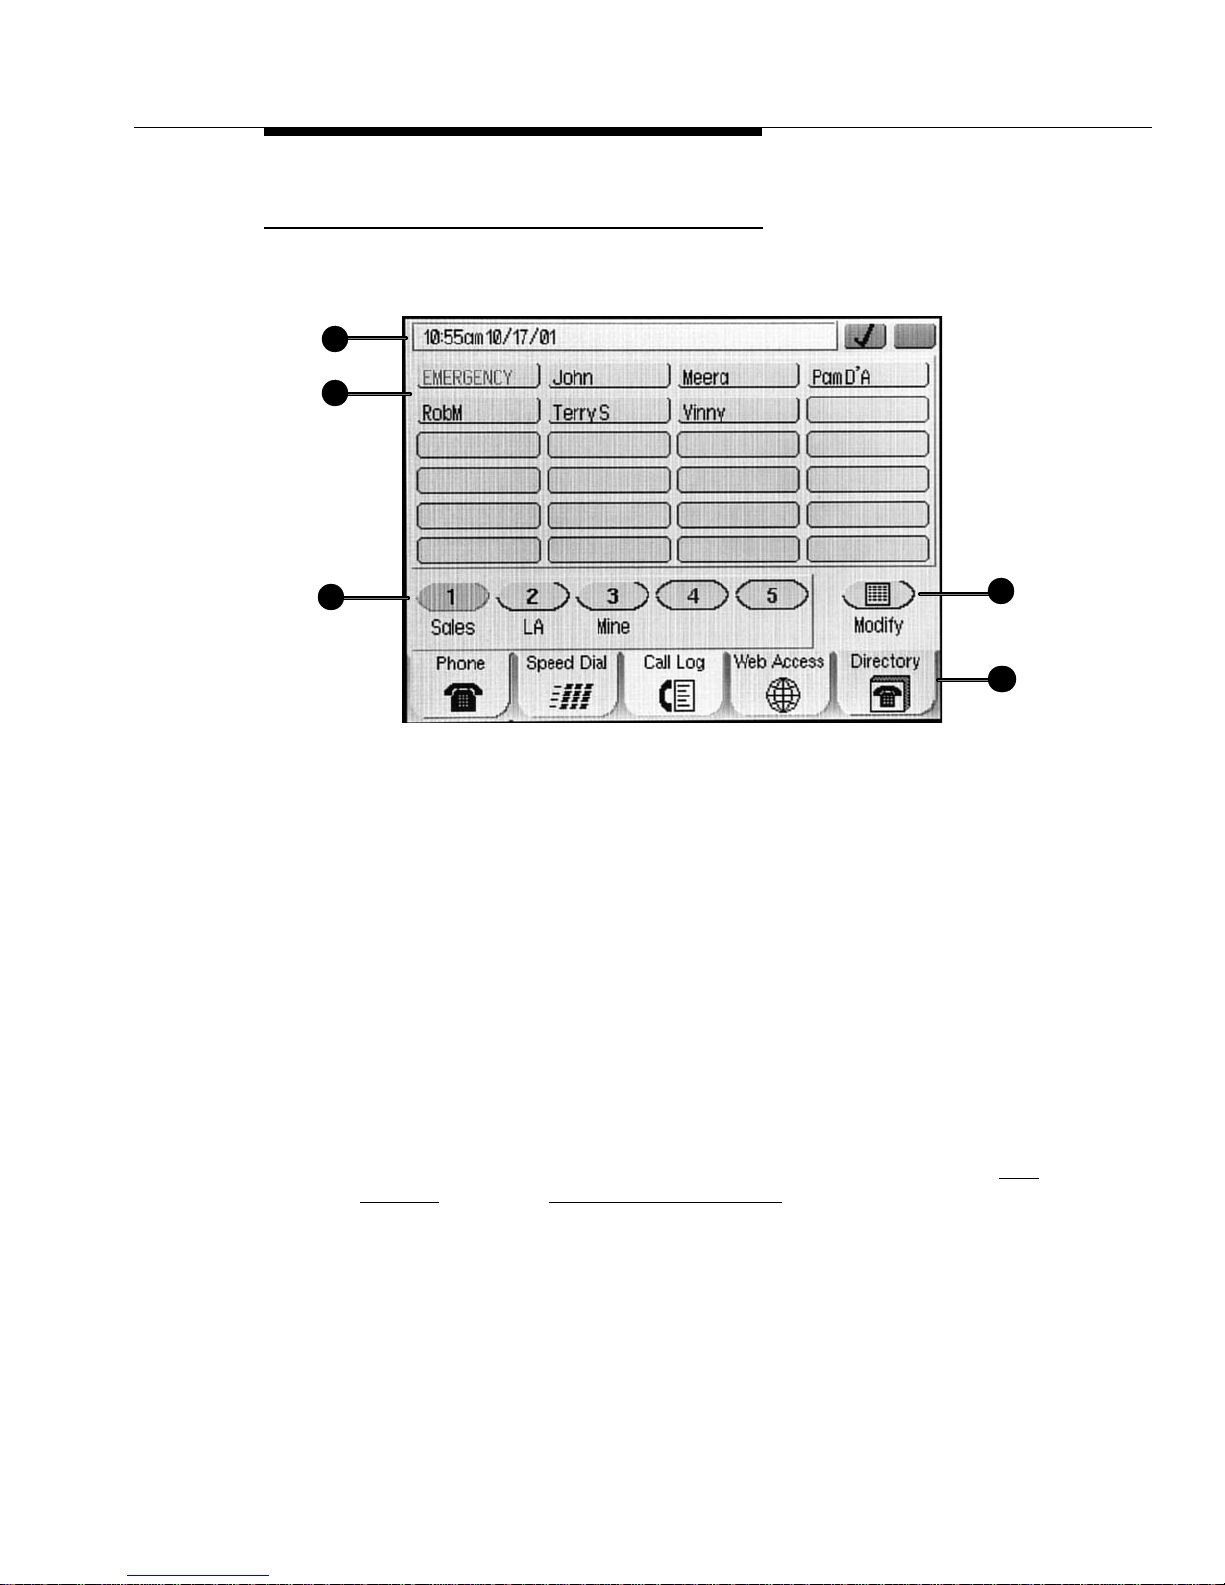
The Speed Dial application provides access to Speed Dial Group Lists , which
facilitate automatic dialing.
1
2
3
The main Speed Dial screen has five distinct areas, related to the numbered
callouts in the above illustration:
1. Time of Day/Current Date, Volume Control, call/feature information and/or
application screen Help, and access to the Preferences and Options
screen (via the checkmark icon).
2. Buttons labeled with names or designations of persons in a selected
Group.
3. Group Number/Name for each of the five available groups .
4. A Modify button, used to set up/modify th e Group Name or group
members’ names or numbers.
5. Application tabs which provide access to the other 4630 applications. You
can always access Speed Dial from any other application by selecting the
Speed Dial application tab.
Making calls using the Speed Dial application is described in Chapter 2, Call
Handling. Chapter 3, Speed Dialing Application, covers setting up and modifying
Speed Dial Groups.
4
5
Issue 1 December 2001
1-7
Page 20
Call Log Application
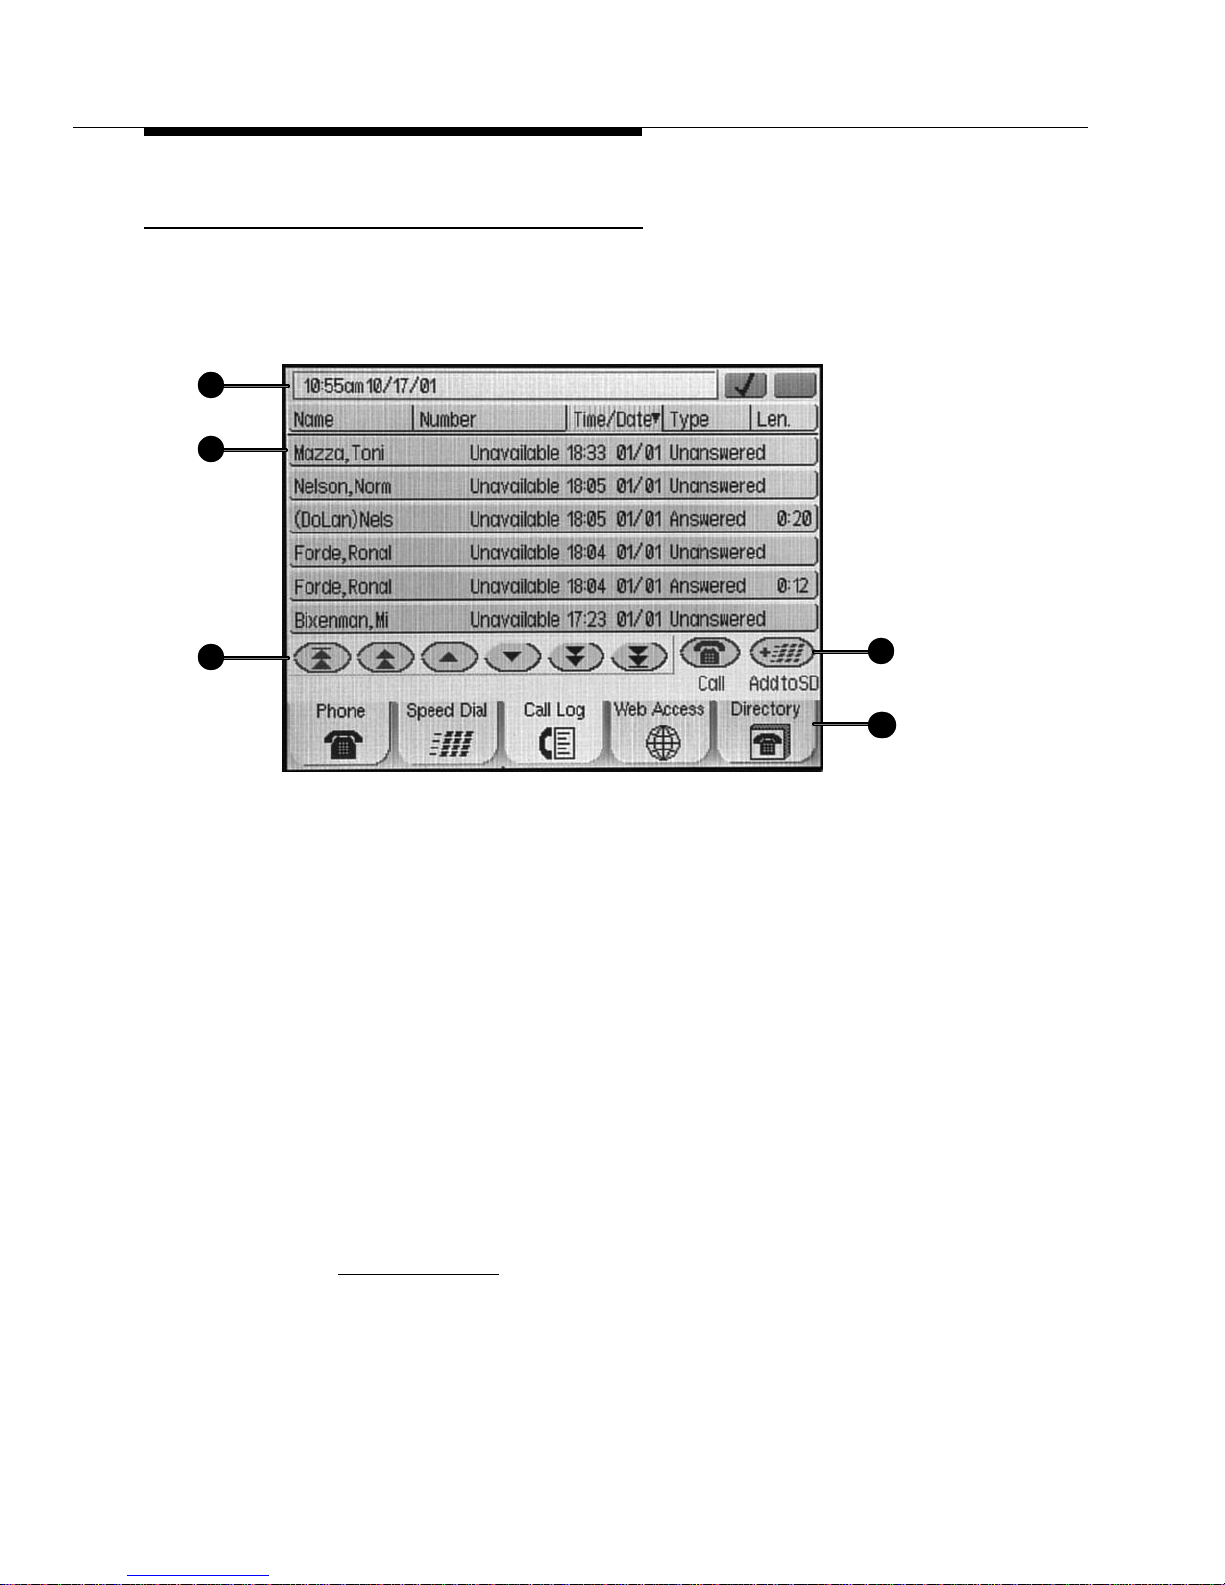
The Call Log application provides a list of up to 100 outgoing and incoming
(answered and unanswered) calls. This application also allows you to call a
person directly from the Call Log screen and add a log entry’s name and number
to a Speed Dial Group List.
1
2
3
The Call Log screen has fiv e distinct areas, relate d to the numbered callo uts in the
above illustration:
1. Time of Day/Current Date, Volume Control, call/feature information and/or
application screen Help, and access to the Preferences and Options
screen (via the checkmark icon).
2. Call information area, including name of caller/called party, telephone
number, time and date of call, type of call (outgoing, answered or
unanswered) and length of call.
3. Scroll buttons, for viewing the Call Log.
4. Feature buttons, either Call or Add to SD (Speed Dial), used to initiate a
call to a selected log entry or add a selected entry’s name and nu mber to a
Speed Dial Group, respectively.
5. Application tabs which provide access to the other 4630 applications. You
can always access the Call Log from any other application b y selecting the
Call Log application tab.
4
5
Chapter 4, Using the Call Log
adding an entry to a Spee d Di al Group.
Issue 1 December 2001
1-8
, covers log vie wing, direct-dialing of a log entry, and
Page 21
4630 IP Telephone Applications
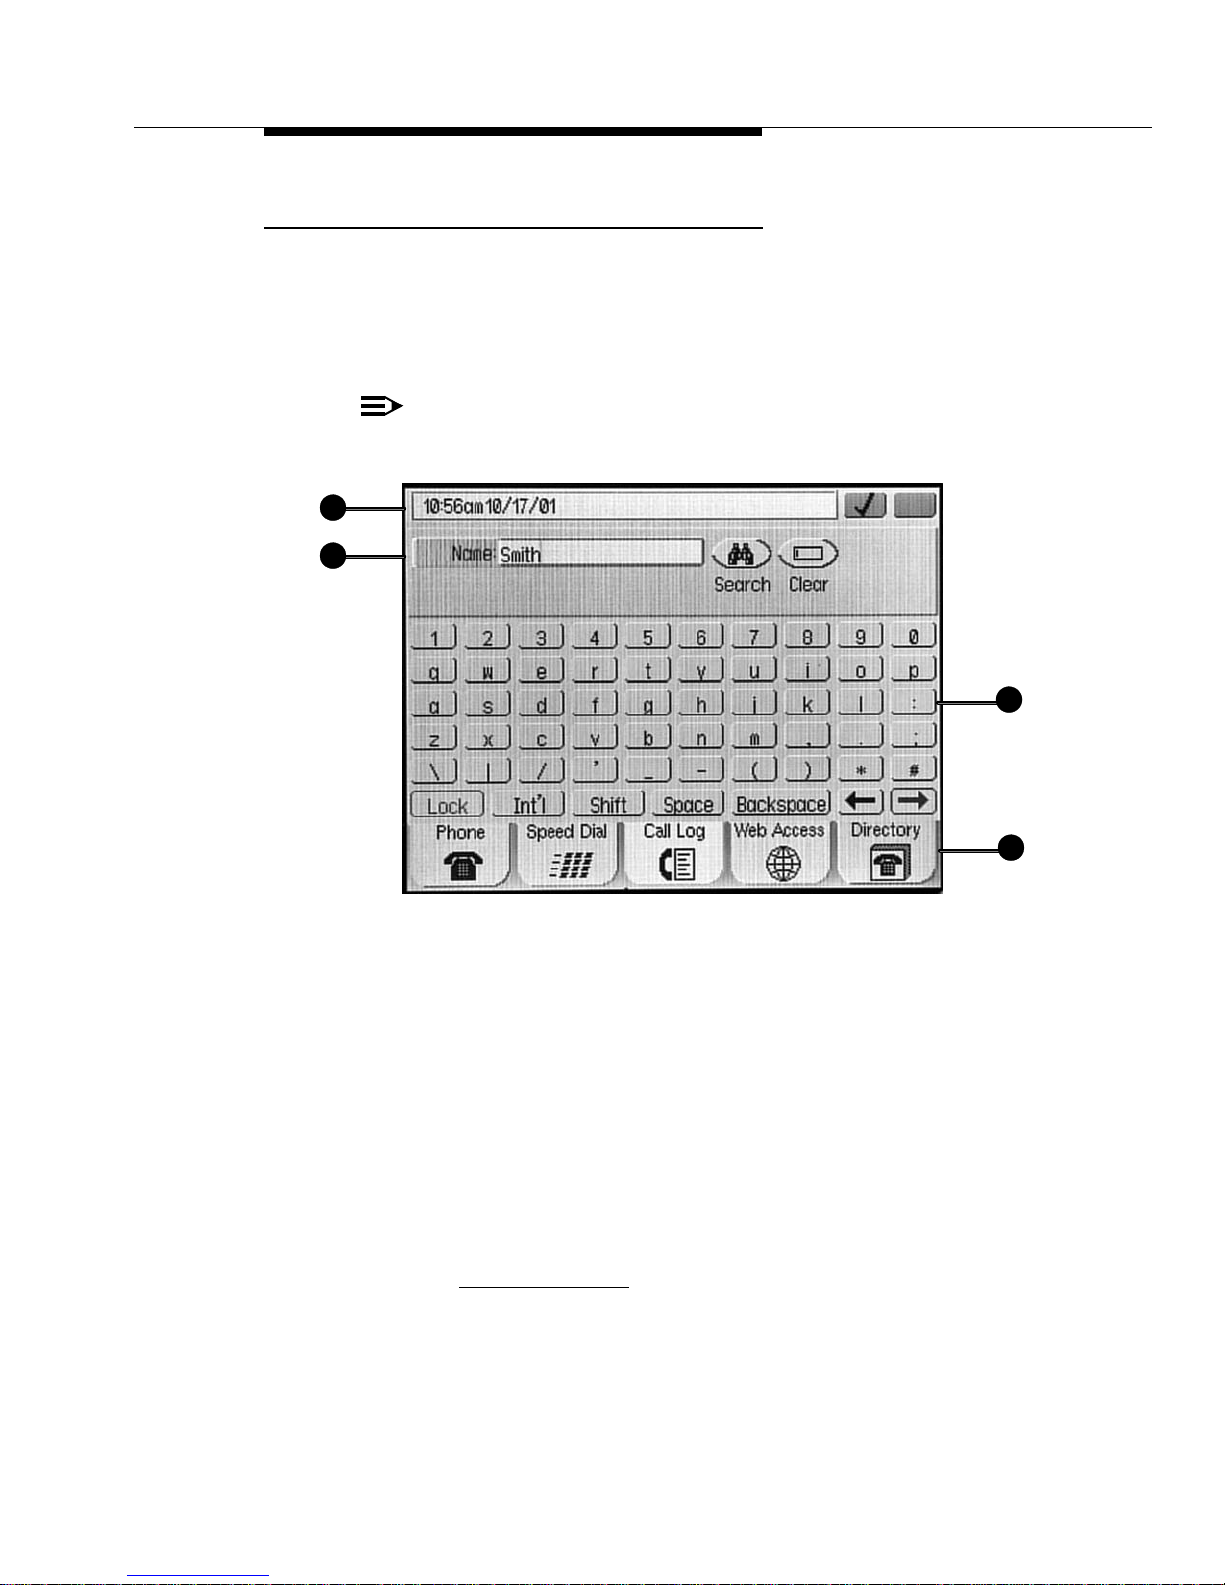
Directory Application
The Directory application allows users whose System Administrator has
established a Corporate phone directory to search for telephone numbers by
name and to initiate direct dialing from the Directory list. This application also
allows users to add a Directory entry’s name and number to a Speed Dial Group
List.
NOTE:
The Directory application tab may not be available, depending on your local
network and 4630 configuration.
1
2
3
4
The Directory screen has four distinct areas, related to the numbered callouts in
the above illustration:
1. Time of Day/Current Date, Volume Control, call/feature information and/or
application screen Help, and access to the Preferences and Options
screen (via the checkmark icon).
2. Name entry field for a Directory search and related Feature buttons
(Search and Clear).
3. Keyboard for entry of search criteria.
4. Application tabs which provide access to the other 4630 applications. You
can always access the Directory from any other application b y selecting the
Directory application tab.
Chapter 5, Using the Directory
, covers search procedures, direct-dialing of a
directory entry and adding a directory name/number to a Speed Dial Group.
Issue 1 December 2001
1-9
Page 22
Web Access Application
The Web Access application of fers a way to browse and connect to specific
Corporate Intranet information, as well as to Avaya support for the 4630 IP
Telephone. Your System Administrator has established a “home pa ge” for your
office system containing the sites available for browsing. This home page’s
address (URL) is downloaded as part of the 4630 IP Telephone’s
initialization/installation process.
Although not intended to replace your PC’s browser capabilities, the Web Access
application can provide quick reference to information related to your business.
For ex ample, a Human Resources Director may want to access and review a
specific area of the company’s online policy on terms and conditions of
employment during a phone conference; selecting the Web Access application
makes it easy to review the policy while on the call.
NOTE:
The Web Access application tab may not be available, depending on your
local network and 4630 configuration.
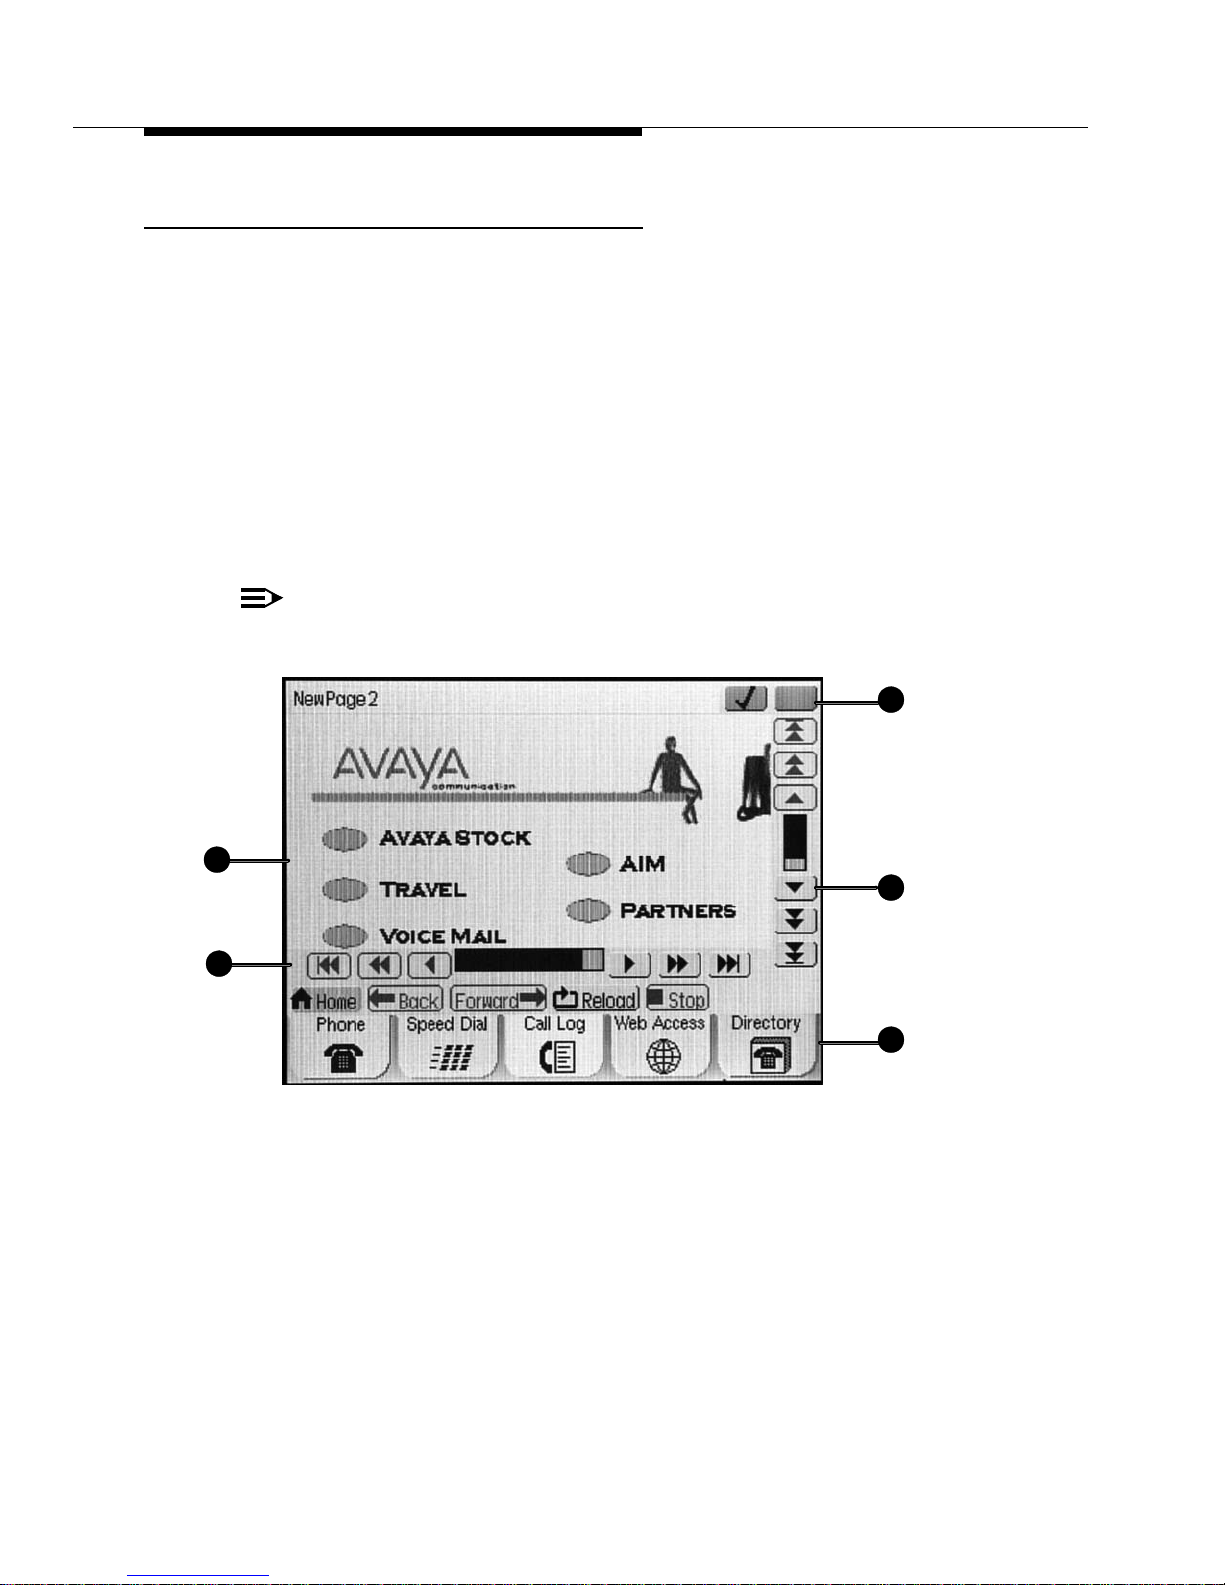
1
2
3
3
4
The Web Access Home P age display screen has four distinct areas, related to the
numbered callouts in the above illustration:
1. Volume Control, call/feature information and/or application screen Help.
2. Web page displa y area.
3. Web page control buttons.
4. Application tabs which provide access to the other four 4630 applications.
You can always ge t to Web Access from any other application by selecting
the Web Access application tab.
Issue 1 December 2001
1-10
Page 23

4630 IP Telephone Applications
Depending upon the type of web page displayed, other control buttons may
replace those shown in the illustration above. The Web Access application is
described fully in Chapter 7, Web Access
.
Issue 1 December 2001
1-11
Page 24

Issue 1 December 2001
1-12
Page 25

Call Handling
Introduction
Call handling features are those y ou w o uld u se while making a ca ll, while a ca ll is
in progress or related to receiving a call. They are features which may have a
dedicated phone button (such as Mute), or may be accessed using a display
screen action or Feature button.
This chapter describes the various ways of making calls, including manual and
automatic dialing, as well as options for handling ca lls in progress.
2
Making Calls
Manual Dialing
Dial a call manually by picking up the handset or pressing the Speakerphone
button. Then, depending on y our pref erence, use either procedu re below to initiate
dialing.
Direct (Manual) Dialing
1. Pick up the handset or press the Speakerphone button.
Issue 1 December 2001
2-1
Page 26
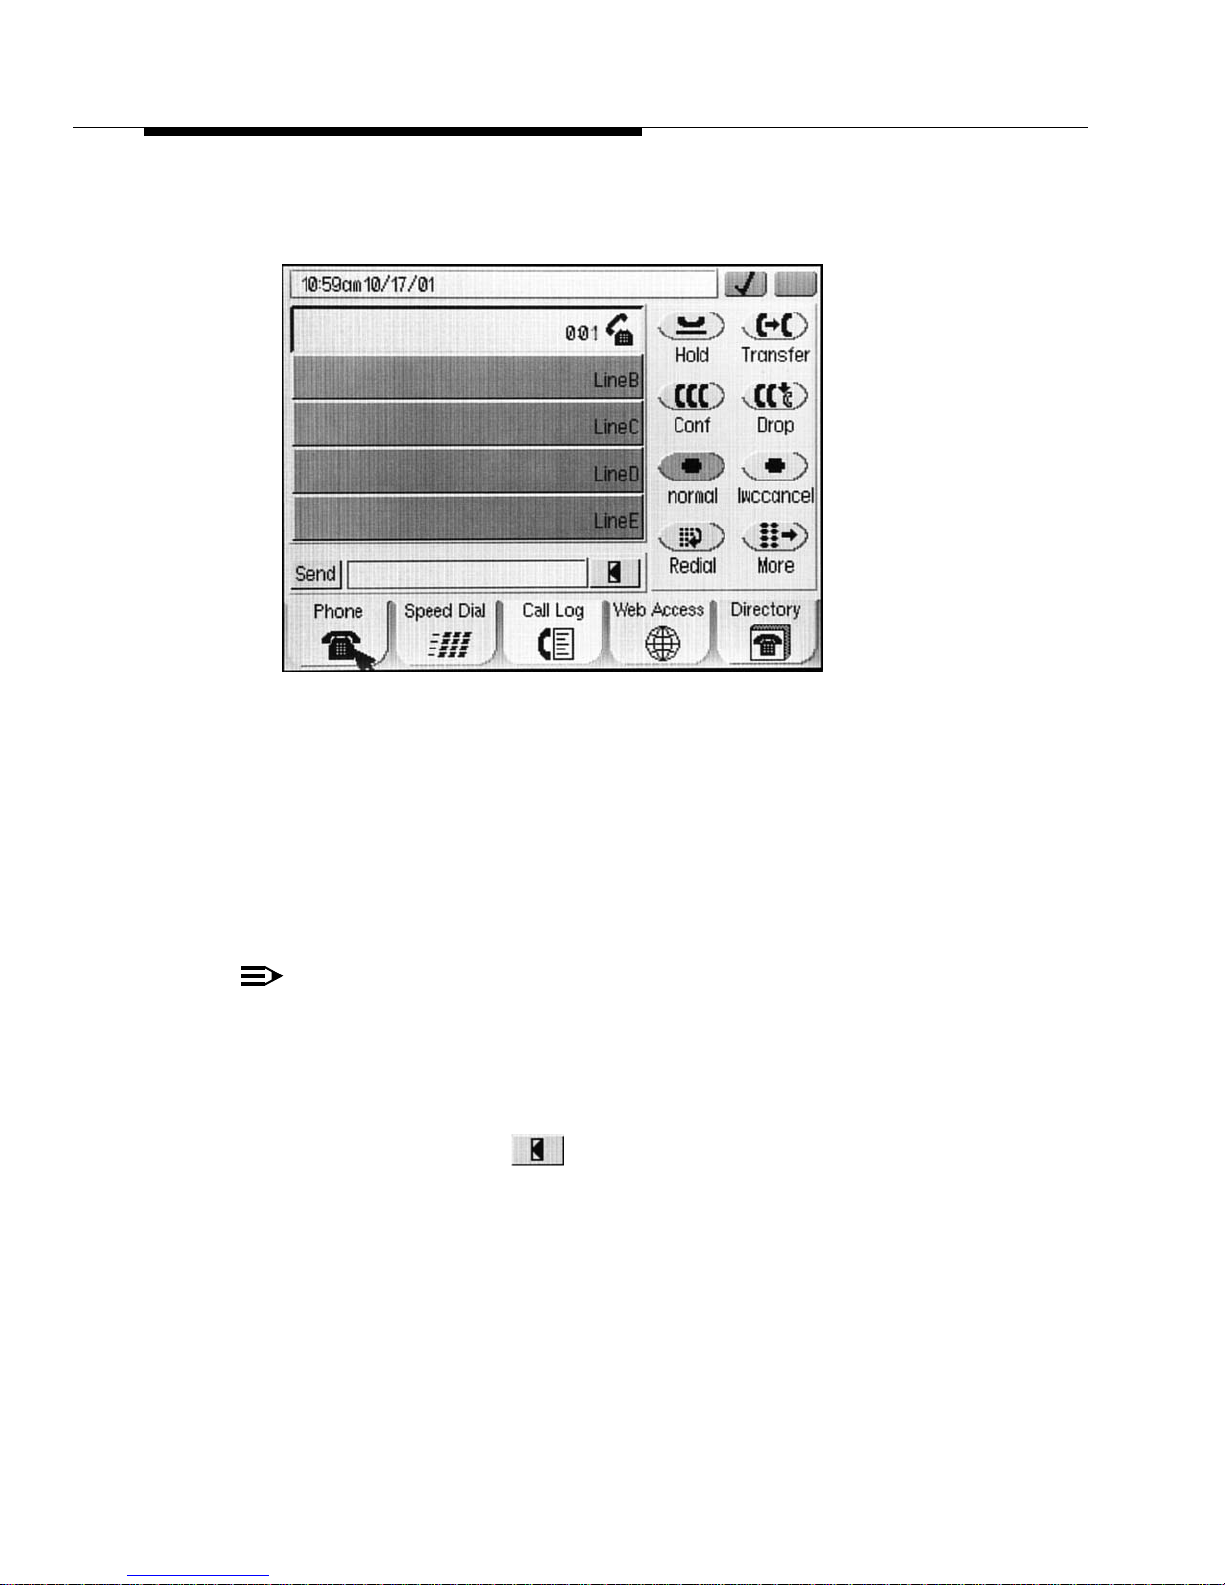
The first available call appearance highlights, displays the off-hook icon,
and starts the Call Timer.
2. Use the dial pad to enter the number you want to call.
The number entered displays on the active call appearance line, and the
4630 IP Telephone initiates the call.
Edit Dialing
This feature lets you correct a number as you enter it, before actual dialing and
call connection occur. Use the Speakerphone for ease of dialing.
3. Hang up the handset or press the Speakerphone button to end the call.
NOTE:
When using Edit Dial, dialing is not initiated until you select the Send button.
1. Select the Edit Dial button.
A dial line displays below the last call appearance line.
2. Using the dial pad, enter the number you want to call. To correct an entry,
select the Backspace ( ) button and retype the digit in error.
The digits entered display on the dial line as you type.
3. When the number is complete, select Send.
A call appearance line highlights, displays the off-hook icon and starts the
Call Timer. The n umber entere d displa ys on the activ e call appe arance line
and the 4630 IP Telephone initiates the call.
4. Pick up the handset if desired, or use the Speakerphone to proceed with
the call.
Issue 1 December 2001
2-2
Page 27

Making Calls
5. Hang up the handset or press the Speakerphone button to end the call.
Automatic (Speed) Dialing
Speed dial is the most common method of automatic dialing. Your System
Administrator may have programmed individual numbers on Feature buttons (this
is called Abbreviated Dialing), or you can set up speed dial groups and select the
party you want to call from a Group List. For information on setting up speed dial
group lists, see Chapter 3, Speed Dia ling Application
Telephone’s advanced capabilities that allow up to 120 speed dial entries, speed
dialing using Group Lists as described in the following procedures is convenient
and efficient.
Speed Dialing a party using a Feature button
If your System Administrator has set up one or more Abbreviated Dial buttons,
they are displayed on the Phone screen with the labels the system Administrator
has assigned.
If the label for the number yo u want to call is displayed on the Feature
button panel, select the appropriate button,
. Because of the 4630 IP
or
Select More until the label of the party you want to call is displayed, then
select that button.
The number dials automatically and the screen displays the appropriate
call appearance line as active.
Speed Dialing a party on a Group List
1. Select the Speed Dial tab at the bottom of the display screen.
Issue 1 December 2001
2-3
Page 28
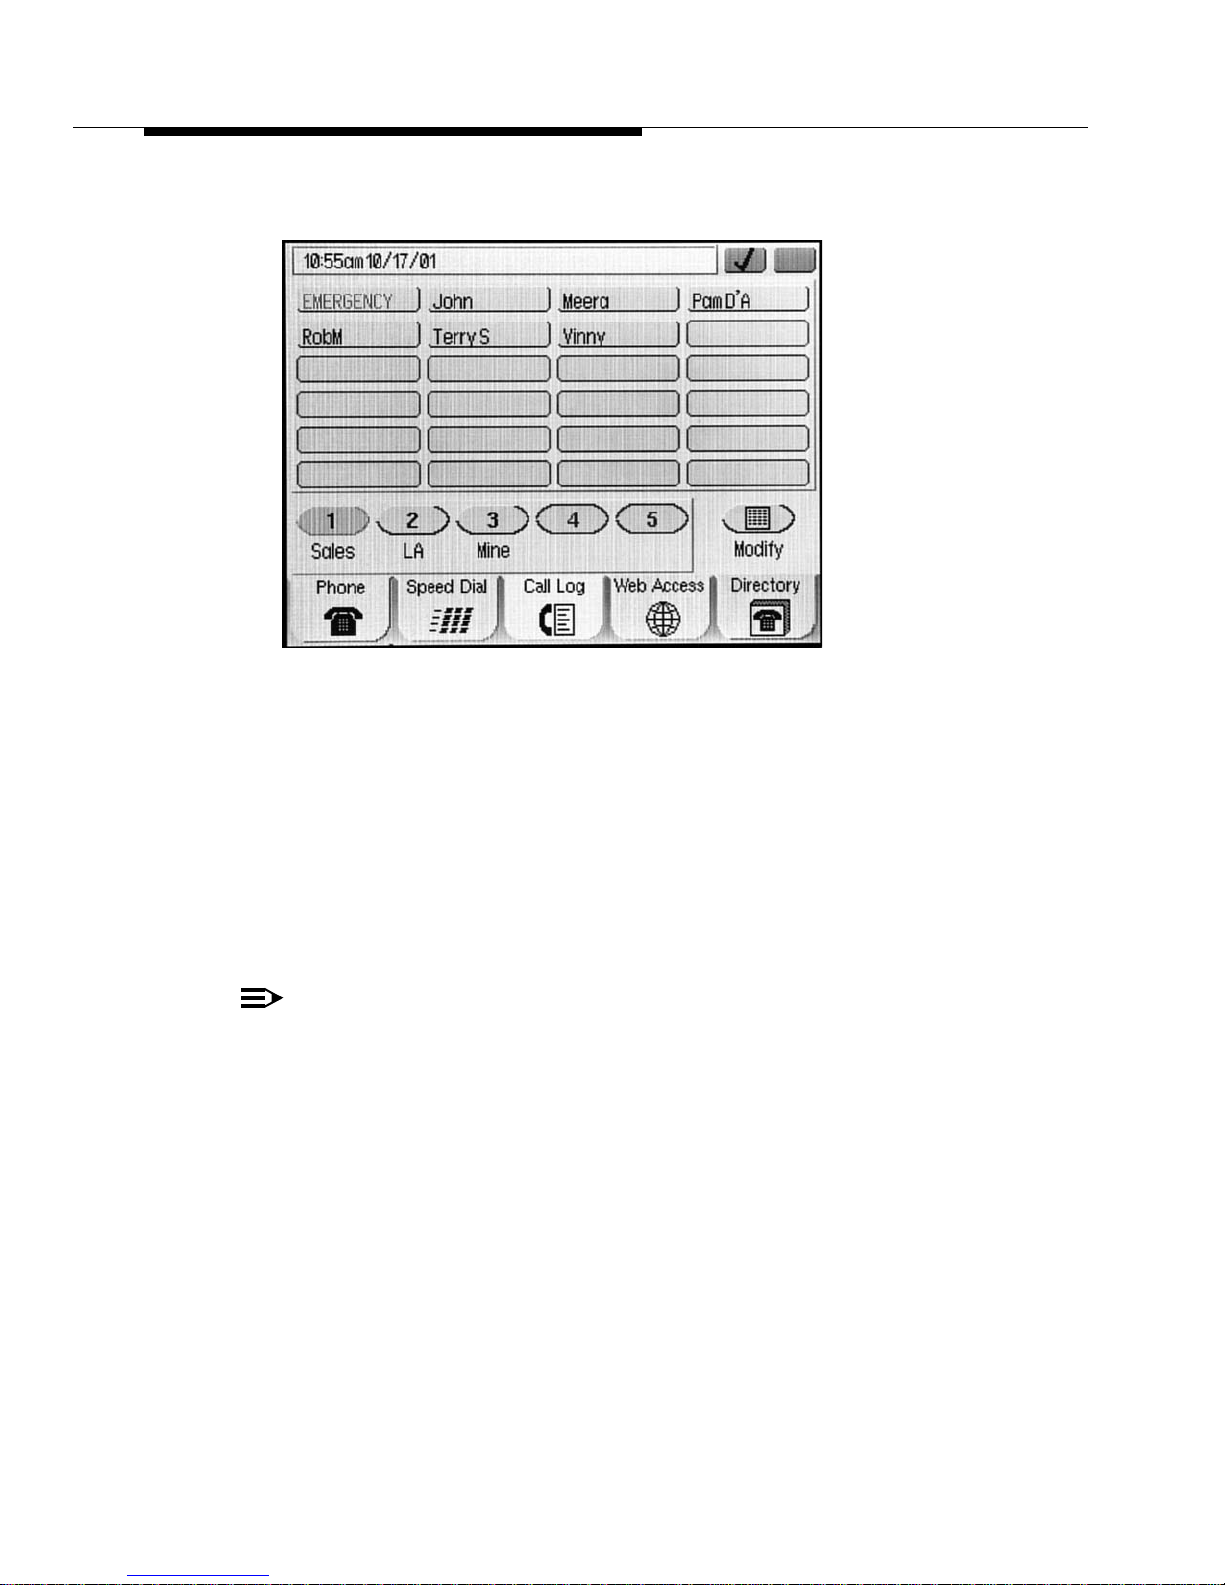
The first Speed Dial Group List displays, one name/number per button.
2. If the party you want to call appears in this group, proceed to Step 3. If the
party you want to call is not in this group, select the (Group Number) button
representing the Group in which that person is included. If y ou do not kno w
the Group Number, press each Group Number button until the party you
want displays.
3. Select the name of the person you want to call.
The number of the selected person is dialed automatically.
4. Pick up the handset if desired, or use the Speakerphone to proceed with
the call.
5. Hang up the handset or press the Speakerphone button to end the call.
NOTE:
If your System Administrator has administered one, the first Speed Dial
Group contains an EMERGENCY speed dial number, shown in red type.
This number is set up to obtain quick response in an emergency situation.
Because emergency procedures differ between organizations, your System
Administrator can provide inf ormation regarding the services connected to
your EMERGENCY speed dial number.
Issue 1 December 2001
2-4
Page 29

Call Handling
Calling a Party From the Call Log
Your 4630 IP Telephone maintains a log of up to 100 outgoing, answered, and
unanswered calls to/from your phone.
NOTE:
Only Call Log entries with a call type of “Outgoing” can be dialed directly
from the Call Log. If all call appearance lines are in use, the Call Log feature
will not proceed with dialing.
1. To call a party listed in the Call Log, be sure the Call Log is displayed and
that the Dial Permission (accessed via the Preferences and Options
screen, described in Chapter 6) is set to Yes.
2. With the Call Log displayed, se lect an outgoing entry.
3. Select Call.
The phone goes off-hook and the selected party’s number is dialed. If the
“Go to Phone” option is set to “Yes” in your Preferences and Options, the
Phone application screen displays. A Call Log entry is created for this call.
4. Proceed with the call as you normally would.
See Chapter 4, Using the Call Log
Calling a Party from the Directory
Your System Administrator may have set up a Corporate phone directory. If a
directory has been established, you can search for individu als by name and
automatically initiate a call. See Chapter 5, Using the Directory
Call Handling
Access call handling features while on a ca ll using the F eature b utton panel or th e
dedicated feature buttons, as applicable.
Conference
The Conference feature allows you to conference up to the maximum number of
parties set by your System Administrator.
Adding another party to a call
for more information about the Call Log.
for information.
1. Dial the first party, then select the Conference Feature button.
2. Dial the number of the next party and wait for an answer.
The current call is placed on hold and you hear a dial to ne.
Issue 1 December 2001
2-5
Page 30

3. Select Conference again to add the new party to the call.
4. Repeat Steps 1- 3 for each party you want to conference in to the call.
Adding a held call to the current call
1. Select the Conference Feature button.
The current line and the held line lights change to a patterned background.
2. Press the line button of the held call.
3.
Select Conference again.
All parties are now connected.
Dropping the last person added to the call
Select the Drop Feature button.
The last party connected to the conference call is dropped from the call.
Hold
The Hold feature puts a call on hold until y ou retrieve it.
Placing a call on hold
Select Hold.
The call appearance line of the held call changes to a patterned
background and the Held Call icon displays.
Retrieving the held call
Select (press) the call appearance line of the held call.
The call is now active.
Mute
During an active call, the Mute feature prevents the party with whom you are
speaking from hearing you. This feature is most commonly used in conjunction
with the Speakerphone, but can be used to hold an off-line conversation at any
time during a call.
Preventing the other person on the line from
hearing you
1. Press the Mute button next to the dial pad.
Issue 1 December 2001
2-6
Page 31

Call Handling
The other party cannot hear you. The indicator next to the Mute button
lights.
2. To reinstate two-way conversation, press Mute again.
Redial
Depending on how you have set up your Redial option (as covered in Chapter 6,
4630 Telephone Options
most recent number dialed, or displays a list of the last eight outgoing calls for
selection of the number to be dialed. Both procedures follow.
NOTE:
If all call appearance lines are in use, the Redial feature will not proceed with
dialing, or allow selection of a number to be redialed from the Redial screen.
Redialing the last number called
Select the Redial Feature button.
) the Redial feature automatically initiates dialing of the
The last number dialed is automatically redialed.
Redialing using a list of the last eight numbers
called
1. Select the Redial Feature button.
The Redial screen displays the last eight unique numbers dialed.
NOTE:
Following a power-up or phone reset, the Redial list displays only those
numbers dialed after the reset or pow er-up; numbers dialed prior to the reset
or power-up do not display.
2. Select the number you want to redial.
If the call can be dialed, the Phone application screen displa ys and the
selected number dials automatically.
If the selected number cannot be dialed (for example, if all call appearance
lines are currently on Hold), all Redial entries are disabled. If you press a
number for redialing while in this state, an error beep tone sounds and no
further action occurs.
3. Proceed with the call.
Issue 1 December 2001
2-7
Page 32

Speakerphone
A two-way, built-in Spea kerphone lets you place and answer calls without lifting
the handset.
NOTE:
It is also possible to disable the Speakerphone feature. If your
Speakerphone does not operate as indicated, contact your System
Administrator to be sure your telephone's Speakerphone is enabled.
Placing or answering a call without lifting the
handset, or using the Speakerphone with any
feature
1. Press the Speaker button on the dial pad.
The indicator next to the Spe ak er b utton lights and v o ice control is handle d
by the speaker. The first available call appearan ce line activates.
2. Place or answer the call, or access the selected feature.
3. Adjust the speaker volume if needed by pressing the Volume Control
button until you reach the desired volume level.
As you press the Volume Control button, the display screen shows the
volume level.
Changing from the speakerphone to the handset
Pick up the handset and talk.
The Speaker indicator next to the Speaker button goes off.
Changing from the handset to the speakerphone
Press the Speaker button on the dial pad, then hang up the handset.
The indicator next to the Spe ak er b utton lights and v o ice control is handle d
by the speaker.
Turning the speaker on during a call
Press the Speaker button on the dial pad.
The Speaker indicator next to the Speaker button lights. Both the speaker
and handset are now operational.
Turning the speaker off during a call
Lift the handset at any time.
The speaker and the corresponding indicator light turn off; voice control
reverts to the handset.
Issue 1 December 2001
2-8
Page 33

Call Handling
Ending a call while the speaker is active
Press the Speaker button on the dial pad.
The speaker and the corresponding indicator light tur n off and the call
terminates.
Transfer
The Transfer feature lets you transfer a call from your telephone to another
extension or outside number.
Sending a call to another telephone
1. With the call active (or with only one held call and no active calls), select
the Transfer Feature button.
The call is placed on hold; you hear a dial tone and the next available call
appearance line activates.
2. Dial the number to which you wan t to transfer the call.
3. Remain on the line and announce the call; if the line is busy or if no one
answers, return to the held call by pressing the line button on which it is
being held.
4. Press the Transfer Feature button again.
The call is sent to the extension or number you dialed.
5. Hang up your handset.
Issue 1 December 2001
2-9
Page 34

Issue 1 December 2001
2-10
Page 35

Speed Dialing Application
Introduction
This chapter describes how to label and use a Speed Dial Group and how to add,
update, or remove a button label (representing a phone number) from a Speed
Dial Group List. To make a call using a Speed Dial button, see Automatic (Speed)
Dialing in Chapter 2.
Speed Dial Groups
3
Your 4630 IP Telephone maintains up to 5 Speed Dial Groups with up to 24 Speed
Dial buttons (each representing a phone nu mber) per group. You can set up your
own group labels/b uttons as desired, with the possi ble e xception of one number in
the first Group. That number is an EMERGENCY number, optionally established
by your System Administrator, to allow you quick access to emergency services
for your site. When administered, the EMERGENCY button is labeled in red type,
to allow you to recogniz e it immediately if needed.
When you use your telephone for the first time, the only active Speed Dial button
is the EMERGENCY button in Speed Dial Group 1. You m ust set up any other
buttons or groups, and can change the Group 1 default label to represent the
name of your first group as well.
Activating a Speed Dial Group or Changing a
Group Label
1. To access the Speed Dial application from any other application , select the
Speed Dial tab at the bottom of the display screen.
Issue 1 December 2001
3-1
Page 36
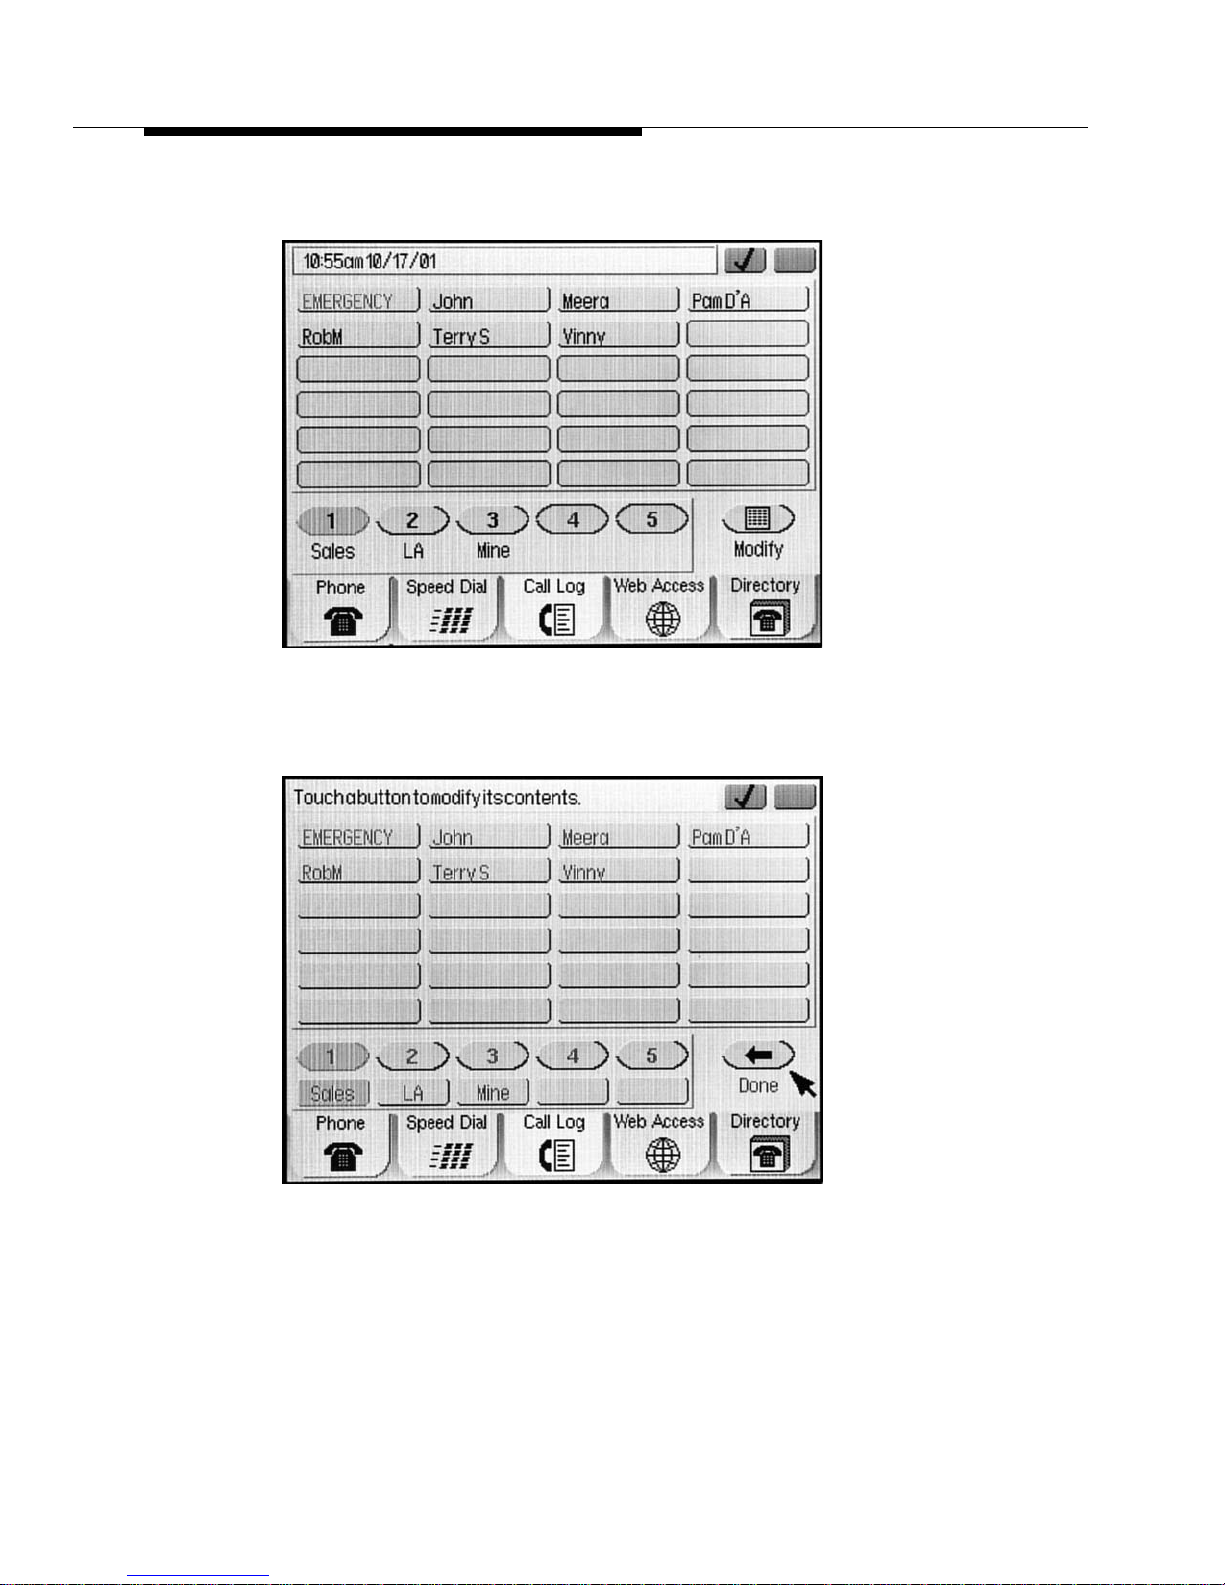
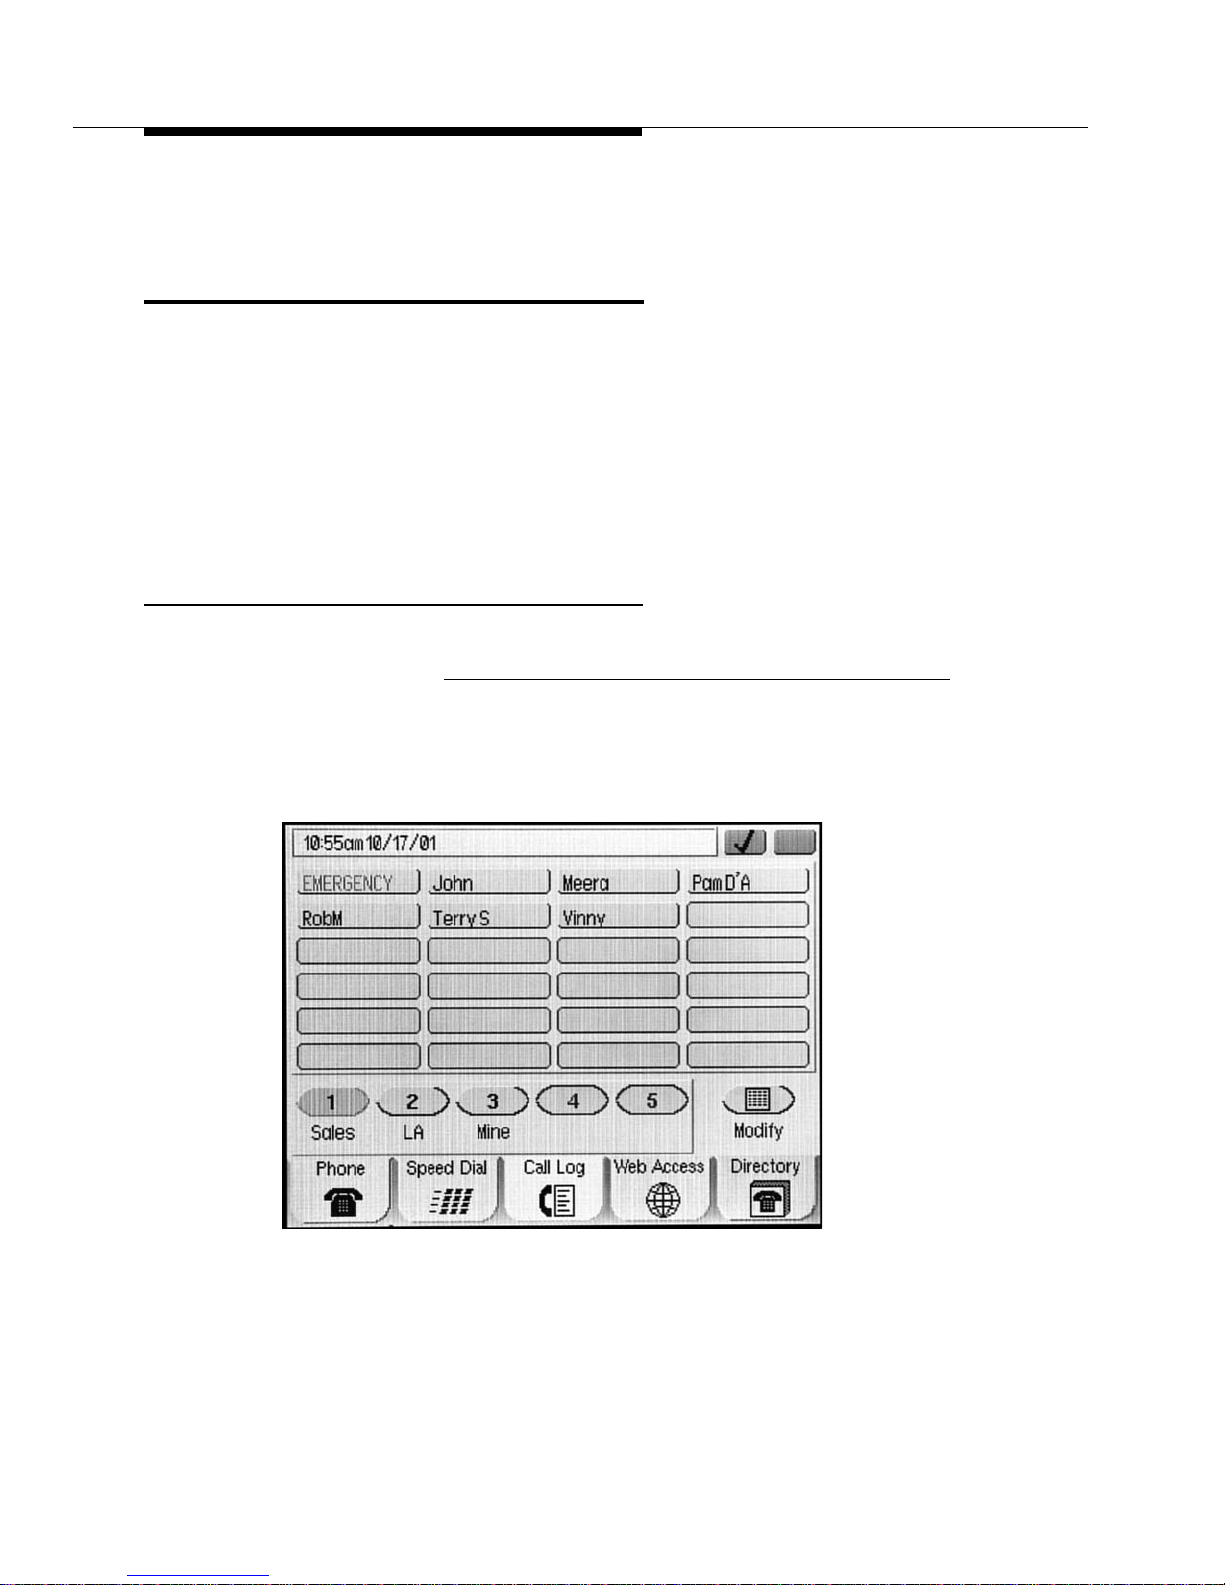
The Speed Dial screen displays.
2. Select Modify.
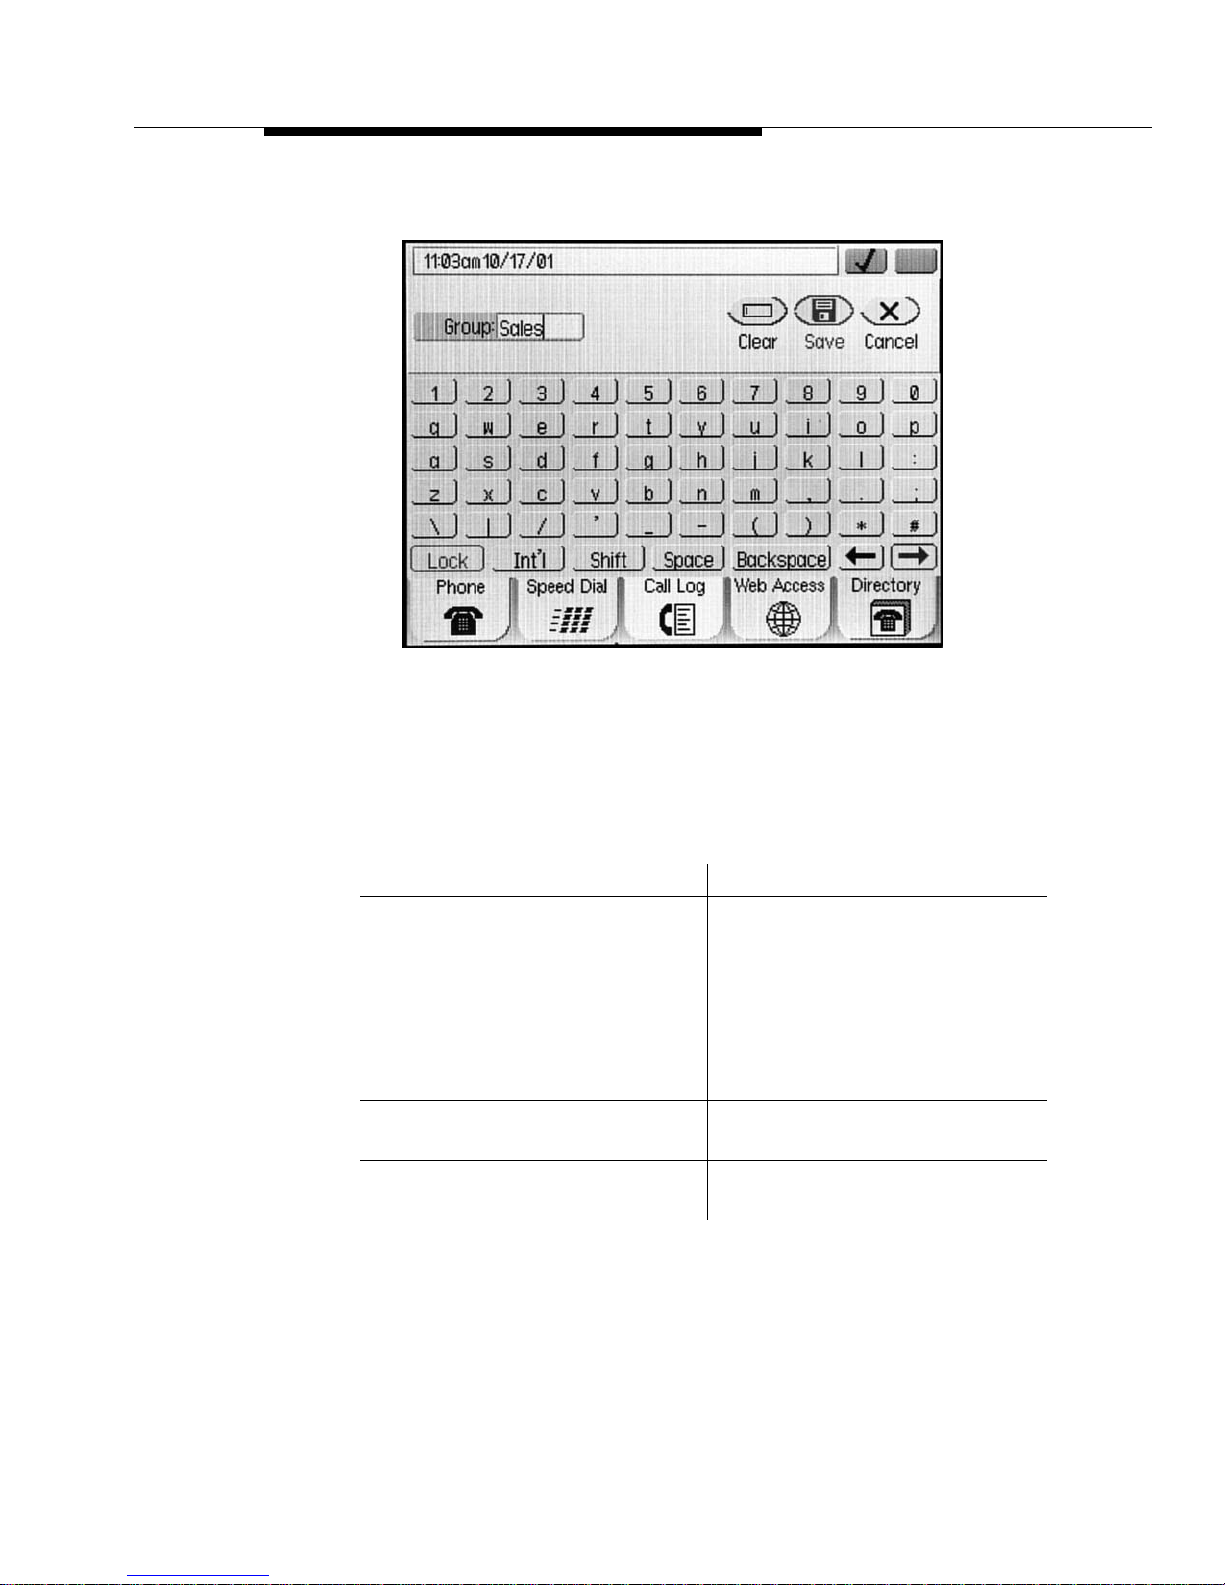
The Modification Screen displays, prompting “Touch a button to modify its
contents.” The label below each Speed Dial Group number is enabled.
3. Select the Group label button you want to activ ate or change.
Issue 1 December 2001
3-2
Page 37
Speed Dial Groups
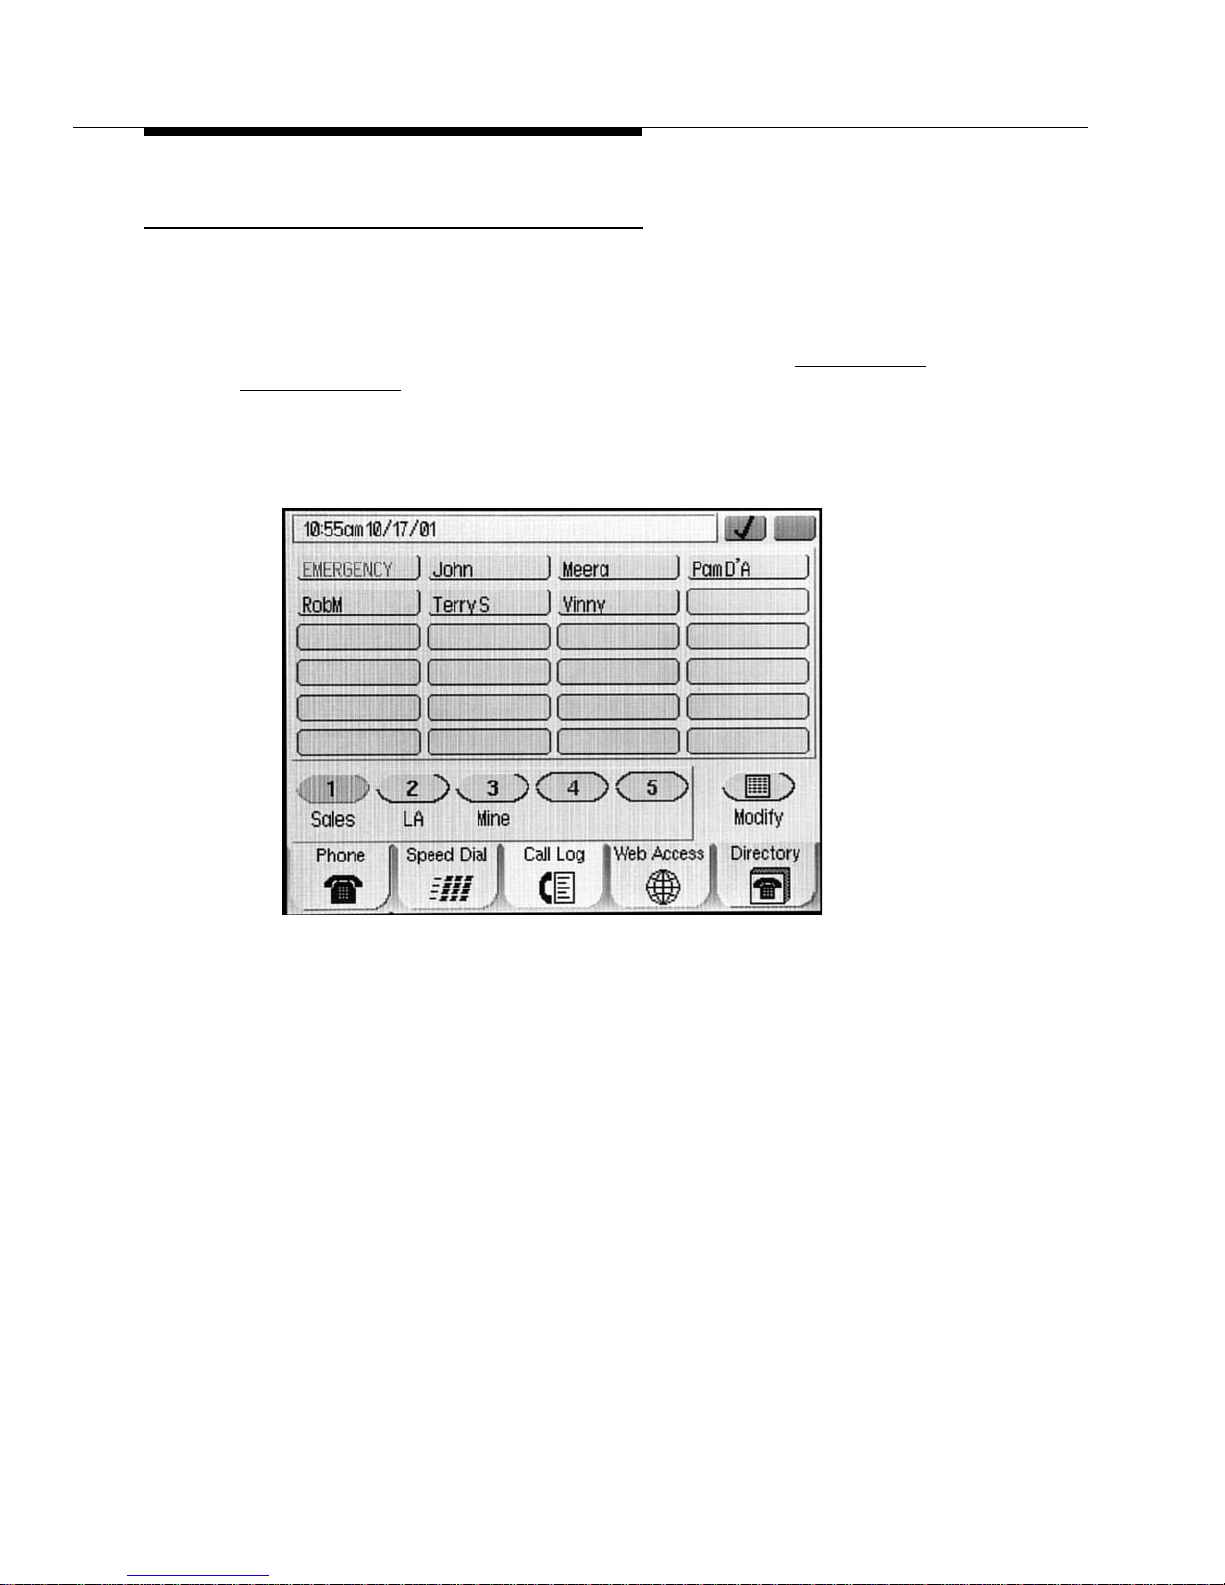
4. Touch the appropriate keyboard letters to enter the label y ou want to assign
The Ke yboard Entry screen displays with the cursor in the Group field:
to this group.
As you press each letter, the Group field populates. When modifying an
existing label, your new label will overwrite the current one.
5. Choose one of the following options:
If you want to Then
Make a change, one character at a
time
Touch the appropriate directional
arrow to move to the character in
error, then touch Backspace.
The character to the left of your
current position erases.
Retype the character(s) in error and
proceed to Step 6.
Erase the entire Group Name and
retype the label
Return to the Modification screen
Select Clear. Repeat Steps 4 and
5, then proceed to Step 6.
Select Cancel. Proceed to Step 7.
without entering a label
6. Verify the label and select Save.
The Modification screen redispla ys showing the new label beneath the
applicable Group.
7. Select Done to return to the Speed Dial screen, or, repeat Steps 3 - 6 to
continue to activ ate/modify Group Labels.
Issue 1 December 2001
3-3
Page 38
Deactivating a Speed Dial Group
The procedure that follows do es not specifically delete a g roup and its associated
Speed Dial Numbers (buttons). It removes the Speed Dial Group Label only,
retaining any Speed Dial buttons assigned to the gr oup.To fully delete a Speed
Dial Group, remove (clear) each individual Speed Dial button assigned to the
group (as described in the procedure later in this chapter titled Deactivating a
Speed Dial Button), then follow this procedure to deactivate the Group.
1. To access the Speed Dial application from any other application, se lect the
Speed Dial tab at the bottom of the display screen.
The Speed Dial screen displays.
2. Select Modify.
Issue 1 December 2001
3-4
Page 39
Speed Dial Groups
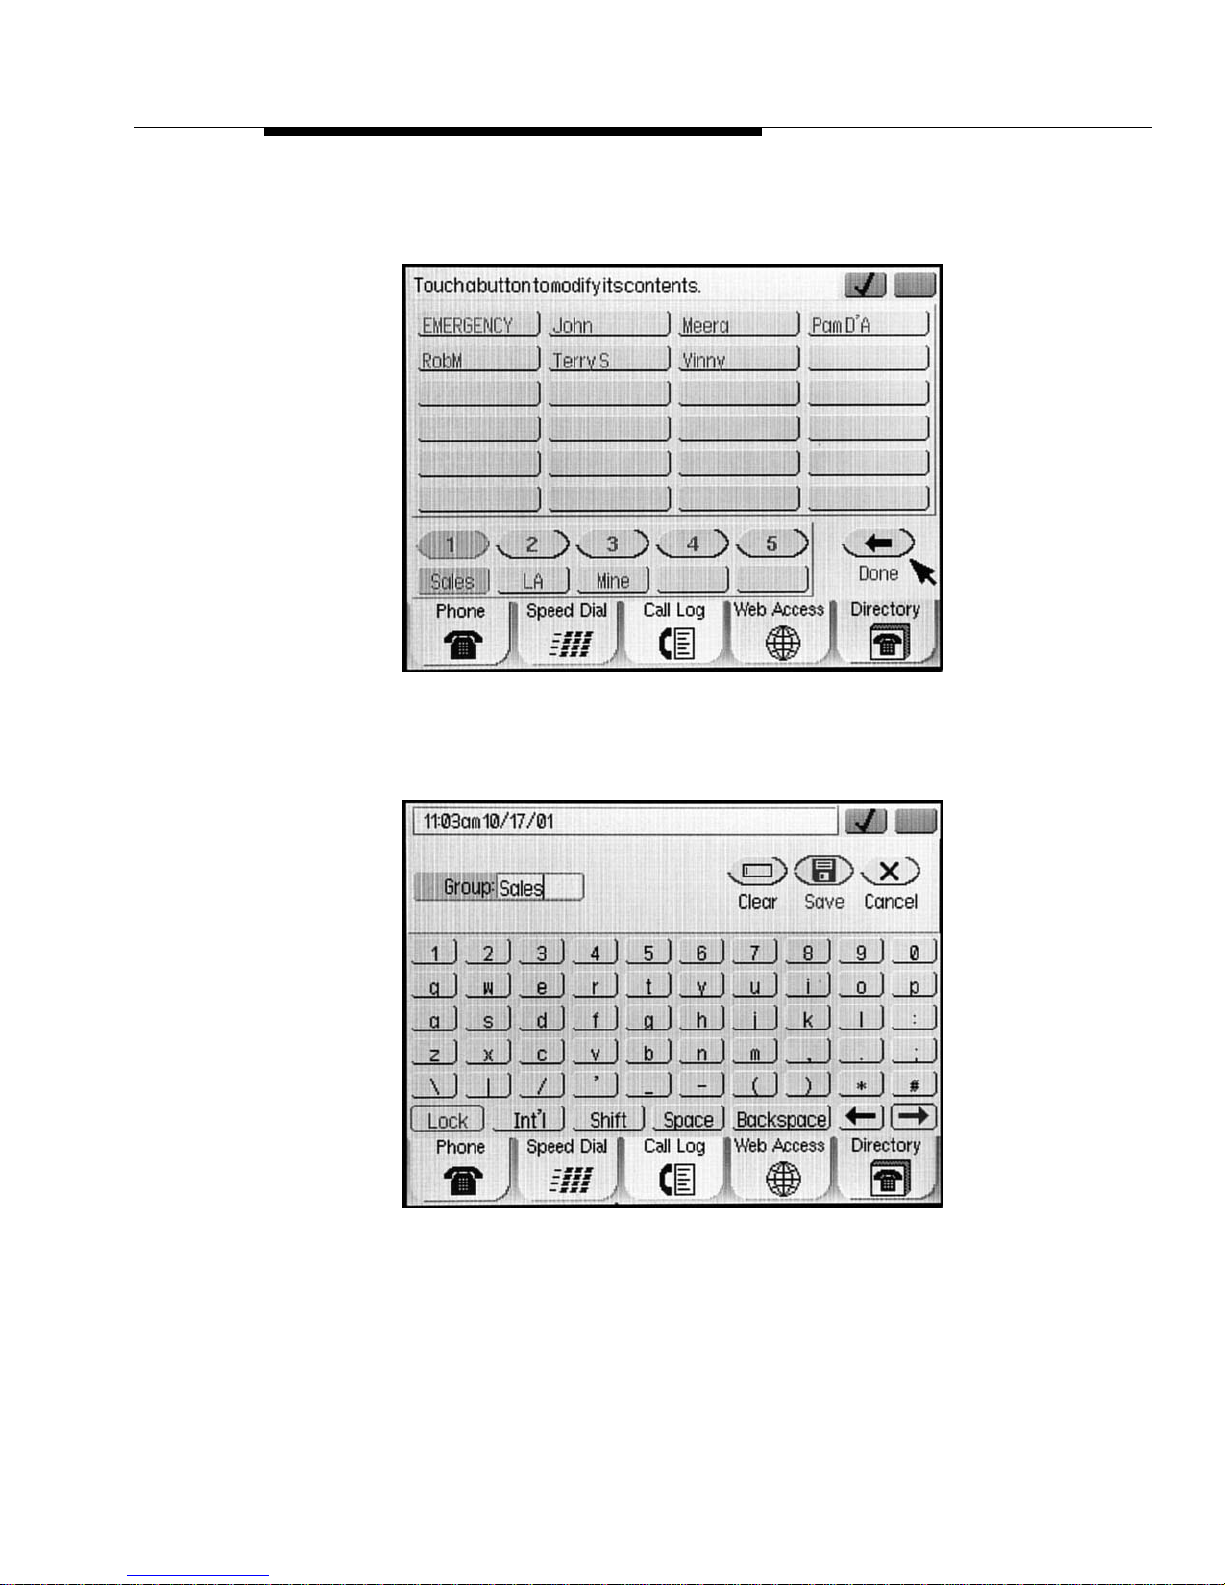
The Modification Screen displays, prompting “Touch a button to modify its
contents.”
3. Select the Group button for which you want to remove the label.
The Group Name Keyboard Entry screen displays with the cursor in the
Group field:
4. Select Clear.
The name in the Group field is removed.
5. Select Save.
The Modification screen redispla ys showing no label beneath the
applicable Group.
Issue 1 December 2001
3-5
Page 40
6. Select Done to return to the Speed Dial screen.
Speed Dial Buttons
Each Speed Dial Group can have up to 24 Spee d Dial buttons associated with it,
with each button displayed alphabetically by name. Each button represents a
telephone number you call by pressing one button. You can set your own buttons
up as desired, with the possible exception of one number (button) in the first
Group. That number is an EMERGENCY number, optionally established by your
System Administrator, to allow you quick access to emergency services for your
site. When administered, the EMERGENCY button is labeled in red type, to allow
you to recognize it immediately if needed.
Adding Speed Dial Buttons to a Group or
Updating Speed Dial Button Information
Before adding bu ttons to a Speed Dial Group, be sure to assign a Group name
(label), as described in Activating a Speed Dial Group or Changing a Grou p Label
earlier in this chapter.
1. To access the Speed Dial application from any other application, se lect the
Speed Dial tab at the bottom of the display screen.
,
The Speed Dial screen displays.
2. Select Modify.
Issue 1 December 2001
3-6
Page 41
Speed Dial Buttons
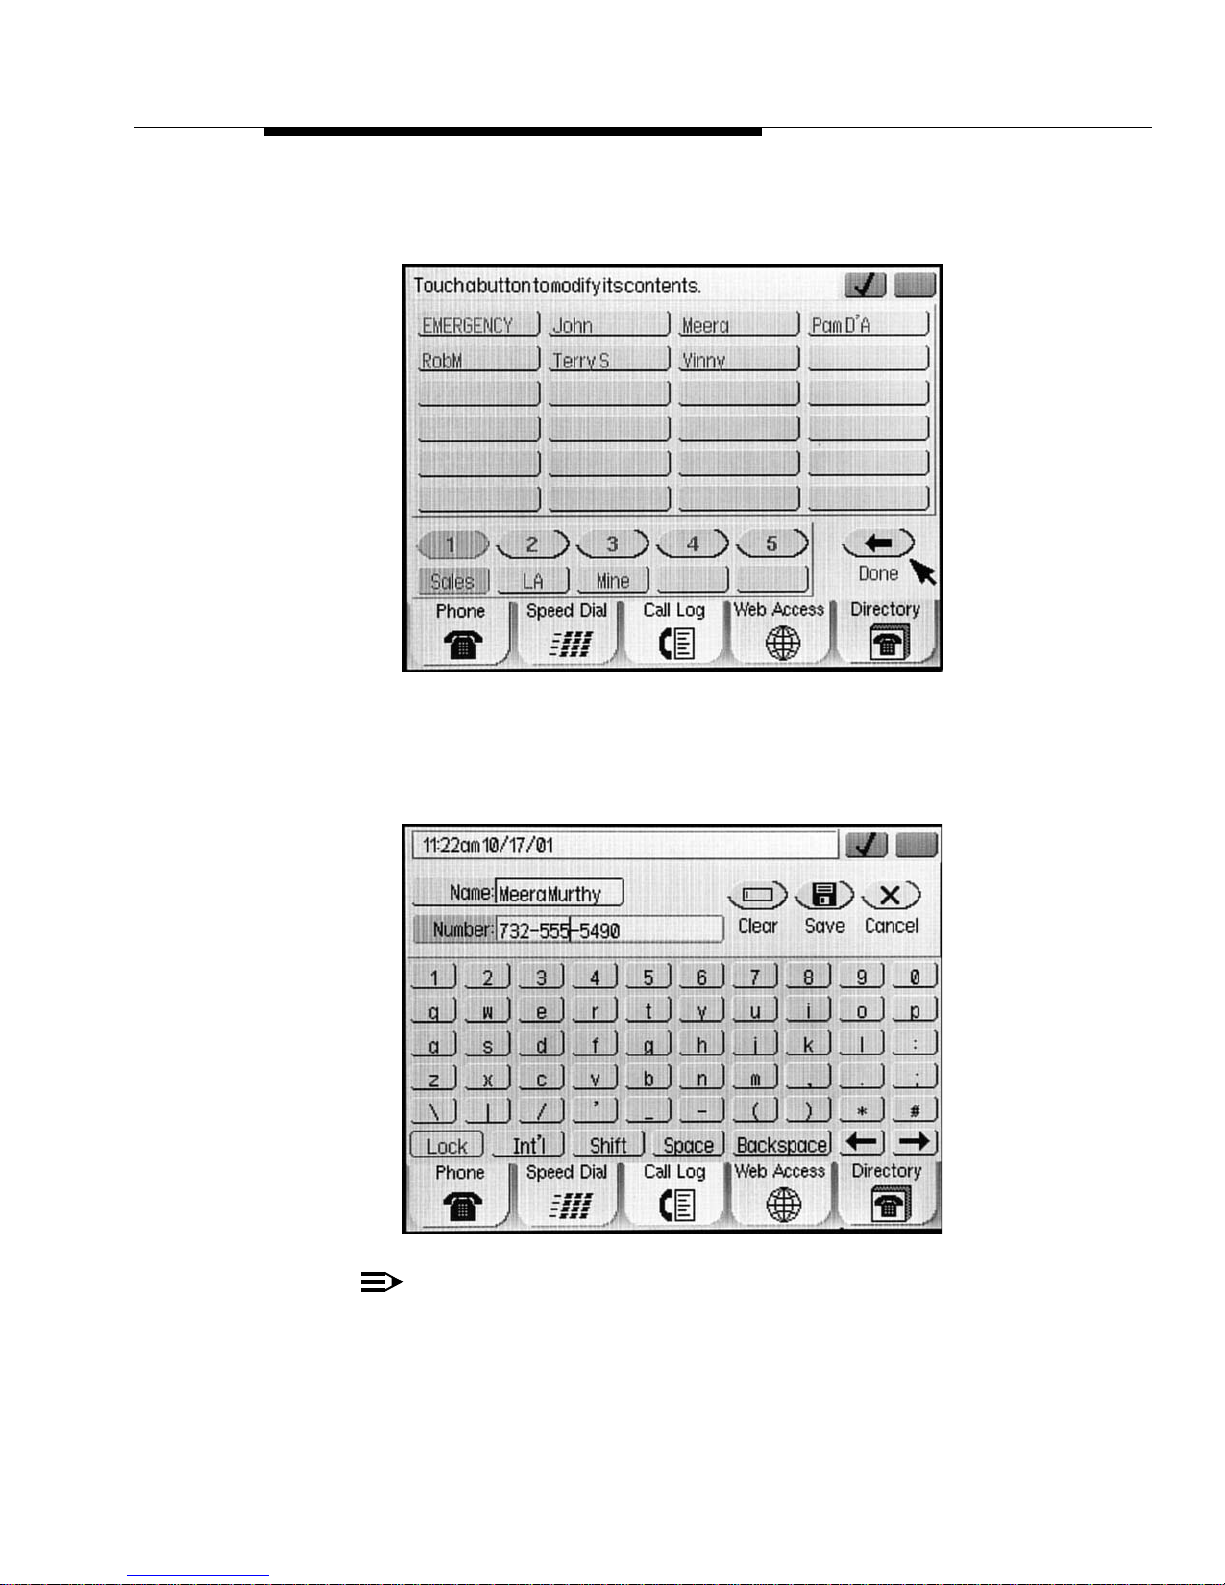
The Modification Screen displays, prompting “Touch a button to modify its
contents.”
3. Select the Speed Dial button to which you want to assign/chang e a n ame
and/or telephone number.
The Speed Dial Keyboard Entry screen displays with the cursor in the
Name field:
NOTE:
When adding an entry, the cursor starts on the Name field. When editing an
existing entry, the cursor starts on the Number field.
Issue 1 December 2001
3-7
Page 42

4. Touch the appropriate keyboard characters to enter the name you want to
assign to this button using up to 12 characters. This can be a person’s
name, phone number, other designation or abbreviation.
As you press each character , the Name field populates . When modifying an
existing name, what you type overwrites the current name.
5. Choose one of the following options:
If you want to Then
Make a change, one character at a
time
Touch the appropriate directional
arrow to move to the character in
error, then touch Backspace.
The character to the left of your
current position erases.
Retype the character(s) in error and
proceed to Step 6.
Erase the entire Name or Number,
and type new information
Select Name or Number as
appropriate, then select Clear.
Repeat Steps 4 and 5, then
proceed to Step 6.
Return to the Modification screen
without entering or changing a name
or number
Select Cancel.
The Modification screen redisplays.
6. Verify the name and select the Number field.
7. Touch the appropriate keyboard characters to enter the telephone number
you want to assign to this button using up to 30 characters. Be sure to
include trunk numbers (for example, a 1 or 9 to get an outside line), area
codes and exchanges when entering outside numbe rs. You can use any
characters you want to format the number - for example, hyphens,
parentheses, letters, or periods; these characters are ignored when the
number is dialed. For inter nal numbers, follow your telephone system
protocols for extensions or other offices.
As you press each character, the Number field populates. When modifying
an existing number, what you type overwrites the current number.
Issue 1 December 2001
3-8
Page 43

Speed Dial Buttons
8. Choose one of the following options:
If you want to Then
Make a change, one character at a
time
Touch the appropriate directional
arrow to move to the character in
error, then touch Backspace.
The character to the left of your
current position erases.
Retype the character(s) in error and
proceed to Step 9.
Erase the entire Name or Number
and type new information
Select Name or Number as
appropriate, then select Clear.
Repeat Steps 4-6 to re-enter the
Name or Steps 6-8 to re-enter the
Number.
Return to the Modification screen
Select Cancel. Proceed to Step 10.
without entering or changing a
Name or Number
9. Verify the number and select Save.
The Modification screen redisplays showing the new/updated button name
in alphabetical order.
10. Select Done to return to the Speed Dial screen or repeat this procedure
from Step 3 to add/modify another button.
Deactivating a Speed Dial Button
The procedure that follows clears ou t a single Speed Dial button’s name and
number, and disables the button on the associated Speed Dial Group List.
NOTE:
You cannot deactivate the EMERGENCY button, if one is administered for
your phone.
1. To access the Speed Dial application from any other application , select the
Speed Dial tab at the bottom of the display screen.
Issue 1 December 2001
3-9
Page 44
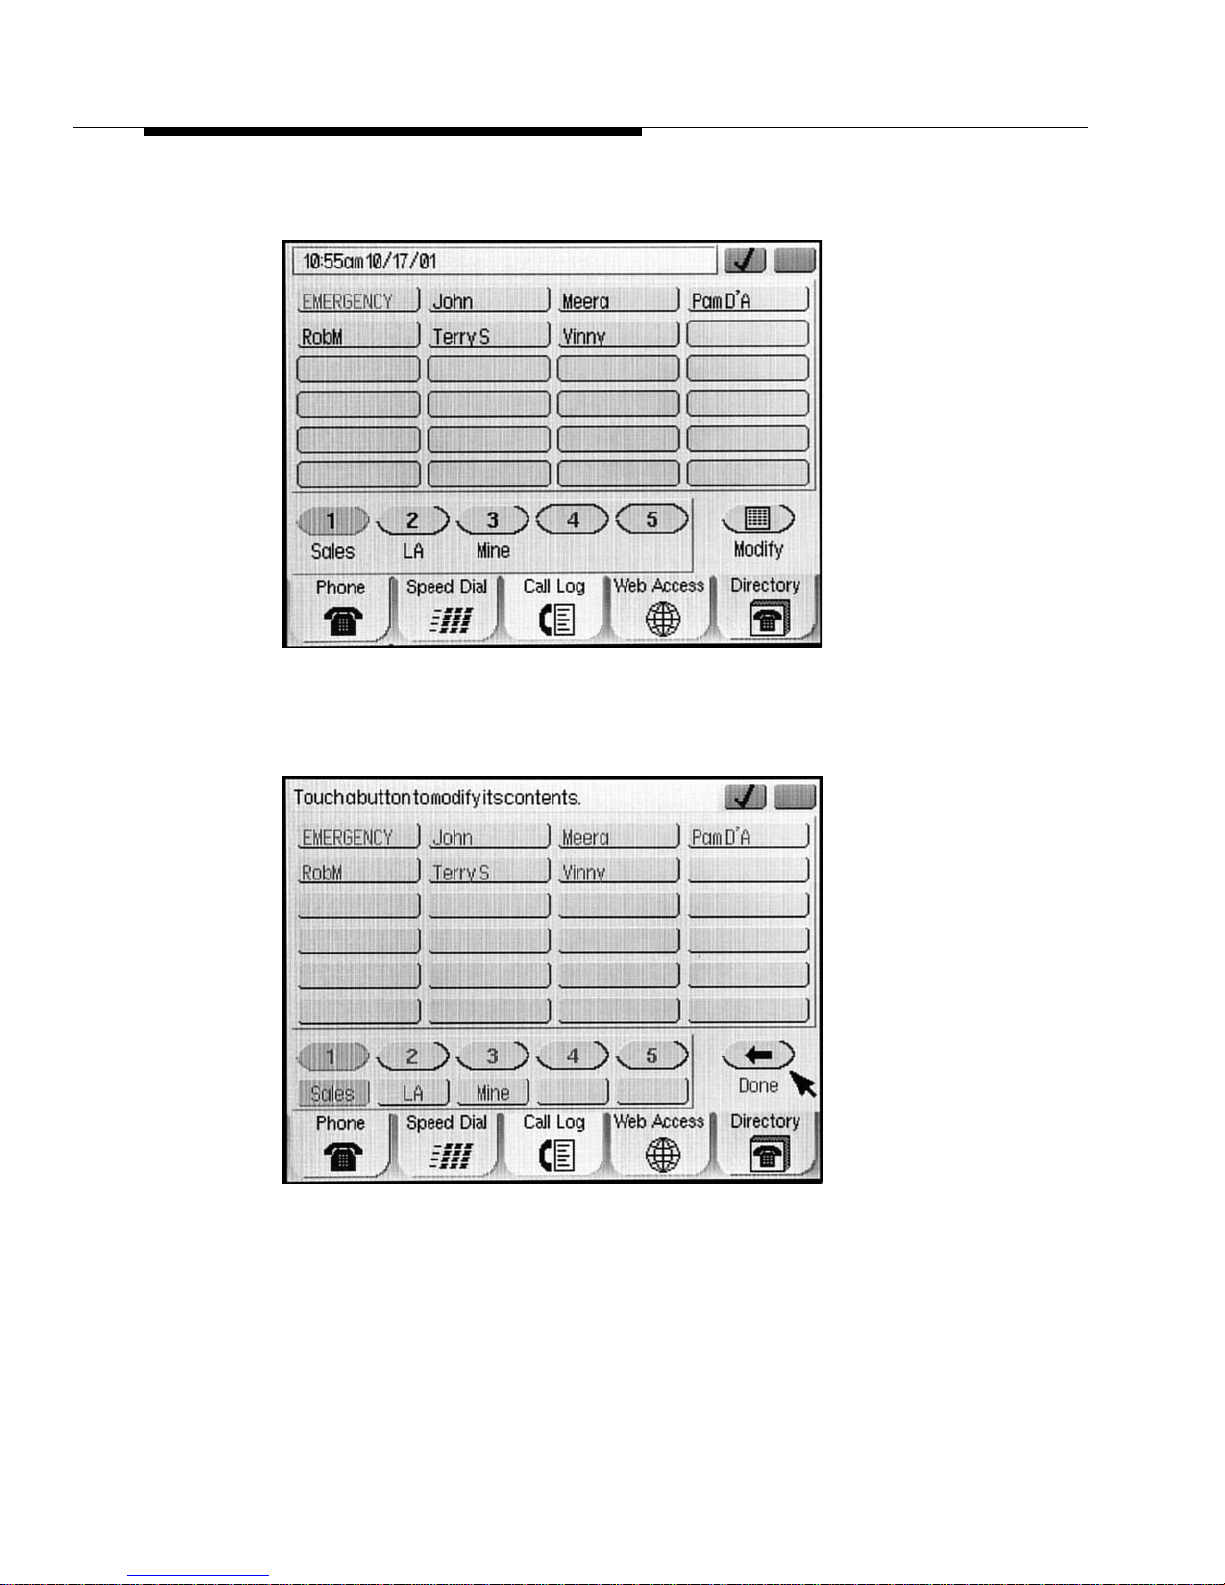
The Speed Dial screen displays.
2. Select Modify.
The Modification Screen displays, prompting “Touch a button to modify its
contents.”
3. Select the Speed Dial button you want to remove.
Issue 1 December 2001
3-10
Page 45
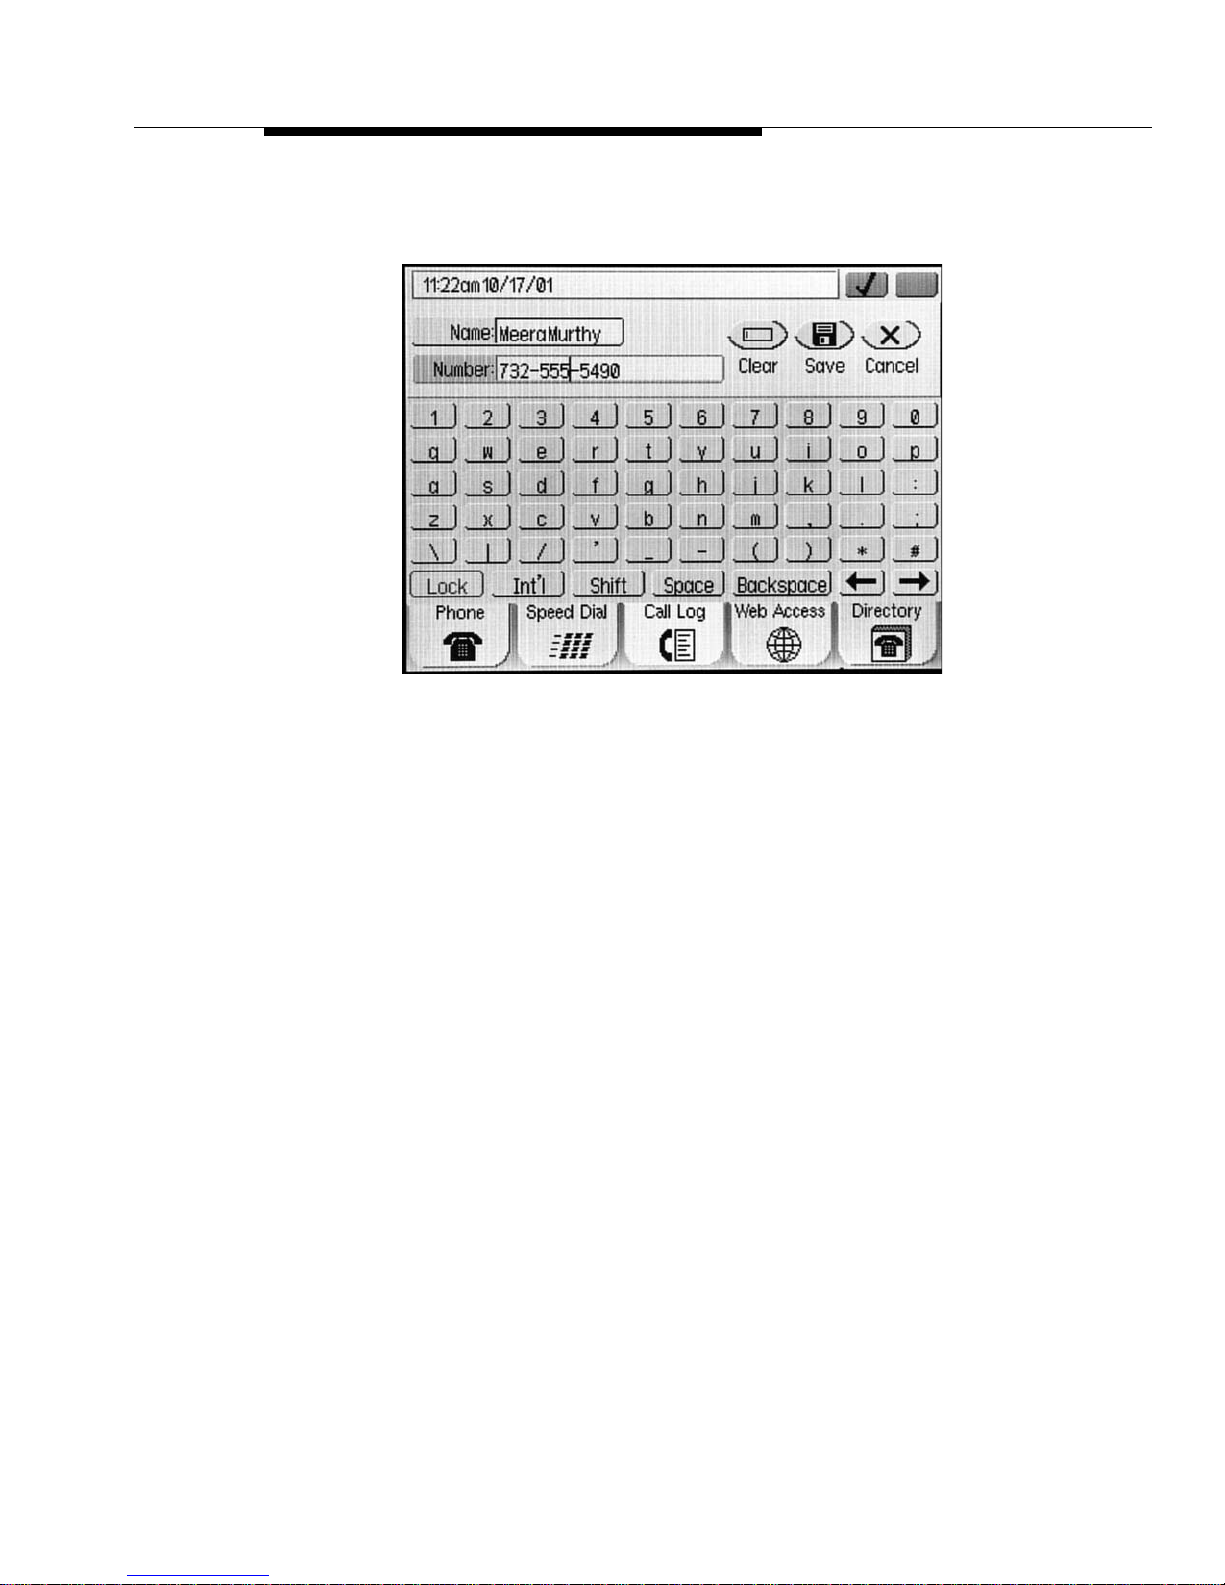
Speed Dial Buttons
The Speed Dial Keyboard Entry screen displays with the cursor in the
Number field:
4. Select Clear.
The number is removed.
5. Select the Name field, then select Clear.
The name is removed.
6. Select Save.
The Modification screen redisplays showing no name in the selected
button; the button is disabled.
7. Select Done to return to the Speed Dial screen.
Issue 1 December 2001
3-11
Page 46

Issue 1 December 2001
3-12
Page 47

Using the Call Log
Introduction
This chapter describes how to view the list of calls made to or from your phone ,
how to sort the Call Log entries, and how to add a Call Log entry to a Speed Dial
Group List. Removing Call Log entries is also covered in this chapter.
For information on calling a party listed in the Call Log, see Chapter 2, Call
Handling.
4
About the Call Log
All calls made to or from your 4630 IP Telephone are added to the Call Log. The
log displays the following information for each call as available:
Caller’s Name
■
Caller’s Phone Number
■
Time and Date of the call
■
Type of call (incoming, outgoing and unanswered)
■
Call length (expressed in hours/min utes/seconds)
■
You determine how you want your Call Log sorted by selecting the appropriate
heading on the Call Log screen. The default sort order is Time/Date order, with
the most recent entry first. If you select the Type or Le ng th column heading (or
any other column), the list is re-sorted according to your selection and
redisplayed. Highlighting in a column heading indicates that column is the current
sort criterion. A downward triangle in a column indicates the list is sorted from the
most recent to the earliest (for Type), shortest to longest (for Length), alpha betical
A to Z (for Name), or numerical (1 and up); re-selecting a [selected] column
reverses the display order, and shows an upward tr iangle.
Calls made or received while the Call Log is displayed are added to the list if they
fall within the current order of the list or if you are at the top of the list. For
example, if your Call Log is sorted in descending Time/Date order (the most
Issue 1 December 2001
4-1
Page 48
common method of sorting the list), an incoming call is added to the top of the list
as you view it. But if your Call Log sort preference is set to descending Type, an
outgoing call will follow any unanswered and incoming calls on the log.
The Call Log’s maximum number of entries is 100. When this maximum is
exceeded, the oldest (chronological) en try is automatically dropped from the log
before a new call is added.
!
WARNING:
If the 4630 IP Telephone loses power or is reset, all Call Log entries will be
lost, and cannot be retrieved.
Viewing the Call Log
1. To view the Call Log, select the Call Log application tab from any 4630
application screen.
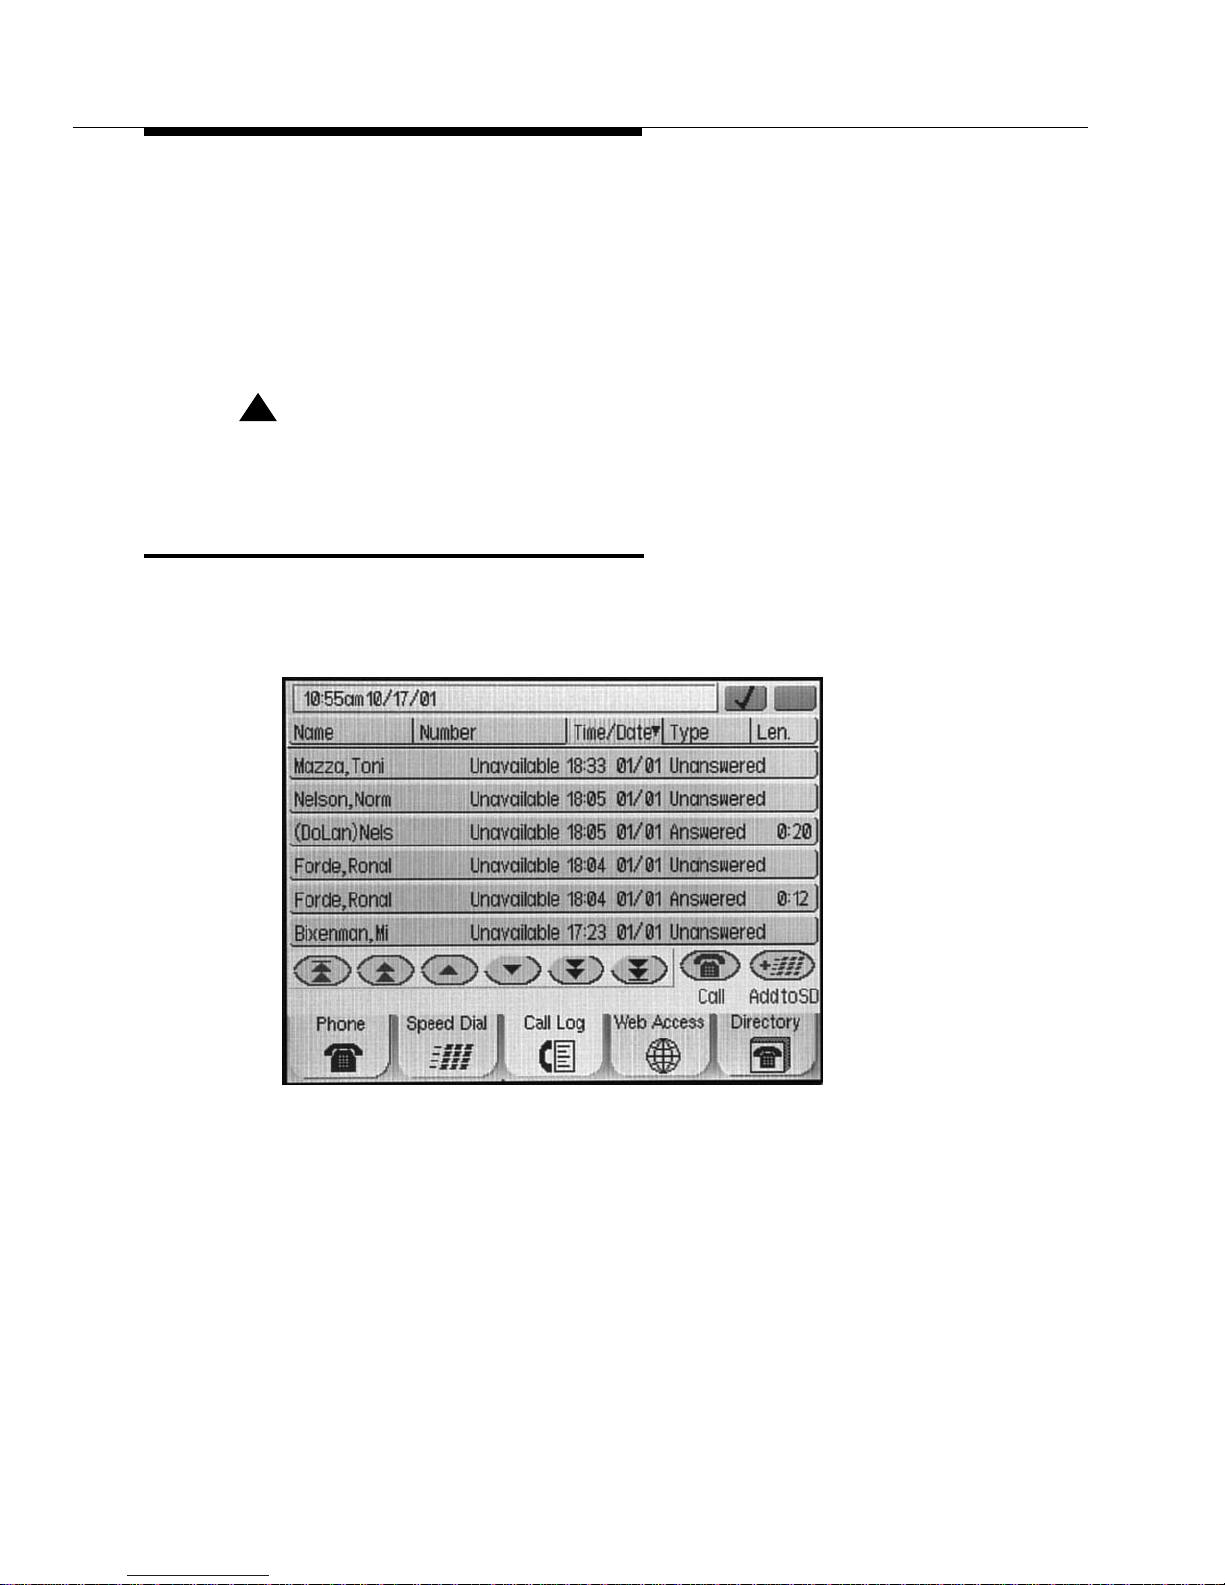
The Call Log screen displays, as illustrated below.
If the Time/Date default sort order is highlighted, the list of the last six
incoming, outgoing and unanswered calls displays in time and date order.
Scroll buttons display und er the f ollo wing conditions: If less than six entries
are returned, no scroll buttons display; if six entries are returned, scroll
buttons display but are disabled, and if more than six entries are returned,
scroll buttons display as appropriate.
Issue 1 December 2001
4-2
Page 49
Viewing the Call Log
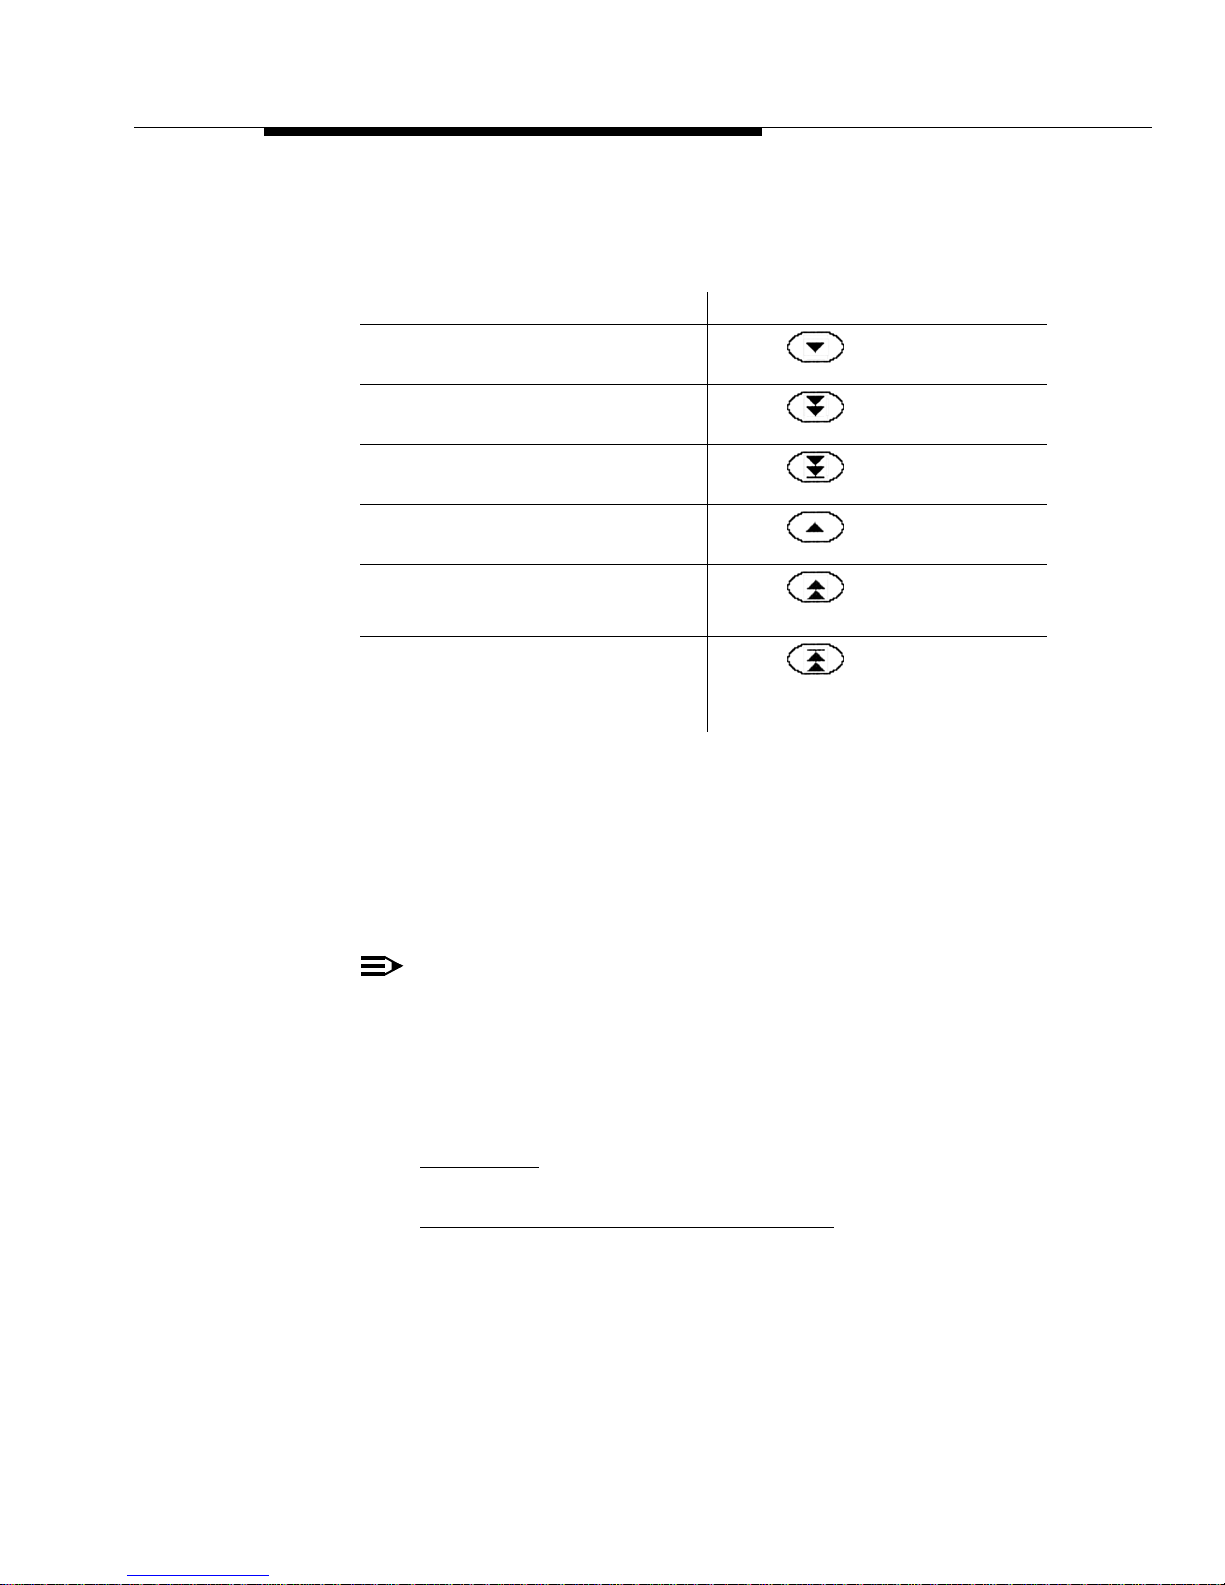
2. To scroll through a Call Log of more than six entries, use the Scroll buttons
at the bottom left of the screen as follows:
If you want to Then
Scroll downward one entry at a time Select
Scroll downward one screen (6
Select
entries) at a time
Scroll to the bottom of the Call Log Select
Scroll upward one entry at a time Select
Scroll upward one screen (6 entries)
Select
at a time
Scroll to the top of the Call Log Se l ect
Note: Scroll buttons are disabled
when they would have no effect.
3. To re-sort the log, select the column heading to be used as the new sort
criterion.
The Call Log is re-sorted according to the selected criteria and a downward
triangle icon displays to indicate the column selected. If “Type” was
selected, unanswered calls display first, followed by answered calls,
followed by outgoing calls. If “Len (Length)” was selected, calls having the
shortest length appear first followed b y calls having the longest length.
NOTE:
Selecting any [selected] column again re verses the triangle and sort order.
For example if Type was selected, then re-selected, the sort order changes
to outgoing calls, followed by answered calls, then unanswered calls.
4. To call a party listed as the recipient of an Outgoing call, select the entry,
5. To add an entry to a Speed Dial Group, see the procedure that f ollows titled
6. To exit the Call Log, select the appropriate application tab at the bottom of
then select Call. Only Outgoing entries can be selected to call. A detailed
procedure for making calls from the Call Log can be found in Chapter 2,
Call Handling
Adding a Call Log Entry to a Speed Dial Group
.
.
the Call Log screen.
Issue 1 December 2001
4-3
Page 50
Adding a Call Log Entry to a Speed
Dial Group
If there is at least one available Speed Dial button and a Call Log entry has been
selected, the Add to SD button on the Call Log screen is enabled. If all Spe ed
Dial buttons in all Groups have been assigned, this feature will not be available
from the Call Log screen.
NOTE:
Any Call Log entry may be selected for addition to a Speed Dial Group.
Entries selected for addition to a Speed Dial Group remain listed in the Call
Log.
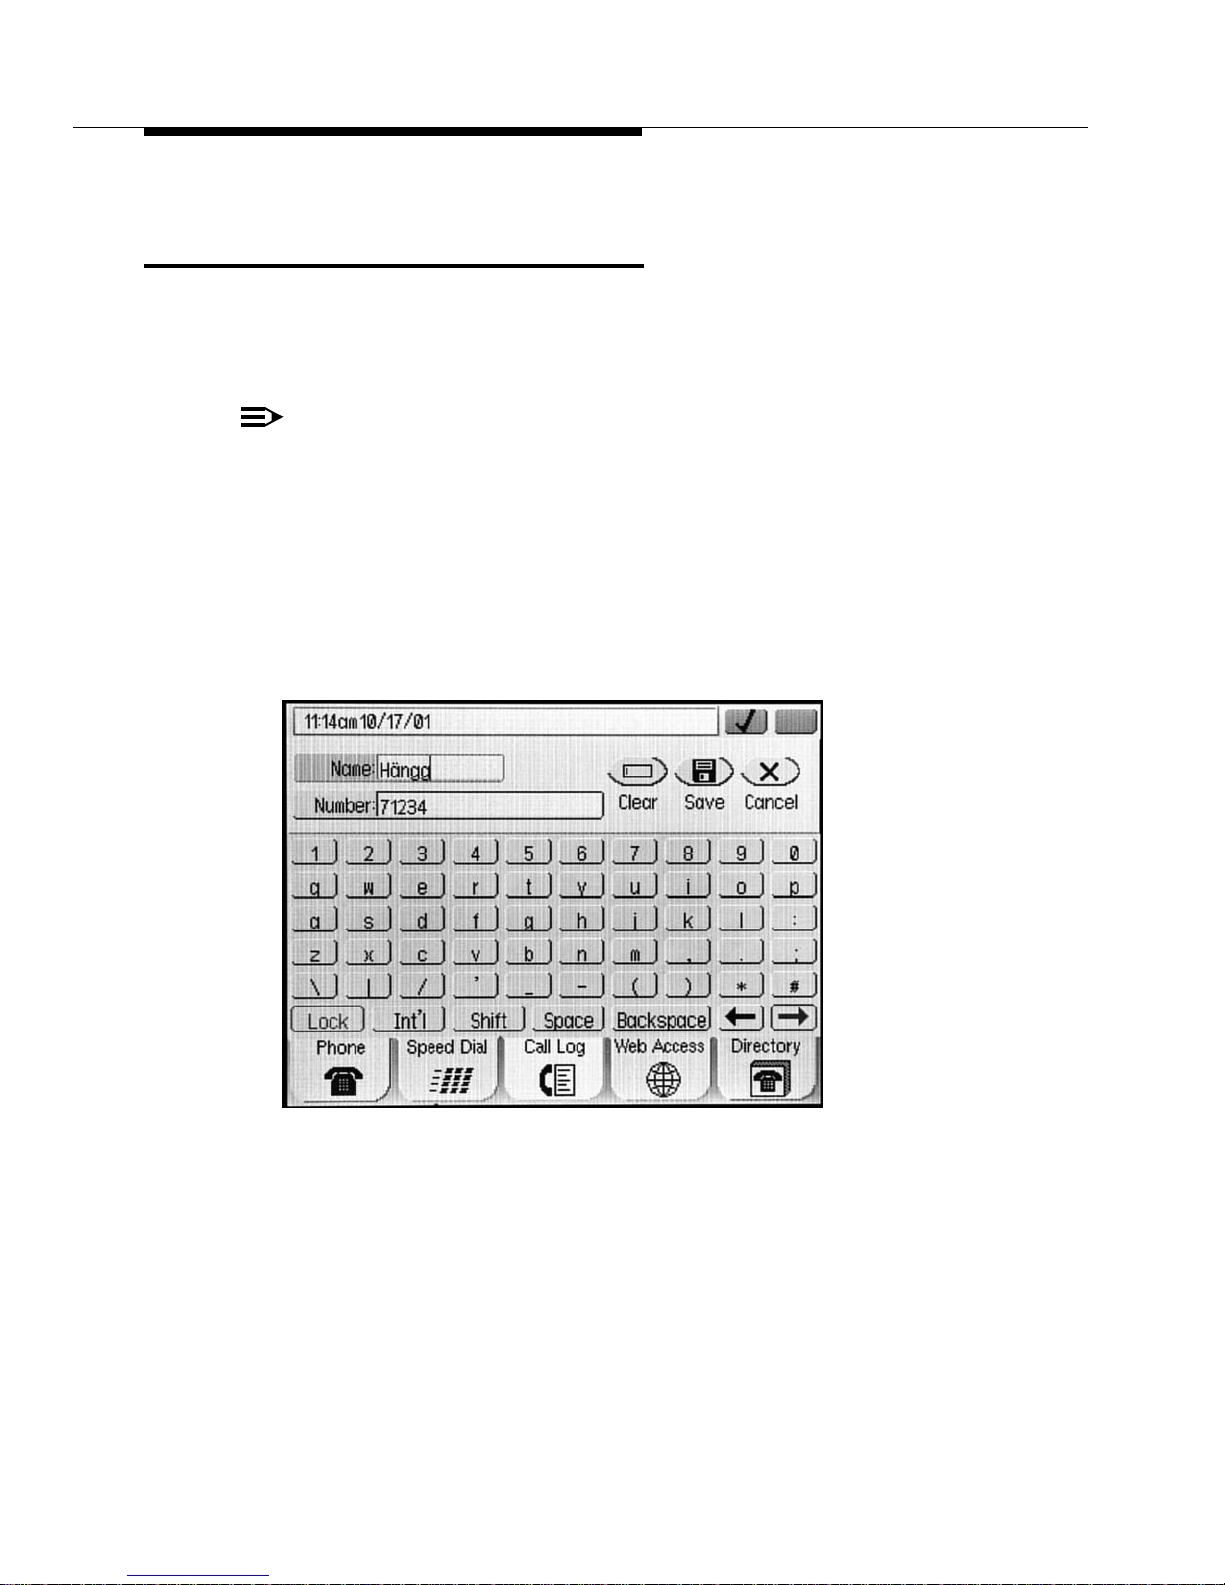
1. Select the Call Log entry you want to add to a Speed Dial Group, then
select the Add to SD button.
The Speed Dial Keyboard Entry screen displays, as shown below. The
Name and Number fields are populated with those from the selected Call
Log entry. The cursor is positioned to the right of the last digit of the
telephone number.
2. To change the Name and/or Number, modify the m using the keyboard and
keyboard control buttons at the bottom of the screen. For example, you
may need to add a trunk number (a 9 or other number needed to obtain an
outside line), and/or other network dial access codes (such as an Area
Code or Country Code) to prepare th e number for speed dialing.
3. If the Name and Number are correct, select Save.
Issue 1 December 2001
4-4
Page 51
Removing Call Log Entries
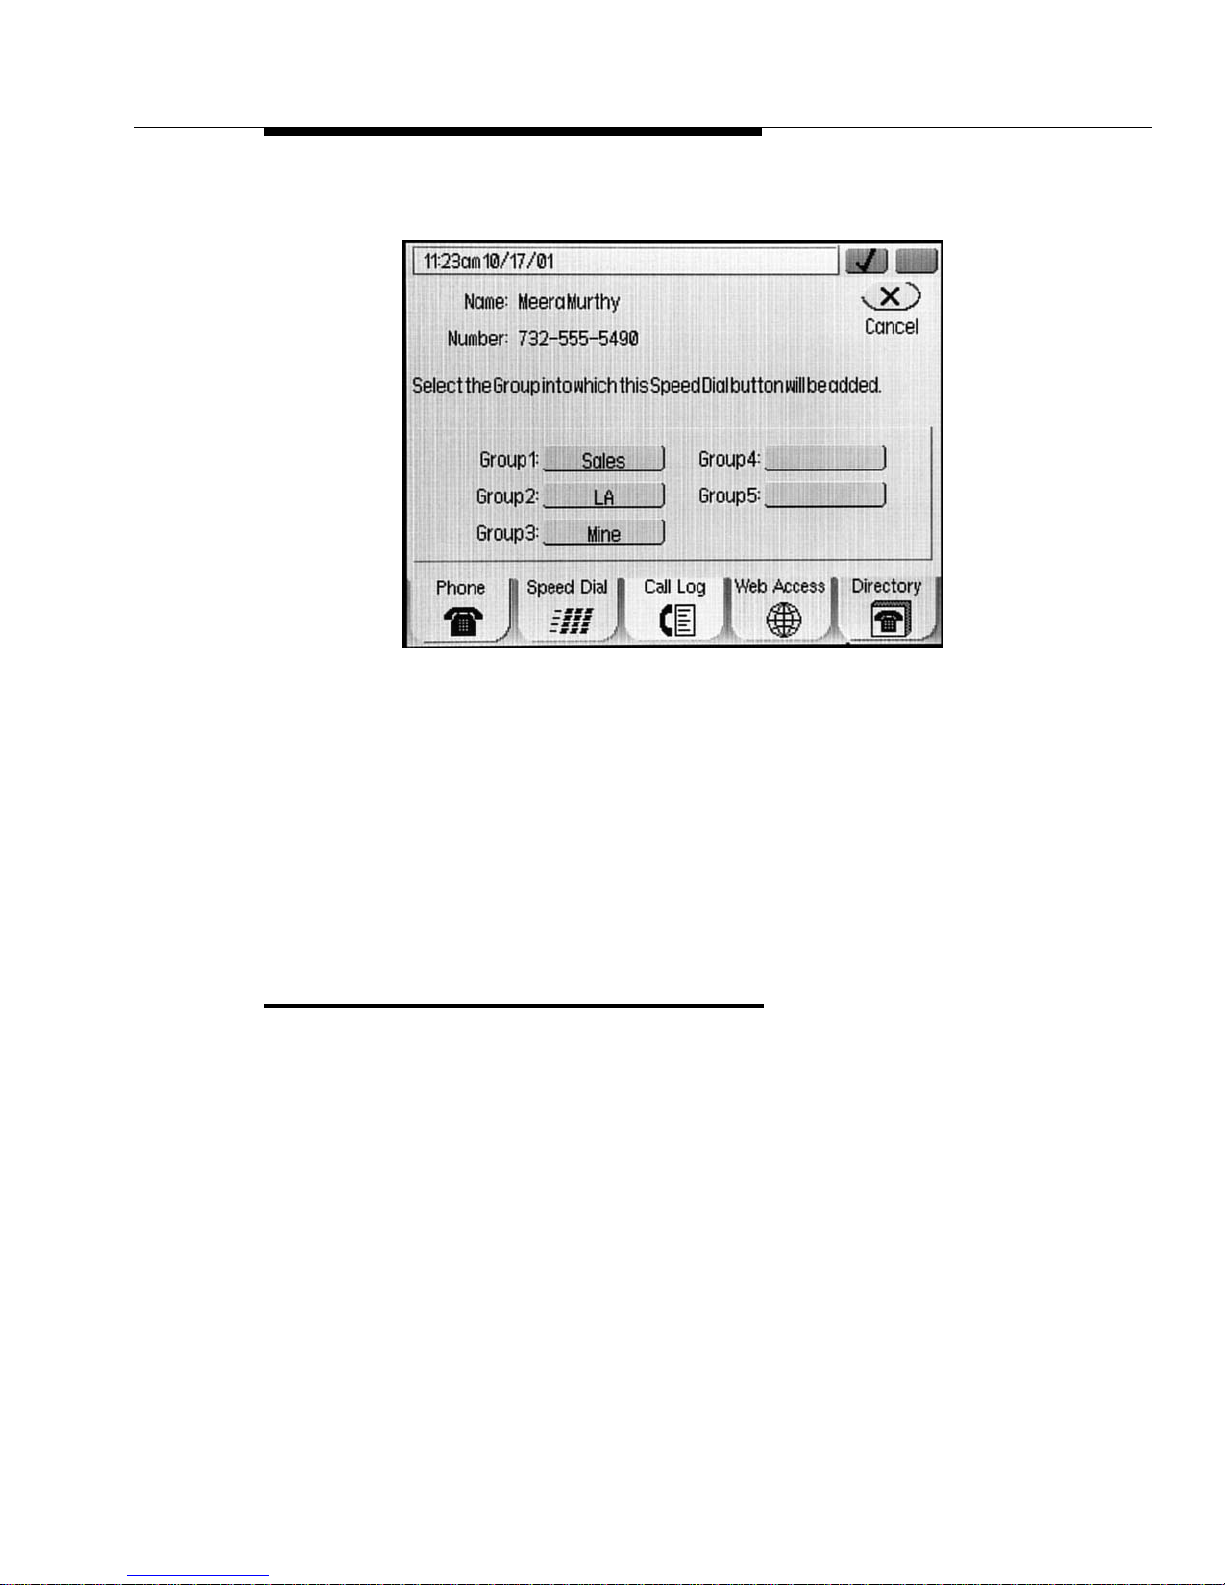
The Speed Dial Group Select screen displays, as shown below:
4. Select the Group Name to which the Speed Dial button created in Steps 2
and 3 should be added. You can add the new b utton to any g roup having an
unlabeled speed dial button, including one to which a Group Name label
has not yet been assigned.
The new Speed Dial button is added to the specified group in alphabetical
order. The Speed DIa l Modification screen displays sho wing the new b utton
for that Group.
5. Select Done.
The Speed Dial screen displays.
Removing Call Log Entries
Individual phone users cannot delete or remov e Call Log entries themselves.
However, all Call Log entries are automatically deleted upon loss of power or
telephone reset.
Call Log entry removal is performed automatically, without user intervention.
When the 101
the log, to maintain a 100 entry maximum.
st
log entry is created, the oldest entry is automatically deleted from
Issue 1 December 2001
4-5
Page 52

Issue 1 December 2001
4-6
Page 53

Using the Directory
Introduction
The Corporate Directory is an optional application for your 4630 IP Telephone
system. Check with your Telephone System Administrator to be sure a Corporate
Directory has been established before proceeding with this chapter.
This chapter describes how to search your Corporate Directory for a name or
phone number, call a person listed in the Directory, add a Directory entry to a
Speed Dial button, and use the Trouble screen to resolve any search- or
directory-related problems.
5
About the Directory
The Directory application allows you to search a database of names an d
telephone numbers using the name of the person whose phone number you wish
to locate. As with any database search tool, the more specific you are in
specifying the search criteria, the more specific the results.
You can optionally enter a few characters of a name and search, or enter a full
name. For example, if the number you want is that of someone named Jones,
entering “Jo” might produce a long list of all names starting with those two letters,
including not only all Jones, but any Johnson, Jonas, Jolly, and Jordan. But if you
narrow your search criteria by entering “JONES” you will receive a much shorter
list containing only those individuals named Jones.
Ask your System Administrator the appropriate way to locate a person based on
how your directory is structured. For example, ask whether entering a full name
(Last Name followed by First Name or First Name followed b y Last Name), a Last
Name only, or a partial Name will produce optimal search results.
Issue 1 December 2001
5-1
Page 54
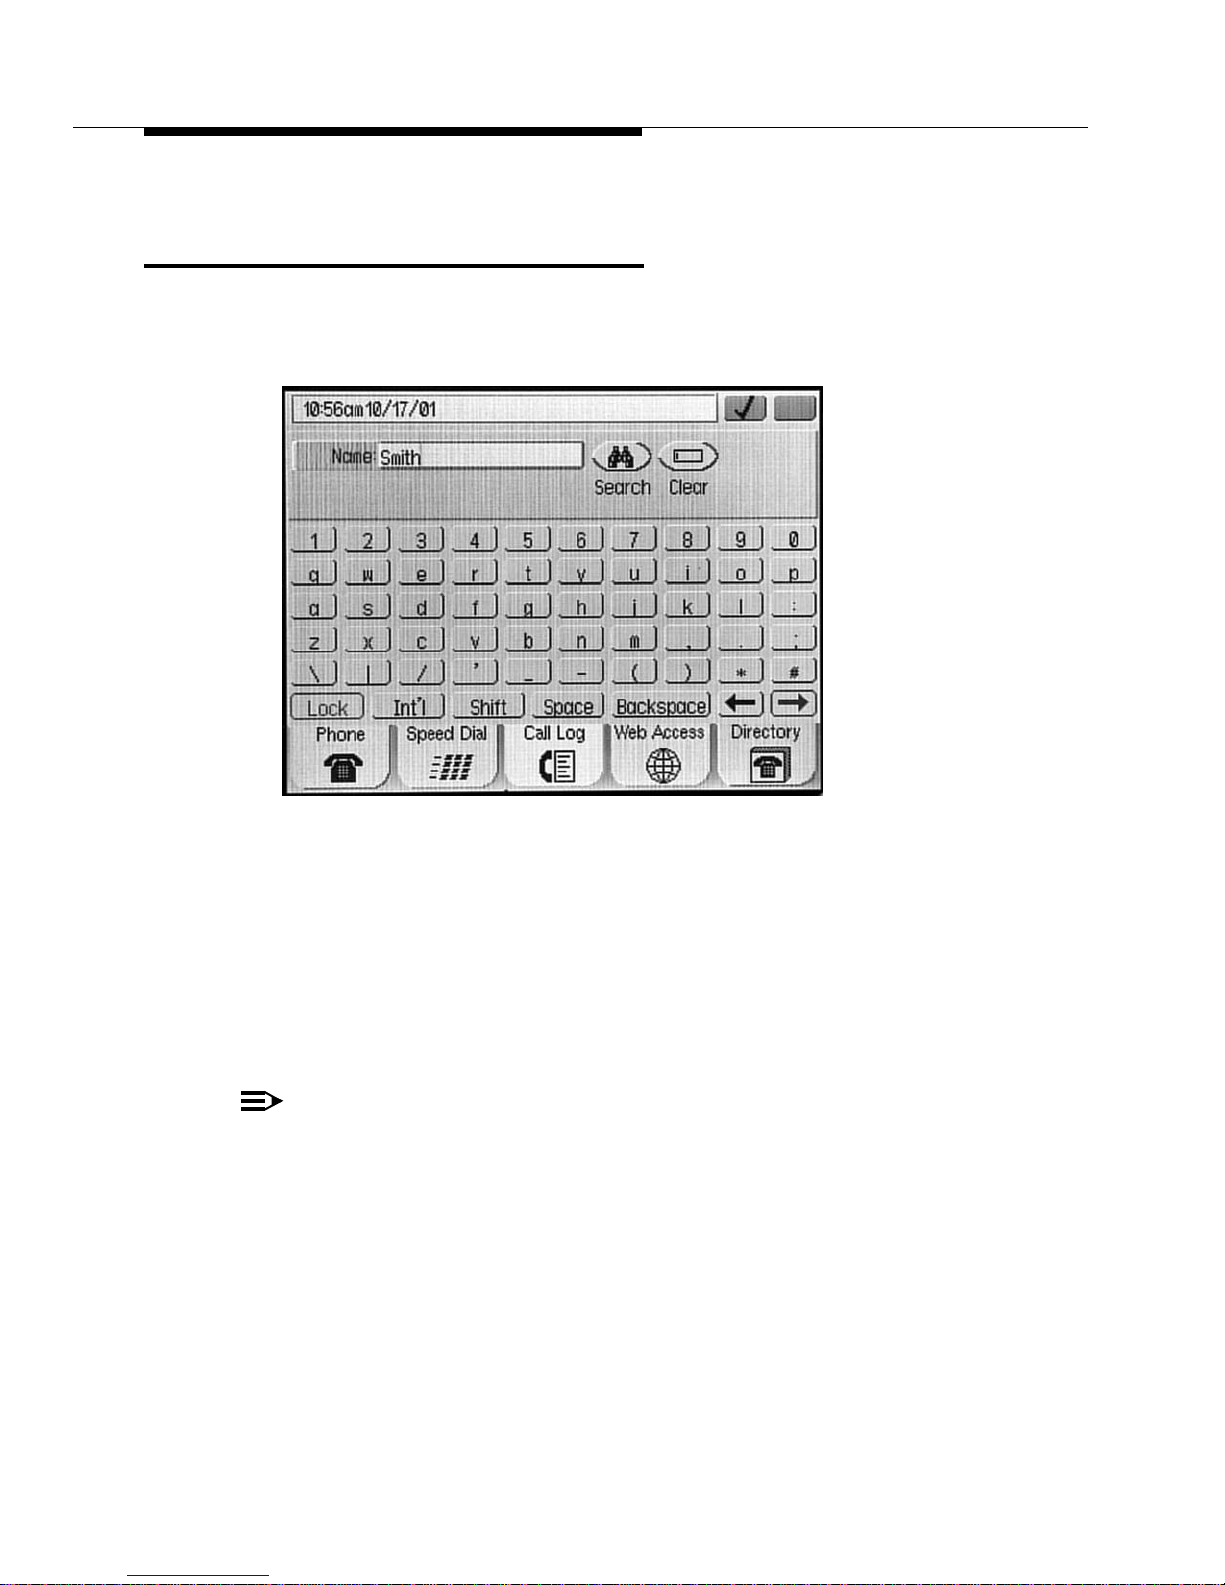
Locating a Phone Number Using the
Directory
1. To access your Corporate Directory, select the Directory application tab
from any 4630 application screen.
The Query Specification screen displays, as illustrated below.
2. In the Name field, type the full or partial name of the person whose number
you wish to locate.
3. If you make a mistake while entering the name to be searched, you can
press Clear to remove the entry or use the Backspace key, then repeat
Step 2.
4. Select Search.
The Query Initiation screen displays the Name you specified and the
message “Searching.”
NOTE:
To stop the search at any time and return to the Query Specification screen,
select Cancel.
Issue 1 December 2001
5-2
Page 55
Locating a Phone Number Using the Directory
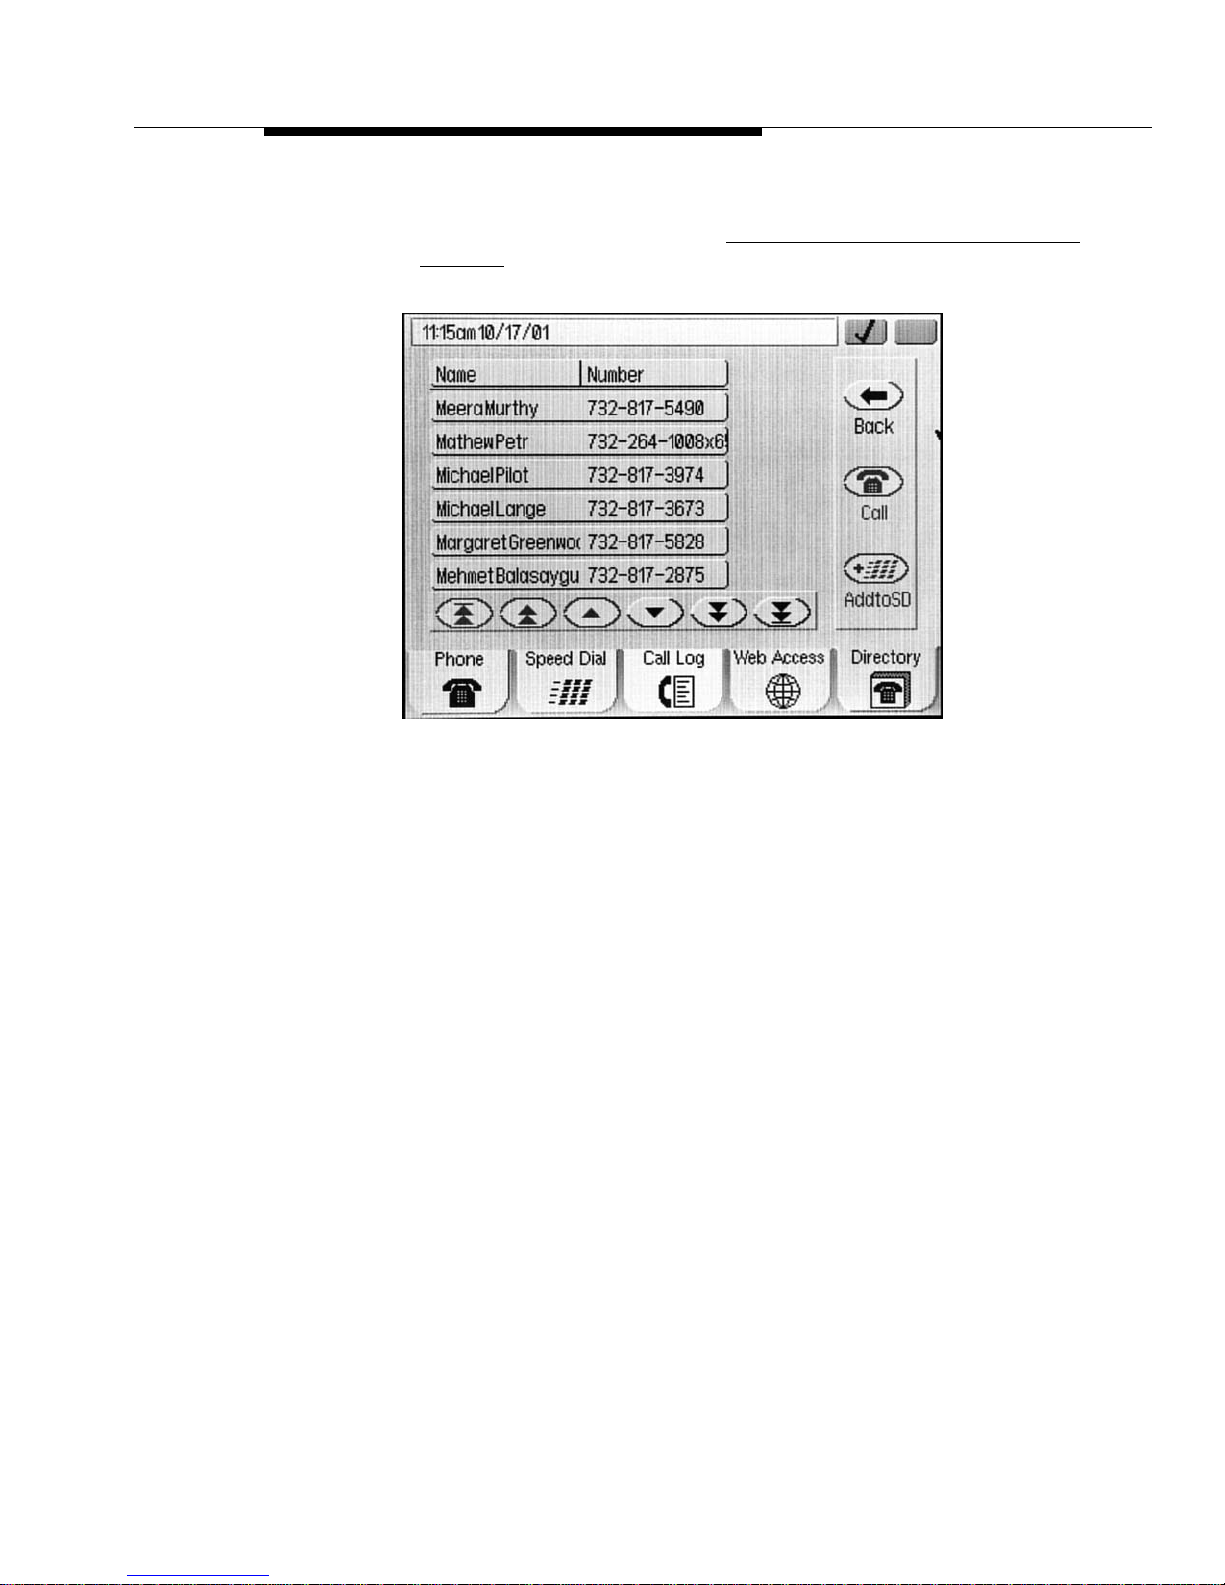
If the search is not successful, the Directory Trouble screen displays (see
the procedure in this chapter titled Resolving Search- or Directory-Related
Problems). If the search is successful, the Successful Query screen
displays, as illustrated below.
Results are listed in chronological order as they were received by the
phone. Only the first 100 entries matching your query are displayed. Scroll
buttons display unde r the following conditions: If less than six entries are
returned, no scroll buttons display; if six entries are returned, scroll buttons
display but are disabled, and if more than six entries are returned, scroll
buttons display as appropriate.
Issue 1 December 2001
5-3
Page 56
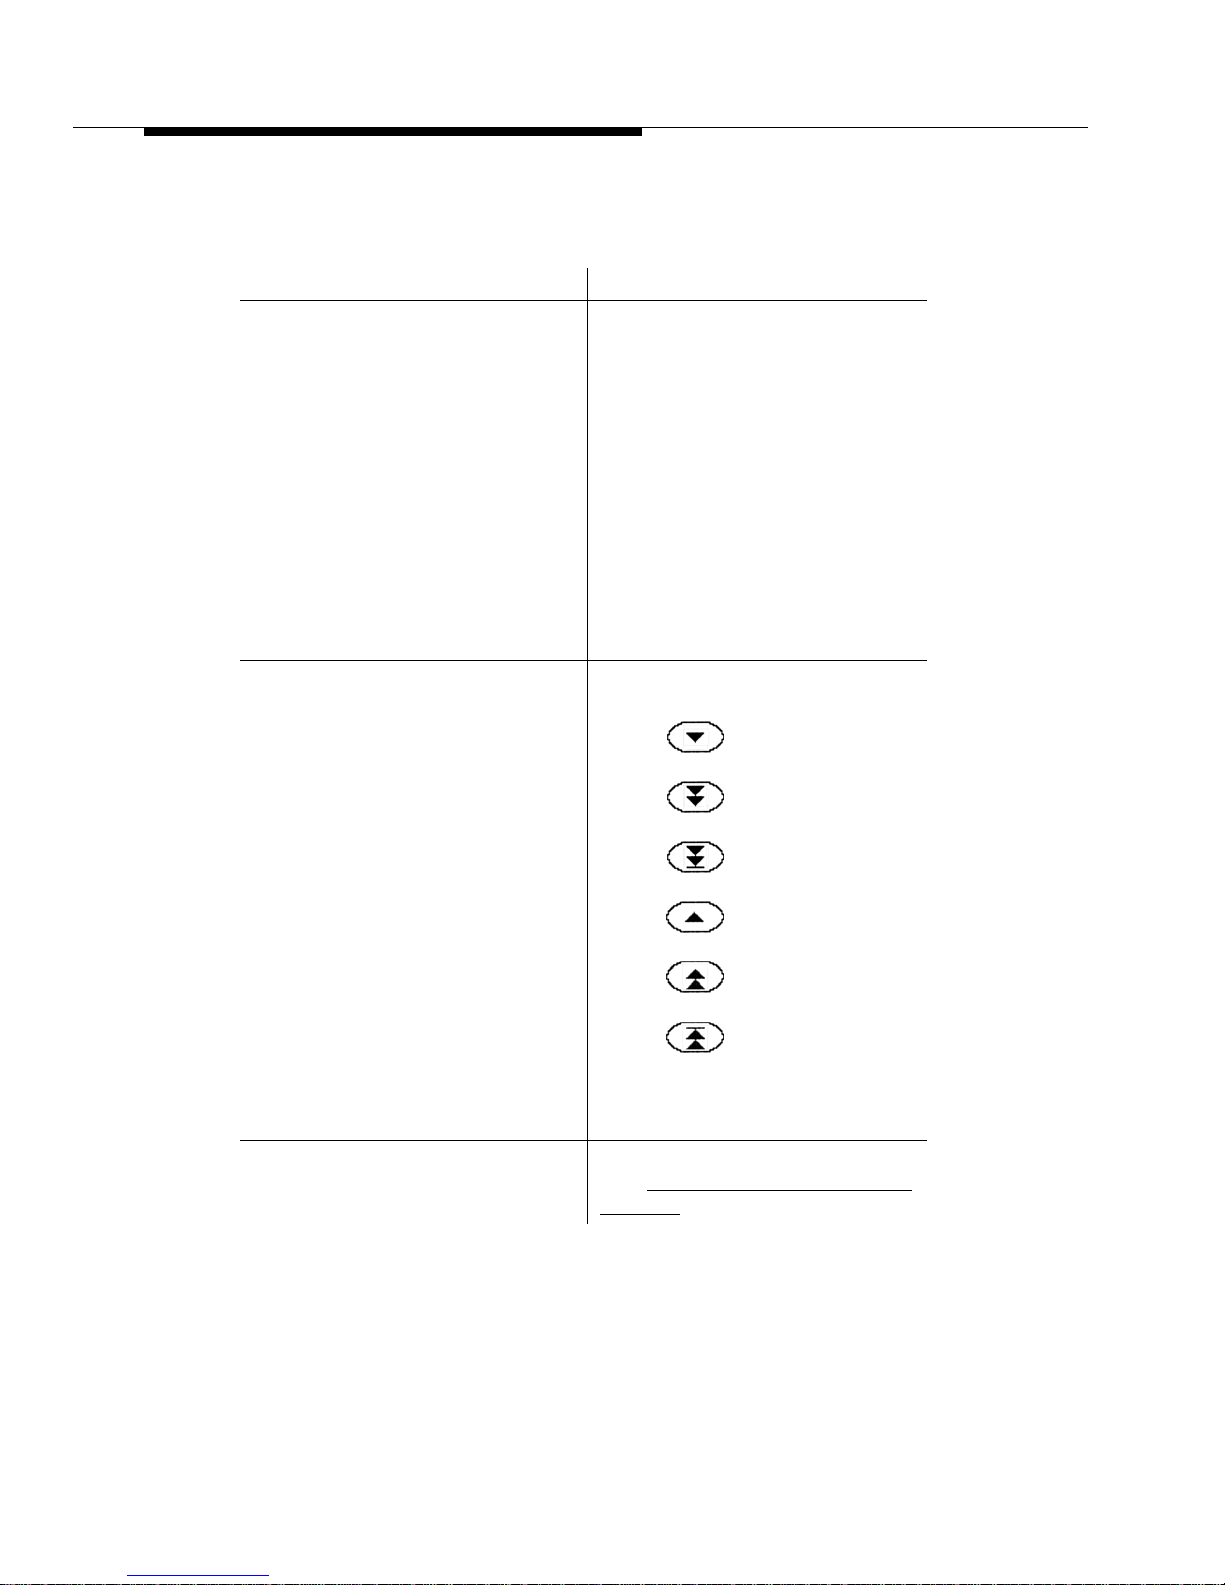
5. Choose one of the following options:
If you want to Then
Sort the entries in alphabetical or
numerical order
Scroll through the list of entries
when it contains more than six
names/numbers matching your
search criteria
To sort the entries in alphabetical
order, select the Name column
heading.
The entries re-display in
alphabetical order and a triangle
symbol displays in the Name
column heading.
To sort the entries in numerical
order, select the Number column.
The entries redisplay in phone
number order and a triangle symbol
displays in the Number column
heading.
Use the Scroll buttons at the bottom
left of the screen as follows:
Select to scroll downward
one entry at a time.
Select to scroll downward
one screen (6 entries) at a time.
Select to scroll to the
bottom of the list of entries.
Call a person shown on the list of
entries
Issue 1 December 2001
5-4
Select to scroll upward one
entry at a time.
Select to scroll upward one
screen (6 entries) at a time.
Select to scroll to the top of
the list of entries.
Note: Scroll buttons are disabled
when they would have no effect.
See the procedure that follows,
titled Calling a Person Listed in the
Directory.
Page 57
Calling a Person Listed in the Directory
If you want to Then
Add an entry to a Speed Dial Group See the procedure that follows titled
Perform another search Select Back to return to the Query
Exit the Directory Select the appropriate application
Calling a Person Listed in the
Directory
Adding a Directory Entry to a
Speed Dial Group.
Specification screen and repeat this
procedure from Step 2.
tab at the bottom of the Director y
screen.
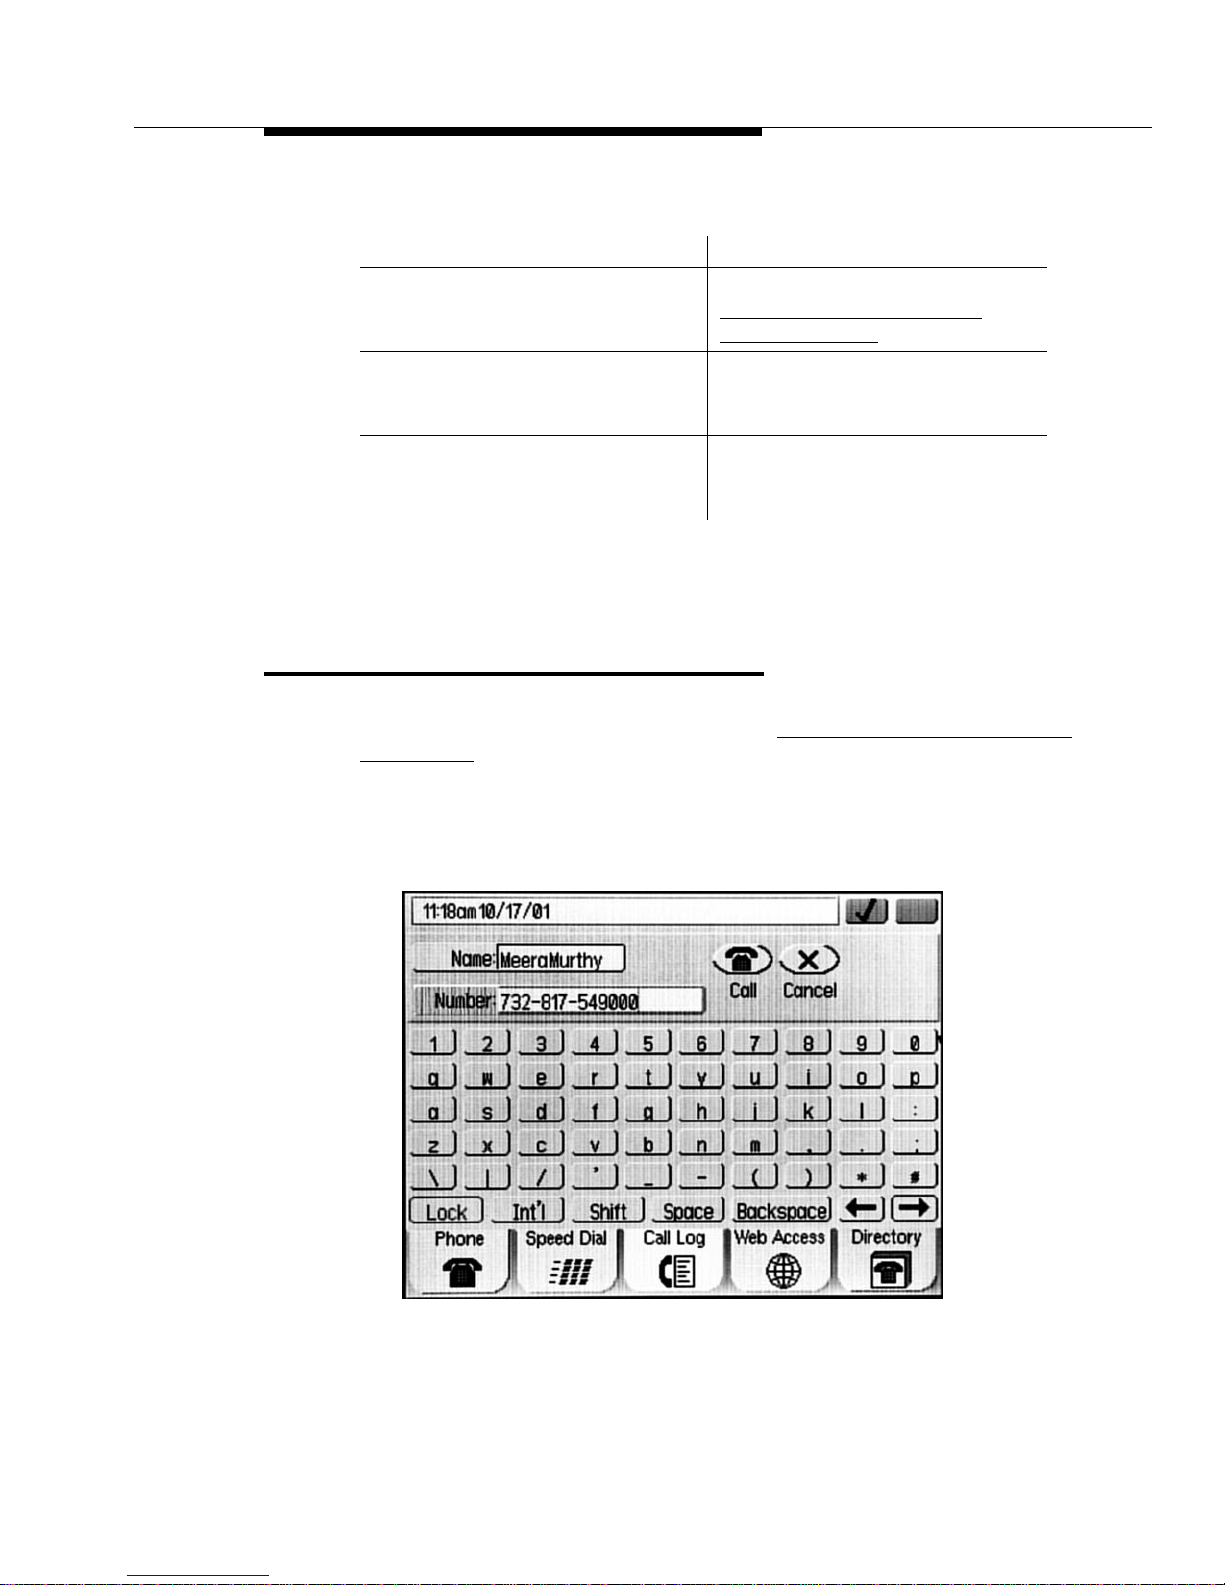
This procedure assumes you hav e perf ormed a search for the n umber you w ant to
call, as described in the procedure above titled Locating a Phone Number Using
the Directory. Begin this procedure with the Successful Query screen displayed.
1. Select the entry you want to call.
2. Select Call.
The Directory Number Editing screen displays, as illustrated below.
Issue 1 December 2001
5-5
Page 58

3. Choose one of the following options:
If you want to Then
Dial the number as currently shown Proceed to Step 4.
Edit the number before dialing Use the keyboard to add numbers
(for example, a network dial access
code) or to modify the current
number so that it is dialable.
Return to the previous screen
without dialing the number displayed
4. Select Call.
The number is dialed automatically. If your Directory “Go to Phone” option
is set to “Yes,” the Phone Application screen displays. If your Directory “Go
to Phone” option is set to “No,” the Successful Query screen redisplays.
Adding a Directory Entry to a Speed
Dial Group
If there is at least one available Speed Dial button in any Group, the Add to SD
button on the Directory screen is enabled. If all Speed Dial buttons in all Groups
have been assig ned, this feature will not be available from the Directory screen.
NOTE:
Any Directory entry may be selected for addition to a Speed Dial Group.
1. Select the Directory entry you want to add to a Speed Dial Group, then
select the Add to SD button.
Select Cancel.
The Query Specification screen
redisplays; the Name field displays
the original entry to allow you to edit
it and perform another query.
Issue 1 December 2001
5-6
Page 59
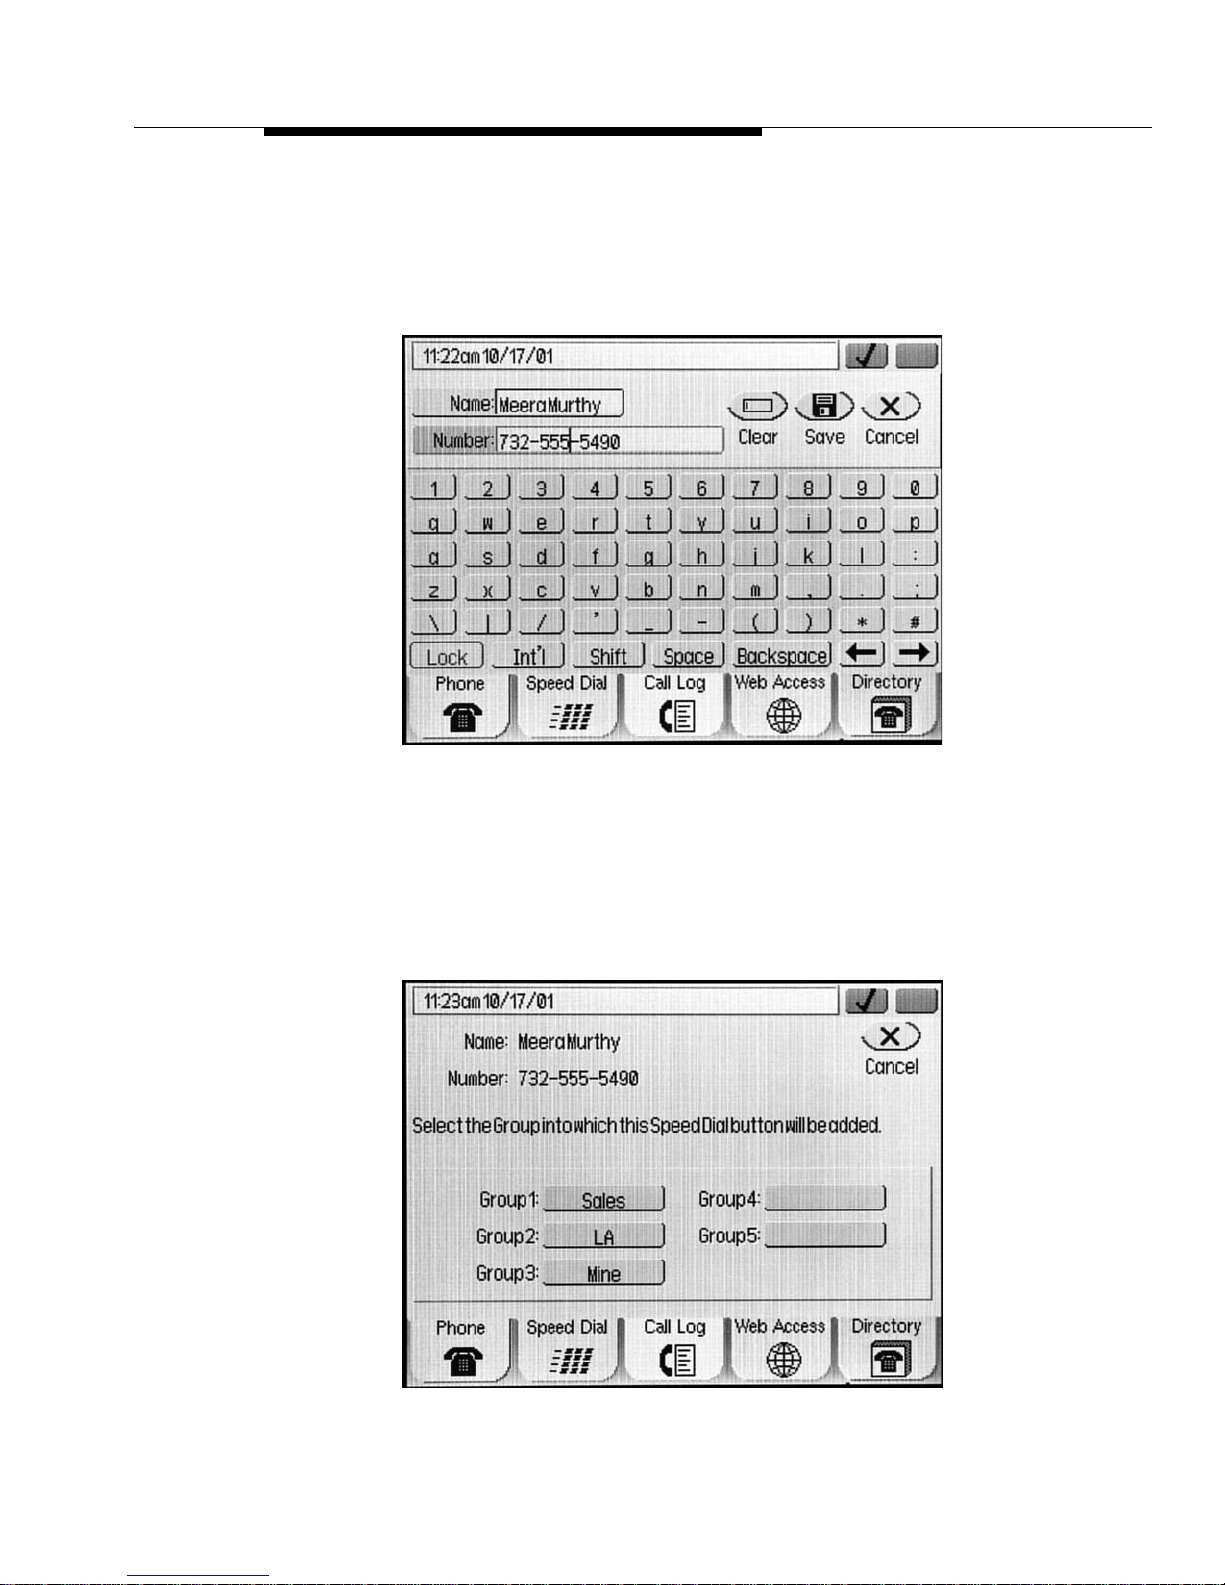
Adding a Directory Entry to a Speed Dial Group
The Speed Dial Keyboard Entry screen displays, as shown belo w. The
Name and Number fields are populated with those from the selected
Directory entry. The cursor is posit ioned to the right of the last digit of the
telephone number. (Note that Names/Numbers exceeding the available
field space may be not be shown or saved.)
2. To change the Name and/or Number, mod i fy them using the keyboard and
keyboard control b uttons at the bottom of the scree n. For example, you
may need to add a trunk number (a 9 or other number neede d to obtain an
outside line), and/or other network dial access codes to prepare the
number for speed dialing.
3. When the Name and Number are correct, select Save.
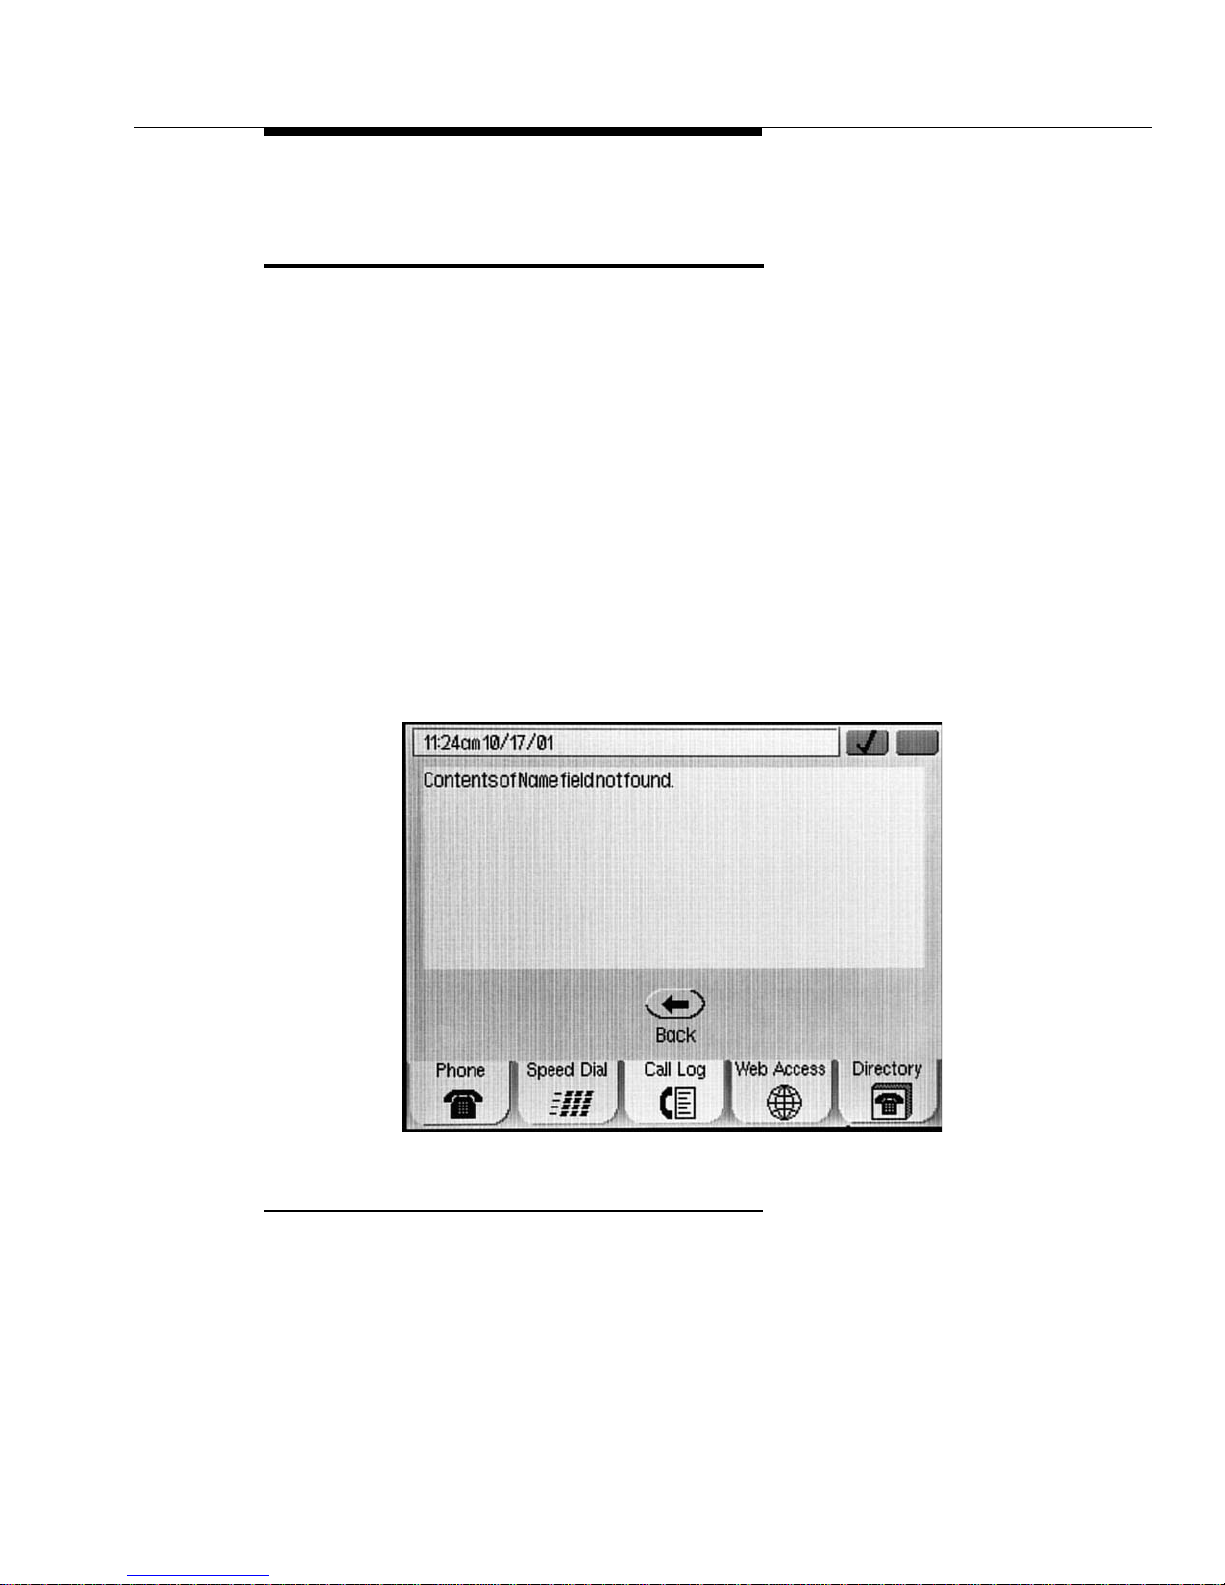
The Speed Dial Group Select screen displays, as shown below:
Issue 1 December 2001
5-7
Page 60

4. Select the Group Name to which the Speed Dial button created in Steps 2
and 3 should be added. You can add the new b utton to any g roup having an
unlabeled speed dial button, including one to which a Group Name label
has not yet been assigned.
The new Speed Dial button is added to the specified group in alphabetical
order. The Spee d DIal Modification screen displa ys showing the ne w button
for that Group.
5. Select Done.
The Speed Dial screen displays.
Issue 1 December 2001
5-8
Page 61
Resolving Search- or Directory-Related Problems
Resolving Search- or Directory-Related
Problems
Search-related problems may occur due to improper search criteria being entered
or when valid search criteria does not produce the desired result. For example,
you may en ter an in valid nam e which cannot be located on the Telephone Number
database being searched, or enter a valid name which is not included in the
database.
Because using the Directory application to locate telephone numbers involves
connection to your Corporate Directory server, directory- or network-related
problems may occur from time to time. Such problems may involve not being able
to connect to, or receiv e a response from, the server, or a slow response due to
server or network congestion.
When a search (or query) cannot be successfully completed, a T rouble screen (an
example of which is illustrated below) displays messages to help you determine
the problem. Based on the message displayed, you can determine whether to
re-initiate the search, or contact your Telephone System Administrator f or
assistance.
Trouble Message Resolution
Most Trouble messages require the involvement of your System Administrator.
Those which are search-related require yo u to re-initiate your search after
verifying and/or modifying your search criteria.
If you receive either of the following messages, verify your search criteria and
re-try the query:
Issue 1 December 2001
5-9
Page 62

■
Server Timed Out - The Corporate Directory may be too big for this
search, or your network may be congested. Narrowing your search criteria
(for example, typing a full name rather than a partial name) may help.
■
(Name) Field Not Found - The Name you entered is not in your Corporate
Directory . Verify that you typed the Name whose number y ou w ant to locate
correctly and that it is in the format appropriate for your Corporate
Directory, and re-initiate the search.
If you cannot resolve a Directory Trouble message yourself, contact your
Telephone System Administrator for assistance .
Issue 1 December 2001
5-10
Page 63

4630 IP Telephone Options
Introduction
This chapter describes the procedures available on the Main Options and
Preferences screen. For example, you can change the appearance of y our
touchscreen, set a different ringer tone, add a timer to each call, or set u p a “go to
phone” option within each application to automatically take you bac k to the Phone
application to make calls. At your first opportunity we suggest you review the
default settings by reviewing each options screen; you may change your options
and preferences at any time.
6
Accessing the Options and Preferences
Screen
Access your preferences and phone options by selecting the symbol at the
top of any application screen.
The Main Options and Preferences screen provides access to the
setup/maintenance information for each application, or allows you to return to the
application screen displayed prior to selecting the Options and Preferences
screen.
The procedures that follow describe the options for each application.
Issue 1 December 2001
6-1
Page 64

Screen Options
Screen Options are those which control:
How you want your keyboard screen (for use in Speed Dial and other
■
procedures) displayed,
How the display screen is oriented, or
■
How to clean the 4630 Touchscreen without selecting application features
■
or buttons during cleaning.
You select these options from the Screen Options and Preferences screen,
accessed by selecting Screen Options from the Main Options and Pref erences
screen.
When you are finished, select Done to return to the Main Options and
Preferences screen. There are five Screen options and preferences availabl e,
which show the current settings. Each optio n has a specific purpose as described
in the procedures that follow.
Setting the Keyboard Layout
Applications which allow speed dial entries to be created use a keyboard screen
into which a name and/or number is typed. Two keyboard layout options are
available:
QWERTY - the standard arrang ement for (personal computer and other)
■
keyboard-reliant devices. This is the default keyboard layout setting.
ABCDEF - characters are arranged in alphabetical order, for those users
■
who find the QWERTY layout confusing.
1. To modify the your keyboard layout, select Keyboard Options from the
Screen Options and Preferences screen.
The Select Keyboard Layout screen displays. The current setting is
highlighted.
2. Select either QWERTY or ABCDEF, to indicate how you want any screen
with a keyboard layout to appear.
3. To save your selection, select Save. To exit without making a change,
select Cancel.
The Screen Options and Preferences screen redisplays.
Issue 1 December 2001
6-2
Page 65

Screen Options
Calibrating the Screen
If needed, adjust the screen display orientation using this option.
1. To change the orientation of your 4630 display, select Calibrate... from the
Screen Options and Preferences screen.
The Calibrate the Screen screen displays, with an instruction to start
calibration.
2. Touch (select) the upper left corner of the screen.
The screen redisplays with a second instruction.
3. Touch (select) the lower right corner of the screen.
The screen reorients as appropriate. The message “The screen is now
calibrated.” displays.
4. To save the calibration, select Done.
The screen adjustment is stored and the Screen Options and Prefere nces
screen redisplays .
Cleaning the Screen
Use this option to display instructions for cleaning the 4630 IP Telephone’s
screen. Cleaning the screen with the instructions displayed ensures that touching
the screen during cleaning will not cause buttons, options or applications to be
inadvertently selected.
1. To clean the screen and/or review instructions about cleaning the screen,
select Clean the Screen... from the Screen Options and Preferences
screen.
The Clean the Screen screen displays.
2. Review the instructions on the screen. Pay particular attention to the
Warning note regarding use of harsh liquids or solv ents.
3. After cleaning the screen or reviewing the cleaning instructions, select
Done.
The Screen Options and Preferences screen redisplays.
Issue 1 December 2001
6-3
Page 66
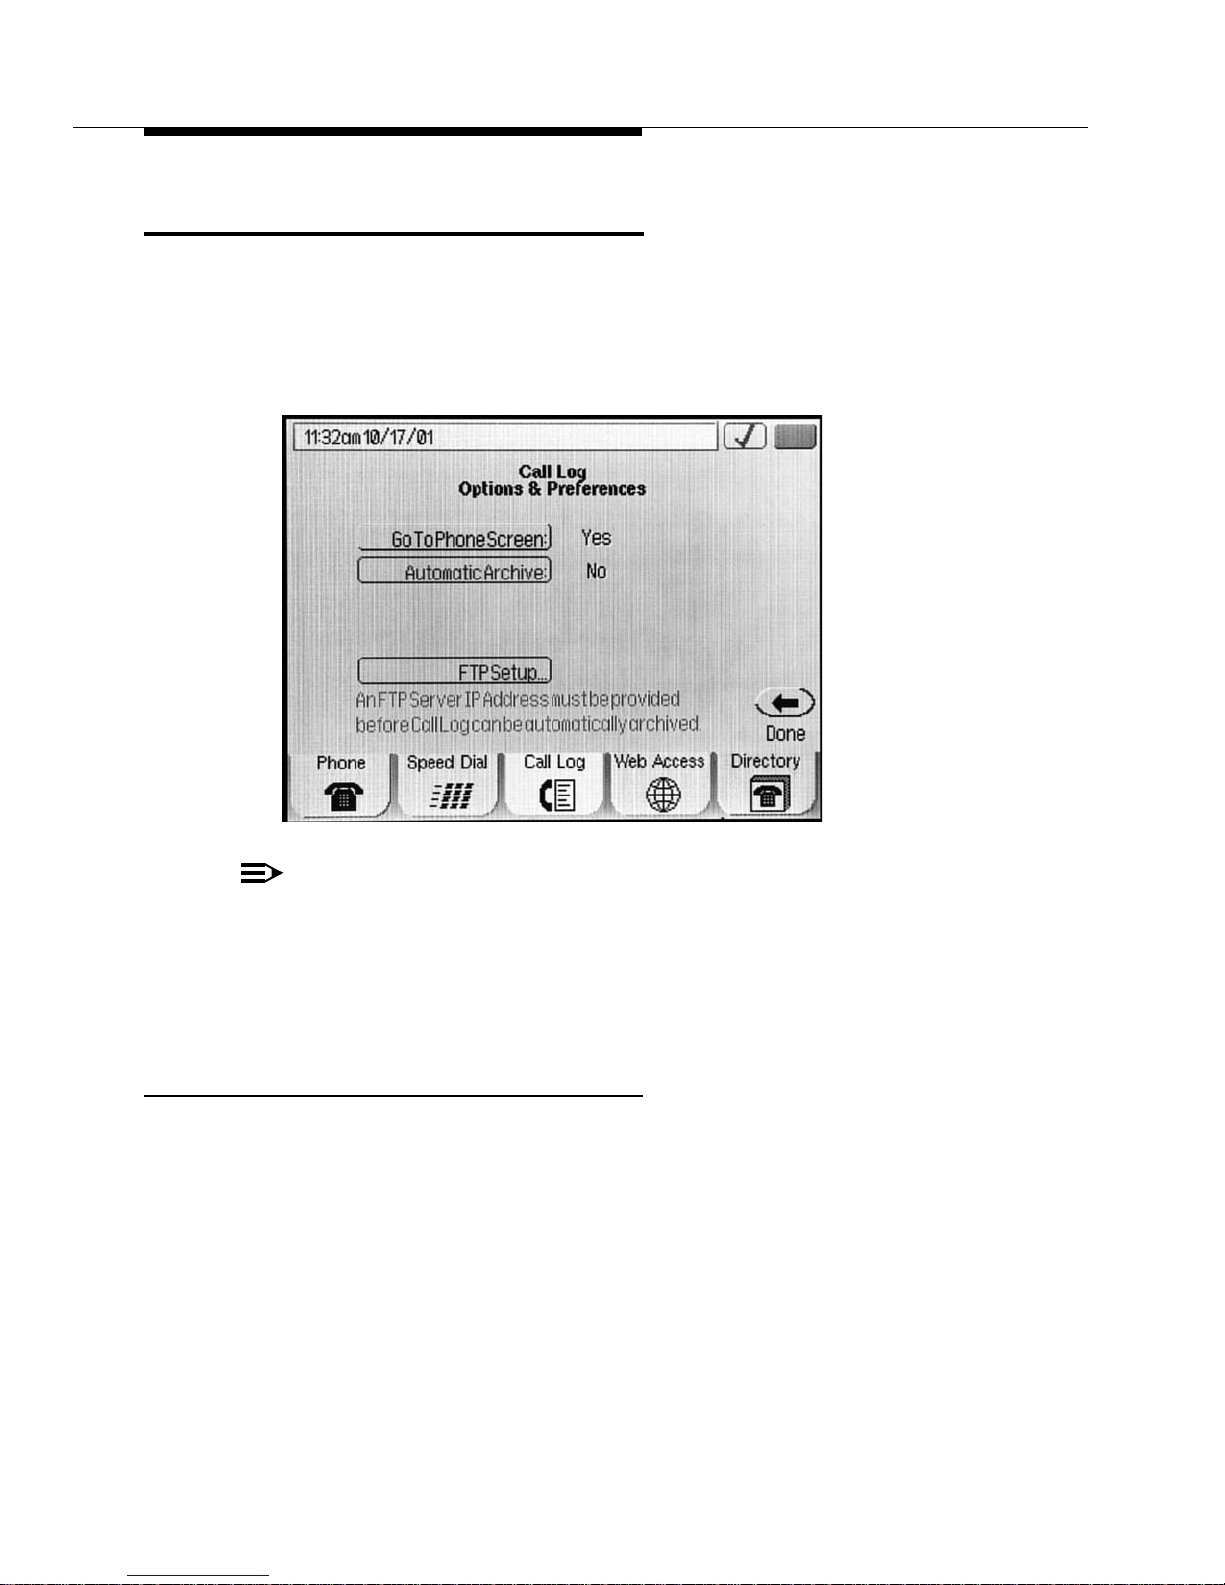
Call Log Options
The Call Log option allows you to have the Phone screen display automatically
when you place an outgoing call from the Call Log screen,
You select this option from the Call Log Options and Preferences screen,
accessed by selecting Call Log Options from the Main Options and Preferences
screen:
NOTE:
Automatic Archiv e and FTP Setup are reserved for use as future
enhancements.
When you are finished, select Done to return to the Main Options and
Preferences screen. The Call Log option is described in the procedure that
follows.
Setting the Call Log “Go to Phone” Option
When this option is selected, the Phone screen will be displayed automatically
whenever you place an outgoing call to someone from the Call Log. When this
option is not selected, the Call Log screen will remain displayed whenever you
place a call from the Call Log. The default setting is to not display the Phone
screen upon placing a call from the log (although you can always manually select
the Phone application tab, if desired).
1. To modify the current Go to phone setting, select Go to Phone Screen
from the Call Log Options and Prefere nces screen.
Issue 1 December 2001
6-4
Page 67
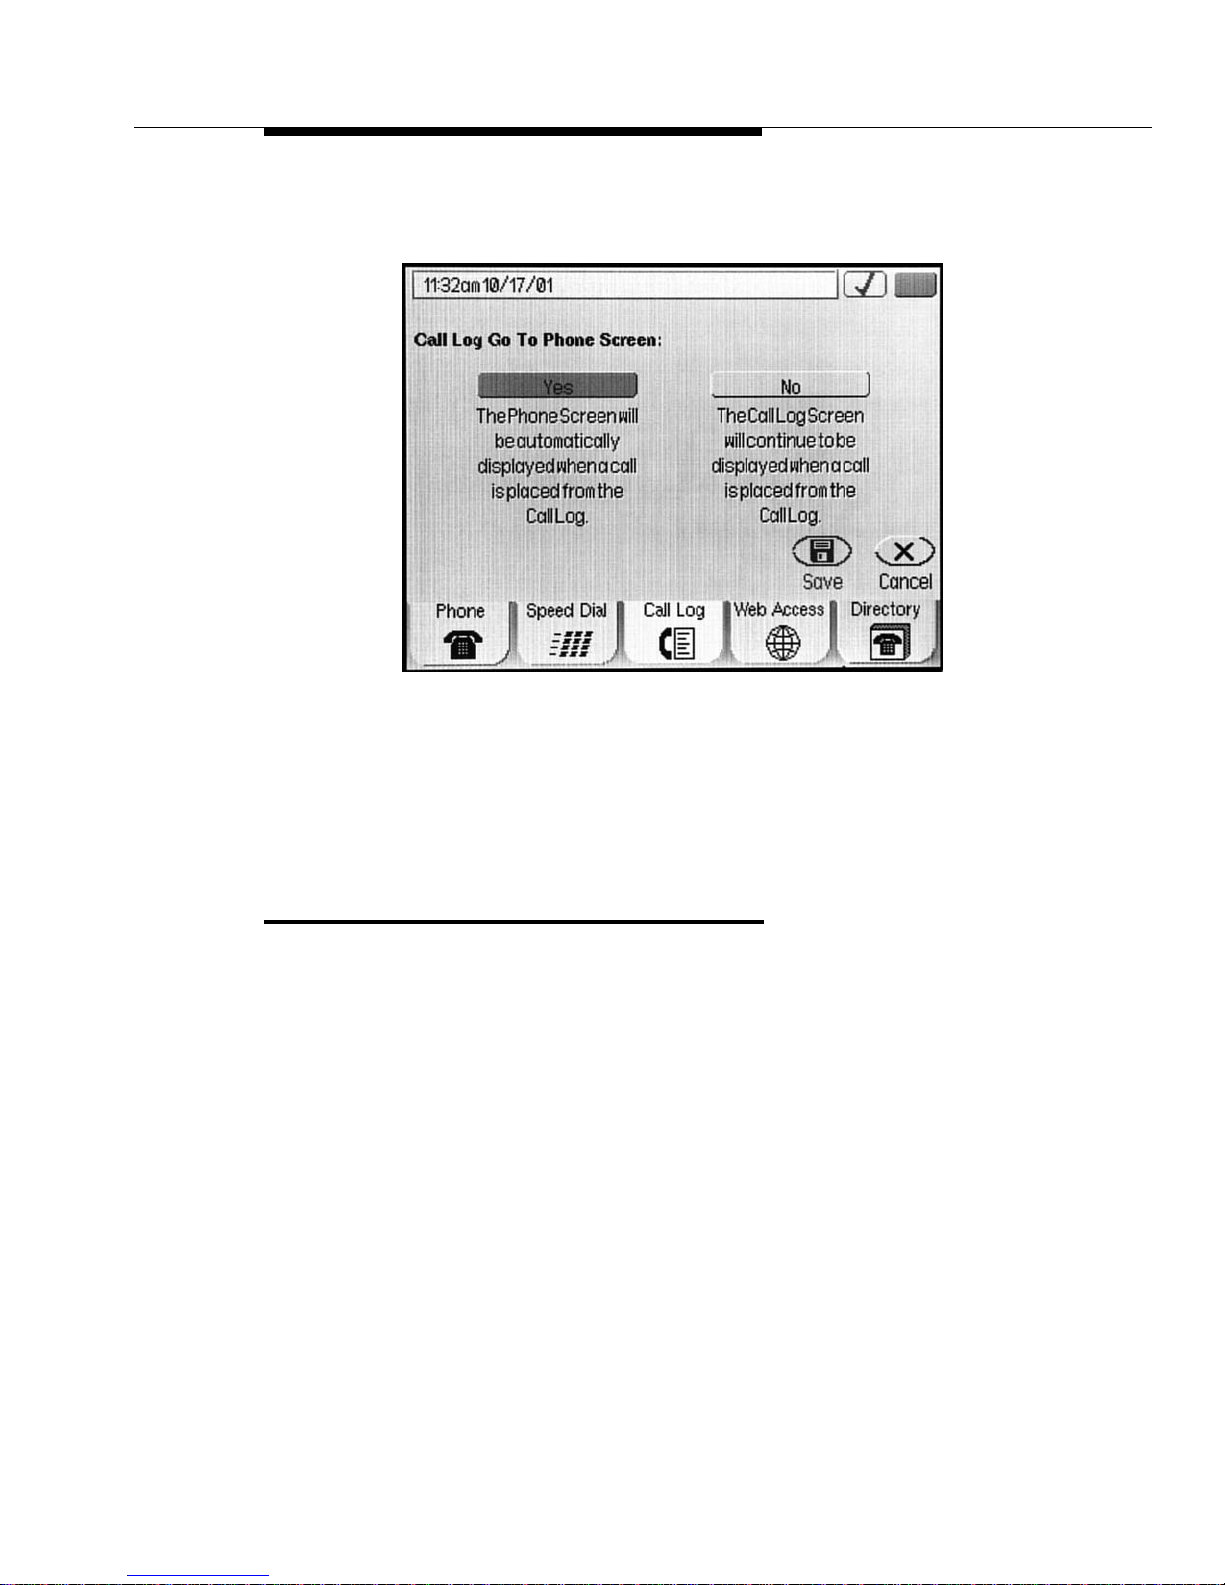
Phone Application Options
The Call Log Go to Phone screen displays, as illustr ated below . The current
setting is highlighted:
2. Select either Yes or No, to indicate whether or not you want the Phone
screen displayed upon dialing a person listed in the Call Log.
3. To save your selection, select Save. To exit without making a change ,
select Cancel.
The Call Log Options and Preferences screen redisplays.
Phone Application Options
Phone application options and preferences allow you establish or modify several
phone- or call-related features. These features are:
1. Personalizing your phone’s ringing pattern - Choose from eight different
ring tones/patterns.
2. Adding (or removing, if already set) an “edit dialing” field to the Phone
screen. The Edit Dial field allows you to edit phone numbers prior to dialing
them.
3. Opting to choose from a list of the last eight numbers dialed or always
redialing the last number called when you select the Redial feature button.
4. Displaying a timer during active and he ld calls.
5. Optionally choosing the “Phone” screen to display automatically from any
of the 4630 application screens upon receiving a call.
You select any of the above options from the Phone Options and Preferences
screen, accessed by selecting Phone Options from the Main Options and
Preferences screen.
Issue 1 December 2001
6-5
Page 68
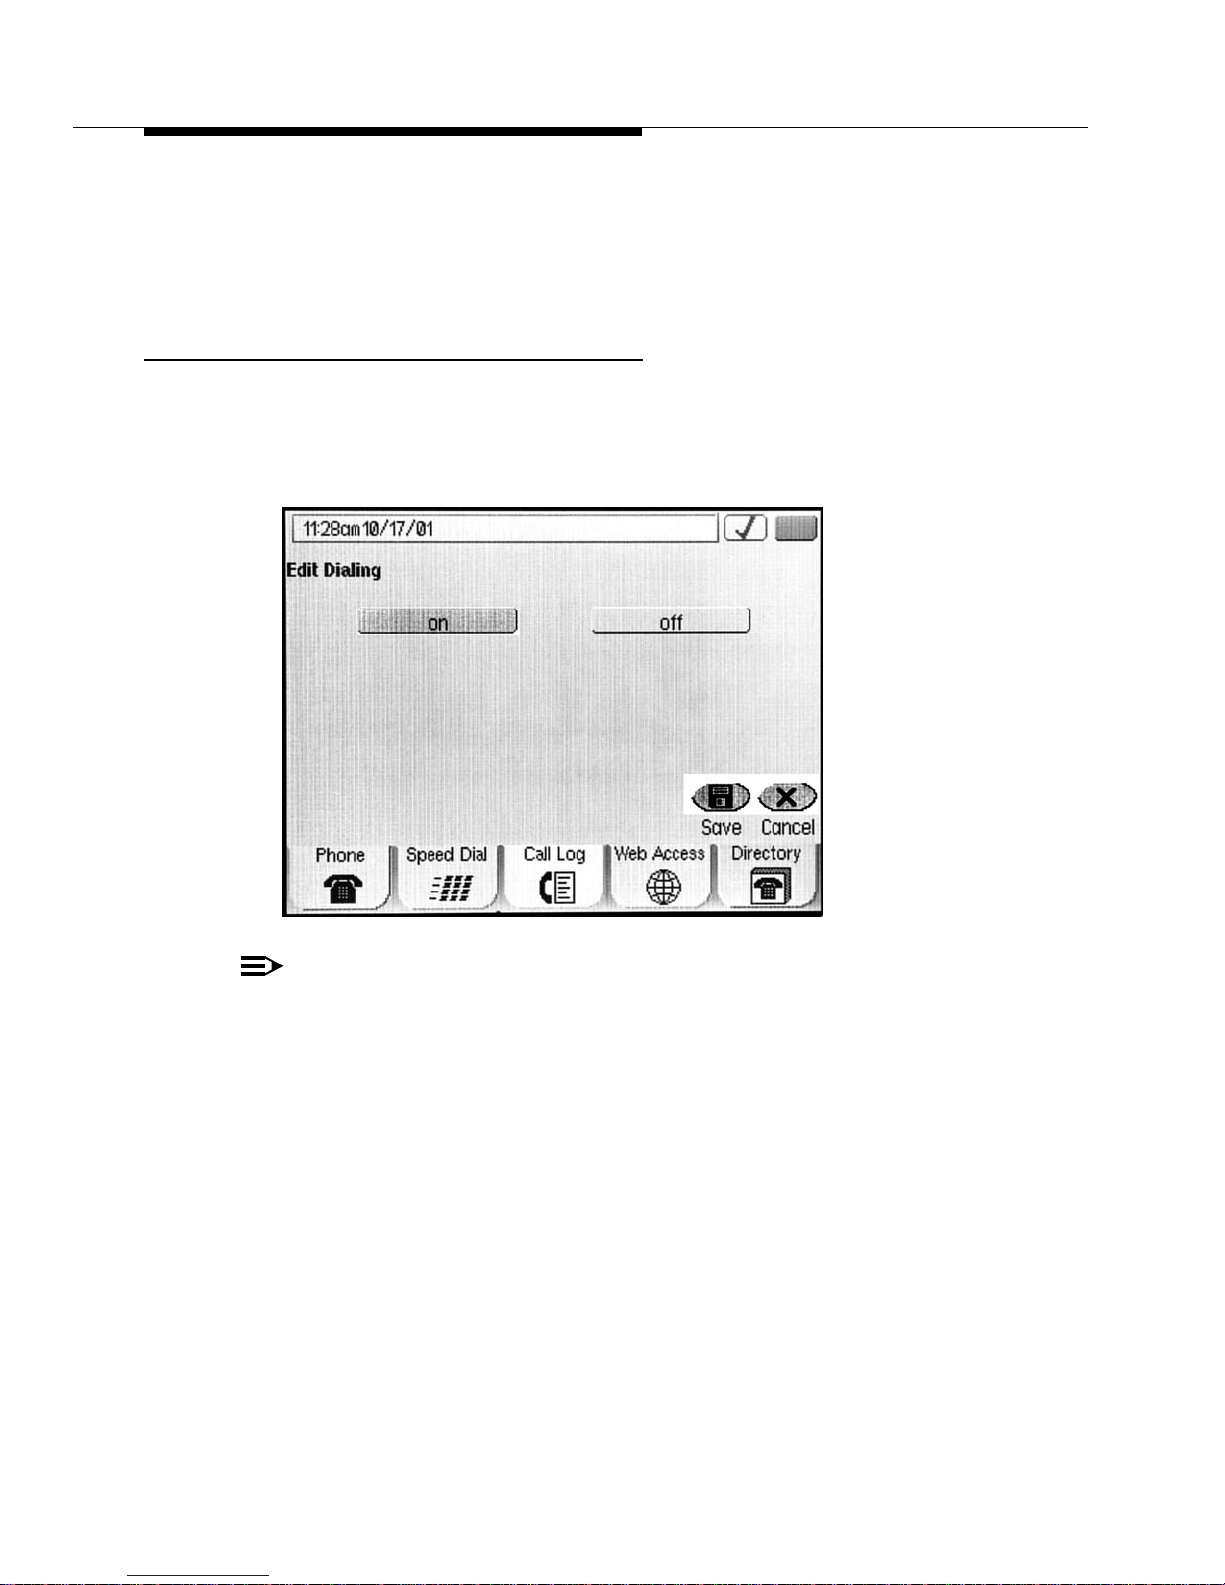
When you are finished, select Done to return to the Main Options and
Preferences screen. There are five Phone options and preferences available, and
the current setting is displayed next to its respective option. Each option is
described in the procedur es that follow.
Setting Edit Dialing
1. To display the Edit Dialing field on the Phone application screen (or to
remove it if it is currently displayed), select Edit Dialing from the Phone
Options and Preferences screen.
The Edit Dialing screen displays, as illustrated below.
NOTE:
The Edit Dialing screen also displays instructions on how to use the Edit
Dialing field, if activated.
Issue 1 December 2001
6-6
Page 69

Phone Application Options
2. Choose one of the following options:
If you want to Then
Turn the Edit Dialing option “on” to
display the edit dial field on the
Phone application screen
Turn the Edit Dialing option “off” so
that the edit dial field does not
display on the Phone screen
Return to the Phone Options and
Preferences screen without
changing the Edit Dialing setting
3. Select Save to set the Edit Dial field to the option selected.
The Phone Options and Preferences screen displays.
Selecting a Personalized Ring
Change the tone or pattern of your phone’s ring using this procedure.
1. To change the ringing tone/pattern, select Personalized Ring Options
from the Phone Options and Preferences screen.
The Select Personalized Ring screen displays. The current ring setting is
highlighted.
Select On. Proceed to Step 3.
The button highlights to indicate an
“On” status.
Select Off. Proceed to Step 3.
The button highlights to indicate an
“Off” status.
Select Cancel.
No change is made and the Phone
Options and Preferences screen
re-displays.
2. Select the ring option number you prefer.
The selected option highlights to indicate an “On” status and the selected
pattern/tone sounds for one cycle.
3. Repeat Step 2 until the desired ring pattern or tone sounds.
4. To save your selection, select Save. To exit without making a change ,
select Cancel.
The Phone Options and Preferences screen redisplays.
NOTE:
To raise or lower the ringer volume , use the phone’s Volume Control button.
Issue 1 December 2001
6-7
Page 70

Selecting a Redial Option
This procedure instructs you in selecting or changing your phon e’s redial option.
The Redial feature button displays on the Phone application screen and you h ave
two choices for how this button operates:
When selected, the last number called is dialed, or
■
When selected, a list of the last eight numbers called is displayed, from
■
which you may choose the number you want to redial.
The default setting is to d isplay the list o f the last eight numbers called. Se e Redial
in Chapter 2, Call Handling
for information on using this feature.
1. To modify the current Redial setting, select Redial from the Phone Option s
and Preferences screen.
The Select Redial Option screen displays. The current setting is
highlighted.
2. Select either Last number or Last 8 numbers, to indicate how you want
the Redial feature button to operate.
3. To save your selection, select Save. To exit without making a change,
select Cancel.
The Phone Options and Preferences screen redisplays.
Setting the “Go to Phone On Answer” Option
This option allows you to select or change the “Go to Phone On Answer” option.
When this option is set to “Yes,” the Phone screen is displayed automatically
whenever you ans wer a call. When this option is not selected, the current screen
remains displayed wh enev er you ans we r a call (although you ca n alwa ys manually
select the Phone application tab , if desired). The default setting is to not display
the Go To Phone screen upon answering a call.
1. To modify the current Go to Phone On Answer setting, select Go to Phone
On Answer from the Phone Options and Preferences screen.
The Go to Phone On Answer screen displays. The current setting is
highlighted.
2. Select either Yes or No, to indicate whether or not you wa nt the Phone
screen displayed upon answering a call.
3. To save your selection, select Save. To exit without making a change,
select Cancel.
The Phone Options and Preferences screen redisplays.
Issue 1 December 2001
6-8
Page 71
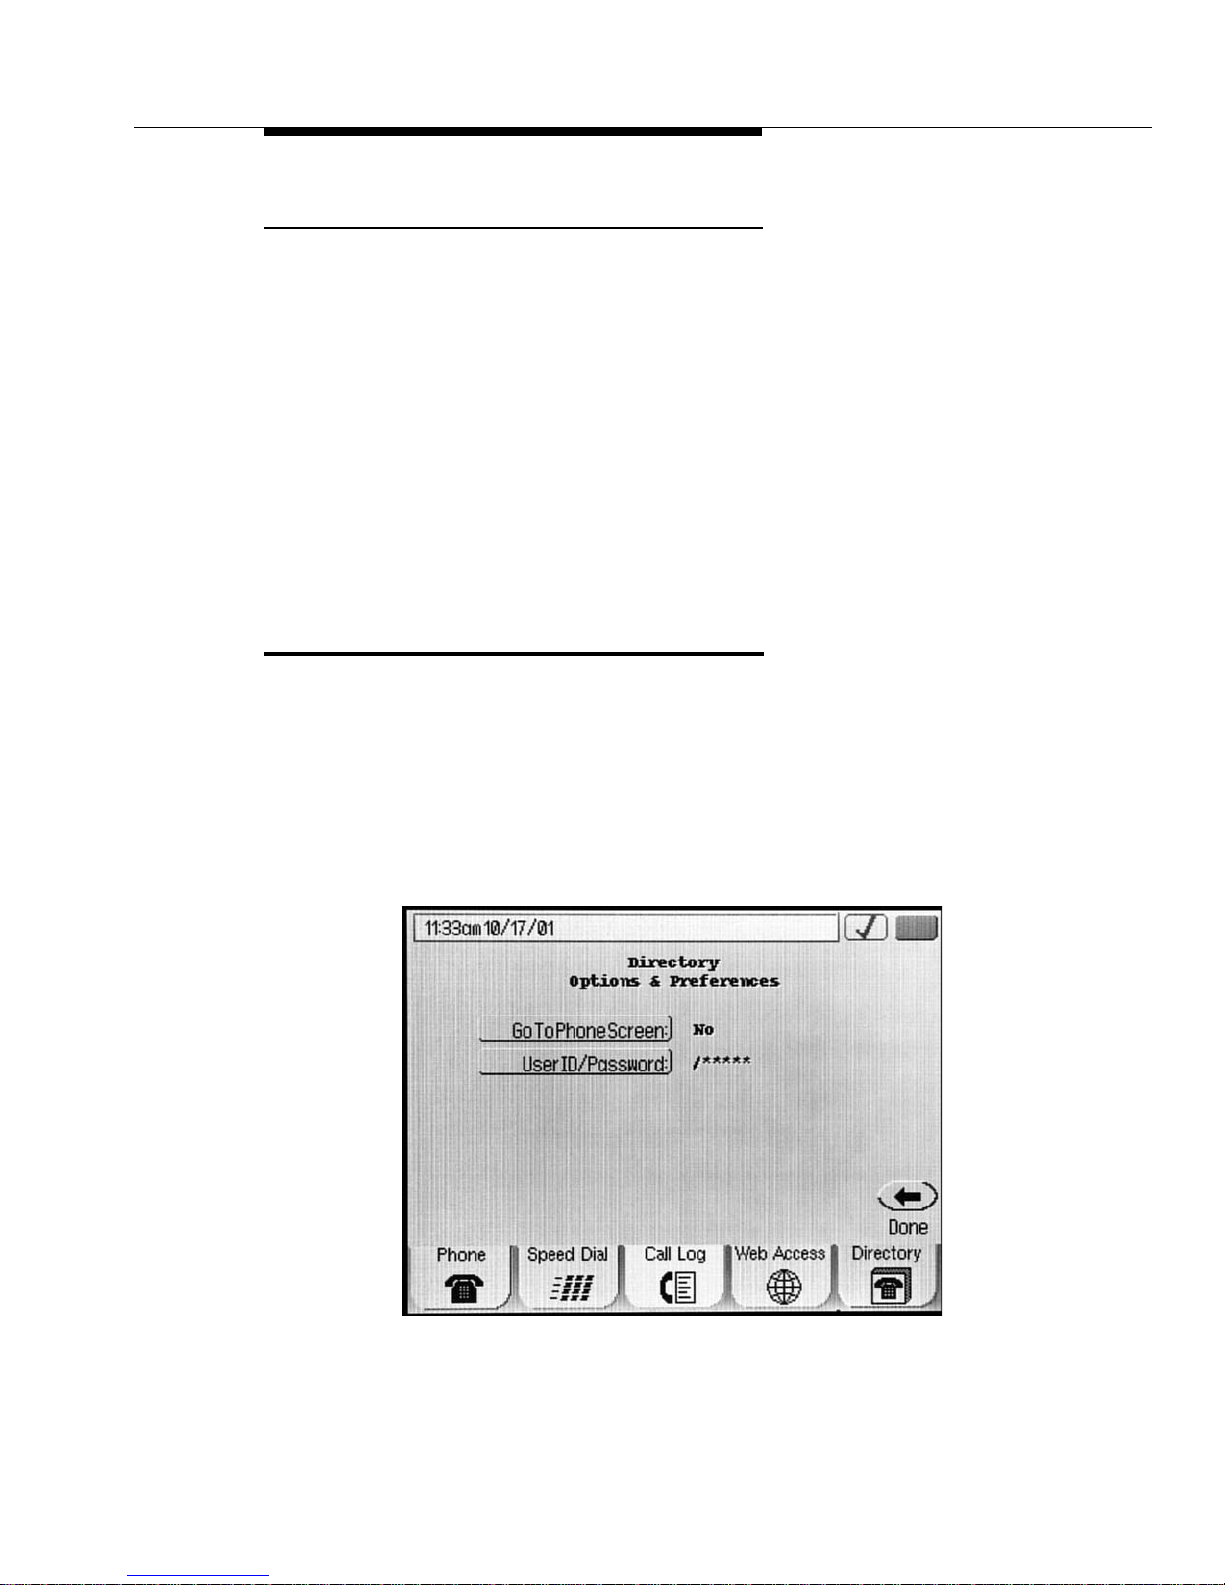
Directory Options
Setting the Call Timer
This option allows you to have a timer displayed during an active call or f or a call
that you have put on Hold. Displaying the timer is the default, but you can change
it using the procedure below.
1. To modify the current Call Timer setting, select Call Timer from the Phone
Options and Preferences screen.
The Call Timer screen displays. The current setting is highlighted.
2. Select either Yes or No, to indicate whether or not you want the Call Timer
displayed for each active or held call.
3. To save your selection, select Save. To exit without making a change ,
select Cancel.
The Phone Options and Preferences screen redisplays.
Directory Options
There are two Directory options, which allow you to:
Have the Phone screen display automatically when you make an outgoing
■
call from the Corporate Directory screen, or
Add a User ID and Password to protect Corporate Directory access.
■
You select either option from the Directory Options and Preferences screen,
accessed by selecting Directory Options from the Main Options and Preferences
screen:
When you finish checking or setting the Directory options, select Done to return to
the Main Options and Preferences screen.
Issue 1 December 2001
6-9
Page 72
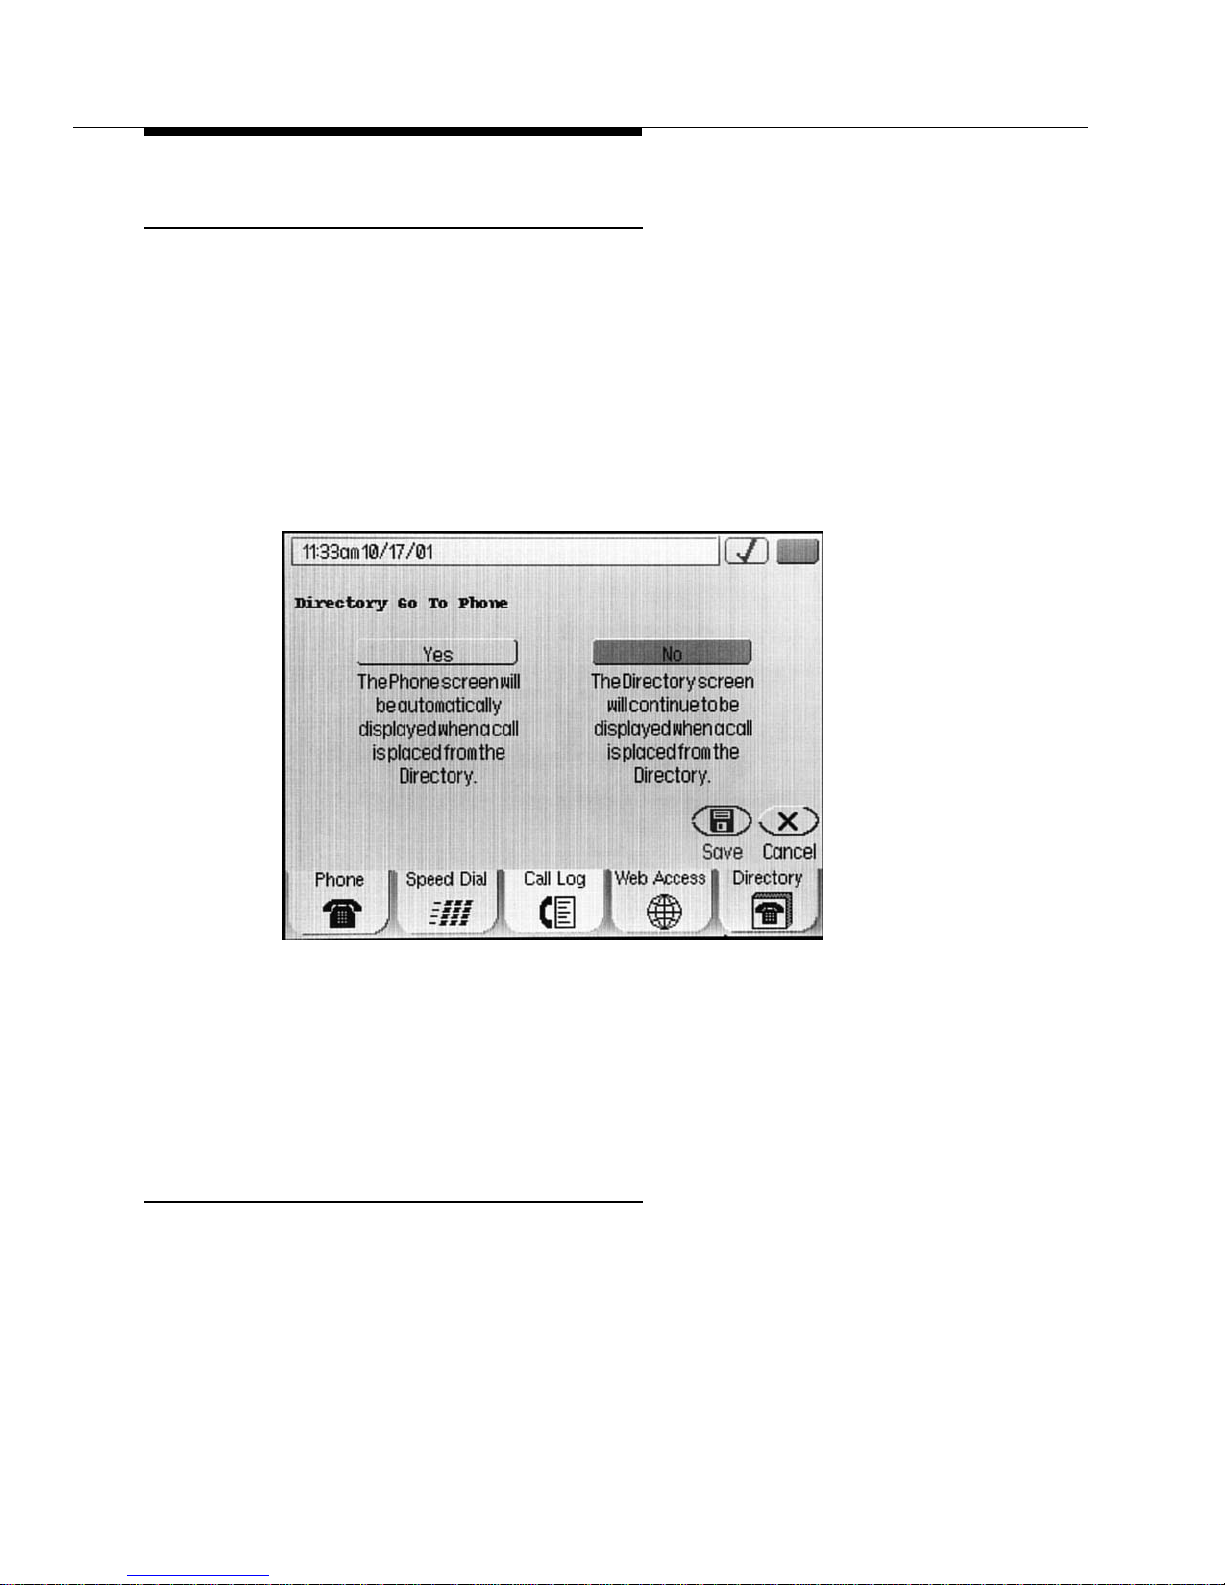
Setting the Directory “Go to Phone” Option
When this option is selected, the Phone screen will be displayed automatically
whenever you place a call to someone found from a Directory search. When this
option is not selected, the Directory screen will remain displayed whenev er you
place a call from the Directory screen. The default setting is to not display the
Phone screen upon placing a call from the Directory (although you can always
manually select the Phone application tab, if desired).
1. To modify the current Go to phone setting, select Go to Phone Screen
from the Directory Options and Preferences screen.
The Directory Go to Phone screen displays, as illustrated below. The
current setting is highlighted:
2. Select either Yes or No, to indicate whether or not you wa nt the Phone
screen displayed upon dialing a person found in the Directory.
3. To save your selection, select Save. To exit without making a change,
select Cancel.
The Directory Options and Preferences screen redisplays.
Setting Up or Modifying a Directory User ID and
Password
Establishing a User ID and Password protects the security of your Corporate
Directory. Once established, you are prompted to provide both the ID and
Password when you use the Corporate Directory. You dete rmine your own ID and
Password; your System Administrator does not have access to this information.
Use the procedure below to establish your User ID and Password and to modify
either item as needed.
Issue 1 December 2001
6-10
Page 73
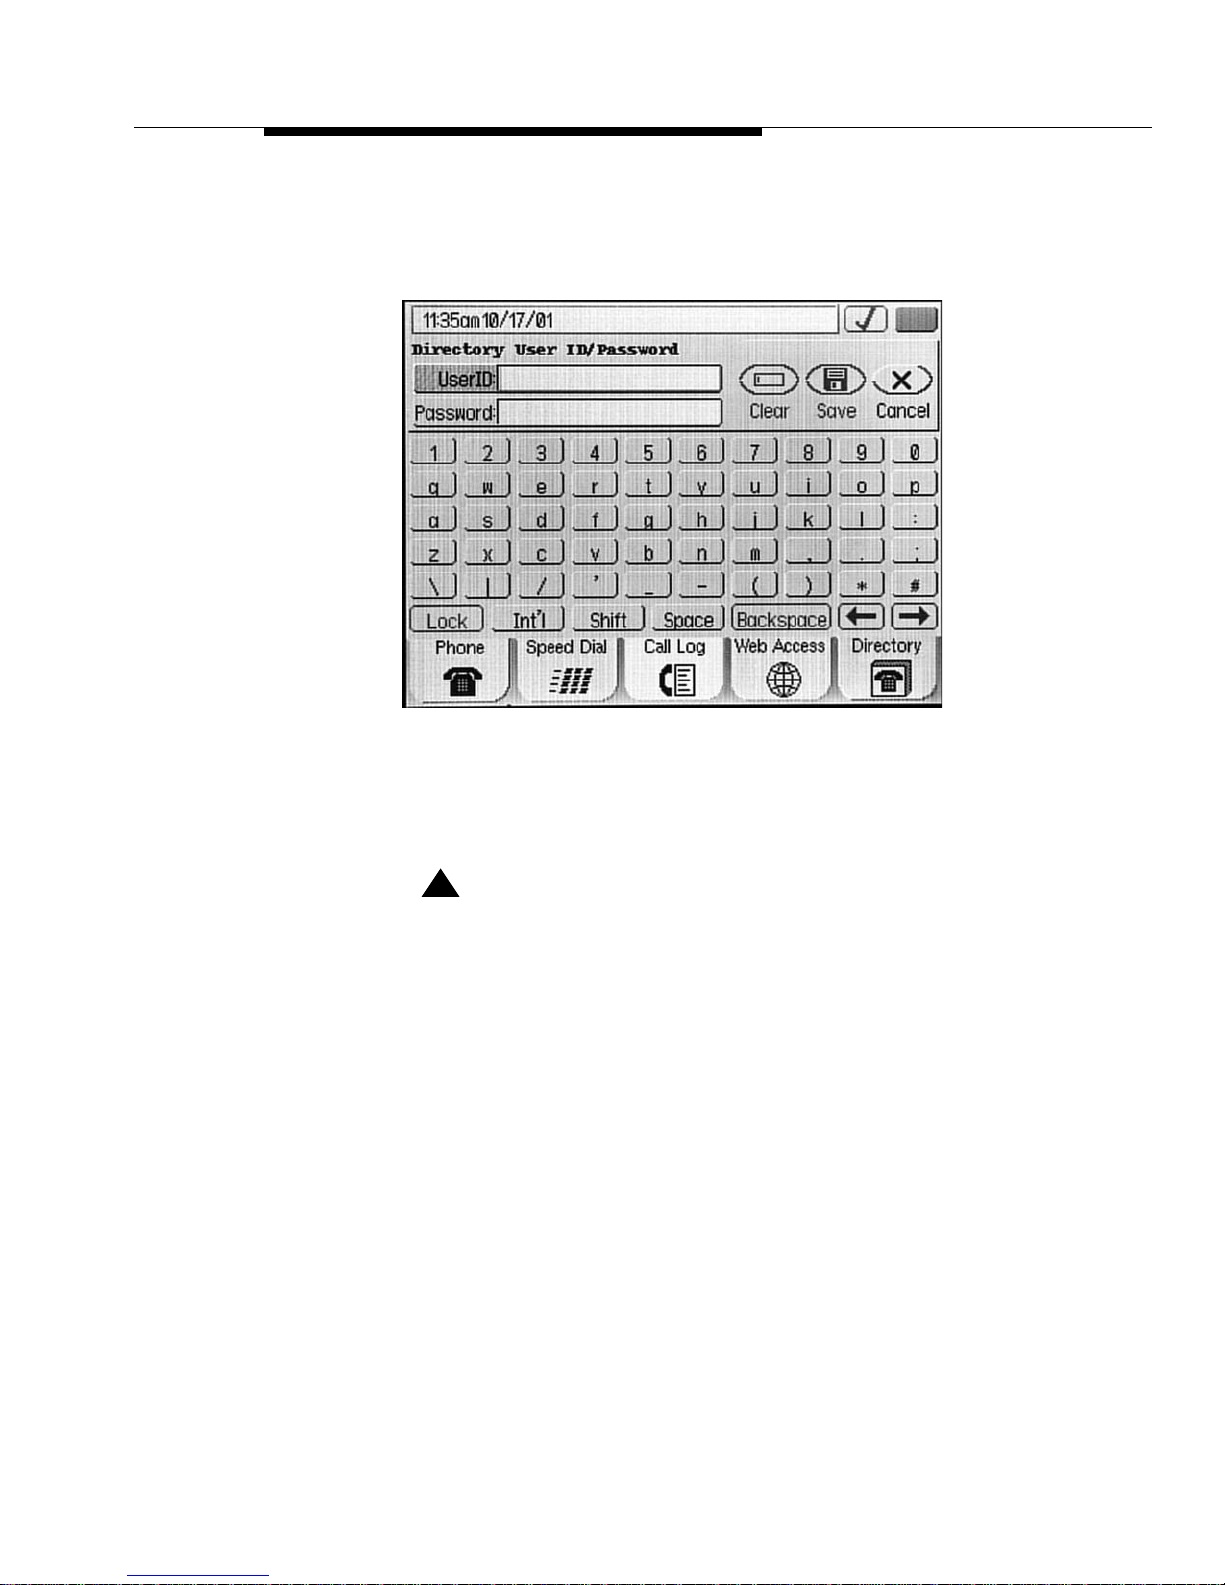
Directory Options
1. To add/modify a Directory User ID and Password, select User
ID/Password from the Directory Options screen.
The Directory User ID/Password Keyboard screen displays.
2. Touch the appropriate keyboard char acters to enter the User ID, using up to
12 characters.
As you press each character, the User ID field populates. When modifying
an existing User ID, what you type overwrites the current ID.
!
CAUTION:
Before proceeding with Step 3, be sure you know the Password you
want to use and that you enter it correctly. As you enter the P ass word ,
you will not be able to see what you are typing!
3. Select Password and touch the appropriate keyboard characters
representing the password you want to assign. If you are unsure of what
you have entered, select Clear and re-type the correct password.
As you type, asterisks display in the Password field. When modif ying an
existing Password, what you type overwrites the current Password.
4. To save your selection, select Save. To exit without making a change ,
select Cancel.
The Directory Options and Preferences screen redisplays.
Issue 1 December 2001
6-11
Page 74
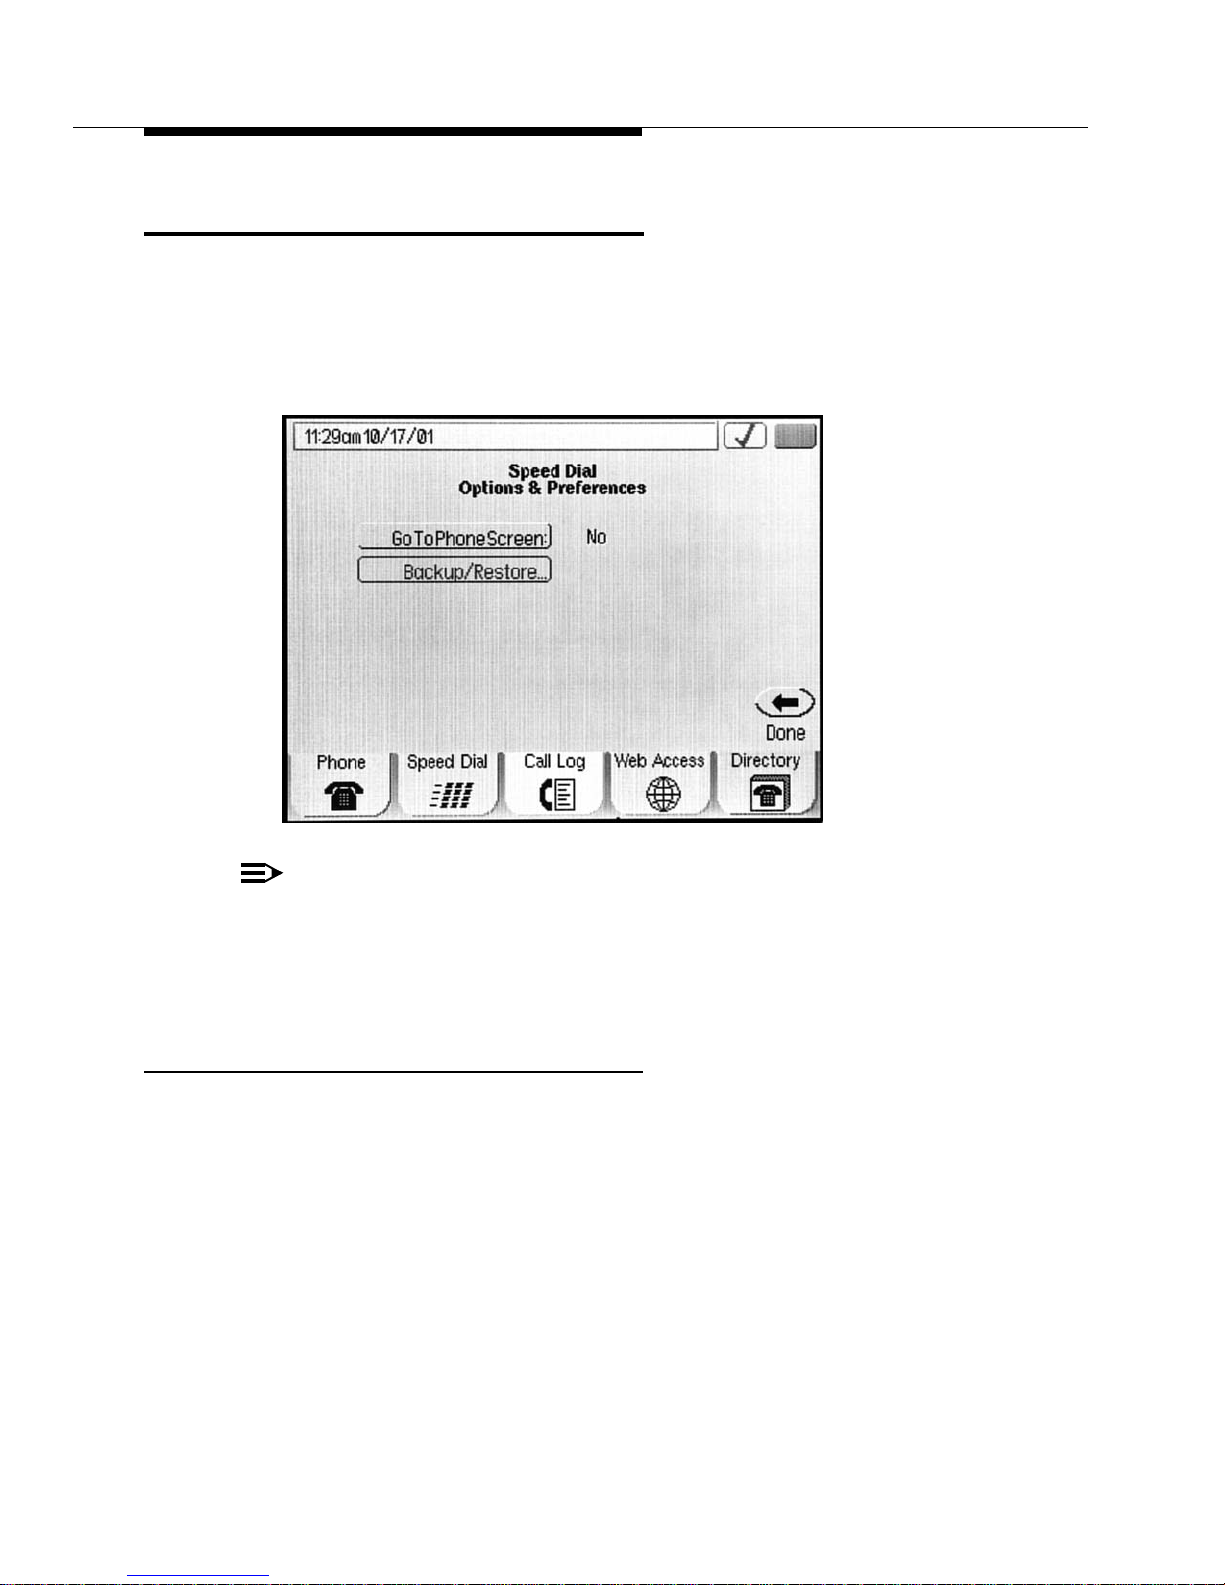
Speed Dial Options
One Speed Dial option is available which allows you to display the Phone screen
automatically when you place an outgoing call using speed dialing.
You select this Speed Dial option from the Speed Dial Options and Preferences
screen, accessed by selecting Speed Dial Options from the Main Options and
Preferences screen:
NOTE:
Backup/Restore is reserved for use as a future enhancement.
When you are finished, select Done to return to the Main Options and
Preferences screen. The Speed Dial option is described in the procedure that
follows.
Setting the Speed Dial “Go to Phone” Option
When this option is selected, the Phone screen will be displayed automatically
whenever you place an outgoing call using a Speed Dial button. When this option
is not selected, the Speed Dial screen remains displayed whenever you place a
call using a Speed Dial button. The default setting is to not display the Phone
screen upon speed dialing a call (although you can alw ays manually select the
Phone application tab, if desired).
1. To modify the current Go to phone setting, select Go to Phone Screen
from the Speed Dial Options and Preferences screen.
Issue 1 December 2001
6-12
Page 75
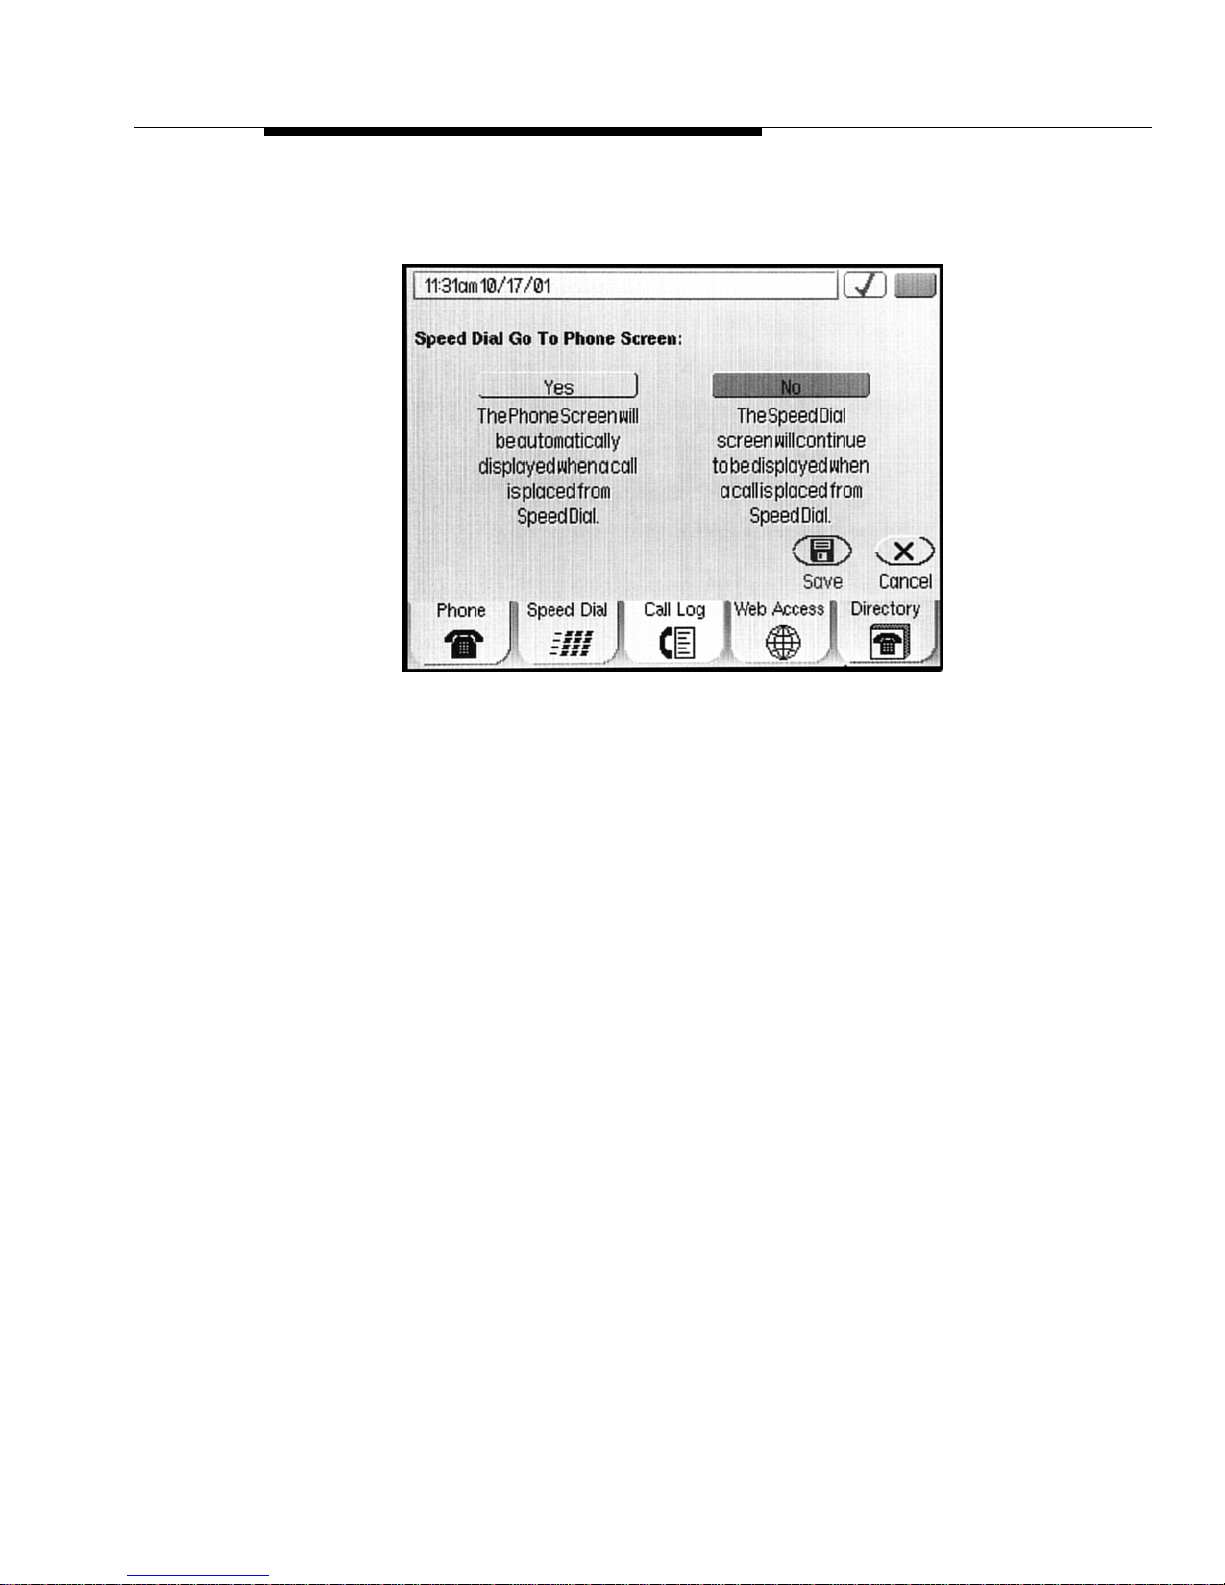
Speed Dial Options
The Speed Dial Go to Phone screen displays, as illustrated below. The
current setting is highlighted:
2. Select either Yes or No, to indicate whether or not you want the Phone
screen displayed upon speed dialing a call.
3. To save your selection, select Save. To exit without making a change ,
select Cancel.
The Speed Dial Options and Preferences screen redisplays.
Issue 1 December 2001
6-13
Page 76

Issue 1 December 2001
6-14
Page 77

Web Access
Introduction
An optional Web Access application is provided with the 4630 IP Telephone
system, to allow access via your 4630 telephone to Avaya -p rovided information
(an online version of this user guide) and your Corporate intranet, if appropriate.
Your System Administrator has the option of designing a Home page on which
your web options reside or using a Home page provided by Avaya for this
purpose.
Note that the Web Access application off ers a basic browser capability; it does not
support all the data types found on the Internet and is not intended to replace your
PC’s browser.
7
This chapter describes the basic functions available with the Web Access
application. These functions include accessing and na vigating pages link ed to the
Home page. Because this application can be customized by your System
Administrator for specific business use, not all features described in this chapter
may apply to you, and o thers which result from customizing ma y not be described
here. For this reason, contact your System Administrator for specific information
about how your Web Access application has been administered before
proceeding.
Because any customizing may affect the flow of web-related activity, the primary
web access screens are described in this chapter without a standard procedural
flow.
Issue 1 December 2001
7-1
Page 78
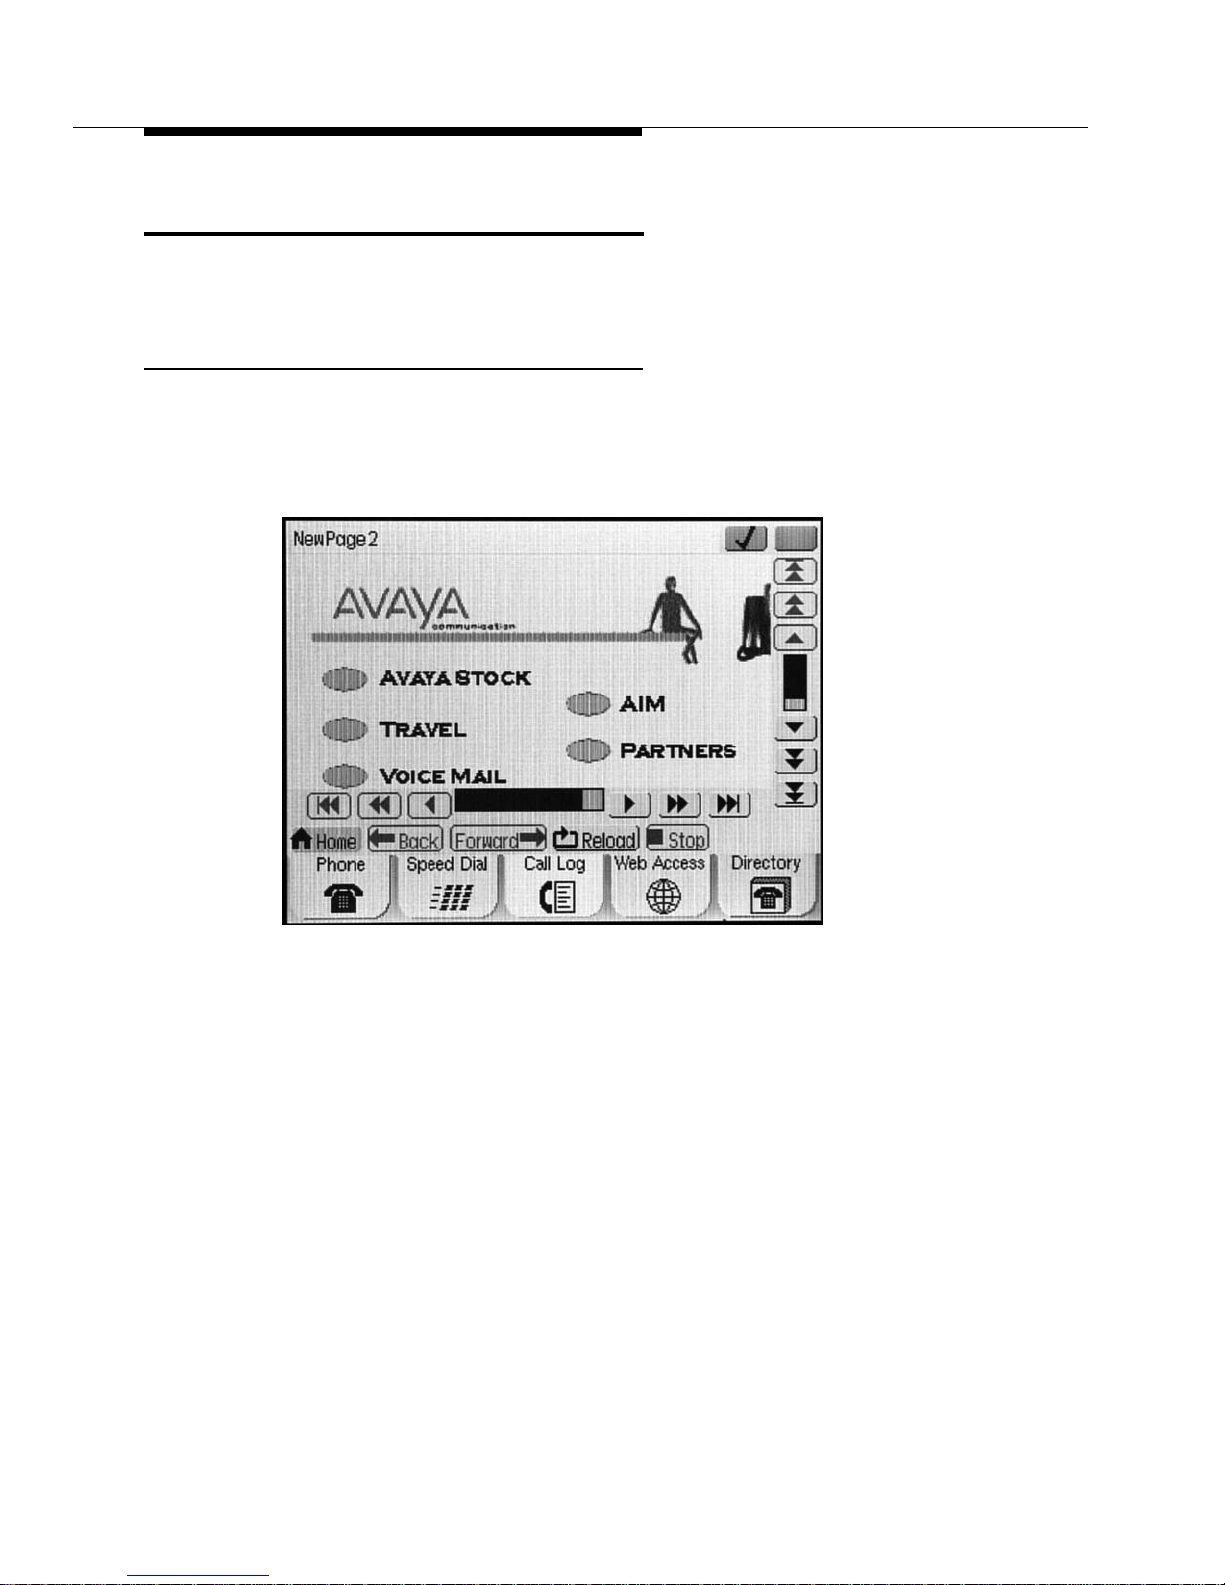
Navigating Web Pages
The Web application browser performs similarly to those on your PC.
Navigating the Home Page and Other
Standard-Size Web Pages
1. Access the Web Access screen by selecting the Web tab at the bottom of
any application screen.
The Web Access screen displays the Home page, a sample of which is
illustrated below:
Your Home page may look different, if your System Administrator has set
up a local Home page.
Issue 1 December 2001
7-2
Page 79
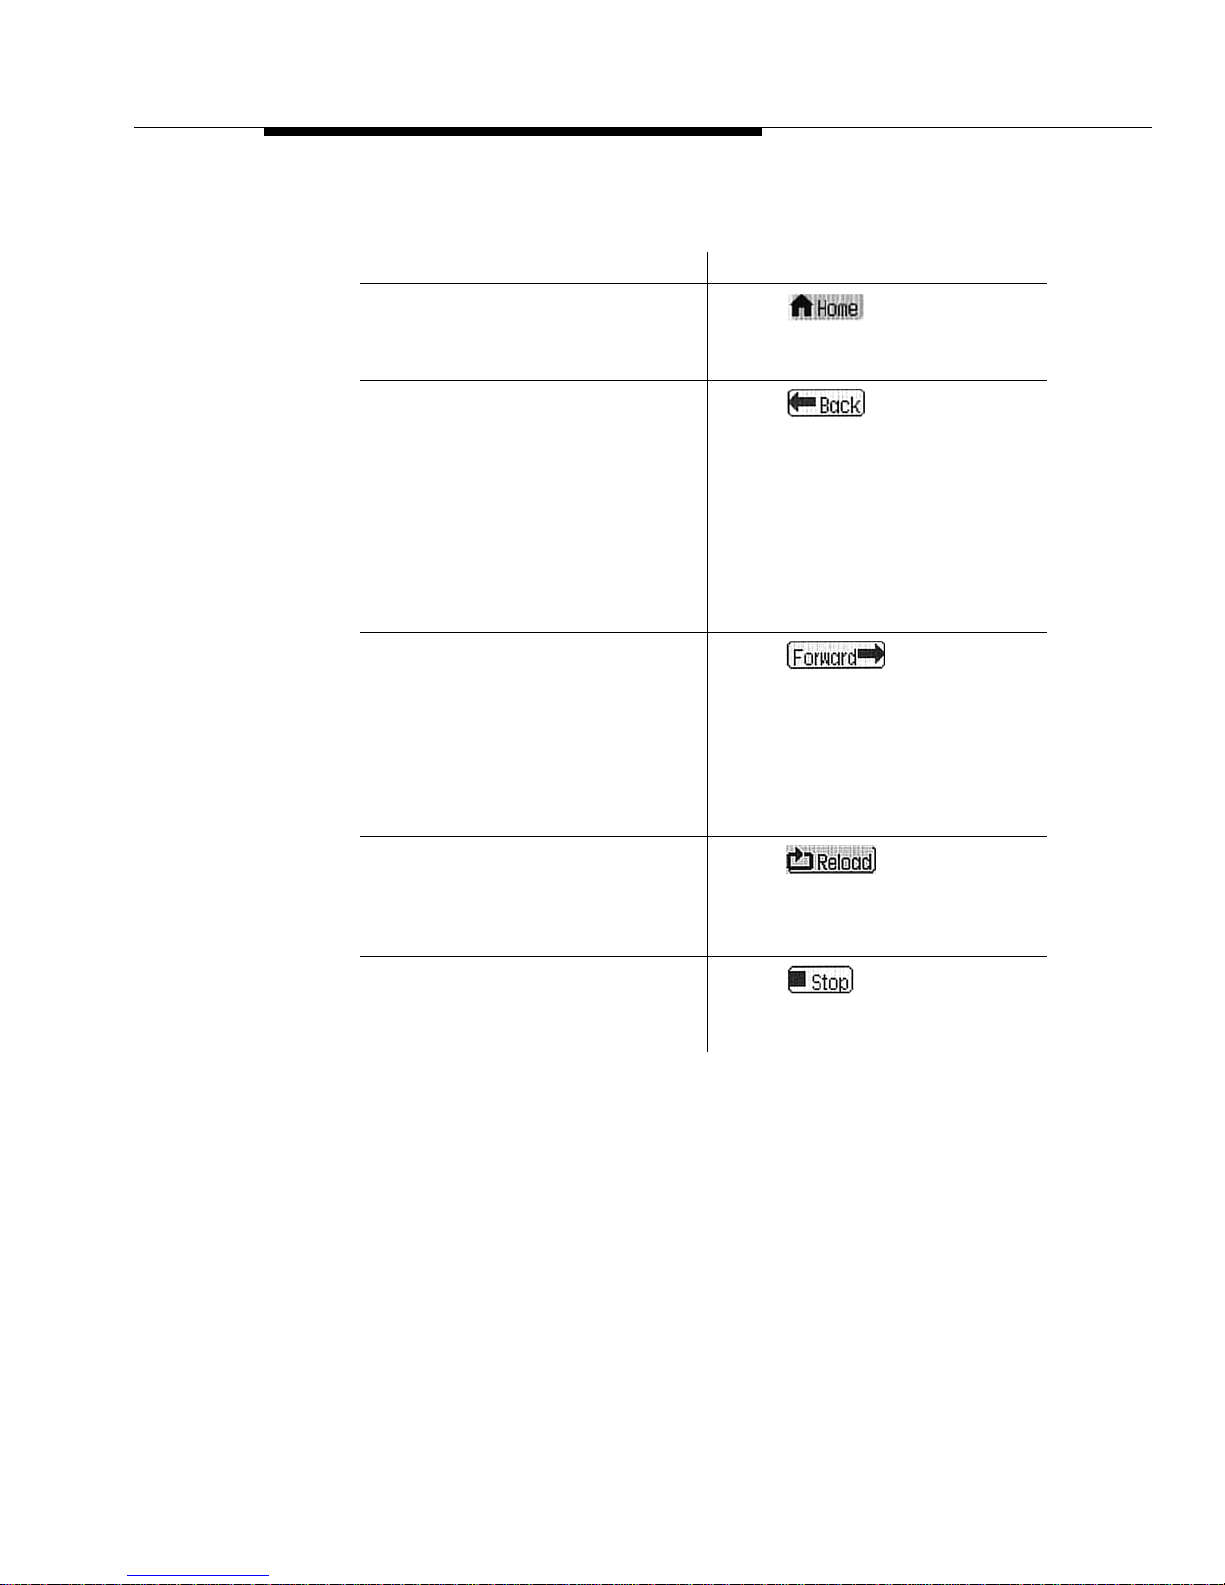
Navigating Web Pages
2. Navigate the Home page and other web screens as follows:
If you want to Then
Redisplay the Home page Select .
Any web page loading/processing
stops and the Home page displays.
Return to the previous web page or
application/options screen
Select .
(This button is enabled only when
more than one web address has
been accessed/browsed.)
Any web page loading/processing
stops and the previous web page
(or 4630 application or options
screen, if that was the previous
item) displays.
Move to the next web page Select .
(This button is enabled only when
there is a web address following the
web address/page currently
displayed.)
Any web page loading/processing
stops and the next page displays.
Redisplay the current web page Select .
Any web page loading/processing
stops and the current page
redisplays.
Stop loading or processing a web
page for display
Select .
The processing or loading of the
web page stops.
Issue 1 December 2001
7-3
Page 80
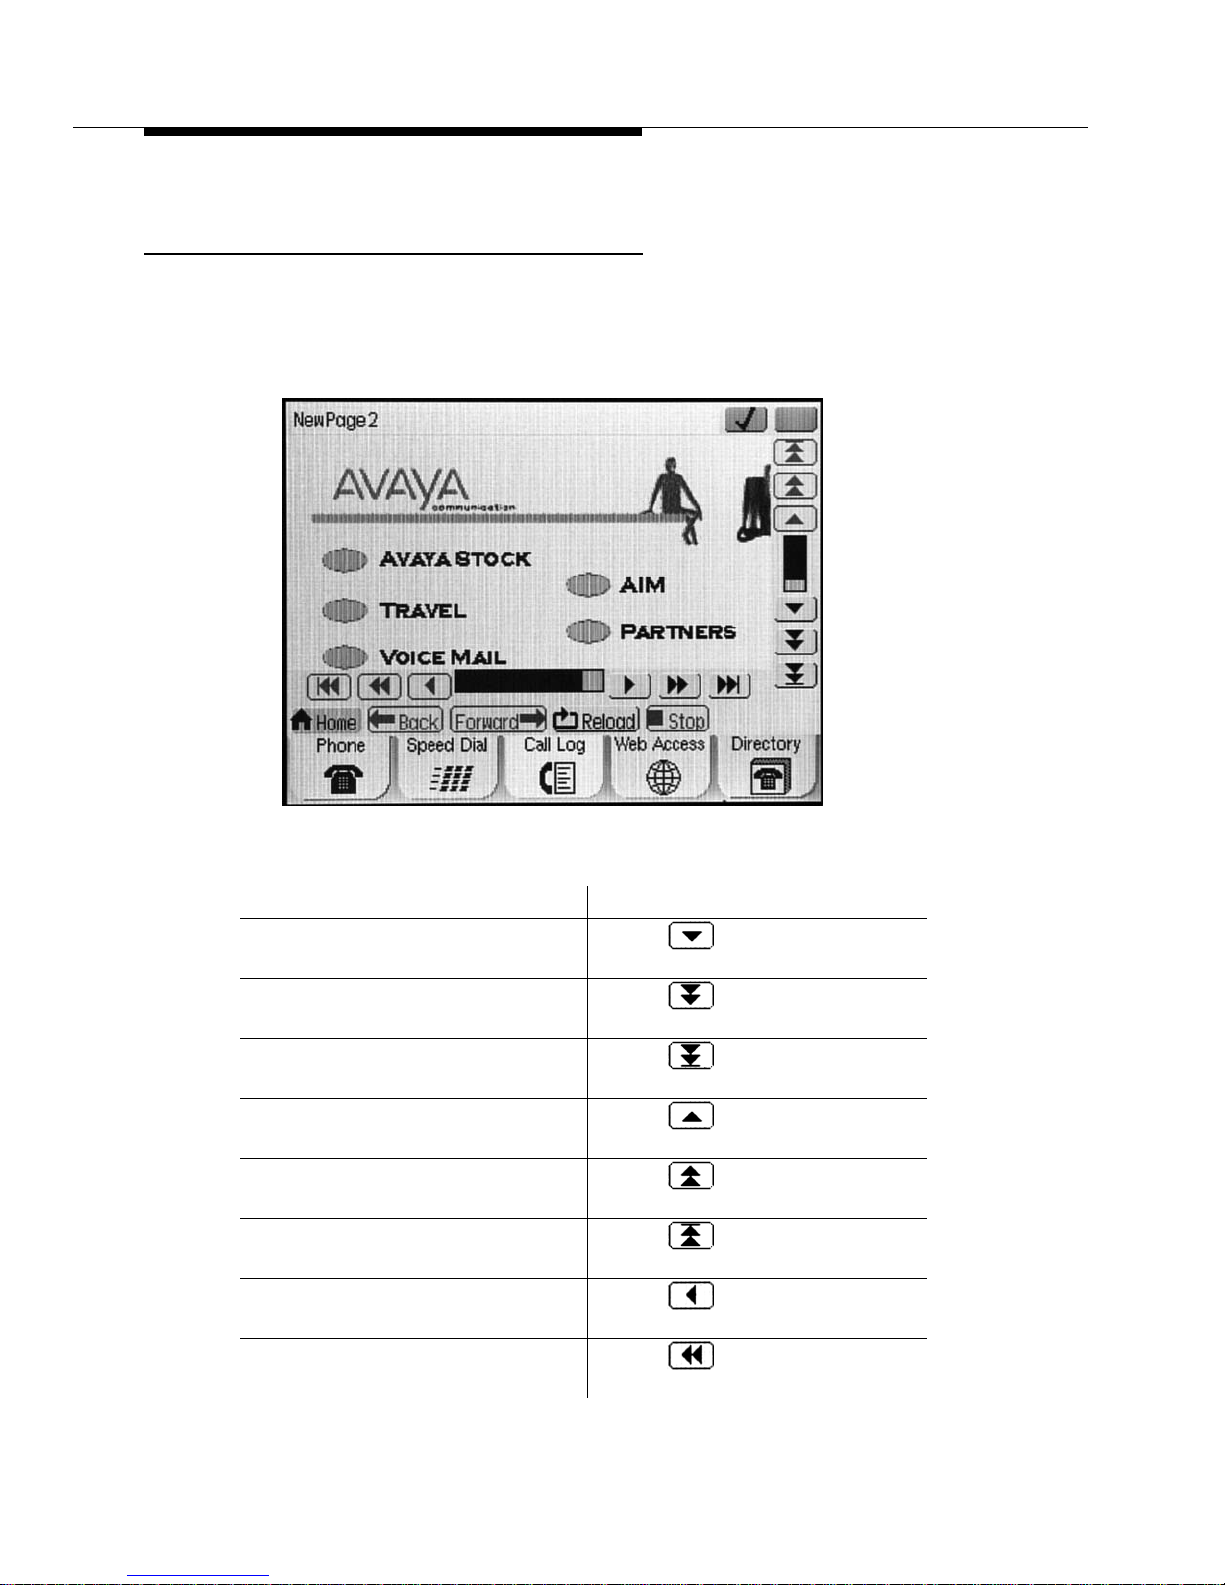
Navigating Web Pages Larger than the Display
Area
Some web pages may be larger than the 463 0 display area. To accommodate
such pages, scroll controls appear in addition to the buttons described above, to
help you navigate larger w eb page widths and/or lengths, as illustrated on the
sample page below:
Navigate this type of page using the following scroll buttons:
If you want to Then
Move the web page down one text
line
Move the web page down one
display length
Move to the bottom of the web page Select .
Move the web page up one text line Select .
Move the web page up one display
length
Move to the top of the web page Select .
Move the web page one character to
the left
Move the web page to the left one
display width
Select .
Select .
Select .
Select .
Select .
Issue 1 December 2001
7-4
Page 81
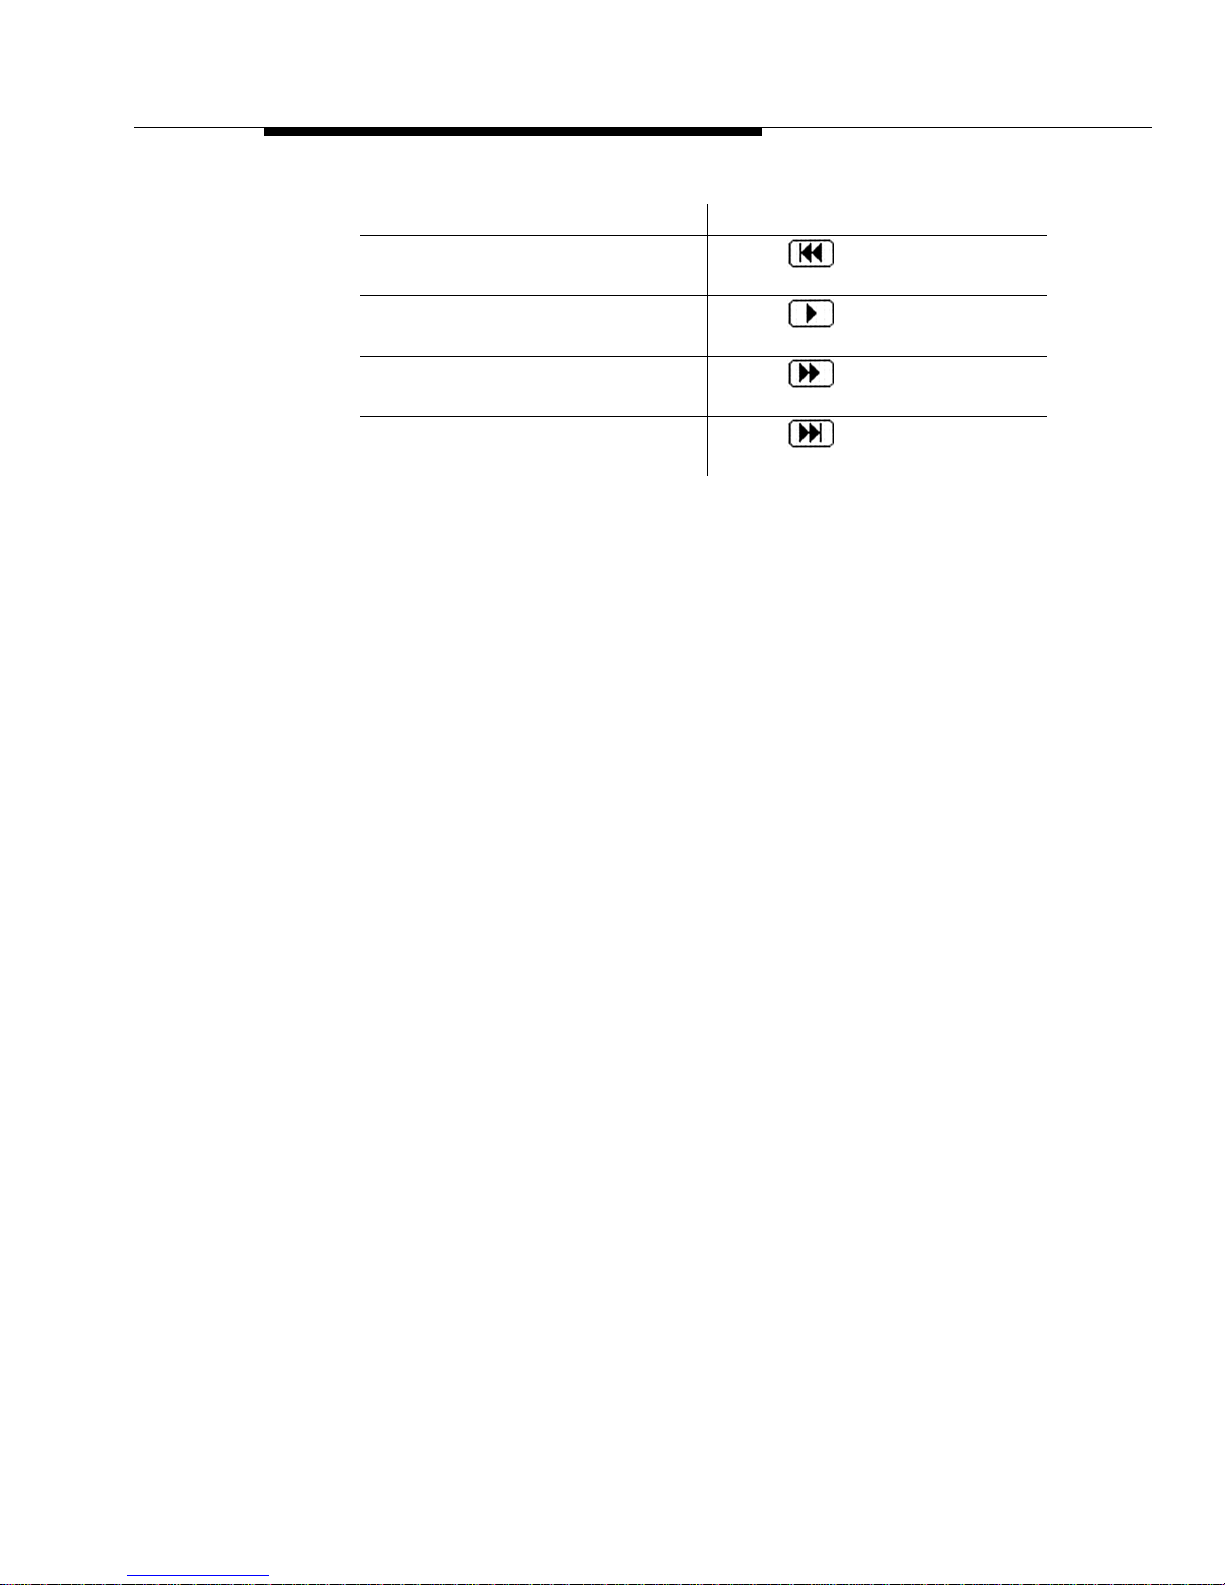
Navigating Web Pages
If you want to Then
Move to the left side of the web page Select .
Move the web page one character to
the right
Move the web page to the right one
display width
Move to the right side of the web
page
Select .
Select .
Select .
Issue 1 December 2001
7-5
Page 82

Issue 1 December 2001
7-6
Page 83

Using a Headset or Specialized
Handset
Introduction
This chapter describes the headsets and specialized handsets that are
compatible with your IP telephone. How to operate a headset is also covered.
IP Telephone-Compatible Headsets
Use any of the following headsets with th e 4600-Series IP Telephones:
8
■
■
■
■
■
■
■
■
■
■
■
■
■
■
■
■
■
Earset Starter
Earset Starter Noise Canceling
Encore Ultra VT
Encore Ultra Noise Canceling
Encore Ultra II
Encore Ultra II Noise Canceling
Mirage Ultra
Mirage Ultra Noise Canceling
Starset Supra Starter
Starter Special VT
Starter Special Noise Canceling
Supra Starter Noise Canceling
Supra Ultra
Supra Ultra Noise Canceling
Supra Ultra II Twin Top
Supra Ultra II Noise Canceling
Tristar Ultra
■
Tristar Ultra Noise Canceling
Issue 1 December 2001
8-1
Page 84

Operating a Headset
Headset operation must be administered by your System Administrator and
requires either an M12LU Modular Base Unit (PEC 3124-022) or a 3124-HIC:
Attenuation (headset adapter) Cord (PEC 3124-HIC). For the latest list of
compatible headsets and adapters, or for ordering information, access "Products
and Services" at www.avayadirect.com
.
IP Telephone-Compatible Specialized
Handsets
The IP Phone's handset interface (labeled HAC on the underside of the phone) is
compatible with the following handsets:
AB1C (the handset provided with your phone)
■
AB5C
■
AB6C
■
AB8C
■
Specialized handsets are available for noisy environments, hearing-impaired
users and other special purposes. These handsets are lab eled either as "K-type"
or "AJ-type" handsets.
For the latest list of special purpose handsets and ordering information, access
"Products and Services" at www.avayadirect.com
.
Issue 1 December 2001
8-2
Page 85

Troubleshooting
Introduction
The DEFINITY 4600-Series IP Telephones are relatively trouble-free. The Basic
Troubleshooting chart provides the most common problems an end user might
encounter. Th e Application Troubleshooting chart provides troubleshooting
specific to each of the 4630 applications. The remaining pages in this chapter
provide procedures f or re setting o r power-cycling your phone, when neither Basic
nor Application Troubleshooting resolves the problem. If you have a question or
experience a problem that is no t described in this chapter , conta ct your Telephon e
System Administrator.
9
Issue 1 December 2001
9-1
Page 86

Basic Troubleshooting
Problem/Symptom Suggested Resolution
Phone does not activate after
connecting it the first time
Phone does not activate after a
power interruption
Characters do not appear on the
Display screen
Unless your System Administrator
has already initialized your
telephone, you may experience a
delay of several minutes before it
becomes operational. Upon plug-in,
your telephone immediately begins
downloading its operational
software, its IP address and any
special features programmed by
your System Administrator from the
server to which it is connected.
Report any delay of more than 5
minutes to your System
Administrator.
Allow a few minutes for
re-initialization after unplugging,
powering down the phone, server
problems or other power
interruption causes.
See "Phone does not activate after
connecting it the first time" above.
Check all lines into the phone to be
sure it is properly connected.
Issue 1 December 2001
9-2
Check the power source to be sure
your telephone is receiving power.
Perform the following Test
procedure: with the telephone idle
(on-hook), press and hold the Mute
button while dialing this sequence:
8 3 7 8 #. The display should
indicate the self-test has started
then report if the test was
successful or failed. If nothing
appears on the display,and the
phone is receiving power, your
phone may need to be replaced.
If the above suggested solutions do
not resolve the problem, reset or
power cycle the phone.
Page 87

Basic Troubleshooting
Problem/Symptom Suggested Resolution
Display shows an error/informational
message
Most messages involve
server/phone interaction. If you
cannot resolve the problem based
on the message received, contact
your Telephone System
Administrator for resolution.
No dial tone Make sure both the handset and
line cords into the phone are
securely connected. Note that there
may be a slight operational delay if
you unplug and reconnect the
phone.
If nothing appears on the display,
check your power source .
Check to be sure your phone is
communicating with the switch;
select any Speed Dial button or any
outgoing Call Log entry. If the
outgoing call completes, there is a
problem with the dial tone itself, and
you should contact your System
Administrator for resolution. If the
call does not go through, contact
your System Administrator who will
determine whether the problem is
with the phone, the switch or the
network.
Echo, noise or static when using a
headset; handset operation works
properly
Always contact your Telephone
System Administrator if the
troubleshooting steps do not
produce the desired result.
Check the headset connection.
If the connection is secure, verify
that you are using an approved
headset, base unit and/or adapter,
as described in the list of approved
Avaya Communication compatible
Headsets in Chapter 8 of this guide.
Issue 1 December 2001
9-3
Page 88

Problem/Symptom Suggested Resolution
Audio quality is poor, specifically,
you hear an echo while using a
handset or static, sudden silences
(gaps in speech), clipped or garbled
speech, etc.
When using the Speakerphone, the
other party reports hearing an echo;
your reception is fine
Various potential network problems
may be causing the problem.
Contact your LAN Administrator
with as complete a description of
the problem as possible.
Room acoustics may be causing
problems. Clear the area around
the telephone’s speaker; if this
does not resolve the problem, use
the handset.
Phone does not ring If the "Ringer Off" feature is
programmed on a feature button,
that feature is engaged if the button
is darkened or shaded; reactivate
the ringer by pressing that feature
button.
Set your ringer volume to a higher
level using the Up/Down Volume
keys.
From another phone, place a call to
your extension to test the above
suggested solutions.
Speakerphone does not operate Ask your System Administrator if
your Speakerphone has been
disabled.
Screen seems to drift or waver a bit
after first being “powered up”
The 4630 display screen takes an
hour or so to completely warm up;
and images may be distorted until it
is fully operational.
Wait an hour or so after first
powering up the phone, then
Calibrate the screen as described
in Chapter 6, 4630 IP Telephone
Options.
A feature does not work as indicated
in the User Guide
See the section that follows titled
Troubleshooting 4630 Applications.
Issue 1 December 2001
9-4
Page 89

Troubleshooting 4630 Applications
Troubleshooting 4630 Applications
Problem/Symptom Suggested Resolution
GENERAL:
A feature does not work as indicated
in the User Guide, or does not work
as it had previously worked
PHONE APPLICATION: Please review the pre vious section,
SPEED DIAL APPLICATION:
You cannot dial out using any Speed
Dial button
CALL LOG APPLICATION:
You cannot dial out after selecting a
call log entry
Verify the procedure and retry.
Check below to troubleshoot the
specific application with which you
are working.
Ensure that any options have not
been changed. Contact your
Telephone System Administrator if
these actions do not produce the
desired result.
Basic Troubleshooting.
Check that all call appearances
(incoming/outgoing lines) are not
already in use. If all lines are in use,
wait until a line is available to make
your call.
Only entries with a status of
“Outgoing” can be called. You
cannot call entries with a status of
“Answered” or “Unanswered”
directly without first editing and
saving them.
DIRECTORY APPLICATION:
No Directory tab displays with the
other application tabs at the bottom
of every screen
Check that all call appearances
(incoming/outgoing lines) are not
already in use. If all lines are in use,
wait until a line is available to make
your call.
Your telephone is not administered
to support the Directory application.
If you believe it should be available,
contact your System Administrator.
Issue 1 December 2001
9-5
Page 90

Problem/Symptom Suggested Resolution
DIRECTORY APPLICATION:
Directory application tab displays,
but you receive an “Attempting to
connect to server” message when
you select the tab
Directory query produces an error
message
WEB ACCESS APPLICATION:
No Web tab displays with the other
application tabs at the bottom of
every screen
The telephone cannot connect to
the Directory server administered
for it. Contact your System
Administrator to ensure the server
address has been properly
administered.
Verify the spelling of your query. If
correct, there is a problem with
either the 4630’ s administration, the
server, or the network. Contact y our
System Administrator, providing the
exact text of the error message you
received.
Your telephone is not administered
to support the Web Access
application. If you believe it should
be available, contact your System
Administrator.
Issue 1 December 2001
9-6
Page 91

Resetting and Power Cycling the IP Telephone
Resetting and Power Cycling the IP
Te le p ho n e
Reset your IP Telephone when other Troubleshootin g suggestions do not correct
the problem or after being advised to do so by your System Administrator.
!
CAUTION:
Use a Power Cycle only with the approval of your System Administrator and
only when a reset does not resolve the problem . Power-cycling may cause
stored information such as the telephone options and preference settings
and Speed Dial lists to be lost.
Resetting your phone
This basic reset procedure should resolve most problems.
1. Press Mute.
2. Using the dial pad, press the following keys in sequence: 73738#
The display shows the messa ge "Reset values? * = no # = yes."
3. Choose one of the following:
If you want to Then
Reset the phone without
resetting any assigned
values
Reset the phone and any
previously assigned
(programmed) values
(Use this option only if your
phone has programmed,
static values)
Press * (asterisk).
A confirmation tone sounds
and the display prompts
"Restart phone? * = no # =
yes."
Press # (the pound key).
The display shows the
message "Resetting values"
while your IP Telephone
resets its programmed
values, such as the IP
address, to its default
values, and re-establishes
the connection to the server.
The display then prompts
"Restart phone? * = no # =
yes."
4. Press # to restart the phone or * to terminate the restart and restore the
phone to its previous state .
Issue 1 December 2001
9-7
Page 92

NOTE:
Any reset/restart of your phone may tak e a few minutes.
Power cycling the phone
Use the power cycle with your System Administrator’ s approv al only if the basic or
programmed reset procedure cannot be performed or does not correct the
problem:
1. Unplug the phone and plug it back in.
The phone connection is re-established.
2. If power-cycling does not correct the problem, your System Administrator
can perform a more severe power cycle routine by unplugging both the
phone and the Ethernet cables.
!
WARNING:
Because the type of power cycle mentioned in Step 2 involves
reprogramming certain values, it should only be performed by your
Telephone System Administrator.
Issue 1 December 2001
9-8
 Loading...