

Page 1

9608/9611G and 9621/9641G H.323
Deskphone Call Center User Guide
16-603613
Issue 1
May 2011
Page 2

©
2011 Avaya Inc.
All Rights Reserved.
Notice
While reasonable efforts have been made to ensure that the
information in this document is complete and accurate at the time of
printing, Avaya assumes no liability for any errors. Avaya reserves the
right to make changes and corrections to the information in this
document without the obligation to notify any person or organization of
such changes.
Note
Using a cell, mobile, or GSM phone, or a two-way radio in close
proximity to an Avaya IP telephone might cause interference.
Documentation disclaimer
“Documentation” means information published by Avaya in varying
mediums which may include product information, operating instructions
and performance specifications that Avaya generally makes available
to users of its products. Documentation does not include marketing
materials. Avaya shall not be responsible for any modifications,
additions, or deletions to the original published version of
documentation unless such modifications, additions, or deletions were
performed by Avaya. End User agrees to indemnify and hold harmless
Avaya, Avaya's agents, servants and employees against all claims,
lawsuits, demands and judgments arising out of, or in connection with,
subsequent modifications, additions or deletions to this documentation,
to the extent made by End User.
Link disclaimer
Avaya is not responsible for the contents or reliability of any linked Web
sites referenced within this site or documentation provided by Avaya.
Avaya is not responsible for the accuracy of any information, statement
or content provided on these sites and does not necessarily endorse
the products, services, or information described or offered within them.
Avaya does not guarantee that these links will work all the time and has
no control over the availability of the linked pages.
Warranty
Avaya provides a limited warranty on its Hardware and Software
(“Product(s)”). Refer to your sales agreement to establish the terms of
the limited warranty. In addition, Avaya’s standard warranty language,
as well as information regarding support for this Product while under
warranty is available to Avaya customers and other parties through the
Avaya Support Web site:
you acquired the Product(s) from an authorized Avaya reseller outside
of the United States and Canada, the warranty is provided to you by
said Avaya reseller and not by Avaya.
Licenses
THE SOFTWARE LICENSE TERMS AVAILABLE ON THE AVAYA
WEBSITE,
APPLICABLE TO ANYONE WHO DOWNLOADS, USES AND/OR
INSTALLS AVAYA SOFTWARE, PURCHASED FROM AVAYA INC.,
ANY AVAYA AFFILIATE, OR AN AUTHORIZED AVAYA RESELLER
(AS APPLICABLE) UNDER A COMMERCIAL AGREEMENT WITH
AVAYA OR AN AUTHORIZED AVAYA RESELLER. UNLESS
OTHERWISE AGREED TO BY AVAYA IN WRITING, AVAYA DOES
NOT EXTEND THIS LICENSE IF THE SOFTWARE WAS OBTAINED
FROM ANYONE OTHER THAN A V A Y A, AN A V A Y A AFFILIA TE OR AN
AVAYA AUTHORIZED RESELLER; AVAYA RESERVES THE RIGHT
TO TAKE LEGAL ACTION AGAINST YOU AND ANYONE ELSE
USING OR SELLING THE SOFTWARE WITHOUT A LICENSE. BY
INSTALLING, DOWNLOADING OR USING THE SOFTWARE, OR
AUTHORIZING OTHERS TO DO SO, YOU, ON BEHALF OF
YOURSELF AND THE ENTITY FOR WHOM YOU ARE INSTALLING,
DOWNLOADING OR USING THE SOFTWARE (HEREINAFTER
REFERRED TO INTERCHANGEABL Y AS “YOU” AND “END USER”),
AGREE TO THESE TERMS AND CONDITIONS AND CREATE A
HTTP://SUPPORT.AVAYA.COM/LICENSEINFO/ ARE
http://support.avaya.com. Please note that if
BINDING CONTRACT BETWEEN YOU AND AVAYA INC. OR THE
APPLICABLE AVAYA AFFILIATE (“AVAYA”).
Avaya grants End User a license within the scope of the license types
described below. The applicable number of licenses and units of
capacity for which the license is granted will be one (1), unless a
different number of licenses or units of capacity is specified in the
Documentation or other materials available to End User. “Designated
Processor” means a single stand-alone computing device. “Server”
means a Designated Processor that hosts a software application to be
accessed by multiple users. “Software” means the computer programs
in object code, originally licensed by Avaya and ultimately utilized by
End User, whether as stand-alone Products or pre-installed on
Hardware. “Hardware” means the standard hardware originally sold by
Avaya and ultimately utilized by End User.
License types
Designated System(s) License (DS). End User may install and use
each copy of the Software on only one Designated Processor, unless
a different number of Designated Processors is indicated in the
Documentation or other materials available to End User. Avaya may
require the Designated Processor(s) to be identified by type, serial
number, feature key, location or other specific designation, or to be
provided by End User to Avaya through electronic means established
by Avaya specifically for this purpose.
Shrinkwrap License (SR). Customer may install and use the Software
in accordance with the terms and conditions of the applicable license
agreements, such as “shrinkwrap” or “clickthrough” license
accompanying or applicable to the Software (“Shrinkwrap License”).
(see “Third-party Components” for more information).
Copyright
Except where expressly stated otherwise, no use should be made of
materials on this site, the Documentation, Software, or Hardware
provided by Avaya. All content on this site, the documentation and the
Product provided by Avaya including the selection, arrangement and
design of the content is owned either by Avaya or its licensors and is
protected by copyright and other intellectual property laws including the
sui generis rights relating to the protection of databases. You may not
modify, copy, reproduce, republish, upload, post, transmit or distribute
in any way any content, in whole or in part, including any code and
software unless expressly authorized by Avaya. Unauthorized
reproduction, transmission, dissemination, storage, and or use without
the express written consent of Avaya can be a criminal, as well as a
civil offense under the applicable law.
Third-party components
Certain software programs or portions thereof included in the Product
may contain software distributed under third party agreements (“Third
Party Components”), which may contain terms that expand or limit
rights to use certain portions of the Product (“Third Party Terms”).
Information regarding distributed Linux OS source code (for those
Products that have distributed the Linux OS source code), and
identifying the copyright holders of the Third Party Components and the
Third Party Terms that apply to them is available on the Avaya Support
Web site:
Preventing Toll Fraud
“T oll fraud” is the unauthorized use of your telecommunications system
by an unauthorized party (for example, a person who is not a corporate
employee, agent, subcontractor, or is not working on your company's
behalf). Be aware that there can be a risk of Toll Fraud associated with
your system and that, if Toll Fraud occurs, it can result in substantial
additional charges for your telecommunications services.
Avaya Toll Fraud Intervention
If you suspect that you are being victimized by T oll Fraud and you need
technical assistance or support, call Technical Service Center Toll
Fraud Intervention Hotline at +1-800-643-2353 for the United States
and Canada. For additional support telephone numbers, see the Avaya
Support Web site:
http://support.avaya.com/Copyright.
http://support.avaya.com. Suspected security
2 9608/9611G and 9621/9641G H.323 Deskphone Call Center User Guide May 2011
Comments? [email protected]
Page 3

vulnerabilities with Avaya products should be reported to Avaya by
sending mail to: [email protected].
Trademarks
All non-Avaya trademarks are the property of their respective owners,
and “Linux” is a registered trademark of Linus Torvalds.
Downloading Documentation
For the most current versions of Documentation, see the Avaya
Support Web site:
Contact Avaya Support
Avaya provides a telephone number for you to use to report problems
or to ask questions about your Product. The support telephone number
is 1-800-242-2121 in the United States. For additional support
telephone numbers, see the Avaya W eb site: http://support.avaya.com.
Federal Communications Commission (FCC) Interference
Statement
This equipment has been tested and found to comply with the limits for
a Class B digital device, pursuant to Part 15 of the FCC rules. These
limits are designed to provide reasonable protection against harmful
interference in a residential installation. This equipment generates,
uses, and can radiate radio frequency energy and, if not installed and
used in accordance with the instructions, may cause harmful
interference to radio communications. However, there is no guarantee
that interference will not occur in a particular installation. If this
equipment does cause harmful interference to radio or television
reception, which can be determined by turning the equipment off and
on, the user is encouraged to try to correct the interference by one of
the following measures:
• Reorient or relocate the receiving antenna.
• Increase the separation between the equipment and receiver.
• Connect the equipment into an outlet on a circuit different from
that to which the receiver is connected.
• Consult the dealer or an experienced radio/TV technician for
help.
This device complies with Part 15 of the FCC Rules. Operation is
subject to the following two conditions: (1) This device may not cause
harmful interference, and (2) this device must accept any interference
received, including interference that may cause undesired operation.
FCC Caution: Any changes or modifications not expressly approved by
the party responsible for compliance could void the user's authority to
operate this equipment.
FCC/Industry Canada Radiation Exposure Statement
This device complies with the FCC's and Industry Canada's RF
radiation exposure limits set forth for the general population
(uncontrolled environment) and must not be co-located or operated in
conjunction with any other antenna or transmitter.
Warning
The handset receiver contains magnetic devices that can attract small
metallic objects. Care should be taken to avoid personal injury.
Power over Ethernet (PoE) warning
This equipment must be connected to PoE networks without routing to
the outside plant.
http://support.avaya.com.
9608/9611G and 9621/9641G H.323 Deskphone Call Center User Guide May 2011 3
Page 4

4 9608/9611G and 9621/9641G H.323 Deskphone Call Center User Guide May 2011
Comments? [email protected]
Page 5

Contents
Chapter 1: Introduction to the Avaya Call Center Agent Deskphones...........................
9621G and 9641G buttons and features...................................................................................................
Scrolling and navigation using touch-based deskphone models..............................................................
9608 and 9611G buttons and features......................................................................................................
Scrolling and navigation using button-based deskphone models.............................................................
Call Center work icons..............................................................................................................................
Status alerting...........................................................................................................................................
Using the on-screen keyboard..................................................................................................................
Setting the Quick Touch panel..................................................................................................................
Adjustable telephone stand.......................................................................................................................
Chapter 2: About logging in/out and signing in/out as an agent...................................
Logging in to your telephone extension....................................................................................................
Logging out of your telephone extension..................................................................................................
Signing in as an agent..............................................................................................................................
Signing off as an agent.............................................................................................................................
Chapter 3: About the Home Screen and Avaya Menu Options.......................................
Home screen and Avaya menu.................................................................................................................
The Home Screen (touch-based phones).................................................................................................
Avaya Menu (button-based phones).........................................................................................................
Chapter 4: Setting Up and Using Recorded Agent Greetings........................................
About Agent Greetings..............................................................................................................................
About call center greeting types................................................................................................................
Adding an agent greeting using a touch-based deskphone......................................................................
Changing the greeting type using a touch-based deskphone..........................................................
Adding an agent greeting using a button-based deskphone.....................................................................
Changing existing greetings......................................................................................................................
Chapter 5: About Call Center Deskphone Functionality.................................................
Using Agent Deskphones in the Call Center.............................................................................................
About status line information and icons....................................................................................................
About the agent information line...............................................................................................................
About agent work modes and states.........................................................................................................
Changing agent work mode or status...............................................................................................
Chapter 6: Answering a Call..............................................................................................
Answering a call if you are signed in as an agent.....................................................................................
Chapter 7: About Features.................................................................................................
Accessing the Features menu...................................................................................................................
Accessing features using a button module...............................................................................................
Index.....................................................................................................................................
7
7
10
11
14
14
16
17
18
18
19
19
20
20
21
23
23
23
24
27
27
27
29
30
31
32
35
35
35
36
36
37
39
39
41
41
42
43
9608/9611G and 9621/9641G H.323 Deskphone Call Center User Guide May 2011 5
Page 6

6 9608/9611G and 9621/9641G H.323 Deskphone Call Center User Guide May 2011
Page 7

Chapter 1: Introduction to the Avaya Call
Center Agent Deskphones
The 9608, 961 1G, 9621G, and 9641G are multiline deskphones that can be used in a standard
office environment or with Avaya Call Center 3.0 (or later releases). The 9621G and 9641G
are touch–based phones with a color display . The 9611G and 9608 are button-based phones;
the 961 1G has a color display while the 9608 has a monochrome display . The 9641, 9608, and
961 1G models allow a dual headset adapter to be connected so that two persons can listen in
on calls, and one or more button modules can also be attached to these models to extend call
appearances and/or features. Additionally, the 9641G has an optional faceplate designed
specifically for using this model in a call center. For an agent, these deskphones put convenient
features and capabilities at your fingertips, including a Phone Screen to view and manage your
calls, and icons indicating agent status, call states, feature status, queued calls, and missed
calls. Designated feature buttons let you change your agent work mode or status with one
touch.
Not all functions and features described in this user guide may be available on your deskphone
or applicable to the way your call center operates. If you find that a function or feature is not
available, contact your supervisor or system administrator.
Important:
This guide describes only the features and operation of the 9608, 961 1G, 9621G, and 9641G
deskphones in a call center environment. Standard office deskphone operation and features
like placing calls, reviewing call history, conference calling, and modifying deskphone
options and settings for your personal preferences are covered in separate user guides.
Depending on which deskphone model you have see either the Avaya one-X™ Deskphone
H.323 9608/9611G User Guide (Document Number 16–603593) or the Avaya one-X
Deskphone H.323 9621G/9641G User Guide (Document Number 16–603594), available on
the Avaya Support Site http://avaya.support.com.
9621G and 9641G buttons and features
™
9608/9611G and 9621/9641G H.323 Deskphone Call Center User Guide May 2011 7
Page 8
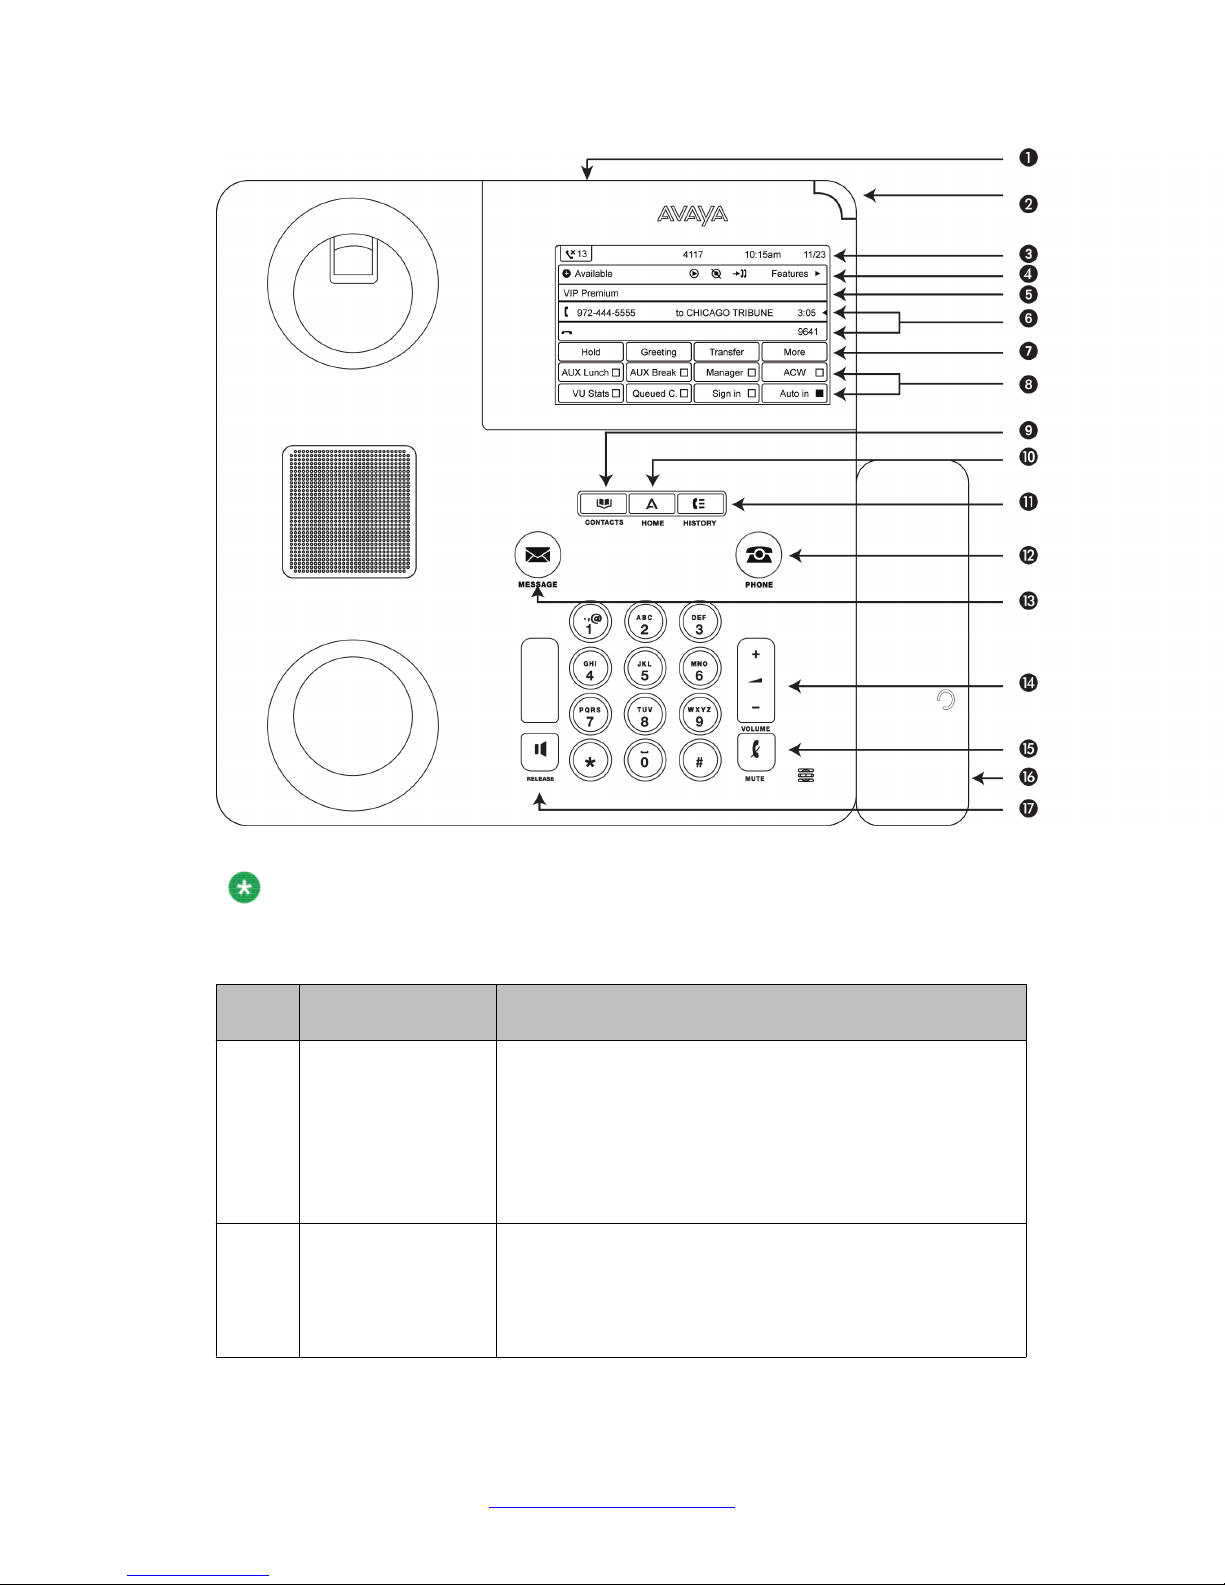
Introduction to the Avaya Call Center Agent Deskphones
Note:
The illustration above depicts a 9641G model with a call center faceplate and a dual headset
adapter replacing the handset as the only voice option.
Callout
No.
1 USB Port If administered, you can insert a USB device (also called a
2 Message Waiting
Indicator
Name Description
memory stick, thumb drive, or flash drive) to transfer
contacts between your phone and an external data source.
You can also recharge some battery-powered devices by
using a USB cable to connect the device to your
deskphone's USB port. Note: the 9621G does not have a
USB port.
An illuminated red light in the upper-right corner of your
phone indicates you have messages waiting. This light
flashes when you receive an incoming call. If Visual Alerting
is enabled, this light flashes when you receive an incoming
call. In addition to the Message Waiting Indicator, the
8 9608/9611G and 9621/9641G H.323 Deskphone Call Center User Guide May 2011
Comments? [email protected]
Page 9
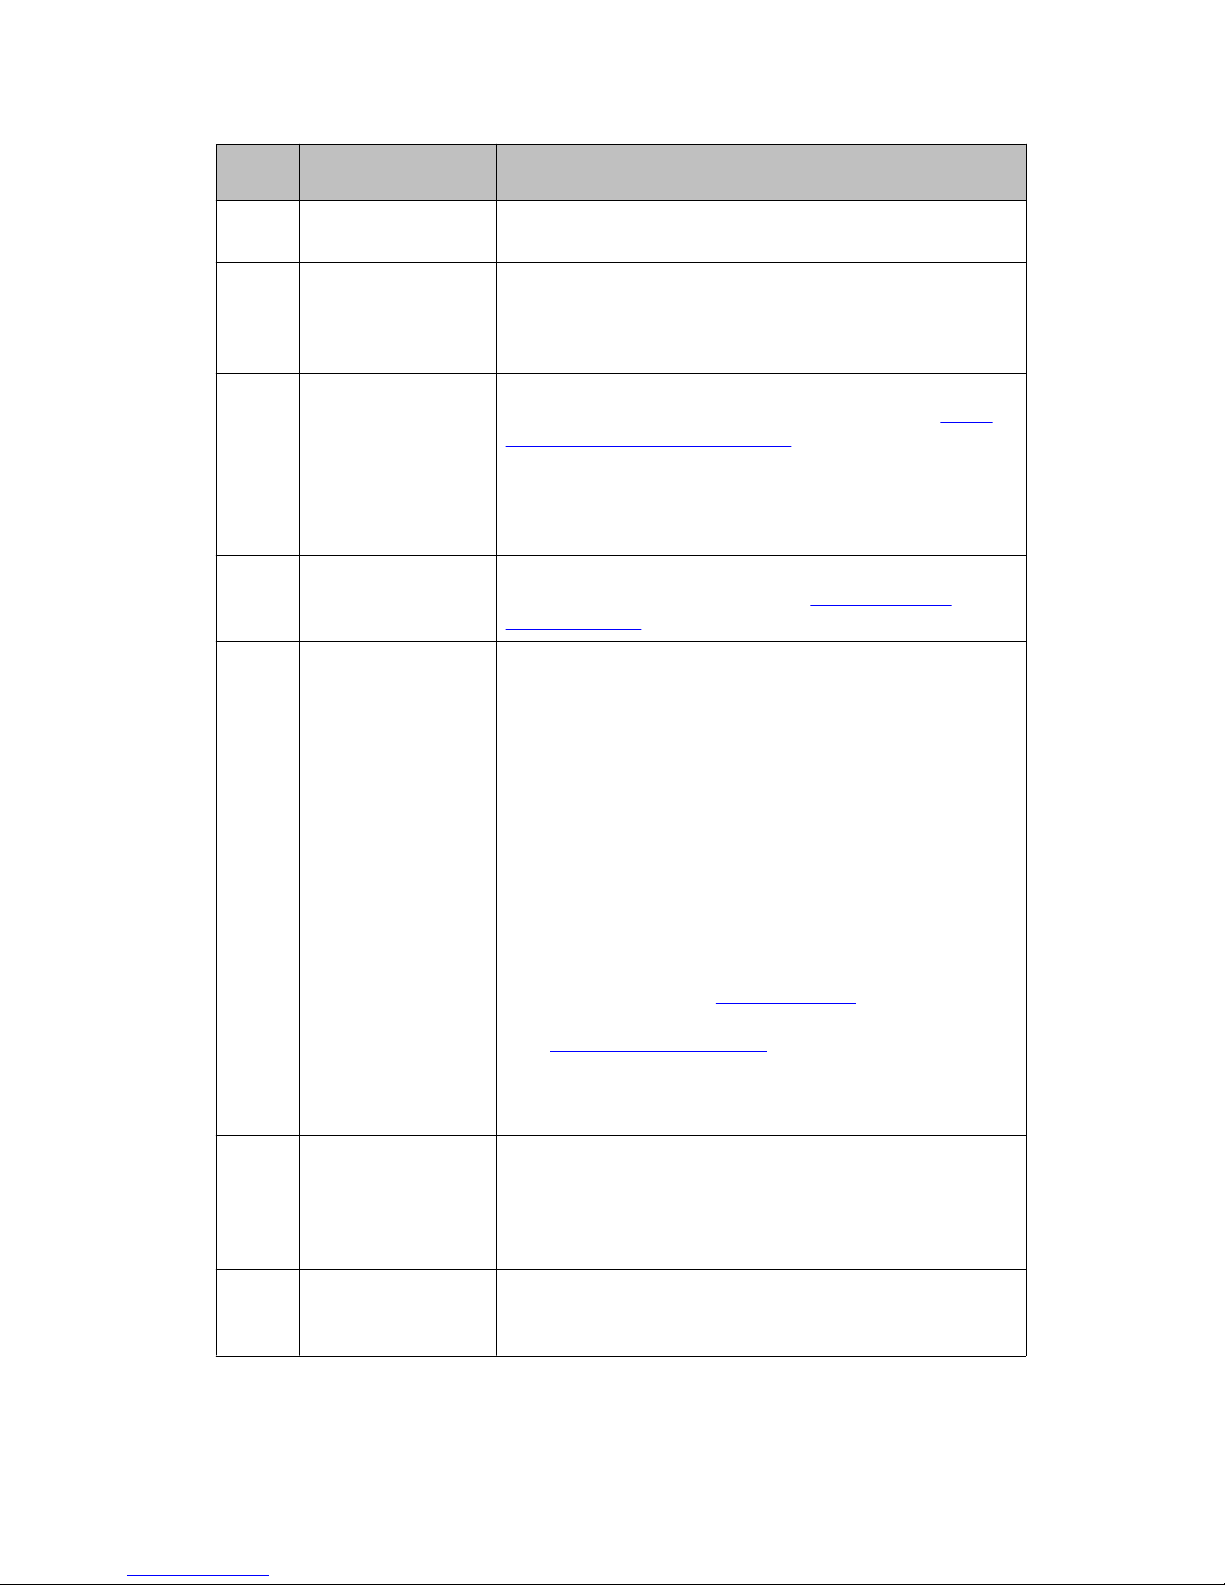
9621G and 9641G buttons and features
Callout
Name Description
No.
3 Phone Display: Top
Line
4 Phone Display:
Agent Status Line
5 Phone Display:
Agent Information
Line
6 Call Appearance/
Feature lines
Message button is also illuminated when you have voice
mail messages waiting.
When the phone is idle, the top line shows the missed call
icon with the number of calls missed, your primary
extension, and the time and date. System messages also
display on the top line.
When you are logged in as an agent, the Status line (below
the top line) shows your current work status; see About
status line information and icons on page 35 for
information. Touch Features on the right side of the Status
line to move from the Phone screen to the Features list.
T ouch Calls on the right side of the Status line to move from
the Features list to the Phone screen.
The Agent Information line below the Status line shows
information about a call state; see About the agent
information line on page 36 for information.
When the Phone screen is active, the lines below the Status
line show call appearances — for example, information
about an active call, an idle line, or which line has a held or
conference call. Touch a call/line appearance to make or
answer a call. When the Features list is active, the lines
show the call center features you use to do your job, such
as VU Stats, After Call work, etc. Touch a labeled feature
button to enable or disable that feature. The feature buttons
provide access to the A vaya call center system features that
have been administered for your extension. The green LED
next to each feature button indicates if the feature is
currently on or off. If the green light is on, the feature is on.
The feature buttons provide the same features that are
available in the features menu. For more information about
the features menu, see Features Menu. If you have the
Quick Touch panel activated at the bottom of the display
(see Setting the Quick Touch on page 18panel), only two
or three call appearance lines show on the display,
depending on how many lines you indicate for the Quick
Touch panel.
7 Softkeys The bottom line of the display shows the softkeys applicable
8 Quick Touch Panel If administered, the Quick Touch panel provides additional
9608/9611G and 9621/9641G H.323 Deskphone Call Center User Guide May 2011 9
to the information displayed on the screen. Softkey labels
appear directly on the softkeys, which you touch to take the
indicated action. The labels and the actions vary depending
on the current context.
buttons for features and work modes. Note that when
displayed, the Quick T ouch panel may overlay some of your
Page 10

Introduction to the Avaya Call Center Agent Deskphones
Callout
No.
9 Contacts Press the Contacts button to view the entries in your
10 Home Press the Home button to access the Home screen. The
11 History Press the History button to view a list of your outgoing,
12 Phone Button Press the Phone button to return to the Phone screen from
13 Message Press the Message button to connect directly to your
14 Volume Press + or - on the Volume button while active on the
Name Description
call appearance lines. See Setting the Quick Touch
Panel on page 18 for more information.
contact list.
Home screen provides options that allow you to set up or
modify call center greetings, customize phone settings,
configure call logging, select the display language, view
network information, and log the telephone extension out.
incoming, and missed calls. The icon on the History button
is illuminated when you have missed calls. DAC calls (direct
agent calls) will show on your log but call center calls will
not.
the Features list or another application.
voicemail system.
headset to adjust the volume. To adjust the volume of the
ringer, press + or - on the volume button while the headset
is inactive.
15 Mute Press the Mute button to mute a call in progress. To take a
call off mute, press Mute again.
16 Dual Headset
Adapter
17 Release Press the Release button to end a call.
When attached, this adjunct device allows two people with
headsets to listen to the same call.
Scrolling and navigation using touch-based deskphone
models
If you have a 9621G or 9641G deskphone model, use the on-screen up and down arrow
buttons on the right middle of the screen to scroll up or down through a list.
To switch between call appearances and features, touch Features or Calls in the upper right
of the display, depending on which screen is currently displayed.
10 9608/9611G and 9621/9641G H.323 Deskphone Call Center User Guide May 2011
Comments? [email protected]
Page 11
On touch-based phones, when a list item has a “Details” button (a blue right-facing arrow),
touching it shows more information about the item. For example, touching the line of a greeting
produces a detail screen showing the details on file for that greeting.
You act on objects such as a line or softkey by touching them or by touching the on-screen
softkey labels. Softkey labels change according to the context. For example, touch a greeting
number then touch the Play softkey to listen to that greeting, or touch a line on the Calls screen
to answer an incoming call, to go off hook to place a call, or to resume a call on hold.
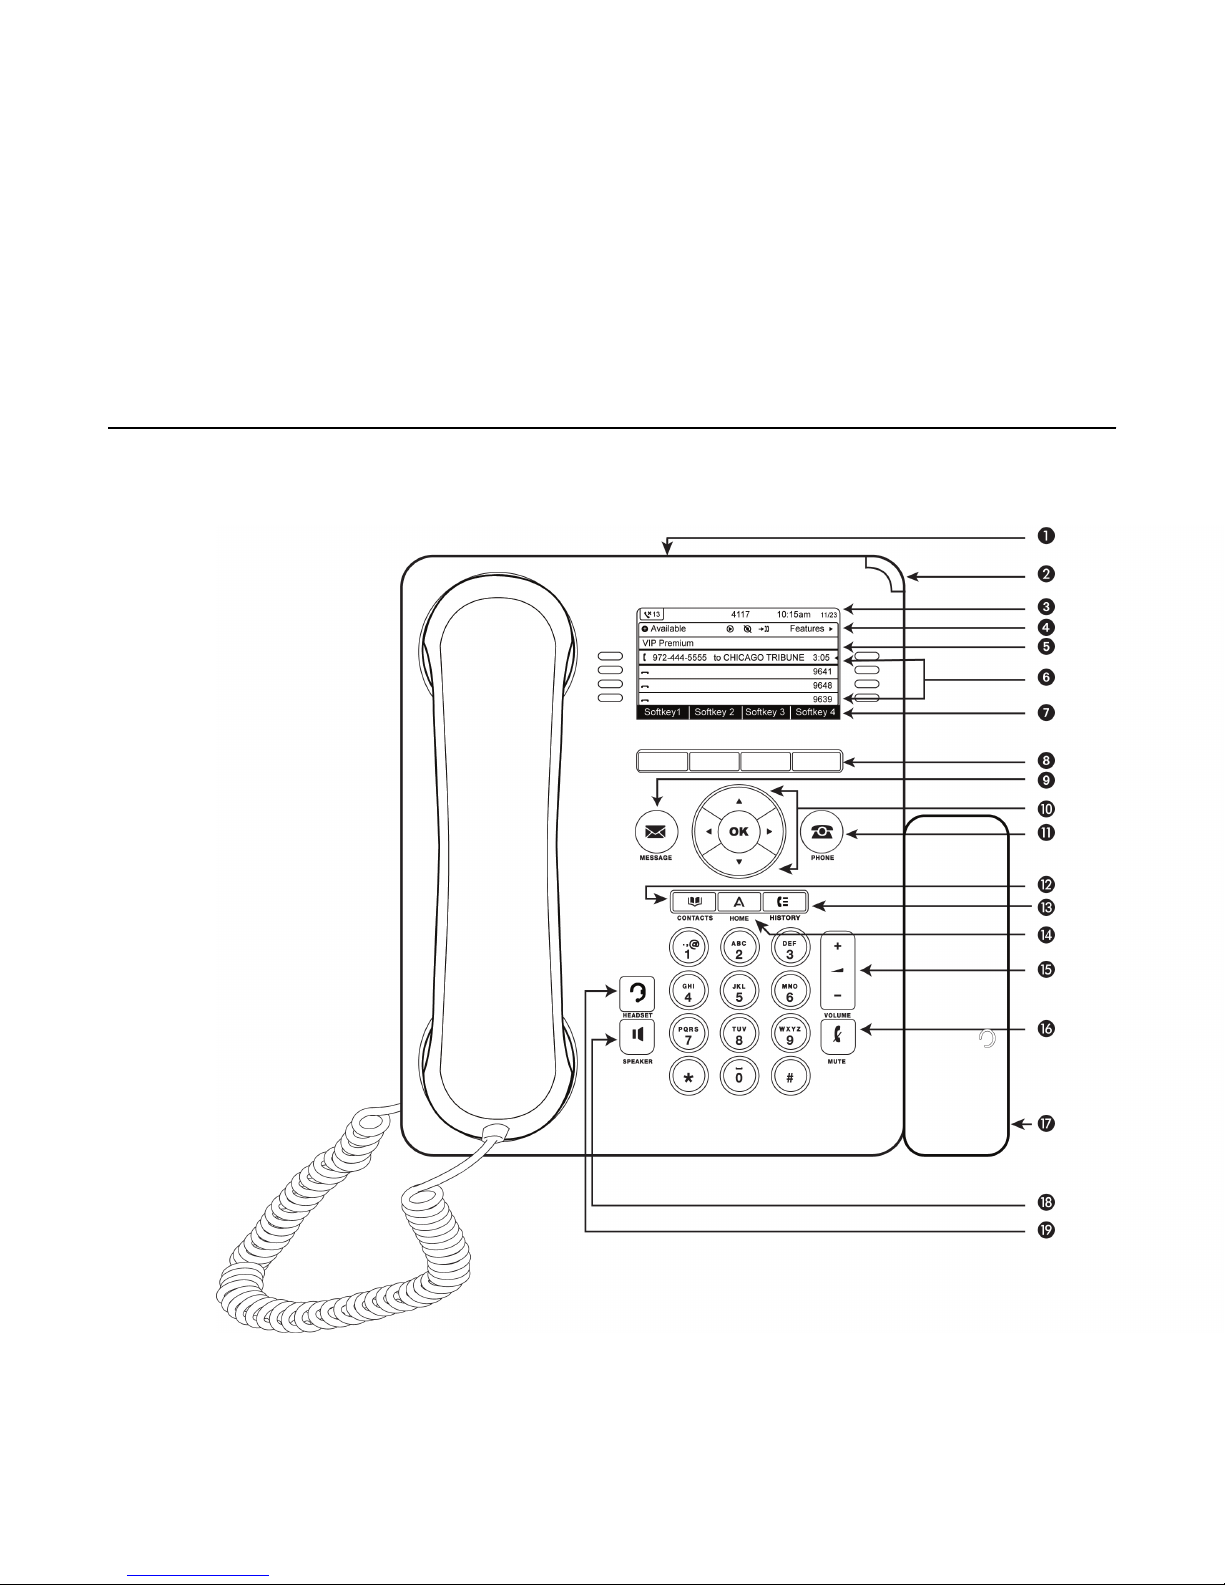
9608 and 9611G buttons and features
9608 and 9611G buttons and features
9608/9611G and 9621/9641G H.323 Deskphone Call Center User Guide May 2011 11
Page 12
Introduction to the Avaya Call Center Agent Deskphones
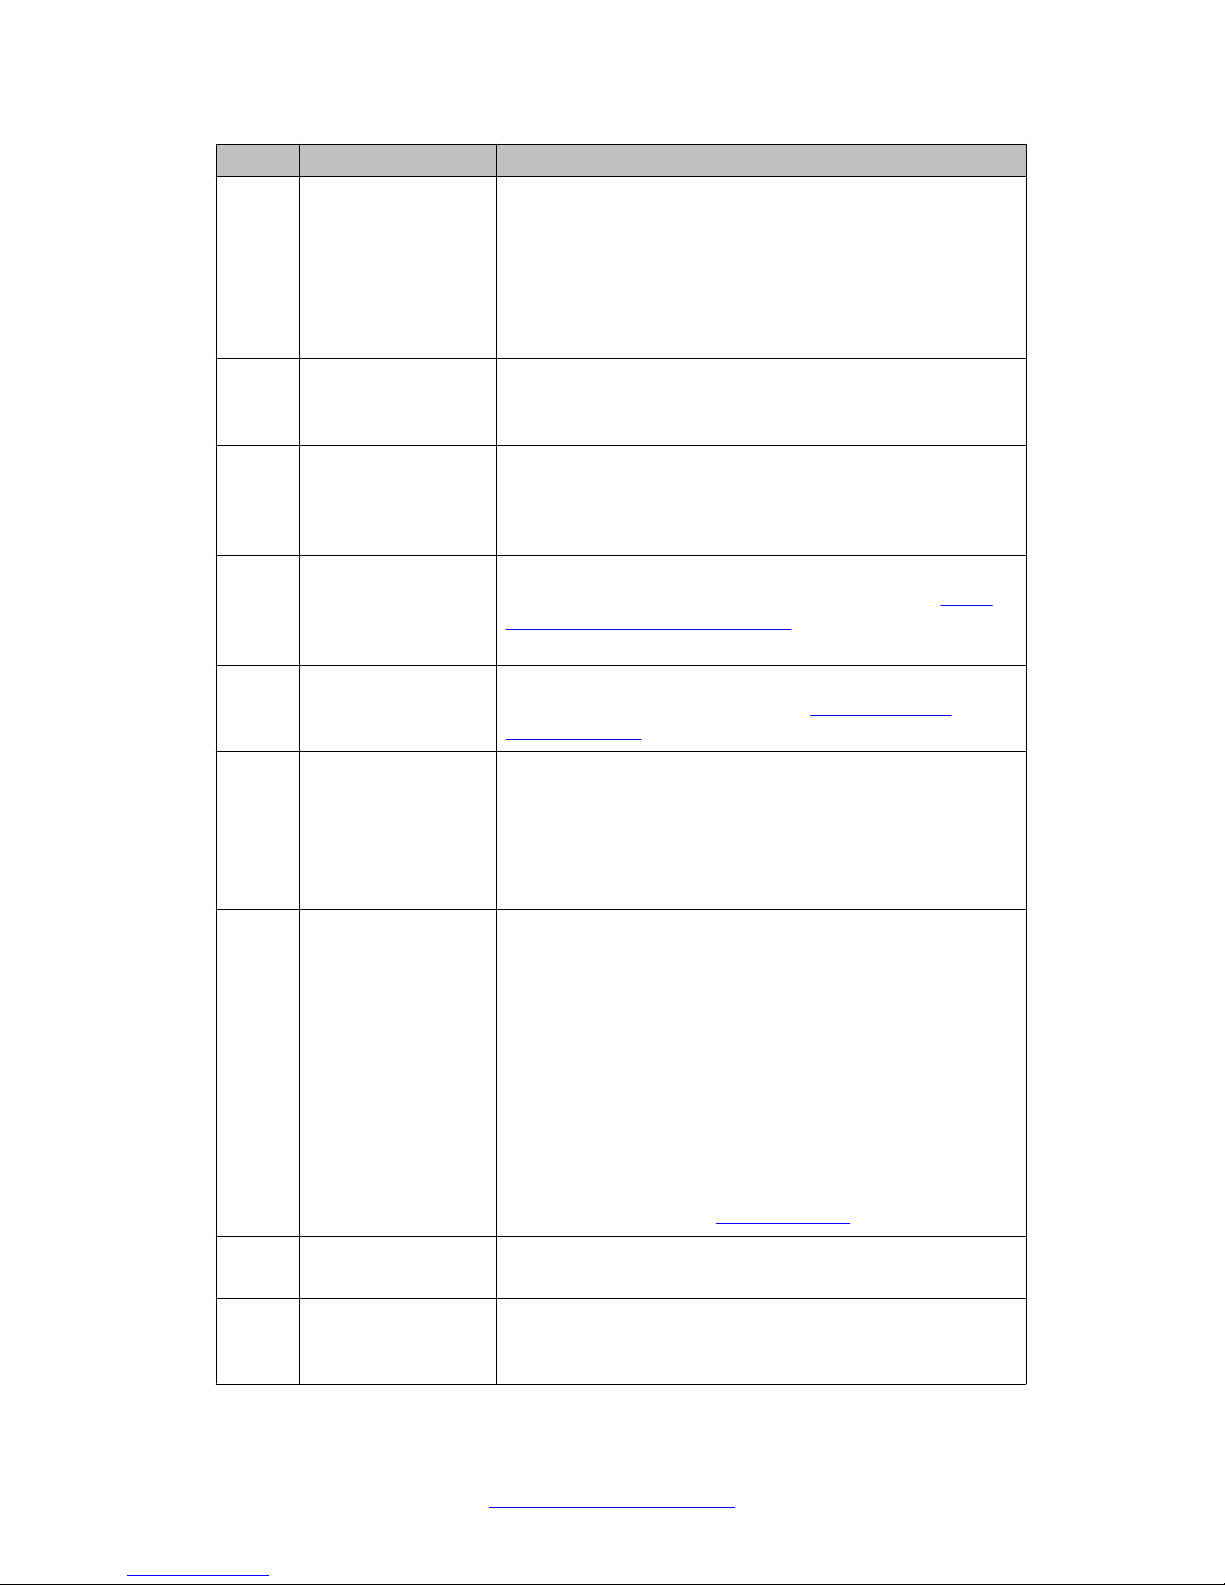
Name Description
1 USB Port Available on 9611G deskphones only. If administered, you
can insert a USB device (also called a memory stick, thumb
drive, or flash drive) to transfer contacts between your
phone and an external data source. You can also recharge
some battery-powered devices by using a USB cable to
connect the device to your deskphone's USB port. Note: the
9608 does not have a USB port.
2 Message Waiting
Indicator
3 Phone Display: Top
Line
4 Phone Display:
Agent Status line
5 Phone Display:
Agent Information
line
6 Phone Display: Call
Appearances/
Feature Lines
6 Call/Line
Appearance Buttons
or Feature Buttons
An illuminated red light in the upper-right corner of your
phone indicates you have messages waiting. This light
flashes when you receive an incoming call.
When the phone is idle, the top line shows the missed call
icon with the number of calls missed, your primary
extension, and the time and date. System messages also
display on the top line.
When you are logged in as an agent, the Status line (below
the top line) shows your current work status; see About
status line information and icons on page 35 for
information.
The Agent Information line below the Status line shows
information about a call state; see About the agent
information line on page 36 for information.
When the Phone screen is active, the Call Appearance lines
show call information — for example, information about an
active call, an idle line, or which line has a held or
conference call. When the Features list is active, the display
area shows the call center features you use to do your job,
such as VU Stats, After Call work, etc.
There are up to 8 buttons along the right and left sides of
the display screen that can be programmed as either call
appearance/line buttons or feature buttons. Press a call
appearance/line button to make or answer a call or to
resume a call on hold. Press a labeled feature button to
activate or deactivate that feature. The feature buttons
provide access to the A vaya call center system features that
have been administered for your extension. The green LED
next to each feature button indicates if the feature is
currently on or off. If the green light is on, the feature is on.
The feature buttons provide the same features that are
available in the Features menu. For more information about
the features menu, see Features Menu.
7 Phone Display:
Softkey Labels
8 Softkeys Press the softkeys to select the actions indicated by the
12 9608/9611G and 9621/9641G H.323 Deskphone Call Center User Guide May 2011
The bottom line of the display shows the softkey labels
applicable to the information displayed on the screen.
softkey labels above them. The labels and the actions vary
depending on the current context.
Comments? [email protected]
Page 13
9608 and 9611G buttons and features
Name Description
9 Message Press the Message button to connect directly to your
voicemail system.
10 Navigation Arrows A scroll bar appears on the right side of the display area
when there is more information than can be displayed.
Press the up or down navigation arrows on the scroll bar to
scroll through lists in that direction. Press the right or left
navigation arrows to navigate between different views of an
application, to move between the Calls screen and the
Features menu, to move the cursor during text input, or to
move between option choices, for example, when working
in a greetings screen.
10 OK Press the OK button for a shortcut to an action. For
example, when you select a call log entry , pressing OK dials
the number.
11 Calls/Features Press Calls to move from the Features list to the Phone
screen. Press Features to move from the Phone screen to
the Features list. Pressing the Phone button on the phone
also displays the Phone screen.
12 Contacts Press the Contacts button to view the entries in your
contact list.
13 History Press the History button to view a list of your outgoing,
incoming, and missed calls. The icon on the History button
is illuminated when you have missed calls. DAC calls (direct
agent calls) will show on your log but call center calls will
not.
14 Home Press the Home button to access the Avaya menu. The
Avaya Menu screen provides options that allow you to set
up or modify call center greetings, customize phone
settings, configure call history logging, select the display
language, view network information, and log the telephone
extension out.
15 Volume Press + or - on the Volume button while active on the
headset to adjust the volume. To adjust the volume of the
ringer, press + or - on the volume button while the headset
is inactive.
16 Mute Press the Mute button to mute a call in progress. To take a
call off mute, press Mute again.
17 Dual Headset
Adapter
An adjunct device vailable on the 9608 deskphone to allow
more than one person to listen in on a call.
18 Speaker On/Off Illuminates when the Speakerphone is active.
19 Headset On/Off Illuminates when a Headset is active.
9608/9611G and 9621/9641G H.323 Deskphone Call Center User Guide May 2011 13
Page 14
Introduction to the Avaya Call Center Agent Deskphones
Scrolling and navigation using button-based deskphone
models
If you have a 9608 and 961 1G model deskphone a navigation icon appears in the phone display
to indicate that you can scroll to more options or information. When navigating through the
options and features on your telephone display , use the navigation arrows to scroll and the line
buttons or the OK button to select lines or options. The navigation arrows are located on the
phone itself surrounding the OK button.
When you scroll to a line on the display , that line is selected, as indicated by highlighting. The
softkey labels change according to the options available for the selected line. The OK button
is a shortcut for the default action. For example, when you select a greeting number, pressing
the OK button displays details about that greeting. Y ou can also select a line or feature without
scrolling by pressing the corresponding line button.
Call Center work icons
The icons in the following table indicate the state of a call, navigation choices, or the status of
a call center feature or activity. Depending on the action they depict, these icons can appear
on the agent status line, the Information line, a call appearance line, or in the general
application area of the display screen. If you have a monochrome deskphone (9608), the icons
show in black and white. If you have a color display deskphone (9611G, 9621G, or 9641G),
the icons display in color and/or gray shades.
Note:
For information about the agent work status icons, see About status line information and
icons. on page 35
Icon
Description
Missed call(s); a call was not answered or was
forwarded to voice mail. If there is more than one missed
call, the total number of missed calls displays next to this
icon.
This call appearance line is idle and not in use.
An incoming call is alerting on this call appearance
line.
14 9608/9611G and 9621/9641G H.323 Deskphone Call Center User Guide May 2011
A call is active on this line.
A call is on Hold on this line.
Comments? [email protected]
Page 15
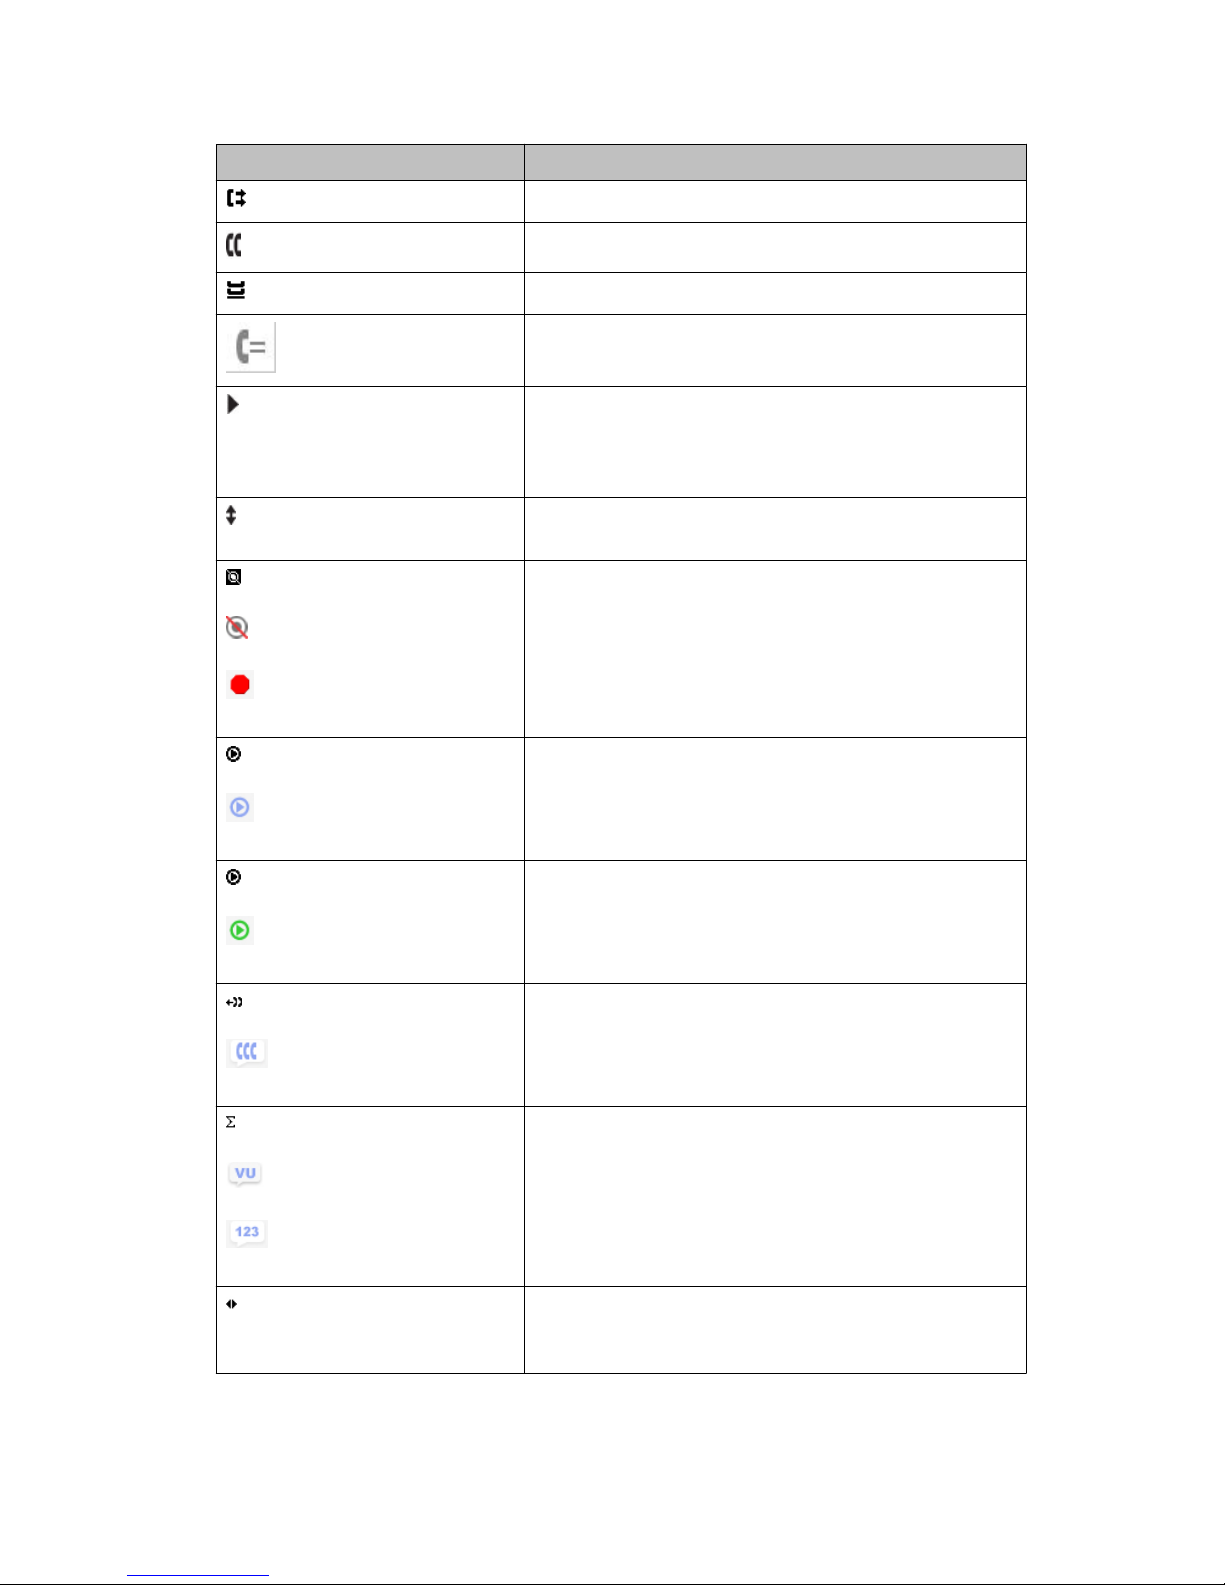
Icon Description
Your calls are being forwarded.
A Conference is active on this line.
A Conference is on hold on this line.
A Bridged Call is in progress on this line.
If the Phone screen is displayed, use the right
arrowhead icon to access the Features screen. If the
Features screen is displayed, use the right arrowhead
icon to access your calls on the Phone screen.
Scroll up or down when there is more information than
can display in the application area.
Indicates a Forced Logout Override is in effect.
(9608)
Depending on how your call center system is
administered, a system-generated "forced" logout might
(9611G)
occur, for example, based on the time of day; this icon
indicates an override is active.
Call Center work icons
(9621G, 9641G))
(9608)
(9611G, 9621G, 9641G)
(9608)
(9611G, 9621G, 9641G)
(9608, 9611G)
(9621G, 9641G)
(9608)
(9611G)
(9621G, 9641G)
Notifies you that your Agent Greeting has been recorded
and is available.
Notifies you that your Agent Greeting is being played.
Indicates the Queued Calls feature is active and you
have calls in the queue.
Indicates that the VU Stats feature is active.
(9608, 9611G)
9608/9611G and 9621/9641G H.323 Deskphone Call Center User Guide May 2011 15
Use the feature arrows to move left or right between
feature settings, for example, to select a Greeting type
when establishing an Agent Greeting.
Page 16
Introduction to the Avaya Call Center Agent Deskphones
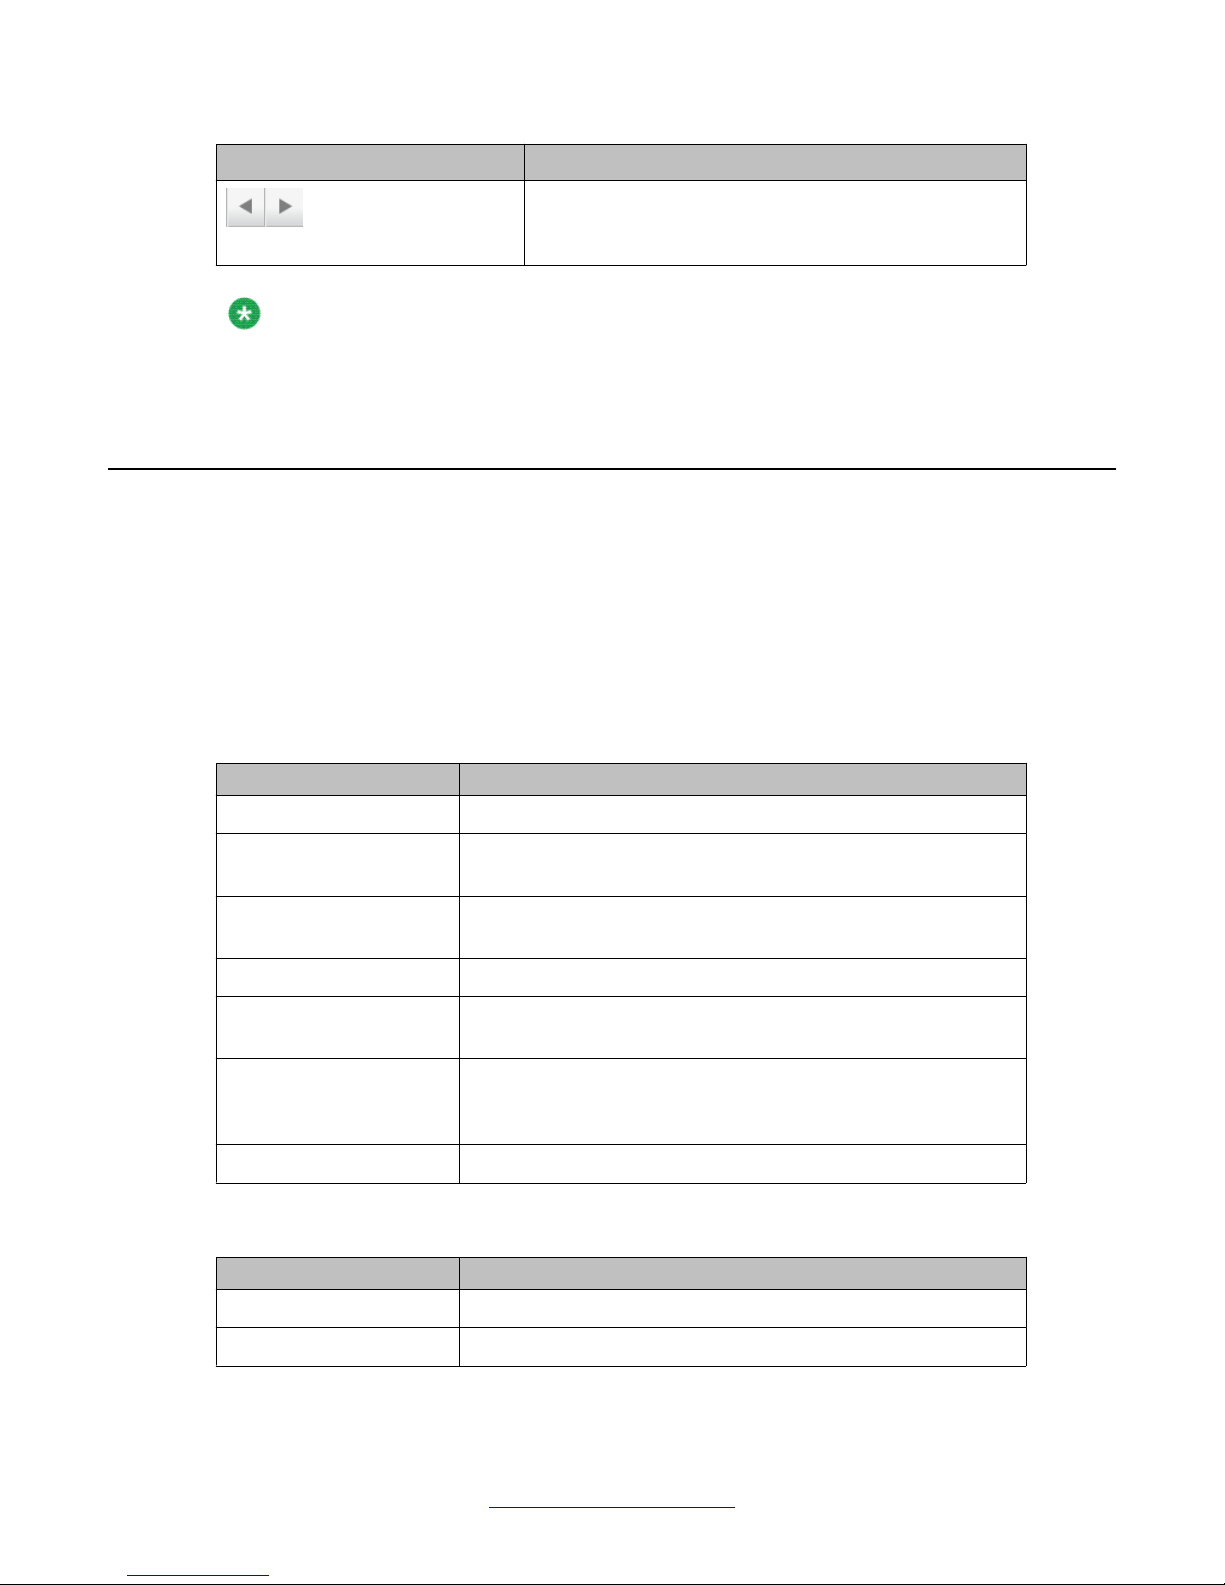
Icon Description
(9621G, 9641G)
Note:
For a few screens (for example, the Contacts main screen), these icons may not be
displayed to allow room for other controls and indicators that apply to that specific screen.
Status alerting
For button-based agent deskphone models (9608 and 9611G) each call appearance button
and feature button has two LEDs, one green and one red, to indicate the status of the call
appearance or feature. For touch-based agent deskphones (9621G and 9641G), the entire
line is shown in a color to indicate call status, and for the Feature list, a colored square icon
indicates the status. The status is identified by whether the LED/color highlight is on, off, or
blinking (LEDs only) as described in the following tables.
Table 1: Call appearance button LEDs/line colors
LED or Line Color Description
Steady green LED Call appearance or Feature is active (9608, 9611G only).
Steady blue highlight on
line
Steady yellow highlight on
line
Slow blinking green LED Call appearance is ringing (9608, 9611G only)
Steady green highlight on
line
Steady red LED Call appearance is selected and will be used when you go off-
Off Call appearance is available.
Call appearance is active (9621G and 9641G only).
Call appearance is active (9611G only)
Call appearance is ringing (9621G and 9641G only)
hook. It remains steady red while you use the call appearance
(9608, 9611G only).
Table 2: Feature button LEDs
LED/Square Icon Description
Steady green Feature is active.
Off Feature is not active.
16 9608/9611G and 9621/9641G H.323 Deskphone Call Center User Guide May 2011
Comments? [email protected]
Page 17
Using the on-screen keyboard
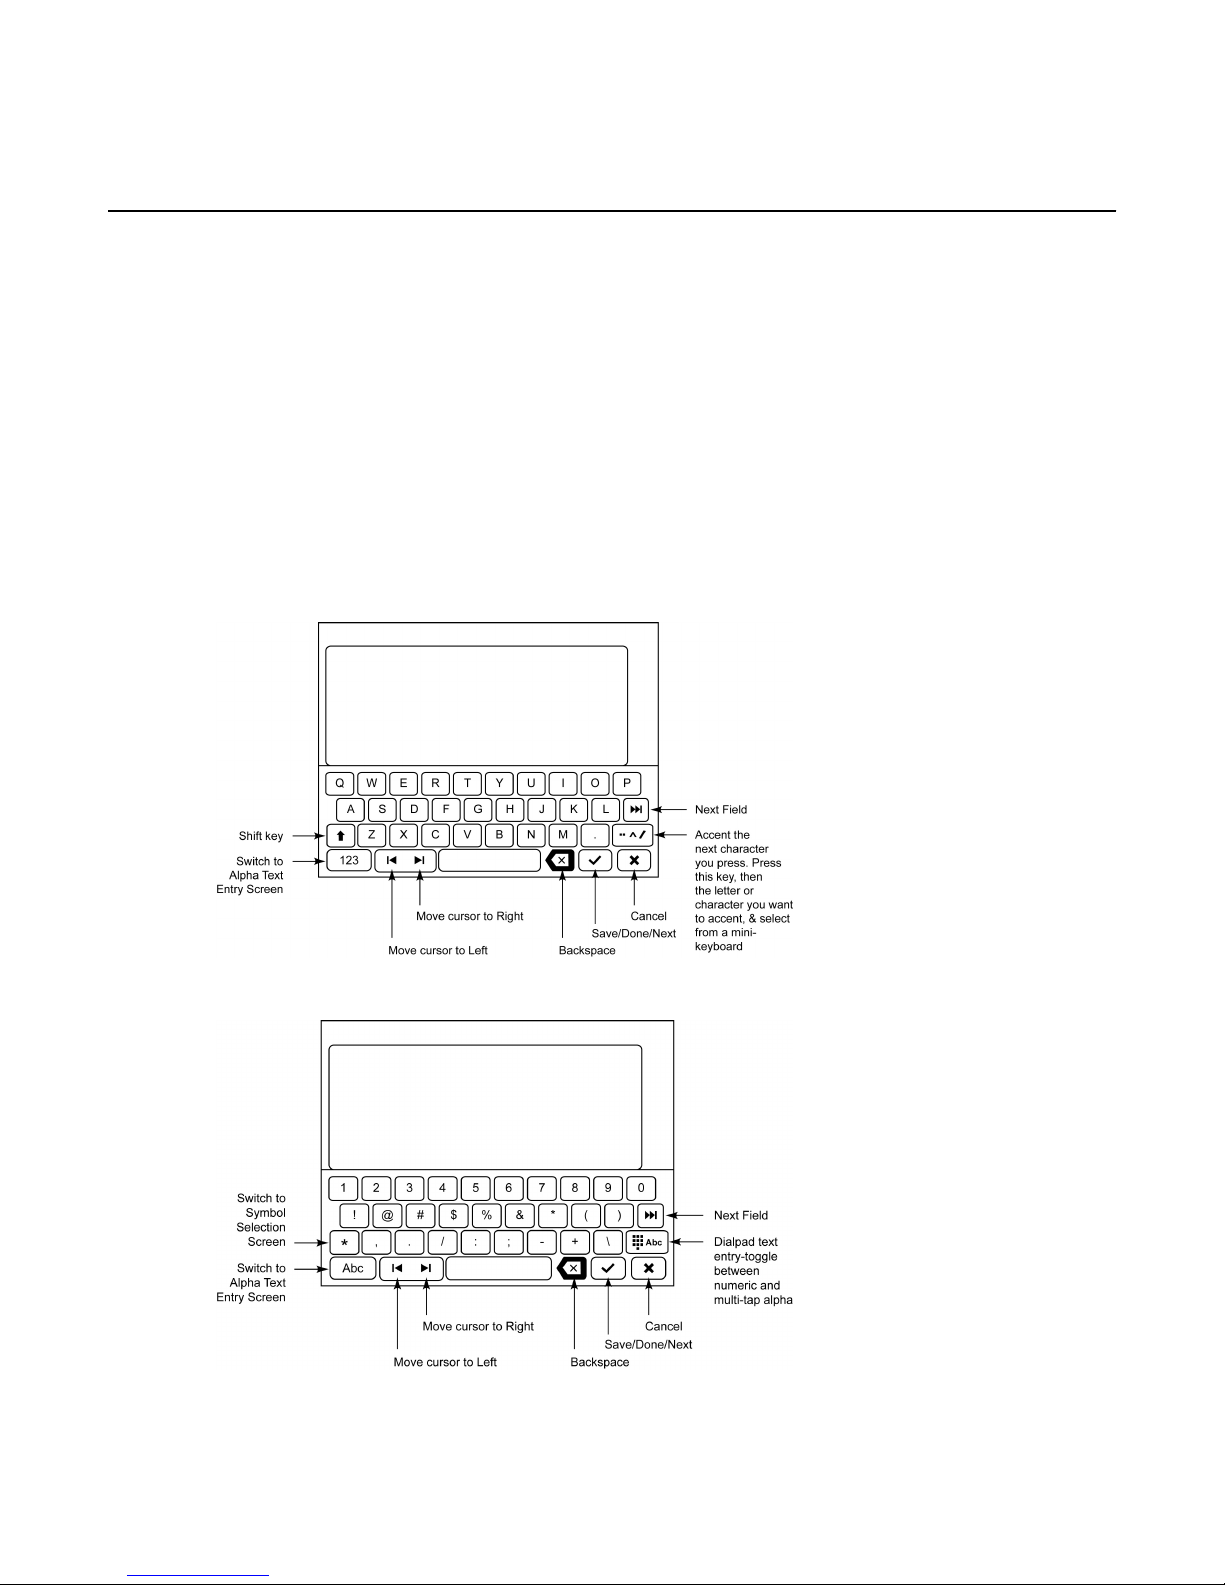
If you have a touch-based deskphone (9621G or 9641G), an on-screen keyboard appears
when you add or edit Greeting labels or to allow you to enter a full or partial telephone number
string to match when you are setting up a VDN-type greeting. You can switch between
alphabetic and numeric keyboards, and you can use the keyboard to enter symbols and
accented letters.
Use the diagrams that follow to add or change text or numbers. Touching and holding the
Backspace or cursor right/left buttons down produces an “automatic repeat” action that stops
when you lift your finger or stylus. Remember to touch the “Done” check mark when you finish
editing. Use the “Cancel” X to discard any edits and return to the previous screen, retaining
the original information.
Figure 1: Text Entry Keyboard
Using the on-screen keyboard
Figure 2: Numeric Entry Keyboard
9608/9611G and 9621/9641G H.323 Deskphone Call Center User Guide May 2011 17
Page 18

Introduction to the Avaya Call Center Agent Deskphones
Setting the Quick Touch panel
About this task
When you use the Quick Touch panel, the Calls screen provides access to more of your work
states, features, at a glance. When a feature is on/active, the associated button is highlighted
in green. You can set the Quick Touch Panel to display one (the default) or two lines, or set it
not to display at all. Note that displaying the Quick Touch panel can limit your call appearances
display to two or three lines at a time.
Procedure
1. Press Home.
2. Touch Settings.
3. Touch Options & Settings.
4. Touch Screen and Sound Options.
5. On the Screen and Sounds menu, touch Show Quick Touch Panel to change the
setting from 1 Line to 2 Lines, from 2 Lines to No, or from No to 1 Line.
Note:
When you are signed in as an agent, the default number of lines on the Quick
Touch panel is two lines; when you are not signed in as an agent, the default
number of lines is one.
6. Touch Save to save the setting or Cancel to return to the menu without saving.
Adjustable telephone stand
The deskphone stand attaches to the phone in one of two ways so that you can place the
phone in a relatively flat position or at an angle. Before you attach the stand, take note of your
deskphone's Model Number label, attached to the deskphone's underside.
The 9621G and 9641G models also let you adjust the display screen to different angles for
optimal viewing. To move the display screen, gently pull from the top of the display screen
towards you. As you pull the screen towards you, you may hear a clicking sound. Each of these
four clicks is a locking position for the display screen. Gently push on the display screen to
adjust the screen to a previous position. Gently pull the display screen all the way towards you
and push to return it to its original flat position.
18 9608/9611G and 9621/9641G H.323 Deskphone Call Center User Guide May 2011
Comments? [email protected]
Page 19

Chapter 2: About logging in/out and signing
in/out as an agent
Call center agents have two types of logins:
• one for the telephone extension itself (login), and
• one that identifies you as a call center agent (sign in.)
To sign in as an agent, you must first log in to the deskphone itself unless the deskphone is
already logged in. To log out from your telephone extension, you must first sign off as an agent.
If you share a deskphone with another agent, you may be instructed to just sign in and sign
off as an agent, leaving the deskphone logged in at all times to preserve call center information.
There are different ways to sign in and out as an agent, depending on how your call center
system is administered:
• using a Feature Access Code (FAC) provided by your supervisor, or
• using a Feature button labeled Sign In or Sign Out,
• using a Feature button labeled Login or Logout,
• using another Feature Button, softkey, autodial button, or abbreviated dial button
designated by the system administrator for agent sign in and sign out.
Your supervisor will explain the proper agent sign in/out procedures for your call center
environment, which may not be the same as the procedures provided in this chapter. In all
cases, follow the Agent sign in/out procedures your supervisor provides.
Logging in to your telephone extension
About this task
Before you can sign in as an agent, you must log in to your telephone extension if you have
not already done so. Log in from the initial screen when it prompts you for your extension.
Procedure
1. Enter your extension.
2. If you have a touch-based deskphone, touch Enter. If you have a button-based
deskphone, press Enter or OK.
9608/9611G and 9621/9641G H.323 Deskphone Call Center User Guide May 2011 19
Page 20

About logging in/out and signing in/out as an agent
3. Enter your password.
4. If you have a touch-based deskphone, touch Enter. If you have a button-based
deskphone, press Enter or OK.
Logging out of your telephone extension
Procedure
1. Press Home.
2. If you have a touch-based deskphone, select Settings. If you have a button-based
deskphone, proceed to the next step.
3. If you have a touch-based deskphone, touch Log Out. If you have a button-based
deskphone, scroll down and select Log Out.
4. If you have a touch-based deskphone, touch Log Out to confirm. If you have a
button-based deskphone, press Log Out or OK, then press Log Out to confirm.
Signing in as an agent
About this task
If the telephone prompts you for your Extension, you must first log in to the deskphone before
your enter your call center agent identification.
Important:
The agent sign in procedure that follows uses a Feature Access Code (FAC). Depending on
how your call center operation is administered, this particular sign in procedure may not apply .
For example, some call center systems may be administered for Agent sign in using a Feature
Button or softkey. In this case, sign in to the Call Center as you have been trained to do by
your supervisor. Also note that when signing in using other than a Feature Access Code (F AC),
the Agent Greetings functionality will not be available to you, nor will your Agent ID display on
the Top line.
20 9608/9611G and 9621/9641G H.323 Deskphone Call Center User Guide May 2011
Comments? [email protected]
Page 21

Procedure
1. Enter your Sign In Feature Access Code using the dialpad.
2. Enter your Agent ID using the dialpad.
3. Enter your Agent Password, if applicable.
Result
The top display line now shows your Agent ID and the Agent Status line shows your current
status (Aux Work, etc.). The headset LED is illuminated and the Aux Work feature button is
shown as active/on.
Signing off as an agent
About this task
Depending on how your call center system is administered and how busy the call center is,
the system may override your attempt to sign out. In this case, follow the procedures specified
by your supervisor.
Signing off as an agent
Important:
The agent sign off procedure that follows uses a Feature Access Code (FAC). Depending on
how your call center operation is administered, this particular sign off procedure may not apply .
For example, some call center systems may be administered for Agent sign of f using a Feature
Button or softkey . In this case, sign of f from the Call Center as you have been trained to do by
your supervisor.
Procedure
Enter your Sign Off Feature Access Code (FAC) using the dialpad.
Result
The top display line no longer shows your Agent ID and the Agent Status line shows your
current status as Logged/Signed Out.
9608/9611G and 9621/9641G H.323 Deskphone Call Center User Guide May 2011 21
Page 22

About logging in/out and signing in/out as an agent
22 9608/9611G and 9621/9641G H.323 Deskphone Call Center User Guide May 2011
Comments? [email protected]
Page 23

Chapter 3: About the Home Screen and
Avaya Menu Options
Home screen and Avaya menu
If you have a 9621G or 9641G Deskphone, the Home screen contains icons that provide
access to adjust and customize options and settings for your deskphone, record and update
your Greetings, get information about your phone and network settings, and log out. But if you
have a 9608 or 9611G Deskphone, the Avaya Menu provides access to those features
instead.
Note:
The options, settings, and sub-menus that appear on the Home Screen and Avaya Menu
depend on how your extension was administered. Some items described here may not be
available. Other options, settings, and sub-menus may be available which are not
specifically call center-related. For example, you may also see Browser, Directory, VPN
Settings, and/or Guest Login on the Avaya Menu or Home screen. For those standard
features, see either the Avaya one-X™ Deskphone H.323 9608/9611G User Guide
(Document Number 16–603593) and the Avaya one-X™ Deskphone H.323 9621G/9641G
User Guide (Document Number 16–603594), available on the Avaya Support Site http://
avaya.support.com.
The Home Screen (touch-based phones)
Press the Home button under the display to access the Home screen. The Home screen has
a black background with icons that let you access your telephone's options and settings to
adjust or customize them or view your phone and network settings. From the Home screen,
you can also set up and update your Agent Greetings, access Web-based applications to get
information about the time and weather in different parts of the world, display a calculator , use
Favorite speed dial buttons, and log out your telephone extension. The exact content of your
9608/9611G and 9621/9641G H.323 Deskphone Call Center User Guide May 2011 23
Page 24

About the Home Screen and Avaya Menu Options
Home screen depends on how your administrator has set up your system but it normally
includes the following standard Avaya features:
• Greetings lets you add up to six Agent Greetings, edit those greetings, ad remove
greetings you no longer need.
• Settings displays a menu that lets you change your call settings, the language in which
information displays on the screen, the way your screen looks and sounds, log into a
phone as a guest, clean your screen, log your phone out, and more.
• World Clock shows the time and weather in different parts of the world. This is an Avaya
application that may not be available on Call Center deskphones.
• Weather shows the current weather conditions in an area you choose and a short-term
weather forecast. This is an Avaya application that may not be available on Call Center
deskphones.
• Calculator provides a simple, four-function calculator. This is an Avaya application that
may not be available on Call Center deskphones. This is an Avaya application that may
not be available on Call Center deskphones.
• My Pictures lets you use pictures from a USB device as your telephone screensaver.
Your administrator may make other Web-based applications available to you, for example, a
corporate directory or support page. To invoke any application you see on the Home screen,
touch its icon. Depending on how many Avaya applications, contact favorites, and/or Webbased applications are administered, you may have a second page for your Home screen.
Touch the scroll bar on the right side of the Home screen to view the next page.
Note:
The Settings options that appear depend on how your extension was administered. Some
options described in this guide may not be available to you. This guide describes the
Greetings option only; for other features and applications that may be on your touch-based
deskphone, see the Avaya one-X Deskphone H.323 9621G/9641G User Guide (Document
number 16–603594).
Avaya Menu (button-based phones)
Y ou can use the Avaya Menu to adjust and customize options and settings for your telephone,
add or update Agent Greetings, access additional Web-based applications, get information
about your phone and network settings, and log out. Except for
which is described in this guide, the menu choices you see are explained in detail in the Avaya
one-X™ Deskphone H.323 9608/9611G User Guide (Document Number 16–603593). When
you press the Home button, you see the following menu, depending on how your administrator
has set up your system and on the applications available to you:
Agent Greetings on page 27
24 9608/9611G and 9621/9641G H.323 Deskphone Call Center User Guide May 2011
Comments? [email protected]
Page 25
Avaya Menu (button-based phones)
Note:
The menus and sub-menus that appear depend on how your extension was administered.
Some options or sub-menus may not be available. Contact your System Administrator if you
have any questions.
Sample Menu — if no WML Applications
administered
> Greetings
> Phone Settings
> Guest Login
> Log Out
> About Avaya one-X
> My Pictures
Sample Menu — with WML Applications
administered
> Greetings
> Options & Settings
> Browser
> Network Information
> VPN Settings
> Log Out
> About Avaya one-X
> My Pictures
Note:
On menus without WML applications, select Phone Settings to access the standard
telephone Options & Settings menu.
Greetings let you add an Agent Greeting, change an existing Agent Greeting, or remove an
Agent Greeting you no longer need.
Options & Settings or Phone Settings, if your menu is customized, lets you change your call
settings, personalize button labels, adjust brightness and contrast, select your ringing pattern,
and more.
The Browser menu contains additional web-based applications. (If no web applications are
available for your phone, the Browser menu is not shown.)
Network Information shows a summary of network-related parameters for your phone and
provides diagnostic information. If your administrator has set up Web applications, this option
appears under the Phone Settings menu instead.
About A vaya one-X provides the release number of your telephone software; our administrator
may ask you to check the release number to troubleshoot problems.
Guest Login lets you log in to a phone to which you are not normally assigned, to access your
own contacts and features.
Log Out lets you sign off the phone, to protect your settings or to allow another user to log in.
Log out does not display unless your phone (and any associated button module) is in an idle
state.
My Pictures lets you use pictures from a USB device as your telephone screensaver, but is
only available on those deskphones with a USB interface.
9608/9611G and 9621/9641G H.323 Deskphone Call Center User Guide May 2011 25
Page 26

About the Home Screen and Avaya Menu Options
26 9608/9611G and 9621/9641G H.323 Deskphone Call Center User Guide May 2011
Comments? [email protected]
Page 27

Chapter 4: Setting Up and Using Recorded
Agent Greetings
About Agent Greetings
Agents can record their own “greetings” which can then be played back to callers. For example,
“Thanks for calling Informaxx. My name is Sally; How can I help you?”. Up to six greetings can
be set up, each ten seconds in length. Recorded greetings consist of a Label (or greeting
name), the recorded greeting itself, and an optional Type. The agent initiates Manual type
greetings while VDN greeting types play automatically by recognizing the number the caller
has dialed and playing the corresponding greeting. This can be important when the agent
handles incoming calls for different departments or companies. When you set up a VDN
greeting, you must specify which numbers the system should look for to play the correct VDN
greeting. Y ou can also specify where in the phone number the system should look. The pattern
of numbers the system looks for is called a “match string” and the place to look is called a
“match criterion.” See
set up a greeting, see
if you have a 9641G or 9621G model or Adding an agent greeting using a button-based
deskphone on page 31 if you have a 9608 or 9611G model.
About call center greeting types on page 27 for more information. To
Adding an agent greeting using a touch-based deskphone on page 29
Note:
Supervisors or administrators can prevent agents from setting up their own greetings. If you
don't see a Greetings option on the A vaya Menu (9608, 961 1G) or the Home screen (9621G,
9641G), your administrator has denied you permission to establish and modify your own
greetings.
About call center greeting types
When you add a greeting, a default type of “Auto Answer” is automatically assigned and will
play that greeting for all incoming calls. There are other greeting types that may apply to your
operation depending on how your call center is set up and how many different customers are
assigned to an agent. Your supervisor will assist you in setting up your greetings or might set
them up for you. Because different greeting types have different match criteria options (and
associated text strings), use the chart below to determine with your supervisor the type of
greeting and associated information best suited to each type of greeting you record.
9608/9611G and 9621/9641G H.323 Deskphone Call Center User Guide May 2011 27
Page 28
Setting Up and Using Recorded Agent Greetings
Table 3: Greeting Types and Match Criteria
Greeting Type Description Match Criteria Options
Manual Agent must select the Greetings softkey
to play the message for each incoming
call.
Auto answer
(default)
The greeting plays automatically for an
incoming call or automatically for any
incoming call that does not fully match
other options.
VDN Vector Directory Number . Call vectors are
commands that route incoming calls to
the call center and determine how these
calls are processed. The VDN permits
each call to be treated uniquely according
to a number of factors, including the
number the caller dials, the number the
caller calls from, the number of calls in
queue, and the time of day and/or day of
the week.
None
Play for all incoming calls
(default) or play for incoming
calls when agent status is
Available.
Anywhere (default) — the
data matches any set of
characters in the incoming
call-associated display
message; On left — the data
matches the characters on
the left end of the incoming
call-associated display
message; On right — the
data matches the characters
on the right end of the
incoming call-associated
display message; Exact
match — the data matches
exactly the entire incoming
call-associated display
message .
ANI Automatic Number Identification. This
type makes vector routing decisions
based on the caller identity and the
number of the originating line.
Prompted Digits Used in call centers with automatic
recordings for that “prompt” the caller to
enter “digits” to reach a specific area of
assistance in the call center. For example,
Anywhere (default) — the
data matches any set of
characters in the incoming
call-associated display
message; On left — the data
matches the characters on
the left end of the incoming
call-associated display
message; On right — the
data matches the characters
on the right end of the
incoming call-associated
display message; Exact
match —the data matches
exactly the entire incoming
call-associated display
message.
Anywhere (default) — the
data matches any set of
characters in the incoming
call-associated display
28 9608/9611G and 9621/9641G H.323 Deskphone Call Center User Guide May 2011
Comments? [email protected]
Page 29
Adding an agent greeting using a touch-based deskphone
Greeting Type Description Match Criteria Options
a caller might be prompted to press “1” to
reach Sales or “2” for Billing inquiries.
message; On left — the data
matches the characters on
the left end of the incoming
call-associated display
message; On right — The
data matches the characters
on the right end of the
incoming call-associated
display message; Exact
match — the data matches
exactly the entire incoming
call-associated display
message.
Adding an agent greeting using a touch-based deskphone
About this task
You can add up to six different greetings and set them to play automatically or manually when
you have an incoming call.
Note:
Use this procedure if you have a touch-based deskphone (9621G or 9641G). If you have a
button-based deskphone (9608 or 9611G), see Adding an agent greeting using a button-
based deskphone on page 31.
Procedure
1. Press Home.
2. Touch Greetings.
3. Touch New or touch any numbered blank greeting line.
The on-screen keyboard displays to allow entry of the new greeting's label.
4. Use the on-screen keyboard to enter a label that distinguishes this greeting from
other greetings you may already have or will be adding. The Greeting Label can be
up to 15 characters. See
entering text using the keyboard.
5. Touch the Next keyboard button.
6. Touch Record.
7. Speak your greeting (up to ten seconds) into the headset, then press Stop.
8. Choose one of the following options:
• To listen to the greeting, touch Play.
Using the on-screen keyboard on page 17 for details on
9608/9611G and 9621/9641G H.323 Deskphone Call Center User Guide May 2011 29
Page 30

Setting Up and Using Recorded Agent Greetings
• To replace the greeting, touch Restart and repeat the previous step.
• To save the recording, touch Done and proceed to the next step.
• To delete the recording you just made touch Cancel.
Next steps
If the default greeting type shown is correct, touch Save to save the Greeting, its label, and
the Greeting type.
If the default greeting type is not the one you want, proceed to Changing the greeting type
using a touch-based deskphone on page 30 before saving the greeting.
Related topics:
Changing the greeting type using a touch-based deskphone on page 30
Changing the greeting type using a touch-based deskphone
About this task
When adding a new greeting, the Greetings T ype Selection screen displays after you indicate
you are Done recording your greeting; new greetings are automatically assigned a default type
of “Auto Answer ” with a Match Criterion of “All Calls” and you use the Greetings Type Selection
screen to change that default type, if desired. When changing an existing greeting, the Greeting
Type Selection screen displays when you select the greeting you want to change, and touch
the Type Details icon.
The default greeting type “Auto Answer” with a Match Criterion of “All Calls” means that this
greeting plays automatically when you answer an incoming call. Other types are Manual, VDN,
ANI and Prompted Digits. Types other than Manual require that you also select match criteria
(when to invoke this greeting, or where to find the data to trigger the greeting), and possibly
additional data (a telephone number sequence or string) that allows the system to match the
display message to a specific greeting. This is useful when you deal with different groups of
customers and want a customer-specific greeting to play based, for example, on the number
the caller has dialed. For more information about Greeting Types and their applicable match
criteria, see
About call center greeting types.
Procedure
1. With the greeting whose type you want to change displayed, touch the Details icon
on the right side of the Type line.
2. Use the Right Arrow on the Type line to cycle consecutively through the available
types or the Left Arrow to cycle back through the types. Notice that the Match
Criteria value below the type may change to correspond with the type currently
displayed
30 9608/9611G and 9621/9641G H.323 Deskphone Call Center User Guide May 2011
Comments? [email protected]
Page 31

Adding an agent greeting using a button-based deskphone
3. To change the match criterion for the greeting type, use the Right Arrow on the
Match Criterion line to cycle consecutively through the available criteria or the Left
Arrow to cycle back through the choices.
4. If the “String to Match” label displays, you must indicate what string of digits the
telephone should look for. Touch the Details icon on the String to Match line and
use the dialpad to enter the number sequence that should be matched for this
greeting. For example, if you serve two customers with the telephone numbers 732–
842–1111 and 732–842–2222, you can enter just the last four digits of those
numbers as the strings to match for their respective greetings. After entering the
string, press Done to return to the Type Selection screen.
5. Touch Done again, then touch Save on the Greetings Summary screen.
Adding an agent greeting using a button-based
deskphone
About this task
You can add up to six different greetings and set them to play automatically or manually when
you have an incoming call. The default greeting type “Auto Answer” with a Match Criterion of
“All Calls” means that this greeting plays automatically when you answer an incoming call.
Other types are Manual, VDN, ANI and Prompted Digits. T ypes other than Manual require that
you also select match criteria (when to invoke this greeting, or where to find the data to trigger
the greeting), and possibly additional data (a telephone number sequence or string) that allows
the system to match the display message to a specific greeting. This is useful when you deal
with different groups of customers and want a customer-specific greeting to play based, for
example, on the number the caller has dialed. For more information about Greeting T ypes and
their applicable match criteria, see
Note:
Use this procedure if you have a button-based deskphone (9608 or 9611G). If you have a
touch-based deskphone (9621G or 9641G), see Adding an agent greeting using a touch-
based deskphone on page 29 instead.
Procedure
About call center greeting types.
1. Press Home.
2. Select Greetings.
3. Press New or press the line button for any numbered blank greeting line.
4. Use the dialpad to enter a label for that distinguishes this greeting from other
greetings you may already have or will be adding. The Greeting Label can be up to
15 characters.
9608/9611G and 9621/9641G H.323 Deskphone Call Center User Guide May 2011 31
Page 32

Setting Up and Using Recorded Agent Greetings
5. Press Record.
6. Speak your greeting (up to ten seconds) into the headset or speaker (whichever
device is active) then press Stop.
7. Choose one of the following options:
• To listen to the greeting, press Play.
• To replace the greeting, press Restart and repeat the previous step.
• To save the greeting, press Done and proceed to the next step.
• To delete the greeting without saving it, press Cancel.
8. If the default greeting type shown (Auto Answer with a Match Criterion of “All Calls”)
is correct, proceed to the last step. T o change the greeting type, press the line button
for the line on which Type appears to display the Greetings Type Selection screen
and proceed to the next step.
9. On the T ype line, use the Right Arrow to cycle consecutively through the available
types or the Left Arrow to cycle back through the types. Notice that the Match
Criteria value below the type may change to correspond with the type currently
displayed.
10. To change the match criteria for the greeting type, press the line button on which
Match Criteria appears, then use the Right Arrow to cycle consecutively through
the available criteria or the Left Arrow to cycle back through the types.
11. Press the line button on which “String to match” appears and press More. Use the
dialpad to enter a number sequence that should be matched. For example, if you
serve two customers with the telephone numbers 732–842–1111 and 732–842–
2222, you can enter just the last four digits of those numbers as the string to match
for their respective greetings. After entering the string, press More again to return
to the Type Selection screen.
12. Press Done, and then press Save on the Greetings Summary screen.
Changing existing greetings
You can change an existing greeting in any or all of the following ways:
• You can edit a greeting's label.
• You can re-record a greeting without changing any other part of it.
• You can edit the greeting Type, Match Criteria, and/or String to Match.
• You can delete the entire greeting and any associated data.
To change any part of a greeting, press Home, select Greetings, and then select the greeting
you want to change or remove, as described in
32 9608/9611G and 9621/9641G H.323 Deskphone Call Center User Guide May 2011
Adding an agent greeting using a touch-based
Comments? [email protected]
Page 33

Changing existing greetings
deskphone on page 29 and Changing the greeting type using a touch-based deskphone on
page 30 for 9641G and 9621G models, and Adding an agent greeting using a button-based
deskphone on page 31 for 9608 and 961 1G models. You can then make a change as indicated
in those procedures, and select Save to store the change(s).
9608/9611G and 9621/9641G H.323 Deskphone Call Center User Guide May 2011 33
Page 34

Setting Up and Using Recorded Agent Greetings
34 9608/9611G and 9621/9641G H.323 Deskphone Call Center User Guide May 2011
Comments? [email protected]
Page 35
Chapter 5: About Call Center Deskphone
Functionality
Using Agent Deskphones in the Call Center
Your duties as an agent involve understanding how the deskphone presents work-related
information, including work modes and agent status, call information, and greetings.
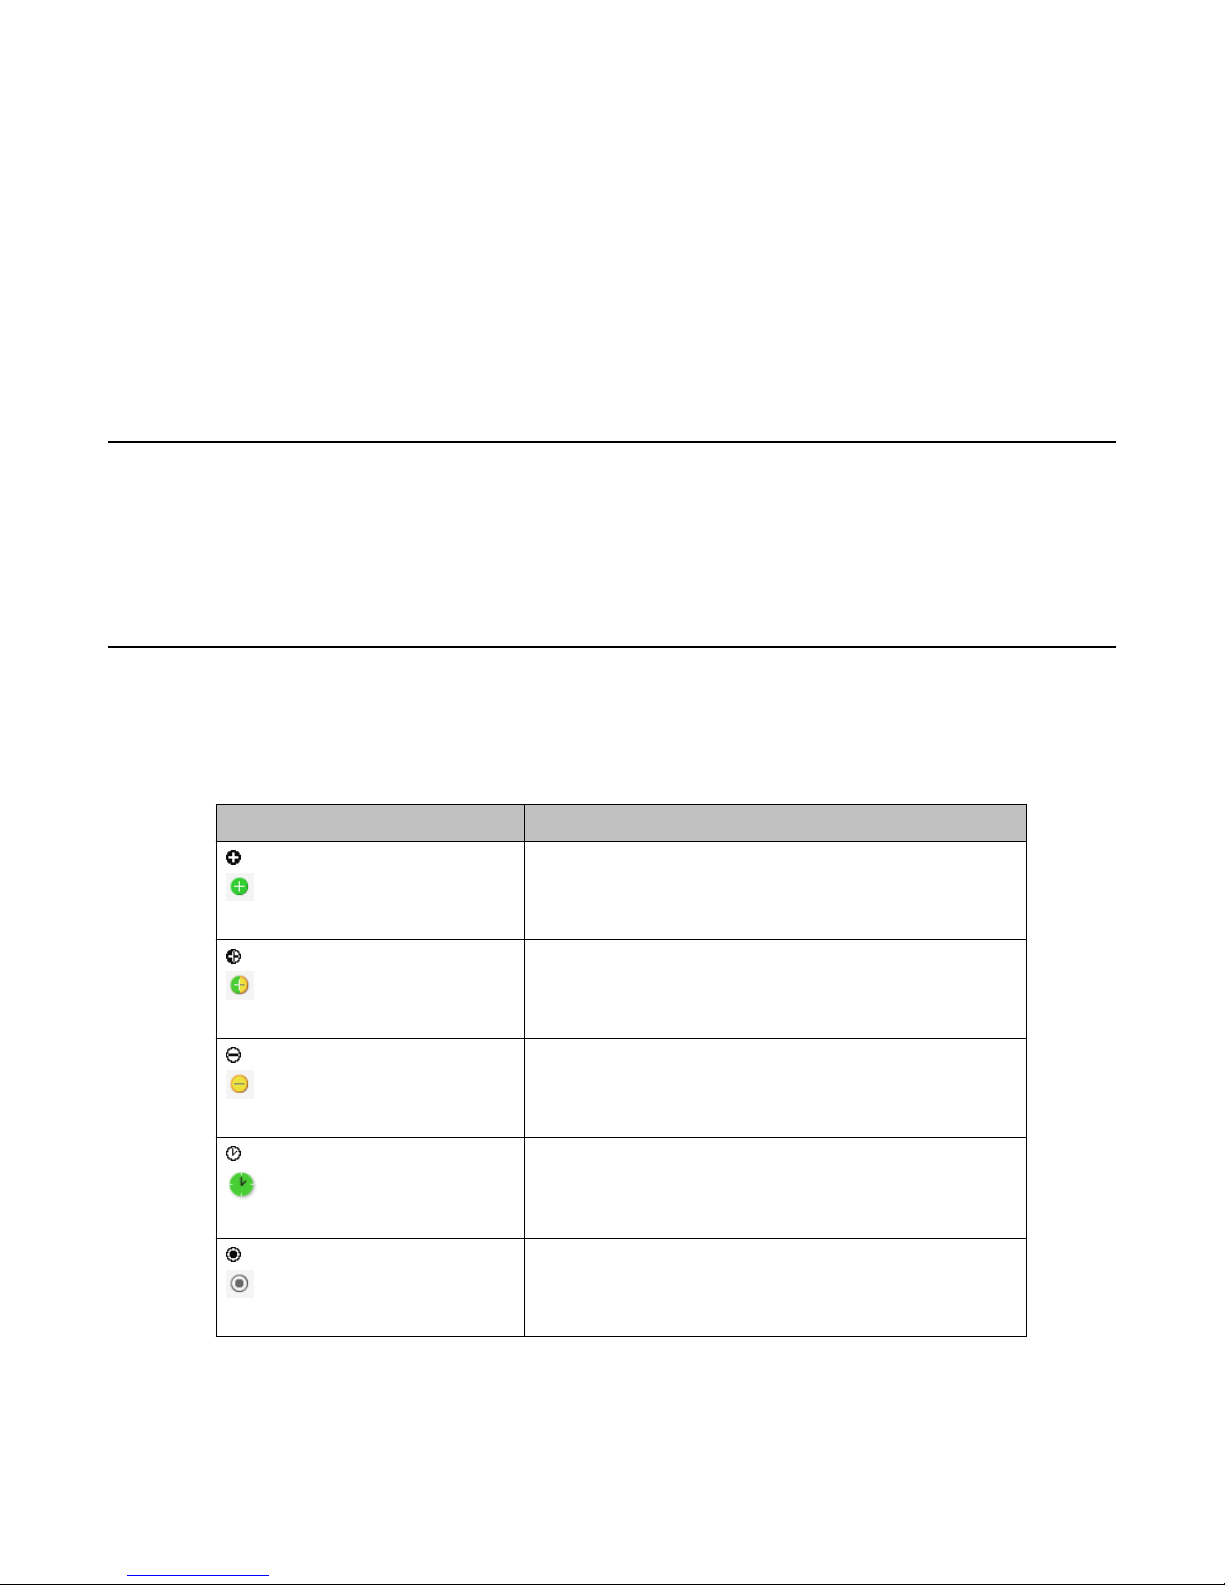
About status line information and icons
What you see on the display screen's status line depends on what you are doing at the time.
Special icons indicate your status. At times, more than one icon might display, for example,
when a greeting is playing and you have queued calls waiting.
If you see this icon and text:
(for monochrome displays) or
(for color displays) and the
word Available
(for monochrome displays) or
(for color displays) and the
word Pending
(for monochrome displays) or
(for color displays) and the
words Aux Work
(for monochrome displays) or
(for color displays) and the
words After Call
(for monochrome displays) or
(for color displays) and the
words Logged Out
your Status is:
Signed in; in Available mode with no Aux Work
pending.
Signed in; in A vailable mode with Aux Work or After Call
Work pending.
Signed in; in Aux Work mode.
Signed in; in After Call Work mode.
Signed out as an agent.
9608/9611G and 9621/9641G H.323 Deskphone Call Center User Guide May 2011 35
Page 36
About Call Center Deskphone Functionality
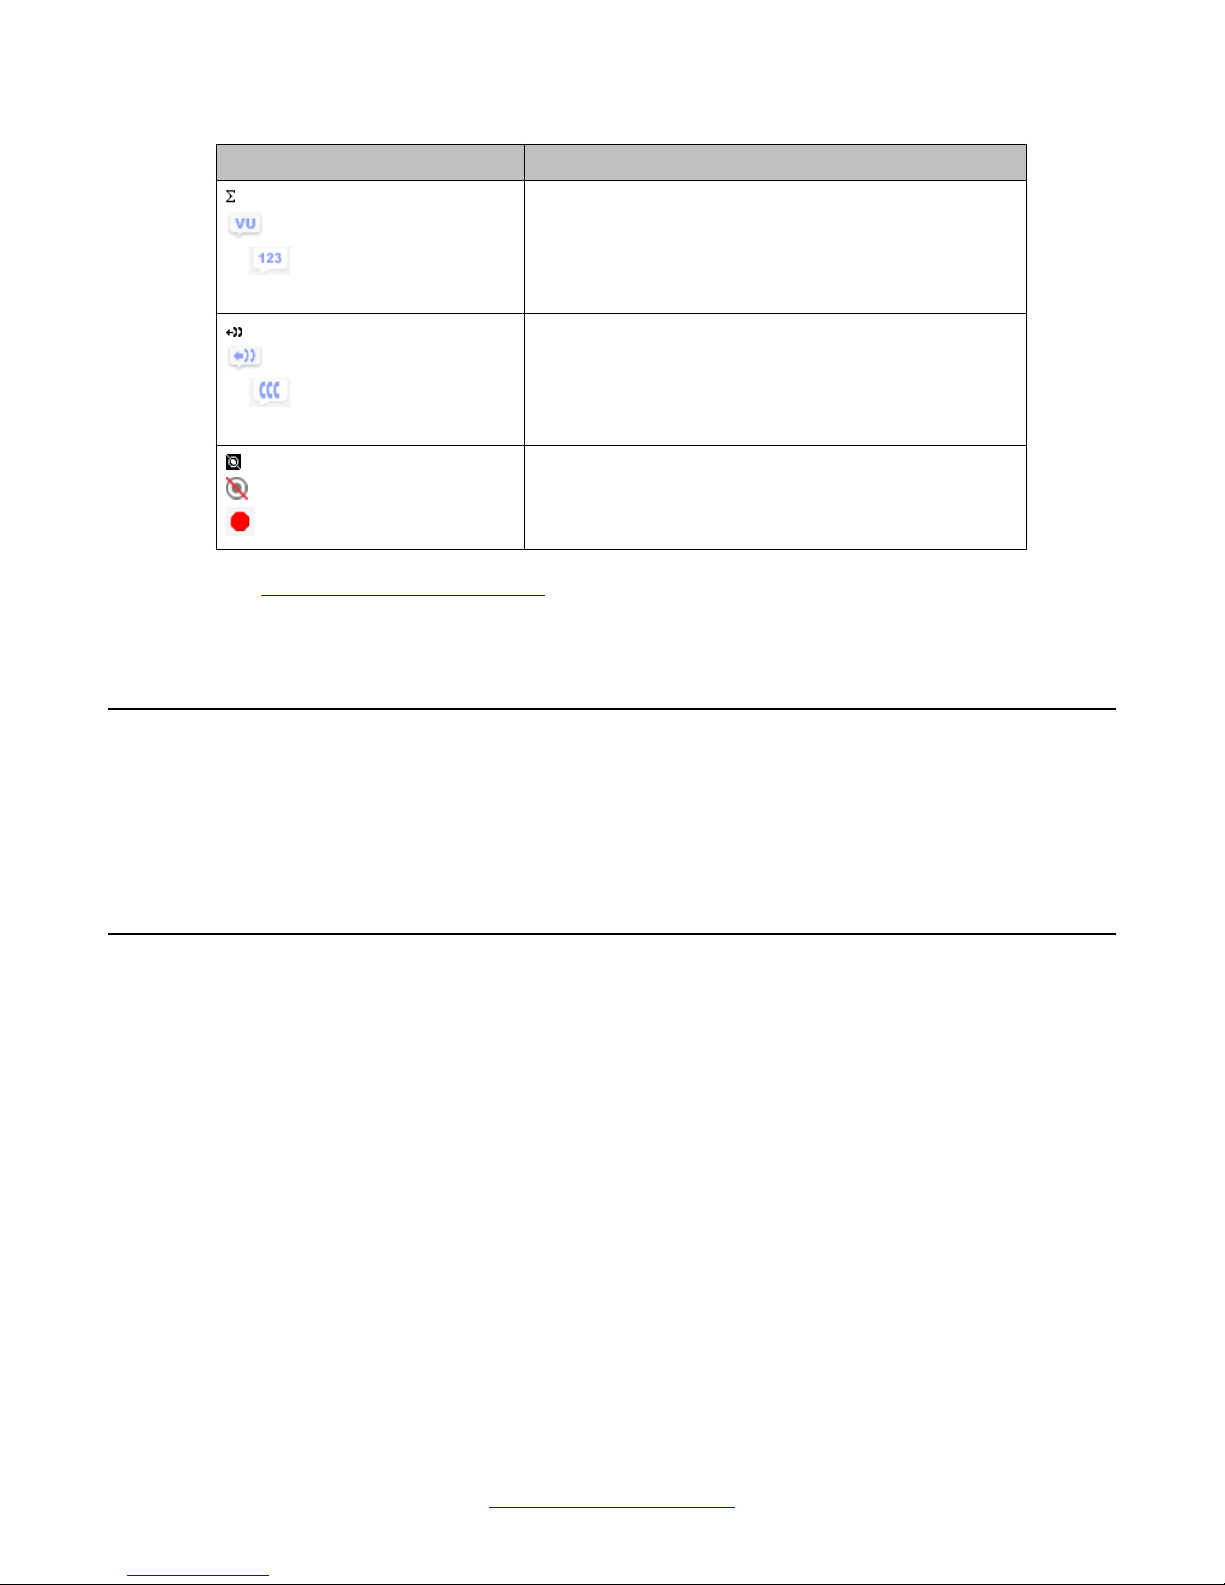
If you see this icon and text: your Status is:
(for monochrome displays) or
(for the 9611G color display)
or (for the 9621G and
9641G)
(for monochrome displays) or
(for the 9611G color display)
or (for the 9621G and
9641G)
(for monochrome displays) or
(for the 961 1G color display) or
(for the 9621G and 9641G)
The VU Stats feature is active.
Incoming calls are queued up and waiting.
Forced logout override is in effect.
See Other call center action icons on page 14 for descriptions of other status indicators and
icons for call center activities.
About the agent information line
When the Phone screen is displayed, the Agent Information line displays directly below the
Status line. This line provides information such as the company or group for which you are
assigned to receive calls or caller information based on the number the caller dialed.
About agent work modes and states
When you are logged in as an agent, icons on the top two display lines and the Feature buttons
show your current work mode and state. Agent work modes are Auto-In, and Manual-In. An
agent will usually have only one work mode (either Auto-In or Manual-In) administered for him
or her. Agent states are:
Pending This state appears when you are in the Available state, but have pressed an Aux
or ACW button. The Pending state reminds you that when the call is completed,
you will be placed in the Aux or ACW state as applicable.
Aux Y ou are placed in the Auxiliary state after agent login. Y ou must change to Auto-
In or Manual-In work mode to become available to receive incoming call center
calls. You can change back to Aux to indicate you are not available to receive
call center calls, for example, when you want to take a break. Depending on how
your system is administered, you might be prompted to optionally enter or be
required to enter a Reason Code when changing to Aux.
36 9608/9611G and 9621/9641G H.323 Deskphone Call Center User Guide May 2011
Comments? [email protected]
Page 37

About agent work modes and states
ACW The deskphone may automatically put you into an ACW (After Call Work) state
after you complete each call. If you were in Manual-In mode before the call you
must re-enter a Manual-In mode to accept another call. Switch to ACW to
perform after call work, such as completing a call-related form.
Available
Logged
Out
See About status line information and icons on page 35 and About the agent information line
on page 36for how to interpret upper line displays. See also Call center work icons on page 14
and Status alerting on page 16 for information on the icons and button LEDs you might see
while signed in as an agent.
This state is automatically assigned when you are not on an active call for both
Auto-In and Manual-In modes.
This state is automatically assigned when the deskphone is administered as a
call center phone but no agent sign-in has occurred. If you sign out as an agent
but do not log off the deskphone, this status is also assigned.
Changing agent work mode or status
Press or touch the line or feature button assigned to the work mode or work state to which
you want to change. Alternately, access the Features menu screen and select the desired
work mode/state. The associated LED flashes to indicate you are transitioning into the
work mode or state you chose, then is steadily lit when the selected work mode or status
is active.
9608/9611G and 9621/9641G H.323 Deskphone Call Center User Guide May 2011 37
Page 38

About Call Center Deskphone Functionality
38 9608/9611G and 9621/9641G H.323 Deskphone Call Center User Guide May 2011
Comments? [email protected]
Page 39

Chapter 6: Answering a Call
Procedure
To answer a call to the Call Center, you must be signed in as an agent. When you
receive an incoming call on a touch-based deskphone, the incoming line is highlighted.
When you receive an incoming call on a button-based deskphone, the green LED
associated with the call flashes. The incoming call is usually selected automatically.
However, if you are already on a call or if you receive more than one incoming call at
a time, you may need to select the call you want to answer manually. Receiving
incoming call center calls also depends on your current work mode and status, as
described in
Answering a call if you are signed in as an agent
About this task
About agent work modes and states on page 36.
Several variables such as your call center system configuration, call delivery mode, agent
status and whether you have one or more greetings recorded determine how you answer a
call; see
and icons on page 35 for more information. In all cases, you are alerted to incoming calls by
a special tone, the call appearance line button flashing green (for button-based models) or the
call appearance line itself highlighted in green (for touch-based phones), and the ringing icon
displayed on the incoming call's line.
If you have a touch-based deskphone (9621G or 9641G), touch the desired softkey. If you
have a button-based deskphone (9608 or 961 1G), press the desired softkey . Alternate ways
to using the Answer softkey to answer a call are to press the flashing line button for the
incoming call (button-based models) or touching the call appearance line itself (for touchbased models). Your supervisor will advise you as to how incoming calls to the call center
appear and provide any details not covered below.
About agent work modes and states on page 36 and About status line information
Note:
Procedure
1. If you are in either Manual-In or Auto-In mode, you must always wait for an alerting
signal (such as a ring or tone), then touch or press the Answer softkey. If AutoAnswer is enabled, the phone generates a zip tone to alert you, then activates the
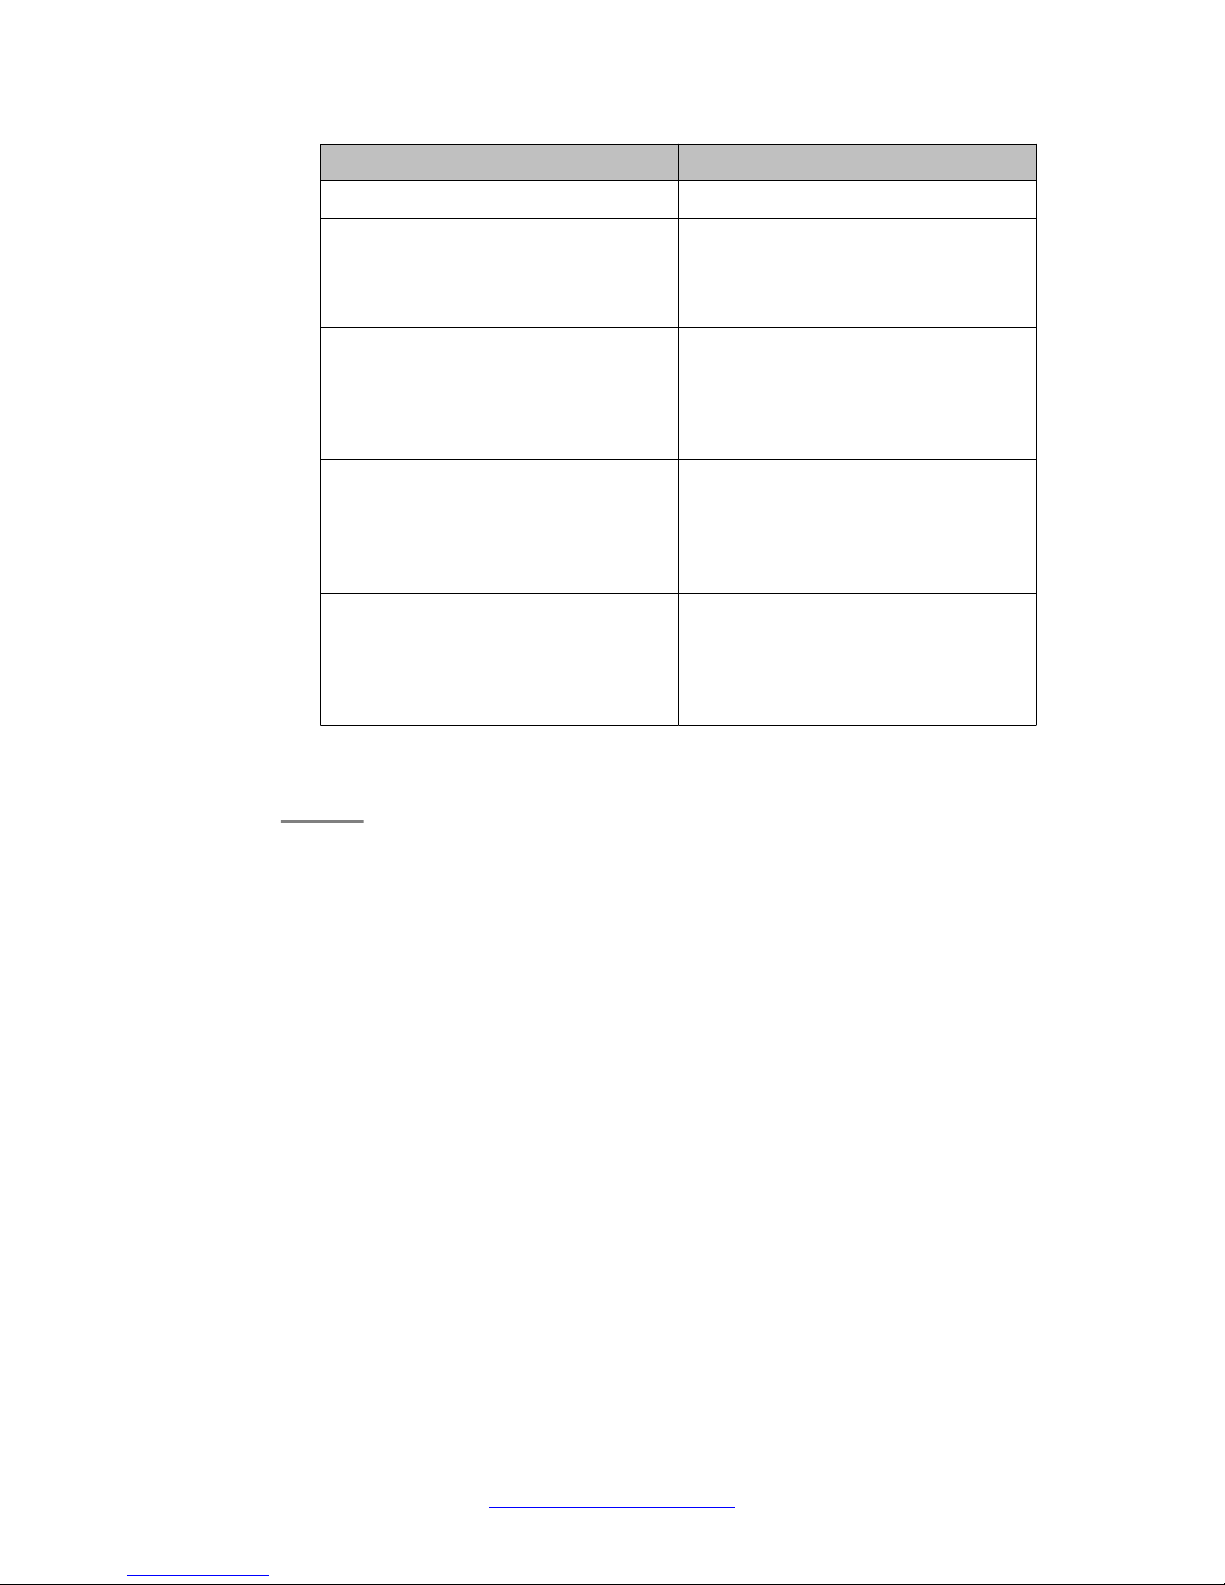
call. In either case, the table below identifies how to answer the call depending on
what type of greeting(s) you have recorded:
9608/9611G and 9621/9641G H.323 Deskphone Call Center User Guide May 2011 39
Page 40
Answering a Call
If : To answer the call:
No greeting is recorded Start speaking to the caller.
A non-Manual greeting is recorded
that matches the Type, Match
Listen to the greeting, then start
speaking to the caller.
Criterion, and String to Match for the
incoming call
No non-Manual greeting is recorded
that matches the Type, Match
Criterion, and String to Match for the
Touch or press the Greeting softkey,
listen to the greeting, then start
speaking to the caller.
incoming call, but one Manual
greeting has been recorded
No non-Manual greeting is recorded
that matches the Type, Match
Criterion, and String to Match for the
incoming call, but more than one
Manual greeting has been recorded
No non-Manual greeting is recorded
Touch or press the Greeting softkey,
select the appropriate greeting to return
to the Phone screen, listen to the
greeting, then start speaking to the
caller.
Start speaking to the caller.
that matches the Type, Match
Criterion, and String to Match for the
incoming call, and no Manual
greeting has been recorded
2. Press or touch Release to end a call, unless you are instructed otherwise by your
supervisor.
40 9608/9611G and 9621/9641G H.323 Deskphone Call Center User Guide May 2011
Comments? [email protected]
Page 41

Chapter 7: About Features
Your administrator may have set up your telephone so that it presents the Features as
described in this chapter together on one screen with your call appearances; if so, the features
do not appear on a separate Features menu. However, for most agent deskphones, the
Features menu gives you access to agent work modes, Speed Dial buttons and/or advanced
telephony features like Directory , Abbreviated Dial, and Call Forwarding. Directory allows you
to dial other users on your system by name. Abbreviated dialing, if set up by your administrator ,
lets you dial certain numbers by touching one number on the dialpad. You can use Send All
Calls and Call Forward to have your incoming calls sent to other numbers. Note that if you
have a touch-based phone, any features assigned to an attached Button Module will not display
on the Features menu; if you have a button-based phone, features assigned to the Button
Module will display on the Features menu. The particular features available to you depend on
what your administrator has assigned to your phone.
In addition to the Features menu, your administrator may also place selected features on
softkeys on the call appearance (Calls) screen. For touch-based phones, frequently used
features can also be set up on the Quick Touch panel, if the panel is activated. For more
information about what features and options are available for your extension, contact your
system administrator.
Accessing the Features menu
Procedure
1. If you have a touch-based deskphone model (9621G or 9641G), from the Calls
screen, touch the Features button at the upper right corner to view the Features
menu. If you have a button-based deskphone model (9608, 961 1G), use the Right
navigation arrow from the Phone screen to access the Features menu.
On a touch-based model, the
for a button-based model, the feature line button indicates its status. If shown in
green on color phone models, the feature is active; if the icon is gray-shaded it is
available but not active. For models with LEDs (9608, 9611G), the LED next to the
feature name indicates if the feature is currently on or off. If the light is on, the feature
is on.
2. Scroll down to see the features that have been administered for your extension.
icon next to a feature indicates the feature status;
9608/9611G and 9621/9641G H.323 Deskphone Call Center User Guide May 2011 41
Page 42

About Features
Accessing features using a button module
About this task
If you have a button module attached to your agent deskphone, the button module might have
feature buttons for call center features, additional call appearances, and standard deskphone
features like Call Forwarding, Call Pickup, Go to Coverage, or Auto Callback.
Note:
The 9621G Deskphone does not support button modules.
Procedure
To use a feature button on a button module, press the button next to the feature you
want to activate. Depending on your button module model, the LED associated with
the feature you select lights up to indicate that feature is active.
42 9608/9611G and 9621/9641G H.323 Deskphone Call Center User Guide May 2011
Comments? [email protected]
Page 43

Index
A
Adding a greeting ..................................................29, 31
Adjustable display ......................................................18
Agent greetinggreeting type entry ..............................30
Agent greetings ..........................................................27
Agent information line .................................................36
Agent sign in .........................................................19, 20
agent sign off ..............................................................21
Agent sign off .............................................................19
Agent work information ...............................................35
Agent work mode/state ...............................................36
Answering a call .........................................................39
if you are logged in as an agent ...........................39
Avaya Menu ..........................................................23, 24
about ..............................................................23, 24
B
Button module ............................................................42
accessing features using .....................................42
C
changing agent work mode or status .........................37
D
Deskphone stand .......................................................18
about ....................................................................18
setting up ........................................................29, 31
Greetings, about .........................................................27
H
Home screen ..............................................................23
about ....................................................................23
Home Screen .............................................................23
about ....................................................................23
I
Icons in telephone display ..........................................14
about ....................................................................14
Incoming Calls ............................................................39
answering .............................................................39
K
Keyboard ....................................................................17
using ....................................................................17
L
LEDs ...........................................................................16
alerting .................................................................16
legal notices .................................................................2
Logging in to your telephone ......................................19
logging in to your telephone extension .......................19
Logging out of your telephone extension ...................19
Logout ........................................................................23
F
Features .....................................................................41
about ....................................................................41
accessing .............................................................41
G
Greeting Type .............................................................30
entering using touch-based phone .......................30
Greeting types ............................................................27
explanation of .......................................................27
Greetings .........................................................29, 31, 32
changing ..............................................................32
9608/9611G and 9621/9641G H.323 Deskphone Call Center User Guide May 2011 43
N
Navigation Arrows .................................................10, 14
page control ....................................................10, 14
right ................................................................10, 14
up & down ......................................................10, 14
Network Information ...................................................23
O
On-screen keyboard ...................................................17
about ....................................................................17
Options & Settings ................................................18, 23
Page 44

setting the Quick Touch panel ..............................18
Q
Quick Touch panel ......................................................18
configuring ...........................................................18
S
about ....................................................................14
U
Using deskphones in the call center ...........................35
about ....................................................................
35
Scrolling and Navigation .......................................10, 14
about ..............................................................10, 14
Signing in ....................................................................20
as agent ...............................................................20
Status line information and icons ...............................35
T
Telephone display icons .............................................14
W
Work mode .................................................................36
Work state ..................................................................36
44 9608/9611G and 9621/9641G H.323 Deskphone Call Center User Guide May 2011
 Loading...