

Page 1

CRK; Reviewed:
SPOC 10/7/2011
Solution & Interoperability Test Lab Application Notes
©2011 Avaya Inc. All Rights Reserved.
1 of 14
Polycom8400-IPO
These Application Notes describe the procedures for configuring Polycom® SpectraLink®
8400 Series Wireless Telephones which were compliance tested with Avaya IP Office.
The overall objective of the interoperability compliance testing is to verify Polycom®
SpectraLink® 8400 Series Wireless Telephones functionalities in an environment comprised
of Avaya IP Office and various Avaya H.323, SIP IP Telephones, and DCP telephones.
Information in these Application Notes has been obtained through DevConnect compliance
testing and additional technical discussions. Testing was conducted via the DevConnect
Program at the Avaya Solution and Interoperability Test Lab.
Avaya Solution & Interoperability Test Lab
Application Notes for Polycom® SpectraLink® 8400 Series
Wireless Telephones and Avaya IP Office – Issue 1.0
Abstract
Page 2

CRK; Reviewed:
SPOC 10/7/2011
Solution & Interoperability Test Lab Application Notes
©2011 Avaya Inc. All Rights Reserved.
2 of 14
Polycom8400-IPO
1. Introduction
These Application Notes describe the procedures for configuring Polycom® SpectraLink® 8400
Series Wireless Telephones (8440 and 8450) which were compliance tested with Avaya IP
Office.
Polycom® SpectraLink® 8400 series Telephones (herein referred to as SpectraLink 8400 Series)
improve productivity and responsiveness for on-site mobile professionals across a wide range of
industries, including healthcare, retail, manufacturing and hospitality. Built on open standards,
SpectraLink 8400 Series transforms the delivery of mobile enterprise applications by bringing
the power of thin client and browser technology to front-line professionals in an easy-to-use and
easy-to-manage interface. Additionally, SpectraLink 8400 Series supports a broad range of
interfaces to enterprise-grade PBX, wireless LAN, and infrastructures to deliver maximum
interoperability with the low cost of ownership.
These Application Notes assume that Communication Manager and Session Manager are already
installed and basic configuration steps have been performed. Only steps relevant to this
compliance test will be described in this document. For further details on configuration steps not
covered in this document, consult references [1] and [2].
2. General Test Approach and Test Results
The general test approach was to place calls to and from SpectraLink 8400 Series and exercise
basic telephone operations. The main objectives were to verify the following:
Registration
Codecs (G.711MU and G.729A)
Inbound calls
Outbound calls
Hold/Resume
Call termination (origination/destination)
Transfer with Shuffling enabled (origination/destination/ attended/unattended)
Transfer with Shuffling disabled (origination/destination/ attended/unattended)
Three party conference (origination/destination)
Avaya Feature Name Extension (FNE)
o Call Park
o Call Pickup
o Call Forward (Unconditional, Busy/no answer)
MWI
Voicemail
Serviceability
2.1. Interoperability Compliance Testing
The interoperability compliance test included features and serviceability. The focus of
interoperability compliance testing was primarily on verifying call establishment on SpectraLink
8400 Series. SpectraLink 8400 Series operations such as inbound calls, outbound calls,
Page 3

CRK; Reviewed:
SPOC 10/7/2011
Solution & Interoperability Test Lab Application Notes
©2011 Avaya Inc. All Rights Reserved.
3 of 14
Polycom8400-IPO
hold/resume, transfer, conference, short code, and SpectraLink 8400 Series interactions with
Avaya IP Office, and Avaya SIP, H.323, and digital telephones were verified. The serviceability
testing introduced failure scenarios to see if SpectraLink 8400 Series can recover from failures.
2.2. Test Results
The test objectives were verified. For serviceability testing, SpectraLink 8400 Series operated
properly after recovering from failures such as cable disconnects, and resets of SpectraLink 8400
Series and Avaya IP Office. SpectraLink 8400 Series successfully negotiated the codec that was
used. The features tested worked as expected.
2.3. Support
Technical support on SpectraLink 8400 Series can be obtained through the following:
Phone: (978) 292-5000, and select Option 3.
Web: http://www.polycom.com/support/index.html
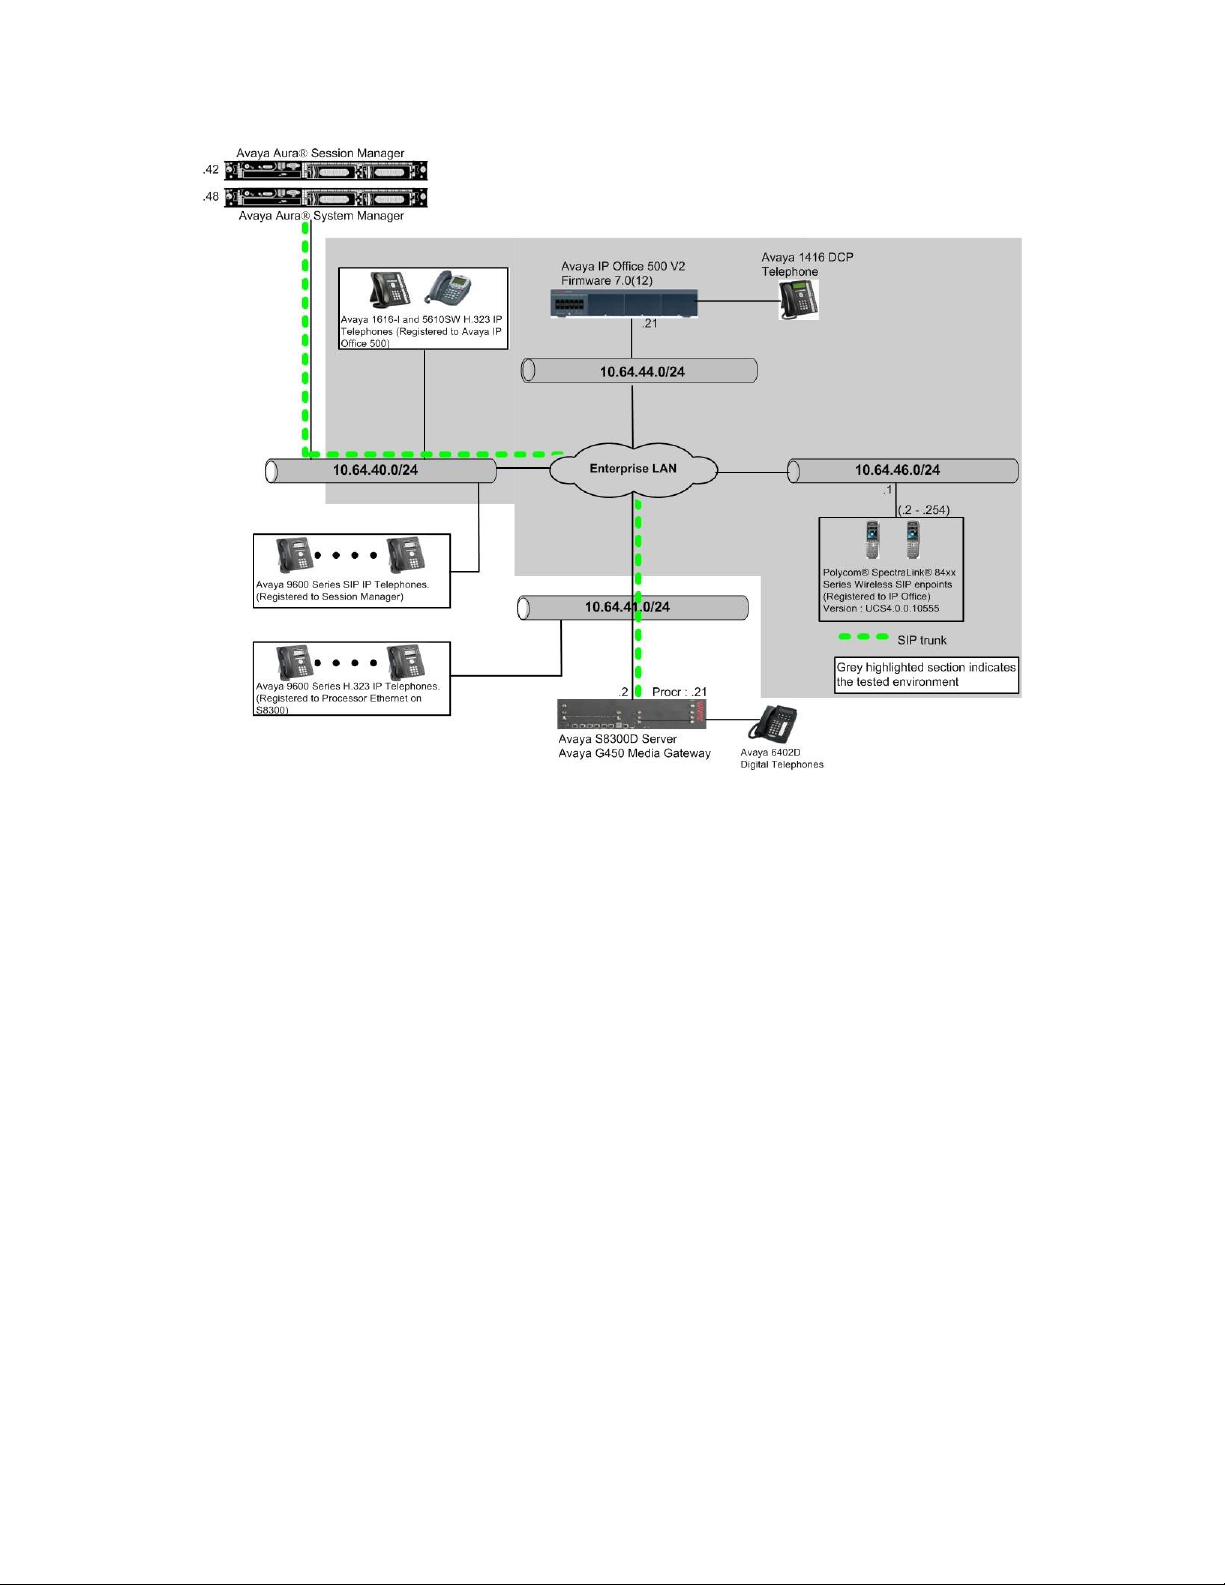
3. Reference Configuration
Figure 1 illustrates a sample configuration consisting of an Avaya IP Office and SpectraLink
8400 Series. Avaya Aura® System Manager, Avaya Aura® Session Manager, and Avaya
S8300D with G450 were included in the test to provide an inter-switch test scenario. For
completeness, Avaya 5610 and 1616-I H.323 IP Telephones, Avaya 9600 Series SIP IP
Telephones, Avaya 9600 Series H.323 IP Telephones, and Avaya 6400 and 1416 Series Digital
Telephones, are included in Figure 1 to demonstrate calls between the SIP-based SpectraLink
8400 Series and Avaya SIP, H.323, and digital telephones.
Page 4
CRK; Reviewed:
SPOC 10/7/2011
Solution & Interoperability Test Lab Application Notes
©2011 Avaya Inc. All Rights Reserved.
4 of 14
Polycom8400-IPO
Figure 1: Test Configuration of Polycom SpectraLink 8400 Series Wireless Telephones
with Avaya IP Office
Page 5

CRK; Reviewed:
SPOC 10/7/2011
Solution & Interoperability Test Lab Application Notes
©2011 Avaya Inc. All Rights Reserved.
5 of 14
Polycom8400-IPO
4. Equipment and Software Validated
Equipment
Software/Firmware
Avaya IP Office 500 V2
7.0(12)
Avaya IP Office Manager
9.0(3)
Avaya S8300D Media Server with Avaya G450
Media Gateway
Avaya Aura® Communication
Manager 6.0.1 (R016x.00.1.510.1) with
SP2 (00.1.510.1-18860)
Avaya Aura® System Manager
6.1.5.0
Avaya Aura® Session Manager
6.1.1.0.611023
Avaya H.323 IP Telephones on IP Office
5610 (H.323)
1616-I (H.323)
2.9.1
1.22
Avaya 1416 Digital Telephone on IP Office
-
Avaya 9600 Series SIP Telephones on Session
Manager
9620 (SIP)
9630 (SIP)
9650 (SIP)
2.6.4
2.6.4
2.6.4
Avaya 9600 Series H.323 Telephones on S8300D
server
9620 (H.323)
9630 (H.323)
9650 (H.323)
3.1
3.1
3.1
Avaya 6408D+ Digital Telephone
- SpectraLink 8400 Series
4.0.0.16545
The following equipment and software were used for the test configuration.
Page 6

CRK; Reviewed:
SPOC 10/7/2011
Solution & Interoperability Test Lab Application Notes
©2011 Avaya Inc. All Rights Reserved.
6 of 14
Polycom8400-IPO
5. Configure Avaya IP Office
This section provides the procedures for configuring Avaya IP Office. The procedures include
the following areas:
Verify IP Office license
Obtain LAN IP address
Administer SIP registrar
Administer SIP extensions
Administer SIP users
These steps are performed from the Avaya IP Office Manager.
5.1. Verify IP Office License
From a PC running the Avaya IP Office Manager application, select Start All Programs
IP Office Manager to launch the Manager application. Select the proper IP Office system if
there are more than one IP Office system, and log in with the appropriate credentials.
The Avaya IP Office Manager screen is displayed. From the configuration tree in the left pane,
select Licence 3rd Party IP Endpoints to display the Avaya IP endpoints screen in the right
pane. Verify that the License Status field is set to Valid.
Page 7

CRK; Reviewed:
SPOC 10/7/2011
Solution & Interoperability Test Lab Application Notes
©2011 Avaya Inc. All Rights Reserved.
7 of 14
Polycom8400-IPO
5.2. Obtain LAN IP Address
From the configuration tree in the left pane, select System to display the System screen in the
right pane. Select the LAN1 tab, followed by the LAN Settings sub-tab in the right pane. Make
a note of the IP Address, which will be used later to configure SpectraLink 8400 Series.
Note: During the initial configuration of Avaya IP Office, the LAN1 was configured on the
private network side and LAN2 was configured on the public network side. Avaya IP Office can
support SIP extensions on the LAN1 and/or LAN2 interfaces, but the compliance test used the
LAN1 interface. Thus, only the LAN1 configuration will be discussed in these Application
Notes.
Page 8

CRK; Reviewed:
SPOC 10/7/2011
Solution & Interoperability Test Lab Application Notes
©2011 Avaya Inc. All Rights Reserved.
8 of 14
Polycom8400-IPO
5.3. Administer SIP Registrar
Select the VoIP sub-tab. Ensure that SIP Registrar Enable is checked, as shown below.
Select the SIP Registrar sub-tab, and enter a valid Domain Name for SIP endpoints to use for
registration with IP Office. In the compliance testing, the Domain Name field was set to
avaya.com. If the Domain Name field is left blank, then the SIP endpoints will use the LAN IP
address for registration.
Page 9

CRK; Reviewed:
SPOC 10/7/2011
Solution & Interoperability Test Lab Application Notes
©2011 Avaya Inc. All Rights Reserved.
9 of 14
Polycom8400-IPO
5.4. Administer SIP Extensions
From the configuration tree in the left pane, right-click on Extension and select New SIP
Extension from the pop-up list to add a new SIP extension. Enter the desired digits for the Base
Extension field, and retain the default check in the Force Authorization field as shown below.
Select the VoIP tab, and retain the default values in all fields.
Repeat this section to add a new SIP extension for each SpectraLink 8400 Series. During the
compliance test, extensions 77011, 77012 and 77013 were created for SpectraLink 8400 Series.
Page 10

CRK; Reviewed:
SPOC 10/7/2011
Solution & Interoperability Test Lab Application Notes
©2011 Avaya Inc. All Rights Reserved.
10 of 14
Polycom8400-IPO
5.5. Administer SIP Users
From the left pane, right-click on User, and select New from the pop-up list. Enter desired
values for the Name and Full Name fields. For the Extension field, enter the SIP extension
created in Section 5.4.
Select the Telephony tab, followed by the Call Settings sub-tab. Check the Call Waiting On
field, as shown below.
Page 11

CRK; Reviewed:
SPOC 10/7/2011
Solution & Interoperability Test Lab Application Notes
©2011 Avaya Inc. All Rights Reserved.
11 of 14
Polycom8400-IPO
Select the Supervisor Settings tab, and enter a desired Login Code.
Repeat this section for each SIP extension from Section 5.4.
Page 12

CRK; Reviewed:
SPOC 10/7/2011
Solution & Interoperability Test Lab Application Notes
©2011 Avaya Inc. All Rights Reserved.
12 of 14
Polycom8400-IPO
6. Configure Polycom SpectraLink 8400 Series Wireless
<?xml version="1.0" encoding="utf-8" standalone="yes"?>
<!-- Default Master SIP Configuration File-->
<!-- Edit and rename this file to <Ethernet-address>.cfg for each phone.-->
<!-- $Revision: 1.14 $ $Date: 2005/07/27 18:43:30 $ -->
<APPLICATION APP_FILE_PATH="sip.ld" APP_NET_LOAD_FILE_PATH=""
CONFIG_FILES="sip_77013.cfg" MISC_FILES="" LOG_FILE_DIRECTORY=""
OVERRIDES_DIRECTORY="" CONTACTS_DIRECTORY="" />
<?xml version="1.0" encoding="utf-8"?>
<PHONE_CONFIG>
<reg reg.1.address="77013@avaya.com" reg.1.displayName="77013" reg.1.label="77013"
reg.1.auth.userId="77013" reg.1.auth.password="123456"
reg.1.server.1.address="10.64.44.21" reg.1.server.1.port="5060" />
<msg.mwi msg.mwi.1.subscribe="77013@avaya.com" />
</PHONE_CONFIG>
Telephone
This section provides steps to configure SpectraLink 8400 Series. The latest firmware was
provided by Polycom SpectraLink. For additional information regarding configuring the
SpectraLink 8400 series handsets please refer to the latest product documentation available at
www.polycom.com. The following files need to be configured, as the phone boots up to register
with Avaya IP Office:
00907a0cd950.cfg – The first file that the phone searches while booting up is
<MAC>.cfg file. The header, 00907a0cd950, indicates the MAC address of SpectraLink
8400 Series. In this configuration file, there are sub-configuration files that are listed
under CONFIG_FILES field; sip_77013.cfg. During the compliance test, sip_77013.cfg
was modified.
sip_77013.cfg – This is an extension configuration file. This file includes UserID,
Password, Fully Qualified Domain Name (FQDN) of the phone, and the IP address of
Avaya IP Office.
To work with Avaya IP Office short code, launch a web browser, enter http://<IP
address of SpectraLink 8400 Series > in the URL, and log in with the appropriate
credentials. Modify Digitmap to match the dial plan configuration on Avaya IP Office.
In the compliance testing, the value “*xx*xT|*xxT” was used to allow for dial strings
prefixed with digits, “*”, or “#”.
Disable the RemoveEnd-Of-Dial Marker field. Click Submit.
Page 13

CRK; Reviewed:
SPOC 10/7/2011
Solution & Interoperability Test Lab Application Notes
©2011 Avaya Inc. All Rights Reserved.
13 of 14
Polycom8400-IPO
7. Verification Steps
The following steps may be used to verify the configuration:
From a PC running the Avaya IP Office Monitor application, select Start Programs
IP Office Monitor to launch the application. The Avaya IP Office R6.1
SysMonitor screen is displayed, as shown below. Select Status SIP Phone Status
from the top menu.
Verify that there is an entry for each SpectraLink 8400 Series extension from Section 5.4
and the Status is SIP: Registered.
Place calls to and from SpectraLink 8400 Series Wireless telephones and verify that the
calls are successfully established with two-way talk path.
8. Conclusion
SpectraLink 8400 Series was compliance tested with Avaya IP Office (Version 7.0.12).
SpectraLink 8400 Series (UCS 4.0.0.16545) functioned properly for feature and serviceability.
During compliance testing, SpectraLink 8400 Series successfully registered with Avaya IP
Office, placed and received calls to and from SIP and non-SIP telephones, and executed other
telephony features like three-way conference, transfers, hold, etc.
9. Additional References
The following Avaya product documentation can be found at http://support.avaya.com
[1] Avaya IP Office Manager, May 2011, Release 7.0, Issue 26h, Document Number 15-601011.
The following document was provided by Polycom.
[2] Polycom® SpectraLink® 8400 Series Wireless Handset User Guide, February 2011, 172536720-001 Rev A
Page 14

CRK; Reviewed:
SPOC 10/7/2011
Solution & Interoperability Test Lab Application Notes
©2011 Avaya Inc. All Rights Reserved.
14 of 14
Polycom8400-IPO
©2011 Avaya Inc. All Rights Reserved.
Avaya and the Avaya Logo are trademarks of Avaya Inc. All trademarks identified by ® and ™
are registered trademarks or trademarks, respectively, of Avaya Inc. All other trademarks are the
property of their respective owners. The information provided in these Application Notes is
subject to change without notice. The configurations, technical data, and recommendations
provided in these Application Notes are believed to be accurate and dependable, but are
presented without express or implied warranty. Users are responsible for their application of any
products specified in these Application Notes.
Please e-mail any questions or comments pertaining to these Application Notes along with the
full title name and filename, located in the lower right corner, directly to the Avaya DevConnect
Program at devconnect@avaya.com.
 Loading...