

Avaya 8000 Technical Configuration Manual

`
Ethernet Routing Switch
8000
Virtual Services Platform
4000 7200 8000 9000
Engineering
> Border Gateway Protocol (BGP)
Technical Configuration Guide
Avaya Networking
Document Date: January 2016
Document Number: NN48500-538
Document Version: 3.2

2
avaya.com
January 2016
© 2016 Avaya Inc.
All Rights Reserved.
Notices
While reasonable efforts have been made to ensure that the information in this document is complete and accurate at the time of
printing, Avaya assumes no liability for any errors. Avaya reserves the right to make changes and corrections to the information in
this document without the obligation to notify any person or organization of such changes.
Documentation disclaimer
Avaya shall not be responsible for any modifications, additions, or deletions to the original published version of this documentation
unless such modifications, additions, or deletions were performed by Avaya. End User agree to indemnify and hold harmless Avaya,
Avaya’s agents, servants and employees against all claims, lawsuits, demands and judgments arising out of, or in connection with,
subsequent modifications, additions or deletions to this documentation, to the extent made by End User.
Link disclaimer
Avaya is not responsible for the contents or reliability of any linked Web sites referenced within this site or documentation(s)
provided by Avaya. Avaya is not responsible for the accuracy of any information, statement or content provided on these sites and
does not necessarily endorse the products, services, or information described or offered within them. Avaya does not guarantee that
these links will work all the time and has no control over the availability of the linked pages.
Warranty
Avaya provides a limited warranty on this product. Refer to your sales agreement to establish the terms of the limited warranty. In
addition, Avaya’s standard warranty language, as well as information regarding support for this product, while under warranty, is
available to Avaya customers and other parties through the Avaya Support Web site: http://www.avaya.com/support
Please note that if you acquired the product from an authorized reseller, the warranty is provided to you by said reseller and not by Avaya.
Licenses
THE SOFTWARE LICENSE TERMS AVAILABLE ON THE AVAYA WEBSITE, HTTP://SUPPORT.AVAYA.COM/LICENSEINFO/
ARE APPLICABLE TO ANYONE WHO DOWNLOADS, USES AND/OR INSTALLS AVAYA SOFTWARE, PURCHASED FROM
AVAYA INC., ANY AVAYA AFFILIATE, OR AN AUTHORIZED AVAYA RESELLER (AS APPLICABLE) UNDER A COMMERCIAL
AGREEMENT WITH AVAYA OR AN AUTHORIZED AVAYA RESELLER. UNLESS OTHERWISE AGREED TO BY AVAYA IN
WRITING, AVAYA DOES NOT EXTEND THIS LICENSE IF THE SOFTWARE WAS OBTAINED FROM ANYONE OTHER THAN
AVAYA, AN AVAYA AFFILIATE OR AN AVAYA AUTHORIZED RESELLER, AND AVAYA RESERVES THE RIGHT TO TAKE
LEGAL ACTION AGAINST YOU AND ANYONE ELSE USING OR SELLING THE SOFTWARE WITHOUT A LICENSE. BY
INSTALLING, DOWNLOADING OR USING THE SOFTWARE, OR AUTHORIZING OTHERS TO DO SO, YOU, ON BEHALF OF
YOURSELF AND THE ENTITY FOR WHOM YOU ARE INSTALLING, DOWNLOADING OR USING THE SOFTWARE
(HEREINAFTER REFERRED TO INTERCHANGEABLY AS "YOU" AND "END USER"), AGREE TO THESE TERMS AND
CONDITIONS AND CREATE A BINDING CONTRACT BETWEEN YOU AND AVAYA INC. OR THE APPLICABLE AVAYA
AFFILIATE ("AVAYA").
Copyright
Except where expressly stated otherwise, no use should be made of the Documentation(s) and Product(s) provided by Avaya. All
content in this documentation(s) and the product(s) provided by Avaya including the selection, arrangement and design of the
content is owned either by Avaya or its licensors and is protected by copyright and other intellectual property laws including the sui
generis rights relating to the protection of databases. You may not modify, copy, reproduce, republish, upload, post, transmit or
distribute in any way any content, in whole or in part, including any code and software. Unauthorized reproduction, transmission,
dissemination, storage, and or use without the express written consent of Avaya can be a criminal, as well as a civil offense under
the applicable law.
Third Party Components
Certain software programs or portions thereof included in the Product may contain software distributed under third party agreements
("Third Party Components"), which may contain terms that expand or limit rights to use certain portions of the Product ("Third Party
Terms"). Information regarding distributed Linux OS source code (for those Products that have distributed the Linux OS source
code), and identifying the copyright holders of the Third Party Components and the Third Party Terms that apply to them is available
on the Avaya Support Web site: http://support.avaya.com/Copyright.
Trademarks
The trademarks, logos and service marks ("Marks") displayed in this site, the documentation(s) and product(s) provided by Avaya
are the registered or unregistered Marks of Avaya, its affiliates, or other third parties. Users are not permitted to use such Marks
without prior written consent from Avaya or such third party which may own the Mark. Nothing contained in this site, the
documentation(s) and product(s) should be construed as granting, by implication, estoppel, or otherwise, any license or right in and
to the Marks without the express written permission of Avaya or the applicable third party. Avaya is a registered trademark of Avaya
Inc. All non-Avaya trademarks are the property of their respective owners.
Downloading documents
For the most current versions of documentation, see the Avaya Support. Web site: http://www.avaya.com/support
Contact Avaya Support
Avaya provides a telephone number for you to use to report problems or to ask questions about your product. The support
telephone number is 1-800-242-2121 in the United States. For additional support telephone numbers, see the Avaya Web site:
http:// www.avaya.com/support.
Avaya Inc. – External Distribution

3
avaya.com
January 2016
No
Date
Version
Revised By
Remarks
1
24/11/2014
3.0
John Vant Erve
Updated examples using ACLI. Added ISIS/BGP
redistribution
2
3/12/2014
3.1
John Vant Erve
Edited by Ludovico Stevens – ISIS/BGP
redistribution configuration example
3
13/1/2016
3.2
John Vant Erve
Added VSP 7200 and BGP+
Abstract
This document provides examples on configuring BGP on the Avaya Ethernet Routing Switch 8000 and
Virtual Services Platform 4000, 8000, 7200, and 9000. This document covers some of the more popular
BGP commands and attributes and the command used to configure them.
Acronym Key
Throughout this guide the following acronyms will be used:
AS: Autonomous System
BGP: Border Gateway Protocol
CIDR: Classless Inter-Domain Routing
EBGP: External BGP
EGP: Exterior gateway protocol
IBGP: Internal BGP
IGP: Interior gateway protocol
Revision Control
Avaya Inc. – External Distribution

4
avaya.com
January 2016
Table of Contents
Figures .......................................................................................................................................................... 8
Tables ............................................................................................................................................................ 9
1. Border Gateway Protocol (BGP) Overview ......................................................................................... 11
2. BGP Features Supported by software release ................................................................................... 11
2.1 BGP Configuration Guideline ...................................................................................................... 12
2.1.1 ERS 8000 – Converting from CLI to ACLI .............................................................................................. 12
2.1.2 Configuration Guidelines ........................................................................................................................ 12
3. Basic BGP Fundamentals ................................................................................................................... 14
3.1 Basic BGP Configuration Example ............................................................................................. 15
3.1.1 Configure 8008 and 9001 ....................................................................................................................... 15
3.1.2 Verify Operations .................................................................................................................................... 19
4. BGP Timers ......................................................................................................................................... 26
5. BGP Network Command ..................................................................................................................... 28
6. Redistribution Policies ......................................................................................................................... 29
6.1 BGP Redistribution ...................................................................................................................... 29
6.2 OSPF and BGP Route Distribution ............................................................................................. 30
6.2.1 Configuration .......................................................................................................................................... 30
6.3 Creating a Policy to Inject Default Route When Using OSPF as an Interior Gateway Protocol . 32
6.3.1 Configuration .......................................................................................................................................... 33
7. ISIS and BGP Route Distribution ........................................................................................................ 35
7.1 Configuration ............................................................................................................................... 36
7.1.1 ISIS Configuration .................................................................................................................................. 36
7.1.2 Prefix list and route policies .................................................................................................................... 39
7.1.3 BGP Configuration ................................................................................................................................. 40
7.1.4 Enable ISIS Route Policy and Disable Alternative Route ....................................................................... 42
7.1.5 Enable BGP to ISIS Redistribution ................................................................................................ ......... 43
7.1.6 Enable ISIS to BGP Redistribution ................................................................................................ ......... 46
7.2 BGP 4-Byte Autonomous System Numbers (ASN) .................................................................... 50
8. CIDR and Aggregate Addresses ......................................................................................................... 51
8.1 Configuration Example ................................................................................................................ 51
8.1.1 Configuration .......................................................................................................................................... 51
9. EBGP Multihop .................................................................................................................................... 53
9.1 Configuration Example – BGP Multihop ..................................................................................... 53
9.1.1 8008 and 9001 Configuration ................................................................................................................. 53
Avaya Inc. – External Distribution

5
avaya.com
January 2016
10. EBGP Load Balance Using ECMP ................................................................................................. 56
10.1 Configuration Example ................................................................................................................ 56
10.1.1 8008 Configuration ............................................................................................................................. 56
11. BGP Synchronization and Next-Hop-Self ....................................................................................... 58
11.1 Configuration Example 1 – Initial Configuration .......................................................................... 59
11.1.1 Configuration – With BGP Synchronization Enabled ......................................................................... 59
11.1.2 Verify Operations ............................................................................................................................... 62
11.2 Correcting the Next Hop Problem ............................................................................................... 64
11.3 How to Correct the Next Hop Problem from Step 11.1 ............................................................... 64
11.3.1 Configuration – Enabling BGP Next Hop-Self and Synchronization .................................................. 64
11.3.2 Verify Operations ............................................................................................................................... 65
11.3.3 Verifying Operation ............................................................................................................................ 67
12. MD5 Authentication Configuration Example ................................................................................... 68
12.1 MD5 Configuration ...................................................................................................................... 68
12.1.1 Configure ERS8000 and VSP 9000 for MD-5 Authentication ............................................................ 68
13. BGP Peer Group Configuration Example ....................................................................................... 70
13.1 BGP Peer Group Configuation .................................................................................................... 70
13.1.1 Create the Peer Group (Group_1) ..................................................................................................... 70
13.1.2 Create BGP Peers ............................................................................................................................. 71
13.1.3 Add Peers as Member of Group_1 .................................................................................................... 71
13.1.4 Assign Peer Group to AS 20 .............................................................................................................. 71
13.1.5 Assign Variables to Peer Group ......................................................................................................... 71
13.1.6 Enable the Peer Group ...................................................................................................................... 71
13.1.7 Assigning Policies to Peer Group ....................................................................................................... 71
14. Route Selection and Traffic Management – BGP Path Attributes .................................................. 72
14.1 Origin Attribute (Type 1) .............................................................................................................. 73
14.1.1 Origin Attribute Configuration Example – Static Route Distribution.................................................... 73
14.1.2 Changing the Origin Type .................................................................................................................. 76
14.2 AS Path Attribute (Type 2) .......................................................................................................... 79
14.2.1 Config Example: Load Balance Approach using AS Path to Influence Inbound Traffic Flow ............. 79
14.2.2 Configuration Example: AS_Path Filtering ......................................................................................... 81
14.2.3 Alternative Configuration Method for 8008 ......................................................................................... 82
14.3 Local Preference Attribute (Type 5) Configuration Example ...................................................... 83
14.3.1 Configuration : Local Preference........................................................................................................ 84
14.4 Configuration Example: Adding Preference to Specific Routes .................................................. 86
14.4.1 Configuration: Preference for Specific Routes ................................................................................... 87
14.5 Multi-Exit Discriminator (MED) Attribute (Type 4) ....................................................................... 88
Avaya Inc. – External Distribution

6
avaya.com
January 2016
14.5.1 MED Configuration – Example 1 ........................................................................................................ 88
14.6 MED Configuration – Example 2 ................................................................................................. 90
14.6.1 Configuration...................................................................................................................................... 90
14.6.2 Other MED Commands ...................................................................................................................... 91
14.7 Community Attribute (Type 8) ..................................................................................................... 93
14.7.1 Community Attribute Configuration Example ..................................................................................... 94
14.7.2 Verification ......................................................................................................................................... 96
15. EBGP Scalability Issues .................................................................................................................. 98
15.1 Using Policies to Limit EBGP Routes ......................................................................................... 98
15.1.1 Configuration Example: Using AS List to Limit Route Table Size ...................................................... 98
16. IBGP Scalability Issues ................................................................................................................. 101
16.1 BGP Confederations ................................................................................................................. 101
16.2 Confederation Configuration Example ...................................................................................... 102
16.2.1 Configuration.................................................................................................................................... 102
16.3 Route Reflectors ....................................................................................................................... 105
16.3.1 Route Reflector Configuration Example ........................................................................................... 105
16.4 Configuration Example using Cluster List ................................................................................. 108
16.4.1 Configuration.................................................................................................................................... 108
17. Configuring EBGP Route Flap Dampening ................................................................................... 111
17.1 Configuration: Route Flap Damping .......................................................................................... 111
17.1.1 Enabling BGP Route Flap Damping ................................................................................................. 111
17.2 Verification ................................................................................................................................. 112
17.2.1 Viewing Damping Configuration ....................................................................................................... 112
17.3 BGP Quick-Start Feature .......................................................................................................... 113
18. BGP+ ............................................................................................................................................. 114
18.1 Configuration Example: iBGP+ ................................................................................................. 115
18.1.1 BGP+ Configuration ......................................................................................................................... 115
18.1.2 Verification ....................................................................................................................................... 118
19. Appendix A .................................................................................................................................... 121
19.1 Translating Cisco to Avaya Equivalents .................................................................................... 121
19.2 Interpreting the Cisco to Avaya BGP Translation Table ........................................................... 131
19.3 Comparing Cisco and Avaya BGP Operational Commands ..................................................... 133
19.4 Interpreting the Cisco and Avaya BGP Operational Table ....................................................... 135
19.5 Interpreting the Cisco and Avaya BGP Operational Table ....................................................... 136
20. Appendix B .................................................................................................................................... 137
20.1 Translating Juniper to Avaya Equivalents ................................................................................. 137
20.2 Interpreting the Juniper to Avaya BGP Translation Table ........................................................ 149
Avaya Inc. – External Distribution

7
avaya.com
January 2016
20.3 Comparing Juniper and Avaya BGP Operational Commands .................................................. 151
20.4 Interpreting the Juniper and Avaya BGP Operational Table ..................................................... 153
20.5 Interpreting the Juniper and Avaya BGP Operational Table ..................................................... 154
21. Appendix C – BGP Events ............................................................................................................ 155
22. Appendix D – EDM BGP Command Options ................................................................................ 159
Avaya Inc. – External Distribution

8
avaya.com
January 2016
Figures
Figure 1: BGP Fundamentals...................................................................................................................... 14
Figure 2: Inject Default Route Configuration Example ................................................................................ 32
Figure 3: ISIS and BGP Route Distribution ................................................................................................. 35
Figure 4: Aggregate Address Configuration Example ................................................................................ 51
Figure 5: EBGP Configuration Example ..................................................................................................... 53
Figure 6: EBGP Configuration Example ..................................................................................................... 56
Figure 7: BGP Synchronization and Self Hop Configuration Example ....................................................... 58
Figure 8: BGP MD5 Configuration Example ............................................................................................... 68
Figure 9: BGP Peer Group Configuration Example .................................................................................... 70
Figure 10: BGP Origin Attribute Configuration Example ............................................................................. 73
Figure 11: BGP AS Path Configuration Example ....................................................................................... 79
Figure 12: BGP AS Path Filtering Example ................................................................................................ 81
Figure 13: BGP Local Preference Configuration Example ......................................................................... 83
Figure 14: BFP Local Preference to Specific Routes Configuration Example ............................................ 86
Figure 15: BGP MED Configuration Example ............................................................................................. 88
Figure 16: BFP MED Configuration Example 2 .......................................................................................... 90
Figure 17: BGP Community Configuration Example .................................................................................. 94
Figure 18: BGP AS Path Filtering Example ................................................................................................ 98
Figure 19: BGP Confederation Configuration Example ............................................................................ 102
Figure 20: BGP Route Reflector Configuration Example .......................................................................... 105
Figure 21: BGP Route Reflector with Cluster List Configuration Example ............................................... 108
Figure 22: BGP Route Flap Damping Configuration Example .................................................................. 111
Avaya Inc. – External Distribution

9
avaya.com
January 2016
Tables
Table 1: BGP Features by Software Release ............................................................................................. 11
Table 2: BGP Timers ................................................................................................................................... 26
Table 3 Translating Cisco to Avaya Equivalents....................................................................................... 121
Table 4: Cisco and Avaya BGP Operational Commands ......................................................................... 133
Table 5: Cisco and Avaya Route Preference Comparison ....................................................................... 136
Table 6: Translating Juniper to ERS 8000 Equivalents ............................................................................ 137
Table 7: Juniper and Avaya BGP Operational Commands ...................................................................... 151
Table 8: Route Preference Comparison ................................................................................................... 154
Table 9: EDM BGP Configuration Options ................................................................................................ 159
Table 10: EDM BGP Peer Configuration Options ..................................................................................... 163
Avaya Inc. – External Distribution

10
avaya.com
January 2016
Symbols
Tip – Highlights a configuration or technical tip.
Note – Highlights important information to the reader.
Warning – Highlights important information about an action that may result in equipment
damage, configuration or data loss.
Text
Bold text indicates emphasis.
Italic text in a Courier New font indicates text the user must enter or select in a menu item, button or
command:
ERS5520-48T# show running-config
Output examples from Avaya devices are displayed in a Lucida Console font:
ERS5520-48T# show sys-info
Operation Mode: Switch
MAC Address: 00-12-83-93-B0-00
PoE Module FW: 6370.4
Reset Count: 83
Last Reset Type: Management Factory Reset
Power Status: Primary Power
Autotopology: Enabled
Pluggable Port 45: None
Pluggable Port 46: None
Pluggable Port 47: None
Pluggable Port 48: None
Base Unit Selection: Non-base unit using rear-panel switch
sysDescr: Ethernet Routing Switch 5520-48T-PWR
HW:02 FW:6.0.0.10 SW:v6.2.0.009
Mfg Date:12042004 HW Dev:H/W rev.02
Conventions
This section describes the text, image, and command conventions used in this document.
Avaya Inc. – External Distribution
11
avaya.com
January 2016
Feature
ERS 8800
VSP 4000
VSP 7200
VSP 8000
VSP 9000
eBGP (GRT & VRF)
7.0
3.1
4.2.1.0
4.1.0
3.0
eBGP (GRT & VRF) and
iBGP (GRT only)
7.0
4.2.0
4.2.1.0
4.2.0
3.0
4-byte AS
7.1.0
3.1.0
4.2.1
4.1.0
3.2.0
BGP+ RFC2545 (GRT only)
7.0
5.0
5.0
5.0
4.1.0
1. Border Gateway Protocol (BGP) Overview
The Border Gateway Protocol (BGP) is an exterior gateway protocol that border routers use to exchange
network reachability information with other BGP systems. BGP routers form peer relationships with other
BGP routers. Using an entity called a BGP Speaker, BGP peers transmit and receive current routing
information over a reliable transport layer connection, making periodic updates unnecessary. BGP can be
used both within and between autonomous systems.
BGP peers exchange complete routing information only when they establish the peer connection.
Thereafter, BGP peers exchange routing information in the form of routing updates. An update includes a
network number, a list of autonomous systems that the routing information has passed through (the AS
path), and other path attributes that describe the route to a set of destination networks. When multiple
paths are available, BGP compares the path attributes to choose the preferred path.
In addition to exchanging BGP information between autonomous systems, you can use BGP to exchange
BGP information between routers in the same AS. To differentiate between these uses, the latter is called
interior BGP (IBGP).
2. BGP Features Supported by software release
Table 1: BGP Features by Software Release
Avaya Inc. – External Distribution

12
avaya.com
January 2016
The BGP Router ID by default is automatically derived from the OSPF Router ID. It is
recommended to configure a circuitless IP address (CLIP) and to use this address as
the OSPF Router ID. The CLIP address can also be referred to as a loopback address.
It should be noted that once BGP is configured, some parameter changes may require
having either the BGP Global state or neighboring admin-state to be disabled/enabled.
The CLI prompt will notify you if this is the case.
To enable/disable BGP globally, enter:
2.1 BGP Configuration Guideline
2.1.1 ERS 8000 – Converting from CLI to ACLI
As the ERS 8000 supports CLI and ACLI, it is highly recommended to use ACLI as all other switches from
Avaya only support ACLI. If you are presently using CLI, you can convert to ACLI using the following
configuration.
ERS8800-1:5# copy /flash/config.cfg /flash/backup.cfg
ERS8800-1:5# save config file /flash/config_acli.cfg backup /flash/config.cfg mode
acli
ERS8800-1:5# config boot flags acli true
ERS8800-1:5 config boot choice primary config-file /flash/config_acli.cfg
ERS8800-1:5# save boot
ERS8800-1:5# boot -y
2.1.2 Configuration Guidelines
When configuring BGP parameters on the Avaya switch, at a minimum it must be configured with the
following parameters
Router ID
Local AS Number
Enable BGP Globally
BGP Neighbor Peer Session: remote IP addresses
BGP Neighbor Remote Peer AS
Enable BGP peer
In addition, BGP Policies can be added to the BGP peer configuration to influence route decisions as we
will demonstrate later on in the document.
The BGP policies are dynamically modified. On the global level, the BGP redistribution has an apply
command that causes the policy to be applied at that time. The BGP neighbor peer has a CLI command
named ‘restart soft-reconfiguration <in> <out>’ that allows policies to be applied without bringing down the
peer.
The following are some examples of these commands:
router bgp <as> enable
no router bgp enable
Avaya Inc. – External Distribution

13
avaya.com
January 2016
To enable/disable a BGP neighbor, enter:
To set BGP soft-reconfiguration, enter:
To restart a BGP peer after adding a route policy to a peer, enter:
To apply BGP policy redistribution, enter:
EDM: To enable/disable BGP globally, enter:
EDM: To disable a BGP neighbor, enter:
EDM: To set BGP soft-reconfiguration, enter:
router bgp
neighbor <ip address of neighbor or neighbor group name> enable
no neighbor <ip address of neighbor or neighbor group name> enable
exit
neighbor <ip address of neighbor or neighbor group name> soft-reconfiguration-in
enable
ip bgp restart-bgp neighbor <ip address of neighbor or neighbor group name> softreconfiguration <in/out>
ip bgp apply redistribute
ip bgp apply redistribute <direct|isis|ospf|rip|static|vrf>
If using EDM, use the following commands:
IP->BGP->Generals->AdminStatus <enable/disable>
IP->BGP->Peers->RemoteAddr <IP address of peer> Enable <true/false>
IP->BGP->Peers->RemoteAddr SoftReconfiguration <true/false>
Avaya Inc. – External Distribution
14
avaya.com
January 2016
3. Basic BGP Fundamentals
There are two types of BGP connections, external BGP (EBGP) and internal BGP (IBGP). Routers
belonging to the same autonomous system (AS) and exchange BGP updates are referred to as running
IBGP. Routers that belong to a different AS and exchange BGP updates are referred to as running
EBGP. Within an AS, routers run an interior gateway protocol such as OSPF.
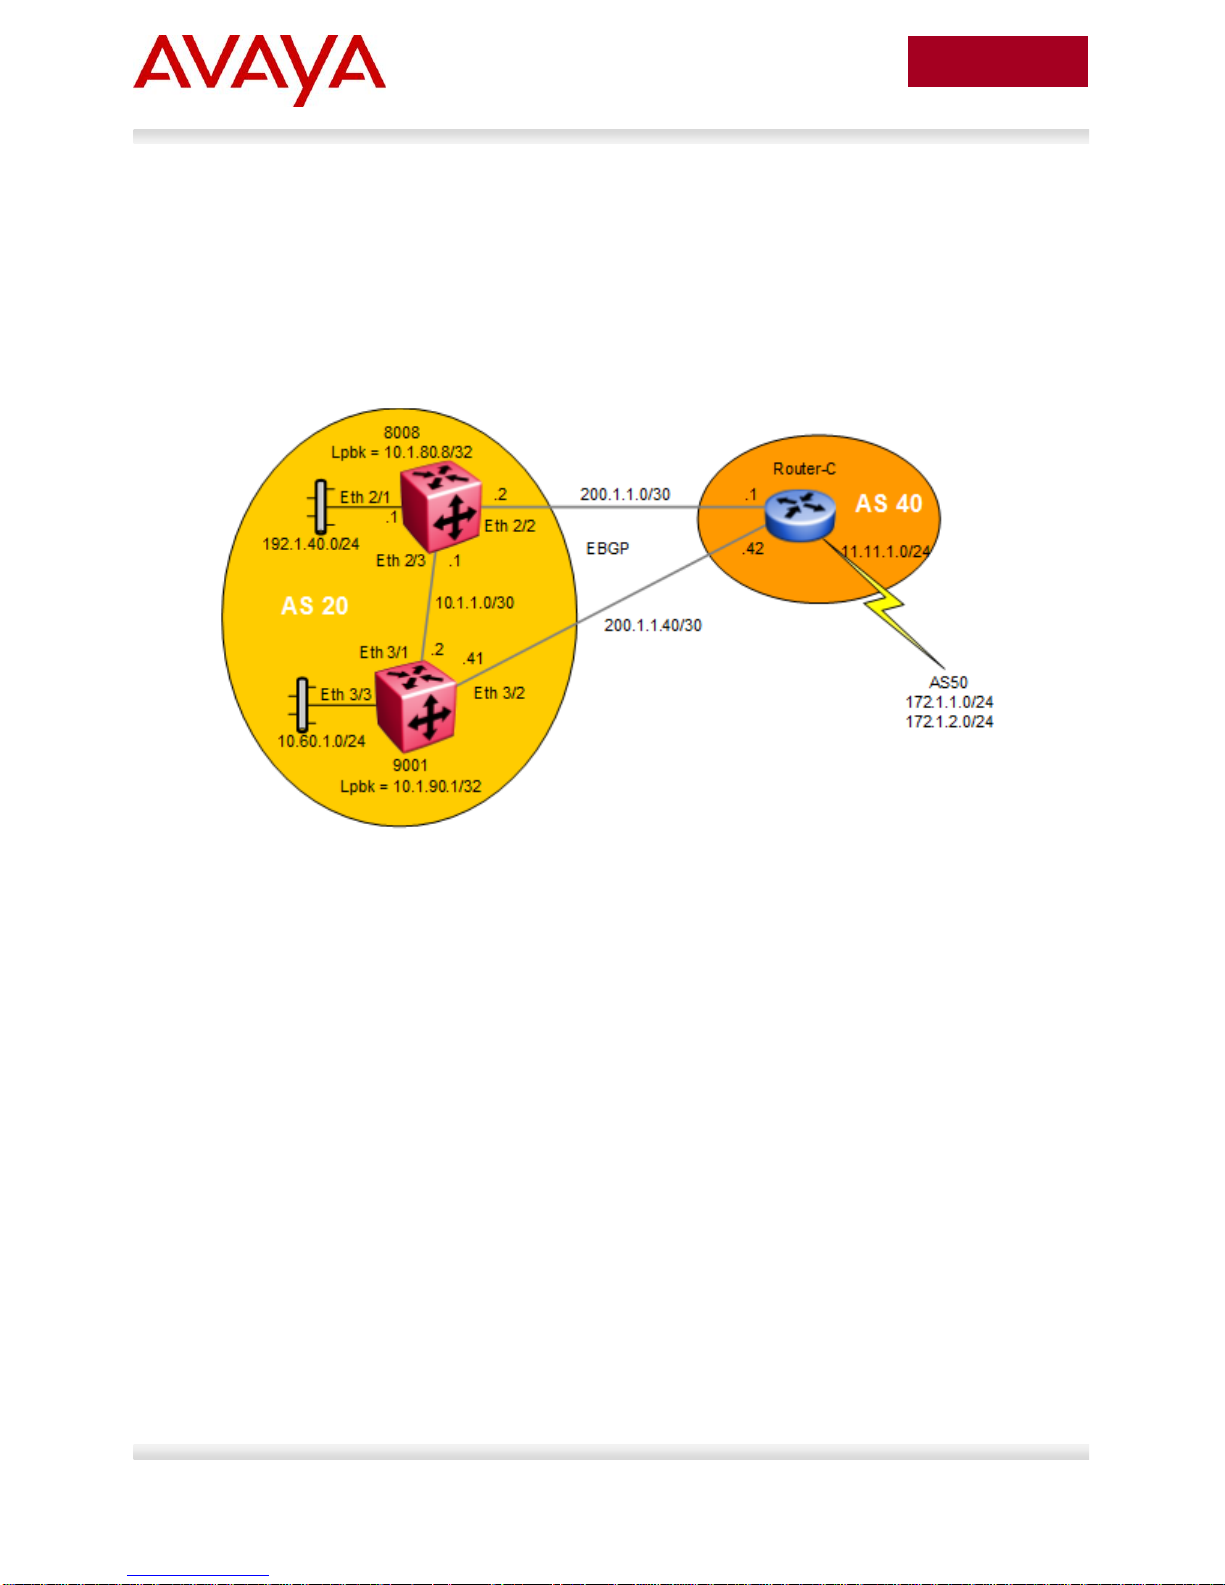
In Figure 1 shown below, the connections between Router-C in AS 40 to ERS 8000 switch 8008 and VSP
9000 switch 9001 in AS 20 are running EBGP. The connection between 8008 and 9001 is running IBGP.
Figure 1: BGP Fundamentals
To configure a router for basic BGP operations, the following parameters must be configured:
The Local AS number
The BGP Router ID
o By default, the BGP Router ID will automatically use the OSPF Router ID. As BGP uses
the OSPF router ID, they cannot be different. A change in the router ID will require a BGP
restart to take effect.
o It is recommended to use a loopback IP (also known as a circuitless IP or CLIP) address
for the OSPF Router-ID which in turn also becomes the BGP Router-ID. The CLIP
address can also be referred to as a loopback address. This IP address is used in BGP
Update messages. This will help for trouble-shooting purposes to give you an idea where
the updates are coming from.
The BGP neighbor peer(s) which can be iBGP or/and eBGP.
o If iBGP, the remote-as will be the same
o If eBGP, the remote-as will be different
For example, the following commands are used to configure BGP on ERS 8000 switch named 8008 and
VSP 9000 switch named 9001
Avaya Inc. – External Distribution
15
avaya.com
January 2016
For this example, we will simply select loopback instance 1 although any instance
number from 1 to 256 can be used.
8008 and 9001: Add a loopback address using instance 1 and enable OSPF
8008 and 9001: Add IP addresses to brouter ports
3.1 Basic BGP Configuration Example
3.1.1 Configure 8008 and 9001
3.1.1.1 Configure Loopback IP
8008:
8008:5(config)#interface loopback 1
8008:5(config-if)#interface ip address 10.1.80.8/32
8008:5(config-if)#ip ospf
9001:
9001:1(config)#interface loopback 1
9001:1(config-if)#interface ip address 10.1.90.1/32
9001:1(config-if)#ip ospf
3.1.1.2 Configure Ports with Appropriate IP Address
For this configuration example, we will use brouter ports. If you wish to use more than one port on a
switch, it is recommended to add a normal VLAN instead of using brouter ports.
8008:
8008:5(config)#interface gigabitEthernet 2/2
8008:5(config-if)#brouter vlan 2090 subnet 200.1.1.2/30
8008:5(config-if)#exit
8008:5(config)#interface gigabitEthernet 2/3
8008:5(config-if)#brouter vlan 2091 subnet 10.1.1.1/30
8008:5(config-if)#exit
8008:5(config)#interface gigabitEthernet 2/1
8008:5(config-if)#brouter vlan 2092 subnet 192.1.40.1/24
8008:5(config-if)#exit
9001:
9001:1(config)#interface gigabitEthernet 3/1
9001:1(config-if)#brouter vlan 2090 subnet 10.1.1.2/30
9001:1(config-if)#exit
9001:1(config)#interface gigabitEthernet 3/2
Avaya Inc. – External Distribution
16
avaya.com
January 2016
In the configuration above, we are using Avaya Ethernet Routing Switch 8000 and VSP
9000 brouter ports as the BGP EBGP and IBGP interfaces. Hence, the reason VLAN
ID’s of 2090, 2091, and 2092 are used. Either a brouter port or a VLAN can be
configured as the BGP interface. To display the brouter port VLAN ID’s, use the
following command:
8008:5#show vlan brouter-port
8008 and 9001: Enable OSPF AS boundary router (ASBR), add loopback address as the
OSPF router-id, and enable OSPF on brouter ports
Please note that the BGP router-id is derived from the OSPF router-id. In this example,
the BGP router-id will become the CLIP address of 10.1.80.8.
9001:1(config-if)#brouter vlan 2092 subnet 200.1.1.41/30
9001:1(config-if)#exit
3.1.1.3 Enable OSPF Globally and on Brouter Ports
8008:
8008:5(config)#router ospf
8008:5(config-ospf)#as-boundary-router enable
8008:5(config-ospf)#router-id 10.1.80.8
8008:5(config-ospf)#exit
8008:5(config)#router ospf enable
8008:5(config)#interface gigabitEthernet 2/1,2/3
8008:5(config-if)#ip ospf enable
9001:
9001:1(config)#router ospf
9001:1(config-ospf)#as-boundary-router enable
9001:1(config-ospf)#router-id 10.1.90.1
9001:1(config-ospf)#exit
9001:1(config)#router ospf enable
9001:1(config)#interface gigabitEthernet 3/1,3/3
9001:1(config-if)#ip ospf enable
Avaya Inc. – External Distribution
17
avaya.com
January 2016
8008 and 9001: Assign both switch to BGP AS20 and disable synchronization
The BGP synchronization option is set to disable so that it does not require a match for
a route prefix in the route table for an IBGP path. By default, BGP synchronization is
enabled. Please see section 11 for more details regarding BGP Synchronization.
8008 and 9001: Add BGP peers
3.1.1.4 Configure BGP Globally
8008:
8008:5(config)#router bgp 20 enable
8008:5(config)#router bgp
8008:5(router-bgp)#no synchronization
9001:
9001:1(config)#router bgp 20 enable
9001:1(config)#router bgp
9001:1(router-bgp)#no synchronization
3.1.1.5 Configure BGP Peers
8008:
8008:5(config)#router bgp
8008:5(router-bgp)#neighbor 200.1.1.1
8008:5(router-bgp)#neighbor 200.1.1.1 remote-as 40 enable
8008:5(router-bgp)#neighbor 10.1.1.2
8008:5(router-bgp)#neighbor 10.1.1.2 remote-as 20 enable
8008:5(router-bgp)#exit
9001:
9001:1(config)#router bgp
9001:1(router-bgp)#neighbor 200.1.1.42
9001:1(router-bgp)#neighbor 200.1.1.42 remote-as 40 enable
9001:1(router-bgp)#neighbor 10.1.1.1
9001:1(router-bgp)#neighbor 10.1.1.1 remote-as 20 enable
9001:1(router-bgp)#exit
Avaya Inc. – External Distribution
18
avaya.com
January 2016
8008 and 9001: Add the appropriate networks which you wish to advertise via BGP
The networks must be present in the routing table before BGP will advertise them.
Please see Section 5 for more details regarding the Network command.
By default, the switch will summarize network routes based on class limits (for example,
Class A, B, C networks). To disable this feature, use the following command.
8008:5(config)#router bgp
8008:5(router-bgp)#no auto-summary
The max-prefix parameter controls the maximum number of routes that a peer can
accept. The purpose is to prevent configurations from accepting more routes than it can
forward to. Use a setting of 0 to accept an unlimited number of prefixes.
To modify the Max prefix use the following CLI Command:
3.1.1.6 Configure IGP Network Prefixes
Configure the BGP network prefixes that you want to distribution. The “network” command is used for this
purpose. The command format is as follows:
8008:
8008:5(config)#router bgp
8008:5(router-bgp)#network 192.1.40.0/24
9001:
9001:1(config)#router bgp
9001:1(router-bgp)#network 10.60.1.0/24
3.1.1.7 Specifying Number of Routes Learned – Max-Prefix
The BGP implementation has a default number of routes that can be accepted per peer. For the ERS
8000 switch, the default value is 250,000 BGP forwarding routes in its routing information base (RIB) and
500,000 in its forwarding information base (FIB). For the VSP 9000 as of release 4.0 and using
generation 2 modules, up to 1 million route operations is supported.
If you wish to set the number of routes, you must change the max-prefix parameter value.
8008 & 9001:
8008:5(config)#router bgp
8008:5(router-bgp)#neighbor <remote peer> max-prefix ?
<0-2147483647> Max prefix
Example: to allow an unlimited number of prefixes, enter the following command assuming the BGP peer
address is 150.1.0.3:
8008:5(router-bgp)#neighbor 150.1.0.3 max-prefix 0
Avaya Inc. – External Distribution
19
avaya.com
January 2016
To verify that the BGP peers are up, use the show ip bgp summary command. Following is
the output of this command:
3.1.2 Verify Operations
3.1.2.1 Verify BGP Neighbor State
8008:
8008:5#show ip bgp summary
================================================================================
BGP Summary - GlobalRouter
================================================================================
BGP version - 4
local-as - 20
Identifier - 10.1.80.8
Decision state - Idle
The total number of routes is 0
BGP NEIGHBOR INFO :
NEIGHBOR RMTAS STATE HLDTM KPALV HLDCFG KPCFG WGHT CONRTY ADVINT
--------------------------------------------------------------------------------
10.1.1.2 20 Established 180 60 180 60 100 120 5
200.1.1.1 40 Established 180 60 180 60 100 120 5
Total bgp neighbors: 2
BGP CONFEDERATION INFO :
confederation identifier 0
confederation peer as
BGP NETWORK INFO :
================================================================================
BGP Networks - GlobalRouter
================================================================================
192.1.40.0 mask 255.255.255.0 metric 0
Avaya Inc. – External Distribution
20
avaya.com
January 2016
Option
Verify
Neighbor
Verify that the BGP neighbors are 10.1.1.2 and 200.1.1.1.
Rmt AS
Verify that the BGP Remote-AS for each neighbor is correct:
For neighbor 10.1.1.2, the local AS should be displayed as 20.
For neighbor 200.1.1.1, the remote AS should be displayed as 40.
State
Verify that the state is Established for each neighbor. If not, check the
configuration on both switches, port state, and any possible mis-configurations
in the BGP timers used.
To show routes in the base route table, enter the following command:
Via 8008, verify the following information:
3.1.2.2 Displaying BGP Routes
Assuming the following:
Router-C is advertising networks 11.11.1.0/24, 172.1.1.0/24, and 172.1.2.0/24
9001 is advertising network 10.60.1.0/24
Default local preference used on all switches
8008:
8008:5#show ip route
================================================================================
IP Route - GlobalRouter
================================================================================
NH INTER
DST MASK NEXT VRF COST FACE PROT AGE TYPE PRF
--------------------------------------------------------------------------------
10.1.1.0 255.255.255.252 10.1.1.1 - 1 2/3 LOC 0 DB 0
10.1.80.8 255.255.255.255 10.1.80.8 - 1 0 LOC 0 DB 0
10.60.1.0 255.255.255.0 10.1.1.2 Glob~ 0 2/3 BGP 0 IB 175
11.11.1.0 255.255.255.0 200.1.1.1 Glob~ 1 2/2 BGP 0 IB 45
172.1.1.0 255.255.255.0 200.1.1.1 Glob~ 2 2/2 BGP 0 IB 45
172.1.2.0 255.255.255.0 200.1.1.1 Glob~ 2 2/2 BGP 0 IB 45
192.1.40.0 255.255.255.0 192.1.40.1 - 1 2/1 LOC 0 DB 0
200.1.1.0 255.255.255.252 200.1.1.2 - 1 2/2 LOC 0 DB 0
Avaya Inc. – External Distribution
21
avaya.com
January 2016
To display the full BGP route table, enter the following command:
Option
Verify
DST
Peer Rem Addr
NextHop Address
Verify that networks 10.60.1.0/24, 11.11.1.0/24, 172.1.1.0/24, and 172.1.2.0/24
are learned via BGP in the common route table. In the BGP route table, both
route paths should be displayed with the appropriate NextHop address and AS
Path.
PROT
Verify that the BGP routes 10.60.1.0/24, 11.11.1.0/24, 172.1.1.0/24, and
172.1.2.0/24 are learned via BGP in the command route table.
NEXT
TYPE
Verify that all routes learned from AS40 (11.11.1.0/24, 172.1.1.0/24, and
172.1.2.0/24) are using the best path:
Next = 200.1.1.1 and TYPE = IB (Indirect & Best)
Verify that all routes learned from within AS20 (10.60.1.0/24) are using the best
path:
Next = 10.1.1.2 and TYPE = IB
8008:
8008:5#show ip bgp route
The total number of routes is 8
Network/Mask Peer Rem Addr NextHop Address Org Loc Pref
------------------ --------------- --------------- --- ----------
10.60.1.0/24 10.1.1.2 10.1.1.2 IGP 100
AS_PATH: path-is-empty
10.60.1.0/24 200.1.1.1 200.1.1.1 IGP 100
AS_PATH: (40)
11.11.1.0/30 200.1.1.1 200.1.1.1 IGP 100
AS_PATH: (40)
11.11.1.0/30 10.1.1.2 200.1.1.42 IGP 100
AS_PATH: (40)
172.1.1.0/24 200.1.1.1 200.1.1.1 IGP 100
AS_PATH: (40 50)
172.1.1.0/24 10.1.1.2 200.1.1.42 IGP 100
AS_PATH: (40 50)
172.1.2.0/24 200.1.1.1 200.1.1.1 IGP 100
AS_PATH: (40 50)
172.1.2.0/24 10.1.1.2 200.1.1.42 IGP 100
AS_PATH: (40 50)
For 8008, verify the following information:
Avaya Inc. – External Distribution

22
avaya.com
January 2016
To show routes advertised from neighbor 200.1.1.1, use the following command:
3.1.2.3 Display BGP Routes Learned via BGP Neighbor
8008:
8008:5#show ip bgp neighbors 200.1.1.1 routes
================================================================================
BGP Neighbor Routes - GlobalRouter
================================================================================
NETWORK/MASK PEER-REM-ADDR NEXTHOP-ADDRESS ORG LOC-PREF STATUS
--------------------------------------------------------------------------------
10.60.1.0/24 200.1.1.1 200.1.1.1 IGP 100 Accepted
AS_PATH: (40)
11.11.1.0/30 200.1.1.1 200.1.1.1 IGP 100 Used
AS_PATH: (40)
172.1.1.0/24 200.1.1.1 200.1.1.1 IGP 100 Used
AS_PATH: (40 50)
172.1.2.0/24 200.1.1.1 200.1.1.1 IGP 100 Used
AS_PATH: (40 50)
8008:5#show ip bgp neighbors 10.1.1.2 routes
================================================================================
BGP Neighbor Routes - GlobalRouter
================================================================================
NETWORK/MASK PEER-REM-ADDR NEXTHOP-ADDRESS ORG LOC-PREF STATUS
-------------------------------------------------------------------------------The total number of accepted routes from the neighbor is 4
Network/Mask Peer Rem Addr NextHop Address Org Loc Pref Status
------------------ --------------- --------------- --- -------- ----
10.60.1.0/24 10.1.1.2 10.1.1.2 IGP 100 Used
AS_PATH: path-is-empty
11.11.1.0/30 10.1.1.2 200.1.1.42 IGP 100 Accepted
AS_PATH: (40)
172.1.1.0/24 10.1.1.2 200.1.1.42 IGP 100 Accepted
AS_PATH: (40 50)
172.1.2.0/24 10.1.1.2 200.1.1.42 IGP 100 Accepted
AS_PATH: (40 50)
Avaya Inc. – External Distribution
23
avaya.com
January 2016
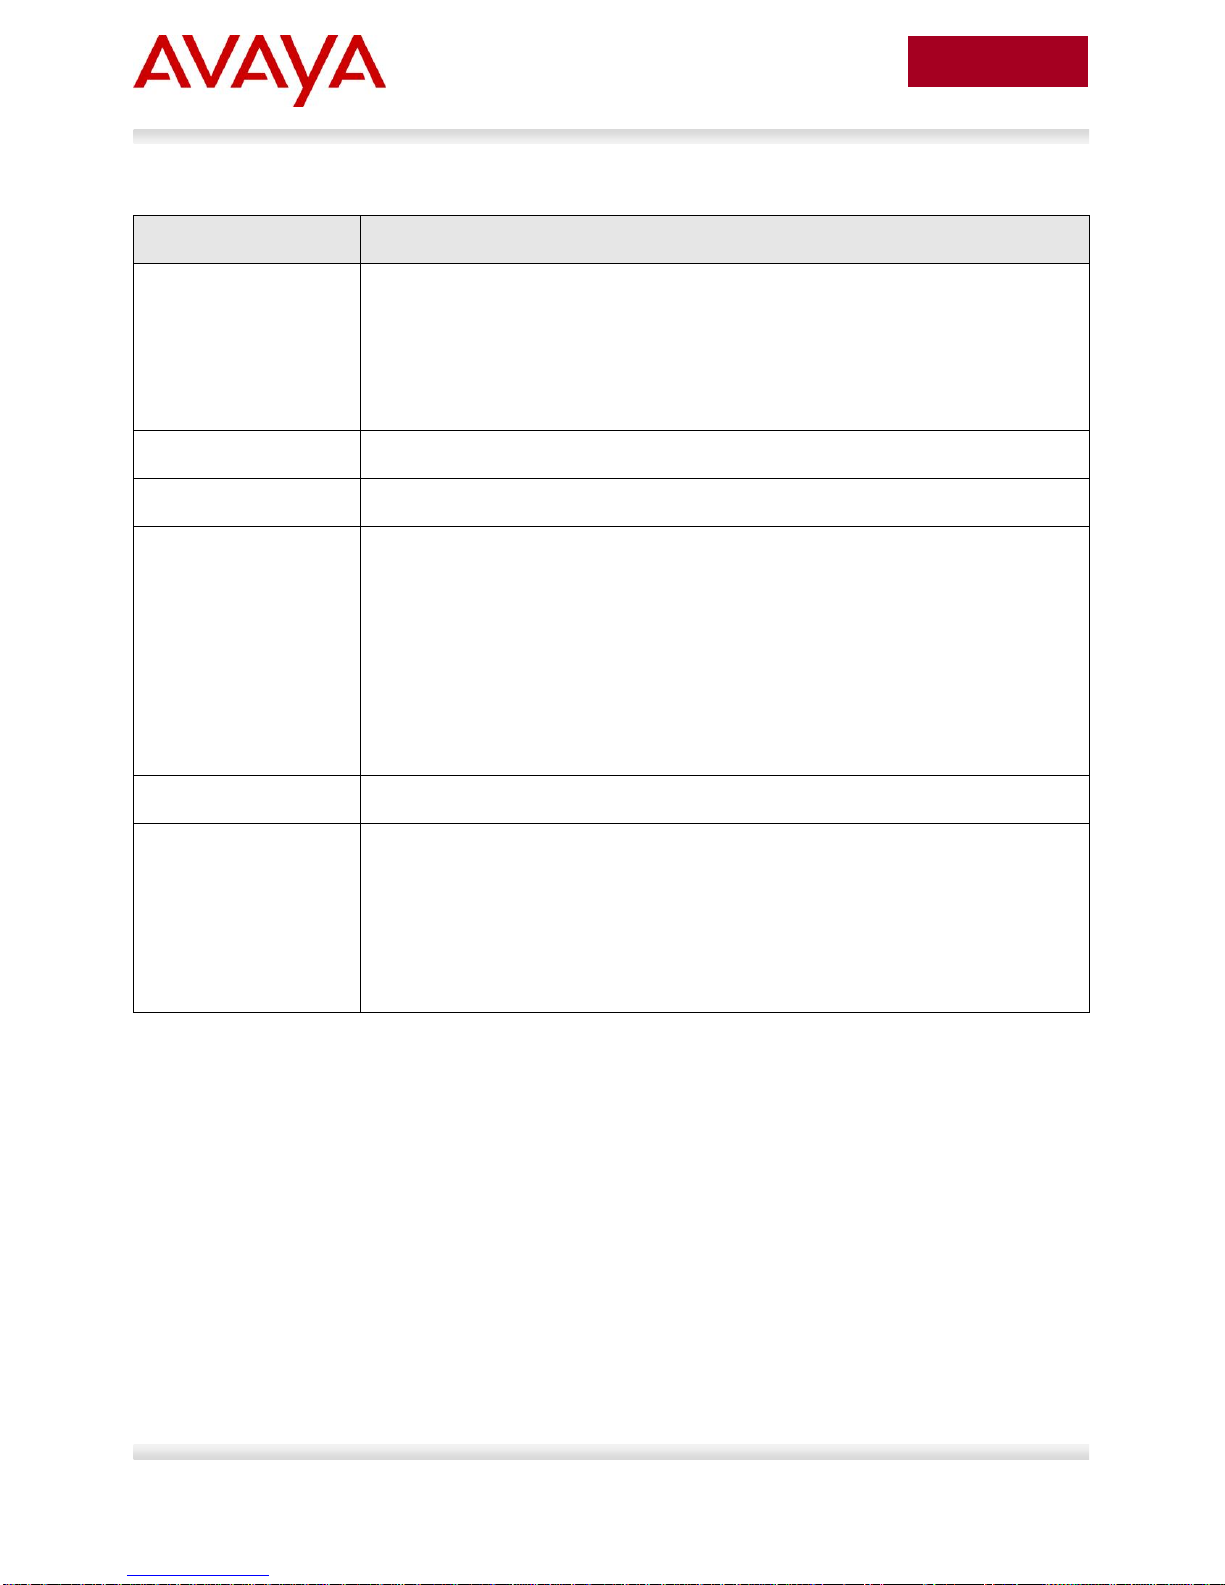
Option
Verify
Network/Mask
Displays the IP network and mask for the direct route. The best route should
have it status displayed as Used as follows:
For BGP peer 10.1.1.2, network 10.60.1.0/24 should be used
For BGP peer 200.1.1.1, networks 11.11.1.0/24, 172.1.1.0/24,and
172.1.2.0/24 should be used.
Peer Rem Addr
Displays, the peer remote address.
NextHop Address
Displays the next-hop address IP address.
Org
Well-known mandatory attribute that specifies the source of a route:
IGP — the route is interior to the originating AS that inserts this route
into the BGP table (0 = IGP).
EGP — the route is learned via the Exterior Gateway Protocol (EGP)
prior to being inserted into the BGP table (1 = BGP).
Incomplete — the origin of the route is unknown or learned by some
other means. For example, these routes could be learned through RIP,
OSPF, or static routes (2 = Incomplete).
Local Pref
Displays the local preference attribute.
Status
Displays the route status which will be either Accepted, Best, Used, or
Rejected. For this example:
For BGP peer 10.1.1.2, network 10.60.1.0/24 should be displayed as
Used
For BGP peer 200.1.1.1, networks 11.11.1.0/24, 172.1.1.0/24,and
172.1.2.0/24 should be Used.
Overview of the information displayed:
Avaya Inc. – External Distribution

24
avaya.com
January 2016
To display the networks configured, enter the following command:
To show routes advertised to a specific peer, in this case, 200.1.1.1 from switch 8008,
enter the following command:
3.1.2.4 Verify BGP Networks
8008:
8008:5#show ip bgp networks
================================================================================
BGP Networks - GlobalRouter
================================================================================
192.1.40.0 mask 255.255.255.0 metric 0
3.1.2.5 View the BGP Routes Sent out to a Specific Peer
8008:
8008:5#show ip bgp neighbors 200.1.1.1 advertised-routes
================================================================================
BGP Neighbor Advertised Routes - GlobalRouter
================================================================================
The total number of routes advertised to the neighbor is 1
NETWORK/MASK NEXTHOP ADDRESS LOC PREF ORG STATUS
--------------------------------------------------------------------------------
10.60.1.0/24 10.1.1.2 100 IGP Used
8008:5#show ip bgp neighbors 10.1.1.2 advertised-routes
================================================================================
BGP Neighbor Advertised Routes - GlobalRouter
================================================================================
The total number of routes advertised to the neighbor is 3
NETWORK/MASK NEXTHOP ADDRESS LOC PREF ORG STATUS
--------------------------------------------------------------------------------
11.11.1.0/24 200.1.1.1 100 IGP Used
172.1.1.0/24 200.1.1.1 100 IGP Used
172.1.2.0/24 200.1.1.1 100 IGP Used
Avaya Inc. – External Distribution
25
avaya.com
January 2016
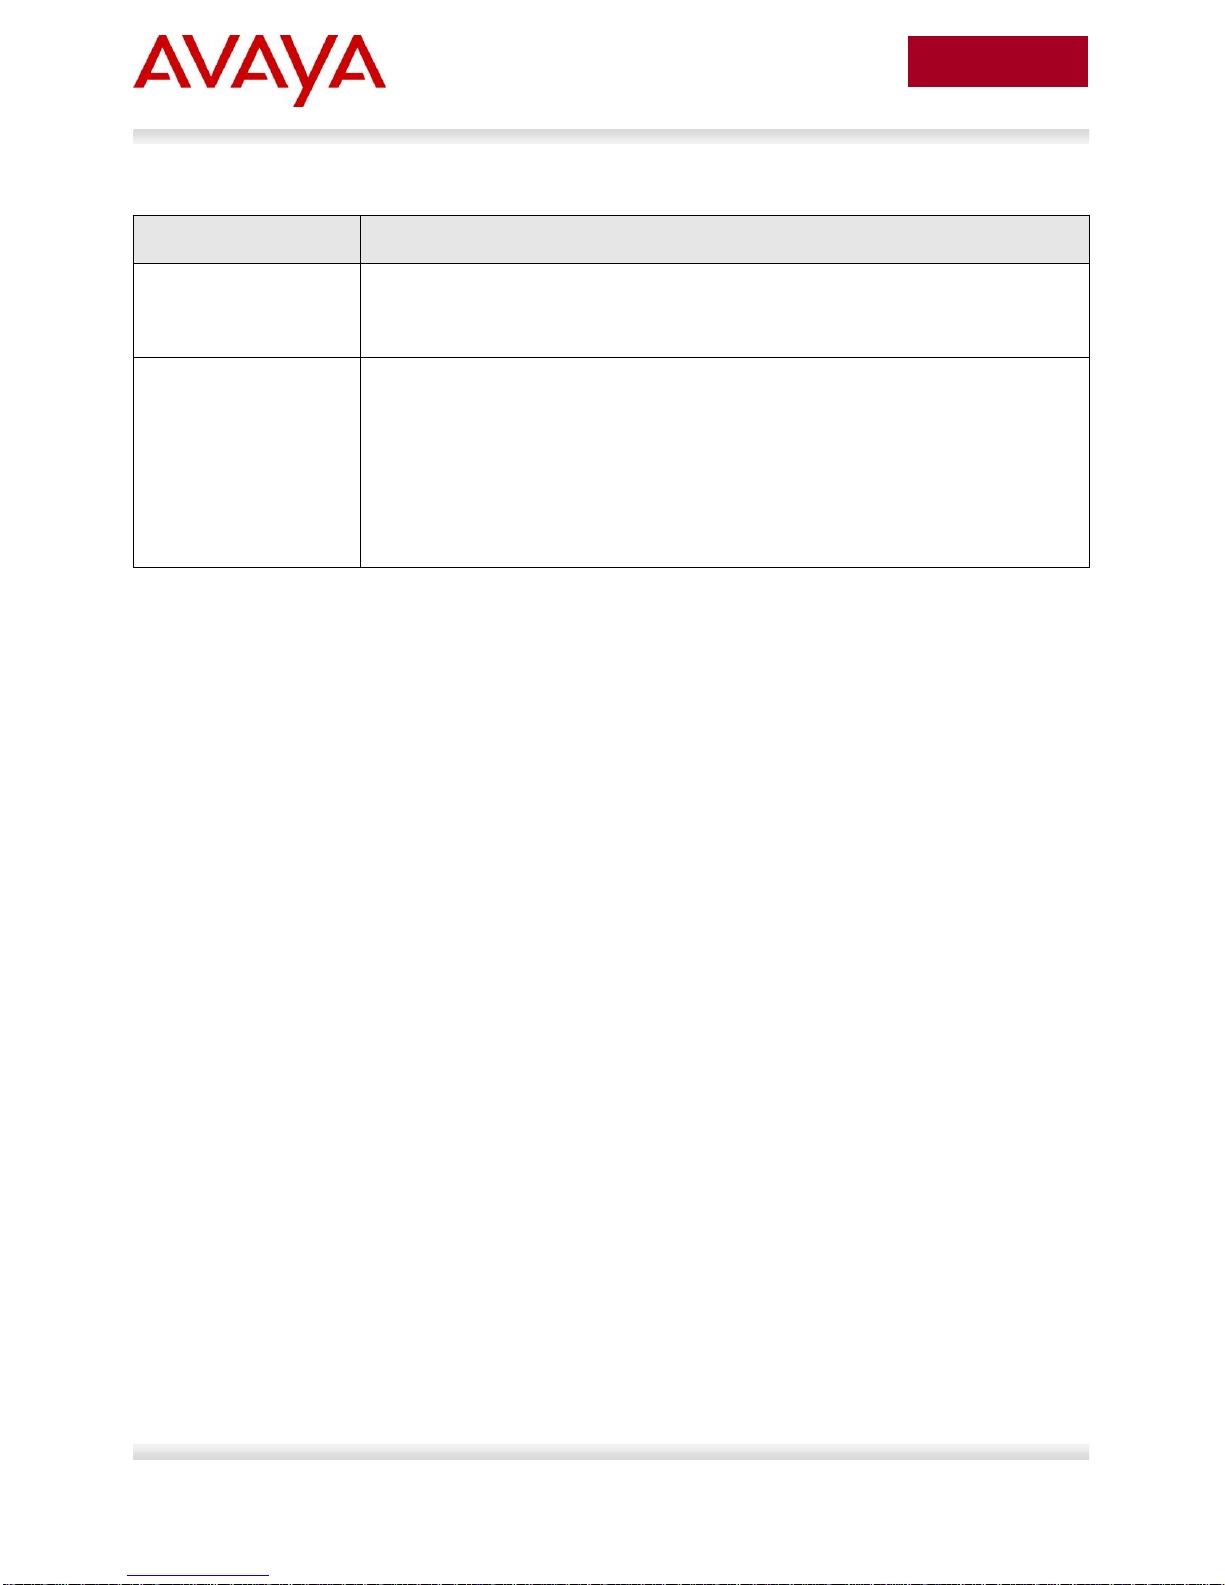
Option
Verify
Network/Mask
Verify that only networks 192.1.40.0/24, and 10.60.1.0/24 are advertised to
BGP neighbor 200.1.1.1. Verify that all networks are advertised to BGP
neighbor 10.1.1.2.
Status
Verify that the network 192.1.40.0/24 is set to import to indicate a local
interface advertised via BGP through the network command.
Verified that network 10.60.1.0/24 is set to Used from peer 200.1.1.1 and set
to Accepted from peer 10.1.1.2. The networks 11.11.1.0/24, 172.1.1.0/24, and
172.1.2.0/24 should NOT be advertised back to 200.1.1.1.
Verify that networks 11.11.1.0/24, 172.1.1.0/24, and 172.1.2.0/24 are set to
Used from peer 10.1.1.2.
Via 8008, verify the following information:
Avaya Inc. – External Distribution

26
avaya.com
January 2016
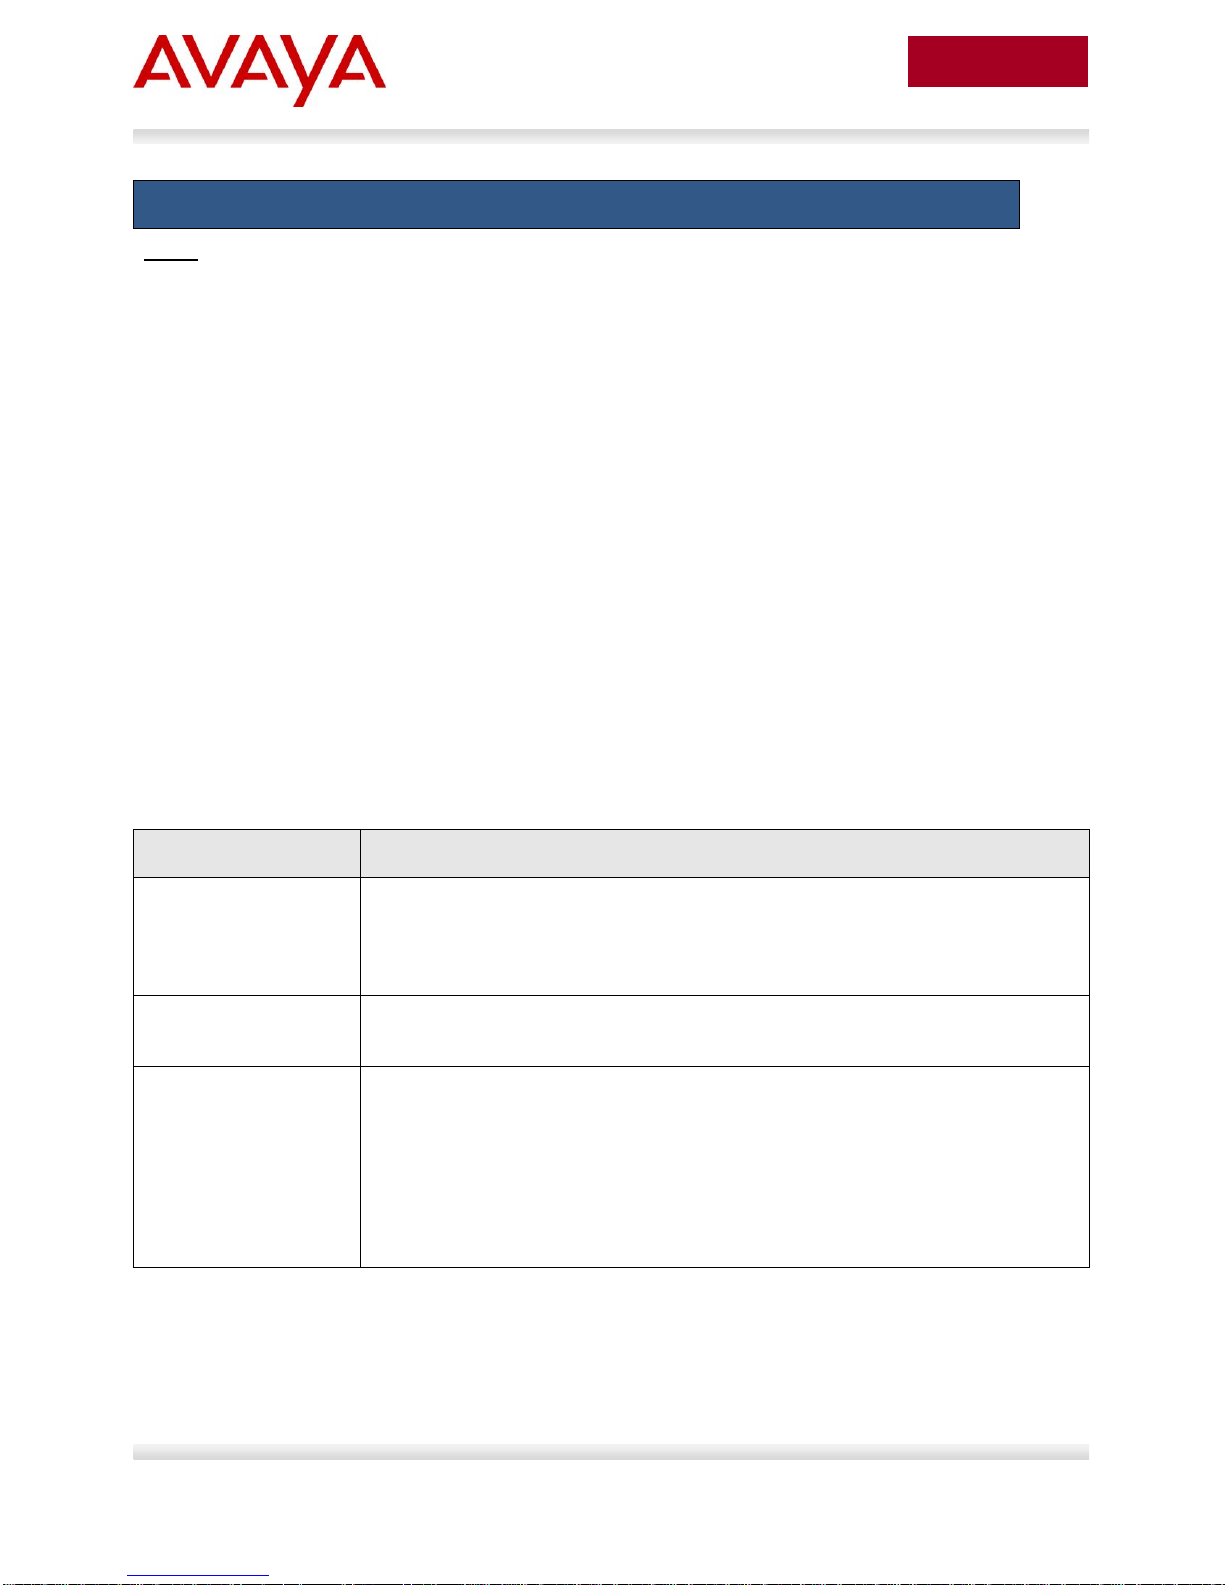
Parameter
Description
Connect Retry
Interval (Sec)
Amount of time in seconds to wait before attempting to reconnect
to a BGP neighbor after failing to connect. Router falls back to
Connect State after timer expires.
Range 1 to 65535 seconds; default 120.
KeepAlive
Message sent to keep BGP connection alive to ensure Hold Timer
does not expire when no Update messages are sent. If the value is
zero, no periodical keepalive messages are sent to this neighbor
after the BGP connection has been established.
Range 0 to 21845 seconds; default 60
Advertisement
Interval (Sec)
Specifies the time interval that transpires in seconds between each
transmission of a router advertisement from a BGP neighbor
Range: 1 to 120 seconds; default 5
Hold Timer (Sec)
The hold time is the maximum time allowed between receipt of
successive KeepAlive, and/or Update messages. This hold time is
reset and counts down upon a successful receipt of a message.
The hold time must be either 0 or at least 3 seconds and is 3 x
KeepAlive value.
Range 0-65535; default 180
4. BGP Timers
Every BGP router maintains a KeepAlive and Hold Timer for each BGP session it possesses. These
timers are used for peer health check. When the KeepAlive Timer expires, a KEEPALIVE message is
sent to the peer router associated with the session. When receiving a KEEPALIVE message or an
UPDATE message, the Hold Timer is cleared. When an UPDATE message is sent out, the KeepAlive
Timer is also cleared. If the Hold Timer expires, the BGP router assumes that the peer router cannot
respond correctly, and thus resets the BGP session.
The following table displays the various timer options available on the Avaya Ethernet Routing Switch
8000. Please see Appendix C – BGP Events regarding details on BGP events and in reference to the
timers below.
Table 2: BGP Timers
Avaya Inc. – External Distribution

27
avaya.com
January 2016
Go to BGP configuration
To change the Keepalive and Holddown Timer:
To change the Connect Retry Interval:
To change the Advertisement Interval:
The Hold Time is negotiated between peers during session establishment. The smaller
value is used. The keepalive is not negotiated and is used at the set value unless the
hold timer negotiated is less than the keepalive. Then the keepalive will be 1/3 the hold
timer.
Changing the default timers is performed at the BGP neighbor level using the following commands.
8008:5(config)#router bgp
8008:5(router-bgp)#
8008:5(router-bgp)#neighbor <neighbor> timers <0-21845> <0-65535>
8008:5(router-bgp)#neighbor <neighbor> retry-interval <1-65535>
8008:5(router-bgp)#neighbor <neighbor> advertisement-interval <5-120>
Avaya Inc. – External Distribution

28
avaya.com
January 2016
To change the Keepalive and Holddown Timer:
5. BGP Network Command
The Avaya Ethernet Routing Switch and Virtual Services Platform uses the Network command to specify
a list of IGP networks that are advertised as originating from an autonomous system.
8008:5(config)#router bgp
8008:5(router-bgp)#network <prefix/len>
The prefix/len that is specified must match an active entry in the IP routing table. The route may be local
to the switch, configured as a static route, or dynamically learned via an IGP such as RIP or OSPF. The
network command cannot be used to aggregate or summarize BGP routes.
When the prefix originated by the Network command is advertised via BGP, its Route Origin attribute is
set to “IGP”. This indicates that the route is interior to the originating AS.
For example, via 8008 from Section 3.1, if we wish to originate the CLIP address 10.1.80.8./32, enter the
following command:
8008:5(config)#router bgp
8008:5(router-bgp)#network 10.1.80.8/32
On Router C the BGP route table indicates that the network has been learned from 8008. Note that the
Route Origin is “IGP”:
RouterC:5#show ip bgp route 10.1.80.8/32
==============================================================================
BGP Routes - GlobalRouter
==============================================================================
The total number of routes is 4
NETWORK/MASK PEER REM ADDR NEXTHOP ADDRESS ORG LOC PREF
------------------------------------------------------------------------------
10.1.80.8/32 200.1.1.2 200.1.1.2 IGP 100
AS_PATH: (20)
Avaya Inc. – External Distribution

29
avaya.com
January 2016
If the AS is running OSPF, the border router must be configured as an AS boundary
router (ASBR) in order to accept external routes.
The following command is used to configure BGP route distribution:
For example, to redistribute direct interfaces, enter the commands shown below.
6. Redistribution Policies
Within an AS, BGP update information is distributed between BGP speakers using an Interior Gateway
Protocol (IGP) that runs within the AS. The Avaya Ethernet Routing Switch and Virtual Services Platform
supports either RIP, ISIS (SPBM), or OSPF for IGP. In regards to SPBM, please see section 6 below.
Under normal operation, the IGP carries no BGP information. Each BGP speaker in an AS uses IBGP
exclusively to determine reachability to external networks. In order to inject routes into the IGP,
redistribution policies must be created to inject external routes within an AS.
This section provides examples of the commands you use to create redistribution policies that can inject
external routes within an AS.
6.1 BGP Redistribution
The ERS or VSP can redistribute routes learned by RIP, ISIS, OSPF, or static route configuration. In
addition, it can also redistribute local or direct interfaces. The following command is used to configure
BGP route distribution:
8008:1(config)#router bgp
8008:1(router-bgp)#redistribute ?
direct Ip bgp redistribute direct command
ipv6-direct Ip bgp redistribute ipv6-direct command
ipv6-static Ip bgp redistribute ipv6-static command
isis Ip bgp redistribute isis command
ospf Ip bgp redistribute ospf command
ospfv3 Ip bgp redistribute ospfv3 command
rip Ip bgp redistribute rip command
static Ip bgp redistribute static command
8008:5(config)#router bgp
8008:5(router-bgp)#redistribute direct
WARNING: Routes not inject until apply command is issued after enable command
8008:5(router-bgp)#redistribute direct enable
8008:5(router-bgp)#exit
8008:5(config)#ip bgp apply redistribute direct
Note that when the routes are imported into the BGP route table, a route-policy may be applied in order to
suppress specific routes or modify BGP route attributes. For example, this may be useful if you
Avaya Inc. – External Distribution

30
avaya.com
January 2016
Configure 8008 as an OSPF ASBR and enable OSPF
The ERS 8000 must be configured as an OSPF Autonomous System Border Router
(ASBR) in order to support other routing protocols other than OSPF.
redistribute all “direct” (i.e. locally connected) routes but do not wish to advertise the IP prefixes of certain
interfaces.
Also, the BGP “metric” attribute associated with each prefix, also known as MED, may also be set. Note
that if the metric is also set via a route-policy, the route-policy specified metric takes precedence.
When the prefix originated by the “redistribute” command is advertised via BGP its Route Origin attribute
is set to “INC”, or incomplete. When BGP selects the best path to a given destination a route with origin
“IGP” takes priority over a route with origin “INC”. The following is an example of routes imported on an
ERS 8000 after BGP direct redistribute has been enable on a peer ERS 8000. Notice the Route Origin is
“INC”.
RouterC:5#show ip bgp neighbors 200.1.1.2 routes longer-prefixes 10.1.1.0/30
The total number of accepted routes from the neighbor is 6
===============================================================================
BGP Neighbor Routes - GlobalRouter
===============================================================================
NETWORK/MASK PEER-REM-ADDR NEXTHOP-ADDRESS ORG LOC-PREF STATUS
-------------------------------------------------------------------------------
10.1.1.0/30 200.1.1.2 200.1.1.2 INC 100 Used
AS_PATH : (20)
6.2 OSPF and BGP Route Distribution
This section describes commands you use to create OSPF and BGP route distribution. The commands
used are in reference to Figure 1 used in Section 3.1 above using 8008.
6.2.1 Configuration
To create OSPF and BGP route distribution policies, complete the following steps:
6.2.1.1 Configure OSPF on 8008
8008:1(config)#router ospf
8008:5(config-ospf)#as-boundary-router enable
8008:5(config-ospf)#exit
8008:5(config)#router ospf enable
Avaya Inc. – External Distribution
 Loading...