

Page 1

Configuring a Cisco 7960/7940 SIP Phone
Configuring a Cisco 7960/7940 SIP Phone
for use with Avaya SIP Solutions
for use with Avaya SIP Solutions
June 12, 2006
© 2006 Avaya Inc. All rights reserved.
Page 2

Agenda
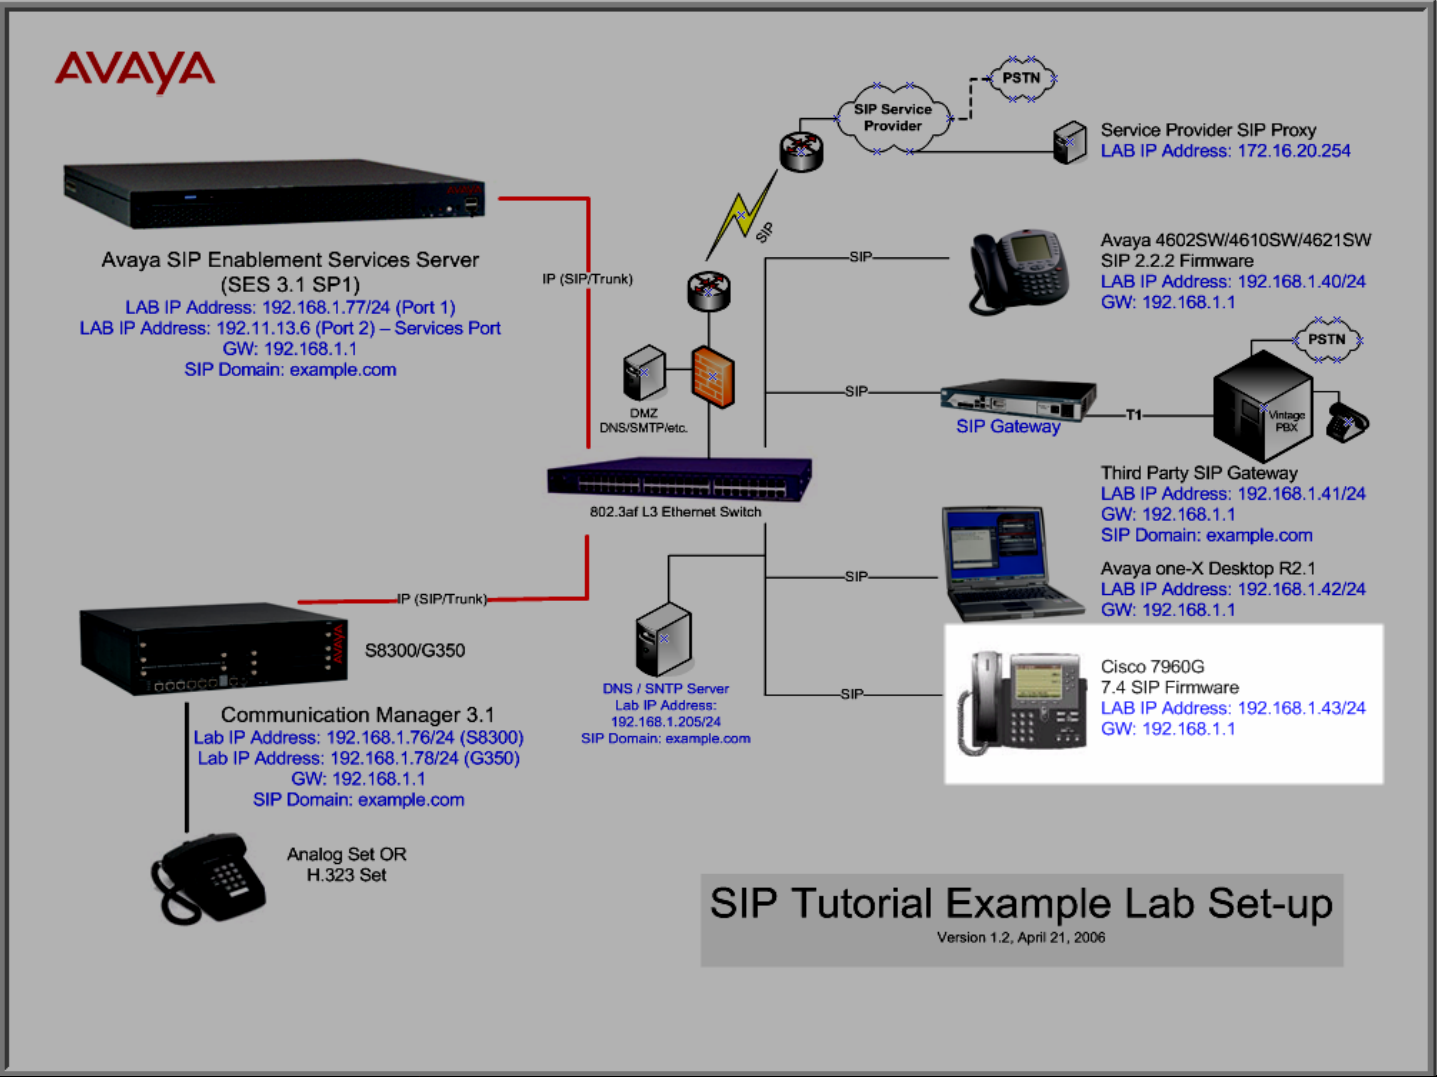
Lab Topology Overview
Relevant Cisco Product Documentation Links
Converting/Upgrading a Cisco 7960/7940 SIP phone for
use with Avaya SIP Solutions (post 5.3 firmware)
Converting/Upgrading a Cisco 7960/7940 SIP phone for
use with Avaya SIP Solutions (pre-5.3 firmware)
Upgrade Notes
Additional Miscellaneous Slides
Avaya Solution and Interoperability Lab Application Note
© 2006 Avaya Inc. All rights reserved.
2
Page 3

***NOTE*** ***NOTE*** ***NOTE*** ***NOTE*** ***NOTE***
Please read through this complete
presentation BEFORE
attempting the
conversion/upgrade process
***NOTE*** ***NOTE*** ***NOTE*** ***NOTE*** ***NOTE***
© 2006 Avaya Inc. All rights reserved.
3
Page 4

Foreword: This presentation is part of an overall series of PowerPoint and Camtasia Studio Flash Recordings
This PowerPoint presentation is part of a series of PowerPoint
presentations and Camtasia Studio Flash Recordings covering:
– Episode 1 - Overview of Documentation/Call Flows
– Episode 2 - SES 3.1 SP1 Installation/Configuration
– Episode 3 - CM 3.1 SIP Specific Configuration
– Episode 4 - 46xx SIP end-points and one-X Desktop Edition configuration
As such, this PowerPoint does not cover information previously
captured by the above presentations.
This presentations core goal is to assist in the conversion and/or
upgrade of a Cisco 7960/7940 SIP phone for use with Avaya SIP
Solutions
© 2006 Avaya Inc. All rights reserved.
4
Page 5

© 2006 Avaya Inc. All rights reserved.
Lab Topology Overview
Lab Topology Overview
Page 6
© 2006 Avaya Inc. All rights reserved.
6
Page 7

Relevant Cisco Product
Relevant Cisco Product
Documentation
Documentation
© 2006 Avaya Inc. All rights reserved.
Page 8

Relevant Cisco Product Documentation
Release Notes for Cisco SIP IP Phone 7940/7960 Release 7.4
Cisco SIP IP Phone Administrator Guide, Versions 6.x and 7.x
Converting a Cisco 7940/7960 CallManager Phone to a SIP Phone and
the Reverse Process
Using the Cisco IP Phone 7940/7960
Cisco IP Phone 7960 and 7940 Firmware Upgrade Matrix
* The above links are hyperlinked to the documentation
© 2006 Avaya Inc. All rights reserved.
8
Page 9

Configuring a Cisco 7960/7940 SIP phone for
Configuring a Cisco 7960/7940 SIP phone for
user with Avaya SIP Solutions
user with Avaya SIP Solutions
(*For Cisco 7960/7940’’
(*For Cisco 7960/7940
(*For Cisco 7960/7940’s running 5.3 or later firmware)
*If this is not the case, SKIP to the next section, “*Upgrading from a pre-5.3 version of 7960/7940 firmware”
© 2006 Avaya Inc. All rights reserved.
s running 5.3 or
s running 5.3 or
later
later
firmware)
firmware)
Page 10
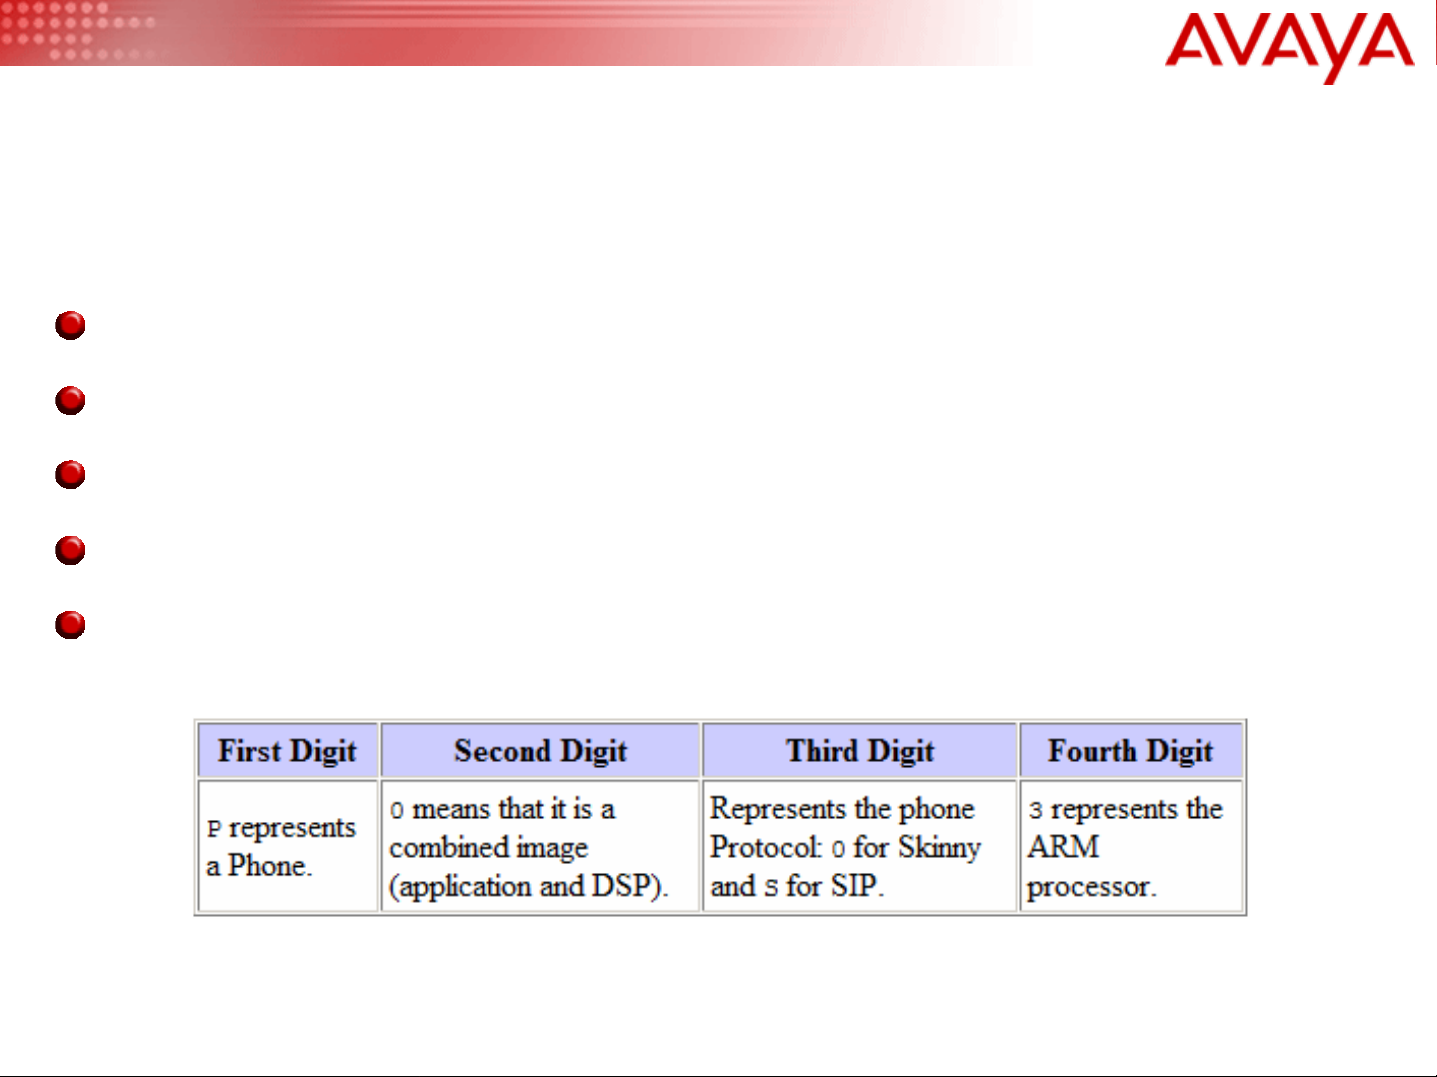
For this lab, the 7960 was running existing SKINNY (SCCP) firmware Version 7.2 (4.0) – details below
Model Number: CP-7960G
MAC Address: 00-09-43-66-53-83
AppLoad ID: P00307020400
Boot Load: PC03A300
Version: 7.2 (4.0)
© 2006 Avaya Inc. All rights reserved.
10
Page 11

After the upgrade, the 7960 is running SIP 7.4 firmware – details below
Model Number: CP-7960G
MAC Address: 00-09-43-66-53-83
AppLoad ID: POS3-07-4-00
Boot Load: PC03A300
DSP Load ID: PS03AT45
© 2006 Avaya Inc. All rights reserved.
11
Page 12

A Note about the .cnf filename extension in Windows
The .cnf extension utilized by the Cisco SIP configuration files,
SIPDefault.cnf and SIPMacAddress.cnf is an extension already
associated with the Windows terminal program, Hyperterm.
By Default, Hyperterm hides the .cnf extension
If you would like the .cnf extension to be visible, follow these steps
– Double Click the “My Computer” icon in Microsoft Windows
– Under the menu bar of this dialog select: Tools, Folder Options…,
File Types Tab
– Click an item inside the Registered File Types list box and press the
letter C (to jump down to “C”) and scroll down to the file type .cnf
and select it
– Click the “Advanced” Button
– Check the checkbox, “Always show extension” shown in the
following slide…
© 2006 Avaya Inc. All rights reserved.
12
Page 13
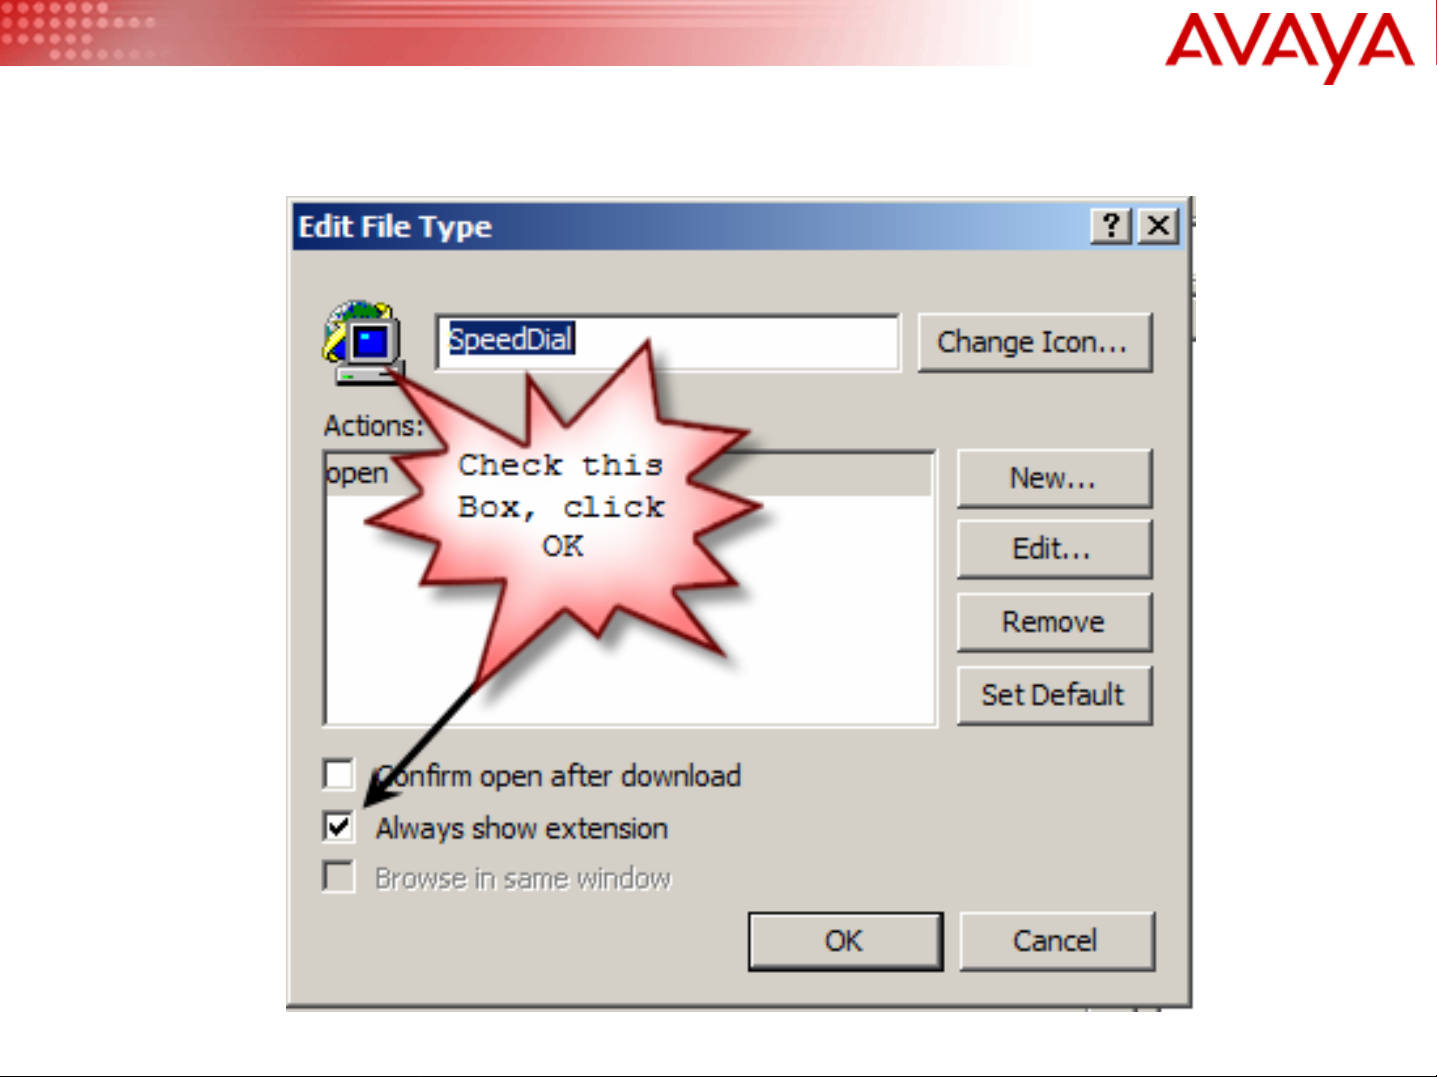
A Note about the .cnf filename extension in Windows - continued
© 2006 Avaya Inc. All rights reserved.
13
Page 14

Installation Step by Step…(5.3 or later firmware)
1. Download the 7.4 Firmware from the Cisco Web Site Here
– P0S3-07-4-00.zip
2. Download the SIPDefault.cnf and SIPMacAddress.cnf Here
– SIPmacaddress.cnf -Generic Phone Specific SIPmacaddress.cnf File
– SIPDefault.cnf - Generic SIPDefault.cnf Configuration File
3. Unzip the contents of P0S3-07-4-00.zip into the /tftpboot directory of your
TFTP server (contents below)
– OS79XX.TXT
– POS3-07-4-00.bin
– POS3-07-4-00.loads
– POS3-07-4-00.sb2
– POS3-07-4-00.bin
– POS3-07-4-00.sbn
4. Copy the SIPmacaddress.cnf and SIPDefault.cnf into the /tftpboot directory of
your TFTP server
* Do not use any firmware version other then 7.4 as earlier and later firmware
versions suffer from various interoperability issues
© 2006 Avaya Inc. All rights reserved.
14
Page 15

Installation Step by Step…(5.3 or later firmware) cont..
5. Rename the SIPmacaddress.cnf file to SIP + the MAC address of your 7960
SIP phone (the lab 7960’s MAC address is: 00-09-43-66-53-83). All alpha
characters are UPPERCASE
– SIP000943665383.cnf
6. Make the edits detailed in the following slides titled, “Key changes (from
defaults) in: SIPDefault.cnf” – don’t forget to make the below changes, unique
to your environment
– proxy1_address, sntp_server, outbound_proxy, logo_url, messages_uri
– Verify: image_version is set to POS3-07-4-00
7. Make the edits in (SIP000943665383.cnf for this example) detailed in the
following slides titled, “Key changes (from defaults) in: SIPmacaddress.cnf”–
don’t forget to make the below changes, unique to your environment
(the .cnf is lowercase)
– Line # Configuration (name, authname, password, display name)
8. Create the dialplan.xml file as detailed in the following slides titled, “Creation
of dialplan.xml (stored in the tftp directory along with SIP phone firmware)” and
copy it into the /tftpboot directory of your TFTP server
– Customize the dialplan.xml for your unique environment
© 2006 Avaya Inc. All rights reserved.
15
Page 16

Installation Step by Step…(5.3 or later firmware) cont..
9. Create the ringlist.dat file as detailed in the following slide titled, “Creation of ringlist.dat
(stored in the /tftpboot directory)” and copy it into the /tftpboot directory of your TFTP
server. Note: The ringlist.dat file is optional.
– You will also want to copy the referenced .pcm files into /tftpboot
10. Verify DHCP server is enabled and that DHCP option#66 is provisioned with the IP
Address of the TFTP server hosting the above files.
11. Enable the TFTP Server application
12. Power-up the Cisco 7960 SIP phone and proceed with the upgrade process
13. The Cisco 7960 SIP phone should convert itself from SCCP to SIP and register with the
extension and password provisioned in the SIP000943665383.cnf (SIPmacaddress.cnf)
file.
14. Assuming that Avaya Communication Manager and the SIP Enablement Server have
been properly configured, the Cisco 7960 should be able to make and receive phone
calls at this point.
15. At the 7960 telephone, access the Call Preferences menu. Using the up/down button,
move the highlighted selection to Speed Dial Lines, and press the Select soft key. The
Speed Dial Configuration menu will be displayed. Move the highlighted selection to the
desired speed dial button and press the Edit soft key to enter the CM provisioned
Feature Name Extensions (FNE’s).
CONGRATULATIONS! YOU ARE NOW
© 2006 Avaya Inc. All rights reserved.
16
Page 17

Upgrade Screenshot 7960 SCCP -> 7960 SIP 7.4
• IP Address
192.168.1.70 is
the Cisco 7960
SIP Phone
•Ringlist.dat was
not utilized for
this example
© 2006 Avaya Inc. All rights reserved.
17
Page 18

*Upgrading from a pre-5.3 version of
*Upgrading from a pre-5.3 version of
7960/7940 firmware
7960/7940 firmware
* Assumption: Your Firmware Release is later then Release 2.3
© 2006 Avaya Inc. All rights reserved.
Page 19

Additional Configuration Notes (Upgrading from very old Cisco SIP releases)
•There are incremental firmware steps required when upgrading from older
SIP/SCCP firmware releases (pre 5.3) to the currently supported 7.4 SIP firmware
release. For example, SCCP firmware version 5.0(4.0) to SIP 7.4 in this case.
•For additional details, you may choose to reference the “Cisco IP Phone 7960 and
7940 Firmware Upgrade Matrix” noted earlier in this document.
•Note, if you have statically configured the IP parameters for your 7960/7940 sets
(vs. using DHCP), these static values will be erased and have to be re-entered
during the first part of the upgrade process from your current pre 5.3 firmware to
5.3. When Upgrading from SIP 5.3 to SIP 7.4, the static parameters are retained,
however.
© 2006 Avaya Inc. All rights reserved.
19
Page 20

Additional Configuration Notes (Upgrading from very old Cisco firmware releases) - Incremental Upgrade Steps
1. Download the 5.3 and 7.4 Firmware from the Cisco Web Site Here
– P0S3-05-3-00.zip
– P0S3-07-4-00.zip
2.
3.
Download the SIPDefault.cnf and SIPMacAddress.cnf from the Cisco Web Site Here
– SIPmacaddress.cnf -Generic Phone Specific SIPmacaddress.cnf File
– SIPDefault.cnf - Generic SIPDefault.cnf Configuration File
Unzip the contents of P0S3-05-3-00.zip and P0S3-07-4-00.zip into the /tftpboot directory
of your TFTP server (contents below)
– P0S3-05-3-00.zip Contents
• Bulletin_5.3.txt, P0S3-05-3-00.bin, P0S3-05-3-00.sbn, READ_BEFORE_INSTALLING.txt
– P0S3-07-4-00.zip Contents
• OS79XX.TXT, POS3-07-4-00.bin, POS3-07-4-00.loads, POS3-07-4-00.sb2, POS3-07-4-
00.bin, POS3-07-4-00.sbn
4.
Copy the SIPmacaddress.cnf and SIPDefault.cnf into your /tftpboot directory of your
TFTP server
5. Edit the file, OS79XX.TXT (note all uppercase filename and extension) which is now
located in your /tftpboot directory with a plain text editor (i.e. Wordpad) and replace the
current line with the following single:
– From this: image_version: P003-07-4-00
– To this: image_version: P0S3-05-3-00
© 2006 Avaya Inc. All rights reserved.
20
Page 21

Additional Configuration Notes (Upgrading from very old Cisco firmware releases) - Incremental Upgrade Steps
5. Rename the SIPmacaddress.cnf file to SIP + MAC address of your 7960 SIP
phone (the lab 7960’s MAC address is: 00-09-43-66-53-83). All alpha
characters are UPPERCASE
– SIP000943665383.cnf
6. Make the edits detailed in the following slides titled, “Key changes (from
defaults) in: SIPDefault.cnf” – don’t forget to make the below changes, unique
to your environment
– proxy1_address, sntp_server, outbound_proxy, logo_url, messages_uri
– Verify: image_version is set to P0S3-05-3-00
7. Make the edits in (SIP000943665383.cnf for this example) detailed in the
following slides titled, “Key changes (from defaults) in: SIPmacaddress.cnf”–
don’t forget to make the below changes, unique to your environment
(the .cnf is lowercase)
– Line # Configuration (name, authname, password, display name)
8. Create the dialplan.xml file as detailed in the following slides titled, “Creation
of dialplan.xml (stored in the /tftpboot directory along with the SIP phone
firmware)” and copy it into the /tftpboot directory of your TFTP server
– Customize the dialplan.xml for your unique environment
© 2006 Avaya Inc. All rights reserved.
21
Page 22

Additional Configuration Notes (Upgrading from very old Cisco firmware releases) - Incremental Upgrade Steps
9. Create the ringlist.dat file as detailed in the following slide titled, “Creation of
ringlist.dat (stored in the /tftpboot directory)” and copy it into the /tftpboot
directory of your TFTP server. Note: The ringlist.dat file is optional.
– You will also want to copy the referenced .pcm files into /tftpboot
10. Verify DHCP server is enabled and that DHCP option#66 is provisioned with
the IP Address of the TFTP server hosting the above files.
11. Enable the TFTP Server application
12. Power-up the Cisco 7960 SIP phone and proceed with the upgrade process
13. If your were using static IP addressing, re-enter the IP parameters into the
phone one the upgrade process is complete since the upgrade to SIP 5.3 will
clear them. Note: The default password to “Unlock Config” is cisco. You must
first disable DHCP to be able to re-enter/save the static IP parameters. Power
cycle the phone.
14. The Cisco 7960 SIP phone should register with the extension and password
provisioned in the SIP000943665383.cnf (SIPmacaddress.cnf) file.
15. Edit the OS79XX.TXT and replace the current line (P0S3-05-3-00) with this
line
– P003-07-4-00
© 2006 Avaya Inc. All rights reserved.
22
Page 23

Additional Configuration Notes (Upgrading from very old Cisco firmware releases) - Incremental Upgrade Steps
16. Edit the SIPdefault.cnf file and make sure the following line item is changed
back:
– From this: image_version: P0S3-05-3-00
– To this: image_version: P0S3-07-4-00
17. Power cycle the phone
18. The Cisco 7960 SIP phone should convert itself from SIP 5.3 to SIP 7.4 and
register with the extension and password provisioned in the
SIP000943665383.cnf (SIPmacaddress.cnf) file
19. Assuming that Avaya Communication Manager and the SIP Enablement
Server have been properly configured, the Cisco 7960 should be able to make
and receive phone calls at this point.
20. At the 7960 telephone, access the Call Preferences menu. Using the up/down
button, move the highlighted selection to Speed Dial Lines, and press the
Select soft key. The Speed Dial Configuration menu will be displayed. Move
the highlighted selection to the desired speed dial button and press the Edit
soft key to enter the CM provisioned Feature Name Extensions (FNE’s).
CONGRATULATIONS! YOU ARE NOW
© 2006 Avaya Inc. All rights reserved.
23
Page 24

SIPDefault.cnf and SIPMacAddress.cnf Edits
SIPDefault.cnf and SIPMacAddress.cnf Edits
© 2006 Avaya Inc. All rights reserved.
Page 25

Key changes (from defaults) in: SIPDefault.cnf
# Image Version
– image_version: POS3-07-4-00
# Proxy Server
– proxy1_address: “example.com“ ; Can be dotted IP or FQDN
# Proxy Server Port (default – 5060)
– proxy1_port: 5060
# Proxy Registration (0-disable (default), 1-enable)
– proxy_register: 1 ; Set to 1 so phone registers to proxy
# Out of band DTMF Settings (none-disable, avt-avt enable (default),
avt_always - always avt )
– dtmf_outofband: none
# Dialplan template (.xml format file TFTP root directory)
– dial_template: dialplan ; Avoids having to press “DIAL” after
number
# Time Server (There are multiple values and configurations…
– sntp_server: “192.168.1.205” ; Set to lab NTP Server
– sntp_mode: unicast ; unicast, multicast, anycast, or
directedbroadcast (default)
© 2006 Avaya Inc. All rights reserved.
25
Page 26

Key changes (from defaults) in: SIPDefault.cnf (continued)
# Do Not Disturb Control (0-off, 1-on, 2-off with no user control, 3-on
with no user control)
– dnd_control: 0
# Outbound Proxy Support
– outbound_proxy: “192.168.1.77” ; restricted to dotted IP or DNS A
record only
– outbound_proxy_port: 5060; default is 5060
# Allow for the bridge on a 3way call to join remaining parties upon
hangup
– cnf_join_enable : 0 ; 0-Disabled, 1-Enabled (default)
# Telnet Level (enable or disable the ability to telnet into the phone)
– telnet_level: 0 ; 0-Disabled (default), 1-Enabled, 2-Privileged
# XML URLs
– logo_url: “http://x.x.x.x/AvayaPhoneLogo.bmp”; URL for branding
logo to be used on phone display (Note: Lab has no HTTP server to
host this content)
# URI for Messages Button
– messages_uri: “xxxxx” ; Set to voice mail hunt group (Note: Lab has
no voice mail hunt group set-up)
# Enable (1) or Disable (0) Call Forward soft key
– local_cfwd_enable: 0
© 2006 Avaya Inc. All rights reserved.
26
Page 27

Key changes (from defaults) in: SIPmacaddress.cnf
# SIP Configuration Generic File
# Line 1 appearance
– line1_name: 55001
# Line 1 Registration Authentication
– line1_authname: “55001"
# Line 1 Registration Password
– line1_password: “123456"
# Line 2 appearance
– line2_name: 55001
# Line 2 Registration Authentication
– line2_authname: “55001"
# Line 2 Registration Password
– line2_password: “123456"
# Phone Label (Text desired to be displayed in upper right corner)
– phone_label: “Avaya SES” ; Has no effect on SIP messaging
© 2006 Avaya Inc. All rights reserved.
27
Page 28

Key changes (from defaults) in: SIPmacaddress.cnf (continued)
# Line 1 Display Name (Display name to use for SIP messaging)
– line1_displayname: “Jim Cantwell”
# Line 2 Display Name (Display name to use for SIP messaging)
– line2_displayname: “Jim Cantwell”
# Phone Prompt (The prompt that will be displayed on console and
telnet)
– phone_prompt: “Cisco SIP Phone“ ; Limited to 15 characters
(Default - SIP Phone)
# Phone Password (Password to be used for console or telnet login)
– phone_password: "cisco" ; Limited to 31 characters (Default -
cisco)
# User classifcation used when Registering [ none(default), phone,
ip ]
– user_info: none
© 2006 Avaya Inc. All rights reserved.
28
Page 29

Creation of dialplan.xml (stored in the /tftpboot directory along with the SIP phone firmware)
<DIALTEMPLATE>
<TEMPLATE MATCH=“5...." Timeout="0" User="Phone" Rewrite="%s"/>
<TEMPLATE MATCH="9,1.........." Timeout="0" Tone="Bellcore-Inside" User="Phone" Rewrite="%s"/>
<TEMPLATE MATCH=“#.." Timeout="0" User="Phone" Rewrite="%s"/>
<TEMPLATE MATCH=“\*.." Timeout="0" User="Phone" Rewrite="%s"/>
</DIALTEMPLATE>
• The periods in the match string stand for any digit. The examples above will
automatically send the SIP INVITE after dialing a 5 plus 4 digits or a 91
plus 10 digits.
• The #.. and \*.. symbol above are the FAC codes defined on the dial plan
analysis form of CM.
• Comments can be entered into this file in the format <!-- Comment -->
• The # is processed as a "dial now" event by default. You can override this
(which we did above) by specifying # in the dial-plan template, in which
case the phone does not dial immediately when the # is pressed but does
continue to match the dial-plan template that specifies the #. The # is not
matched by the wildcard character * or the period (.).
• The * is processed as a wildcard character. You can override this (which we
did above) by preceding the * with the backward slash (\) escape sequence,
resulting in the sequence \*. The phone automatically strips the \ so that
it does not appear in the outgoing dial string. When * is received as a
dialed digit, it is matched by the wildcard characters * and period (.).
© 2006 Avaya Inc. All rights reserved.
29
Page 30

Creation of dialplan.xml (store in the /tftpboot directory along with SIP phone firmware) continued…
• A secondary dial tone is invoked by the comma character (tone names below)-
see example of use on previous slide, i.e. tone=Bellcore-Inside (default is
BellCore-Outide)
• How to Create Dial Plans (on the Cisco 7960/7940)
For more information on the Bellcore tones, see Bellcore GR-506-CORE
© 2006 Avaya Inc. All rights reserved.
30
Page 31

Creation of ringlist.dat (stored in the /tftpboot directory)
This file contains a list of the files with the ring tones and a label
displayed to the user on the phone. From the phone select Settings : Ring
Type. This file is optional.
Format:
– Ring Tone Name <tab> filename
• AT&T 1 ring_att1.pcm (tab is between AT&T 1 and ring_att1.pcm)
• AT&T 2 ring_att2.pcm (tab is between AT&T 2 and ring_att1.pcm)
• AT&T 3 ring_att3.pcm (tab is between AT&T 3 and ring_att1.pcm)
• AT&T 4 ring_att4.pcm (tab is between AT&T 4 and ring_att1.pcm)
Ring Tone files (.pcm) are hosted on the TFTP server
Customizing the Cisco SIP IP Phone Ring Types
© 2006 Avaya Inc. All rights reserved.
31
Page 32

© 2006 Avaya Inc. All rights reserved.
Upgrade Notes
Upgrade Notes
Page 33

Notes
Verify that the phone icon located next to each defined line appearance
does not have an “X” next to it, indicating that registration has occurred.
If the “X” appears, check that the proxy server address is set to the
correct domain name, the outbound proxy IP address and port number
are correct, and that the Proxy Register parameter is set to 1 (Enable).
Verify that the line appearance shows the SES provisioned extension
for that phone.
© 2006 Avaya Inc. All rights reserved.
33
Page 34

Additional Notes
The Cisco IP 7960G phone supports 1 to 6 line appearances, the Cisco
IP 7940G phone supports 1 to 2. This lab uses 2 line appearances for
the 7960G. The number of line appearances takes away from the speed
dial appearances.
This lab uses the Jim Cantwell account provisioned on the Avaya SES,
55001, for the Cisco 7960G login identity.
The background space allocated for the background image is 90 x 56
pixels. Images that are larger than this will automatically be scaled down
to 90 x 56 pixels. This parameter supports Windows 256 color bitmap
format only. White is clear on the telephones display.
The contents of the SIPMacAddress.cnf file override the contents of the
SIPDefault.cnf file. So, for example, you could place the logo_url:
parameter located in the SIPDefault.cnf file into the SIPMacAddress.cnf
to place a unique background graphic for a specific phone.
© 2006 Avaya Inc. All rights reserved.
34
Page 35

Additional Notes
The Cisco 7960G/7940G supports only SIP/UDP
The MAC address for the 7960/7940 sets are located on a
sticker underneath the phone
The Cisco 7960G/7940G supports TFTP for centralized
configuration. All firmware files and configuration files
should be placed in the TFTP root directory (
defaults to this root directory)
used by the phone to locate the TFTP server.
© 2006 Avaya Inc. All rights reserved.
tftp_cfg_dir
. DHCP Option#66 is
35
Page 36

Additional Notes – Required DHCP Options
The Cisco SIP phones can use DHCP to obtain their IP
addresses. Scope Configuration options are as follows:
– dhcp option #1 (IP subnet mask)
– dhcp option #3 (default IP gateway)
– dhcp option #6 (DNS server IP address)
– dhcp option #15 (domain name) – i.e. example.com
– dhcp option #50 (IP address)
– dhcp option #66 (TFTP server IP address)
© 2006 Avaya Inc. All rights reserved.
36
Page 37

Additional Miscellaneous Slides
Additional Miscellaneous Slides
© 2006 Avaya Inc. All rights reserved.
Page 38

CM “change locations” form and certain SIP x-fer scenarios
© 2006 Avaya Inc. All rights reserved.
38
Page 39

From the “Cisco IP Phone 7960 and 7940 Firmware
Upgrade Matrix” Documentation
The universal application loader allows the system administrator to use SCCP, SIP, and MGCP, on the same network.
To do this, a hunt algorithm is employed that searches for multiple configuration files. Depending on which configuration
file is found first, the phone will automatically select that protocol. The hunt algorithm ensures that the administrator can
assign a specific protocol to a specific phone. The hunt algorithm searches for files in the following order:
– 1. CTLSEP MAC File—For example, CTLSEP003094C25D2E.tlv. See the "Secure and Nonsecure Configuration" section.
– 2. SEP MAC File—For example, SEP003094C25D2E.cnf.xml.
– 3. SIP MAC File—For example, SIP003094C25D2E.cnf.
– 4. MGCP MAC File—For example, MGC003094C25D2E.cnf.
– 5. XML Default File—For example, XMLDefault.cnf.xml.
– 6. SIP Default File—For example, SIPDefault.cnf.
– 7. MGCP Default File—For example, MGCDefault.cnf.
From the Cisco SIP IP Phone Administrator Guide, Versions 6.x and 7.x (PDF Page 37):
© 2006 Avaya Inc. All rights reserved.
39
Page 40

Useful Avaya SES SIP Debugging Tips
From SES 3.1 *SP1 from bash shell prompt - tethereal
– tethereal -i eth0 -R sip
– tethereal -i eth0 -R sip -V (verbose)
– tethereal -i eth0 -R tcp.port==5061 (you wont be able to read the
encrypted SIP packets but you can see if packets are flowing
between SES and CM CLAN/S8300 PROCR)
– tethereal -i eth0 -R ip.addr==x.x.x.x (x.x.x.x = a from/to IP address)
4xx, 5xx SIP messages may expand upon error condition (use Tethereal –V verbose option)
*SES 3.1 SP1 provides access to tethereal for admin account
© 2006 Avaya Inc. All rights reserved.
40
Page 41

Avaya Solution and Interoperability
Avaya Solution and Interoperability
Lab Application Note
Lab Application Note
© 2006 Avaya Inc. All rights reserved.
Page 42

Configuring SIP IP Telephony Using Avaya SIP Enablement Services,
Avaya Communication Manager, and Cisco 7940/7960 SIP
Telephones - Issue 1.1 (Double Click embedded PDF Below)
** Click Here to check for the latest Avaya Application Notes
© 2006 Avaya Inc. All rights reserved.
42
Page 43

© 2006 Avaya Inc. All rights reserved.
Thank You!
Thank You!
 Loading...