

Page 1

CentreVu® Call Management System
Release 3 Version 9
Sun
®
Enterprise
TM
3000 Computer
CentreVu Upgrade Express Instructions
Comcode 700220627
Compas ID 91141
Issue 3.0
February 2002
Page 2

© 2002, Avaya Inc.
All Rights Reserved
Notice
Every effort was made to ensure that the information in this document
was complete and accurate at the time of printing. However, information
is subject to change.
Preventing Toll Fraud
“Toll fraud” is the unauthorized use of your telecommunications system
by an unaut horized party (for example, a per son who is not a corporate
employee, agent, subcontractor, or working on your company's behalf).
Be aware that there may be a risk of toll fraud associated with your
system and that, if toll fraud occurs, it can result in substantial additional
charges for your telecommunications services.
Avaya Fraud Intervention
suspect that you are being victimized
If you
technical assistance or support, call Technical Service Center Toll Fraud
Intervention Hotline at +1 800 643 2353 for the United States and
Canada. For additional support telephone numbers, see the Avaya web
site:
http://www.avaya.com
Click on Support, then click on Escalation Lists US and International.
This web site includes telephone numbers for escalation within the
United States. For escalation telephone numbers outside the United
States, click on Global Escalation List.
Providing Telecommunications Security
Telecommunications security (of voice, data, and/or video
communications) is the prevention of any type of intrusion to (that is,
either unauthorized or malicious access to or use of) your company's
telecommunications equ ipm ent by some part y.
Your company's “telecommunications equipment” includes both this
Avaya product and any other voice/data/video equipment that could be
accessed via this A vaya product (that is, “networked equipment”).
An “outside party” is anyone who is not a corporate employee, agent,
subcontractor, or working on your company's behalf. Whereas, a
“malicious party” is anyone (including someone who may be otherwise
authorized) who accesses your telecommunications equipment with
either malicious or mischievous intent.
Such intrusions may be either to/through synchronous (time-multiplexed
and/or circuit-based) or asynchronous (character-, message-, or packetbased) equipment or interfaces for reasons of:
• Utilization (of capabilities special to the accessed equipment)
• Theft (such as, of intellectual property, financial assets, or
toll-facility access)
• Eavesdropping (privacy invasions to humans)
• Mischief (troubling, but apparently innocuous, tampering)
• Harm (such as harmful tampering, data loss or alteration,
regardless of motive or intent)
Be aware that there may be a risk of unauthorized intrusions associated
with your system and/or its networked equipment. Also realize that, if
such an intrusion should occur, it could result in a variety of losses to your
company (including but not limited to, human/data privacy, intellectual
property, material assets, financial resources, labor costs, and/or legal
costs).
Yo ur Responsibility for Your Company’s Teleco mmunications
Security
The final responsibility for securing both this system and its networked
equipment rests with you - an Avaya customer's system administrator,
your telecommunications peers, and your managers. Base the fulfillment
of your responsibility on acquired knowledge and resources from a
variety of sources including but not limited to:
• Installation documents
• System administration documents
• Security documents
• Hardware-/software-based security tools
• Shared information between you and your peers
• Telecommunications security experts
To prevent intrusions to your telecommunications equipment, you and
your peers should carefully program and configure:
• your Avaya-provided telecommunications systems and their
interfaces
• your Avaya-provided software applications, as well as their
underlying hardware/software platforms and interfaces
• any other equipment networked to your Avaya products.
by toll fraud and you need
Trademarks
CentreVu is a registered trademarks of Avaya, Inc.
Enterprise, Solaris, SPARCserver, Sun, SunSwift, and Ultra are
trademarks or registered trademarks of Sun Microsystems Inc.
Informix is a registered trademark of Informix Software Inc.
All other product names mentioned herein are the trademarks of their
respective owners.
Avaya Support
Avaya provides a telephone number for you to use to report problems or
to ask questions about your contact center. The support telephone
number is 1-800-242-2121 in the United States and Canada. For
additional support telephone numbers, see the Avaya web site:
http://www.avaya.com
Click on Support, then click on Escalation Lists US and International.
This web site includes telephone numbers for escalation within the
United States. For escalation telephone numbers outside the United
States, click on Global Escalation List.
Acknowledgment
This document was written by the CRM Development group.
Page 3

CentreVu Call Management System
Release 3 Version 9
Sun Enterprise 3000 Computer CVUE Instructions
Contents
Contents 3
Preface
Overview . . . . . . . . . . . . . . . . . . . . . . . . . . . . . . . . . . . . . . . 5
Related documents. . . . . . . . . . . . . . . . . . . . . . . . . . . . . . . . . . . 6
Support . . . . . . . . . . . . . . . . . . . . . . . . . . . . . . . . . . . . . . . . 7
Frequently asked questions (FAQs) . . . . . . . . . . . . . . . . . . . . . . . . . . 7
Customer support for the United States. . . . . . . . . . . . . . . . . . . . . . . . . 7
Technician support for the United States . . . . . . . . . . . . . . . . . . . . . . . . 7
Customer and technician support outside the United States . . . . . . . . . . . . . . . 7
Upgrading an Enterprise 3000 to CMS R3V9
Overview . . . . . . . . . . . . . . . . . . . . . . . . . . . . . . . . . . . . . . . 9
Preparing for the upgrade. . . . . . . . . . . . . . . . . . . . . . . . . . . . . . . . 10
Overview . . . . . . . . . . . . . . . . . . . . . . . . . . . . . . . . . . . . . . . 10
Trouble escalation. . . . . . . . . . . . . . . . . . . . . . . . . . . . . . . . . . . 10
Hardware additions . . . . . . . . . . . . . . . . . . . . . . . . . . . . . . . . . . 10
Disk mirroring. . . . . . . . . . . . . . . . . . . . . . . . . . . . . . . . . . . . . 11
Customization issues . . . . . . . . . . . . . . . . . . . . . . . . . . . . . . . . . 11
Parts list . . . . . . . . . . . . . . . . . . . . . . . . . . . . . . . . . . . . . . . 12
Procedures that are done by the customer before the upgrade . . . . . . . . . . . . . . 13
Overview . . . . . . . . . . . . . . . . . . . . . . . . . . . . . . . . . . . . . . . 13
Cleaning the tape drive . . . . . . . . . . . . . . . . . . . . . . . . . . . . . . . . 14
Determining the current CMS load . . . . . . . . . . . . . . . . . . . . . . . . . . . 14
Doing a CMSADM backup . . . . . . . . . . . . . . . . . . . . . . . . . . . . . . 14
CMSADM backup for R3V6 and earlier . . . . . . . . . . . . . . . . . . . . . . . 15
CMSADM backup for R3V8 . . . . . . . . . . . . . . . . . . . . . . . . . . . . . 19
Backing up Visual Vectors vector layouts and comments . . . . . . . . . . . . . . . . 22
Doing a full maintenance backup. . . . . . . . . . . . . . . . . . . . . . . . . . . . 24
Doing an incremental maintenance backup . . . . . . . . . . . . . . . . . . . . . . . 27
Checking for printer requests and large mail files . . . . . . . . . . . . . . . . . . . . 29
Checking for nonsequential ACDs . . . . . . . . . . . . . . . . . . . . . . . . . . . 30
Collecting third-party and custom software . . . . . . . . . . . . . . . . . . . . . . . 30
Issue 3.0 February 2002 3
Page 4

Contents
Upgrading the system . . . . . . . . . . . . . . . . . . . . . . . . . . . . . . . . . 31
Procedures that are done by the customer after the upgrade . . . . . . . . . . . . . . . 67
Overview. . . . . . . . . . . . . . . . . . . . . . . . . . . . . . . . . . . . . . . 31
Extracting the customer’s administration and options . . . . . . . . . . . . . . . . . . 32
Removing and replacing Enterprise 3000 disk drives . . . . . . . . . . . . . . . . . . 39
Overview . . . . . . . . . . . . . . . . . . . . . . . . . . . . . . . . . . . . . 39
Disk upgrade procedures . . . . . . . . . . . . . . . . . . . . . . . . . . . . . . 39
Copying and activating the customer’s administration and options . . . . . . . . . . . . 46
Overview . . . . . . . . . . . . . . . . . . . . . . . . . . . . . . . . . . . . . 46
Installing CMS patches . . . . . . . . . . . . . . . . . . . . . . . . . . . . . . . 47
Copying customer data . . . . . . . . . . . . . . . . . . . . . . . . . . . . . . . 49
Activating customer options. . . . . . . . . . . . . . . . . . . . . . . . . . . . . 50
Shutting down and rebooting the system. . . . . . . . . . . . . . . . . . . . . . . 53
Verifying the status of the disks . . . . . . . . . . . . . . . . . . . . . . . . . . . 54
Removing temporary ACDs . . . . . . . . . . . . . . . . . . . . . . . . . . . . . 54
Verifying CMS permissions . . . . . . . . . . . . . . . . . . . . . . . . . . . . . 54
Turning on CMS . . . . . . . . . . . . . . . . . . . . . . . . . . . . . . . . . . 55
Verifying that CMS is operating . . . . . . . . . . . . . . . . . . . . . . . . . . . 55
Checking Free Space Allocation . . . . . . . . . . . . . . . . . . . . . . . . . . 56
Comparing directory and file permis s io ns . . . . . . . . . . . . . . . . . . . . . . 57
Updating the switch setup. . . . . . . . . . . . . . . . . . . . . . . . . . . . . . 58
Setting the Informix configuration parameters . . . . . . . . . . . . . . . . . . . . 58
Removing the upgrade files . . . . . . . . . . . . . . . . . . . . . . . . . . . . . 59
Migrating the customer’s data. . . . . . . . . . . . . . . . . . . . . . . . . . . . 60
Checking the status of the disks. . . . . . . . . . . . . . . . . . . . . . . . . . . 64
Replacing the customer’s tapes . . . . . . . . . . . . . . . . . . . . . . . . . . . 64
Troubleshooting upgrade failures . . . . . . . . . . . . . . . . . . . . . . . . . . 65
Overview. . . . . . . . . . . . . . . . . . . . . . . . . . . . . . . . . . . . . . . 67
Migrating historical data . . . . . . . . . . . . . . . . . . . . . . . . . . . . . . . . 68
Restoring non-CMS files . . . . . . . . . . . . . . . . . . . . . . . . . . . . . . . 70
R3V6 and earlier . . . . . . . . . . . . . . . . . . . . . . . . . . . . . . . . . . 70
R3V8 . . . . . . . . . . . . . . . . . . . . . . . . . . . . . . . . . . . . . . . 71
Installing and administering unpreserved software . . . . . . . . . . . . . . . . . . . 72
Doing a CMSADM backup. . . . . . . . . . . . . . . . . . . . . . . . . . . . . . . 73
Doing a full maintenance backup . . . . . . . . . . . . . . . . . . . . . . . . . . . 73
4 CentreVu CMS R3V9 Sun Enterprise 3000 Computer CVUE Instructions
Page 5

Preface
Overview
The
Computer CentreVu Upgrade Express Instructions
upgrading an Enterprise 3000 computer from Call Management System (CMS) R3V5u,
R3V6, or R3V8 to CMS R3V9.
CentreVu Call Management System Release 3 Version 9 Sun® Enterprise™ 3000
are written for technicians who are
Note:
CentreVu Upgrade Express (CVUE) can NOT be used to upgrade a Sun
SP ARCserver™ computer to R3V9. You must follow the procedures found in
CentreVu CMS Release 3 Version 9 Platform Upgrade and Data Migration
Instructions
platform sold with CMS R3V9.
. These instructions are shipped with every new hardware
Issue 3.0 February 2002 5
Page 6

Preface
Related documents
The following table lists sources for additional informat ion about the Enterprise 3000
computer. To order any of these documents, call the Publications Center
at 1-800-457-1235 (Unit ed States and Cana da) or +1-410-568-3680 (outside of th e United
St ates and Canada).
Title Document
number
Installing CMS computers
CentreVu Call Management System Release 3 Version 6 Sun Enterprise 3000
Computer Hardware Installation
CentreVu Call Management System Release 3 Version 6 Sun Enterprise 3000
Computer Connectivity Diagram
Maintaining and troubleshooting a CMS computer
CentreVu Call Management System Enterprise 3000 and SPARCserver
Computers Hardware Maintenance and Troubleshooting
585-215-867
585-215-865
585-214-016
6 CentreVu CMS R3V9 Sun Enterprise 3000 Computer CVUE Instructions
Page 7

Support
If a problem arises that requires assistance, use the support information and help lines
presented below.
Frequently asked questions (FAQs)
For answers to common problems, CMS customers and Avaya technicians can access the
CMS technical support FAQ at:
http://www.avaya.com
Click on Support, then click on Call Center/CRM Solutions, then click on CentreVu Call
Management System, and then click on FAQ.
Please check this information before you cal l in a trouble ti ck et. It could save you ti me and
money .
Support
Customer support for the United States
Customers can report problems and generate trouble tickets by calling:
1-800-242-2121
The customer is prompted to identify the type of problem (that is, Automatic Call
Distribution, hardware, or CentreVu
organization.
CMS), and is connected to the appropriate servic e
Technician support for the United States
Avaya technicians can receive help by calling:
1-800-248-1234
Customer and technician support outside the United Stat es
For customer and technician support outside the United States, see the Avaya web site:
http://www.avaya.com
Click on Support, then click on Escalation List s US and International. For escalation
telephone numbers outside the United States, cli ck on Global Escal ation List.
Issue 3.0 February 2002 7
Page 8

Preface
8 CentreVu CMS R3V9 Sun Enterprise 3000 Computer CVUE Instructions
Page 9

Upgrading an Enterprise 3000 to CMS R3V9
Overview
This chapter contains the procedures that are required to upgrade an Enterprise 3000
computer to CMS R3V9. The process used to upgrade a Su n computer i s called Centr eVu
Upgrade Express (CVUE). The CVUE process includes the following:
● Preparing for the upgrade
● Procedures done by the customer before the upgrade begins
● Upgrading the system:
— Extracting the customer’s administration and options
— Installing new disk drives that are preinstalled with the CMS R3V9 software
— Copying and activating the customer’s administration and options
— Updating the switch links and removing the upgrade files
— Migrating the customer’s data
● Procedures done by the customer after the upgrade is finished
!
Important:
The site technician must have a copy of these instructions before beginni ng
the upgrade.
!
Important:
All CVUE procedures are done at the customer’s site. However, when the
upgrade is being supported by remote personnel, such as CMS
Provisioning, the system commands used in this document shoul d be done
by the remote personnel so that they can monitor the progress of the
upgrade. Run the commands from the local console only when instr ucted to
do so, or when there is no remote support.
Issue 3.0 February 2002 9
Page 10

Upgrading an Enterprise 3000 to CMS R3V9
Prep aring for the upgrade
Overview
Before you begin a CVUE upgrade, consider the following issues:
● Trouble escalat ion
● Hardware additions
● Disk mirroring
● Customization issues
● Upgrade parts
Trouble escalation
If problems occur during the upgrade procedure:
1. Escalate the problem through normal channels.
2. Inspect the upgrade log file that is located at /var/log/cvuelog.
3. If the problem persists, shut down the system, reinstall the customer’s old disk
configuration, and bring the system back up under the old CMS load.
Hardware additions
Avoid hardware additions whenever possible during a CVUE upgrade. If the customer
wants to increase the amount of RAM that is in t he computer, add it only after verifying that
the CVUE upgrade was successful. Install the RAM as described in the main tenance and
troubleshooting document for the computer.
10 CentreVu CMS R3V9 Sun Enterprise 3000 Computer CVUE Instructions
Page 11

Disk mirroring
The CVUE disk drives that accompany this document are intended for an upgrade to a
nonmirrored system. If the customer has purchased additional disk drives to convert the
system from nonmirrored to mirrored, you must fi rst do the CVUE upgrade for the
nonmirrored system as described in this document.
!
Important:
During the CVUE upgrade, do not insert any disks that were not part of the
CVUE kit.
Preparing for the upgrade
After you have completed the CVUE procedures, use the instructions given in
Software Installation, Maintenance, and Troubleshooting
system from nonmirrored to mirrored.
Customization issues
If the customer’s CMS computer has third-party software or customizations that were
added to the standard set of CMS-related software, such as network printers or Visual
Vectors, those software packages and customi zations are not preserved by the CVUE
upgrade process. The customer must collect, reinstall, recompile, and reconfigure any
non-CMS software after the upgrade is completed and approved.
The customer data copied during the upgrade procedure i n cludes information such as the
following:
● License information
● User logins and passwords
● System name and IP address
● Serial printer administration
● CMS administration, setup, and authorizat ions
For a complete list of the files copied during the upgrade, see the /var/log/cvuelog file
after the upgrade is complete. A copy of the old system’ s /etc/vfstab file is saved in the
cvuelog file.
CMS R3V9
, 585-215-956, to convert the
Issue 3.0 February 2002 11
Page 12

Upgrading an Enterprise 3000 to CMS R3V9
Parts list
When upgrading an Enterprise 3000 computer to CMS R3V9, the following par ts are
delivered to the customer’s site:
● One boot disk drive (labeled “Boot Disk - Slot 0”)
● Optionally, up to 9 nonboot blank formatted disk drives
The quantity of optional nonboot disks depends on how many the customer ordered.
● One 160-meter, 8-millimeter blank tape
● CVUE Upgrade Tool CD
● Blank labels that are used to label the old disk drive configuration
● A complete set of system software, including:
— R3V9 CMS
— R3V9 Supplemental Services
®
— Solaris
— Informix
8 Upgrade
®
IDS
— Informix ILS
— Informix SQL (optional)
—Driver CD
— Alarm Admin GUI Client
12 CentreVu CMS R3V9 Sun Enterprise 3000 Computer CVUE Instructions
Page 13

Procedures that are done by the customer before the upgrade
Procedures that a re done by the customer be fore the
upgrade
Overview
It is the customer’s responsibility to ensure that the followi ng procedures are done before a
technician begins an upgrade to CMS R3V9. Use this checklist to verify that the
procedures are done.
Procedure Completed
Clean the tape drive.
Determine the current CMS load.
Do a CMSADM backup, if needed.
If Visual Vectors is installed, back up the Visual Vectors
vector layouts and comments the night before the upgrade.
Do a full maintenance backup of all administration dat a,
historical data, and non-CMS data the night before the
upgrade.
Do an incremental maintenance backup of all
administration data, historical data, and non-CMS data
immediately before the upgrade procedure begins.
Check for old printer requests and large mail files.
Check for nonsequential ACDs.
Collect all third-p a rty and custom software for reinstallation
after the upgrade.
!
CAUTION:
It is highly recommended that customers do NOT reuse their old disk drives
as part of the upgrade pr ocedure. These old disk dr iv es should b e saved for
system recovery if any problems occur during the upgrade procedure.
Issue 3.0 February 2002 13
Page 14

Upgrading an Enterprise 3000 to CMS R3V9
Cleaning the tape drive
See the hardware documentation for your Sun computer for instructions on how to clean
the tape drive.
Determining the current CMS load
To display the current CMS load:
1. Enter:
pkginfo -x cms
2. Save this information for troubleshooting purposes.
Doing a CMSADM backup
A recent CMSADM backup is required before beginning any upgrade. Preferably, a
CMSADM backup should be done the night before the upgrade. Minimally, the CMSADM
backup must not be
for the date of the last CMSADM backup.
more
than a week old. Check the /cms/install/logdir/ backup.log file
14 CentreVu CMS R3V9 Sun Enterprise 3000 Computer CVUE Instructions
Page 15

Procedures that are done by the customer before the upgrade
CMSADM backup for R3V6 and earlier
The CMSADM backup for R3V6 and earlier is service affecting (that is, links will go down
and data will not be collected during the backup). Schedule the backup for a low or notraffic period.
To do a CMSADM backup on an R3V6 or earlier system:
!
WARNING:
Verify that you are using the correct tape for the tape drive on your system.
Many of the tape cartridges look alike, and using the wron g tape can
damage the tape drive mechanism and tape heads.
1. Log on as root.
2. Enter:
cmsadm
The system displays the CMS Administration menu:
Call Management System Administration Menu
Select a command from the list below.
1) acd_create Define a new ACD
2) acd_remove Remove all administration and data for an ACD
3) backup Filesystem backup
4) diskmap Estimate disk requirements
5) memory Estimate memory requirements
6) realtime Estimate real-time report refresh rate
7) pkg_install Install a feature package
8) pkg_remove Remove a feature package
9) run_cms Turn CentreVu CMS on or off
10) port_admin Administer Modems, Terminals, and Printers
Enter choice (1-10) or q to quit:
3. Enter the number that corresponds to the backup option.
The system displays the tape drive options:
Select the tape drive type:
1) 150MB cartridge tape
2) 60MB cartridge tape
3) 14.0 Gbyte 8mm tape
4) 5.0 Gbyte 8mm tape
5) 2.5 Gbyte cartridge tape
6) 4.0 - 8.0 Gbyte cartridge tape
7) 40.0 Gbyte 8mm tape
Enter choice (1-7):
Issue 3.0 February 2002 15
Page 16

Upgrading an Enterprise 3000 to CMS R3V9
4. Enter the number for the tape drive that is installed on your system.
The system displays the following message and calcu lates the approxi mate number of
tapes that are required for the back up. Note that this is an approximation, and more
tapes may be needed.
Calculating approximate number of tapes required. Please wait.
If only one tape is required, the system dis p lays the following message:
The backup will need approximately 1 tape.
Please insert the first cartridge tape into </dev/rmt/
Press ENTER when ready:
X
>.
If more than one tape is required, the system displays the following message:
The backup will need approximately
Be sure to number the cartridge tapes consecutively in the order
they will be inserted.
Please insert the first cartridge tape into
Press ENTER when ready:
<X>
tapes.
</dev/rmt/x>
.
5. To begin the backup, insert the first cartr idge tape, wait for the tape to rewind and
reposition, and then press Enter.
The system displays the following message:
The backup is about to begin. CMS is currently on.
CMS will be turned off automatically during that portion
of the backup which needs CMS off.
Press ENTER to proceed or Del to quit:
16 CentreVu CMS R3V9 Sun Enterprise 3000 Computer CVUE Instructions
Page 17

Procedures that are done by the customer before the upgrade
6. To continue the backup, press Enter. Note that a CMSADM backup can take several
hours, depending on the speed of the system and the tape drive.
If only one tape is required, the system dis p lays the following message:
Backing up files...
..................................................
..................................................
(dots continue to display as the system is backed up)
..................................................
XXXXXX
Tape verification
XXXXXX
Please label the backup tape(s) with the date and the
current CMS version (
blocks
blocks
r3vXxx.x
)
7. Do one of the following:
● If only one tape is required, continue with Step 11.
● If more than one tape is required, the system displays the following message, and
you continue with Step 8:
Backing up files...
..................................................
..................................................
(dots continue to display as the system is backed up)
..................................................
End of medium on “output”.
X
Please remove the current tape, number it, insert tape number
and press ENTER
,
8. Insert the next tape and press Enter to continue. When you insert the next tape, allow
it to rewind and reposition before you press Enter. Repeat this step for any additional
tapes.
After the system completes the backup, the system displays the following message:
XXXXXXX
Tape Verification
Insert the first tape
Press Return to proceed:
blocks
Issue 3.0 February 2002 17
Page 18

Upgrading an Enterprise 3000 to CMS R3V9
9. Insert the first tape and press Enter to continue.
After the tape is verified, the system displays the following message:
End of medium on “input”.
Please insert tape number
10. Remove the first tape and insert the second tape. After the tape rewinds and
repositions, press Enter to continue. Repeat thi s step for each additional tape.
After the last tape is verified, the system displays the following message:
X
and press Return
XXXXXXX
Please label the backup tape(s) with the date and the
current CMS version (
blocks
r3vXxx.x
)
11. When the tape drive LED stops blinking, remove the tape. The CMSADM file system
backup is complete.
12. Label all tapes with the tape number and the date of the backup. Set the write-protect
switch on the tape to read-only.
18 CentreVu CMS R3V9 Sun Enterprise 3000 Computer CVUE Instructions
Page 19

CMSADM backup for R3V8
The CMSADM backup for R3V8 is not service affecting. The backup can be done at any
time.
To do a CMSADM backup on an R3V8 system:
!
WARNING:
Verify that you are using the correct tape for the tape drive on your system.
Many of the tape cartridges look alike, and using the wron g tape can
damage the tape drive mechanism and tape heads.
1. Log on as root.
Procedures that are done by the customer before the upgrade
2. Enter
:
cmsadm
The system displays the CMS Administration menu:
Call Management System Administration Menu
Select a command from the list below.
1) acd_create Define a new ACD
2) acd_remove Remove all administration and data for an ACD
3) backup Filesystem backup
4) pkg_install Install a feature package
5) pkg_remove Remove a feature package
6) run_pkg Turn a feature package on or off
7) run_cms Turn CentreVu CMS on or off
8) port_admin Administer Modems, Terminals, and Printers
Enter choice (1-8) or q to quit:
3. Enter the number that corresponds to the backup option.
Depending on the configuration of your system, the syst em displ a ys one of the
following options.
● If only one tape drive is available on the system, the system displays the following
message:
Please insert the first cartridge tape into <device name>.
Press ENTER when ready or Del to quit:
Continue with Step 5.
● If more than one tape drive is avail able for use by the system, the syste m displays a
message listing the different tape drives.
Issue 3.0 February 2002 19
Page 20

Upgrading an Enterprise 3000 to CMS R3V9
4. Enter a tape drive selection from the displayed list.
The system displays the following message:
Please insert the first cartridge tape into <device name>.
Press ENTER when ready or Del to quit:
5. Press Enter.
The backup process begins. If more than one tape is requ ired, the syst em displays the
following message:
End of medium on "output".
Please remove the current tape, number it, insert tape number x,
and press Enter
6. If the system displays the message in Step 5, insert the next tape and allow it to
rewind. When it is properly positioned, press Enter.
7. When the backup is completed, the system displays information according to the
number of tapes that are required for the backup:
● If the number of tapes required is one, the system displ a ys the following message:
xxxxxxx blocks
Tape Verification
xxxxxxx blocks
WARNING: A CMS Full Maintenance Backup in addition to this cmsadm
backup must be done to have a complete backup of the system. . .
. .
Please label the backup tape(s) with the da te and the current CM S
version (R3V8xx.x)
Continue with Step 10.
● If the number of tapes required is more than one, the system displays the following
message:
xxxxxxx blocks
Tape Verification
Insert the first tape
Press Return to proceed :
8. Insert the first tape to be used in the backup and press Enter . When the LED on the
tape drive stops blinking, remove the tape.
20 CentreVu CMS R3V9 Sun Enterprise 3000 Computer CVUE Instructions
Page 21

Procedures that are done by the customer before the upgrade
9. When prompted, repeat Step 8 for any additional tapes generated by the backup
process. When the final tape is verified, the program displays the following message:
xxxxxxx blocks
Tape Verification
xxxxxxx blocks
WARNING: A CMS Full Maintenance Backup in addition to this cmsadm
backup must be done to have a complete backup of the system. . .
. .
Please label the backup tape(s) with the da te and the current CM S
version (R3V8xx.x)
10. Label all tapes with the:
● Tape number
● Date of backup
● Current version of CMS
11. Set the tape write-protect switch to read-only.
Issue 3.0 February 2002 21
Page 22
Upgrading an Enterprise 3000 to CMS R3V9
Backing up Visual Vectors vector layouts and comments
Visual Vectors Server software provides backup and restore functions that allow you to
save vector layouts and comments previously placed on the server from Visual Vectors
client applications. The vector layout and comment files (1 through 8) are found in
/cms/aas/vector/layout and /opt/cc/aas/vector/layout. You can skip this procedure if no
vector layouts and comments were pl aced on the server or the upgraded server will not
have the Visual Vectors Server software installed.
To backup Visual Vectors vector layouts and comments:
1. Insert a backup tape into the tape drive.
!
CAUTION:
Do not use the CMSADM or maintenance backup tapes.
2. Enter:
cd /
3. Enter:
setupaas
The system displays the Visual Vectors System Services Menu.
Avaya Visual Vectors Server System Services Menu
Select a command from the list below.
1) init_vvs Setup the initial configuration
2) run_vvs Turn VVS on or off
3) auth_display Display simultaneous VVS logins
4) auth_set Change simultaneous VVS logins
5) backup Backup vector steps and layout files
6) restore Restore vector steps and layout files
Enter choice (1-6) or q to quit:
4. Enter the number associated with the backup option.
The system displays the following message:
Enter path to backup device (default: /dev/rmt/0)
22 CentreVu CMS R3V9 Sun Enterprise 3000 Computer CVUE Instructions
Page 23
Procedures that are done by the customer before the upgrade
5. Enter the path for the backup device.
Note:
The default device name is /dev/rmt/0. However, the device name used
depends on the drive’s SCSI ID. Possible device names are:
/dev/rmt/0 I ndicates the first noncomp ressing tape drive with
the lowest target address
/dev/rmt/1 I ndicates the second noncompressing tape drive
with the second lowest target addres s
/dev/rmt/0c Indicates the first compressed-mode tape drive
with the lowest target address
/dev/rmt/1c Indicates the second compressed-mode tape
drive with the second lowest target address
The system backs up the Visual Vectors vector layouts and comments, and then
displays a message similar to the following:
Using
as backup device.
Starting backup of vector steps and layout files. Please wait...
Backup completed successfully.
Please remove tape and label it
X
XXXXXXXXXX
Issue 3.0 February 2002 23
Page 24

Upgrading an Enterprise 3000 to CMS R3V9
Doing a full maintenance backup
A full maintenance backup provides migration data for the new CMS version. Do the
backup the night before the upgrade. Backups are done using the CMS Backup Data
window.
To do a full maintenance backup:
1. Log on to CMS.
2. Select Maintenance > Back Up Data from the CMS main menu.
The system displays the following for R3V6 and earl ier :
3/ 9/01 17:29 CentreVu(R) CMS Windows: 1 of 4 vv^v vv
Maintenance: Backup Data Dad11R6vpe
Backups completed today: 0 | Cancel
Status: Last backup finished 03/07/2001 21:48:19. | List devices
Errors: | Run
| Select tables
Device name: default +-------------- Verify tape can be read after backup? (y,n): y
ACD(s) to back up (Select one):
<x> All ACDs
< > Current ACD
Data to back up (Select any you wish):
[x] System administration data
[x] ACD-specific administration data
[x] Historical data,
Select one:
<x> Full
< > Incremental
[x] Non-CMS data
[ ] Specific tables
Help Window Commands Keep Exit Scroll Current MainMenu
24 CentreVu CMS R3V9 Sun Enterprise 3000 Computer CVUE Instructions
Page 25

Procedures that are done by the customer before the upgrade
The system displays the following for R3V8:
3/ 9/01 18:43 CentreVu(R) CMS Windows: 1 of 4 ^vvvv^v^
Maintenance: Backup Data hyena3g3v5e
Backups completed today: 0 | Cancel
Status: | List devices
Errors: | Run
| Select tables
Device name: default +-------------- Verify tape can be read after backup? (y,n): y
ACD(s) to back up (Select one):
<x> All ACDs < > Current ACD
Data to back up (Select any you wish):
[x] Local system administration data
[x] CMS system administration data
[x] ACD-specific administration data
[x] Historical data,
Select one:
<x> Full < > Incremental
[x] Non-CMS data
[ ] Specific tables
Help Window Commands Keep Exit Scroll Current MainMenu
Issue 3.0 February 2002 25
Page 26

Upgrading an Enterprise 3000 to CMS R3V9
3. In the Backup Data window, select the options and enter the values that are indicated
in the following table:
Field Value to enter or option to select
Device name The tape drive device name
Verify tape...? y
ACD(s) to back up All ACDs
Data to back up For R3V6 and earlier:
System administration data
ACD-specific administration data
Historical data - Full
Non-CMS data (if needed)
For R3V8:
Local system administration data
CMS system administration data
ACD-specific administration data
Historical data - Full
Non-CMS data (if needed)
4. Press Enter to access the action list, and select Run.
5. After the backup is complete, remove and label the backup tape.
26 CentreVu CMS R3V9 Sun Enterprise 3000 Computer CVUE Instructions
Page 27

Procedures that are done by the customer before the upgrade
Doing an incremental maintenance backup
Do an incremental maintenance backup immediately before the upgrade. Backups are
done using the CMS Back Up Data window.
To do an incremental maintenance backup:
1. Log on to CMS.
2. Select Maintenance > Back Up Data from the CMS main menu.
The system displays the following for R3V6 and earl ier :
3/ 9/01 17:29 CentreVu(R) CMS Windows: 1 of 4 vv^v vv
Maintenance: Backup Data Dad11R6vpe
Backups completed today: 0 | Cancel
Status: Last backup finished 03/07/2001 21:48:19. | List devices
Errors: | Run
| Select tables
Device name: default +-------------- Verify tape can be read after backup? (y,n): y
ACD(s) to back up (Select one):
<x> All ACDs
< > Current ACD
Data to back up (Select any you wish):
[x] System administration data
[x] ACD-specific administration data
[x] Historical data,
Select one:
< > Full
<x> Incremental
[x] Non-CMS data
[ ] Specific tables
Help Window Commands Keep Exit Scroll Current MainMenu
Issue 3.0 February 2002 27
Page 28

Upgrading an Enterprise 3000 to CMS R3V9
The system displays the following for R3V8:
3/ 9/01 18:43 CentreVu(R) CMS Windows: 1 of 4 ^vvvv^v^
Maintenance: Backup Data hyena3g3v5e
Backups completed today: 0 | Cancel
Status: | List devices
Errors: | Run
| Select tables
Device name: default +-------------- Verify tape can be read after backup? (y,n): y
ACD(s) to back up (Select one):
<x> All ACDs < > Current ACD
Data to back up (Select any you wish):
[x] Local system administration data
[x] CMS system administration data
[x] ACD-specific administration data
[x] Historical data,
Select one:
< > Full <x> Incremental
[x] Non-CMS data
[ ] Specific tables
Help Window Commands Keep Exit Scroll Current MainMenu
28 CentreVu CMS R3V9 Sun Enterprise 3000 Computer CVUE Instructions
Page 29

Procedures that are done by the customer before the upgrade
3. In the Back Up Data window, sel ect t he opt ions and ent er the val ues that are indi cated
in the following table:
Field Value to enter or option to select
Device name The tape drive device name
Verify tape...? y
ACD(s) to back up All ACDs
Data to back up For R3V6 and earlier:
System administration data
ACD-specific administration data
Historical data - Incremental
Non-CMS data (if needed)
For R3V8:
Local system administration data
CMS system administration data
ACD-specific administration data
Historical data - Incremental
Non-CMS data (if needed)
4. Press Enter to access the action list, and select Run.
5. After the backup is complete, remove and label the backup tape.
Checking for printer requests and large mail files
The CVUE extract process first copies the files that are being migrated to the new system
to the /var/tmp/new directory, then copies the files to tape. If the system does not have
enough disk space to create this first copy to /var/tmp/new, the system may run out of
space and the extract will fail .
Before you continue with the upgra de, c heck the f ollowi ng dir ectori es f or old pri nt requ ests
and large, unneeded mail files that may be taking up space:
● /var/spool/lp/requests
● /var/mail/root
● /var/mail/root2
● /var/mail/cms
Delete any unneeded files.
Issue 3.0 February 2002 29
Page 30

Upgrading an Enterprise 3000 to CMS R3V9
Checking for nonsequential ACDs
The CVUE tool cannot upgrade systems that have a series of ACDs that are not in
sequential order. For example, if a system has ACD1, ACD2, ACD4, and ACD5, it is
missing ACD3 and cannot be upgraded until you add a temporary ACD to fill the gap.
To determine if the system has nonsequential ACDs:
1. Log on to CMS.
2. Do one of the following:
● Select System Setup > Switch Setup > List All to display a list of the
administered ACDs. This list will show if there are any gaps in the administered
ACDs.
● On the upper right corner of the CMS Main Window, the status of the ACDs are
displayed with up arrows and down arrows (for example,
shows a series of ACDs with one ACD missing (for example, ∧∨ ∧∨ shows that
ACD3 is missing because there is a space), you must add a temporary ACD before
you begin the upgrade. Note which ACDs were up and which were down to see that
they are returned to the same state after the upgrade.
∧∨∧∧∨
). If the display
3. To add a temporary ACD:
a. Enter:
cmsadm
b. Select the number that corresponds to the acd_create option.
This adds the next unassigned ACD.
c. Enter the switch name and switch model, enable vectoring, enable disconnect
supervision, and enter 1 for the local port and the remote port.
d. When you select a link device, use ei ther TCP/I P with an inva li d IP addr ess, or X.25
and select one of the loopback links. Since the ACD is deleted aft e r the upgrade, it
is acceptable to assign an invali d IP address or a loopback link.
e. For the remaining options, use the defaults or minimum values.
f. Repeat these steps for any other ACDs that are missing.
Collecting third-party and custom software
If third-party and cust om software is in st all ed on th e system, t he customer must col lect t he
software so that it will be available for installation after the upgrade. This can include
software such as Internet Call Center and V isual Vectors.
30 CentreVu CMS R3V9 Sun Enterprise 3000 Computer CVUE Instructions
Page 31

Upgrading the system
Overview
Use the following checklist when upgrading a CMS computer.
Inventory the CVUE kit. Make sure that the CVUE Upgrade Tool CD
version is compatible wit h the boot di sk drive.
If the customer ordered Informix SQL (ISQL), locate the ISQL
software CD-ROM.
Verify that the customer completed the preupgrade procedur es.
Upgrading the system
Procedure Completed
Obtain the current CMSSVC password.
Extract the customer’s administration and options.
Remove and replace the disk drives.
Copy and activate the customer’s administration and options.
!
CAUTION:
It is highly recommended that customers do NOT reuse their old disk drives
as part of the upgrade pr ocedure. These old disk dr iv es should b e saved for
system recovery if any problems arise during the upgrade procedure.
Issue 3.0 February 2002 31
Page 32

Upgrading an Enterprise 3000 to CMS R3V9
Extracting the customer’s administration and options
To minimize the time that the system is out of service during the upgrade, you can extract
the customer’s administration and options while the system is operati ng, but do not allow
the customer to make any administration changes while you ar e performing thi s procedure .
Note:
When the upgrade is being supported by remote personnel, such as CMS
Provisioning, the system commands in this section are for use by remote
personnel to monitor the progress of the upgrade. Run the commands from
the local console only when instructed to do so, or when there is no remote
support.
To extract the customer’s administration and options:
1. For the tape being used with the upgrade, check for the following:
● Make sure that you are using the correct tape.
● Make sure that the tape is not write-protected.
2. Label the blank tape as “CVUE Extract,” and insert the tape into the tape drive.
!
Important:
If the system has more than one tape drive, the CVUE program defaults to
the tape drive that has a tape installed and that has the lowest SCSI ID. To
help prevent using the wrong tape drive, remove the tapes from any other
tape drives.
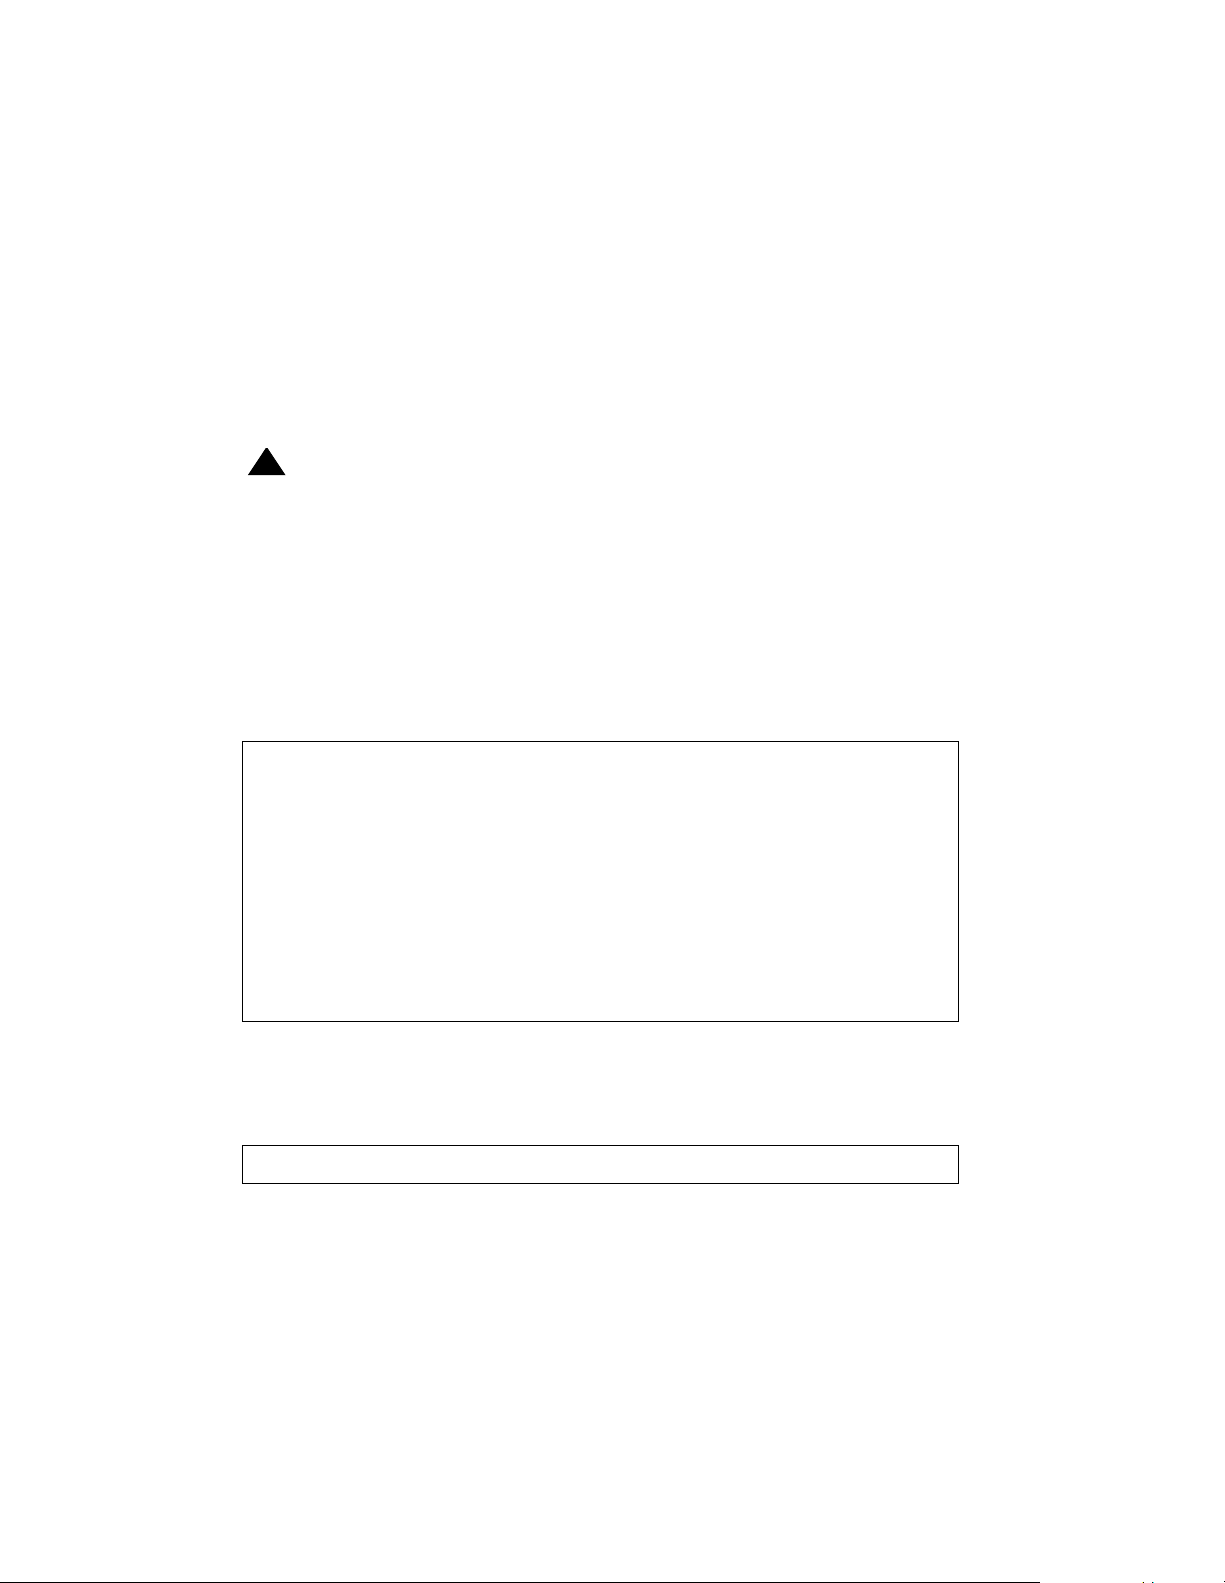
3. Document the original position of the key switch. You must return the key switch to this
original position later duri ng the upgrade.
4. If the key switch is in the “Locked” or “Diagnostics” position, move the key switch to the
vertical “On” position. See the following figure.
U
U
U
U
U
U
U
Sun
U
0
12
U
U
U
U
U
U
U
U
U
U
U
U
U
U
10
U
U
U
U
U
U
U
U
U
U
U
U
U
U
U
U
U
U
U
U
U
U
U
U
U
U
11 12
Enterprise
3
U
U
U
U
U
U
U
U
U
13 14 15
U
U
U
U
U
U
Sun
U
Thereis abunch ofstuff
thatalks aboutFCC and
othersuch stuff.
Thereis abunch ofstuff
thatalks aboutFCC and
othersuch stuff.
3000
XL
key_switch_3000.cdr
32 CentreVu CMS R3V9 Sun Enterprise 3000 Computer CVUE Instructions
Page 33

Upgrading the system
5. Log on as root.
6. Enter:
cd /
7. Load the CVUE Upgrade Tool CD.
The File Manager window may open. Move and click the cursor in an XTERM window.
8. After waiting about 15 seconds, enter mount to verify that the CD is detected.
The system displays a list of devices and file systems that are currently mounted. The
final line should show /cdrom/cvue.
9. Enter the following commands:
cd /cdrom/cdrom0
./cvue_extract
The extract process begins. To track the progress of the extract command from a
different XTERM window, or from a remote or local terminal, use the following
command:
tail -f /var/tmp/new/var/log/cvuelog
The system displays several messages as shown in the follo wing example:
Using /var/tmp/new as temporary directory.
CVUE VERSION:
Current CMS version is: r3v
vXcvueXX.X
Xxx.x
10. The CVUE tool next checks the tape and the tape drive. The system determines if the
tape is defective, write-pr otected, or not compatible with the tape drive. The system
displays the following message:
Testing tape on /dev/rmt/
X
11. Depending on what the system determines about the tape and tape drive, one of the
following occurs:
● If the tool determines that the tape and t ape drive are operational, the system does
not display any error messages, and the upgrade continues with Step 12.
Issue 3.0 February 2002 33
Page 34

Upgrading an Enterprise 3000 to CMS R3V9
● If the tool determines that the tape or tape drive are not operational, the system
displays the following message:
Tape test failed!! Could not write and then read a file
from the tape at /dev/rmt/
Check the following items for possible problems:
Verify the tape is not write-protected
Verify the correct type of tape is in the tape drive
Verify the tape is not defective
Make sure the tape is not write-protected and is the correct tape for the tape drive.
Try a different tape and start over with Step 1.
12. The CVUE tool next runs the CMS converter tool. The system displays the following
message:
X
.
Admin data will be spooled to /dev/rmt/
.
.
Converter completed successfully.
Converter completed successfully.
X
<timestamp>
13. The CVUE tool next checks to see if any of the ACD switch links use X.25. One of the
following happens:
● If no X.25 switch links are found, the upgrade continue s with Step 14.
● If at least one X.25 switch link is found, the system displays the following message:
CVUE found that some ACDs use X.25 for the switch link. If X.25
will continue to be used for ACD switch links after the upgrade,
CMS R3V9 requires that the customer purchase a new license. If
all switch links will be converted to TCP/IP after the upgrade,
purchase of a new license is not required. To continue, enter
(y) if the customer agrees to purchase or has purchased a new
X.25 license, or if the switch links will be converted to TCP/IP
(entering (n) will stop the upgrade) (y/n):
If you answer y, the upgrade continues and the new X.25 license will be installed. If
you answer n, the upgrade stops and you must resolve the license issue.
34 CentreVu CMS R3V9 Sun Enterprise 3000 Computer CVUE Instructions
Page 35

Upgrading the system
14. The CVUE tool next checks the current version of Solari s and d isplays the following
message:
The current version of Solaris on the system is
It will be replaced with Solaris 5.8 as a part of upgrade
Please wait as admin files are extracted..
..........................
X.X.X
Extracting the administration files will take several minutes.
15. The CVUE tool next checks to see if ISQL software version 7.20.UC1 is currently
installed on the system. One of the following happens:
● If ISQL version 7.20.UC1 is currently on the sys tem, it is automatically installed as
part of the upgrade. Continue with Step 16.
● If an older, incompatible versi on of ISQL version is installed, or if ISQL is not
currently installed, the system displays the following message:
Has ISQL been purchased for this upgrade (y or n)?
Continue with Step 17.
16. The extract process continues, and the system displays the following message:
Your current version of ISQL is 7.20.UC1.
ISQL will be installed.
Continue with Step 18.
17. Do one of the following:
● If ISQL was purchased as part of the upgrade, the ISQL CD is included in the
upgrade kit. If the CD is in the kit, enter y. Enter the serial number and key number
printed on the CD. This is an optional package and can only be installed if the
customer has purchased the software. After ent ering the serial number and key
number , the system displays the following message:
ISQL will be installed.
When entering the serial number and key, you have three attempts to successfully
enter this information. After the third attempt, the installation of ISQL is skipped, but
the extract process continues with Step 18.
Issue 3.0 February 2002 35
Page 36

Upgrading an Enterprise 3000 to CMS R3V9
● If ISQL was not purchased as part of the upgrade, enter n. If you enter n, ISQL is
not installed and the system displays the following message:
ISQL will not be installed as part of upgrade
The CVUE upgrade continues with Step 18.
18. The system displays the following message:
Supplemental Services css
Network Terminal Server R10.0B will be installed.
.
.
xXxx.x
will be installed.
19. The CVUE tool next checks to see if ODBC version 3.0 or 3.2 is currently installed on
the system. One of the following happens:
● If ODBC version 3.0 or 3.2 is currently on the system, version 3.2 is automatically
installed as part of the upgrade. Continue with Step 20.
● If ODBC is not installed, or if the current version is older than version 3.0, ODBC is
not installed. The system displays the following message:
Note: CVUE has found that ODBC software is not installed on
current CMS system.
No ODBC software will be installed on upgraded CMS system.
If the customer purchased ODBC for CMS R3V9, the software must be installed
after the upgrade is complete. Continue with Step 21.
20. The extract process continues, and if ODBC is to be installed, the system displays the
following message:
ODBC Version 3.2 will be installed.
21. The CVUE tool next checks to see if the ACDs are administered in sequential order.
That is, ACD1, ACD2, ACD3, and so on with no gaps. Depending on what the tool
finds, do one of the following:
● If the system does not display an error message, the ACDs are in sequential or der,
and the process continues with Step 23.
36 CentreVu CMS R3V9 Sun Enterprise 3000 Computer CVUE Instructions
Page 37

Upgrading the system
● If the system displays the following error message, the ACDs are not in sequential
order, and you must add one or more temporary ACDs using the commands shown
in Step 22:
ERROR: The following ACDs are not currently administered: x,x.
CVUE cannot upgrade when ACDs are not sequentially numbered.
Please run cmsadm, add the missing ACDs, then run
“./cvue_extract” again.
#
22. To add a temporary ACD:
a. Enter:
cmsadm
b. Select the number that corresponds to the acd_create option.
This adds the next unassigned ACD.
c. Enter the switch name and switch model, enable vectoring, enable disconnect
supervision, and enter 1 for the loc a l port and the remote port.
d. When you select a link device, use either TCP/IP with an invalid IP addr ess, or X.25
and select one of the loopback links. Since the ACD is deleted aft er the upgrade, it
is acceptable to assign an invalid IP address or a loopback link.
e. For the remaining options, use the defaults or minimum values.
f. Repeat these steps for any other ACDs that are missing.
g. Return to Step 9 and start the extract process again.
23. The system displays the following messages:
CMS default backup device will be checked.
Sendmail permissions will be fixed.
Serial printers will be administered
.
.
Merging cvue_file_properties with cvuelog
The properties of the files being preserved are written to the /var/log/cvuelog file on
the new system. This information i s used later t o comp are the preser ved file propert ies
with the file properties on the new system.
Issue 3.0 February 2002 37
Page 38

Upgrading an Enterprise 3000 to CMS R3V9
24. The system may display messages similar to the following:
Copying admin to tape.
103346-XX not needed because version -XX is already installed
Exiting spatches/install/install_eeprom
These last two messages show that the OpenBoot PROM (OBP) is being checked. If
the system finds that the OBP version is out of date, a script is created to upgrade to
the correct version.
25. The system displays the following message:
.
.
The cvue_extract process is complete.
#
26. Enter:
pg /var/tmp/new/var/log/cvuelog
This displays the temporary CVUE log file. Check for failure messages (FAIL) or other
indications that the extract process did not successfully complete. This file also
contains a list of file s that are being copied to the new system. The list of files may be
useful for later troubleshooting.
27. Remove the tape, set the write-protect switch on the t ape to read- only, and reinsert the
tape.
28. Enter:
/usr/sbin/shutdown -y -i0 -g0
This shuts down the computer. The system displays the ok prompt.
29. Turn the power switch on the CMS computer to off, and turn off the power to any
external SCSI disk drives and tape drives.
30. Continue with Removing and replacing Enterprise 3000 disk drives on page 39.
38 CentreVu CMS R3V9 Sun Enterprise 3000 Computer CVUE Instructions
Page 39

Upgrading the system
Removing and replacing En terprise 3000 disk drives
Overview
This section contains the procedures that are required to upgrade the disk drives in an
Enterprise 3000 computer to CMS R3V9.
These procedures require you to remove the old disk dri ves in the computer, and replace
them with new disk drives that are preloaded with the CMS R3V9 software. Depending on
the amount of disk space that is required by the cu stomer, you will install from 1 to 10 new
disk drives.
!
CAUTION:
It is highly recommended that customers do NOT reuse their old disk drives
as part of the upgrade pr ocedure. These old disk dr iv es should b e saved for
system recovery if any problems occur during the upgrade procedure.
Disk upgrade procedures
The disk upgrade process consists of the foll owing procedures:
1. Removing and labeling the old disk drives
!
CAUTION:
All old disk drives must be removed from the customer’s system and
replaced with the disk drives from the CVUE kit. Do not leave any old disk
drives in the system.
2. Installing the new disk drives
3. Booting up the system with the new disk drives
4. Verifying that the system recognizes the new disk drives
5. Checking the status of the disk drives and tape drives
6. Verifying that the upgrade can continue
Removing and labeling the old disk drives
To remove the existing disk drives from an Enterprise 3000 computer:
1. If you have not already done so, enter the following command to shut down the
computer:
/usr/sbin/shutdown -y -i0 -g0
2. Turn off the power to the computer using the key switch on the fr ont of the computer
and the power switch on the back of the computer.
3. For ESD isolation, verify that the AC power cord is plugged in.
Issue 3.0 February 2002 39
Page 40

Upgrading an Enterprise 3000 to CMS R3V9
4. Open the front door of the system.
5. Attach an ESD wrist strap to the metal chassis of the computer and to your wrist.
6. While the original disk drives are still in the computer, use the colored labels from the
upgrade kit to label each disk drive with the slot number. Save the old disk drives in
case you have to reinstall the original configuration.
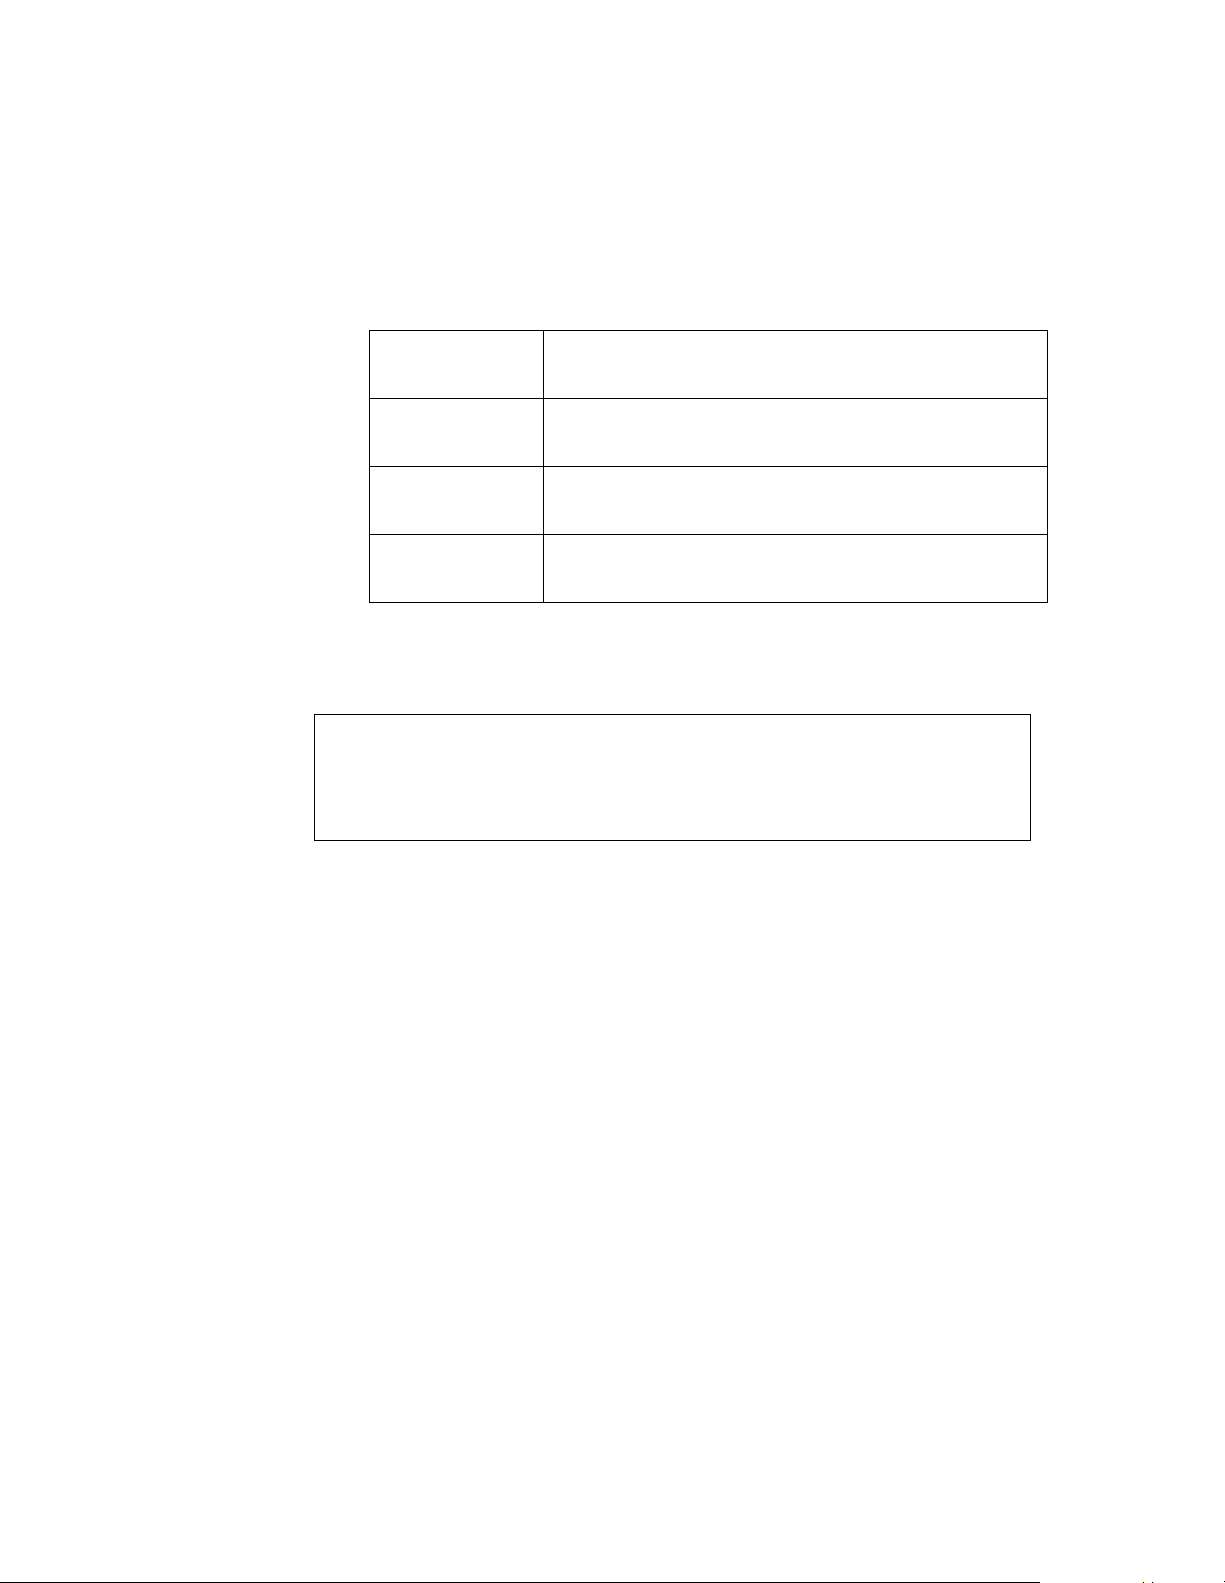
7. Unlatch the disk drive retainer. Use the extended retainer as a handle. See the
following figure.
e3000_remove_disk.cdr
8. While grasping the retainer, press your thumb on the sheet met al of the chassis that is
directly above the disk drive to be removed. This allows for smoother release of the
disk drive from the connector on the drive.
9. Pull on the retainer to slide the disk drive out of the chassis.
10. Repeat this procedure for each disk drive that is installed.
40 CentreVu CMS R3V9 Sun Enterprise 3000 Computer CVUE Instructions
Page 41

Upgrading the system
Installing the new disk drives
You have one boot disk drive, and up to nine optional nonboot disk drives. The boot disk
drive must be installed in Slot 0, which is on the top shelf. The opt ional nonboo t disk drives
must be installed in Slots 1 through 3 and 10 through 15, consecutively. See the following
figure.
U
U
U
U
U
U
U
Sun
U
Enterprise
3000
XL
Boot disk
drive
0
U
U
U
U
U
U
U
U
12
U
U
U
U
U
U
U
U
3
U
U
U
U
U
U
U
U
U
U
U
U
U
U
U
U
U
U
U
U
U
U
U
Sun
U
Thereis a bunch of stuff
thatalks about FCC and
othersuch stuff.
Thereis a bunch of stuff
thatalks about FCC and
othersuch stuff.
(Boot Disk - Slot 0)
U
U
U
U
U
U
U
U
U
U
U
U
U
U
U
U
Blank
nonboot
disk drives
10
11 12
13 14 15
e3000_nonmir.cdr
To install the new disk drives:
1. Attach an ESD wrist strap to the metal chassis of the computer and to your wrist.
2. Install the boot disk drive in Slot 0. This disk is labeled “Boot Disk - Slot 0.”
3. If the customer ordered one or more of the optional nonb oot d isk dri ves , inst al l them in
Slots 1 through 3 and 10 through 15. Do not skip any slots.
4. Disconnect the ESD wrist strap.
5. Continue with Booting up the system with the new disk drives on page 42.
Issue 3.0 February 2002 41
Page 42

Upgrading an Enterprise 3000 to CMS R3V9
Booting up the system with the new disk drives
Note:
When the upgrade is being supported by remote personnel, such as CMS
Provisioning, the system commands in this section are for use by remote
personnel to monitor the progress of the upgrade. Run the commands from
the local console only when instructed to do so, or when there is no remote
support.
To boot up the system with the new disk drives:
1. Turn on all external SCSI devic es, st arting with th e device far thest from t he system and
working toward the system.
2. Turn on the system monitor .
3. Turn on the system. Return the key switch to the position that was used by the
customer before the upgrade was started.
4. Close the front door of the system.
The system begins to boot up. If the boot fails, turn off the power to the computer and
check all device cabling. Cycle power on all external devices.
The power LEDs on the SCSI drives wi ll light. Note that du ring boot-up, you might see
error messages concerning hardware for which software is not yet installed. This will
be corrected later in the upgrade procedur e when the customer’s options are installed.
5. After the system reboots, log in as root.
6. If prompted for a password, press Enter. (At this point in the upgrade, there is no
password.)
7. If using the CMS console on site, open an XTERM window if one is not displayed.
Move the cursor into the window and click the left mouse button to activate that
window .
8. Continue with Verifying that the system recognizes the new disk drives on page 43.
42 CentreVu CMS R3V9 Sun Enterprise 3000 Computer CVUE Instructions
Page 43

Verifying that the system recognizes the new disk drives
You must next verify that the system recognizes the new disk dr ives.
To verify that the system recognizes the new disk drives:
1. Enter:
format
The system displays a message similar to the following:
Searching for disks...done
AVAILABLE DISK SELECTIONS:
0. c0t0d0 <SUN18G cyl 7506 alt 2 hd 19 sec 248>
X
/sbus@
1. c0t1d0 <SUN18G cyl 7506 alt 2 hd 19 sec 248>
/sbus@X,0/SUNW,fas@3,8800000/sd@1,0
2. c0t2d0 <SUN18G cyl 7506 alt 2 hd 19 sec 248>
/sbus@X,0/SUNW,fas@3,8800000/sd@2,0
Specify disk (enter its number):
,0/SUNW,fas@3,8800000/sd@0,0
Upgrading the system
The message displays the number of disks recognized by the system. This example
shows a system with three disks. The number of disks that are inst all ed on the system
must match the number that is shown with the format command.
2. Enter: 0
3. Enter: q
4. Continue with Checking the status of the disk drives.
Checking the status of the disk drives
To check the status of the disk drives:
1. Enter:
. /opt/informix/bin/setenv
2. Enter:
onstat -d | egrep “X” | pg
The system should not display anything except the command prompt . If any lines
display NX, the disk requires maintenance. Escalate through normal channels.
Issue 3.0 February 2002 43
Page 44

Upgrading an Enterprise 3000 to CMS R3V9
3. Enter:
metadb -i
The system displays a message similar to the following:
flags first blk block count
a m p luo 16 1034 /dev/dsk/c0t0d0s1
a p luo 1050 1034 /dev/dsk/c0t0d0s1
a p luo 2084 1034 /dev/dsk/c0t0d0s1
a p luo 3118 1034 /dev/dsk/c0t0d0s1
This command shows the dat abase repl icas. Ther e should be four r eplicas f or the boot
disk. If the correct number of replicas are not shown, escalate using the normal
channels.
4. Continue with Checking the status of the tape drives.
Checking the status of the tape drives
To check the status of the tape drives:
1. Enter:
ls -x /dev/rmt
The system displays a list of the current tape device modes for each installed tape
drive. If there is only one tape drive, a series of files start ing with 0 is displayed. The
following example shows a series of files star ting with 0. This indicates that there is
one tape drive installed on the system.
0 0b 0bn 0c 0cb 0cbn 0cn 0h 0hb 0hbn 0hn 0l 0lb
0lbn 0ln 0m 0mb 0mbn 0mn 0n 0u 0ub 0ubn 0un
2. Note whether or not the number of tape drives th at is displayed matches th e number of
tape drives that are connected to the system.
3. Continue with Verifying that the upgrade can continue.
44 CentreVu CMS R3V9 Sun Enterprise 3000 Computer CVUE Instructions
Page 45

Upgrading the system
Verifying that the upgrade can continue
To continue with the upgrade, do one of the following:
● If the disk drive and tape dr ive stat us is correct , continue wit h Copying and a ctivating the
customer’s administration and options on page 46.
● If the disk drive and tape drive status is not correct, do the following:
a. Enter the following commands. These commands shut d own the system and force a
reconfiguration the next time that the system boots.
cd /
touch /reconfigure
/usr/sbin/shutdown -y -i0 -g0
b. Turn off the syst em.
c. Turn off the system monitor .
d. Turn off any external SCSI devices starting with the device that is closest to the
system and working toward the farthest device.
e. Check all device cables. Cycle power on all external devices.
f. Restart with Verifying that the system recognizes the new disk drives on page 43. If
the number of disks and tape drives still do not matc h, escalate through normal
channels.
Issue 3.0 February 2002 45
Page 46

Upgrading an Enterprise 3000 to CMS R3V9
Copying and activating the customer’s administration and options
Overview
After you verify the new configuration, do the following:
● Install CMS patches.
● Copy the customer’s data from the extract tape onto the system.
● Activate the customer’s options.
● Shut down and reboot the system.
● Remove any temporary ACDs that you created during the extraction phase of the
upgrade process.
● Ver if y CMS permissi ons.
● Turn on CMS.
● Verify that CMS is operating.
● Check Free Space Allocation (FSA).
● Compare directory and file permissions.
● Update the switch setup.
● Set the Informix configuration parameters.
● Remove the upgrade files.
● Migrate the customer’s data.
● Replace the customer’s tapes in the tape drives.
Note:
When the upgrade is being supported by remote personnel, such as CMS
Provisioning, the system commands in this section are for use by remote
personnel to monitor the progress of the upgrade. Run the commands from
the local console only when instructed to do so, or when there is no remote
support.
46 CentreVu CMS R3V9 Sun Enterprise 3000 Computer CVUE Instructions
Page 47

Installing CMS patches
If the new CMS load has any patches, those patches must be installed on the system.
These patches are on the CentreVu CMS software CD, not the CVUE Upgrade Tool CD.
The CentreVu CMS software CD is includ ed in the CVUE upgrade kit.
If there are patches on the CMS software CD, it will be labeled similar to “CMS Patch
Issue 2,” for example. If there are no patches on the CD, continue with Copying customer
data on page 49.
If the CMS software CD does have patches, continue with this procedure.
To install CMS patches:
1. Enter:
cd /
2. Enter:
eject cdrom
3. Remove CVUE Upgrade Tool CD. Save the CD for when you remove the upgrade
files.
Upgrading the system
4. Load the CentreVu CMS software CD.
The File Manager window will open. Move and click the cursor in an XTERM window.
5. After about 15 seconds, enter:
cmssvc
The system displays the CMS services menu.
6. Enter the number that corresponds to the load_all option.
7. One of the following occurs:
● If no patches are found on the CD, the system displays the following message:
No CMS patches found on the CD.
Please check the CD and try again.
Continue with Step 9.
● If patches are found on the CD-ROM, the system displays a list of the patches.
Issue 3.0 February 2002 47
Page 48

Upgrading an Enterprise 3000 to CMS R3V9
8. To load all patches, enter: y
The system installs the patches. As it does so, it displays a message similar to the
following for each patch installed:
@(#) installpatch 1.0 96/04/01
cmspx-s
Generating list of files to be patched...
Creating patch archive area...
Saving a copy of existing files to be patched...
xxxx blocks
File compression used
Installing patch packages...
Doing pkgadd of
Installation of
Patch packages installed:
cmspx-s
Patch installation completed.
See /cms/patch/
cmspx-s
cmspx-s
cmspx-s
package:
was successful.
/log for more details
9. After all patches are installed, or if there are no patches on the CD, enter:
eject cdrom
10. Continue with Copying customer data.
48 CentreVu CMS R3V9 Sun Enterprise 3000 Computer CVUE Instructions
Page 49

Copying customer data
To copy the customer’s data from the CVUE backup tape onto the system:
1. Verify that the customer’s “CVUE Extract” tape is write-prot ected and is inserted in the
correct tape drive. Remove tapes from any other tape drives connected to the system.
2. Load the CVUE Upgrade Tool CD.
The File Manager window will open. Move and click the cursor in an XTERM window.
3. After about 15 seconds, enter:
cd /cdrom/cdrom0
4. Do one of the following:
● If running the command locally at the console, enter:
./cvue_copy
● Optionally, if running the command remotely on a dial-up line, enter:
nohup ./cvue_copy | tee /nohup.out
Upgrading the system
!
CAUTION:
If the dial-up modem line drops after starting this command with nohup,
reconnect to the system, but DO NOT rerun this command. Use tail -f
/nohup.out to view the progress of the command. When finished viewing
the nohup.out file, press Del to break out of the command.
During the copy process, the status lamp on the tape drive flashes, and the system
displays a list of files being copied:
Reading admin data from /dev/rmt/
.
.
X
When the copy process is completed, the system displays the following message:
The cvue_copy process is complete...Tue Jan 16 12:36:15 EST 2001
#
5. Continue with Activating customer options.
!
Important:
Do not open any new windows on the local console. Do not eject the CD.
Issue 3.0 February 2002 49
Page 50

Upgrading an Enterprise 3000 to CMS R3V9
Activating customer options
The activate process can take from as li ttle as a few min utes to as much as 1 t o 2 hours to
complete. The amount of time depends on the number of customer options, the number
and size of the disk drives, the number of ACDs, and so on.
To activate the customer’s software options:
1. Enter:
cd /cdrom/cdrom0
2. Do one of the following:
● If running the command locally at the console, enter:
./cvue_activate
● Optionally, if running the command remotely on a dial-up line, enter:
nohup ./cvue_activate | tee /nohup.out
!
CAUTION:
If the dial-up modem line drops after starting this command with nohup,
reconnect to the system, but DO NOT rerun this command. Use tail -f
/nohup.out to view the progress of the command. When finished viewing
the nohup.out file, press Del to break out of the command.
For On Site Personnel: If the upgr ade is b eing suppor te d by remot e per sonnel ( for
example, provisioning), use the following command from the local console during
the copy and activate process to view the CVUE log file and track the pro gress of
the upgrade:
tail -f /var/log/cvuelog
When finished viewing the /var/log/cvuelog file, press Del to break out of the
command.
3. One of the following occurs:
● If the CVUE copy was not done, the system displays th e following message and you
must run CVUE copy again:
cvue_copy not successful, run the cvue_copy again
50 CentreVu CMS R3V9 Sun Enterprise 3000 Computer CVUE Instructions
Page 51

Upgrading the system
● If the CVUE copy completed successfully, the system begins activating the
customer’s options. The system displays messages such as the following:
CVUE VERSION: v9cvue
..
S00Sethostname Start Time -> Tue Jan 16 12:48:45 EST 2001
S00Sethostname End Time -> Tue Jan 16 12:48:45 EST 2001
S00install_sql Start Time -> Tue Jan 16 12:48:45 EST 2001
.
.
XX.X
The system continues activating the custo mer’s options. The system displays
messages such as the following to show that serial printers are readministered
(network printers must be readministered after the upgrade):
.
.
S12AdministerPrinters Start Time -> Tue Jan 16 12:51:07 EST 2001
S12AdministerPrinters End Time -> Tue Jan 16 12:51:08 EST 2001
.
.
The system continues activating the custo mer’s options. The system displays
messages such as the following:
.
.
S70converter End Time -> Tue Jan 16 12:51:45 EST 2001
S80cmssetup Start Time -> Tue Jan 16 12:51:53 EST 2001
CMS setup started Tue Jan 16 12:51:53 EST 2001
Schema updated started Tue Jan 16 12:52:13 EST 2001
.
.
If you are looking at the /var/log/cvuelog file during CMS setup (the S80cmssetup
script), you may see failure messages about the SQL database. These messages can
be ignored. CMS setup takes several minutes to complete.
Issue 3.0 February 2002 51
Page 52

Upgrading an Enterprise 3000 to CMS R3V9
The system continues activating the custo mer’s options. The system displays
messages such as the following:
.
.
Customer CMS data successfully initialized
..............................................
Computing space requirements and dbspace availability.
Setup completed successfully.
S80cmssetup End Time -> Tue Jan 16 13:03:08 EST 2001
.
.
The system continues activating the custo mer’s options. The system displays
messages such as the following:
.
.
S81cmsfeatpkg Start Time -> Tue Jan 16 13:03:08 EST 2001
<timestamp>
S81cmsfeatpkg End Time -> Tue Jan 16 13:03:09 EST 2001
.
.
S99instUSProvisioning Start Time -> Tue Jan 16 13:04:15 EST 2001
Copying Provisioning upgrade files to /usr/spool/uucppublic
S99instUSProvisioning End Time -> Tue Jan 16 13:04:37 EST 2001
The cvue_activate process is complete.
Prompting user to shutdown.
To complete the cvue_activate process a reboot is required with
the following command: /usr/sbin/shutdown -y -i0 -g0
cvue#
4. When the system displays the command prompt, and if no error messages are
displayed, enter:
ls -l /adminsave/init.d
The system displays a message similar to the following:
total 0
-r2-r--r-- 1 root other 0 May 2 12:20 0
If there are no
successful. Ignore any zero-length or
SXXscriptname
files in this directory, the activate process was
jvp
files in the directory.
52 CentreVu CMS R3V9 Sun Enterprise 3000 Computer CVUE Instructions
Page 53

5. Continue with Shutting down and rebooting the system.
!
CAUTION:
If you receive an error message, such as the following, a failure occurred in
one of the installation scripts. Note the name of the script (in this example,
install_saip) and see Troubleshooting upgrade failures on page 65 to
recover from this error.
ERROR[1]: FUNCTION install_saip() FAILED at Thu Jul 13 12:54:23 MDT 2000
script /adminsave/init.d/S04install_saip failed
Shutting down and rebooting the system
To shut down and reboot the system:
1. Enter:
/usr/sbin/shutdown -y -i0 -g0
The system displays the ok prompt.
Upgrading the system
2. Enter the following command at the ok prompt:
copy-clock-tod-to-io-boards
The system displays the ok prompt.
3. Enter:
boot
This reboots the system and brings up the switch links. Ignore any warning messages.
4. Log on as root using the original password for the old system.
5. If using the CMS console on site, open an XTERM window if one is not displayed.
Move the cursor into the window and click the left mouse button to activate that
window .
6. Remove the “CVUE Extract” tape. This tape can be reused by the customer as a
backup tape.
7. Continue with Verifyi ng the status of the disks.
Issue 3.0 February 2002 53
Page 54

Upgrading an Enterprise 3000 to CMS R3V9
Verifying the status of the disks
After the system boots up, you must check the status of the disks.
1. Enter:
. /opt/informix/bin/setenv
2. Enter:
onstat -d | egrep “X” | pg
The system should not display anything excep t the command prompt. If any lines
display, the disk requires maintenance. Escalate through normal channels.
3. Continue with Removing temporary ACDs.
Removing temporary ACDs
If you created one or more temporary ACDs dur ing the ext ract proc ess of the up grade, y ou
must now remove those ACDs. If you did not add any temporary ACDs, continue with
Ver if ying CMS permissions.
To remove a temporary ACD:
1. Enter:
cmsadm
The CMS Administration menu displays.
2. Enter the number that corresponds to the acd_remove option.
3. Enter the ACD number to remove.
The system displays a warning message.
4. Enter: y
5. Continue with Verifying CMS permissions.
Verifying CMS permissions
To verify that the CMS permissions were preserved during the upgrade:
1. Enter:
pkgchk -n cms
Correct any problems with CMS permissions that are displayed.
2. Continue with Turning on CMS.
54 CentreVu CMS R3V9 Sun Enterprise 3000 Computer CVUE Instructions
Page 55

Turning on CMS
To turn on CMS:
1. Enter:
cmsadm
The CMS Administration menu displays.
2. Enter the number that corresponds with the run_cms option.
3. Enter 1 to turn on CMS.
4. Continue with Verifying that CMS is operating.
Verifying that CMS is operating
To verify that CMS is operating properly:
1. Enter:
su - cms
Upgrading the system
The system displays the $ prompt.
2. Enter:
cms
Ignore any messages about backups.
3. Display the CMS main window to verify that the status of the switch links before the
upgrade match the status of the switch links af ter the upgrade. That is, if a switch link
was operating before the upgr ade, it should be operating after the upgrade. If a switch
link that should be operating is not, make sure that data collection is turned on.
4. Continue with Checking Free Space Allocation.
Issue 3.0 February 2002 55
Page 56

Upgrading an Enterprise 3000 to CMS R3V9
Checking Free Space Allocation
To check Free Space Allocation:
1. Go to the Free Space Allocation window that is located in the CMS System Setup
subsystem.
2. Verify that the amount of available space is positive for each ACD and make any
necessary adjustments.
For more information about Free Space Allocation, see
System R3V9 Administration
Example:
In the Free Space Allocation window shown below, ACD 8 has negative space
available.
, 585-214-015.
CentreVu Call Management
If the Total Free Space: field shows that there is not enough space availabl e to mak e
the adjustment it will be necessary to modify Data Storage Allocation or add an
additional hard drive.
3. Log out of CMS.
4. At the $ prompt, enter:
exit
5. Continue with Comparing directory and file permissions.
56 CentreVu CMS R3V9 Sun Enterprise 3000 Computer CVUE Instructions
Page 57

Comparing directory and file permissions
After you activate the new system, you should verify that the directories and files copied
over from the old system retain the same permissions, or that the new permissions are
acceptable. The system can compare the permissions of the directories and files.
Because comparing the file permissions may take a long time (30 minutes or more), you
may want to run this command in the background so you can continue with other CVUE
upgrade procedures.
To compare directory and file permissions:
1. Enter:
cd /cdrom/cdrom0
2. Enter:
./verify_fileproperties
To run this command in the background, enter:
nohup ./verify_fileproperties /nohup.out&
This begins the comparison of the director y and fi le permissions.
Upgrading the system
3. After the command is finished, the system displays the following message:
See /var/log/cvue_file_diff for differences
#
4. To view the permission differences after the command is finished, enter:
pg /var/log/cvue_file_diff
The file permission differences are displayed. If any file permissions are not
appropriate, correct those discrepancies. Any files that are found only on the new
system are identified as such and should not be changed.
5. To check the progress of the comparison command while it is still executing, enter:
tail -f /var/log/cvue_file_diff
Messages display directory and file permission differences as they are found. Press
Del to break out of viewing the file.
6. Continue with Updating the switch setup.
Issue 3.0 February 2002 57
Page 58

Upgrading an Enterprise 3000 to CMS R3V9
Updating the switch setup
In many cases, the switch is upgraded to a new release when the CMS is upgraded with
CVUE. In addition, the link s from the switc h to t he CMS may need c onver sio n from X.25 to
TCP/IP. If either of these happen, you must do the following:
● Readminister each ACD on the CMS using the swsetup option of the cmssvc
command. CMS must be turned off to administer the ACDs. Remember to turn CMS on
after setting up the ACDs. Readministering the ACDs includes converting the link from
X.25 to TCP/IP, if appropriate. For more information about converting links, see
CentreVu CMS Switch Connections, Admini strat ion, and Troubleshooting
Note:
While you have CMS turned off, you can save time by Setting the Informix
configuration parameters at the same time.
● Readminister the CMS version on the switch using the Customer Options form. This
change requires superuser permissions. Contact y our technical support organi zation or
your COE for assistance.
● Check the switch links on the CMS main window and verify that the switch links are up.
, 585-215-876.
● If the conversion from X.25 to TCP/IP involves adding another network card to the CMS
computer, this must be done after the CVUE upgrade is completed.
Continue with Setting the Informix configuration parameters.
Setting the Informix configuration parameters
The Informix Dynamic Server (IDS) parameters for CMS must be adjusted to optimize
system performance. Adjusting these parameters allows the system to fully uti li ze
additional processors and memory.
Note:
During this procedure, both CMS and IDS must be turned off.
To adjust the IDS parameters, see the section
parameters for CMS
CMS R3V9 Software Installation, Maintenanc e, and Troubleshooting
Continue with Removing the upgrade files .
in the chapter
Installing CMS and Supporting Software
Setting the Informix configuration
of
, 585-215 956.
CentreVu
58 CentreVu CMS R3V9 Sun Enterprise 3000 Computer CVUE Instructions
Page 59

Removing the upgrade files
The files used for the upgrade must be removed.
To remove the upgrade files:
1. Enter:
cd /cdrom/cdrom0
2. Do one of the following:
● If running the command locally at the console, enter:
./cvue_cleanup
● Optionally, if running the command remotely on a dial-up line, enter:
nohup ./cvue_cleanup | tee /nohup.out
!
CAUTION:
If the dial-up modem line drops after starting this command with nohup,
reconnect to the system, but DO NOT rerun this command. Use tail -f
/nohup.out to view the progress of the command. When finished viewing
the nohup.out file, press Del to break out of the command.
Upgrading the system
Note that since the number of files to remove is large, this procedure takes several
minutes to complete. When the files are removed, the sys tem displays the following
message:
The cvue_cleanup process is complete...Wed Aug 23 13:56:00 MDT 2000
#
3. Enter:
cd /
4. Enter:
eject cdrom
5. Remove the CVUE Upgrade T ool CD. Save the CD with the other customer soft ware in
case you have to run the upgrade tool again.
6. Continue with Migrating the customer’s data.
Issue 3.0 February 2002 59
Page 60

Upgrading an Enterprise 3000 to CMS R3V9
Migrating the customer’s data
The following customer data must be migrated from the backup tapes:
● System administration data
● Agent and call center administration data
Migrating system administration data
!
CAUTION:
Perform this step only once. Attempting to migrate system administration
data more than once causes catastrophic errors from which you are unable
to recover. Failure to heed this warning may irretrievably destroy data.
To migrate the system administration data:
1. If CMS is not turned on, do the following:
a. Enter:
cmsadm
The CMS Administration menu displays.
b. Enter the number for the run_cms option.
c. Enter 1 to turn on CMS.
2. Log on to CMS.
The system displays the CMS main window.
3. From the CMS main menu, select System Setup > CMS State to put CMS into
single-user mode.
4. Insert the most recent incremental maintenance backup tape into the tape drive.
60 CentreVu CMS R3V9 Sun Enterprise 3000 Computer CVUE Instructions
Page 61

Upgrading the system
5. From the CMS Main Menu, select System Setup > R3 Migrate Data.
The system displays the following:
3/ 9/01 21:19 CentreVu(R) CMS Windows: 1 of 4 vvvv^vvv
System Setup: R3 Migrate Data All ACDs
| Cancel
Device name: default | List devices
| Run
Data type (Select one): +------------- <x> System Administration data (single-user required)
< > Agent/Call Center Admin data (single-user required)
< > Historical data
Stop date:
Stop time: 11:59 PM
Specify ACD(s) to migrate (Select one):
<x> All ACDs
< > Single ACD
from: to:
Status:
Help Window Commands Keep Exit Scroll Current MainMenu
6. In the R3 Migrate Data window, select the options and enter the values that are
indicated in the following table:
Field Value to enter or option to select
Device name The tape drive device name
Data Type System Administration data
Specify ACD(s) All ACDs
7. Press Enter to access the action list in the top right corner.
8. Select Run and press Enter.
The system displays the progress of the migrati on in the Status: field. When the
migration ends, the system ind icates t he su ccess or f ailur e of the mi gra tion in thi s fi eld .
9. Press F3 and select the UNIX option to display the UNIX prompt.
Issue 3.0 February 2002 61
Page 62

Upgrading an Enterprise 3000 to CMS R3V9
10. Enter:
pg /cms/migrate/r3mig.log
This displays the customer migration log.
11. Look at the contents of the customer migration log and take any necessary corrective
action. For help with interpr eting the log and it s messages, conta ct technical suppor t or
your customer representati ve.
12. To exit the UNIX window, enter:
exit
Migrating agent and call center administration data
To migrate agent and call center administration data:
1. Verify that the most recent increment al maintenance backup tape is in the t ape drive.
2. From the CMS Main Menu, select System Setup > R3 Migrate Data.
The system displays the following:
3/ 9/01 21:19 CentreVu(R) CMS Windows: 1 of 4 vvvv^vvv
System Setup: R3 Migrate Data All ACDs
| Cancel
Device name: default | List devices
| Run
Data type (Select one): +------------- < > System Administration data (single-user required)
<x> Agent/Call Center Admin data (single-user required)
< > Historical data
Stop date:
Stop time: 11:59 PM
Specify ACD(s) to migrate (Select one):
<x> All ACDs
< > Single ACD
from: to:
Status:
Help Window Commands Keep Exit Scroll Current MainMenu
62 CentreVu CMS R3V9 Sun Enterprise 3000 Computer CVUE Instructions
Page 63

Upgrading the system
3. In the R3 Migrate Data window, select the options and enter the values that are
indicated in the following table:
Field Value to enter or option to select
Device name The tape drive device name
Data Type Agent/Call Center Admin data
Specify ACD(s) All ACDs
4. Press Enter to access the action list in the top right corner.
5. Select Run and press Enter.
The system displays the progress of the migrati on in the Status: field. When the
migration ends, the system ind icates t he su ccess or f ailur e of the mi gra tion in thi s fi eld .
6. Press F3 and select the UNIX option to display the UNIX prompt.
7. Enter:
pg /cms/migrate/r3mig.log
This displays the customer migration log.
8. Look at the contents of the customer migration log and take any necessary corrective
action. For help with interpre ting the log and its messa ges, conta ct technical suppor t or
your customer representati ve.
9. To exit the UNIX window, enter:
exit
10. Select System Setup > CMS State to put CMS into multiuser mode.
Issue 3.0 February 2002 63
Page 64

Upgrading an Enterprise 3000 to CMS R3V9
Checking the status of the disks
After migrating the customer’s data, you should verify that the disks have resynchronized
successfully before leaving the site.
To check the status of the disk drives:
1. Enter:
. /opt/informix/bin/setenv
2. Enter:
onstat -d | egrep “PD|R|X” | pg
The system should not display anything except the command prompt.
If any lines display MX or NX, the disk requir es ma intenance. Escalate through normal
channels.
If one or more lines display with PD or MR, the disks either need resyncing or are
currently resyncing. If any disks are still resyncing, you should continue to check the
system and run the onstat command to verify that the disks are in a stable state.
Replacing the customer’s tapes
After migrating the customer’s data, remove the tapes from the tape drives, and replace
any tapes that the customer origi nally had in the tape drives. These t apes may be us ed fo r
scheduled backups and must be replaced before leaving the customer site.
64 CentreVu CMS R3V9 Sun Enterprise 3000 Computer CVUE Instructions
Page 65

Upgrading the system
Troubleshooting upgrade failures
If you receive an error message that one of the instal lation scripts failed when you run the
cvue_activate command, you may be able to recover and continue with the upgrade.
Some of the installation scripts can be skipped during this part of the upgrade. However ,
any script that is skipped during thi s part of the upgrade must be installed later using the
standard software inst allation procedures found in the CMS software installation
document.
The following table lists al l of the possi ble software i nstalla tion script s, and explai ns what to
do if one of them fails during the upgrade. When identifying the installation scripts, be
aware that each script is number ed wit h a prefi x (fo r example , S04) before the script n ame.
Script name Description How to recover
install_sql ISQL software All of these scripts install optional software or
x25_setup Set up X.25
install_nts NTS drivers
install_hsip HSI/P drivers
install_hsis HSI/S drivers
install_saip SAI/P drivers
install_saipu SAI/P utilities
install_tokenring_s Token Ring software
install_tokenring_p Token Ring software
install_odbcX_X ODBC software
drivers needed by the customer. You can skip the
script and reinstall the software later. To skip the
script:
1. Enter: cd /adminsave/init.d
2. Enter: mv
scriptname
3. Enter: cd /cdrom/cdrom0
4. Run the ./cvue_activate command again.
5. Install the software p a ckage that you skipped
before you migrate the customer’s data.
After each script is execute d, a copy of the script is
moved to /adminsave/init.d.completed.
scriptname
is the name of the script.
/adminsave/ where
Issue 3.0 February 2002 65
Page 66

Upgrading an Enterprise 3000 to CMS R3V9
Script name Description How to recover
sethostname Sets the host name For all of these scripts, do not attempt to continue
install_supplemental Supplemental services
with the upgrade. Escalate the problem through
the normal channels.
sqlhosts SQL hosts file setup
dev_links Cleans up WWN and
resets Informix paths
(E3500 only)
fixsendmail Restores proper
permissions
AdministerPrinters Administers serial
printers
modifyfile Restores CMS setup
information
checkdevices Checks for devices
add_disks A dds nonboot disks
storage Data storage allocation
converter Preserves CMS setup
data
cmssetup CMS setup command
cmsfeatpkg Feature package setup
instUSProvisioning Installs United States
provisioning scripts
66 CentreVu CMS R3V9 Sun Enterprise 3000 Computer CVUE Instructions
Page 67

Procedures that are done by the customer after the upgrade
Procedures that are done by the customer after the
upgrade
Overview
After the upgrade is completed, the customer must do the following procedures to restore
the system to normal operation:
Procedure Completed
Migrate historical data.
Restore non-CMS files (optional).
Install and administer unpreserved software (optional).
Do a CMSADM backup.
Do a full maintenance backup.
Issue 3.0 February 2002 67
Page 68

Upgrading an Enterprise 3000 to CMS R3V9
Migrating histori ca l da ta
Migrate historical dat a after migrating the system administration data, and the agent and
call center administration data. You must migrate the historical dat a twice, first using the
full backup tape, followed by the incremental backup tape.
To migrate historical data:
1. Log on to CMS.
The system displays the CMS main menu.
2. Verify that the maintenance backup tape is in the tape drive. Use the full backup first,
followed by the incremental backup.
3. From the CMS main menu, select System Setup > R3 Migrate Data.
The system displays the following:
3/ 9/01 21:19 CentreVu(R) CMS Windows: 1 of 4 vvvv^vvv
System Setup: R3 Migrate Data All ACDs
| Cancel
Device name: default | List devices
| Run
Data type (Select one): +------------- < > System Administration data (single-user required)
< > Agent/Call Center Admin data (single-user required)
<x> Historical data
Stop date:
Stop time: 11:59 PM
Specify ACD(s) to migrate (Select one):
<x> All ACDs
< > Single ACD
from: to:
Status:
Help Window Commands Keep Exit Scroll Current MainMenu
68 CentreVu CMS R3V9 Sun Enterprise 3000 Computer CVUE Instructions
Page 69

Procedures that are done by the customer after the upgrade
4. In the R3 Migrate Data window, select the options and enter the values that are
indicated in the following table:
Field Value to enter or option to select
Device name The tape drive device name
Data Type Historical data
Stop date Leave blank
Stop time 11:59 PM
Specify ACD(s) All ACDs
5. Press Enter to access the action list in the top right corner.
6. Select Run and press Enter.
The system displays the progress of the migrati on in the Status: field. When the
migration ends, the system ind icates t he su ccess or f ailur e of the mi gra tion in thi s fi eld .
Note that a full historical migration can take several hours. It runs in the background,
however , so you can exi t the migr ation wi ndow and perfor m other t as ks. If you do that ,
bring up the migration window periodically to check on the progress.
7. Press F3 and select the UNIX option to display the UNIX prompt.
8. Enter:
pg /cms/migrate/r3mig.log
This displays the customer migration log.
9. Look at the contents of the customer migration log and take any necessary corrective
action. For help with interpre ting the log and its messa ges, conta ct technical suppor t or
your customer representati ve.
10. To exit the UNIX window, enter:
exit
Issue 3.0 February 2002 69
Page 70

Upgrading an Enterprise 3000 to CMS R3V9
Restoring non-CMS files
The customer may want specific non-CMS files copied from the preupgrade CMSADM
backup tape to the upgraded system. The procedure is different if the old system was
R3V6 or earlier, or if the old system was R3V8.
R3V6 and earlier
To copy specific files from an R3V6 or earlier system:
1. Insert the most recent CMSADM backup tape from the old system into the tape drive.
2. Enter the following command for each file you want to copy:
cpio -icmudv -C 10240 -I /dev/rmt/
insert tape number %d, press ENTER” “
The
/<path>/<file_name>
X
is either 0 or 1, depending on how many tape drives are connected to the
The
system. If you have only one tape drive, use 0. If you have more than one tape drive,
use the following commands to determine which tape drive you should use:
X
-M “Remove current tape,
/<path>/<file_name>”
is the fully-qualified path to the file being copied.
mt -f /dev/rmt/0 status
mt -f /dev/rmt/1 status
The tape drive that contai ns the CMSADM backup tape reports a status simil ar to the
following:
<tape drive model name>
sense key(0x6)= Unit Attention residual= 0 retries= 0
file no= 0 block no= 0
:
For example, a command to copy the file /accounting/invoices would be:
cpio -icmudv -C 10240 -I /dev/rmt/X -M “Remove current tape,
insert tape number %d, press ENTER” “/accounting/invoices”
70 CentreVu CMS R3V9 Sun Enterprise 3000 Computer CVUE Instructions
Page 71

R3V8
Procedures that are done by the customer after the upgrade
To copy specific files from an R3V8 system:
1. Insert the most recent CMSADM backup tape from the old system into the tape drive.
2. Enter:
cd /
3. Enter the following command for each file you want to copy:
cpio -icmudv -C 10240 -I /dev/rmt/X -M “Remove current tape,
insert tape number %d, press ENTER” “
The
<path>/<file_name>
X
is either 0 or 1, depending on how many tape drives are connected to the
The
is the relative path to the file being copied.
<path>/<file_name>
”
system. If you have only one tape drive, use 0. If you have mor e than one tape drive,
use the following commands to determine which tape drive you should use:
mt -f /dev/rmt/0 status
mt -f /dev/rmt/1 status
The tape drive that contai ns the CMSADM backup tape reports a status simil ar to the
following:
<tape drive model name>
sense key(0x6)= Unit Attention residual= 0 retries= 0
file no= 0 block no= 0
:
For example, a command to copy the file /accounting/invoices would be:
cpio -icmudv -C 10240 -I /dev/rmt/X -M “Remove current tape,
insert tape number %d, press ENTER” “accounting/invoices”
Issue 3.0 February 2002 71
Page 72

Upgrading an Enterprise 3000 to CMS R3V9
Installing and administering unpreserved software
After the CVUE upgrade, any unpreserved software should be installed and any new
features or services should be administered. The following table lists several of these
features and services, and the Avaya organi zation that can be contacted for assistance.
Feature or service Responsible
Internet Call Center Professional
Services
Organization (PSO)
Network information names service, such as NIS or NISplus PSO
Network printers PSO
Pseudo-ACDs. Pseudo-ACDs must be added, and then data must be
PSO
migrated from the old system.
Visual Vectors server softwar e
Provisioning
Vector layouts and comments backed up before the upgrade shoul d be
restored using the setupaas command and restore option.
Mounted file systems that were in the customer’s /etc/vfstab file before
Provisioning
the upgrade. See the copy of /etc/vfstab that is saved in
/var/log/cvuelog. Have your administ rator verify that your new
configuration is correct.
Common Desktop Environment options such as screen layout and
Provisioning
password protection
1
Add, change, or remove ACDs Provisioning
Add CentreVu Supervisor logins Provisioning
Install new feature packages (if purchased) Provisioning
Change authorizations Provisioning
Install Open Database Connectivity (ODBC) Provisioning
Start up the Alarm Origination Manager (AOM) softwar e Provisioning
1. Outside of the United States, Avaya distributors are responsible for these items, with assistance from the
COE.
72 CentreVu CMS R3V9 Sun Enterprise 3000 Computer CVUE Instructions
Page 73

Doing a CMSADM backup
Procedures that are done by the customer after the upgrade
Do a CMSADM backup on the system as described in
Installation, Maintenance and Troubleshooting
, 585-215-956.
CentreVu CMS R3V9 Software
Doing a full maintenance backup
A full maintenance backup provides migration data for the new CMS version. Backup s are
done using the CMS Backup Data window.
To do a full maintenance backup:
1. Log on to CMS.
2. Select Maintenance > Back Up Data from the CMS main menu.
The system displays the following:
3/ 9/01 21:29 CentreVu(R) CMS Windows: 1 of 4 vvvv^vvv
Maintenance: Backup Data ccqadads28
Backups completed today: 0 | Cancel
Status: | List devices
Errors: | Run
| Select tables
Device name: default +-------------- Verify tape can be read after backup? (y,n): y
ACD(s) to back up (Select one):
<x> All ACDs < > Current ACD
Data to back up (Select any you wish):
[x] Local system administration data
[x] CMS system administration data
[x] ACD-specific administration data
[x] Historical data,
Select one:
<x> Full < > Incremental
[x] Non-CMS data
[ ] Specific tables
Help Window Commands Keep Exit Scroll Current MainMenu
Issue 3.0 February 2002 73
Page 74

Upgrading an Enterprise 3000 to CMS R3V9
3. In the Backup Data window, select the options and enter the values that are indicated
in the following table:
Field Value to enter or option to select
Device name The tape drive device name
Verify tape...? y
ACD(s) to back up All ACDs
Data to back up Local system administration data
4. Press Enter to access the action list, and select Run.
5. After the backup is complete, remove, label, and reinsert the backup tape.
CMS administration data
ACD-specific administration data
Historical data - Full
Non-CMS data (if needed)
74 CentreVu CMS R3V9 Sun Enterprise 3000 Computer CVUE Instructions
 Loading...