

Page 1

6408+, 6408D+, 6416D+, 6416D+M, 6424D+,
and 6424D+M Telephones
User’s Guide
Contents
6400 Series Multi-line Telephones. . . . . . . . . . . . . . . . . . . 5
Using the Softkeys. . . . . . . . . . . . . . . . . . . . . . . . . . . . . . . . 8
Using the So ft ke y F e ature Menus. . . . . . . . . . . . . . . . . . 8
Other Softkey Features That May Be On Your Display. 9
Call-Handl in g Features . . . . . . . . . . . . . . . . . . . . . . . . . . . . 9
Getting Messages . . . . . . . . . . . . . . . . . . . . . . . . . . . . . . .13
Selecting a Personalized Ring . . . . . . . . . . . . . . . . . . . . . 13
Selected Voice Features . . . . . . . . . . . . . . . . . . . . . . . . . . 14
Display Features . . . . . . . . . . . . . . . . . . . . . . . . . . . . . . . . 21
Time and Date . . . . . . . . . . . . . . . . . . . . . . . . . . . . . . . . . 21
Call Information . . . . . . . . . . . . . . . . . . . . . . . . . . . . . . . 21
Tones And Their Meaning . . . . . . . . . . . . . . . . . . . . . . . . . . 25
Line and Feature Button Lights . . . . . . . . . . . . . . . . . . . . 32
555-230-739
Comcode 108339029
Issue 3
April 1999
Page 2
6400 Series Multi-line Telephones
The 6400 Series multi-line telephones include the following:
• The 6408+ Telephone — has eight call appearance/feature buttons with
a two-way speakerphone.
• The 6408D+ Telephone — has eight call appearance/feature buttons, a
2-line by 24-character display, and a two-way speakerphone.
• The 6416D+ and 6416D+M Telephones — have 16 call appearance/
feature buttons, a 2-line by 24-character display, and a two-way
speakerphone.
• The 6424D+ and 6424D+M Telephones — have 24 call appearance/
feature buttons, a 2-line by 24-character display, and a two-way
speakerphone.
Note: Only the 6416D+M and 6424D+M have modular capabilities.
For more information on this feature, see
Capabilities” on page 24.
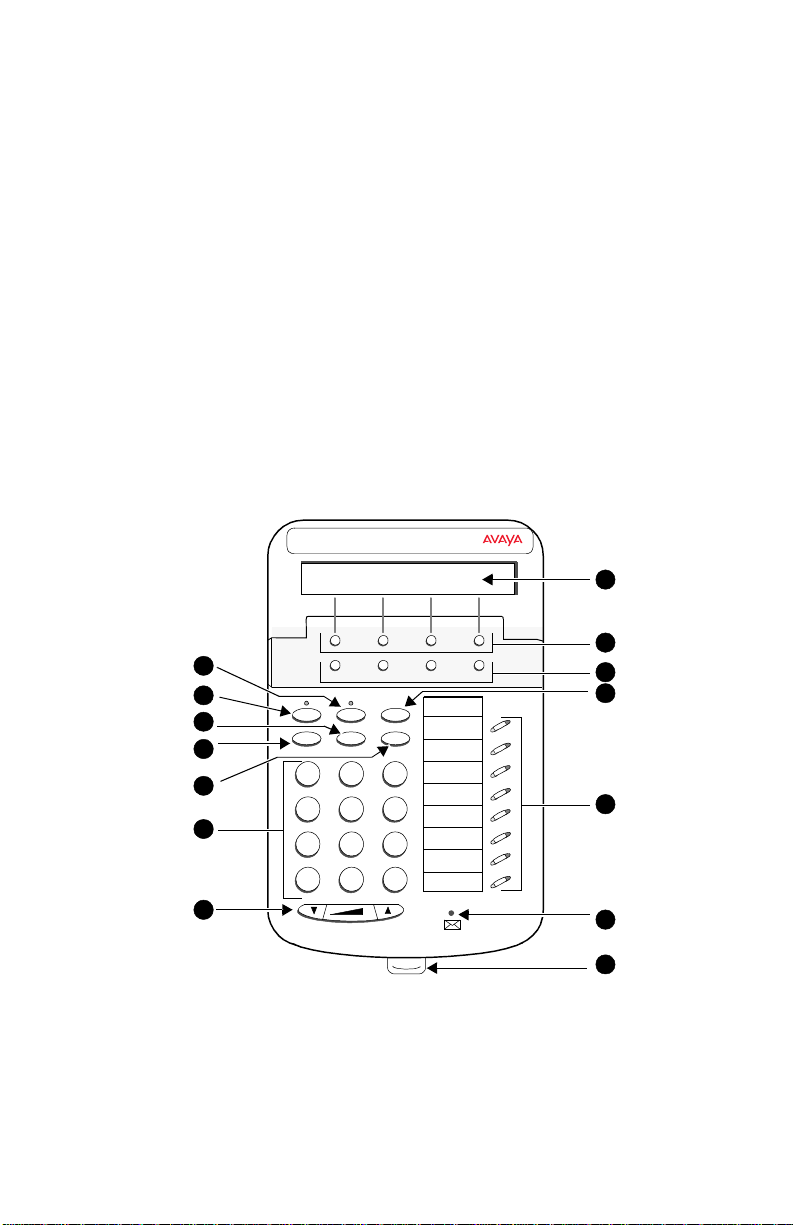
Use Figure 1 below to familiarize yourself with your 6400 Series telephone.
(The 6408D+ is shown in Figure 1.)
1
2
3
4
5
6
7
Menu Exit Prev Next
Spkr
Mute Hold
Redial Trn sfr Conf
Test Ring
DEF
ABC
GHI
PQRS
*
1
4
7
3
2
MNOJKL
56
TUV
WXYZ
8
9
O#
Tel #
“Modular I nterface
8
9
10
11
12
13
FIGURE 1 T he 6408D+ Telephone
14
5
Page 3
The following features correspond to the numbers in Figure 1.
1) Mute button 8) Display — available on ly on t he
6408D+, 6416D+ and 6416D+M, and
the 6424D+ and 6424D+M
2) Speaker button 9) Softke ys
3) Transfer/Test button 10) Display control button s
4) Redial button 11) Hold button
5) Conf/Ring button 12) Call appearance/feature buttons
6) Dial pad 13) Message light — labe led
7) Volume control button 14) Tray handle
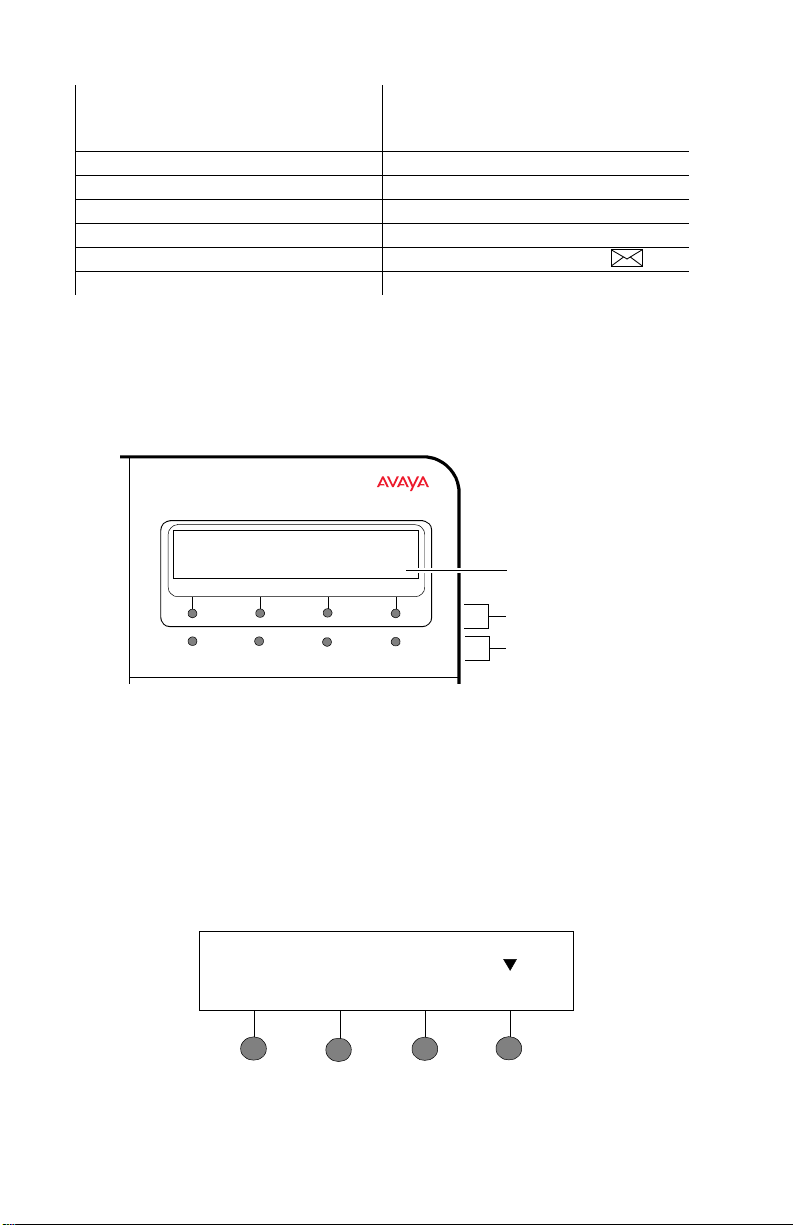
Using the Softkeys
The softkeys are the four unlabeled round keys located directly below the
display. The four round display control buttons, labeled Menu, Exit, Prev, and
Next are located under the softkeys. See Figure 4.
Display
Softkeys
NextPrevMenu Exit
FIGURE 4 The Display, Softkeys, and Display Control Buttons
Display
control buttons
Using the Softkey Feature Menus
There are three separate softkey feature menus. Each of these menus allows
you to select from four different features.
You can enter Softkey Mode (and view the softkey feature menu) by pressing
the display control button labeled Menu. The following is an example of a
softkey feature menu.
Dir Drop HFAns Timer
8
Page 4

The top line of each softkey feature menu screen shows you the status of
Conf
Conf
Conf
each of the four features. An arrow appears above the feature name or
abbreviation if that feature is active. In the above example, the arrow above
the Timer feature indicates that feature is active.
The second line on each softkey feature menu shows the features you can
access. To use any of these fe atures, you must press the softkey below the
feature name or abbreviation.
Press the Next or Prev button unti l the fe ature y ou want to use appe ars on the
display.
Note: An error tone (one beep) sounds when you have made an
inappropriate softkey entry.
Press the Exit button at any time to exit the softkey f eature menus and
return to normal call-handling operation.
Other Softkey Features That May Be On Your Display
There are 12 default features that can be accessed with the softkeys on a
6400 Series telephone. However, the system manager may substitute other
softkey features in their place.
Call-Handling Features
Conference
The Conference feature allows you to conference up to six parties (including
yourself) on a call.
To add another party to a call (for a total of six parties)
1. Press . [dial tone]
2. Dial the number of the new party and wait for an answer.
3. When you want to add the new person, press again.
4. Repeat Steps 1 through 3 for additional conference connections.
Conf
To add a call you have put on hold to another call you are connected to
1. Press . [dial tone]
2. Press the call appearance button of the call on hold (first call).
3. Press again.
To drop the last person added to the conference call
1. With a display: Press t he Menu button and then press the softkey
below Drop.
Without a display: Press the button (if administered).
Drop
9
Page 5

Hold
The Hold feature puts a call on hold until you can return to it.
To put a call on hold while you answer another call or perform another
task
1. Press .
Hold
To answer a new call while active on another
1. Press .
Hold
2. Press the call appearance button of the incoming call.
To return to the held call
1. Press the call appearance button of the held call.
Redial
The Redial (or Last Number Dialed) feature automatically redials the last
extension or outside number (up to 24 digits) you dialed.
To redial the last number that you dialed
1. Press .
.
Redial
Speaker (Listen-Only) and Group Listen
The Speaker feature allows you to place calls or access other features
without lifting the handset. However, in order to speak to the other party, you
must use the handset. With the Group Li sten feature, the handset and
speaker are active at the same time.
Note: All of the 6400 Series telephones described in this manual can be
optioned for either a two-way speakerphone or a one-way, listen-only
speaker. Check with your system manager to see which feature you
can use on your telephone.
T o use the lis ten-only speaker to place a call without lifting the ha nds et
or for any listening-only feature (such as monitoring a call on which
you have been put on hold or for group listening)
1. Press .
Spkr
2. Place a call or access the selected feature.
3. Adjust speaker volume if necessary:
To raise the volume, press the rig ht h al f of the Speaker Volume contro l
button labeled
; to lower the volume, press the left half of the
Speaker Volume control button labeled .
10
Page 6
If you have a display, it shows the volume level: (There are eight
Spkr
Spkr
volume levels.)
->>>>>> +
To turn off the speaker and return to handset
1. Pick up the handset.
To end a call (while the handset is on-hook and only the speaker is
active)
1. Press .
T o activa te the spe aker w hile usin g the hand set so th at both ar e acti ve at
the same time (the Group Listen feature, if administered)
1. While you are using the handset, activate the speaker by pressing
Spkr
.
Note: If you hang up the handset within 10 seconds after pressing ,
Spkr
the call remains active on the speaker.
If you hang up the handset more than 10 seconds after pressing
Spkr
, the speaker will also turn off, and the call is disconnected.
Speakerphone
The two-way built-in speakerphone allows you to place and answer calls
without lifting your handset.
Note: Your telephone may be set for the two-way speakerphone or for the
one-way , listen -on ly speaker. Check with your sy stem m anage r to see
which of these features you can use.
Note: Speakerphones may not operate satisfactorily in every environment
(such as in very noisy locations). In such an environment, the
one-way, listen only speaker should be used.
Note: Some locations may wish to use the speakerphone for the Group
Listen feature. With this fea ture you can hear the other pers on through
the handset and speakerphone, but in order to speak to the othe r
person, you must use the handset. Ask your system manager if the
Group Listen feature has been administered for your telephone.
To place or answer a call without lifting the handset, or to use the
speakerphone with any feature
1. Press .
2. Place or answer the call, or access th e selected fea ture.
3. Adjust speakerphone volume if necessary:
To raise the volume, press the right half of the Volume control button
labeled
; to lower the volume, press the left half of the Volume
control button labeled .
11
Page 7

4. If you have a display, it shows the volume level:
(There are eight volume levels.)
->>>>>> +
To change from the speakerphone to the handset
1. Pick up the handset and talk.
To change from the handset to the speakerphone
1. Press .
Spkr
2. Within 10 seconds, hang up the handset.
To use the Group Listen feature (if administered) in which the handset
and the speaker are active at the same time
1. While you are active on the handset, press .
Note: If you hang up the handset within 10 seconds after pressing ,
Spkr
Spkr
the call remains active on the speaker.
If you hang up the handset more than 10 seconds after pressing
Spkr
, the speaker will also turn off, and the call is disconnected.
T o end a call
1. Press again.
Spkr
Test
The Test feature allows you to test the lights and display on your telephone.
To test the lights and display on your telephone
1. While on-hook, press and hold down .
Lights go on in columns, and if there is a display on the telephone, all
the display segments fill in.
2. To end test, release .
Trnsfr
Lights return to normal operation.
Note: If the lights or the display segments do not respond during the test,
see your system manager.
Trnsfr
Transfer
The Transfer feature allows you to transfer a call from your telephone to
another extension or outside number.
To send the present call to another extension
1. While on a call, press . [dial tone]
2. Dial the number to which the call is to be transferred. [ringing tone]
3. Remain on the line and announce the call.
(If the line is busy or if there is no answer, you can return to the held
call by pressing its call appearance button.)
Trnsfr
12
Page 8

4. Press again to complete the transfer.
Trnsfr
5. Hang up.
Getting Messages
Message
Your Message light goes on when a caller has left a message for you.
Note: If your telephone has a display, you may also be able to use the
Message Retrieval display feature.
For directions on retrieving your messages, see your system manager.
Selecting a Personalized Ring
Select Ring
The Select Ring feature allows you to choose your own personalized ringing
pattern for your telephone from among eight different patterns.
To select a personalized ringing pattern
1. While on-hook, press .
Conf
Current ringing pattern plays and repeats every three seconds.
2. Continue to press (and then rele as e) to cycle th roug h all eight
ringing patterns.
3. If you want to save the ringing pattern currently being played, do not
Conf
press
more times, and then it will be automatically saved.
anymore. You will hear the selected ringing pattern two
Conf
You will hear a confirmation tone (two rising tones), and your new
ringing pattern is set.
Note: If you go off-hook, receive a call, or lose power during selection, the
process is canceled and you must start again.
13
Page 9

Selected Voice Features
Abbreviated Dialing/Automatic Dialing (AD)
The Abbreviated Dialing (AD) feature allows you to store selected telephone
numbers for quick and easy dialing. Each number can be a complete or
partial telephone number, an extension number, or a trunk or feature access
code. Abbreviated Dialing offers four possible types of lists — Personal,
Group, System, and Enhanced, and you can have a total of three lists. (Of
these three lists, y ou can have onl y one Syste m List and one Enhance d List.)
You program numbers on a Personal List; numbers on Group Lists are
programmable by the controller of the list; System Lists and Enhanced Lists
are programmable only by the system manager.
You can also program a number on an AD button t hat i s not stored on an AD
list. This Automatic Dialing number can be up to 16 digits and characters.
For all 6408+ telephones, and all 6408D+, 6416D+ and 6416D+M , and
6424D+ and 6424D+M telephones connected to DEFINITY switches 6.2
and prior releases, or when using the Program feature access code
T o progr am /repr o gram an AD button (adm inis ter ed as a feature button)
Note: The system manager must first program a call appearance/
feature button as an AD button before you can program a
number on it.
Note: There is a 10-second time limit between your entering the
Program mode and entering the first digit of an AD button, and
then a 10-second time limit between each digit. If you hear
intercept tone while you are programming the button, you have
exceeded the time limit and you must begin again.
1. Locate the Program button on your telephone. There are three
possibilities.
a. If you are using a telephone with a display, press the Menu button
and, if necessary, the Next or Prev button until Prog appe ars on the
display screen.
b. If you telepho ne doe s not ha ve a dis play or i f Prog is n ot avail able on
your display, press
c. Ask your system manager for the AD Program feature access code.
2. Pick up the handset or press . [dial tone]
3. Press the Prog button (or dial the feature access code).
4. Press the AD button to be programmed.
5. Dial an outside n um ber, extension, or feature acc es s cod e y ou w ant to
store (as you would normally dial it).
6. Press . [confirmation tone]
7. Repeat Steps 4 through 6 (within 10 seconds) to program additional
8. Hang up or press to end programming.
#
buttons.
Program
Spkr
administered as a feature button.
Spkr
14
Page 10

For 6408D+, 6416D+ and 6416D+M, and 6424D+ and 6424D+M
telephones connected to a DEFINITY ECS Release 6.3 or later
To program an Abbreviated Dialing button on the softkey feature menu
screens or on a feature button
Note: If you make a mist ake while pro gramm ing an AD butto n on you r
display, you CANNOT move back a space to erase it. Instead,
save whatever you have entered by pressing the “#” key and
then start over.
1. Locate the Program button. It will e ith er b e a b utton labeled
Program
or you will see Prog on one of the feature menu screens.
2. To access the Program feature, press the Menu button, then the Next
or Prev button, if necessary, until you see Prog on the display. Then
press the softkey below Prog. If Prog is not on one of your feature
menu screen s, press the
Program
button.
Your telephone will automatically go off-hook, and the light next to
Spkr
will go on.
3. Select the feature button or the AD softke y you wa nt to prog ram. (To do
this, press the Menu bu tton again, then press Next or Prev, if
necessary, until you see the AD softkey label, such as AD1, on the
display.)
You will see the message, Change number? Yes=1 No=2 on the
display.
4. If you want to enter a new number or ch ange an ex isting num ber, press
the “1” key on the dial pad. If you do not want to change the number,
press the “2” key and skip to Step 6.
5. When you see the message Enter number: on the display, enter the
number you want that button to call. When you have finished entering
the number , pres s the “#” key. Go on to the next step.
Note: When you have changed the number called by a feature
button, you may want to change its label on the paper strip too.
6. When you see the message Change label? Yes=1 No=2, press the
“1” key on the dial pad to change a button label. If you do not want to
change the label, press the “2” key and skip to Step 8.
7. When you see the message Enter label on the display, use the dial
pad to enter the label you want, up to five characters. (Pressing a dial
pad key once enters the first letter on the key; if you want a different
letter or the number, press the key repeatedly until the character you
want appears on the display.) Press the “
space. When you have finished entering the label, press the “#” key.
8. When you see the message Press button to program, decide if you
want to program another button. If so, go b ack to St ep 3. If n ot, go on to
the next step.
Note: When you program a label, it does not appear on the display
until you hang up.
9. To exit from Programming mode, press the Speaker button.
” key to advance to the next
*
15
Page 11

To place an AD call
Pers List
Enhcd List
1. Press the selected AD button, either a feature button or the softkey
below the AD feature on the feature menu screens.
To program or reprogram an outside number, extension, or feature
access code into an AD personal list
1. Locate the Program button on your telephone. There are three
possibilities.
a. If you are using a telephone with a display, press the Menu button
and, if necessary, the Next or Prev button until Prog appe ars on the
display screen.
b. If your telephone does not have a display or if Prog is not availabl e
on your display, press
Program
administered as a feature button.
c. Ask your system manager for the AD Program feature access code.
2. Pick up the handset or press . [dial tone]
Spkr
3. Press the Program button (or dial the feature access code).
4. Dial the Personal Li st number (1, 2, or 3).
5. Dial the list item (1, 2, 3...) .
6. Dial the number you want to store (up to 24 digits) as you would
normally dial it.
7. Press . [confirmation tone]
#
8. Repeat Steps 5 through 7 if you want to program additional items on
the same list; hang up a nd begin again at Step 2 if y ou want to program
items on another list.
9. Hang up or press to end programming.
Spkr
Note: Record your personal list items on the Abbreviated Dialing list on the
cards in the tray under the telephone; group, system, and enhanced
list can be obtained from your system manager.
To place a call using an AD list button or code
1. Press the or or buttons (if administered)
Grp List Sys List
or Dial the appropriate AD List code for List 1, or List 2, or List 3.
[dial tone]
Note: An (Enhanced List) may also be available; see your
system manager.
2. Dial the desired list item (1, 2, 3...).
Call Forwarding All Calls
The Call Forwarding feature temporarily forwards all your calls to another
extension or to an outside number, depending on your system.
To temporarily redirect all calls to an extension or outside number of
your choice
1. With a display: Press the Menu button and then press the softkey
below CFrwd (while on-hook or off-hook).
16
Page 12

Without a display: Press the button (if administered) (while
Call Park
Trnsfr
Trnsfr
Call Fwd
on-hook or off-hook) or Dial the Call Forward access code
(while off-hook). [dial tone]
Note: If you have co nsole pe rmi ssion, n ext, di al the exten sion n umbe r
whose calls are to be forwarded; receive dial tone.
2. Dial the extension or number where calls will be sent.
[confirmation tone]
3. Hang up.
To cancel Call Forwarding
1. With a display: Press the Menu button and then press the softkey
below CFrwd (while on-hook or off-hook).
2. Without a display: Press the button (while on-hook) or Dial
Call Fwd
the Call Forward cancel code (while off-hook). [confirmation tone].
Call Park
The Call Park feature allows you to put a call on hold at your telephone, for
retrieval at any extension.
To park a call at your extension (for retrieval at any extension)
Note: To use the Call Park feature on a tel ephone with d isplay (if Call Park is
one of your softkey features), press the Menu button and then the
softkey below CPark. Then hang up.
or, if a button has been assigned to your telephone, press
Call Park
the button (if administered) and hang up.
Otherwise, follow these instructions to park a call at your extension.
1. Press . [dial tone]
2. Dial the Call Park access code. [confirmation tone]
3. Press again.
Call is parked at your extension.
4. Hang up.
To retrieve a parked call from another extension
1. Pick up the handset or press .
Spkr
2. Dial the Call Park access code. [confirmation tone]
3. Dial the extension where the call is parked. [confirmation tone]
If returning to a call parked at your telephone, dial your own
extension.
17
Page 13

Call Pickup and Directed Call Pickup
DirCall PkUp
The Call Pickup feature lets you answer a call at your telephone for another
extension in your pickup group. If you can use the Directed Call Pickup
feature, you can pick up a call ringing at a specific extension without the
person’s being a member of your pickup group.
To answer a call placed to a member of your pickup group when your
telephone is idle
1. With a display: Press the Menu button and then press the softkey
below CPkUp.
Without a display: Press the button (if administered) or
Dial the Call Pickup access code.
Called telephone stops ringing, and you are connected to the ringing
call.
To pick up a call directly for someone else in your office
Note: Again, the Directed Call Pickup feature is designed for covering calls
for someone while they are away from their desk. In this case, you do
not have to be a member of the same pickup group.
1. Press the button or Dial the Directed Call Pickup access
code.
2. Dial the extension of the ringing telephone.
Called telephone stops ringing, and you are connected to the ringing
call.
CallPickup
Leave Word Calling
The Leave Word Calling (LWC) feature leaves a message for a person at
another extension to call you back. The called party will be able to dial
message service (for example, an attendant, AUDIX or other voice mail
system, a covering user, etc.) to retrieve a short, standard message which
gives your name and extension, the date and time you called, and the
number of times you called.
To leave a message after dialing an extension (when your call is not
answered, you hear a coverage or busy tone, or you have been put on
hold)
1. With a display: Press the Menu button and then press the softkey
below LWC before hanging up.
Without a display: Press the button (if administered) before
hanging up. [confirmation tone]
Message light goes on at the called telephone (if so equipped).
Note: If reorder tone is heard, message is not stored; try again.
To leave a message without ringing an extension
1. With a display: Press the Menu button and then press the softkey
below LWC.
LWC
18
Page 14

Without a display: Press the button or Dial the Leave Word
LWC
Calling access code (while off-hook). [dial tone]
2. Dial the extension. [confirmation tone]
Message light goes on at the called telephone (if so equipped).
3. Hang up.
To cancel a Leave Word Calling message
Note: You cannot cancel a message left for an AUDIX subscriber.
1. With a display: Press the Menu button and then press the softkey
below CnLWC (while on-hook or off-hook).
Without a display: Press the button (while on-hook or
Cancel LWC
off-hook) or Dial the Leave Word Calling cancel code (while off-hook).
[dial tone]
2. Dial the extension. [confirmation tone]
Note: If reorder tone is heard, the message is not canceled; try again.
Send All Calls
The Send All Calls feature temporarily sends all your calls to another
extension in the same system.
Note: Before you can use this feature, your syste m manager m ust provide a
coverage path for your extension.
To send all calls (except priority calls) immediately to coverage
ith a display: Press the Menu button and then press the softkey
1. W
below SAC (while on-hook).
Send Calls
Without a display: Pre
the Send All Calls access code (while off-hook)
T o can cel Send A ll Calls
1. With a display: Press the Menu button and then press the softkey
below SAC again (while on-hook).
Without a display: Press the button again (while on-hook)
or Dial the Send All Calls cancel code (while off-hook).
[confirmation tone]
ss the button (while on-hook) or Dial
[confirmation tone]
Send Calls
19
Page 15

Display Features
a=
Note: To ensure easier display vi si bil ity, the display on th e 6 408 D +, 6 416 D +
and 6416D+M, and 64 24D + and 6424D+M can be left in its horizontal
position or can be raised to a slightly steeper angle. Check which
viewing angle is best for your workstation.
Time and Date
Ordinarily, the time and the date will appear on the upper line of your display.
(The 6408+ does not have a display.) The time and date are set at the switch,
so if there is an error, contact your system manager.
Note: On initially plugging in a 6400 Series display telephone or after a
power outage, it may take approximately 15 minutes before the time
and date appear on the screen.
Call Information
The 6408 telephones have eight call appearance buttons; the 6416D+ and
6416D+M have 16; the 6424D+ and 6424D+M have 24 buttons. Beginning
with the first button in the upper left hand corner of your faceplate and going
down, the display identifies the buttons in the left column as a through h. The
buttons in the right column be gin with i and then go through p (on the 6416D+
and 6416D+M) and th rough x (on the 6424D+ and 6424D+M). When the
display shows , it represents call information for the first call
appearance button. The next b utton dow n woul d be shown as , and
so on.
When you dial an extension, that number is shown and then replaced by the
alled party’s name and extension. When a call is received from another
c
extension, the caller’s name is shown; when a call is received from outside,
“OUTSIDE CALL” or a trunk identifier is shown.
The display remains in Normal (call-handling) Mode until you activate one of
he other display or softkey features. After using any of these features, return
t
to Normal Mode by pressing the Exit button.
b=
21
Page 16

Call Timer and Timer
The Call Timer and the Timer features are used to measure elapsed
time on a call.
However, the Call Timer feature can be used ONLY if your telephone
is connected to a DEFINITY ECS Release 6.3 or later. This feature,
once activated, measures elapsed time automatically on all calls until
you turn off the Call Timer feature.
The Timer feature must be turned on for each individual call you wish
to time. At the e nd of the call, y ou must immediate ly turn o ff the feature .
This feature can be used with any DEFINITY switch release.
Check with your system manager to see if you can use either of these
features.
To use the Call Timer feature to measure elapsed time on telephone
calls
1. Press the Menu button and then press the softkey below CTime
or, if CTime is not available on your display, press the
button (if administered).
The Call Timer will measure elapsed time automatically on all calls
until you turn off the Call Timer feature.
2. When you want to turn off the Call Timer feature, press the Menu
button and press the softkey below CTime
or, if you have activated this feature with , press the
Call Timer
button.
To use the Timer feature to measure elapsed time on an individual
telephone call
1. Press the Menu button and then press the softkey below Timer (which
exits you from softkey mode)
or, if Timer is not available on your display, press the button
(if administered).
2. To stop the timer and clea r the disp lay, press the Menu button and then
press the softkey below Timer again
or, if Timer is not available on your display, press again.
Call Timer
Call Timer
Timer
Timer
22
Page 17

Directory
*
The Directory feature allows you to search for the extension of another user
in your location by keying in the user’s name at the dial pad.
To search the directory for a name
1. Press the Menu button and then press the softkey below Dir
or, if Dir is not available on your display, press the button
Directory
(if administered).
2. Key in the selected name with dial pad keys:
last name, comma (use ), first name or initial.
3. Press the Next button for each successive directory name you wish to
see.
4. To search for a new name, pres s the so ftke y bel ow Dir or press the
Directory
button and go through the above sequence again.
5. When you are ready to exit the directory, press the Exit button.
To place a call to the name shown on the display
1. Pick up the handset.
2. While the name is shown, press the button (if administered)
or, if you do not have a button on your set, press the Exit
Call Disp
Call Disp
button and then dial the number using the dial pad.
Note: You can also leave your handset on-hook. The speakerphone
will turn on automatically when you press
Call Disp
.
Exit
Use the Exit featu re to lea ve Dis play M ode (a fter us ing a ny d ispla y or soft key
feature) and return to No rmal M ode. You can then use t he dis play to vie w the
time and date and to identify call appearance, calling/called party, and
calling/called number.
To exit a display feature and return to Normal (display) Mode
1. Press the Exit button.
Display will show the time and date or, when applicable, call/caller
information.
Inspect
The Inspect feature shows you call-related information for an incoming call
when you are already active on a call, or, with this feature, you can see who
is on hold.
To use the Inspect feature
1. Press the Menu button and then press the softkey below Inspt
or, if Inspt is not available on your display, press the button (if
administered).
23
Inspect
Page 18

2. Press the call appearance button in question.
Enhcd List
Information is shown on the display screen;
you remain connected to the present call.
3. To return to the held call, press the Exit button and then the call
appearance button of the held call.
.
Stored Number/View
The Stored Number or View feature allows you t o c he ck : 1) t he number stored
as an item on an Abbrev iated Dialing list, 2) the number you la st dialed (via
Last Number Dialed feature), or 3) the name of the feature that has been
programmed on any of your telephone’s call appearance/feature buttons.
To view the number stored as a list item
1. Press the Menu button and then press the softkey below BtnVu
or Press the button.
2. Press the selected or or button
or Dial the appropriate AD List code for List 1, or List 2, or List 3.
Note: An (Enhanced List) may also be av ailable; see your
3. Dial the selected list item (1, 2, 3...).
Stored number is shown.
4. Hang up.
5. To return to the Normal (display) Mode, press the Exit button or begin
again at Step 2 to see another stored number.
To view the feature stored on a call appearance/feature button OR the
last number you dialed OR a number stored on an AD button
1. Press the Menu button and then press the softkey below View
or, if View is not available on your display, press the button.
2. Press the selected feature button.
Note: To view the last number you dialed, press , or to view
3. To return to the Normal (call-handling) Mode display, press the Exit
button or repeat Step 2 to see another stored number.
View
Pers List Grp List Sys List
system manager.
View
Redial
the number stored on an AD button, press the selected AD
button.
24
Page 19

Tones and Their Meaning
Note: The tables below describe the defaults for each ringing and feedback
tone. Check with your system manager to verify if the descriptions in
the Meaning column are accurate for your system.
Ringing Tones are produced by an incoming call.
Ringing Tones
Rings Meaning
1 ring A call from another extension.
2 rings A call from outside or from the attendant
3 rings A p riority call from a nother ext ensio n, or
from an Automatic Callbac k ca ll you
placed.
◆
Feedback tones are those which you hear through the handset (receiver) or
the speaker.
Feedback Tones
ring-ping
(half-ring)
A call redirected from your telephone to
another because Send All Calls or Call
Forwarding All Calls is active.
Tones Meaning
busy A low-pitched tone repeated 60 times a
minute; indicates the number dialed is in
use.
call waiting
ringback
confirmation Three short bursts of tone; indicates a
A ringback tone with lower-pitc hed signal at
the end; indicates the extension call is
busy , and the c alled party has b een given a
call waiting tone. If you hear this tone, you
may wish to activate Automatic Callback
feature activation or cancellation has been
accepted.
25
continued on next page
Page 20

Feedback Tones (continued)
Tones Meaning
coverage One short burst of tone; indi cates your
call will be sent to another extension
to be answered by a covering user.
dial A continuous tone; indicates dialing
can begin.
intercept/
time-out
recall dial Three short bursts of tone f ollow ed by
reorder A fast busy tone repeated 1 20 times a
ringback A low-pitched tone repeated 15 times
An alternating high and low tone;
indicates a dialing error, a denial of
the service requested, or a failure to
dial within a preset interval (usually
seconds) after listing the handset
10
or dialing the previous digit.
a steady dial tone; indicates the
feature request has been accepted
and dialing can begin.
minute; indicates all trunks are busy.
a minute; indicates the number dialed
is being rung.
Line and Feature Button Lights
Line and Feature Button Lights
Light Meaning
Steady red The line you are using or will use when you lift
the handset or press the Speaker button.
Steady green The l ine is in use, or the feature programmed
on this button is on.
Blinking green You have put a call on hold on this
line button.
26
 Loading...