

Page 1
TELEPHONE TIPS
A Quick Reference Guide for the Avaya MultiVantage
Telephone System
46xx Model IP-Telephones
By Joseph T. Massey, Jr.
JTM Associates, Inc.
Revised 05-13-06
© 2006 JTM Associates, Inc. ®
Page 2

TELEPHONE TIPS
A Quick Reference Guide for the Avaya MultiVantage Telephone System
46xx Model IP-Telephones
TABLE OF CONTENTS
Page Section
4 Extension Format and Inter-Office Dialing
Local Calling
Long Distance Calling
5 Telephones and Use
Set ID
st
1
Three Buttons
6 Caller ID
7 Screen – Multiple Pages
Left/Right Arrow Keys
Exit Key
Speaker Button
Mute Button
Up/Down Arrow Keys
Transfer Button
Conference Button
Drop Button
Redial Button
8 Telephone Features Summary
Send All Calls
Intercom
Auto Intercom
Dial Intercom
EC500
9 Call Log
10 Speed Dial (SD) Buttons
11 Speed Dial Phone List
12 Label Button
14 Directory
Next
Make Call
Stored Number
Options
Revised 05/13/06– JTM © 2006 JTM Associates, Inc. ® Page 2 of 43
Page 3

TELEPHONE TIPS
A Quick Reference Guide for the Avaya MultiVantage Telephone System
46xx Model IP-Telephones
TABLE OF CONTENTS
Page Section
Telephone Features Summary (concluded)
15 In-Use/Feature Activated Indicator
Busy Indicator
17 Line Status Indicators
18 Call Transfer/Conference
20 Call Forward (Activate/Cancel)
Forwarding to a Long Distance Number
21 Telecommuting Features
Remote EC500 (Activate/Cancel)
22 Remote Forwarding (Activate/Cancel)
23 Remote Send All Calls (Activate/Cancel)
24 Voice Mail
Access and Password
Messages Button
Default Password for initial login
25 Transferring to the Operator or Extension from Voice Mail
26 Voice Mail Message Playback
28 Configuring Speakers vs. Telephone
37 Interchanging between Speaker/Telephone Playback
40 Scrolling the messages on the Player
41 Voice Mail Telephone User Interface (TUI) Summary
Voice Mail Assistant Procedures
42 IP-Softphone
43 Call History
LDAP Directory Access
Revised 05/13/06– JTM © 2006 JTM Associates, Inc. ® Page 3 of 43
Page 4

TELEPHONE TIPS
A Quick Reference Guide for the Avaya MultiVantage Telephone System
46xx Model IP-Telephones
Extension Format and Inter-office Dialing:
Office extensions remain 4-digits. However, additional numbers have been obtained to
support growth.
• You must dial 4-digits when calling extensions.
• To call FGCU offices, dial as follows:
o Numbers in the 239-590-1xxx and 590-7xxx (dial 1xxx or 7xxx)
o New Numbers in the 239-745-3xxx and 745-4xxx (dial 3xxx or 4xxx)
Local Calling:
There are no changes for local calls except that you do not have to wait for a second Dial
Tone after dialing (9). Dial as follows:
• Ft. Myers
o 9 + 7-digits for Local and Extended Local calls
Long Distance Calling:
To ensure authorized use of the phone system, a 5-digit Authorization Code will be
entered immediately after dialing an International Long Distance number when 3-beeps
and dial tone is received. Please see the Multivantage Dialing Instructions card for
details.
• Routine Long Distance:
o Dial (9) + 1 + Area Code and Number
• International:
o Dial (9) + 011 + Country Code + Route Code + Number: Receive 3-beeps
followed by Dial Tone: Dial 5-digit Authorization Code
• Suncom:
o Suncom has been changed. Dialing (8) and the 7-dgit number is no longer
provided by Suncom. All calls are processed by dialing as instructed
above.
Revised 05/13/06– JTM © 2006 JTM Associates, Inc. ® Page 4 of 43
Page 5
TELEPHONE TIPS
A Quick Reference Guide for the Avaya MultiVantage Telephone System
46xx Model IP-Telephones
Telephones and Use:
• Please use the Dialing Instructions Card until you become familiar with the
processes detailed on the card. This will provide Step-by-Step procedures for
Transferring calls and programming functions.
• When the phone is not in use, the display provides the Set ID on the left side and
the Time /Date on the right side of the display.
• The first three buttons on the left side of the first Page/Screen on your phone are
the extension assigned to the phone. These allow for three calls.
o One extension button is automatically reserved by the system for outgoing
and/or incoming Intercom calls. The actual button selected by the system
for outgoing calls varies depending on which buttons you actually have
calls.
Revised 05/13/06– JTM © 2006 JTM Associates, Inc. ® Page 5 of 43
Page 6
TELEPHONE TIPS
A Quick Reference Guide for the Avaya MultiVantage Telephone System
46xx Model IP-Telephones
Telephones and Use: (continued)
• The Telephone Screen provides caller ID for incoming calls in the display area at
the top of the phone.
• When a call is received, the button ID associated with the call is displayed, e.g., a,
b, c along with the Caller ID.
o Caller Name and Number are displayed when provided by the calling
party as shown below, e.g., Bell, Bryan calling from extension 6-2903.
o A bell symbol appears by the ringing line button.
Revised 05/13/06– JTM © 2006 JTM Associates, Inc. ® Page 6 of 43
Page 7
TELEPHONE TIPS
A Quick Reference Guide for the Avaya MultiVantage Telephone System
46xx Model IP-Telephones
Telephones and Use: (concluded)
• The Telephone Instrument has a screen with multiple pages (4-pages 4610 model
and 2-pages 462x model) of information and uses for the buttons down each side
of the screen.
o Use the large left/right arrows to navigate to different pages
o Use the PHONE/EXIT button to return to the HOME/1
st
-page and to exit
menu functions.
o If your phone display is not on the HOME/1
st
-page, you can answer a call
and process it (place on hold, transfer, etc.) however, you must return to
the Home/1st-page to return to a call that is on hold or to abort a
transfer process.
• The Speaker button activates the Speakerphone Operation. The Mute button
turns off the Speakerphone microphone and/or the Receiver microphone.
• The Up/Down Arrow keys on the lower left of the dial pad adjust:
o The ringer volume - when the phone is not in use.
o The receiver/listen volume - when talking on the phone.
o The speaker volume - when using the Speakerphone.
• The Transfer button places an existing call on temporary hold, e.g., the call on
the (a) button, and provides a Dial Tone, e.g., on the (b) button, for call transfer.
A subsequent depression of Transfer completes the call transfer.
o When attempting to transfer a call and you make a dialing error, wish to
try another number, or return to the original party, depress the line button
of the original party, e.g., button (a).
• The Conference button sets up a conference between two parties and yourself as
follows:
o With a party on the line, depress either Transfer or Conference to call a
second party. When the party answers, depress Conference.
rd
• The Drop button drops the 3
/last party from a Conference.
• The Redial button redials the most recently dialed number.
Revised 05/13/06– JTM © 2006 JTM Associates, Inc. ® Page 7 of 43
Page 8

TELEPHONE TIPS
A Quick Reference Guide for the Avaya MultiVantage Telephone System
46xx Model IP-Telephones
Telephone Features Summary:
• Send All Calls – The Send All Calls (SendAllCalls) feature button activates the
Coverage Feature and sends all of your calls to a Receptionist, Assistant, or Voice
Mail depending on individual telephone parameters.
o This button can be toggled on/off to send a call to Coverage after
incoming caller ID inspection while the line is ringing.
o When a call covers to an Assistant, the call is bridged on both your phone
and Assistant’s phone. Either of you may pick up the call.
• Intercom – Depending on how the Telephone Administrator for your area setup
the Intercom, there are two ways to use the Intercom when it is provided:
o Auto-Intercom (AutoIc) – Depression of this button places a call on the
intercom to one telephone (usually the Assistant).
o Dial-Intercom (Dial Icom) – Depression of this button provides a Dial
Tone. A 2-digit code is then dialed for the telephone desired.
o Your Telephone Administrator can have the Intercom configured for
hands-free answer on the Intercom.
• EC500 – For Business Continuity/Disaster Recovery and enhanced ability to
receive calls, the Extension-to-Cellular (EC500) feature is available. When
requested by your Telephone Administrator, this feature provides the ability to
have incoming calls to your desk phone, ring at the same time on your Cell
Phone. The feature is activated by depressing the (EC500) feature button on your
phone.
o To Activate:
Be sure that your (SendAllCalls) button/feature is not activated.
Depress the (EC500) Feature button.
This feature can be activated/cancelled remotely as detailed later in
this document under Telecommuting Features.
o If you answer a call on the cell phone, you may pickup the call on the desk
phone and hang up the cell phone.
o Using the (Extend Call) feature button, a call in progress on the desk
phone can be extended to the cell phone, so that the desk phone can be
hung up and the call continued on the cell phone.
o When calling an office location from the cell phone, the called party sees
your Name and Extension number rather than your cell phone number.
This occurs regardless of whether or not your EC500 feature button is
active for incoming calls. However, this will only work for Offices that
are part of the Avaya system.
Revised 05/13/06– JTM © 2006 JTM Associates, Inc. ® Page 8 of 43
Page 9

TELEPHONE TIPS
A Quick Reference Guide for the Avaya MultiVantage Telephone System
46xx Model IP-Telephones
Telephone Features Summary: (continued)
• EC500 – concluded
o If your Cell Phone voice mail is programmed to answer in fewer rings
than your office phone, or if your cell phone is turned-off or out of range,
your office Voice Mail will not be able to answer a call when EC500 is
active. Your Telephone Administrator can assist in having the ringing
intervals for the office/cell phone adjusted, as needed, to minimize calls to
the cell phone voicemail. Another option is to have the cell phone
voicemail removed so that all unanswered EC500 calls route only to the
office voice mail.
o You cannot call your office extension from the phone administered as
your EC500 phone.
o If you have your home phone administered as your EC500 phone, people
calling you from the home phone will first have to dial the “Privacy”
feature code provided by the Telephone Company. Having your Home
Phone administered as your EC500 destination is not recommended.
• Call Log - provides access to a log of telephone calls using the Screen Labeled
Key (SLK) designated as (Log) found at the bottom of the screen.
o To Use the Log:
Depress (Log).
Select a call using the buttons on the left side of the screen or
follow the instructions provided on the screen.
Depress the SLK (Call) to call the selected entry.
Depress (PHONE/EXIT).
o The (Log) button and feature provides call information including the
duration of the call.
o This information is not available when using IP-Softphone (detailed later
herein) but can be replicated in Softphone.
o There is no indication that calls have been logged other than checking the
log.
o Calls are logged by the following types:
Missed
Incoming Answered
Outgoing
o A call that is logged can be automatically placed in the Speed Dial list as
described herein under Speed Dial Phone List.
o Each Call Log (Missed, Incoming Answered, Outgoing) can store a a
maximum number of entries as follows:
15 (4610)
30 (462x)
Revised 05/13/06– JTM © 2006 JTM Associates, Inc. ® Page 9 of 43
Page 10
TELEPHONE TIPS
A Quick Reference Guide for the Avaya MultiVantage Telephone System
46xx Model IP-Telephones
Telephone Features Summary: (continued)
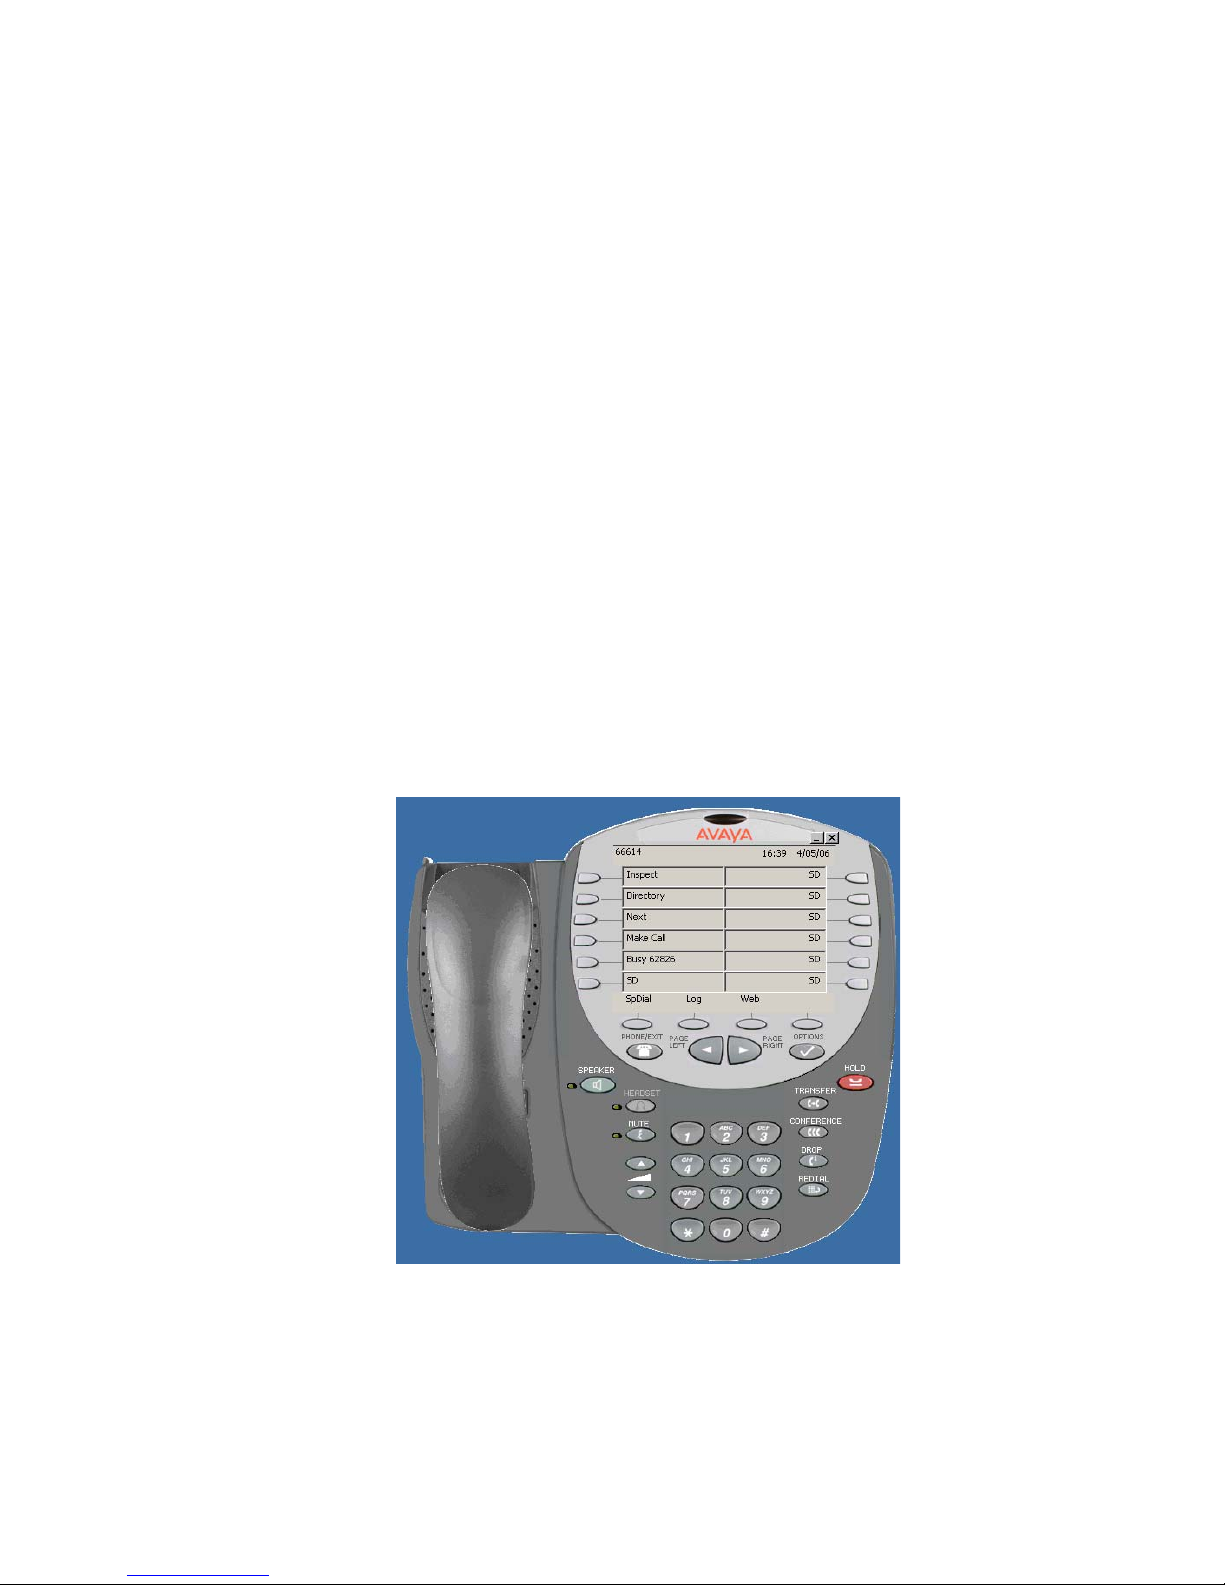
• Speed Dial Buttons – Speed Dial (SD) buttons (shown below) are those which
you can program to dial numbers.
o The number that is programmed is stored in the telephone system
independent of the telephone instrument.
o This information is also available when using IP-Softphone (detailed later
herein).
o These buttons can be labeled with a name if you like using the (Label)
button found on the lower right side of the screen. Instructions for
labeling are provided later in this document.
o Programming Summary:
Get Dial Tone and dial (#80) – the # sign must be dialed.
Depress the SD button to be programmed.
Dial (9 for calls outside the system) and the number to be called as
you would normally dial it. A maximum of 16-digits may be
entered.
Re-Depress the SD button being programmed.
Hang up. The button has been programmed.
Depress (PHONE/EXIT)
It may take a few moments for the display to refresh after
programming a button.
Revised 05/13/06– JTM © 2006 JTM Associates, Inc. ® Page 10 of 43
Page 11
TELEPHONE TIPS
A Quick Reference Guide for the Avaya MultiVantage Telephone System
46xx Model IP-Telephones
Telephone Features Summary: (continued)
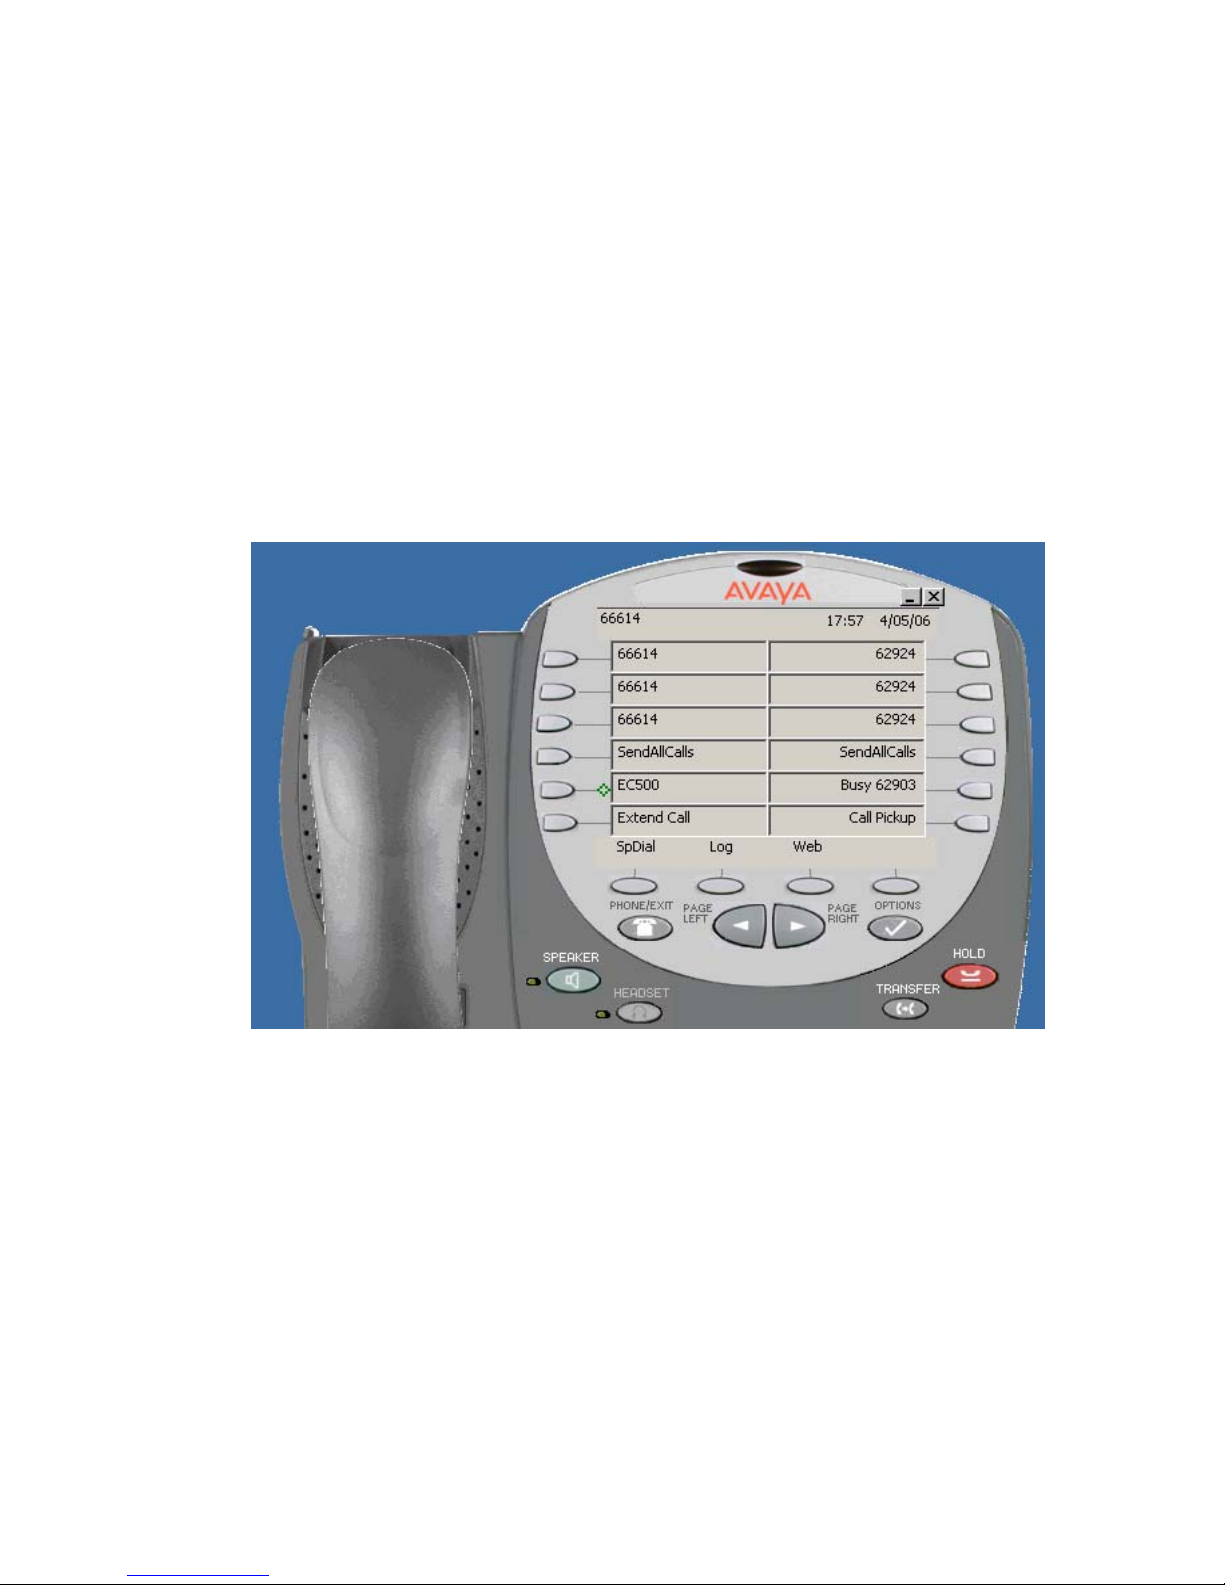
• Speed Dial Phone List – The Telephone Instruments also provide Speed Dial that
is programmed into the telephone instrument.
o While this information is backed up to a server, it is possible that it could
be lost.
o This information is not available when using IP-Softphone (detailed later
herein) but can be replicated in Softphone.
o Up to 48 Speed Dial entries (4610 Model) and 108 entries (462x Models)
can be made
o The (SpDial) button found on the lower left of the screen is used to access
the list for adding entries or making calls.
o Adding a Speed Dial entry:
Depress the (SpDial) button.
Depress the SLK (Add).
Spell the Name using the Dial pad using SLKs for special
characters (Apostrophe, Hyphen, Comma, and Space).
Select the button for the Number and enter the number. An entry
cannot be saved until a number has been provided.
Depress the SLK (Save). Entries are stored in Alphabetical order.
Depress (PHONE/EXIT).
Revised 05/13/06– JTM © 2006 JTM Associates, Inc. ® Page 11 of 43
• Depress the selected Dial pad buttons multiple times to
scroll through the associated letters and numbers.
• Depress the SLK arrow Key (→) when the same button is
used twice in a row, e.g. AB for the name Abbott).
Page 12

TELEPHONE TIPS
A Quick Reference Guide for the Avaya MultiVantage Telephone System
46xx Model IP-Telephones
Telephone Features Summary: (continued)
• Speed Dial Phone List – The Telephone Instruments also provide Speed Dial that
is programmed into the telephone instrument (concluded).
o To add a Log entry to the Speed Dial Phone List:
Depress (Log).
Select a call using the buttons on the left side of the screen or
follow the instructions provided on the screen.
Depress the SLK (AddToSD).
Modify the Name/Number, as necessary, by depressing the button
on the left side of the screen by the Name/Number field.
Depress (Save).
Depress (PHONE/EXIT).
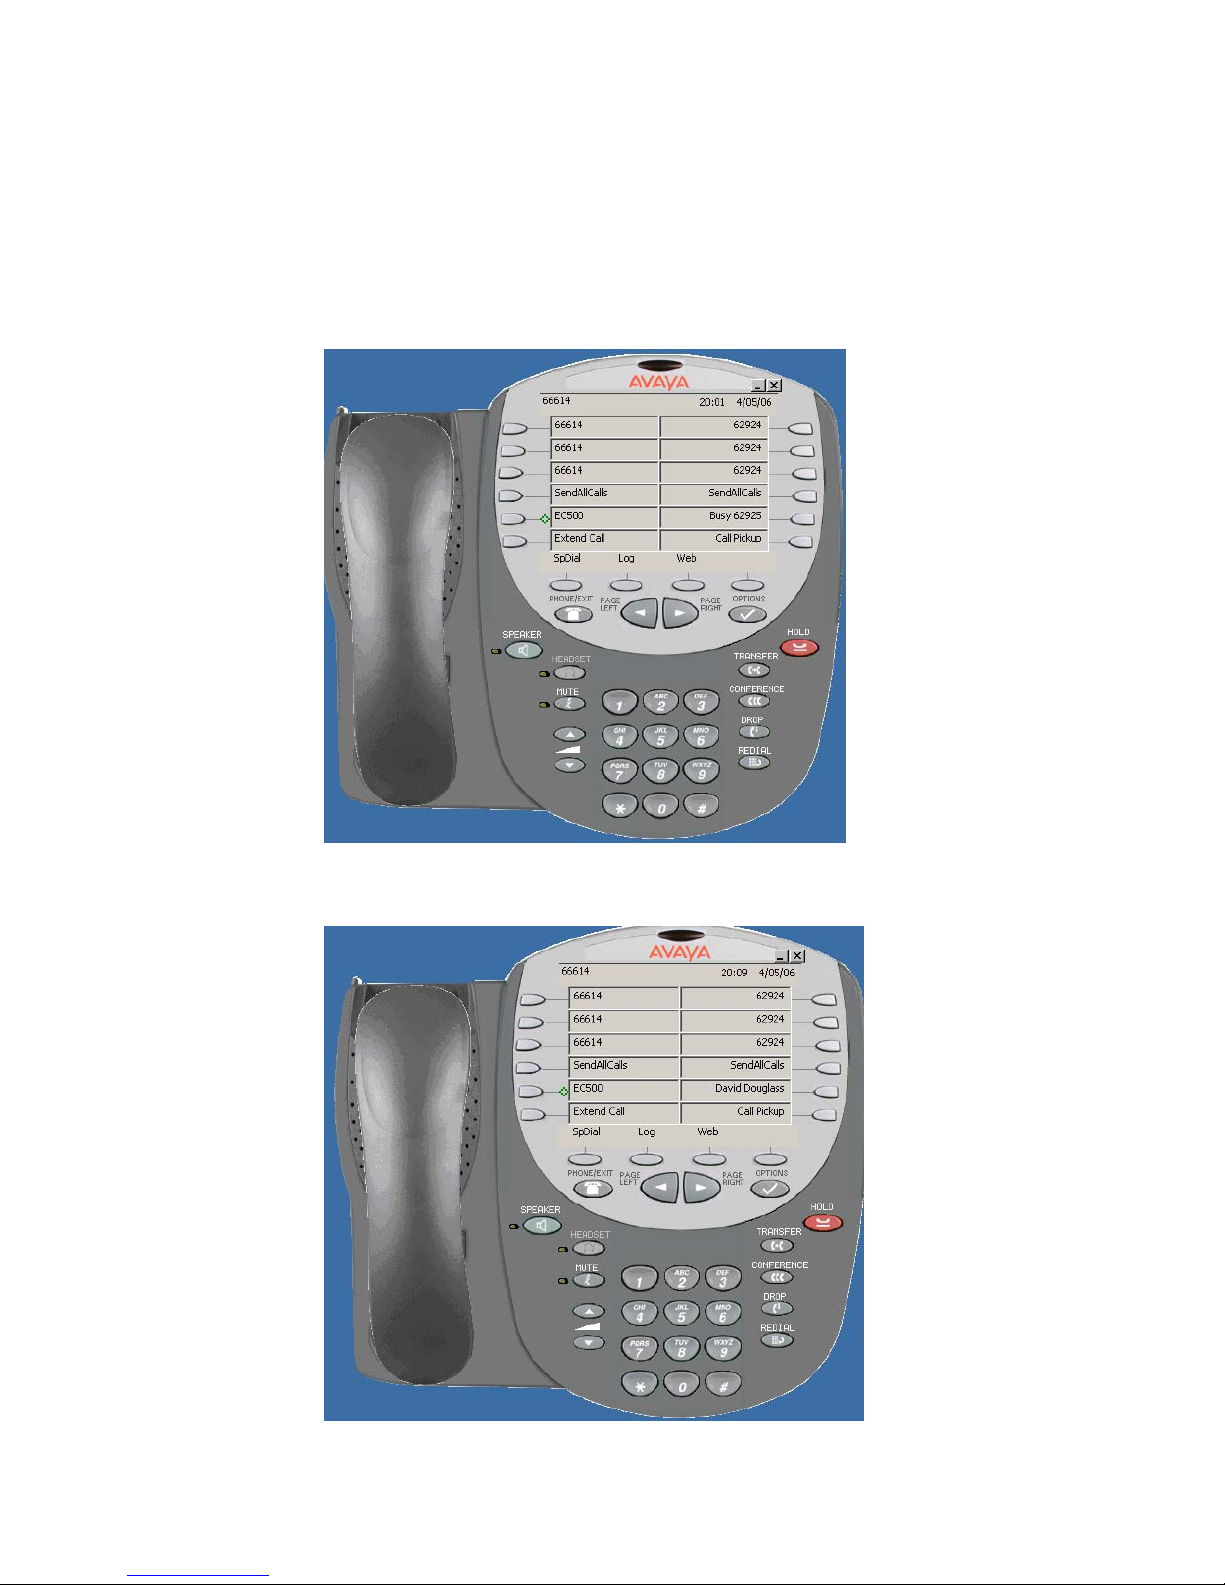
• Label – provides the ability to customize the label (13 Characters Maximum) for
Busy and Speed Dial buttons, e.g., David, HOME, using the (Label) button. To
use:
o Depress (Options) found above and to the left of the (Hold) button.
o Depress (Right Page Arrow Button →).
o Depress (Feature Button Labeling).
o Depress (Relabel feature buttons).
o Scroll to the Busy or SD button desired using the Left/Right Page arrow
keys.
o Depress the Busy/SD button to be relabeled.
Be sure you only label buttons designated as “Busy” or “SD” as
the default value. Relabeling other buttons can inhibit the
maintenance support of your phone.
Spell the Name using the Dial pad using SLKs for special
characters (Apostrophe, Hyphen, Comma, and Space).
• Depress the selected Dial pad buttons multiple times to
scroll through the associated letters and numbers.
Depress the SLK arrow Key (
→) when the same button is used
twice in a row, e.g. AB for the name Abbott).
• Change to Upper/Lower Case characters using the SLK
(Case) button.
Depress (Save) when finished.
Depress (Return) to label another button.
Depress (PHONE/EXIT) when finished.
o To see numbers programmed on buttons after labeling them, see Stored
Number later in this document.
Revised 05/13/06– JTM © 2006 JTM Associates, Inc. ® Page 12 of 43
Page 13
TELEPHONE TIPS
A Quick Reference Guide for the Avaya MultiVantage Telephone System
46xx Model IP-Telephones
Telephone Features Summary: (continued)
• Label – provides the ability to customize the label (concluded)
o Busy 62925 is shown below before Labeling.
o Busy 62925 is shown below after Labeling (David Douglass)
Revised 05/13/06– JTM © 2006 JTM Associates, Inc. ® Page 13 of 43
Page 14

TELEPHONE TIPS
A Quick Reference Guide for the Avaya MultiVantage Telephone System
46xx Model IP-Telephones
Telephone Features Summary: (continued)
• Directory – The (Directory) button, usually found on the 2
nd
Screen/Page,
provides the ability to spell an Avaya telephone system user’s name, find the
number and, if desired, automatically call the person. To use:
o Depress (Directory).
o Spell the name using the Dial Pad and entering Last Name first.
Special characters (Hyphen, Period, etc.) are not used in spelling.
Use the (Next) button to scroll through the list of names created
from the characters entered or key in more characters of the name.
Use the (*) button as the Comma between the Last Name and the
First Name.
o Use the (Make Call) button to automatically call the displayed party.
o Depress (PHONE/EXIT) when finished.
• Stored Number – This function allows you to see what number is programmed
on an (SD) or (Busy) button after you have labeled it.
o Depress (Options) found above and to the left of the (Hold) button.
o Depress (Right Page Arrow Button →).
o Depress (Feature Button Labeling).
o Depress (View default labels).
o Scroll to the Busy or SD button desired using the Left/Right Page arrow
keys.
o Depress (PHONE/EXIT) when finished.
• The other options found after pressing the (Options) button should not be used
unless specific training in the navigation of these functions is provided.
Revised 05/13/06– JTM © 2006 JTM Associates, Inc. ® Page 14 of 43
Page 15
TELEPHONE TIPS
A Quick Reference Guide for the Avaya MultiVantage Telephone System
46xx Model IP-Telephones
Telephone Features Summary: (continued)
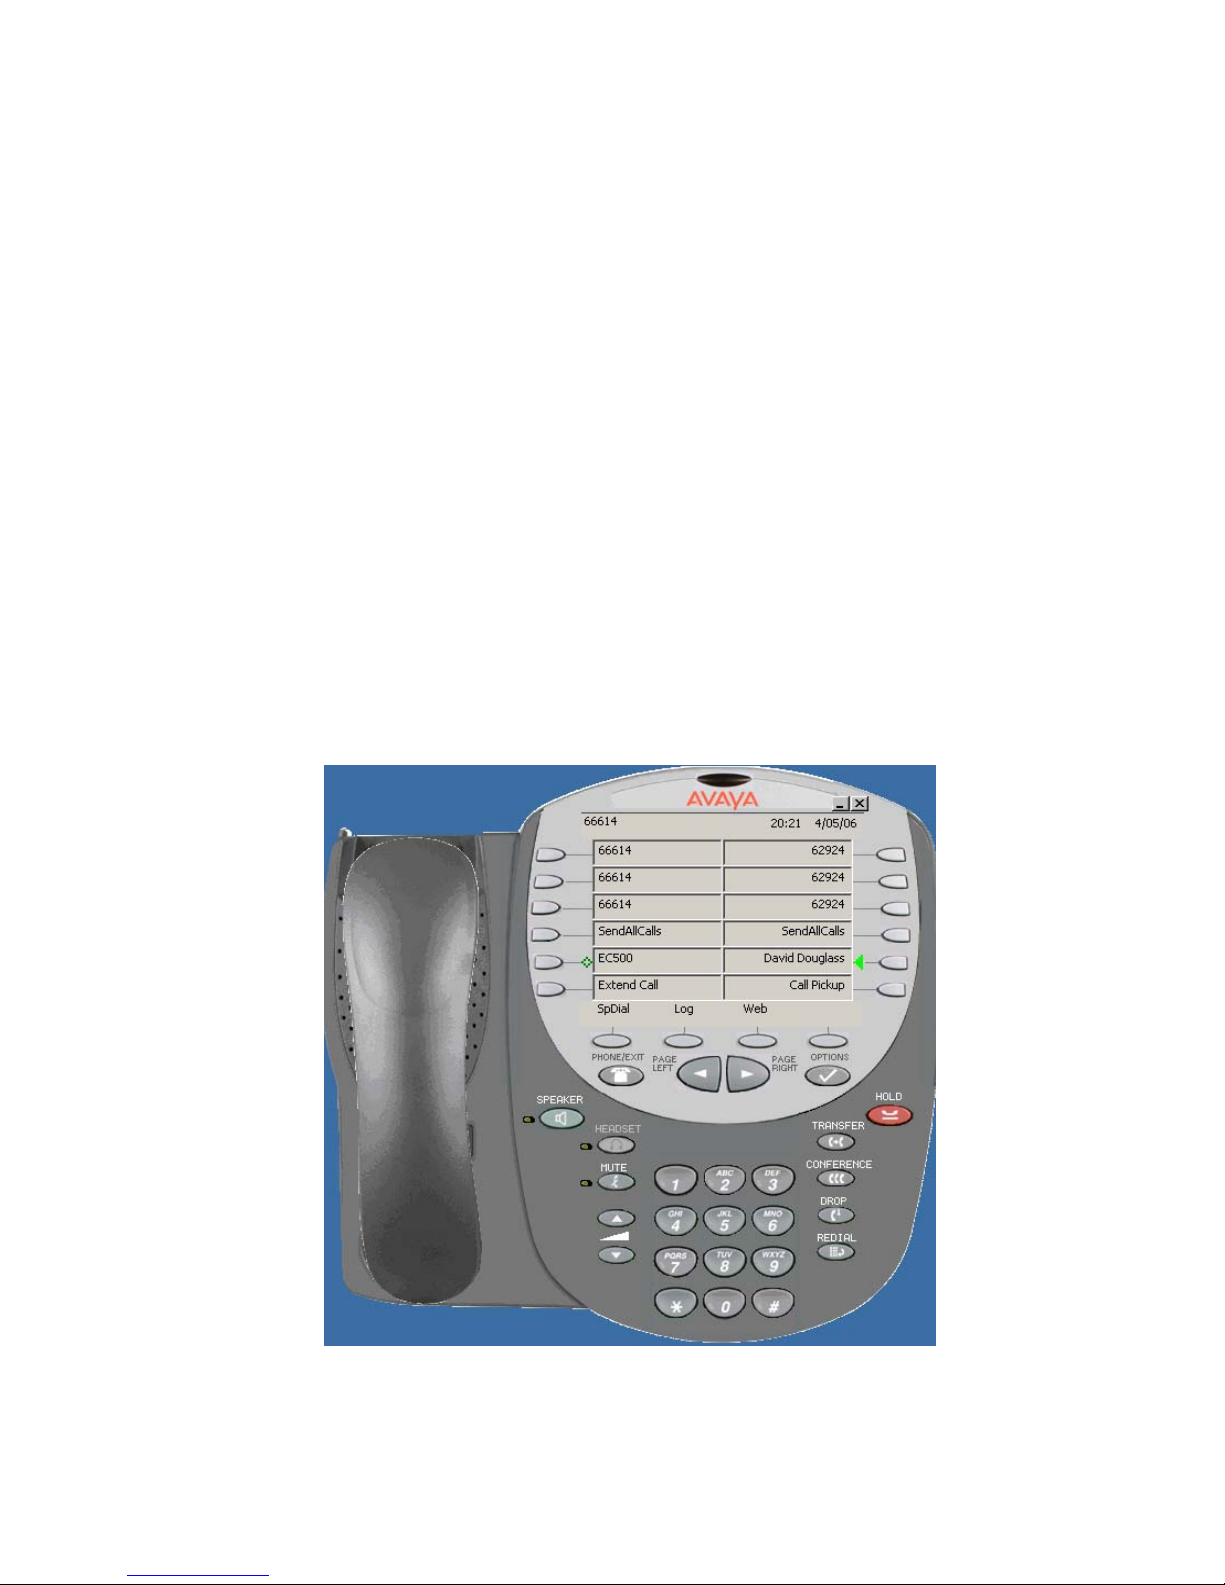
• In-Use/Feature Activated Indicator – When a feature is activated or a
line/feature appearance of an extension is in-use, the associated button shading
changes. For IP-Softphone, a lamp indicator is provided.
• Busy – A Busy button changes shading when the associated telephone station is
in-use.
o It also provides the ability call the station by depressing the associated
button.
o It does not provide the ability to override Send All Calls to Coverage when
that feature activated.
To override Send All Calls when calling another person in your
office, you will need either an Intercom button or a Speed Dial
button to that person that is programmed by Telecommunications
with the Priority Calling feature.
o A busy button changes shading and will display a diamond Symbol when
the associated station calls you.
o The IP-Softphone example below shows that David Douglass’ phone is
busy.
Revised 05/13/06– JTM © 2006 JTM Associates, Inc. ® Page 15 of 43
Page 16
TELEPHONE TIPS
A Quick Reference Guide for the Avaya MultiVantage Telephone System
46xx Model IP-Telephones
Telephone Features Summary: (continued)
• Busy – A busy button changes shading when the associated telephone station is in
use. (concluded)
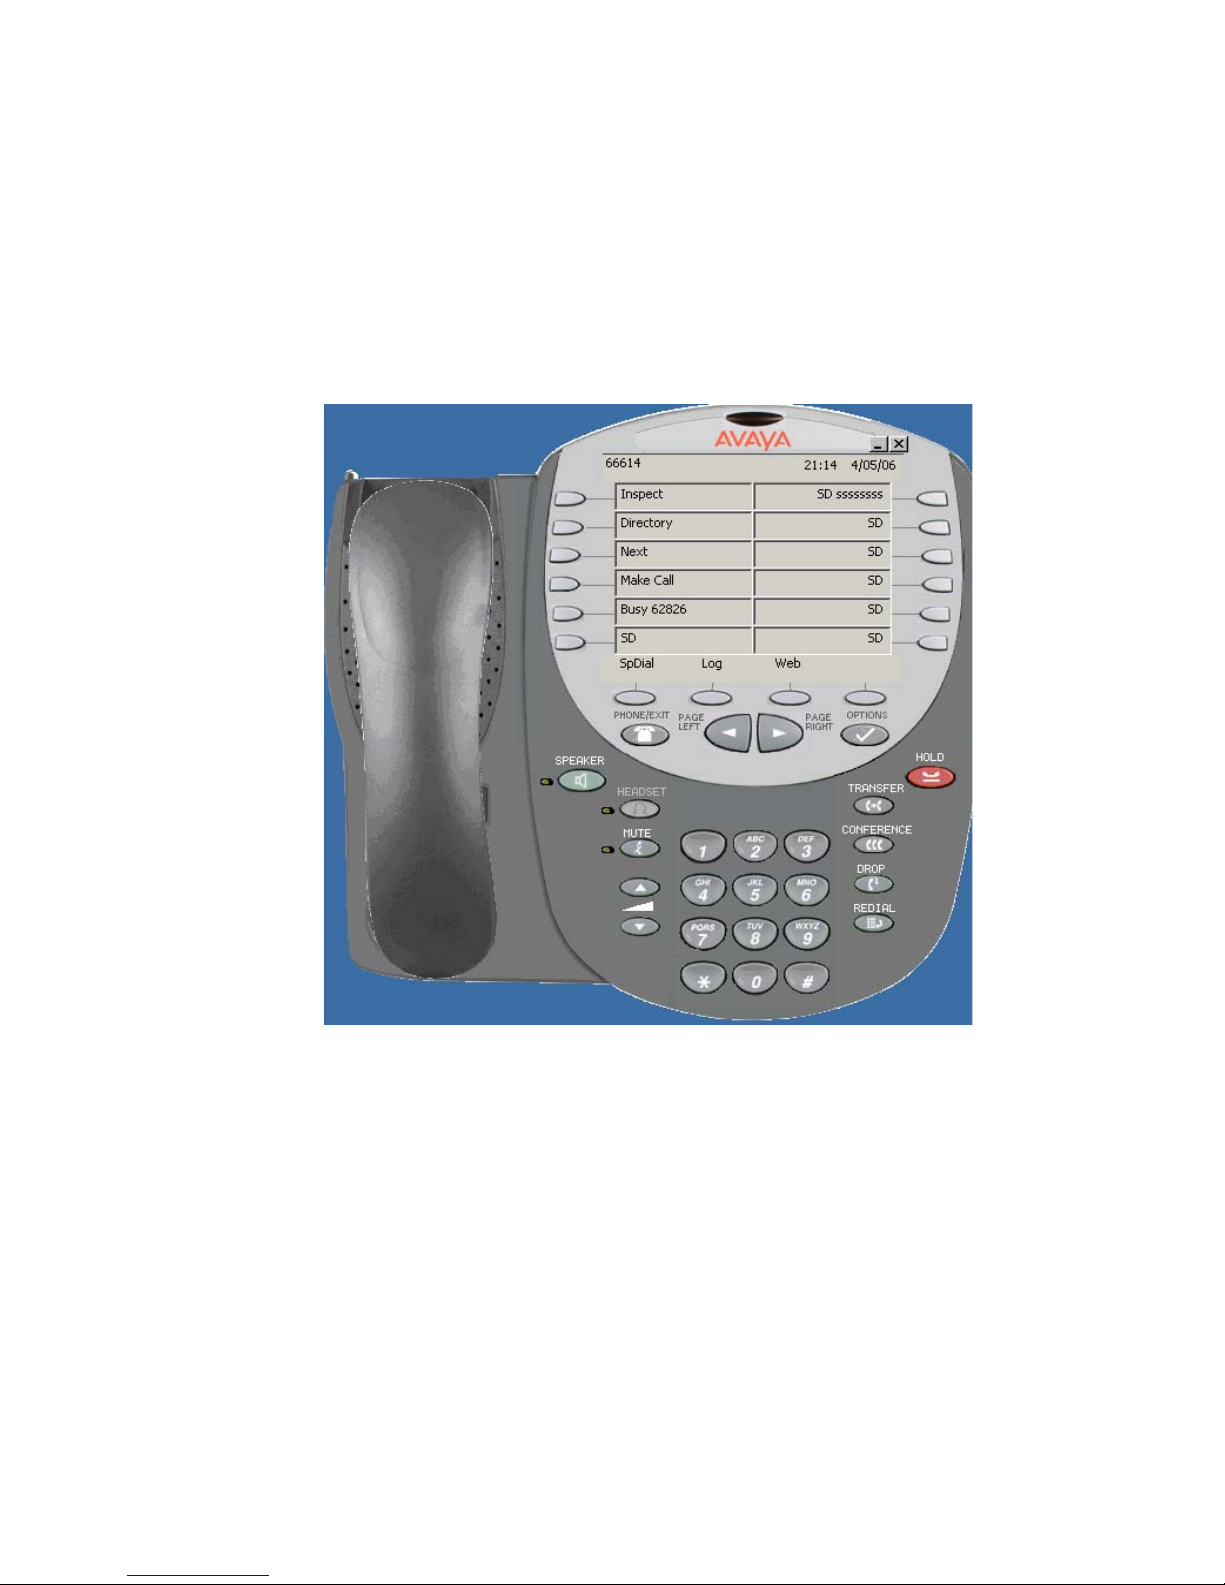
o The example below shows a button that has been programmed by
Telecommunications with Priority Calling (SD sssssss). This button will
need you to provide a Label, e.g. Douglass-Priority.
Revised 05/13/06– JTM © 2006 JTM Associates, Inc. ® Page 16 of 43
Page 17
TELEPHONE TIPS
A Quick Reference Guide for the Avaya MultiVantage Telephone System
46xx Model IP-Telephones
Telephone Features Summary: (continued)
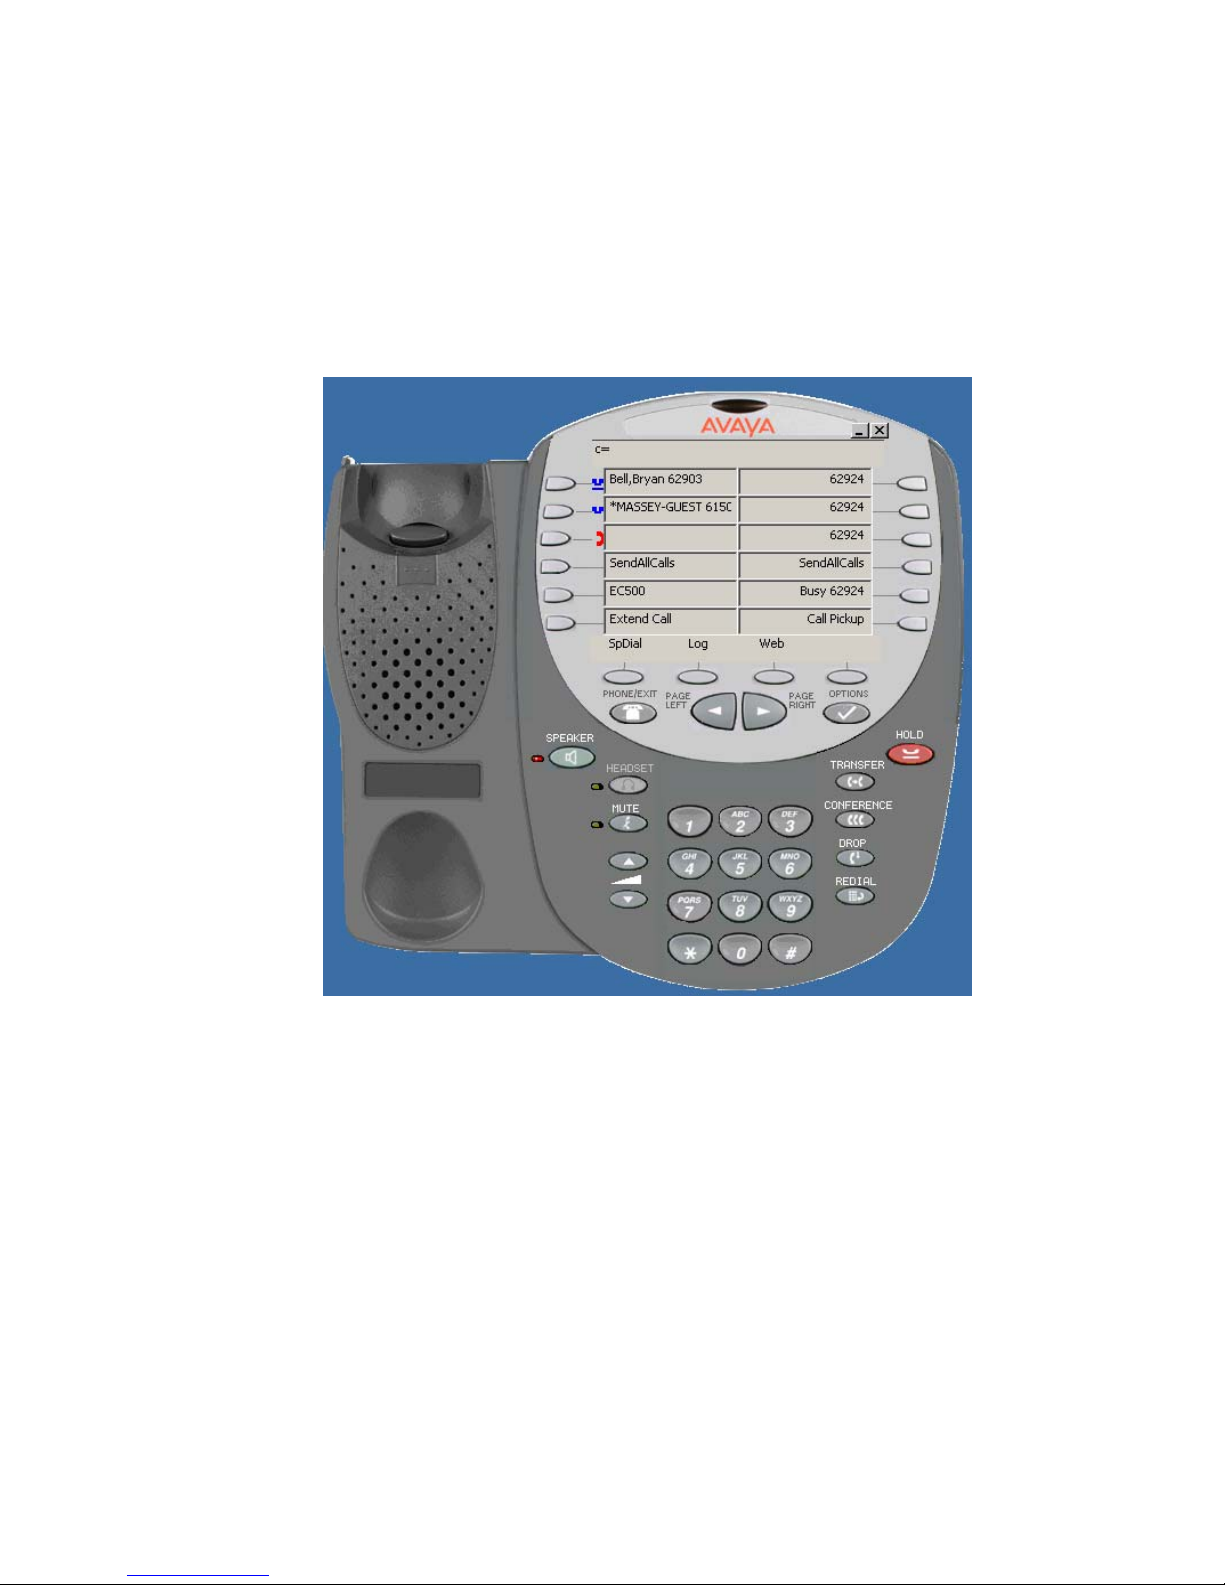
• Line Status Indicators – Provide a visual indication of the line status as show in
the example below:
o Button 1 = Line is on Hold (Symbol matches Hold-button Symbol)
o Button 2 = Line is on Soft-Hold (Being Transferred/Conferenced)
o Button 3 = Line is Off-Hook (you are calling/talking on it)
Revised 05/13/06– JTM © 2006 JTM Associates, Inc. ® Page 17 of 43
Page 18
TELEPHONE TIPS
A Quick Reference Guide for the Avaya MultiVantage Telephone System
46xx Model IP-Telephones
Telephone Features Summary: (continued)
• Call Transfer/Conference – You can transfer any call and hang up leaving the
parties connected as long as at least one of the following conditions is met:
o One of the remaining parties is an extension on the system.
o One of the remaining parties, while outside the system, had called into the
system.
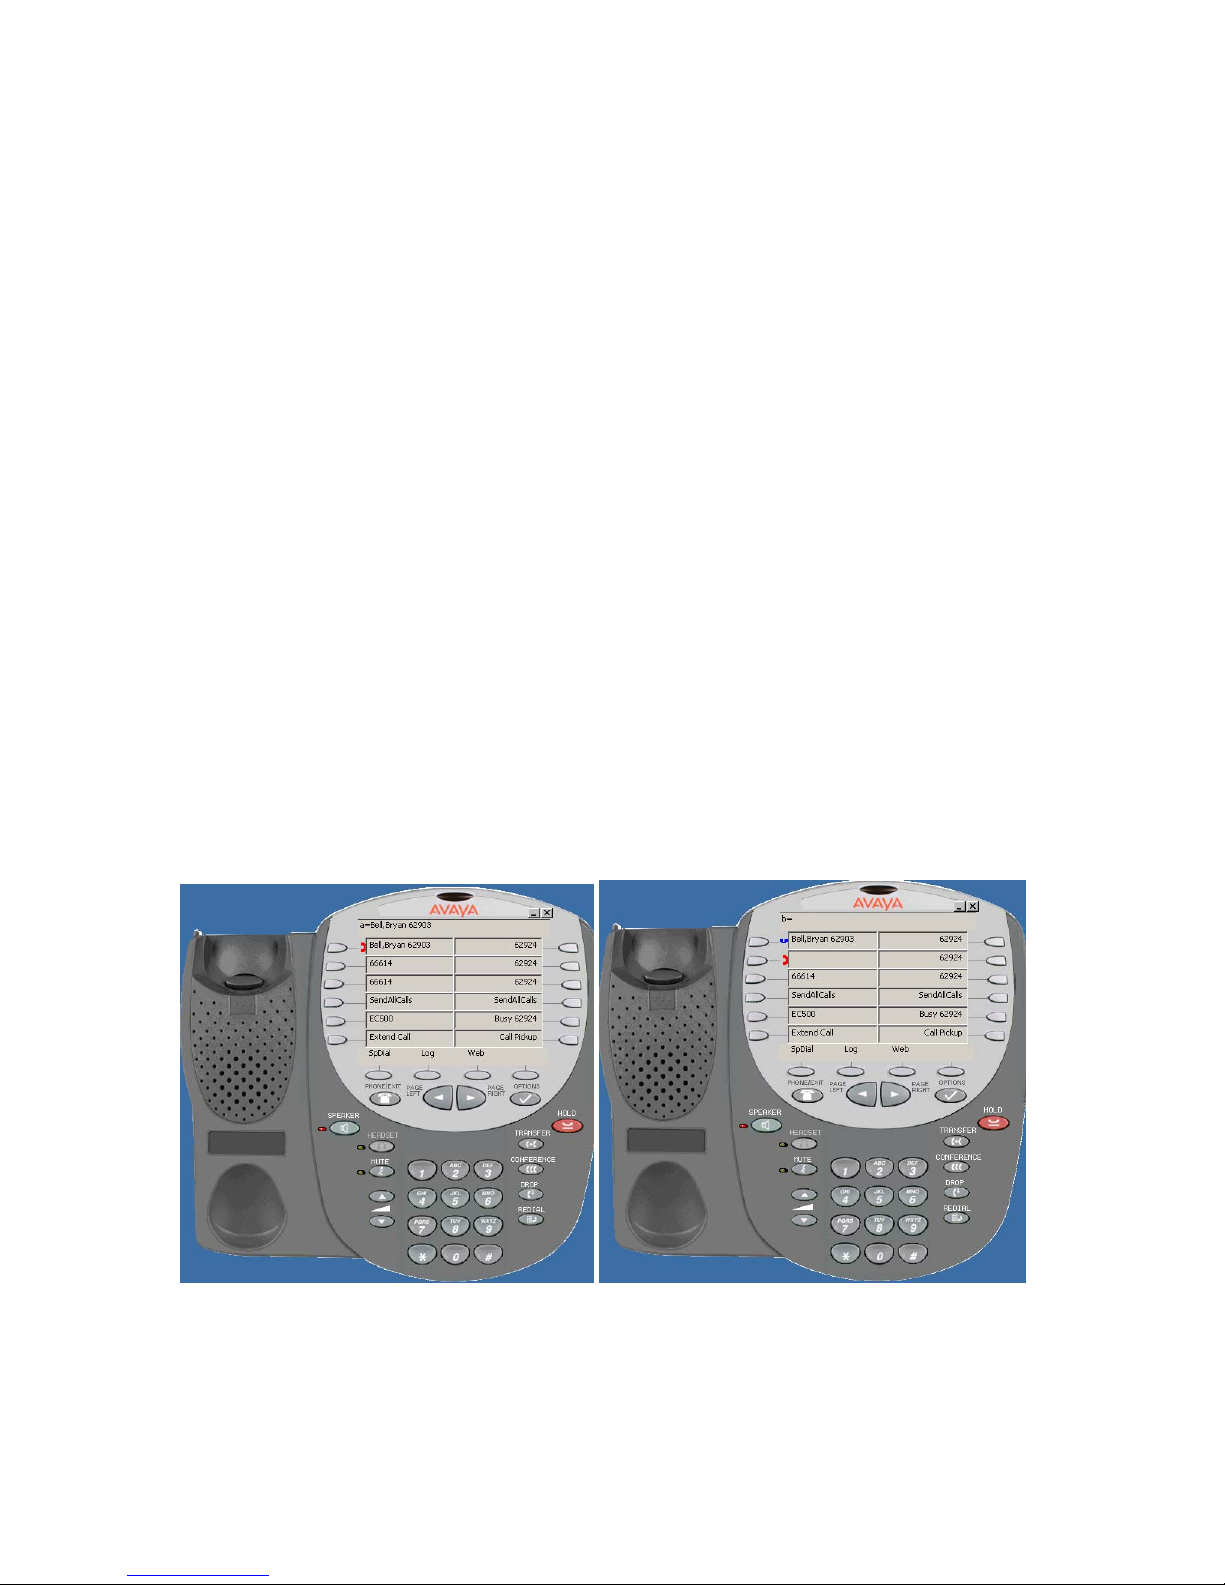
o To Transfer/Conference:
With one party on the line, Depress (Transfer).
• Your 1
st
party is placed on Soft-hold indicating which
button is being transferred.
• You will receive a Dial Tone from another button
appearance.
Dial the 3
rd
Party:
• If the party cannot be reached for any reason, re-depress the
button of the party that is on Soft-hold and either try the
process again or notify the 1st party. Do not use the (Drop)
button.
When the 3
rd
party is reached, announce the call.
Depress (Conference).
• Introduce the parties and hang up.
The (Drop) button should only be used to drop the 3
rd
/last party
from a conference.
1st Party is on Line appearance (a) Transfer is Depressed. (a) on Soft-Hold
Revised 05/13/06– JTM © 2006 JTM Associates, Inc. ® Page 18 of 43
Page 19
TELEPHONE TIPS
A Quick Reference Guide for the Avaya MultiVantage Telephone System
46xx Model IP-Telephones
Telephone Features Summary: (continued)
Call Transfer/Conference – You can transfer any call… (concluded)
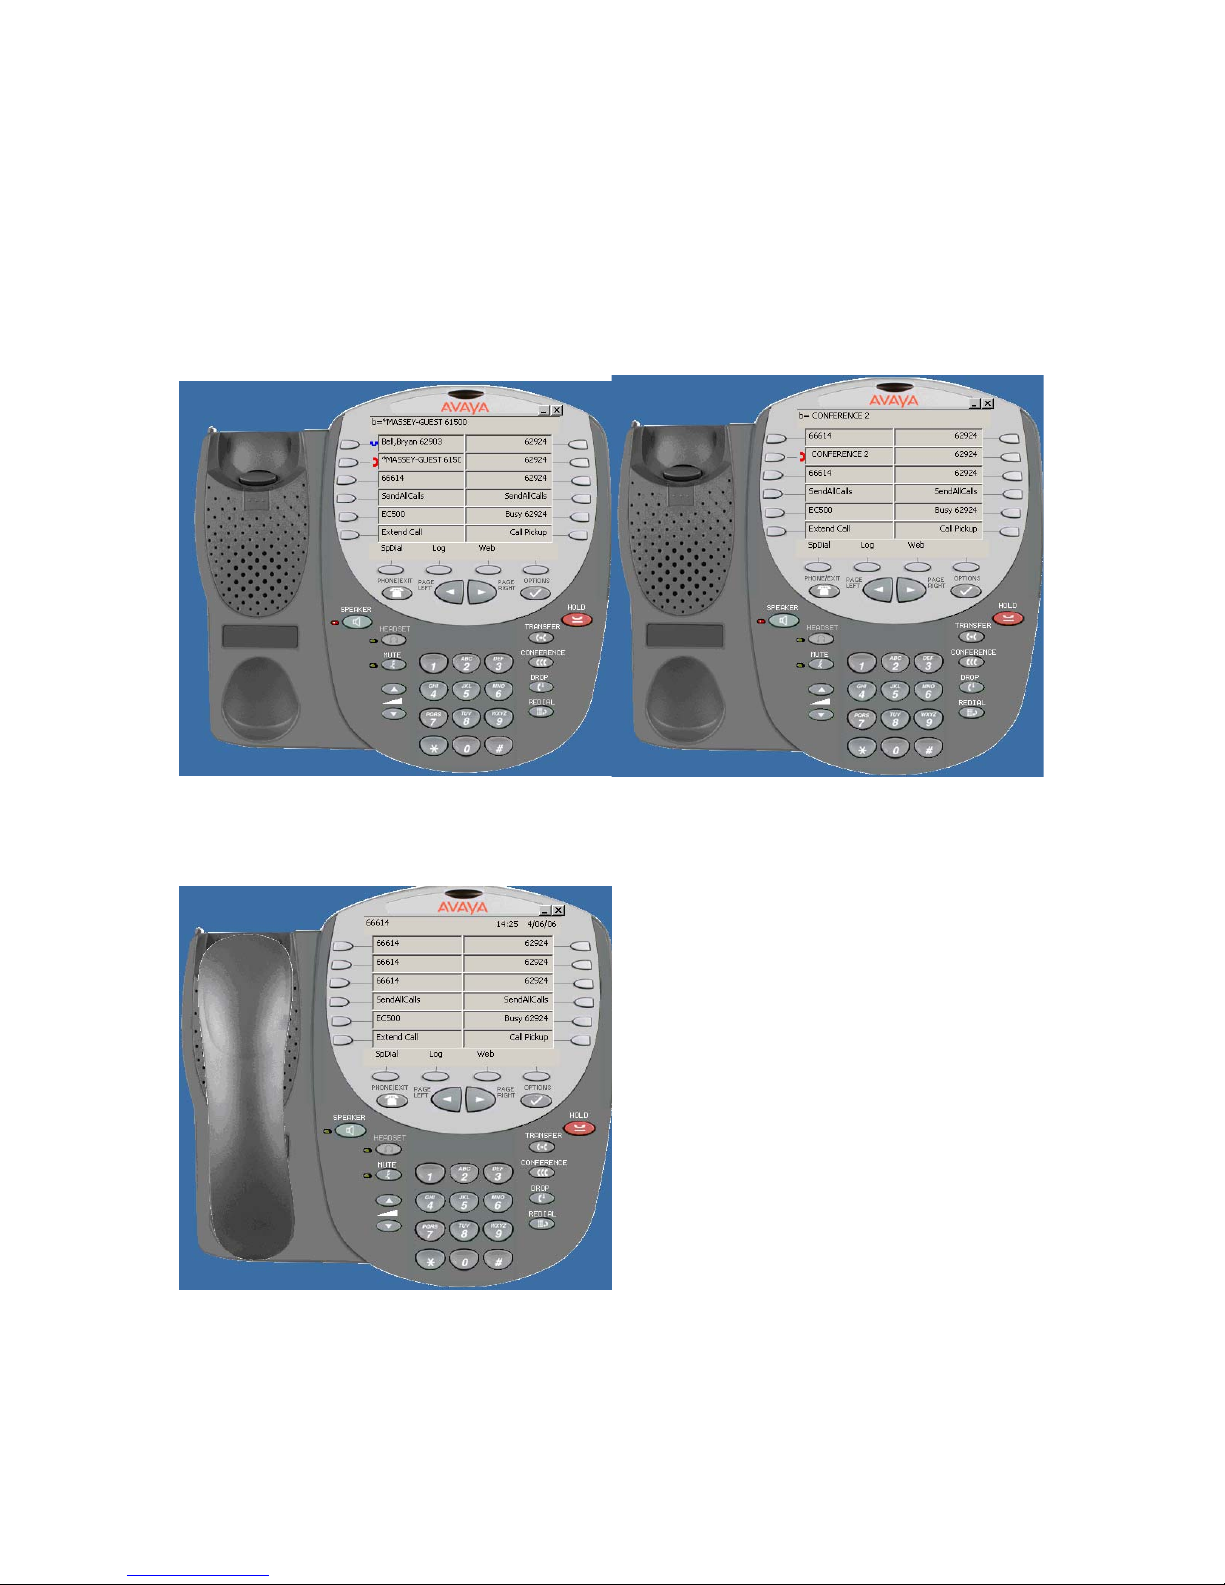
3rd Party Answers. Announce Call. Depress Conference. 1st Party on (a) is
combined with 3rd Party on (b).
Introduce Parties.
Hang up or repeat the process to
Conference up-to 6 parties (you and five
others).
Revised 05/13/06– JTM © 2006 JTM Associates, Inc. ® Page 19 of 43
Page 20

TELEPHONE TIPS
A Quick Reference Guide for the Avaya MultiVantage Telephone System
46xx Model IP-Telephones
Telephone Features Summary: (concluded)
• Call Forward – The system provides the ability to forward calls to another
phone. This is usually used when you are temporarily located in a Conference
Room and wish to answer your calls there.
o To Activate:
Be sure that your (SendAllCalls) button/feature is not active.
Get a Dial Tone and Dial (*2) followed by:
The 4-digit extension to which you wish to forward or
Dial (9) and the outside number to which you wish to forward.
• Be sure to enter the number as you would normally dial it
from your office, e.g., 9 & Number or, 9-1-Area Code &
Number.
o If you do not answer a call at the forwarded-to phone, the system will send
the call to your normal Coverage point, e.g., Assistant, Voice Mail.
o To Cancel:
Get a Dial Tone from your phone and Dial (#22).
• Forwarding to a Long Distance Number:
o If you need to be able to forward to a number that is Long Distance from
your office, the Class of Restriction (COR) on your phone will need to be
changed to a (14). Your Telephone Administrator can request this change.
Revised 05/13/06– JTM © 2006 JTM Associates, Inc. ® Page 20 of 43
Page 21

TELEPHONE TIPS
A Quick Reference Guide for the Avaya MultiVantage Telephone System
46xx Model IP-Telephones
Telecommuting Features – The system provides the ability to remotely activate and
cancel some features. This is done by dialing the Telecommuting Telephone Number,
entering the feature code desired, followed by your Extension and Extension’s Security
Code.
• Local Number – 239-745-3000 (3000)
The features and procedures are:
• Remote EC500 (Extension to Cellular)
o To Activate:
• Your (SendAllCalls) button/feature must not be active at your
desk phone for EC500 to operate. See below on how to remotely
cancel (SendAllCalls).
• Dial 745-3000 and wait for a Telecommuting Dial Tone from the
Avaya System.
• Dial (#95) receive a second Dial Tone.
• Dial your 4-digit extension followed by a (#).
• If you are calling from the EC500 Cell phone or your host
office extension, you do not need to enter the extension
number. In these cases, just press (#).
• Dial your Extension’s Security Code (same number as your 4-digit
extension) followed by a (#).
• Receive a 3-beep Confirmation Tone – the feature is activated.
o To Cancel:
• Dial 745-3000 and wait for a Telecommuting Dial Tone from the
Avaya System.
• Dial (#96) receive a second Dial Tone.
• Dial your 4-digit extension followed by a (#).
• If you are calling from the EC500 Cell phone or your host
office extension, you do not need to enter the extension
number. In these cases, just press (#).
• Dial your Extension’s Security Code (same number as your 4-digit
extension) followed by a (#).
• Receive a 3-beep Confirmation Tone – the feature is cancelled.
Revised 05/13/06– JTM © 2006 JTM Associates, Inc. ® Page 21 of 43
Page 22

TELEPHONE TIPS
A Quick Reference Guide for the Avaya MultiVantage Telephone System
46xx Model IP-Telephones
Telecommuting Features – The system provides the ability to remotely activate and
cancel some features. This is done by dialing the Telecommuting Telephone Number,
entering the feature code desired, followed by your Extension and Extension’s Security
Code. The features and procedures are: (continued)
• Remote Forwarding
o To Activate:
• Your (SendAllCalls) button/feature must not be active at your
desk phone for Forwarding to operate. See below on how to
remotely cancel (SendAllCalls).
• Dial 745-3000 and wait for a Telecommuting Dial Tone from the
Avaya System.
• Dial (#52) receive a second Dial Tone.
• Dial your 4-digit extension followed by a (#).
• If you are calling from the EC500 Cell phone or your host
office extension, you do not need to enter the extension
number. In these cases, just press (#).
• Dial your Extension’s Security Code (same number as your 4-digit
extension) followed by a (#).
• Receive a third Dial Tone and dial:
• The 4-digit extension to which you wish to forward or
• (9) and the Telephone Number to which you wish to
forward.
o Be sure to enter the number as you would normally
dial it from your office, e.g., 9 & Number or, 9-1Area Code & Number.
• Receive a 3-beep Confirmation Tone – Forwarding is activated
o To Cancel:
• Dial 745-3000 and wait for a Telecommuting Dial Tone from the
Avaya System.
• Dial (#57) receive a second Dial Tone.
• Dial your 4-digit extension followed by a (#).
• If you are calling from the EC500 Cell phone or your host
office extension, you do not need to enter the extension
number. In these cases, just press (#).
• Dial your Extension’s Security Code (same number as your 4-digit
extension) followed by a (#).
• Receive a 3-beep Confirmation Tone – the feature is cancelled.
Revised 05/13/06– JTM © 2006 JTM Associates, Inc. ® Page 22 of 43
Page 23

TELEPHONE TIPS
A Quick Reference Guide for the Avaya MultiVantage Telephone System
46xx Model IP-Telephones
Telecommuting Features – The system provides the ability to remotely activate and
cancel some features. This is done by dialing the Telecommuting Telephone Number,
entering the feature code desired, followed by your Extension and Extension’s Security
Code. The features and procedures are: (concluded)
• Remote Send All Calls
o To Activate:
• Dial 745-3000 and wait for a Telecommuting Dial Tone from the
Avaya System.
• Dial (#62) receive a second Dial Tone.
• Dial your 4-digit extension followed by a (#).
• If you are calling from the EC500 Cell phone or your host
office extension, you do not need to enter the extension
number. In these cases, just press (#).
• Dial your Extension’s Security Code (same number as your 4-digit
extension) followed by a (#).
• Receive a 3-beep Confirmation Tone – Forwarding is activated.
o To Cancel:
• Dial 745-3000 and wait for a Telecommuting Dial Tone from the
Avaya System.
• Dial (#63) receive a second Dial Tone.
• Dial your 4-digit extension followed by a (#).
• If you are calling from the EC500 Cell phone or your host
office extension, you do not need to enter the extension
number. In these cases, just press (#).
• Dial your Extension’s Security Code (same number as your 4-digit
extension) followed by a (#).
• Receive a 3-beep Confirmation Tone – the feature is cancelled.
Telecommuting Summary
• The process of using Telecommuting to activate and cancel feature as described
above is the same (except Forwarding) for all features and differs only in the
Feature Codes dialed.
• To Activate/Cancel:
o Dial 745-3000
o Dial the Activate Feature Code.
o Dial your 4-digit extension + (#).
o Dial your Station Security Code which is the same as your extension
number + (#).
o Dial the Activate/Cancel Feature Code.
With Forwarding, you would dial the number to which you are
forwarding.
Revised 05/13/06– JTM © 2006 JTM Associates, Inc. ® Page 23 of 43
Page 24

TELEPHONE TIPS
A Quick Reference Guide for the Avaya MultiVantage Telephone System
46xx Model IP-Telephones
Voice Mail Telephone Access and Password:
The new Avaya Modular Messaging voice mail system is integrated with Microsoft
Exchange and your Outlook desktop Client. This will allow you to see and access voice
mail and email messages from one screen.
You can continue to retrieve voice mail messages using the telephone.
• The Telephone Number for Voice Mail is:
o 239-590-1550 (1550)
• When calling Voice Mail from your own desk, depress the (MESSAGES) button
to reach Voice Mail if your Telephone Administrator has provided one.
Otherwise, dial the extension detailed above.
Immediately after the new Telephone/Voice Mail system is implemented, please call the
Modular Messaging Voice Mail system (as instructed above) and administer your
personal greeting and password.
• On your initial login, the default voice mail password will be 1550. You will
then be prompted to change your voice mail password.
When logging in through your telephone, the system will tell you how many
unopened/unheard email/voicemail messages you have and how many opened (saved)
messages you have in your in box.
• Since the system is integrated with email, it can read your email messages to you
over the telephone.
• If you are not interested in email, depress (1) (1) to go to voice mail.
o The system will play only the voice mail messages.
It will play new messages first followed by old (saved) messages.
Revised 05/13/06– JTM © 2006 JTM Associates, Inc. ® Page 24 of 43
Page 25

TELEPHONE TIPS
A Quick Reference Guide for the Avaya MultiVantage Telephone System
46xx Model IP-Telephones
Voice Mail Telephone Access and Password: (concluded)
When logging in through your telephone, the system will tell you how many
unopened/unheard email/voicemail messages you have and how many opened (saved)
messages you have in your in box. (concluded)
If you delete a voice mail message using the telephone, it will move it to your
•
Trash/Deleted Folder in Outlook. If you delete it using Outlook, it will also move
it to your Trash/Deleted Folder.
o The system will allow you to review play voice mail messages using the
phone. Items in the Trash/Deleted Folder are offered as the last review
category.
o If you Delete messages (Press 7) or Save them (Press 9) using the
telephone, the system will turn off the Message Waiting Lamp on your
phone. However, if you skip the message (Press #), it is considered
unread and will not turn off the Message Waiting Lamp.
• If you use the telephone to listen to email messages, you can reply to the email.
When you do so, the system records what you say in your reply and attaches it as
a WAV file in the email reply.
Transferring to the Operator or Extension from Voice Mail:
• When Calling Voice Mail from a location other than the office:
o
Before you login to your mailbox, you may:
Dial (Zero) for the Receptionist/Operator.
Dial (the Extension) of someone you wish to call (only works if
they have Voice Mail and are located in your office).
Dial (*) to spell the name of someone you wish to call (only works
if they have Voice Mail and are located in your office).
Dial (#) to login to a mailbox.
o
After you login in to your mailbox, you may:
Listen to see if you are at the Main Menu (System will say "Main
Menu").
Dial (9) to Transfer.
If not at Main Menu, Dial (*) to backup to Main Menu.
Dial (Zero) for the Receptionist in your office.
Dial (the Extension) of someone you wish to call (only
works if they have Voice Mail and are located in your
office).
Dial (*) to spell the name of someone you wish to call
(only works if they have Voice Mail only works if they are
located in your office).
Dial (#) to login to a mailbox in your office.
Revised 05/13/06– JTM © 2006 JTM Associates, Inc. ® Page 25 of 43
Page 26
TELEPHONE TIPS
A Quick Reference Guide for the Avaya MultiVantage Telephone System
46xx Model IP-Telephones
Voice Mail Message Playback:
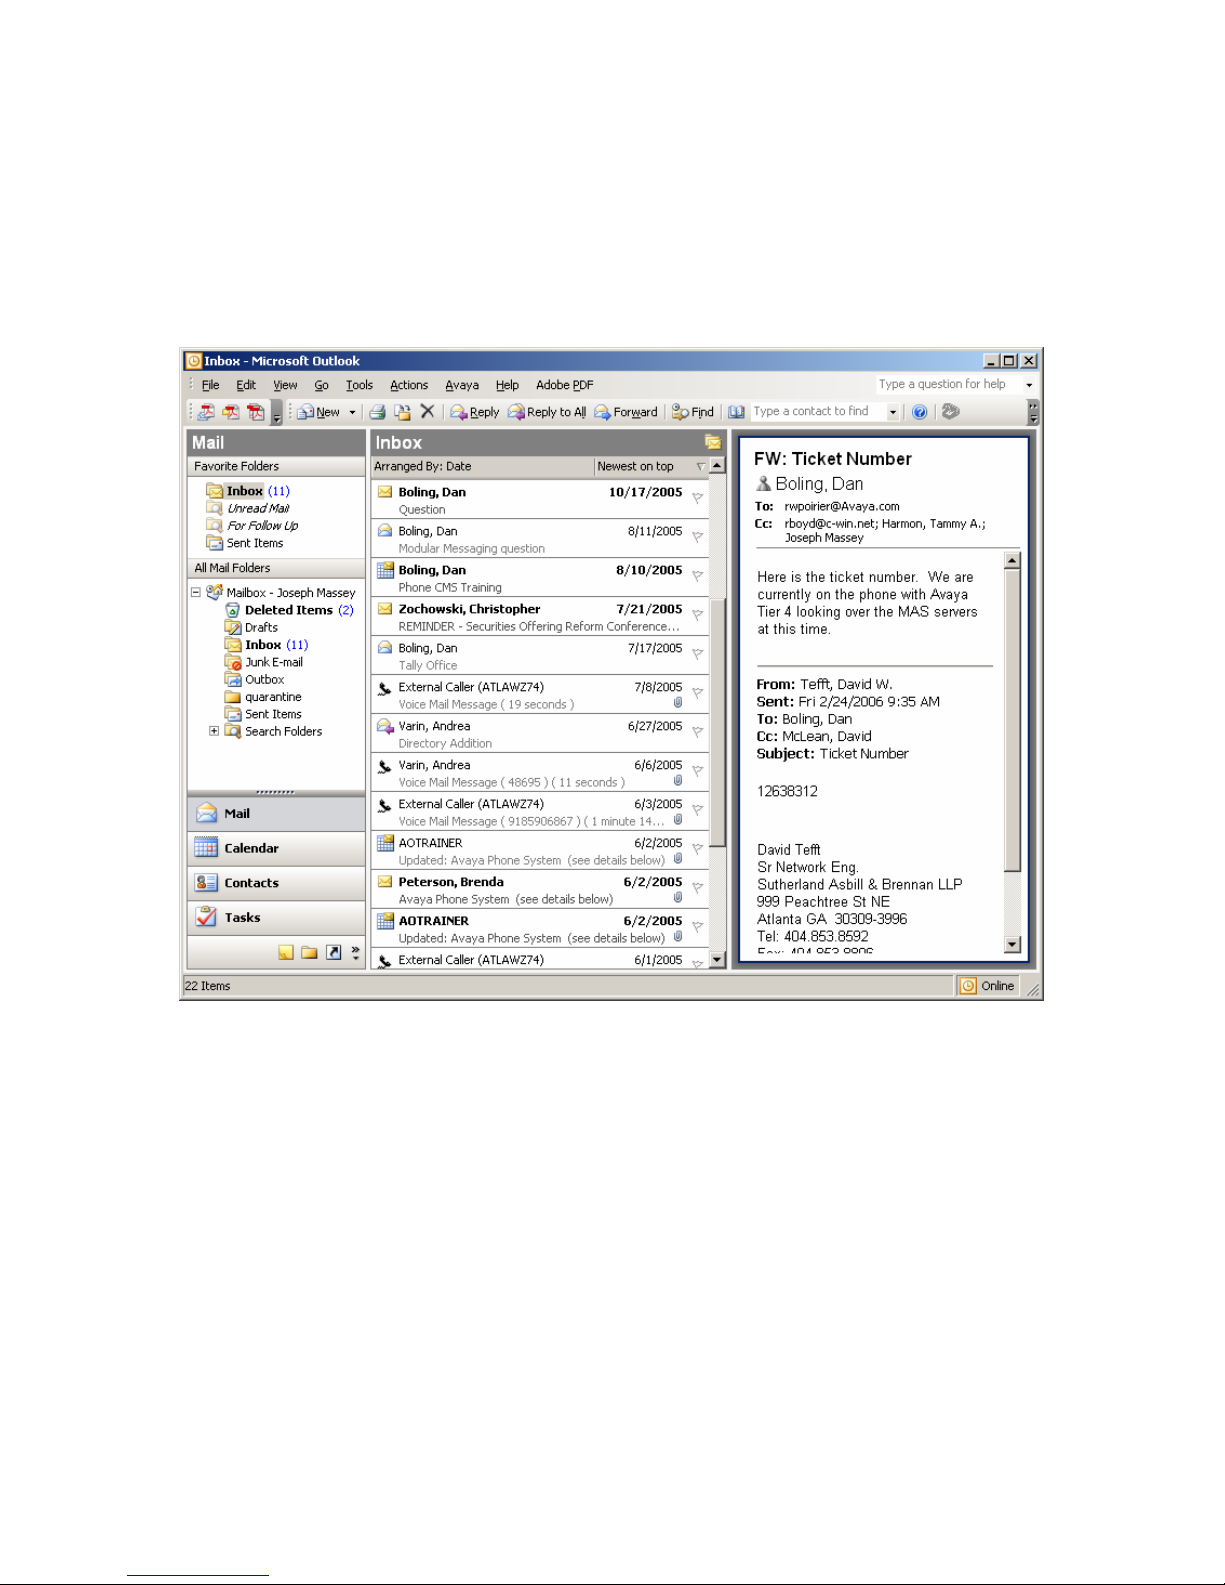
The following screen shows an example of email and voice mail messages in Outlook
2003. The voice mail messages are indicated with a Telephone icon.
Revised 05/13/06– JTM © 2006 JTM Associates, Inc. ® Page 26 of 43
Page 27
TELEPHONE TIPS
A Quick Reference Guide for the Avaya MultiVantage Telephone System
46xx Model IP-Telephones
Voice Mail Message Playback: (continued)
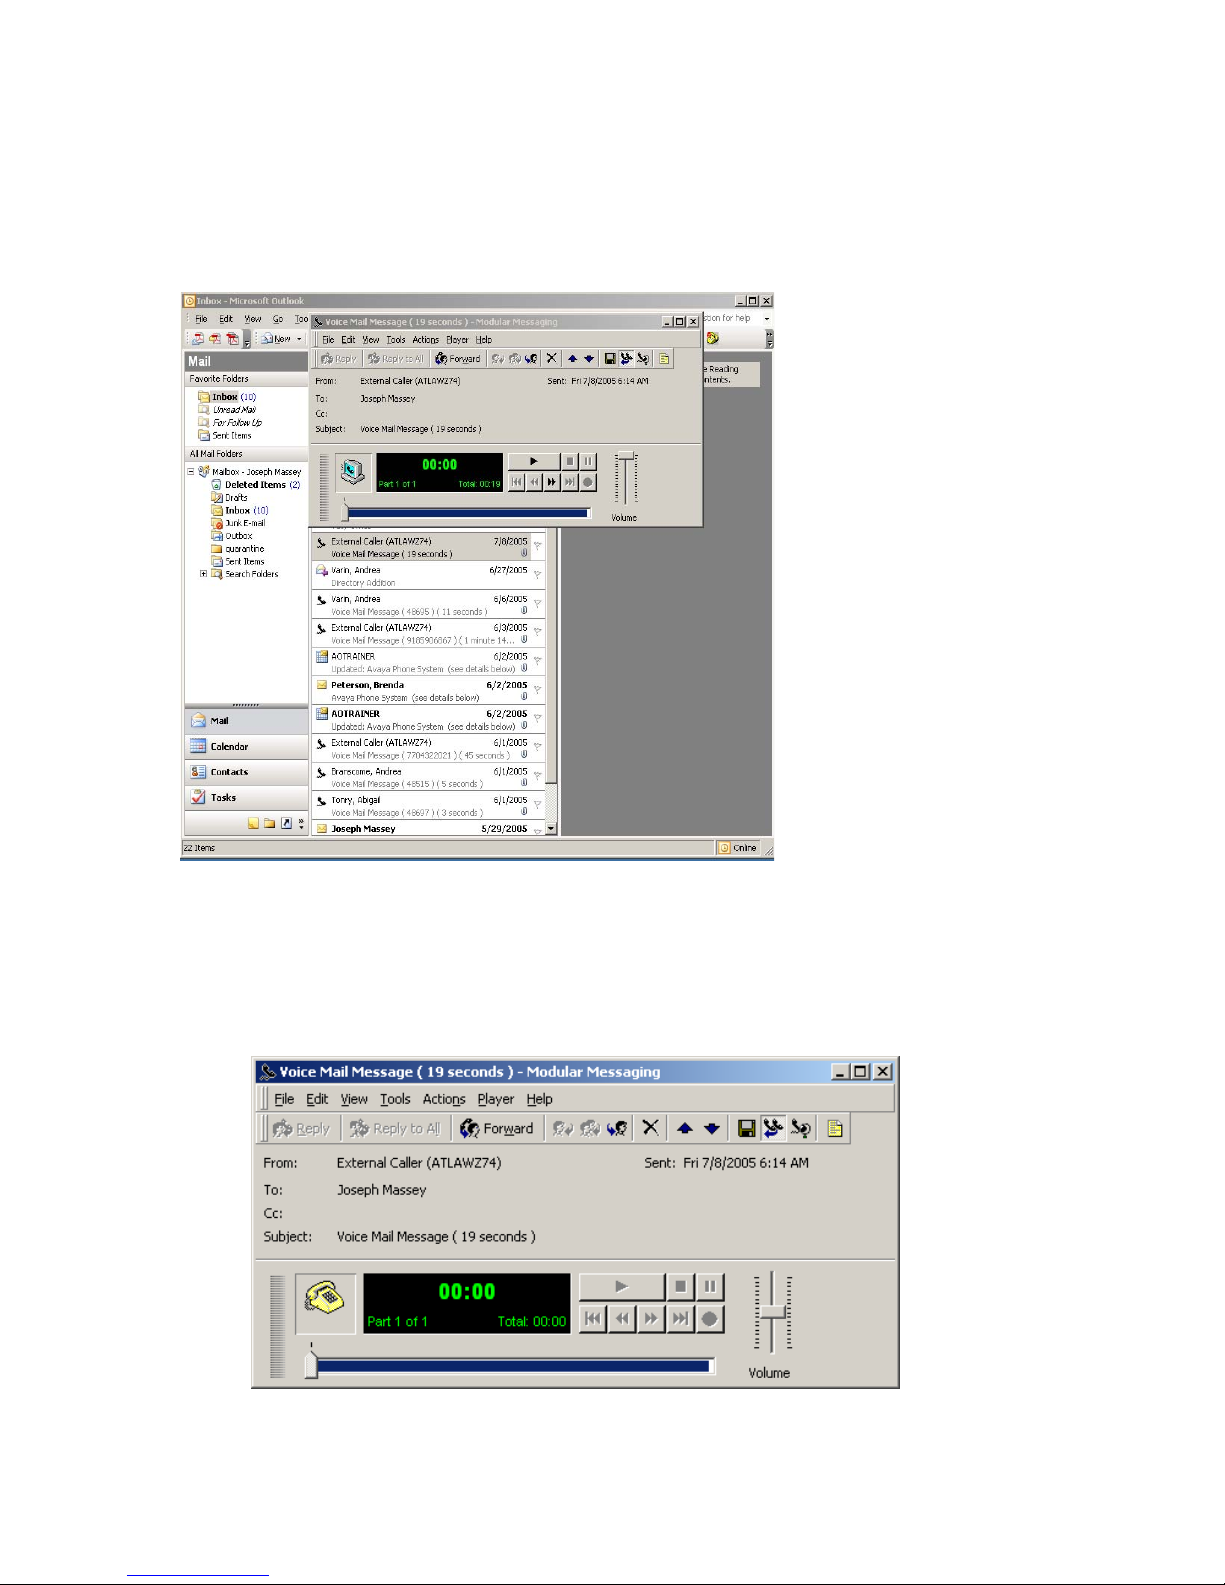
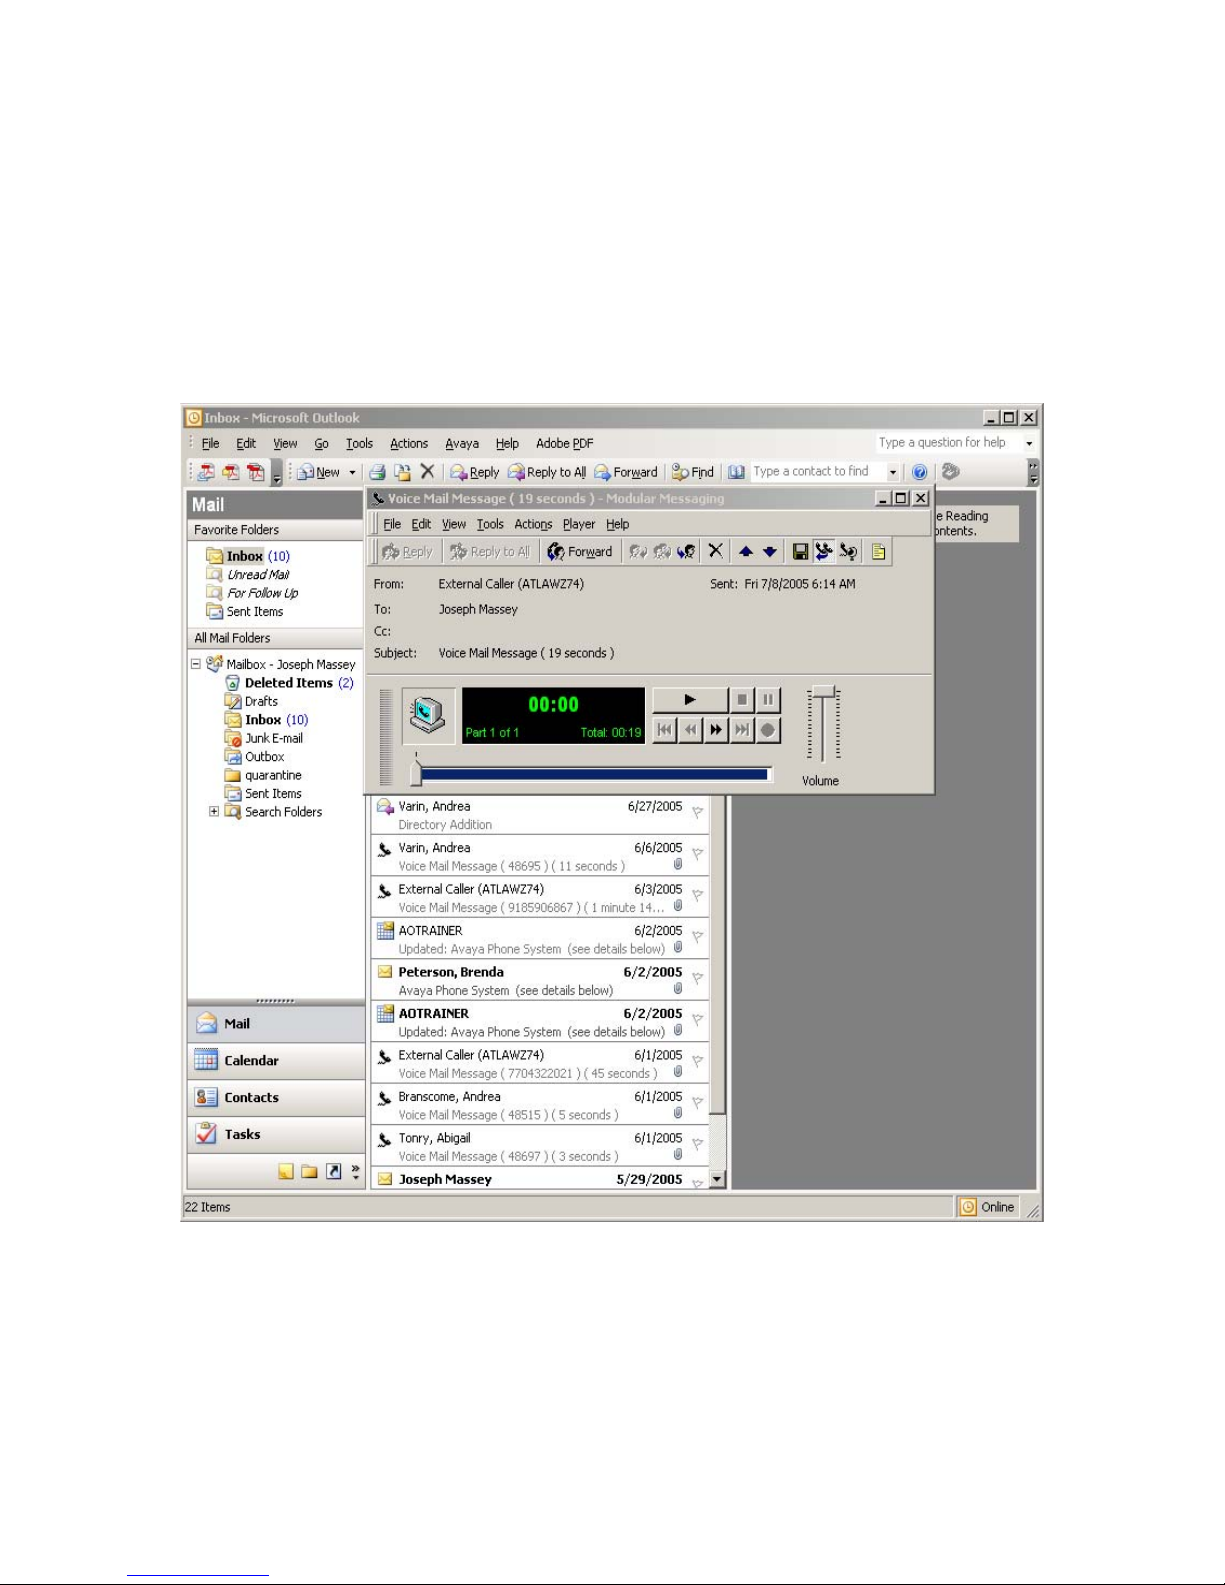
When a voice mail is opened in Outlook, a player is provided as shown below.
A computer Icon (shown above) or Telephone Icon (shown below) is displayed in the
player. This allows you to select where voice mail messages are to be played.
• If you select the phone, the Voice Mail system will call you on your telephone to
play the message.
• If you select the Computer Icon, the system will play the message over your
desktop speakers.
Revised 05/13/06– JTM © 2006 JTM Associates, Inc. ® Page 27 of 43
Page 28
TELEPHONE TIPS
A Quick Reference Guide for the Avaya MultiVantage Telephone System
46xx Model IP-Telephones
Voice Mail Message Playback – Configuring Speakers vs. Telephone:
You can continue to use your telephone to retrieve voice mail as you have always done.
Depress the MESSAGES button on your phone to reach voice mail.
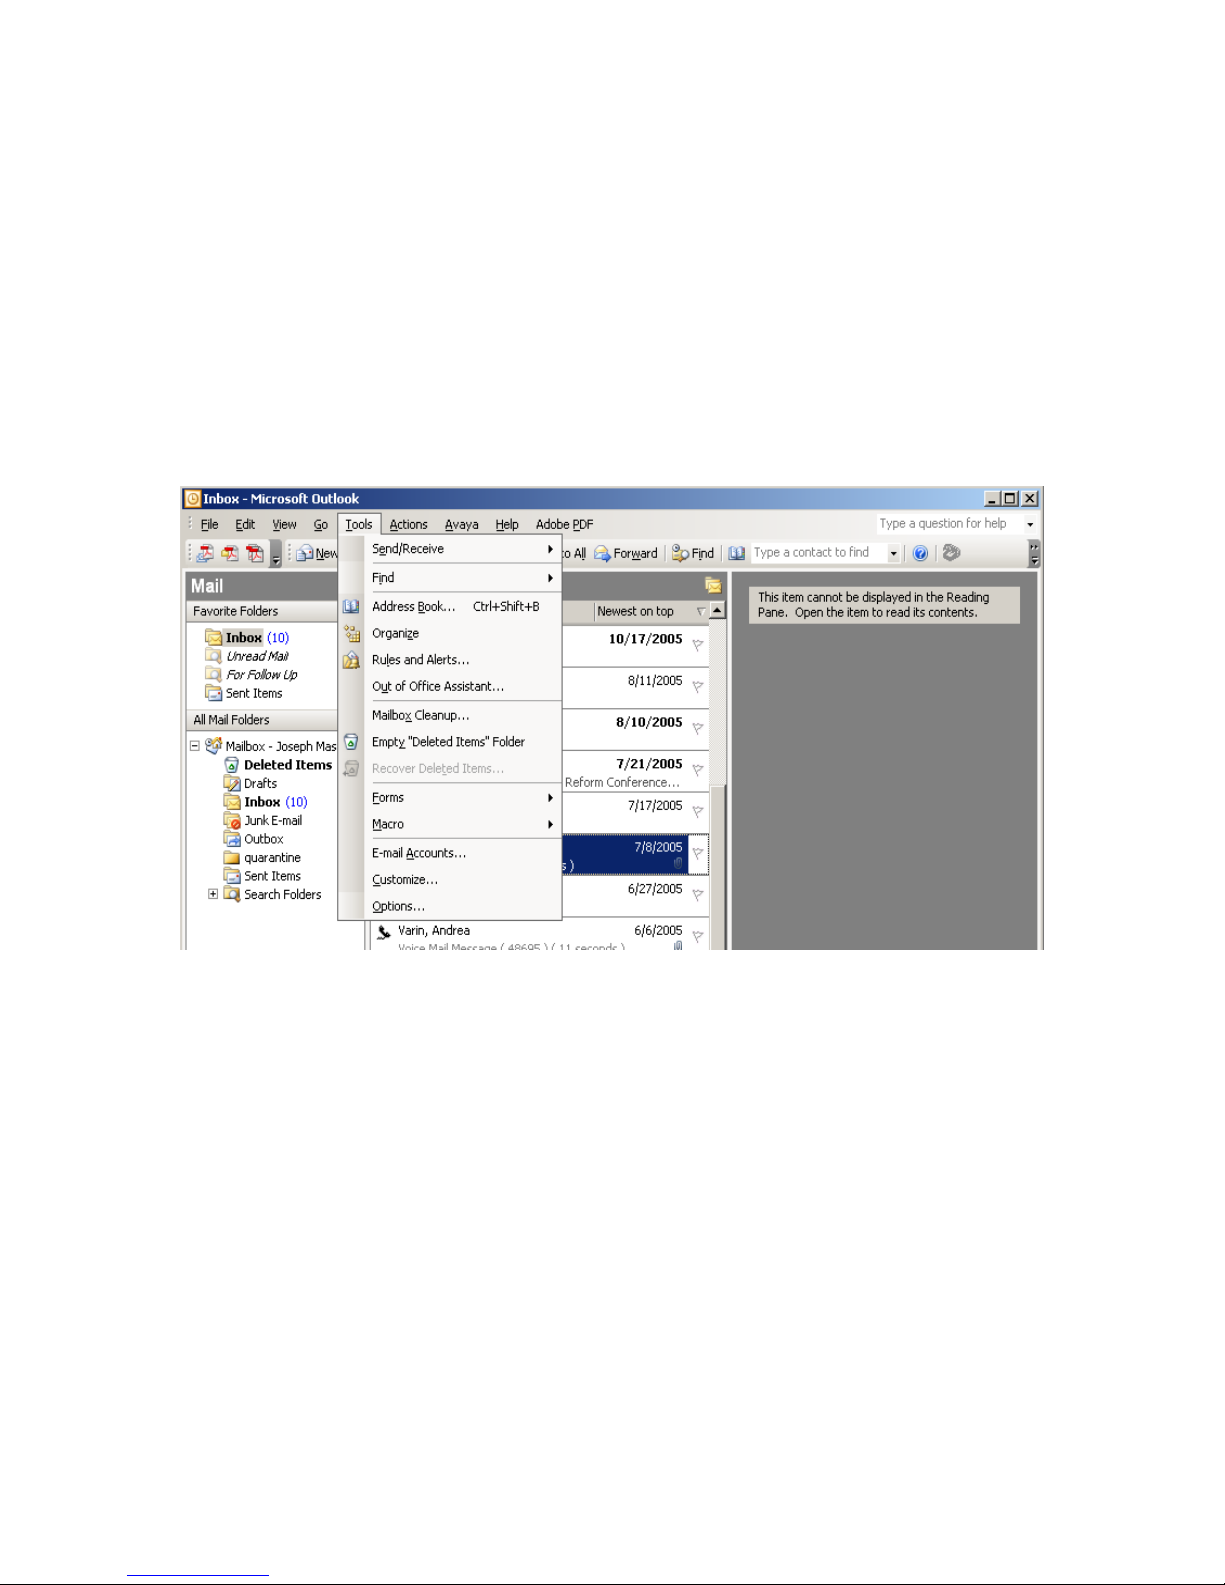
However, to use the PC to control the playback of messages, you will need to configure
your Outlook to either play messages over your desktop/laptop speakers or over your
telephone. This configuration process is as follows:
From Outlook select Tools: Options
Revised 05/13/06– JTM © 2006 JTM Associates, Inc. ® Page 28 of 43
Page 29
TELEPHONE TIPS
A Quick Reference Guide for the Avaya MultiVantage Telephone System
46xx Model IP-Telephones
Voice Mail Message Playback – Configuring Speakers vs. Telephone: (continued)
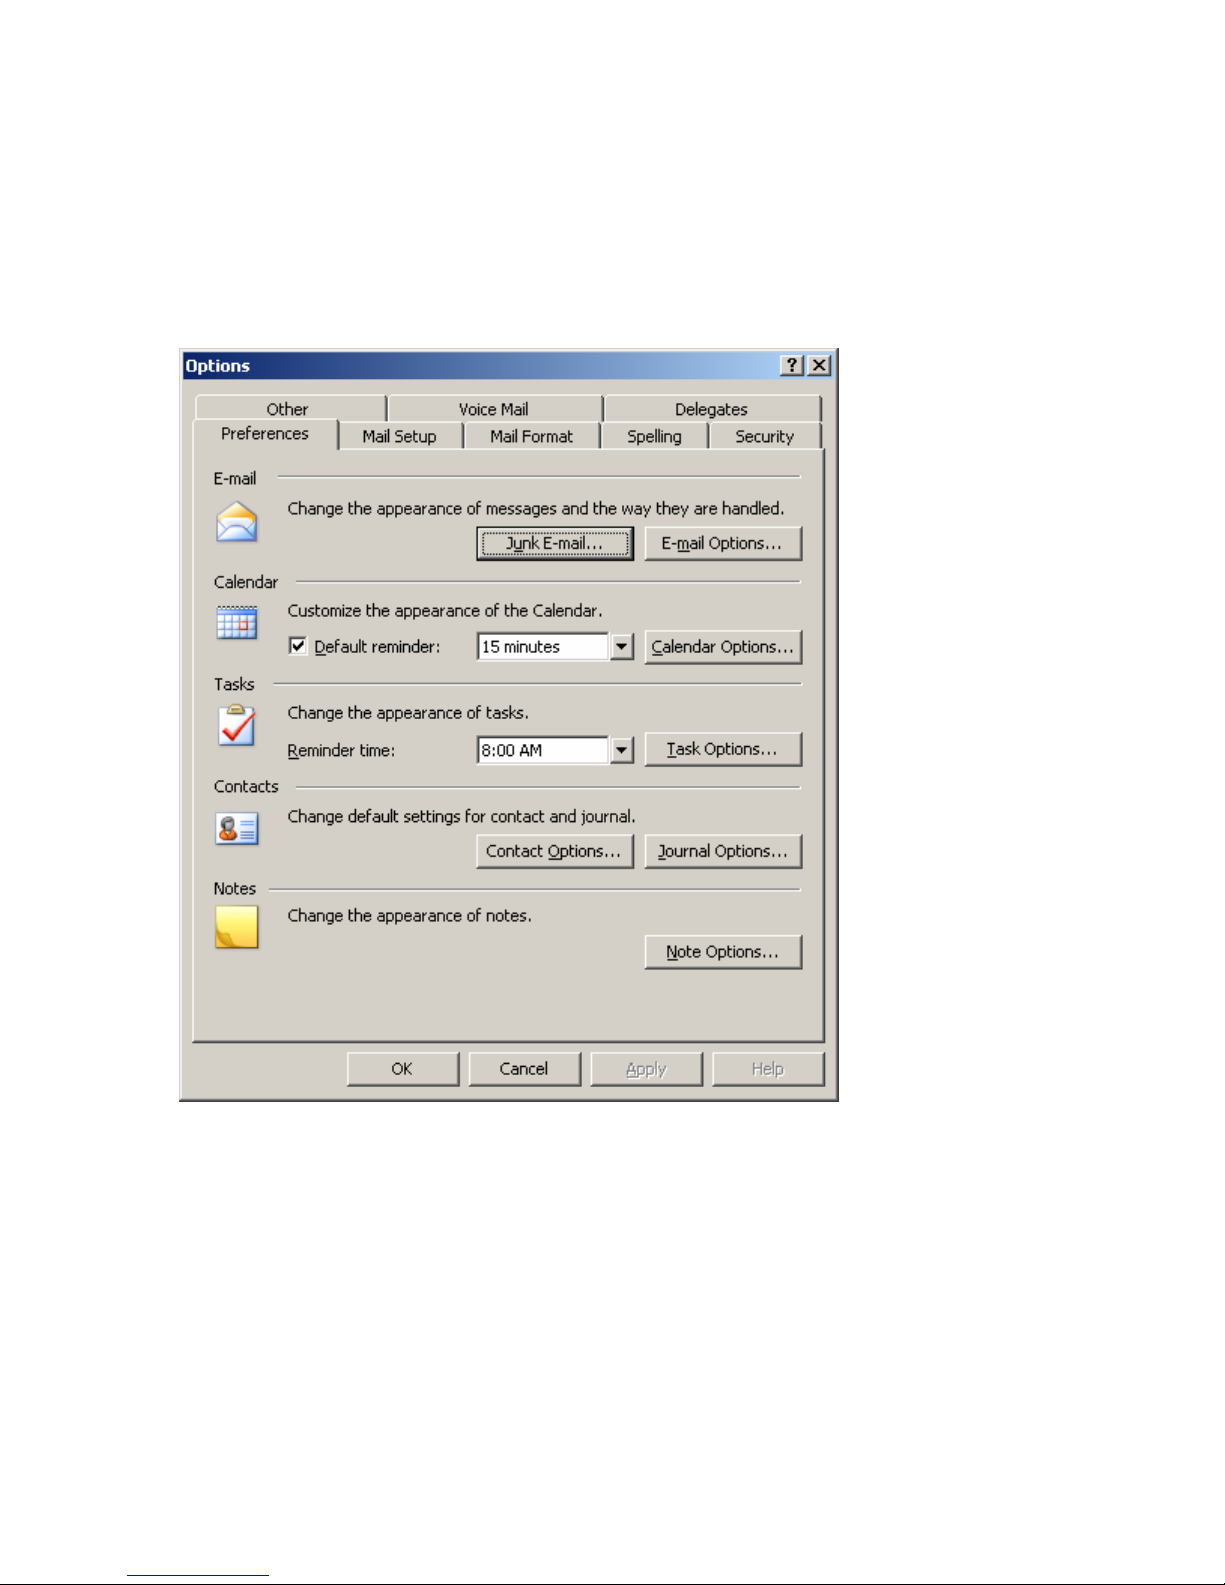
Receive the window below.
Then click the Voice Mail tab at the top of the Options window.
Revised 05/13/06– JTM © 2006 JTM Associates, Inc. ® Page 29 of 43
Page 30
TELEPHONE TIPS
A Quick Reference Guide for the Avaya MultiVantage Telephone System
46xx Model IP-Telephones
Voice Mail Message Playback – Configuring Speakers vs. Telephone: (continued)
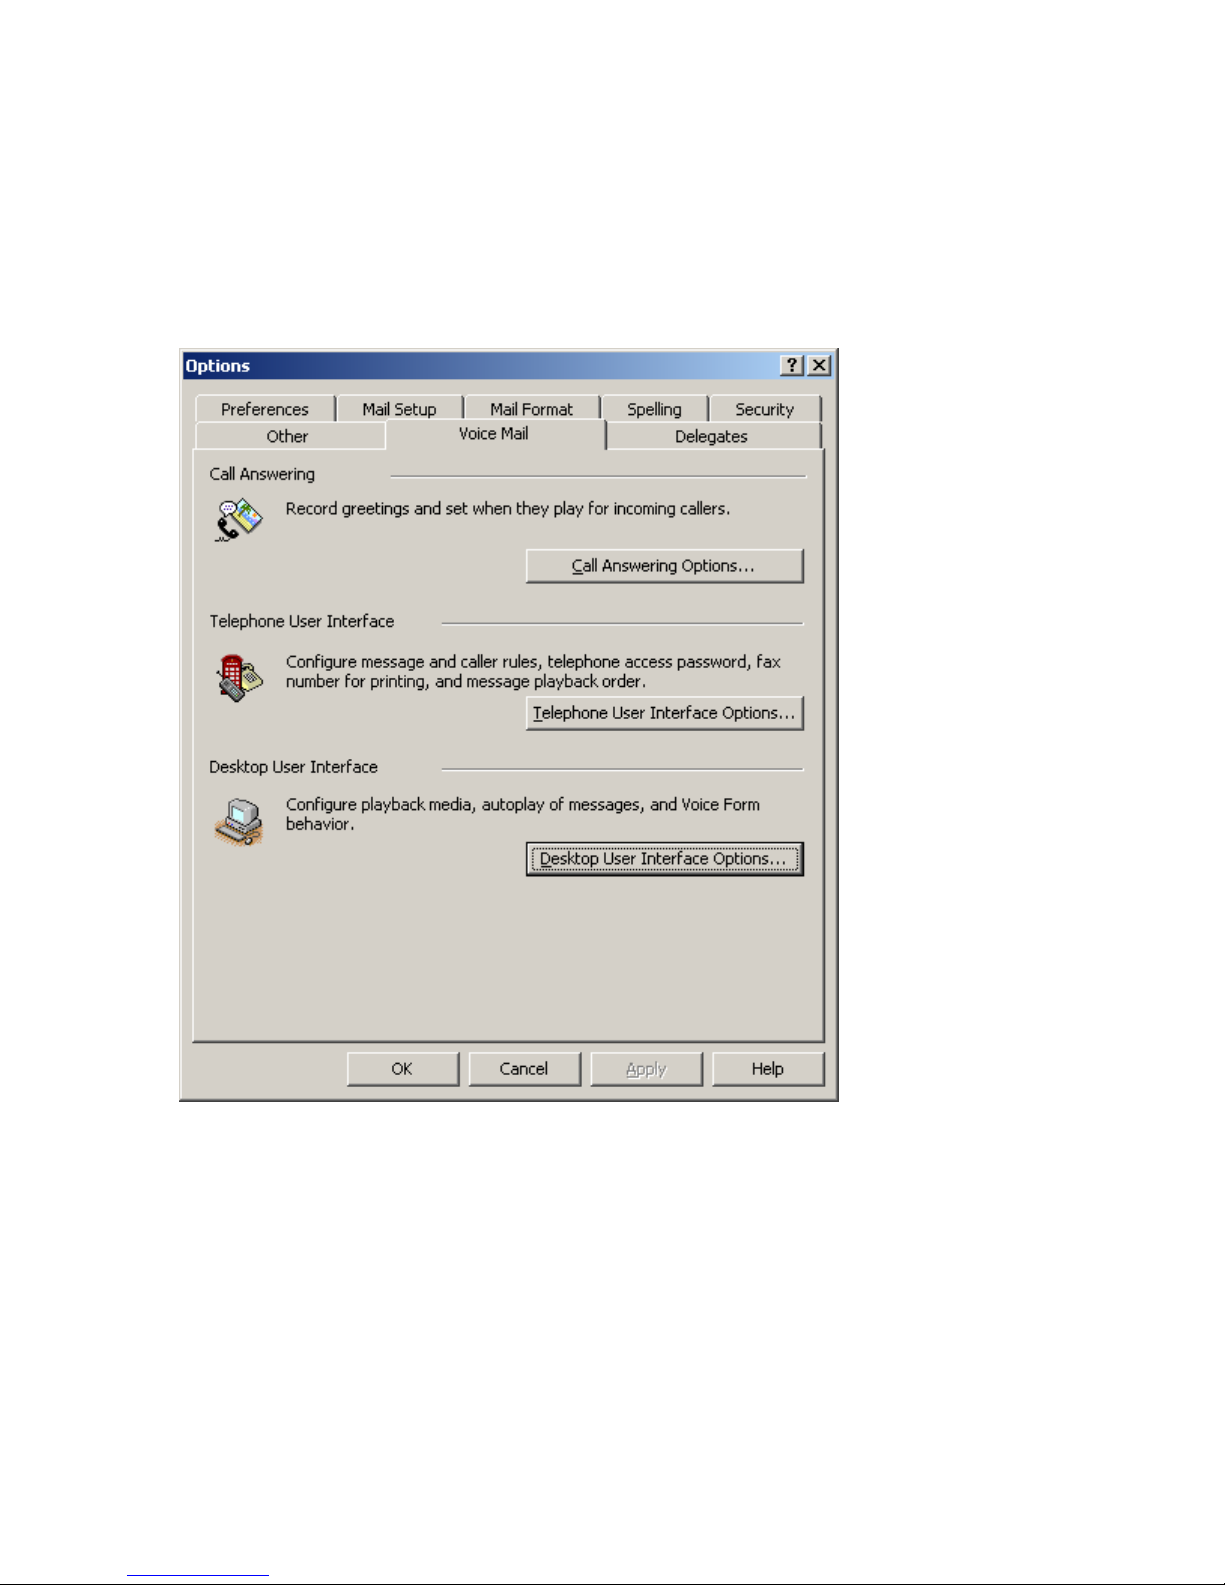
Receive the Window below.
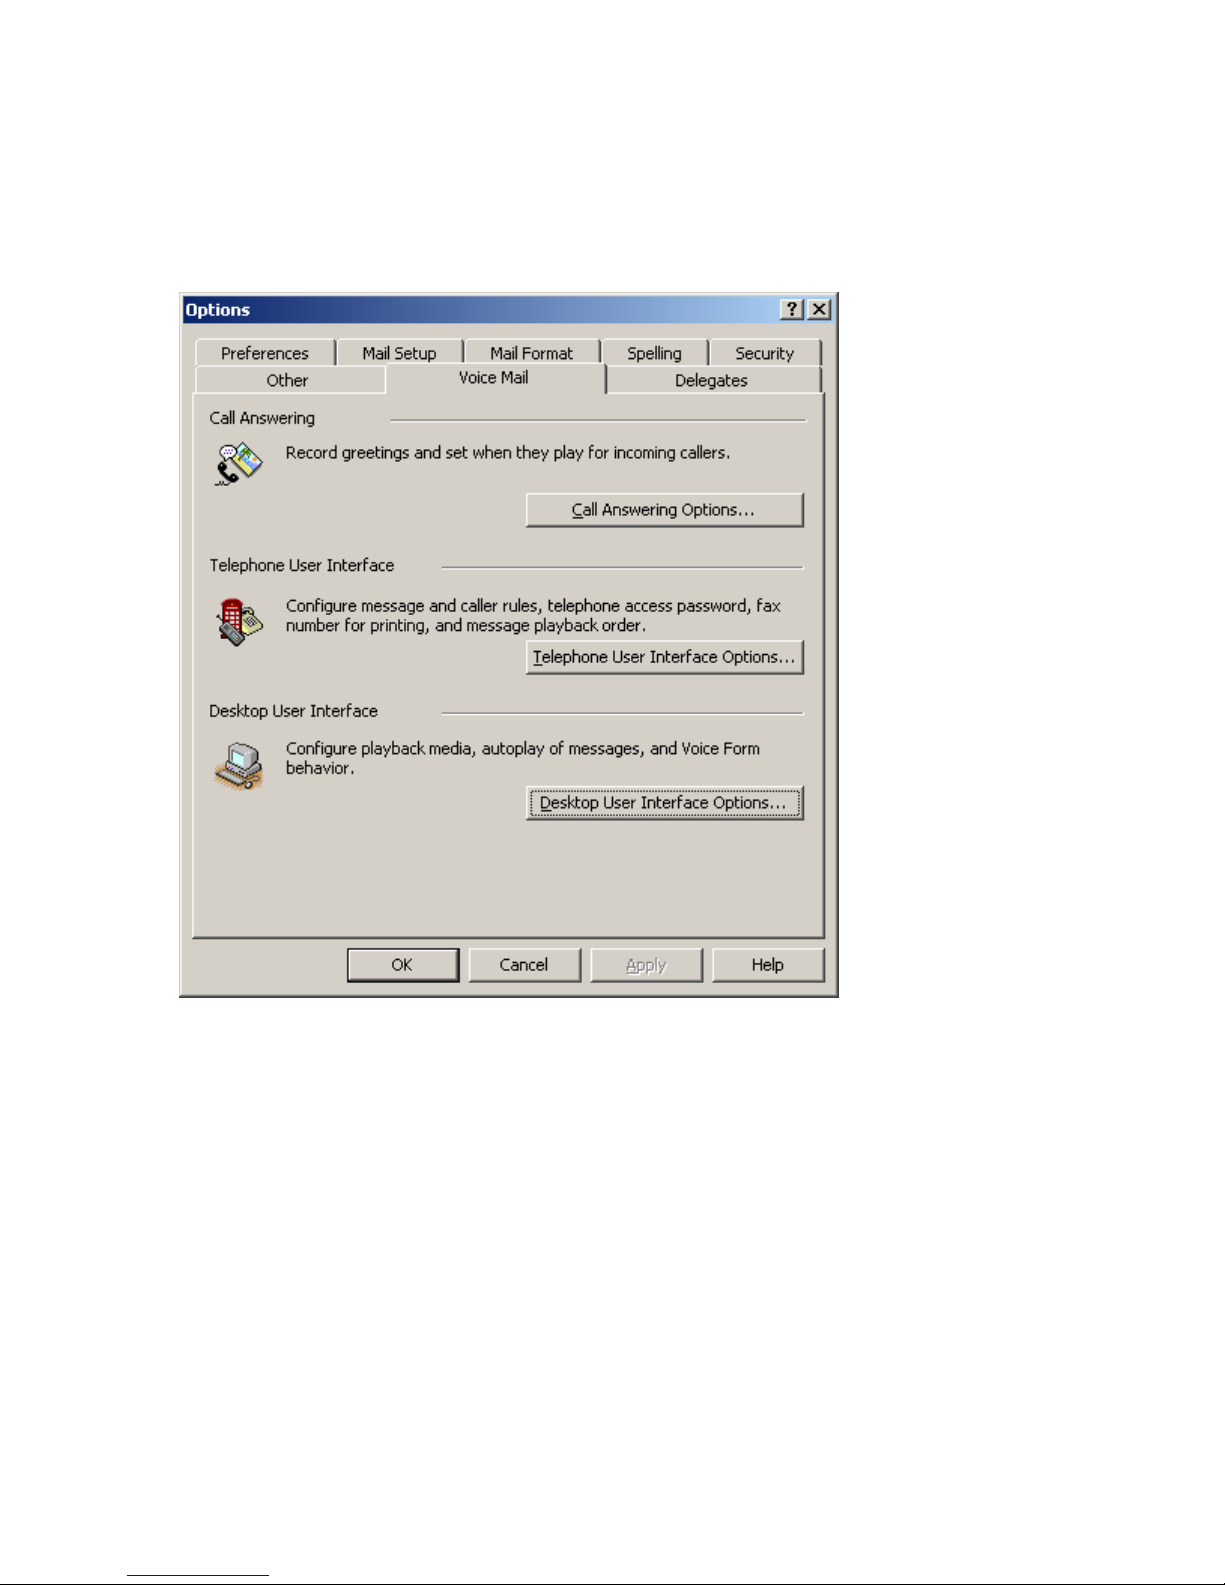
Under Desktop User Interface, select the Desktop User Interface Options button.
Revised 05/13/06– JTM © 2006 JTM Associates, Inc. ® Page 30 of 43
Page 31
TELEPHONE TIPS
A Quick Reference Guide for the Avaya MultiVantage Telephone System
46xx Model IP-Telephones
Voice Mail Message Playback – Configuring Speakers vs. Telephone: (continued)
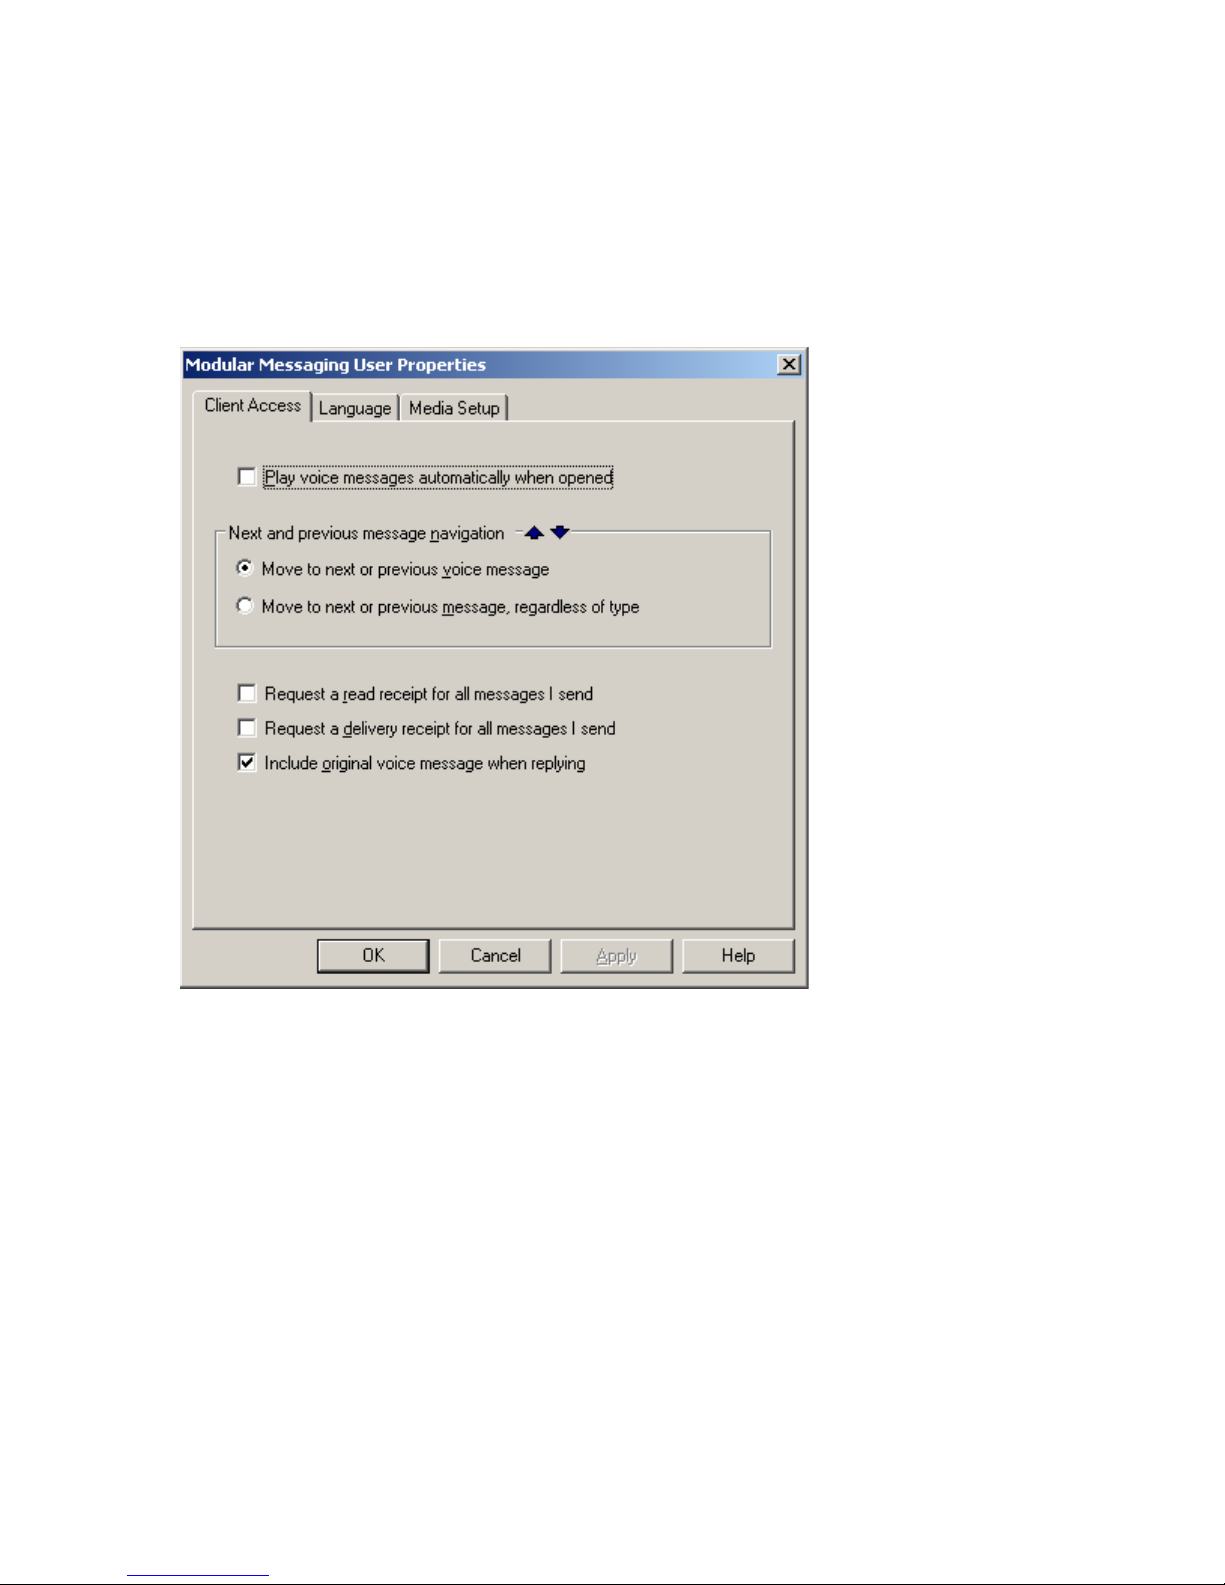
Receive the Window below.
Select the Media Setup tab at the top of the Properties window.
Revised 05/13/06– JTM © 2006 JTM Associates, Inc. ® Page 31 of 43
Page 32
TELEPHONE TIPS
A Quick Reference Guide for the Avaya MultiVantage Telephone System
46xx Model IP-Telephones
Voice Mail Message Playback – Configuring Speakers vs. Telephone: (continued)
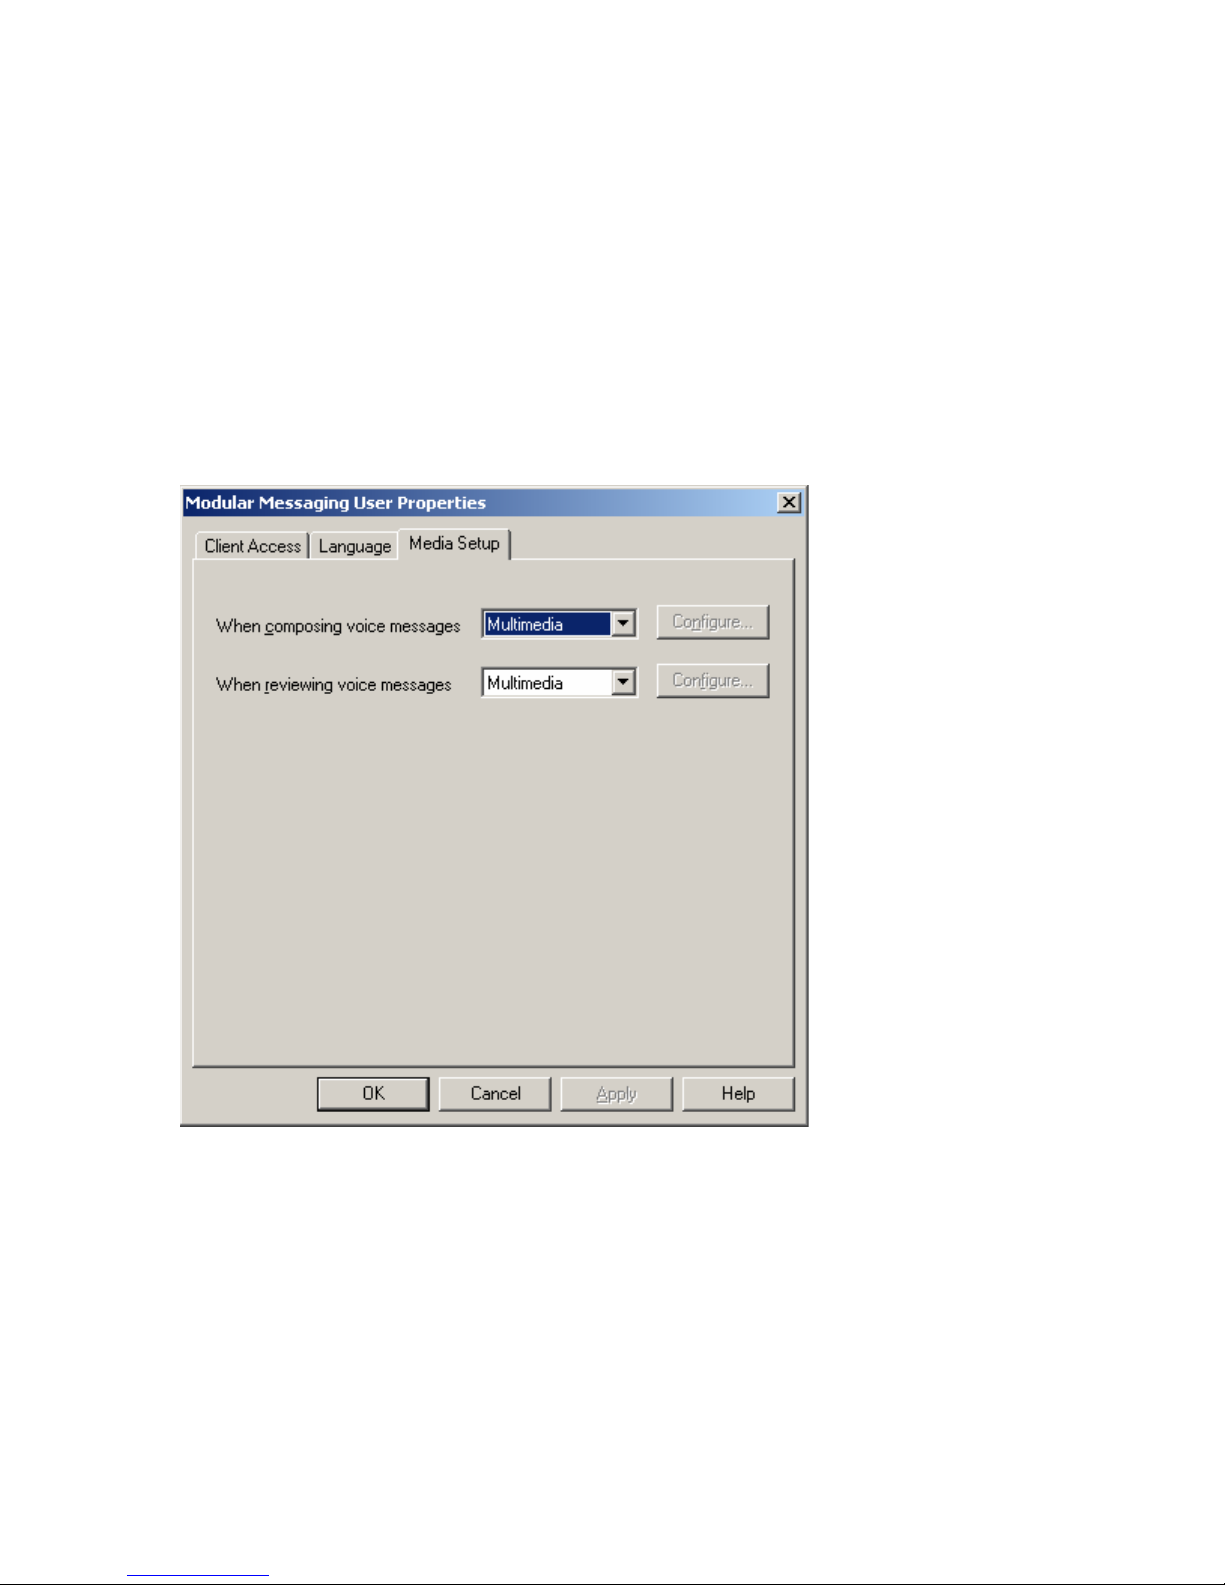
Receive the Window below.
If the list box shows Multimedia, your Outlook is configured to play voice mail over
your desktop/laptop speakers when you open the message.
If you either do not have speakers or do not wish to use them, you will need to configure
your Outlook to call you and play the voice mail messages through your telephone when
you open a message.
Revised 05/13/06– JTM © 2006 JTM Associates, Inc. ® Page 32 of 43
Page 33
TELEPHONE TIPS
A Quick Reference Guide for the Avaya MultiVantage Telephone System
46xx Model IP-Telephones
Voice Mail Message Playback – Configuring Speakers vs. Telephone: (continued)
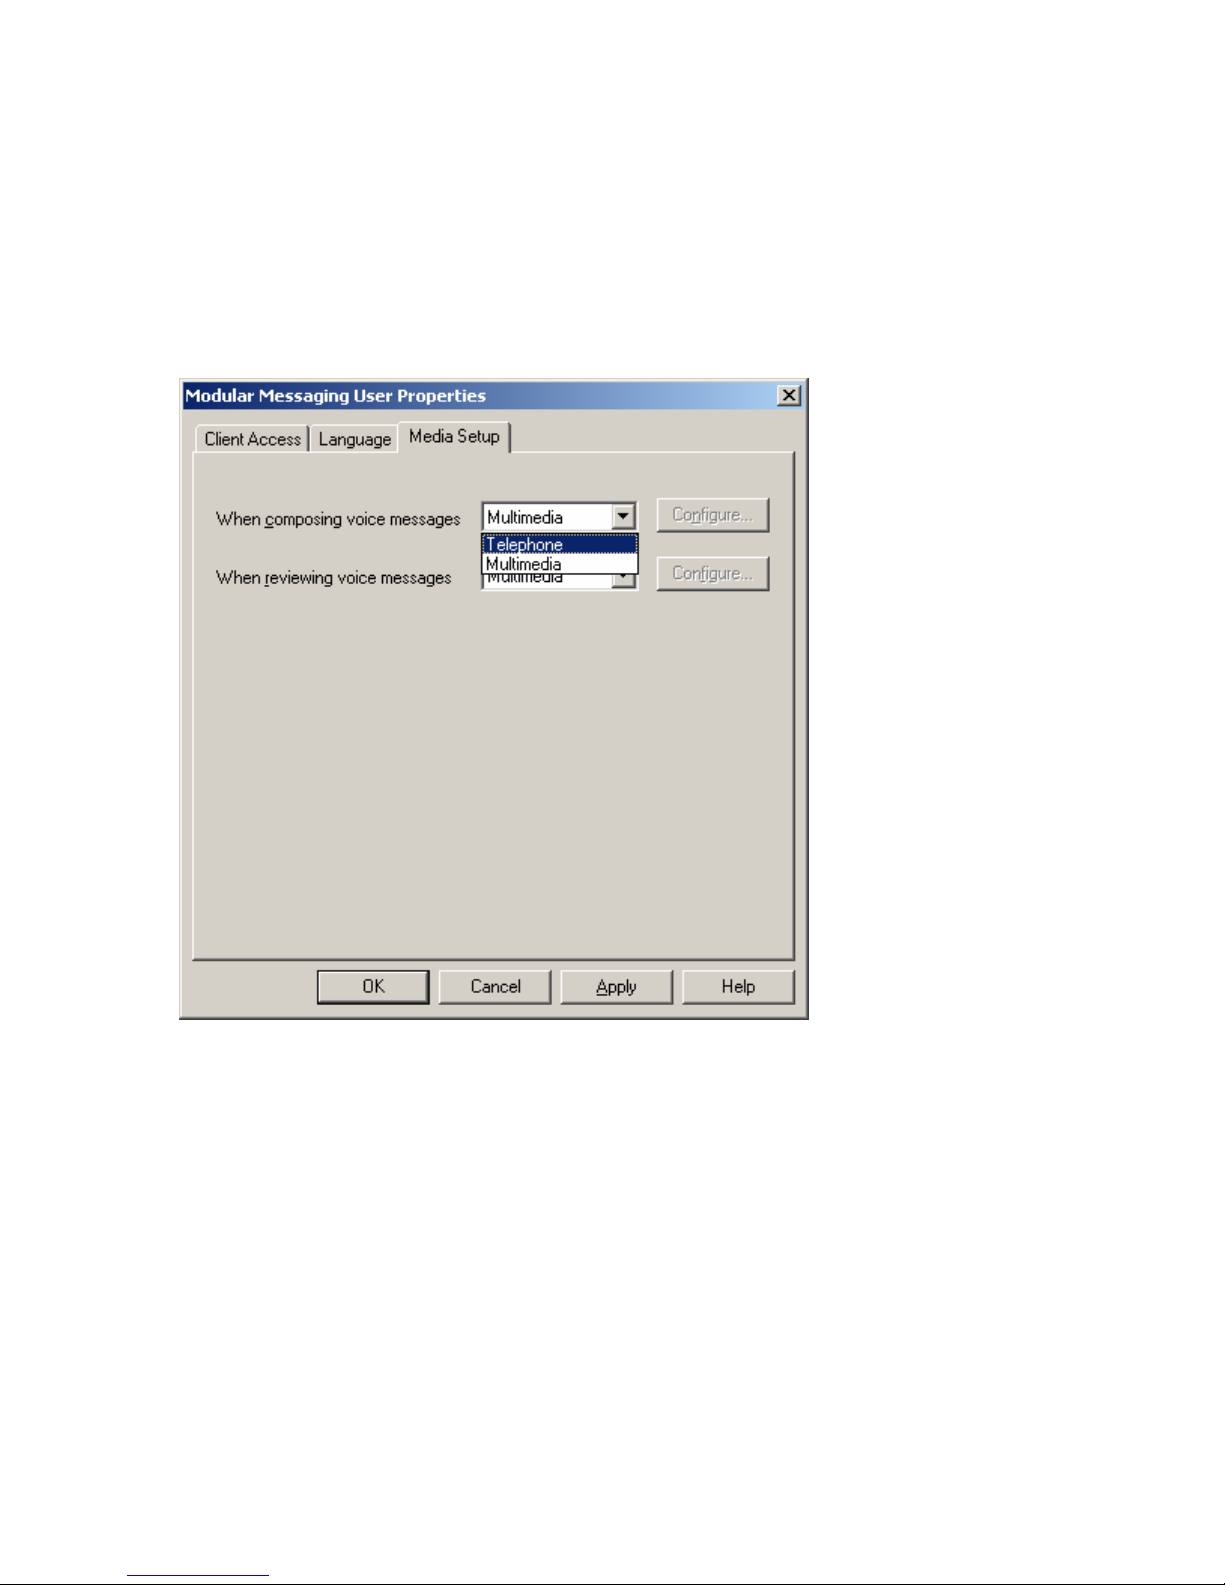
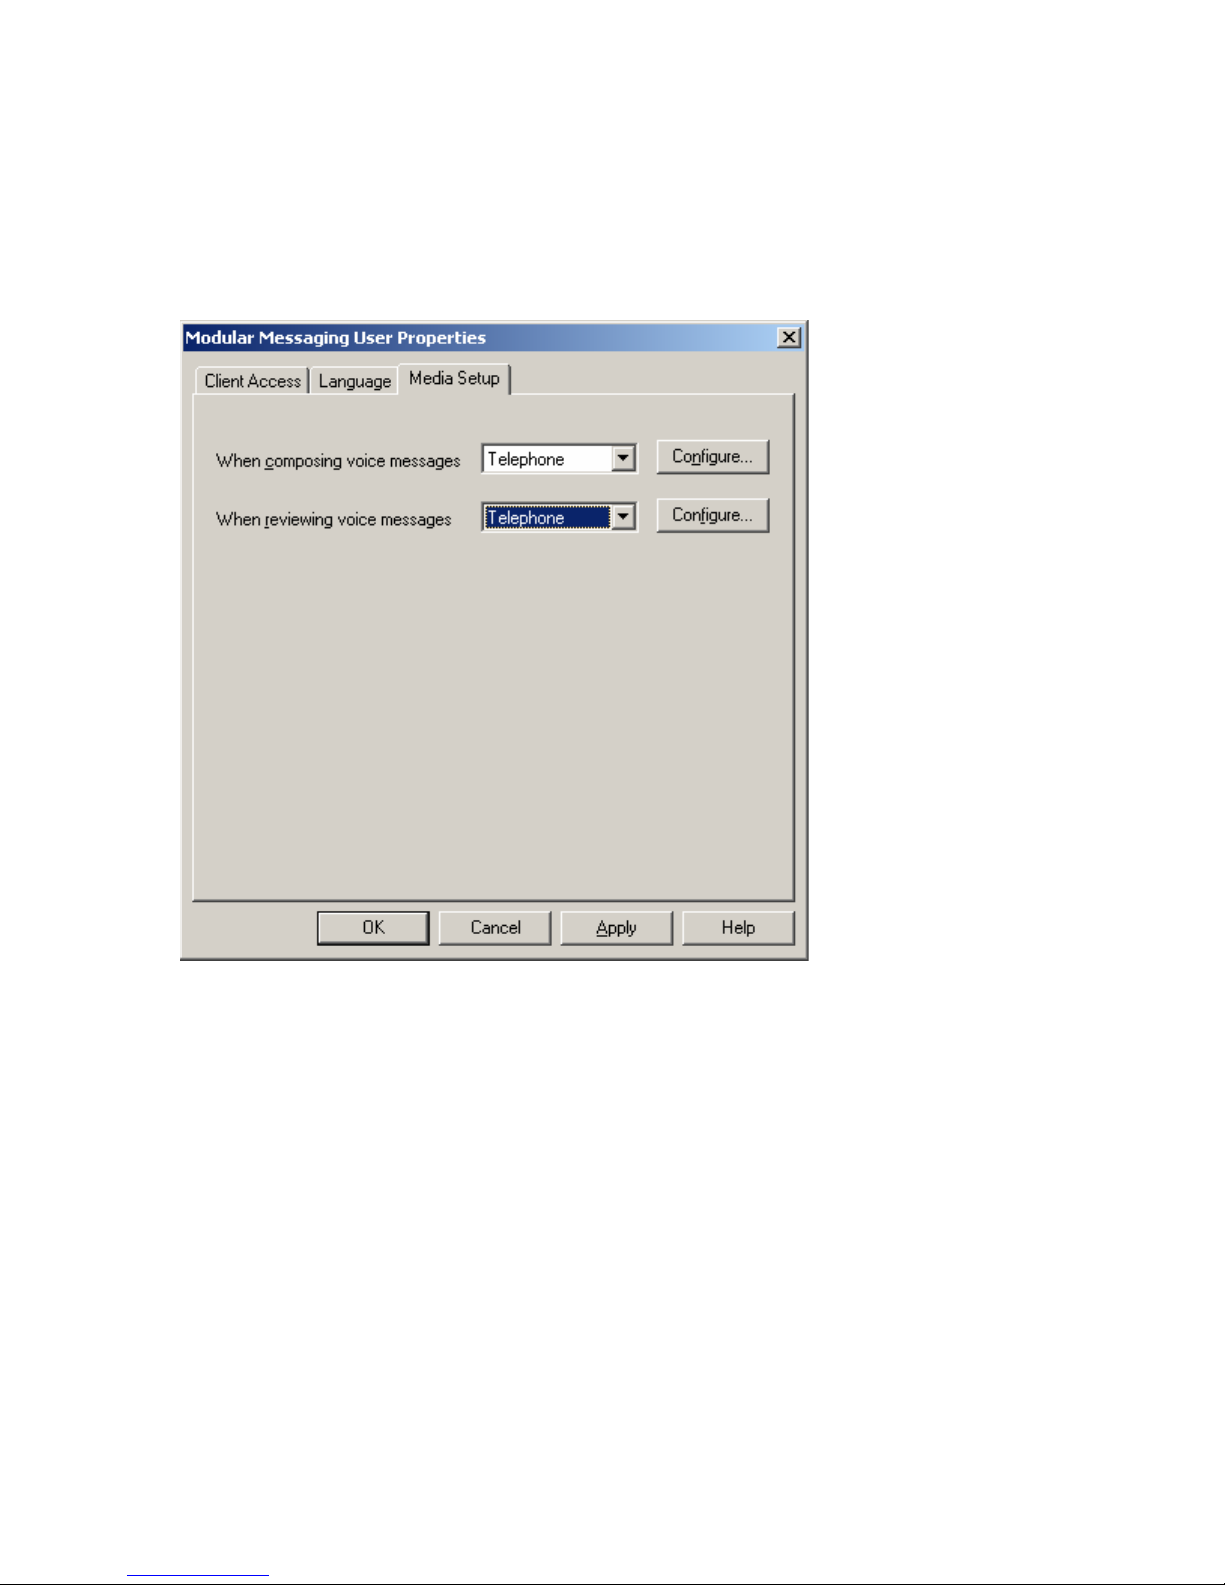
To play voice mail through your phone, click the list box and select Telephone as shown
below. You should do this for both conditions:
• When composing voice messages
• When reviewing voice messages
Revised 05/13/06– JTM © 2006 JTM Associates, Inc. ® Page 33 of 43
Page 34
TELEPHONE TIPS
A Quick Reference Guide for the Avaya MultiVantage Telephone System
46xx Model IP-Telephones
Voice Mail Message Playback – Configuring Speakers vs. Telephone: (continued)
After setting your Outlook to Telephone in both conditions, as shown below, click either
of the Configure buttons.
Revised 05/13/06– JTM © 2006 JTM Associates, Inc. ® Page 34 of 43
Page 35
TELEPHONE TIPS
A Quick Reference Guide for the Avaya MultiVantage Telephone System
46xx Model IP-Telephones
Voice Mail Message Playback – Configuring Speakers vs. Telephone: (continued)
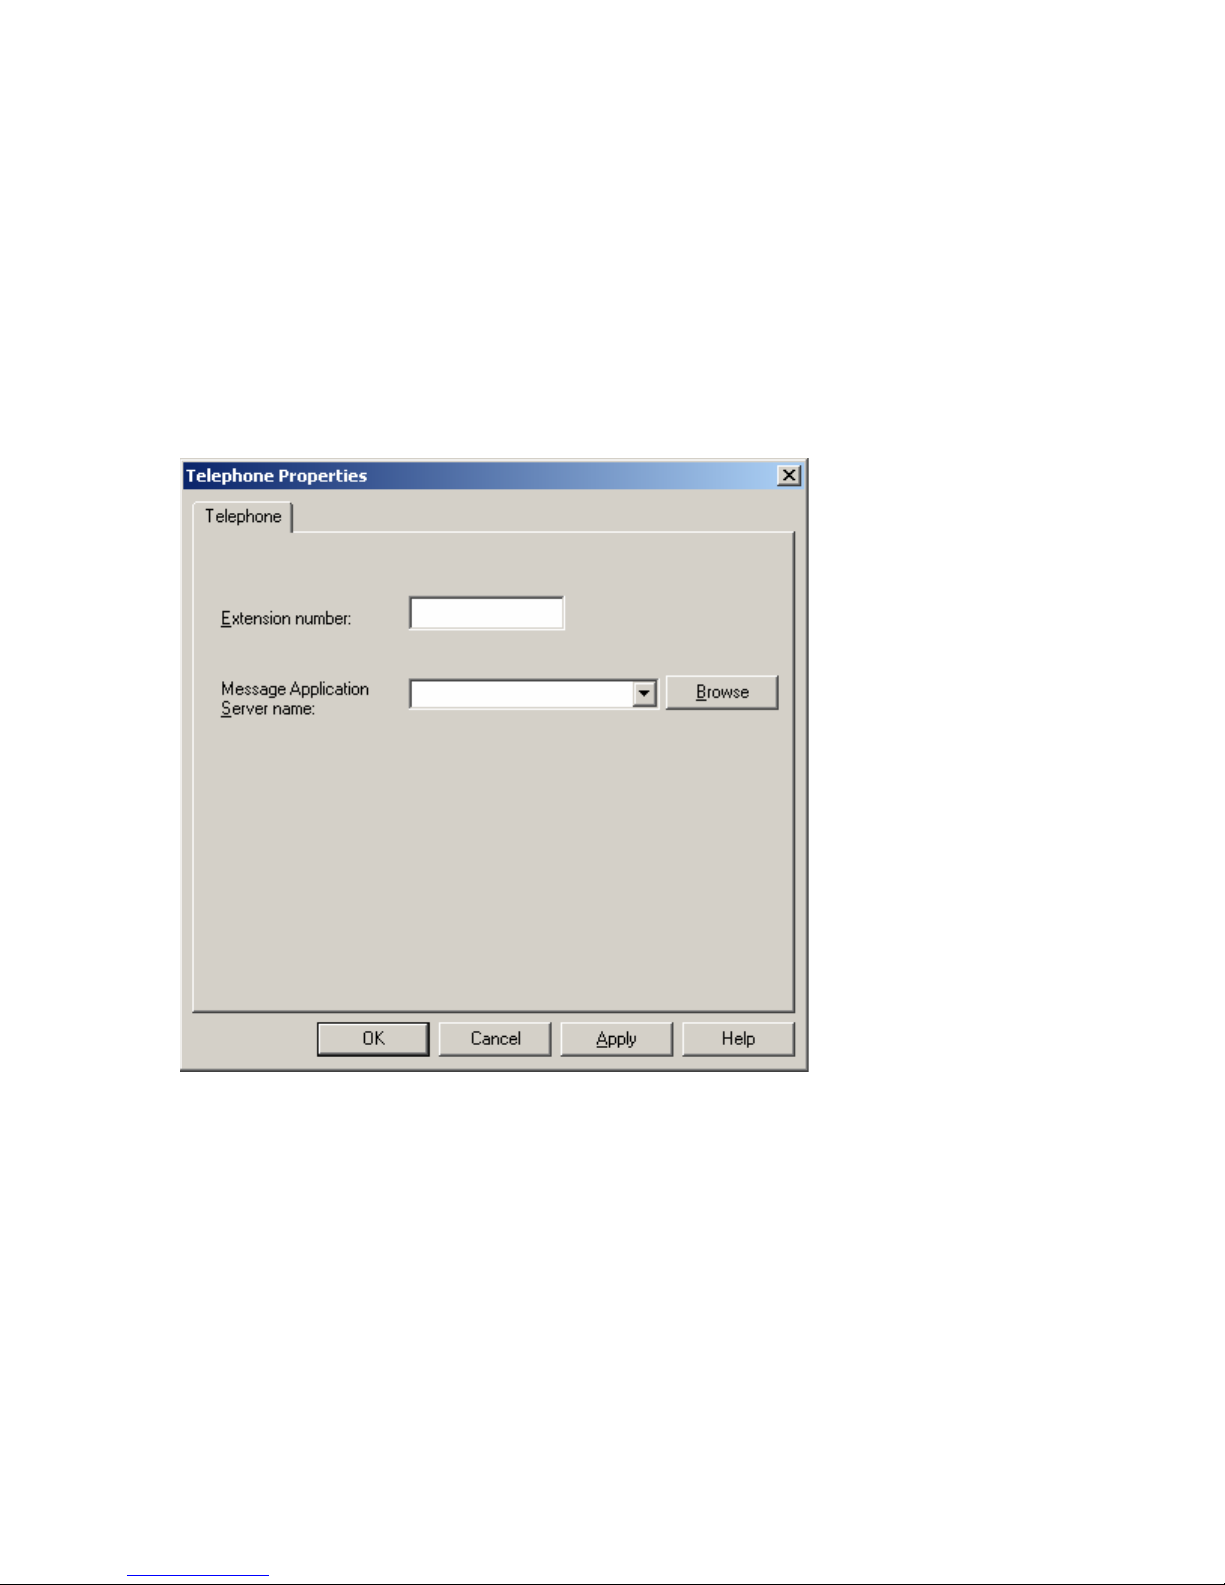
Enter your 4-digit telephone extension number in the Extension Number field. This is the
extension that the system will call to play voice mail messages to you. The system
should display the default “Message Application Server Name” for your office.
Click the Apply button, and then click the OK button.
Revised 05/13/06– JTM © 2006 JTM Associates, Inc. ® Page 35 of 43
Page 36
TELEPHONE TIPS
A Quick Reference Guide for the Avaya MultiVantage Telephone System
46xx Model IP-Telephones
Voice Mail Message Playback – Configuring Speakers vs. Telephone: (continued)
Close the Options window by clicking OK.
Revised 05/13/06– JTM © 2006 JTM Associates, Inc. ® Page 36 of 43
Page 37
TELEPHONE TIPS
A Quick Reference Guide for the Avaya MultiVantage Telephone System
46xx Model IP-Telephones
Voice Mail Message Playback – Interchanging Between Speaker/Telephone
Playback:
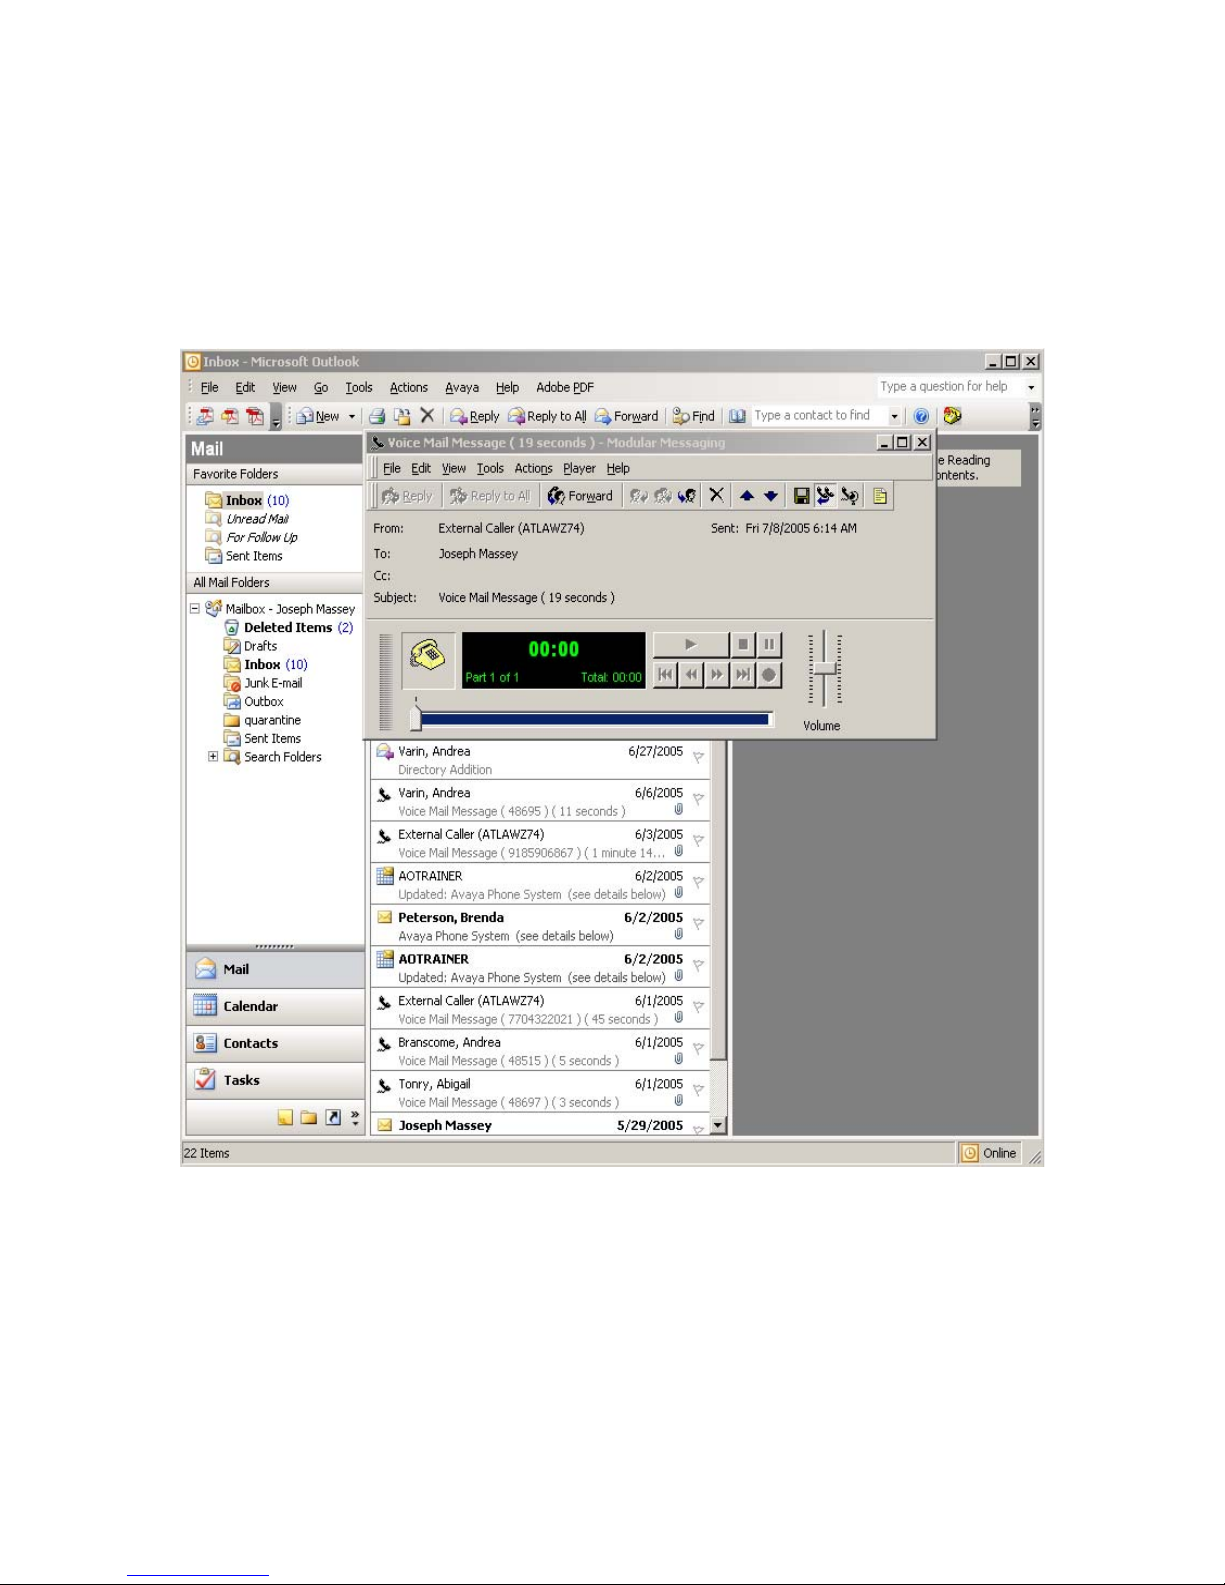
When you open a voice mail message in Outlook, the system will provide the Player
Window as shown below. In the lower left corner of the player, there will be an Icon that
either displays a Computer or a Telephone. The following picture shows the Computer
Icon.
Revised 05/13/06– JTM © 2006 JTM Associates, Inc. ® Page 37 of 43
Page 38
TELEPHONE TIPS
A Quick Reference Guide for the Avaya MultiVantage Telephone System
46xx Model IP-Telephones
Voice Mail Message Playback – Interchanging Between Speaker/Telephone
Playback: (continued)
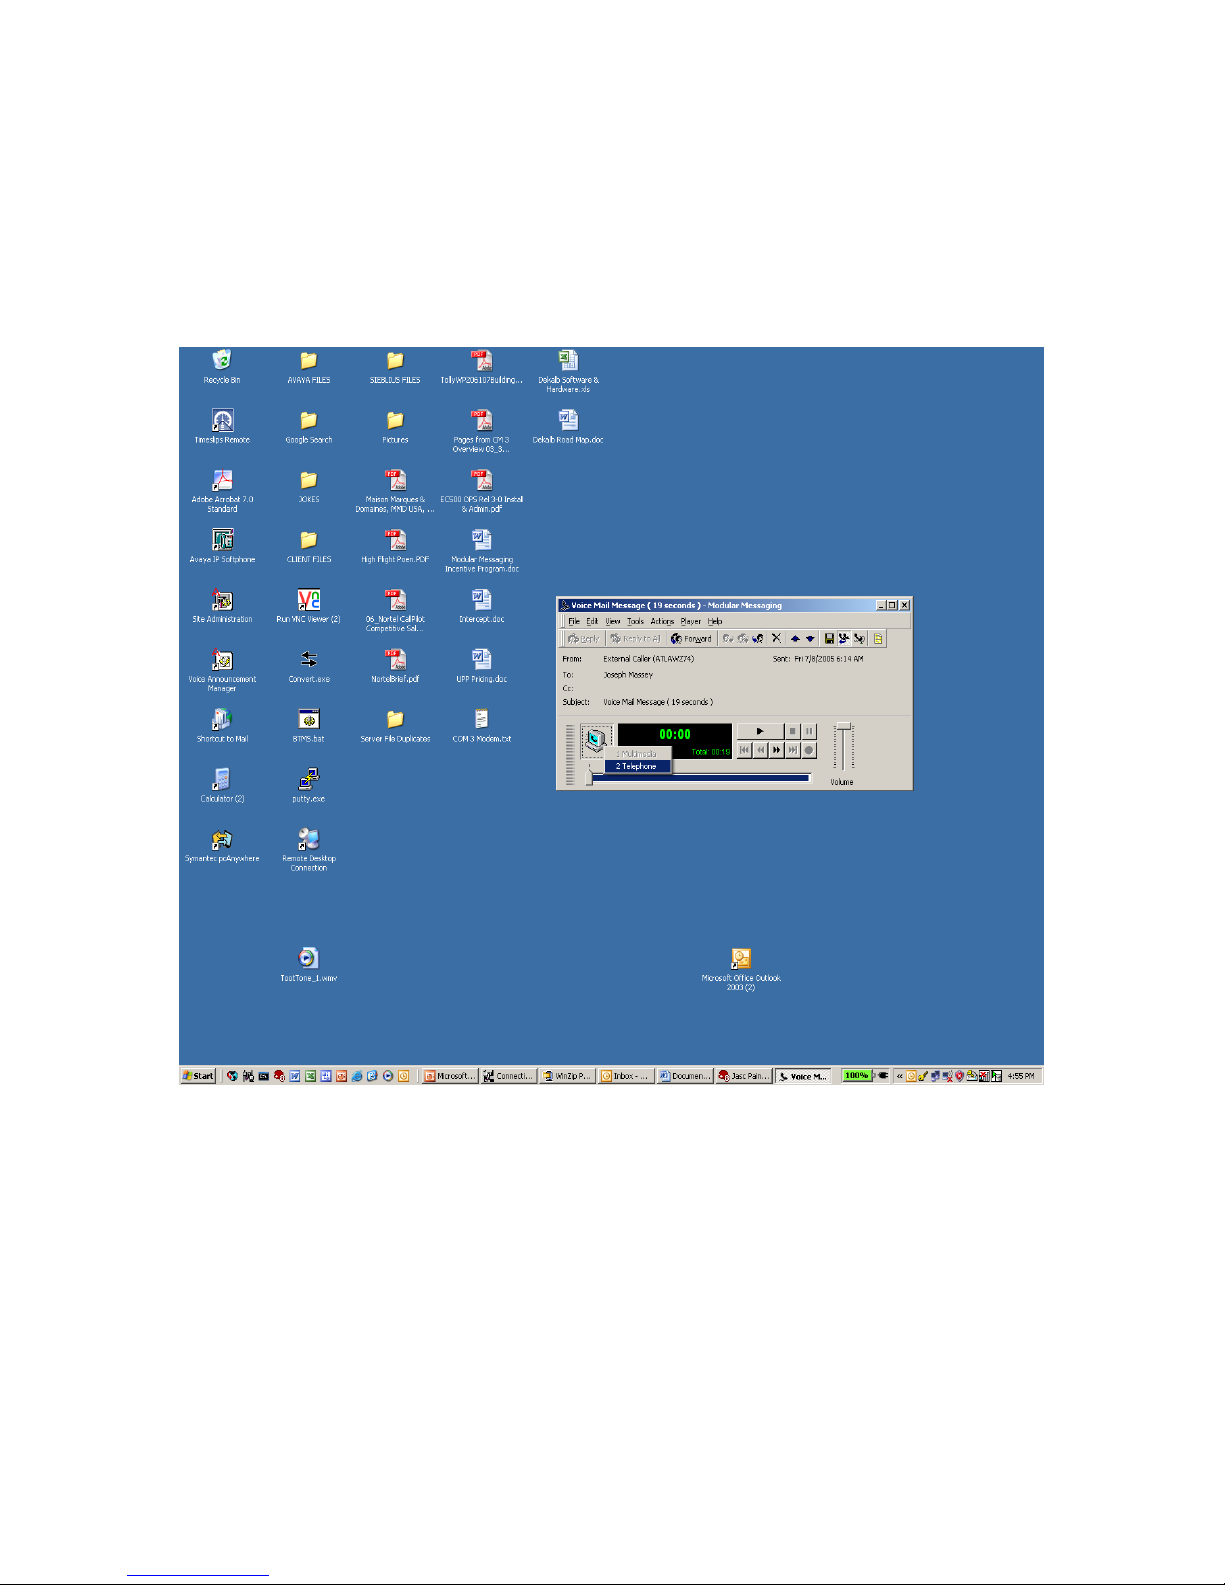
The picture below shows the Telephone Icon. If the Telephone Icon is displayed, the
system will play voice mail to you over the telephone when you open the message.
Revised 05/13/06– JTM © 2006 JTM Associates, Inc. ® Page 38 of 43
Page 39
TELEPHONE TIPS
A Quick Reference Guide for the Avaya MultiVantage Telephone System
46xx Model IP-Telephones
Voice Mail Message Playback – Interchanging Between Speaker/Telephone
Playback: (concluded)
To change the playback media from speakers to phone and vice versa, right click the
Computer/Phone Icon and select the alternative as shown below.
Revised 05/13/06– JTM © 2006 JTM Associates, Inc. ® Page 39 of 43
Page 40
TELEPHONE TIPS
A Quick Reference Guide for the Avaya MultiVantage Telephone System
46xx Model IP-Telephones
Voice Mail Message Playback – Scrolling the Messages on the Player:
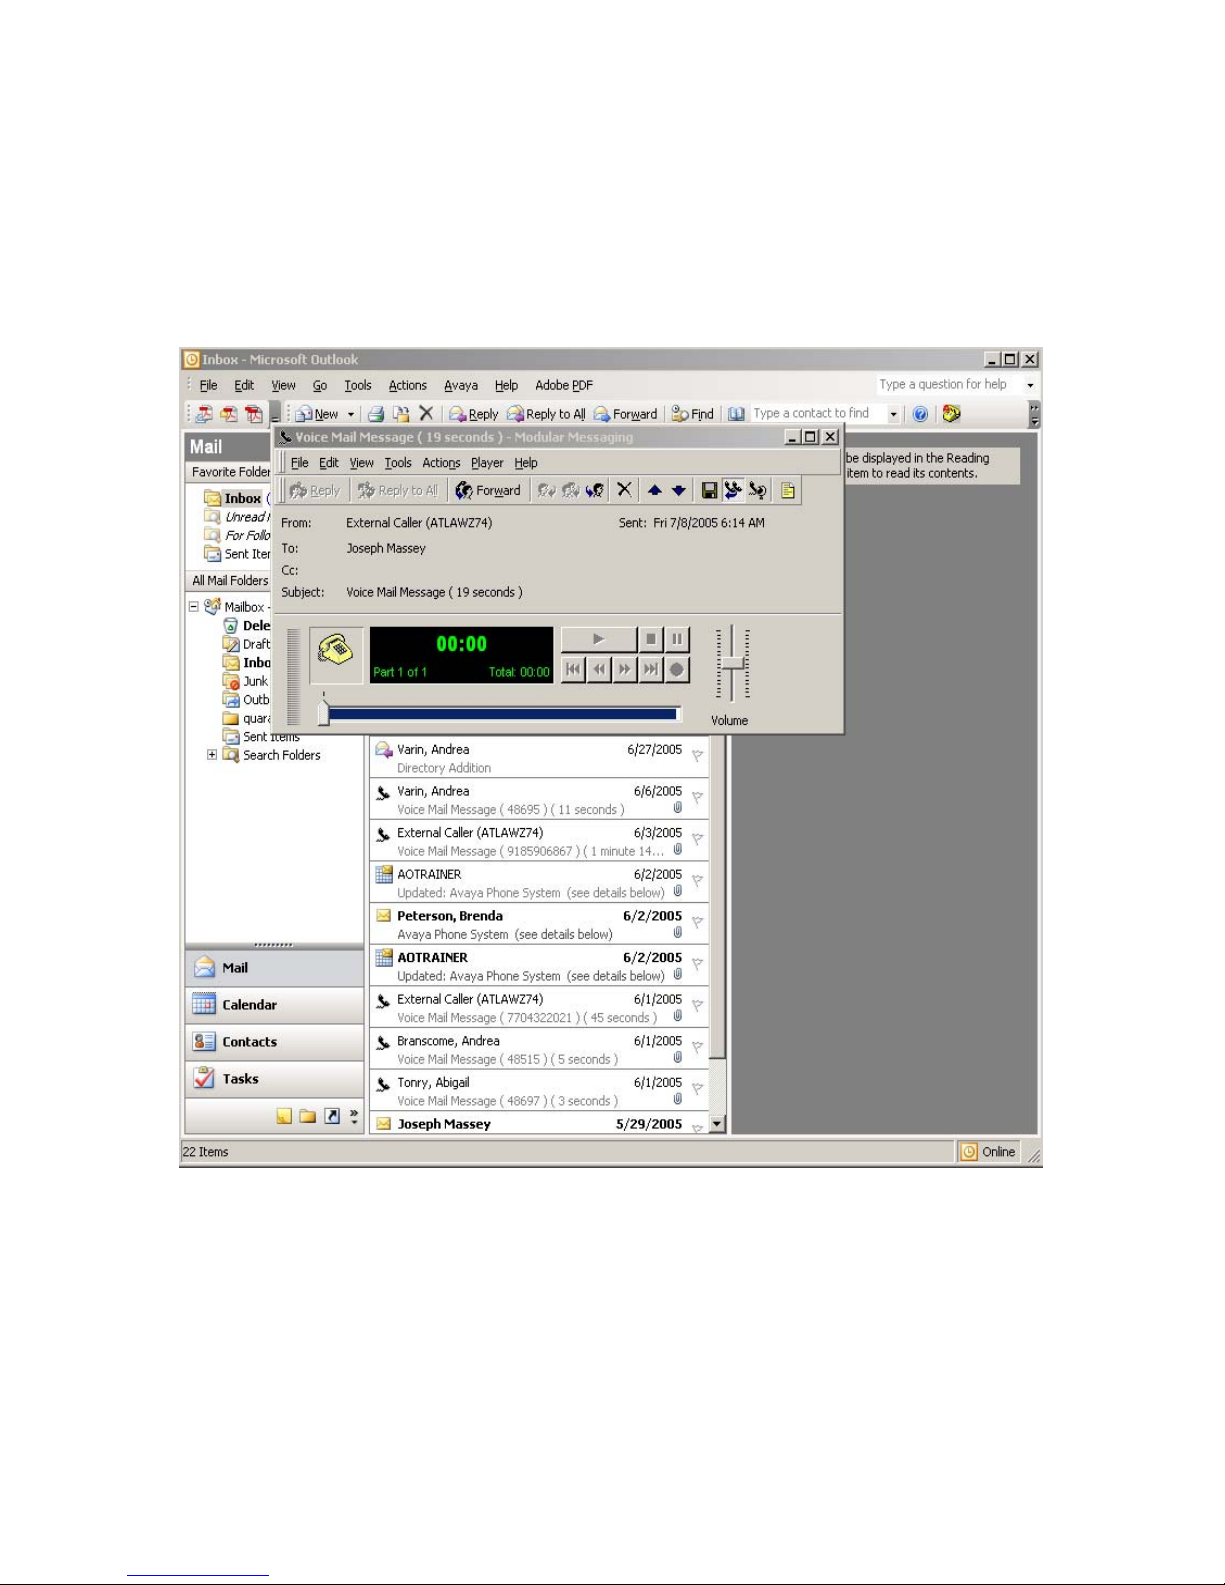
When listening to a series of voice mail, use the up/down arrows▲▼ in the player to
scroll to the next message. Otherwise, the system will place a separate call to you to play
each message.
Revised 05/13/06– JTM © 2006 JTM Associates, Inc. ® Page 40 of 43
Page 41

TELEPHONE TIPS
A Quick Reference Guide for the Avaya MultiVantage Telephone System
46xx Model IP-Telephones
Voice Mail Telephone User Interface (TUI) Summary:
When retrieving messages using the telephone rather than Outlook, the following notes
will help:
• When using the Telephone, the (#) moves you forward in the menu tree and (*)
moves you back.
• Commands:
o From Main Menu:
Press 1 to retrieve messages.
Press 2 to create and send messages.
Press 3 to search for messages.
Press 4 to change greetings and passwords.
o When Listening to Messages:
Press 7 to Erase/Delete.
Press 9 to save.
Press # to skip.
• Skip keeps the message as an unread message and keeps
the Message Waiting Lamp on. Use Erase/Delete (7) or
Save (9) to turn off the lamp.
Press 6 to forward the message.
Press 8 to reply.
Press 33 to go to end of message.
• You must be at the end of a message to delete a message.
The Red Lamp above the “AVAYA” logo on the Telephone is the Message Waiting
Lamp.
Voice Mail - Assistant Procedures:
To Transfer a Caller to a Mailbox number which is different from the telephone number
dialed by the calling party, e.g., caller dials Assistant’s number but wants someone else’s
voice mail:
• Depress TRANSFER ♦ Dial 3001 ♦ Enter Mailbox Number Desired ♦ Depress
TRANSFER.
To Transfer a Caller to the Mailbox of the called party, e.g., caller dials a co-worker and
Assistant answers the call:
• Depress TRANSFER ♦ Dial (#89) ♦ Depress TRANSFER.
Revised 05/13/06– JTM © 2006 JTM Associates, Inc. ® Page 41 of 43
Page 42
TELEPHONE TIPS
A Quick Reference Guide for the Avaya MultiVantage Telephone System
46xx Model IP-Telephones
IP-Softphone:
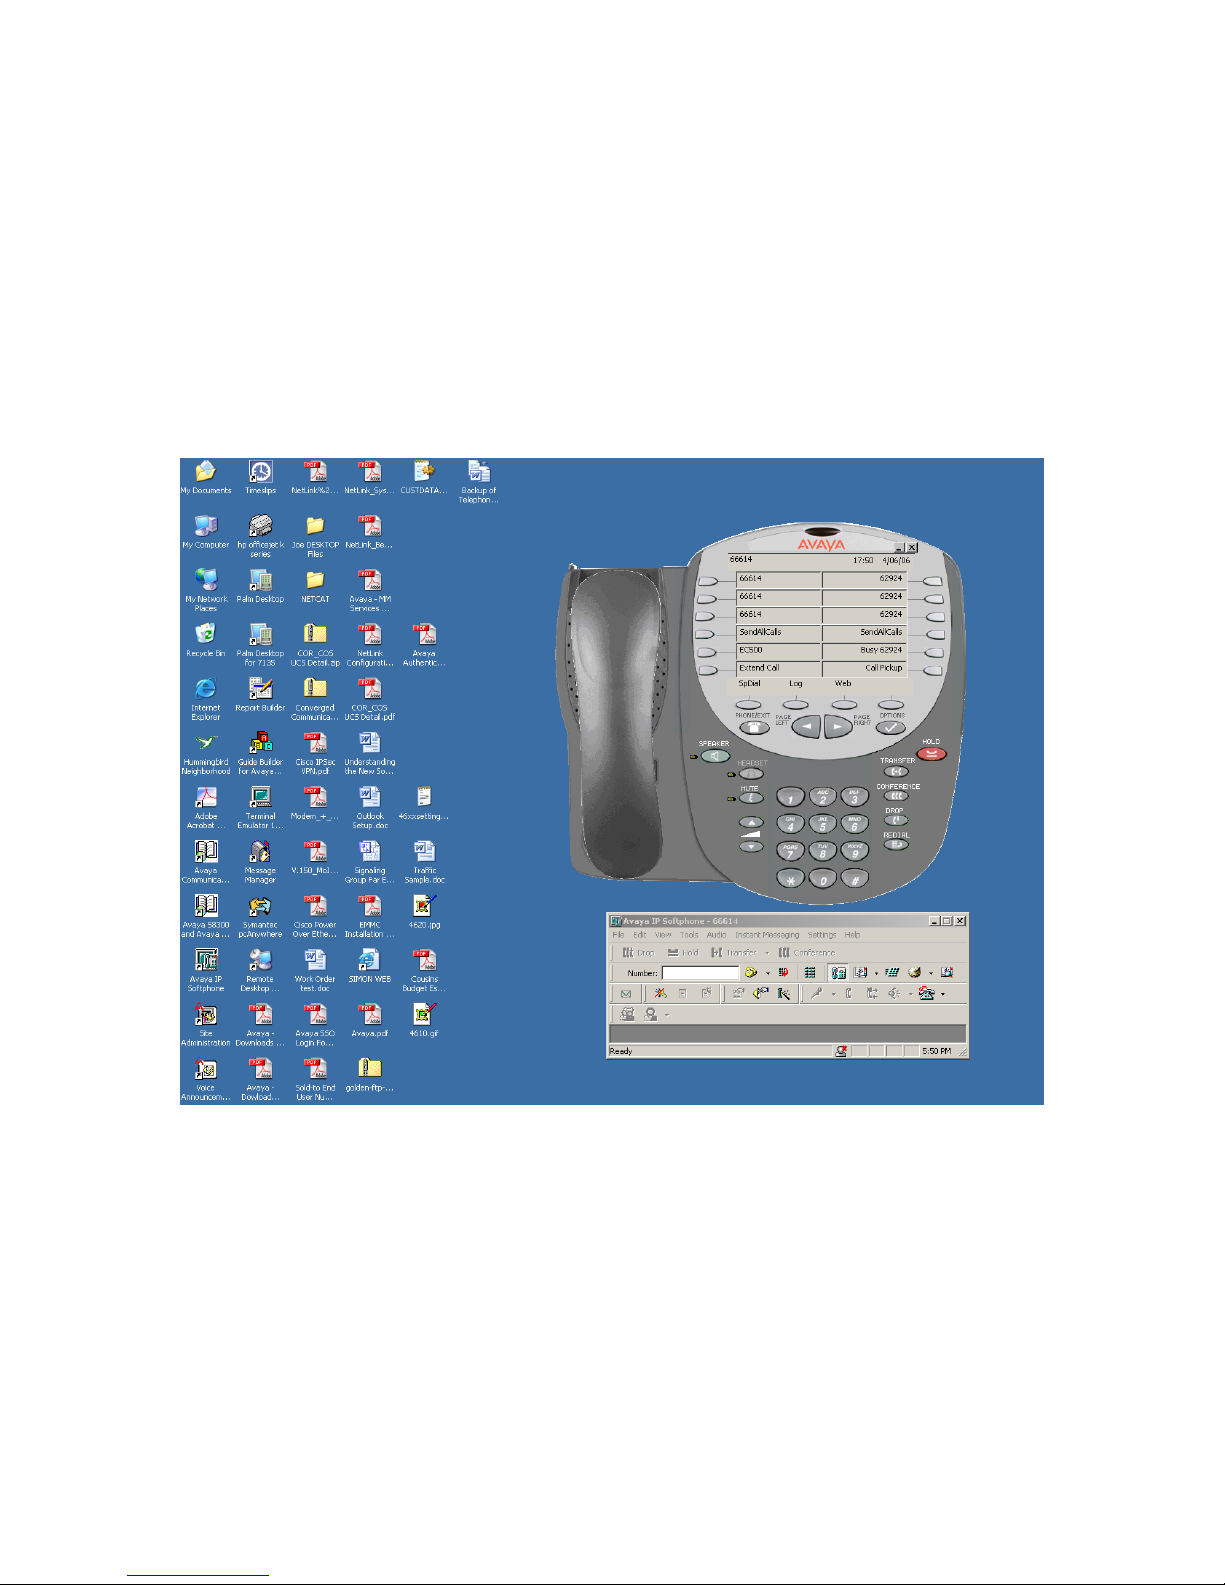
The Avaya system supports the ability to replicate your telephone on your PC using
Avaya IP-Softphone. This allows you to see displays of your telephone and control your
telephone from your PC. This also provides the ability to have your telephone displays
and controls when using your Laptop at home and to make and receive calls using your
office phone when at home or other location.
Revised 05/13/06– JTM © 2006 JTM Associates, Inc. ® Page 42 of 43
Page 43
TELEPHONE TIPS
A Quick Reference Guide for the Avaya MultiVantage Telephone System
46xx Model IP-Telephones
IP-Softphone: (concluded)
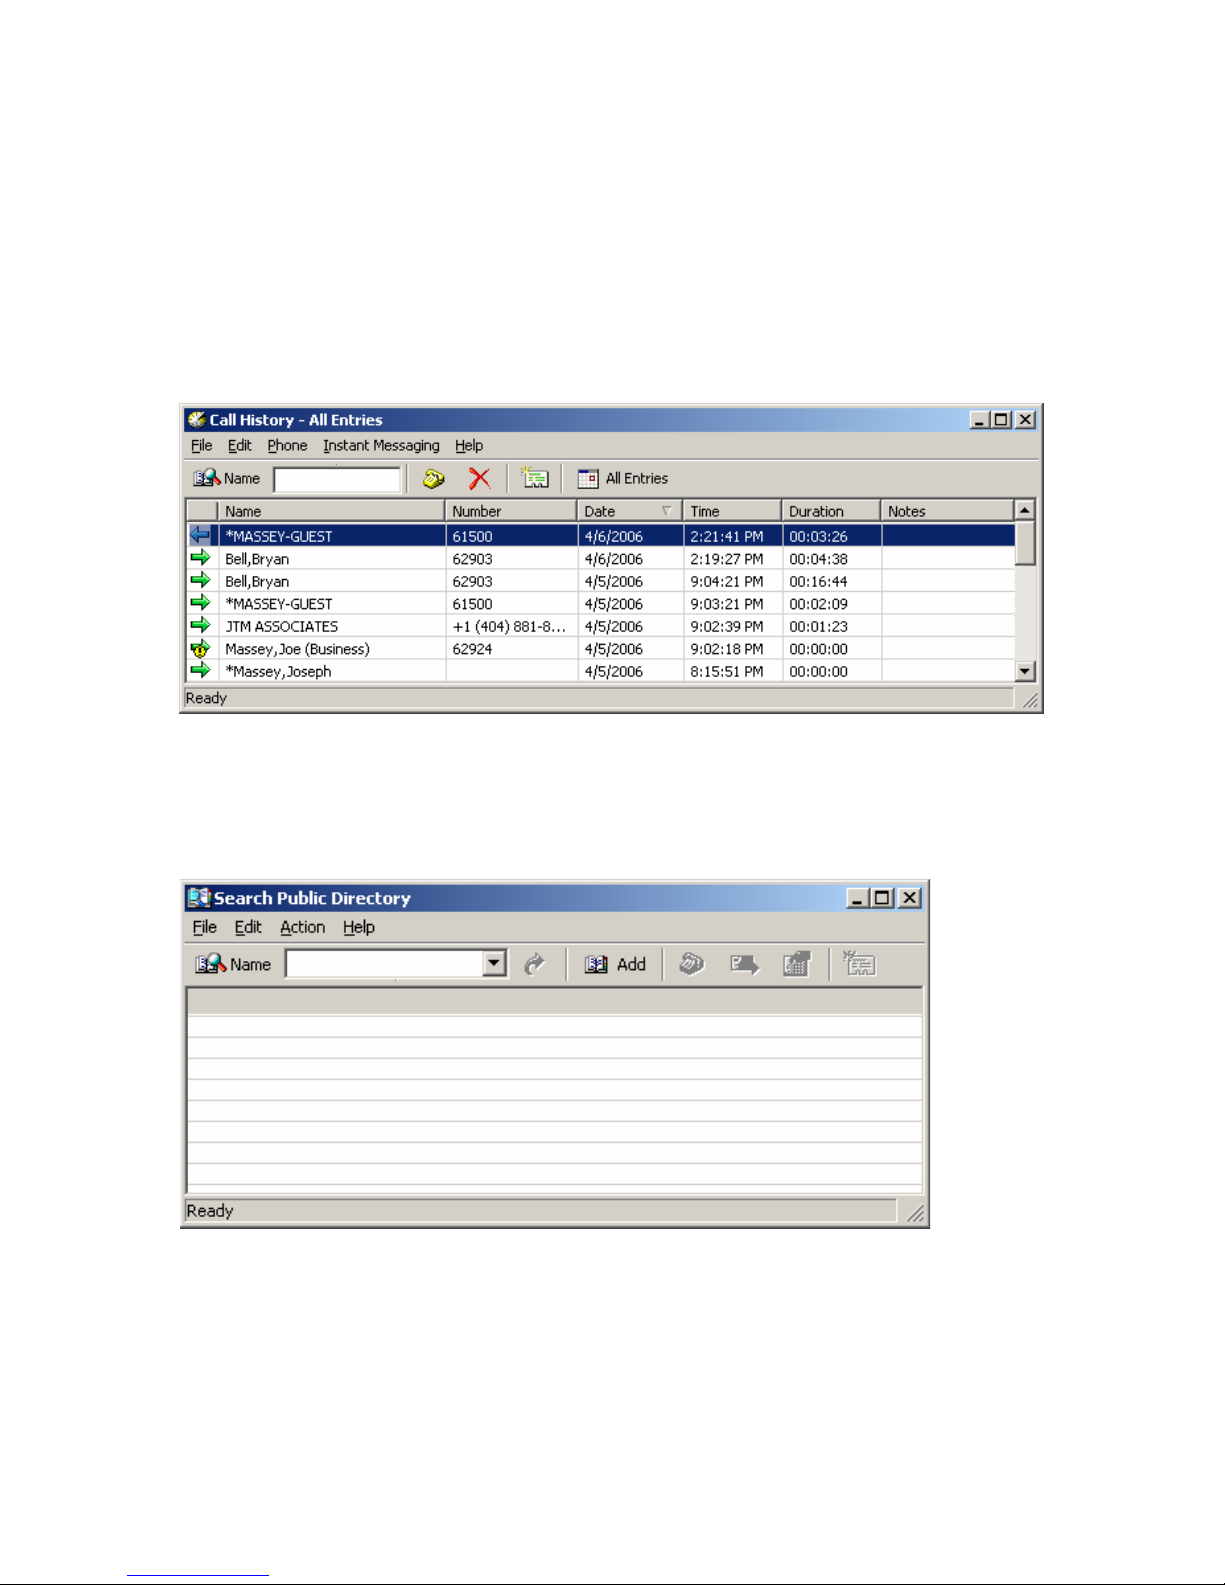
Call History:
You will receive instruction on how to use this application if you are provided the
application. The picture below shows the Call History/Log that is available that
automatically provides the duration of each call.
LDAP Directory Access:
Lightweight Directory Access Protocol (LDAP) provides the ability to access various
directory systems when using IP-Softphone.
Revised 05/13/06– JTM © 2006 JTM Associates, Inc. ® Page 43 of 43
 Loading...