

Avaya 3735 User Manual

Using Avaya 3735 DECT handsets
®
connected to Avaya Aura
Communication Manager and IP Office
Release 4.7.1
Issue 1
August 2019

©
2017-2019, Avaya Inc.
All Rights Reserved.
Note
Using a cell, mobile, or GSM phone, or a two-way radio in close
proximity to an Avaya DECT handset might cause interference.
Documentation disclaimer
“Documentation” means information published in varying mediums
which may include product information, operating instructions and
performance specifications that are generally made available to users
of products. Documentation does not include marketing materials.
Avaya shall not be responsible for any modifications, additions, or
deletions to the original published version of Documentation unless
such modifications, additions, or deletions were performed by or on
the express behalf of Avaya. End User agrees to indemnify and hold
harmless Avaya, Avaya's agents, servants and employees against all
claims, lawsuits, demands and judgments arising out of, or in
connection with, subsequent modifications, additions or deletions to
this documentation, to the extent made by End User.
Link disclaimer
Avaya is not responsible for the contents or reliability of any linked
websites referenced within this site or Documentation provided by
Avaya. Avaya is not responsible for the accuracy of any information,
statement or content provided on these sites and does not
necessarily endorse the products, services, or information described
or offered within them. Avaya does not guarantee that these links will
work all the time and has no control over the availability of the linked
pages.
Warranty
Avaya provides a limited warranty on Avaya hardware and software.
Refer to your sales agreement to establish the terms of the limited
warranty. In addition, Avaya’s standard warranty language, as well as
information regarding support for this product while under warranty is
available to Avaya customers and other parties through the Avaya
Support website:
https://support.avaya.com/helpcenter/
getGenericDetails?detailId=C20091120112456651010 under the link
“Warranty & Product Lifecycle” or such successor site as designated
by Avaya. Please note that if You acquired the product(s) from an
authorized Avaya Channel Partner outside of the United States and
Canada, the warranty is provided to You by said Avaya Channel
Partner and not by Avaya.
“Hosted Service” means an Avaya hosted service subscription that
You acquire from either Avaya or an authorized Avaya Channel
Partner (as applicable) and which is described further in Hosted SAS
or other service description documentation regarding the applicable
hosted service. If You purchase a Hosted Service subscription, the
foregoing limited warranty may not apply but You may be entitled to
support services in connection with the Hosted Service as described
further in your service description documents for the applicable
Hosted Service. Contact Avaya or Avaya Channel Partner (as
applicable) for more information.
Hosted Service
THE FOLLOWING APPLIES ONLY IF YOU PURCHASE AN AVAYA
HOSTED SERVICE SUBSCRIPTION FROM AVAYA OR AN AVAYA
CHANNEL PARTNER (AS APPLICABLE), THE TERMS OF USE
FOR HOSTED SERVICES ARE AVAILABLE ON THE AVAYA
WEBSITE,
HTTPS://SUPPORT.AVAYA.COM/LICENSEINFO UNDER
THE LINK “Avaya Terms of Use for Hosted Services” OR SUCH
SUCCESSOR SITE AS DESIGNATED BY AVAYA, AND ARE
APPLICABLE TO ANYONE WHO ACCESSES OR USES THE
HOSTED SERVICE. BY ACCESSING OR USING THE HOSTED
SERVICE, OR AUTHORIZING OTHERS TO DO SO, YOU, ON
BEHALF OF YOURSELF AND THE ENTITY FOR WHOM YOU ARE
DOING SO (HEREINAFTER REFERRED TO INTERCHANGEABLY
AS “YOU” AND “END USER”), AGREE TO THE TERMS OF USE. IF
YOU ARE ACCEPTING THE TERMS OF USE ON BEHALF A
COMPANY OR OTHER LEGAL ENTITY, YOU REPRESENT THAT
YOU HAVE THE AUTHORITY TO BIND SUCH ENTITY TO THESE
TERMS OF USE. IF YOU DO NOT HAVE SUCH AUTHORITY, OR IF
YOU DO NOT WISH TO ACCEPT THESE TERMS OF USE, YOU
MUST NOT ACCESS OR USE THE HOSTED SERVICE OR
AUTHORIZE ANYONE TO ACCESS OR USE THE HOSTED
SERVICE.
Licenses
THE SOFTWARE LICENSE TERMS AVAILABLE ON THE AVAYA
WEBSITE, HTTPS://SUPPORT.AVAYA.COM/LICENSEINFO,
UNDER THE LINK “AVAYA SOFTWARE LICENSE TERMS (Avaya
Products)” OR SUCH SUCCESSOR SITE AS DESIGNATED BY
AVAYA, ARE APPLICABLE TO ANYONE WHO DOWNLOADS,
USES AND/OR INSTALLS AVAYA SOFTWARE, PURCHASED
FROM AVAYA INC., ANY AVAYA AFFILIATE, OR AN AVAYA
CHANNEL PARTNER (AS APPLICABLE) UNDER A COMMERCIAL
AGREEMENT WITH AVAYA OR AN AVAYA CHANNEL PARTNER.
UNLESS OTHERWISE AGREED TO BY AVAYA IN WRITING,
AVAYA DOES NOT EXTEND THIS LICENSE IF THE SOFTWARE
WAS OBTAINED FROM ANYONE OTHER THAN AVAYA, AN AVAYA
AFFILIATE OR AN AVAYA CHANNEL PARTNER; AVAYA
RESERVES THE RIGHT TO TAKE LEGAL ACTION AGAINST YOU
AND ANYONE ELSE USING OR SELLING THE SOFTWARE
WITHOUT A LICENSE. BY INSTALLING, DOWNLOADING OR
USING THE SOFTWARE, OR AUTHORIZING OTHERS TO DO SO,
YOU, ON BEHALF OF YOURSELF AND THE ENTITY FOR WHOM
YOU ARE INSTALLING, DOWNLOADING OR USING THE
SOFTWARE (HEREINAFTER REFERRED TO
INTERCHANGEABLY AS “YOU” AND “END USER”), AGREE TO
THESE TERMS AND CONDITIONS AND CREATE A BINDING
CONTRACT BETWEEN YOU AND AVAYA INC. OR THE
APPLICABLE AVAYA AFFILIATE (“AVAYA”).
Avaya grants You a license within the scope of the license types
described below, with the exception of Heritage Nortel Software, for
which the scope of the license is detailed below. Where the order
documentation does not expressly identify a license type, the
applicable license will be a Designated System License as set forth
below in the Designated System(s) License (DS) section as
applicable. The applicable number of licenses and units of capacity
for which the license is granted will be one (1), unless a different
number of licenses or units of capacity is specified in the
documentation or other materials available to You. “Software” means
computer programs in object code, provided by Avaya or an Avaya
Channel Partner, whether as stand-alone products, pre-installed on
hardware products, and any upgrades, updates, patches, bug fixes,
or modified versions thereto. “Designated Processor” means a single
stand-alone computing device. “Server” means a set of Designated
Processors that hosts (physically or virtually) a software application
to be accessed by multiple users. “Instance” means a single copy of
the Software executing at a particular time: (i) on one physical
machine; or (ii) on one deployed software virtual machine (“VM”) or
similar deployment.
License types
Designated System(s) License (DS). End User may install and use
each copy or an Instance of the Software only: 1) on a number of
Designated Processors up to the number indicated in the order; or 2)
up to the number of Instances of the Software as indicated in the
order, Documentation, or as authorized by Avaya in writing. Avaya
may require the Designated Processor(s) to be identified in the order
by type, serial number, feature key, Instance, location or other
specific designation, or to be provided by End User to Avaya through
electronic means established by Avaya specifically for this purpose.
Shrinkwrap License (SR). You may install and use the Software in
accordance with the terms and conditions of the applicable license
agreements, such as “shrinkwrap” or “clickthrough” license
accompanying or applicable to the Software (“Shrinkwrap License”).
Heritage Nortel Software
“Heritage Nortel Software” means the software that was acquired by
Avaya as part of its purchase of the Nortel Enterprise Solutions
Business in December 2009. The Heritage Nortel Software is the
software contained within the list of Heritage Nortel Products located
https://support.avaya.com/LicenseInfo under the link “Heritage
at
Nortel Products” or such successor site as designated by Avaya. For
Heritage Nortel Software, Avaya grants Customer a license to use
Heritage Nortel Software provided hereunder solely to the extent of
the authorized activation or authorized usage level, solely for the
purpose specified in the Documentation, and solely as embedded in,
for execution on, or for communication with Avaya equipment.
Charges for Heritage Nortel Software may be based on extent of
activation or use authorized as specified in an order or invoice.

Copyright
Except where expressly stated otherwise, no use should be made of
materials on this site, the Documentation, Software, Hosted Service,
or hardware provided by Avaya. All content on this site, the
documentation, Hosted Service, and the product provided by Avaya
including the selection, arrangement and design of the content is
owned either by Avaya or its licensors and is protected by copyright
and other intellectual property laws including the sui generis rights
relating to the protection of databases. You may not modify, copy,
reproduce, republish, upload, post, transmit or distribute in any way
any content, in whole or in part, including any code and software
unless expressly authorized by Avaya. Unauthorized reproduction,
transmission, dissemination, storage, and or use without the express
written consent of Avaya can be a criminal, as well as a civil offense
under the applicable law.
Virtualization
The following applies if the product is deployed on a virtual machine.
Each product has its own ordering code and license types. Unless
otherwise stated, each Instance of a product must be separately
licensed and ordered. For example, if the end user customer or
Avaya Channel Partner would like to install two Instances of the
same type of products, then two products of that type must be
ordered.
Third Party Components
“Third Party Components” mean certain software programs or
portions thereof included in the Software or Hosted Service may
contain software (including open source software) distributed under
third party agreements (“Third Party Components”), which contain
terms regarding the rights to use certain portions of the Software
(“Third Party Terms”). As required, information regarding distributed
Linux OS source code (for those products that have distributed Linux
OS source code) and identifying the copyright holders of the Third
Party Components and the Third Party Terms that apply is available
in the products, Documentation or on Avaya’s website at:
support.avaya.com/Copyright or such successor site as designated
by Avaya. The open source software license terms provided as Third
Party Terms are consistent with the license rights granted in these
Software License Terms, and may contain additional rights benefiting
You, such as modification and distribution of the open source
software. The Third Party Terms shall take precedence over these
Software License Terms, solely with respect to the applicable Third
Party Components to the extent that these Software License Terms
impose greater restrictions on You than the applicable Third Party
Terms.
The following applies only if the H.264 (AVC) codec is distributed with
the product. THIS PRODUCT IS LICENSED UNDER THE AVC
PATENT PORTFOLIO LICENSE FOR THE PERSONAL USE OF A
CONSUMER OR OTHER USES IN WHICH IT DOES NOT RECEIVE
REMUNERATION TO (i) ENCODE VIDEO IN COMPLIANCE WITH
THE AVC STANDARD (“AVC VIDEO”) AND/OR (ii) DECODE AVC
VIDEO THAT WAS ENCODED BY A CONSUMER ENGAGED IN A
PERSONAL ACTIVITY AND/OR WAS OBTAINED FROM A VIDEO
PROVIDER LICENSED TO PROVIDE AVC VIDEO. NO LICENSE IS
GRANTED OR SHALL BE IMPLIED FOR ANY OTHER USE.
ADDITIONAL INFORMATION MAY BE OBTAINED FROM MPEG LA,
L.L.C. SEE
Service Provider
THE FOLLOWING APPLIES TO AVAYA CHANNEL PARTNER’S
HOSTING OF AVAYA PRODUCTS OR SERVICES. THE PRODUCT
OR HOSTED SERVICE MAY USE THIRD PARTY COMPONENTS
SUBJECT TO THIRD PARTY TERMS AND REQUIRE A SERVICE
PROVIDER TO BE INDEPENDENTLY LICENSED DIRECTLY FROM
THE THIRD PARTY SUPPLIER. AN AVAYA CHANNEL PARTNER’S
HOSTING OF AVAYA PRODUCTS MUST BE AUTHORIZED IN
WRITING BY AVAYA AND IF THOSE HOSTED PRODUCTS USE
OR EMBED CERTAIN THIRD PARTY SOFTWARE, INCLUDING
BUT NOT LIMITED TO MICROSOFT SOFTWARE OR CODECS,
THE AVAYA CHANNEL PARTNER IS REQUIRED TO
INDEPENDENTLY OBTAIN ANY APPLICABLE LICENSE
AGREEMENTS, AT THE AVAYA CHANNEL PARTNER’S EXPENSE,
DIRECTLY FROM THE APPLICABLE THIRD PARTY SUPPLIER.
WITH RESPECT TO CODECS, IF THE AVAYA CHANNEL
PARTNER IS HOSTING ANY PRODUCTS THAT USE OR EMBED
THE H.264 CODEC OR H.265 CODEC, THE AVAYA CHANNEL
HTTP://WWW.MPEGLA.COM.
https://
PARTNER ACKNOWLEDGES AND AGREES THE AVAYA
CHANNEL PARTNER IS RESPONSIBLE FOR ANY AND ALL
RELATED FEES AND/OR ROYALTIES. THE H.264 (AVC) CODEC
IS LICENSED UNDER THE AVC PATENT PORTFOLIO LICENSE
FOR THE PERSONAL USE OF A CONSUMER OR OTHER USES
IN WHICH IT DOES NOT RECEIVE REMUNERATION TO: (I)
ENCODE VIDEO IN COMPLIANCE WITH THE AVC STANDARD
(“AVC VIDEO”) AND/OR (II) DECODE AVC VIDEO THAT WAS
ENCODED BY A CONSUMER ENGAGED IN A PERSONAL
ACTIVITY AND/OR WAS OBTAINED FROM A VIDEO PROVIDER
LICENSED TO PROVIDE AVC VIDEO. NO LICENSE IS GRANTED
OR SHALL BE IMPLIED FOR ANY OTHER USE. ADDITIONAL
INFORMATION FOR H.264 (AVC) AND H.265 (HEVC) CODECS
MAY BE OBTAINED FROM MPEG LA, L.L.C. SEE
WWW.MPEGLA.COM.
Compliance with Laws
You acknowledge and agree that it is Your responsibility for
complying with any applicable laws and regulations, including, but not
limited to laws and regulations related to call recording, data privacy,
intellectual property, trade secret, fraud, and music performance
rights, in the country or territory where the Avaya product is used.
Preventing Toll Fraud
“Toll Fraud” is the unauthorized use of your telecommunications
system by an unauthorized party (for example, a person who is not a
corporate employee, agent, subcontractor, or is not working on your
company's behalf). Be aware that there can be a risk of Toll Fraud
associated with your system and that, if Toll Fraud occurs, it can
result in substantial additional charges for your telecommunications
services.
Avaya Toll Fraud intervention
If You suspect that You are being victimized by Toll Fraud and You
need technical assistance or support, call Technical Service Center
Toll Fraud Intervention Hotline at +1-800-643-2353 for the United
States and Canada. For additional support telephone numbers, see
the Avaya Support website:
successor site as designated by Avaya.
Security Vulnerabilities
Information about Avaya’s security support policies can be found in
the Security Policies and Support section of
support.avaya.com/security.
Suspected Avaya product security vulnerabilities are handled per the
Avaya Product Security Support Flow (https://
support.avaya.com/css/P8/documents/100161515).
Downloading Documentation
For the most current versions of Documentation, see the Avaya
Support website:
as designated by Avaya.
Contact Avaya Support
See the Avaya Support website:
product or Hosted Service notices and articles, or to report a problem
with your Avaya product or Hosted Service. For a list of support
telephone numbers and contact addresses, go to the Avaya Support
website:
designated by Avaya), scroll to the bottom of the page, and select
Contact Avaya Support.
Regulatory Statements
Australia Statements
Handset Magnets Statement:
Industry Canada (IC) Statements
RSS Standards Statement
https://support.avaya.com (or such successor site as
Danger:
The handset receiver contains magnetic devices that can
attract small metallic objects. Care should be taken to avoid
personal injury.
https://support.avaya.com, or such successor site
https://support.avaya.com or such
https://support.avaya.com for
HTTP://
https://
This device complies with Industry Canada licence-exempt RSS
standard(s). Operation is subject to the following two conditions:
1. This device may not cause interference, and
2. This device must accept any interference, including
interference that may cause undesired operation of the
device.
Le présent appareil est conforme aux CNR d'Industrie Canada
applicables aux appareils radio exempts de licence. L'exploitation est
autorisée aux deux conditions suivantes:
1. L'appareil ne doit pas produire de brouillage, et
2. L'utilisateur de l'appareil doit accepter tout brouillage
radioélectrique subi, même si le brouillage est susceptible
d'en compromettre le fonctionnement.
Radio Transmitter Statement
Under Industry Canada regulations, this radio transmitter may only
operate using an antenna of a type and maximum (or lesser) gain
approved for the transmitter by Industry Canada. To reduce potential
radio interference to other users, the antenna type and its gain
should be so chosen that the equivalent isotropically radiated power
(EIRP) is not more than that necessary for successful
communication.
Conformément à la réglementation d'Industrie Canada, le présent
émetteur radio peut fonctionner avec une antenne d'un type et d'un
gain maximal (ou inférieur) approuvé pour l'émetteur par Industrie
Canada. Dans le but de réduire les risques de brouillage
radioélectrique à l'intention des autres utilisateurs, il faut choisir le
type d'antenne et son gain de sorte que la puissance isotrope
rayonnée équivalente ne dépasse pas l'intensité nécessaire à
l'établissement d'une communication satisfaisante.
This Class B digital apparatus complies with Canadian ICES-003.
Cet appareil numérique de la classe B est conforme à la norme
NMB-003 du Canada.
Radiation Exposure Statement
This equipment complies with FCC & IC RSS102 radiation exposure
limits set forth for an uncontrolled environment. This equipment
should be installed and operated with minimum distance 20cm
between the radiator & your body. This transmitter must not be colocated or operating in conjunction with any other antenna or
transmitter.
Cet équipement est conforme aux limites d'exposition aux
rayonnements ISEDétablies pour un environnement non contrôlé.
Cet équipement doit être installé et utilisé avec un minimum de 20
cm de distance entre la source de rayonnement et votre corps.
This product meets the applicable Innovation, Science and Economic
Development Canada technical specifications.
Japan Statements
Class B Statement
This is a Class B product based on the standard of the VCCI Council.
If this is used near a radio or television receiver in a domestic
environment, it may cause radio interference. Install and use the
equipment according to the instruction manual.
Denan Power Cord Statement
Danger:
Please be careful of the following while installing the
equipment:
• Please only use the connecting cables, power cord, and
AC adapters shipped with the equipment or specified by
Avaya to be used with the equipment. If you use any
other equipment, it may cause failures, malfunctioning,
or fire.
• Power cords shipped with this equipment must not be
used with any other equipment. In case the above
guidelines are not followed, it may lead to death or
severe injury.
本製品を安全にご使用頂くため、以下のことにご注意ください。
• 接続ケーブル、電源コード、AC アダプタなどの部品は、必ず
製品に同梱されております添付品または指定品をご使用くだ
さい。添付品指定品以外の部品をご使用になると故障や動作
不良、火災の原因となることがあります。
• 同梱されております付属の電源コードを他の機器には使用し
ないでください。上記注意事項を守らないと、死亡や大怪我
など人身事故の原因となることがあります。
México Statement
The operation of this equipment is subject to the following two
conditions:
1. It is possible that this equipment or device may not cause
harmful interference, and
2. This equipment or device must accept any interference,
including interference that may cause undesired operation.
La operación de este equipo está sujeta a las siguientes dos
condiciones:
1. Es posible que este equipo o dispositivo no cause
interferencia perjudicial y
2. Este equipo o dispositivo debe aceptar cualquier
interferencia, incluyendo la que pueda causar su operación
no deseada.
U.S. Federal Communications Commission (FCC) Statements
Compliance Statement
The changes or modifications not expressly approved by the party
responsible for compliance could void the user’s authority to operate
the equipment.
To comply with the FCC RF exposure compliance requirements, this
device and its antenna must not be co-located or operating to
conjunction with any other antenna or transmitter.
This device complies with part 15 of the FCC Rules. Operation is
subject to the following two conditions:
1. This device may not cause harmful interference, and
2. This device must accept any interference received,
including interferences that may cause undesired
operation.
This equipment has been tested and found to comply with the limits
for a Class B digital device, pursuant to Part 15 of the FCC Rules.
These limits are designated to provide reasonable protection against
harmful interferences in a residential installation. This equipment
generates, uses and can radiate radio frequency energy and, if not
installed and used in accordance with the instructions, may cause
harmful interference to radio communications. However, there is no
guarantee that interference will not occur in a particular installation. If
this equipment does cause harmful interferences to radio or
television reception, which can be determined by turning the
equipment off and on, the user is encouraged to try to correct the
interference by one or more of the following measures:
• Reorient or relocate the receiving antenna.
• Increase the separation between the equipment and receiver.
• Connect the equipment into an outlet on a circuit different from
that to which the receiver is connected.
• Consult the dealer or an experienced radio/TV technician for
help.
Radiation Exposure Statement

This equipment complies with FCC radiation exposure limits set forth
for an uncontrolled environment . This equipment should be installed
and operated with minimum distance of 8 in or 20 cm between the
radiator and your body. This transmitter must not be co-located or
operating in conjunction with any other antenna or transmitter.
EU Countries
This device when installed complies with the essential requirements
and other relevant provisions of the EMC Directive 2014/30/EU,
Safety LV Directive 2014/35/EU, Radio Equipment Directive
2014/53/EU, and RoHS Directive 2011/65/EU. A copy of the
Declaration may be obtained from
Inc., 4655 Great America Parkway, Santa Clara, CA 95054–1233
USA.
General Safety Warning
• Use only the Avaya approved Limited Power Source power
supplies specified for this product.
• Ensure that you:
- Do not operate the device near water.
- Do not use the device during a lightning storm.
- Do not report a gas leak while in the vicinity of the leak.
Trademarks
The trademarks, logos and service marks (“Marks”) displayed in this
site, the Documentation, Hosted Service(s), and product(s) provided
by Avaya are the registered or unregistered Marks of Avaya, its
affiliates, its licensors, its suppliers, or other third parties. Users are
not permitted to use such Marks without prior written consent from
Avaya or such third party which may own the Mark. Nothing
contained in this site, the Documentation, Hosted Service(s) and
product(s) should be construed as granting, by implication, estoppel,
or otherwise, any license or right in and to the Marks without the
express written permission of Avaya or the applicable third party.
Avaya is a registered trademark of Avaya Inc.
The Bluetooth™ word mark and logos are registered trademarks
owned by Bluetooth SIG, Inc. and any use of such marks by Avaya
Inc. is under license. Other non-Avaya trademarks and trade names
are the property of their respective owners.
http://support.avaya.com or Avaya

Contents
Chapter 1: Introduction.......................................................................................................... 11
Purpose................................................................................................................................ 11
Change history...................................................................................................................... 11
Chapter 2: Avaya 3735 DECT handset overview.................................................................. 12
3735 DECT handset physical layout....................................................................................... 13
Avaya 3735 DECT handset.................................................................................................... 15
Functions.............................................................................................................................. 16
Accessories.......................................................................................................................... 18
DC3 Desktop Charger and DP1 Desktop Programmer....................................................... 19
Icons and text in the display............................................................................................. 20
Chapter 3: Menu Tree............................................................................................................. 27
Calls..................................................................................................................................... 27
Contacts............................................................................................................................... 28
Profiles................................................................................................................................. 29
Messaging............................................................................................................................ 30
My favorites.......................................................................................................................... 31
Shortcuts.............................................................................................................................. 32
Connections.......................................................................................................................... 34
Settings................................................................................................................................ 35
In call................................................................................................................................... 36
Additional In Call functions..................................................................................................... 38
Customizing the menu tree..................................................................................................... 38
Chapter 4: Basic operation.................................................................................................... 39
Switching the handset on....................................................................................................... 39
Switching the handset off....................................................................................................... 39
Log in or out of a shared phone.............................................................................................. 39
Logging onto a handset......................................................................................................... 40
Logging off a handset............................................................................................................ 40
Turning the audible signal on or off......................................................................................... 40
Locking and unlocking the keypad.......................................................................................... 41
Locking and unlocking the keypad in idle mode.................................................................. 41
Locking and unlocking the keypad during a call.................................................................. 41
Locking and Unlocking the handset......................................................................................... 42
Muting ringtone for incoming call or message.......................................................................... 43
Chapter 5: Configuring Bluetooth Headset.......................................................................... 44
Introduction to Bluetooth........................................................................................................ 44
Wearing a Bluetooth headset................................................................................................. 44
Headsets.............................................................................................................................. 44
Operation............................................................................................................................. 45
August 2019 Using 3735 DECT handsets with Communication Manager and IP Office 6
Comments on this document? infodev@avaya.com

Contents
Enabling a Bluetooth connection....................................................................................... 45
Disabling the Bluetooth connection................................................................................... 45
Pairing or connecting Bluetooth headset........................................................................... 46
Selecting a Bluetooth headset.......................................................................................... 46
Removing a headset........................................................................................................ 47
Changing the name of Bluetooth headset.......................................................................... 47
Changing the headset profile............................................................................................ 47
Calling.................................................................................................................................. 48
Making a call................................................................................................................... 48
Answering a call.............................................................................................................. 48
Ending a call................................................................................................................... 49
Volume and Mute Control....................................................................................................... 49
Adjusting the volume during a call..................................................................................... 49
Muting or unmuting a call................................................................................................. 49
Messaging...................................................................................................................... 50
Transfer a call....................................................................................................................... 50
Transferring a call to the handset...................................................................................... 50
Transferring a call to the Bluetooth headset....................................................................... 50
Switching to a corded headset.......................................................................................... 51
Operation Notice................................................................................................................... 51
Troubleshooting.................................................................................................................... 51
Changing the system....................................................................................................... 52
Subscribing handset in DECT system............................................................................... 53
Unsubscribing the system................................................................................................ 54
Renaming the system...................................................................................................... 54
Setting priority................................................................................................................. 54
Defining handset actions when placed in charger and in call............................................... 55
Defining handset actions when placed in charger and not in call.......................................... 55
Chapter 6: Menu operation.................................................................................................... 57
Managing incoming calls........................................................................................................ 57
Incoming call................................................................................................................... 57
Answering a call.............................................................................................................. 57
Declining a call................................................................................................................ 57
Ending a call................................................................................................................... 58
Declining a call with a predefined message....................................................................... 58
Answering a text message with a predefined message....................................................... 58
Managing call list................................................................................................................... 59
Call list........................................................................................................................... 59
Editing a number from the call list..................................................................................... 59
Saving a number from the call list..................................................................................... 59
Sending a message from the call list................................................................................. 60
Deleting entries from the call list....................................................................................... 60
Viewing missed calls........................................................................................................ 61
August 2019 Using 3735 DECT handsets with Communication Manager and IP Office 7
Comments on this document? infodev@avaya.com

Contents
Viewing the time of a call.................................................................................................. 61
Push-to-talk group call..................................................................................................... 62
Managing calls in absentia..................................................................................................... 65
Call services................................................................................................................... 65
Absence handling............................................................................................................ 66
Deactivating the Absence settings.................................................................................... 66
Diverting calls................................................................................................................. 66
Stopping the diversion of calls.......................................................................................... 67
Emergency calls.............................................................................................................. 67
Managing Mid-call operations................................................................................................. 68
During a call.................................................................................................................... 68
Managing outgoing calls........................................................................................................ 75
Calling a number from contacts........................................................................................ 75
Calling a contact from the local or company phonebook..................................................... 75
Calling a contact from the central phone book.................................................................... 75
Making a local call........................................................................................................... 76
Making an international call.............................................................................................. 76
Dialing a number with the headset button.......................................................................... 77
Dialing using a pre-programmed number........................................................................... 77
Dialing a number from the call list..................................................................................... 77
Dialing last called number with the headset number........................................................... 78
Managing contacts................................................................................................................ 78
Contacts......................................................................................................................... 78
Managing shortcuts............................................................................................................... 82
Shortcuts........................................................................................................................ 82
Managing My favorites........................................................................................................... 84
Adding to My favorites..................................................................................................... 84
Editing My favorites......................................................................................................... 85
Deleting My favorites....................................................................................................... 85
Managing messages.............................................................................................................. 85
Message List................................................................................................................... 85
Inbox.............................................................................................................................. 86
Sent messages............................................................................................................... 90
Received messages........................................................................................................ 91
Enhanced messaging...................................................................................................... 92
Mobile data..................................................................................................................... 95
Voice mail....................................................................................................................... 95
Managing profiles.................................................................................................................. 96
Profiles........................................................................................................................... 96
Alarm operation............................................................................................................... 98
Activating an alarm.......................................................................................................... 98
Acoustic location signal.................................................................................................... 98
Testing the alarm............................................................................................................. 98
August 2019 Using 3735 DECT handsets with Communication Manager and IP Office 8
Comments on this document? infodev@avaya.com

Contents
Alarm with location information......................................................................................... 99
Alarm with data............................................................................................................... 99
Automatic call after alarm................................................................................................. 99
Procedure call................................................................................................................. 99
System Profiles............................................................................................................. 100
Advanced Functions............................................................................................................ 101
Admin menu................................................................................................................. 101
Clearing lists in charger................................................................................................. 102
Troubleshooting.................................................................................................................. 102
Operational problems.................................................................................................... 102
Error or warning messages............................................................................................ 103
System Handling................................................................................................................. 105
Software upgrade and additional features........................................................................ 105
Handset updates via the charging rack............................................................................ 105
Chapter 7: Customizing Avaya 3735 DECT handset......................................................... 107
Settings.............................................................................................................................. 107
Sound and alert settings................................................................................................ 107
Keypad lock settings...................................................................................................... 109
Phone lock settings........................................................................................................ 111
Display settings............................................................................................................. 112
Time and date settings................................................................................................... 114
Call answering settings.................................................................................................. 115
Alarm settings............................................................................................................... 116
Other settings................................................................................................................ 116
Chapter 8: Maintenance........................................................................................................ 118
Maintenance....................................................................................................................... 118
Maintenance of Batteries................................................................................................ 118
Easy Replacement of Handset........................................................................................ 119
Attach the hinge-type clip............................................................................................... 121
Attach the swivel-type clip.............................................................................................. 121
Attach cover for no clip.................................................................................................. 122
Chapter 9: Energy efficiency............................................................................................... 123
Chapter 10: Related Resources........................................................................................... 124
Documentation.................................................................................................................... 124
Appendix A: Safety Precautions......................................................................................... 125
Safe operation.................................................................................................................... 125
Regulatory Compliance Statements (EU and EFTA)............................................................... 125
Exposure to radio frequency signals............................................................................... 125
Regulatory Compliance Statements (USA and Canada only).................................................. 126
FCC and IC compliance statements................................................................................ 126
Exposure to radio frequency signals............................................................................... 127
Precautions......................................................................................................................... 127
Handset........................................................................................................................ 127
August 2019 Using 3735 DECT handsets with Communication Manager and IP Office 9
Comments on this document? infodev@avaya.com

Contents
Battery......................................................................................................................... 128
Glossary................................................................................................................................. 129
August 2019 Using 3735 DECT handsets with Communication Manager and IP Office 10
Comments on this document? infodev@avaya.com

Chapter 1: Introduction
Purpose
This document describes how to use product features and capabilities
This document is intended for people who want to learn how to use product features and
capabilities.
Change history
Issue Date Summary of changes
Release 4.7.1, Issue1July 2019 • Updated Contacts on page 28.
• Updated Calling a contact from the central phone
book on page 75.
• Added Central phonebook on page 81.
August 2019 Using 3735 DECT handsets with Communication Manager and IP Office 11
Comments on this document? infodev@avaya.com

Chapter 2: Avaya 3735 DECT handset
overview
The Avaya 3735 DECT handset is a robust DECT handset designed for medium to high demand
environments such as hospitals, elderly care, retail and enterprise. Its advanced messaging features
make it ideal for applications where two-way messaging or interaction with automated equipment is
required.
The Avaya 3735 DECT handset streamlines maintenance or administration and can easily be
adapted to fit the changing needs of large and diversified organizations.
3735 DECT handset has the following rich features:
• Color display
• Telephony
• Messaging
• Bluetooth
The two available models of the handset are:
• 3735 DECT handset
• 3735 DECT handset Alarm
Related links
3735 DECT handset physical layout on page 13
August 2019 Using 3735 DECT handsets with Communication Manager and IP Office 12
Comments on this document? infodev@avaya.com
3735 DECT handset physical layout
1
2
3
4
5
6
7
8
9
10
11
12
13
14
15
16
17
3735 DECT handset physical layout
Callout
number
1 Multifunction/Alarm
2 Earpiece speaker -
3 Volume button (up) N/A Increases the speaker volume.
4 Volume button
Name Button Icon Description
N/A Used as a shortcut to:
button
• Functions
• Long or double press modes
Depending on the model of handset, the
button can be used as a push button,
alarm or can be configured as a PTT
button.
N/A Decreases the speaker volume.
(down)
Table continues…
August 2019 Using 3735 DECT handsets with Communication Manager and IP Office 13
Comments on this document? infodev@avaya.com
Avaya 3735 DECT handset overview
Callout
Name Button Icon Description
number
5 Mute and PTT
button
N/A • Turning on or off audible signals in an
idle mode.
• Muting the ring signal for an incoming
call.
• Turning the microphone on or off
during a call.
6 Soft keys Can be pre-programmed or used with the
GUI.
7 Off hook key Used for:
• Answering a call.
• Pre-dialling a number.
• Creating a shortcut to the Call list.
8 Five-way navigation
key
Used to step in the menu and carry out
various functions.
A navigation key with the Left, Right, Up,
Down, and Confirmation (in the middle)
keys. These keys, except the middle key,
can also be programmed for shortcuts.
9 Voicemail access N/A Gives a quick access to the handset
Voicemail. This is a system dependent
feature.
10 Key lock, and Upper
and Lower case
N/A Used for:
• Locking the keypad in combination with
the soft key Lock.
• Switching between upper or lower case
and digits.
11 Microphone -
12 Space N/A Adds space between text.
13 Sound off key N/A Used to:
• Turning on or off audible signals in an
idle mode.
• Silencing the ring signal at incoming
call.
• Turning the microphone on or off
during a call.
14 Tactile indicators N/A Indicates the centre of the key pad.
Table continues…
August 2019 Using 3735 DECT handsets with Communication Manager and IP Office 14
Comments on this document? infodev@avaya.com
Avaya 3735 DECT handset
Callout
number
15 On hook and On/Off
16 Color display N/A The full graphic type display is a 1.77
17 Headset connector N/A The headset connector is for connecting
Name Button Icon Description
Used as a combined button:
key
• To end a call
• To return to the standby mode
• To switch the handset on or off by long
press
inch TFT. The display has multiple colors
and backlighting.
a standard 3.5 mm headset. The
connector is protected against dust by
using the headset connector cover.
Avaya 3735 DECT handset
Important:
The handset may retain small magnetic objects around the mouthcap or earcap region.
Parts of the handset Description
Case The plastic cover parts are made of durable PC/ABS material.
Antenna The antenna is integrated inside the handset.
Loudspeaker The handset has a separate loudspeaker for the alerting and hands
free function. The loudspeaker is located on the back side of the
handset.
Microphone The microphone is located on the front bottom side of the handset.
Clip There are two different belt clip options to the handset: a hinge-type
clip (standard) or a swivel-type clip.
Use the clip to attach the handset to a belt or similar.
You can use the handset without any clip.
Battery The battery is a rechargeable Li-Ion battery, located under a battery
cover. The battery is fully charged within four hours.
August 2019 Using 3735 DECT handsets with Communication Manager and IP Office 15
Comments on this document? infodev@avaya.com
Avaya 3735 DECT handset overview
Functions
Note:
Some functions are license/system dependent or require settings in handset via WinPDM/
Device Manager.
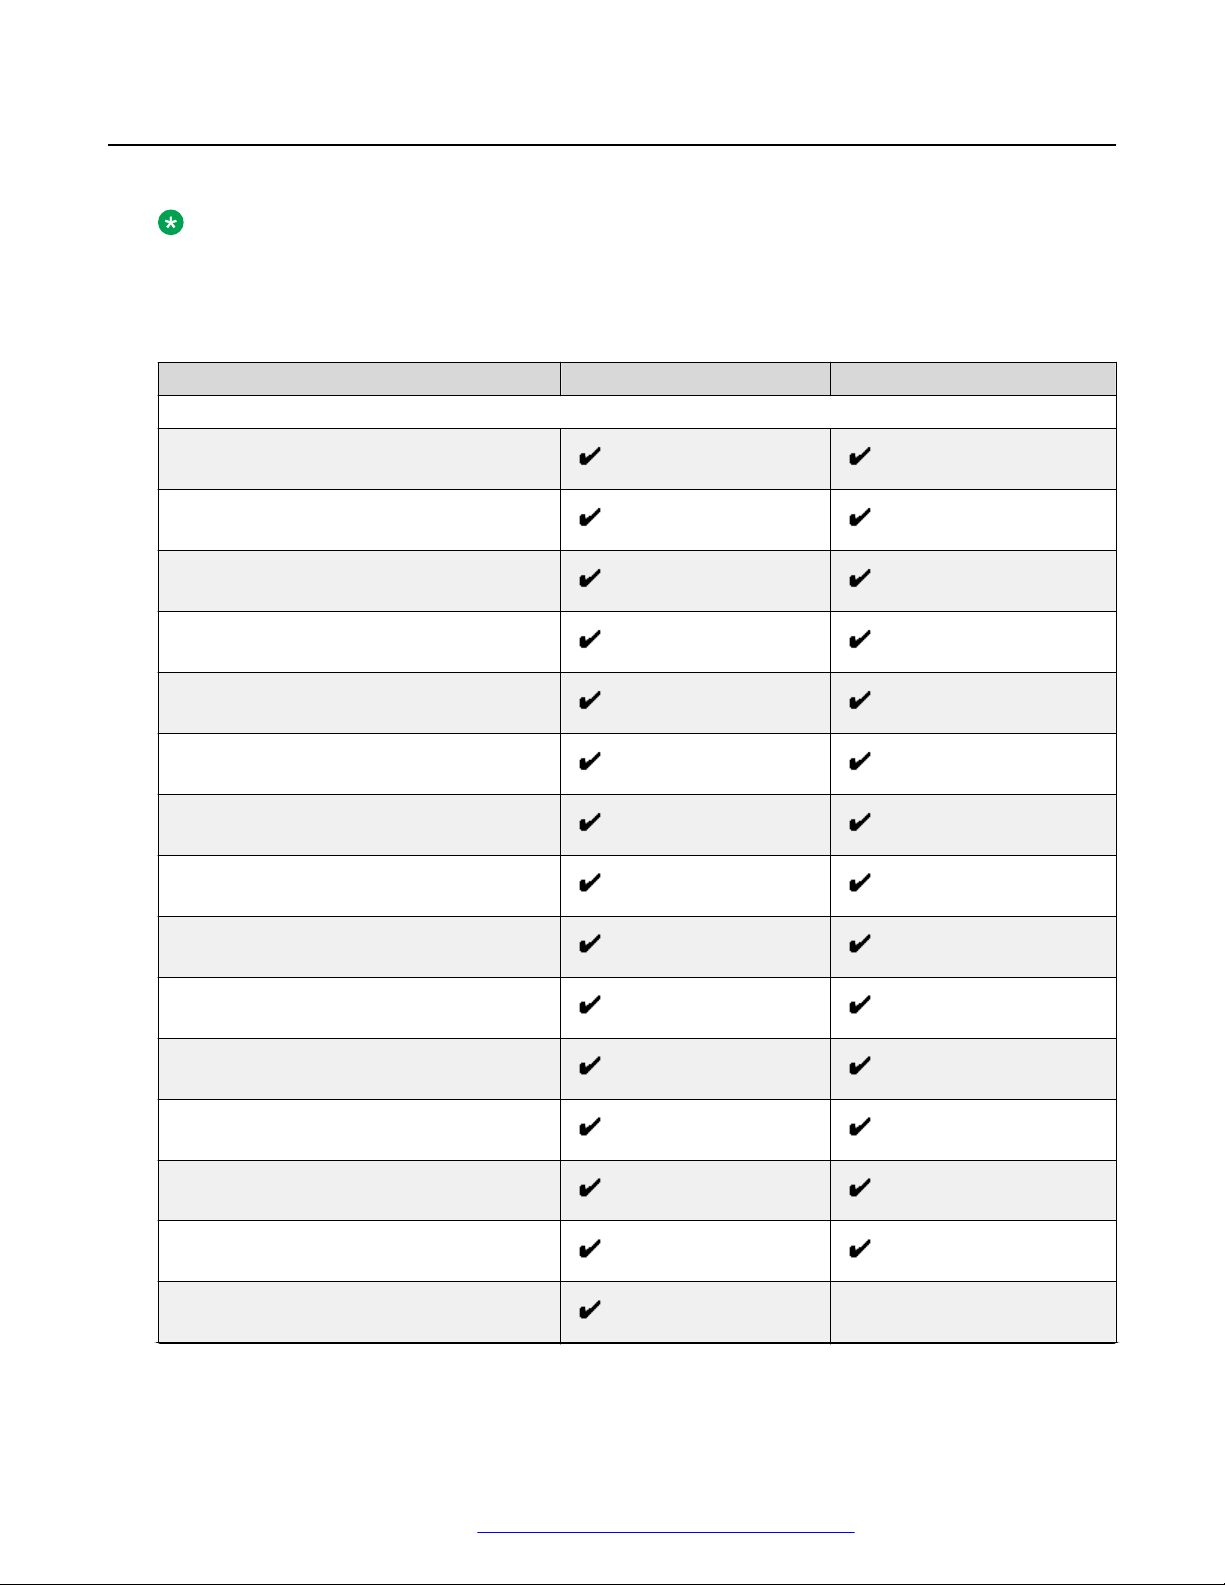
Table 1: Functions of 3735 DECT handset
Functions 3735 3735 Alarm
General
Easy registration
Enhanced DECT Security
Vibrator
Headset connector
Loudspeaking function
3 Programmable Soft keys
9 Programmable Hot keys
Profiles
System profiles
Shared phone
Contacts (250 contacts)
Central phonebook
Company phonebook (1000 contacts)
Downloadable languages
Multifunction button —
Table continues…
August 2019 Using 3735 DECT handsets with Communication Manager and IP Office 16
Comments on this document? infodev@avaya.com
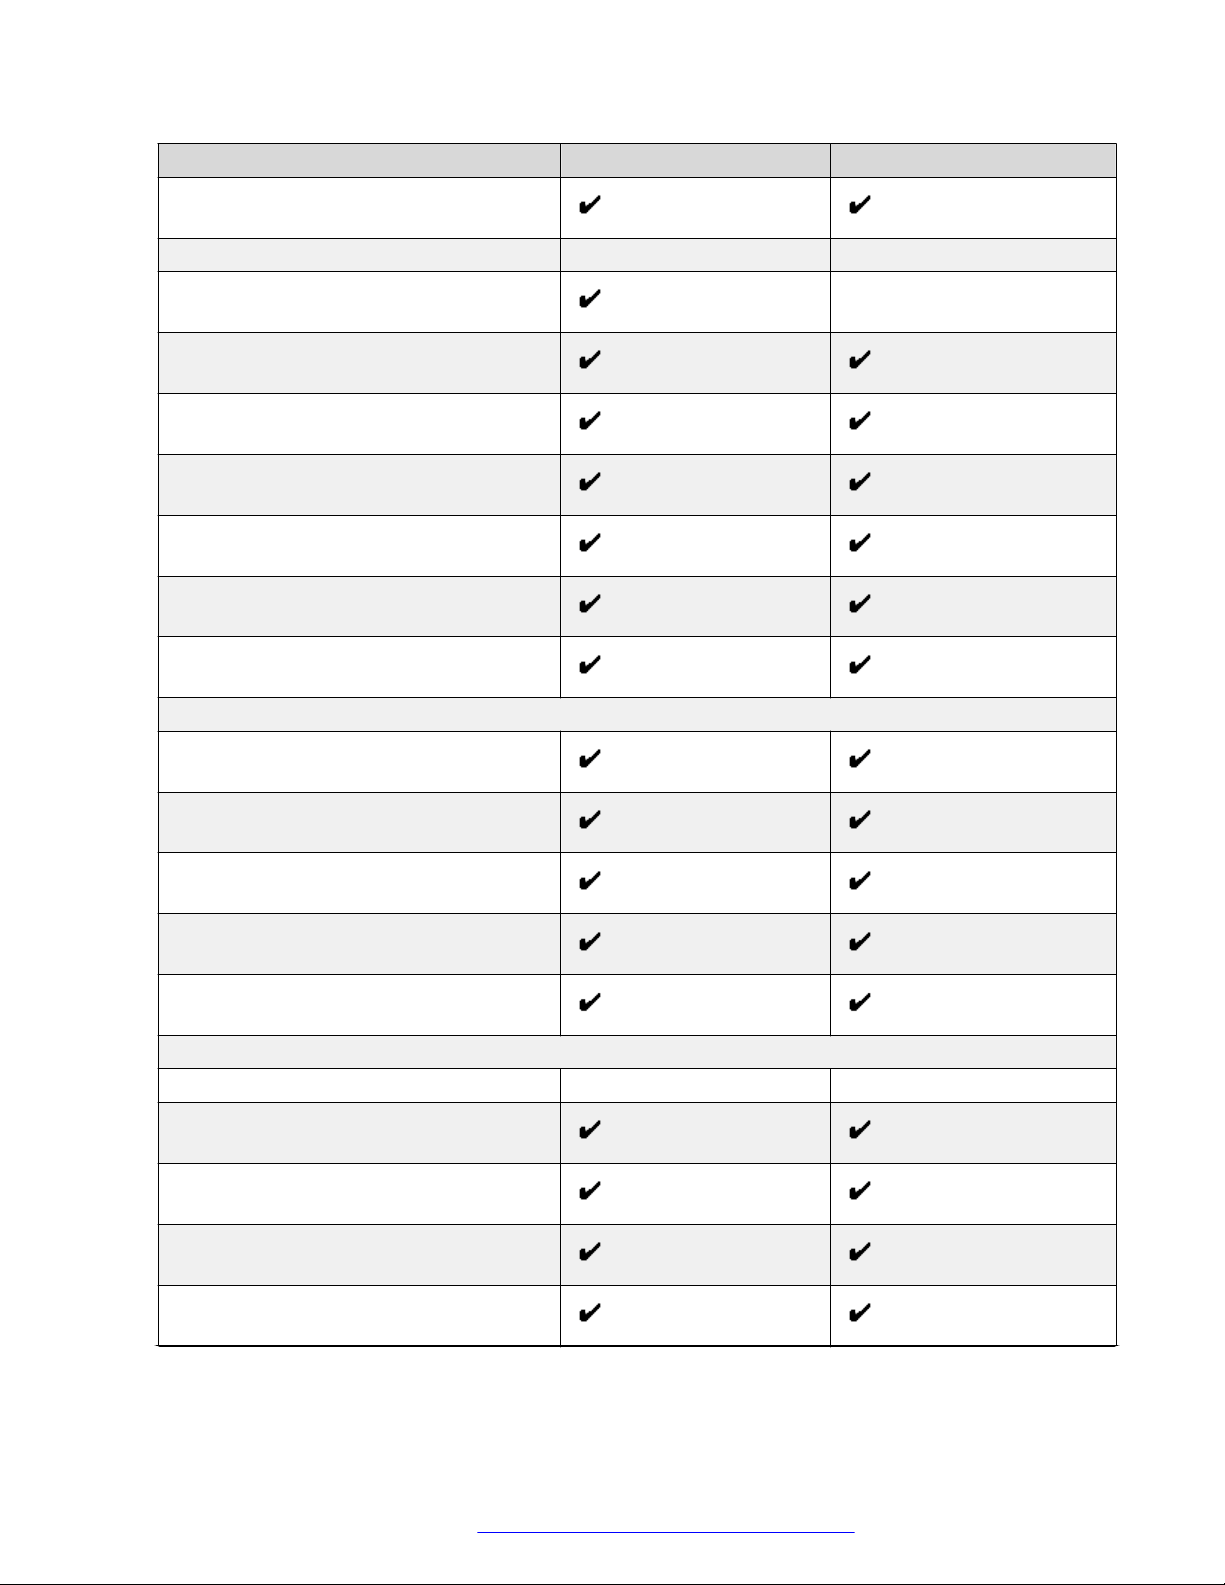
Functions 3735 3735 Alarm
Programmable Navigation key
Upgradable to Messenger — —
Upgradable to Protector —
Centralized management
Personalized menus
Replaceable battery
Easy replacement of handset
Handset restrictions
Bluetooth
Functions
Telephony
Push to Talk (PTT)
Procedure call
Voicemail access
Microphone on/off during call
Five predefined emergency numbers
Messaging
Mini messaging (12 characters) — —
Data Send
Colored messaging
Interactive messaging
Data with prefix
Table continues…
August 2019 Using 3735 DECT handsets with Communication Manager and IP Office 17
Comments on this document? infodev@avaya.com
Avaya 3735 DECT handset overview
Functions 3735 3735 Alarm
Alarm
Push button alarm —
Acoustic Location Signal (ALS) —
Alarm with data —
Location
Location, base stations
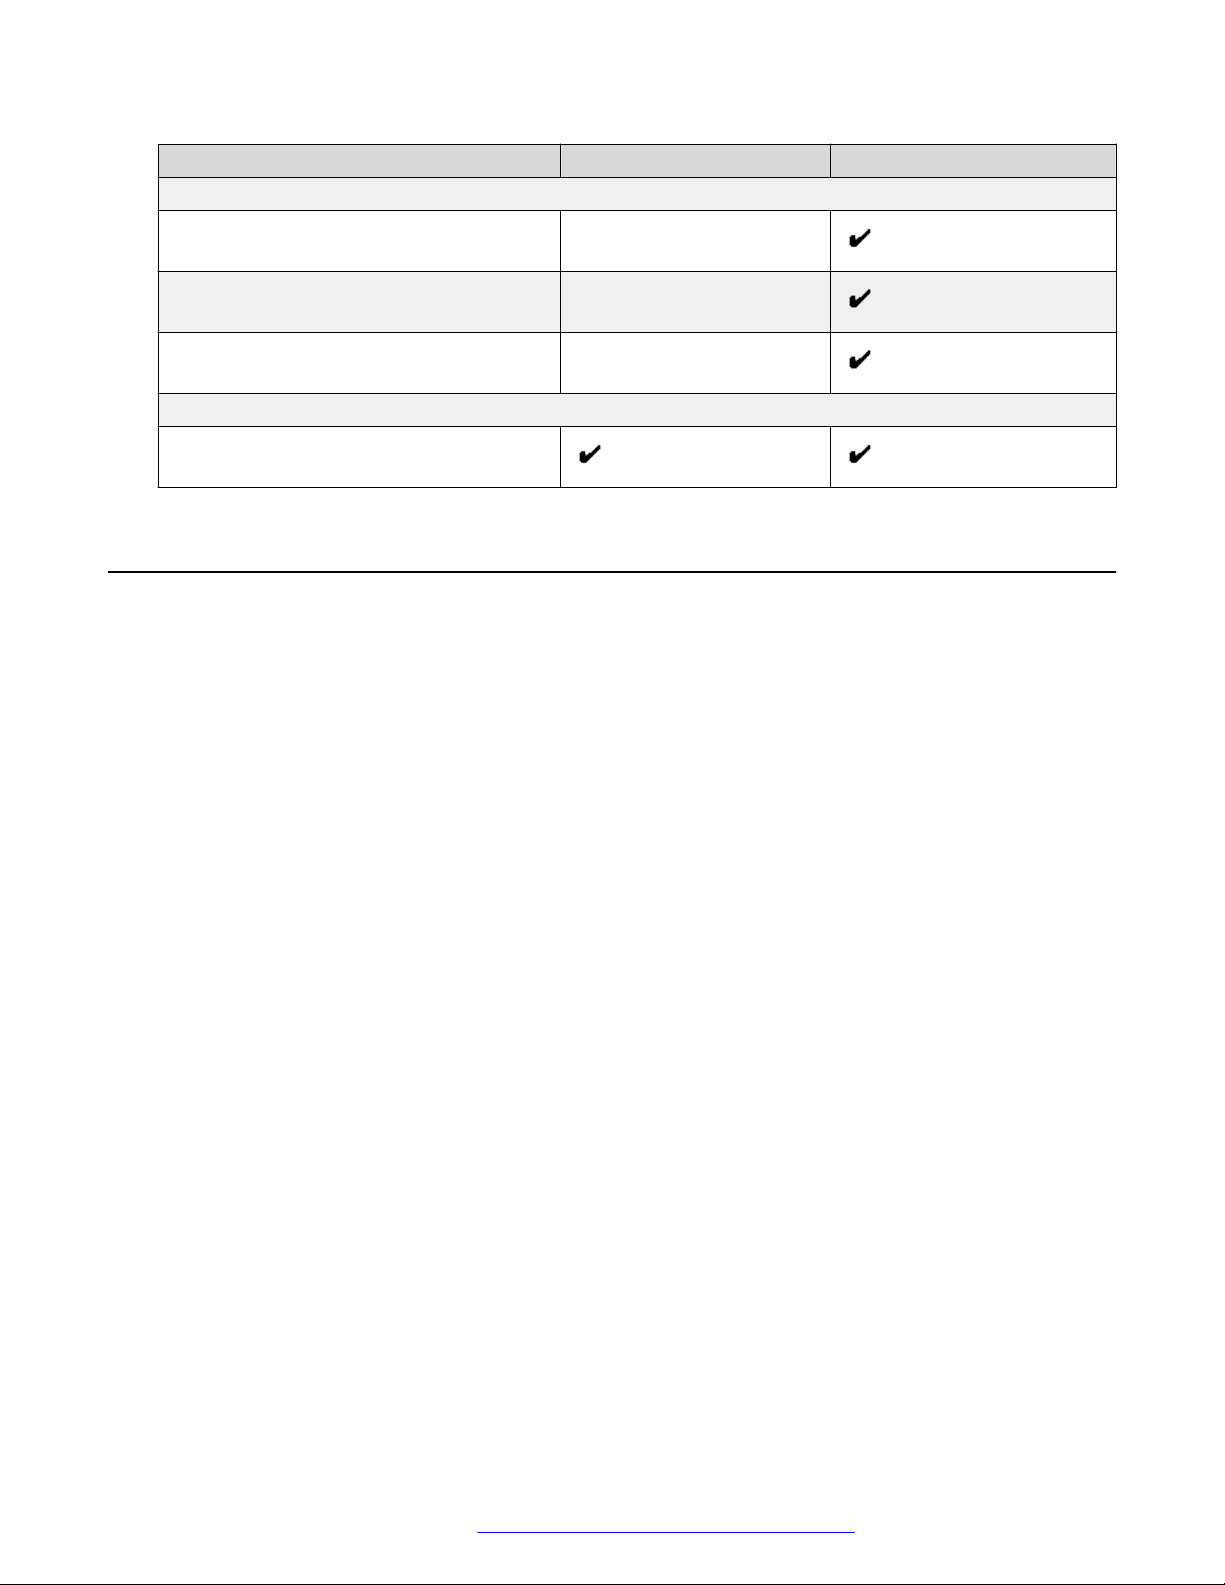
Accessories
• Desktop charger
• Desktop programmer
• Charging rack
• Battery pack charger
• Carrying case
• Belt Clip
- hinge-type
- swivel-type
• Security cord
• Headset with microphone on boom
• Headset with microphone on cable
• Bluetooth headset
August 2019 Using 3735 DECT handsets with Communication Manager and IP Office 18
Comments on this document? infodev@avaya.com
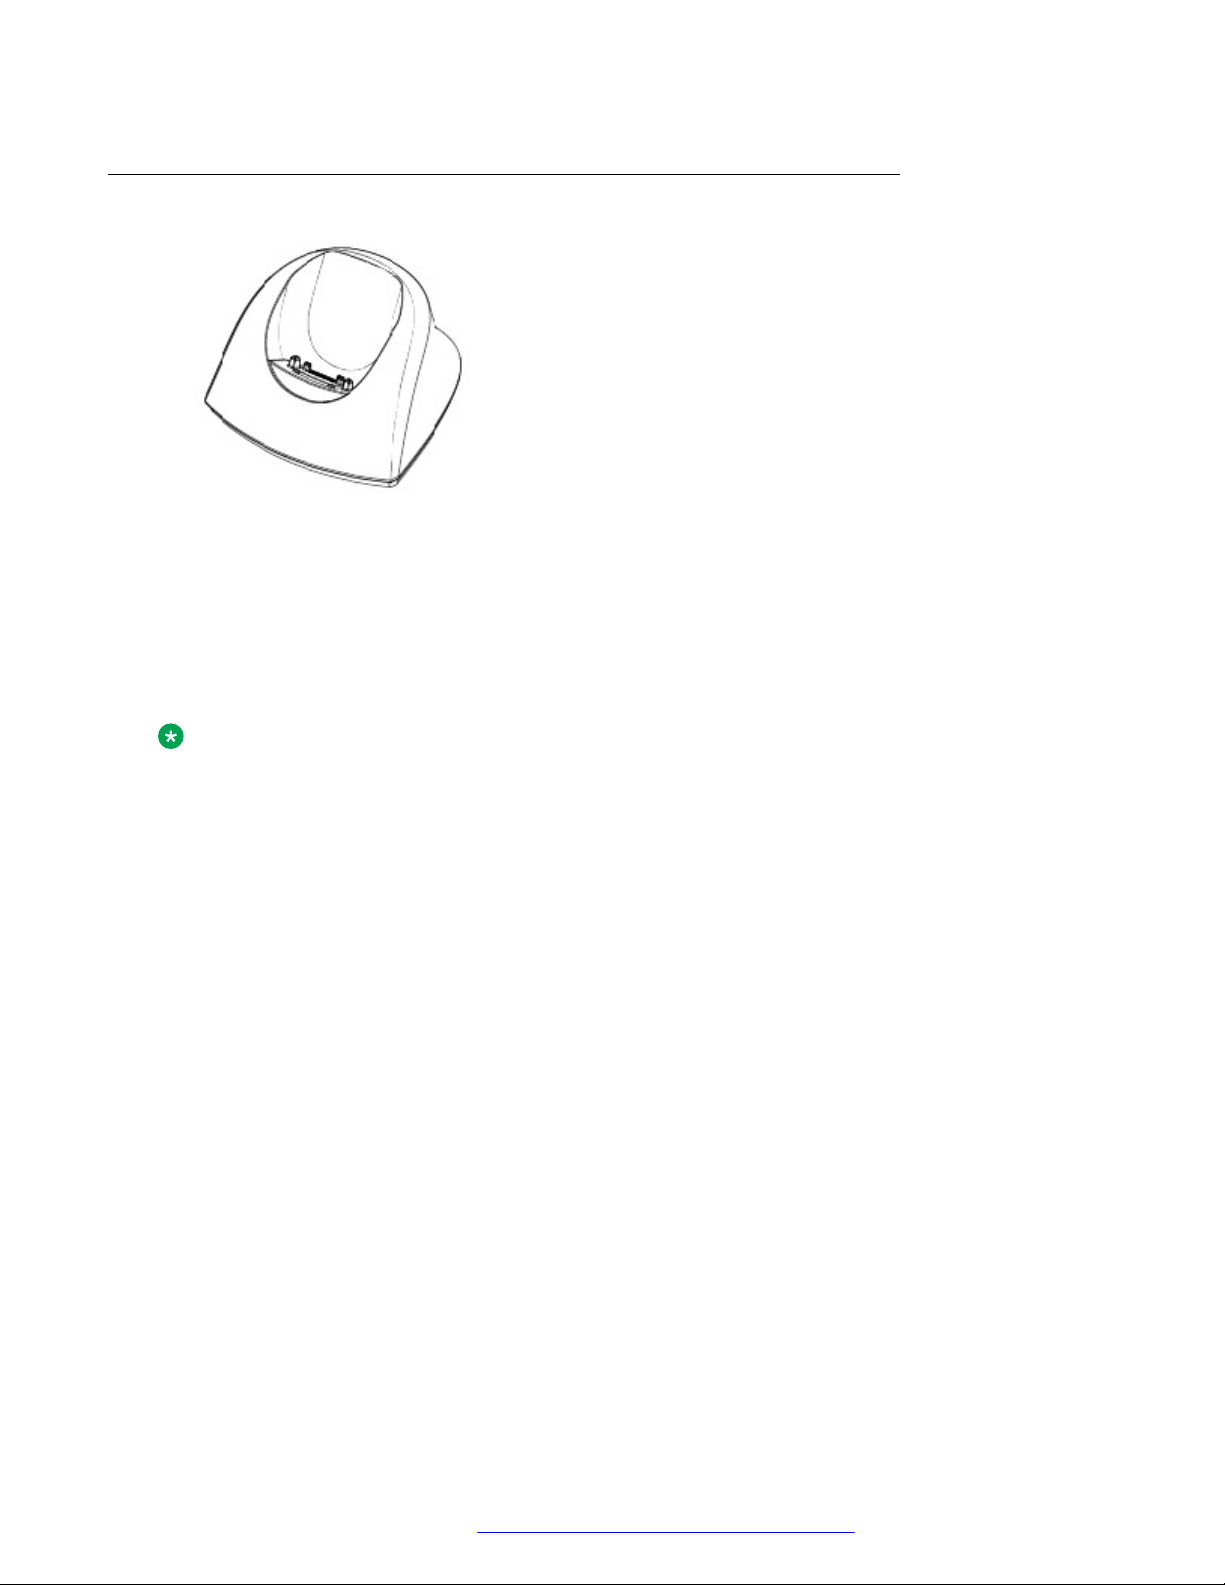
DC3 Desktop Charger and DP1 Desktop Programmer
Figure 1: Chargers
You can use any of the following chargers:
• DC3 Desktop charger: Charges the handset only. The charger is delivered with a plug-in
power supply and connected to an ordinary wall socket.
Accessories
• DP1 Desktop Programmer: Downloads new software and synchronizes parameters. The
handset becomes fully operational when you keep it in a charger.
Note:
Use the charger within the temperature range of +5° C – +40° C.
CR3 Charging Rack
The CR3 Charging Rack is used for:
• Charging several handsets
• Synchronizing parameters
• Downloading software
The built in power supply can charge up to six handsets.
Battery pack charger
The battery pack charger is used for charging up to six spare batteries.
373x Accessories
Belt Clips
The two belt clip options are:
• Hinge-type clip: The clip on the back of the handset is used to fasten the handset to a belt or
similar. The clip can also be changed to a swivel-type.
• Swivel-type clip: The ordinary belt clip can be replaced with a special swivel-type belt clip that
is adapted to firmly secure the handset into your belt.
August 2019 Using 3735 DECT handsets with Communication Manager and IP Office 19
Comments on this document? infodev@avaya.com
Soft key bar
Active area
Header bar
Status bar
Avaya 3735 DECT handset overview
Note:
The handset can be used without a belt clip by installing the included filler plate.
Security Cord
The security cord is 800 mm long and is attached directly to the handset.
Carrying case
The carrying case is especially designed for the handset and includes a swivel type belt clip. The
handset is fully operational while located in the carrying case.
Headset
A headset is recommended if the handset is frequently used or the user want to have both hands
free.
The headset comes in the following three versions:
• Microphone integrated in the cable
• Microphone on a boom
• Hearing protection
In order to achieve optimal audio quality with the different headset types it is recommended to
select the corresponding headset profile. See
Changing the headset profile on page 47
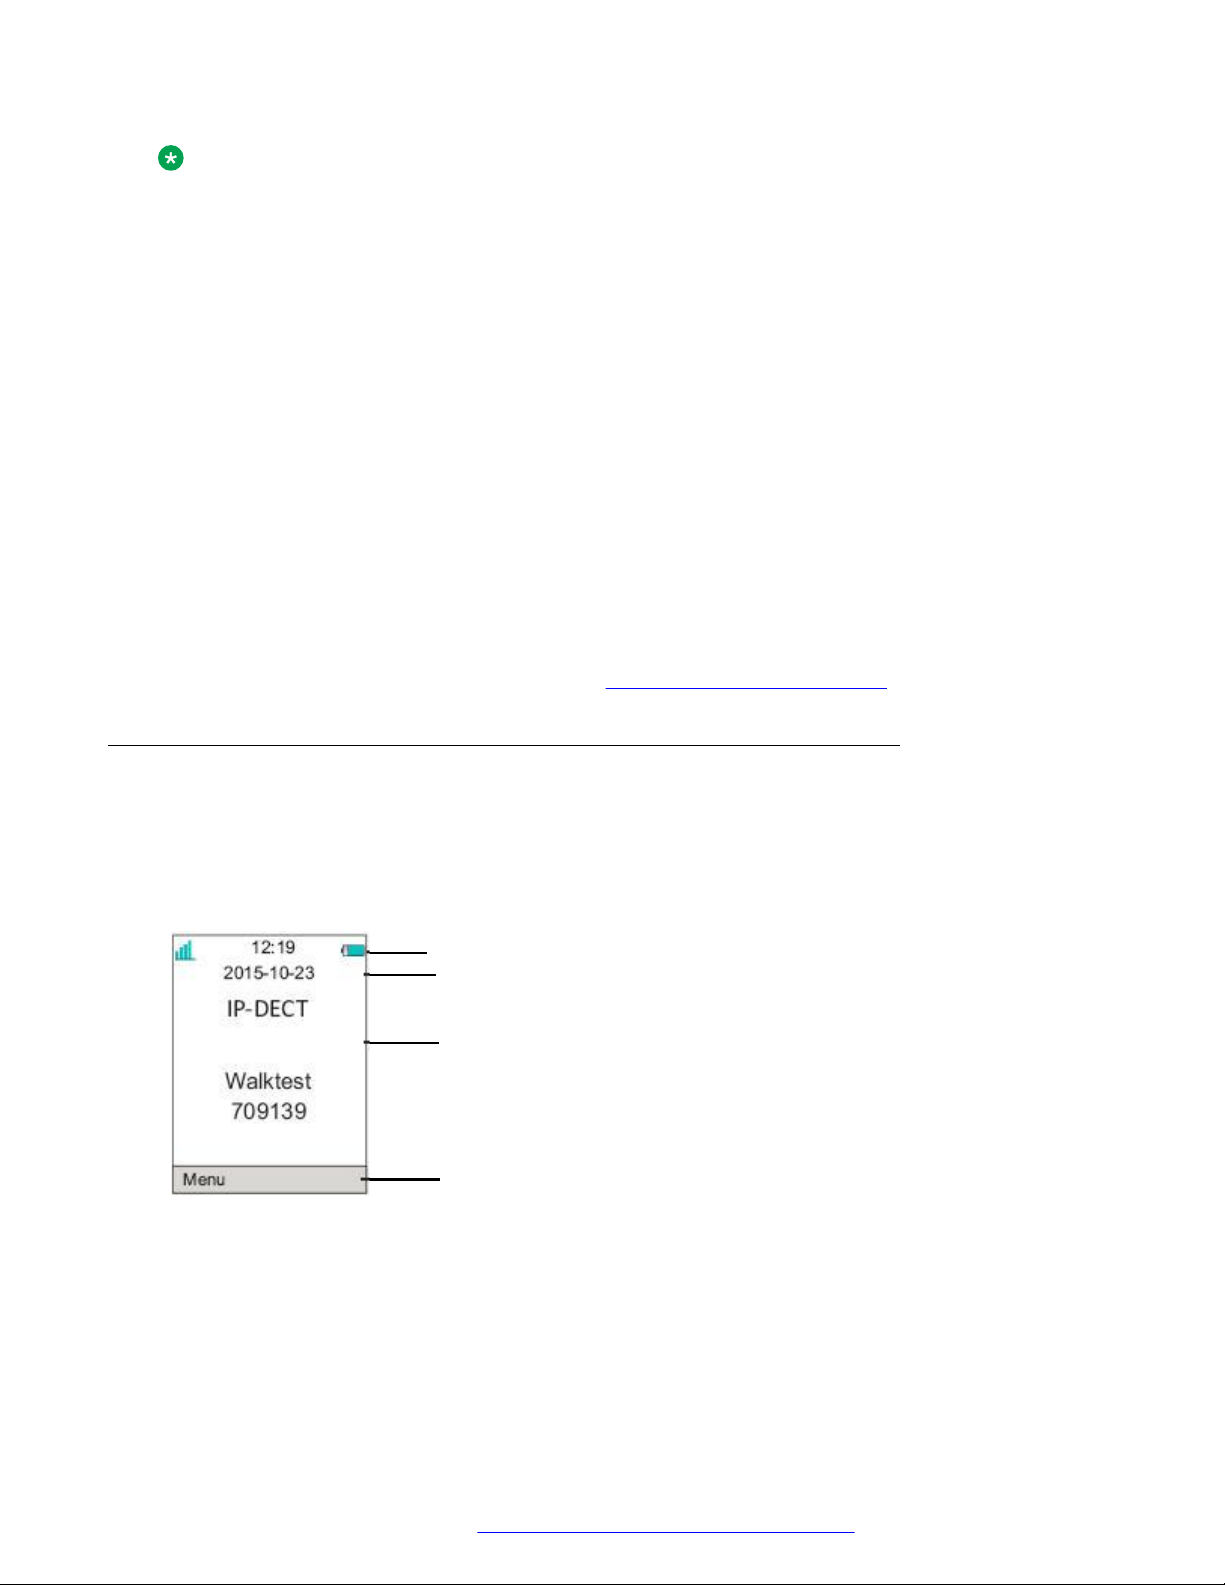
Icons and text in the display
All functions and settings available to the user are shown as icons and text in the display. The
icons and text in the display indicate functions and settings to which you have access. The display
normally displays date and time, the Owner ID and telephone number. The Owner ID can
manually be set by the user.
Figure 2: Example of a display configuration in idle mode
August 2019 Using 3735 DECT handsets with Communication Manager and IP Office 20
Comments on this document? infodev@avaya.com
Name Description
Status bar This is the top row that is used for icons which provide information for signal
strength, missed call, new message, phone lock, key lock, sound off, time and
battery status. This row is always visible in all screens.
Header bar This row displays the current date, headset connection, Bluetooth connection,
and system connection.
Active area This row contains information such as, profiles, the name of the system to which
the handset is connected. A user identity provided from the system and/ or an
Owner ID can also be displayed if configured in the Settings menu. This is also
the area for pop up text for example, missed calls or to confirm an action.
Soft key bar This row is used for soft keys that can be used as shortcuts for functions in the
handset.
Scroll bar This is the bottom row that is located to the right side of the active area. It
becomes visible when a menu screen has more than six menus, or if the
complete text in a message cannot be displayed on the screen simultaneously.
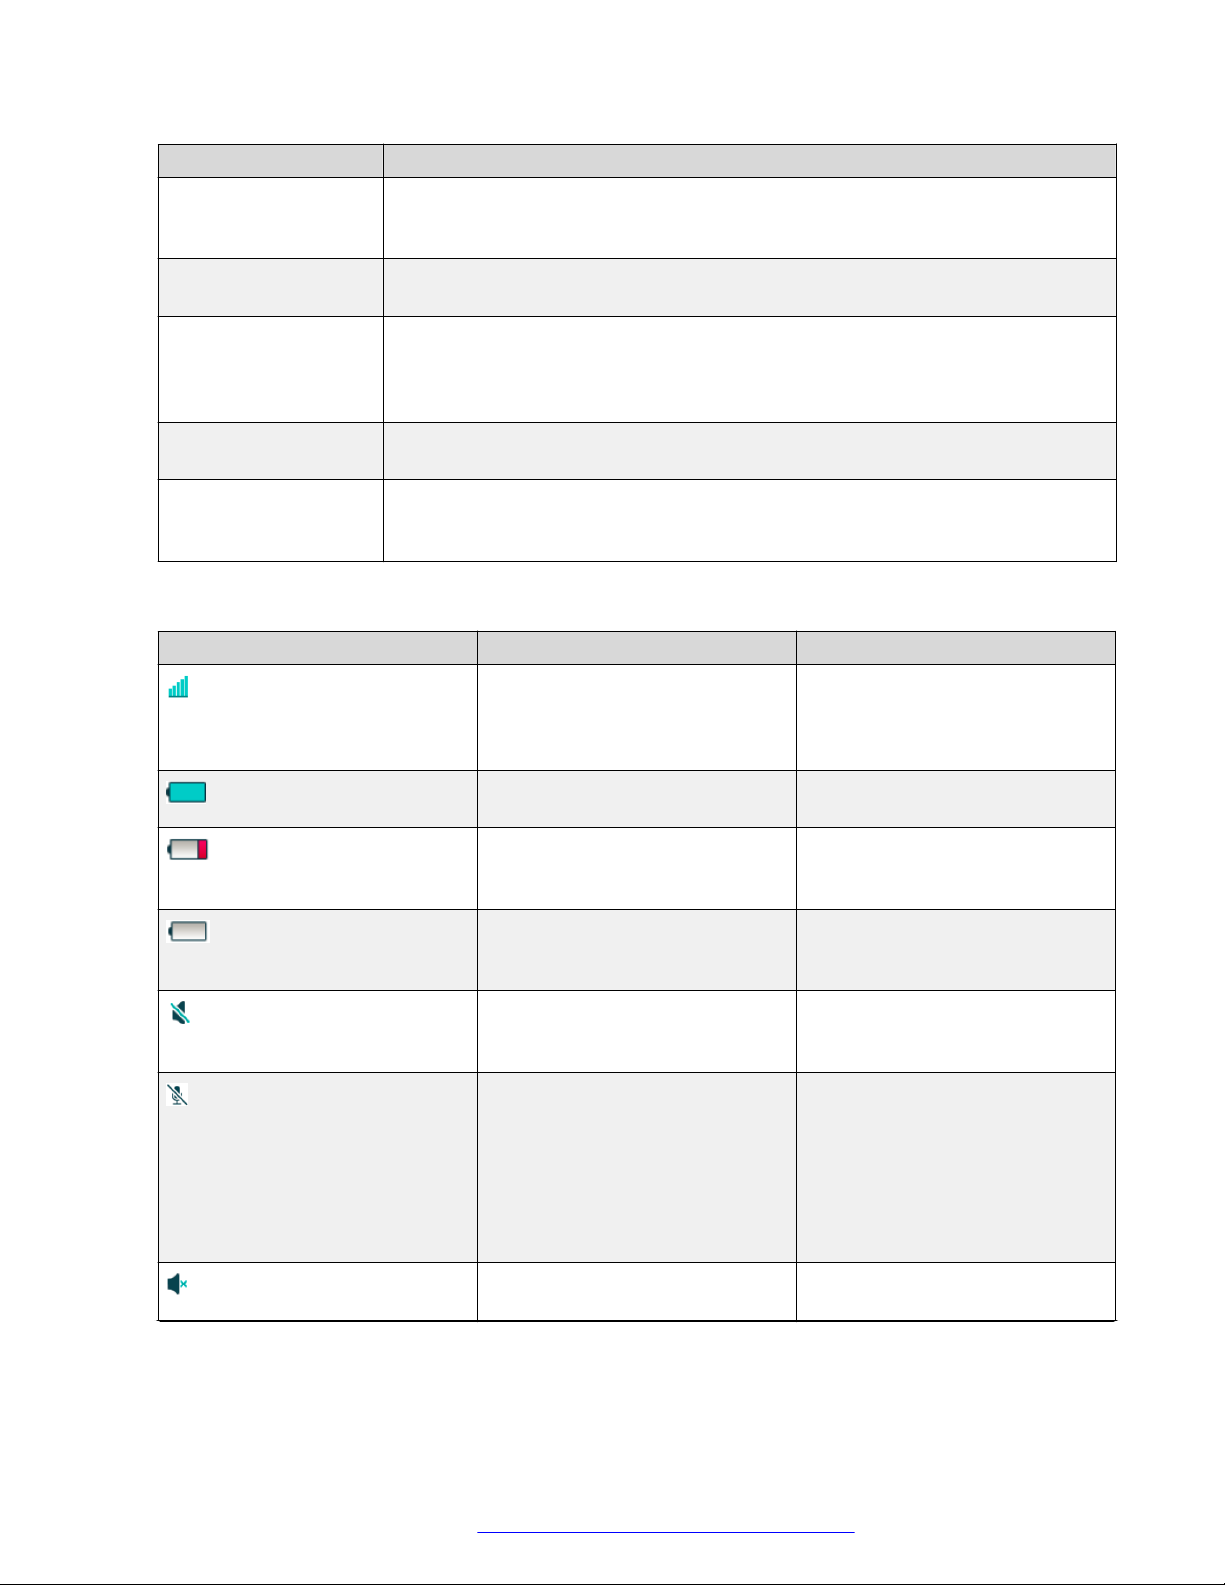
Icons
Icon Name Description
Signal strength This icon is visible in the upper
left corner. The number of bars
shown on display depends on the
signal strength.
Full battery This icon is displayed in upper
right corner.
Low battery warning This icon is shown when the
battery has 10% or less
remaining capacity left.
Empty battery warning This icon is flashing when the
battery has 5% or less remaining
capacity left.
Mute and PTT This icon is displayed when the
Sound off key or Mute is
pressed.
Microphone off This icon indicates a silenced
microphone. It is displayed after a
long press on the Sound off key,
Mute during a call.
Accessories
During a push-to-talk call, the
microphone is silenced when the
push-to-talk is released.
Silent volume This icon is displayed when the
volume has been set to Silent.
Table continues…
August 2019 Using 3735 DECT handsets with Communication Manager and IP Office 21
Comments on this document? infodev@avaya.com
Avaya 3735 DECT handset overview
Icon Name Description
Loudspeaking This icon is displayed in the soft
Loudspeaking off This icon is displayed after the
New message Also known as Interactive
Request for answer This icon in front of a message
Voicemail message This icon is displayed in the
key bar during a call. Pressing
this icon turns on the
loudspeaker.
soft key for Loudspeaking icon
has been pressed. Pressing this
icon turns off the loudspeaker.
message, this icon indicates that
a new text message (or
messages) has arrived. The icon
remains in the status bar until all
new messages in the inbox are
read.
indicates that this message must
be acknowledged or rejected.
status bar when there are
voicemails. The icon remains until
voicemail has been listened to.
This icon is displayed in the
message inbox when there are
voicemails. The icon remains until
voicemail has been listened to.
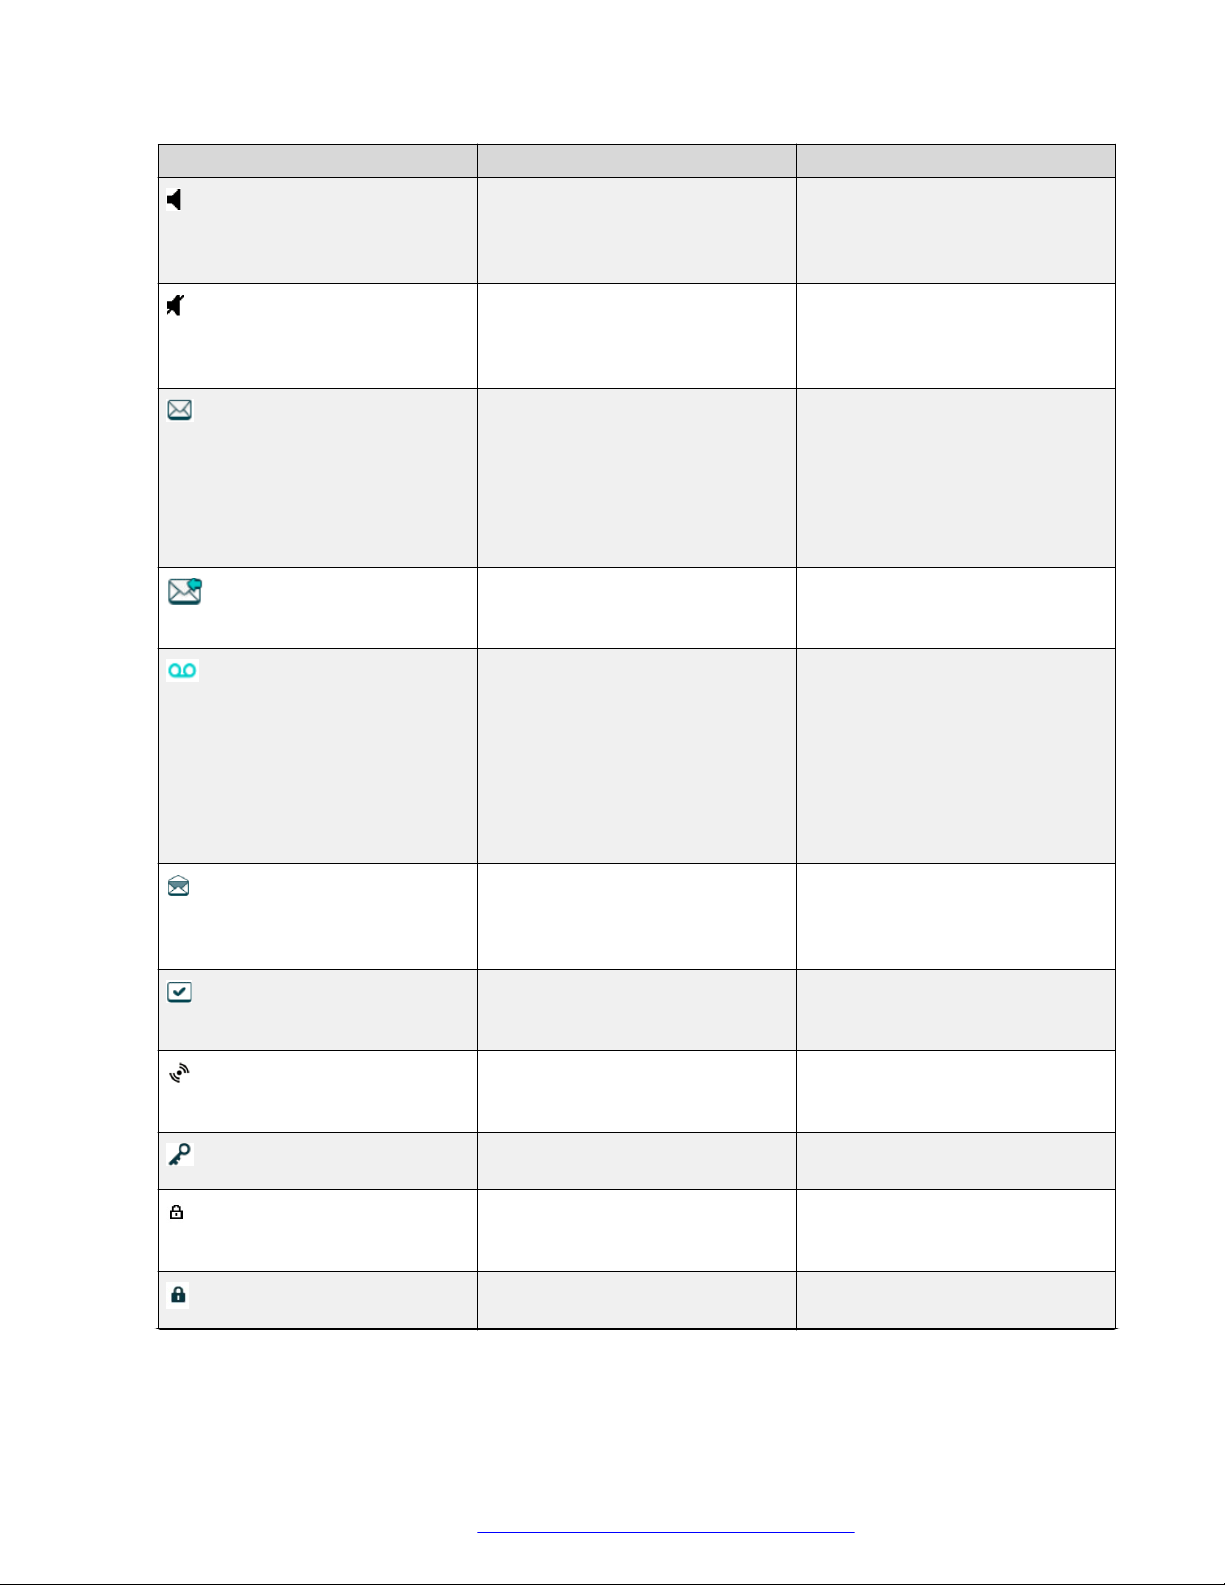
Read message Also known as Read Interactive
message, this icon in front of a
message shows that this
message once has been read.
Sent message This icon is displayed when a
message is delivered to its
recipient.
High prio Also known as Alarm prio, this
icon indicates high priority of a
message.
Key lock This icon indicates a locked
keypad.
Locked entry This icon indicates that the
contact cannot be edited or
deleted by the user.
Phone lock This icon indicates a locked
handset.
Table continues…
August 2019 Using 3735 DECT handsets with Communication Manager and IP Office 22
Comments on this document? infodev@avaya.com

Icon Name Description
Bluetooth This icon indicates that Bluetooth
is enabled.
Bluetooth headset This icon indicates that Bluetooth
headset is connected to the
handset.
Headset This icon indicates that a corded
headset is connected to the
handset.
Outgoing call This icon is added to all outgoing
calls in the call list.
Incoming call This icon is added to all answered
calls in the call list.
Push-to-talk This icon is added to all incoming,
outgoing, missed and answered
PTT calls in the call list or missed
calls.
Note:
Accessories
The icon is added when a
PTT invitation is managed as
a call only.
Missed call This icon is added to all missed
calls in the call list.
Missed call This icon indicates missed calls in
the status bar.
WinPDM/Device Manager
communication
This icon is visible when handset
is communicating with WinPDM
or Device Manager via advanced
charger.
This icon is also visible when IPDECT Master is connecting to
BroadWorks Device Management
System and 3735 DECT handset
is subscribed to this system.
August 2019 Using 3735 DECT handsets with Communication Manager and IP Office 23
Comments on this document? infodev@avaya.com
Avaya 3735 DECT handset overview
Menu Icons
Icon Name Description
Contacts Contains all names or numbers in
My favorites Contains menu shortcuts used to
Messaging Contains all message handling
Calls Contains call lists, call time, and
the Contacts list.
In addition, a company
phonebook* with up to 1000
entries can be downloaded to the
handset via the WinPDM.
A central phonebook* can also be
accessed from the Contacts
menu.
The asterisk (*) denotes system
dependency.
customize own menu.
such as reading and writing
messages.
call services*. Call services is
configured in the WinPDM or
Device Manager.
The asterisk (*) denotes system
dependency.
Connections Contains Bluetooth connection,
Headset selection, System
selection, and In charger
selection.
Settings Contains personal handset
settings such as changing the
ring volume, selecting language.
Shortcuts Contains shortcuts for:
• Soft keys
• Hot keys
• Navigation keys
• Multifunction
Note:
3735 Alarm does not support
Multifunction.
Table continues…
August 2019 Using 3735 DECT handsets with Communication Manager and IP Office 24
Comments on this document? infodev@avaya.com
Icon Name Description
Profiles Allows up to four different profiles
373x Keys and buttons
Icon Name Description
Off-hook key This key is used for connecting
On-hook and On/Off key This key is used for disconnecting
Navigation/Confirmation Key This key is used to step in the
Sound off key A long press on the key in idle
N/A
Mute and PTT button A long press on the Mute in idle
Accessories
to be added. The Normal profile
is active by default.
calls. One short press in standby
mode opens the call list.
calls and returning to main
screen. A long press in standby
mode switches the handset on or
off.
menu and when working in text
mode. The picture on the left
shows how to press the
navigation key to step left or right
and up or down in the menu. The
navigation key can be
programmed. Up is by default a
shortcut to the Inbox and Down
is a shortcut to Call contact.
During a call the volume can be
increased or decreased by
pressing up and down on the
navigation key.
mode, changes between ring
signal on or off. At incoming call,
a short press on the key silences
the ring signal. During a call, a
long press on the key changes
between microphone on or off.
mode, changes between ring
signal on or off, at incoming call, a
short press on the button silences
the ring signal. During a call, a
long press on the button changes
between microphone on or off.
During a PTT call, the
microphone is silenced when PTT
is released.
Table continues…
August 2019 Using 3735 DECT handsets with Communication Manager and IP Office 25
Comments on this document? infodev@avaya.com
Avaya 3735 DECT handset overview
Icon Name Description
Key lock, and Upper and Lower
case key
This key is to lock the keypad in
combination with the soft key
Lock. It is also for switching
between upper and lower case
and digits.
Soft keys The three Soft keys are located
just beneath the display. The
functions of each soft key is
indicated by text in the display
just above the keys.
In idle mode, the Soft keys can
be used for specific functions
defined by the user of the
handset.
- Hot keys Any key between 2 and 9 can be
set to a Hot key. A long press on
any of these numbers in stand by
mode are by default a shortcut to
the Call contact list. The list is in
an alphabetic order, and
depending on which key that is
pressed is dependent on where in
the list the contact appears. A
Hot key can be programmed to
give access to frequently used
functions such as dialling a
specific handset number, a
shortcut on the menu, or sending
an SMS.
- Multifunction The button is used as a shortcut
to functions; long or double press
modes. By default it is not used,
but can be defined by the user of
the handset. If the button is
defined, it can be used in standby
mode only.
Note:
The support for this feature
is dependent on what model
of handset is used.
- Volume button The two buttons placed on the
upper left side of the handset are
used for increasing or decreasing
the earpiece, headset, and the
loudspeaker volume.
August 2019 Using 3735 DECT handsets with Communication Manager and IP Office 26
Comments on this document? infodev@avaya.com
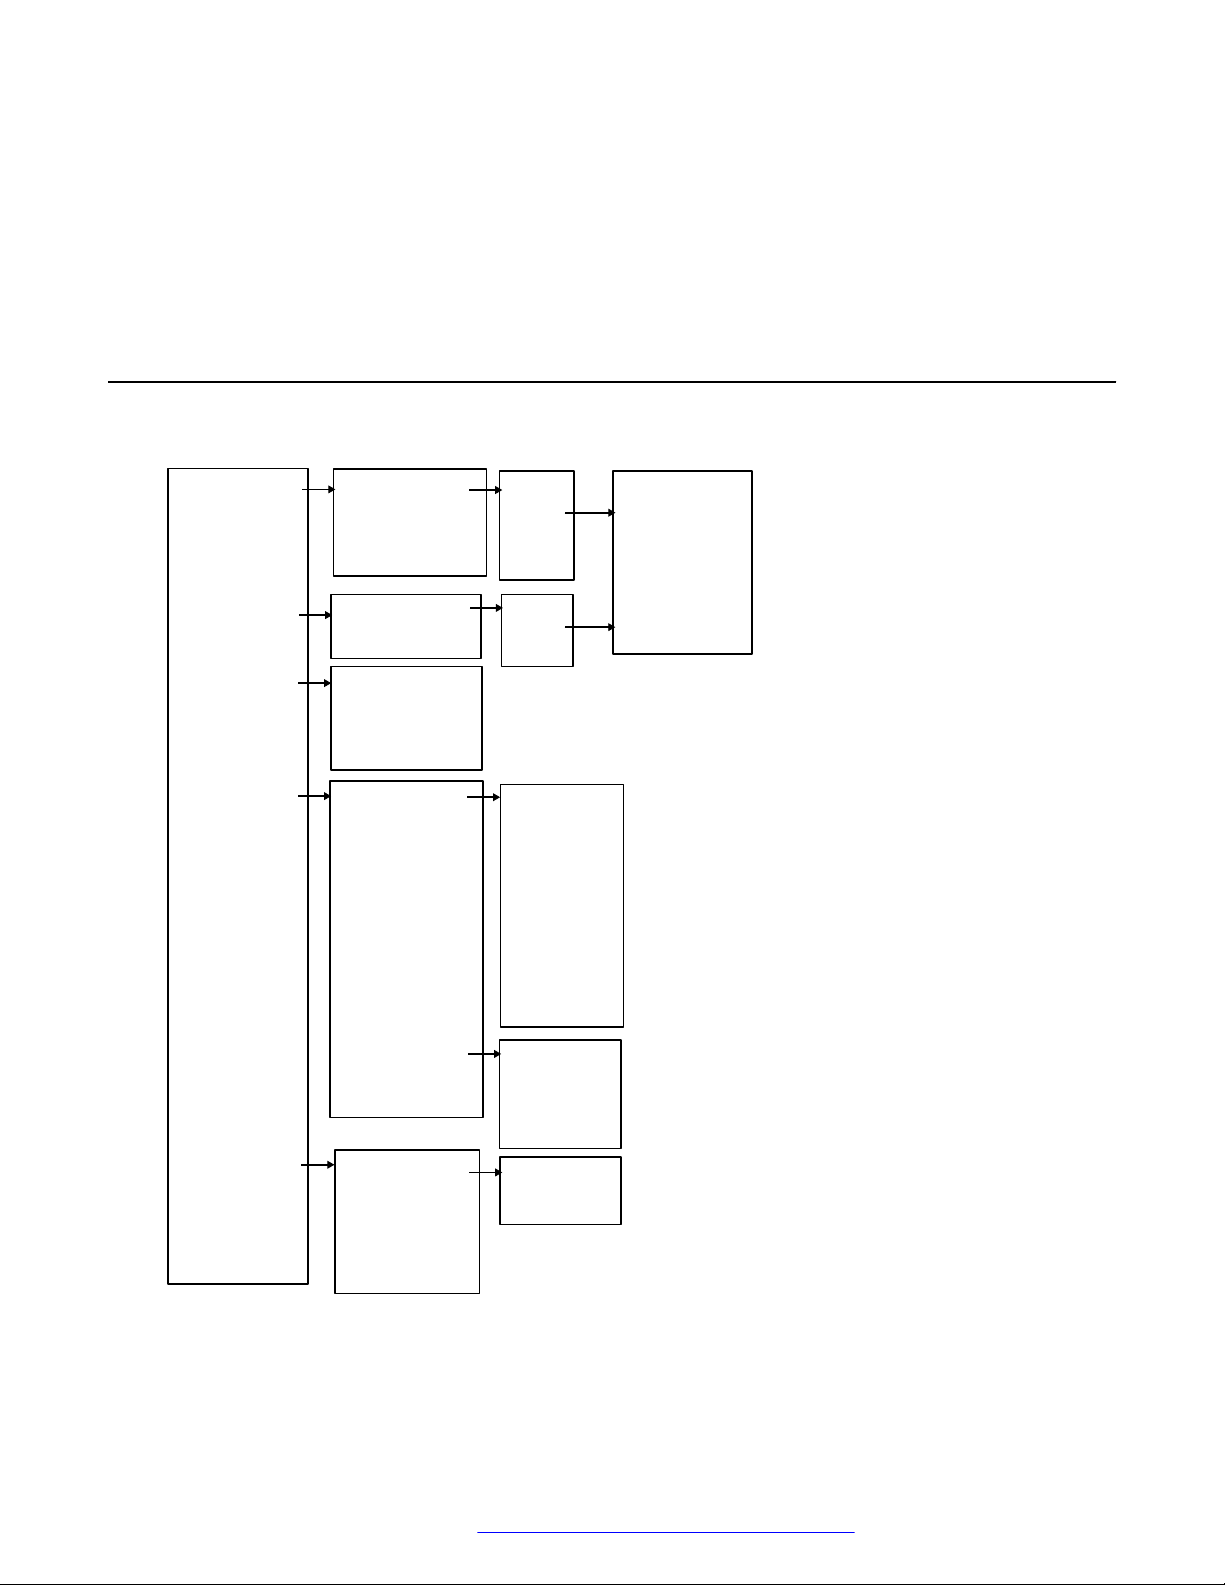
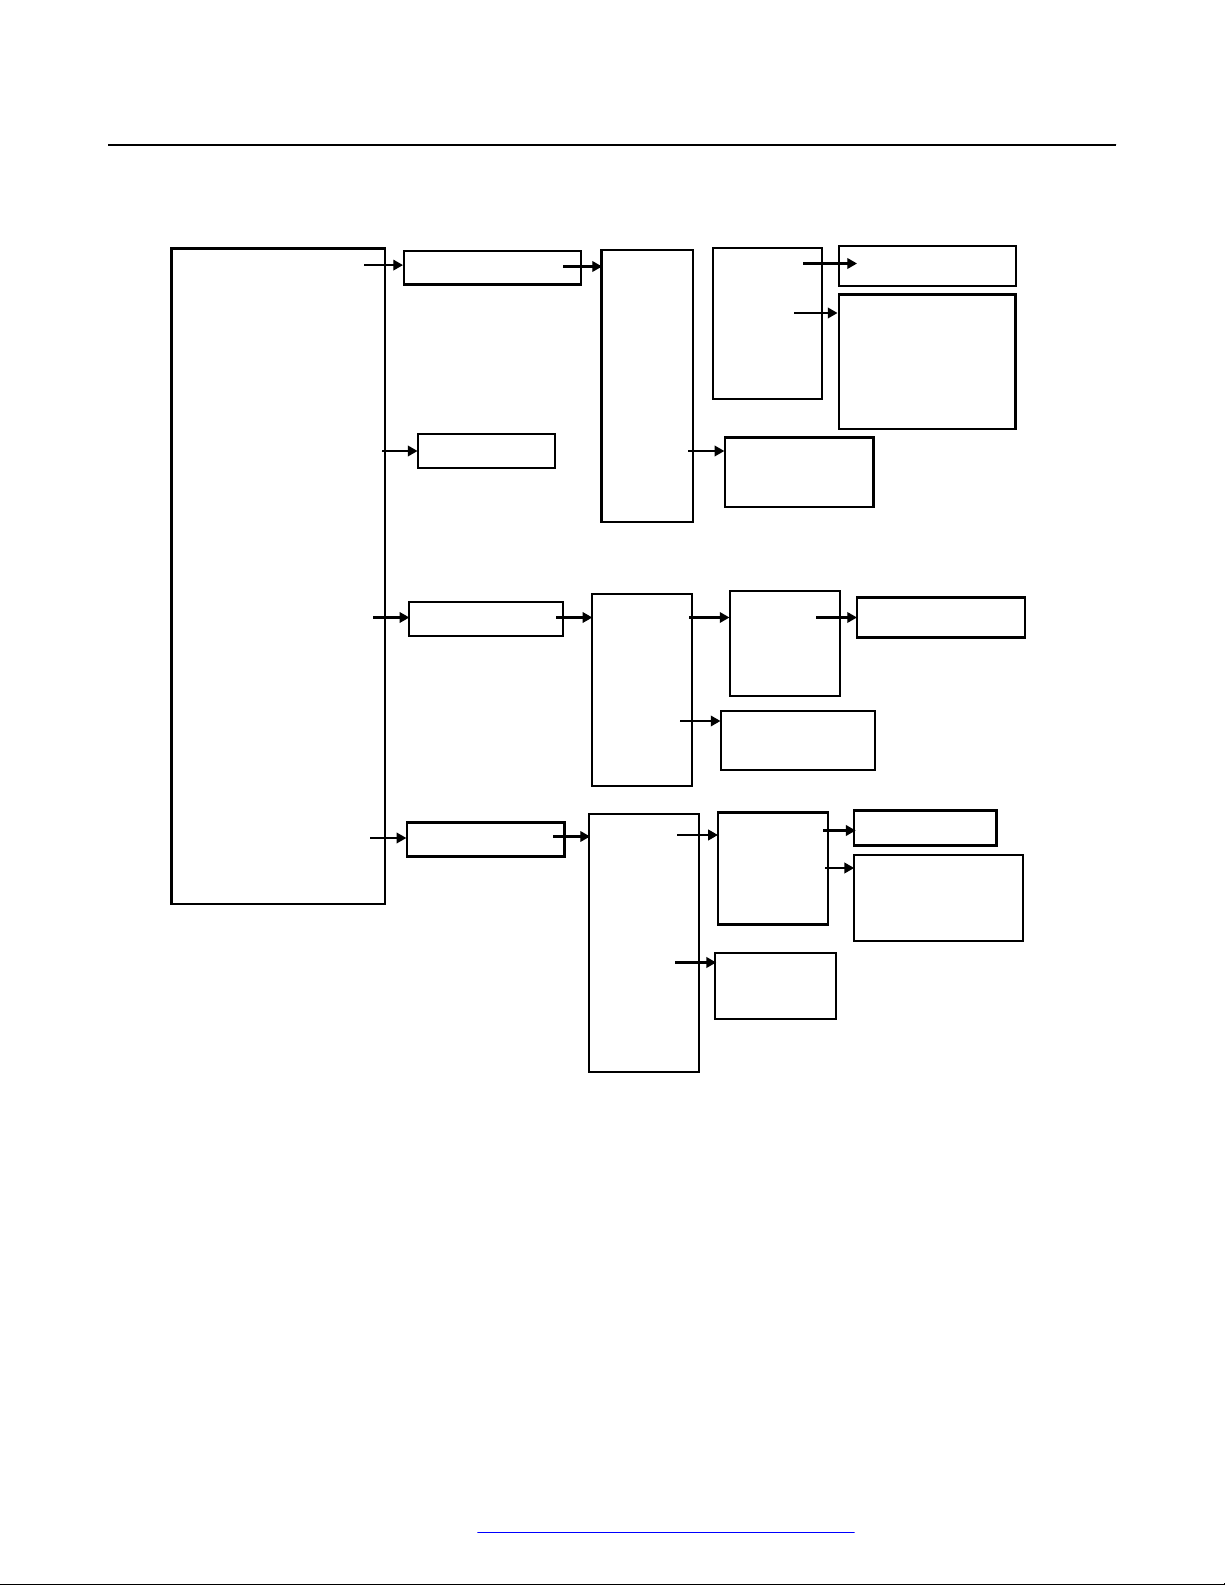
Chapter 3: Menu Tree
- Call list
- Missed calls
- Call time
- Call services
- Call
- More
- Back
- Call
- More
- Back
7891 01:30
7827 03:35
7682 05:26
7845 20-Oct-03
7682 05:26
7845 23-Sep-03
Total call time:
03:47:06
Last call:
00:00:07
- PTT Groups*
PTT Group 1
(example)
|
|
PTT Group 10
(example)
*) Visible if defined in the WinPDM/Device Manager
|
- Time of call
- Edit number
- Save number
- Send message
- Delete
- Delete all
>
>
>
>
>
>
- Deactivate
- Lunch
- Meeting
- Trip
- Vacation
- Out
- Absence 1
- Absence 2
- Absence 3
- Absence 4
- Absence *
- Divert calls* - Internal
- External
- No reply
- When busy
- Call
- Back
>
>
>
>
>
>
>
>
>
>
>
>
>
>
>
>
Calls
August 2019 Using 3735 DECT handsets with Communication Manager and IP Office 27
Comments on this document? infodev@avaya.com
*System dependent
- Central
phonebook*
- Delete contact
- Edit contact
- Add contact
- Call contact
- Search by name
- Search by number
- Last result
- Search
- From contact list
>
>
- Search
- From contact list
- New
- From Call list
>
- Search
- From contact list
>
>
- Call
- More
- Back
- View contact
- Add to contacts
- Send message
>
>
>
- Name
- Work number
- Mobile number
- Other number
- Ring signal
>
>
>
>
>
- Name
>
- Work number
>
- Mobile number
>
- Other number
>
- Ring signal
>
- Selected directory
- Enterprise
- Enterprise freq.
- User
- Group freq.
- Group
>
>
>
>
>
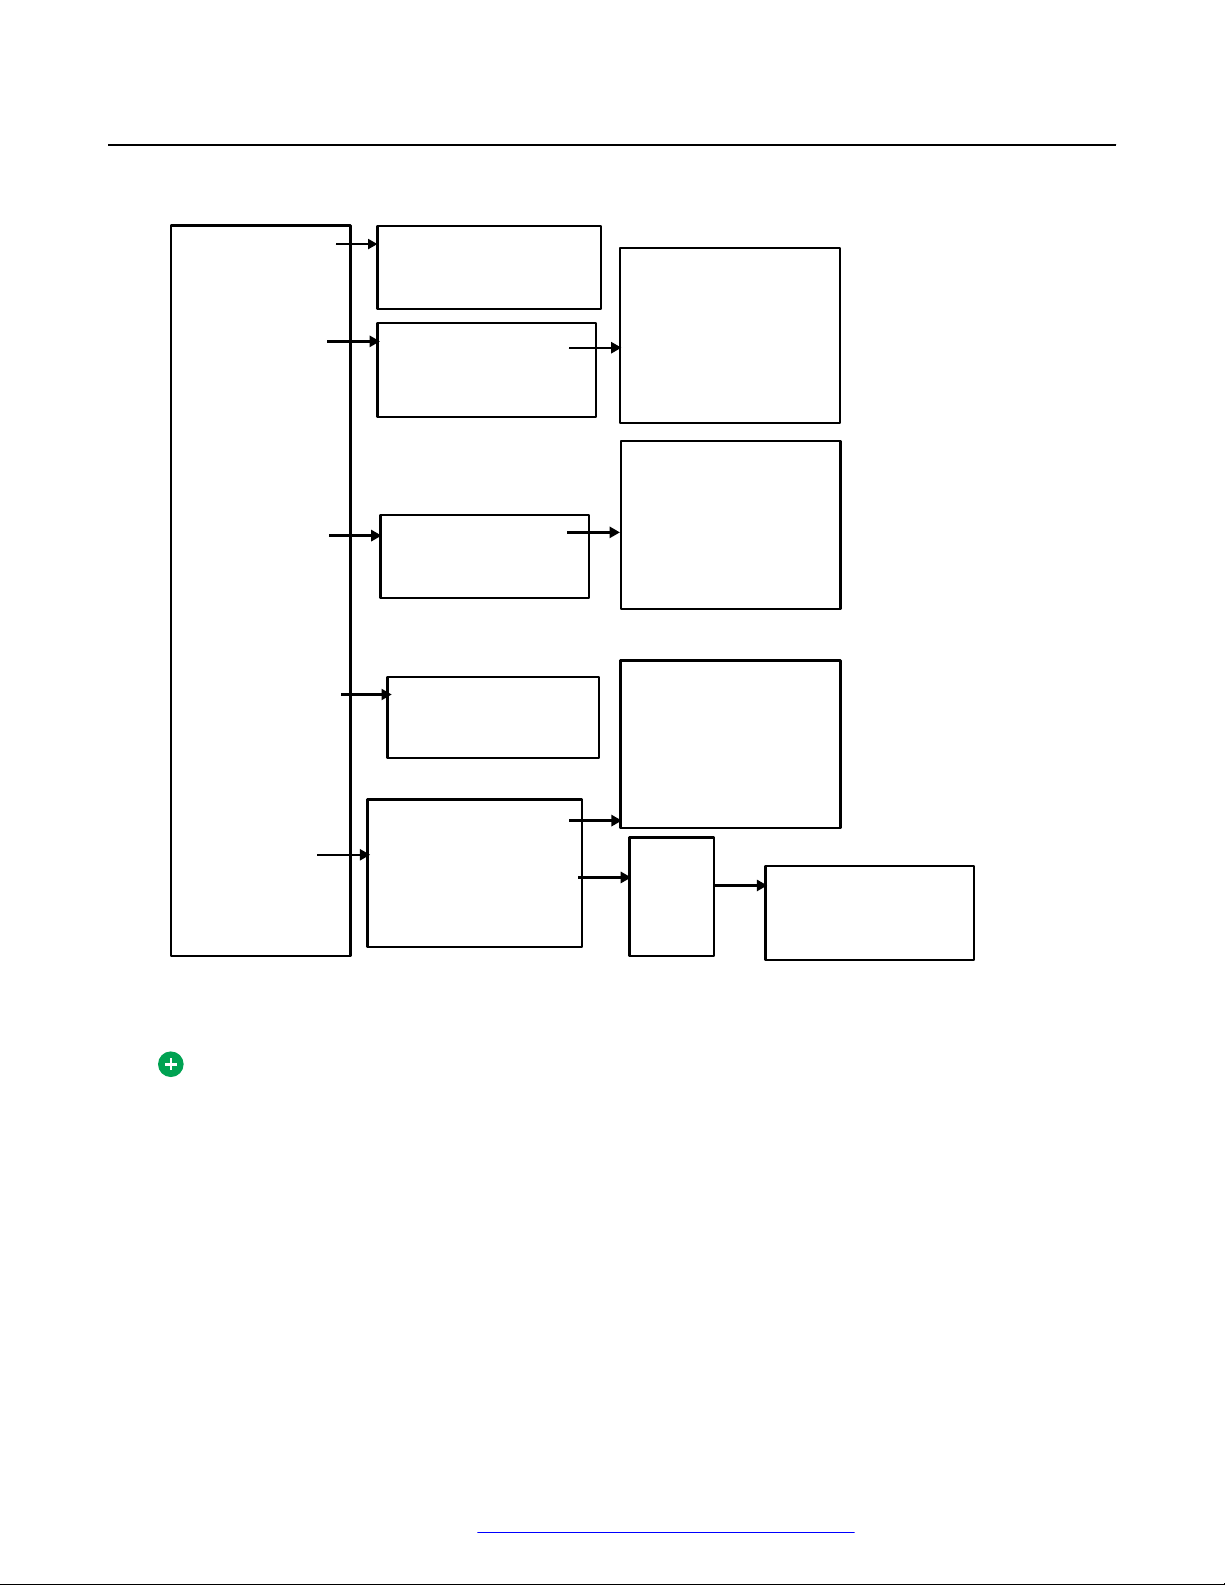
Menu Tree
Contacts
August 2019 Using 3735 DECT handsets with Communication Manager and IP Office 28
Tip:
When adding or editing a number in a contact, a variable or the character U in the Work/
Mobile/Other number field can be added that allows the user to enter one or more additional
numerical characters before calling the number.
Comments on this document? infodev@avaya.com

Profiles
- Normal
(default)
- Meeting
(example) *
- Add new
- Internal call
- External call
- Call back
- PTT
- Ring signal
- Message alert 1
|
|
- Message alert 7
- Beep
*This example profile does not have all applicable settings.
- Volume
- Message
alert
Profiles
August 2019 Using 3735 DECT handsets with Communication Manager and IP Office 29
Comments on this document? infodev@avaya.com
- Inbox
- Write new message
- Unsent
- Sent
Message List
- Enter text
Message List
Message List
- Reply
- More
- Close
- Enter text
>
- View
- Delete
>
- Forward >
- Call sender
- Save number
- More
- Delete
>
- Delete all >
- Back
- Edit
- More
- Back
- Send
- Clear
- Back
- Enter number
- Delete
>
- Delete all
>
- View
- Forward
- More
- Close
- Enter text
- Delete
- Call no. in text
- Save number
- More
- Back
- Delete
- Delete all
>
>
>
>
>
>
>
>
>
- Call no. in text*
* Visible if the number consists of minimum 3 digits.
Menu Tree
Messaging
August 2019 Using 3735 DECT handsets with Communication Manager and IP Office 30
Comments on this document? infodev@avaya.com
 Loading...