

Avaya 3120 Installation Manual

Avaya Secure Router 3120 Installation
Guide
NN47260-300, 03.01
December 2010
9.4

© 2010 Avaya Inc.
All Rights Reserved.
Notice
While reasonable efforts have been made to ensure that the
information in this document is complete and accurate at the time of
printing, Avaya assumes no liability for any errors. Avaya reserves the
right to make changes and corrections to the information in this
document without the obligation to notify any person or organization of
such changes.
Documentation disclaimer
“Documentation” means information published by Avaya in varying
mediums which may include product information, operating instructions
and performance specifications that Avaya generally makes available
to users of its products. Documentation does not include marketing
materials. Avaya shall not be responsible for any modifications,
additions, or deletions to the original published version of
documentation unless such modifications, additions, or deletions were
performed by Avaya. End User agrees to indemnify and hold harmless
Avaya, Avaya's agents, servants and employees against all claims,
lawsuits, demands and judgments arising out of, or in connection with,
subsequent modifications, additions or deletions to this documentation,
to the extent made by End User.
Link disclaimer
Avaya is not responsible for the contents or reliability of any linked Web
sites referenced within this site or documentation provided by Avaya.
Avaya is not responsible for the accuracy of any information, statement
or content provided on these sites and does not necessarily endorse
the products, services, or information described or offered within them.
Avaya does not guarantee that these links will work all the time and has
no control over the availability of the linked pages.
Warranty
Avaya provides a limited warranty on its Hardware and Software
(“Product(s)”). Refer to your sales agreement to establish the terms of
the limited warranty. In addition, Avaya’s standard warranty language,
as well as information regarding support for this Product while under
warranty is available to Avaya customers and other parties through the
Avaya Support Web site:
you acquired the Product(s) from an authorized Avaya reseller outside
of the United States and Canada, the warranty is provided to you by
said Avaya reseller and not by Avaya.
Licenses
THE SOFTWARE LICENSE TERMS AVAILABLE ON THE AVAYA
WEBSITE,
APPLICABLE TO ANYONE WHO DOWNLOADS, USES AND/OR
INSTALLS AVAYA SOFTWARE, PURCHASED FROM AVAYA INC.,
ANY AVAYA AFFILIATE, OR AN AUTHORIZED AVAYA RESELLER
(AS APPLICABLE) UNDER A COMMERCIAL AGREEMENT WITH
AVAYA OR AN AUTHORIZED AVAYA RESELLER. UNLESS
OTHERWISE AGREED TO BY AVAYA IN WRITING, AVAYA DOES
NOT EXTEND THIS LICENSE IF THE SOFTWARE WAS OBTAINED
FROM ANYONE OTHER THAN AVAYA, AN AVAYA AFFILIATE OR AN
AVAYA AUTHORIZED RESELLER; AVAYA RESERVES THE RIGHT
TO TAKE LEGAL ACTION AGAINST YOU AND ANYONE ELSE
USING OR SELLING THE SOFTWARE WITHOUT A LICENSE. BY
INSTALLING, DOWNLOADING OR USING THE SOFTWARE, OR
AUTHORIZING OTHERS TO DO SO, YOU, ON BEHALF OF
YOURSELF AND THE ENTITY FOR WHOM YOU ARE INSTALLING,
DOWNLOADING OR USING THE SOFTWARE (HEREINAFTER
REFERRED TO INTERCHANGEABLY AS “YOU” AND “END USER”),
AGREE TO THESE TERMS AND CONDITIONS AND CREATE A
BINDING CONTRACT BETWEEN YOU AND AVAYA INC. OR THE
APPLICABLE AVAYA AFFILIATE (“AVAYA”).
HTTP://SUPPORT.AVAYA.COM/LICENSEINFO/ ARE
http://support.avaya.com. Please note that if
Copyright
Except where expressly stated otherwise, no use should be made of
materials on this site, the Documentation, Software, or Hardware
provided by Avaya. All content on this site, the documentation and the
Product provided by Avaya including the selection, arrangement and
design of the content is owned either by Avaya or its licensors and is
protected by copyright and other intellectual property laws including the
sui generis rights relating to the protection of databases. You may not
modify, copy, reproduce, republish, upload, post, transmit or distribute
in any way any content, in whole or in part, including any code and
software unless expressly authorized by Avaya. Unauthorized
reproduction, transmission, dissemination, storage, and or use without
the express written consent of Avaya can be a criminal, as well as a
civil offense under the applicable law.
Third-party components
Certain software programs or portions thereof included in the Product
may contain software distributed under third party agreements (“Third
Party Components”), which may contain terms that expand or limit
rights to use certain portions of the Product (“Third Party Terms”).
Information regarding distributed Linux OS source code (for those
Products that have distributed the Linux OS source code), and
identifying the copyright holders of the Third Party Components and the
Third Party Terms that apply to them is available on the Avaya Support
Web site:
Trademarks
The trademarks, logos and service marks (“Marks”) displayed in this
site, the Documentation and Product(s) provided by Avaya are the
registered or unregistered Marks of Avaya, its affiliates, or other third
parties. Users are not permitted to use such Marks without prior written
consent from Avaya or such third party which may own the Mark.
Nothing contained in this site, the Documentation and Product(s)
should be construed as granting, by implication, estoppel, or otherwise,
any license or right in and to the Marks without the express written
permission of Avaya or the applicable third party.
Avaya is a registered trademark of Avaya Inc.
All non-Avaya trademarks are the property of their respective owners,
and “Linux” is a registered trademark of Linus Torvalds.
Downloading Documentation
For the most current versions of Documentation, see the Avaya
Support Web site:
Contact Avaya Support
Avaya provides a telephone number for you to use to report problems
or to ask questions about your Product. The support telephone number
is 1-800-242-2121 in the United States. For additional support
telephone numbers, see the Avaya Web site:
http://support.avaya.com/Copyright.
http://support.avaya.com.
http://support.avaya.com.
2 Avaya Secure Router 3120 Installation Guide December 2010

Contents
Chapter 1: Regulatory Information..........................................................................................7
International Regulatory Statements of Conformity..........................................................................................7
National Electromagnetic Compliance (EMC) Statements of Compliance........................................................7
FCC Statement (USA only)......................................................................................................................7
TIA–968–A................................................................................................................................................7
ICES statement (Canada only).........................................................................................................................8
Canadian Department of Communications Radio Interference Regulations............................................8
Règlement sure le brouillage radioélectrique du ministère des Communications....................................8
CE marking statement (Europe only)................................................................................................................9
EN55022 statement..................................................................................................................................9
EN55024 statement..................................................................................................................................9
EN300386 statement................................................................................................................................9
European Union and European Free Trade Association (EFTA) notice............................................................9
VCCI statement (Japan/Nippon only)..............................................................................................................10
BSMI statement (Taiwan only)........................................................................................................................10
MIC notice (Republic of Korea only)...............................................................................................................10
National Safety Statements of Compliance.....................................................................................................11
EN60950 statement................................................................................................................................11
RoHS Compliance Statement..........................................................................................................................11
NOM statement (Mexico only).........................................................................................................................12
Información NOM (unicamente para México).........................................................................................12
Denan statement (Japan/Nippon only)............................................................................................................13
Notices............................................................................................................................................................13
Cautions and Warnings...................................................................................................................................14
Chapter 2: New in this release...............................................................................................15
Chapter 3: ABOUT THIS GUIDE.............................................................................................17
Organization....................................................................................................................................................17
Conventions....................................................................................................................................................18
Notices....................................................................................................................................................18
Cautions and Warnings...................................................................................................................................19
Documentation................................................................................................................................................19
Avaya Secure Router Guides.................................................................................................................20
Chapter 4: PRODUCT INTRODUCTION.................................................................................21
3120 Chassis..................................................................................................................................................21
Front Panel.............................................................................................................................................21
Back Panel.............................................................................................................................................22
Chapter 5: INSTALLATION......................................................................................................23
Site Preparation..............................................................................................................................................23
Environment...........................................................................................................................................23
Site Safety..............................................................................................................................................24
Power Requirements..............................................................................................................................24
Network Connection...............................................................................................................................25
Equipment Rack.....................................................................................................................................25
Tools and Materials.................................................................................................................................26
Unpacking the Secure Router 3120................................................................................................................27
Avaya Secure Router 3120 Installation Guide December 2010 3

Mounting the Secure Router 3120..................................................................................................................28
Surface Mount........................................................................................................................................28
Rack Mount............................................................................................................................................28
Secure Router 3120 Power.............................................................................................................................30
DC Power...............................................................................................................................................30
AC Power...............................................................................................................................................32
External Alarms...............................................................................................................................................34
Connecting to the Network..............................................................................................................................35
LAN/WAN Interface................................................................................................................................35
Serial Interface.......................................................................................................................................36
Operator Interface...........................................................................................................................................38
Local Access..........................................................................................................................................38
Remote Access......................................................................................................................................38
Telnet and Web UI..................................................................................................................................40
Console Messages.................................................................................................................................40
Connecting a Modem.............................................................................................................................40
Chapter 6: CONFIGURATION..................................................................................................45
Applying Power...............................................................................................................................................45
Logging In.......................................................................................................................................................45
Command Tips.......................................................................................................................................46
Configuration Tips...................................................................................................................................46
Ethernet..................................................................................................................................................47
Changing Login Parameters...........................................................................................................................47
Password................................................................................................................................................47
Administrator Account............................................................................................................................48
Secure Router 3120 Host Name............................................................................................................48
Date and Time........................................................................................................................................49
Adding Users..........................................................................................................................................49
Removing Users.....................................................................................................................................50
Default Configuration......................................................................................................................................50
Default Serial Interface mode..........................................................................................................................52
Upgrade considerations..................................................................................................................................53
Firewall upgrade considerations.............................................................................................................53
BGP upgrade considerations for SR3120..............................................................................................54
Upgrading Secure Router Software................................................................................................................54
Boot Process...................................................................................................................................................56
Interface Configuration....................................................................................................................................56
E1 Interface............................................................................................................................................56
T1 Interface............................................................................................................................................57
DS3 Interface..........................................................................................................................................57
CT3 Interface..........................................................................................................................................57
Serial Interface.......................................................................................................................................58
Bundle Configuration.......................................................................................................................................58
E1/PPP Bundle.......................................................................................................................................59
NxE1/MLPPP Bundle.............................................................................................................................59
NxE1/MFR Bundle..................................................................................................................................59
Fractional E1/Cisco-compatible HDLC Bundle.......................................................................................60
Fractional T1/Cisco-compatible HDLC Bundle.......................................................................................60
T1/PPP Bundle.......................................................................................................................................60
DS3/PPP Bundle....................................................................................................................................60
4 Avaya Secure Router 3120 Installation Guide December 2010

DS3/FR Bundle.......................................................................................................................................61
CT3/PPP Bundle....................................................................................................................................61
CT3/FR Bundle.......................................................................................................................................61
NxT1/MFR Bundle..................................................................................................................................62
Frame Relay Bundle...............................................................................................................................62
Serial/FR Bundle....................................................................................................................................62
Serial/MFR Bundle.................................................................................................................................63
Serial/PPP Bundle..................................................................................................................................63
Serial/MLPPP Bundle.............................................................................................................................64
Serial/Cisco-compatible HDLC Bundle...................................................................................................64
Routing Configuration.....................................................................................................................................64
RIP..........................................................................................................................................................64
OSPF......................................................................................................................................................65
BGP4......................................................................................................................................................65
Compact Flash Configuration..........................................................................................................................66
Saving Configurations.....................................................................................................................................67
Chapter 7: TROUBLESHOOTING...........................................................................................69
Alarms and Secure Router 3120 Status..........................................................................................................69
WAN Statistics........................................................................................................................................70
Power Supply Alarms.............................................................................................................................70
Network Tests..................................................................................................................................................71
Ping Test.................................................................................................................................................71
T1 Tests..................................................................................................................................................71
Smartjack Remote Loopback..........................................................................................................................74
T1 BERT Testing support................................................................................................................................74
Temperature Sensor Readings.......................................................................................................................76
Diagnostics Tips..............................................................................................................................................77
General Symptoms.................................................................................................................................77
Chapter 8: SPECIFICATIONS..................................................................................................83
Environment and Power..................................................................................................................................83
Interface..........................................................................................................................................................84
Cable Pinouts..................................................................................................................................................86
MIBs................................................................................................................................................................99
Chapter 9: LED STATES........................................................................................................101
Chapter 10: ACCESSORIES..................................................................................................103
Accessories...................................................................................................................................................103
Chapter 11: COMPLIANCE AND STANDARDS....................................................................107
Compliance...................................................................................................................................................107
FCC Conformance........................................................................................................................................108
Incidence of Harm................................................................................................................................108
Rights of the Telephone Company.......................................................................................................108
Industry Canada............................................................................................................................................108
Chapter 12: Translations of Safety Messages....................................................................109
Class A device Caution statement................................................................................................................109
Qualified service personnel warning statement.............................................................................................110
Overcurrent warning statement.....................................................................................................................111
Avaya Secure Router 3120 Installation Guide December 2010 5

6 Avaya Secure Router 3120 Installation Guide December 2010

Chapter 1: Regulatory Information
International Regulatory Statements of Conformity
This is to certify that the Avaya Secure Router 3120 Series products are evaluated to the
international regulatory standards for electromagnetic compliance (EMC) and safety and was
found to have met the requirements for the following international standards:
• EMC - Electromagnetic Emissions – CISPR 22, Class A
• EMC - Electromagnetic Immunity – CISPR 24
• Electrical Safety – IEC 60950, with CB member national deviations
Further, the equipment has been certified as compliant with the national standards as detailed
below.
National Electromagnetic Compliance (EMC) Statements of
Compliance
FCC Statement (USA only)
This equipment has been tested and found to comply with the limits for a Class A digital device,
pursuant to Part 15 of the Federal Communications Commission (FCC) rules. These limits are
designed to provide reasonable protection against harmful interference when the equipment
is operated in a commercial environment. This equipment generates, uses, and can radiate
radio frequency energy. If it is not installed and used in accordance with the instruction manual,
it may cause harmful interference to radio communications. Operation of this equipment in a
residential area is likely to cause harmful interference, in which case users will be required to
take whatever measures may be necessary to correct the interference at their own expense.
TIA–968–A
This equipment complies with Part 68 of the FCC rules. The FCC Part 68 label is located on
the bottom chassis panel. This label contains the FCC Registration Number and Ringer
Avaya Secure Router 3120 Installation Guide December 2010 7

Regulatory Information
Equivalence Number (REN) for this equipment. If requested, this information must be provided
to your telephone company.
Connection to the telephone network should be made by using standard modular telephone
jacks, type RJ-48C. The RJ-48C plug and/or jacks used must comply with the FCC Part 68
rules.
MFRs Port Identifier Facilities Interface
Code
T1: lines 1-4 04DU9-1SN 6.0N RJ-48C
04DU9-1ZN
T1: lines 1-8 04DU9-1SN 6.0N RJ-48C
04DU9-1ZN
T1: lines 1-16 04DU9-1SN 6.0N RJ-48C
04DU9-1ZN
Service Order Code Network
Connectors
ICES statement (Canada only)
Canadian Department of Communications Radio Interference
Regulations
This digital apparatus (Avaya Secure Router 3120 Series) does not exceed the Class A limits
for radio-noise emissions from digital apparatus as set out in the Radio Interference
Regulations of the Canadian Department of Communications.
Règlement sure le brouillage radioélectrique du ministère des
Communications
Cet appareil numérique (Avaya Secure Router 3120 Series) respecte les limites de bruits
radioélectriques visant les appareils numériques de classe A prescrites dans le Règlement sur
le brouillage radioélectrique du ministère des Communications du Canada.
8 Avaya Secure Router 3120 Installation Guide December 2010

CE marking statement (Europe only)
EN55022 statement
This is to certify that the Avaya Secure Router 3120 series products are shielded against the
generation of radio interference in accordance with the application of Council Directive 89/336/
EEC. Conformity is declared by the application of EN 55022 Class A (CISPR 22).
Caution:
This device is a Class A product. Operation of this equipment in a residential area is likely
to cause harmful interference, in which case users will be required to take whatever
measures may be necessary to correct the interference at their own expense.
CE marking statement (Europe only)
EN55024 statement
This is to certify that the Avaya Secure Router 3120 series products are shielded against the
susceptibility to radio interference in accordance with the application of Council Directive
89/336/EEC. Conformity is declared by the application of EN 55024 (CISPR 24).
EN300386 statement
The Avaya Secure Router 3120 series complies with the requirements of EN 300386 V1.3.1
for emissions and for immunity for a Class A device intended for use in either
Telecommunications centre or locations other than telecommunications centres given the
performance criteria as specified by the manufacturer.
European Union and European Free Trade Association
(EFTA) notice
All products labeled with the CE marking comply with the Electromagnetic
Compliance (EMC) Directive (89/336/EEC) and the Low Voltage Directive
(73/336/EEC) issued by the Commission of the European Community.
Avaya Secure Router 3120 Installation Guide December 2010 9
Regulatory Information
Compliance with these directives implies conformity to the following European Norms (ENs).
The equivalent international standards are listed in parenthesis.
• EN 55022 (CISPR 22)–Electromagnetic Interference
• EN 55024 (IEC 61000-4-2, -3, -4, -5, -6, -8, -11)–Electromagnetic Immunity
• EN 61000-3-2 (IEC 610000-3-2)–Power Line Harmonics
• EN 61000-3-3 (IEC 610000-3-3)–Power Line Flicker
VCCI statement (Japan/Nippon only)
This is a Class A product based on the standard of the Voluntary Control Council for
Interference (VCCI) for information technology equipment. If this equipment is used in a
domestic environment, radio disturbance may arise. When such trouble occurs, the user may
be required to take corrective actions.
BSMI statement (Taiwan only)
This is a Class A product based on the standard of the Bureau of Standards, Metrology and
Inspection (BSMI) CNS 13438, Class A.
MIC notice (Republic of Korea only)
This device has been approved for use in Business applications only per the Class A
requirements of the Republic of Korea Ministry of Information and Communications (MIC). This
device may not be sold for use in a non-business application.
10 Avaya Secure Router 3120 Installation Guide December 2010
National Safety Statements of Compliance
Observe the Regulatory Marking label on the back or bottom of each switch for specific
certification information pertaining to this model. Each model in the Avaya Secure Router 3120
Series is approved for shipment to/usage in Korea and is labeled as such, with all appropriate
text and the appropriate MIC reference number.
National Safety Statements of Compliance
EN60950 statement
This is to certify that the Avaya Secure Router 3120 Series products are in compliance with
the requirements of EN 60950 in accordance with the Low Voltage Directive. Additional national
differences for all European Union countries have been evaluated for compliance.
RoHS Compliance Statement
The Restriction on Hazardous Substances Directive (RoHS) (2002/95/EC), which
accompanies the WEEE Directive, bans the use of heavy metals and brominated flameretardants in the manufacture of electrical and electronic equipment. Specifically, restricted
materials under the RoHS Directive are Lead (including Solder used in PCB's), Cadmium,
Mercury, Hexavalent Chromium, and Bromine.
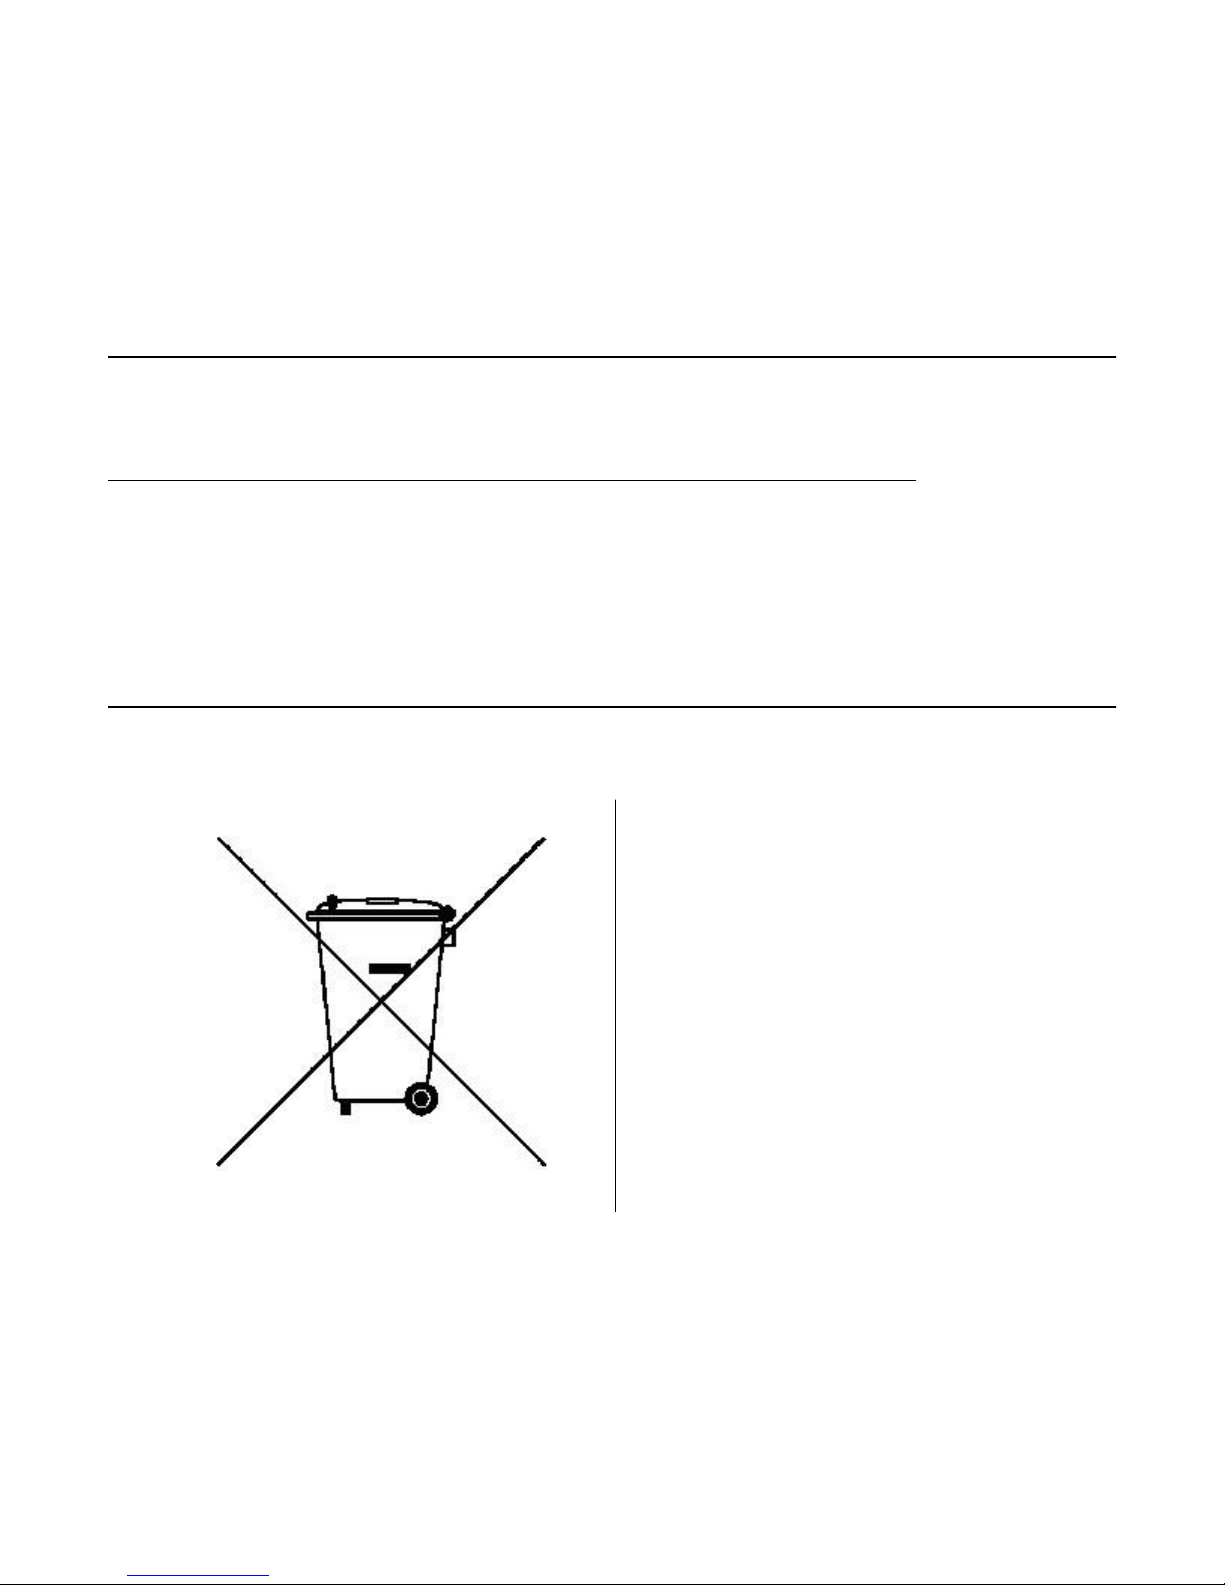
This product at end of life is subject to
separate collection and treatment in the EU
Member States, Norway, and Switzerland
and therefore is marked with the symbol
shown at the left. Treatment applied at end of
life of these products in these countries shall
comply with the applicable national laws
implementing Directive 2002/96EC on Waste
of Electrical and Electronic Equipment
(WEEE).
The WEEE Directive 2002/96/EC and RoHS
(Restriction of Hazardous Substances)
Directive 2002/95/EC sets collection,
recycling and recovery targets for various
categories of electrical products and their
waste.
Avaya Secure Router 3120 Installation Guide December 2010 11

Regulatory Information
Avaya declares compliance with the European Union (EU) WEEE Directive (2002/96/EC).
NOM statement (Mexico only)
The following information is provided on the devices described in this document in compliance
with the safety requirements of the Norma Oficial Méxicana (NOM):
Exporter: Avaya 4655 Great America Parkway Santa Clara CA 95054 USA
Importer: Avaya Networks de México, S.A. de C.V. Avenida Insurgentes Sur #1605 Piso
30, Oficina Col. San Jose Insurgentes Deleg-Benito Juarez México D.F.
03900
Tel: Fax: 52 5 480 2100 52 5 480 2199
Input: Model 3120 100-240 ~ 2.5A 50-60Hz
Información NOM (unicamente para México)
La información siguiente se proporciona en el dispositivo o en los dispositivos descritos en
este documento, en cumplimiento con los requisitos de la Norma Oficial Méxicana (NOM):
Exportador: Avaya 4655 Great America Parkway Santa Clara CA 95054 USA
Importador: Avaya Networks de México, S.A. de C.V. Avenida Insurgentes Sur #1605 Piso
30, Oficina Col. San Jose Insurgentes Deleg-Benito Juarez México D.F.
03900
Tel: Fax: 52 5 480 2100 52 5 480 2199
Entrada Modele 3120 CA 100-240 ~ 2.5A 50-60Hz
12 Avaya Secure Router 3120 Installation Guide December 2010

Denan statement (Japan/Nippon only)
Notices
Denan statement (Japan/Nippon only)
Notice paragraphs alert you about issues that require your attention. The following paragraphs
describe the types of notices used in this guide.
Note:
Notes provide tips and useful information regarding the installation and operation of Avaya
Secure Routers.
Electrostatic alert:
ESD
ESD notices provide information about how to avoid discharge of static electricity and
subsequent damage to Avaya Secure Routers.
Caution:
Caution notices provide information about how to avoid possible service disruption or
damage to Avaya Secure Routers.
Warning:
Warning notices provide information about how to avoid personal injury when working with
Avaya Secure Routers.
Voltage:
Danger — High Voltage notices provide information about how to avoid a situation or
condition that can cause serious personal injury or death from high voltage or electric shock.
Avaya Secure Router 3120 Installation Guide December 2010 13
Regulatory Information
Danger:
Danger notices provide information about how to avoid a situation or condition that can
cause serious personal injury or death.
Cautions and Warnings
Warning:
Installation must be performed by qualified service personnel only. Read and follow all
warning notices and instructions marked on the product or included in the documentation.
Warning:
The SR3120 relies on the building’s installation for overcurrent protection. Ensure that a fuse
or circuit breaker no larger than 120 VAC, 15A U.S. (240 VAC, 10 A international) is used
on the phase conductors.
Caution:
Always use an ESD wrist strap when installing or replacing Secure Router 3120
components. Make sure that the ESD strap makes contact with your skin.
Warning:
Before working on this equipment be aware of good safety practices and the hazards
involved with electrical circuits.
Refer to the 3120 Router Installation Guide for more detailed information about safety
information and how to install, configure, operate, and troubleshoot this equipment.
Warning:
This device is intended to be installed in a restricted-access location.
Warning:
Before working on this equipment be aware of good safety practices and the hazards
involved with electrical circuits. Working on this equipment without this knowledge could
result in bodily injury.
Warning:
Do not operate this equipment without a suitable electrical ground conductor. If you are
unsure of the adequacy of the grounding capability in your installation environment, contact
an authorized electrician or a representative from your local electrical inspection authority.
14 Avaya Secure Router 3120 Installation Guide December 2010

Chapter 2: New in this release
This topic identifies the new feature content that has been added for Releases 9.2, 9.3, and 9.4 in the
Avaya Secure Router 3120 Series Installation Guide.
New in this release
New feature content from existing release notes and readmes from release 9.2 to 9.4 is now incorporated
into this document. For more information, see
Upgrade considerations on page 53
•
Firewall upgrade considerations on page 53
•
• BGP upgrade considerations for SR3120 on page 54
• Smartjack Remote Loopback on page 74
T1 BERT Testing support on page 74
•
• Temperature Sensor Readings on page 76
Avaya Secure Router 3120 Installation Guide December 2010 15

New in this release
16 Avaya Secure Router 3120 Installation Guide December 2010

Chapter 3: ABOUT THIS GUIDE
This chapter provides information about the intended audience for this Avaya Secure Router 3120 guide,
how this guide is organized, typographical conventions, the use of notices, and related documentation.
This guide is designed for network managers and technicians who are responsible for the installation and
administration of networking equipment in Telco and service provider environments. Knowledge of
Telecom technologies and standards, T1, DS3, Serial, and Ethernet technologies is assumed.
Instructions are provided in this guide for installing Secure Router 3120s and configuring basic system
parameters. Important safety instructions related to network telecommunications equipment are included
in this guide.
Organization
The following tables describe the organization and content of this guide.
Table 1: Guide Organization: Chapters
Chapter Description
1 About This Guide defines the user audience, and describes the
organization of this guide, use of special notices, and other Avaya user
guides.
2 PRODUCT INTRODUCTION on page 21 provides a description of
installation site requirements, and cables and tools required for installing
Secure Router 3120s.
3 INSTALLATION on page 23 describes the Secure Router 3120 front
and back panels and how to install Secure Router 3120s. Information is
also provided about the operator interface, network cabling, alarms, and
Secure Router 3120 power.
4 CONFIGURATION on page 45 describes powering on the Secure
Router 3120, initial configuration, logging in, factory defaults, and
changing the default password.
5 TROUBLESHOOTING on page 69 provides information about network
indicators, tests, and general troubleshooting tips. A summary of
common problems and solutions is also included.
Avaya Secure Router 3120 Installation Guide December 2010 17
ABOUT THIS GUIDE
Table 2: Guide Organization: Appendices
Appendix Description
A SPECIFICATIONS on page 83 lists the electrical, physical, and
networking characteristics of Secure Router 3120s. Cable pinout
information is also provided.
B LED STATES on page 101 provides information about interpreting
Secure Router 3120 LEDs.
C ACCESSORIES on page 103 provides information about ordering
cables, replacement parts, and printed documentation for Avaya
products.
D COMPLIANCE AND STANDARDS on page 107 provides regulatory
information and compliance information applicable to these Avaya
products.
Conventions
This guide uses the following typographical conventions:
Table 3: Text Conventions
Font Description
boldface font Used for commands that you enter, words that you type, or keyboard
screen font
Notices
Notice paragraphs alert you about issues that require your attention. The following paragraphs
describe the types of notices used in this guide.
Note:
Notes provide tips and useful information regarding the installation and operation of Secure
Router 3120s.
keys that you press.
Used to display a screen capture example.
Electrostatic alert:
ESD
18 Avaya Secure Router 3120 Installation Guide December 2010
Cautions and Warnings
ESD notices provide information about how to avoid discharge of static electricity and
subsequent damage to Secure Router 3120s.
Caution:
Caution notices provide information about how to avoid possible service disruption or
damage to Secure Router 3120s.
Warning:
Warning notices provide information about how to avoid personal injury when working with
Secure Router 3120s.
Voltage:
Danger — High Voltage notices provide information about how to avoid a situation or
condition that can cause serious personal injury or death from high voltage or electric shock.
Danger:
Danger notices provide information about how to avoid a situation or condition that can
cause serious personal injury or death.
Cautions and Warnings
Warning:
Installation must be performed by qualified service personnel only. Read and follow all
warning notices and instructions marked on the product or included in the documentation.
For translations of this statement, see Qualified service personnel warning statement on
page 110.
Warning:
The Secure Router 3120 relies on the building’s installation for overcurrent protection.
Ensure that a fuse or circuit breaker no larger than 120 VAC, 15A U.S. (240 VAC, 10 A
international) is used on the phase conductors. For translations of this statement, see
Overcurrent warning statement on page 111.
Documentation
All Router user guides are available in Portable Document Format (PDF). These PDF files are
included on the CD-ROM that ships with each Router system. The PDF files are also available
on the Router website: http://www.avaya.com.
Avaya Secure Router 3120 Installation Guide December 2010 19

ABOUT THIS GUIDE
To view PDF files, Adobe Acrobat Reader 4.0 must be installed on your PC. If you do not have
the Adobe Acrobat Reader installed on your system, you can obtain it free from the Adobe
website: http://www.adobe.com.
Avaya Secure Router Guides
Avaya Secure Router 3120 documentation includes the following:
• Avaya Secure Router 3120 Quick Start Guide
A quick start guide is shipped with each Secure Router 3120.
• Avaya Secure Router 3120 Installation Guide
This guide is designed for network managers and technicians who are responsible for the
installation of networking equipment in Telco and service provider network facility
environments.
• Avaya Secure Router 3120 Module Installation Guide
This guide describes the modules supported by theSecure Router 3120 and explains how
to handle them.
• Avaya Secure Router 3120 Configuration Guide
These guides explain how to implement specific features and protocols on Secure Router
3120.
• Avaya Secure Router 3120 Routing Guide
This user guide explains the general usability features of Secure Router 3120.
• Avaya Secure Router 3120 Command Reference Guide
This user guide explains how to configure Secure Router 3120 using the CLI.
• Avaya Secure Router 3120 Web UI User Guide
This user guide explains how to configure Secure Router 3120 using the WebUI.
20 Avaya Secure Router 3120 Installation Guide December 2010
Chapter 4: PRODUCT INTRODUCTION
This chapter provides information about front and back panels for Avaya Secure Router 3120s. In addition,
information is provided about cable connection ports and panel components.
3120 Chassis
This section describes front and back-panel components of the Secure Router 3120. Additional
information is also provided about external cables, wiring, and connection points.
The Secure Router 3120 comes with single and dual AC, single DC and dual DC, and single
AC/single DC power options.
Front Panel
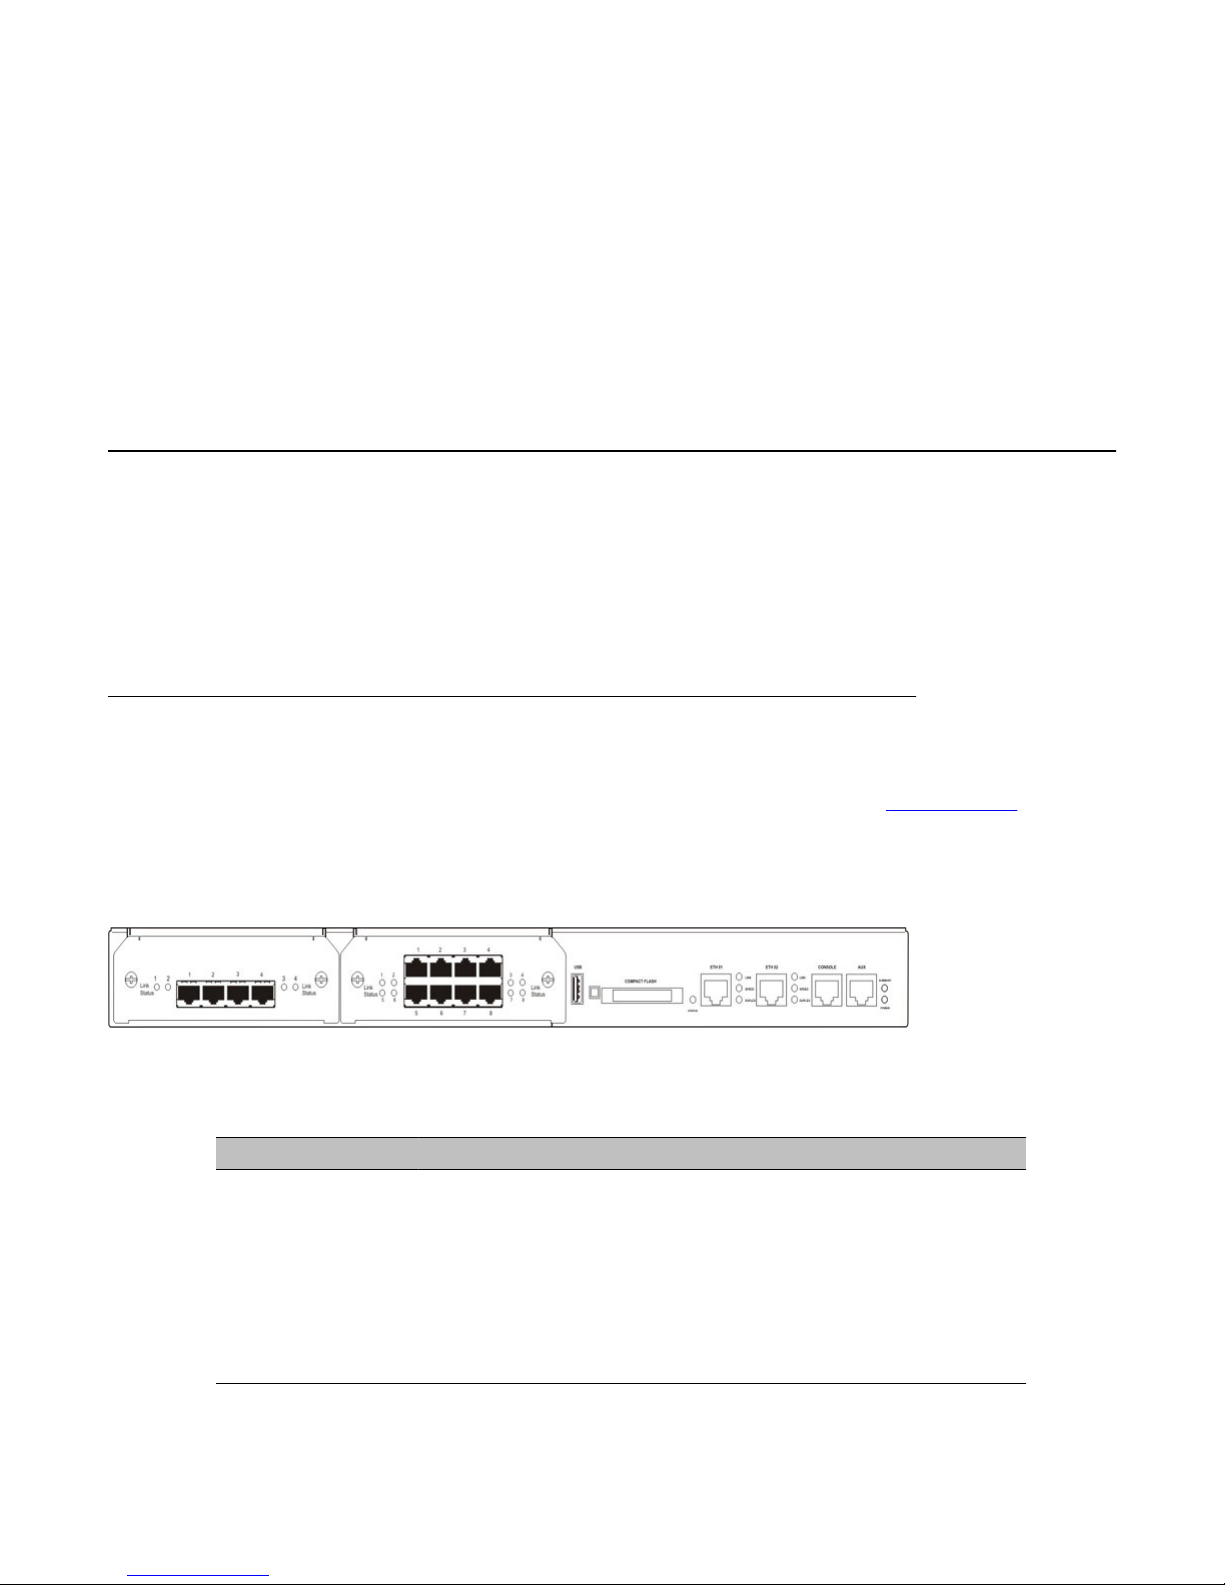
The 3120 front panel provides connections for one USB port, a compact Flash slot, two 10/100
Base-T Ethernet ports, one console port, and one auxiliary port. See LED STATES on
page 101 for more information.
The following figure shows a Secure Router 3120 chassis with a four-port and an eight-port
T1/E1 module installed. You must order modules separately.
Figure 1: Secure Router 3120 Front Panel (Modules shown are 4-port module and 8-port module)
Table 4: Secure Router 3120 Front-Panel Connectors
Feature Description
USB Port Standard peripheral port for USB devices.
Compact Flash Slot for Compact Flash card.
Status LED Green when Compact Flash module is present and mounted.
Otherwise, is off.
Ethernet Ports (2) One RJ-45 connector per port.
Eth Link LED Indicates traffic activity.
Avaya Secure Router 3120 Installation Guide December 2010 21
PRODUCT INTRODUCTION
Feature Description
Eth Speed LED Indicates transmission speed.
Eth Duplex LED When off, indicates half duplex.When on, indicates full duplex.
Console Port RJ-45 connector.
Aux One RJ-48C connector. (Not used in this release.)
Summary LED Summary alarm. Indicates a hardware problem (power failure, fan
Power LED Green indicates the Secure Router 3120 has power. Off indicates
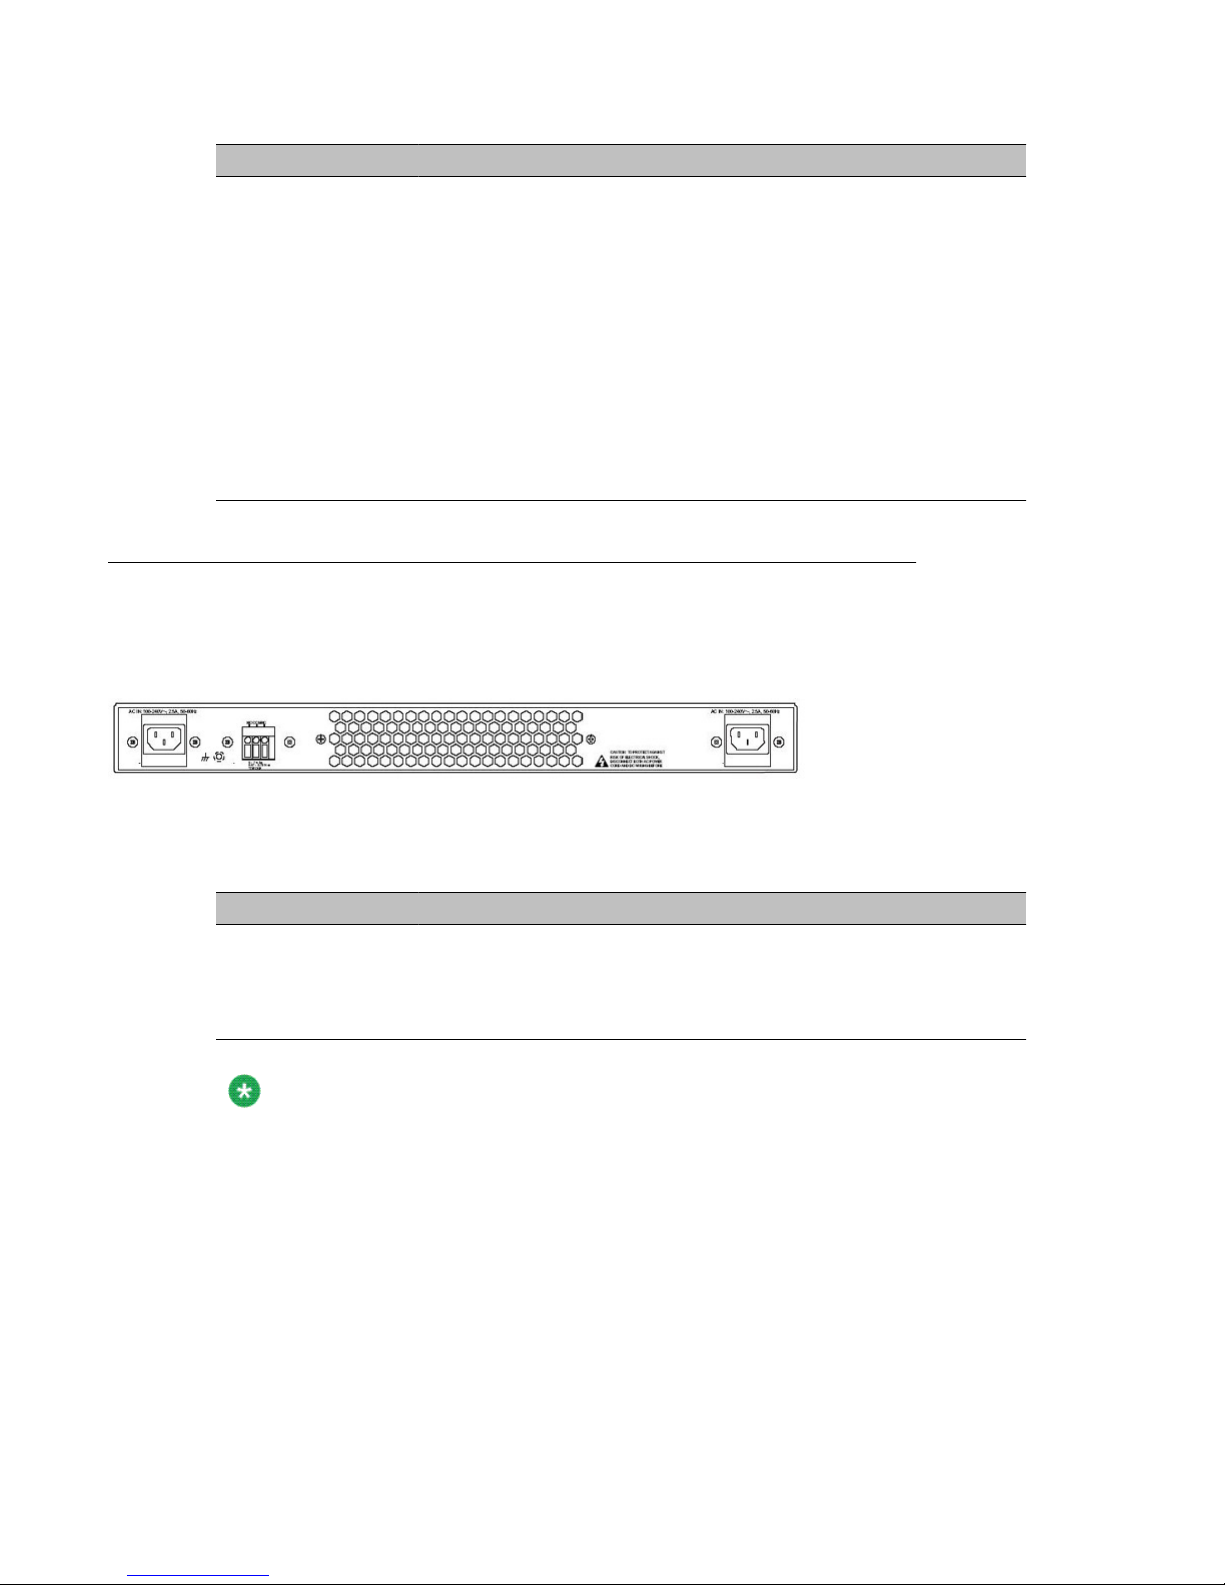
Back Panel
The 3120 rear provides connections for power. There are no maintenance access
requirements for the rear panel.
Use this port to set up a connection between a VT-100 (or equivalent)
terminal (or modem) and the Secure Router 3120.
failure, etc.)
the Secure Router 3120 is not powered.
Figure 2: 3120 Rear Panel
Table 5: 3120 Rear-Panel Connectors
Connector Description
AC Power Two standard grounded AC power (100-240V) receptacles.
DC Power DC power receptacle.
ESD Ground Lug Ground lug next to the alarm relay output.
Note:
If DC power is configured then the AC input panel is replaced with a blank plate and the
terminal block is used for input power.
22 Avaya Secure Router 3120 Installation Guide December 2010

Chapter 5: INSTALLATION
This chapter describes how to install Avaya Secure Router 3120s for operation in a network facility.
Information is also provided describing the Secure Router 3120 front and back panels, operator interface,
how to mount the chassis, and how to connect network, power, and alarm cables.
Before you install a Secure Router 3120, familiarize yourself with the network interface, power, and ground
connections described in the following paragraphs.
Site Preparation
Before installing a Secure Router 3120, ensure that the site conditions comply with the
following requirements and that the mounting equipment, tools, and cables are available at the
designated site.
See Tools and Materials on page 26 for information about tools and materials required for
installation.
Environment
Note:
The Avaya 3120 must be installed in a restricted-access location. Access to the Avaya 3120
should be limited to authorized service personnel only.
Site location is important for the proper operation of Secure Router 3120s. Place the unit in a
clean, dry environment with adequate air circulation. Allow two to three feet additional
clearance around the Secure Router 3120 for access to the cable connectors on the front and
rear panels.
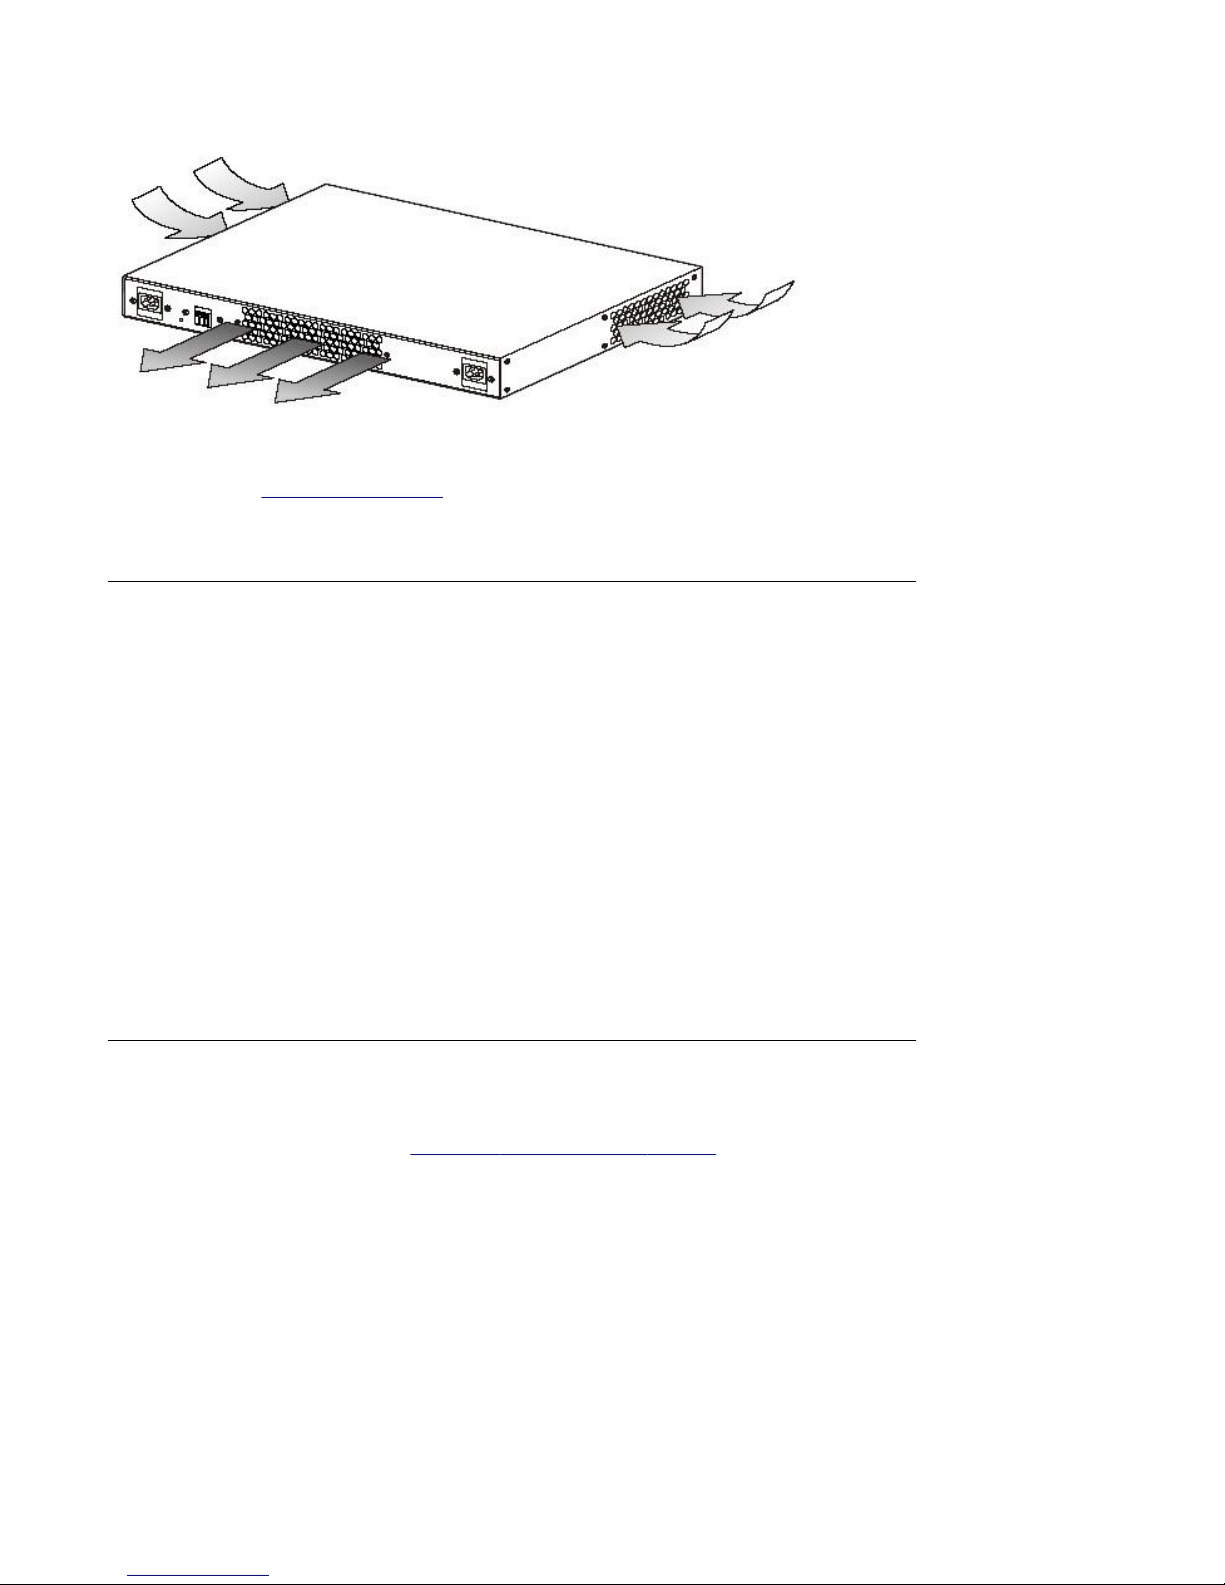
The selected installation site must meet basic environmental requirements.
Figure 3: Chassis Air Flow on page 24 shows a top view of the path of cooling air through
the chassis. Clearance must be maintained near the air intake and exhaust vents to prevent
over-temperature conditions, which could result in Secure Router 3120 failure or performance
degradation.
Avaya Secure Router 3120 Installation Guide December 2010 23
INSTALLATION
Figure 3: Chassis Air Flow
SPECIFICATIONS on page 83 for further information about environmental
See
requirements.
Site Safety
Practice these techniques to prevent accidents or injury at the installation site.
• Make sure that the site is safe from hazards such as damp or wet floors, improper or
missing circuit breakers, poor grounds, etc.
• Use two people to lift the Secure Router 3120 chassis when installing the chassis in an
equipment rack.
• Keep your back straight and lift with your legs. Bend only at the knees.
• While lifting, avoid twisting your body.
• maintain solid footing to keep your balance.
• Do not wear jewelry, metal objects, or loose clothing while working on electrical
equipment.
Power Requirements
The 3120 can be ordered with single AC, dual AC, single DC, dual DC, or AC/DC power
configurations. See Table 22: Specifications: Power on page 83 for additional information
about Secure Router 3120 power.
The acceptable voltage range for AC power is 100 VAC to 240 VAC, 1.5A 50-60 Hz.The
acceptable voltage range for DC power is 40 to 60 VDC.
DC power must be provided by an external source that provides overcurrent protection of 5
amps (125% of the maximum Secure Router 3120 rating).
For ALL installations, proper grounding must be provided through a UL Listed ring terminal
attached to the threaded earthing stud on the rear of the chassis. Use 18 AWG copper wire
24 Avaya Secure Router 3120 Installation Guide December 2010
Site Preparation
for the ground lead. Use a UL Listed ring terminal sized for a #6 stud and 18 AWG copper wire,
Panduit PV18-6RB-3K, or equivalent. Fasten the ring terminal to the threaded stud using a
6-32 hex nut with a captive external star washer. One should be provided on the chassis.
Warning:
Disconnect this unit from all power sources (AC and DC) before servicing.
Warning:
La Prudence: Proteger contre le risque de choc electrique, debrancher les cordes
d'alimentation et DC telegraphiant avant d'entretenir. (French translation of warning above.)
Note:
Grounding wires are required to be connected to the terminal block ground terminal when
DC power is supplied from external power supplies. See DC Power on page 30 for more
details. See Table 22: Specifications: Power on page 83 for more information and
specifications for DC power supplies.
Caution:
As a general safety precaution, be sure to provide DC power through a circuit breaker on
the equipment rack.
Note:
For more information, refer to guidelines presented in Articles 110-16, 110-17, and 110-18
of the National Electric Code, ANSI/NFPA 70.
Note:
The connection between the earthed conductor of the DC power circuit and the earthing
conductor is provided at the source
Network Connection
To successfully complete the installation, these Secure Router 3120s must be connected to a
network to be able to perform system acceptance. Before you start the installation, make sure
that a live network connection is available at the site.
Equipment Rack
These Secure Router 3120s are designed to be surface mounted or installed in a 19- or 23inch Telco equipment rack. These Secure Router 3120s can be flush (front), middle, or rear
mounted in an equipment rack.
Avaya Secure Router 3120 Installation Guide December 2010 25

INSTALLATION
Tools and Materials
The following additional items may be required to install these Secure Router 3120s in your
operating environment. This is dependent on Secure Router 3120 configuration and how the
Secure Router 3120 will be managed.
Cables
The following cables may be required for operation of these Secure Router 3120s in your
environment. The console cable is provided with the Secure Router 3120.
• Console cable (for console connection to terminal)
• Ethernet 10/100, CAT-5 STP cable (for a LAN connection)
Table 29: Pinouts: Ethernet Cable (RJ-45) on page 86 for pinout information.
See
• Null-modem cable (optional for a remote console)
Tools
• One of the following types of serial cable to connect to the Serial interface module:
- V.35
- X.21
- RS-232
- RS-449
- EIA-530
- EIA-530A
• RJ-48C connectors of the T1 cables to the T1 ports
• RG-59 coaxial cable to the Clear Channel DS3 interface
The following tools are required to install these Secure Router 3120s.
• #2 Phillips screwdriver (to attach the rack-mounting brackets to the Secure Router 3120)
• #3 Phillips screwdriver (to attach the Secure Router 3120 to the equipment rack)
• Wire stripping tool (for alarm and DC power wiring)
• Small flat-blade screwdriver (DC power, ground, and external alarm)
26 Avaya Secure Router 3120 Installation Guide December 2010

Materials
The following additional materials are required to install these Secure Router 3120s.
• 18 AWG copper wire (for DC power) and ground connection
• 18 AWG copper wire (for alarm connections)
• UL Listed Ring Terminal for 18 AWG copper wire and #6 stud, Panduit PV18-6RB-3K, or
equivalent.
• 6-32 nut with captive external star washer should be provided for ground terminal. (If
missing, use a similar part equivalent.)
• Screws or other fasteners for rack mounting
• Cable ties
Unpacking the Secure Router 3120
Unpacking the Secure Router 3120
After opening the shipping carton, remove and save all packing materials and boxes.
Note:
Save the packing materials. If you need to return the product, you will need to repack the unit.
Check the packing slip and contents of the shipping carton to ensure that you have received
the following:
• Secure Router 3120
• Console cable
• One male DB-25 to RJ-45 cable adapter
• Rack-mount package, including:
- Two 19-inch rack-mount brackets
- Two 23-inch rack-mount brackets
- Four #6 screws
- Four #6 flat washers
- Four #6 lock washers
• Surface-mount package (four self-adhering rubber feet)
• Avayal Secure Router CD-ROM
Inspect the Secure Router 3120 for damage that may have occurred during shipping. If you
discover damage or missing items, contact Avayal Technical Support.
Avaya Secure Router 3120 Installation Guide December 2010 27
INSTALLATION
Mounting the Secure Router 3120
This section describes how to prepare the Secure Router 3120 for operation either as a
tabletop or a rack-mounted unit.
Warning:
Do not install the Secure Router 3120 near a standing or running water source or in a highhumidity environment. See Table 21: Specifications: Environment on page 83 for more
information about environmental conditions.
Caution:
Do not block the fan intake and exhaust vents on the front and sides of the chassis unit.
Surface Mount
Place the Secure Router 3120 on a clean, flat, and stable surface with a minimum available
footprint of 12 by 19 inches (30.48 or 48.26 cm). Allow sufficient room at the front, rear, and
side of the unit for interface cabling, power cord clearance, and adequate ventilation.
Apply the rubber feet (4 included) to the bottom of the chassis prior to placing the unit on a
surface or when stacking several units on a surface.
Rack Mount
Secure Router 3120s can be mounted in either a 19- or a 23-inch (48.26 or 58.42 cm)
equipment rack.
Important information for the Secure Router 3120
When rack-mounting a Secure Router 3120, additional empty vertical space is required to
satisfy requirements for dissipated heat. Multiple Secure Router 3120s may be mounted in the
same rack without an air gap between the units, and they can be intermingled with other Avaya
products or other vendor equipment. However, the cumulative required empty space for the
number of Secure Router 3120s mounted in a rack must be accounted for in that rack. This
required empty space can be all above, all below, or a combination of above and below the
installed Secure Router 3120(s).
28 Avaya Secure Router 3120 Installation Guide December 2010
Mounting the Secure Router 3120
Note:
Other vendor equipment installed in the same rack may have a similar requirement, and if
so, those space requirements must be added to the space requirements for the Secure
Router 3120(s).
The following table provides metrics for the empty vertical space requirement per Secure
Router 3120.
Table 6: Empty Vertical Space Requirement
19-inch rack 23-inch rack
inches centimeters inches centiimeters
.83 2.1 .31 .80
Note:
For problem-free operation, the equipment rack should be located in an area with sufficient
clearance for cabling and adequate ventilation.
Note:
Attach the mounting brackets to the Secure Router 3120 before securing the Secure Router
3120 to the rack.
To attach the mounting brackets:
1. Select one of the three possible mounting positions on the sides of the Secure
Router 3120 chassis.
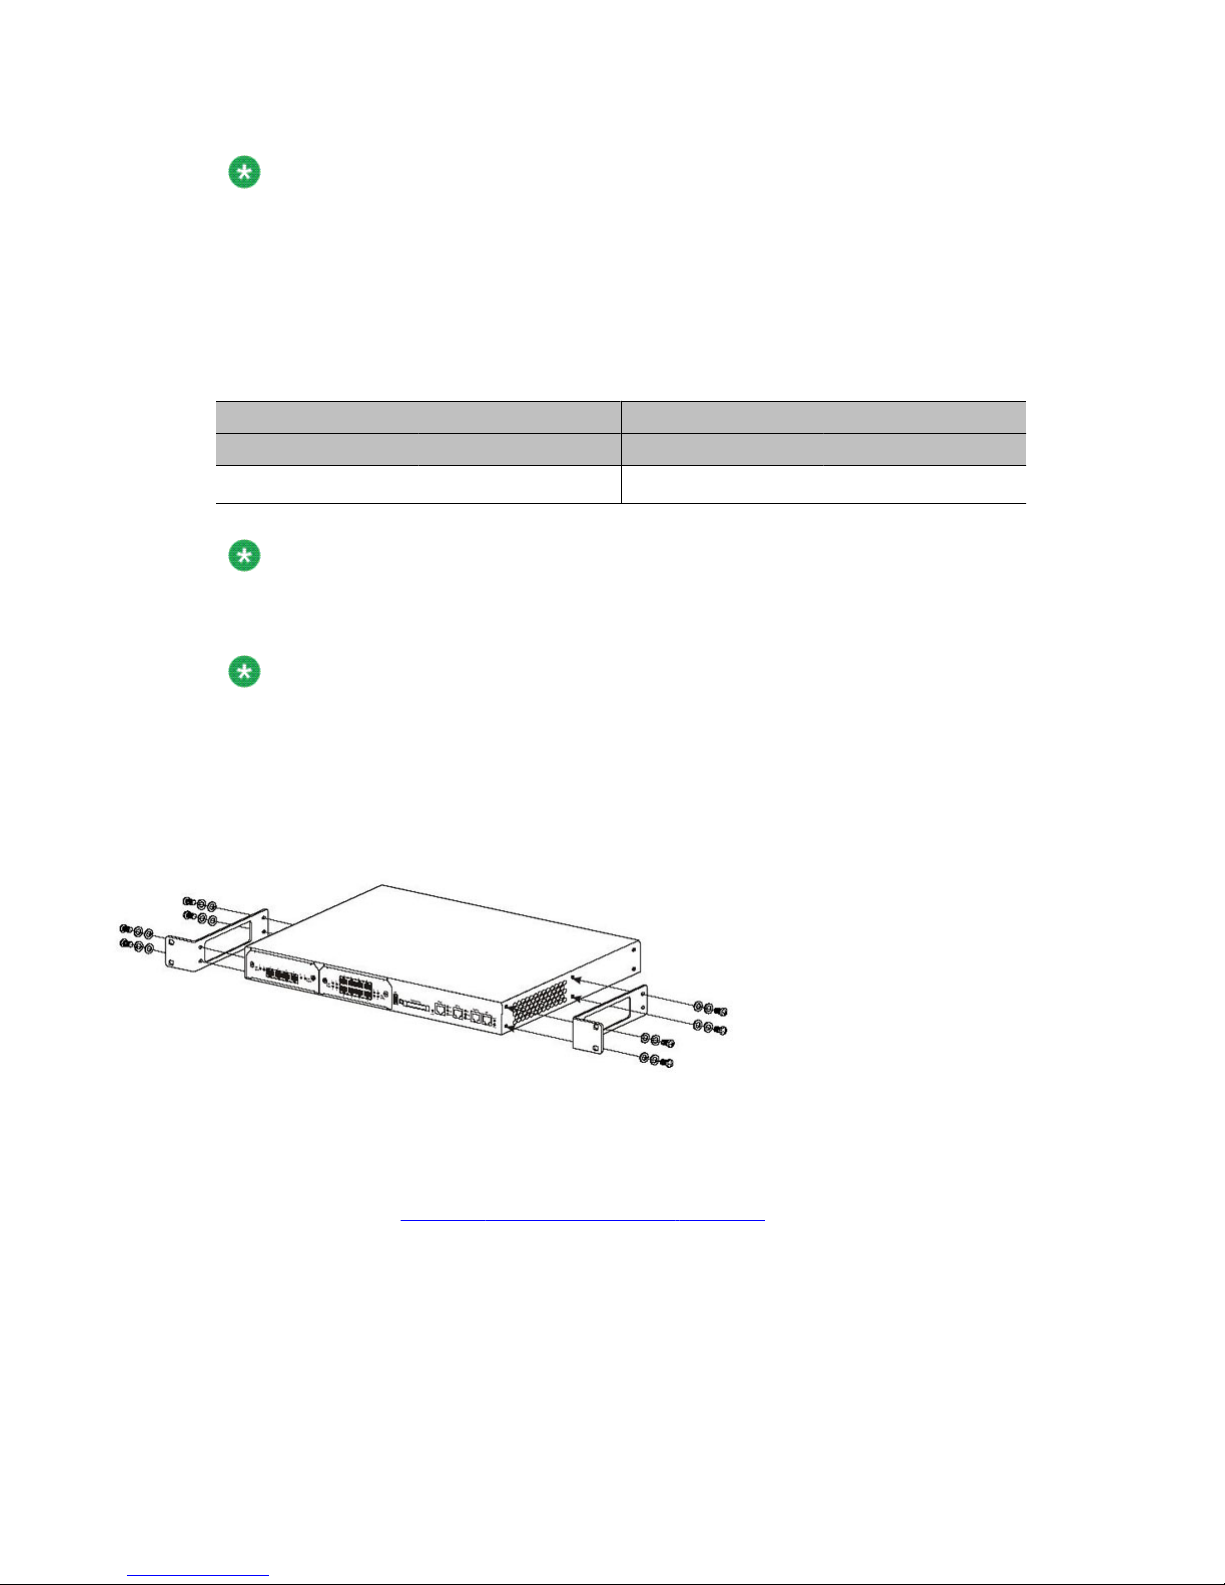
Figure 4: Attaching Mounting Brackets
2. Using a #2 Phillips screwdriver, attach a bracket to the desired mounting position
on one side of the Secure Router 3120.
Refer to Figure 4: Attaching Mounting Brackets on page 29. Use two #6 flat washers,
#6 lock washers, and #6 screws to mount each bracket. Torque the mounting
bracket screws to 12 in-lbs.
3. Attach the other bracket to the corresponding position on the other side of the
Secure Router 3120.
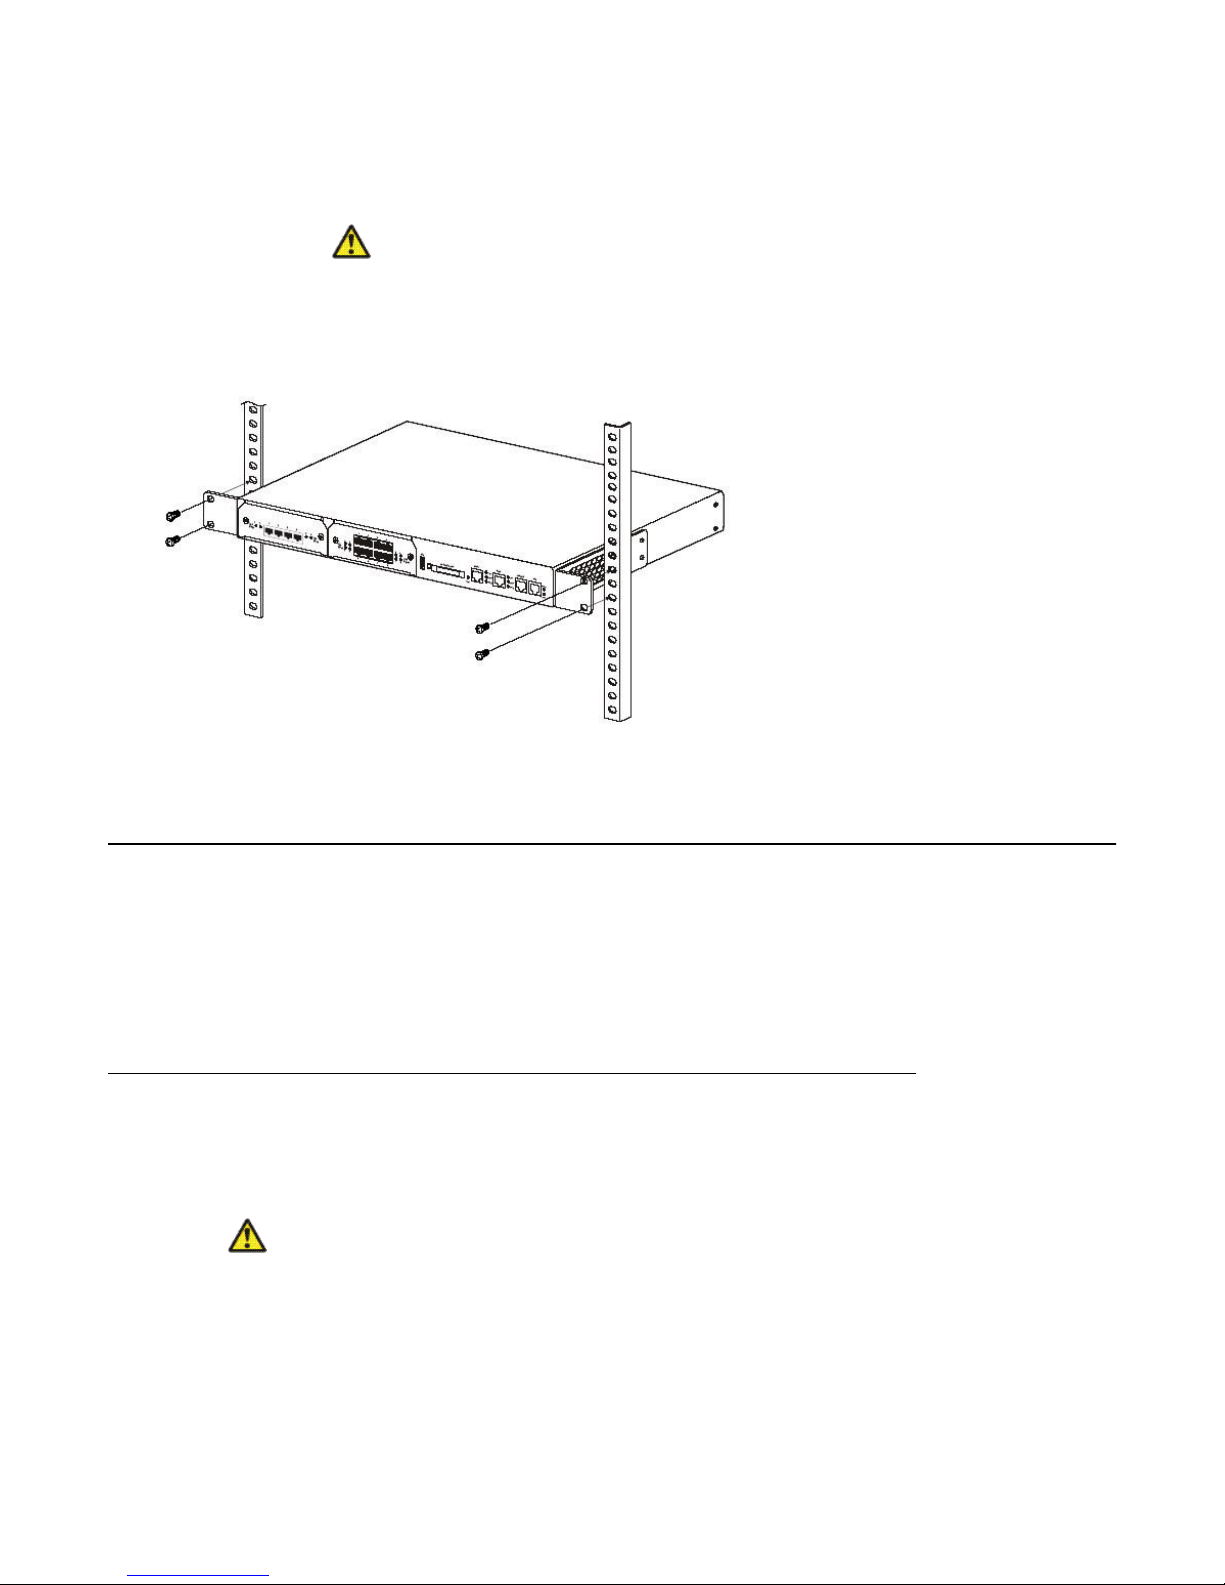
To secure the Secure Router 3120 to the rack:
Avaya Secure Router 3120 Installation Guide December 2010 29
INSTALLATION
1. Lift the Secure Router 3120 assembly into the rack and align the bracket holes with
the desired holes on the rack.
Caution:
Practice good safety habits. Use two people to rackmount the Secure Router
3120.
2. Attach the Secure Router 3120 to the rack according to the instructions provided
by the rack manufacturer.
Figure 5: Rackmounting the Secure Router 3120
Secure Router 3120 Power
The Avaya 3120 supports single AC, dual AC, single DC, dual DC or AC/DC power, depending
on the ordered configuration. These Secure Router 3120s accept external power from single
AC, dual AC, single DC, dual DC, or single AC/single DC sources. External 48 volt DC power
supplies are not provided by Avaya and must be obtained from a third-party vendor.
DC Power
Up to two external DC power supplies can be connected to the terminal block on the back
panel of these Secure Router 3120s.
Electrostatic alert:
ESD
Before connecting cables or performing maintenance on a Secure Router 3120, always wear
an ESD-preventative wrist strap. Connect the banana plug to the ESD ground connector on
the Secure Router 3120 chassis. Make sure that the wrist strap makes contact with your skin.
30 Avaya Secure Router 3120 Installation Guide December 2010
 Loading...