

Page 1

Avaya Solution & Interoperability Test Lab
Application Notes for ProCurve 5400zl, 3500yl and 2600
Series Switches by HP connected to Avaya Communication
Manager, Avaya SIP Enablement Services, Avaya Modular
Messaging and Avaya IA770 INTUITY AUDIX in a
Converged VoIP and Data Network - Issue 1.0
Abstract
These Application Notes describe the configuration of a Voice over IP (VoIP) solution using
ProCurve 5400zl, 3500yl and 2600 Series Switches by HP connected to an Avaya
Communication Manager, Avaya SIP Enablement Services, Avaya Modular Messaging and
Avaya IA770 INTUITY AUDIX. The ProCurve 5406zl, 3500yl-24G-PWR, 2610-24-PWR
and 2626-24-PWR Switches were compliance-tested with Avaya Communication Manager,
Avaya SIP Enablement Services and Avaya Modular Messaging. Emphasis was placed on
verifying the prioritization of VoIP traffic and voice quality in a converged VoIP and data
network scenario.
Information in these Application Notes has been obtained through DevConnect compliance
testing and additional technical discussions. Testing was conducted via the DevConnect
Program at the Avaya Solution and Interoperability Test Lab.
TMA; Reviewed:
SPOC 7/21/2008
Solution & Interoperability Test Lab Application Notes
©2008 Avaya Inc. All Rights Reserved.
1 of 21
ProCurve-ACM
Page 2

1. Introduction
These Application Notes describe the configuration of a Voice over IP (VoIP) solution using
ProCurve 5400, 3500 and 2600 Series Switches by HP connected to an Avaya Communication
Manager, Avaya SIP Enablement Services, Avaya Modular Messaging and Avaya IA770
INTUITY AUDIX. Compliance testing emphasis was placed on verifying the prioritization of
VoIP traffic and voice quality in a converged VoIP and data network scenario. Quality of Service
(QoS) based on Layer 2 Priority (802.1p) and Layer 3 Differentiated Services (Diffserv) was
implemented across the network to prioritize voice traffic over the LAN. The Avaya IP
Telephones get QoS priority settings from Avaya Communication Manager and are enforced in
the network by the ProCurve Switches. To verify VoIP traffic was given priority over data traffic
tests were performed by over subscribing the LAN interfaces with low priority data traffic and
verifying that acceptable voice quality was achieved when calls were routed over all of the LAN
interfaces. Compliance testing included QoS, throughput, link aggregation, rapid spanning tree,
load balancing, Open Shortest Path First (OSPF), Direct IP Media connectivity and the G.711
and G.729 codecs.
1.1. ProCurve Switch 5400zl/3500yl Series Switch
The ProCurve Switch 5400zl series includes a 6-slot and a 12-slot chassis and the ProCurve
Switch 3500yl series includes 24-port and 48-port stackables. The foundation for all these
switches is a purpose-built, programmable ProVision ASIC that allows networking features, such
as QoS and security, to be implemented in a scalable yet granular fashion. The ProCurve Switch
5400zl/3500yl series have options for a variety of Gigabit Ethernet (GigE) interfaces, integrated
Power over Ethernet (PoE) on all 10/100/1000Base-T ports, and 10-GigE capability. The
ProCurve Switch 5400zl/3500yl series are IEEE 802.3af compliant for PoE and provide up to
15.4 Watts per port. A redundant external power supply is also available as an accessory.
1.2. ProCurve Switch 2600 Series Switch
The ProCurve Switch 2600 series is a collection of stackable, multi-layer, managed switches
with 48, 24, or 8 auto-sensing 10/100 ports and dual-personality ports for 10/100/1000 or mini
gigabit interface converter (GBIC) connectivity. The ProCurve Switch 2600 Series is IEEE
802.3af compliant for PoE and provide up to 15.4 Watts per port. A redundant external power
supply is also available as an accessory.
2. Hardware Configuration
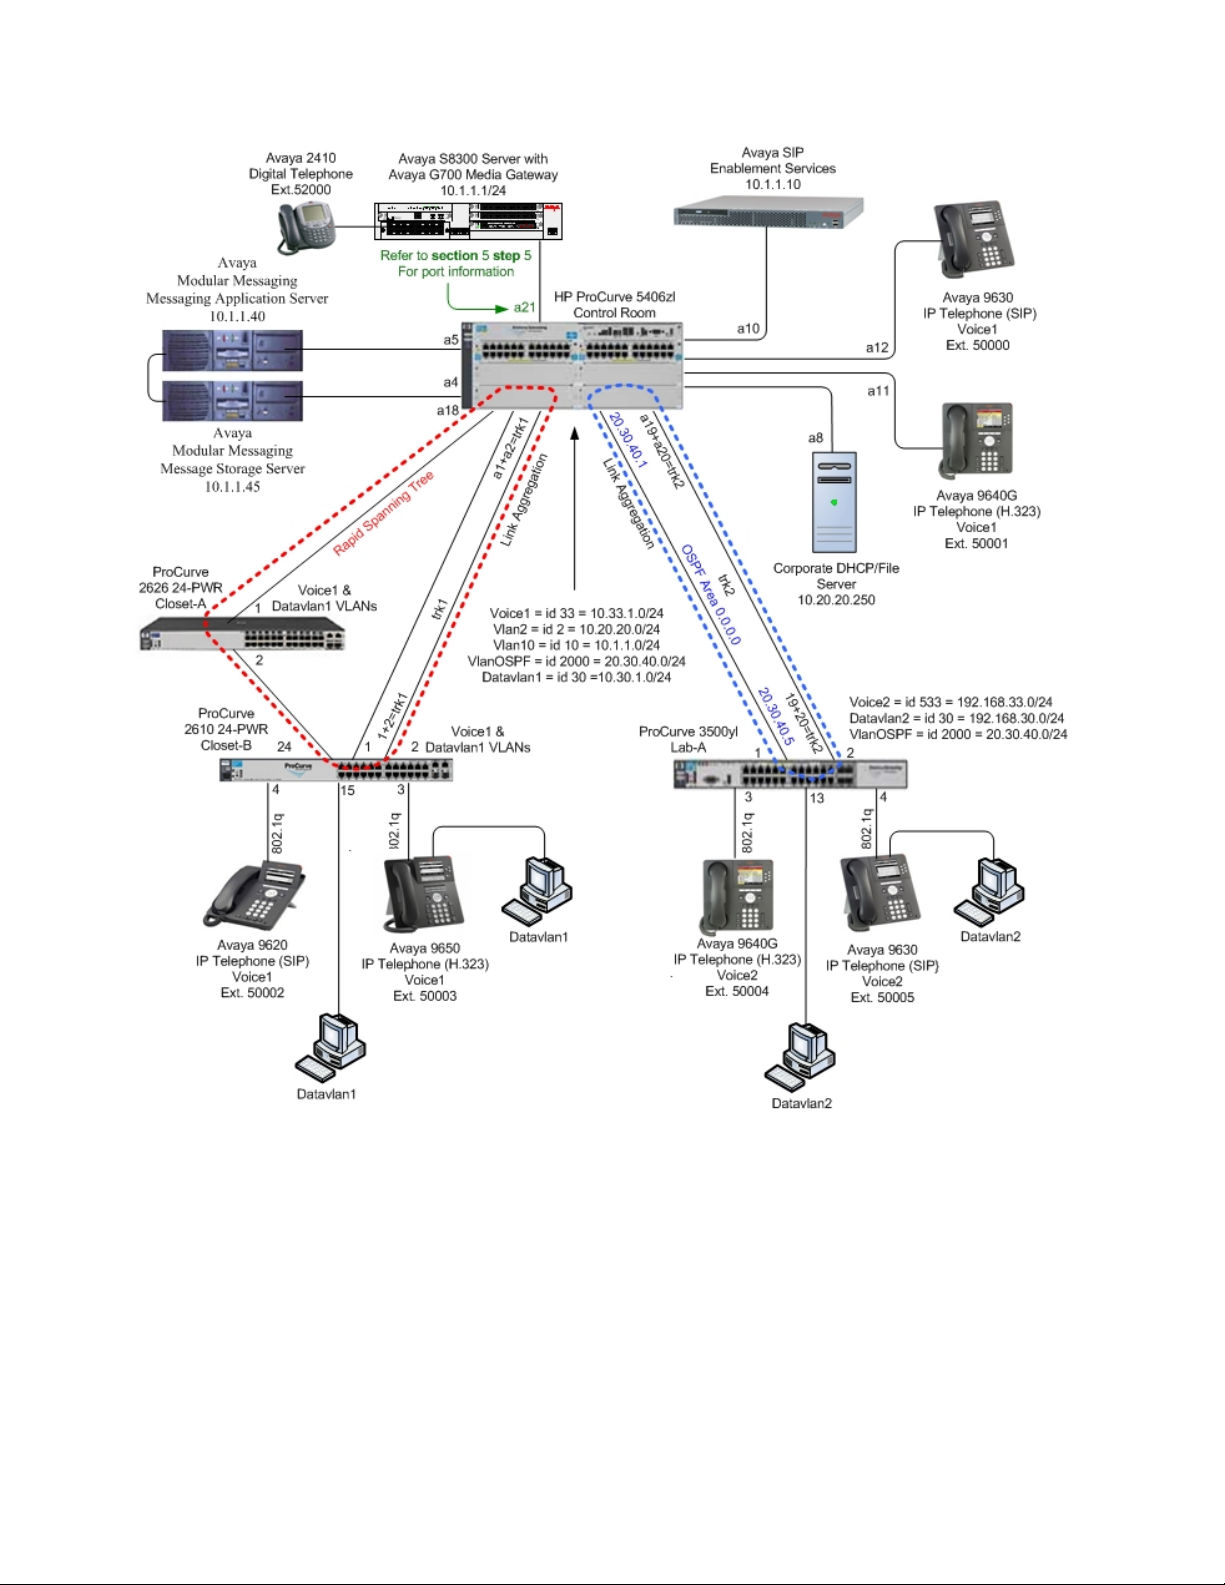
The configuration in Figure 1 shows a single site converged VoIP and data network with
multiple closets and labs configured with link aggregation, rapid spanning tree, load balancing
and OSPF.
For compliance testing, a centralized corporate DHCP server was used. To better manage the
different traffic types, the voice and data traffic were separated onto different VLANs.
TMA; Reviewed:
SPOC 7/21/2008
Solution & Interoperability Test Lab Application Notes
©2008 Avaya Inc. All Rights Reserved.
2 of 21
ProCurve-ACM
Page 3

2.1. Control Room
The control room consisted of a ProCurve 5406zl Switch, Avaya Communication Manager
running on an Avaya S8300 Server with an Avaya G700 Media Gateway, one SIP Enablement
Services server, one Avaya Modular Messaging Application Server, one Avaya Modular
Messaging Storage Server, one Avaya 2400 Series Digital Telephone, one Avaya 9640G IP
Telephone running Avaya one-X™ Deskphone Edition, one Avaya 9630 IP Telephone running
Avaya one-X Deskphone SIP and one Corporate DHCP/File Server. The corporate site provided
a DHCP/File server for assigning IP network parameters and to download settings to the Avaya
IP telephones. The ProCurve 5406zl Switch supplied PoE power for the Avaya IP Telephones
and was configured to support link aggregation, rapid spanning tree, load balancing and OSPF
with the peer ProCurve switches.
2.2. Lab-A
Lab-A consisted of a ProCurve 3500yl-PWR Switch, one Avaya 9640G IP Telephone running
Avaya one-X Deskphone Edition and one Avaya 9630 IP Telephone running Avaya one-X
Deskphone SIP on VLAN Voice2 and a PC on Datavlan2. The ProCurve 3500yl-PWR Switch
supplied PoE power for the Avaya IP Telephones and was configured to support link
aggregation, rapid spanning tree, load balancing and OSPF with the peer ProCurve switches.
2.3. Closet-A
Closet-A consisted of a ProCurve Switch 2626-24-PWR Switch as an edge switch. As an edge
switch, it was configured to support VLANs, enforce QoS policies and rapid spanning tree.
2.4. Closet-B
Closet-B consisted of a ProCurve 2610-24-PWR Switch, one Avaya 9620G IP Telephone
running Avaya one-X Deskphone SIP and one Avaya 9650 IP Telephone running Avaya one-X
Deskphone Edition on VLAN Voice1 and a PC on VLAN Datavlan1. The ProCurve 2610-24PWR Switch supplied PoE power for the Avaya IP telephones and was configured to support
link aggregation, rapid spanning tree and load balancing.
TMA; Reviewed:
SPOC 7/21/2008
Solution & Interoperability Test Lab Application Notes
©2008 Avaya Inc. All Rights Reserved.
3 of 21
ProCurve-ACM
Page 4
TMA; Reviewed:
SPOC 7/21/2008
Figure 1: Network Configuration
Solution & Interoperability Test Lab Application Notes
©2008 Avaya Inc. All Rights Reserved.
4 of 21
ProCurve-ACM
Page 5

3. Equipment and Software Validated
The following equipment and software/firmware were used for the sample configuration
provided:
Equipment Software/Firmware
Avaya S8300 Server
Avaya G700 Media Gateway
MGP
MM712 DCP Media Module
Avaya SIP Enabled Services (SES) 5.0 - SES-5.0.0.0-825.31
Avaya Modular Messaging - Messaging
Application Server (MAS)
Avaya Modular Messaging - Message Storage
Server (MSS)
Avaya IA 770 INTUITY AUDIX 5.0
Avaya 9600 Series IP Telephones
Avaya 9600 Series IP Telephones
Avaya 2410 Digital Telephone 5.0
ProCurve 5406zl by HP
with J8705A module and RJ45 (J8177C
Transceiver)
ProCurve 3500yl-24-PWR by HP FW-K.13.09
ProCurve 2610-24-PWR by HP FW-H.11.07
ProCurve 2626-24-PWR by HP FW-H.10.50
Avaya Communication Manager
5.0 - R015x.00.0.825.4
26.31.0
HW05 / FW08
3.1
3.1
Avaya one-X Deskphone SIP
2.0.3 (SIP)
Avaya one-X Deskphone Edition
2.0 (H.323)
FW-K.13.09
4. Configure Avaya Communication Manager
This section shows the steps used to configure Avaya Communication Manager. For detailed
information on the installation, maintenance, and configuration of Avaya Communication
Manager, refer to [1].
4.1. Configure QoS on Avaya Communication Manager
IP networks were originally designed to carry data on a best-effort delivery basis, which meant
that all traffic had equal priority and an equal chance of being delivered in a timely manner. As a
result, all traffic had an equal chance of being dropped when congestion occurred. To prioritize
VoIP traffic, QoS is utilized and should be implemented throughout the entire network.
In order to achieve prioritization of VoIP traffic, the VoIP traffic must be classified. The Avaya
S8300 Server, Avaya G700 Media Gateway, Avaya SIP Enablement Services and Avaya IP
telephones support both Layer 2 802.1.p/Q priority and Layer 3 DiffServ.
TMA; Reviewed:
SPOC 7/21/2008
Solution & Interoperability Test Lab Application Notes
©2008 Avaya Inc. All Rights Reserved.
5 of 21
ProCurve-ACM
Page 6

All network components are in network region 1 for this sample configuration. The DiffServ and
802.1P/Q values configured here will be downloaded to the Avaya H.323 IP telephones via
Avaya Communication Manager. Avaya SIP IP telephones will get QoS settings by downloading
the 46xxsettings file from the HTTP server. For more information on QoS settings, please refer
to [1].
Use the change ip-network-region 1 command to change the DIFFSERV/TOS PARAMETERS
and 802.1P/Q PARAMETERS settings configured in Avaya Communication Manager. Set the
Call Control PHB Value to 46 and the Audio PHB Value to 46. Set the Call Control 802.1p
Priority and Audio 802.1p Priority to 6.
change ip-network-region 1 Page 1 of 19
IP NETWORK REGION
Region: 1
Location: Authoritative Domain: devcon.com
Name:
MEDIA PARAMETERS Intra-region IP-IP Direct Audio: yes
Codec Set: 1 Inter-region IP-IP Direct Audio: yes
UDP Port Min: 2048 IP Audio Hairpinning? y
UDP Port Max: 3027
DIFFSERV/TOS PARAMETERS RTCP Reporting Enabled? y
Call Control PHB Value: 46 RTCP MONITOR SERVER PARAMETERS
Audio PHB Value: 46 Use Default Server Parameters? y
Video PHB Value: 26
802.1P/Q PARAMETERS
Call Control 802.1p Priority: 6
Audio 802.1p Priority: 6
Video 802.1p Priority: 5 AUDIO RESOURCE RESERVATION PARAMETERS
H.323 IP ENDPOINTS RSVP Enabled? n
H.323 Link Bounce Recovery? y
Idle Traffic Interval (sec): 20
Keep-Alive Interval (sec): 5
Keep-Alive Count: 5
The Differentiated Services Code Point (DSCP) value of 46 is used for both PHB values. DSCP
46 represents the Traffic Class of Premium and the Traffic Type Voice.
Note: The PHB and DSCP values used above (i.e. 6 and 46) will be used consistently throughout
the configuration of the ProCurve switches. The DSCP value used above is in decimal whereas
the value used for ProCurve switch configuration later will be in binary (i.e. 101110).
5. Configure the ProCurve 5406zl Switch
This section addresses how to configure the ProCurve 5406zl Switch. The ProCurve 5406zl
Switch is used as the core Layer 2/Layer 3 router, enforces QoS policies and supports link
aggregation, OSPF and spanning tree.
To configure the ProCurve 5406zl Switch, connect a PC or laptop to the serial port of the
ProCurve 5406zl Switch. Run a terminal emulation program with the following configuration:
Bits per second: 9600
Data bits: 8
Parity: None
Stop bits: 1
Flow Control: None
TMA; Reviewed:
SPOC 7/21/2008
Solution & Interoperability Test Lab Application Notes
©2008 Avaya Inc. All Rights Reserved.
6 of 21
ProCurve-ACM
Page 7

1. Log into the ProCurve 5406zl Switch using the appropriate Login ID and Password.
Login:
Password:
ProCurve Switch 5406zl#
2. Enable the following features on the ProCurve 5406zl Switch.
• Enable routing.
• Enable spanning tree and make the ProCurve 5406zl Switch the root bridge.
• Enable QoS for Differentiated Services.
• Create trunks trk1 and trk2 using link aggregation protocol. Trunk trk1 goes to the
ProCurve 2610-24-PWR Switch and trunk trk2 goes to the ProCurve 3500yl-24G-PWR
Switch.
• Set priority for the IP address of Avaya Communication Manager.
• Set priority for the Avaya SIP Enablement Services IP address.
• Save the running configuration to the startup configuration.
ProCurve Switch 5406zl# configure
ProCurve Switch 5406zl(config)# ip routing
ProCurve Switch 5406zl(config)# spanning-tree
ProCurve Switch 5406zl(config)# spanning-tree priority 1
ProCurve Switch 5406zl(config)# qos dscp-map 101110 priority 6
ProCurve Switch 5406zl(config)# trunk a1-a2 trk1 lacp
ProCurve Switch 5406zl(config)# trunk a19-a20 trk2 lacp
ProCurve Switch 5406zl(config)# qos device-priority 10.1.1.1 dscp 101110
ProCurve Switch 5406zl(config)# qos device-priority 10.1.1.10 dscp 101110
ProCurve Switch 5406zl(config)# write memory
TMA; Reviewed:
SPOC 7/21/2008
Solution & Interoperability Test Lab Application Notes
©2008 Avaya Inc. All Rights Reserved.
7 of 21
ProCurve-ACM
Page 8

3. Create and configure the VLAN for OSPF.
• Assign a VLAN ID for the OSPF VLAN.
• Assign a name for the OSPF VLAN.
• Assign an IP address for the OSPF VLAN.
• Assign ports to the OSPF VLAN.
ProCurve Switch 5406zl# configure
ProCurve Switch 5406zl(config)# vlan 2000
ProCurve Switch 5406zl (vlan-2000)# vlan 2000 name vlanOSPF
ProCurve Switch 5406zl (vlan-2000)#ip address 20.30.40.1/24
ProCurve Switch 5406zl (vlan-2000)# untagged trk2
ProCurve Switch 5406zl (vlan-2000)# exit
4. Enable OSPF routing and set VLAN 2000 to ospf area 0.
ProCurve Switch 5406zl# configure
ProCurve Switch 5406zl(config)# router ospf
ProCurve Switch 5406zl(ospf)# area 0
ProCurve Switch 5406zl(ospf)# redistribute connected
ProCurve Switch 5406zl(ospf)# vlan 2000
ProCurve Switch 5406zl (vlan-2000)# ip ospf area 0
ProCurve Switch 5406zl (vlan-2000)# exit
TMA; Reviewed:
SPOC 7/21/2008
Solution & Interoperability Test Lab Application Notes
©2008 Avaya Inc. All Rights Reserved.
8 of 21
ProCurve-ACM
Page 9

5. Create and configure the telephony VLAN where all of the Avaya telephony equipment will
run.
• Assign a VLAN ID for the telephony VLAN.
• Assign a name for the telephony VLAN.
• Assign an IP address for the telephony VLAN.
• Assign ports to the telephony VLAN.
• Assign a QoS priority to the telephony VLAN.
• Note: The commands identified with an “*” below are required when connecting an
Avaya G700 Media Gateway to a ProCurve 5406zl Switch with J8177C Transceiver.
Auto negotiation for the associated port must be set to auto-100. The Avaya G700 Media
Gateway is auto-100 by default and requires no change. The port on the ProCurve 5406zl
Switch (port a21 in this example) is a GigE port and needs to be changed from the default
of auto-1000 to auto-100.
ProCurve Switch 5406zl# configure
ProCurve Switch 5406zl(config)# vlan 10
ProCurve Switch 5406zl (vlan-10)#vlan 10 name vlan10
ProCurve Switch 5406zl (vlan-10)#ip address 10.1.1.254/24
ProCurve Switch 5406zl (vlan-10)# untagged a4,a10,a21
ProCurve Switch 5406zl (vlan-10)# qos priority 6
ProCurve Switch 5406zl (vlan-10)# exit
* ProCurve Switch 5406zl# configure
* ProCurve Switch 5406zl(config)# interface a21
* ProCurve Switch 5406zl(eth-A21)# speed-duplex auto-100
6. Create and configure the voice VLAN that will run between the control room and closets.
• Assign a VLAN ID for the voice VLAN.
• Assign a name for the voice VLAN.
• Assign voice option.
• Assign an IP address for the voice VLAN.
• Set an IP helper address for DHCP.
• Assign ports to the voice VLAN.
ProCurve Switch 5406zl# configure
ProCurve Switch 5406zl(config)# vlan 33
ProCurve Switch 5406zl (vlan-33)#vlan 33 name Voice1
ProCurve Switch 5406zl (vlan-33)# voice
ProCurve Switch 5406zl (vlan-33)#ip address 10.33.1.254/24
ProCurve Switch 5406zl (vlan-33)# ip helper-address 10.20.20.250
ProCurve Switch 5406zl (vlan-33)# tagged a11-a12,trk1
ProCurve Switch 5406zl (vlan-33)# exit
TMA; Reviewed:
SPOC 7/21/2008
Solution & Interoperability Test Lab Application Notes
©2008 Avaya Inc. All Rights Reserved.
9 of 21
ProCurve-ACM
Page 10

7. Create and configure the data VLAN that will run between the control room and closets.
• Assign a VLAN ID for the data VLAN.
• Assign a name for the data VLAN.
• Assign an IP address for the data VLAN.
• Set an IP helper address for DHCP.
• Assign ports to the data VLAN.
ProCurve Switch 5406zl# configure
ProCurve Switch 5406zl(config)# vlan 30
ProCurve Switch 5406zl (vlan-30)# vlan 30 name Datavlan1
ProCurve Switch 5406zl (vlan-30)# ip address 10.30.1.254/24
ProCurve Switch 5406zl (vlan-30)# ip helper-address 10.20.20.250
ProCurve Switch 5406zl (vlan-30)# tagged trk1
ProCurve Switch 5406zl (vlan-30)# exit
8. Create and configure the VLAN that where the DHCP/File server runs.
• Assign a VLAN ID for the DHCP/File VLAN
• Assign a name for the DHCP/File VLAN
• Assign an IP address for the DHCP/File VLAN
• Assign ports to the DHCP/File VLAN
ProCurve Switch 5406zl# configure
ProCurve Switch 5406zl(config)# vlan 2
ProCurve Switch 5406zl (vlan-2)#vlan 2 name vlan2
ProCurve Switch 5406zl (vlan-2)#ip address 10.20.20.254/24
ProCurve Switch 5406zl (vlan-2)# untagged a8
ProCurve Switch 5406zl (vlan-2)# exit
TMA; Reviewed:
SPOC 7/21/2008
Solution & Interoperability Test Lab Application Notes
©2008 Avaya Inc. All Rights Reserved.
10 of 21
ProCurve-ACM
Page 11

9. Set priority for telephony ports.
• Set the port QoS priority of the Avaya Modular Messaging Message Storage Server to 6.
• Set the port QoS priority of the Avaya Modular Messaging Messaging Application Server
to 6.
• Set the port QoS priority of the Avaya SIP Enablement Services to 6
• Set the port QoS priority of Avaya Communication Manager to 6
ProCurve Switch 5406zl# configure
ProCurve Switch 5406zl(config)# interface a4
ProCurve Switch 5406zl(eth-A4)# qos priority 6
ProCurve Switch 5406zl(eth-A4)# exit
ProCurve Switch 5406zl# configure
ProCurve Switch 5406zl(config)# interface a5
ProCurve Switch 5406zl(eth-A5)# qos priority 6
ProCurve Switch 5406zl(eth-A5)# exit
ProCurve Switch 5406zl# configure
ProCurve Switch 5406zl(config)# interface a10
ProCurve Switch 5406zl(eth-A10)# qos priority 6
ProCurve Switch 5406zl(eth-A10)# exit
ProCurve Switch 5406zl# configure
ProCurve Switch 5406zl(config)# interface a21
ProCurve Switch 5406zl(eth-A21)# qos priority 6
ProCurve Switch 5406zl(eth-A21)# exit
10. Save the running configuration to the startup configuration.
ProCurve Switch 5406zl# configure
ProCurve Switch 5406zl(config)# write memory
6. Configure Lab-A ProCurve 3500yl-24G-PWR Switch
This section addresses configuring the ProCurve 3500yl-24G-PWR Switch. The ProCurve
3500yl-24G-PWR Switch is used as the Lab-A Layer 2/ Layer 3 router, enforces QoS policies,
and supports link aggregation, OSPF and spanning tree.
To configure the ProCurve 3500yl-24G-PWR Switch, connect a PC or laptop to the serial port of
the ProCurve 3500yl-24G-PWR Switch. Run a terminal emulation program with the following
configuration:
Bits per second: 9600
Data bits: 8
Parity: None
Stop bits: 1
Flow Control: None
TMA; Reviewed:
SPOC 7/21/2008
Solution & Interoperability Test Lab Application Notes
©2008 Avaya Inc. All Rights Reserved.
11 of 21
ProCurve-ACM
Page 12

1. Log into ProCurve 3500yl-24G-PWR Switch using the appropriate Login ID and Password.
Login:
Password:
ProCurve Switch 3500yl-24G-PWR#
2. Enable the following features on the ProCurve 3500yl-24G-PWR Switch.
• Enable Routing.
• Enable spanning-tree.
• Enable DHCP snooping.
• Save the running configuration to the startup configuration..
• Reboot the ProCurve 5406zl Switch.
• Enable QoS for Differentiated Services.
• Create trunk trk1. Trunk trk1 goes to ProCurve 5406zl Switch.
• Set priority for the IP address of Avaya Communication Manager.
• Set priority for the Avaya SIP Enablement Services IP address.
ProCurve Switch 3500yl-24G-PWR# configure
ProCurve Switch 3500yl-24G-PWR(config)# ip routing
ProCurve Switch 3500yl-24G-PWR(config)# spanning-tree
ProCurve Switch 3500yl-24G-PWR(config)# dhcp-snooping authorized-server 10.20.20.250
ProCurve Switch 3500yl-24G-PWR(config)# write memory
ProCurve Switch 3500yl-24G-PWR(config)# boot
<Log back into the ProCurve Switch 3500yl-24G-PWR Switch after the reboot>
ProCurve Switch 3500yl-24G-PWR# configure
ProCurve Switch 3500yl-24G-PWR(config)# qos type-of-service diff-services
ProCurve Switch 3500yl-24G-PWR(config)# trunk 19-20 trk2 lacp
ProCurve Switch 3500yl-24G-PWR(config)# qos device-priority 10.1.1.1 dscp 101110
ProCurve Switch 3500yl-24G-PWR(config)# qos device-priority 10.1.1.10 dscp 101110
TMA; Reviewed:
SPOC 7/21/2008
Solution & Interoperability Test Lab Application Notes
©2008 Avaya Inc. All Rights Reserved.
12 of 21
ProCurve-ACM
Page 13

3. Create and configure the VLAN for OSPF.
• Assign a VLAN ID for the OSPF VLAN.
• Assign a name for the OSPF VLAN.
• Assign an IP address for the OSPF VLAN.
• Assign ports to the OSPF VLAN.
ProCurve Switch 3500yl-24G-PWR# configure
ProCurve Switch 3500yl-24G-PWR(config)# vlan 2000
ProCurve Switch 3500yl-24G-PWR (vlan-2000)# vlan 2000 name vlanOSPF
ProCurve Switch 3500yl-24G-PWR (vlan-2000)#ip address 20.30.40.5/24
ProCurve Switch 3500yl-24G-PWR (vlan-2000)# untagged trk2
ProCurve Switch 3500yl-24G-PWR (vlan-2000)# exit
4. Enable OSPF routing and set VLAN 2000 to ospf area 0.
ProCurve Switch 3500yl-24G-PWR# configure
ProCurve Switch 3500yl-24G-PWR(config)# router ospf
ProCurve Switch 3500yl-24G-PWR(ospf)# area 0
ProCurve Switch 3500yl-24G-PWR(ospf)# redistribute connected
ProCurve Switch 3500yl-24G-PWR(ospf)# vlan 2000
ProCurve Switch 3500yl-24G-PWR (vlan-2000)# ip ospf area 0
ProCurve Switch 3500yl-24G-PWR (vlan-2000)#exit
5. Create and configure the voice VLAN that will run in Lab-A.
• Assign a VLAN ID for the voice VLAN.
• Assign a name for the voice VLAN.
• Make vlan Voice2.
• Assign an IP address for the voice VLAN.
• Set an IP helper address for DHCP.
• Assign ports to the voice VLAN.
ProCurve Switch 3500yl-24G-PWR# configure
ProCurve Switch 3500yl-24G-PWR(config)# vlan 533
ProCurve Switch 3500yl-24G-PWR (vlan-533)# vlan 533 name Voice2
ProCurve Switch 3500yl-24G-PWR (vlan-533)# voice
ProCurve Switch 3500yl-24G-PWR (vlan-533)# ip address 192.168.33.254/24
ProCurve Switch 3500yl-24G-PWR (vlan-533)# ip helper-address 10.20.20.250
ProCurve Switch 3500yl-24G-PWR (vlan-533)# tagged 3-4
ProCurve Switch 3500yl-24G-PWR (vlan-533)# exit
TMA; Reviewed:
SPOC 7/21/2008
Solution & Interoperability Test Lab Application Notes
©2008 Avaya Inc. All Rights Reserved.
13 of 21
ProCurve-ACM
Page 14
6. Create and configure the data VLAN that will run in Lab-A.
• Assign a VLAN ID for the data VLAN.
• Assign a name for the data VLAN.
• Assign an IP address for the data VLAN.
• Set an IP helper address for DHCP.
• Assign ports to the data VLAN.
ProCurve Switch 3500yl-24G-PWR# configure
ProCurve Switch 3500yl-24G-PWR(config)# vlan 30
ProCurve Switch 3500yl-24G-PWR (vlan-30)#vlan 30 name Datavlan2
ProCurve Switch 3500yl-24G-PWR (vlan-30)#ip address 192.168.30.254/24
ProCurve Switch 3500yl-24G-PWR (vlan-30)# ip helper-address 10.20.20.250
ProCurve Switch 3500yl-24G-PWR (vlan-30)# untagged 3-4,13
ProCurve Switch 3500yl-24G-PWR (vlan-30)# exit
7. Save the running configuration to the startup configuration.
ProCurve Switch 3500yl-24G-PWR# configure
ProCurve Switch 3500yl-24G-PWR(config)# write memory
7. Configure Closet-A ProCurve 2626-24-PWR Switch
This section addresses configuring the Closet-A ProCurve 2626-24-PWR Switch. The ProCurve
2626-24-PWR Switch was used as an edge switch to supply PoE power, support VLANs and to
enforce QoS policies.
To configure the ProCurve 2626-24-PWR Switch, connect a PC or laptop to the serial port of the
2626-24-PWR. Run a terminal emulation program with the following configuration:
Bits per second: 9600
Data bits: 8
Parity: None
Stop bits: 1
Flow Control: None
TMA; Reviewed:
SPOC 7/21/2008
Solution & Interoperability Test Lab Application Notes
©2008 Avaya Inc. All Rights Reserved.
14 of 21
ProCurve-ACM
Page 15

1. Log into ProCurve 2626-24-PWR Switch using the appropriate Login ID and Password.
Login:
Password:
ProCurve Switch 2626-PWR#
2. Enable the following features on the ProCurve 2626-24-PWR Switch.
• Enable spanning tree.
• Set DSCP map setting for priority 6.
ProCurve Switch 2626-PWR# configure
ProCurve Switch 2626-PWR# spanning-tree
ProCurve Switch 2626-PWR# qos dscp-map 101110 priority 6
3. Create and configure the voice VLAN that will run between the control room and the closets.
• Assign a VLAN ID for the voice VLAN.
• Assign a name for the voice VLAN.
• Assign ports to the voice VLAN.
• Assign a QoS priority to the voice VLAN.
ProCurve Switch 2626-PWR (config)# vlan 33
ProCurve Switch 2626-PWR (vlan-33)#vlan 33 name Voice1
ProCurve Switch 2626-PWR (vlan-33)# tagged 1-2
ProCurve Switch 2626-PWR (vlan-33)# qos priority 6
ProCurve Switch 2626-PWR (vlan-33)# exit
TMA; Reviewed:
SPOC 7/21/2008
Solution & Interoperability Test Lab Application Notes
©2008 Avaya Inc. All Rights Reserved.
15 of 21
ProCurve-ACM
Page 16
4. Create and configure the data VLAN that will run between the control room and the closets.
• Assign a VLAN ID for the data VLAN.
• Assign a name for the data VLAN.
• Assign ports to the data VLAN.
ProCurve Switch 2626-PWR# configure
ProCurve Switch 2626-PWR(config)# vlan 30
ProCurve Switch 2626-PWR (vlan-30)# vlan 30 name Datavlan1
ProCurve Switch 2626-PWR (vlan-30)# tagged 1-2
ProCurve Switch 2626-PWR (vlan-30)# exit
5. Save the running configuration to the startup configuration.
ProCurve Switch 2626-PWR# configure
ProCurve Switch 2626-PWR(config)# write memory
8. Configure Closet-B ProCurve 2610-24-PWR Switch
This section addresses configuring the ProCurve 2610-24-PWR Switch. The ProCurve 2610-24PWR Switch is used as an edge switch to supply PoE power, support VLANs, link aggregation
and to enforce QoS policies.
To configure the ProCurve 2610-24-PWR Switch, connect a PC or laptop to the serial port of the
ProCurve 2610-24-PWR Switch. Run a terminal emulation program with the following
configuration:
Bits per second: 9600
Data bits: 8
Parity: None
Stop bits: 1
Flow Control: None
1. Log into the ProCurve 2610-24-PWR Switch using the appropriate Login ID and Password.
Login:
Password:
ProCurve Switch 2610-24-PWR#
TMA; Reviewed:
SPOC 7/21/2008
Solution & Interoperability Test Lab Application Notes
©2008 Avaya Inc. All Rights Reserved.
16 of 21
ProCurve-ACM
Page 17

2. Enable the following features on the ProCurve 2610-24-PWR Switch.
• Enable spanning tree.
• Set DSCP map setting for priority 6.
• Set QoS type of service.
• Create trunk trk1 using link aggregation. Trunk trk1 goes to the ProCurve 5406zl Switch.
ProCurve Switch 2610-24-PWR# configure
ProCurve Switch 2610-24-PWR# spanning-tree
ProCurve Switch 2610-24-PWR# qos dscp-map 101110 priority 6
ProCurve Switch 2610-24-PWR(config)# qos type-of-service diff-services
ProCurve Switch 2610-24-PWR(config)# trunk 1-2 trk1 lacp
3. Create and configure the voice VLAN that will run between the control room and the closets.
• Assign a VLAN ID for the voice VLAN.
• Assign a name for the voice VLAN.
• Assign ports to the voice VLAN.
• Assign a QoS priority to the voice VLAN.
ProCurve Switch 2610-24-PWR(config)# vlan 33
ProCurve Switch 2610-24-PWR(vlan-33)# vlan 33 name Voice1
ProCurve Switch 2610-24-PWR(vlan-33)# tagged 3,4,24,trk1
ProCurve Switch 2610-24-PWR(vlan-33)# qos priority 6
ProCurve Switch 2610-24-PWR(vlan-33)# exit
4. Create and configure the data VLAN that will run between the control room and the closets..
• Assign a VLAN ID for the data VLAN.
• Assign a name for the data VLAN.
• Assign ports to the data VLAN.
ProCurve Switch 2610-24-PWR# configure
ProCurve Switch 2610-24-PWR(config)# vlan 30
ProCurve Switch 2610-24-PWR(vlan-30)# vlan 30 name Datavlan1
ProCurve Switch 2610-24-PWR(vlan-30)# untagged 3,4,15
ProCurve Switch 2610-24-PWR(vlan-30)# tagged 24,trk1
ProCurve Switch 2610-24-PWR(vlan-30)# exit
5. Save the running configuration to the startup configuration.
ProCurve Switch 2610-24-PWR# configure
ProCurve Switch 2610-24-PWR(config)# write memory
TMA; Reviewed:
SPOC 7/21/2008
Solution & Interoperability Test Lab Application Notes
©2008 Avaya Inc. All Rights Reserved.
17 of 21
ProCurve-ACM
Page 18

9. Interoperability Compliance Testing
Interoperability compliance testing covered feature functionality, serviceability, and performance
testing.
Feature functionality testing focused on the QoS and VLAN implementation in the
Avaya/ProCurve configuration. Specifically, compliance testing verified that when the ProCurve
Switch interfaces are over subscribed with low priority data traffic, the higher priority VoIP
media and signaling traffic still got through and achieved good voice quality. Prioritization of
voice traffic was achieved by implementing Layer 3 DiffServ-based QoS and Layer 2 priority
(801.p). Voice and data traffic were segmented in the enterprise network using VLANs.
QoS and performance testing was verified by making voice calls while a traffic generator
generated low priority data traffic to simulate a converged network. At the end of the
performance test, it was verified that the network devices continued to operate successfully.
Serviceability testing was conducted to verify the ability of the Avaya/ProCurve VoIP solution to
recover from adverse conditions, such as power cycling network devices and disconnecting
cables between the LAN interfaces. In all cases, the ability to recover after the network
normalized was verified.
9.1. General Test Approach
All feature functionality test cases were performed manually. The general test approach entailed
verifying the following:
LAN connectivity between the Avaya and ProCurve products.
Registration of Avaya H.323 IP Telephones with Avaya Communication Manager.
Registration of Avaya SIP IP Telephones with Avaya SIP Enablement Services.
Verification of the DHCP relay configuration.
VoIP calls over Layer 2 and Layer 3 connections.
Inter-office calls using G.711 mu-law & G.729 codecs, conferencing, and
sending low priority data traffic over the LAN.
Verifying that QoS directed the voice signaling and voice media to the higher priority
egress queue based on the packets’ DSCP value.
Verifying that Avaya Modular Messaging & Avaya IA770 INTUITY AUDIX voicemail
and MWI works properly.
The performance tests were performed by over subscribing the lines with low priority data and
verifying that VoIP traffic was prioritized and that good voice quality was achieved when calls
were routed over all of the LAN interfaces.
TMA; Reviewed:
SPOC 7/21/2008
Solution & Interoperability Test Lab Application Notes
©2008 Avaya Inc. All Rights Reserved.
18 of 21
ProCurve-ACM
Page 19

9.2. Test Results
All feature functionality, serviceability, and performance test cases passed. The ProCurve
implementation did prioritize VoIP traffic and yielded good voice quality with no calls being
lost. The stability of the Avaya/ProCurve solution was successfully verified through performance
and serviceability testing.
10. Verification Steps
This section provides the steps for verifying end-to-end network connectivity and QoS in the
field from the perspective of the ProCurve 5406zl Switch. In general, the verification steps
include:
1. Verify the DHCP relay on the ProCurve switches is functioning by confirming that the IP
telephones receive their IP addresses from the DHCP server connected to the ProCurve
5406zl Switch.
2. Check that the Avaya IP telephones have successfully registered with Avaya Communication
Manager by using the list registered-ip-stations command.
3. Place internal and external calls between the digital telephone and IP telephones at each site.
11. Conclusion
These Application Notes describe the configuration steps required for integrating ProCurve
switches with an Avaya telephony infrastructure. For the configuration described in these
Application Notes, the ProCurve switches were responsible for enforcing QoS using Diffserv
and 802.1p as well as link aggregation, rapid spanning tree, load balancing and OSPF. Avaya
Communication Manager delivered the voice traffic to the routers for transmission over the LAN
together with data traffic. Prioritization of VoIP traffic and good voice quality was successfully
achieved in the Avaya/ProCurve configuration described herein.
TMA; Reviewed:
SPOC 7/21/2008
Solution & Interoperability Test Lab Application Notes
©2008 Avaya Inc. All Rights Reserved.
19 of 21
ProCurve-ACM
Page 20

12. Additional References
The documents referenced below were used for additional support and configuration
information.
The following Avaya product documentation can be found at http://support.avaya.com.
[1] Administrator Guide for Avaya Communication Manager, Document Number 03-300509.
[2] Installing and Administering SIP Enablement Services, March 2007, Issue 2.1, Document
Number 03-600768.
[3] Avaya one-X Deskphone Edition for 9600 Series IP Telephones Administrator Guide
Release 2.0, Document Number 16-300698.
[4] Avaya one-X Deskphone SIP for 9600 Series IP Telephones Installation and Maintenance
Guide Release 2.0, Document Number 16-601943.
[5] Messaging Application Server (MAS) Administration Guide, Release 3.1, February 2007.
[6] Avaya IA 770 INTUITY AUDIX Messaging Application Release 5.0 Administering.
Communication Manager Servers to Work with IA 770 November 2007.
The HP product documentation can be found at: http://www.hp.com/rnd/support/manuals
[7] Command Line Interface Reference Guide for ProCurve 5400zl/3500yl(K.13.XX)
[8] Management and Configuration Guide for the ProCurve Switch 2600 Series, Switch
2600-PWR Series, Switch) (Entire Manual).
TMA; Reviewed:
SPOC 7/21/2008
Solution & Interoperability Test Lab Application Notes
©2008 Avaya Inc. All Rights Reserved.
20 of 21
ProCurve-ACM
Page 21

©
2008 Avaya Inc. All Rights Reserved.
Avaya and the Avaya Logo are trademarks of Avaya Inc. All trademarks identified by ® and ™
are registered trademarks or trademarks, respectively, of Avaya Inc. All other trademarks are the
property of their respective owners. The information provided in these Application Notes is
subject to change without notice. The configurations, technical data, and recommendations
provided in these Application Notes are believed to be accurate and dependable, but are
presented without express or implied warranty. Users are responsible for their application of any
products specified in these Application Notes.
Please e-mail any questions or comments pertaining to these Application Notes along with the
full title name and filename, located in the lower right corner, directly to the Avaya DevConnect
Program at [email protected].
TMA; Reviewed:
SPOC 7/21/2008
Solution & Interoperability Test Lab Application Notes
©2008 Avaya Inc. All Rights Reserved.
21 of 21
ProCurve-ACM
 Loading...