

Page 1
TM
Air
Lift
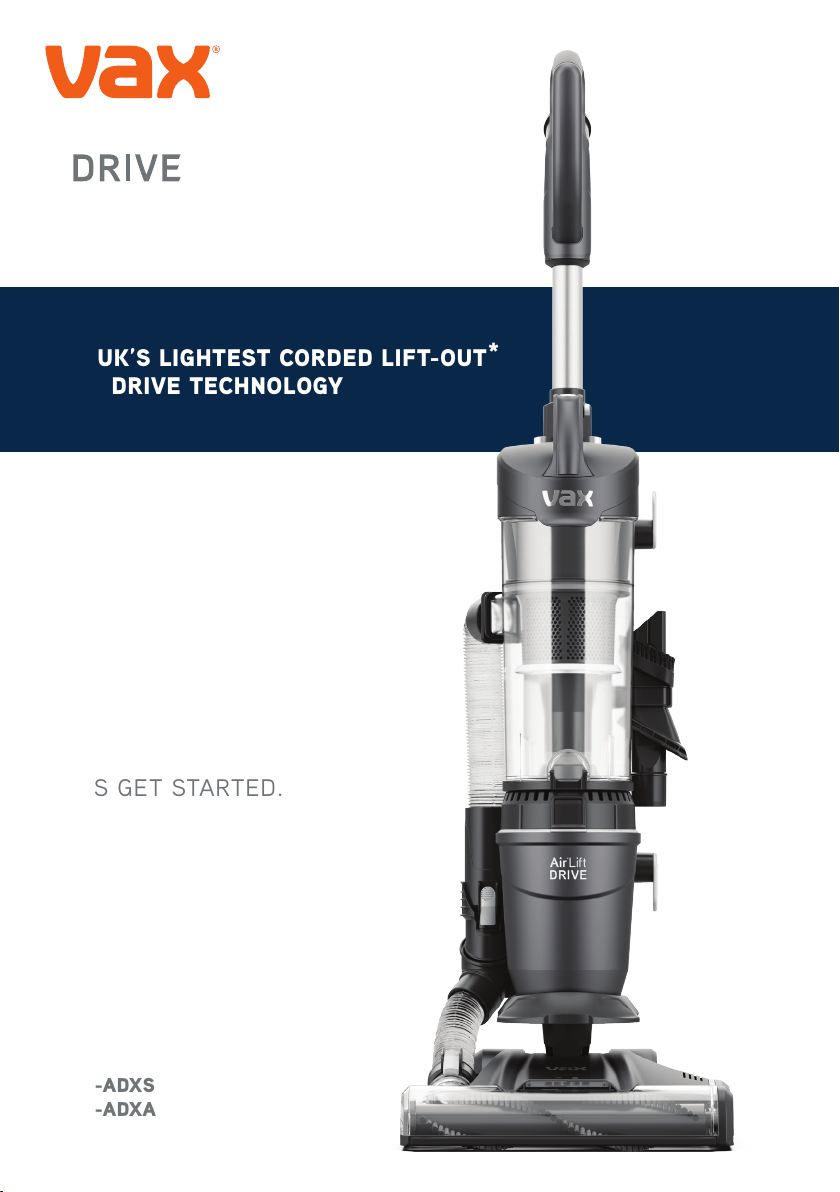
THE UK’S LIGHTEST CORDED LIFT-OUT*
WITH DRIVE TECHNOLOGY
LET’S GET STARTED.
CDUP-ADXS
CDUP-ADXA
*UK market data January – December 2018.
Page 2

SAFETY GUIDE
BASIC SAFETY PRECAUTIONS
This machine is intended for household use only and NOT for commercial or
industrial use.
PLEASE KEEP INSTRUCTIONS FOR FURTHER USE AND USE ONLY AS
INSTRUCTED IN THIS GUIDE.
• This machine is not intended to be used or cleaned by persons with reduced
physical, sensory or mental capabilities, or lack of experience or knowledge,
unless they have been given instructions concerning the safe use of the machine
by a person legally responsible for their safety. They should be supervised whilst
using the machine. Children shall not use, clean or play with this machine, which
when not in use should be secured out of their reach.
• Only use the machine indoors on dry surfaces and keep the area you’re cleaning
well lit.
• Keep fingers, hair and loose clothing away from moving parts and openings whilst
using the machine.
• Only VAX recommended accessories/tools should be used with the machine, use
of non-branded accessories/tools will invalidate your warranty.
• Always switch off and unplug the machine before performing maintenance or
troubleshooting checks. If the brushbar has been obstructed, the brushbar motor
protection sensor may have been activated. The brushbar will stop and the light
on the floorhead will illuminate red.
DON’TS
• Don’t use the machine if it has been dropped, damaged or left outdoors.
• Don’t run over the power cord or use the
damaged. If the power cord is damaged, it must be replaced by a qualified person
in order to avoid a hazard.
• Don’t handle the plug or use the machine with wet hands.
• Don’t pull or carry the machine by the power cord.
• Don’t use the power cord as a handle, pull the power cord around corners, sharp
edges or close a door over the power cord.
• Don’t unplug the machine by pulling on the power cord.
• Don’t vacuum up hard or sharp objects such as glass, nails, screws or coins etc.
• Don’t vacuum up any flammable or combustible materials (lighter fluid, petrol,
kerosene etc.) or use the machine in an area with explosive vapours
or liquid.
2
machine
if the power cord or plug is
support.vax.co.uk
Page 3

• Don’t vacuum up hot coals, cigarette butts, matches or smoking hot burning
items or use in an area where there may be harmful fluids (chlorine, bleach,
and ammonia drain cleaner).
• Don’t attempt to remove blockages with sharp objects as this may cause damage
to the machine. Remove blockages only as instructed in this guide.
• Don’t use the machine with incorrect voltage as this may result in damage or
injury to the user. The correct voltage is listed on the ratings label.
• The brushbar constantly rotates when switched on. Never use on one spot for an
extended period of time as the brushbar may damage the floor surface.
DO’S
• Turn off all controls on the machine before connecting or disconnecting the plug
from the mains socket.
• Always keep the power cord away from the brushes during use. After use always
wrap the power cord around the cord hooks provided.
• Always make sure both the pre-motor/post-motor filters are in place before use.
• Hold the lift-out by the carry handle at all times when the lift-out is detached for
stair and above floor cleaning.
• Take extra care when positioning the machine on the stairs.
• Always switch off the machine before disconnecting or connecting the hose and
accessories.
• Keep all openings clear and free from debris as this may affect the airflow/suction.
• Always replace the fuse in the plug with a British 13amp fuse.
• Always protect the power cord from heated surfaces and open flames.
• Use only CE approved 13amp extension cords, non-approved extension cords may
overheat. Care should be taken to arrange the extension cord as it can be a trip
hazard.
• Always check the floorhead and accessories are free from damage, dirt and
debris before use.
• Store the machine in a cool, dry area. If the filters have been cleaned as per the
user guide instructions ensure they are thoroughly dry before storing away.
3
support.vax.co.uk
Page 4

WARRANTY & TECHNICAL
WARRANTY
If a VAX machine is used in the way it is intended and it breaks down within the
guarantee period, it’s our responsibility to repair or replace it.
Here’s what isn’t covered:
• Functional parts, tools and accessories after 12 months that may suffer
premature failure due to every day wear and tear.
• Consumables after 3 months such as belts, filters, brushbars, fuses etc.
• Accidental damage.
• Cosmetic damage that does not affect the functioning of the product.
• Damage as a result of use not in accordance with the user guide.
• Damage caused by not carrying out regular maintenance.
• Damage to the cable.
• Blockages; please refer to the user guide.
• Poor product performance caused by:
- Negligent use, misuse or careless operation of the machine.
- Failure to clean or maintain the product in accordance with the user guide.
- Use of the vacuum cleaner which is not in accordance with the user guide.
- Use of a VAX product for anything other than normal domestic household
purposes in the country in which it was purchased.
- Use of parts, accessories and consumables, which are not genuine VAX
components.
- Faulty installation or repairs - unless carried out by a qualified electrician or
engineer.
TECHNICAL
EU Statement of Compliance: Manufacturer/EU importer: VAX Limited, hereby on
our own responsibility, declare that the VAX AirTM Lift Drive series is manufactured
in compliance with the following Directives:
Safety: 2014/35/EU Low Voltage Directive.
EMC: 2014/30/EU Electromagnetic Compatibility Directive.
Waste electrical products should not be disposed of with household
waste. Please recycle where facilities exist. Check with your Local
Authority or retailer for recycling advice.
VAX is a trade mark of Techtronic Cordless GP.
© 2019 - 2020 Techtronic Cordless GP. All rights reserved.
VAX Ltd, Artillery House, Heritage Way, Droitwich, WR9 8YB, UK.
4
support.vax.co.uk
Page 5
CONTENTS
Safety guide
Warranty & technical
Getting to know your machine
Getting started
Using your machine
Maintenance & cleaning
What to do if it goes wrong
Getting in touch
2 - 3
4
6
7
8 - 11
12 - 16
17
18
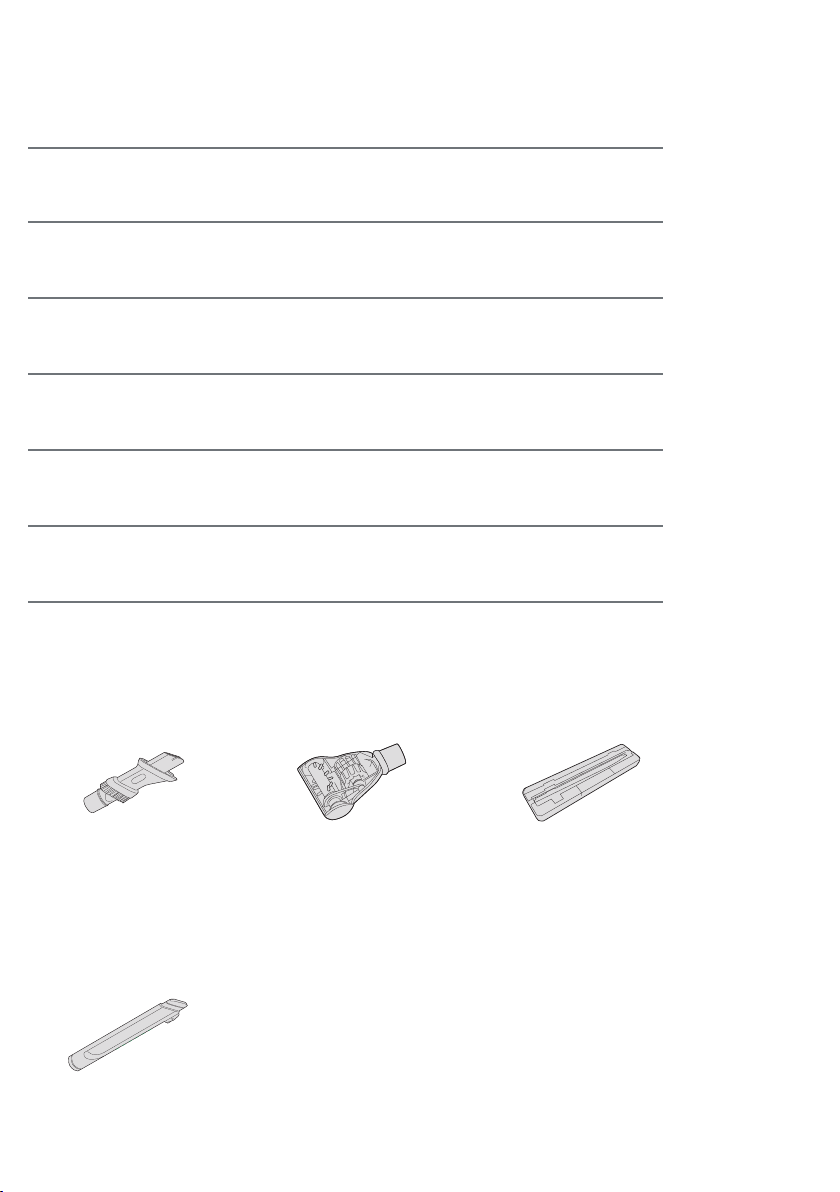
Included with your AirTM Lift Drive and AirTM Lift Drive Plus
3-in-1 Tool
(Crevice Tool, Dusting Brush
and Upolstery Tool)
TurboTool
Hard Floor Adaptor
Extra tool included with your AirTM Lift Drive Plus
Flexi Crevice Tool
5
support.vax.co.uk
Page 6
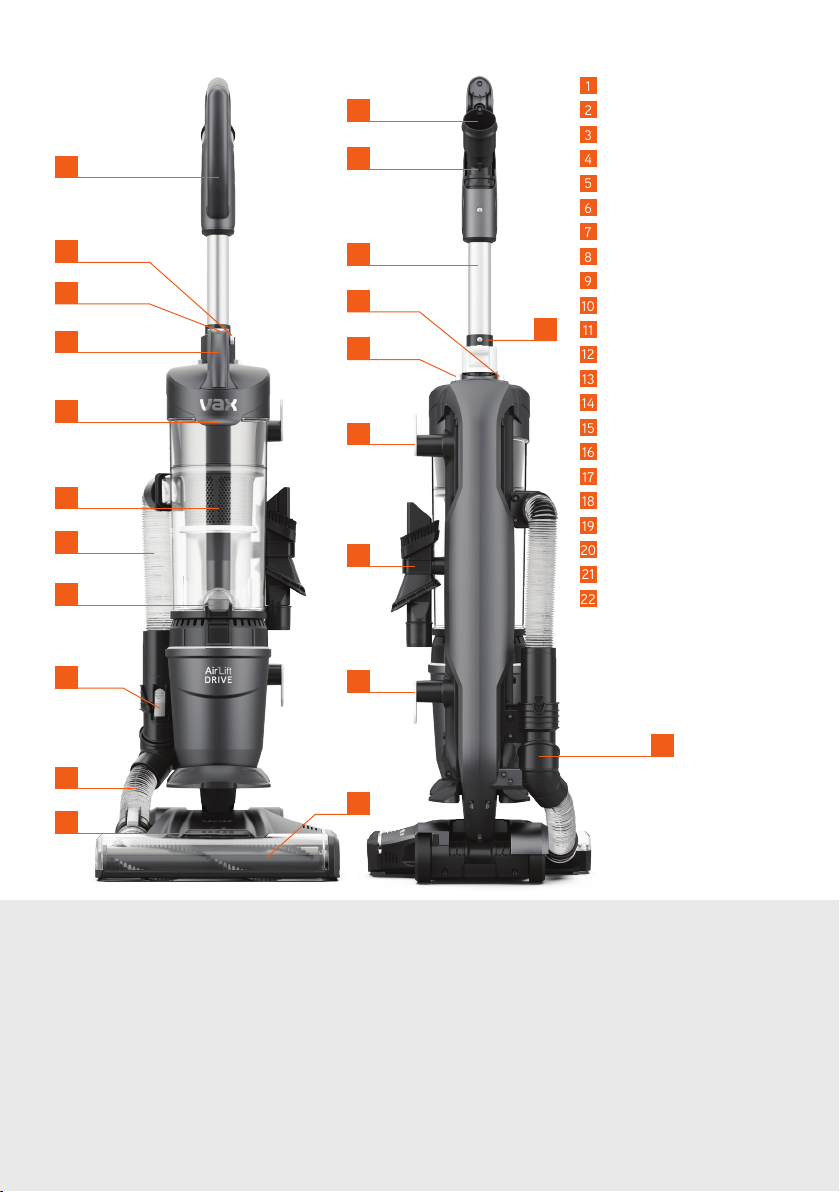
GETTING TO KNOW YOUR MACHINE
13
1
2
3
4
5
6
7
8
14
15
16
17
18
19
1
Handle
2
Dirt container release button
3
Lift-out release button
4
Carry handle
5
Dirt container lid release clip
6
Separator
7
Hose
8
Dirt release button (hidden)
9
Hose end clip
10
Lower hose
21
11
LED headlights
12
Brushbar
13
Hose to handle connection
14
Cord hook
15
Extension tube
16
Power On/Off button
17
Brushbar On/Off button
18
Quick release cord hook
19
3-in-1 tool storage clip
20
Quick release cord hook
21
Wand release
22
Hose holder
9
10
11
20
12
TECHNICAL SPECIFICATION
VAX AirTM Lift Drive Series
Voltage 220-240V
Wattage Full product: 850W
Lift-out: 750W
Frequency 50Hz
Cord length 9m
Weight 6.2kg
To purchase accessories and consumables visit: vax.co.uk
6
Subject to technical change without notice. Images are illustrative only.
22
support.vax.co.uk
Page 7
GETTING STARTED
PLEASE READ THE SAFETY PRECAUTIONS ON PAGES 2 & 3 BEFORE USE.
IMPORTANT: Always switch off the machine before connecting or disconnecting the lift-out/hose/accessories or
removing and emptying the dirt container.
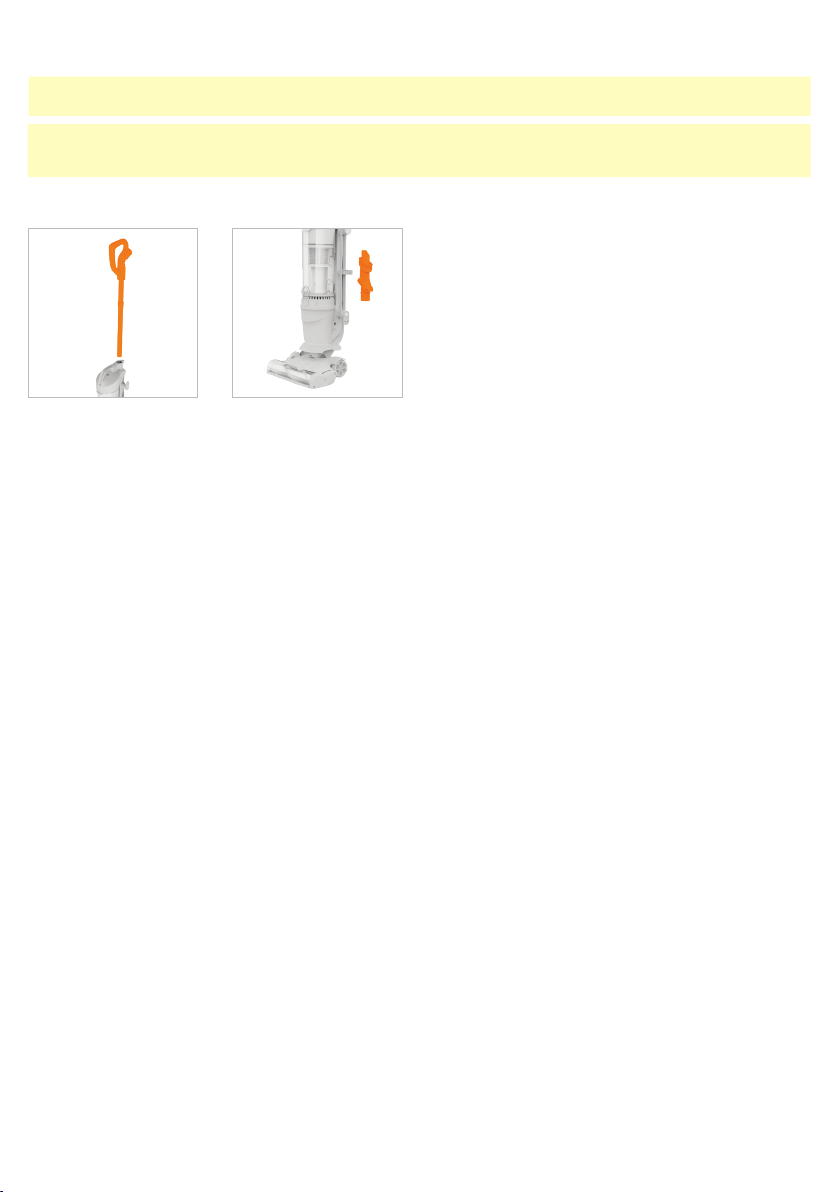
Assembly
Slide the handle with the
extension tube into the
top of the machine until it
clicks into place.
Place the 3-in-1 tool onto
the storage clip.
7
support.vax.co.uk
Page 8
USING YOUR MACHINE
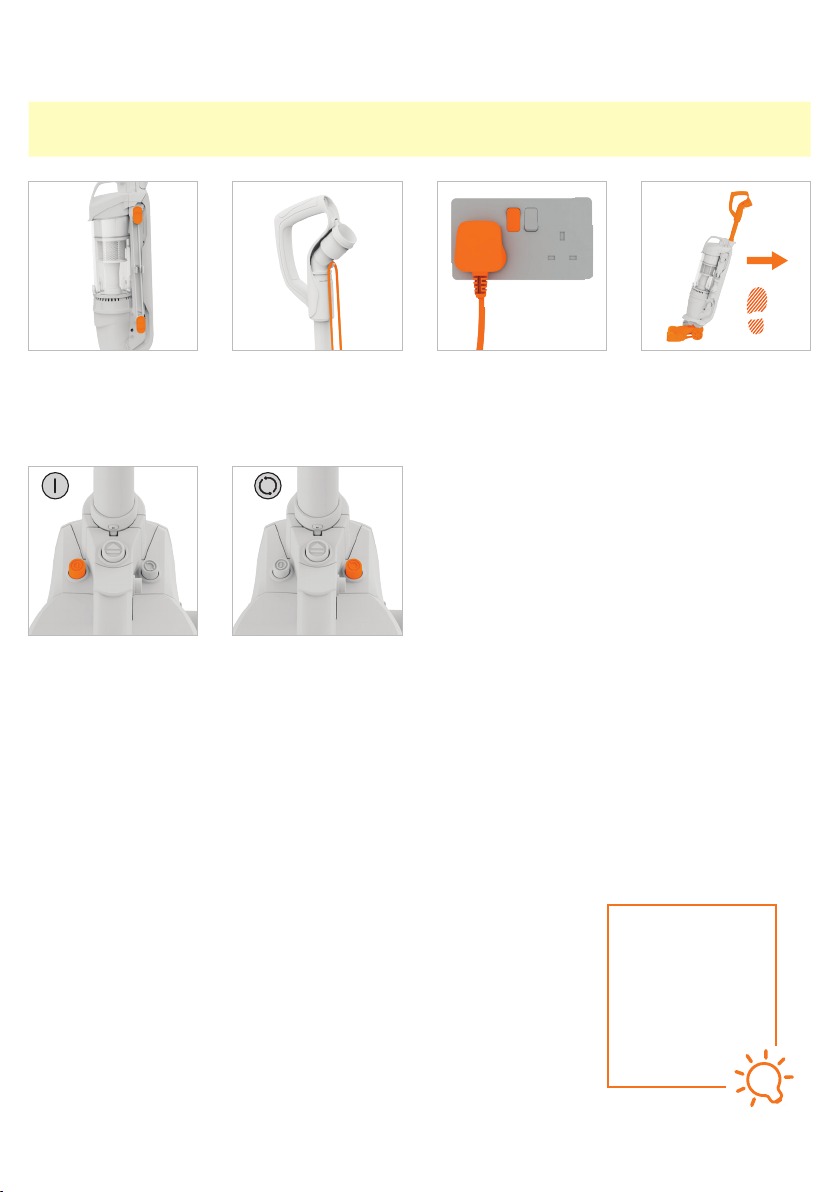
Using your machine with the lift-out attached
CAUTION: The brushbar constantly rotates when switched on. Never use on one spot for an extended period of time as the
brushbar may damage the floor surface. The brushbar should be ON for carpets and OFF for hard floors.
Turn the quick release
cord hooks to release the
power cord.
Press the On/Off button
to switch the machine on.
Clip the cord into the cord
hook so that the cord does
not get pulled, caught or
tangled in the machine.
BRUSHBARON/OFF
Press the brushbar button
to activate the brushbar.
The brushbar should be
ON for carpets and OFF
for hard floors.
Plug the machine into the
mains and switch on.
Place a foot on the
floorhead and pull the
handle backwards to
recline.
Whilst using the whole
unit, don’t forget to use
the handle cord hook
so that the cord doesn’t
get pulled, caught or
tangled in the machine.
TIP
8
support.vax.co.uk
Page 9
USING YOUR MACHINE
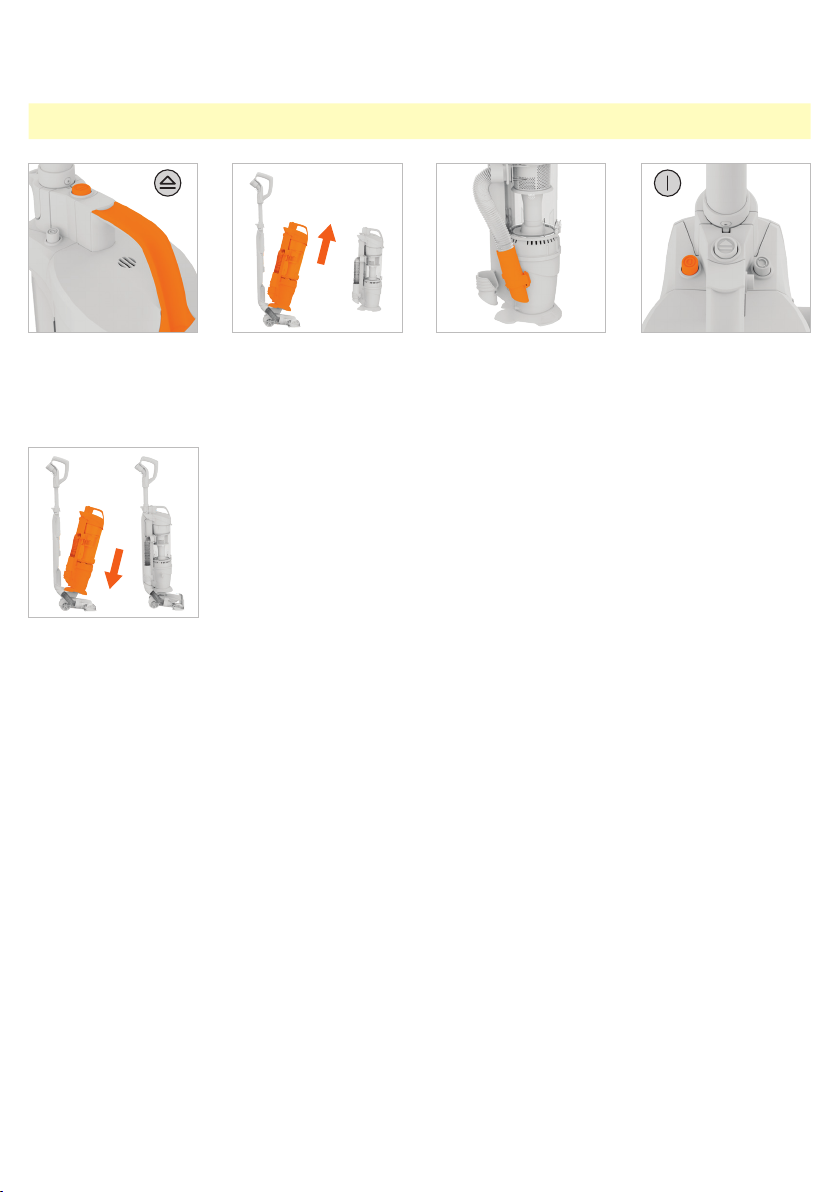
Using your machine with the lift-out detached
IMPORTANT: Hold the lift-out by the carry handle at all times when the lift-out is being used on stairs and cleaning high areas.
LIFT-OUT
Hold the carry handle and
press the lift-out release
button.
To refit the lift-out place
the lift-out base onto
the back panel and
floorhead. In a hinge like
manner push the lift-out
backwards until it clicks
into place.
Lift and remove the lift-out
off the back panel and
floorhead.
Press the hose end clip
and pull to remove the
hose from the hose
holder.
ON/OFF
Press the On/Off button
to switch the machine on.
9
support.vax.co.uk
Page 10
USING YOUR MACHINE
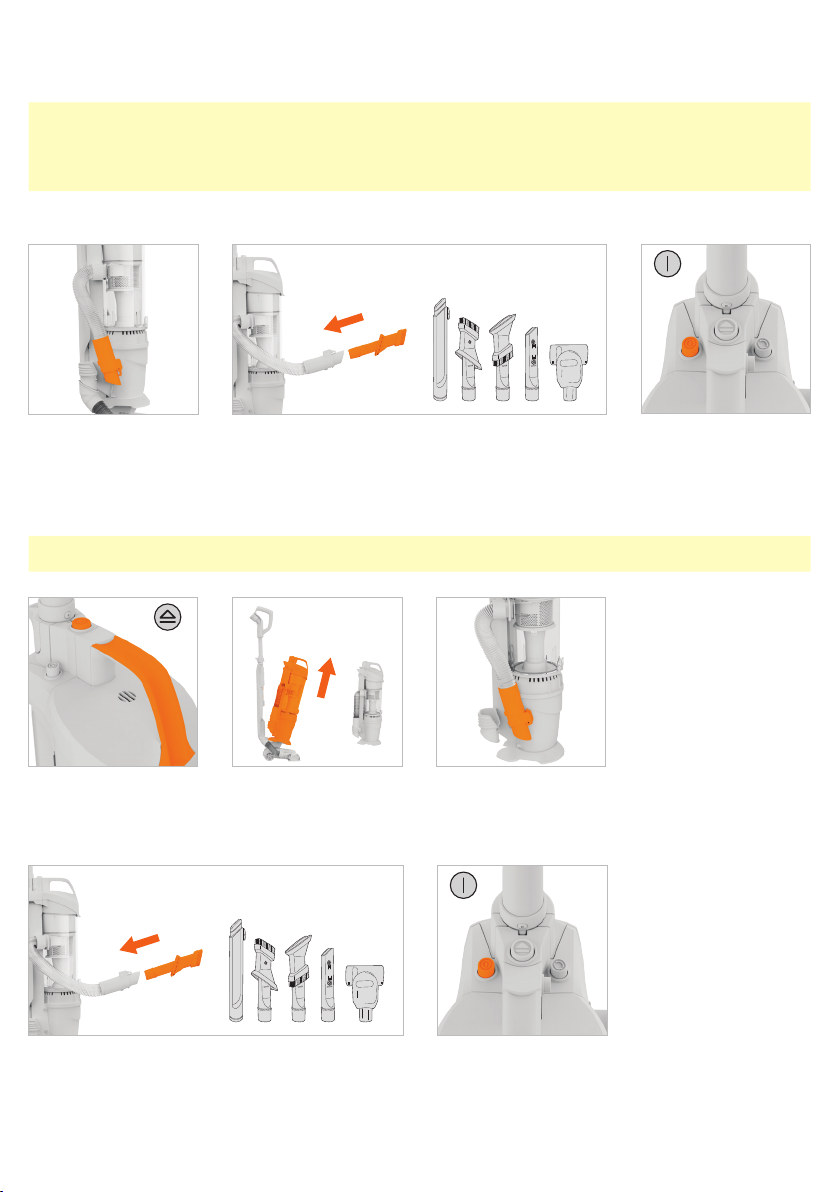
Using the accessories
IMPORTANT: Always switch off the machine before connecting or disconnecting the lift-out/hose/accessories.
The tools can be used with the lift-out either attached or detached from the main unit. For easier cleaning detach the lift-out
for stair and above floor cleaning. Hold the lift-out by the carry handle at all times when detached and take extra care when
positioning on the stairs.
With the lift-out attached
ON/OFF
Press the hose end clip
and pull to remove the
hose from the hose holder.
Attach the chosen accessory to the end of the hose.
With the lift-out detached
IMPORTANT: Hold the lift-out by the carry handle at all times when the lift-out is detached.
LIFT-OUT
Hold the carry handle and
press the lift-out release
button.
Lift and remove the lift-out
body off the back panel and
floorhead.
Press the hose end clip
and pull to remove the
hose from the hose holder.
ON/OFF
Press the On/Off button
to switch the machine on.
Attach the chosen accessory to the end of the hose.
10
Press the On/Off button
to switch the machine on.
support.vax.co.uk
Page 11
USING YOUR MACHINE
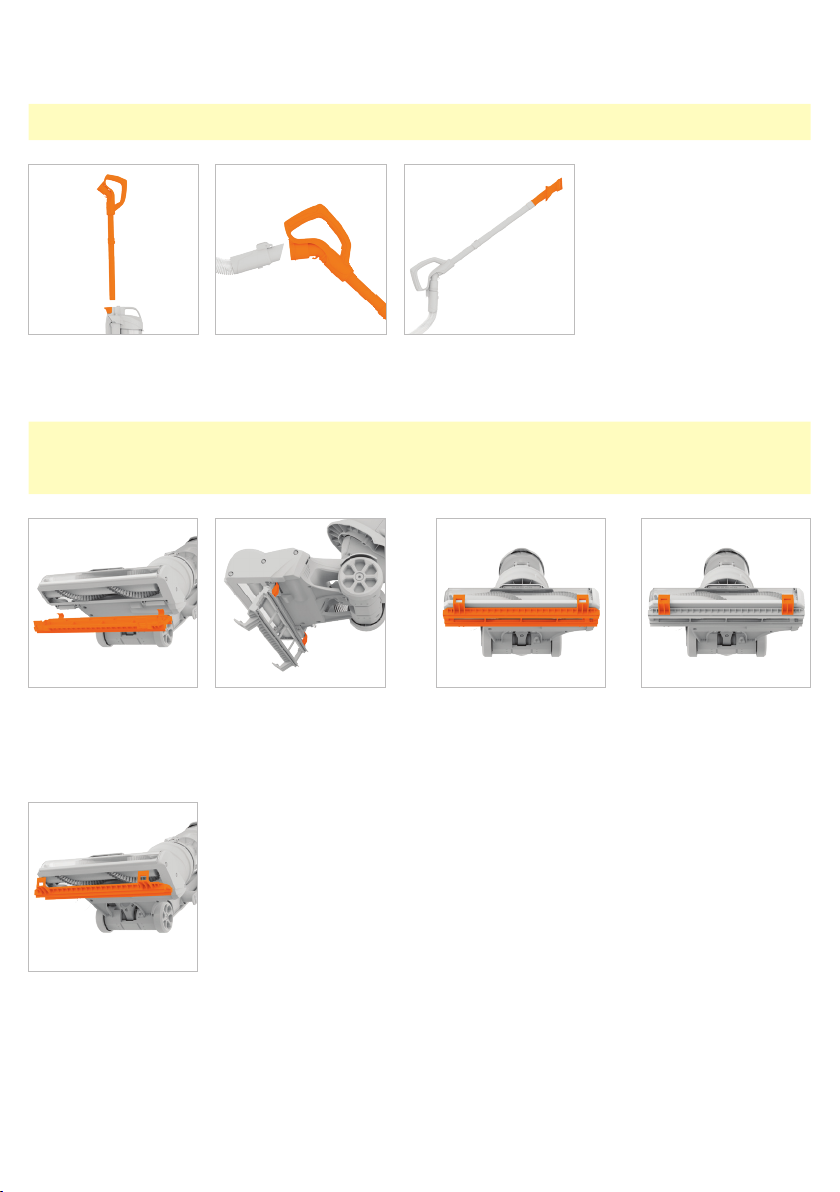
Using the handle and hose for hard to reach areas
IMPORTANT: Always switch off the machine before connecting or disconnecting the handle.
Remove the handle from the main unit, attach to the hose and attach the chosen accessory.
Using the hard floor adaptor
IMPORTANT: Always check that the adaptor, wheels and brushbar are free from any dirt/debris before use. Do not use the
hard floor adaptor if it has become damaged or worn. Remove any sharp objects from the floor that could become trapped and
may scratch or damage the surface. The hard floor adaptor should be removed to vacuum carpets.
Lie the machine on its back. Hook the curved clips on
the back of the adaptor under the small wheels on the
base of the machine.
Unhook the curved clips
from the small wheels on
the base of the machine.
11
Push the hard floor
adaptor onto the base of
the machine until it clicks
into place.
To remove the adaptor, pull
the front clips to unlock.
support.vax.co.uk
Page 12
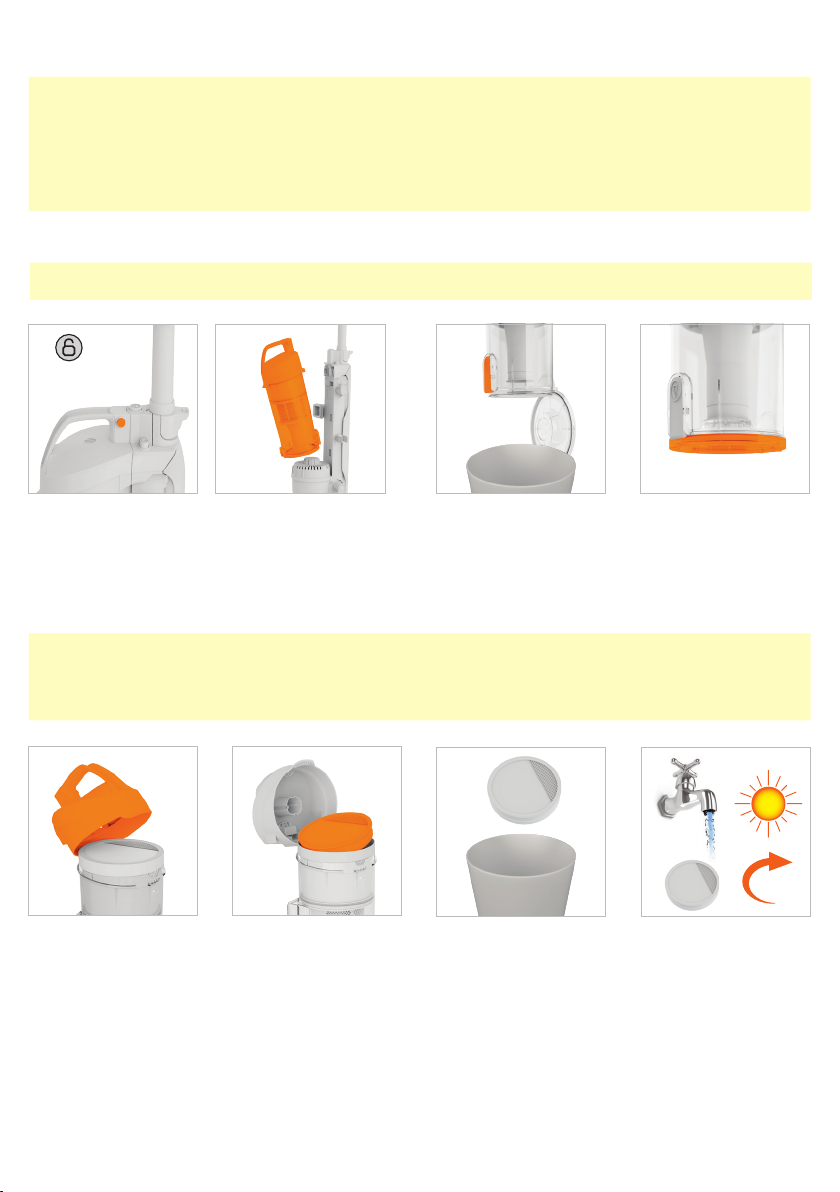
MAINTENANCE & CLEANING
IMPORTANT: Always switch off and unplug the machine before performing maintenance or troubleshooting checks.
Switch the machine off before connecting or disconnecting the lift-out, hose and accessories or before emptying the dirt container.
The motor is equipped with a thermal cut-out. If for any reason the machine should overheat, the thermostat will automatically
turn the machine off. If this happens switch off and unplug the machine. Remove and empty the dirt container.
Check the machine for blockages and clean the filters if required. Allow the machine to cool for approximately 1 hour.
If you have washed the pre-motor filter, wait 24 hours or until fully dry before putting it back into the machine.
Emptying the dirt container
IMPORTANT: Don’t over fill the dirt container to avoid blocking the air flow through the machine.
DIRT
CONTAINER
Press the dirt container release buttons located on the
side of the carry handle, pull to remove the dirt container.
Hold the dirt container over
a bin. Press the dirt release
button to open and allow
the dirt to fall out.
To close, push the dirt
release door until it clicks
into place.
Cleaning the pre-motor filter
IMPORTANT: Wash the pre-motor filter with warm water (40°C max) and leave for 24 hours or until fully dry before
replacing into the machine. For best cleaning results, filters should be tapped over a bin every 4-6 uses to remove dirt/
debris, washed every 3 months (depending on the level of use) and replaced every 9-12 months. Ensure all filters are in
place before using the machine.
40°C
MAX
Push the dirt container lid
release clip upwards to
open the container lid.
Pull the pre-motor filter
tab and remove the filter.
Tap the filter over a bin
to remove any dirt/debris.
Wash the filter under
running water (40˚ max).
Leave for 24 hours or until
fully dry before replacing.
24hr
12
support.vax.co.uk
Page 13
MAINTENANCE & CLEANING
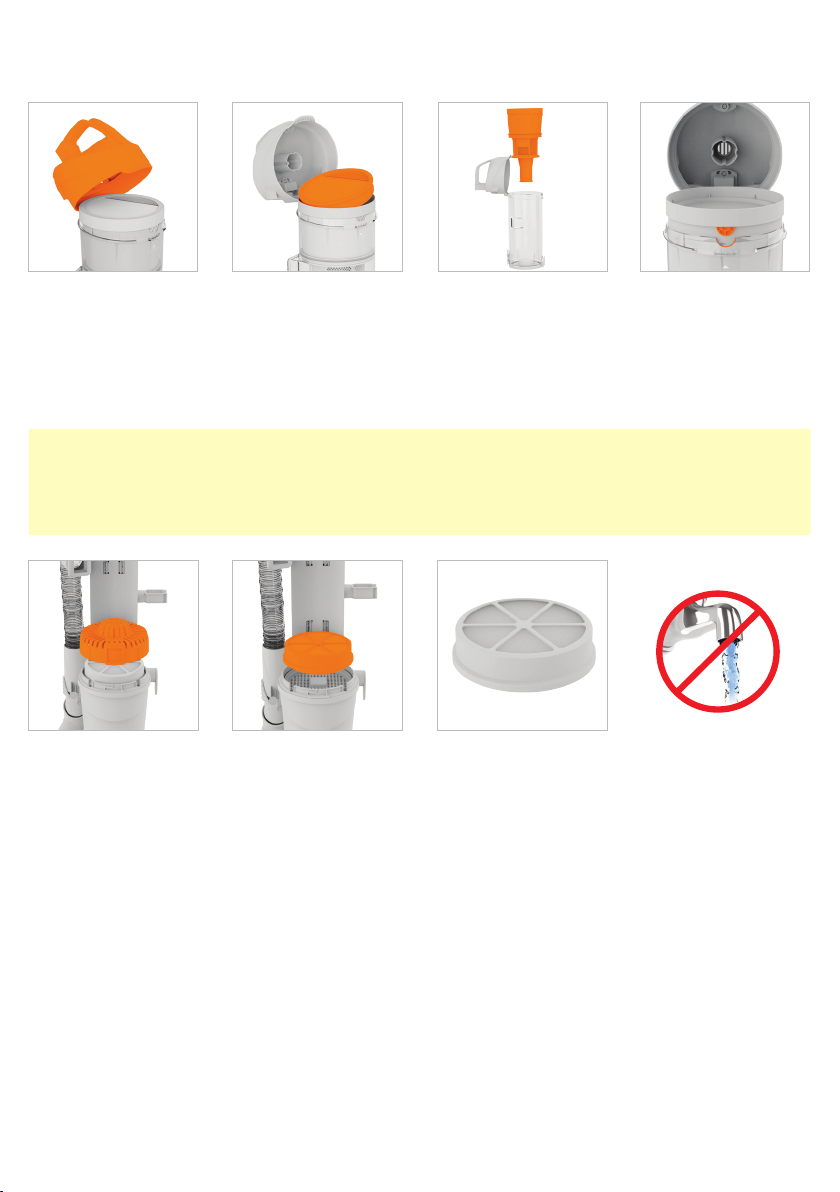
Cleaning the separator
Push the dirt container lid
release clip upwards to
open the container lid.
Pull the pre-motor filter
tab and remove the filter.
Lift and remove the
separator out of the dirt
container. Using a soft
brush remove any dirt/
debris from the separator.
Refit the separator making
sure that the semi circular
tab on the separator fits
into the groove on the
dirt container.
Post-motor filter maintenance
IMPORTANT: The post-motor filter is designed to offer long life with no maintenance. The filter should be checked periodically
and when heavily discoloured it should be replaced.
Do not wash, scrub or brush the post-motor filter as this will damage the filter.
Ensure all filters are in place before using the machine.
Twist the post-motor filter
cover anticlockwise and
remove.
Lift and remove the
post-motor filter.
Check the post-motor filter
for any discolouration,
when heavily discoloured it
should be replaced.
13
support.vax.co.uk
Page 14
MAINTENANCE & CLEANING
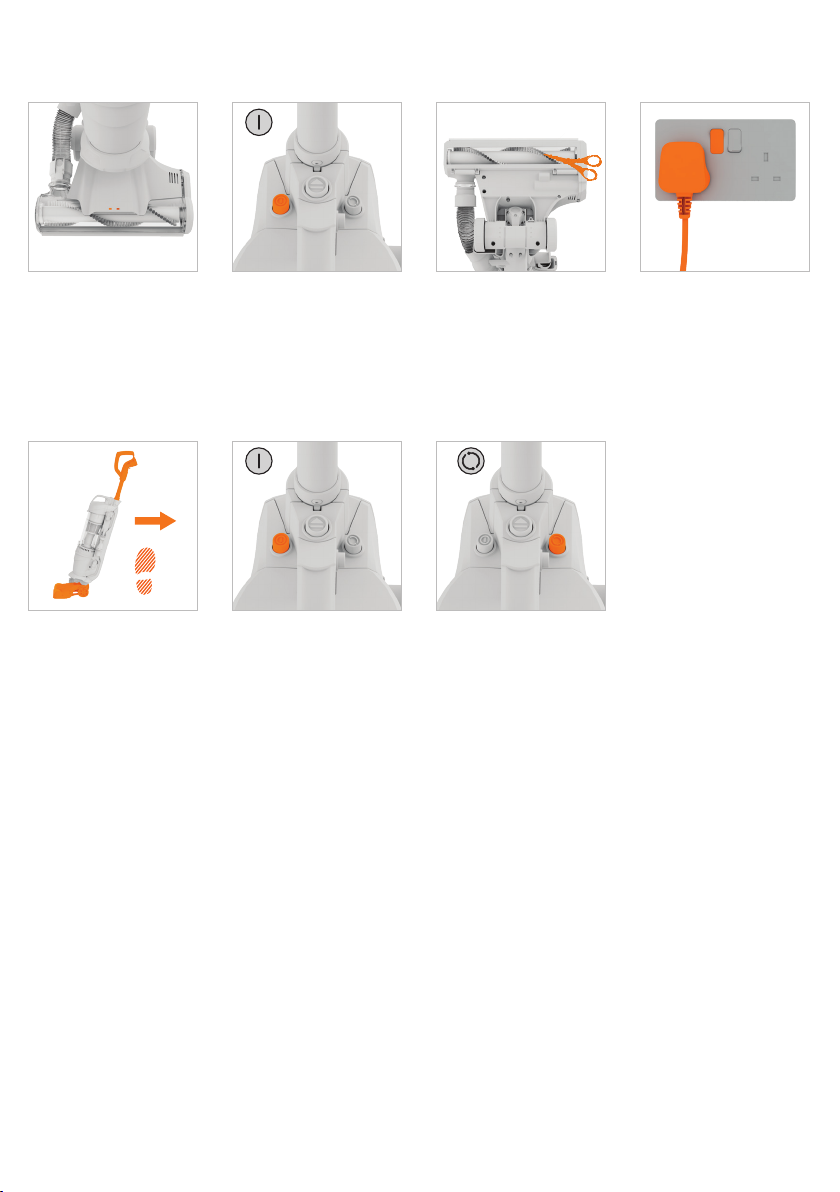
Resetting/removing obstructions from the brushbar
ON/OFF
If the brushbar has been
obstructed, the brushbar
motor protection sensor
may have been activated.
The brushbar will stop and
the light on the floorhead
will illuminate red.
Place a foot on the
floorhead and pull the
handle backwards to
recline.
Press the On/Off button
to switch the machine off.
Unplug from the mains.
ON/OFF
Press the On/Off button
to switch the machine on.
Lie the machine on
its back and remove the
obstruction. Using a pair
of scissors remove any
threads or hair caught
around the brushbar.
BRUSHBAR
Press the brushbar button
to activate the brushbar.
The brushbar should be
ON for carpets and OFF
for hard floors.
Plug the machine into the
mains and switch on.
14
support.vax.co.uk
Page 15
MAINTENANCE & CLEANING
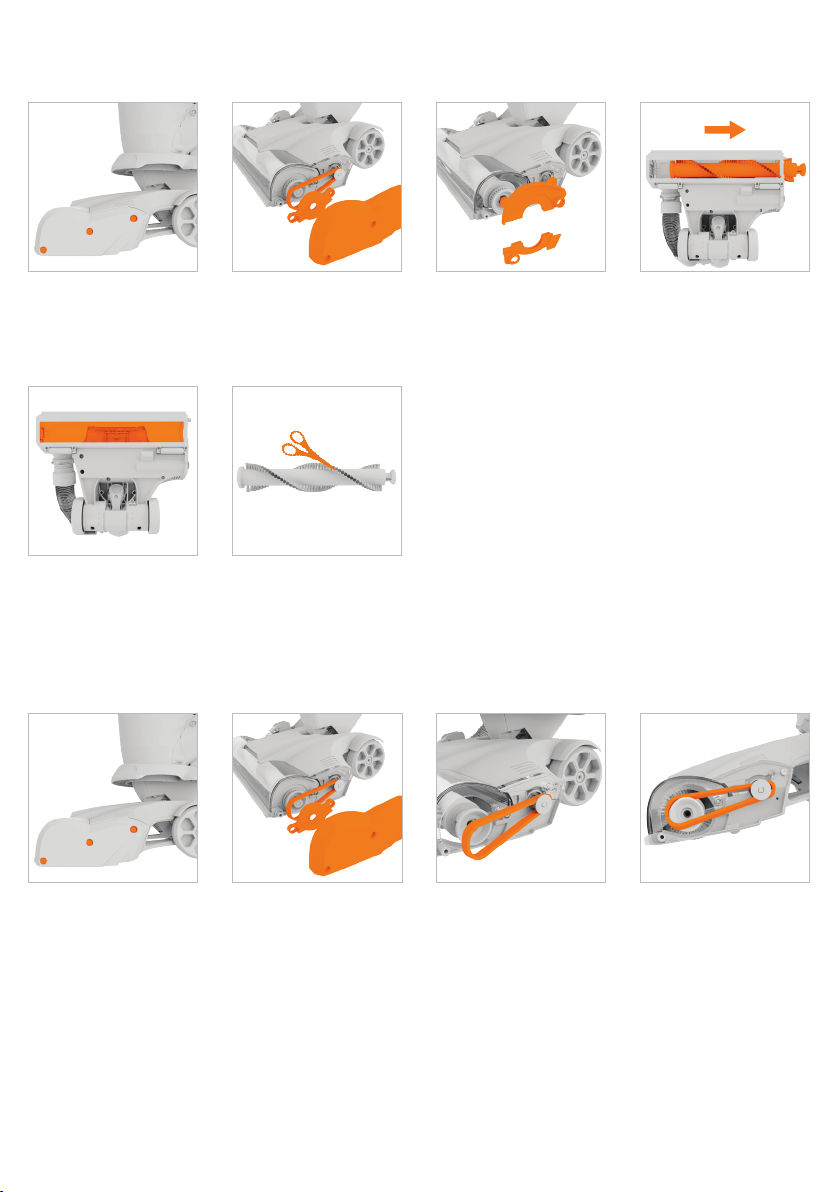
Cleaning the brushbar
Using a crosshead
screwdriver, remove the 3
screws from the belt cover
on the side of the floorhead.
Clear any dirt/debris inside
the brushbar housing.
Changing the belt
Pull to remove the belt
cover and brushbar
location plate. Remove
the belt.
Using a pair of scissors
remove any threads or
hair caught around the
brushbar and end caps
before refitting.
Lift and separate brushbar
side cover.
Pull the brushbar through
the side cover to remove.
Using a crosshead
screwdriver, remove the 3
screws from the belt cover
on the side of the floorhead.
15
Pull to remove the belt
cover and brushbar
location plate. Remove
the belt.
Clean any debris from the
cogs. To replace the belt
firstly hook the belt over
the small cog.
Slide the belt over the
top of the large cog and
rotate the belt and cog
anticlockwise. During
rotation the belt will slide
onto the cog.
support.vax.co.uk
Page 16
MAINTENANCE & CLEANING
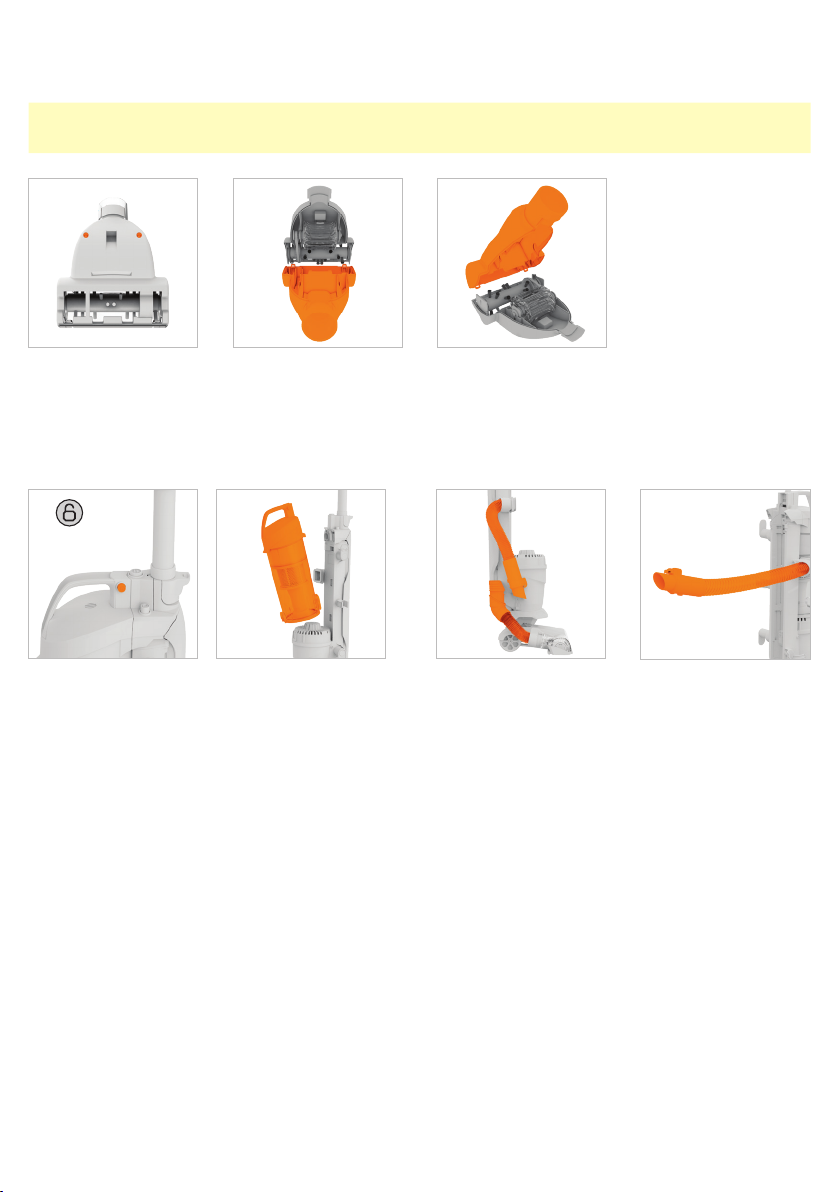
Removing dirt/debris from the TurboTool
CAUTION: To reduce the risk of injury remove the tool from the machine before performing maintenance or troubleshooting.
Always ensure the machine is switched off and unplugged before doing so.
Open the TurboTool by
removing the 2 screws with
a crosshead screwdriver.
Pull open the bottom
cover. Clean out any
debris or hair from the
brushbar and turbine fan.
Checking for blockages
DIRT
CONTAINER
Press the dirt container release buttons located on the
side of the carry handle, pull to remove the dirt container.
Refit the bottom cover, insert
and tighten the screws.
Press the hose end clips
and pull to remove the 2
hoses from the hose holders.
Pull and stretch the hose,
any blockage in the hose
should then be visible.
Using a blunt instrument,
push into the stretched
out hose to remove the
blockage.
16
support.vax.co.uk
Page 17

WHAT TO DO IF IT GOES WRONG
WARNING: Always switch o and unplug the machine before performing any maintenance or troubleshooting checks.
There is an accessory missing
• Check the contents on the box to make sure the part is definitely included with your machine.
Why does the machine have no power?
• The plug may not be fully pushed into the electrical socket.
• The fuse in the plug may need replacing. Always replace with a British 13amp fuse.
• The motor thermostat may have tripped. If this has happened, unplug the machine. Remove and empty the dirt container and
check the hose for blockages. Clean the filters and allow the machine to cool for approximately 1 hour. If you have washed
the pre-motor filter, wait 24 hours or until it is fully dry before putting it back into the machine.
Why won’t the machine pick up?
• The dirt container may not be fitted correctly. Remove the dirt container and refit making sure it clicks into place.
• The dirt container may be full or blocked, empty the dirt container and clear any blockages. See Emptying the dirt container page 12.
• The separator may be blocked. Check and clear any blockages. See Cleaning the separator page 13.
• The filters may need cleaning or replacing. See Cleaning your filters page 12.
• There may be a blockage in the hose. Check and clear any blockages. See Checking for blockages page 16.
• The brushbar may not be turning. See Why isn’t my brushbar rotating? below.
• The accessory/tool will not pick up. Check and clear any blockages.
Why isn’t the brushbar rotating?
• The brushbar may not have been activated. See Using your machine with the lift-out attached page 8.
• The machine may not be reclined. See Using your machine with the lift-out attached page 8.
• The lift-out may not be correctly assembled to the back panel and floorhead. See Using your machine with the lift-out detached page 9
• The brushbar may be obstructed. See Resetting/removing obstruction from the brushbar page 14.
• The brushbar may need resetting. See Resetting/removing obstruction from the brushbar page 14.
• The belt may be broken. See Changing the belt page 15.
Why is there a red light on the floorhead?
• The brushbar may have been obstructed, the brushbar motor protection sensor may have been activated.
The brushbar will stop and the light on the floorhead will illuminate red. Check the brushbar and clear any hair or debris.
See Resetting/removing obstruction from the brushbar page 14.
Why is dust escaping from the machine?
• The filters may not be correctly fitted. See Cleaning the pre-motor filter page 12 and Post-motor filter maintenance page 13.
• The dirt container may be full or blocked, empty the dirt container and clear any blockages. See Emptying the dirt container page 12.
• The filters may need cleaning or replacing. See Cleaning the pre-motor filter page 12 and Post-motor filter maintenance page 13.
• There may be a blockage in the hose, check and clear any blockages. See Checking for blockages page 16.
17
support.vax.co.uk
.
Page 18

 Loading...