

SP1
Owner’s Manual
Model: 100000
Important Notice
Travel in avalanche terrain is inherently dangerous. You are responsible for your own
actions and decisions. Knowledge and experience are essential to reduce the risk of injury
or even death. Do not travel in snow terrain without an experienced guide or equivalent
training. Never travel alone. By using the AvaTech SP1, each user confirms that:
User has read and understands the user manual, terms of use, and privacy policy.
User understands the limitations of the Avatech SP1.
User agrees that the AvaTech SP1 is not a substitute for users’ own judgment.
Activities in snow are inherently dangerous. Use the AvaTech SP1 at your own risk.

Letter to the Customer
At AvaTech, we believe safety in the mountains starts with a community empowered to
share knowledge, communicate effectively, and make good, data-driven decisions. We
started AvaTech because of our passion for the mountains and personal experiences with
life-threatening avalanches. On Monday mornings we have a team meeting that starts by
asking ourselves the question: “Why do we exist?” The answer: We exist to serve you,
and in doing so we aim to leave a lasting impact on the safety of our fellow mountain
travelers all over the world.
We want to express our most sincere appreciation for your early adoption of our products
and belief in us at AvaTech. Without you, we do not exist. As one of our first customers,
you will experience an entirely new proactive avalanche safety system. The SP1 and
AvaNet, when combined together, allow you to gather, share, and analyze many valuable
types of snowpack data all over the world. These tools are powerful, but let’s always
remember that they are just tools. The SP1 does not replace a snowpit or your education,
judgment, and experiences in the mountains. The avalanche puzzle is complicated, but
we believe that new technologies designed to facilitate your observations and decisionmaking process can be valuable tools in your toolkit. Even more exciting is how these
tools enable us to access the shared wisdom of the community. With AvaNet we can
learn from not only our own observations, but from our neighbor’s observations days,
hours, or even minutes before we set foot in the backcountry.
And finally, AvaTech was founded out of MIT, but our technologies were not the
products of years holed up in a lab. Ask anyone who knows us and you’ll learn about our
process. Our technologies are the products of deep engagement with hundreds of experts
and influencers in our industry over two years of intense product development.
Ultimately, knowledge alone will not set us free. As a community we must come together
to gather, share, and discuss information that can help us all make better decisions, stay
safe, and enjoy the beautiful snowcapped mountains that inspire our lives. Enjoy the
snow, be proactive, and let’s find out what we can all do when we work together!
Sincerely,
the AvaTech Team
Copyright Notice
Contact us
For more information about the SP1 or AvaNet, please visit www.avatech.com.
Sales: sales@avatech.com
Customer Inquiries: contact@avatech.com
Product Support & Troubleshooting: service@avatech.com
Phone Number: (435) 214-4692

Address:
AvaTech, Inc.
2700 Rasmussen Rd.
Park City, UT 84098

1.0 Getting Started
1.1 Read and Understand All Instructions and Warnings
1.2 Sign up for AvaNet
AvaNet allows professionals around the world to map and share SP1 snowpack data,
manual snowpits, test results, and avalanche observations. Signing up will give you the
ability to register and keep your SP1 up to date with the latest firmware. If you have not
signed up for AvaNet, please do so at www.avanet.avatech.com/register
1.3 Register your SP1
To register your SP1, sign in to AvaNet and click on SP1 registration in your
organization’s profile. Your SP1 must be registered in order for members of your
organization to be able to upload their data.
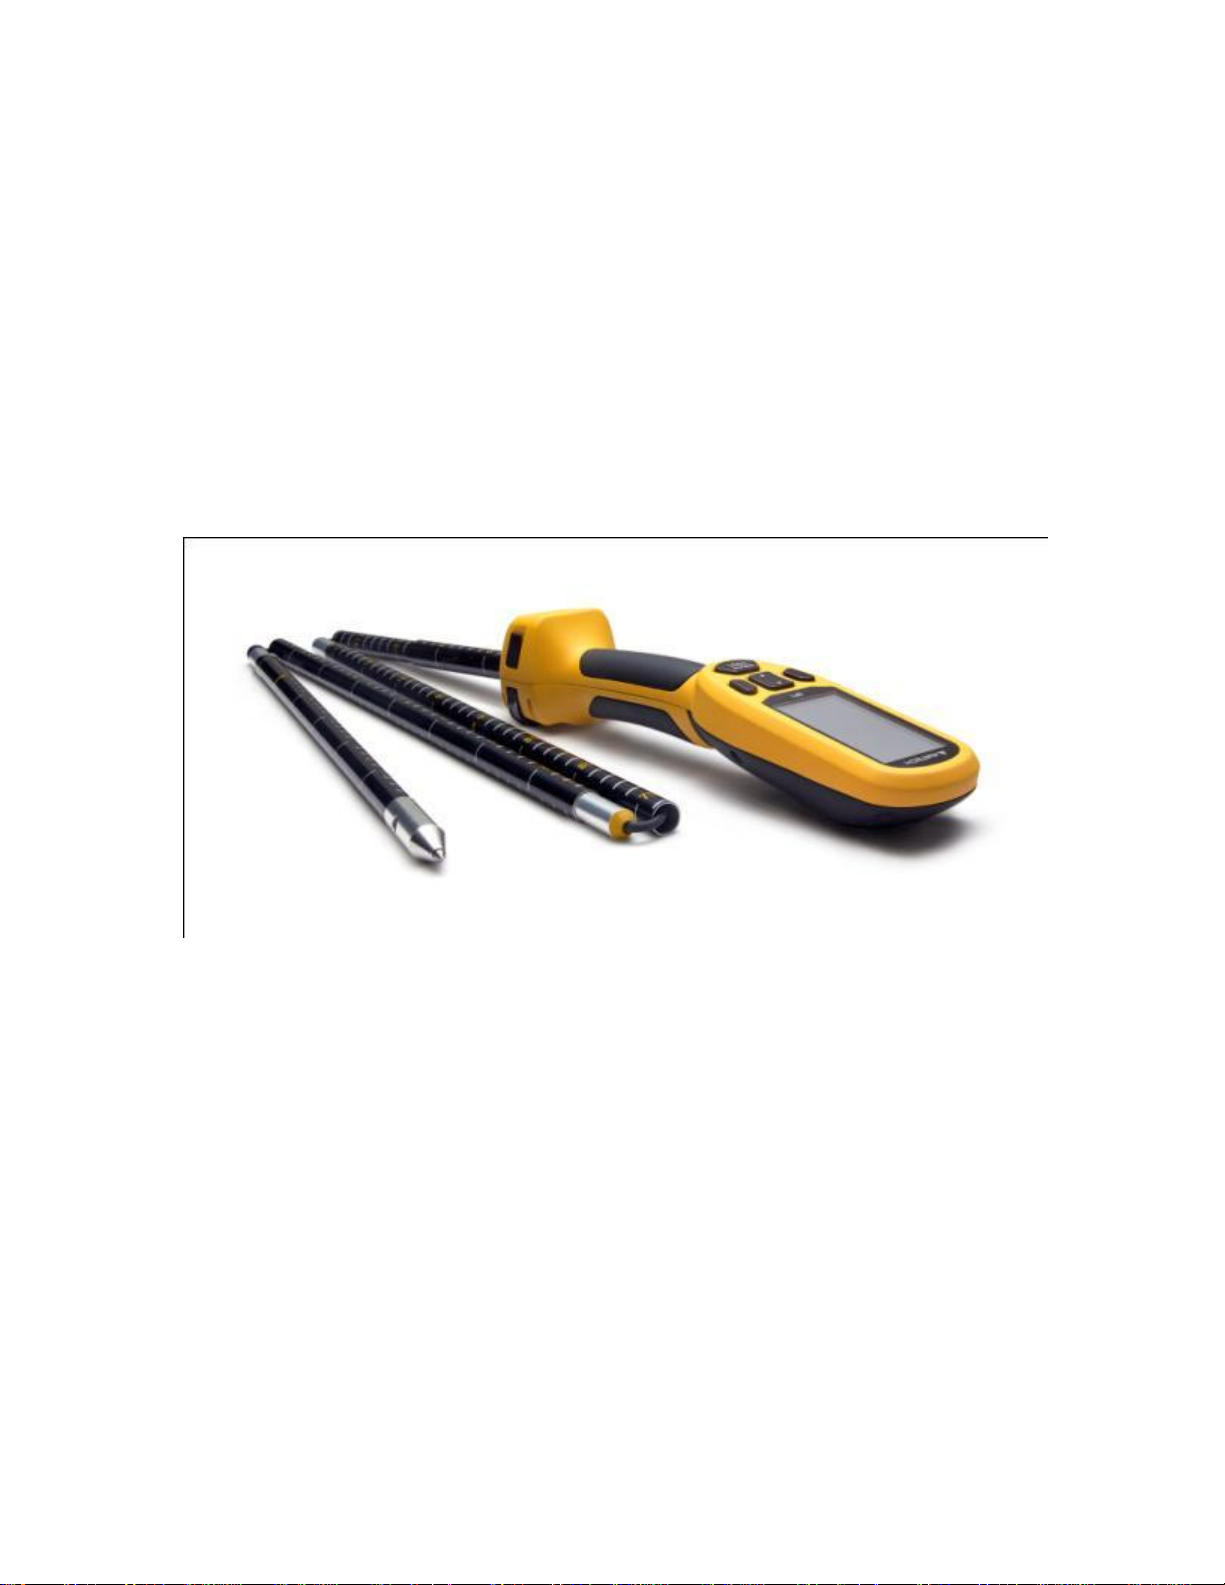
1.4 SP1 Anatomy
Picture of device highlighting features
Pressure Sensor
Depth Sensor
Eye
Slider Tube
Battery door
Pole strap
1.5 What’s in the box?
SP1, Model: 100000
USB Cable
SP1 Travel Sleeve
SP1 Quick Start Guide
1.6 Battery Information and Installation
Battery Type
The SP1 is designed for use in cold temperatures. Only use 2 non-rechargeable Lithium
1.5 volt AA batteries of the same type to power the SP1. Do not use alkaline batteries,
because they do not have sufficient load capacity for this device.

Caution
Risk of explosion if batteries are replaced by an incorrect type. Please contact your local
waste disposal department to properly recycle used batteries.
Notice
Batteries lose a significant amount of their capacity as the temperature decreases. The
temperature rating for the SP1 may exceed the usable range of some batteries. For best
battery-life performance in cold temperatures:
Keep the SP1 powered-off when not in use.
Warm up the SP1 inside of your jacket prior to use.
Battery Installation
1. To open the battery door, turn the D-ring counter-clockwise.
2. Remove the battery contact protector sheet.
3. Check to make sure the provided batteries are installed correctly.
4. To close the battery door, orient the D-ring vertically. Apply pressure and turn the
D-ring clockwise 90 degrees.
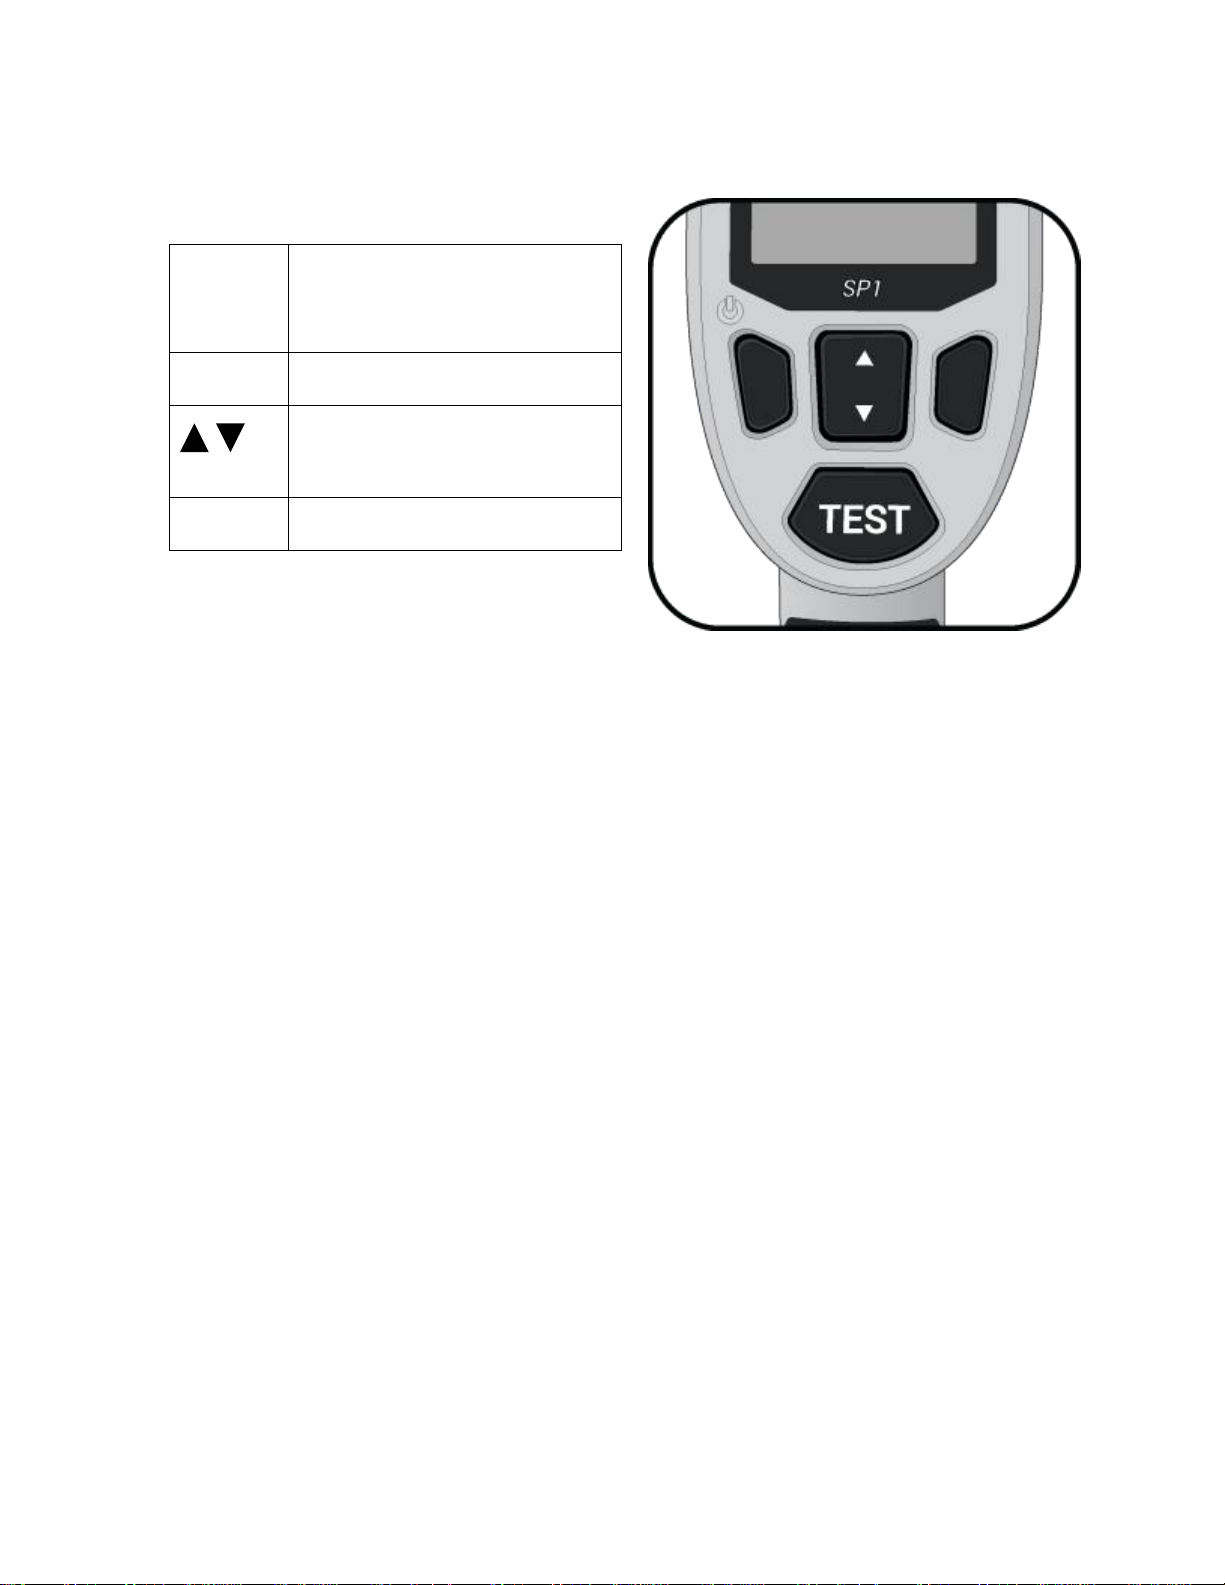
1.7 Buttons and Navigation
LEFT
Press to power on, do left
button action, or hold to power
off.
RIGHT
Press to do right button action.
Press to select menu options.
TEST
Press to start a test.
1.8 Power-on & SP1 Setup
1. Power on your SP1 by pressing the LEFT button.
2. Input the date and time information.
3. Select your time zone and daylight savings time setting.
Daylight Savings Time: The user must control this setting manually. Generally Daylight
Savings Time is ON during the summer months and OFF during the winter months.
When turned ON, the clock is advanced forward by one hour.
Warning: Proper date and time settings are critical to keeping accurate records of
snowpack data. Please take care to input them correctly.
Notice: Date and time settings will automatically update when a GPS signal is acquired.
Be sure to set the proper time zone, and check the settings after a GPS signal is acquired.
Toggle on/off the daylight savings time to adjust accordingly.

2.0 Using your SP1
2.1 Settings Configuration
The device settings can be accessed from the main menu.
Date & Time
After a GPS signal is acquired, you can adjust the time format, time zone, and daylight
savings time setting.
GPS
When a satellite signal is acquired, indicated by the (gps) icon, latitude and longitude
coordinates for each test are saved in decimal degree format. Turning the GPS off will
disable all signal searching and location services.
Notice: GPS accuracy and signal connectivity are dependent on location and terrain
features. It may take 60 to 90 seconds to acquire satellite signals.
Bluetooth
Bluetooth Low Energy allows you to wirelessly sync SP1 snow profiles to AvaNet via
the AvaNet mobile app. The Bluetooth setting must be turned on in order for the SP1 to
communicate with the mobile app.
To download the mobile app, …
Graph Detail
This setting can be adjusted to change viewing resolution of the snow profile graphs.
Setting 1 is the default “high resolution” view, and setting 5 is the most blocky “low
resolution” view. This setting can be adjusted when viewing graph options as well.
Notice: The graph detail setting only affects the viewing of the snow profile data, and it
does not impact the stored data or BLE synced data in any way.
Compass Calibration
Before using the Slope Angle & Aspect feature, you may be required to calibrate the
compass:
1. Collapse the SP1 and connect the pole strap.
2. Enter the compass calibration screen from the settings menu.
3. Hold the SP1 horizontal, and press the RIGHT button to begin.
4. Roll the SP1 one full revolution in five seconds.
5. Spin the SP1 one full revolution in five seconds.
6. Flip the SP1 one full revolution in five seconds.
Caution: Compass calibration should be done outdoors, away from objects that can
disturb magnetic fields such as cars, buildings, power lines, and handheld electronic
devices.

Notice: The compass must be re-calibrated after replacing the batteries.
2.2 Extending & collapsing the probe
To extend the probe:
1. While holding the handle, disconnect the pole strap and let the pole sections hang
down.
2. Grip the pole section just below the slider tube, and pull down firmly until the
spring button clicks into place.
To collapse the probe:
1. While holding the probe vertically, press the spring button and push the pole
segment up into the slider tube as far as possible.
2. Separate the lower pole segments one at a time and fold at each joint.
3. Align the poles into the grooves and reconnect the pole strap.
Caution: Take care to evenly distribute the cable slack throughout the folding joints.
Tightness at a joint may cause pinching and potential damage to the internal electrical
wiring.
(illustrated instructions)
2.3 Collecting snowpack data
You can enter the test mode at any time by pressing the TEST button. The primary test,
called a “snow profile”, is a measurement of snow structure – hardness over depth. Snow
profile measurements are gathered along with date and time, and GPS location, and can
be supplemented with slope angle and aspect.
To conduct a snow profile measurement:
1. With the probe fully extended, press TEST to enter the test mode.
2. Align the probe vertically, holding the tip 1 to 5 cm above the snow surface.
3. When ready, press TEST to begin. A beep indicates when you can start pushing
the probe into the snow.
Caution: The screen will show “calibrating” before the first beep. Take care to
keep the tip out of the snow until after the first beep is heard.
4. Probe at a constant speed, aiming to finish the probe strike in 2 to 3 seconds. A
double-beep indicates that the test is almost complete.
Caution: Avoid jamming the tip into dirt, rocks, or buried vegetation.
5. Wait until the screen says “Processing Data…” to remove the SP1 from the snow.
Slope angle and aspect can be measured at any time by pressing the RIGHT button from
the test mode screen. If you want to add slope angle and aspect information to a snow
profile measurement, follow these steps:
1. Open the graph of the snow profile, and access the graph options by pressing the
RIGHT button.

2. Navigate up to the slope angle and aspect icon, and press the RIGHT button to
*
Creates a copy of the snow profile in the favorites folder.
< ^
Displays slope angle and aspect data for the current snow profile.
O
Displays GPS coordinates for the current snow profile.
5
Adjusts the detail level of the snow profile graph display.
X
Permanently deletes the current snow profile.
record.
3. With the SP1 extended, lay the pole on the slope with the handle pointing directly
uphill and the screen facing the sky. The angle shown on the screen is the angle of
the pole itself. The aspect shown on the screen is the direction that the probe tip is
pointing.
[images to explain]
4. Press the RIGHT button to save the slope angle and aspect.
2.4 Viewing snowpack data
Snow profile measurements are sorted into folders for each day of testing. Within a given
day, snow profiles are numbered in chronological order. This makes it easier to quickly
recall a profile and keep track of your snow measurement process.
You can choose to tag snow profile measurements and add them to your “favorites”
folder. This can be useful if you come across an interesting snow structure and you want
to be able to easily find it for future reference. Favorite profiles are marked with an
asterisk icon.
Snow Profile Graph
The snow profile graph shows the penetration hardness of the snow layers (horizontal
axis) along with the snow layer depth (vertical axis). Penetration hardness is measured in
kPa on a natural logarithmic scale. This scaling helps to show the variations in softer
layers of snow, much like the industry hand-hardness graphing and AvaTech Snowpit
Editor.
Snow Profile Options
2.5 Syncing and sharing with AvaNet
You can sync and share the snow profile data from your SP1 with the AvaNet mobile
app. Syncing your data is a great way to back it up to a secure location, and sharing is a
great way to support your mountain community with valuable information.

The process to sync data from your SP1 is controlled through the AvaNet mobile app.
Simply make sure your SP1 Bluetooth setting is turned ON, then use the app interface to
pair your phone and SP1.

3.0 About your SP1
Weight
500 grams (XX lbs.)
Collapsed length
49 cm (19.3 in.)
Measurement length
150 cm (59 in.)
Operating temperature range
Viewing: -20° to 50° C (-4° to 122° F)
Testing: XX to XX (requires Sam’s input)
Radio frequency and
protocols
Bluetooth 4.0 (Bluetooth Low Energy)
2.4GHz (2.402 – 2.48 MHz)
GPS
Water Resistance
IP55 Water Resistant rating
Battery type
Two non-rechargeable lithium 1.5 volt AA batteries
3.1 Product Specifications
3.2 Measurement Specifications
Snow profiles
Depth
Hardness
Slope angle and aspect
GPS
3.3 Interference Warnings
Beacons
Cell phones
Other?

4.0 Maintenance
4.1 Firmware updates
AvaTech will periodically release updates to the SP1 firmware. A subscription to AvaNet
will give you access to the latest firmware updates. To update the firmware on your SP1,
follow these steps:
1. If you do not yet have the SP1 Firmware Updater desktop app, go to
SP1update.avatech.com to download client for your PC or Mac computer.
2. Run the SP1 Firmware Updater and follow the instructions on-screen. The
desktop app will automatically check for new updates and install them.
3. Once complete, unplug your SP1 from your computer, and press the RIGHT
button to reboot. A blank screen follows a beep while the device is updating. This
process may take a few seconds to complete.
To ensure your SP1 is operating on the latest version of firmware, check for updates
regularly.
4.2 Cleaning
Tip
(need Sam’s input)
Pole Sections
Dust and debris may build up in the ends of the pole segments and on the ferrules. To
clean the segments, use a rag to wipe down the inner and outer surfaces.
Notice: Do not clean the SP1 with harsh abrasives or chemicals. A semi-damp cloth
should suffice to wipe off dust and dirt.
4.3 Storage
Let the probe sections air-dry before storing them in the SP1 Travel Sleeve or other
container. Remove the batteries for long-term storage.
4.4 Adjusting cable tension
Adjusting SP1 cable tension: Over time the SP1 cable may slightly stretch from normal
use. This will cause a gap between the slider tube and spring button that results in a loose
feeling when fully extended. This can be fixed by adjusting the tension in the cable.
1. Collapse the SP1 and expose the threaded ferrule between the lower pole
segments.
2. Using your fingers or an 11 mm wrench, turn the threaded ferrule clockwise to
tighten or counter-clockwise to loosen.

4.5 Tip o-ring replacement
(Need Sam’s input)
4.6 Service Centers
United States
AvaTech, Inc.
2700 Rasmussen Rd.
Park City, UT 84098
Phone: (435) 214-4692
Europe
Concept Pro Shop
100 Place de l’Aguille du Midi
74400 Chamonix-Mont-Blanc
France
Phone: +33 4 50 54 21 43
5.0 Troubleshooting
The screen is frozen and the device won’t respond. If your SP1 stops responding, there
are a few steps you should take to restart it. Don’t worry, your data and settings won’t be
lost!
1. First, try to power-cycle the device. If this doesn’t work, or if the device is still
behaving strangely after this process, move to step 2.
a. Power-down by pressing and holding the LEFT button for 2 seconds.
b. Wait for 5 seconds, then power-on by pressing the LEFT button.
2. If the first method didn’t solve the problem, follow these steps. Your data and
settings won’t be lost, however it will require that you re-enter the Date and Time
for temporary use until a GPS signal is achieved.
a. Open the battery door and completely remove the batteries.
b. Wait 5 seconds, then replace the batteries. Close the battery door and
power-on by pressing the LEFT button.
Snow profile graphs don’t match my expectations. Sometimes snow profile graphs
may not meet your expectations, while other times they may make perfect sense. If
graphs vary from your own snowpit observations, a few things can be happening:
1. An SP1 profile, while often correlated to manual hand-hardness, is inherently a
different measurement. Firstly, the SP1 measures vertical penetration hardness
while hands measure horizontal penetration hardness. Secondly, the SP1 features
a small, conical tip to measure changes in penetration force, while hand-hardness
uses a constant force and various sizes to measure changes in required penetration

pressure. These differences are subtle, but they do result in some differences when
quantifying snow hardness.
2. Sometimes underbrush, rocks, or debris in the snow may affect layers we expect
to see. Ski tracks and compaction will also have an effect on SP1 profile
measurements. Be aware of spatial variability, even on a micro-scale.
3. If the snow profile graph shows layers as weaker than you’d expect, or if there are
no visible hardness variations even when you could feel them, then the tip sensor
may be jammed. Check the tip sensor for debris between the tip and tip cone. Dirt
and/or ice build-up can be removed with a fingernail or head of a small nail.
O-ring missing/present?
Notice: Do not pull the tip away from the cone. Be gentle when removing debris
from the groove.
I get a lot of “Test Error” messages during my snow profile measurements. (need
Sam’s input here)
The device won’t turn on. If your SP1 won’t turn on when you press the power button,
try the following steps:
1. First, try replacing the batteries and confirm that they are 2 non-rechargeable
Lithium 1.5 volt AA batteries of the same type.
2. If the first step didn’t solve the issue, You may need to reboot the firmware. To do
this, follow these steps:
a. Hold the RIGHT button and press the LEFT button. If done properly, you
should hear a beep. If no beep is heard, go to step 3.
b. If a beep is heard, wait for approximately 15 seconds while the firmware
reboots. Upon successful reboot, the AvaTech logo should appear, and the
device should return to normal operation.
3. If the second step didn’t solve the issue, you may need to reset the device and
reinstall the latest firmware. To do this, follow these steps:
a. Hold the RIGHT and TEST buttons, and press the LEFT button. If done
properly, you should hear a long beep.
b. If a beep is heard, wait for approximately 15 seconds while the device
resets itself. Upon successful reset, the AvaTech logo should appear,
followed by a screen that says “Connect Device to PC”.
c. Follow the instructions to update your device firmware, described in
section 4.1 Firmware Updates.
The device can’t get a satellite GPS signal. GPS accuracy and signal connectivity are
dependent on location and terrain features. It may take 60 to 90 seconds to acquire
satellite signals. If your SP1 is unable to achieve a signal, try the following steps:
1. Check to make sure the GPS is turned on in the settings menu.
2. Be sure to step away from any large obstacles that may impact connectivity, such
as buildings, trees, and large terrain features.
3. Wait while the device searches for satellites. The (gps) icon will appear at the top
of the screen when the device has acquired satellite signals.


Product Warranty
AvaTech Every SP1 comes with a 1-year warranty against manufacturing defects from
the date of shipment. In case of a warranty claim, all parts that can be shown to have
material or production defects will be replaced free of charge. Damage that can be traced
to incorrect handling or normal wear and tear is excluded. The warranty is voided if the
buyer or any non-authorized third party opens the device. Warranty repairs do not extend
the duration of the warranty. There is a six-month warranty on spare parts. Warranty
repairs will only be conducted if the device is sent in along with the receipt. The owner
will be charged for the shipping. No other warranty shall exist. Any liability for any kind
of loss or damage including but not limited to any direct, indirect or consequential
damage is explicitly excluded.
FCC ID: 2ADY4-SP1
IC: 12664A-SP1
Made in China
Importer: XXXXX (TBD)
Manufacturer
AvaTech, Inc.
2700 Rasmussen Rd.
Park City, UT 84098, USA

FCC STATEMENT
This device complies with Part 15 of the FCC Rules. Operation is subject to the following
two conditions:
(1) This device may not cause harmful interference, and
(2) this device must accept any interference received, including interference that may
cause undesired operation.
NOTE 1: This equipment has been tested and found to comply with the limits for a Class
B digital device, pursuant to part 15 of the FCC Rules. These limits are designed to
provide reasonable protection against harmful interference in a residential installation.
This equipment generates, uses and can radiate radio frequency energy and, if not
installed and used in accordance with the instructions, may cause harmful interference to
radio communications. However, there is no guarantee that interference will not occur in
a particular installation. If this equipment does cause harmful interference to radio or
television reception, which can be determined by turning the equipment off and on, the
user is encouraged to try to correct the interference by one or more of the following
measures:
- Reorient or relocate the receiving antenna.
- Increase the separation between the equipment and receiver.
-Connect the equipment into an outlet on a circuit different from that to which the
receiver is connected.
-Consult the dealer or an experienced radio/TV technician for help.
NOTE 2: Any changes or modifications to this unit not expressly approved by the party
responsible for compliance could void the user's authority to operate the equipment.
IC STATEMENT
This device complies with Industry Canada licence-exempt RSS standard(s): Operation is
subject to the following Two conditions:(1) this device may not cause interference, and
(2) this device must accept any interference, including interference that may cause
undesired operation of the device.
CAN ICES-3 (B)/NMB-3(B)
Le présent appareil est conforme aux CNR d'Industrie Canada applicables aux appareils
radio exempts de licence. L'exploitation est autorisée aux deux conditions suivantes : (1)
l'appareil ne doit pas produire de brouillage, et (2) l'utilisateur de l'appareil doit accepter
tout brouillage radioélectrique subi, même si le brouillage est susceptible d'en
compromettre le fonctionnement.
 Loading...