

Page 1

Wireless Headphones
Scan me for warranty registraon
User Manual
BTHS-AS9S
Page 2
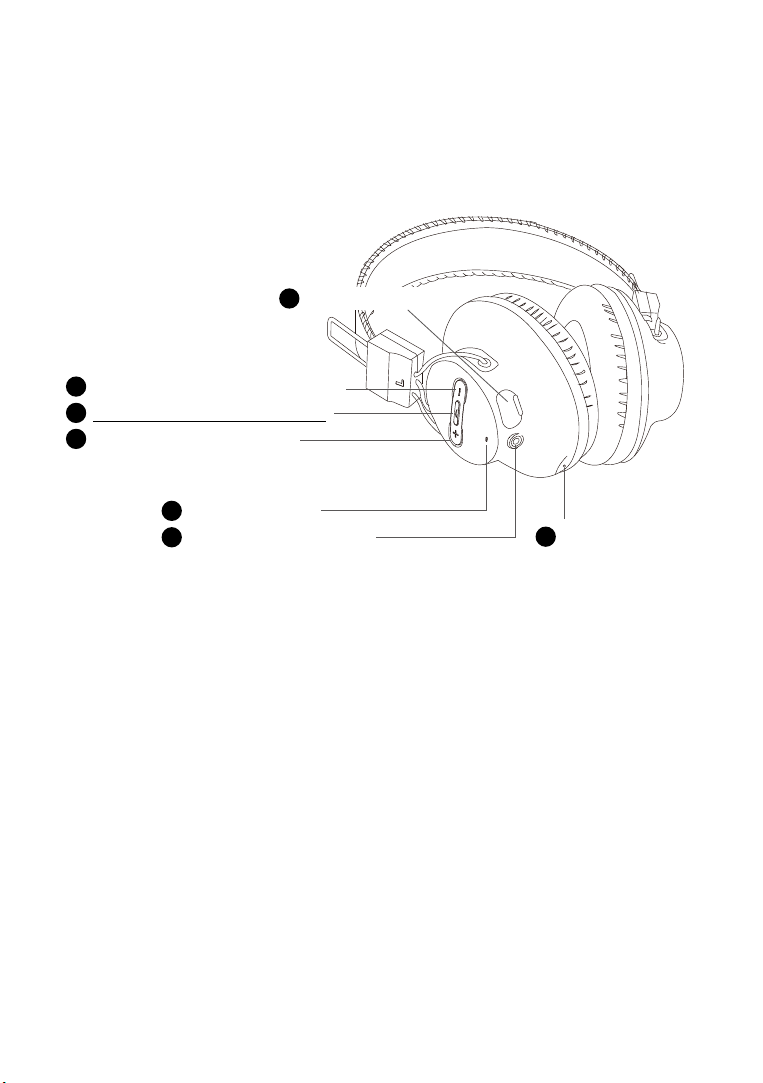
1. Product Overview
Bluetooth Headphones
Charging Port
7
1
Volume down / Previous track
2
Mul-funcon buon(MFB)
3
Volume Up / Next track
Indicator light
4
5
3.5mm audio socket
6
Microphone
2. Standalone Use of the Headphones
2.1. Use of the headphones with smart phone/tablet
1) Ensure the transmitter is off.
2) Enter the headphones into PAIRING MODE - from its OFF state,
press and hold the MFB for 5 seconds until the LED flashes RED and
BLUE alternately, and you hear “Pairing” from the headphones.
3) Turn on Bluetooth on your smart phone/tablet. Find & select “AS9S”
to pair and connect.
Notes:
The next time you want to use your headphones in this way you will
need to select “AS9S” on your smart phone /tablet to reconnect.
Page 3

2.2. Basic operation of the headphones
Function
Power on
Power off
Enter
pairing
mode
Answer/
end a call
Reject a call Press and hold MFB for 1 second
Redial last
number
Play/Pause
music
Next Track
Volume
down
Previous
Track
Clear paired
history
Voice dial
Component
MFB
+
-
&
+
-
Operation
From off status, press and hold MFB
for 3 seconds until the BLUE LED is on
for 1 second and you hear “Welcome
to Avantree”.
Press and hold MFB for 5 seconds
until the RED LED is on for 2 seconds
and you hear “Goodbye”.
From the off state, press and hold the
MFB for 5 seconds until LED flashes
RED and BLUE alternately and you
hear “Pairing”.
Press MFB once
Double click MFB
Press “+” once
Press and hold “+” for 1 second
Press “-” once
Press and hold “-” for 1 second
From “disconnected” state, press and
hold “+” and “-” for 10 seconds until
both RED and BLUE LED are on for
2 seconds (looks PINK).
Click “+” and “-” once simultaneously
Notes:
• Not all phones support full function control from the headphones.
Page 4

2.3. LED indicators & voice prompts of the headphones
Status
Power on
Power off RED LED is on for 2 seconds
Pairing mode
Connected
Disconnected
Charging RED LED on
Charging is
complete
Low battery
LEDs indication
BLUE LED is on for 1 second
RED and BLUE LED flashes alternately
BLUE LED flashes twice per 5 seconds
BLUE LED flashes once per 2 seconds
RED LED off
RED LED flashes
Voice prompt
Welcome to
Avantree
Good bye
Pairing
Connected
NA
NA
NA
Low battery
3. Charging headphones
If you hear the “low battery” voice prompt from the headphones, please
charge it as soon as possible. Charge using a phone charger, PC USB,
TV USB or any other USB outlet with 5V/500mA-2A using the included
USB cable.
It takes about 3.5 hours to fully charge the headphones. The LED will turn
RED during charging and turn off once charging is complete.
4. Clear Paired History
If you are experiencing unexpected issues such as short work range,
audio cut in and out, not pairing, etc. you may need to clear the paired
history of the headphones.
After turning on, press and hold “+” and “-” for 10 seconds until the RED
and BLUE LEDs are BOTH on for 2 seconds (looks PINK), now all paired
history of the headphones is cleared. It will then enter pairing mode
automatically with the LED flashing RED and BLUE alternately
Page 5

5. Product Specifications
• Model No.: BTHS-AS9S
• Bluetooth version: V4.1
• Supported profiles: headset, handsfree, A2DP, AVRCP
• Audio codec: Fast stream, SBC
• Operation range: Class 2, 30 FT/10M
• Working time: up to 40hours music time and 20 days standby
time
• Driver size: 40mm
• Impedance: 32 ohm
• Frequency Response 20Hz-20KHz
• Headset size: 200mm x 180mm X 80mm
• Ear pad inner diameter: 6.3cm (length) 4cm (width)
• Ear pad Outer diameter: 10cm (length) 8.5cm (width)
• Headset weight: 200g
6. Declaration of Conformity
Changes or modifications not expressly approved by the party responsible for compliance could void the user’s authority to operate the equipment.
This equipment has been tested and found to comply with the limits for
a Class B digital device, pursuant to Part 15 of the FCC Rules. These
limits are designed to provide reasonable protection against harmful
interference in a residential installation. This equipment generates, uses
and can radiate radio frequency energy and, if not installed and used in
accordance with the instructions, may cause harmful interference to
radio communications. However, there is no guarantee that interference
will not occur in a particular installation.
If this equipment does cause harmful interference to radio or television
Page 6

reception, which can be determined by turning the equipment off and
on, the user is encouraged to try to correct the interference by one or
more of the following measures:
-- Reorient or relocate the receiving antenna.
-- Increase the separation between the equipment and receiver.
-- Connect the equipment into an outlet on a circuit different from that to
which the receiver is connected.
-- Consult the dealer or an experienced radio/TV technician for help.
This device complies with FCC RF radiation exposure limits set forth
for an uncontrolled environment. This transmitter must not be colocated or operating in conjunction with any other antenna or
transmitter.
This device complies with part 15 of the FCC Rules. Operation is
subject to the following two conditions: (1) This device may not cause
harmful interference, and (2) this device must accept any interference
received, including interference that may cause undesired operation.
FCC ID: 2AITF-BTHS-AS9S
Dispose of the packaging and
this product in accordance with
the latest provisions.
FCC ID: 2AITF-BTHS-AS9S
Page 7

For a Beer Experience
More FAQs on support.avantree.com
Telephone support refer to http://www.avantree.com/contact-us
Email support: support@avantree.com
www.avantree.com
support@avantree.com
 Loading...