

Page 1
User Manual
Low Latency Wireless Headphones
BTHS-AS9P
Overview ------------------------------------------------------------------------------------------------------------------
Basic operation ----------------------------------------------------------------------------------------------------------
LED indicators -----------------------------------------------------------------------------------------------------------
Connecting with a mobile phone ----------------------------------------------------------------------------------
Use with two mobile phones simultaneously -------------------------------------------------------------------
Reconnecting ------------------------------------------------------------------------------------------------------------
Use with an NFC enabled mobile phone------------------------------------------------------------------------
Connecting with a TV --------------------------------------------------------------------------------------------------
Why is there no sound?------------------------------------------------------------------------------------------------
Connecting with a Bluetooth enabled PC/Laptop -------------------------------------------------------------
Use as wired headphones --------------------------------------------------------------------------------------------
Charging ------------------------------------------------------------------------------------------------------------------
Clear pairing history ----------------------------------------------------------------------------------------------------
Troubleshooting ---------------------------------------------------------------------------------------------------------
1
1
2
2
3
3
3
4
5
6
6
7
7
7
Page 2
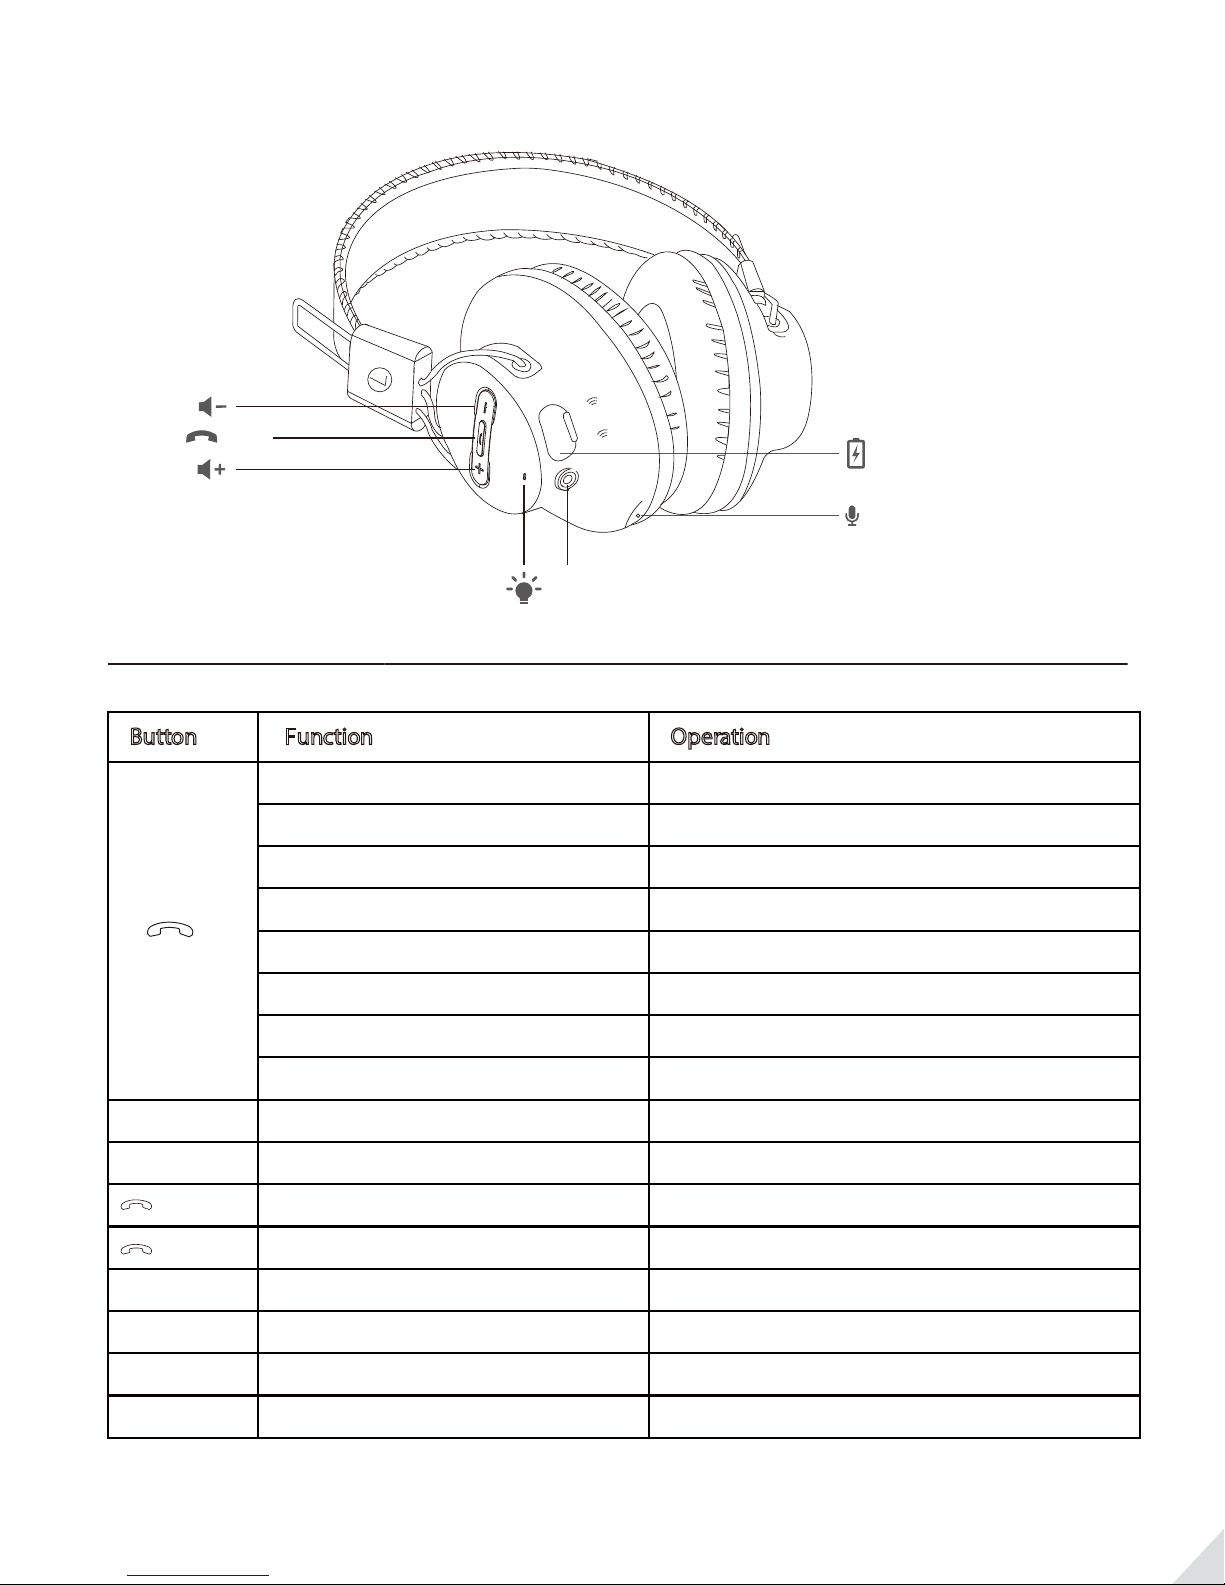
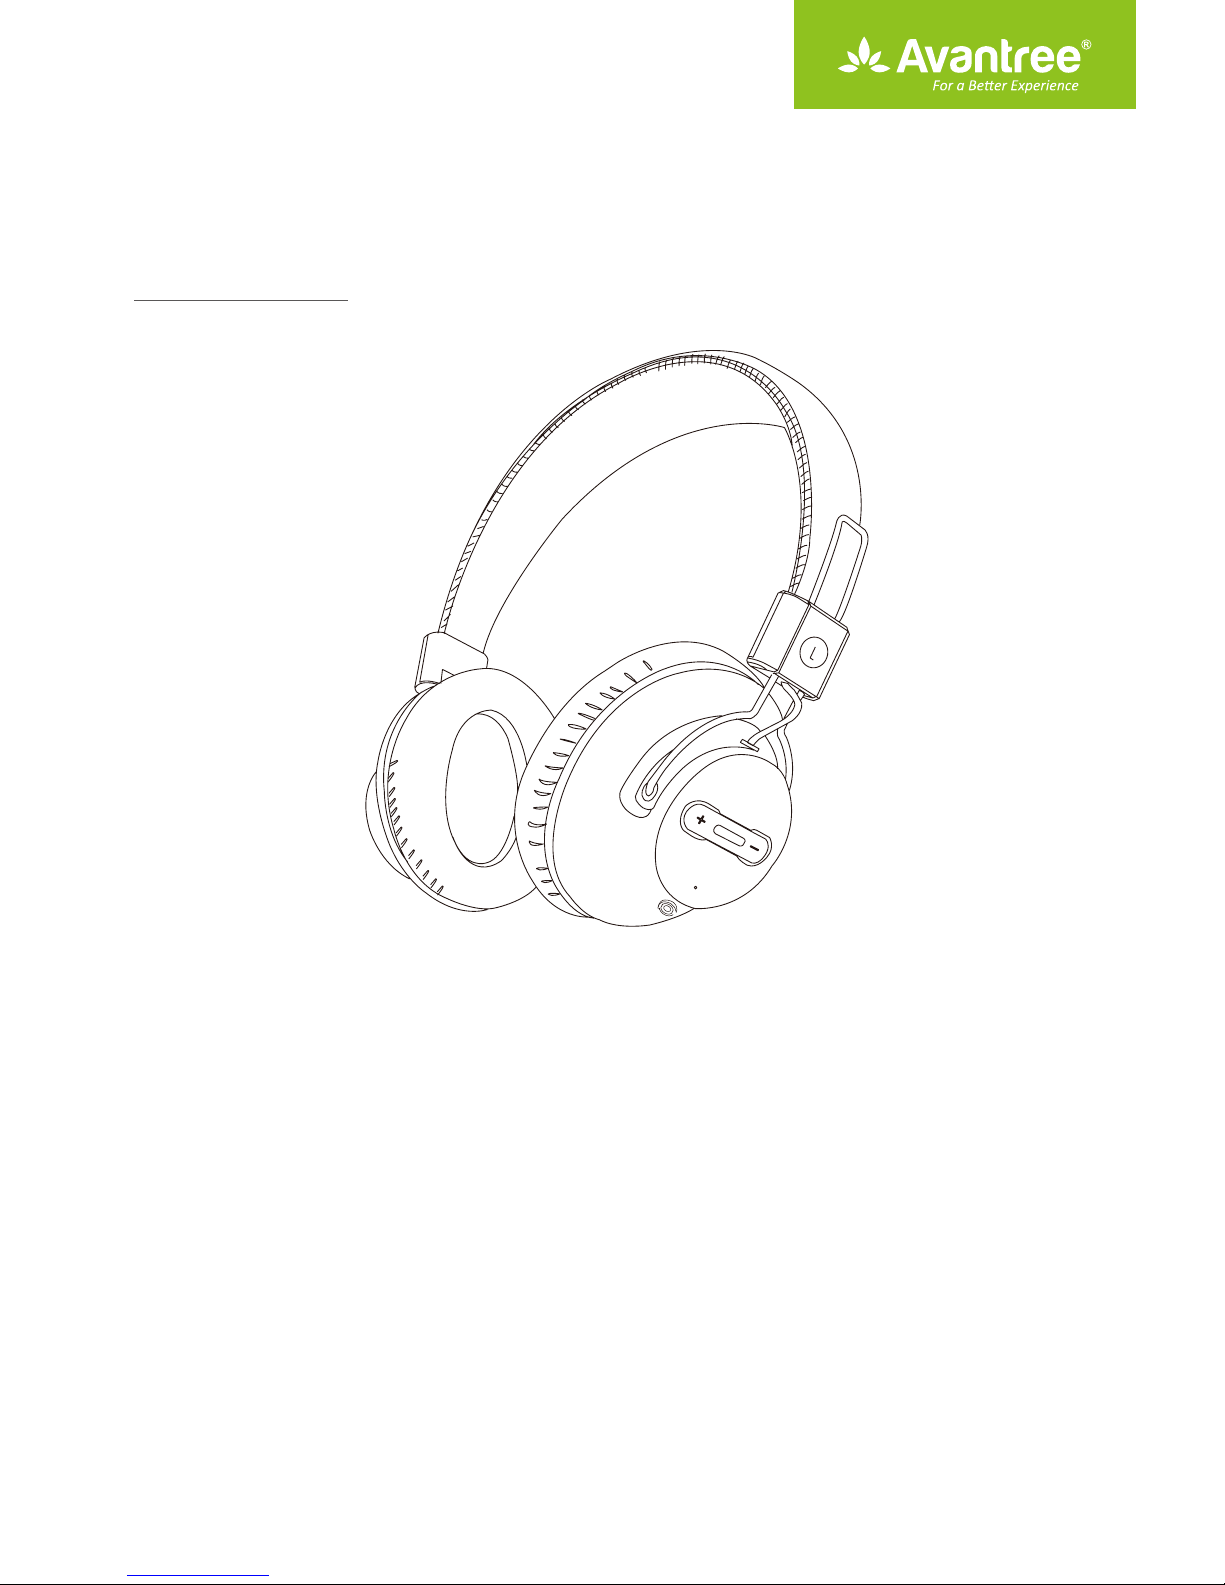
Overview
(MFB)
Basic operation
utton Function
B
Power on
Power o
Answer a call
End a call
Reject a call
Redial last number
NFC
AUX
Operation
Press and hold MFB for 1 second
Press and hold MFB for 2 second
Press MFB once
Press MFB once
Press and hold MFB for 1 second
Double click MFB
Play music
Pause music
“V+” and “V-”
“V+” and “V-”
and “V+”
and “V-”
V+ Volume up
V-
V+
V- Previous track Press and hold “V-”
Voice Dial / Command (Phone feature)
Bass boost
Voice prompts ON
Voice prompts OFF
Volume down
Next track
Note: To switch between Bass ON and Bass OFF modes, press and hold V+ and V- for about 3 seconds
while listening to the music. You will hear the voice prompts “Bass on” and “Bass o”.
Press MFB once
Press MFB once
Short press both
Press and hold both “V+” and “V-” for 3 seconds
Press both MFB and “V+” once
Press both MFB and “V-” once
Press “V+” once
Press “V-” once
Press and hold “V+”
“V+” and “V-”
1
Page 3
LED indicators
Working mode
SBC codec
AAC codec
aptX codec
aptX Low Latency codec
Note: aptX Low Latency is supported when the headphones are paired with a transmitter that also
supports aptX Low Latency. This can be veried by the LED indications.
Headphones LED indicator
LED ashes BLUE once every 7 seconds
LED ashes BLUE twice quickly every 7 seconds
LED ashes WHITE once every 7 seconds
LED ashes WHITE twice every 7 seconds
Connecting with a mobile phone
Use with one mobile phone
The rst time you turn on your headphones they will automatically enter pairing mode.
Step 1 While the headphones LEDs are ashing red and blue alternately, activate Bluetooth ® on your
phone and set it to search for new devices.
• iPhone ® Settings > Bluetooth > On*
• Android ™ Settings > Bluetooth: On > Scan for devices*
NOTE *Menus may vary by device.
Step 2 Select “Avantree Audition Pro” - If prompted, enter passkey 0000/accept connection.
Step 3 Once successfully paired, you will hear “your headset is connected”.
If you want to pair another phone, you can enter pairing mode by pressing and holding the “MFB”
button for 5 seconds until the LED ashes alternately blue and red.
NFC
2
Page 4

Use with two mobile phones simultaneously
Step 1 Connect headphones with the rst phone as above. Then Turn o the headphones.
Step 2 Connect headphones with the second phone as above.
Step 3 Tap and select “Avantree Audition Pro” on the rst phone to connect it.
Step 4 Now the headset should be connected with both phones simultaneously.
NOTE: Audition Pro only has one audio channel, if you want to play music from another Bluetooth
device, please pause the current device’s music rst.
NFCNFC
Reconnecting
The next time you turn on the Audition Pro it should automatically reconnect to your phone. Alternatively you can press the MFB button once to reconnect them.
Use with an NFC enabled mobile phone
Step 1 Turn on your phone’s NFC function from the phone settings and ensure the screen is active and
unlocked.
Step 2 Hold the NFC mobile phone against the NFC zone of the headset (the NFC logo) until your
mobile phone plays an indicate note. (Some phones will vibrate, some will emit a beep sound.)
Step 3 Your phone will get a reception request asking if you would like to pair with the headphones.
Step 4 Tap “Yes”, then your mobile phone will connect with your Audition Pro.
Step 5 Tap it again to disconnect.
NFC
NFC
3
Page 5

NOTE: Since the NFC antenna location is dierent depending on the phone, it is helpful to know its
location for accurate pairing. Please refer to your phone’s user manual. NFC pairing is active
pairing, the headset can be activated both while power is on or power o.
Connecting with a TV
Many TVs currently include Bluetooth streaming as a built-in feature. Check to see if your TV is Bluetooth enabled by referring to your user manual or by searching for Bluetooth audio options in your TV’s
settings menu.
Use with a Bluetooth enabled TV
Step 1 Make sure the Audition Pro is OFF.
Step 2 Press and hold the MFB for about 5s until the LED indicator ashes blue and red alternately.
Step 3 Enable your TV’s Bluetooth function from its System Settings menu then select ‘Avantree Audi
tion Pro’ to connect.
NFC
NOTE: To make use of the Audtion Pro’s aptX-Low Latency feature (Latency of <40ms) , your TV’s
Bluetooth or your Bluetooth transmitter must also support aptX-LL. (Our Avantree Oasis and
Avantree Audikast support both aptX and aptX-LL)
Use with a Non-Bluetooth enabled TV (must use a Bluetooth transmitter)
Step 1 Press and hold the MFB for about 5s until the LED indicator ashes blue and red alternately.
Step 2 Enter the transmitter’s pairing mode (please refer to your user manual), keep it close to the
Audition Pro and wait for them to pair and connect (You’ll hear “connected” once they success
fully connected).
Step 3 Connect Bluetooth transmitter to your TV’s audio out (please refer to user manual).
AUX
AUX
ON/OFF
DCIN
DCIN
OPTIAL
OPTIAL
ON/OFF
For more instructions details please search "Audition Pro"
on support.avantree.com or contact support@avantree.com
4
Page 6

Why is there no sound?
Optical Audio Out
When you set up your Bluetooth transmitter using optical audio out:
a. Ensure your TV speaker is set to “External Speaker”
b. Ensure your TV Audio Format is set to “PMC” (This is IMPORTANT)
Speakers
Internal speakers
External speakers
Headset
Settings
Audio Format
PCM
Dolby Digital
DTS
DTS Neo 2:5
Set TV speaker to “External Speaker” Set TV Audio Format to “PCM” (IMPORTANT)
AUX/3.5mm Audio Out
When you set up your Bluetooth transmitter using optical audio out, please ensue your TV speaker is
set to “Headset”.
Speakers
Internal speakers
External speakers
Headset
Set TV speaker to “Headset”
RCA Audio Out ( Red/White ports labeled "AUDIO OUT" )
When you set up your Bluetooth transmitter using RCA Audio Out:
a. Ensure use TV Red/White ports labeled “AUDIO OUT”, other Red/White ports are incorrect.
b. Ensure your TV Speaker is set to “External Speaker”
1
Speakers
Internal speakers
External speakers
Headset
Set TV speaker to “External Speaker”Use the right RCA ports
5
Page 7

Connecting with a Bluetooth enabled PC/Laptop
Turn on: Press and hold the MFB for 1 second, the LED ashes blue and you will hear: “Welcome to
Avantree”.
Turn o: Press and hold the MFB for 2 seconds, the LED ashes red and you will hear: “Goodbye”.
Step 1 Turn your Audition Pro o (press and hold the MFB for 2 seconds).
Step 2 Press and hold the MFB for about 5s until the LED indicator ashes blue and red alternately.
Step 3 Activate Bluetooth on your PC/Laptop and connect with “Avantree Audition Pro”.
Avantree
Audition
NOTE: Your PC/notebook should support the A2DP prole, if not you may need a separate
Bluetooth dongle that supports this feature. On “Playback devices”, please select the “Avantree
Audition Pro Hands-Free” as the Default Communications Device, and the “Avantree Audition
Pro Stereo” as the Default Device, or the sound will come from the laptop speakers instead of
the headphones. For additional details on PC/Laptop please see support.avantree.com.
Use as wired headphones
If your audio source is not Bluetooth enabled, or if the Audition Pro battery is low (LED blinking red),
you can use a 3.5mm audio cable to stream music. Connect the supplied 3.5mm audio cable between
your device and the 3.5mm audio socket on your Audition Pro.
NFCNFC
NOTE: The buttons and microphone on your Audition Pro will not work when connected as wired
headphones.
6
Page 8

Charging
When the LED blinks red, you should recharge your headphones. Remove the Micro USB port protector
and charge the headphones via the supplied Micro USB cable. It normally takes about 3 hours to fully
charge the battery. The LED will stay red when charging and will turn o when charging is complete.
NFC
NFC
Micro USB cable
Micro USB cable
Charging requirement: You can plug our supplied Micro USB cable into a compatible USB charger (wall
charger/travel charger/car charger etc.) with 5V/500mA-2A output or to a PC/Mac USB port. It is OK to
use most mobile phone chargers on the market.
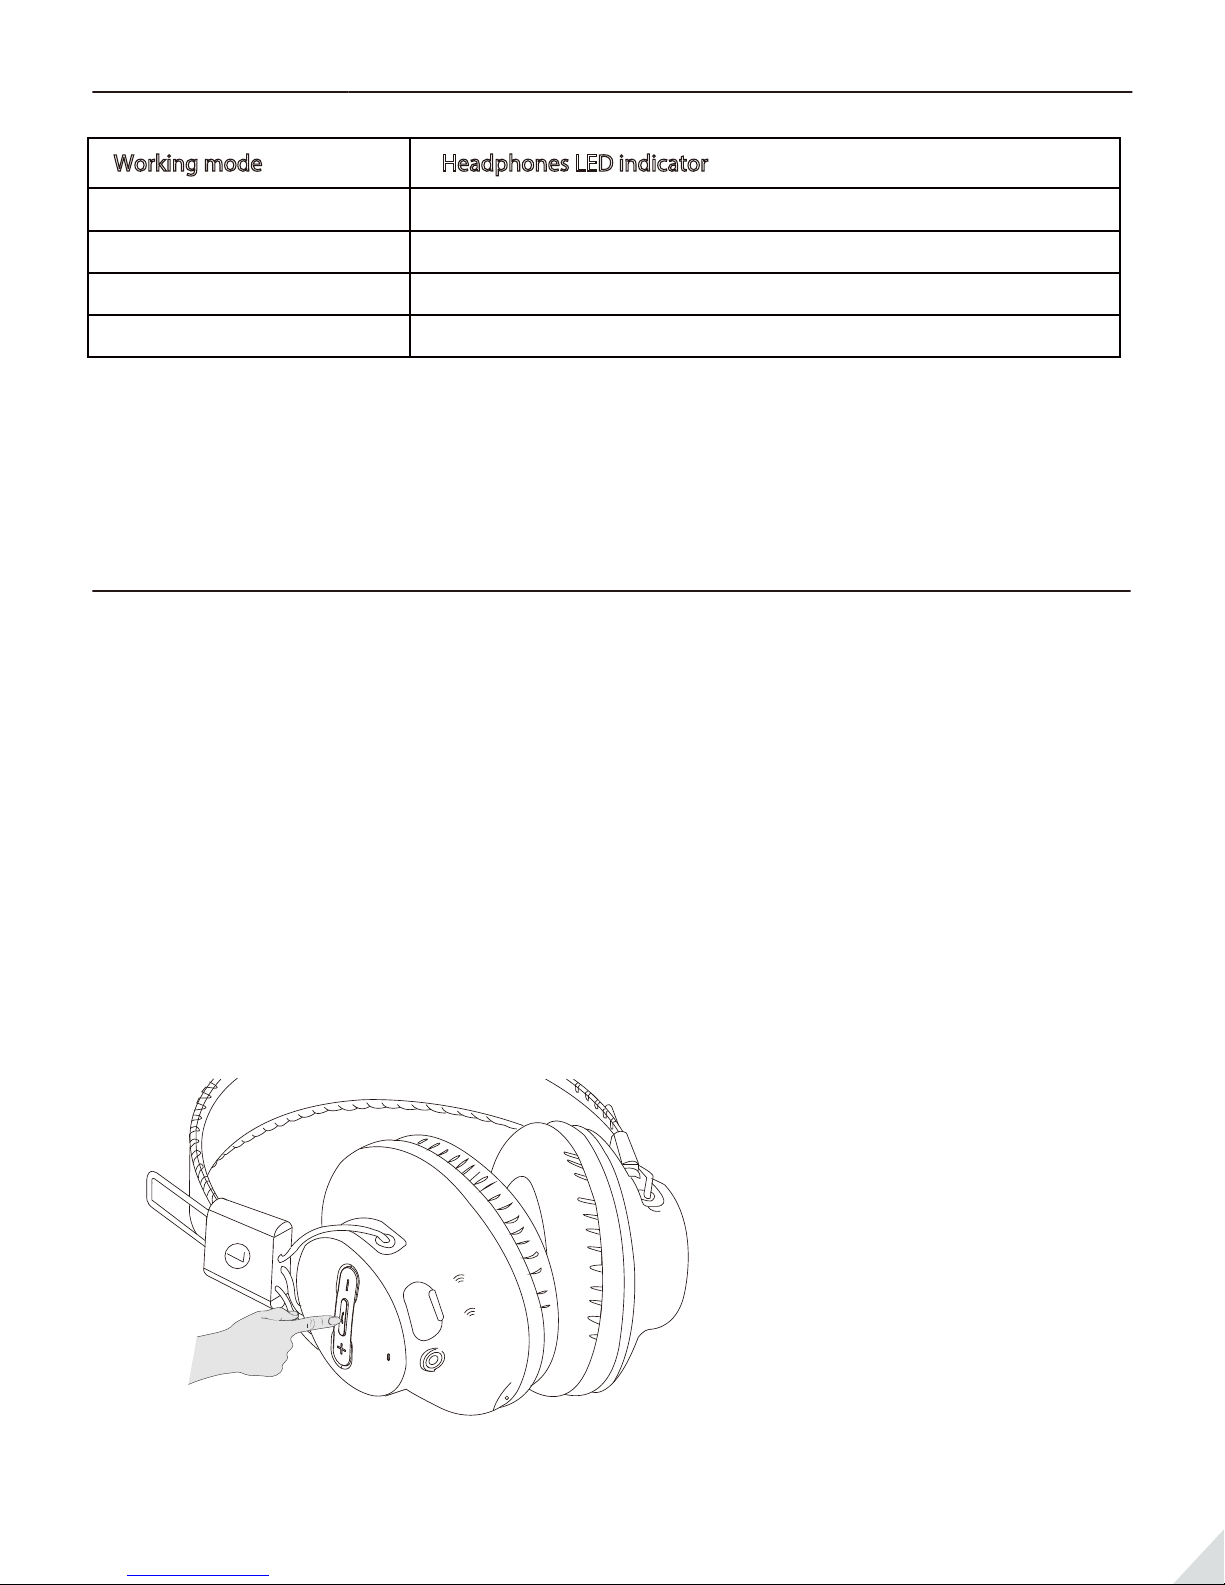
Clear pairing history
You may need to reset your Audition Pro if it’s not working as expected. In standby mode, press and
hold both “V+” and MFB buttons for 5 seconds until the LED ashes blue and red together very quickly
about 2 times and then the headset will turn o automatically. Now your Audition Pro has been
restored to its default settings. After turning it on again, it will automatically enter pairing mode.
Troubleshooting
No sound with PC?
1. Under Playback Devices select the Avantree AS9P as the default playback device
2. When using AS9P to make VOIP calls from an app, please select the AS9P Hands-Free for Micro
phone and Speaker device
No sound using a Bluetooth transmitter to watch TV?
1. Ensure the Bluetooth transmitter and headphones are connected properly
2. Check that your audio OUTPUT is functioning properly
· AUX & RCA (red and white) outputs on TV – test audio with any wired headphone
· OPTICAL output on TV – set your TV audio format to “PCM/LPCM” or turn o Dolby/DTS
3. Change your TV audio out device setting to External speakers/Headset
7
Page 9

Clearing paired history (Bluetooth & Broadcast)
Turn on headphones (do not activate Broadcast function), hold and together for 5 seconds until the LED
blinks Blue and Red together (looks PINK) for 2s.
To restart the headphones
If the headphones DO NOT respond, please recharge the headphones or connect the headphones with
any audio device via the 3.5 mm audio cable.
Headphones do not pair with Bluetooth device
1. Ensure the AS9P is in Pairing mode – LED will ash BLUE and RED alternately.
2. For Bluetooth transmitter, ensure the transmitter is in Pairing mode – please refer to user manual.
3. For mobile phones, tablets and PCs
· Turn the Bluetooth o then on again.
· Delete/forget the “Avantree AS9P” from your device’s Bluetooth list and then try to pair again
· Clear the headphone’s pairing history, and pair again
· Pair and connect
WARNINGS / CAUTIONS
• Permanent hearing loss may result from long-term exposure to sound at high volumes.
• This product contains small parts which may be a choking hazard. Not suitable for children under age 3.
• To reduce the risk of re or electrical shock, do NOT expose this product to rain, liquids or moisture.
• Do NOT make unauthorized alterations to this product.
• Do NOT expose products containing batteries to excessive heat (e.g.direct sunlight,re, etc.).
• Do not leave a fully charged battery connected to a charger;overcharging may shorten its life.
Declaration of Conformity
CE: The product is in conformity with the essential requirements of Article 3.1 (a) (b),3.2 of Directive
1999/5/EC and the essential requirements of Directive 2004/108/EC.
This device complies with part 15 of the FCC Rules. Operation is subject to the condition that this device
does not cause harmful interference (1) this device may not cause harmful interference, and (2) this device
must accept any interference received, including interference that may cause undesired operation.Changes or modications not expressly approved by the party responsible for compliance could void the user's
authority to operate the equipment.
NOTE: This equipment has been tested and found to comply with the limits for a Class B digital device,
pursuant to Part 15 of the FCC Rules. These limits are designed to provide reasonable protection against
harmful interference in a residential installation. This equipment generates uses and can radiate radio
frequency energy and, if not installed and used in accordance with the instructions, may cause harmful
interference to radio communications. However, there is no guarantee that interference will not occur in a
particular installation.If this equipment does cause harmful interference to radio or television reception,
which can be determined by turning the equipment o and on, the user is encouraged to try to correct
the interference by one or more of the following measures:
-- Reorient or relocate the receiving antenna.
-- Increase the separation between the equipment and receiver.
-- Connect the equipment into an outlet on a circuit dierent from that to which the receiver is connected.
-- Consult the dealer or an experienced radio/TV technician for help.
8
Page 10

To maintain compliance with FCC’s RF Exposure guidelines, This equipment should be installed and
operated withminimum distance between 20cm the radiator your body: Use only the supplied antenna.
FCC ID: 2AITF-BTHS-AS9P
Dispose of the packaging and this product
in accordance with the latest provisions.
9
 Loading...