

Page 1
User Manual
Wireless Hands Free Car Kit
BTCK-11
MUTE
Overview ································································································································································· 1
What’s in the box ·················································································································································· 1
Basic Operations ··················································································································································· 2
LED Indicators ······················································································································································· 2
Set Up ······································································································································································· 3
“Auto Power On/OFF” function ······················································································································· 3
Pairing a mobile phone ······································································································································ 4
To add another phone (Multipoint function) ····························································································· 5
PAIR /
RECONNECT
Reconnection ························································································································································· 5
Restore to default settings ································································································································ 5
How to charge ······················································································································································· 6
Troubleshooting
····················································································································································· 6
Page 2

Overview
ON
OFF
MUTE
Micro USB
What’s in the box
1. Avantree CK11
2. USB Car Charger
3. USB charging cable
4. Sun-visor clip
RECONNECT
PAIR /
MFB
ON OFF
MUTE
PHONE /
VOLUME
1
Page 3
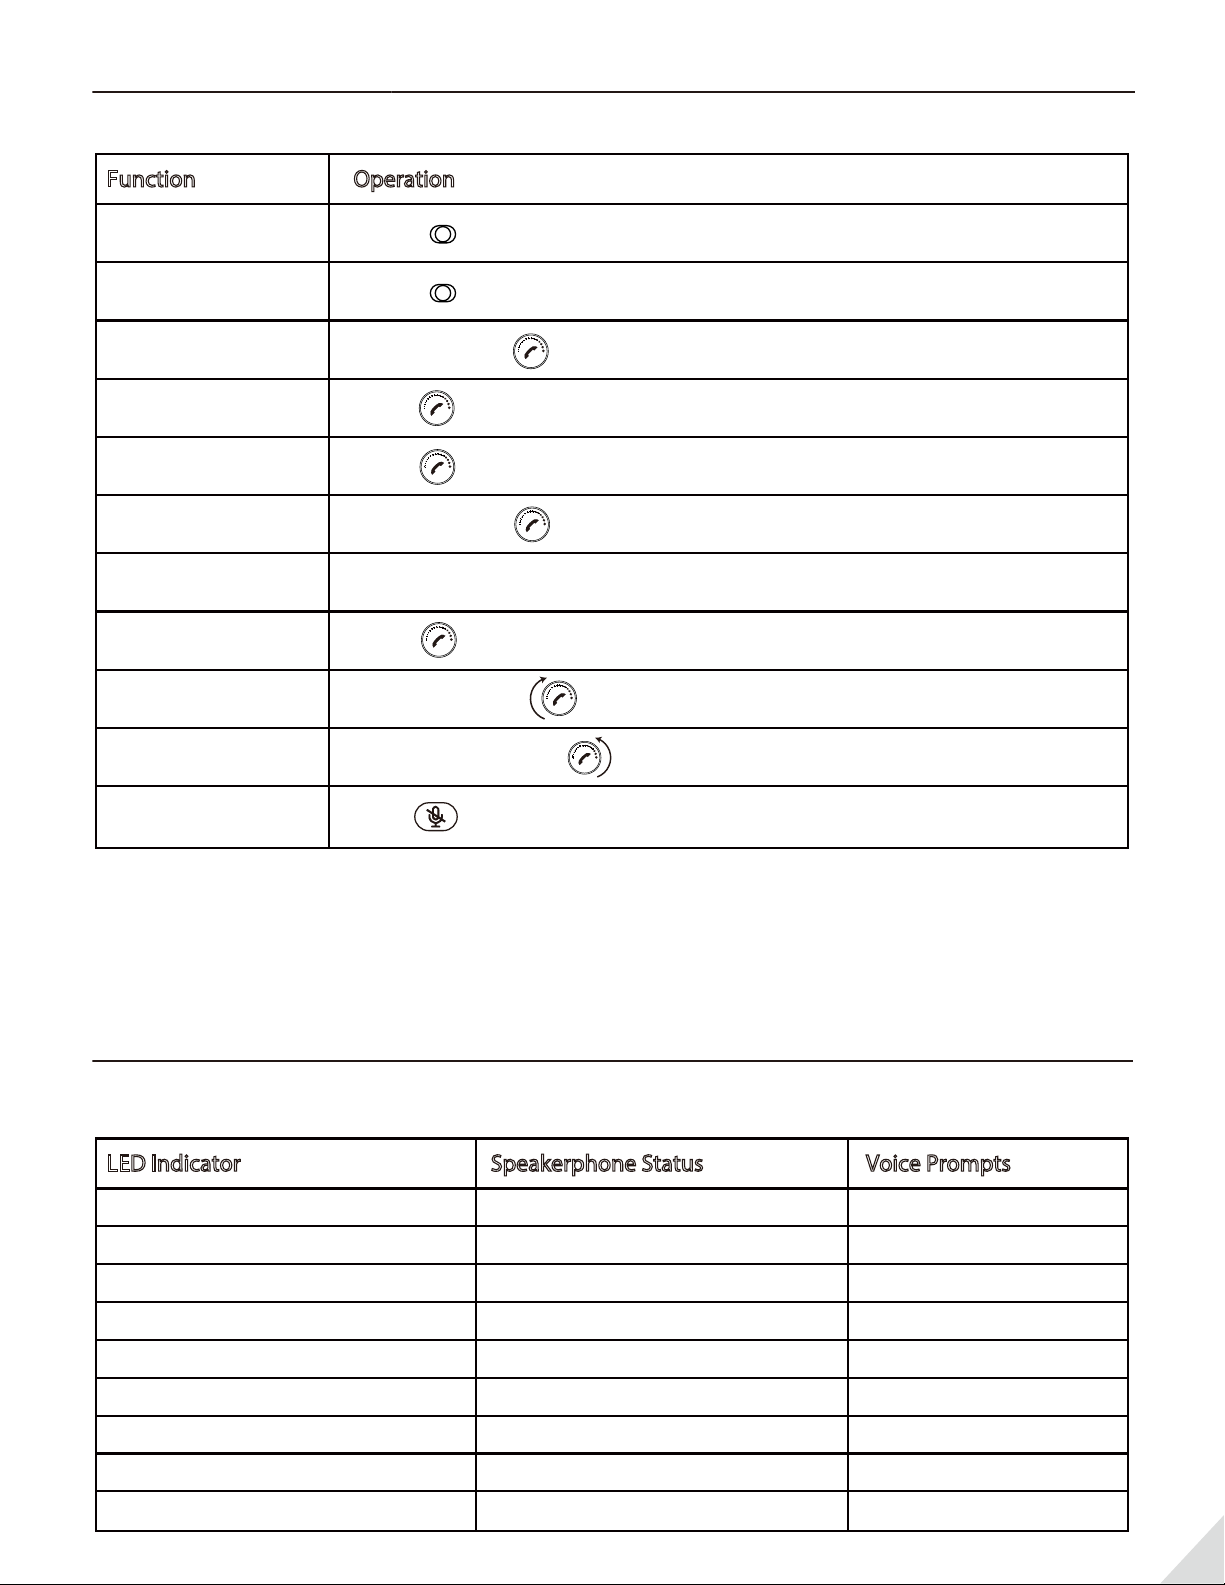
Basic Operations
Function
Power on Slide to ON
Power O
Pairing mode
Manually re-connect
Answer / End a call
Reject a call
Redial
Voice control
(phone feature)
Volume up
Volume down
Operation
ON OFF
ON OFF
Slide to OFF
Press and hold for 3s until the LED ashes Blue and Red alternately
Press once
Press once
Press and hold for 1s
Double click
Press once
Rotate clockwise
Rotate anticlockwise
Mute/Un-mute the
microphone
Press once(during a call)
Note: When the microphone is muted, please be aware that the speakers may still be on.
LED Indicators
LED Indicator
Blue LED on 1 second
Blue LED ash twice every 5 seconds
The red and blue LED ash alternate
Blue LED ash once every 5 seconds
Blue LED ash once every 5 seconds
Speakerphone Status Voice Prompts
Power on
Standby
(Disconnect Bluetooth Device)
Pairing in progress
Standby mode
(Connect Bluetooth Device)
"Power On"
"Paring"
Play Music
Red LED ash every 5 seconds
Red LED on 1 second
Red LED steady on
Red LED o
Low voltage
Power o
Charging in progress
Charging completed
"Battery Low"
"Power O"
2
Page 4

Set Up
ON
OFF
Insert short end of clip into slot until it clicks in place / Attach to sun visor (2 types of installation)
Right-hand
use
ON
OFF
MUTE
MUTE
Left-hand
use
“Auto Power On/OFF” function
Enable the "Auto Power ON" function
When the power switch is set to “ON”, the motion sensor function is activated. It will automatically
Power On when it detects any motion (e.g. opening the car door) and will auto Power OFF after 70
minutes of inactivity.
Disable the "Auto Power ON" function
Auto Power On function will be disabled by setting the power switch to "OFF". When set to "OFF", the
car kit will also be powered o.
3
Page 5

ON
OFF
VOL
MUTE
PHONE /
VOLUME
Note: If you want to use the motion sensor feature, do not set to ”OFF”.
Pairing a mobile phone
1. Power on CK11 by moving the switch to ON position.
2. Enter CK11 into PAIRING MODE - Press and hold the for 3 seconds until LED indicator ashes
BLUE and RED alternately. (Upon rst use the CK11 will automatically enter pairing mode)
MUTE
PAIR /
RECONNECT
3. Activate Bluetooth on your phone; search and select “Avantree CK11” to connect.
ON
OFF
MUTE
VOL
PHONE /
VOLUME
MUTE
VOL
PHONE /
VOLUME
Bluetooth
Avantree CK11
4
Page 6

To add another phone (Multipoint function)
1. Connect the rst phone (instructions above).
2. Set CK11 to PAIRING MODE (refer to Chapter 5) to pair and connect the 2nd phone.
3. Reboot the CK11 by turning it o and then on again. Now both phones will be connected to the
CK11 or you may need to manually click “Avantree CK11” on your phone to connect.
Bluetooth
Avantree CK11
Reconnection
Normally, the CK11 will automatically reconnect the last paired device once it powers on. For other
devices, you may need to manually click "Avantree CK11" on your phone to reconnect.
Note: To ensure the successful auto re-connection with 2 devices (including the last paired device),
please activate Bluetooth on both phones before opening the car door.
Restore to default settings
You may nd it necessary to reset the CK11 if it is not working as expected. After reset to factory default
settings, all the paired mobile phone history will be erased.
1. Set CK11 to PAIRING MODE - press and hold the for 3 seconds until the LED ashes BLUE and
RED alternately.
MUTE
2. Double click the mute button - you will hear 2 beeps indicating a successful reset. Then it will
auto matically enter pairing mode.
PAIR /
RECONNECT
Note: For successful connection, please also delete the pairing history on your phone and re-pair with
CK11.
5
Page 7

How to charge
When the LED ashes RED every 5 seconds, you should fully recharge the device for about 3 hours. The
LED will remain RED while charging and then turn o when charging is completed.
You can plug the CK11 into a USB wall charger/car charger (DC 5V/0.5-1A) or computer USB port that is
powered on.
MUTE
RECONNECT
PAIR /
Troubleshooting
1) CK11 repeatedly announces “Power on - Power o”. What should I do?
When CK11 can’t connect to any devices, it will repeat "Power on - Power o" due to its build-in
motion sensor.(Refer to Chapter 4)
a. Please make sure your mobile phones Bluetooth is on before you enter the car so that the CK11
can auto reconnect to your phone.
b. The CK11 will automatically reconnect to the last connected phone once powered on; for other
paired devices, you may need to manually click "Avantree CK11" on the Bluetooth screen of your
phone to reconnect.
c. If you don't want to use the CK11, you can DISABLE this motion sensor function by setting the
power switch to "OFF".
2) Why doesn’t it turn on automatically?
Please note that it will only turn on automatically when the power switch is set to “ON”. If you
manually set the power switch to “OFF“, the device will power o and not automatically turn on
again.
3) How to make a call by voice command?
Step 1: Make sure your smartphone is CONNECTED with WIFI or WLAN/Mobile Data; pair and
connect with CK11 successfully.
Step 2: Activate voice command of your phone by following 2 methods:
a. Press of CK11 once to activate voice command of your phone. You will hear a beep
indicating success. Then you can make a call by voice control (e.g. “call Mom”) or any
other voice commands.
b. You can also activate by “Hey Siri” or “OK Google” for Siri/Google Assistant, but you need
to congure your phone rst. You need to use your voice to complete the setting and it
will be activated by your voice in the future.
6
Page 8

Voice command conguration below:
Siri(iPhone): Settings | Siri & Search | Activate Listen for "Hey Siri"/ Press Home for Siri / Allow Siri
When Locked
Google assistance(Android phones): Settings | Google Assistance Settings | Voice Match | Teach the
Assistance to recognize your voice.
Click here for more information
WARNINGS / CAUTIONS
• Permanent hearing loss may result from long-term exposure to sound at high volumes.
• This product contains small parts which may be a choking hazard. Not suitable for children under age of 3.
• To reduce the risk of re or electrical shock, do NOT expose this product to rain, liquids or moisture.
• Do NOT make unauthorized alterations to this product.
• Do NOT expose products containing batteries to excessive heat (e.g. direct sunlight, re, etc.).
• Do not leave a fully charged battery connected to a charger; overcharging may shorten its life
Declaration of Conformity
CE: The product is in conformity with the essential requirements of Article 3.1 (a) (b), 3.2 of Directive 1999/5/EC
and the essential requirements of Directive 2004/108/EC.
FCC: This device complies with part 15 of the FCC Rules.Operation is subject to the condition that this
device does not cause harmful interference
(1) this device may not cause harmful interference, and
(2) this device must accept any interference received, including interference that may cause undesired
operation. Changes or modications not expressly approved by the party responsible for compliance could
void the user's authority to operate the equipment.
NOTE : This equipment has been tested and found to comply with the limits for a Class B digital device, pursuant
to Part 15 of the FCC Rules. These limits are designed to provide reasonable protection against harmful
interference in a residential i nstallation. This equipment generates, uses and can radiate radio frequency
energy and, if not installed and used in accordance with the instructions, may and used in accordance with
the instructions, may cause harmful interference to radio communications.However, there is no guarantee that
interference will not occur in a particular installation. If this equipment does cause harmful interference to radio
or television reception, which can be determined by turning the equipment o and on, the user is encouraged to
try to correct the interference by one or more of the following measures:
-- Reorient or relocate the receiving antenna.
-- Increase the separation between the equipment and receiver.
-- Connect the equipment into an outlet on a circuit dierent from that to which the receiver is connected.
-- Consult the dealer or an experienced radio/TV technician for help.
FCC ID: 2AITF-BTCK-11
To maintain compliance with FCC’s RF Exposure guidelines, this equipment should be installed and operated with
minimum distance between 20cm the radiator your body: Use only the supplied antenna.v
Dispose of the packaging and this product
in accordance with the latest provisions.
7
 Loading...