

Page 1

Avanti Hearth Products
Z60
INSTALLATION AND OPERATING INSTRUCTION
If you are unable to read or understand these instructions
do not attempt to install or operate
Please keep these Instructions for future reference.
☆
INTRODUCTION
The Avanti Z60 thermal remote control system was developed with the latest radio frequency (RF)
technology. The Avanti Z60 is easy to install. It allows the user to operate a gas appliance manually or
thermostatically with a user-friendly remote control system which does not require any household electric
current. The range of operation is approximately 20 feet (7 meters). The operating code of this remote
control system has been pre-programmed for instant operation after installation. However, its special
code-learning feature (on the receiver) allows the user to regulate the codes for operating with other
transmitters for a maximum flexibility. Note: installation in metal cabinets may limit the range of operation
☆
COMPONENTS INCLUDED
TRANSMITTER
Description QTY
Transmitter 1
“AAA” Batteries 2
Wall Mount Bracket (with Screws) 1
WALL-MOUNT COVERPLATE
WALL MOUNT
BRACKET
SLIDE BUTTONS
Receiver 1
“AA” Batteries 4
Wall Mount faceplate (with Screws) 1 7) Velcro at the bottom of the box
Hearth Mount Slide knob (Black) 1
Page 2

Wall Mount Slide knob (White) 1
Velcro 1
☆
INSTALLING Z60 REMOTE SYSTEM
(A) Getting the Transmitter Ready:
1.
Installing Batteries
The transmitter operates on 2 AAA-size 1.5V batteries. It is recommended that ALKALINE
batteries always be used for longer battery life and maximum operational performance.
Rechargeable batteries are not recommended.
(1) Open the lid of the battery compartment on the back of the transmitter.
(2) Insert 2 new or fully charged AAA-size 1.5V batteries into the battery compartment. Make
sure the (+) and (-) ends of the batteries are correctly positioned as indicated on the casing.
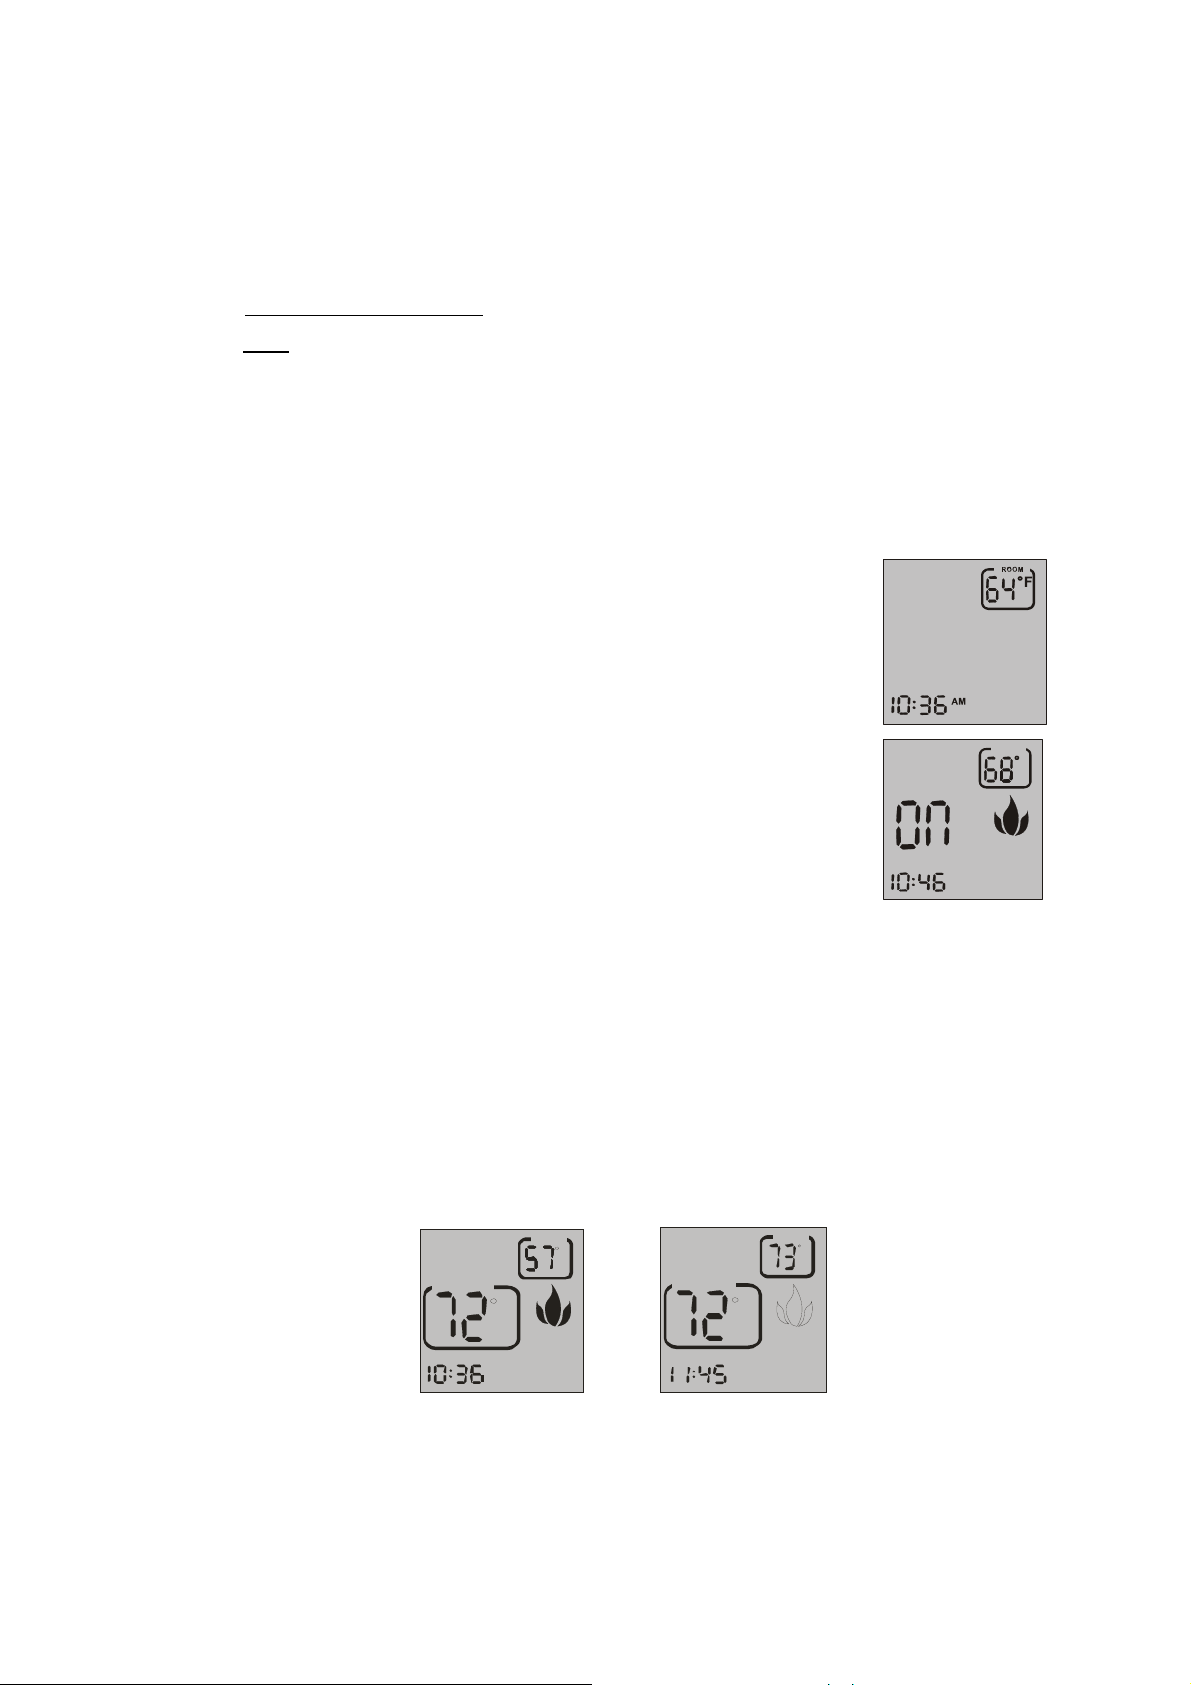
(3) When the batteries are installed, the LCD with similar numbers will display.
Insert Batteri e s
_
+
AAA
+
AAA
_
Note 1:
either check the positions of the batteries or replace with new batteries.
Note 2: It may take a few minutes (up to 15 minutes on a severe cold weather) for accurate
room temperature readings to appear after the batteries have been installed.
On initial start up if a low battery indicator appears on the screen, you should
LCD Display
2.
① RF signal – Appears when signals are being emitted
Page 3

② Thermostat Indicator – Thermo Off appears when it’s manually on; Thermo On appears
A
when thermostat is activated.
③ Manual On/ Temp Set – ON shows when it’s manually turned on; set temperature shows
when thermostat is in operation
④ Clock – Indicates the current time in AM/PM
⑤ Room – Indicates current room temperature
⑥ Flame – Indicates burner/ valve in operation
⑦ Battery – Battery power is low. Replace batteries within 2 weeks
⑧ Timer – Indicates time remaining before system shuts off when timer-programmed; 9-hour
maximum setting
⑨ Lock – Childproof lock-out
3.
Control Buttons
ON/OFF
UP
TIMER/
CLOCK
THERMOSTAT
DOWN
SET
3.
Setting the Clock
(1) Press and hold the “Timer/Clock” button for more than five seconds, the
hour digit(s) will begin flashing.
(2) Press the ▲ (UP) or ▼ (DOWN) button until the desired hour is
displayed in AM or PM.
(3) After setting the desired hour, push the “Timer/Clock” button again to set
the minutes. The minute digits will begin flashing.
(4) Press the ▲ (UP) or ▼ (DOWN) button until the desired minute is displayed.
(5) Press the SET button, the minute digits will stop flashing, indicating the clock has been
ROOM
F
AM
successfully set.
Note:
Flashing digits on LCD indicate the system is awaiting user’s input as mentioned above.
The digits will stop flashing if no input is made within 10 seconds and the setting is
automatically completed.
4.
Setting ℉
/
℃ Scale
The factory setting for temperature is ℉(Fahrenheit).
To change this setting to ℃(Celsius):
(1) Remove the battery cover on the back of the transmitter.
oF/o
C Switch
oFo
_
+
C
AA
AAA
+
_
Page 4
(2) Adjust the temperature scale Dip Switch (on the left hand side, with ℉/℃ mark) with your
F
fingernail or a ball pen point and move it to the ℃ scale on the right.
To change from ℃ back to ℉, move the dip switch back to ℉ again.
5.
Note: The slide switch on the receiver must be placed in the REMOTE position for receivin g
Operation Functions
commands from the transmitter. In other words, the transmitter (remote control) only works
when the receiver is set in the REMOTE mode (Also refer to instructions in the RECEIVER
section in this manual). To change the settings on the receiver, install the black knob on
the receiver by pushing the knob gently on the control.
(1) Turning ON/OFF the Fireplace:
1 To turn the fireplace on, press the ψ (ON/OFF) button on the
○
transmitter. The text ON and the flame icon will appear on the LCD. A
thermo bulb and texts THERMO OFF are also seen on the LCD
indicating the system is manually on but not thermostatically
operating.
2 Press the ψ(ON/OFF) button again to turn off the fireplace. The text
○
ON, flame icon and thermo bulb will disappear from the LCD.
(2) Setting Desired Temperature (THERMOSTAT):
THERMO
Ã
ROOM
OFF
AM
F
This remote control system can be thermostatically controlled by activating the
THERMOSTAT (Auto) function from the transmitter:
1 Press the ψ(ON/OFF) button to turn on the fireplace. The text ON, the flame icon, the
○
thermo bulb and texts THERMO OFF will appear on the LCD.
2 Press the AUTO button, the thermo bulb icon and texts THERMO ON will appear on the
○
top row of LCD, the text ON will become THERMO TEMPERATURE.
3 Press the ▲ (UP) or ▼ (DOWN) button to select the desired thermo temperature. The
○
system will operate thermostatically as per your selected thermo temperature.
Thermo ON/Fireplace ON
ON
ROOM
F
THERMO
Ã
THERMO SET
F
AM
● To disengage the THERMO function, press the AUTO button again, it will return to the
manual ON mode. To completely turn off the fireplace, press the ψ(ON/OFF) button.
Thermo ON/Fireplace OF
ON
ROOM
F
THERMO
Ã
THERMO SET
F
AM
Page 5
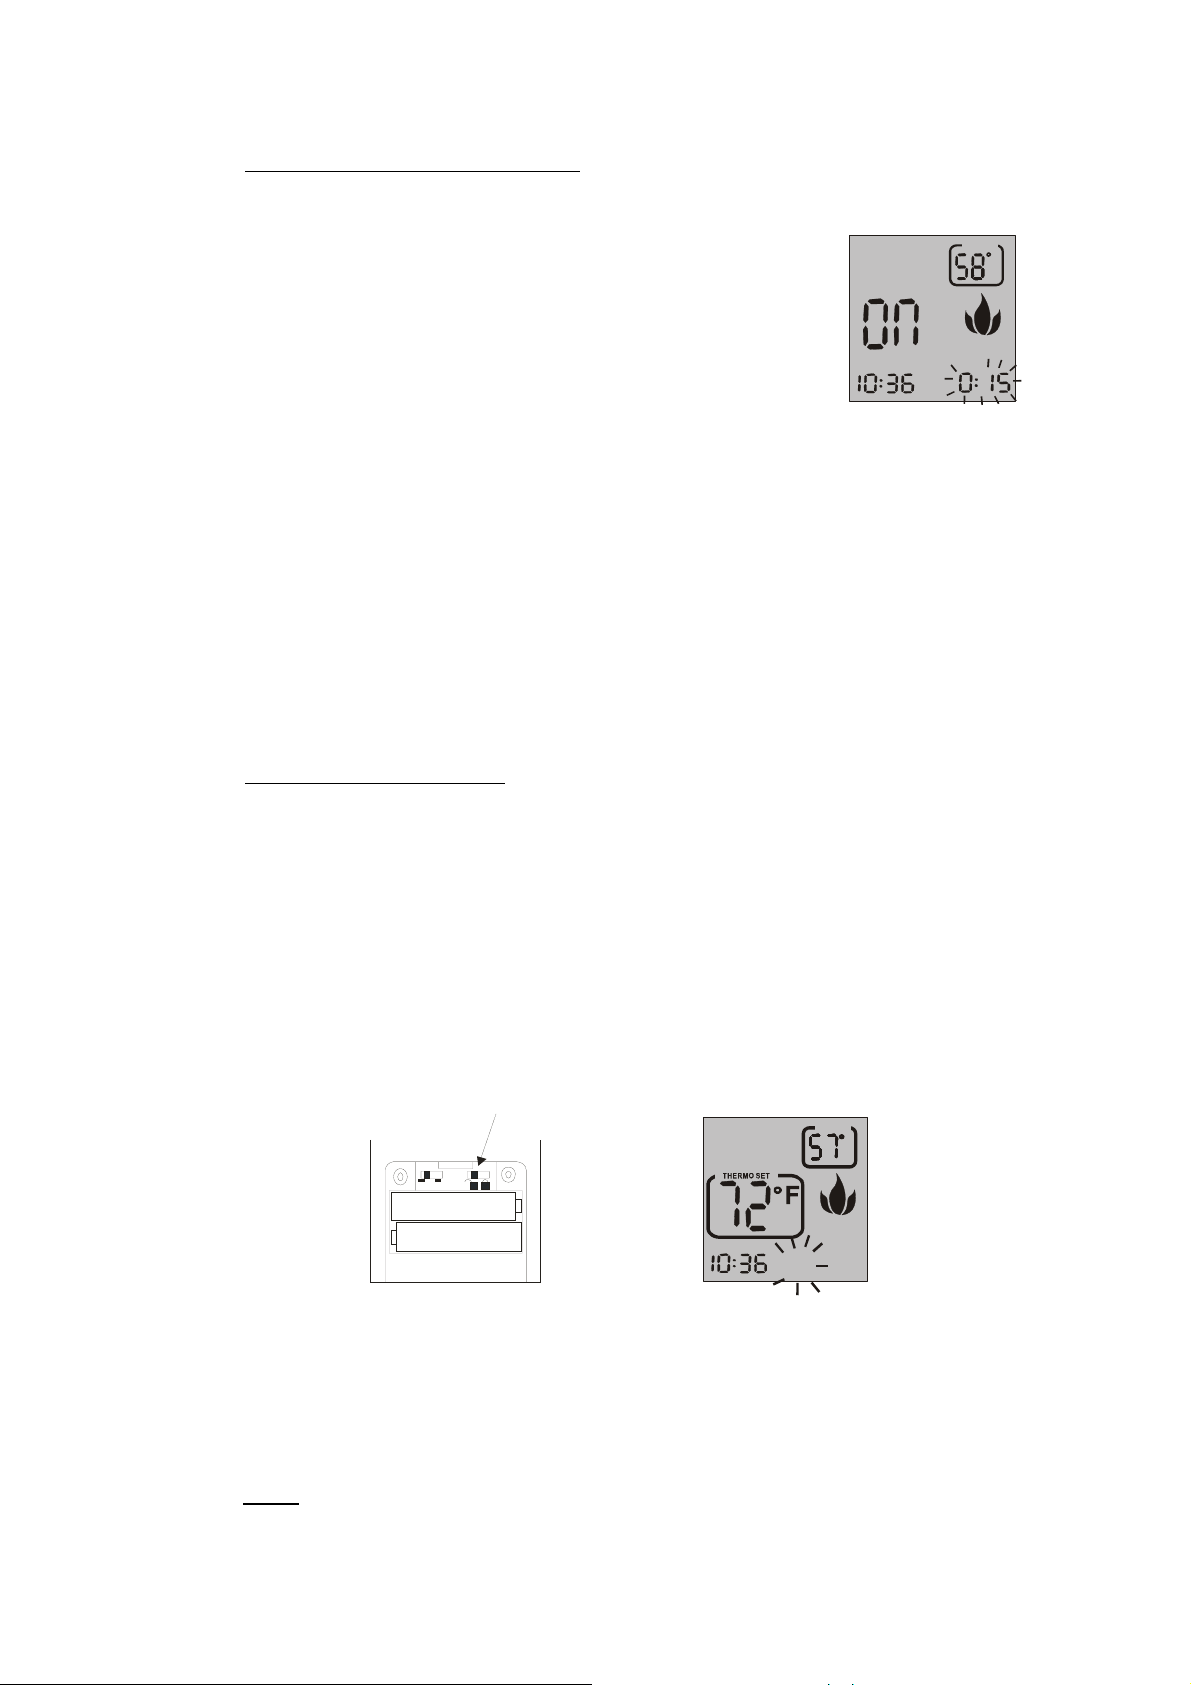
6.
h
Setting the Countdown Timer
The Avanti Z60 can be programmed to operate with a built-in countdown timer when the
transmitter is in the ON or THERMO modes.
To operate the timer,
(1) Press the “Timer/Clock” button on the transmitter, “TIMER” icon will
show and the minimum time of 0:15 minutes on LCD will begin
flashing.
(2) Press the ▲ (UP) or ▼ (DOWN) button to begin advancing through
each of the countdown time options. Available countdown times are 15 minutes, 30 minutes
45 minutes, 1 hour, 1 hour 30 minutes, 2 hours, 2 hours and 30minutes, and each additional
half-hour increments up to nine hours.
(3) Press the SET button when countdown time is selected. (The timer will set automatically
even if you don’t press the SET button in 10 seconds before the “time” stops flashing.) The
fireplace will remain on until the set time has expired.
(4) To cancel the countdown timer, press the “Timer/Clock” button again, TIMER and remaining
countdown time will disappear from LCD.
7.
Childproof “Lock-Out”
Avanti Z60 includes a CHILDPROOF “LOCK-OUT” safety feature that allows the user to
OFF
AM
TIMER
ROOM
F
THERMO
Ã
Count down timer ON
“LOCK-OUT” operation of the appliance from the TRANSMITTER.
● To activate the Lock-Out feature,
(1) Remove the battery cover on the back of the transmitter.
(2) Slide the lock-out Dip Switch with your fingernail or a ball pen point to the right (with a
locked lock icon) to activate the childproof feature. The lock icon will appear on the LCD
screen.
Lock Swi tc
ON
ROOM
F
THERMO
Ã
F C
_
AAA
+
● To disengage the childproof lock-out,
Slide the lock-out Dip Switch to the left (with an unlocked lock icon). The lock icon will
disappear from the LCD screen and the transmitter will return to its normal operating
condition.
AAA
+
_
AM
±
If the appliance is already operating in the ON or THERMO modes, engaging the
NOTE:
Page 6

“LOCK-OUT” will not cancel the operating mode. Engaging the “LOCK-OUT” prevents
only the manual operation of the TRANSMITTER. If in the auto modes, the THERMO
operation will continue to operate normally. To totally “LOCK-OUT” the operation of the
TRANSMITTER’S operating signals; the transmitter’s mode must be set to OFF.
8.
The low battery indicator appears on the LCD appears When the battery
9.
The wall mount bracket provides you an ideal location to
put away the transmitter. Use the screws included to fix it on the
10.
Low Battery Indicator
THERMO
ON
power is low. Failure to replace the batteries will result in the loss of power
in the system and eventual failure.
Ã
AM
Wall Mount Bracket
wall of your convenience for relocating of it (Fig-1)
Communication Safety
The Avanti Z60 has a communication-safety function built in its software. It provides an extra
margin of safety when the transmitter is out of the normal 20-foot operating range of the receiver
or has a power failure.
(1) Should the receiver NOT receive a signal from the transmitter for 24 hours in the manual
ROOM
F
ON mode set on the transmitter, the receiver will automatically shut down the appliance
being controlled by the receiver.
(2) Should the r eceiver NOT receive a signal from the transmitter for 2 hours in the THERMO
mode, the receiver will automatically shut down the appliance being controlled by the
receiver.
To reset the receiver and operate the appliance,
Note:
1 Make sure the transmitter is powered by good batteries. Replace them if necessary.
○
2 Press theψ(ON/OFF) button (and AUTO if thermo mode is required) on the transmitter to
○
turn on the fireplace again.
3 Be sure to place the transmitter within the normal 20 feet operation range from the receiver.
○
(B) Installing the Remote Receiver:
1.
Inserting Batteries
Page 7

b
The receiver operates on 4 AA-size 1.5V batteries. It is recommended that ALKALINE batteries
always be used for longer battery life and maximum operational performa nce. Rech argeable
batteries are not recommended.
(1) Move the slide switch to the OFF position.
(2) Slide-open the battery cover on the top of the receiver.
(3) Insert 4 new or fully charged AA-size 1.5V batteries into the battery compartment. Make
sure the (+) and (-) ends of the batteries are correctly positioned as indicated on the casing.
(4) Replace the battery cover.
2.
Matching Security Code with the Transmitter
The code of this remote control system has been pre-programmed for instant operation after
installation. However, its code-learning feature allows the user to regulate the codes for
operating with other transmitters for a maximum flexibility.
REMOTEON OFF
LED Indicator
Switch Kno
3-posi tion
Slide Switch
(1) Initial Set Up
○1 After the batteries have been inserted, slide the switch on the front panel to REMOTE
position in the center.
○2 The red LED on the front panel will flash t wice. Wait for one minute for the receiver to
initialize. The LED will flash twice again and the receiver is ready to operate with the
transmitter.
(2) Reset Operating Code
Page 8

It may be necessary to program the remote receiver to LEARN the security code of the
transmitter upon initial use, if batteries are replaced, if a replacement transmitter is
purchased from your dealer or the factory, or any time the receiver does not respond to the
transmitter due to the loss of codes.
● To program the remote receiver to LEARN a new security code:
1 Move the slide switch on the front of the remote receiver to the OFF position, then move
○
it to the REMOTE position, the red LED on the front panel will flash twice, indicating it’s
ready to learn a code from the transmitter.
2 Press theψ(ON/OFF) button on a ready-to-use transmitter (refer to the TRANSMITTER
○
section in this instruction manual).
3 The red LED on the receiver will flash twice again indicating the transmitter’s code has
○
been successfully programmed into the receiver.
Note 1:
Note 2: When an existing receiver is matched to a new transmitter, the new security code will
Note 3: The microprocessor that controls the security code matching procedure is controlled
When matching security codes, be sure the slide button on the receiver is placed in
the REMOTE setting from the OFF or ON position and stays in the REMOTE position;
the code will NOT “LEARN” if the slide switch is in the ON or OFF positions.
override the old one.
by a timing function. If you are unsuccessful in matching the security code on the first
attempt, wait five minutes before trying again – this delay allows the microprocessor
to reset its timer circuitry – and try up to two or three more times.
Control Panel
3.
<Slide Switch>
The remote receiver has a 3-position slide switch for selecting the mode of operation:
ON-REMOTE-OFF.
● With the slide switch on the receiver in the ON position, the appliance being controlled b y
the remote system will remain on until the slide switch is placed in the OFF or REMOTE
position.
● With the slide switch in the REMOTE position, the appliance will only operat e if the remot e
receiver receives commands from the transmitter.
● With the slide switch in the OFF position, the appliance is off
Note 1:
The remote receiver will only respond to the transmitter when the 3-position sli de button
on the remote receiver is in the REMOTE (center) position.
Note 2: It is suggested that the slide switch be placed in the off position if you will be away from
Page 9

your home for an extended period of time. If the remote receiver is mounted out of
children’s reach, placing the slide switch in the OFF position also functions as a safety
“lock-out” by both turning the system off and rendering the remote receiver inoperative.
If the transmitter is misplaced or damaged, the appliance can be operated in the ON or
OFF position until the transmitter is replaced or located.
<LED Indicator>
The LED on the front of the receiver serves for three functions:
(1) Communicating with Transmitter: One flash whenever it receives the ON signal from the
transmitter.
(2) Code-learning: It flashes twice when the slide switch is moved from OFF or ON to
REMOTE; it flashes twice again when the receiver has learned the code from the
transmitter.
(3) Low Battery warning: It’ll flash twice every minute – indicati ng the batteries are low – to
remind you to change batteries as soon as possible.
4.
Installation
● The remote receiver can be either wall-mounted in a standard plastic switch box or placed on
or near the fireplace hearth. Preferably, the remote receiver should be wall-mounted in a plastic switch
box, as this will protect its electronic components from both the heat produced by the gas appliance and
potential damage or abuse that can occur if it is left exposed on the hearth.
● PROTECTION FROM EXTREME HEAT IS VERY IMPORTANT. Like any piece of electronic
equipment, the remote receiver should be kept away from temperatures exceeding 140
0 F inside the
receiver case. Battery life is also significantly shortened if batteries are exposed to high temperatures.
● Make sure the remote receiver switch is in the OFF position. Install the 18 gauge. wire
leads (included) from the receiver to the appropriate terminal wiring block connections on the millivolt gas
valve or electronic module. When installing the receiver in a wall mount application an additional length of
18 gauge stranded or solid wire, with no splices and measuring no longer than 20 feet total run, can be
used to install the receiver box to the gas appliance. Do not install the rece iver in a metal electrical box.
This can created problems with the RF transmission of the remote system.
● Hearth Mount
(1) The remote receiver can be placed on the fireplace hearth or under the fireplace, behind
the control access panel.
*(2) Position it where the ambient temperature inside the receiver case does not
exceed 140 degree F.
(3) With the battery compartment on top, push the Black slide Button
over the receiver
slide switch. (Do not use the white slide button which is to use with the wall-mount plate.).
Page 10

Make sure tab on slide button fits into groove on the receiver front panel.
(4) Use the Velcro included in the package to adhere the receiver onto the hearth.
●
Wall Mount
1 Attach the wall cover plate to the
○
receiver box: Position the receiver as
shown in diagram with lower tab on
wall cover plate into groove of
receiver (Make sure LED hole on
cover plate properly aligns with remote receiver) (Fig-2)
2 Pull receiver up and snap into top tab of cover plate.
○
○3 Position the wall cover plate so the word ON is facing up.
4 Install the remote receiver into the plastic switch box using the two
○
long screws provided.
5 Push the White slide Button (not the black one) over the receiver
○
slide switch. Make sure tab on slide button fits into groove of wall
cover plate.
Note:
When the remote receiver is installed as a wall sw itch, it should be
installed in a PLASTIC switch box. Remote functions may not operate properly if the
remote receiver is installed in a steel switch box. (Fig-3)
WhiteSlideButton
N
O
R
E
M
O
T
E
F
F
O
Wiring Instructions
5.
A qualified electrician or a gas technician who is familiar with the gas appliance and gas valves
that will be operated by this remote should install the remote control system. Incorrect wiring
connections WILL CAUSE DAMAGE to the gas valve or electronic module operating the
gas appliance and may also damage the remote receiver.
WIRING MILLIVOLT VALVES
(Fig-4)
Page 11

● The remote receiver is connected to the millivolt valve using the TH (thermostat) terminals on
the terminal block on the millivolt gas valve. Connect 18 gauge stranded or solid wires from
the remote receiver to the gas valve.
● Operation of the remote receiver is similar to that of a thermostat in that both turn the gas
valve on and off based on input signals. A thermostat’s input signals are different
temperatures. The remote receiver’s input signals come from the transmitter.
● Connect each of the two wires leading from the TH and TH/TP terminals on the millivolt gas
valve to either of the two wire terminals on the remote receiver. Normally it does not matter
which wires go to which terminal. Always consult your appliance manufacturer’s installation
instructions before installing the remote control system.
WIRING ELECTRONIC SPARK IGNITIONS (Fig-5)
● The remote control receiver can be connected, in series, to a 24VAC transformer to the TR
(transformer) terminal on the ELECTRONIC MODULE.
● Connect the hot wire (18 gauge - not included) from the 24VAC transformer to either of the
wire terminals on the remote receiver.
● Connect another wire between the other receiver wire terminal and the TH (thermostat)
terminal on the ELECTRONIC MODULE. Consult your manufacturer’s installation
instructions on this installation procedure to avoid damage to the remote system.
ELECTRONIC MODULE
TH
TR
neutral wire
24VAC
hot wire
REMOTE
RECEIVER
110/24VAC
Transformer
110VAC
6.
Thermo Safety
Note: The receiver will automatically turn off the fireplace if the ambient temperature in the
Page 12

receiver box exceeds 140 degree F.
The Avanti Z60 has a THERMO- SAFETY feature that is built into the system’s RECEIVER.
This feature is temperature- activated and provides an extra margin of safety when the receiver
is operating where ambient temperatures exceed 140 0 F degrees inside the receiver case. The
receiver is thermally protected from extreme heat conditions. Heat in excess of the normal
operating range can have negative effect on the operation of the receiver’s microprocessors.
Note:
To reset the receiver and operate the appliance after overheating shutdown,
1 Allow sufficient time for the receiver to cool below 1200 F,
○
2 Then press ON button on the transmitter to reactivate the appliance.
○
☆
TROUBLE SHOOTING
Should you encounter problems with your fireplace system, th e problem may be with the fireplace
itself or it could be with the AVANTI remote control. Review the fireplace manufacturer’s operation
manual to make sure all connections are properly made. Then check the operation of the AVANTI
remote in the following manner:
1 Make sure receiver batteries are installed properly. If one battery is installed backward, receiver will
○
not operate in remote mode. Be sure battery output is 5.0 volts or more. (Receiver slide switch is
independent of battery condition in ON or OFF settings.)
2 Be sure the transmitter’s batteries are properly installed and that the battery output is 5.0 V or more.
○
3 Check to make sure the transmitter is communicating with the receiver.
○
● If the slide switch on the receiver is placed in the REMOTE position.
● If the LED on the receiver flashes once when the ON button is depressed on the transmitter they
are communicating.
● If the LED on the receiver does not flash when the ON button is depressed on the transmitter, you
will need to teach the receiver the code of the transmitter. This is done by sliding the slide
switch on the receiver to OFF then to REMOTE again and the LED on the receiver flashes twice.
Press the ON button on the transmitter and the LED on the receiver will flash twice again indicating
the transmitter’s code has been programmed into the receiver.
4 Make sure the transmitter is within the 20 feet range of the receiver.
○
5 Positionin g of the receiver is important. If the receiver is “enclosed” in a metal surround, the
○
operation of the receiver may be affected as noted below. Reposition the receiver to improve
Page 13

operating range. Installation of the receiver where metal can block the receiver will sometimes:
● Cause the RF signal to get lost and not communicate with the receiver.
● Cause the working distance to be shorter than normal.
Note:
A receiver located in an area, where the ambient temperature inside the case exceeds 140 0F,
will cause THERMO-SAFETY feature to activate. This will require the receiver to be
repositioned and then “reset” the receiver’s operation.
<Specifications>
● BATTERIES:
Transmitter 3V- 2 ea. AAA 1.5V, Alkaline
Receiver 6V –4ea. AA 1.5 Alkaline
● Operating Frequency: 303.8MHZ
● FCC ID No.’s: xxxxxxxx
● Canadian IC ID No.’s: xxxxxxxx
FCC REQUIREMENTS
NOTE: THE MANUFACTURER IS NOT RESPONSIBLE FOR ANY RADIO OR TV INTERFERENCE
CAUSED BY UNAUTHORIZED MODIFICATIONS TO THIS EQUIPMENT. SUCH MODIFICATIONS
COULD VOID THE USER’S AUTHORITY TO OPERATE THE EQUIPMENT.
Limited Lifetime Warranty
Avanti Heart Products, LLC warrant the Avanti Remote Control system for a limited lifetime
of the original owner of the remote system. This warranty is for the original purchaser of the
product and is not transferable. Should any part of the system fail because of defective
workmanship or material from the original date of purchase, Avanti Hearth Products, LLC
will, at its option, replace any or all of the defective parts.
Replacement parts will be available at no charge to the original purchaser for the first five
years from the date of purchase. Parts for the system will be sold to the original purchaser at
market price for the remainder of the warranty.
Proof of purchase is required in the form of a bill or a cancelled check, bill of sale or other
form of payment verification that will establish purchase date and warranty verification for
Page 14

the original owner of the product.
The owner shall provide a payment record, bill of sale, cancelled check or other form of proof
of purchase to establish purchase date and establish the warranty beginning date. Service
labor, travel costs, diagnostic costs, or any repair costs to repair any defective system, any
freight or shipping charges to and from the factory are the responsibility of the owner. Avanti
will not be responsible for labor charges or damage incurred during installation of the product,
replacement, repair or for any consequential or incidental damages. Batteries for the product
or damage caused by batteries are not covered under this warranty.
Any damage to the product caused by installation error, abuse, misuse, or accident that is
caused by the owner, contractors, or service companies is not covered by this warranty. Any
modifications to the Avanti remote system will void this warranty. This warranty does not
cover any claims which do not involve defective materials or workmanship.
In no event shall Avanti be liable for consequential or incidental damages or limitations on the
period which a warranty is in effect, so the above limitations may not apply to you. This warranty
gives the owner specific rights and you may have other rights, which can vary from state to state,
nation or province.
For Service Contact your Dealer or Avanti Hearth Products, LLC and furnish the
following information:
Name, address, contact information of the owner
Model Number, Date and Proof of Purchase
Brief description of problem
For warranty claim information directly from Avanti Hearth Products, LLC, you can mail a
request for a warranty form to the address below:
Avanti Customer Service
PO Box 403
Belmont, NC 28012
Or an email request at sales@avantihearth.net
at 704-866-4342
or by calling the main customer service number
Page 15

Note: This equipment has been tested and found to comply with the limits for a Class
B digital device, pursuant to part 15 of the FCC Rules. These limits are designed to
provide reasonable protection against harmful interference in a residential installation.
This equipment generates, uses and can radiate radio frequency energy and, if not
installed and used in accordance with the instructions, may cause harmful interference
to radio communications. However, there is no guarantee that interference will not
occur in a particular installation. If this equipment does cause harmful interference to
radio or television reception, which can be determined by turning the equipment off
and on, the user is encouraged to try to correct the interference by one or more of the
following measures:
—Reorient or relocate the receiving antenna.
—Increase the separation between the equipment and receiver.
—Connect the equipment into an outlet on a circuit different from that to which the
receiver is connected.
—Consult the dealer or an experienced radio/TV technician for help.
 Loading...