

Page 1
Avanti Hearth Products
Installation and operating manual
Model AHP304R2—Thermo Remote system
Product Description
The Avanti remote system described here is designed with the most up to date technology to provide a
reliable radio frequency product that does not need normal household current to function. The unique
patent pending code switch system using just 16 codes combined with a higher operating frequency (433.92
MHz) allows the user to set operating codes for maximum flexibility with a minimum of interference. This
is especially important when more than one remote system is used in a dwelling.
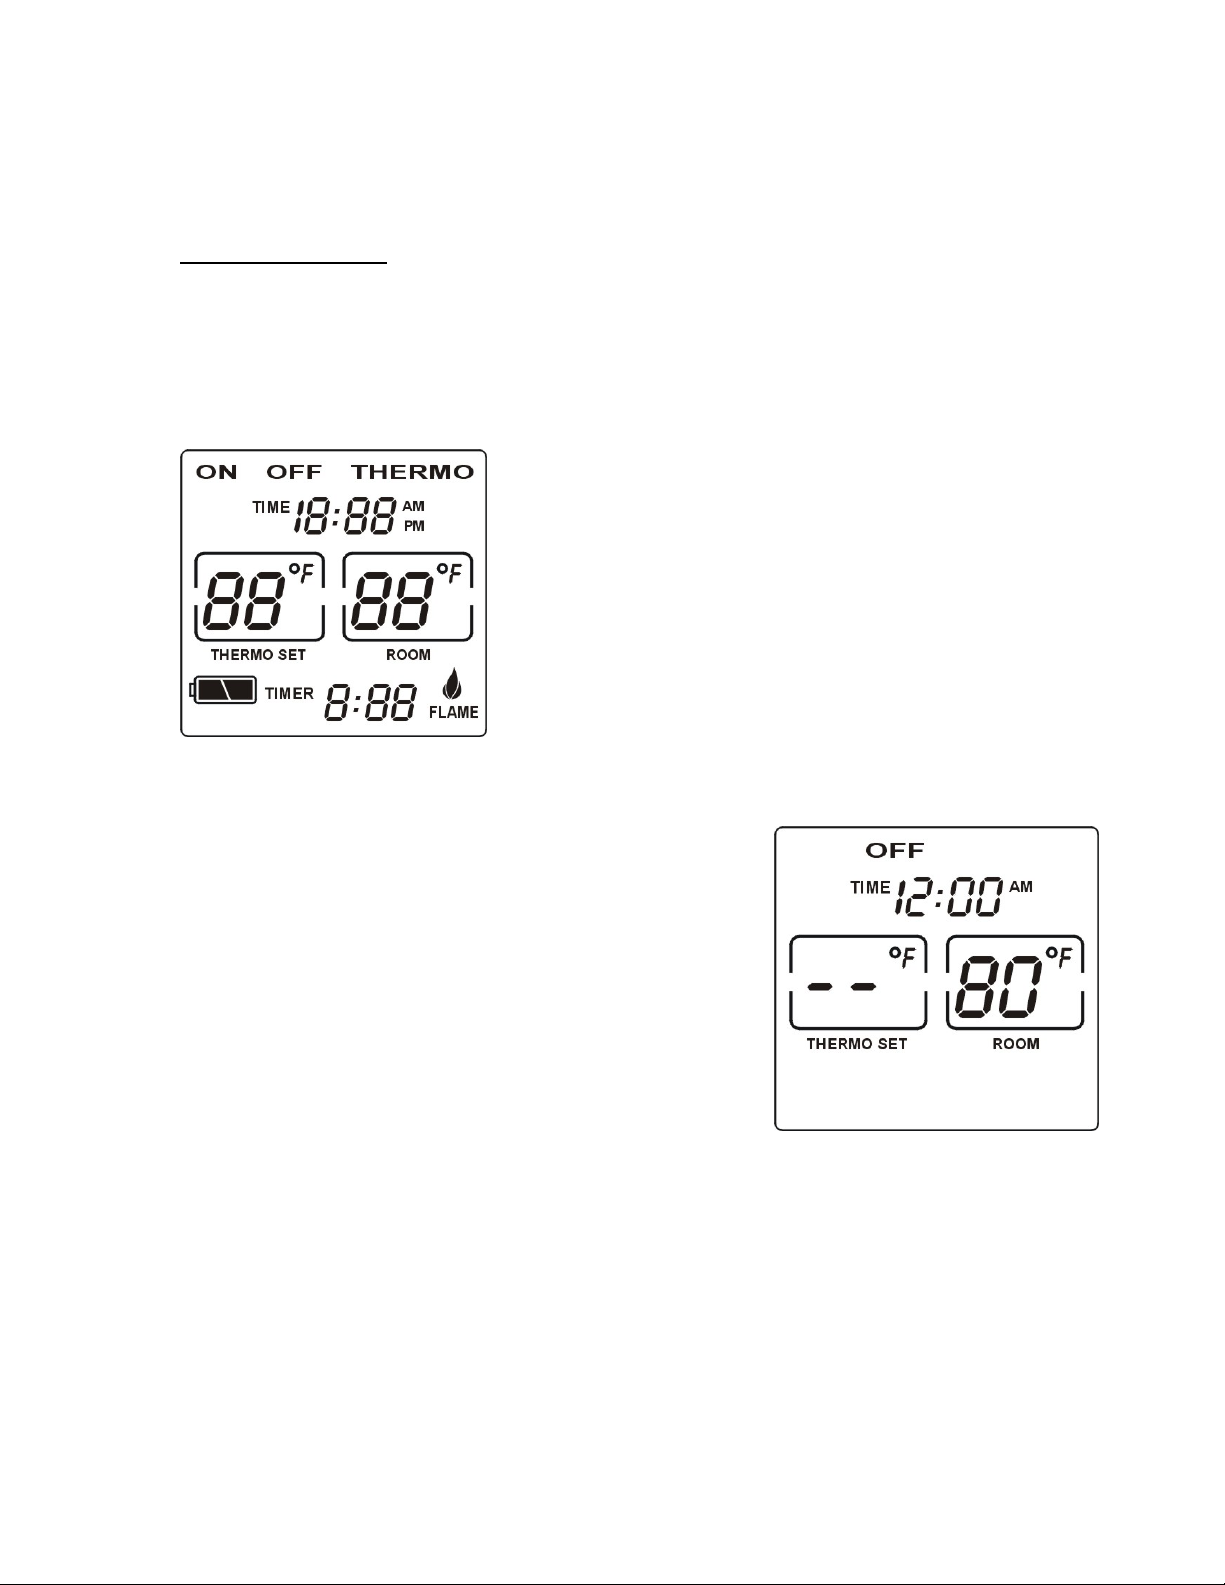
When transmitter batteries are installed, the LCD screen will
display the information shown in the diagram to the right. NOTE:
improperly installed batteries will cause the transmitter not working.
Setup Note: The Avanti transmitter contains a thermostat designed
To monitor temperature changes for the system. Due to the sensitive
Nature of the components, allow the transmitter to remain in the room
Where it will be installed until it reaches room temperature. Always
Allow 15-20 minutes for the transmitter to adjust from a cold room
Before the LCD readings are used for programming the system.
1. Low Battery Power. Replace Batteries
2. Clock- current time – AM or PM setting
3. Flame – Indicates main burner in operation
4. Room-Shows CURRENT room temperature
5. F-indicates temperature in Fahrenheit or C for Celsius
temperature reading
6. Time-When timer is programmed; this icon indicates time left
before system shuts down. Maximum of 9 hours
7. Mode-Controls function of unit. ON means the system is on,
thermostatically or manually. OFF indicates system is off.
THERMO indicates system will cycle automatically based on
programming settings.
LCD DISPLAY
1
Page 2
n
y
g
t
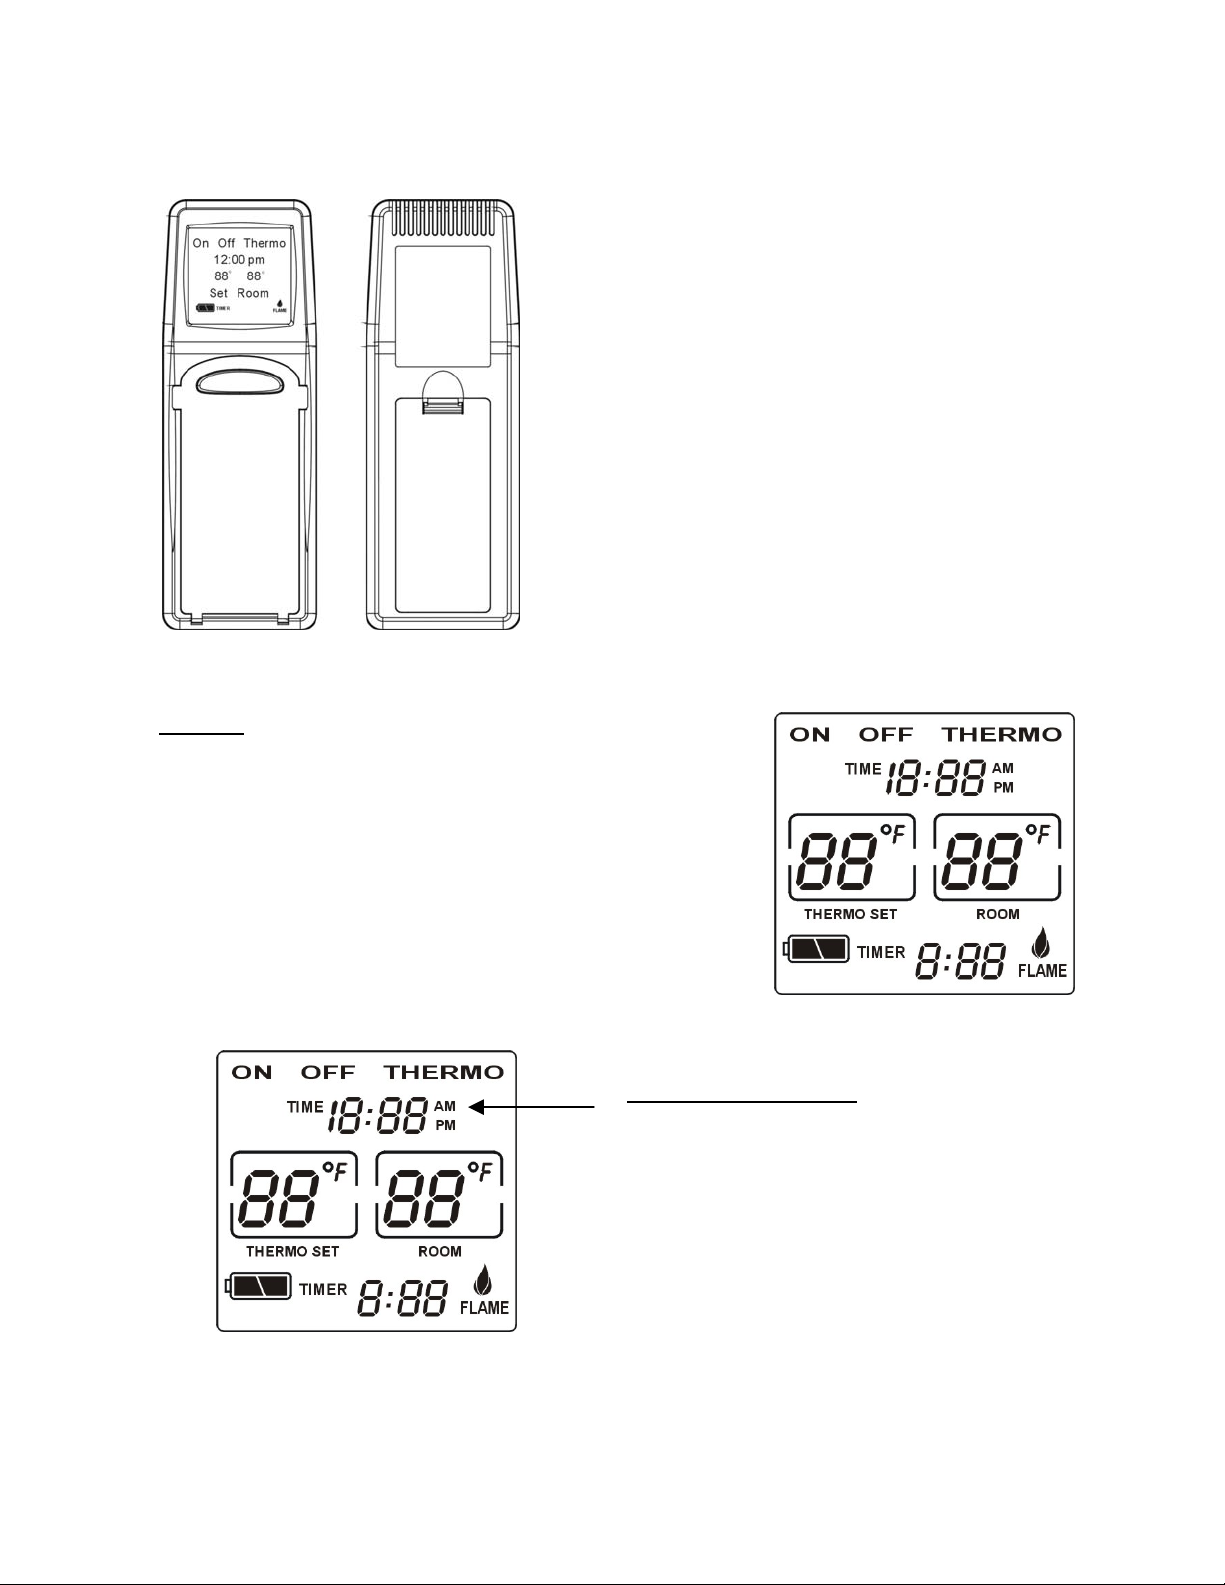
Functions
Press the MODE button located on the front of the transmitter
to select the desired function.
• The ON indictor shows the system is turned on in the
• The OFF icon indicates the system is turned off.
• The THERMO icon indicates the system is
manual, timer or thermostat settings.
programmed to automatically cycle ON or OFF
according to the temperature programmed.
The transmitter uses 2-AAA (1.5V) batteries. Alkaline batteries are
recommended for long life and peak performance. Insert batteries in
the back of the housing by opening the battery compartment cover.
Make sure the batteries are positioned with the (+) and (-) markings i
the correct position. Upon battery installation, the LCD display will
show the icons pictured on the LCD diagram. NOTE: Icon does not
appears on the screen, check battery positioning. Reversed batteries
transmitter will not work. Check condition of batteries and repeat
process if necessary.
NOTE: If the transmitter is taken from a cold storage area, it can take
up to 20 minutes for the unit to acclimate to the new temperature.
Allow time for proper temperature readings to appear when this
condition occurs.
IMPORTANT: Always follow appliance manufacturers installation
manual when installing this system. This product should be installed
by a qualified technician familiar with gas appliances. Always wear
gloves and safety glasses when installing this product and follow all
installation instructions. Modification of any components will void
the warrant
and could create a fire hazard.
Setting the Time Function:
Open front door of the transmitter and locate the TIME/TIMER
button. Press and hold the TIME/TIMER button until the time
flashes. Use the UP or DOWN buttons to change the time to the
desired setting. NOTE: If no change UP or DOWN is made to the
flashing TIME icon within 10-15 seconds, the system will reset to
the last setting. Close the front cover when finished with the
settin
.
2
Page 3
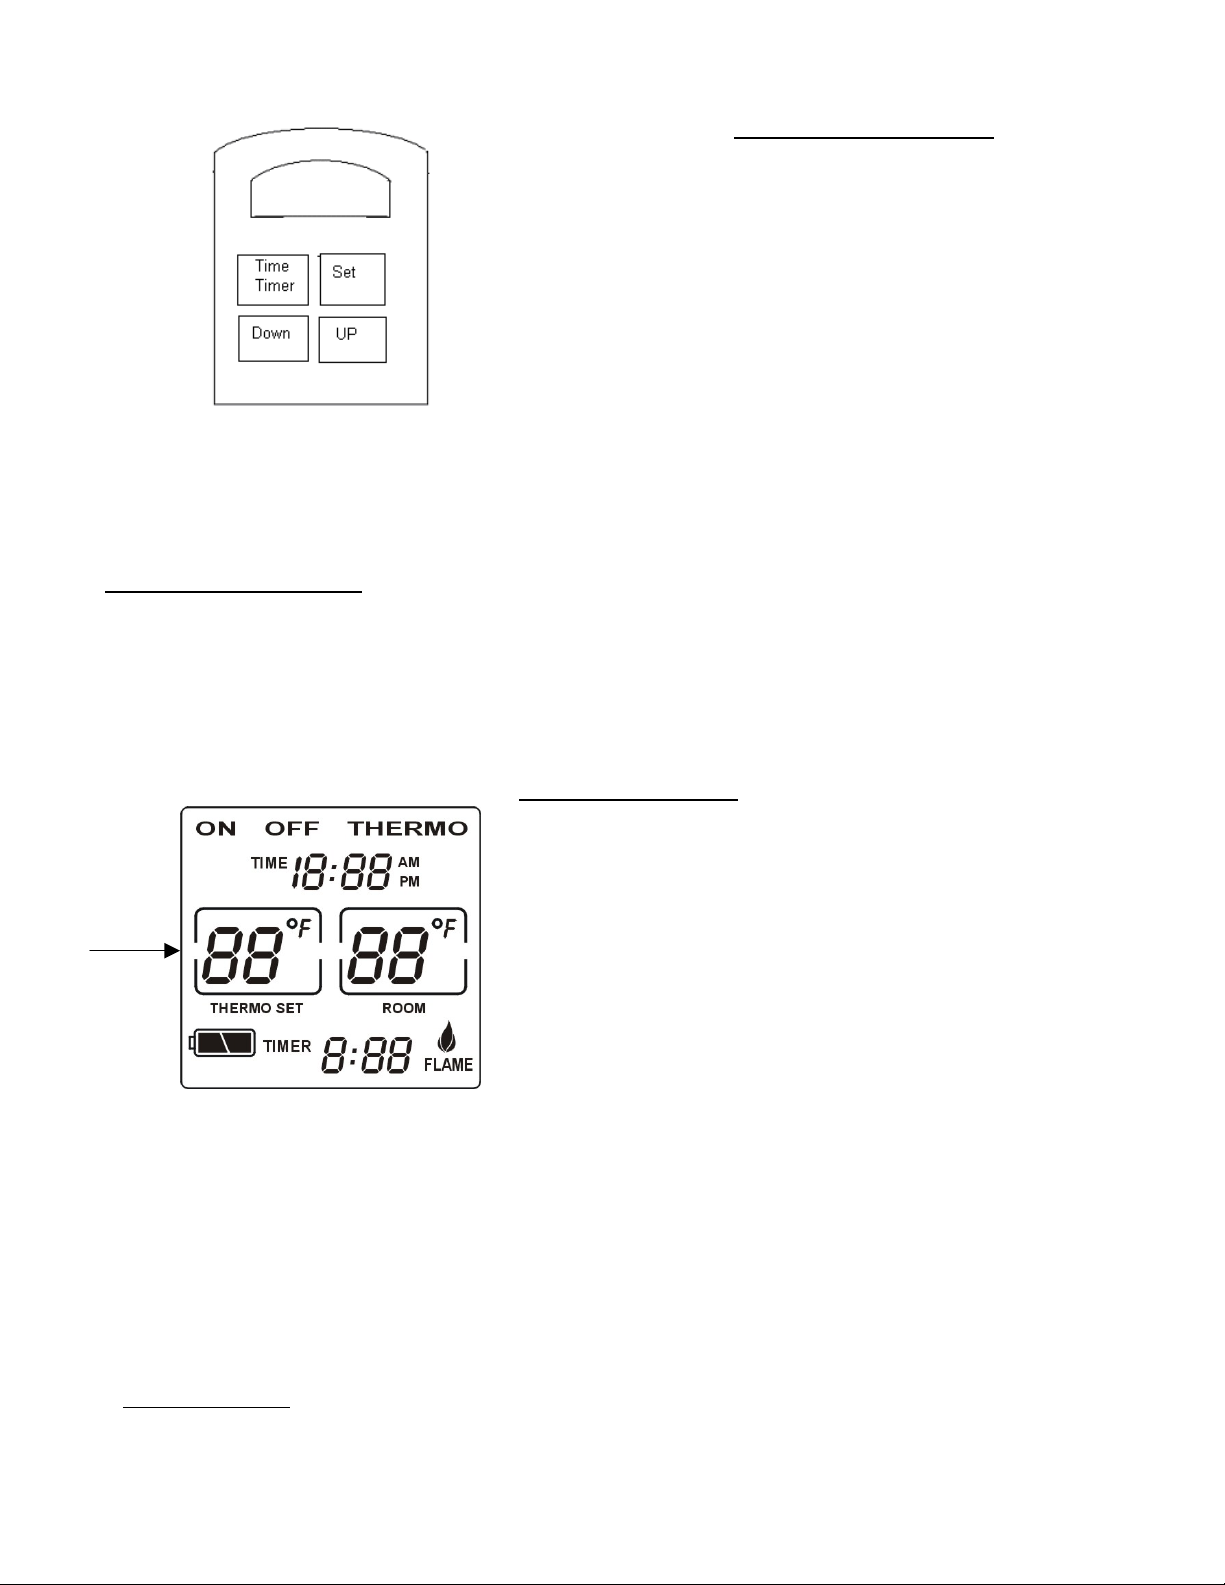
Button Functions and Settings
m
MODE
Depress the TIME/TIMER button for three seconds and
the TIME icon flashes.
• Set hour by pressing the UP or DOWN button to set the
hour in AM or PM.
• With hour set to desired setting, press the TIME-TIMER
button a second time until the minute icon flashes.
• Set minutes by pressing the UP or DOWN button to set the
minutes.
• Press SET button , the time icons will stop flashing to
indicate the time has been correctly programmed.
Fahrenheit / Celsius settings. The transmitter is set at the factory to Fahrenheit. Press and hold both UP & DOWN buttons at the
same time to change to Celsius setting. Repeat this procedure to change back to Fahrenheit. When making these changes, the SET
icon will return to the lowest temperature setting ( 45 F or 6 C ). NOTE: Maximum Fahrenheit setting is 99 degrees and the
maximum setting for Celsius is 32.
Setting the Timer: To use the countdown timer function, the transmitter must be in the ON or THERMO setting. When first
using this function, set the timer for 15 minutes. The timer should count down to zero and the appliance should return to the OFF
setting. The minutes are shown next to the TIMER icon. To restart the system, reset TIMER to desired minutes or turn to the
ON setting. NOTE: If the transmitter fails to function, check placement and condition of batteries in both transmitter and
receiver.
Set Room Temperature: To set temperature function, the transmitter must be
in the THERMO mode with the THERMO icon displayed on the screen. The
system will function thermostatically when set in this mode. To set this
function, press the MODE button until the THERMO icon appears. Press the
UP or DOWN buttons until the temperature setting appears in the thermo set
box.
When the THERMO feature is programmed, the transmitter operates the
appliance and cycles the appliance when the room temperature varies more
than two degrees. The unit will typically cycle 2-5 times per hour. The syste
in factory is set to thermostatically, change the temperature setting when the
room temperature varies more than two degrees F or one degree C.
NOTE: When using the transmitter in the THERMO mode, care should be
taken to keep the transmitter away from direct heat sources such as direct
sunlight, heat ducts or fireplaces that could affect the temperature diode in the
transmitter. An incorrect temperature reading could result from exposure to
these other heat sources.
3
Page 4

Batteries: The Avanti remote control system uses four AA (1.5V) alkaline batteries in the receiver and two AAA (1.5V) alkaline
b
atteries in the transmitter. Always use alkaline batteries for maximum performance and battery life. If the system begins to operate
at a reduced distance, weak batteries may be the problem. Replace batteries in both receiver and transmitter and retest. Another
cause of poor performance could be the length of wire between the gas valve and the receiver box. A longer wire lead causes a drop
in voltage and could affect the system. Never exceed appliance manufactures recommendations on wire length. It is recommended
that the 18 inch wire lead furnished with the system be used.
LOW Battery Indicator:
(normally 1-2 weeks). An improperly installed battery will not work. Check battery placement.
Childproof Safety Feature: This feature allows the user to disable the unit when desired. The CP setting is activated by holding
the TIME/TIMER and the UP function buttons down at the same time for a minimum of four seconds. When properly activated,
CP will appear in the ROOM box on the LCD screen. To eliminate the childproof feature, hold the TIME/TIMER and UP buttons
down again and the letters will disappear. The unit should be in normal operating mode at this time.
Receiver Box
The receiver box operates on four AA alkaline batteries (1.5 V ea.) included with the system. The operating code
for the transmitter and receiver must be set to the same letter in order for the system to work. NOTE: Always make
sure batteries are new or are properly charged for maximum performance.
Important:
exposure to temperatures above this will damage the receiver and shorten battery life.
Receiver Box Installation: The receiver box may be installed adjacent to the appliance or in a wall box. A wall
mount application is preferable due to high temperature produced by the gas appliance. It is extremely important to
locate the receiver so that the electronic components do not overheat. Temperatures in excess of 130 degrees F can
damage the receiver and shorten battery life. Make sure that the receiver is in the OFF position before installation.
Setting Receiver Code:
used. To set the code, check the code setting on the Avanti transmitter being used. Locate the code switch on the
top of the receiver housing. Using a small slotted screwdriver, turn the codeswitch in the receiver box in a
clockwise rotation until the indicator matches the letter setting on the transmitter. NOTE: Never use two or more
remote systems set to the same operating code in a dwelling. This could cause an inadvertent start up of a gas
appliance and create a fire hazard. If more than one remote is used in a dwelling, set each system (transmitter &
remote) to a different matching code.
Wall Mount– Before starting; make sure the remote receiver is in the OFF position. When mounting the receiver in
a wall mount application, never use a metal electrical box which may cause interference with the RF transmission.
A plastic electrical box (18 cubic inches min.) works best. Metal electrical boxes may interfere with the remote
operation. Use an uncut length of 18 gauge two-stranded wire no more than 20 ft. in length. Attach the male end of
the 18-inch wire connector to the receiver box. Clip the female plug and strip the tow leads to an appropriate length.
Strip the ends of the length of wire from the gas valve and secure with appropriate and sized wire nuts and secure
making sure to leave sufficient wire to remove the receiver from the electrical box if necessary. Attach the opposite
end of the wire length to the gas valve. The receiver should be mounted with the word “TOP” at the top of the
electrical box. Insert two screws (included) in the slots at the top and bottom of the receiver and attach to the
electrical box. Install the white switch plate cover with the ON function at the top. Using the two white screws
included, attach the cover to the receiver and install the white slide knob. The proper position for the receiver will
have the ON function at the top and the OFF position at the bottom. The low battery light (LED) will be located at
the bottom and show through a small hole in the switch plate cover. The low battery warning light will illuminate
when the batteries need to be replaced. NOTE: Always follow manufacturers installation instructions when
installing this product. See front cover plate and receiver box illustration below.
Do not install the receiver box where ambient temperatures will exceed 130 degrees F. Prolonged
The low battery icon will be visible when the transmitter batteries become weak and need replacement
Installation Instructions
The receiver box transmission code must be set to the same letter as the transmitter being
4
Page 5

p
Hearth Mount:
panel on certain appliances. Position the receiver where the ambient temperatures do not exceed 130 F or
damage to the electronic components could not occur. Battery life will be shortened if the receiver is
exposed to extreme heat for long periods of time. After installing the batteries into the receiver, attach the
front slide plate (with the LED light showing through the plate). Mount the black slide button and attach
the receiver box using the Velcro included in the package.
Wiring for Milivolt Valve Systems
The receiver may be mounted underneath the fireplace, on the hearth or behind the access
The receiver box is connected to the millivolt
valve using the terminals marked TH on the
valve terminal block. Using the 18” wiring
rovided in the package, attach one spade clip to
the terminal and use the other to the TH/TP
terminal. It makes no difference which wire is
attached to the specific terminals. Take the male
end (the opposite of the spade clips attached to
the valve) and insert it into the female connector
on the receiver box. Make sure the valve and the
receiver are in the OFF positions when
connecting the wiring. Refer to the Hearth
Mount or Wall Mount sections for further
instructions on locating the receiver box (see
Wiring for Electronic Spark Ignition Systems
Caution: Disconnect power source before installing
system into 110/120 VAC appliance. To install system
into an electronic ignition unit, cut spade clip from one
wire lead furnished, strip to ¼ in. and attach to the
transformer hot wire (strip & wire nut as necessary).
Attach the other wire from the receiver to the TH
connection on the ignition module. Attach the TR
(neutral) connection from the 24 VAC transformer and
attach the ignition nodule. Check all wire connections
before turning power back on to the system.
5
Page 6

Checking the System
Milivolt Valve Systems
Following the manufacturers lighting instructions included with the appliance, light the appliance. Make sure
the pilot flame is lit and burning properly. Proper operation of the pilot assembly is necessary for the unit to
function. Always wear safety glasses and gloves when working on gas appliances.
Locate the small slide button on the front of the receiver. Move this button to the ON position. This should
open the main or burner flame and the unit should light. Be aware that the main burner often lights abruptly.
Locate the OFF position on the receiver (the sequence on the receiver is OFF-REMOTE-ON). By pushing
the button to the OFF position, the burner flame should be extinguished but the pilot flame will continue to
burn.
Move the button to the center REMOTE position. Press the MODE button on the transmitter to the ON
position and the appliance should light. Upon initial use or long periods of inactivity, the user may need to
depress the ON button for three-four seconds to initialize the receiver.
Press the MODE button on the transmitter until OFF appears on the LCD screen and burner should extinguish
but the pilot still burns.
Press the MODE button until THERMO appears on the screen. Press the UP button and advance the
temperature to a minimum of three degrees above the ROOM temperature showing on the LCD screen.
When programmed in the manual setting, the thermostatic function is bypassed and the appliance should
ignite the main burner. Press the DOWN button to three degrees below ROOM temperature and the
appliance burner should extinguish but the pilot remains on. When placed in this setting, the appliance
should cycle thermostatically as the ROOM temperature changes. This will normally occur every three-five
minutes as the temperature reading varies by more than two degrees.
Electronic Ignition Systems
Consult appliance manufacturers manual for proper lighting procedures and wiring connections.
Move the slide button to the ON position to start ignition sequence and light the appliance.
Place the slide in the OFF position and the unit should extinguish.
Move button to REMOTE setting and push MODE button on transmitter until the ON icon appears. The
ignition sequence should begin and the unit should light. NOTE: Some appliances have a 5-7 second delay
before the ignition sequence starts and the burner lights. Follow manufacturers lighting instructions.
Push the MODE button on the transmitter to the OFF position appliance should shut down.
Press the MODE button to the THERMO setting. Press the UP button and advance the temperature to a
minimum of three degrees above the ROOM temperature showing on the LCD screen. When programmed in
the manual setting, the thermostatic function is bypassed and the appliance should ignite the main burner.
Press the DOWN button to three degrees below the ROOM temperature and the appliance burner should
extinguish the burner flame. When placed in this setting, the appliance should cycle thermostatically as the
ROOM temperature varies. This will normally occur every three-five minutes as the room temperature varies
by more than two degrees.
WARNING
Before attempting to install this remote control system, read all installation instructions thoroughly. This
system must be installed precisely as outlined in this installation guide. Any changes or modifications to the
Avanti remote control system will void the warranty and could create a fire hazard. Always follow the gas
appliance manufacturers installation manual when installing this product, including wiring diagrams,
wiring for electronic modules, placement of wires and operation of the appliance when using a remote.
Never connect this remote system to 110/120 VAC power. These diagrams are for purposes of illustration
only. Avanti Hearth Products assumes no liability for improper installation or use of this product.
Troubleshooting
Symptom Possible Cause Remedy
Appliance does not start when ON Transmitter & receiver not set to Make sure both transmitter &
button is pushed same operating code receiver codes match
6
Page 7

Wiring or electrical connections Check owners manual for the
Not correct appliance wiring. If the unit
starts when receiver is in the ON
position, wiring is no problem.
Transmitter too far from receiver Move transmitter closer to receiver
Receiver located in metal enclosure Move receiver to non-metal enclosure
Batteries installed wrong or weak Check placement & power of batteries in the transmitter or receiver install new alkaline batteries
Receiver has excessive wire lead to make sure wire is proper length-check
Appliance (over 20’) manufacturers installation manual
Low battery light on Batteries need to be replaced Install new alkaline batteries
LCD does not show icons Check battery placement Install batteries in their proper position
Thermo feature does not work Improper setup of transmitter Check manual & reset transmitter
Transmitter slow to respond upon Temperature differentiation Allow the transmitter to acclimate to the
initial set up Room temperature
Battery icon flashes Low battery Change batteries
Components
Transmitter ------------------1
Hardware Package- ---------1
Installation Instructions -----1
Receiver box ----------------1
White Switch Plate Cover---1
Black Cover plate- ---------1
White Slide Button-----------1
Black Slide Button ---------1
AA (1.5V) batteries- --------4
7
Page 8

AAA 1.5V battery ------------------2
Velcro package -------------1
Limited Warranty
The Avanti REMOTE CONTROL SYSTEM is warranted for a period of seven years from the date of
purchase or installation date to the original purchaser to be free from any defects in workmanship or
materials. Any damage to this SYSTEM resulting from improper installation, abuse, neglect or accident
performed by the owner, service company, contractor or dealer is not covered by this warranty. The
manufacturer will not be responsible for any labor costs or damage from improper installation, repair,
replacement or for any incidental or consequential damages. Batteries are not covered by this warranty nor
any damage caused by batteries. Avanti may choose to repair or replace, at their discretion, any part of
system. Shipping and handling costs are the responsibility of the purchaser. Some provinces, nations or
states do not allow exclusions or limitations of consequential or incidental damages. These limitations may
not apply. This warranty gives you specific legal rights; other rights vary by nation, province or state.
FCC & RSS Certification - The manufacturer of this product has tested this system in accordance
with FCC/RSS testing standards for RF devices. Avanti Hearth Products is not responsible for any
interference that may result from unauthorized modification of this product. Modifications to this
product may void the users authority to operate the equipment and may void the warranty.
FCC /RSS Requirements
The manufacturer is not responsible for any TV or radio interference that is caused by unauthorized
modifications to the equipment. Any modifications to this equipment may void the user’s authority
to operate this equipment.
For product inquires, information, technical service or questions about warranties, please contact:
Avanti Hearth Products, LLC Warranty cards to: P.O. Box 3765
204 South Avon Street, Suite 200 Gastonia, NC 28054
Gastonia, NC 28054 -Page (4)
Phone 704-866-4342
8
Page 9

Federal Communication Commission Interference Statement
This equipment has been tested and found to comply with the limits for a Class B digital device,
pursuant to Part 15 of the FCC Rules. These limits are designed to provide reasonable protection
against harmful interference in a residential installation. This equipment generates, uses and can
radiate radio frequency energy and, if not installed and used in accordance with the instructions,
may cause harmful interference to radio communications. However, there is no guarantee that
interference will not occur in a particular installation. If this equipment does cause harmful
interference to radio or television reception, which can be determined by turning the equipment off
and on, the user is encouraged to try to correct the interference by one of the following measures:
- Reorient or relocate the receiving antenna.
- Increase the separation between the equipment and receiver.
- Connect the equipment into an outlet on a circuit different from that
to which the receiver is connected.
- Consult the dealer or an experienced radio/TV technician for help.
FCC Caution: Any changes or modifications not expressly approved by the party responsible for
compliance could void the user's authority to operate this equipment.
This device complies with Part 15 of the FCC Rules. Operation is subject to the following two
conditions: (1) This device may not cause harmful interference, and (2) this device must accept
any interference received, including interference that may cause undesired operation.
9
 Loading...