

Page 1
Model / Modelo / Modelé: RIM49U3S-IS
INSTRUCTIONS.
Avanti has a policy of continuous improvement on its products and reserves
the right to change materials and specifications without notice.
Avanti Products LLC
www.avantiproducts.com
ICE MAKER
MAQUINA DE HACER HIELO
MACHINE A GLAÇONS
INSTRUCTION MANUAL
MANUAL DE INSTRUCCIONES
MANUEL D’INSTRUCTIONS
BEFORE USE, PLEASE READ AND FOLLOW ALL SAFETY RULES AND OPERATING
P.O. Box 520604
Miami, FL 33152
1
Page 2

TABLE OF CONTENTS
Appliance Safety
3
Important Safeguides
4
Electrical Connection
5
Help Us Help You
6
Parts and Features
7
Important Safety Instructions
8
Installation Instructions
8
Before Using Your Appliance
8
Installation of Your Appliance
9 -13
Operating Your Appliance
14 – 16
How Your Appliance Makes Ice
17
Care and Maintenance
18 – 21
Troubleshooting Guide
22 – 23
Service for Your Appliance
24
Wiring Diagram
24
Your Avanti Products Warranty
25
Instrucciones en Español
26 – 45
Instructions en Français
46 - 69
Registration Information and Registration Card
Last page
2
Page 3
APPLIANCE SAFETY
Your safety and the safety of others are very important.
We have provided many important safety messages in this manual and on your
appliance. Always read and obey all safety messages.
Warning means that failure to heed
personal injury, or death.
Caution means that failure to heed
or property or equipment damage.
All safety messages will alert you to what the potential hazard is, tell you how to
are not followed.
This is the Safety Alert Symbol. This
symbol alerts you to potential
hazards that can kill or injure you
and others.
All safety messages will follow the
Safety Alert Symbol and either the
wards” DANGER”, “WARNING” or
“CAUTION”.
Danger means that failure to heed
this safety statement may result in
reduce the chance of injury, and let you know what can happen if the instructions
severe personal injury or death.
this safety statement may result in
extensive product damage, serious
this safety statement may result in
minor or moderate personal injur y,
PROP. 65 WARNING FOR CALIFORNIA RESIDENTS
WARNING:
Cancer And Reproductive Harm
www.p65warnings.ca.gov
3
Page 4
IMPORTANT SAF EGUARDS
Before the beverage cooler is used, it must be properly positioned and installed
Plug into a grounded 3-prong outlet, do not remove grounding prong, do not use an adapter, and do
in this material. All other servicing should be referred to a qualified technician.
• Use two or more people to move and install the appliance. Failure to do so can result in back or
• Do not use this apparatus for other than its intended purpose.
as described in this manual, so read the manual carefully. To reduce the risk of
fire, electrical shock or injury when using the beverage cooler, follow basic
precautions, including the following:
·
not use an extension cord
• Replace all panels before operating
• It is recommended that a separate circuit, serving only your beverage cooler, be provided. Use
receptacles that cannot be turned off by a switch or pull chain
• Never clean appliance parts with flammable fluids. These fumes can create a fire hazard or
explosion. And do not store or use gasoline or other flammable vapors and liquids in the vicinity of
this or any other appliance. The fumes can create a fire hazard or explosion.
• Before proceeding with cleaning and maintenance operations, make sure the power line of the unit
is disconnected.
• Do not connect or disconnect the electric plug when your hands are wet
• Unplug the appliance or disconnect the power before cleaning or servicing. Failure to do so can
result in electrical shock or death.
• Do not attempt to repair or replace any part of your appliance unless it is specifically recommended
other injury.
• To ensure proper ventilation for your appliance, the unit must be completely unobstructed. Choose a
well-ventilated area with temperatures above 55
be installed in an area protected from the elements, such as wind, rain, water spray or sunlight.
• The appliance should not be located next to ovens, grills or other sources of high heat.
• The appliance must be installed with all electrical, water and drain connections in accordance with
state and local codes. A standard electrical supply (115 V AC only, 60 Hz), properly grounded in
accordance with the National Electrical Code and local codes and ordinances is required.
• Do not kink or pinch the power supply cord of the appliance.
• The fuse (or circuit breaker) size should be 15 amperes.
• It is important for the appliance to be leveled in order to work properly. You may need to make
several adjustments to level it.
• All installation must be in accordance with local plumbing code requirements.
• Make certain that the pipes are not pinched or kinked or damaged during installation.
• Check for leaks after connection.
• Never allow children to operate, play with or crawl inside the appliance
• Do not use solvent-based cleaning agents or abrasives on the interior. These cleaners may damage
or discolor the interior.
0
F (130C) and below 900F (32 0C). This unit must
4
Page 5

Electrical Connecti on
~Warning~
Improper use of the grounded plug can result in the risk of electrical shock. If the power cord
is damaged, have it replaced by an authorized Avanti Products service center.
This appliance should be properly grounded for your safety. The power cord of this
prong plug which mates with standard three
Do not under any circumstances cut or remove the third ground prong from the
p the plug firmly
a qualified electrician or service technician install an outlet near the appliance.
Ø EXTENSION CORD
Because of potential safety hazards under certain conditions, it is strongly
outlet and that the electrical rating of the cord be 115 volts and at least 10 amperes.
Ø SURGE PROTECTOR
Most electrical appliances use a series of electric control boards to operate. These
licensed electrician in your area.
Damages due to power surges are not considered a manufacturer covered defect
and will void your product warranty.
appliance is equipped with a threeprong wall outlets to minimize the possi bil i ty of electrical shock.
power cord supplied.
This appliance requires a standard 115Volts~/60Hz electrical outlet with three-prong
ground.
The cord should be secured behind the appliance and not left exposed or dangling to
prevent accidental injury.
Never unplug the appliance by pulling the power cord. Always gri
and pull straight out from the receptacle.
Do not use an extension cord with this appliance. If the power cord is too short, have
recommended that you do not use an extension cord with this unit. However, if you
must use an extension cord it is absolutely necessary that it be a UL/CUL-Listed, 3wire grounding type appliance extension cord having a grounding type plug and
boards are very susceptible to power surges and could be damaged or destroyed.
If the appliance is going to be used in an area or if your city / country is prone to
power surges / outages; it is suggested that you use a power surge protector for all
electrical devices / appliances you use. The surge protector that you select must
have a surge block high enough to protect the appliance it is connected to. If you
have any questions regarding the type and size of surge protector needed contact a
5
Page 6
HELP US HELP YOU...
Read this guide carefully.
IF YOU NEED SERVICE
We're proud of our service and want you to
NEXT, if you are still not pleased, write all the details,
CAUTION:
It is intended to help you operate and
maintain your new appliance properly.
Keep it handy to answer your questions.
If you don't understand something or you
need more help, please call:
Avanti Customer Service
800-220-5570
Keep proof of original purchase date (such as
your sales slip) with this guide to establish
the warranty period.
THIS APPLIANCE IS NOT
DESIGNED FOR THE STORAGE
OF MEDICINE OR OTHER
MEDICAL PRODUCTS.
Write down the model and serial numbers.
You'll find them on a plate located on the rear
outside wall of the appliance.
Please write these numbers here:
__________________________________
Date of Purchase
__________________________________
Model Number
__________________________________
Serial Number
Use these numbers in any correspondence or
service calls concerning your appliance.
If you received a damaged appliance, immediately
contact the dealer (or builder) that sold you the
appliance.
Save time and money. Before you call for service,
check the Troubleshooting Guide. It lists causes of
minor operating problems that you can correct
yourself.
be pleased. If for some reason you are not
happy with the service you receive, here are
some steps to follow for further assistance.
FIRST, contact the people who serviced your
appliance. Explain why you are not pleased.
In most cases, this will solve the problem.
including your telephone number, and send it to:
Customer Service
Avanti Products
10880 NW 30 Street
Miami, FL 33172 USA
6
Page 7
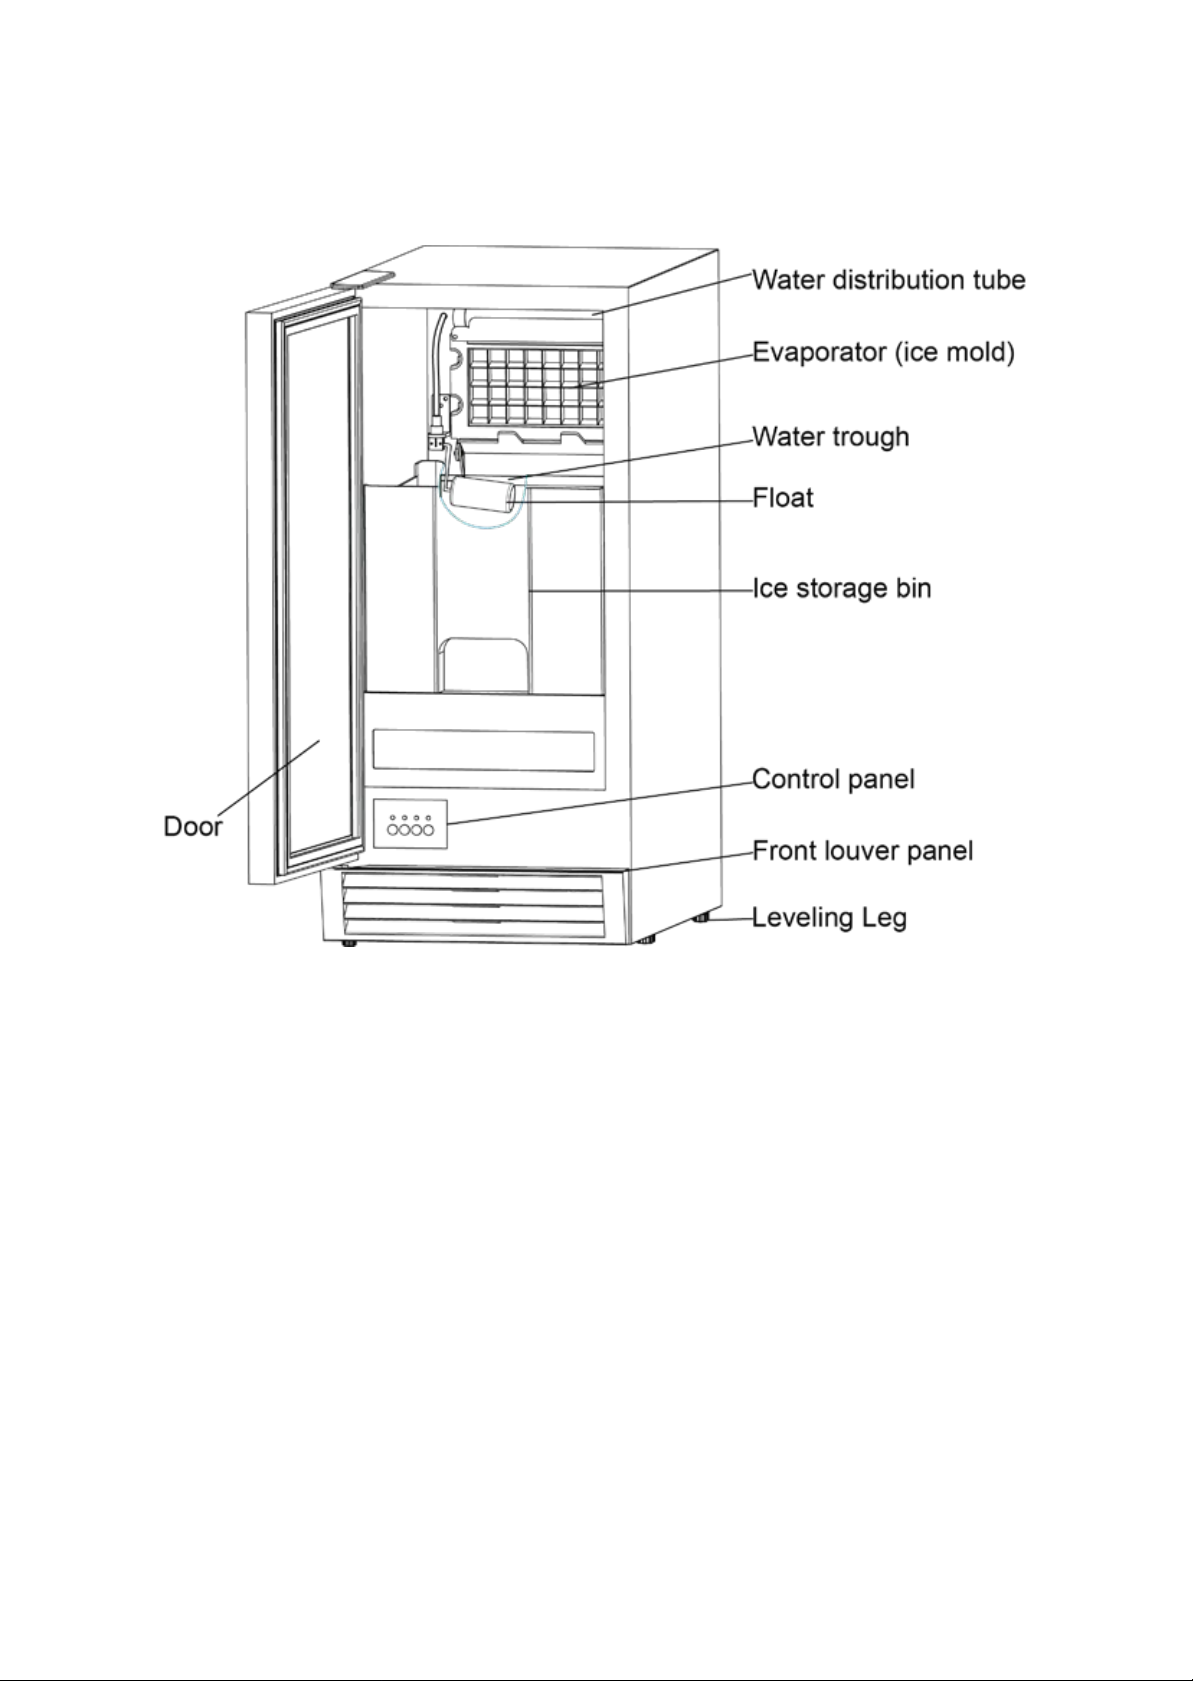
PARTS AND FEATURES
7
Page 8
FAILURE TO DO SO CAN RESULT IN BACK OR OTHER INJURY
~
~
- SAVE THESE INSTRUCTIONS -
IMPORTANT SAFETY INSTRUCTIONS
To reduce the risk of fire, electrical shock, or
injury when using your icemaker, follow these
WARNING
basic precautions:
This Unit Is For Indoor Use Only
− Read all instructions before using the icemaker.
− DANGER or WARNING: Risk of child entrapment. Child entrapment and suffocation are not problems
of the past. Junked or abandoned icemakers are still dangerous . . . even if they will “just sit in the
garage a few days”.
− Before you throw away your old icemaker: take off the doors. Leave the shelves in place so that
children may not easily climb inside.
− Never allow children to operate, play with, or crawl inside the icemaker.
− Never clean
− Do not store or use gasoline or any other flammable vapors and liquids in the vic inity of this or any other
icemaker. The fumes can create a fire hazard or explosion.
icemaker parts with flammable fluids. The fumes can create a fire hazard or explosion.
INSTALLATION INSTRUCTIONS
Before Using Your Icemaker
• Remove the exterior and interior packing.
• Check to be sure you have all of the following parts:
o 1 Ice Scoop
o 1 Water Supply Hose
o 1 Water Drain Hose
o Instruction Manual
• Before connecting the unit to the power source, let it stand upright for approxim ately 2 hours.
This will reduce the possibility of a malfunction in the cooling system from handling during
transportation.
• Clean the interior surface with lukewarm water using a soft cloth.
EXCESSIVE WEIGHT HAZARD
USE TWO OR MORE PEOPLE TO MOVE AND INSTALL THE ICEMAKER
8
Page 9
INSTALLATION OF YOUR ICEMAKER
Operation of the icemaker for extended periods outside of the normal
temperature ranges as described above may affect product performance.
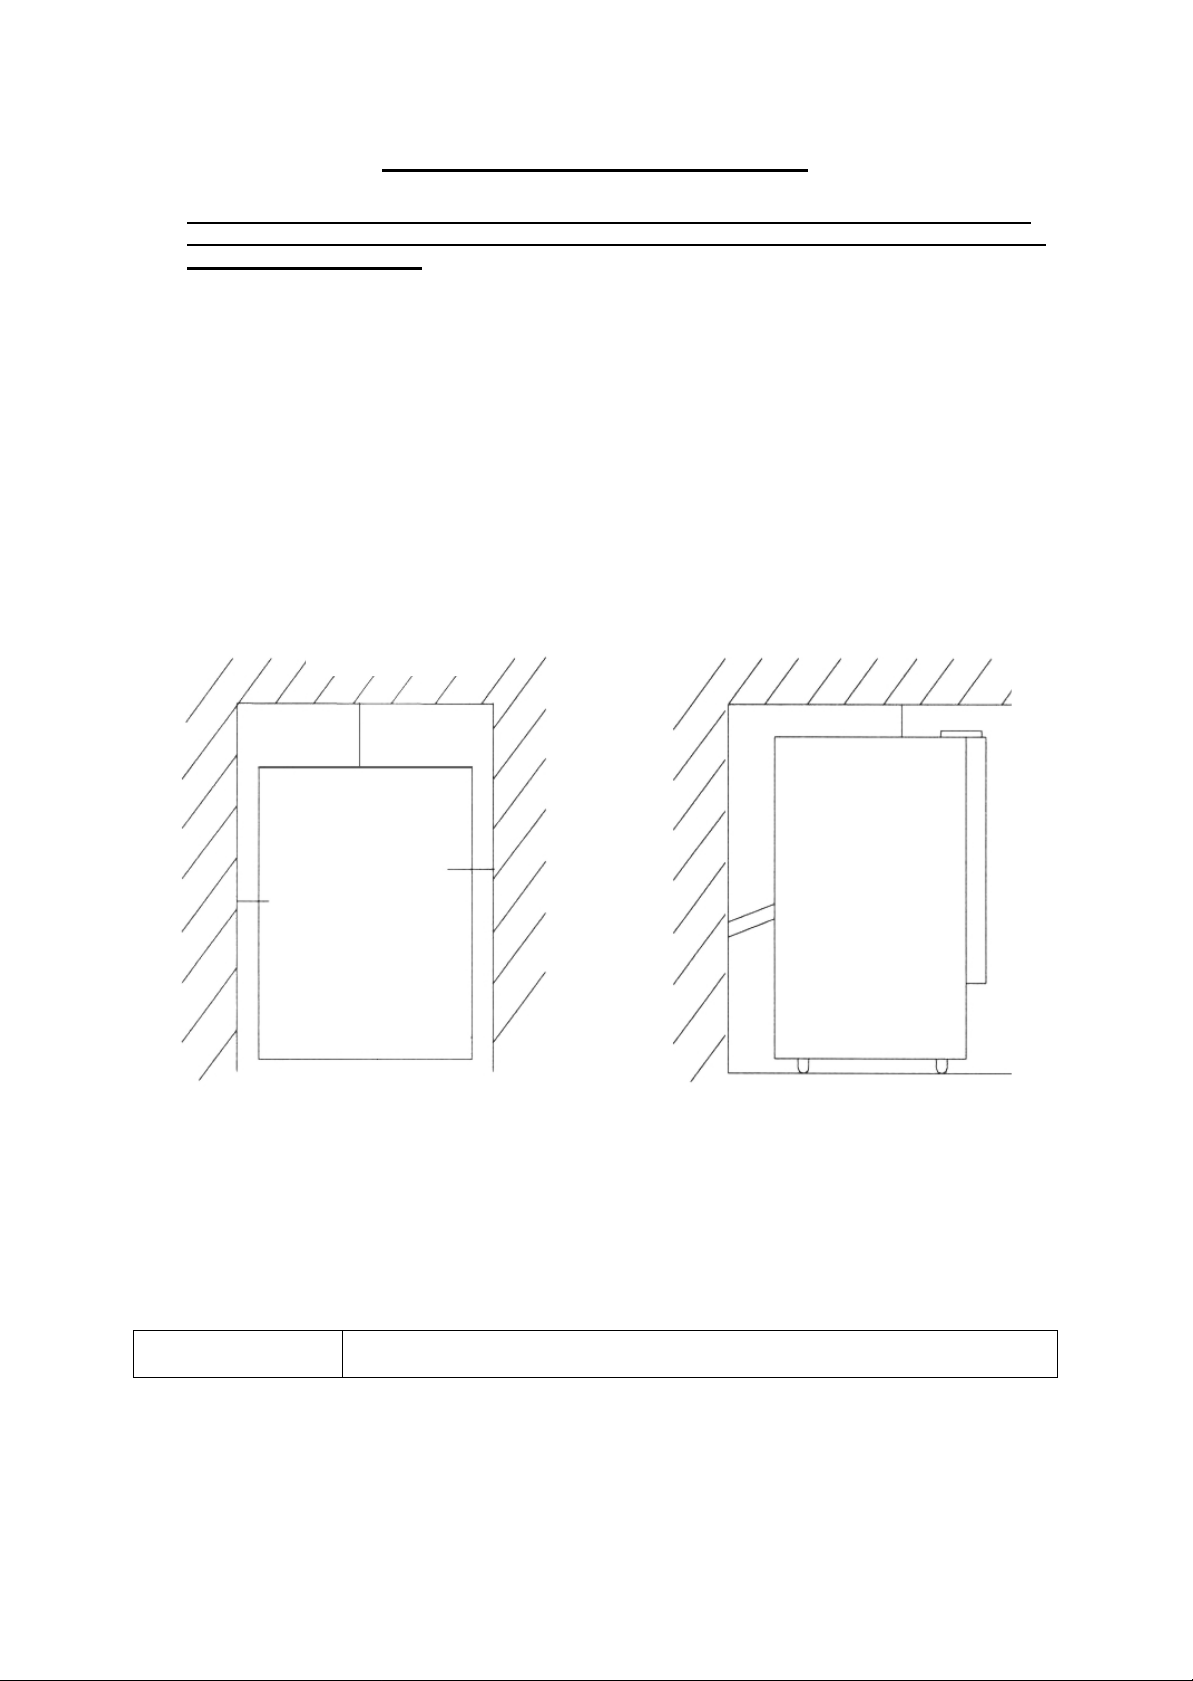
SIDE VIEW
TOP VIEW
Top of unit
Rear of unit
Front of unit
Side Side
4”
1”
1”
1”
• THIS ICEMAKER SHOULD BE PROPERLY INSTALLED BY A QUALIFIED PROFESSIONAL
This icemaker MU ST be i nst alled with electrical an d water connections in ac co rdan c e with
all state and local codes.
• Allow a minimum of 1 inch of space between the top and sides of the icemaker and a
minimum of 4 inches at the back, which allows the proper air circulation to cool the
compressor. Ensure the front of the unit is completely unobstructed.
• Place your icemaker on a floor that is strong enough to support the icemaker when it is fully
loaded. To level your icemaker, adjust the legs at the front of the icemaker.
• Locate the icemaker away from direct sunlight an d sources of heat (stove, heater , radiator, etc .).
Direct sunlight may affect the acrylic coating and heat sources may increase electrical
consumption. Extrem e cold ambient tem peratures may also cause the icemaker not to perform
properly.
• Choose a well ventilated area with temperatures above 50ºF (10ºC) and below 100ºF (38ºC).
This unit MUST be installed in an area protected from the elements.
• Avoid locating the icemaker in moist areas. Too m uch moisture in th e air will cau se frost to f orm
quickly on the evaporator requiring more frequent defrosting of the icemaker.
INSTALLATION CLEARANCES:
• The installation of this icemaker requires a cold water supply inlet of ¼” (6.35mm) soft copper tubing
with a shut off valve.
• The icemaker requires a continuous water supply with a minimum pressure of 15 psig and a static
pressure not to exceed 80 psig. The temperature of the water supply into the icemaker should be
between 41ºF (5ºC) and 90ºF (32ºC) for proper operation.
• It is strongly recommended that a water filter be used. A filter, if it is of the proper type, can remove
taste and odors as well as particles. Some water is very hard, and softened water may result in
white, mushy cubes that stick together. De-Ionized water is NOT recommended.
Warning
9
Page 10
Leveling the ice maker
down
up
It is important for the icemaker to be leveled in order to
work properly. It can be raised or lowered by rotating
the plastic sheaths around each of the four feet on the
bottom of the machine .If you find that the surface is
not level, rotate the feet until the ice maker becomes
level .You may need to make several adjustments to
level it. We recommend using a carpenter’s level to
check the machine.
1. Place a carpenter’s level on top of the product to see if
the ice maker is level from front to back and side to side.
2. Adjust the height of the feet as follows:
Turn the leveling feet to the right to lower that side of the ice maker.
Turn the leveling feet to the left to raise that side of the ice maker.
IMPORTANT: Once you are ready to install it in a cabinet or directly on the floor, you must adjust the
feet to level the ice maker. If the floor is level, just revolve the two front feet to touch the floor.
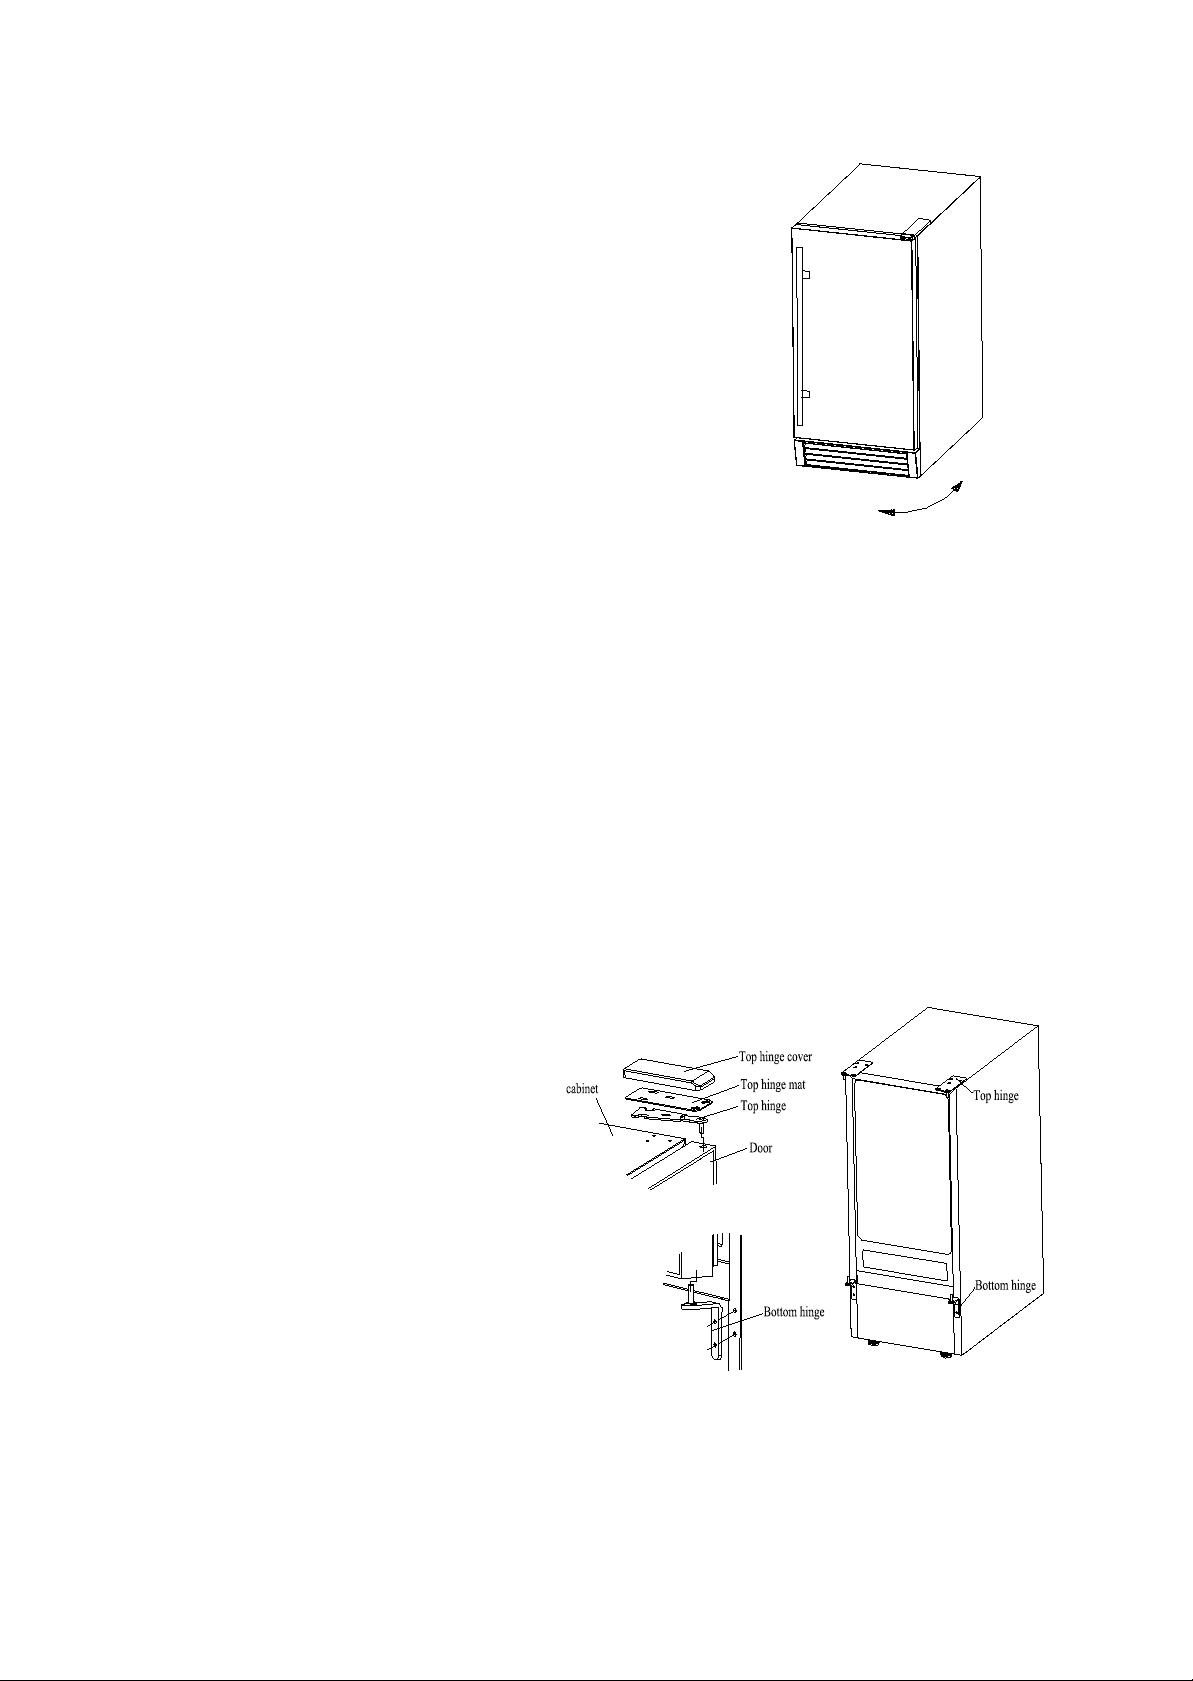
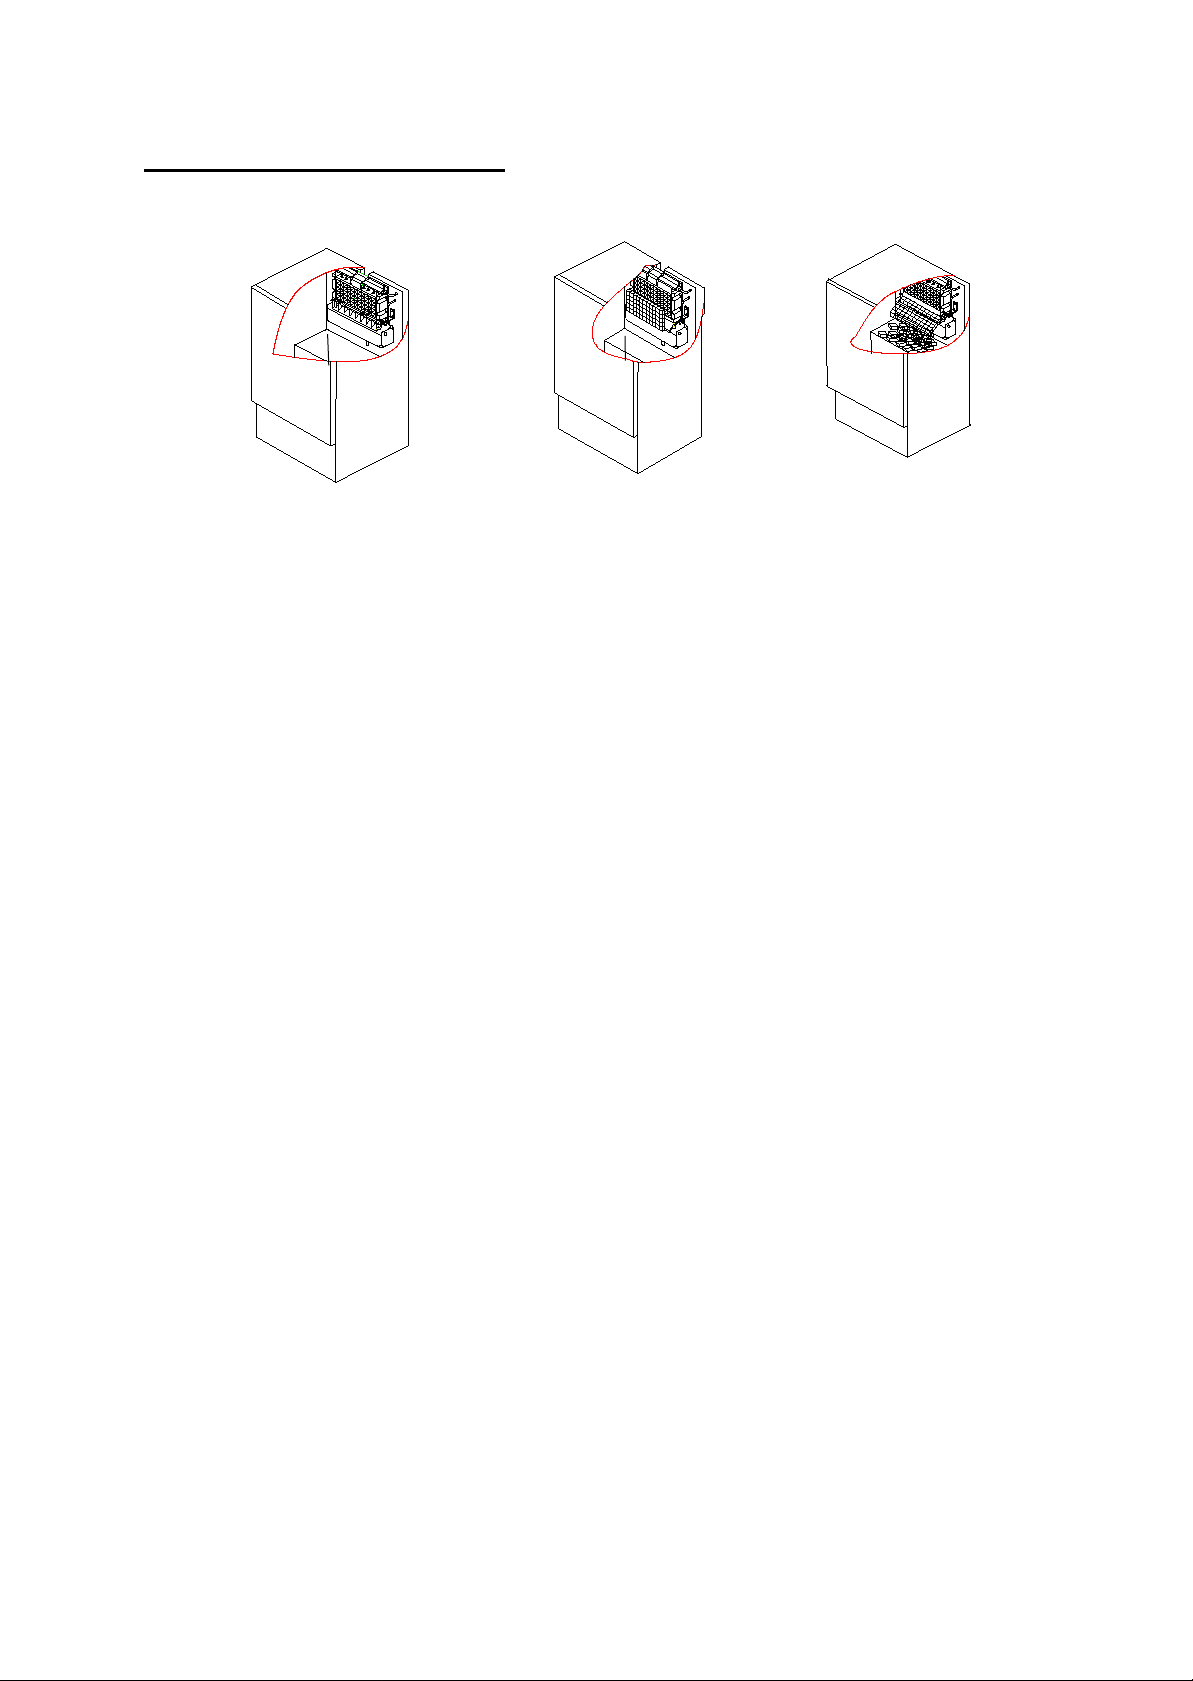
Reversing the door swing
Tools needed: Flat head screwdriver, Phillips screwdriver
IMPORTANT: Before you begin, unplug the ice maker or disconnect power.
To remove door from hinges:
1. Remove top hinge cover by pushing it toward the back of the unit, then lifting it off.
2. U sing a Phillips screwdriver, remove the screws, th en remove the top hinge mat and to p hinge.
Keep the parts together and set them aside.
3. Lift the door off of the bottom hinge and set the door aside.
To replace door on hinges:
1. Using a flathead screwdriver, remove
the plug buttons from the screw holes
opposite the door hinges, top and
bottom. Set aside.
2. Remove the front louver. Set aside.
3. Remove the bottom hinge and place it
on the opposite side at th e bott om of the
door.
4. Position the door on the bottom hinge.
5. Al ign the door on the botto m hinge and
replace the top hinge and top hinge mat.
6. Replace top hinge cover by pressing it
down over the hinge mat and then
pushing it forward.
7. Push the plug buttons into the original
screw holes.
10
Page 11
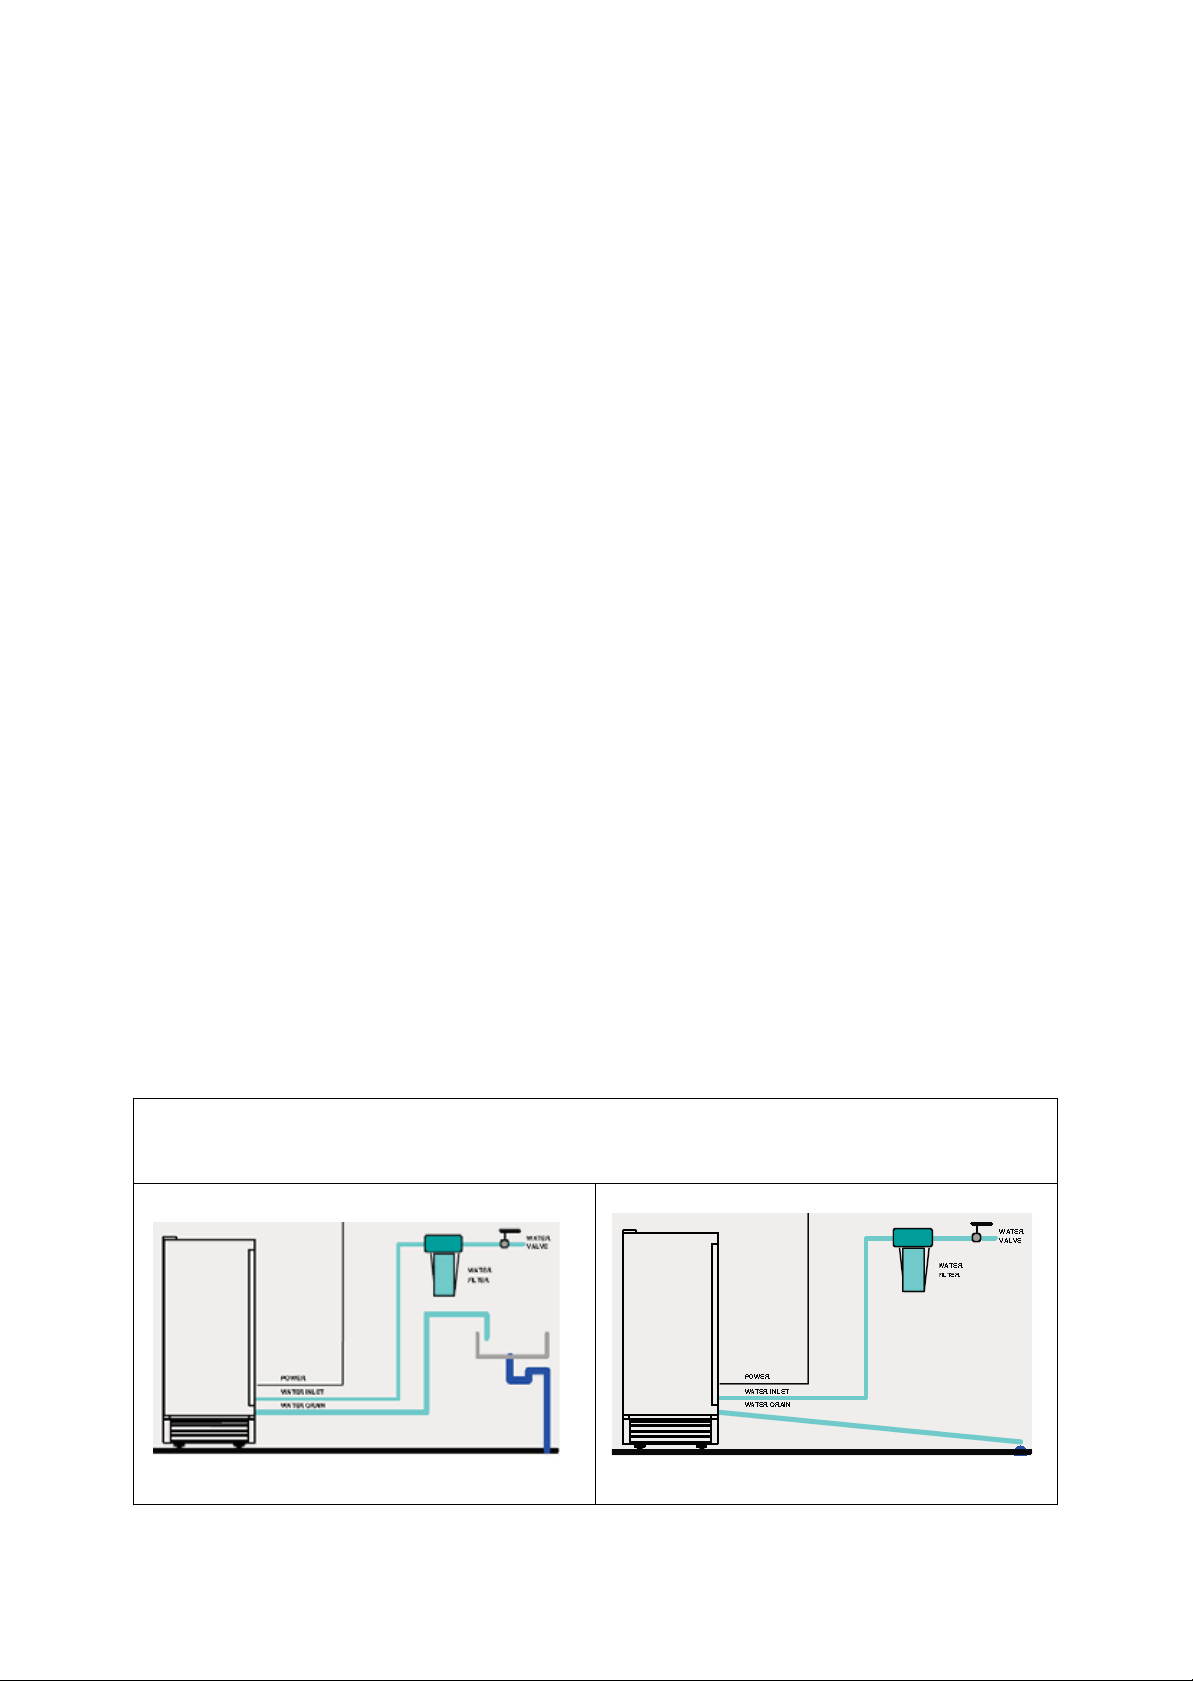
Water Supply
This unit can pump out water up to a rise of 1.5m (59”) or over a horizontal
length of 1.5m (59”).
Vertical Drain
The water supply should be ready at the point of installation. The water supply pressure should be a
minimum of 15 psig with a static pressure not more than 80 psig. (A wall outlet directly behind the ice
machine will make installation easier.)
IMPORTANT:
1. All installations must be in accordance with local plumbing code requirements. Professional
installation is recommended.
2. Make certain the hoses are not pinched or kinked or damaged during installation.
3. Check for leaks after connection.
Tools required: ½-in. open-end wrench, Philli ps scr ewdr iver
Connecting the water line:
1. Turn off main water supply. Turn on the nea rest faucet long enough to clear line of water.
2. F ind a ½-in. to ¾-in. vertical cold water p ipe near the i nstallat ion loc atio n. The d is tance sho uld b e
less than 6 feet. The water supply hose provided with the ice maker is approximately 6 feet long.
3. A s hut-off valve mus t be installed t o the main w ater suppl y. If the water p ipe has a p lain piece of
copper tubing, attach a ¼” O.D. compression union to the tubing and install the valve.
4. C onnect the nut of the water supply hose to the ta p, and connect the other end with the water
inlet. Tighten firmly by hand, then one-ha lf turn with wrenc h.
5. Turn on main water supply and tap. Check for water supply connection leaks. Tighten every
connection (including connection at the water inlet).
IMPORTANT: When you connect the water supply hose and the drain hose, pay
attention to the indications of “Water inlet” and “Drain outlet” on the machine.
Drain
You must connect the drain line before using the ice maker. Follow the steps outlined below.
There are two types of ice machine modes, one that drains by gravity and one
that has an internal drain pump.
Horizontal Drain
11
Page 12
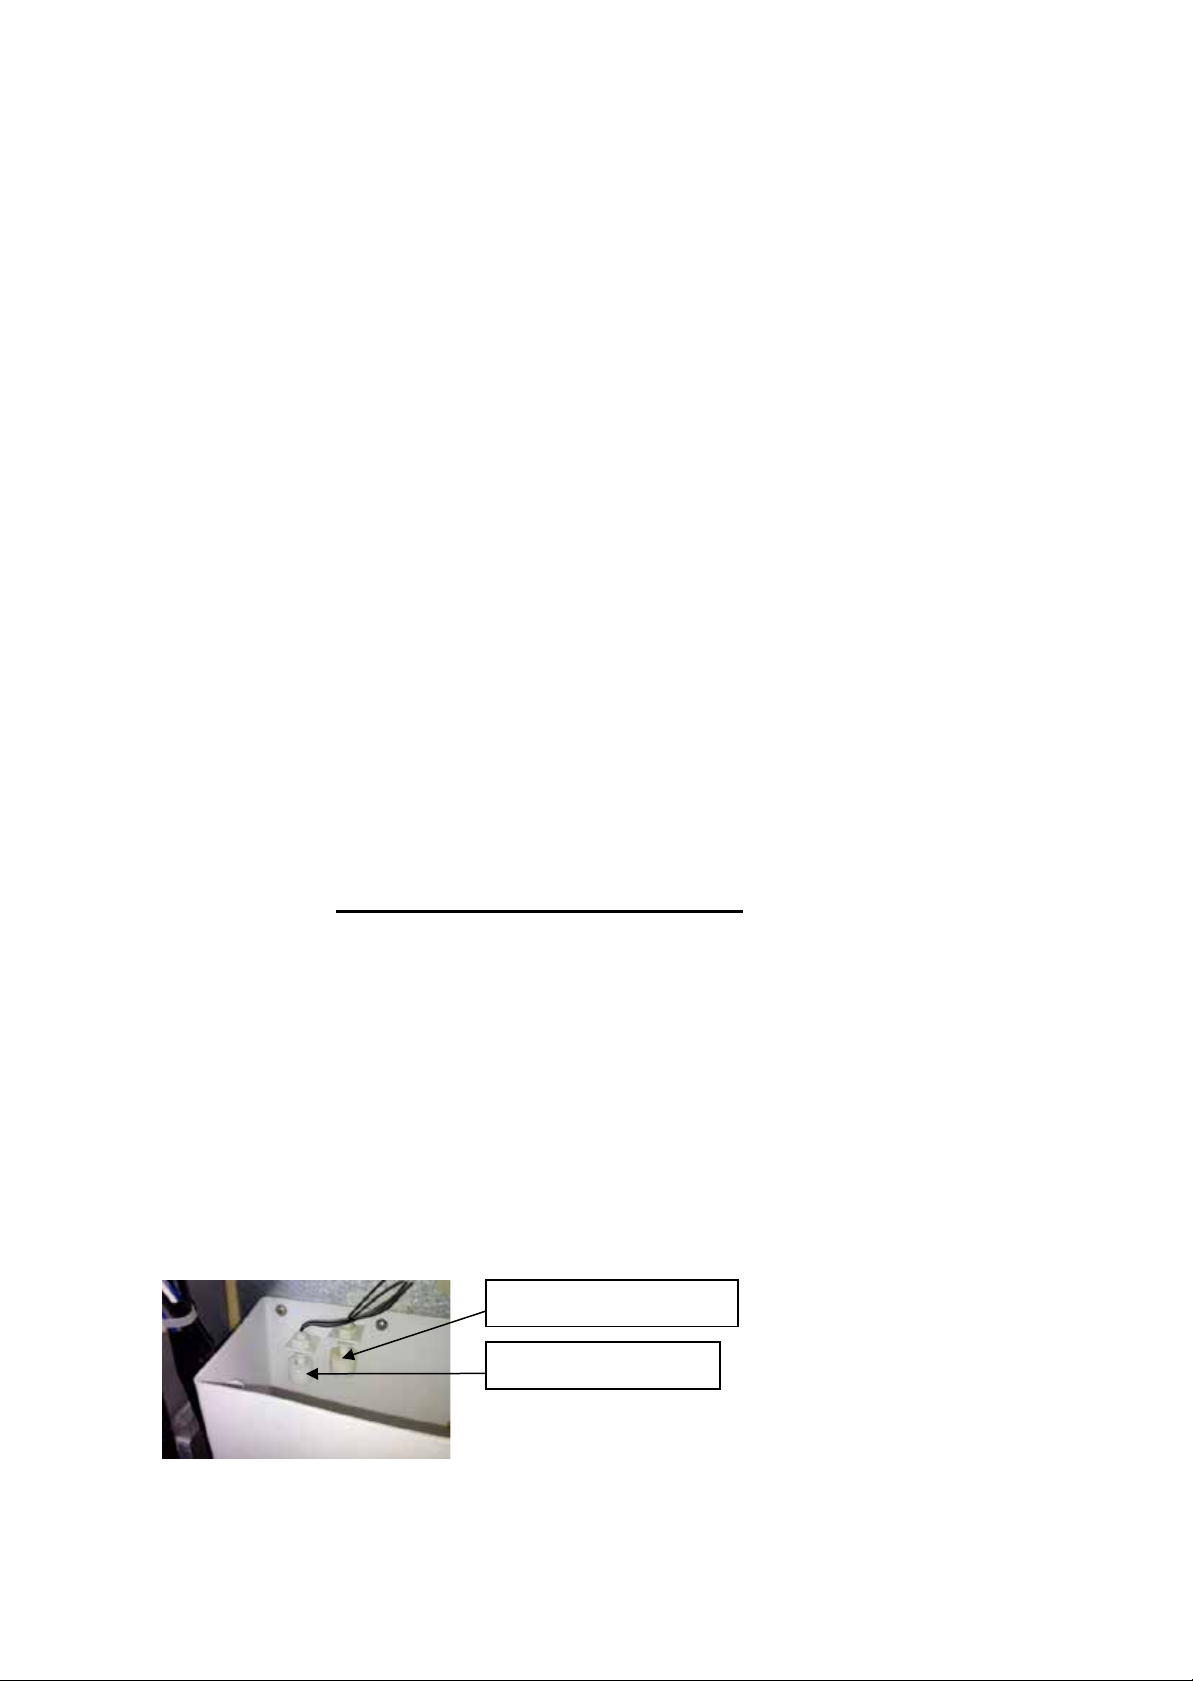
Connecting the drain line:
Water level switch 2
Water level switch 1
NOTE: If there is a drain line near the ice maker, the best choice is to drain
water to the drain line through the drain water hose provided with ice
maker.
1. Locate the floor drain near the ice maker. The distance should be less than 5 feet
since the length of the long drain water hose provided with the ice maker is about
5 feet.
2. Find the drain outlet on the back of ice maker. Connect the drain outlet to the
water draining hose, and insert the other end of the hose into the drain line.
NOTE: Never allow the drain hose to hang or loop higher than the floor of the ice
storage bin.
3. All horizontal runs of drain lines must have a fall of ¼” per foot. An air gap will
likely be required between the ice maker drain tube and the drain/waste
receptacle. A standpipe with a trap below it would be acceptable for the
drain/waste receptacle. A floor drain is also acceptable. If this is not possible, the
use of a condensate pump is recommended.
4. Pour 1 gallon of water into the ice storage bin to check for leaks in the drainage system.
Tighten any connections that leak.
IMPORTANT: This ice maker is not a freezer. Infrequent drainage
will cause a high rate of melting in the ice storage bin.
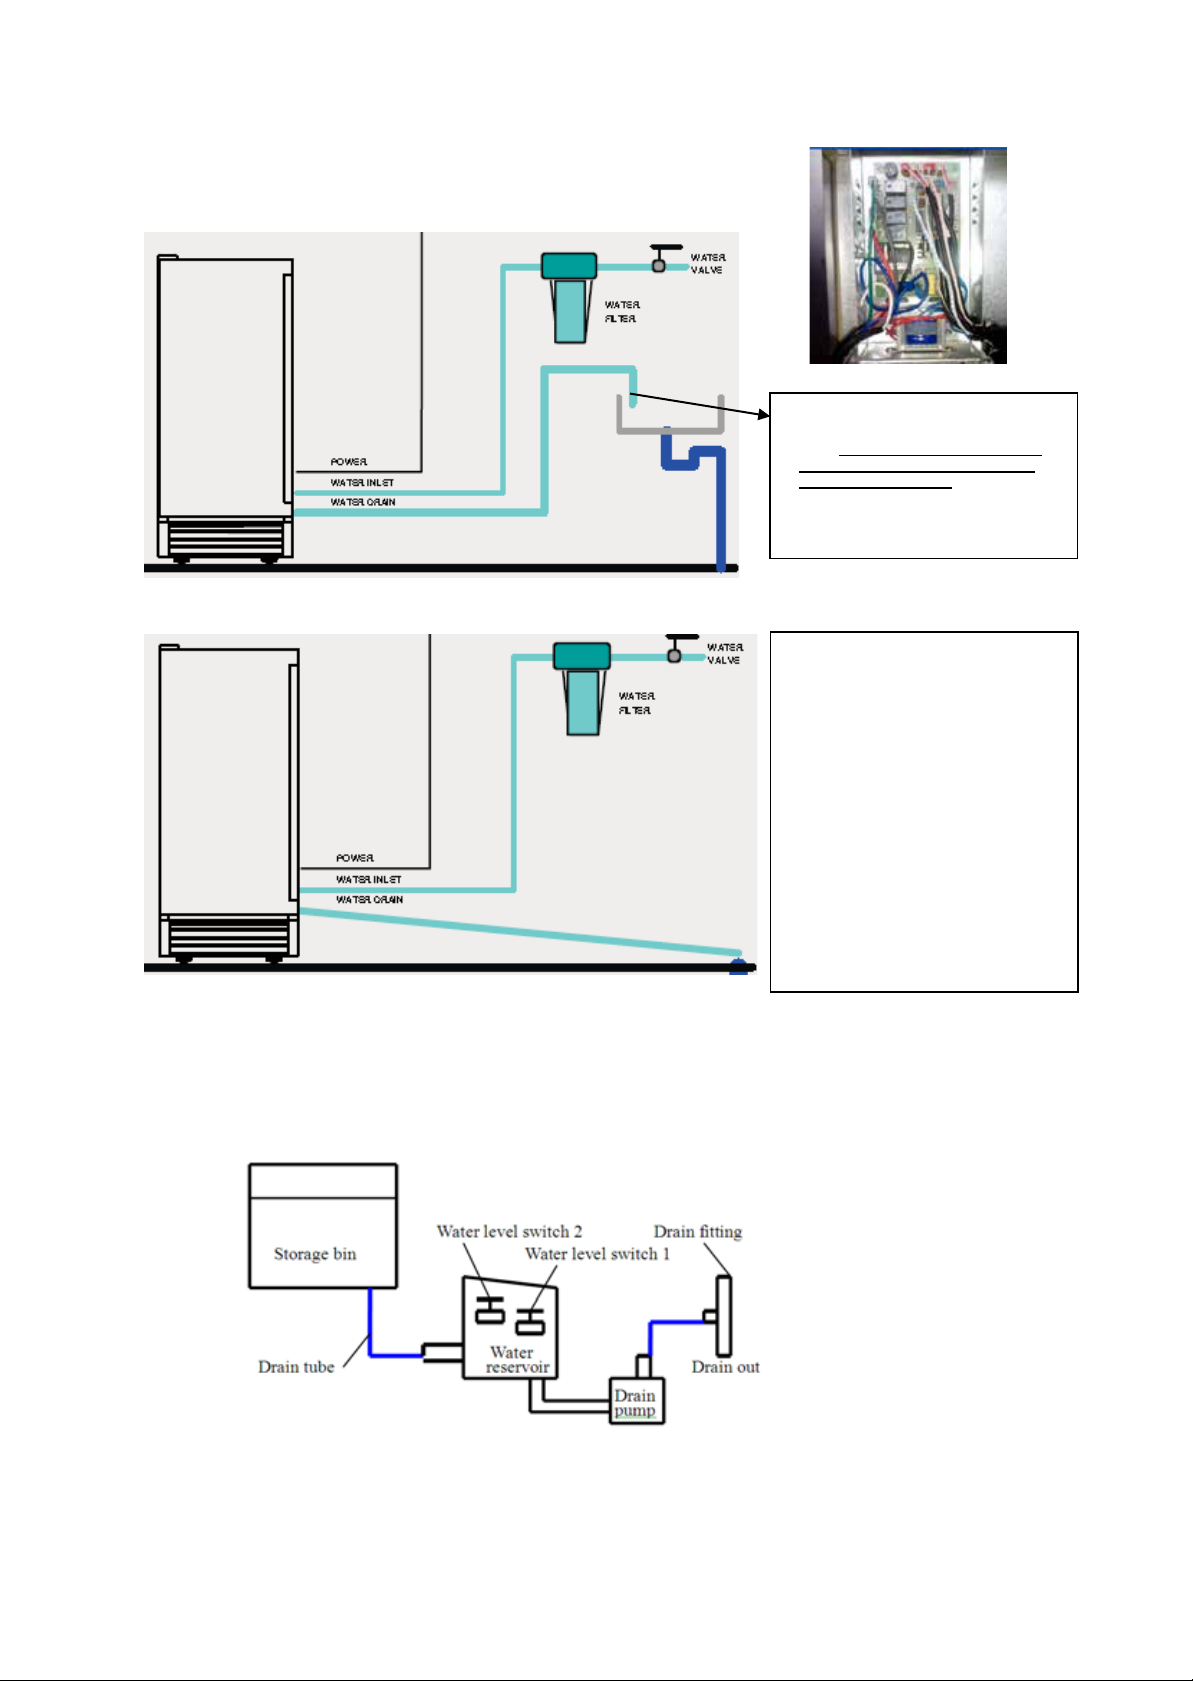
How the drain system operates when water is pumped out
The components of the Pump-Out Water Drain System are
• Water reservoir PC Board & Water level switch 1, 2
• Water Drain Pump
OPERATION
• All water coming from the overflow and the melted ice is collected in the water reservoir.
• As soon as the wate r in the rese rvoir r eaches t he max imum level , the wate r level swi tch 1
closes, transmitting a low voltage current to the PC Board.
12
Page 13
• The PC board activates the water drain pump for 20 seconds,
NOTE:
WARNING!
pumping out most of the water contained in the water reservoir.
• The water can be pumped out up a rise of to 1.5m (59”) or
over a on horizontal length of 1.5m (59”).
The outlet of the drain hose
must be raised higher than
the water surface to prevent
the drained water from
flowing back into the water
reservoir.
If alarm buzzer sounds, turn
off the ice maker and the
water supply, remove all ice
from storage bin, and wipe up
any water that may have
overflowed. Check if there is
any water in water trough at
back of unit; if no water,
drainage pump may not be
receiving the proper amount
of power. Check power
source. If the problem can be
corrected, turn on the unit
again. Also check that none
of the water lines are kinked.
If the problem remains,
contact Customer Service.
• If water level switch 2 closes, transmitting a low-voltage
current to the PC board, the PC board activates the
buzzer alarm, informing you that the drain pump, water
level switch or drain tube may be malfunctioning.
Schematic Diagram
13
Page 14
OPERATING YOUR ICEMAKER
+
_
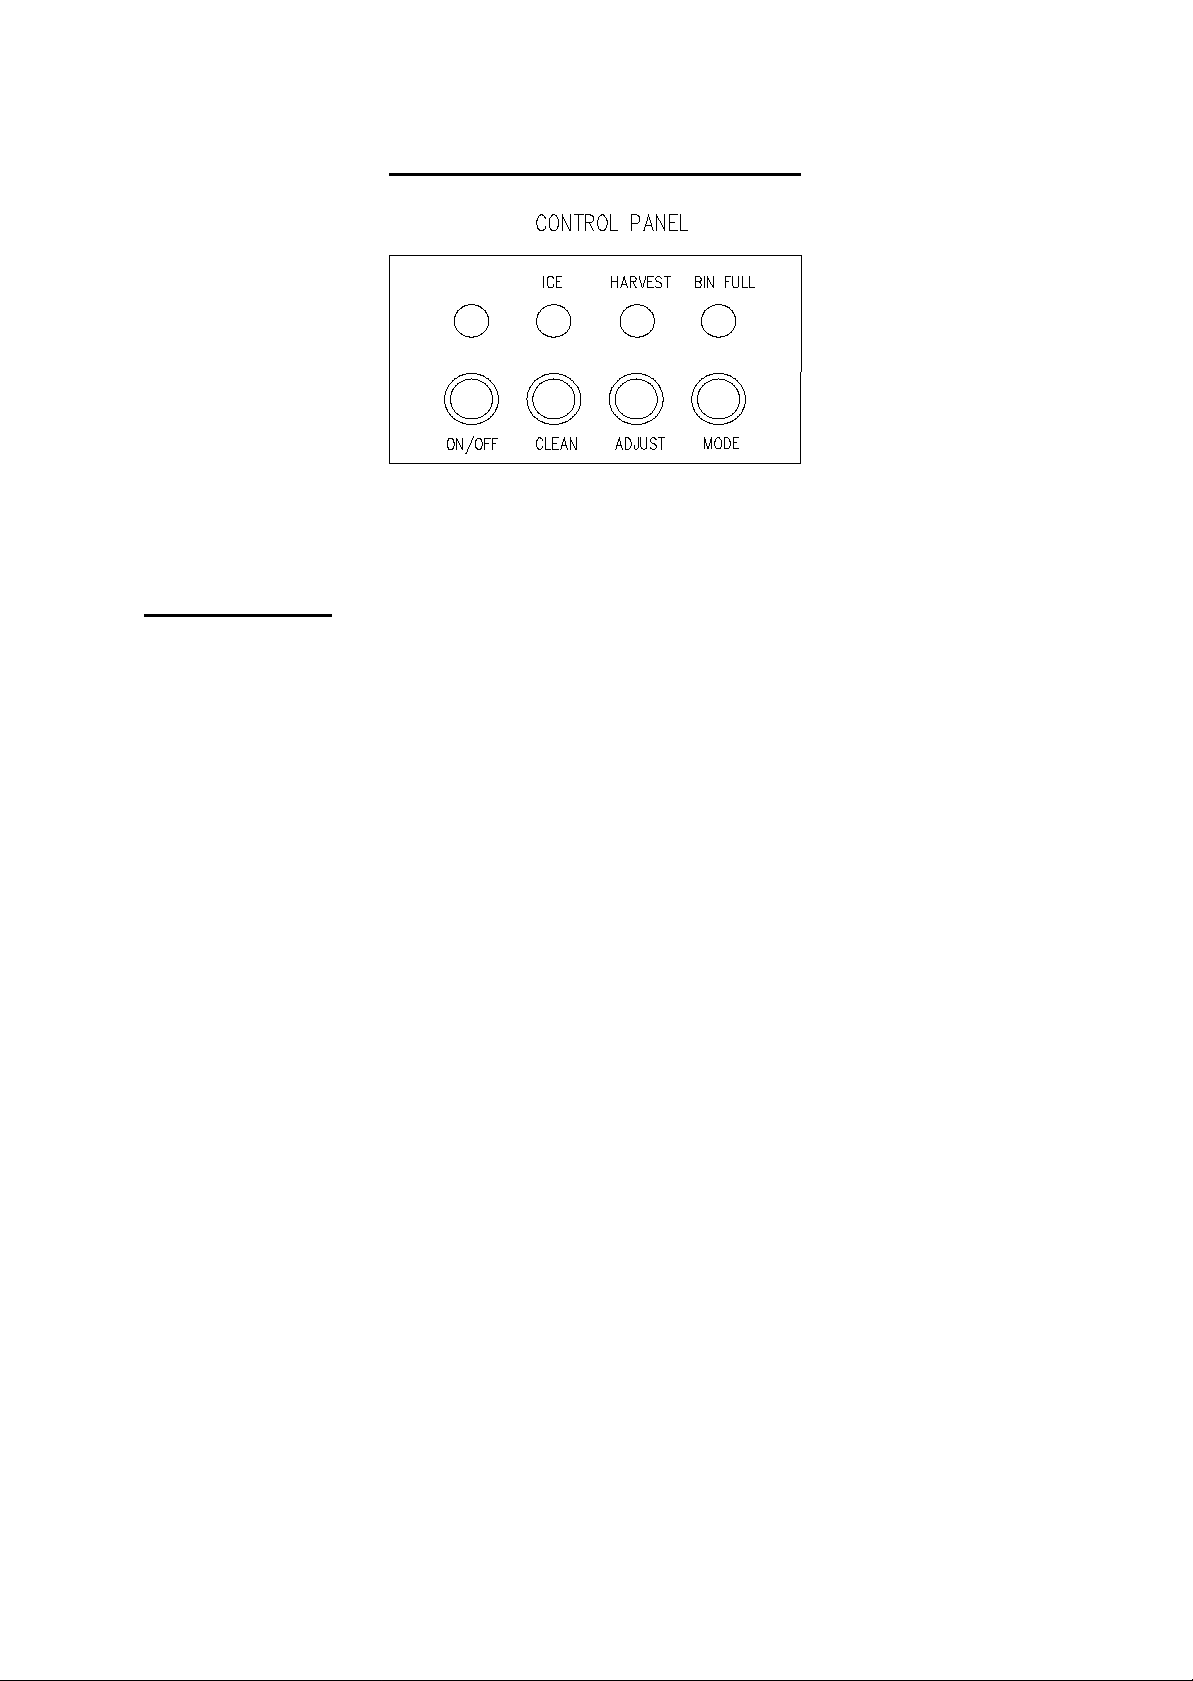
Control Panel: Description of buttons and indicator lights:
Indicator Lights:
1. BIN FULL (RED): Bin is full
When this light is illuminated, the ice storage bin is full of ice or there is something blocking the
bin full sensor. The unit will stop the ice making process until the level of ice has reduced or the
object blocking the sensor is removed.
When ice-cubes are removed and the bin full sensor is cleared; the bin-full indic ator light will blink
for 3 minutes, then the unit will restart and return to the ice-making process.
2. ICE (Green): Ice making process.
When this light is illuminated, the unit is working in the ice-making process which is controlled by
a temperature sensor on the evaporator. When the indicator light flashes green, the unit is
working to produce ice and is based on a fixed timer.
3. HARVEST (Yellow): Ice Harvest process.
When this light is illuminated, the unit is in the process of harvesting the ice that was produced.
The machine will continue to make and harvest ice until the bin-full sensor notes that the bin is
full or until the unit is turned off or the system mode is changed by touching the “MODE” button.
4. Mode button: This button is use d primarily for t he quick star t of the Ice mak ing process or
for service / repa ir iss ues. You can “ quick start” the system b y pressing t he “MO DE” button when
first plugged in, power has been lost or if the unit has been turned off for a period of time.
5. Adjust button: This button is used primarily for service and or to select the size of the ice-
cubes. To select the ice cubes, press and hold the button for approximately 3 seconds, the
“HARVEST” (Yellow) indicator light will illuminate and the system will enter the Ice Size Selection
mode. Release the button once the Harvest light (yellow) blinks and simply press the ( + ) or ( - )
to select larger or smaller cubes, the unit is shipped from the factory set to the normal sized cubes.
14
Page 15
OPERATING YOUR ICE-MAKER
Bin full stage
Ice making stage
Ice harvest stage
1. Turn on the water tap.
2. Press the ON/OFF button.
3. After 3 minutes, the machine will automatically go to the ice-making stage, and the sound of water
flowing will be heard. (The ICE indicator light (GREEN) will blink during this process.)
4. Press the MODE butto n to quick start the Ice-Making proc ess and a llo w the water trough to be gin
to fill automatically. (The ICE indicator light (GREEN) will blink during this process.)
5. When the batch of ice has been f ully formed, the ice will autom atically be harvested and dro p to
the ice storage bin. (The HARVEST indicator light (YELLOW) will blink during this process.)
6. When the ice storage bin is full, the sheet of cubes will not f all com pletel y and will hold the bin-full
sensor open. The machine will s top making ice automatical l y. (The BIN-Full indic ator l ig ht ( RE D)
will blink to indicate the bin is full or the sensor is being blocked.)
7. The unit will start making ice again after ice cubes are removed or when the bin-full sensor swings
back to operating position. (The BIN-Full indicator light (RED) will continue to blink for
approximately 3 minutes, then the system will automatically begin the ice-making process again.)
IMPORTANT:
• Although the unit has been tested and clea ned at the fac tory , due to long-term transit and
storage, the first batch of cubes must be discarded.
• Never turn the water supply tap off when the ice maker is working.
• Never touch the evaporator when unit is running!
• To prevent ice from melting and to ensure proper ice formation, keep the door closed except
when removing ice from the bin.
15
Page 16

Ice Size Adjustment Guide:
1. Press and hold the “Adjust” button for approximately 3 seconds. The unit will enter the Ice Size
Adjustment mode. The “HARVEST” LED (yellow) will be blinking continuously while the ice size is
being selected. Release the button when the LED blinks continuously to adjust the ice size.
2. While in the Ice Size Selection mode, press the “Clean” (-) button or the “Mode” (+) button for the
desired ice size.
Smaller ice setting:
By pressing the “Clean” (-) button, you can select the SMALL size of the ice cubes. The “ICE” LED
(GREEN) will flash as you select the smaller ice size.
Larger ice setting:
By pressing the “Mode” (+) button, you can select the large size of the ice cubes. The “BIN FULL”
LED (RED) will flash as you select the larger ice size.
After 10 seconds without any operation, the unit will return to the previous mode.
NOTE:
• If during the ice size adjus tment mode t he “BIN FULL” , “ICE” and “ HARVEST” LEDS blink all a t
once; this indicates that the unit is in the regular (middle) setting of the ice size.
• When the m achine is in t he clea ning s tage or ice f ull st age, t he ice s i ze adjus tm ent mode c annot
be accessed
16
Page 17

HOW THE ICE MAKER PRODUCES ICE
Set the ON/OFF button to the ON position.
The machine will automatically go in to the ice making stage.
The unit will go through two distinct cycles during the production of your ice.
The first cycle is the “freeze” where the ice is actually produced and the
second is the “harvest” where the ice is dropped into the ice-bin.
The freeze cycle happens when water flows to the evaporator surface. The harvest cycle is when the
ice is released and water enters the machine. A complete cycle takes about 20 minutes, but it
depends on temperature and operating conditions.
Freeze: During the freeze cycle the compressor is pumping refrigerant, the fan motor is blowing air,
and the water pump is circulating water. When the batch of ice has been fully formed, the ice maker
stops the freeze cycle and the harvest cycle will begin.
Harvest: During the harvest cycle the compressor is still operating, but the water pump has stopped.
The hot gas valve opens, diverting hot refrigerant gas into the evaporator. The hot refrigerant gas
warms the evaporator, causing the cubes to slide as a unit off the evaporator and into the storage bin.
The freeze cycle will restart when all the cubes have been harvested.
How the machine uses the water
The ice maker begins with a fixed charge of water which is contained in the water trough. As the
water flows to the freezing evaporator surface, the portion of water that does not contain mineral
impurities freezes and sticks to the ice cube molds. The water containing impurities falls back into the
water trough. During the ice making process, fresh water enters into the water trough continuously as
the water in the trough freezes continuously in the evaporator.
Normal sounds
Your new ice maker may make sounds that are not familiar to you. Most of the new sounds are
normal. Hard surfaces like the floor and walls can make the sounds louder than they actually are. The
following list describes the sounds that might be new to you and what may be causing them.
• Rattling no ises ma y come from the f low of the refrigerant or the water lin e. Items s tored on top of
the ice maker can also make noises due to vibration.
• The high efficiency compressor may make a pulsating or high-pitched sound.
• Running water may make a splashing sound.
• You may hear air being forced over the condenser by the condenser fan.
• During the harvest cycle, you may hear the sound of ice cubes falling into the ice storage bin.
17
Page 18
CARE AND MAINTENANCE
Before proceeding with cleaning and maintenance operations, make sure the
If the ice maker is left unused for a long time, before the next use it
If the ice maker is left unused for a long time, before the next use it must
Cleaning The Icemaker
be thoroughly cleaned. Follow carefully any instructions provided for
Periodic cleaning and proper maintenance will ensure efficiency, top performance, and long life. The
maintenance intervals listed are based on normal conditions. You may want to shorten the intervals if
you have pets, or there are other special considerations.
Important Note:
Never keep anything in the ice storage bin that is not ice: objects like wine and beer
bottles are not only unsanitary, but the labels may slip off and plug up the drain.
must be thoroughly cleaned. Follow carefully any instructions provided
cleaning or use of sanitizing solutions. Do not leave any solution inside
for cleaning or use of sanitizing solutions. Do not leave any solution
the ice maker after cleaning.
inside the ice maker after cleaning.
power line of the unit is disconnected and the water line is shut off.
Cleaning the exterior
The door and cabinet may be cleaned with a mild detergent and warm water solution such as 1 oz. of
dishwashing liquid mixed with 2 gallons of warm water. Do not use solvent-based or abrasive
cleaners. Use a soft sponge and rinse with clean water. Wipe with a soft clean towel to prevent water
spotting.
If the door panel is stainless steel, it may discolor when exposed to chlorine gas and moisture. Clean
stainless steel with a mild detergent and warm water solution and a damp cloth. Never use an
abrasive cleaning agent.
18
Page 19

Cleaning the interior
Right location of the
Condenser
Surface
The ice storage bin should be sanitized occasionally. Clean the water trough before the ice maker is
used first time and reused after stopping for an extended period of time. It is usually convenient to
sanitize the trough after the ice making system has been cleaned, and the ice storage bin is empty.
1. Disconnect the power to the unit.
2. O pen the door and take out t he removable ice storage bin. W ith a clean cloth, wipe do wn the
interior of unit and ice bin with a sanitizing solution made of 1 ounce of household bleach or
chlorine and 2 gallons of hot (95ºF – 115ºF) w ater.
3. Pull off the drain hose of the water trough to drain off all water.
4. Rinse thoroughly with clear water.
5. After draining off all water, put back the drain hose of the water
through to the original location.
6. Put the ice storage bin inside the unit.
7. Reconnect power to the unit.
The ice scoop should be washed regularly. Wash it just like any other food
container.
drain hose
Condenser cleaning
A dirty or clogged condenser prevents proper airflow, reduces ice making capacity, and causes higher
than recommended operating temperatures that may lead to component failure. Have the condenser
cleaned at least once every six months.
1. Unplug the ice maker or disconnect power.
2. Gently pull off the lower front louver.
3. Remove dirt and lint from the condenser and the
unit compartment with the brush attachment of a
.
vacuum cleaner
4. Reassemble the lower front louver.
5. Plug in the ice maker or reconnect power.
Cleaning the water distribution tube
When you find the ice cubes are incompletely formed or the output is low, the water distribution tube
may be blocked. Turn off the power button, gently take out the water distribution tube, locate the holes
in the distribution tube and use a pointed object such as a toothpick to dredge the holes. Then put the
water distribution tube back to its original position. If the tube is badly blocked, clean it as follows:
1. Shut off the water supply
2. D isc onnect the water hose from the distribution tube.
3. Gently take out the distribution tube.
4. W ith a brush, clean the tube with a di lute solution of warm water and a m ild detergent such as
dishwashing liquid. After removing the dirt and lint from the surface, rinse the tube with clean
water.
5. Replace the distribution tube.
6. Reconnect the water supply.
19
Page 20

Ice-making system cleanin g (CLEAN BUTTON)
The ice machine cleaner contains acids.
DO NOT use or mix with any other solvent-based cleaner produc t s.
Use rubber gloves to protect hands. Carefully read the material safety instructions
on the container of the ice machine cleaner.
Discard the first batch o f ice produc ed a ft er cleani ng .
Minerals that are removed from the water during the freezing cycle will eventually form a hard, scaly
deposit in the water system. Cleaning the system regularly helps remove the mineral scale buildup.
How often to clean the system depends upon ho w har d your wat er is or how ef f ective your filtration
may be. With hard water of 15 to 20 grains/gal. (4 to 5 grains/ liter), you may need to clean the system
as often as once every 6 months.
1. Make sure that all the ice is off the evaporator. If ice is being formed, wait until the cycle is
completed, then press the machine’s ON/OFF button on the control panel.
2. Remove all ice from the storage bin.
3. Kee p the ice maker connec ted to the water supply. Pour 8 o z. of Nickel-Safe Ice Mak er Cleaner
Solution into the water tr ough. Then press the ON/OFF button and the CLEAN button, initiating
the wash cycle. The machine will run in the Automatic Clean Mode.
4. Al low 30 m inutes for pr oper clean ing. Af ter clean ing, pres s the ON /OFF button again. Use a dr ain
hose on the front of the water trough to drain off the waste water to a convenient container.
NOTE: Don’t drain off the waste water to the inside of the cabinet.
5. R epeat steps 3 and 4 ( without Ice Maker Cleaning Solution) thre e times to rinse th e ice making
system thoroughly.
6. Pr epare a sanitizing solution made of 1 ounc e of household bleach and 2 gallons of hot water
(95ºF to 115ºF). Wipe the entire bin inside and outside, covering the entire surface of the walls.
7. Fill a spray bottle with the sanitizing solution and spray all corners and edges, making sure to
cover all surfaces with the solution.
8. Allow the solution to be in contact for at least 3 minutes, and then dry.
9. Repeat step 5 to rinse the ice making system one more time.
10. Press the ON/OFF button again. The machine will return to the regular ice making mode.
11. Discard the first batch of ice.
20
Page 21

Power Failure
Most power failures are corrected within a few ho urs and should not aff ect the temperature of your
icemaker if you minimize th e number of times the door is opened. If the power is going to be off for a
longer period of time, you need to take the proper steps to protect your food.
Vacation Time
Short vacations: Leave the unit operating during vacations of less than three weeks.
Long vacations: If the icemaker will not be used f or severa l months, remove all of the ic e and unplug
the power cord. Clea n and dry the interi or thoroughly. To pr event odor and m old growth, leave the
door open slightly: blocking it open if necessary
Moving Your Icemaker
• Remove all the food.
• Securely tape down all loose items inside your unit.
• Turn the leveling screws up to the base to avoid damage.
• Tape the doors shut.
• Be sure the unit stays in the upright position during transportation.
Preparing the ice maker for long term storage
If the ice maker will not be used for a long time, or is to be moved to another place, it will be
necessary to drain the system of water.
1. Shut off the water supply at the main water source.
2. Disconnect the water supply line from the water inlet.
3. Shut off the electric supply at the main electrical power source.
4. Take out the ice storage bin to remove any remaining ice and water. Dry the bin.
5. Pull off the drainage tube of the water trough to drain off all water.
6. Leave the door open to allow for circulation and to prevent mold and mildew.
7. Leave water supply line and power cord disconnected until ready to reuse.
IMPORTANT:
• Do not touch the power plug when your hands are wet.
• Never unplug the unit by pulling on the cord. Grasp the plug and pull out firmly.
Energy Saving Tips
• The unit should be located in the coo lest area of the r oom, away from heat producing appliances
or heating ducts, and out of direct sunlight.
21
Page 22
TROUBLESHOOTING
Problem
Possible Cause
Probable Correction
The ice maker is unplugged.
Plug the ice maker in.
service to check for a short circuit in t he un i t.
set at OFF.
probe is free of ice.
off.
properly connected.
The condenser may be dirty.
Clean the condenser.
may be obstructed.
unit is near some heat source.
remove ice from storage bin.
ice.
leaking.
outlet.
psig.
Check water supply or filter may be restricted.
Check for a water leak at the water trough.
locked.
Maker.
Certain sounds are normal.
See Normal Sounds.
Before Calling for Service
If the unit appears to be malfunctioning, read through the OPERATION section of this manual first. If
the problem persists, check the Troubleshooting Guide on the following pages. Some of the problems
mentioned in the Guide can be solved easily without a service call.
The machine
doesn’t operate.
The water doesn't
feed in after the
machine starts.
Machine makes ice,
but bin does not fill
up with ice.
The fuse is blown.
The ice maker power button is
The ice storage bin is full of ice.
The water supply tap is turned
The water supply pipe is not
The air flow to the ice maker
The ambient temperature and
water temperature are high, or
Some water falls to the floor
Replace fuse. If it happens again, call for
Switch the ice maker power button to ON.
Remove some ice cubes. Be sure the ice-full
Turn on the water supply tap.
Reconnect the water supply pipe.
Check the installation.
Check the installation.
Normal condensation on the door or some water
when you open the door to
Water is leaking out
of the unit.
Cubes are partially
formed or are white
on the bottom.
Noise during
operation
Water supply connection is
Drain pipe higher than drain
Not enough water in the water
trough.
The feet are not leveled and
together with ice. Take care when you take out
Tighten fitting. See Connecting the water line.
Lower drain pipe.
Check if the water supply pressure is below 15
Level and lock the feet. See Leveling the Ice
22
Page 23

The ice maker stops
The electricity is off.
Reconnect the power supply line.
within the stated range.
probe is free of ice.
maker is electrified
socket.
requirements.
machine.
the floor of the ice storage bin.
suddenly while
The room temperature is out of
Cut off the electricity and leave the ice maker
disconnected until the temperature returns to
the stated range.
making ice.
The body of the ice
Scaling occurs
frequently inside the
Water leaks from
the ice storage bin
The ice storage bin is full of ice. Remove some ice cubes; make sure the ice-full
The ground line isn't in the
The hardness level of the water
is too high.
The drain hole below the ice
storage bin is blocked.
The drain hose is kinked or
improperly placed higher than
Use a socket meeting the grounding
Install a water-softeni ng de vice in fr ont of the
water inlet.
Remove the ice storage bin and clean the drain
hole.
Check the drain hose to be sure water can be
drained out unhindered.
23
Page 24

SERVICE FOR YOUR APPLIANCE
We are proud of our customer service organization and the network of professional service
Avanti Products Customer Service team will be here for you. Just call us toll-free.
AVANTI PRODUCTS CUSTOMER SERVICES
800-323 5029
help is available.
You may order parts and accessories that will be
money order, Master Card, or Visa.
know your appliance inside and out.
WIRING DIAGRAM
technicians that provide service on your Avanti appliances. With the purchase of your Avanti
appliance, you can have the confidence that if you ever need additional information or assistance the
Product Information
Part Orders
800-220 5570
In-Home Repair Service
800-220 5570
Whatever your questions are about our products,
delivered directly to your home.
You may order these items by personal check,
An Avanti Products authorized service center will
provide expert repair service, scheduled at a time
that is convenient for you. Our trained servicers
24
Page 25

YOUR AVANTI PRODUCTS
Staple your sales receipt here. Proof of
obtain service under warranty.
WHAT IS COVERED – LIMITED ONE-YEAR WARRANTY
center for repair.
LIMITED SECOND THROUGH FIFTH YEAR WARRANTY
user’s responsibility.
WARRANTY EXCLUSIONS / WHAT IS NOT COVERED:
Products, including without limitation, one or more of the following:
•
lightning, power surges, structural failures surrounding the appliance, and acts of God.
•
• Shipping and handling costs associated with the
In no event shall Avanti Products have any liability or responsibility whatsoever for damage to surrounding
cabinetry, walls, floors, shelving etc., as well as the resetting of breakers or fuses.
OUT OF WARRANTY PRODUCT
repairs, pro-rates, or product replacement, once this warranty has expired.
WARRANTY – REFRIGERATION - COMPRESSOR
WARRANTY
Avanti Products warrants that the product is free from defects in materials and/or workmanship for a period of
twelve (12) months from the date of purchase by the original owner. The foregoing timeline begins to run upon
the date of purchase, and shall not be stalled, tolled, extended, or suspended for any reason whatsoever unless
described in detail in the warranty document. For one year from the date of purchase by the original owner,
Avanti products will, at its option, repair or replace any part of the product which proves to be defective in
material or workmanship under normal use. Avanti Products will provide you with a reasonably similar product
that is either new or factory refurbished. During this period Avanti Products will provide all parts and labor
necessary to correct such defects free of charge, so long as the product has been installed and operated in
accordance with the written instructions in this manual. In rental or commercial use, the warranty period is 90
days. All Avanti appliances of 4.4 cubic feet capacity or less must be brought/sent to the appliance service
For the second through the fifth year from the date of original purchase, Avanti Products will provide a
replacement compressor free of charge due to a failure. You are responsible for the service labor and freight
charges. In rental or commercial use, the limited compressor warranty is one year and nine months. Costs
involved to move the product to the service center and back to the user’s home, as maybe required, are the
The warranty coverage described herein excludes all defects or damage that are not the direct fault of Avanti
A failure to comply with any applicable state, local, city, or county electrical, plumbing and/or building codes,
regulations, or laws, including failure to install the product in strict conformity with local fire and building codes
and regulations.
original purchase date is needed to
• Any external, elemental and/or environmental forces and factors, including without limitation, rain, wind, sand,
floods, fires, mud slides, freezing temperatures, excessive moisture or extended exposure to humidity,
Content losses of food or other content due to
spoilage.
• Incidental or consequential damages
• Parts and labor costs for the following will not be
considered as warranty:
• Repairs performed by unauthorized servicers.
• Service calls that are related to external problems,
• Evaporator doors, door springs, and/or frames.
• Inner door panels, door shelves, door rails,
and/or door supports.
• Light bulbs and/or plastic housing.
• Failure of the product if it is used for other than it
• The warranty does not apply outside the
• Plastic cabinet liners.
• Punctured evaporator that voids the warranty on
the complete sealed system.
property, including cabinetry, floors, ceilings, and other structures and/or objects around the product. Also
excluded from this warranty are scratches, nicks, minor dents, and other cosmetic damages on external surfaces
and exposed parts; Products on which the serial numbers have been altered, defaced or removed; service visits
for customer education, or visits where there is nothing wrong with the product; correction of installation problems
(you are solely responsible for any structure and setting for the product, including all electrical, plumbing and/or
other connecting facilities, for proper foundation/flooring, and for any alterations including without limitation
Avanti Products is under no obligation, at law or otherwise, to provide you with any concessions, including
• Surcharges including but not limited to, any after
replacement of the unit.
such as abuse, misuse, inadequate electrical
power, accidents, fire, floods, or any other acts of
God.
intended purpose.
Continental USA.
hour, weekend, or holiday service calls, tolls, ferry
trip charges, or mileage expense for service calls to
remote areas.
25
Page 26

INSTRUCCIONES DE SEGURIDAD
Su seguridad y la seguridad de los demás son muy importantes.
Hemos incluido muchos mensajes importantes de seguridad en este manual y en su
electrodoméstico. Lea y obedezca siempre todos los mensajes de seguridad.
Todo mensaje de seguridad le avisará a cuál es el peligro potencial, le dirán
siguen las instrucciones.
Éste es el símbolo de alerta de
seguridad. Este símbolo le avisa de
los peligros potenciales que
pueden matar o lesionar a usted y
otros. Toda la seguridad mensajes
seguirá a el símbolo de alerta y
cualquiera de los pabellones"
PELIGRO","ADVERTENCIA" o
"PRECAUCIÓN".
Peligro significa que el
incumplimiento de la medida de
seguridad podría causar lesiones
graves o la muerte.
Advertencia significa que si no se
respeta esta medida de seguridad
podría resultar en graves daños al
producto, lesiones personales
graves o la muerte.
Advertencia significa que si no se
respeta esta medida de seguridad
podría resultar en graves daños al
producto, lesiones personales
graves o la muerte.
cómo reducir el riesgo de lesiones, y le hará saber lo que puede suceder si no se
26
Page 27

MEDIDAS DE SEGURIDAD IMPORTANTES
Antes de enfriador de bebidas se utiliza, debe ser colocado correctamente e
•Enchufe en unas 3 clavijas con conexión a tierra toma de corriente, hacer No retire de puesta a
técnico cualificado.
• Se recomienda utilizar dos o más personas para mover e instalar el electrodoméstico. El aparato es
instalado como descrito en este manual, así que lea cuidadosamente el
manual. Para reducir el riesgo de incendio, descarga eléctrica o lesiones al
utilizar el enfriador de bebidas, Siga las precauciones básicas, incluyendo las
tierra púa, hacer No utilice un adaptador, y no utilice un cable de extensión
• Reemplazar todos los paneles antes operativos
• Eso se recomienda usar un circuito separado, que sólo sirve a su enfriador de bebidas, ser
proporcionado. Use recipientes ese no poder ser desactivado por un interruptor o cadena
• Nunca limpia electrodoméstico piezas con líquidos inflamables. Estos vapores pueden crear un
riesgo de incendio o explosión. Y no almacene ni use gasolina u otros vapores y líquidos
inflamables en la proximidad de este o cualquier otro electrodoméstico. Los vapores pueden crear
un riesgo de incendio o explosión.
• Antes de proceder con las operaciones de limpieza y mantenimiento, asegúrese de que la línea de
alimentación de la unidad se desconecta.
• hacer No conecte o desconecte el enchufe eléctrico con las manos mojadas
• Desenchufe el electrodoméstico o desconectar la alimentación antes de la limpieza o el
mantenimiento. El no hacerlo puede provocar una descarga eléctrica o la muerte.
• hacer No intente reparar o reemplazar cualquier parte de su electrodoméstico a menos que se
recomiende específicamente en este material. Cualquier otro servicio debe ser realizado por un
siguientes
pesado y puede resultar en daños de la espalda u otras lesiones.
• Para garantizar una ventilación adecuada para su electrodoméstico, la unidad debe estar
completamente despejada. Elija un área bien ventilada con temperaturas superiores a 55ºF (13ºC)
y por debajo de 90ºF (32ºC). Esta unidad debe ser instalada en un área protegida de los
elementos, tales como el viento, la lluvia, rocío de agua o luz de sol.
• El electrodoméstico no debe colocarse cerca de hornos, parrillas u otras fuentes de calor.
• El electrodoméstico debe ser instalado con todas las conexiones eléctricas, de agua y de desagüe
según los códigos estatales y locales. Hace falta un suministro eléctrico estándar (sólo 115 V CA,
60 Hz), debidamente conectada a tierra de acuerdo con el Código Eléctrico Nacional y los códigos
y ordenanzas locales.
• Hacer No doble ni apriete el cable de alimentación del electrodoméstico.
• Los fusibles (o disyuntor) tamaño debe ser de 15 amperios.
• Eso Es importante que el electrodoméstico a nivelarse con el fin de funcionar co rr ec tam ente. Pue de
que tenga que hacer varios ajustes para nivelarla.
• Toda la instalación debe realizarse de acuerdo con los requerimientos locales de plomería.
• Asegúrese de que los tubos no están aplastar ni dañado durante instalación.
• Compruebe si hay fugas des pués de la con exió n.
• Nunca permita que los niños operen, jueguen o gatear el interior del electrodoméstico
• Hacer No utilice productos de limpieza a base de disolvente-abr as ivos en el inte r ior. Estos
limpiadores pueden dañar o decolorar el interior.
• No utilice este electrodoméstico para que no sea su finalidad.
27
Page 28

Conexión eléctrica
~Advertencia~
El uso inapropiado del enchufe a tierra puede resultar en el riesgo de descarga eléctrica. Si
autorizado de Avanti Products.
Este electrodoméstico debe estar conectado a tierra adecuadamente para su
de tres puntas que encajan con tres enchufes de pared standard para reducir al
Bajo ninguna circunstancia corte o remueva la punta de tierra del cable de
electrodoméstico tirando del cable de alimentación. Siempre
. Si el cable de
electricista o técnico calificado
instale un tomacorrient e cer ca del electrodoméstico.
Ø CABLE EXTENSIÓ N
Debido a los peligros potenciales de seguridad bajo ciertas condiciones, se
clasificación eléctrica del cable sea de 115 voltios y al menos 10 amperios.
Ø PROTECTOR CONTRA SOBRETENSIONES
La mayoría de los electrodomésticos utilizan una serie de paneles de control
protector contra sobretensiones a un electricista autorizado en su área.
Los daños debidos a sobrecargas de energía no se consideran un defecto cubierto
por el fabricante y anulará la garantía del producto.
el cable de alimentación está dañado, haga que sea reemplazado por un centro de servicio
seguridad. El cable eléctrico de este electrodoméstico está equipado con un enchufe
mínimo la posibilidad de una descarga eléctrica.
alimentación suministrado.
Este electrodoméstico requiere una toma de corriente eléctrica 115Volts ~ / 60 Hz
estándar con tierra de tres clavijas.
El cable debe ser asegurado detrás del electrodoméstico y no déjelo expuesto para
evitar lesiones accidentales.
Nunca desenchufe el
sostenga firmemente el enchufe y tire en línea recta desde el receptáculo.
No utilice un cable de extensión con este electrodoméstico
alimentación es demasiado corto, haga que un
recomienda encarecidamente que no se utilice un cable de extensión con esta
unidad. Sin embargo, si debe utilizar un cable de extensión es absolutamente
necesario que se trate de un UL / CUL, 3 hilos con toma de tierra del
electrodoméstico cable de extensión que tiene un enchufe y la toma a tierra y que la
eléctricos para operar. Estas placas son muy susceptibles a las subidas de tensión y
podrían ser dañados o destruidos.
Si el electrodoméstico va a ser usado en un área o si su ciudad / país es propenso a
subidas de tensión / interrupciones; se sugiere que utilice un protector contra
sobretensiones alimentación de todos los dispositivos / electrodomésticos que
utiliza. El estabilizador de tensión que se selecciona debe tener un bloque oleada
suficientemente alto como para proteger el electrodoméstico está conectado a. Si
usted tiene alguna pregunta relacionada con el tipo y tamaño de contacto necesario
28
Page 29

Ayúdenos a ayudarte...
Si necesita servicio
Estamos orgullosos de nuestro servicio y
A continuación, si usted todavía no está contento,
PRECAUCIÓN:
Lea detenidamente esta guía.
Se pretende que ayudan a utili zar y
mantener su nuevo electrodoméstico
correctamente.
Mantenga a la mano para responder a sus
preguntas.
Si no entiende algo o si necesita más ayuda,
por favor llame a:
Avanti Servicio al Cliente
800-220-5570
Mantenga prueba de la fecha original de
compra (como el recibo de venta) con esta
guía para establecer el período de garantía.
ESTE ELECTRODOMÉSTICO NO
ESTÁ DISEÑADO PARA EL
ALMACENAMIENTO DE
MEDICINA U OTROS
PRODUCTOS MÉDICOS.
Escribir se establece el modelo y número de
serie.
Los encontrará en una placa situada en la pared
exterior trasera del electrodoméstico.
Por favor, escriba estos números aquí:
__________________________________
_
Fecha de compra
__________________________________
_
Número de modelo
__________________________________
_
Número de serie
Utilice estos números en cualquier correspondencia
o llamadas de servicio con respecto a su
electrodoméstico.
Si ha recibido un electrodoméstico dañado,
póngase inmediatamente en contacto con el
distribuidor (o constructor) que le vendió el
electrodoméstico.
Ahorrar tiempo y dinero. Antes de llamar al servicio
técnico, consulte la Guía de solución de problemas.
En él se enumeran las causas de los problemas de
funcionamiento de menor importancia que se
pueden corregir a sí mismo.
queremos que usted esté satisfecho. Si por
alguna razón usted no está satisfecho con el
servicio que recibe, aquí hay algunos pasos
a seguir para obtener más ayuda.
PRIMERA, póngase en contacto con las
personas que servicio de reparación del
electrodoméstico. Explicar por qué usted no
está satisfecho. En la mayoría de los casos,
esto va a resolver el problema.
escribir todos los detalles, incluyendo su número de
teléfono, y enviarlo a:
Servicio al cliente
Avanti Products
10880 NW 30 Street
Miami, FL 33172 EE.UU.
29
Page 30

PARTES Y CARACTERISTICAS
30
Page 31

INSTRUCCIONES DE SEGURIDAD IMPORTANTES
~
~
, siga las siguientes
- GUARDE ESTAS INSTRUCCIONES -
Para reducir el riesgo de incendio, descarga eléctrica, o
PRECAUCIÓN
daño cuando use su aparato
precauciones.
Esta unidad es para uso en interiores
− Leer todas las instrucciones antes de usar el aparato.
− PELIGRO o ADVERTENCIA: Riesgo de encierro para niños. Niños atrapados y sofocación no son
problemas del pasado. Aparatos desechados o abandonados siguen siendo peligrosos. . . incluso si van a
"sentarse en el garaje de unos pocos días".
− Antes de deshacerse de su aparato viejo: quite las puertas. Deje los estantes en su lugar para que los
niños no puedan meterse con facilidad.
− Nunca permita que los niños manejen, jueguen o se arrastren dentro del aparato.
− Nunca limpie las piezas del aparato con líquidos inflamables. Los vapores pueden crear un peligro de
incendio o explosión.
− No almacene ni use gasolina u otros vapores y líquidos inflamables en la proximidad de este o cualquier
otro aparato. Los vapores pueden crear un peligro de incendio o explosión.
INSTRUCCIONES DE INSTALACIÓN
Antes de usar el aparato
• Retire la envoltura interna y externa.
• Verifique para asegurarse de que tiene todas las siguientes partes:
o 1 Cucharón
o 2 mangueras (1 para alimentación de agua / 1 para el desagüe)
o Manual de Instrucciones
• Antes de conectar el aparato a la fuent e d e a lim ent aci ón, es s u geri do d ej ar lo en posic ió n vertic a l
durante aproximadam ente 2 horas. Esto reducirá la posibi lidad de un mal funcionamiento en e l
sistema de refrigeración del aparato de la manipulación durante el transporte.
• Limpie la superficie interior con agua tibia usando un paño suave.
31
Page 32

Instalación del aparato
Uso del aparato bajo temperaturas fuera de los rangos recomendados puede
afectar el funcionamiento del aparato.
Vista Lateral
Vista Frontal
Panel Superior
Trasero
frente
Lado Lado
4”
1”
1”
1”
• Este aparata debe ser instalado por un profesional. Este aparato debe estar instalado en
conformidad con todas las regulaciones locales y estatales.
• Coloque la unidad en u n piso que sea l o suficientem ente fuerte para so portar la unidad cu ando
está completamente cargado. Para nivelar la unidad, ajuste las patas niveladoras en la parte
inferior de la unidad.
• Deje un espacio de un mínimo de 4 pulgadas entre la parte posterior y un mínimo de una
pulgada a los lados y panel s uperior d e la unidad , lo que per m ite la circ ulació n de aire nec esar ia
para enfriar el compresor y el condensador.
• Coloque la unidad l ej os de la lu z so lar directa y de fue ntes d e c a lor ( estufa, calentador, r adi ad or,
etc.) La luz solar directa puede afectar a la capa de acrílico y las fuentes de calor puede
aumentar el consumo eléctrico. Temperaturas ambientales extremadamente frías también
pueden causar que la unidad no funcione correctamente.
• Evite colocar la unidad en áreas húmedas.
Dimensiones requeridas para empotrar:
• La instalación de este aparato requiere una alimentación de agua por tubería de cobre flexible y
válvula de seguridad con una conexión de ¼ de pulgada.
• El aparato requiere una alimentación de agua continua con una presión de 15 psi y una presión
estática que no excede 80 psi. La temperatura de la alimentación debe estar entre 41ºF (5ºC) y
90ºF (32ºC).
Aviso
32
Page 33

Conexión eléctrica
~ PRECAUCIÓN ~
La conexión incorrec ta del conduc tor a tierr a puede re sultar en ries go de descar ga eléctrica. Si el
cable de alimentación de la estufa o aparato está dañado, hágalo cambiar por un centro de
servicio de Avanti Products.
Este aparato debe es tar correctamente conectado a tierra para su seguridad. El c able eléctrico de
este aparato está equipado con un e nchufe de tres patas que se acop la con las tom as de corriente
estándar de tres clavijas para minimizar la posibilidad de cho que el éc tric o.
Bajo ninguna circunstancia corte o quite la tercera clavija de tierra del cable de alimentación
suministrado. Para su seguridad personal, este aparato debe estar correctamente conectado a tierra.
Este aparato requiere un 1 15/120 Volt AC ~ / 60Hz enchuf e estándar de conexión eléctrica a tier ra
con tres clavijas. Haga revisar el tomacorriente y el circuito por un electricista calificado para
asegurarse que el tom acorriente está conectado a tierra correctam ente. Cuando se encuentra una
toma de corriente estándar de 2 patas, es su responsabilidad y obligación reemplazarlo por un
tomacorriente de 3 clavijas debidamente conectado a tierra.
El cable debe manten erse detrás del aparato y no dejó la vista ni colgando para prevenir les iones
accidentales.
El aparato debe ser conectado siempre en su propio contacto eléctrico individual que tenga un voltaje
que vaya de la placa de ca racterís ticas del aparat o. Esto pr oporciona e l mejor rendimiento y también
evitar la sobrecarg a de los circuitos e léctricos de la c asa que podrían causar un riesgo de ince ndio
por sobrecalentado. N unca desench ufe el apar ato tirando del cable de alim entación. S iempre agarre
firmemente el enchufe y tire derecho hacia afuera del tomacorriente. Repare o reemplace
inmediatamente todos l os cables eléctricos que se h ayan desgastado o daña do. No utilice un cable
que muestre grietas o rasp aduras en toda su longitud o en cua lquier extremo. Al m over el aparato,
tenga cuidado de no dañar el cable de alimentación.
Cable de extensión
Debido a peligros potenciales de seguridad bajo ciertas condiciones, se recomienda
encarecidamente que no se utilice un cable de extensión con este aparato. Sin embargo, si debe
utilizar un cable de extensión, es absolutamente necesario que sea un cable de UL / CUL 3 cables de
extensión con puesta a tierra con enchufe con toma de tierra y la salida y que la clasificación eléctrica
del cable sea de 115 voltios y al menos 10 amperios.
Protector contra sobretensiones
La mayoría de los aparatos eléctricos utilizan una serie de tableros de control eléctrico para
funcionar. Estas tarjetas son muy susceptibles a sobretensiones y podrían resultar dañados o
destruidos.
Si el aparato no va a s er ut il i zado en un área o si s u c i udad / país es propenso a s ubid as de t e nsió n /
interrupciones; se sugiere que utilice un protector contra sobrecargas de energía para todos los
dispositivos / aparatos e léctric os que esté tomando. El es tabili zador de te nsión q ue usted selecc ione
debe tener un bloqueo suf i c ientemente alto como para prote ger el aparato está conectado a. Si usted
tiene alguna pregunta relacionada con el tipo y tamaño de protector contra sobretensiones es
necesario ponerse en contacto con un electricista cualificado en su área.
Los daños debidos a las sobrecargas de energía no se consideran un defecto cubierto por el
fabricante y anulará la garantía del prod uc to.
33
Page 34

Alimentación de agua
El aparato requiere una alimentación de agua continua con una presión de 15 psi y una presión
estática que no excede 80 psi. La temperatura de la alimentación debe estar entre 41ºF (5ºC) y
90ºF (32ºC).
IMPORTANTE:
1. Se recomienda instalación por un profesional. Todas las conexiones deben estar en conformidad
con las regulas y regulaciones locales y estatales.
2. Este seguro que las mangueras no están dobladas o comprimidas durante la conexión.
3. Después inspecciona que no hay goteras de las conexiones.
Herramientas necesarias: Llave de boquilla abierta de ½”, destornillador tipo Phillips ( + ).
Como conectar la tubería de alimentación de agua:
1. Apag ar la válvula princip al del suministro de agua. Abre el g rifo para vaciar la tu bería de
suministro, cuando la tubería este vacía cierre el grifo.
2. Bus c a una manguera (½” o ¾”) en pos ici ón ver tic a l cer ca del área de instalación. La distancia del
aparato debe ser menos de 6 pies. La manguera que está incluida con el aparato mide
aproximadamente 6 pies.
3. Requiere una válvula de seguridad conectada al suministro principal de agua.
4. Enr osca un lado de la m anguera al grifo y enrosca el otro lado al aparat o. Apriete con la m ano y
luego con la llave.
5. Abr e la válv ula e inspecciona por goteras en las conexiones.
34
Page 35

Desagüe
Debe conectar la línea de drenaje antes de usar la fábrica de hielo. Siga los pasos descritos a
continuación.
Hay dos tipos de modos de máquina de hielo, uno que drena por gr av eda d y otro que tiene una
bomba de drenaje interna.
Esta unidad puede bombear agua hasta una altura de 1,5 m (59 ") o sobre una longitud horizontal de
1,5 m (59").
Conexión de la línea de drenaje:
NOTA: Si hay una línea de drenaje cerca de la fábrica de hielo, la mejor opción es drenar el agua a la
línea de drenaje a través de la manguera de agua de drenaje provista con la máquina de hielo.
1. Ubique el drenaje del piso cerca de la fábrica de hielo. La distancia debe ser inferior a 5 pies ya que
la longitud de la manguera de agua de drenaje larga pr ovista con la fábric a de hielo es de
aproximadamente 5 pies.
2. Busque la salida de drenaje en la parte posterior de la fábrica de hielo. Conecte la salida de drenaje
a la manguera de drenaje de agua e inserte el otro extremo de la manguera en la línea de
drenaje.
NOTA: Nunca permita que la manguera de drenaje cuelgue o se enrolle más alto que el piso del hielo
cesta de almacenaje.
3. Todas las líneas horizontales de las líneas de drenaje deben tener una caída de ¼ "por pie. Es
probable que se requiera un espacio de aire entre el tubo de drenaje de la fábrica de hielo y el
receptáculo de drenaje / desechos. Una tubería vertical con una trampa debajo sería aceptable
para el receptáculo de drenaje / desechos. Un drenaje de piso también es aceptable. Si esto no
es posible, se recomienda el uso de una bomba de condensado.
4. Vierta 1 galón de agua en el depósito de hielo para verificar si hay fugas en el sistema de drenaje.
Apriete cualquier conexión que tenga fugas.
IMPORTANTE: Esta fábrica de hielo no es un congelador. El drenaje poco frecuente causará una alta
tasa de fusión en el depósito de hielo.
35
Page 36

Los componentes del sistema de drenaje de agua de bombeo son
Interruptor de nivel de agua 2
Interruptor de nivel de agua 1
NOTA:
AVISO!
• Depósito de agua Tarjeta de PC e interruptor de nivel de agua 1, 2
• Bomba de drenaje de agua
OPERACIÓN
• Toda el agua que proviene del desbordamiento y el hielo derretido se recoge en el
depósito de agua.
• Tan pronto como el agua en el depósito alcanza el nivel máximo, el interruptor de
nivel de agua 1 se cierra y transmite una corriente de bajo voltaje a la tarjeta de PC.
• La placa de PC activa la bomba de drenaje de agua durante 20
segundos, bombeando la mayor parte del agua contenida en el
depósito de agua.
• • El agua se puede bombear hasta una altura de 1,5 m (59 ") o
o sobre una longitud horizontal de 1,5 m (59").
• Si el interruptor de nivel de agua 2 se cierra, transmitiendo una
corriente de bajo voltaje a la placa de PC, la placa de PC activa el
La salida de la manguera de
drenaje debe elevarse más
alto que la superficie del
agua para evitar que el agua
drenada regrese al depósito
de agua.
Si suena el timbre de la
alarma, apague la fábrica
de hielo y el suministro de
agua, retire todo el hielo
del depósito de
almacenamiento y limpie el
agua que pueda haberse
desbordado. Verifique si
hay agua en el canal de
agua en la parte posterior
de la unidad; Si no hay
agua, la bomba de drenaje
puede no estar recibiendo
la cantidad adecuada de
energía. Verifique la fuente
de energía. Si se puede
corregir el problema,
encienda la unidad
nuevamente. También
verifique que ninguna de
las líneas de agua esté
doblada. Si el problema
persiste, comuníquese con
el Servicio al cliente.
36
Page 37

alarma del zumbador, informándole que la bomba de drenaje, el interruptor de nivel de agua o el tubo
de drenaje pueden estar funcionando mal.
37
Page 38

FUNCIONAMIENTO DEL APARATO
+
_
Descripción de las luces y botones:
1. Bin Full (Rojo)/(Gaveta llena):
Indica que la gaveta está llena y no continuará haciendo hielo.
Cuando este alumbrado, significa que la gaveta de almacenaje está llena. La unidad parará de
hacer hielo hasta que se remueve hielo de la gaveta o se derriten lentamente los cubos.
Cuando el nivel de cubos se baje, la luz roja titilará por aproximadamente 3 minutos y el aparato
regresará al proceso de hacer hielo.
2. Ice Making(Verde)/(Haciendo Hielo):
Indicador que el aparato está en el proceso de hacer hielo.
Cuando este encendido el aparato está en proceso de hacer hielo.
3. Ice Harvest (Amarillo)/(Guardando Hielo):
Cuando esté encendido, significa que el aparato esté en el proces o de pasar los c ubos de hielo
del evaporador hacia la gaveta de almacenaje.
4. Mode (Modo): Prim ariamente usado para empezar el proc eso de hacer hielo o para servicio y
reparación. Oprime el botón para cambiar el proceso entre hacer hielo y guardar hielo.
5. Adjust (Ajuste): Primariamente usado para servicio. Oprime el botón por aproximadamente 3
segundos para cambiar el tamaño de los cubos.
Como cambiar el tamaño de los cubos:
1. Oprime el botón por aproximadamente 3 segundos. El aparato entrará en modo de ajuste. La luz
indicadora amarilla titilará continuo durante la selección del tamaño de los cubos.
2. Mientras que titila la luz amarilla oprime el botón marcado “Clean” ( - ) o “Mode” ( + ) para
seleccionar el tamaño deseado.
38
Page 39

Cubos de tamaño pequeño:
Gaveta llena
Hacer hielo
Guardar hielo
Oprime el botón marcado “Clean” ( - ) hasta que alumbre la luz verde para seleccionar cubos
pequeños.
Cubos de tamaño grande:
Oprime el botón marcado “Mode” ( + ) hasta que alumbre la luz roja para seleccionar cubos grandes.
Después de 10 segundos el aparato volverá al proceso de hacer hielo automáticamente.
NOTA:
• Si durante el proceso d e seleccionar el tam año de los cubos se alum bran las (3) tres luces a la
vez, esto indica que el tamaño mediano está seleccionado.
• Cuando el aparato es té en el proceso de autolimpieza, no perm ite ningún cambio a la selección
del tamaño de los cubos.
Como hacer hielo:
1. Abre la válvula, oprime el b otón m arcado O N/OF F para encend er la un idad y deje que el canalón
se llene de agua. El aparato empezará automáticamente. (El indicador ICE – Verde titilará)
2. Después de 3 minutos, el aparato empezará hacer hielo y escuchará el sonido de agua fluyendo.
3. Oprime el botón marcado MODE para em pezar el proceso de hacer hielo si no ha em pezado
automáticamente. (El indicador ICE – Verde titilará).
4. Cuando el hielo está formado completamente, los cubos caerán hacía la gaveta de almacenaje.
5. Cuando la gaveta de almacenaje esté llena, el aparato parará de hacer hielo automáticamente.
6. El aparato volverá hacer hielo cuando se remueve los cubos de la gaveta o se derriten
lentamente.
IMPORTANTE:
• Se recomienda botar los primeros cubos pr oducido después de instalación.
• Nunca cierre la válvula mientras que la unidad esté produciendo hielo.
• Nunca tocar el evaporador mientras que la unidad esté produciendo hielo
• Mantener la puerta cerrada para evitar que el hielo se derrita y asegurar función eficie nte del
aparato.
39
Page 40

CUIDADO Y MANET ENI MI EN T O
Desconecte la unidad de la tomacorriente y cierre la válvula antes de proceder con la
limpieza y mantenimiento de la unidad.
Posición correcta de
Como limpiar el aparato.
Si la máquina de hielo no se usa durante mucho tiempo, antes del próximo uso debe limpiarse a
fondo. Siga cuidadosamente las instrucciones proporcionadas para la limpieza o el uso de soluciones
desinfectantes. No deje ninguna solución dentro de la fábrica de hielo después de la limpieza.
Limpieza rutina asegurará eficiencia de función y v
Nota importante:
Nunca almacene artículos en la gaveta de almacenaje, el aparato no es un
congelador. Objetos como botellas de vino o cerveza no son sanitarios y las
etiquetas de las botellas pueden mojarse y caerse causando bloqueo en la
manguera de desagüe.
Limpieza de las partes exteriores
La puerta y el gabinete se pueden limpiar con una solución de un detergente suave y agua tibia (por
ejemplo 1 oz de jabón de lavar platos con 2 galones de agua tibia). No utilice químicos de limpieza
con solventes o abrasivos. Utilice una esponja suave y enjuague con agua lim pia.
Limpieza del parte interior
Se recomienda desinfectar y limpiar la gaveta de almacenaje frecuentemente. Limpie el canalón de
agua la primera vez que se usa y también después de tiempos largos sin uso.
1. D esc onec ta la unidad del tomacorriente.
2. R emueva el hielo y limpia el interior de la unidad c on una solución de 1 oz de clor o y 2 galones
de agua caliente.
3. R emueva la manguera de desagüe del interior de la unidad.
4. Enjuague con agua limpia.
5. D espués de drenar la unidad, inst ale la manguera de desagüe en s u
posición original (ver imagen).
6. Conecte la unidad al tomacorriente.
la manguera de
desagüe
40
Page 41

Como limpiar el condensador
Condenser
Surface
Un condensador sucio impide la circulación del aire y reduce la capacidad de hacer hielo, y causa
elevación de las temperaturas operativas que puede resultar en daños. Debe de limpiar el
condensador cada seis meses.
1. D esc onec te la unidad del tomacorriente.
2. Remueva la parrilla delantera.
3. Limpia el condensador con una aspiradora con broche
4. Instala la parrilla delantera
5. C onecta la unidad al tomacorriente, la unidad volverá a
funcionar automáticamente.
Fallo de alimentación
Usualmente la electric idad regresa en unas pocas hor as sin afectar la temperatura de su aparato,
siempre que la puerta no se abra muy frecuentemente. Si le va a faltar electricidad por un período de
tiempo más largo, usted debe tomar los pasos apropiados para proteger sus alimentos.
Tiempo de vacaciones
Vacaciones cortas: Deje la unidad en funcionamiento durante las vacaciones de menos de tres
semanas.
Vacaciones largas: Si e l aparato no va a utili zar durante varios m eses, retire todos los alim entos y
desenchufe el cable de ali mentación. Limpie y seque bien el interior. Para evitar olores y humedad,
deje la puerta levemente abierta: bloquéela de ser necesario
Para mover su aparato
• Retire el hielo. Cierre la válvula de seguridad.
• Desconecte las mangueras de agua y desagüe.
• Asegúrese de colocar cinta adhesiva a todo lo que se puede caer dentro de su aparato.
• Retire las patas para prevenir que se dañen.
• Selle las puertas con cinta adhesiva.
• Asegúrese que el aparato se mantenga parado durante el traslado.
Consejos para ahorrar energía
Su aparato debe estar ubicado en el área más fría de la habitación, alejado de aparatos que
produzcan calor o conductos de aire caliente y lejos de los rayos solares.
41
Page 42

GUÍA DE SOLUCIÓN DE PROBLEMAS
Problema
Causa posible
Probable corrección
La máquina está desenchufada.
Enchufe la máquina de hielo.
circuito en la unidad.
OFF.
hielo esté libre de hielo.
apaga.
correctamente.
sucio.
hielo puede ser obstruido.
fuente de calor.
de almacenamiento.
está goteando.
línea de agua.
de tubo de drenaje.
parte inferior.
agua es inferior a 15 psi.
estar restringido.
Puede solucionar m uchos problemas comunes de l a unidad fácilmente, ahorrando e l costo de una
posible llamada de servicio. Pruebe las sugerencias a continuación para ver si puede resolver el
problema antes de llamar al servicio técnico.
Reemplace el fusible. Si sucede otra vez,
El fusible está fundido.
llame al servicio verificar que un corto
La máquina no
funciona.
El agua no
alimenta en
después de la
máquina.
La máquina hace
hielo, pero bandeja
no se llene con
hielo.
El botón de encendido del
fabricador de hielo está fijado en
El recipiente de hielo está lleno
de hielo.
El grifo de suministro de agua se
La tubería de suministro de agua
no está conectada
El condensador puede estar
El flujo de aire a la máquina de
La temperatura ambiente y
temperatura del agua son altos, o
unidad está cerca de alguna
Quite algunos cubitos de hielo.
Asegúrese de que la sonda de lleno de
Abrir el grifo de suministro de agua.
Vuelva a conectar la tubería de suministro
de agua.
Limpiar el condensador.
Revise la instalación.
Revise la instalación.
Agua gotea fuera
de la unidad.
Cubos se terminan
de formar o son de
color blancos en la
Agua cae al piso al abrir la puerta
para retirar el hielo del recipiente
Conexión de suministro de agua
Superior a la salida de desagüe
No hay suficiente agua en el
recipiente de agua.
42
Condensación normal en la puerta o agua
con hielo. Tenga cuidado al sacar hielo.
Apriete la conexión. Ver conexión de la
Tubo de drenaje inferior.
Compruebe si la presión de suministro de
Verificar suministro de agua o filtro puede
Page 43

Si hay una fuga de agua en el recipiente
de agua.
bloqueados.
nivelación de la fábrica de hielo.
Ciertos sonidos son normales.
Ver Sonidos normales.
alimentación.
especificada.
El recipiente de hielo está lleno
Quite algunos cubitos de hielo;
hielo esté libre de hielo.
El cuerpo de la
está vivo
La línea de tierra no está en el
Utilizar un receptáculo que cumple con
Escala se produce
máquina.
Desagüe debajo el recipiente de
hielo está bloqueado.
Retire el recipiente de hielo y limpie el
drenaje.
La manguera de desagüe está
recipiente de hielo.
Ruidos durante el
funcionamiento
La fábrica de hielo
se detiene
bruscamente
haciendo hielo.
fábrica de hielo
con frecuencia
dentro de la
Fugas de agua
desde el recipiente
de hielo
Los pies no están nivelados y
La electricidad está apagada. Vuelva a conectar la línea de
La temperatura ambiente es tá
fuera del rango indicado.
de hielo.
zócalo.
El nivel de dureza del agua es
demasiado alto.
retorcida o incorrectamente
colocado más alta que el piso del
Nivelar y trabar las patas. Véase
Cortar la electricidad y salir de la fábrica
de hielo desconectada hasta que la
temperatura vuelva a dentro de la gama
Asegúrese de que la sonda de lleno de
los requisitos de puesta a tierra.
Instalar un dispositivo de ablandamiento
del agua frente a la entrada de agua.
Compruebe la manguera de desagüe
para asegurarse de que el agua puede
drenarse hacia fuera sin trabas.
43
Page 44

SERVICIO EN SU ELECTRODOMESTICO
Estamos orgullosos de nuestra organización de servicio al cliente y la red de técnicos de servicios
profesionales que prestan servicio en sus Avanti Productos. Con la compra de su Avanti Products
número gratuito.
AVANTI PRODUITS SERVICES CLIENTS
Información sobre el producto
800-323-5029
Lo que sus preguntas son acerca de nuestros
productos, la ayuda está disponible .
Usted puede pedir p ie zas y accesorios que s erán
entregados directamente a su casa con un
cheque personal, giro postal, Master Card, o
Visa.
Un centro de servicio autorizado de Avanti
ertos, prevista en un momento que sea
conveniente para usted. Nuestros técnicos de
conocer nuestros productos de adentro hacia
afuera.
ESQUEMA DE CABLEADO
dispositivo, puede estar seguro de que si alguna vez necesita información o asistencia adicional, el
equipo de Servicio al Cliente de Avanti Products estará aquí para usted. Sólo tiene que llamar al
Pedidos de piezas
800-220-5570
Products proporcionar á el servicio de reparac ión
Servicio de reparación en casa
800-220-5570
de exp
44
Page 45

SUS GARANTIA DE AVANTI PRODUCTS
Grapa su recibo de compra aquí. Se necesita un
servicio bajo garantía.
COBERTURA - GARANTÍA LIMITADA DE UN AÑO
servicio del electrodoméstico para su reparación.
SEGUNDO A TRAVÉS DE GARANTÍA LIMITADA DE QUINTO AÑO
producto al centro de servicio y de vuelta a la casa del usuario, como tal requiere, son responsabilidad del usuario.
EXCLUSIONES DE LA GARANTÍA / ¿Qué no cubre:
productos de Avanti, incluyendo, sin limitación, uno o más de los siguientes:
• Un incumplimiento de cualquier estado, la localidad, ciudad, condado o instalaciones eléctricas, hidráulicas y / o códigos de
elementales y / o ambientales, sobretensiones, fallas estructurales alrededor del electrodoméstic o y los actos de Dios.
• las pérdidas de contenido de alimentos o de otros
• Costes de envío asociados a la sustitución de la unidad.
kilometraje para llamadas de servicio a zonas remotas.
En ningún caso Avanti Products tener ninguna obligación o responsabilidad alguna por daños a la propiedad cercana al
limitación gabinetes, paredes, pisos, estanterías etc., así como el reajuste de interruptores o fusibles.
A PARTIR DEL PRODUCTO GARANTÍA
reparaciones, estimados, o el reemplazo del producto, una vez que esta garantía ha expirado.
GARANTÍA - REFRIGERACIÓN - COMPRESOR
Avanti Products garantiza que el producto está libre de defectos en materiales y / o mano de obra durante un período de doce
(12) meses desde la fecha de compra por el propietario original. El tiempo mencionado arriba comienza a ejecutarse a partir
de la fecha de compra, y no se puede detener, estar sujeto a derechos, extender o suspender por cualquier motivo no ser que
se describe en detalle en el documento de garantía. Durante un año a partir de la fecha de compra por el propietario original,
los productos de Avanti, a su elección, reparará o reemplazará cualquier parte del producto que resulta ser defectuosa en
material o mano de obra bajo condiciones normales de uso. Avanti Products le proporcionará un producto parecido al original,
ya sea nuevo o restaurado de fábrica. Durante este período de Avanti Products proporcionará todas las piezas y mano de obra
necesarias para corregir dichos defectos de forma gratuita, siempre y cuando el producto ha sido instalado y operado de
acuerdo con las instrucciones escritas en este manual. En el uso de alquiler o comercial, el periodo de garantía es de 90 días.
Todos los electrodomésticos de Avanti de 4.4 pies cúbicos de capacidad o menos deben ser llevados / enviado al centro de
Para el segundo hasta el quinto año desde la fecha de compra original, Avanti Products proporcionará un compresor de
reemplazo de forma gratuita debido a un fallo. Usted es responsable de las cargas de trabajo y de carga de servicio. En el uso
de alquiler o comercial, la garantía del compresor es limitada a un año y nueve meses. Costos involucrados para mover el
La cobertura de la garantía se describe aquí excluye todos los defectos o daños que no son la responsabilidad directa de los
construcción, reglamentos o leyes, incluyendo la falta de instalar el producto en estricta conformidad con los códigos y
reglamentos contra incendios y de construcción locales.
• Cualquier fuerzas y factores, incluyendo, sin limitación, la lluvia, el viento, la arena, inundaciones, incendios, deslizamientos
de lodo, temperaturas de congelación, humedad excesiva o la exposición prolongada a la humedad, rayos externos,
comprobante de la fecha de compra original para obtener
contenidos debido a su deterioro.
• Los daños incidentales o consecuentes
• Piezas y mano de obra para los siguientes no serán
consideradas como garantía:
• puertas del evaporador, resortes de la puerta, y / o
marcos.
• paneles interiores de puertas, estantes de la puerta, los
carriles de las puertas, y / o soportes de la puerta.
• bombillas y / o carcasa de plástico.
• revestimientos de plástico del gabinete.
• Pinchado evaporador que anula la garantía en el
sistema sellado completo.
electrodoméstico, incluyendo gabinetes, pisos, techos y otras estructuras y / u objetos alrededor del producto. Tam bién se
excluyen de esta garantía los arañazos, golpes, abolladuras menores, y otros daños cosméticos en superficies externas y
partes expuestas; Productos en los que se han alterado los números de serie, dañado o eliminado; visitas de servicio para la
educación del cliente, o visitas donde no hay nada mal con el producto; corrección de problemas de instalación (usted es el
único responsable de cualquier estructura y entorno para el producto, incluyendo todas las instalaciones eléctricas, de
fontanería y / u otras instalaciones de conexión, para la cimentación / pisos adecuados y para alteraciones incluyendo sin
Avanti Products no tiene ninguna obligación, por ley o de otro modo, para ofrecerle ninguna concesión, incluidas las
• Reparaciones realizadas por servicio sin autorización.
• Las llamadas de servicio que están relacionados con los
problemas externos, tales como abuso, mal uso,
suministro eléctrico inadecuado, accidentes, incendios,
inundaciones, o cualquier otro acto de Dios.
• Fallas del producto si se utiliza para otra cosa que tenía la
intención propósito.
• La garantía no se aplica fuera de los EE.UU. continental.
• Recargos incluyendo, pero no limitado a, cualquier tras
hora, llamadas de fin de semana o vacaciones de
servicios, peajes, pasajes de transporte o gastos de
45
Page 46

APPAREIL SÉCURITÉ
Votre sécurité et celle des autres sont très importantes.
Nous avons fourni de nombreux messages de sécurité importants dans ce
manuel et sur votre appareil . To ujour s lir e et obéi r à tout mess ag e d e sécurités.
C'est le symbole d'alerte de
Tout message de sécurités vous alertera à quel est le danger potentiel et vous
peut arriver si les instructions ne sont pas suivies.
sécurité. Ce symbole vous signale
les dangers potenti el s peut tuer ou
blesser vous et d'autres. Tout
sécurité messages suivra la sécurité
symbole d'alerte et soit les
quartiers" DANGER","ATTENTION"
ou "PRUDENCE".
Danger signifie que le non-respect
de cette déclaration de sécur i té peu t
entraîner des blessures ou la mort.
Attention signifie que le non-respect
de cette déclaration de sécur i té peu t
entraîner des dommages importants
du produit, des blessures graves ou
la mort.
Attention signifie que le non-respect
de cette déclaration de sécur i té peu t
entraîner des mineures ou
modérées blessures, ou des biens
ou des dommages matériels.
disent comment réduire le risque de blessure, et vous permettent de savoir ce qui
46
Page 47

APPAREIL SÉCURITÉ
Avant le refroidisseur de breuvages est utilisé, il doit être correctement
•Brancher sur une 3 broches mise à la terre sortie, faire pas enlever la terre broches, faire pas utiliser
à un technicien qualifié.
• Utilisation deux personnes ou plus pour déplacer et installer l’appareil. Ne pas le faire peut entraîner
• Ne pas utiliser cet appareil pour d'autres fins que celles prévues.
positionné et installé comme décrit dans ce manuel, afin de lire attentivement
le manuel. Pour réduire le risque d'incendie, choc ou de blessure électrique
lors de l'utilisation du refroidisseur de breuvages, Suivez les précautions de
un adaptateur, et ne pas utiliser une rallonge
• Remplacer tous les panneaux avant exploitation
• Il est recommandé d'utiliser un circuit distinct, qui sert uniquement votre refroidisseur de breuvages,
fournir. Utilisez des récipients cette ne peut pas être désactivé par une chaîne de traction
interrupteur où
• ne jamais nettoyer appareil pièces avec des liquides inflammables. Ces vapeurs peuvent créer un
risque d'incendie or explosion. Et ne pas stocker ou utiliser de l'essence ou d'autres vapeurs et
liquides inflammables à proximité de cet appareil ou de tout autre appareil. Les vapeurs peuvent
créer un risque d'incendie ou d'explosion.
• Avant de procéder à des opérations de nettoyage et d'entretien, assurez-vous que la ligne
d'alimentation de l'appareil est débranchée.
• Faire pas brancher ou débrancher la prise électrique lorsque vos mains sont humides
• Débranchez l’appareil où déconnecter l’alimentation avant le nettoyage ou l'entretien. Ne pas le faire
peut entraîner un choc électrique ou la mort.
• Faire pas tenter de réparer ou de remplacer une partie de votre appareil à moins qu'il ne soit
spécifiquement recommandé dans ce matériau. Toutes les autres réparations doivent être confiées
bases, comprenant les éléments suivants:
dans le dos ou d'autres blessures.
• Pour assurer une bonne ventilation de votre appareil, l'appareil doit être complètement dégagé.
Choisissez un endroit bien aéré avec des températures supérieures à 55ºF (13ºC) et au-dessous
90ºF (32ºC). Cet appareil doit être installé dans une zone protégée de l’élément, Comme le vent, la
pluie, de l'eau pulvérisée ou lumière du soleil.
• l’appareil ne doit pas être situé à côté de fours, grilles ou autres sources de chaleur élevée.
• L’appareil doit être installé avec toutes les connexions électriques, d'eau et d'évacuation,
conformément à codes étatiques et locaux. Une alimentation électr iqu e stan dard ( 115 V CA
seulement, 60 Hz), mise à la terre conformément au Code national de l'électricité et les codes et
règlements locaux est nécessaire.
• Faire pas plier ou pincer le cordon d'alimentation de l’appare il.
• Le fusible (ou disjoncteur) doit être de 15 ampères.
• Il est important pour l'appareil soit à niveau afin de fonctionner correctement. Vous devrez peut-être
faire plusieurs ajustements à niveler.
• Toute installation doit être conforme aux exigences du code de plomberie locale.
• Assurez-vous que les tuyaux ne sont pas pincés ou pliés ou endommagés au cours installation.
• Vérifier les fuites après connexion.
• Ne jamais laisser les enfants utiliser, jouer avec ou crawl à l'intérieur de l'appareil
• Faire pas utiliser de produits de nettoyage à base de solvants or abrasifs sur l'intérieur. Ces
nettoyants peuvent endommager ou décolorer l'intérieur.
47
Page 48

Connexion électrique
~Attention~
Une mauvaise utilisation de la prise de terre peut entraîner un risque de choc électrique. Si
Products autorisé.
Cet appareil doit être correctement mis à la terre pour votre sécurité. Le cordon
d'alimentation de cet appareil est équipé d'une fiche à trois broches qui accouple
avec trois standards prises murales broches afin de minimiser le risque de choc
che de terre du cordon
et non laissés exposés ou qui pendent
. Si le cordon d'alimentation est trop
court, demandez à un électricien qualifié ou un technicien de service installer une
prise près d’appareil.
Ø RALLONGE ÉLECTRIQUE
En raison des risques potentiels pour la sécurité dans certaines conditions, il est
et que la puissance électrique du câble est de 115 volts et au moins 10 ampères.
Ø PARASURTENSEUR
La plupart des appareils électriques utilisent une série de tableaux de commande
nécessaire à un électricien agréé dans votre région.
Les dommages dus à des surtensions ne sont pas considérés comme un fabricant
couvert défaut et annulera la garantie du produit.
le cordon d'alimentation est endommagé, faites-le remplacer par un centre de service Avanti
électrique.
Ne pas en aucun cas couper ou enlever la troisième bro
d'alimentation fourni .
Cet appareil nécessite une prise électrique standard 115Volts ~ / 60Hz avec le sol à
trois broches.
Le cordon doit être fixé derrière l’appareil
pour prévenir les blessures accidentelles.
Ne jamais débrancher l'appareil en tirant sur le cordon d'alimentation. Toujours saisir
fermement la fiche et tirez tout droit sorti de la prise.
Ne pas utiliser une rallonge avec cet appareil
fortement recommandé de ne pas utiliser une rallonge avec cet appareil. Toutefois,
si vous devez utiliser une rallonge, il est absolument nécessaire que ce soit un UL /
CUL, 3 fils de terre appareil rallonge ayant une fiche de mise à la terre et à la sortie
électriques pour fonctionner. Ces cartes sont très sensibles aux surtensions et
pourraient être endommagés ou détruits.
Si l'appareil va être utilisé dans une zone ou si votre ville / pays est sujette à des
surtensions / coupures; il est suggéré que vous utilisez un dispositif de protection
contre les surtensions pour tous les dispositifs / appareils électriques que vous
utilisez. Le protecteur de surtension que vous sélectionnez doit avoir un bloc de
poussée suffisamment élevé pour protéger l'appareil, il est connecté. Si vous avez
des questions concernant le type et la taille d'un protecteur de surtension contact
48
Page 49

AIDEZ-NOUS À VOUS AIDER ...
SI VOUS AVEZ BESOIN DE SERVICE
Nous sommes fiers de notre service et nous
Ensuite, si vous n'êtes toujours pas satisfait, écrivez
PRUDENCE:
Il est destiné à vous aider à utiliser et à
maintenir votre nouvel appareil correctement.
Garde-le à portée de main pour répondre à
vos questions.
Si vous ne comprenez pas quelque chose où
vous avez besoin de plus d'aide, s'il vous plaît
appelez:
Avanti Service à la clientèle
800-220-5570
Gardez preuve de la date d'achat d'origine (tel
que votre bordereau de vente) avec ce guide
pour établir la période de garantie.
CET APPAREIL EST PAS
CONÇU POUR LE STOCKAGE
DE MÉDECINE OU D'AUTRES
PRODUITS MÉDICAUX.
Écrire le modèle et le numéro de série.
Vous les trouverez sur une plaque située sur la
paroi extérieure arrière de l'appar eil.
S'il vous plaît écrire ces chiffres ici:
__________________________________
Date d'achat
__________________________________
Numéro de modèle
__________________________________
Numéro de série
Utilisez ces numéros dans toute correspondance
ou appels de service concernant votre appareil.
Si vous avez reçu un appareil endommagé,
contactez immédiatement le revendeur (ou le
constructeur) qui vous a vendu l'appareil.
Gagnez du temps et de l'argent. Avant d'appeler le
service, consultez le Guide de dépannage. Il
énumère les causes des problèmes de
fonctionnement mineurs que vous pouvez vous
corriger.
voulons que vous soyez heureux. Si pour une
raison quelconque vous n'êtes pas satisfait du
service que vous recevez, voici quelques
étapes à suivre pour obtenir de l'aide.
FIRST, contacter les gens qui ont réparé vo tr e
appareil. Expliquez pourqu oi vous n' êtes pas
satisfait. Dans la plupart des cas, cela va
résoudre le problème.
tous les détails, y compris votre numéro de
téléphone, et l'envoyer à:
Service Clients
Avanti Produits
10880 NW 30 Street
Miami, FL 33172 USA
49
Page 50

PIÈCES ET CARACTÉRISTIQUES
50
Page 51

IMPORTANT INSTRUCTIONS DE S ÉCURI TÉ S
LE NON-RESPECT PEUT PROVOQUER RETOUR OU AUTRE BLESSURE
~
~
Pour réduire les risques d'incendie,
d'électrocution ou de blessure lors de
- Conservez ces instructions -
ATTENTION
l'utilisation de votre machine à glaçons, suivez
ces précautions de base:
Cette unité est à un usage intérieur
− Lisez toutes les instructions avant d'utiliser la machine à glaçons.
− DANGER ou AVERTISSEMENT: Risque de piégeage des enfants. Le piégeage des enfants et
asphyxie sont toujours du passé. Appareils abandonnés sont toujours dangereux. . . même s'ils « rester
assis dans le garage quelques jours ».
− Avant de jeter votre ancien appareil: Enlever les portes. Laissez les étagères en place afin que les
enfants ne puissent pas facilement grimper à l'intérieur.
− Ne jamais laisser les enfants utiliser, jouer avec, ou ramper à l'intérieur du distributeur de glaçons.
− Ne jamais nettoyer
risque d'incendie ou d'explosion.
− Ne pas entreposer ni utiliser d'essence ou d'autres vapeurs et liquides inflammables à proximité de ce
ou tout autre machine à glaçons. Les vapeurs peuvent créer un risque d'incendie ou d'explosion.
appareil pièces avec des liquides inflammables. Les vapeurs peuvent créer un
INSTRUCTIONS D'INSTALLATION
Avant d'utiliser votre mach in e à glaçons
• Retirez l'emballage extérieur et intérieur.
• Vérifiez que vous avez toutes les pièces suivantes:
o 1 Cuillère à glace
o 1 Approvisionnement en eau Tuyau
o 1 Eau tuyau de vidange
o Manuel d'instructions
• Avant de connecter l'appar eil à la source d'alimentat ion, laisse z-le tenir debout pendant e nviron
2 heures. Cela perm ettra de réduire la possibilité d'un d ysfonctionnement dans le système de
refroidissement de la manipulation pendant le transport.
• Nettoyer la surface intérieure à l'eau tiède avec un chiffon doux.
RISQUE DE POIDS EXCESSIF
UTILISER DEUX OU PLUS pour déplacer et installer la machine à glaçons
51
Page 52

INSTALLATION DE VOTRE ICEMAKER
Le fonctionnement de la machine à glace pour une longue période en dehors
affecter les performances du produit.
VUE DE CÔTÉ
TOP VIEW
Haut de l'unité
Arrière de
Avant de
Side
4”
1"
1"
1"
• CE ICEMAKER DOIT ÊTRE INSTALLÉ PAR UN PROFESSIONNEL QUALIFIÉ
Cette machine à glace DOIT être installé avec des connexions électriques et de l'eau,
conformément à tous les codes régionaux et locaux.
• Prévoir un minimum de 1 pouce de l'espace entr e le dessus et les côtés d e la machine à
glaçons et un minimum de 4 pouces à l'arrière, ce qui permet la circulation de l'air pour
refroidir le compresseur. Assu r ez -vous à l'avant de l'appareil est complètement dégagée.
• Placez votre machine à glaçons sur un sol qui est assez solide pour supporter la machine à
glaçons lorsqu'elle est complètement chargée. Pour mettre à niveau votre m achine à glaçons,
régler les pieds à l'avant de la machine à glaçons.
• Localisez la machine à glaçons l'abri du soleil et des sources de chaleur (poêle, chauffage,
radiateur, etc.). Lumière directe du soleil peut affecter le revêtement acrylique et sources de
chaleur peuvent augmenter la consommation électrique. Les températures ambiantes froides
extrêmes peuvent également causer la machine à glaçons ne pas fonctionner correctement.
• Choisissez un endroit b ien ventilé avec des températur es supérieures à 50 ° F (10 ° C) et au-
dessous 100ºF (38ºC). Cet appareil doit être installé dans une zone protégée contre les
intempéries.
• Éviter de placer la machine à glaçons dans les zones humides. Trop d'humidité dans l'air
provoquera le gel pour former rapidement sur l'évaporateur nécessitant un dégivrage plus
fréquent de la machine à glaçons.
AUTORISATIONS D'INSTALLATION:
• L'installation de cette machine à glaçons nécessite une entrée d'alimentation en eau froide de ¼”
(6.35mm) Un tube en cuivre doux avec une vanne d'arrêt.
• La machine à glaçons nécessite une alimentation continue en eau avec une pression minimale de
15 psi et une pression statique ne doit pas dépasser 80 psi. La température de l'alimentation en
eau dans la machine à glace doit être comprise entre 41 ° F (5 ° C) et 90 ° F (32 ° C) pour un
fonctionnement correct.
• Il est fortement recommandé d'utiliser un filtre à eau utilisé. Un filtre, si elle est du type approprié,
peut éliminer le goût et les odeurs ainsi que des particules. Un peu d'eau est très difficile, et l'eau
adoucie peut entraîner des cubes blancs putrides qui collent ensemble. L’eau déionisée est pas
recommandé.
Attention
des plages de températures normales telles que décrites ci-dessus peuvent
52
Page 53

Mise à niveau de la machine à glaçons
vers
en
Il est important pour la machine à glaçons à être nivelé afin de
travaille correctement. Il peut être relevé ou abaissé par rotation
les gaines en matière plastique autour de chacun des quatre pieds sur le
en bas de la machine. Si vous trouvez que la surface est
pas de niveau, tournez les pieds jusqu'à ce que la machine à glaçons
devient niveau Vous devrez éventuellement faire plusieurs ajustements
niveler. Nous vous recommandons d'utiliser le niveau d'un charpentier
vérifier la machine.
3. Placez un niveau de charpentier sur le dessus du produit pour voir si
la machine à glaçons est le niveau d'avant en arrière et côté à l'autre.
4. Ajustez la hauteur des pieds comme suit:
Tournez les pieds de nivellement vers la droite pour abaisser ce côté de la machine à glaçons.
Tournez les pieds de nivellement vers la gauche pour soulever ce côté de la machine à glaçons.
IMPORTANT: Une fois que vous êtes prêt à l'installer dans une armoire ou directement sur le sol,
vous devez ajuster les pieds au niveau de la machine à glaçons. Si le sol est de niveau, juste tourner
les deux pieds avant de toucher le sol.
Inverser la porte batta nt e
Outils nécessaires: tournevis à tête plate, tournevis Phillips
IMPORTANT: Avant de commencer, débranchez la machine à glaçons ou couper le
courant.
Pour enlever la porte de charnières:
4. Enl ever le couvercle de la charnière supérie ure en le poussant vers l'arrière de l'app areil, en le
soulevant alors fermé.
5. L' utilisation d'un tournevis Phillips , retirer les vis, puis retirer le mat de l a charnière sup érieure et
de la charnière supérieure. Gardez les pièces ensemble et les mettre de côté.
6. Soulever la porte hors de la charnière inférieure et de régler la porte de côté.
Pour remplacer la porte sur
charnières:
8. L'utilisation d'un tournevis à tête plate,
retirer les boutons de pris e de trous de
vis opposé aux charnières de porte, en
haut et en bas. Mettre de côté.
9. R et irez le Louvre avant. Mettre de côté.
10. Retirer la charnière inférieure et le
placer sur le côté op posé au fond de la
porte.
11. Placez la porte sur la charnière
inférieure.
12. Aligner la porte sur la charnière
inférieure et de remplacer la charnière
supérieure et supérieure tapis de
charnière.
13. Remettre le couvercle de la charnière
supérieure en appuyant vers le bas sur le tapis de charnière et puis en la poussant vers l'avant.
14. Appuyez sur les boutons enfichables dans les trous de vis d'origine.
53
Page 54

Connexion électrique
~ATTENTION~
Une mauvaise connexion de l'équipement de mise à la terre peut entraîner un risque de choc
électrique. Si le c ordon d'alimentation de l a gam me ou icemaker es t en dom magé, le remplac er par
un centre de service Avanti produits autorisés.
Cette machine à glace doit être correctement mis à la terre pour votre sécurité. Le
cordon d'alimentation de la machine à glaçons est équipé d'une fiche à troi s broches
qui coopère avec la norme trois broches prises murales pour réduire au minimum la
possibilité d'un choc électrique.
Ne pas en aucun cas couper ou en lever la troisièm e broche de t erre du cordon d'alim entation fourni.
Pour votre sécurité, cette machine doit être correctement mise à la terre.
Cette machine à glace néc essite un e prise de t erre él ectr ique standar d 115 /120 vo lts AC / 60H z avec
trois broches. Avoir la prise murale et le circuit par u n électricien qualifié pour vous assurer que la
prise est correctem ent mise à la terre. Qu and une prise m urale standard 2 broches es t rencontré, il
est de votre responsabilité et l'obligation de la faire remplacer par une prise murale à 3 broches
correctement mise à la terre.
Le cordon doit être fixé derrière la machine à glaçons et non laissés exposés ou ballants pour
prévenir les blessures accidentelles.
La machine à glaç ons doit toujours être branchée sur s a propre pris e électr ique qui a une tens ion qu i
correspond à l'étiquet t e d e notat io n s ur l a machine à glaçons. Cet te of f r e les meilleures performances
et aussi éviter une surc harge des circuits de câb lage qui pourrait provoquer un risque d'incendie de
surchauffe. Ne jamais débrancher la machine à glaçons en tirant sur le cordon d'alimentation.
Toujours saisir f ermement la fiche et retirer directem ent à partir du récipient. Réparer ou r emplacer
immédiatement tous les cordons d'alimentation qui se sont effilochés ou endommagés. Ne pas utiliser
un cordon présentant des fissures ou des dommages à l'abrasion sur sa longueur ou à chaque
extrémité. Lorsque vous déplacez la machine à glaçons, veillez à ne pas endommager le cordon
d'alimentation.
Cordon d'extension
En raison des risques potentiels pour la sécurité dans certaines conditions, il est fortement
recommandé de ne pas utiliser une r allonge avec cett e machine à glaç ons. Toutefois , si vous deve z
utiliser une rallonge, il est absolument néc essaire que c e soit une ex tension UL / CUL-Liste, de terre
3 fils cordon ayant une fiche de mise à la terre et à la sortie et que la capacité électrique du cordon de
115 volts et au moins 10 ampères.
Surge Protector
La plupart des machines à glaçons électriques utilisent une série de panneaux de commande
électrique pour fonctionner. Ces panneaux sont très sensibles aux surtensions et pourraient être
endommagés ou détruits.
Si la machine à glaçons va être utilisé dans une zone ou si votre ville / pays est sujette à des
surtensions / pannes; i l est recom mandé d'util iser un protec teur de surt ension po ur tous les app areils
électriques / icemakers que vous utilisez. Le protecteur de surtension que vous sélectionnez doit
avoir un bloc de poussée s uffis amment élevé pour protéger la m achine à glaçons , il est conn ecté. Si
vous avez des questi ons concernant le type et la taille du par asurtenseur contact nécessaire à u n
électricien agréé dans votre région.
Les dommages dus aux surtensions ne sont pas considérés comm e un fabricant couvert défaut et
annulera la garantie du produit.
54
Page 55

Approvisionnement en ea u
L'alimentation en eau devrait être prête au moment de l'installation. La pression d'alimentation en eau
doit être un minimum de 15 psi avec une pression statique pas plus de 80 psi. (Une prise murale
directement derrière la machine à glace facilité l'installation.)
IMPORTANT:
4. T outes les installations d oivent être conform es aux exigences du code de plomberie. Installation
professionnelle est recommandée.
5. Assurez-vous que les tuyaux ne sont pas pincés ou pliés ou endommagés lors de l'installation.
6. Vérifier les fuites après la connexion.
Outils nécessaires: ½-in. Clé à fourche, un tournevis Phillips
Connexion de la ligne d'eau:
6. Coupez l'alimentation en eau principale. Allumez le robinet le plus proche assez longtemps
pour que la canalisation d'eau.
7. T rouvez une ½ po. ¾-in. v ertical tuyau d'eau froide à proximité du lieu d'ins tallation. La distance
doit être inférieure à 6 pied s. Le tu yau d'alim entation e n eau f ourni avec l a m achine à glaç ons es t
d'environ 6 pieds de long.
8. U ne vanne d'arrêt doit être installée à l'alimentation en eau principale. Si l a conduite d'eau a un e
feuille de tube de cuivre, fixez un ¼” union de compression de diamètre extérieur au tube et
installer la vanne.
9. Connecter l'écrou du tuyau d'alimentation en eau au robinet, et l'autre extrémité avec l'entrée
d'eau. Serrez fermement à la main, puis un demi-tour avec une clé.
10. Allumez l'alimentation en eau principale et appuyez sur. Vérifier les fuites de connexion
d'alimentation en eau. Serrer chaque connexion (y compris la connexion à l'entrée de l'eau).
IMPORTANT: Lorsque vous vous connectez le tuyau d'alimentation en eau et le
tuyau de vidange, faites attention aux indications de « entrée d'eau » et « Trou de
vidange » sur la machine.
Drainer
Vous devez connecter la conduite de drainage avant d'utiliser la machine à glaçons. Suivez les
étapes décrites ci-dessous.
Il existe deux types de mode de machine à glace, un qui draine par gravité et un qui possède une
pompe de vidange interne.
Cette unité peut pomper de l'eau jusqu'à une élévation de 1,5 m (59 po) ou sur une longueur
horizontale de 1,5 m (59 po).
55
Page 56

Raccordement du tuyau de vidange:
Interrupteur de niveau d'eau 2
Interrupteur de niveau d'eau 1
REMARQUE: Si une conduite de drainage se trouve à proximité de la machine à glaçons, le meilleur
choix est de drainer l'eau vers la conduite de drainage à travers le tuyau d'eau de drainage fourni
avec la machine à glaçons.
1. Localisez le siphon de sol près de la machine à glaçons. La distance doit être inférieure à 5 pieds
car la longueur du long tuyau d'eau de drainage fourni avec la machine à glaçons est d'environ 5
pieds.
2. Trouvez la sortie du drain à l’arrière de la machine à glaçons. Connectez la sortie du drain au tuyau
d'évacuation de l'eau et insérez l'autre extrémité du tuyau dans la conduite de drainage.
REMARQUE: Ne jamais laisser le tuyau d'évacuation pendre ou faire une boucle plus haut que le sol
de la glace bac de rangement.
3. Toutes les lignes horizontales de canalisations de drainage doivent avoir une chute de ¼ ”par pied.
Un intervalle d'air sera probablement nécessaire entre le tuyau de dra inage de la machine à glaçons
et le réceptacle de vidange / déchets. Une conduite d’alimentation avec un siphon en dessous serait
acceptable pour le récipient de vidange / déchet. Un drain de sol est également acceptable. Si cela
n'est pas possible, l'utilisation d'une pompe à condensat est recommandée.
4. Versez 1 gallon d'eau dans le bac de stockage de glace pour vérifier s'il y a des fuites dans le
système de drainage. Serrer toutes les connexions qui fuient.
IMPORTANT: Cette machine à glaçons n'est pas un congélateur. Un drainage peu fréquent
entraînera un taux de fonte élevé dans le bac de stockage de glace.
Les composants du système de pompe de vidange d'eau sont:
• Réservoir d’eau, carte de circuit imprimé et commutateur de niveau d’eau 1, 2
• Pompe de vidange d' eau
• OPÉRATION
Toute l’eau provenant du trop-plein et de la glace fondue est collectée dans le réservoir d’eau.
Dès que l'eau dans l e réservoir atteint le niv eau maxim um, l'interrupte ur de niveau d' eau 1 se f erme,
transmettant un courant à basse tension à la carte de circuit imprimé.
56
Page 57

NOTE:
d'eau.
clientèle.
• • La carte d e circuit imprimé active la pompe de vidange pendant
20 secondes, pompant la majeure partie de l'e au contenue dans le
réservoir.
• • L’eau peut être pompée jusqu’à 1,5 m (59 ”) ou
•
sur une longueur horizontale de 1,5 m (59 ”).
• Si le contacteur de niveau d'eau 2 se ferme, transmettant un
La sortie du tuyau
d'évacuation doit être
surélevée par rapport à la
surface de l'eau pour
empêcher l'eau drainée de
refluer dans le réservoir
ATTENTION!
Si l'avertisseur sonore
retentit, fermez la machine à
glaçons et l'alimentation en
eau, retirez toute la glace du
bac de stockage et essuyez
toute eau qui aurait pu
déborder. Vérifiez s'il y a de
l'eau dans le bac à l'arrière
de l'appareil; s'il n'y a pas
d'eau, la pompe de drainage
risque de ne pas recevoir la
quantité d'énergie
appropriée. Vérifiez la source
d'alimentation. Si le problème
peut être résolu, rallumez
l'appareil. Vérifiez également
qu'aucune des lignes d'eau
n'est pliée. Si le problème
persiste, contactez le service
courant basse tension à la carte PC, la carte PC déclenche
l'avertisseur sonore en vous informant que la pompe de vidange, le contacteur de niveau d'eau ou le
tube de vidange sont peut-être défectueux.
Diagramme schématique
57
Page 58

UTILISATION DE VOTRE ICEM AKER
+
_
Panneau de configuration: Description des boutons et voyants lumineux:
Signaux lumineux:
6. BIN COMPLET (ROUGE): Bin est plein
Lorsque ce voyant est allumé, le bac de stockage de glace est plein de glace ou il y a quelque
chose bloque le capteur bac plein. L'unité arrête le processus de fabrication de glace jusqu'à ce
que le niveau de glace soit réduit ou l'objet bloquant le capteur est retiré.
Lorsque les cubes de glace sont enlevés et le capteur bac plein est effacé; le témoin lumineux
bin plein clignote pendant 3 minutes, l'appareil redémarre et revenir au processus de fabrication
de glace.
7. ICE (vert): Processus de fabrication.
Lorsque ce voyant est allumé, l'appareil fonctionne dans le processus de fabrication de glace qui
est commandé par un capteur de température sur l'évaporateur. Lorsque le voyant lumineux
indicateur vert, l'appareil fonctionne pour produire de la glace et est basée sur un temporisateur
fixe.
8. HARVEST (jaune): processus de récolte de glace.
Lorsque ce voyant est allumé, l'appareil est en train de récolter la glace qui a été produit. La
machine continuera à faire et de la glace de la récolte jusqu'à ce que le capteur de bac plein fait
remarquer que le bac est plein ou jusqu'à ce que l'appareil soit mis hors tension ou le mode de
système est modifié en appuyant sur la touche « MODE ».
9. Bouton Mode: Ce bouton est utilis é principalement pour le démarrage rap ide du processus
de fabrication de glace ou pour les problèm es de service / réparation. V ous pouvez « démarrage
rapide » le système en appuyant sur le bouton « MOD E » lors de la première branché, le pouvoir a
été perdu ou si l'appareil a été mis hors tension pendant une période de temps.
10. Bouton de réglage: Ce bouton est utilisé principalement pour le service et ou pour sélectionner la
taille des cubes de glace. Pour sélectionner les cubes de glace, appuyez et maintenez le bouton
pendant environ 3 secondes, le « RÉCOLTE » voyant lumineux (jaune) s'allume et le système
58
Page 59

entrera dans la taille de la glace mode de sélection. Relâchez le bouton une fois que la lumière
Bin étape complète
étape de fabrication de
Stade de la récolte de
récolte (jaune) clignote et appuyez simplement sur le (+) ou (-) pour sélectionner des cubes plus
ou moins, l'appareil est livré de l'usine mis aux cubes de taille normale.
UTILISATION DE VOTRE ICE-MAKER
8. Allumez le robinet d'eau.
9. Appuyez sur le bouton ON / OFF.
10. Au bout d e 3 minutes, la mac hine passe autom atiquem ent à l'étape de fabricati on de glace, et l e
bruit de l'eau qui coule sera entendu. (Le témoin d'ICE (VERT) clignote pendant ce processus).
11. Appu yez sur le bouton MO DE pour dém arrer rapidement le pr ocessus de fabr ication de glace et
laisser le bac à eau pour commencer à remplir automatiquement. (Le témoin d'ICE (VERT)
clignote pendant ce processus).
12. Lorsque le lot de glace a été entièrement formé, la glace sera automatiquement récoltée et
déposer dans le bac de st ockage de glace. (Le vo yant HARVEST (JAUNE) c lignote pendant ce
processus).
13. Lors que le bac de stock age de glace est plein, la feuille de cubes ne tom bera pas com plètement
et tiendra l'ouverture du capteur bac plein. La machine cessera de automatiquement la glace.
(L'indicateur BIN-pleine lumière (ROUGE) clignote pour indiquer que le bac est plein ou le
capteur est bloqué.)
14. L'unité va commencer à f aire de la glace à nouv eau après des cubes de glace sont enlev és ou
lorsque le capteur de bac plein son grand retour à la position de fonctionnement. (L'indicateur
BIN-pleine lumière (RED) continuera à clignoter pendant environ 3 minutes, puis le système
commencera automatiquement le processus de fabrication de glace à nouveau.)
IMPORTANT:
• Bien que l'appareil ait été testé et nettoyé à l'usine, en raison de transit à long terme et le
stockage, le premier lot de cubes doit être mis au rebut.
• Ne jamais couper l'alimentation en eau du robinet lorsque la machine à glaçons fonctionne.
• Ne touchez jamais l'évaporateur lorsque l'appareil est en marche!
59
Page 60

• Pour éviter que la glace de fondre et d'assurer la formation de glace appropriée, garder la porte
fermée, sauf lors du retrait de la glace du bac.
Taille Guide d'ajustement:
3. Appuyez et maintenez enfoncé le bouton « Régler » pendant environ 3 secondes. L'appareil
passe en mode d'ajustement à la taille de la glace. La LED « HARVEST » (jaune) clignote en
continu tandis que la taille de la glace est sélectionnée. Relâchez le bouton lor sque le voyant
clignote en permanence pour régler la taille de la glace.
4. Dans le mode de sélection de la taille de la glace, appuyez sur la « Clean » (-) ou sur le bouton «
Mode » (+) pour la taille de la glace désirée.
Plus petit réglage de la glace:
En appuyant sur la « Clean » (-) bouton, vous pouvez sélectionner la taille des cubes SMALL de
glace. La LED « ICE » (VERT) clignote lorsque vous sélectionnez la plus petite taille de la glace.
Agrandir réglage de la glace:
En appuyant sur le bouton « Mode » (+), vous pouvez sélectionner la grande taille des cubes de
glace. La LED « BIN FULL » (RED) clignote lorsque vous sélectionnez la taille de la glace plus
grande.
Au bout de 10 secondes sans aucune opération, l'appareil retourne au mode précédent.
REMARQUE:
• Si pendant le m ode de régl age de la tail le de la g lace le « BIN FU LL », « IC E » et « RÉCO LT E »
LEDS clignotent à la f ois; cela ind ique que l'appareil e st dans le ré glage norm al (au m ilieu) de la
taille de la glace.
• Lorsque la machine es t dans la phase de nettoyage ou l e stade de glace complète, le m ode de
réglage de la taille de la glace ne peut être consulté
60
Page 61

COMMENT LA GLACE MAKER ICE RÉALISE
Réglez le bouton ON / OFF sur la position ON.
La machine passe automatiquement à la phase de fabrication de glace.
L'unité passera par deux cycles distincts lors de la production de votre glace.
Le premier cycle est le « gel » où la glace est effectivement produite et la
seconde est la « moisson » où la glace est tombée dans le bac à glaçons.
Le cycle de congélation se produit lorsque l'eau à la surface de l'évaporateur. Le cycle de récolte est
quand la glace est libérée et l'eau pénètre dans la machine. Un cycle complet dure environ 20
minutes, mais cela dépend des conditions de température et de fonctionnement.
Gel: Pendant le cycle de congélation est de pompage du compresseur frigorifique, le moteur du
ventilateur soufflant de l'air, et la pompe à eau est en circulation de l'eau. Lorsque le lot de glace a été
entièrement formé, la machine à glaçons arrête le cycle de gel et le cycle de récolte commencera.
Récolte: Au cours du cycle de récolte, le compresseur fonctionne toujours, mais la pompe à eau est
arrêtée. La vanne de gaz chaud débouche, en détournant le gaz réfrigérant chaud dans l'évaporateur.
Le gaz réfrigérant chaud réchauffe l'évaporateur, ce qui provoque les cubes de glisser comme une
unité de l'évaporateur et dans le bac de stockage. Le cycle de congélation redémarre lorsque tous les
cubes ont été récoltés.
Comment la machine utilise l'eau
La machine à glaçons commence par une charge fixe d'eau contenue dans la cuve d'eau. Comme
l'eau coule vers la surface de l'évaporateur de congélation, la partie de l'eau qui ne contient pas
d'impuretés minérales gels et des bâtonnets dans les moules à glaçons. L'eau contenant des
impuretés retombe dans le creux de l'eau. Au cours du processus de fabrication de glace, de l'eau
fraîche pénètre dans le bac à eau en continu que l'eau gèle dans le creux de façon continue dans
l'évaporateur.
Les bruits normaux
Votre nouvelle machine à glaçons peut faire des sons qui ne sont pas familiers. La plupart des
nouveaux sons sont normaux. Les surfaces dures comme le plancher et les murs peuvent faire les
sons plus forts qu'ils ne le sont en réalité. La liste suivante décrit les sons qui pourraient être nouveau
pour vous et ce qui peut être la cause.
• Des vibrations sonores peuvent provenir de l'écoulement du réfrigérant ou de la ligne d'eau.
Articles stockés sur le dessus de la machine à glaçons peut aussi faire des bruits dus aux
vibrations.
• Le compresseur à haut rendement peut faire une palpitation ou son aigu.
• L'eau courante peut faire un son éclaboussant.
• Vous pouvez entendre l'air forcé sur le condenseur par le ventilateur du condenseur.
• Au cours du cycle de récolte, vous pouvez entendr e le bruit des cubes de glace tomber dans le
bac de stockage de glace.
61
Page 62

ENTRETIEN
Si la machine à glaçons est restée longtemps inutilisée, elle doit être nettoyée à fond
l'intérieur de la machine à glaçons après le nettoyage.
Avant de procéder à des opérations de nettoyage et d'entretien, assurez-
Nettoyage La machine à glaçons
avant la prochaine utilisation. Suivez attentivement toutes les instructions fournies pour
le nettoyage ou l'utilisation de solutions désinfectantes. Ne laissez aucune solution à
Un nettoyage périodique et l'entretien adéquat assureront l'efficacité, les performances optimales et
une longue vie. Les intervalles d'entretien indiqués sont basés sur des conditions normales. Vous
pouvez raccourcir les intervalles si vous avez des animaux, ou il y a d'autres considérations
particulières.
Note importante:
Ne jamais garder quoi que ce soit dans le bac de stockage de glace qui ne sont pas
de glace: des objets comme des bouteilles de vin et la bière sont non seulement
insalubre, mais les étiquettes peuvent glisser et boucher le drain.
vous que la ligne d'alimentation de l'appareil est déconnectée et la ligne
d'eau est coupée.
Nettoyage de l'extérieur
La porte et l'armoire peuvent être nettoyées avec un détergent doux et de l'eau chaude tels que 1 oz.
de liquide de lavage de vaisselle mélangé avec 2 litres d'eau chaude. Ne pas utiliser de produits
nettoyants à base de solvants ou abrasifs. Utilisez une éponge douce et rincer à l'eau claire. Essuyez
avec une serviette propre et douce pour éviter les traces d'eau.
Si le panneau de porte est en acier inoxydable, il peut se décolorer lorsqu'il est exposé au chlore
gazeux et de l'humidité. Nettoyez l'acier inoxydable avec un détergent doux et de l'eau chaude et un
chiffon humide. Ne jamais utiliser un agent de nettoyage abrasif.
62
Page 63

Nettoyage de l'intérieur
Emplacement droite
Condenser
Surface
Le bac de stockage de glace doit être désinfecté de temps en temps. Nettoyer le bac à eau avant que
la machine à glaçons soit utilisée première fois et réutilisé après l'arrêt pendant une longue période
de temps. Il est généralement pratique pour assainir le creux après que le système de fabrication de
glace a été nettoyé, et le bac de stockage de glace est vide.
8. C oup er l'alimentation de l'appareil.
9. Ouvrez la porte et sortez le bac de stockage de glace amovible. Avec un chiffon propre et
essuyer l'intérieur de l'unité et le bac à glace avec une solution désinfectante faite de 1 once
d'eau de javel ou du chlore et 2 gallons d'eau chaude (95 ° F - 115 ° F) de l'eau.
10. Retirer le tuyau de vidange de la cuve d'eau pour évacuer toute l'eau.
11. Rincez abondamment à l'eau claire.
12. Après vidange de toute l'eau, rem ettre le tuyau d'évacuation de l'eau
jusqu'à l'emplacement d'origine.
13. Placez le bac de stockage de glace à l'intérieur de l'appareil.
14. Remettre le courant à l'appareil.
La cuillère à glace doivent être lavés régulièrement. Lavez-le comme tout
autre récipient alimentaire.
Nettoyage du condenseur
du tuyau de vidange
Un condenseur sale ou bouché empêche une bonne circulation de l'air, réduit la capacité de
fabrication de glace, et provoque plus que des températures de fonctionnement recommandées qui
peuvent conduire à l'échec du composant. Avoir le condenseur
nettoyé au moins une fois tous les six mois.
6. Débranchez la machine à glaçons ou couper le courant.
7. Retirez délicatement la persienne inférieure avant.
8. Enlever la saleté et les peluches du condenseur et
compartiment avec l'accessoire brosse de nettoyage d’a
vacuum.
9. Réassembler la persienne inférieure avant.
10. Branchez la machine à glaçons ou rétablir le courant.
Nettoyage du tube de distribution d'eau
Lorsque vous trouvez les cubes de glace sont incomplètement formés ou la sortie est faible, le tube
de distribution d'eau peut être bloquée. Éteignez le bouton d'alimentation, doucement retirer le tube
de distribution d'eau, de localiser les trous dans le tube de distribution et l'utilisation d'un objet pointu,
comme un cure-dent pour draguer les trous. Ensuite, placez le tube de distribution de l'eau à sa
position d'origine. Si le tube est m al bloqué, net toyez-le comme suit:
7. C oup er l'alimentation en eau
8. Déconnecter le tuyau de l'eau à partir du tube de distribution.
9. Doucement prendre le tube de distribution.
10. Avec une brosse, Netto yer le t ube a vec un e solution diluée d'eau ch aud e et un détergent doux tel
que liquide vaisselle. Apr ès élimination de la saleté et les pel uches de la surface, rincer le tube
avec de l'eau propre.
63
Page 64

11. Remplacer le tube de distribution.
Jeter le premier lot de glace produite après le nettoyage.
12. Rebranchez l'alimentation en eau.
Le nettoyage du système de fabrication de glace (BOUTON CLEAN)
Le nettoyeur de machine à glace contient des acides.
Ne pas utiliser ou mélanger avec d'autres produits de nettoyage à base de solvants.
Utiliser des gants en caoutchouc pour protéger les mains. Lisez attentivement les consignes de
sécurité importantes sur le récipient du nettoyeur de machine à glace.
Les minéraux qui sont retirés de l'eau au cours du cycle de congélation finiront par former un disque,
le dépôt écailleux dans le système d'eau. Nettoyage du système permet régulièrement éliminer
l'accumulation de tartre minéral. Combien de fois pour nettoyer le système dépend de la dureté de
l'eau est ou comment votre filtration efficace peut être. Avec l'eau dure de 15 à 20 grains / gal. (4 à 5
grains / litre), vous devez nettoyer aussi souvent qu'une fois le système tous les 6 mois.
12. Assurez-vous que toute la glace est de l'évaporateur. Si la glace est formée, attendez que le
cycle est terminé, puis appuyez sur le bouton ON / OFF de la machine sur le panneau de
commande.
13. Retirer tous les glaçons du bac de stockage.
14. Gardez la machine à glaçons connecté à l'al imentation en eau. Verser8 o z. de glace N ickel-Safe
Maker Cleaner Solution d ans le bac à ea u. Appu yez ensuite sur l e bouton ON / OFF et le bou ton
CLEAN, initiant le cycle de lavage. La machine fonctionnera en mode automatique propre.
15. Prévoyez 30 minutes pour un bon nettoyage. Après le nettoyage, appuyez à nouveau sur le
bouton ON / OFF. Ut iliser un tuyau de vidan ge sur le devant de l a cuve d'eau pour évacuer les
eaux usées dans un récipient convenable.
REMARQUE: Ne pas écouler les eaux usées à l'intérieur de l'armoire.
16. Répétez les étapes 3 et 4 (sans nettoyage m achine à glaçons Sol ution) trois fois pour r incer le
système de fabrication de glace à fond.
17. Préparer une solution désinf ectante en 1 once d'eau de Javel et 2 litres d'eau chaude (95 ° F à
115 ° F). Essuyez l'ensemble bac à l'intérieur et à l'extérieur, couvrant toute la surface des murs.
18. Remplir un flacon pul vérisateur avec la solution désinf ectante et pulvériser tous les coins et les
bords, en veillant à couvrir toutes les surfaces avec la solution.
19. La solution à être en contact pendant au moins 3 minutes, puis sèche.
20. Répétez l'étape 5 pour rincer le système de fabrication de glace une fois de plus.
21. Appuyez à nouveau sur le bouton ON / OFF. La machine retourne au mode de fabrication de
glace régulière.
22. Jeter le premier lot de glace.
64
Page 65

Panne électrique
La plupart des pannes de courant sont cor rigées en quelques heur es et ne devraient pas affecter la
température de votre m achine à glaçons si vous rédui sez le nombre de f ois que la porte est ouv erte.
Si la puissance va êt re hors service pendant une longue période de temps, vous devez pren dre les
mesures appropriées pour protéger vos aliments.
Temps de vacances
Courtes vacances: Laissez l'appareil fonctionner pendant les vacances de moins de trois semaines.
Longues vacances: Si la machine à glaçons ne sera pas utilisée pendant plusieurs mois, retirez
toute la glace et débranch ez le cordon d'alimentation. Nettoyer et sécher soigneusement l'intérieur.
Pour prévenir les od eurs et les moisissures, l aisser la porte légèrem ent ouverte: blocage ouverte s i
nécessaire
Déplacement de votre machine à glaçons
• Retirez tous les aliments.
• Fixez solidement vers le bas tous les éléments à l'intérieur de votre appareil en vrac.
• Tournez les vis de réglage à la base pour éviter tout dommage.
• Collez les portes fermées.
• Assurez-vous que l'appareil reste en position vertic a le pend ant le trans por t.
Préparation de la machine à glaçons pour le stockage à long terme
Si la machine à glaçons n’était pas utilisée pendant une longue période, ou doit être déplacé vers un
autre endroit, il serait nécessaire de drainer le système d'eau.
8. C oup er l'alimentation en eau à la source principale d'e au.
9. Déconnecter la ligne d'alimentation en eau à partir de l'entrée d'eau.
10. Couper l'alimentation électrique à la source principale d'alimentation électrique.
11. Sortez le bac de stockage de glace pour enlever toute la glace restante et de l'eau. Sécher le
bac.
12. Retirer le tube de drainage de la cuvette de l'eau pour drainer toute l'eau.
13. Laissez la porte ouverte pour permettre la circulation et de prévenir la moisissure.
14. Laisser la ligne d'alim entation en eau et le cor don d'alimentation est c oupée avant d'être prêt à
réutiliser.
IMPORTANT:
• Ne touchez pas la prise d'alimentation lorsque vos mains sont mouillées.
• Ne jamais débrancher l'appareil en tirant sur le cordon. Attrapez la fiche et tirez fermement.
L'économie d'énergie
• L'appareil doit être situé da ns la zone la plus fraîche de la pièc e, loin des app areils produisant de
la chaleur ou des conduits de chauffage et de lumière directe du soleil.
65
Page 66

DÉPANNAGE
Problème
Cause possible
Correction probable
débranchée.
court-circuit dans l'unité.
OFF.
est plein de glace.
la sonde de glace complète est libre de glace.
est coupé.
connecté.
Le condenseur peut être sale.
Nettoyer le condenseur.
glaçons peut être obstruée.
chaleur.
de stockage.
en eau coule.
de la ligne d'eau.
que la sortie de vidange.
Avant d'appeler
Si l'appareil semble mal fonctionner, lisez la section FONCTIONNEMENT de ce manuel d'abord. Si le
problème persiste, consultez le Guide de dépannage sur les pages suivantes. Certains des
problèmes mentionnés dans le Guide peuvent être résolues sans un appel de service.
La machine ne
fonctionne pas.
L'eau ne se nourrit
pas après
démarrage de la
machine.
La machine fait la
La machine à glaçons est
Le fusible est grillé.
Le bouton d'alimentation de la
machine à glaçons est réglé sur
Le bac de stockage de glace
Le robinet d'alimentation en eau
Le tuyau d'alimentation en eau
ne soit pas correctement
Le débit d'air à la machine à
Branchez la machine à glaçons dans.
Remplacer le fusible. Si cela se produit à
nouveau, appelez le service pour vérifier un
Mettez le bouton d'alimenta tion de la machine à
glaçons sur ON.
Retirer des cubes de glace. Assurez-vous que
Ouvrez le robinet d'alimentation en eau.
Reconnecter le tuyau d'alimentation en eau.
Vérifiez l'installation.
glace, mais bin ne
remplit pas avec de
la glace.
De l'eau sort de
l'unité.
La température ambiante et la
température de l'eau est élevé,
ou de l'unité se trouve à
proximité d'une source de
Un peu d'eau tombe sur le sol
lorsque vous ouvrez la porte
pour enlever les glaçons du bac
Raccordement de l'alimentation
Tuyau de vidange plus élevé
Vérifiez l'installation.
Condensation normale sur la porte ou un peu
d'eau avec de la glace. Faites attention lorsque
vous prenez la glace.
Serrer raccord. Consultez la section Connexion
Inferieur tuyau de vidange.
66
Page 67

Les cubes sont
inférieure à 15 psi.
limité.
Vérifier une fuite d'eau au creux de l'eau.
et verrouillés.
niveau de la machine à glaçons.
Certains sons sont normaux.
Voir Sons normaux.
L'électricité est coupée.
Rebranchez la ligne d'alimentation.
température revienne dans la plage ind iq uée.
est électrifié
machine.
est bloqué.
stockage de glace.
Vérifiez si la pression d'alimentation en eau est
partiellement formés
ou sont blancs sur
le fond.
Le bruit lors du
fonctionnement
La machine à
glaçons arrête
soudainement tout
en glace.
Le corps de la
machine à glaçons
Mise à l'échelle se
produit
fréquemment à
l'intérieur de la
Pas assez d'eau dans le bac à
eau.
Les pieds ne sont pas nivelés
La température ambiante es t
hors de la fourchette indiquée.
Le bac de stockage de glace
est plein de glace.
La ligne de masse ne se trouve
pas dans la prise.
Le niveau de dureté de l'eau est
trop élevé.
Vérifier l'alimentation en eau ou filtre peut être
Niveau et verrouiller les pieds. Voir Mise à
Coupez l'électricité et laisser la machine à
glaçons débranché jusqu'à ce que la
Retirer des cubes de glace; assurez-vous que la
sonde de glace complète est libre de glace.
Utilisez une prise répondant aux exigences de
mise à la terre.
Installer un dispositif d'adoucissement de l'eau
en face de l'entrée d'eau.
Le trou de vidange en dessous
du bac de stockage de glace
Les fuites d'eau du
bac de stockage de
glace
Le tuyau d'évacuation est plié
ou mal placé plus haut que le
plancher de la caisse de
Retirez le bac de stockage de glace et nettoyer
le trou de vidange.
Vérifier le tuyau de vidange pour être de l'eau
que peut être évacuée sans entrave.
67
Page 68

SERVICE POUR VOTRE APPAREIL
Nous sommes fiers de notre organisation de service à la clientèle et le réseau de techniciens de
l'équipe de service à la clientèle Avanti Products sera là pour vous. Appelez-nous sans frais.
AVANTI PRODUITS SERVICES CLIENTS
800-323 5029
produits, l'aide est disponible.
Vous pouvez commander des pièces et
personnel, mandat, Master Card ou Visa.
à l'extérieur.
SCHEMA CABLAGE
services professionnels qui offrent des services sur vos appareils Avanti. Avec l'achat de votre
appareil Avanti, vous pouvez avoir la certitude que si vous avez besoin d'informations ou de l'aide de
Information produit
Les commandes de la pièce
800-220 5570
In-Home Repair Service
800-220 5570
Quelles que soient vos questions sont sur nos
accessoires qui seront livrés directement à votre
domicile.
Vous pouvez commander ces articles par chèque
Un centre de service Avanti Produits autorisé
fournira un service de réparation expert, prévue à
un moment qui vous convient. Nos réparateurs
formés connaissent votre appareil à l'intérieur et
68
Page 69

VOS GARANTIE AV AN TI PRODUCTS
Staple votre reçu de vente ici. Preuve de la date d'achat originale est
nécessaire pour obtenir un service sous garantie.
CE QUI EST COUVERT - GARANTIE LIMITÉE D'UN AN
être traduits / envoyé au centre de service de l'appareil pour la réparation.
DEUXIÈME LIMITÉE À LA CINQUIÈME ANNÉE GARANTIE
centre de service et de retour à la maison de l'utilisateur, comme peut-être nécessaire, sont à la charge de l'utilisateur.
EXCLUSIONS DE LA GARANTIE / NON COUVERTS:
Products, y compris, sans limitation, un ou plusieurs des éléments suivants:
• Un non-respect de tout État applicable, local, ville, ou du comté électricité, plomberie et / ou des codes du bâtiment, des
Dieu.
• Les pertes de contenu de la nourriture ou d'autres contenus
• Les réparations effectuées par réparateurs non
En aucun cas, Avanti Products toute responsabilité ou responsabilité pour les dommages aux biens environnants, y compris
les armoires, les murs, les planchers, les étagères etc., ainsi que la remise à zéro des disjoncteurs ou fusibles.
HORS DE LA GARANTIE DU PRODUIT
réparations, les pro-taux, ou le remplacement du produit, une fois la garantie expirée.
GARANTIE - REFRIGERATION - COMPRESSEUR
Avanti Products garantit que le produit est exempt de défauts de matériaux et / ou de fabrication pour une période de douze
(12) mois à compter de la date d'achat par le propriétaire initial. La durée commence à courir à la date d'achat, et ne sera pas
retardée, restreinte, prolongée ou suspendu pour quelque raison que ce soit, sauf si décrit en détail dans le document de
garantie. Pendant un an à compter de la date d'achat par le propriétaire d'origine, les produits Avanti seront, à sa discrétion,
réparer ou remplacer toute partie du produit qui se révèle être un défaut de matériau ou de fabrication dans une utilisation
normale. Avanti Products vous fournira un produit raisonnablement semblable nouveau ou remis à neuf. Au cours de cette
période Avanti Products fournira toutes les pièces et la main-d'œuvre nécessaires pour corriger ces défauts gratuitement, aussi
longtemps que le produit a été installé et utilisé conformément aux instructions écrites dans ce manuel. En usage locatif ou
commercial, la période de garantie est de 90 jours. Tous les appareils Avanti de 4,2 pieds cubes la capacité ou moins doivent
Pour la deuxième à la cinquième année à partir de la date d'achat originale, Avanti Products fournira un compresseur de
remplacement gratuit en raison d'un échec. Vous êtes responsable de la main-d'œuvre et de fret de service. En usage locatif
ou commercial, la garantie du compresseur est limitée à un an et neuf mois. Les coûts impliqués pour déplacer le produit au
La couverture de la garantie décrite ici exclut tous les défauts ou les dommages qui ne sont pas la faute directe de Avanti
règlements ou des lois, y compris le défaut d'installer le produit en stricte conformité avec le feu et les codes du bâtiment et
les règlements locaux.
• Les forces externes, élémentaires et / ou l'environnement et les facteurs, y compris, sans s'y limiter, la pluie, le vent, le
sable, les inondations, les incendies, les coulées de boue, des températures de congélation, l'humidité excessive ou à une
exposition prolongée à l'humidité, la foudre, les surtensions, les défaillances struct urel l es ent ourant l’ appareil, et les act es de
en raison de la détérioration.
• Les dommages accessoires ou consécutifs
• Pièces et coûts de main-d'œuvre pour les éléments suivants
ne seront pas considérés comme garantie:
• Portes évaporateurs, ressort s de la porte, et / ou des
cadres.
• Panneaux intérieurs de portes, des étagères de porte,
rails de porte, et / ou supports de porte.
• Les ampoules et / ou boîtier en plastique.
• Doublures d'armoires en plastique.
• Poncture évaporateur annule la garantie sur le système
scellé complet.
• Les frais de transport et de manutention associés au
remplacement de l'unité.
les armoires, les planchers, les plafonds, et d'autres structures et / ou des objets autour du produit. Sont également exclus de
cette garantie sont les égratignures, les entailles, les bosses mineures, et d'autres dommages esthétiques sur les surfaces
externes et les parties exposées; Produits dont les numéros de série ont été modifiés, effacés ou supprimés; visites de service
pour l'éducation à la clientèle, ou des visites où il n'y a rien de mal avec le produit; correction des problèmes d'installation (vous
êtes seul responsable de toute structure et réglage pour le produit, y compris tous les systèmes électriques, de plomberie et /
ou d'autres installations de raccordement, pour le bon plancher / fondation, et pour toute modification, y compris sans s'y limiter
Avanti Products est soumis à aucune obligation, en droit ou autrement, de vous fournir toutes les concessions, y compris les
autorisés.
• Les appels de service qui sont liés à des problèmes
externes, tels que l'abus, l'alimentation électrique
inadéquate, les accidents, les incendies, les inondations,
ou tout autre acte de Dieu.
• Une panne du produit si elle est utilisée pour autre chose
que son intention but.
• La garantie ne couvre pas en dehors de la Continental
USA.
• Surtaxes, y compris mais sans s'y limiter, toute après
heure, les appels week-end, ou de services de
vacances, les péages, les frais de voyage de convoyage
ou les frais de kilométrage pour les appels de service
dans les régions éloignées.
69
Page 70

70
Page 71

Registration Information
-------------------------------------------------------(detach here)-------------------------------------------------------------
Avanti Registration Card
Name
Model # Serial #
Address
Date Purchased Store / Dealer Name
City State Zip
E-mail Address
Area Code Phone Number
Occupation
Did You Purchase An Additional Warranty
As your Primary Residence, Do You:
£ Extended
£ Own £ Rent
£ None
Your Age:
Reason for Choosing This Avanti Product:
£ under 18 £ 18-25 £ 26-30
£ Married £ Single
Price
£ Other: _____________ ______
£ Personal Demo
Comments:
Thank you for purchasing this fine Avanti product. Please fill out this form and return it to the
following address within 100 days from the date of purchase and receive these important benefits:
Avanti Products, LLC.
P.O.Box 520604 – Miami, Florida 33152
Ø Protect your product:
We will keep the model number and date of purchase of your new Avanti product on file to
help you refer to this information in the event of an insurance claim such as fire or theft.
Ø Promote better products:
We value your input. Your responses will help us develop products designed to best meet
your future needs.
Please indicate the most important factors
That influenced your decision to purchase
this product:
£
£ Product Features
£ Avanti Reputation
£ Product Quality
£ Salesperson Recommendation
£ Friend / Relative Recommendation
£ Warranty
£ 31-35 £ 36-50 £ over 50
Marital Status:
Is This Product Used In The:
£ Home £ Business
How Did You Learn About This Product:
£ Advertising
£ In-Store Demo
71
Page 72

RIM49U3S-IS 08/15/2019
PRINTED IN CHINA
72
 Loading...