

Page 1
INSTRUCTION MANUAL / MANUAL DE INSTRUCCIONES
PORTABLE AIR CONDITIONER
AIRE ACONDICIONADO PORTATIL
Model Number / Nº de Modelo : PAC12000
CAUTION:
BEFORE USE, PLEASE READ AND FOLLOW ALL SAFETY RULES AND OPERATING
INSTRUCTIONS.
La sección en español empieza en la página 19.
Avanti has a policy of continuous improvement on its products and reserves the right to change materials and specifications
without notice.
Avanti Products, A Division of the Mackle Co., Inc.
P.O. Box 520604 - Miami, Florida 33152
www.avantiproducts.com
Page 2

TABLE OF CONTENTS
Help Us Help You 3
Parts and Features 4
Important Safety Instructions 5
Tips Before Installing Your Air Conditioner 5
Installation Instructions 5
Window Installation Kit 6
Electric al Connection 8
Operating Your Air Conditioner 9
Control Panel Key Pad 9
Remote Control Structure and Operation 11
Battery Operation 12
Care and Maintenance 13
Cleaning the Air Filter 13
Drainage 13
Draining Condensed Water Step by Step 14
End of Season Care 14
Problems with Your Air Conditioner 15
Troubleshooting Guide 15
Service for Your Air Conditioner 16
Avanti Products Customer Services 16
Your Avanti Products Warranty 17
Wiring Diagram 18
Instrucciones en Español 19 - 28
Registration Information and Registrat ion Form 29
2
Page 3

HELP US HELP YOU
Read this guide carefully.
It is intended to help you operate and maintain
your new air conditioner properly.
Keep it handy to answer your questions.
If you don't understand something or you need
more assistance, please call:
Avanti Customer Service
800-220-5570
Keep proof of original purchase date (such as
your sales slip) with this guide to establish the
warranty period.
IF YOU NEED SERVICE
We're proud of our service and want you to be
pleased. If for some reason you are not happy
with the service you receive, here are some
steps to follow for assistance.
FIRST, co ntact the people who s erviced your
air conditioner. Explain why you are not
pleased. In most cases, this will solve the
problem.
Write down the model and serial numbers.
You'll find them on the rating plate located on
the right side of the unit.
Please write these numbers here:
____________________________________
Date of Purchase
____________________________________
Model Number
____________________________________
Serial Number
Use these numbers in any correspondence or
service calls concerning your air conditioner.
If you received a damaged air conditioner,
immediately contact the dealer (or builder) that
sold you the air conditioner.
Save time and money. Before you call for
service, check the Troubleshooting Gui de. It
lists caus es of minor oper a ting problem s that
you can correct yourself.
NEXT, if you are still not pleased, write all the
details, including your telephone number, and
send it to:
Customer Service
Avanti Products
10880 NW 30 Street
Miami, FL 33172 USA
3
Page 4
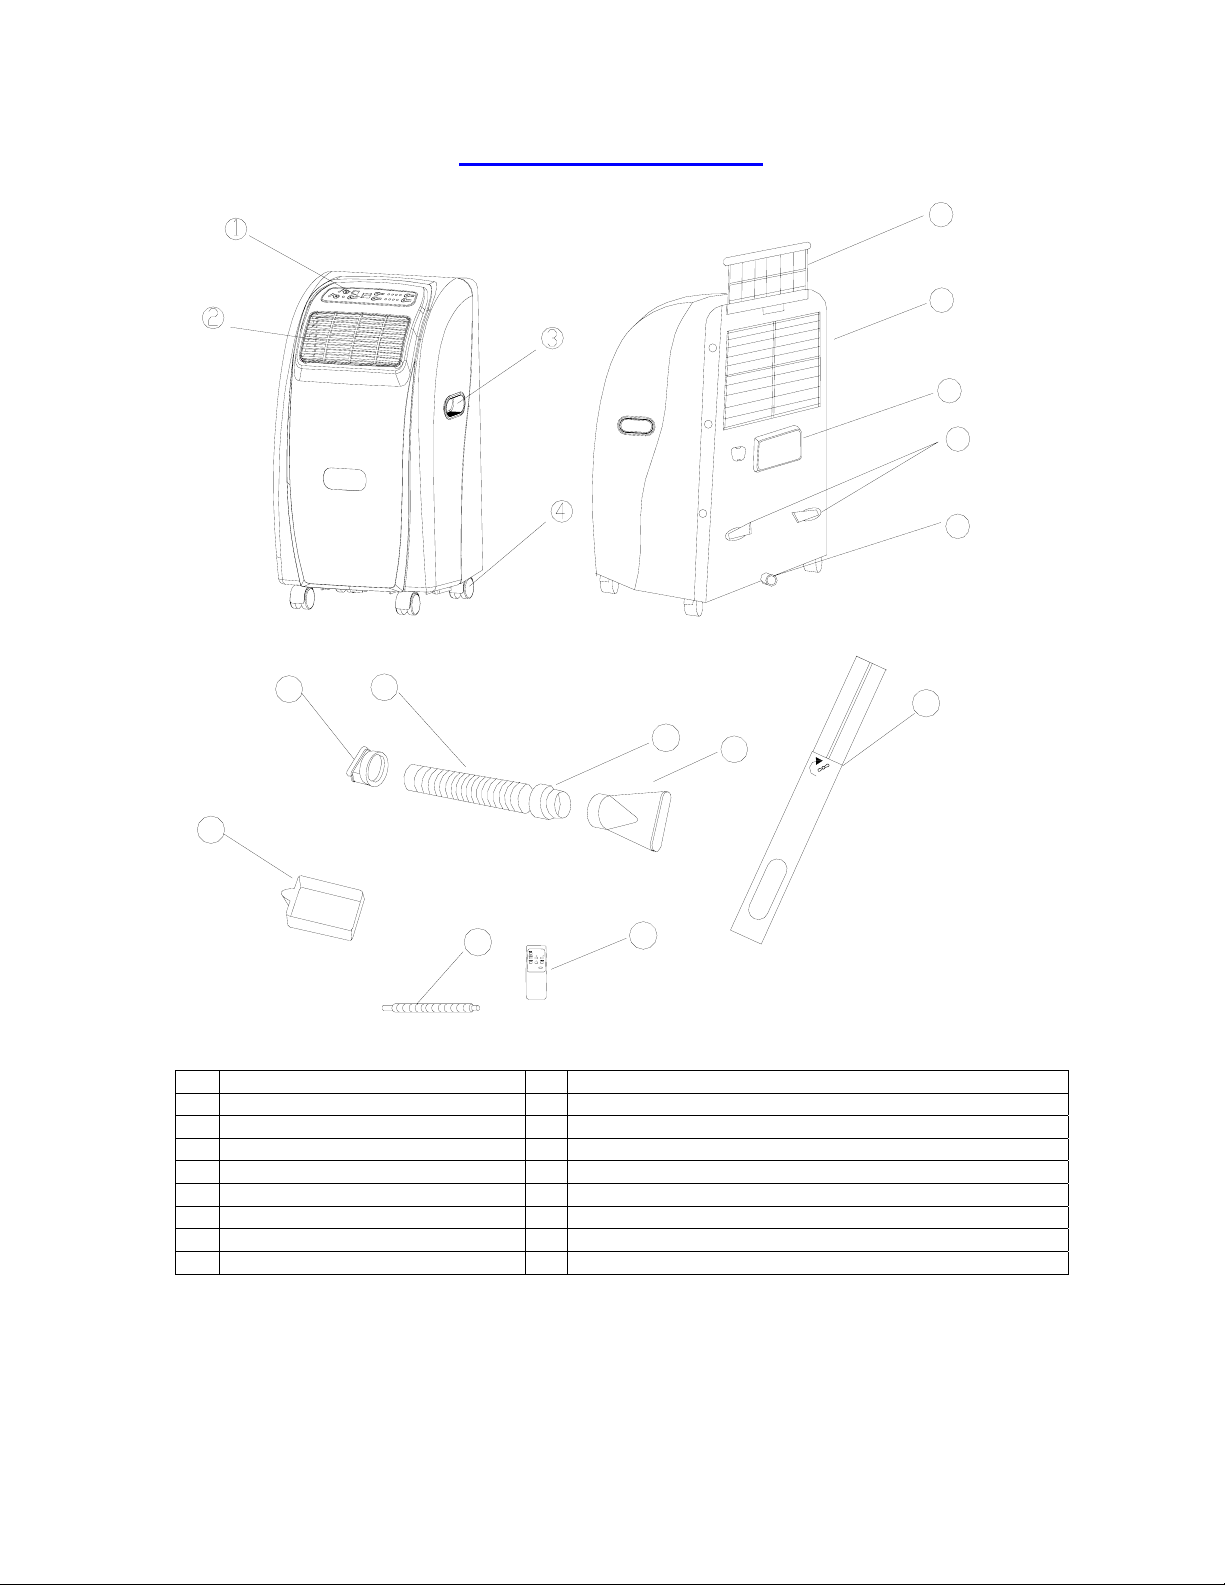
PARTS AND FEATURES
A
r
5
6
7
8
9
10
15
11
17
12
℃/°
ON/OFF
16
13
1 Control Panel 10 Inner
ir Exhaust Adaptor for Air Exhaust Duct (11)
2 Cool Air Outlet 11 Exhaust Air Duct
3 Carry Handles (Both sides) 12 Exhaust Air Duct Adapter
4 Casters 13 Window InstallationAdapte
5 Air Filter 14 Window Installation Kit
6 Air inlet grille 15 Water Drain Tray
7 Exhaust Air Outlet 16 Remote Control
8 Cord Hanger 17 Water drain hose
9 Drain Hole
14
4
Page 5

IMPORTANT SAFETY INSTRUCTIONS
aELECTRIC SHOCK HAZARDa
Read all instructions before using the air conditioner.
• If the air conditioner has a serial plate rating of 115 Volts ~ AC, and up to 7.5 amps,
the unit may be on a fuse or circuit breaker with other devices. However, the
maximum amps of all devices on that fuse or circuit breaker cannot exceed the amps
or the fuse of circuit breaker.
• If the air conditioner has a serial plate rating of 115 Volts ~ AC, and greater than 7.5
amps, it must have its own fuse or circuit breaker, and no other device or unit should
be operated on the fuse or circuit breaker.
• To avoid the possibility of personal injury, disconnect power to the unit before
installing or servicing.
-Save these instructions-
TIPS BEFORE INSTALLING YOUR AIR CONDITIONER
Your room air conditioner unit is designed to be highly efficient and save energy. Follow these
recommendations for greater efficiency:
• Select temperature setting that suits your comfort needs and leave the temperature at that chosen
setting.
• The filter is very efficient in rem oving airborne particles. Keep air filter clean. The filter should be
cleaned once a month. More frequent cleaning may be necessary depending on outdoor and
indoor air quality.
• Use drapes, curtains, or shades to keep direct sunlight from heating your room, but DO NOT
obstruct the air conditioner. Allow air to circulate around the unit without obstructions.
• Start your air conditioner before the room temperature air becomes hot and uncomfo rtable. This
avoids an initial period of discomfort whi le the unit is cooling off the room.
• When room temperature is cool enough, use HIGH, MED or LOW FAN only. T his will circ ulate th e
air, providing some cooling comfort, and utilizes less electricity than when operating on a cooling
setting.
• Sav e the shipping carton and packing materials f or future storage or transport of the unit. Please
check the contents of hardware kit against the corresponding model PARTS AND FEATURES
check list, prior to installation of the unit.
INSTALLATION INSTRUCTIONS
• The unit should be installed on a level surface.
• Select a suitable location with easy access to an electrical outlet.
• Leave at least 12” (30.50cm) clearance between your unit and the nearest object, including walls.
• Install the flexible exhaust hose and the adjustable window slider kit provided (see Fig 1).
• Plug unit into an 115V/60Hz grounded electrical outlet.
NOTE: Use drapes, curtains or shades to keep direct sunshine from penetrating the room but do not
allow them to obstruct the air flow around the unit.
To reduce the risk of fire, electrical shock,
or injury when using your air conditioner,
follow these basic precautions:
5
Page 6

Installation Accessories
WINDOW KIT INSTALLATION
(See Fig 1):
Flexible exhaust hose with adapters Window slider kit adapter -
(Nº 13 on PARTS AND FEATURES) - 1 piece(s)
(Nº 10, 11 and 12 on PARTS AND FEATURES) - 3 piece(s)
Adjustable window slider kit - (Nº 14 on PARTS AND FEATURES) - 1 piece(s)
2
1
3
Air exh aust d uct
In n er air exh au st adapt or
4
Adapt or
Mounting duct
5
Fig 1
These Accessories MUST be installed at all times when the unit is operating under the cooling
modes: AUTO or COOL.
Flexible Exhaust Hose with Adapters:
The unit operates more efficiently if the exhaust hose is shorter.
Length:
The EXHAUST HOSE does not have to be installed during operation of the FAN mode.
Minimum: 21.6” (55 cm)
Maximum: 59” (150 cm)
6
Page 7
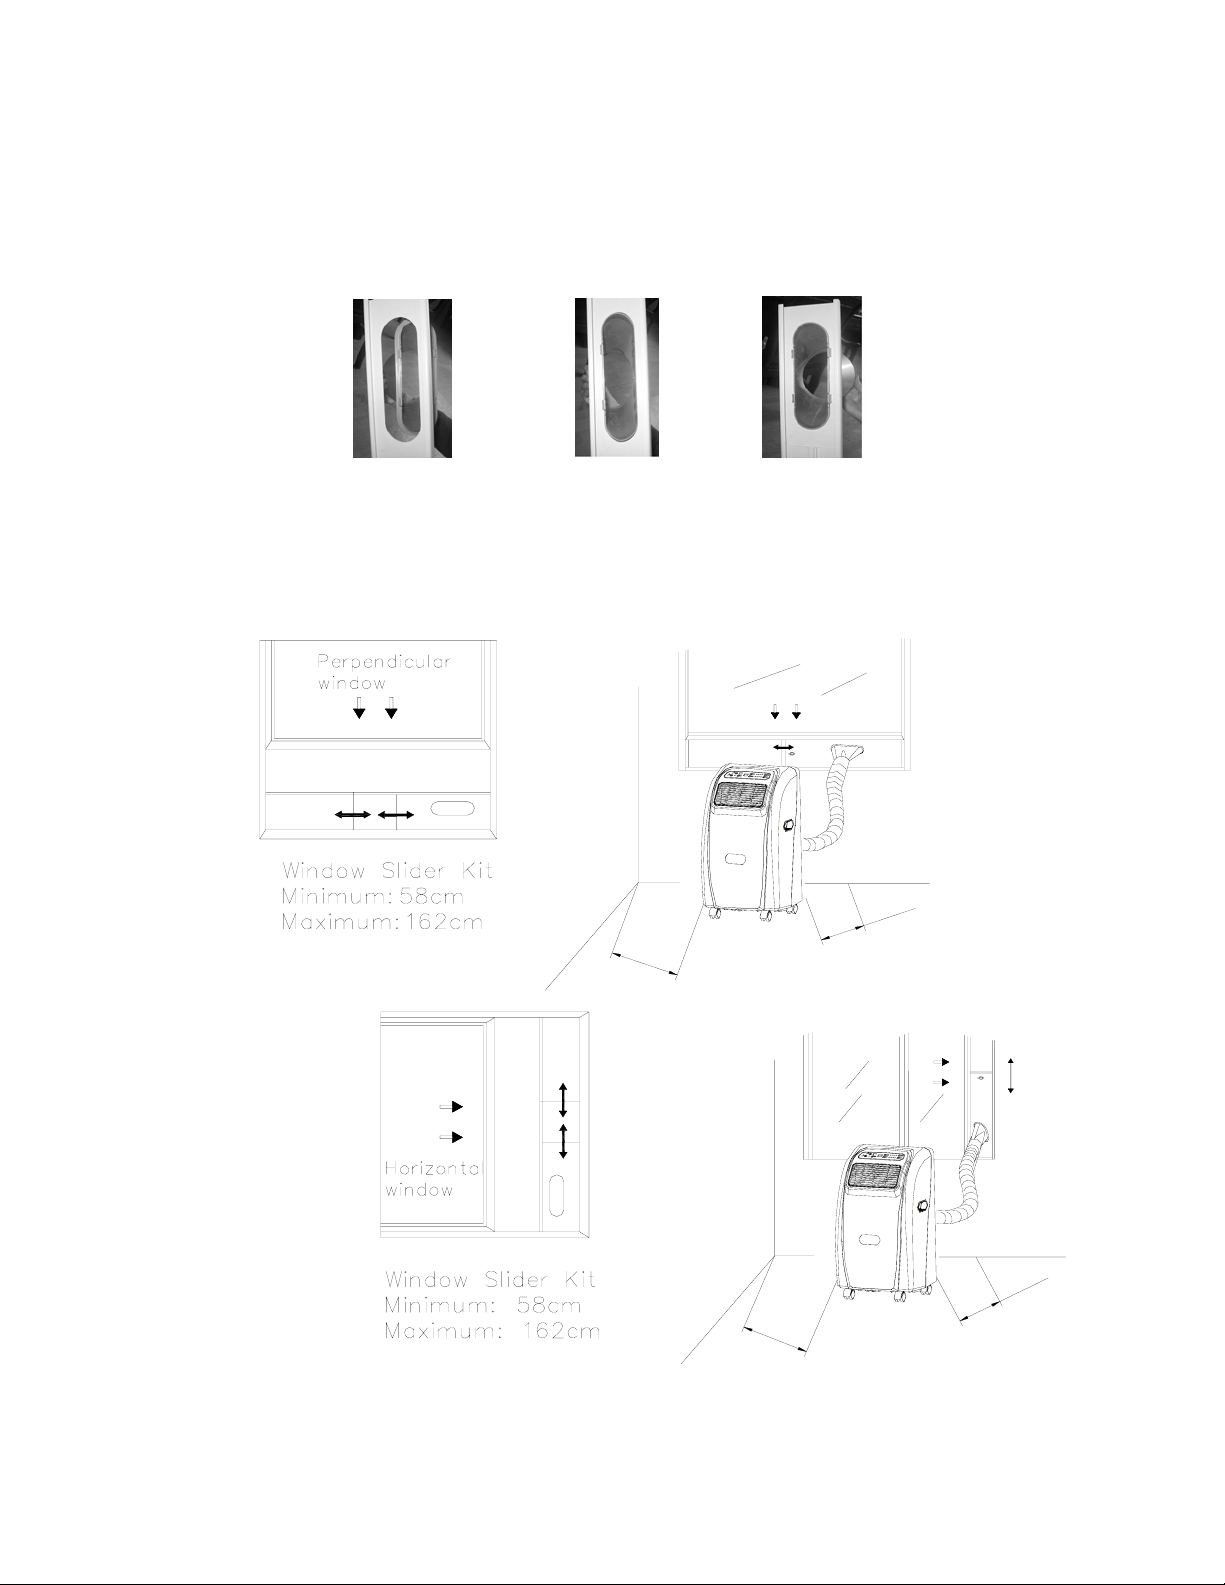
Window KIT Installation
(See Fig 2 ):
? How to insert the window slider adaptor to the windo w slider kit?
z Hold the window slider adaptor close to the hole of t he window slider.(Pic.1)
z Firmly insert the two clippers of the adaptor into the sl ider hole.( Pic.2)
z Press hard to insert the other two clippers inside the hole, make sure all four clippers are full
inserted (Pic.3)
Pic. 1 Pic. 2 Pic. 3
The Kit provided has been designed to fit most standard v ertical and horizontal window applications.
Please refer to figures 2 for minimum and maximum window openings.
For certain type of windows you may have to modify the window slider kit.
The WINDOW KIT does not have to be installed during operation of the FAN mode.
Fig. 2
m
c
0
5
≥
≥
5
0
c
m
m
c
0
5
≥
≥
5
0
c
m
7
Page 8

ELECTRICAL CONNECTION
Improper use of the grounded plug can result in the risk of electrical shoc k. If the power cord is
damaged, have it replaced by an authorized Avant i Products service center.
All wiring must comply with local and national electrical codes and must be installed by a qualified
electrician.
Check available power supply and resolve any wiring problems BEFORE installing and operating this
unit.
This air conditioner should be properly grounded for your safety. The power cord of this air
conditioner is equipped with a three-prong plug which mates with standard thr ee prong wall outlets to
minimize the possibility of electrical shock. If you are not sure whether your wall outlet is properly
grounded, please consult a qualified electrician.
Do not, under any circumstances, cut or remove t he third ground prong from the power cord supplied.
This air conditioner requires a standard 115/120 Volt~AC/60Hz electrical outlet with three-prong
ground.
Never unplug the air conditioner by pulling the power cord. Always grip the plug firmly and pull
straight out from the receptacle.
Do not use plug adapters or an extension cord with this appliance. If t he power cord is t oo short, have
a qualified electrician or service technician install an outlet near the appliance.
aWARNINGa
8
Page 9
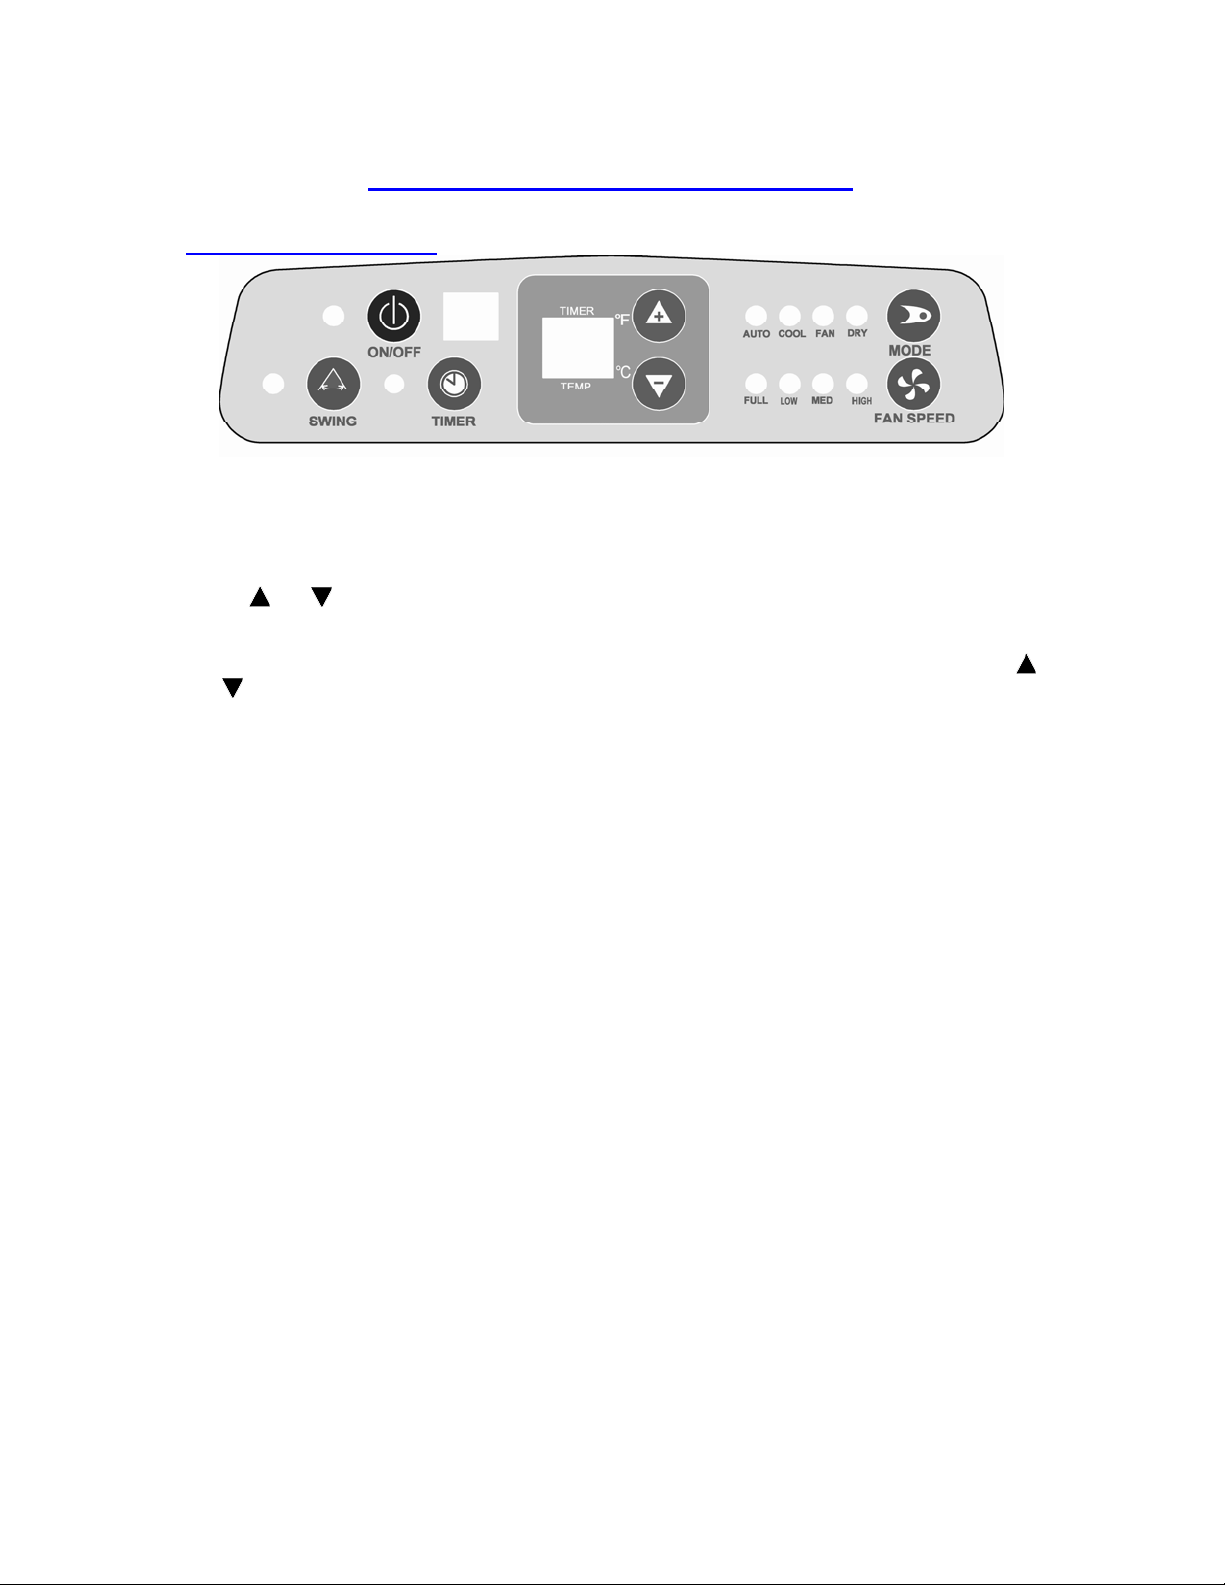
OPERATING YOUR AIR CONDITIONER
CONTROL PANEL KEY PAD
ON/OFF
To turn power ON, press ON/OFF key once. The unit will run at AUTO mode (default). LCD window
will display the AUTO icon. To turn power OFF, press it again.
TEMPERATURE
Press (
displayed in the LCD window.
Temperature settings are adjustable between 59º - 88ºF / 15º - 31ºC.
The defaulted displayed temperature will be in Celsius degrees. To switch to Farenheit, push the (
and
The switching on the remote control is the same as on the Control Panel.
FAN SPEED
Press FAN SPEED key and the speed sequence will be displayed to right of the LCD window.
You can choose between: LO - MED - HIGH
MODE
Each time you press this button, a mode is selected in the following sequence:
The running mode selected will be displayed the right of the LCD window.
SWING Mode
Press the SWING key to activate the multi direction air louver.
Press the SWING key once and the louver will continuously move from left to right. Press the Swing
key again and the louver will stop in its current position.
TIMER ON/OFF (Dual Action Timer)
Press the TIMER key to set desired auto-timer settings sequences of 30 minutes, from ½ hour to 12
hours.
“AUTO-OFF” Function:
When the unit is ON and running in the selected mode, you can select the amount of time you would
like the unit to run before turning itself OFF.
Every time you press the TIMER key, the AUTO OFF time will be displayed in the LCD window. To
disable, press the timer button until 12:00 displays and t hen press once again, the le ngth of operatio n
is now displayed.
“AUTO-ON” Function:
When the unit is OFF, you can select the amount of time to pass before the unit will turn it self ON
and resume the mode and temperature previously set.
The same applies to AUTO ON time. When unit is on power OFF position, press the TIMER key to set
the AUTO ON time.
and ) keys to select a suitable temperature setting. The temperature selected will be
) keys at the same time and hold for 3 seconds.
AUTO – COOL – FAN – DRY
9
Page 10

OPERATING YOUR AIR CONDITIONER
AUTO Display
When this sequence is selected, after pressing the MODE button, the c orresponding signal indicator
is lit. In this mode, your unit will logically choose a desired room temperature. If the temperature is
not comfortable for you, the desired MODE can be selected manually.
COOL Display
When this sequence is selected after pressing the MODE button, the c orresp o nding s ignal indic ator is
lit. You should set the desired room temperature and speed of the fan manually.
TEMPERATURE Display
Shows the selected temperature.
FAN Display
When this sequence is selected, after pressing the MODE button, the signal indicator is lit. Then
select a speed for the fan manually. Under this mode you cannot select the TEMPERATURE.
DEHUMIDIFIER Display
When this sequence is selected after pressing the mode button, the corresponding signal indicat or is
lit.
Under this mode, you cannot select a fan speed or adjust the temperature since the fan motor
operates at a pre-set fan speed.
10
Page 11

REMOTE CONTROL STRUCTURE AND OPERATION
The remote control uses 2 alkaline dry batteries (AAA 1.5V).
To install the batteries, slide back the cover and mount them according to the signs (+ and -) shown
on the rear compartment.
NOTE:
If you plan not to use the control for several weeks, remove the batteries. When replacing the
batteries, do not mix old and new.
Replace the batteries when the transmission indicator light fails to appear.
Mode Button:
Press once will
change the unit run
mode.
Fan speed Button:
Press once can
change fanspeed at
sequence of Low,Mid
and High speed.
Swing Button:
Ipre ss s w in g b u tto n to
auto adjust a right and left
direction of wind
Te mp B u tto n :
Press this button "+" once
setting room temperature
will increase 1
Press this button "-" once
setting room temperature
will decrease 1
℃ .
℃ .
MODE
SPEED
SWING
+
_
ON/ OFF
℃/ ° F
TIMER
℃/ ° F B u tto n
Every tim e press this
botton, the machine
control panel shows the
temperature in
on the conversi
Timer Button:
Unit can be auto OFF if the
unit is under running and
the unit is ready.
ON/OF F Button:
Press once to
start,and press
again to stop.
° C or F
Remote control (Auto mode)
The compressor and fan motor will cycle on or off according to the room temperature
to keep the room comfortable.
Remote control (cooling mode)
Setting temperature r ang e 1 5-31ºC(59-88°F).
When the room temperatur e s e nsor’s temperature is high er than the set
temperature, the compressor starts to run.
When the room temperature sensor’s temperature is lower than the set
temperature, the compressor stops and fan operates at original speed.
Remote control (Fan mode)
Fan mode: the compressor and lower fan motor stop, upper fan run at set
speed, in this case, temperature setting becomes invalid.
Remote control (Dehumidifying mode)
Dehumidifying mode: the compressor and lower fan are running and the upper fan is
running at low speed.
11
Page 12

Battery Operatio n
Please notice the (+) Po sitive and (-) Negative points while mounting th e b atteries.
We suggest using alkaline batteries.
If the batteries need to be replaced or thrown away, the batteries must be removed
and disposed of in accordance with the current laws as it may present an
environmental hazard.
Remote control inserting the batteries
1. Slide the cover as shown in figure.
2. Insert two new non-rechargeable batteries, being careful to place
them in the correct position(+) and (-).
3. Put the cover back on, letting it slide into its original position.
12
Page 13

CARE AND MAINTENANCE
• When servicing the air conditioner, be sure to turn your appliance OFF and disconnect the power
cord from the electrical outlet.
• Do not use gasoline, benzine, thinner or other chemicals on the air conditioner as these
substances may cause damage to the paint finish and deformation of plastic parts.
• Never attempt to pour water directly to the front of the unit as this will cause deterioration of the
electrical insulation.
Cleaning the Air Filter
If the air filter becomes clogged with dust, airflow is obstructed and reduces efficiency. The air filter
should be cleaned once a month. More f requent cleaning may be necessary depending on outdoor
and indoor air quality.
The air filter is located behind the air inlet located in the b ack. To remove the air filter, take out the
Phillips head screw located above the Air Inlet Grille and slide the air filter out (see Fig. 3).
To reinstall the air filter, reverse the above procedure.
Remove dust clogged in the filter by tapping it or vacuum clean it.
Wash the filter well with lukewarm water below 40ºC (104ºF) while rubbing lightly: To get better
results, wash it with soapy water or a neutral cleaning agent.
Rinse the filter well using clean water, and then dry completely.
Drainage
When the air conditioner is running at AUTO, COOL, DEHUMIDIFIER modes, condensed water will
drain into the inner water tray. If the tray gets full, a buzzer will soun d 20 times and the RED LED
FULL indicator light will turn on. At the same time, the cooling system stops running automatically.
Three minutes later, the fan will also stop.
To restart the cooling system, please follow these steps:
Fig. 3
13
Page 14

Draining condensed water step by step
Rubber Plug
Drainage Hole
Wat er Plat e
Drainage Knob
1. Turn off the unit.
2. Place the Water Drain Tray underneath the Drainage Pipe.
3. Remove the Drainage Knob and the Rubber Plug, then condensed water will automatically flow out.
4. If the Water Drain Tray gets full, push the Rubber Plug back to the Dr ainage Pipe and empty the
tray.
5. Repeat steps 2, 3 and 4, until all the condensed water in the unit is drained.
6. Put back the Rubber Plug and the Drainage Knob to the Drain age Pipe.
7. Restart the unit
End-of-Season Care
• Operate the air conditioner, in FAN mode alone, for half a day to dry out the inside of the unit.
• Turn off power and remove plug from wall socket.
• Clean filter.
• Drain.
• Store in dry location.
14
Page 15

PROBLEMS WITH YOUR AIR CONDITIONER?
You can solve many common air conditioner problems easily, saving you the cost of a possible
service call. Try the suggestions below to see if you can solve the problem before calling the service.
TROUBLESHOOTING GUIDE
PROBLEM POSSIBLE CAUSE SUGGESTED SOLUTION
Air conditioner does not
operate.
Inefficient or no cooling. Dirty air filter.
Noisy unit. Loose parts.
Odors.
Water dripping outside.
Water dripping inside.
Ice or frost build-up.
NOTE:
If circuit breaker is tripped repeatedly, or fuse is blown more than once, contact a qualified technician.
No power to the unit. Check connection of power cord
to power source.
The circuit breaker tripped or a
blown fuse.
Set OPERATION knob to
position other than “OFF”.
Clean or replace air filter.
Inappropriate capacity for
application.
Blocked airf lo w.
Power interruption, settings
change too quickly, or
compressor overload tripped.
Inadequate support.
Formation of mold, mildew, or
algae on wet surfaces.
Condensation run-off is normal
during hot and humid weather.
Unit is not properly angled to
allow water to drain outside.
Low outside temperature.
Unit air filter is dirty.
Check with dealer to determine
proper unit capacity for
application.
Remove obstruction from grille
or outdoor louvers.
Let fan run to restart
compressor (in approximately
10 minutes.)
Tighten loose parts.
Provide additional support to
unit.
Remove drain plug and drain
base pan.
Replace drain plug.
Clean unit thoroughly.
Add flexible tubing to redirect
water flow.
Unit must be installed on an
angle for proper condensation
run-off. Check the unit and
make adjustments.
When outdoor temperature is
approximately 65ºF or below,
frost may form when unit is in
cooling mode. Switch unit to
FAN (only) operation until frost
melts.
Remove and clean filter.
15
Page 16

SERVICE FOR YOUR AIR CONDITIONER
We are proud of our customer service organization and the network of professional service
technicians that provide service on your Avanti air conditioner. With the purchase of your Avanti air
conditioner, you can be confident that if you ev er n eed addit i onal inf orm ation or as sis t ance, t he Avant i
Products Customer Service Team will be here for you. Just call us toll-free.
AVANTI PRODUCTS CUSTOMER SERVICES
Product Information
800-323-5029
Part Orders
800-220-5570
In-Home Repair Service
800-220-5570
Whatever your questions are about our products,
help is available.
You may order parts and accessories that will be
delivered directly to your home, by personal
check, money order, Master Card, or Visa.
An Avanti Products authorized service center will
provide expert repair service, scheduled at a time
that is convenient for you. Our trained service
staff knows your air conditioner inside and out.
16
Page 17

YOUR Avanti Products
WARRANTY
Within the 48 contiguous United States and Puerto Rico.
WHAT IS COVERED
FULL ONE-YEAR PARTS AND LABOR WARRANTY
During the first year after the date of original purchase, Avanti Products will, through its authorized
servicers, repair or replace any parts which are defect ive in material or workmanship due to normal
use. Ready access to the air conditioner is the responsibility of the owner.
LIMITED FIVE YEAR SEALED SYSTEM WARRANTY
In addition to the full one year parts and labor warranty described above, Avanti Products will, through
its authorized servicers, exchange sealed system parts (consisting of the compressor, evaporator,
condenser, and interconnecting tubing) during the second thr ough fifth years , from the origin al date of
purchase, providing the parts are defective in material or workmanship. Transportation, handling, and
labor costs to diagnose, repair or replace such defec tive parts are not covered by this limited parts
warranty and are the owner’s responsibility.
WHAT IS NOT COVERED
Avanti’s warranty, as with most other appliance manufacturers’ warranties, is based on time not
usage. The above warranty does not cover f ailure to function caused by damage t o the unit while in
your possession (other than damage caused by defect or malfunction), or by it improper installation,
or be unreasonable use of the unit, including without limitation, failure to provide reasonable and
necessary maintenance or to follow the written Installation and Operating Instructions. If the unit is put
to commercial, business, rental, or other use or application other than for consumer use, we make no
warranties, express or implied, including but not limited to, any implied warranty of merchanta bility of
fitness for particular use or purpose. The above warranty does not cover repairs performed by
unauthorized servicers, service calls that do not involve defects in material or workmanshi p such as
customer education, or proper installation, repl acement of house fuses or resetting circuit breakers.
Service calls that are related to external problems, such as abuse, misuse, inadequate electrical
power, accidents, fire, floods, or acts of God.
The remedies provided for in the above express warranty are the sole and exclusive remedies;
therefore, no other express warranties are made. All implied warranties, including but not limited t o
any implied warranty of merchantability or fitness for a particular use or purpose, are limited in
duration to one year from the date of original purchase. In no event s hall Avanti Products be liable for
indirect, incidental, or consequential damages, even if advised in advance of the possibility of such
damages, no warranties, express or implied, are made to any buyer upon resale.
Some states do not allow limitations on how long an implied warranty lasts or do not allow the
exclusion or limitation of incidental or consequential damages, so the above limitations or exc lusions
may not apply to you. This warranty gives you specific legal rights, and you may also have other
rights, which may vary from state to state.
Staple your sales receipt here. Proof of
original purchase date is needed to obtain
service under warranty.
17
Page 18

WIRING DIAGRAM
18
Page 19

INSTRUCCIONES EN ESPAÑOL
PIEZAS Y CARACTERÍSTICAS
5
6
7
8
9
10
15
11
17
14
12
℃/°
ON/OFF
16
13
1 Control de temperature 10 Adaptador para el escape de aire
2 Salida de aire frio 11 Manguera para el escape de aire
3 Manijas (ambos lados) 12 Adaptador terminal para la manguera del escape de
aire
4 Ruedas 13Adaptador terminal para la manguera del escape de
aire al kit para la instalación en la ventana
5 Filtro de aire 14 Kit para la instalación del adaptador de ventana
6 Parilla del ingreso de aire 15 Bandeja para el agua de drenaje
7 Escape de aire 16 Control remoto
8 Colgador del cable elécrico 17 Manguera de desagüe
9 Tube de drenaje
19
Page 20

KIT PARA LA INSTALACIÓN DEL ADAPTADOR DE VENTANAS
Accesorios de Instalación
(vea la Fig 1):
Manguera de Escape de Aire y Adaptadores Kit Ajustable para Ventanas -
(Nº 15 en PIEZAS Y CARACTERÍSTICAS) - 1 pieza
(Nº 10, 11 y 12 en PIEZAS Y CARACTERÍSTICAS) - 3 piezas
Adaptador del Kit Ajustable para Ventanas - (Nº 15 en PIEZAS Y CARACTERÍSTICAS) - 1 pieza
Fig 1
Estos accesorios deberán estar instalados cuando la unidad esté operando bajo el modo:
AUTOMÁTICO, ENFRIAR o DESHUMEDECEDOR
Manguera de Escape de Aire:
Estas son las extensiones mínimas y máximas de su Manguera de Escape de Aire:
Mínima: 55cm (21.6”)
Máxima: 150cm (59”)
Su unidad operará más eficientemente si la Manguera de Escape de aire es más corta.
No es necesario que la Manguera de Escape Aire esté instalada mientras su equipo esté
operando bajo el modo VENTILADOR
Instalación del Adaptador de Ventanas
(Vea la Fig 2 y 2a):
El Adaptador de Ventanas provisto con su unidad ha sido diseñado para ser instalado en la mayoría
de ventanas horizontales y verticales.
Por favor, sírvase verificar la extensión mínima y máxima del Adaptador, para ventanas horizontales
y verticales en la figura 2 y 2a.
Para algunos tipos de ventana, tal vez deba modificar su Adaptador de Ventana.
No es necesario que el Adaptador de Ventana esté instalado mientras su equipo esté
operando bajo el modo: VENTILADOR.
20
Page 21

m
c
0
5
≥
≥
5
0
c
m
m
c
0
5
≥
≥
5
0
c
m
21
Page 22

CONEXIÓN ELÉCTRICA
El uso inapropiado de la conexión a tierra podría incrementar el riesgo de descarga eléctrica. Si
el cable de electricidad está dañado, hágalo reemplazar en un centro de servicio de Avanti.
El sistema de cableado de su aire condicionado deberá cumplir con todos los estatutos de acuerdo
con los códigos locales y nacionales, además, deberá ser instalado por un electricista calificado.
Verifique la disponibilidad de fuentes eléctricas en donde vaya a instalar su unidad, resuelva
cualquier problema referente a este aspecto ANTES de inst alarla y operarla.
Por su seguridad, este aire condicionado deberá contar c on una conexió n a tierra ap ropiada. El cable
eléctrico de su unidad cuenta con un enchufe de tres puntos , el c ual ha sido diseñ ado para ser us ad o
con los enchufes de pared (con conexión a tierra) standard. De esta manera se reduce el riesgo de
descarga eléctrica. Si tiene alguna pre gunta respecto de la fuente eléctrica y/o la conexión a t ierra,
ésta deberá ser dirigida a un electricista certificado o a un centro de servicio autorizado de Avanti
Products.
Bajo ninguna circunstancia, corte o quite el tercer punto (conexión a tierra) de su cable eléctrico.
Este aire condicionado requiere una fuente de energía standard de 115/120 Volt~AC/60Hz, y un
enchufe de pared con tres puntos (conexión a t ierra).
Nunca desenchufe su equipo halando del cable eléctrico. Siempre sujete el enchufe de tres punt os y
tire firmemente de él hasta sacarlo del enchufe de pared.
No use adaptadores o un cable de extensión. Si el cable eléct rico es muy corto, contáctese con un
electricista calificado o un técnico de servicio para instalar un enchufe de pared cerca de su aire
condicionado.
aAdvertenciaa
¿CÓMO OPERA SU AIRE CONDICIONADO?
PANEL DE CONTROL
TEMPERATURA
Presione los botones (
seleccionada será mostrada en la pantalla LCD.
Las temperaturas que puede escoger se encuentra n entre los 59ºF (15ºC) y los 88ºF (31ºC).
La temperatura programada de fábrica estará representada en grados Fahrenheit. Si desea cambia a
grados Centígrados, presione simultáneamente los botones (
Para realizar el cambio en el control remoto, realice esta misma operación.
VELOCIDAD
Presione el botón FAN SPEED para aumentar la velocidad.
Podrá escoger entre: BAJO (LO) - MEDIO (MED) - ALTO (HI)
MODO
Cada vez que presione el botón MODE, cambiará el modo de operar de su aire condicionado según
la siguiente secuencia:
TEMPORIZADOR AUTOMÁTICO
Presione el botón TIMER para programar el encendido o apagado automático de su aire
condicionado.
Usted podrá escoger entre 30 min. y 12 horas. Cada vez que pulse el botón, el tiempo aum entará en
and ) para seleccionar una temperatura apropiada. La temperatura
and ) por tres (3) segundos.
AUTOMÁTICO – ENFRIAR – VENTILADOR – DESHUMEDECEDOR
22
Page 23

secuencias de 30 min., el nuevo tiempo programado apar ecerá en la pantalla LCD
Para desactivar esta función, presione hasta que aparezca 12:00, entonces presiónelo una vez más.
Ahora, la pantalla mostrará el tiempo que su equipo esta en funcionamiento.
Esto aplica tanto para el apagado como para el encendido. Cuando su equipo este apagado,
presione el botón TIMER para programar el encendido automático.
ENCENDIDO/APAGADO
Para encender presione el botón ON/OFF una vez. Su unidad empezará a trabajar en el modo
AUTOMATICO. Para apagar la unidad, presione el botón ON/OFF nuevamente.
¿COMO OPERA SU AIRE CONDICIONADO?
AUTOMÁTICO
Cada vez que seleccione este modo de operar, el bombillo correspondiente alumbrará. En este
modo, la unidad escogerá, automáticamente, una temperatura para su habitaci ón. Si ésta no es de
su agrado, puede seleccionar otro modo de funcionamiento manualmente.
ENFRIAR
Cada vez que seleccione este modo de operar, el bombillo correspondiente alumbrará.
En este caso, usted deberá programar la temperatura de la habitación y la velocidad del ventilador
manualmente.
TEMPERATURA
Muestra la temperatura seleccionada.
VENTILADOR
Cada vez que seleccione este modo de operar, el bombillo correspondiente alumbrará. En este
modo, solo podrá seleccionar la velocidad del ventilador. NO podrá seleccionar una
TEMPERATURA.
DESHUMIDIFICADOR
Cada vez que seleccione este modo de operar, el bombillo correspondie nte alumbrará. Bajo este
modo de operación, no podrá seleccionar la veloci dad del ventilador o la temperatura (estos viene
pre-programados de fábrica)
En esta función, su aire condicionado extrae la humedad de su habitación.
REJILLAS DE VENTILACION OSCILANTES (SWING)
Presione el botón marcado (SWING) para activar las rejillas de ventilación oscilantes..
Presione el botón marcado (SWING) una vez, las rejillas de ventilación oscilarán de lado a lado para
mejor circulación del aire. Presione el botón marcado (SWING) una vez más, las rejillas de
ventilación se parará de oscilar en su presente posición..
Figura TIEMPO
Cuando la unidad esté encendida, la pantalla mostrará el tiempo que esta en funcionamiento. El
tiempo va desde 00:01 minutos hasta 24:00 horas.
Cuando use l a f u nc ión TIMER, el tiempo programado aparecerá en la pantalla LCD.
(AUTO)
(COOL)
(FAN)
(DEHUMIDIFIER)
(TIME)
23
Page 24

CONTROL REMOTO: ESTRUCTURA Y OPERACIÓN
El control remoto usa dos (2) baterías alcalinas secas (AAA 1.5V).
Para instalar las baterías, deslice la tapa que se encuentra en la parte posterior del c ont rol remoto.
Póngalas en su lugar guiándose por los signos (+ y -) que aparecen en el compartimiento interior.
NOTA:
Si no va usar el control remoto por algunas semanas, quite las baterías.
Cambie las baterías cuando, al operar el control remoto, el indicador de la señal de transmisión no
aparezca.
Cuando cambie las baterías asegúrese de no mezclarlas con las viejas, esto reduciría el tiempo de
duración de las nuevas.
Para las funciones de los BOTONES, por favor diríjase a la sección PANEL DE CONTROL
24
Page 25

CUIDADO Y MANTENIMIENTO
• Cuando vaya a hacerle servicio a su aire condicionado, asegúrese de apagarlo y desconectarlo
del enchufe de pared.
• No use gasolina, bencina, tiner u otros químicos para limpiar su aire condicionado, estas
substancias podrían causar daños al acabado de la pintura y deformar las partes plásticas.
• Nunca intente verter agua directamente al frente de la unidad, esto deterioraría el aislamiento
eléctrico.
Limpiando el Filtro de Aire
Si el filtro de aire se obstruye con polvo, el flujo del aire lo hará también, reduciendo la eficiencia de
su aire condicionado. Para evitar esto, deberá limpia r el filtro de aire una vez al mes. Dependiendo de
la calidad del aire, tanto interior como exterior, la frecuencia de la limpieza podría ser menor.
El filtro de aire está localizado detrás de la parrilla del ingreso de aire (en la parte posterior). Para
sacar el filtro de aire, quite el tornillo que se encuentra en la zona superior de la parrilla
empleando un desentornillador Phillips. Luego deslice el filtro de aire hacia arriba (vea la Fig. 3).
Para reinstalarlo, invierta el procedimiento anterior.
Quite el polvo del filtro golpeándolo suavemente o aspirándolo.
Lave bien el filtro con agua tibia, debajo de 40ºC (104ºF), mientras lo frota ligeramente: Para obtener
mejores resultados, lávelo con agua jabonosa o un agente de limpieza neutral.
Asegúrese de enjuagar bien el filtro con agua limpia, luego séquelo completamente.
Drenado
Mientras el aire condicionado funciona en el modo AUTO, ENFRIAR, o DESHUMEDECEDOR el
agua que se condense, drenará en una bandeja interior. Si la ba ndeja se llena, una alarma sonará
por 20 segundos y el mensaje “E4” aparecerá en la pantalla LCD. Al mismo tiempo, el sistema de
enfriamiento dejará de funcionar. Tres minutos después, el ventilador t ambién deja rá de funcionar.
Para que el aire condicionado vuelva a funcionar, realic e los siguientes pasos:
Fig. 3
25
Page 26

CUIDADO Y MANTENIMIENTO
Drenando el agua condensada paso por paso
1. Apague la unidad.
2. Ponga la bandeja para el agua de drenado debajo del tubo de drenaje.
3. Quite la tapa de rosca y el tapón de jebe del tubo de drenaje. El agua de la bandeja interior
circulará hacia fuera automáticamente.
4. Si la bandeja para el agua de drenado se llena, coloque nuevament e el tapón de jebe y la tapa de
rosca.
5. Repita los pasos 2, 3 y 4, hasta que haya drenado toda el agua de la bandeja interior.
6. Coloque el tapón de jebe y la tapa de rosca en el tubo de drenaje.
7. Reinicie la unidad.
Cuidado para el Fin de Temporada
• Opere la unidad solo bajo el modo VENTILADOR por medio día para secar totalmente el interior
de su aire condicionado.
• Apague el equipo y desconéctelo del enchufe de pared.
• Limpie el filtro de aire.
• Drene su máquina.
• Guárdela en un lugar seco.
26
Page 27

¿PROBLEMAS CON SU AIRE CONDICIONADO?
Usted puede resolver fácilmente muchos problemas comunes de su aire condicionado ahorrándole el
costo de una posible llamada de servicio. Pruebe con las sugerencias aquí indicadas para ver cómo
puede resolver sus problemas antes de realizar una llamada de servicio.
GUÍA DE SOLUCIÓN DE PROBLEMAS
PROBLEMA CAUSA POSIBLE SOLUCIÓN SUGERIDA
El Aire Condicionado no
funciona.
La unidad no tiene energía. Verifique la conexión del cable
eléctrico y el enchufe de pared.
El interruptor se “disparó” o el
fusible voló.
Presione el botón ON/OFF.
No hay enfriamiento o no es
suficiente.
Ruidos en la unidad. Piezas sueltas.
Olores.
Goteo en la parte externa.
Goteo en la parte interna.
Filtro de aire sucio.
La capacidad de su equipo no
es suficiente.
El flujo de aire (ingreso o salida)
está siendo bloqueado.
La alimentación de energía no
es constante, cambios en la
programación de temperatura
muy rápidos o el compresor
está sobrecargado.
Soporte inadecuado.
Formación de moho o algas en
las superficies mojadas.
Esto es normal cuando el
ambiente está caliente o
húmedo.
El ángulo de ubicación de la
unidad no es el indicado para
permitir que el agua drene
hacia afuera.
Limpie o reemplace el filtro de
aire.
Verifique con su distribuidor la
capacidad apropiada para el
uso de su unidad.
Retire los elementos que
obstruyen el ingreso o las
salidas de aire.
Deje que el ventilador corra por
10min para reiniciar el
compresor (Modo AUTO o
ENFRIAR)
Ajuste las piezas sueltas.
Proporcio ne un sop orte
adicional a la unidad.
Drene la unidad y limpie todos
los elementos (tubo de drenaje
y bandejas de agua).
Adicione un tubo flexible para
redireccionar el exceso de
agua.
La unidad se debe instalar en
un ángulo que permita drenar el
agua apropiadamente. Haga los
ajustes necesarios para que
pueda realizar esta acción sin
problemas.
Acumulaci ón de hielo.
NOTA:
Si el interruptor se “dispara” repetidamente o el fusible “vuela” más de una vez, póngase en contacto
con un técnico calificado.
La temperatura de la habitación
es muy baja.
El filtro de aire está sucio.
27
Cuando la temperatura exterior
sea de 65ºF (o menor), se
podrá formar hielo si la unidad
está en AUTO o ENFRIAR.
Cambie al modo VENTILADOR
hasta que el hielo se derrita.
Limpie el filtro de aire.
Page 28

SERVICIO DE MANTENIMIENTO
Estamos orgullosos de la organización de nuestro centro de servicio al cliente y de los técnicos
profesionales que proveen servicio a su aire condicionado portátil Avanti. Cuando compra un
producto Avanti, usted puede estar seguro que si alguna vez necesita información o asistencia,
nuestro equipo de servicio al cliente de Avanti Products estará para ayudarlo.
SERVICIO AL CLIENTE DE AVANTI PRODUCTS
Información de producto
800-323-5029
Pedido de piezas
800-220-5570
Servicio de reparación a domicilio
800-220-5570
Cualquiera sea su pregunta sobre nuestros
productos, la ayuda está disponible.
Usted puede ordenar piezas y accesorios que
serán enviados directamente a su casa con
cargo a un cheque personal, órdenes de diner o,
Visa o Mastercard.
Un centro de servicio autorizado de Avanti
Products le proveerá de un servicio de
reparación experimentado, éste será programado
a la hora que le sea más conveniente. Nuestro
equipo de servicio está totalmente entrenado y
conoce su aire condicionado por dentro y fuera.
28
Page 29

REGISTRATION INFORMATION
Thank you for purchasing this fine Avanti product. Please fill out this form and return it within 100
days of purchase to receive these important benef its to the following address:
Avanti Products, A Division of The Mackle Co ., Inc.
P.O. Box 520604 - Miami, Florida 33152 USA
¾ PROTECT
YOUR PRODUCT:
We will keep the model number and date of purchase of your new Avanti product on file to
help you refer to this information in the event of an insurance claim such as fire or theft.
¾ PROMOTE
BETTER PRODUCTS:
We value your input. Your responses will help us develop products designed to best meet
your future needs.
-----------------------------------------------------
(DETACH HERE) --------------------------------------------------------
AVANTI
REGISTRATION FORM
__________________________________ _____________________________________
NAME MODEL # SERIAL #
_______________________________
ADDRESS DATE
______________________________
CITY STATE ZIP OCCUPATION
________________________________
AREA
CODE PHONE NUMBER OWN RENT
DID
YOU PURCHASE AN ADDITIONAL WARRANTY: YOUR AGE:
EXTENDED NONE UNDER
REASON
PLEASE
THAT
THIS
PRICE HOME BUSINESS
PRODUCT
AVANTI
PRODUCT
SALESPERSON
FRIEND/RELATIVE
WARRANTY _____________________________________
OTHER_______________________ _____________________________________
FOR CHOOSING THIS AVANTI PRODUCT: 31-35 36-50 OVER 50
INDICATE THE MOST IMPORTANT FACTORS MARITAL STATUS:
INFLUENCED YOUR DECISION TO PURCHASE MARRIED SINGLE
PRODUCT. IS THIS PRODUCT USED IN THE:
FEATURES HOW DID YOU LEARN ABOUT THIS PRODUCT:
REPUTATION ADVERTISING
QUALITY IN STORE DEMO PERSONAL DEMO
RECOMMENDATION OTHER______________________________
RECOMMENDATION COMMENTS____________________________
___ ______________________________ _______
PURCHASED STORE/DEALER NAME
____ ___________________________________ ___
__ AS YOUR PRIMARY RESIDENCE, DO YOU:
18 18-25 26-30
PRINTED IN CHINA
29
 Loading...