

Page 1
Models / Modelos / Modèles: MO7191TW / MO7192TB / MT07K4R
Actual design / color may vary
Diseño / color real puede variar
MICROWAVE OVEN
MANUEL D’INSTRUCTIONS
INSTRUCTION MANUAL
MANUAL DE INSTRUCCIONES
BEFORE USE, PLEASE READ AND FOLLOW ALL SAFETY RULES AND OPERATING
INSTRUCTIONS.
Avanti has a policy of continuous improvement on its products and reserves the right to change materials and
specifications without notice.
Avanti Products LLC
P.O. Box 520604 - Miami, Florida 33152
www.avantiproducts.com
Page 2

2
TABLE OF CONTENTS
Help Us Help You
3
Parts and Features
4
Important Safety Instructions
5
Installation Instructions
6
Before Using Your Microwave Oven
6
Installation of Your Microwave Oven
6
Safety Precautions
6 – 7
Electrical Connection
8
Operating Your Microwave Oven
8
Cooking Techniques
14
Care and Maintenance
15
Cleaning Your Microwave Oven
15
Problems with Your Microwave Oven?
16
Troubleshooting Guide
16
Service for Your Microwave Oven
16
Avanti Microwave Oven Warranty
17
Instrucctiones en Español
18 – 30
Instrucctions en Français
31 – 46
Registration Information and Registration Card
Back Cover
Control Panel 9
Operation Procedure 10 – 14
Page 3

3
HELP US HELP YOU…
Read this guide carefully.
It is intended to help you operate and maintain
your new microwave oven properly.
Keep it handy to answer your questions.
If you don't understand something or you need
more assistance, please call:
Avanti Customer Service
800-220-5570
Keep proof of original purchase date (such as
your sales slip) with this guide to establish the
warranty period.
IF YOU NEED SERVICE
We're proud of our service and want you to be
pleased. If for some reason you are not happy
with the service you recei ve, her e are s ome s teps
to follow for further assistance.
FIRST, contact the people who serviced your
microwave oven. Explain why you are not
pleased. In most cases, this will solve the
problem.
Write down the model and serial numbers.
You'll find them on a label located on the rear wall
of the microwave oven.
Please write these numbers here:
____________________________________
Date of Purchase
____________________________________
Model Number
____________________________________
Serial Number
Use these numbers in any correspondence or
service calls concerning your microwave oven.
If you received a damaged microwave oven,
immediately contact the dealer (or builder) that
sold you the microwave oven.
Save time and money. Before you call for service,
check the Troubleshooting Guide. It lists causes
of minor operating problems that you can correct
yourself.
NEXT, if you are still not pleased, write all the
details, including your telephone number, and
send it to:
Customer Servic e
Avanti Products
10880 NW 30 Street
Miami, FL 33172 USA
Page 4
4
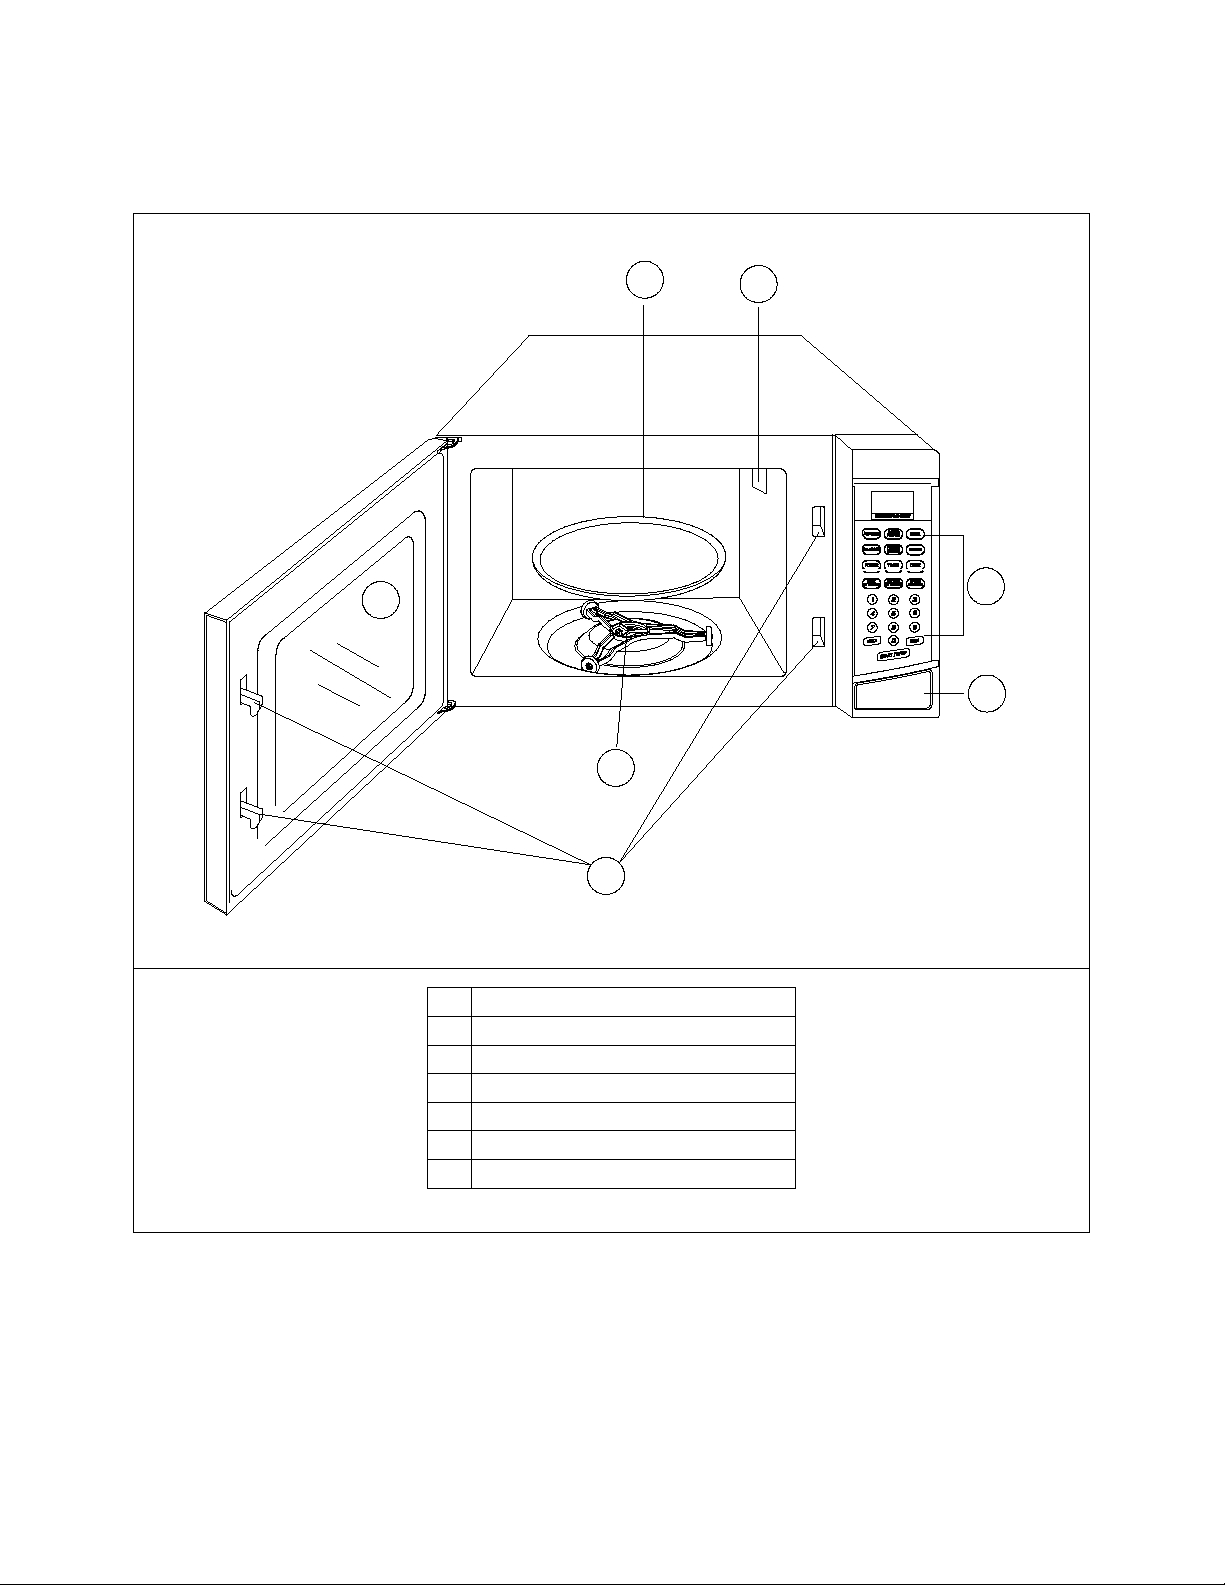
Parts and Features
1
Door Safety Lock System
2
Oven Window
3
Turntable Roller Ring
4
Door Release Button
5
Control Panel
6
Vent
7
Glass Tray
5
4
6
7
1
2
3
Page 5

5
Important Safety Instructions
To reduce the risk of fire, electrical shock, or
basic precautions:
-Save these instructions-
WARNING
• Read all instructions before using the appliance.
• Precautions to avoid possible exposure to excessive microwave energy.
• This appliance must be grounded. Connect onl y to pro perly grounded outlet. See GROUNDING
INSTRUCTIONS.
• Install or locate the appliance only in accordance with the provided installation instructions.
• When cleaning surfaces of door and oven that comes together on the closing door, use only mild,
nonabrasive soaps, or detergents applied with a sponge or soft cloth.
• Liquids, such as water, coffee, or tea are able to be overheated beyond the boiling point without
appearing to be boiling. Visible bubbling or boiling when the container is removed from the
microwave oven is not always present. THIS COULD RESULT IN VERY HOT LIQUIDS
SUDDENLY BOILING OVER WHEN THE CONTAINER IS DISTURBED OR A UTENSIL IS
INSERTED INTO THE LIQUID.
• Some products such as whole eggs and sealed containers-(for example, closed glass jars) may
explode and should not be heated in microwave oven.
• Use this microwave oven only for its intended use as described in this manual.
• Do not use corrosive chemicals or vapors in this appliance. This type of oven is specifically
designed to heat, cook, or dry food. It is not designed for industrial or laboratory use.
• As with any appliance, close supervisi on is necess ary when used by children.
• Do not operate this microwave oven if it has a damaged cord or plug, if it is not working properly, or
if it has been damaged or dropped.
• To reduce the risk of fire in the oven cavity:
• Do not overcook food. Carefully attend microwave oven if paper, plastic, or combustible
materials are placed inside the oven to facilitate cooking.
• Remove wire twist-ties from bags before placing bag in oven.
• If materials inside the oven should ignite, keep oven door closed, turn oven off at the wall
switch, or shut off power at the fuse or circuit breaker panel.
• Do not use the cavity for storage purposes. Do not leave paper products, cooking utensils, or
food in the cavity when not in use.
• Only qualified service personnel should service this appliance. Contact the nearest authorized
service facility for examination, repair or adjustment.
• Do not cover or block any openings on this appliance.
• Do not use this microwave oven to heat corrosive chemicals (for example, sulfides and chlorides).
Vapors from such corrosive chemicals may interact with the contact and springs of the safety
interlock switches thereby rendering them inoperable.
• Do not immerse cord or plug in water.
• Keep cord away from heated surfaces.
• Do not let cord hang over edge of table or counter.
• Never clean appliance parts with flammable fluids. The fumes can create a fire hazard or
explosion.
• Do not store or use gasoline or any other flammable vapors and liquids in the vicinity of this or any
other appliance. The fumes can create a fire hazard or explosion.
• Do not store this appliance outdoors.
• Do not use this product near water – for example, near a kitchen sink, in a wet basement, near a
swimming pool, or similar locations.
injury when using your appliance, follow these
Page 6

6
INSTALLATION INSTRUCTIONS
PRECAUTIONS TO AVOID POSSIBLE EXPOSURE TO EXCESSIVE
MICROWAVE ENERGY
(a) Do not attempt to operate this oven with the door-op en since open-door operation can resu lt in
erly qualified service
personnel.
BEFORE USING YOUR MICROWAVE OVEN
• Remove the exterior and interior packing.
• Check to be sure you have all of the following parts:
• Glass Tray
• Turntable Roller Assembly (Roller or Roller Ring)
• Instruction Manual
• Inspect the oven after unpacking for any visual damage such as:
• Misaligned Door
• Damaged Door
• Dents or Holes in Door Window and Screen
• Dents in Cavity
If any of the above is visible, DO NOT use the oven.
INSTALLATION OF YOUR MICROWAVE OVEN
• When positioning the microwave oven, it should be set on a flat, steady surface.
• Do not block air vents. If they are blocked during operation, the oven may overheat and
eventually cause oven failure.
• Poor television reception and radio interference may result if the oven is located close to a TV,
radio, antenna, or antenna wire. Position the oven as far from them as possible.
• Clean the interior surface with lukewarm water using a soft cloth.
• Keep the oven away from hot air, steam or splashing liquids when choosing a place to locate it,
otherwise, the unit’s operation may be adversely affected, causing it to break down.
• Direct sunlight may affect the acrylic coating and heat sources may increase electrical
consumption.
• Plug the appliance into an exclusive properly installed-grounded wall outlet. Do not under any
circumstances cut or remove the third (ground) prong from the power cord. Any questions
concerning power and or grounding should be directed toward a certified electrician or an
authorized Avanti Products s ervice cen ter .
• DO NOT place anything on the top of the oven.
• Keep the oven at least 5 inches away from both sidewalls and away from rear wall to ensure the
proper ventilation.
• DO NOT remove the turn-table drive shaft.
SAFETY PRECAUTIONS
harmful exposure to microwave energy. It is important not to defeat or tamper with the safety
interlocks.
(b) Do not place any object bet ween the oven f ront fac e and the door or a llow soil or cleaner res idue
to accumulate on sealing surfaces.
(c) Do not operate the oven if it is damaged. It is particularly important that the oven door close
properly and that there is n o dam age to the : (1) Door ( bent ), ( 2) Hi nges and l atc hes ( brok en or
loosened ), (3) Door seals and sealing surfaces.
(d) The oven should not be adjusted or repaired by anyone except prop
Page 7

7
• DO NOT attempt to tamper with or make any adjustments or repairs to door, control panel or any
General Use
Utensils
Food
other part of the oven. Do NOT remove outer panel from oven. Repairs should only be done by
qualified service personnel.
• DO NOT operate the oven empty. The microwave energy will reflect continuously throughout the
oven if no food or water is present to absorb energy.
• If a fire occurs in the oven, touch the START/STOP pad and LEAVE THE DOOR CLOSED.
Disconnect the power cord, or shut off power at the fuse or circuit breaker panel.
• DO NOT attempt to dry clothes, newspapers or other materials in oven. They may catch on fire.
• DO NOT use recycled paper products, as they may contain impurities, which may cause sparks
and/or fires when used.
• DO NOT hit or strike control panel. Damage to controls may occur.
• METAL CONTAINERS or dishes with metallic rims should not be used. Arcing may occur.
• METAL TWIST-TIES may not be used in the microwave oven.
• DO NOT use SEALED JARS or NARROW NECK bottles for cooking or reheating. They may
shatter.
• DO NOT use CONVENTIONAL THERMOMETERS in the microwave oven. They may cause
arcing. Use only those labeled “Microwave Safe” and follow all directions. Check the food in
several places.
• Remove PLASTIC STORE WRAPS before cooking or defrosting in the oven.
RECOMMENDED
• Microwave browning dish – Use to brown exterior of small items such as steaks, chops, or
pancakes. Follow the directions provided with your browning dish.
• Microwaveable plastic wrap – Use to retain steam. Leave a small opening for some steam to
escape and avoid placing it directly on the food.
• Paper towels and napkins – Use for short-term heating and covering; these absorb excess
moisture and prevent splattering. Do not use recycled paper towels, which may contain metal and
could ignite.
• Never use your microwave oven for HOME CANNING. The oven is not designed to permit
proper canning. Improperly canned food may spoil and be dangerous to consume.
• COOKING TIMES are approximate. Factors that may affect cooking are starting temperature,
altitude, volume, size and shape of food and utensils used. As you become familiar with the
oven, you will be able to adjust for these factors.
• It is better to UNDERCOOK RATHER THAN OVERCOOK foods. If food is undercooked, it can
always be returned to the oven for further cooking. If food is overcooked, nothing can be done.
Always start with minimum cooking times.
• SMALL QUANTITIES of food or foods with LOW MOISTURE content can burn, dry out or catch
on fire if cooked too long.
• DO NOT boil eggs in their shell. Pressure may build up and the eggs will explode.
• Potatoes, apples, egg yolks, whole acorn squash and sausage are examples of food with
NONPOROUS SKINS. These must be pierced before cooking to prevent bursting.
• POPCORN must be popped in a microwave corn popper. Microwave popped corn produces a
lower yield than conventional popping. DO NOT use oven for popcorn unless popped in a
microwave approved popcorn utensil or unless it’s commercially packaged and recommended
especially for microwave ovens. DO NOT use oil unless specified by the manufacturer.
• DO NOT attempt to deep fat fry in your oven.
• HEATED LIQUIDS can ERUPT if not mixed with air. DO NOT heat liquids in your microwave
oven without first stirring.
Page 8
8
ELECTRICAL CONNECTION
Warning
exists as to whether the appliance is properly grounded.
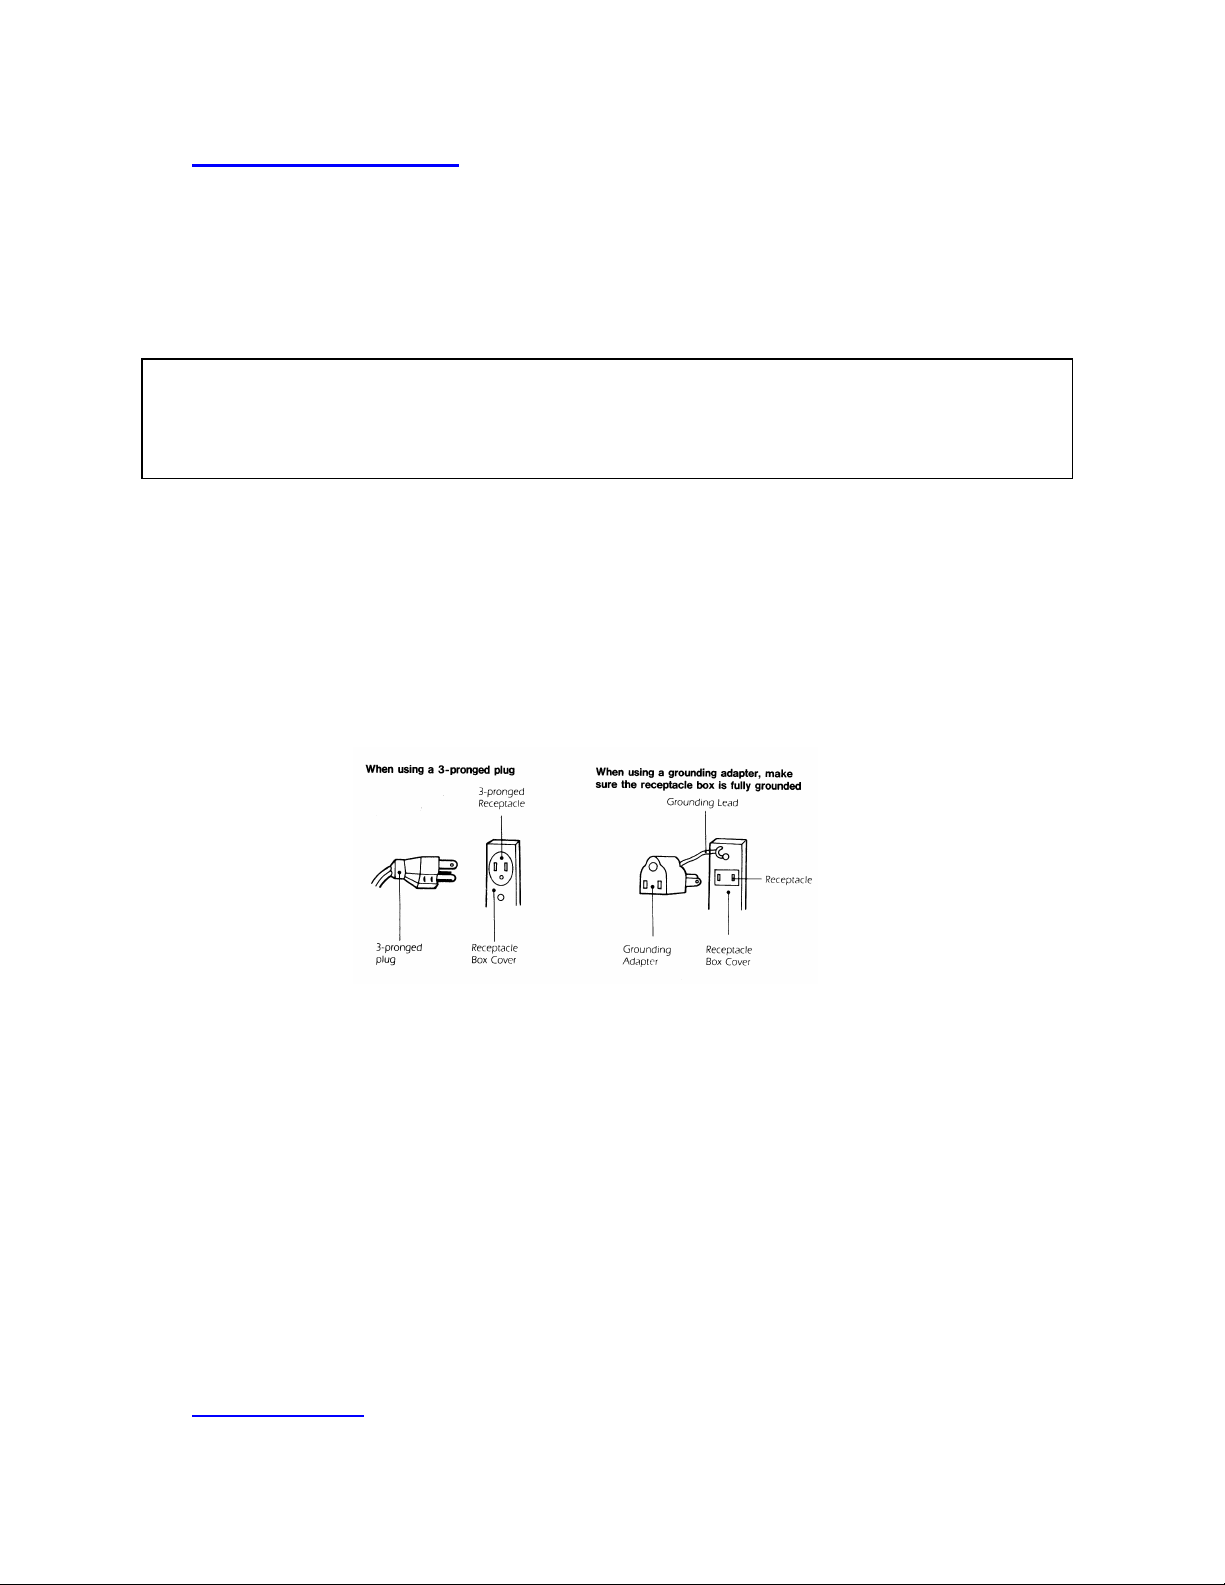
GROUNDING INSTRUCTIONS
This appliance m us t be gr o unde d. I n t he event of an elec tr ica l s h ort circuit, groundi ng reduces the risk of
electrical shock by providing an escape wire for the electric curr ent. This appliance is equipped with a
cord having a grounding wire with a grounding plug. The plug must be insert ed into an outlet that is
properly installed and grounded .
Improper use of the grounded plug can result in the risk of electrical shock. Consult a qualified
electrician or service person if the grounding instructions are not completely understood, or if doubt
The power cord of th is appliance is equipped with a three-prong plug which m ates with standard three
prong wall outlets to minimize the possibility of electrical shock.
Do not under any circumstances cut or remove the third ground prong from the power cord supplied.
Do not use the extension cord. If the power supply cord is too short, have a qualified electrician or
serviceman to install an outlet near the appliance.
This appliance requires a standard 115/120 Volts A.C. ~/60Hz electrical outlet with three-prong ground.
The cord should be secured be hind the appl iance and not left expos ed or dangl ing to pre vent accident al
injury.
OPERATING YOUR MICROWAVE OVEN
Although your oven is provided with safety features, it is important to observe the following:
• It is important not to defeat or tamper with safety interlocks.
• Do not place any object between the oven front face and the door or allow residue to accumulate on
sealing surfaces. Wipe the sealing area frequently with a mild detergent, rinse and wipe dry. Never
use abrasive powders or pads.
• When opened, the door must not be subjected to strain, for example, a child hanging on an opened
door or any load which could cause the oven to fall forward and cause injury and damage the door.
Do not operate the oven if it is damaged, until it has been repaired by a qualified service person. It is
particularly important that the oven closes properly and that there is no damage to the:
• Door (bent)
• Hinges and latches (broken or loosened)
• Door seals and sealing surfaces
• The oven should not be adjusted or repaired by anyone except properly qualified service personnel.
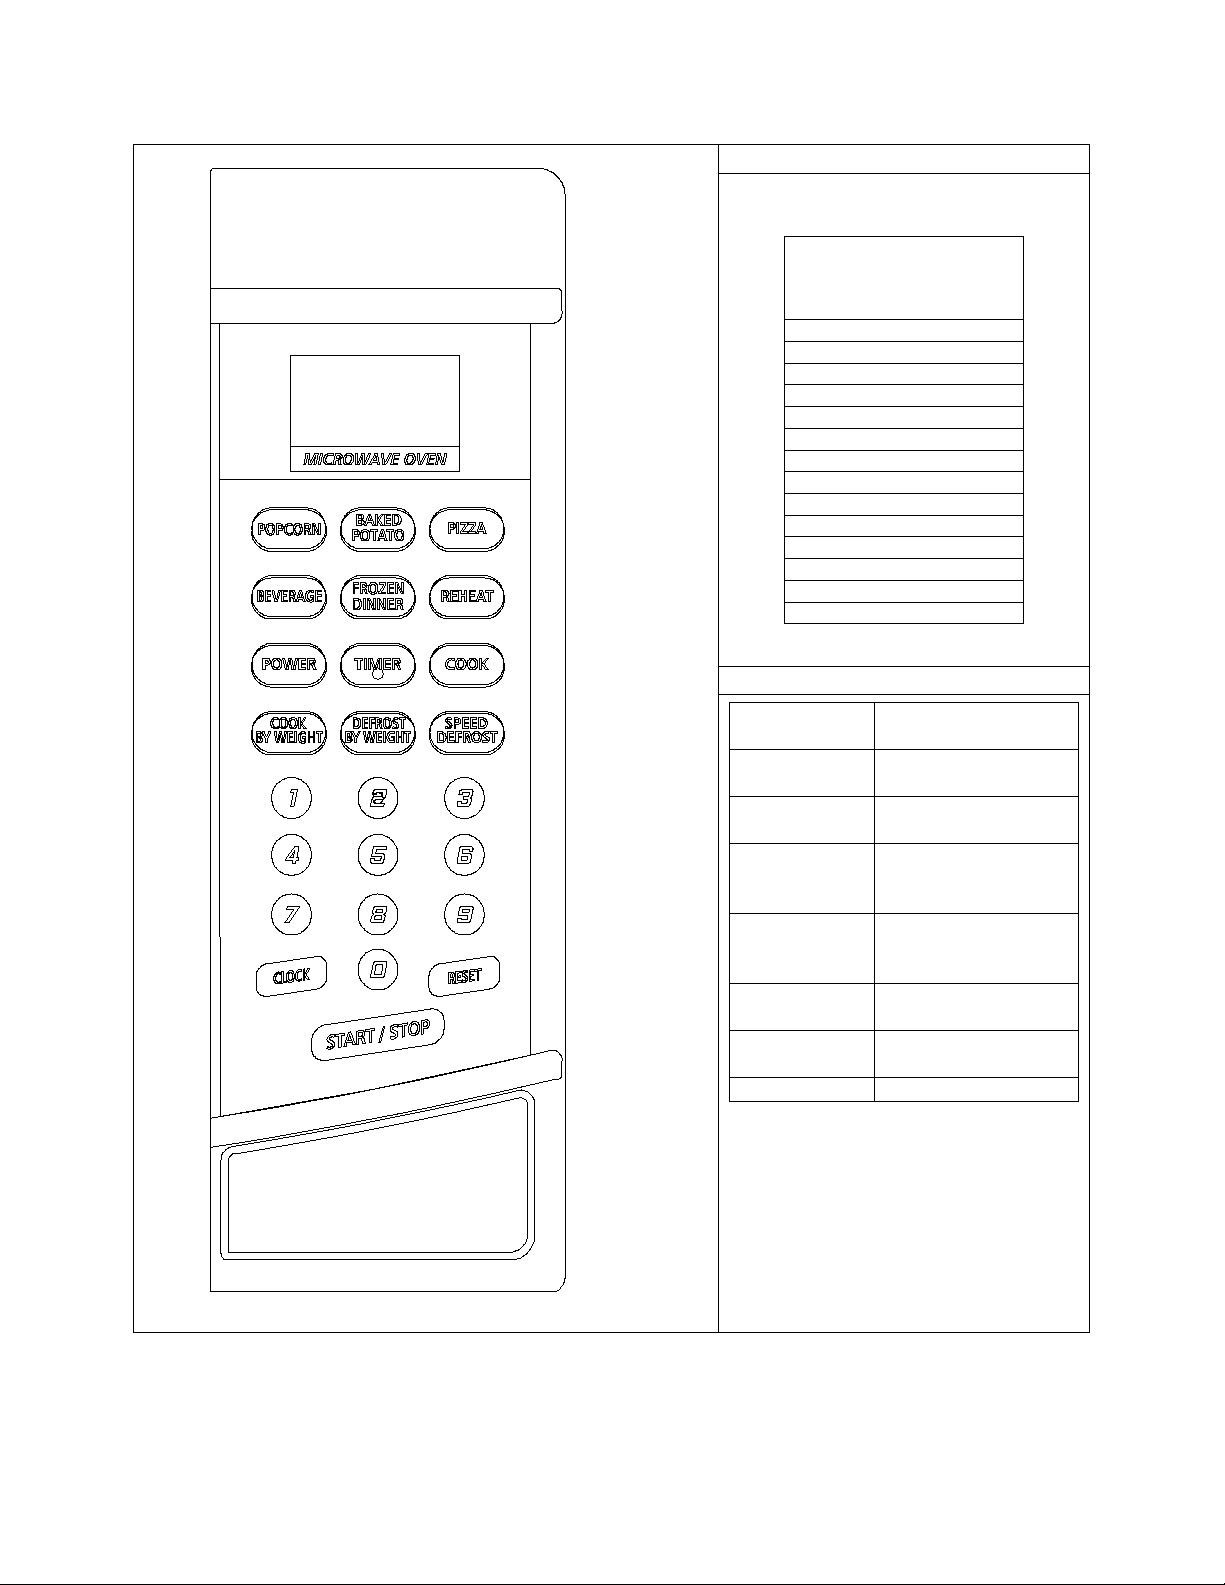
CONTROL PANEL
Page 9
9
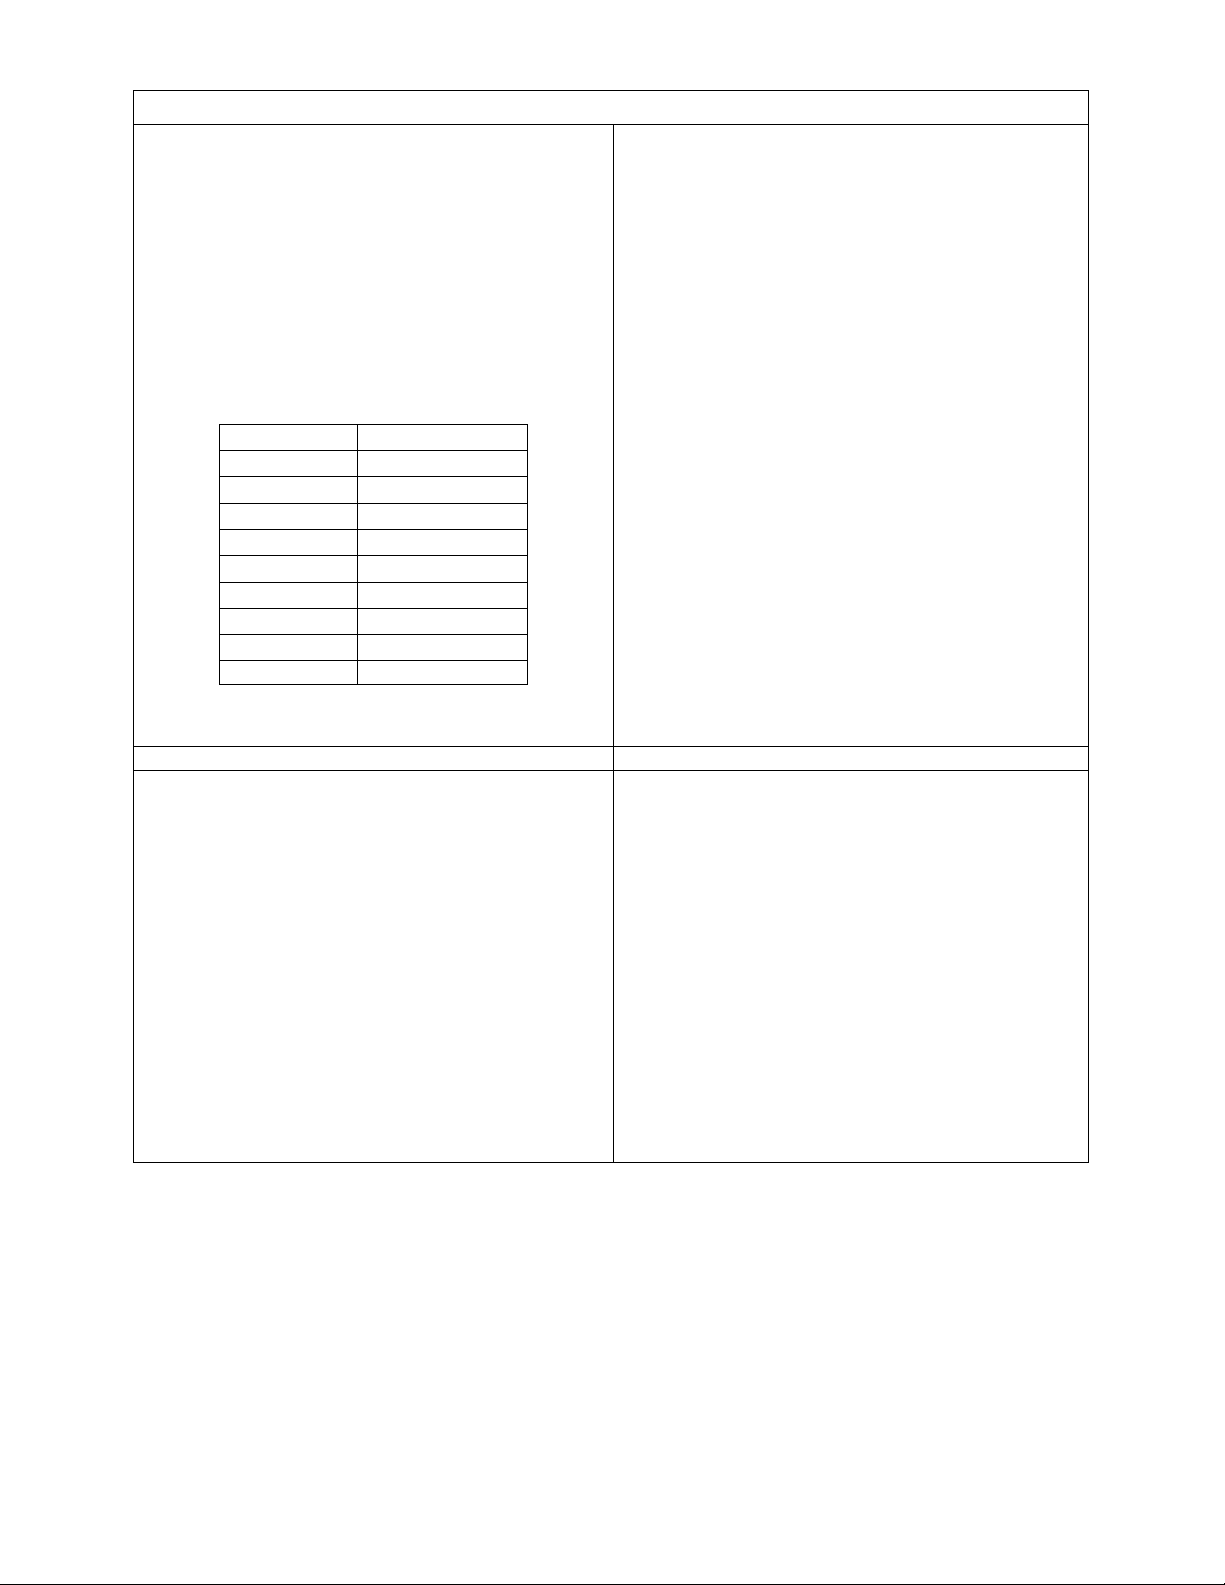
UNIT FEATURES
Baked Potato
Popcorn
Pizza
Beverage
Frozen Dinner
Reheat
Cook By Weight
Defrost By Weight
Speed Defrost
Clock: 12 Hour
Kitchen Timer
UNIT SPECIFICATIONS
Power
Consumption:
120V ~ 60Hz,
1050W
Output
(Watts):
Operation
Frequency:
Unit
(HxWxD):
Oven Cavit y
(HxWxD):
Oven
Capacity:
Cooking
Uniformity:
Net Weight:
Approx. 23.8 Lbs
Pre-Programmed
Cooking Modes
700W
2450MHz
Dimensions
Dimensions
105/16 x 1713/16
81/4 x 123/8 x123/8
x15
9
/16
0.7 cu. Ft.
Turntable
Page 10

10
CONTROL PANEL FEATURE
DESCRIPTION
DISPL AY
Electronic display shows Cooking Time, Cooking Power, Time
Remaining in Cooking Cycle, and the Present Time.
BAKED POTATO BEVERAGE/SOUP PIZZA
level or time.
POWER
Use to set power level
Touch to set the weight of the food to be defrosted. The oven
automatically sets the defrosting time and power level.
Touch to set defrosting time. The oven automatically divides the
cycling on and off.
You can use the TIMER f u nction i ndepen dentl y, even while a cook ing
program is going on in the oven.
NUMBER PADS (0-9)
Touch to set times or amounts.
CLOCK
Touch to set the clock.
RESET
Clears all previous settings if touched before cooking starts.
START/STOP
Touch to start or stop cooking.
PRE-PROGRAMMED
COOKING MODES
DEFROST BY WEIGHT
SEAFOOD POPCORN FROZEN DINNER
FRESH VEGETABLES REHEAT
FROZEN VEGETABLES
Allow you to reheat or cook food automatic all y with out enter i ng po wer
SPEED DEFROST
TIMER
OPERATION PROCEDURE:
• Plug the power supply cord into a standard 3-pronged 15 Amps, 120Volts A.C.~/60Hz.
• After placing the food in a suitable contai n er , open the oven door and put it on the glass tray.
The glass tray and roller guide must always be in place during cooking.
• Shut the door. Make sure that it is firmly closed.
• The oven door can be opened at any time during operation by pulling on the door handle or pushing
the door release button. The oven will automatically shut off. To restart the oven, close the door and
then touch START/STOP.
• Each time a pad is touched, a BEEP will sound to acknowledge the touch. One of the function pads
must be touched before the number pads. Two BEEPS indicates the oven does not accept the entry,
check and try again.
• The oven automatically cooks on high power and defrosts on low power.
• When the oven is first plugged in the display will show “HR 12”, if you prefer to not have the clock
displayed, touch reset or wait 15 seconds.
• When the START/STOP pad is touched during the oven operation, the oven stops cooking. If the
oven door is opened during the oven operation, all information is retained.
• If the START/STOP pad is touched and the oven does not operate, check the area between the door
and door seal for obstructions and make sure the door is closed securely. The oven will not start
cooking until the door is completely closed and the program has been set.
SPECIAL OVEN FEATURES
SPEED DEFROST: Used to defrost frozen foods by time.
This cycle starts at medium – high power, then automatically reduces to medium – low and then to low as
the food thaws. SPEED DEFROST indicator light and cook indicator light will both come on during the
defrost cycle.
TIME R: Use for timing things without oven function. A long beep will sound at the end of the elaps ed
time.
AUTO TIMER: After a DEFROST or COOK PROGRAM has completed, the oven will automatically
continue to sound four beeps every two minutes until the oven door is opened or the RESET pad is
touched.
CHILD PROOF LOCK: Use to prevent unsupervised operation of the oven by children. The CHILD
PROOF LOCK indicator will be lit on the display and the oven cannot be operated while the CHILD
PROOF LOCK is set.
defrosting time into peri ods of alternating defros t and stand times by
Page 11
11
HOW TO SET THE OVEN CONTROLS
SETTING CHILD LOCK: To set, press and hold RESET for 3 seconds. LOCK is indicated on the display. To cancel, press and hold RESET for 3 seconds. LOCK indication disappears.
TIMER: Use to set cooking time. Allows you to set up to 99 minutes and 99 seconds
RESET: Touch to cancel the selected power level, cook or defrost times previously programmed. The
time of day clock is not cancelled.
START/STO P: Touch to start the defros t or cook programs . The cook indicat or light and the oven l ight
will come on and the cooling fan will operate.
NOTE: END OF OPERATION- Display will show “END”.
• Four beeps will sound, th e c ook indicator light will go out and will show “END” on dis play window until
the door is opened and the tim e of day will r eturn to t he disp lay wind ow. The ove n light and cooking
fan will turn off.
• The oven will autom atically continue to sound four beeps every two minutes until the ove n door is
opened or the RESET pad is touched.
NOTE: TO INTERRUPT OPERATION –Open the oven door.
• The oven immediately stops.
• If no further cooking is required, touch the RESET pad.
• To continue cooking, close the oven door and touch the START/STOP pad. The oven will restart.
AUDIBLE SIGNALS
DURING OVEN SETTINGS
ONE SIGNAL: Oven accepts the entry.
TWO SIGNALS: Oven does not accept the entry, check and try
again.
SETTING THE CLOCK
1. Touch CLOCK pad. This is a 12 hour clock.
2. Touch CLOCK pad once more. This is a 24
hour clock.
3. Use the number pads to enter the correct time.
If you selected 12 hour clock system, the digital
clock allows you to set from 1:00 to 12:59. If
you selected 24 hour clock system, the digital
clock allows you to set from 0:00 to 23:59.You
must touch at least three numbers to set the
clock (one for hour and two for minutes).
4. Touch CLOCK pad again.
NOTE: When the oven is first plugged in or when
power resumes after a power interruption, the
SETTING THE OVEN TIMER
1. Touch TIMER.
2. Enter the amount of time by touching the
number pads. Digit time is in minutes and
seconds and set left to right. Set one digit (a 5
for 5 seconds) or up to four digits (2405 for 24
minutes, 5 seconds).
3. Touch START/STOP.
NOTE: Time countdown can be seen in display for
3 seconds before clock or cooking time is returned
to display.
Touch TIMER and then touch RESET to cancel
TIMER during timing process.
display will show “HR 12”. If you prefer to not have
the clock displayed, touch RESET.
You can check the clock time while cooking is in
progress by touching the CLOCK pad.
Page 12
12
SETTING A COOKING PROGRAM
Number pad
Cooking power
9
90%
8
80%
7
70%
6
60%
5
50%
4
40%
3
30%
2
20%
1
10%
1 and 2 and touch START. The oven will
o the end of cooking
After stage 1 time has elapsed, one beep
A. One-stage Cooking
1. Use the number pads to set a cooking time.
You can set a cooking time from one second to
99 minutes and 99 seconds.
2. If you want to set a power level other than
100% power, touch POWER, then use the
number pads to enter the power level. You can
set the power level from 1 to 9.
Use single digits to set a cooking power level:
3. Touch START/STOP to start cooking.
B. Multi-stage Cooking
You can program oven f or 4 cooking stages. Each
stage can be programmed with a different power
level and time. To program 2-stage, 3-stage or 4stage cooking, repeat the one-stage cook ing steps
automatically proceed t
stages.
NOTE:
sound, signaling the beginning of stage 2.
After
total time has elapsed, 4 b eeps sound and END
appears in display. Touch RESET pad or open
oven door to clear END b efore starting another
cooking function.
SPEED DEFROST
1. Touch SPEED DEFROST.
2. Enter desired defrosting time by touching
correct number pads. Digital timer sets minutes
and seconds from left to right so a single digit
can be set (5 for 5 seconds ) or up to 4 digits
(2405 for 24 minutes 5 seconds).
3. Touch START/STOP.
NOTE:
After time has elapsed four signals sound and END
appears in display. Touch RESET pad or open door
to clear END before starting another cooking
function.
DEFROST BY WEIGHT
1. Touch DEFROST BY WEIGHT pad.
2. Enter weight.
3. Touch START/STOP pad.
Note:
Weight must be in pounds and ounces.
Ounce weights less than 10 must be preceded by
a 0. If label gives weight in pounds only, change
the fraction of a pound to ounces using the
following chart (See page 19).
Page 13
13
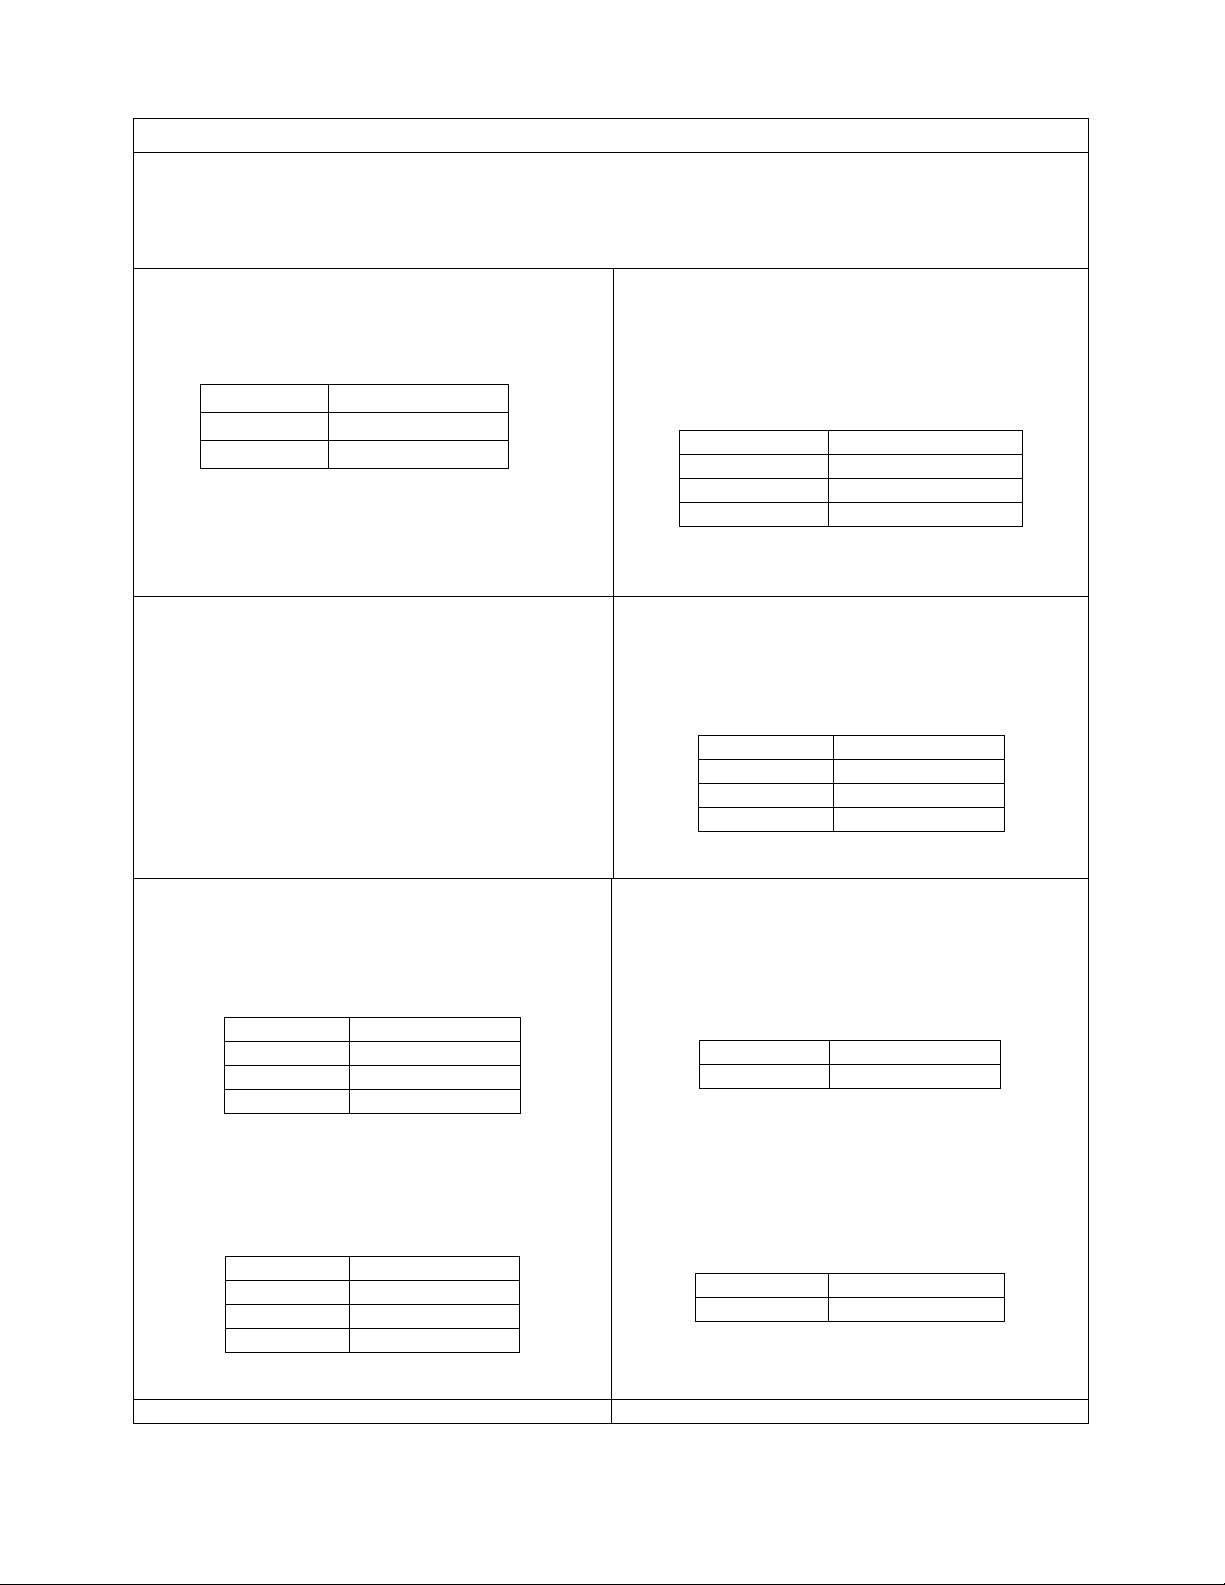
The QUICK COOK settings allow you to cook or reheat food automatically without entering power level or
food. Simply touch pad once, and ENTER AMT
2) to select the
AMOUNT
COOKING TIME
1 (3 oz.)
1 min. 45 sec.
2 (1.5 oz.)
1 min. 35 sec.
1 potato
3 min. 00 sec.
2 potatoes
5 min. 40 sec.
3 potatoes
8 min. 20 sec.
4 potatoes
11 min. 20 sec.
1 potato
4 min. 30 sec.
2 potatoes
8 min. 00 sec.
3 potatoes
11 min. 40 sec.
4 potatoes
15 min. 20 sec.
1 cup.
1 min. 00 sec
2 cups.
2 min. 00 sec
3 cups.
2 min. 50 sec
4 cups.
3 min. 50 sec
1 mug
1 min. 50 sec.
2 mugs
3 min. 10 sec.
3 mugs
4 min. 30 sec.
4 mugs
5 min. 40 sec.
1 entree
4 min. 15 sec.
2 entrees
7 min. 30 sec.
1 entree
8 min. 00 sec.
2 entrees
13 min. 30 sec.
QUICK COOK (PRE-PROGRAMMED) SETTINGS
time.
For smaller portions, simply touch the applicable pad and start. For larger portions, push the pad twice.
FROZEN DINNER, BAKED POTATO and BEVERAGE allow you to cook multiple amounts of the same
POPCORN
1. Touch POPCORN.
2. Touch NUMBER pads (1-
amount of food.
3. Touch START/STOP.
PIZZA
Reheating a slice (or two thin ones) of pizza:
1. Touch PIZZA once. CODE and 0:55 (55 sec.)
appears.
2. Touch START/STOP.
Heating a whole frozen pizza:
1. Touch PIZZA twice. CODE and 4:30 (4 min. 30
sec.) appears.
2. Touch START/STOP.
BAKED POTATO
For 3.5 to 5 oz. potatoes:
1. Touch BAKED POTATO once.
2. Enter number of potatoes by touching number
pads from 1 to 4. Cooking times for smallmedium potatoes are as follows:
3. Touch START/STOP.
For the large 6 to 8 oz. potatoes:
1. Touch POTATO twice.
2. Enter number of potatoes by touching number
pads from 1 to 4. Cooking times for large
potatoes are as follows:
3. Touch START/STOP.
BEVERAGE
For 4 to 6 oz. coffee cups:
1. Touch BEVERAGE once.
2. Enter number of cups by touching number
pads from 1 to 4. Cooking times are as follows:
FROZEN DINNER
For one or two small (5-7 oz.) frozen dinners:
1. Touch FROZEN DINNER once.
2. For 1 entree, just touch START/STOP. For 2
entrees, touch the number pad “2”. Cooking
times for small-size entrees are as follows:
3. Touch START/STOP pad.
3. Touch START/STOP.
For the larger 7 to 9 oz. coffee mugs:
1. Touch BEVERAGE twice.
2. Enter number of mugs by touching number
pads from 1 to 4. Cooking times are as follows:
3. Touch START/STOP.
Microwaving one large (8-10 oz.) frozen dinner :
1. Touch FROZEN DINNER twice.
2. For 1 entree, just touch START/STOP. For 2
entrees, touch the number pad “2”. Cooking
times for larger entrees are as follows:
3. Touch START/STOP.
Page 14
14
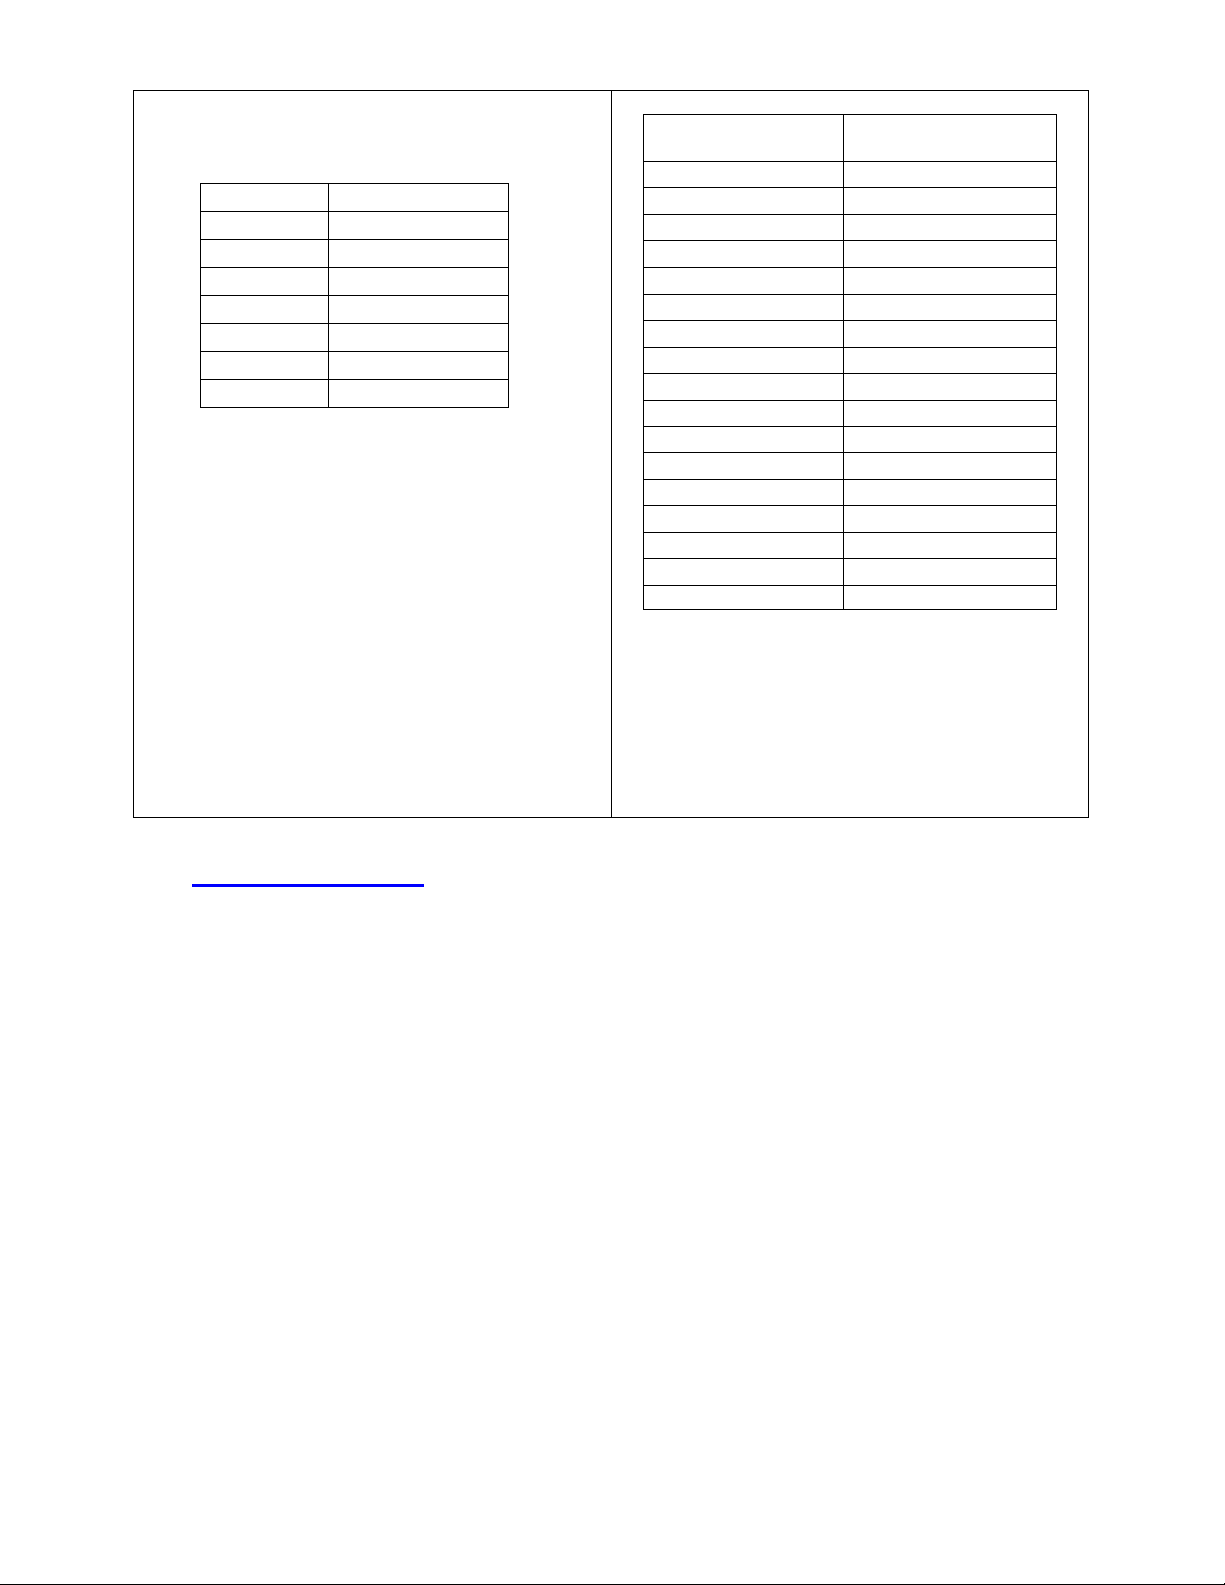
REHEAT
1. Touch REHEAT.
7) to select the
AMOUNT
COOKING TIME
1
0 min. 18 sec.
2
0 min. 35 sec.
3
0 min. 50 sec.
4
0 min. 55 sec.
5
1 min. 10 sec.
6
1 min. 30 sec.
7
2 min. 00 sec.
ghtly larger
Converting Fractions of a Pound to Ounces
Fractions of a
pound
Less than .03
0
.03 to .09
1
.10 to .15
2
.16 to .21
3
.22 to .27
4
.28 to .34
5
.35 to .40
6
.41 to .46
7
.47 to .53
8
.54 to 59
9
.60 to .65
10
.66 to .71
11
.72 to .78
12
.79 to .84
13
.85 to .90
14
.91 to .97
15
above .97
go to next even
2. Touch NUMBER pads (1-
amount (3 oz.) of food.
3. Touch START/STOP.
Note: place in dish or casserole sli
than the amount indicated. Continue to heat with
variable power and time if at the end of sensor
reheat the food is not sufficiently hot.
NOTE:
This setting lets you reheat a dinner
plate of chilled leftovers with good
results.
Ounces
Maximum weight for defrosting is 5 lb 16 oz.
Turn food over when oven signals twice. Touch
START/STOP to resume defrosting.
After total defrosting time, 4 signals sound and
END appears in display. Touch RESET or open
oven door to clear END before starting another
cooking function.
COOKING TECHNIQUES
Your microwave makes cooking easier than conventional cooking, provided you keep these
considerations in mind.
Stirring
Stir foods such as casseroles and vegetables while cooking to distribute heat evenly. Food at the outside
of the dish absorbs more energy and heats more quickly, so stir from the outside to the center. The oven
will turn off when you open the door to stir your food.
Arrangement
Arrange unevenly shaped foods, such as chicken pieces or chops, with the thicker, meatier parts toward
the outside of the turntable where they receive more microwave energy. To prevent overcooking, place
delicate areas, such as asparagus tips, toward the center of the turntable.
Turning
Turn foods over midway through cooking to expose all parts to microwave energy. This is especially
important with large foods such as roasts.
Standing
Foods cooked in the microwave build up internal heat and continue to cook for a few minutes after
heating stops. Let foods stand to complete cooking, especially foods such as cakes and whole
vegetables. Roasts need this time to complete cooking in the center without overcooking the outer areas.
All liquids, such as soup or hot chocolate, should be shaken or stirred when cooking is complete. Let
liquids stand a moment before serving. When heating baby food, stir well at removal and test the
temperature before serving.
Adding Moisture
Microwave energy is attracted to water molecules. Food that is uneven in moisture content should be
covered or allowed to stand so that the heat disperses evenly. Add a small amount of water to dry food to
help them cook.
Page 15

15
CARE AND MAINTENANCE
CLEANING YOUR APPLIANCE
• Turn the oven off and remove the power plug from the wall socket before cleaning.
• Keep the inside of the oven clean. When food splatters or spilled liquids adhere to oven walls, wipe
with a damp cloth. Mild detergent may be used if the oven gets very dirty. The use of harsh
detergent or abrasives is not recommended.
• The outside oven surfaces should be cleaned with a damp cloth. To prevent damage to the
operating parts inside the oven, water should not be allowed to seep into the ventilation openings.
• Do not allow the control panel to become wet. Clean with a soft, damp cloth. Do not use detergents,
abrasives or spray-on cleaners on the control panel. When cleaning the control Panel, leave oven
door open to prevent oven from accidentally turning on.
• If steam accumulates inside or around the outside of the oven door, wipe with a soft cloth. This may
occur when the microwave oven is operated under high humidity conditions and in no way indicates
malfunction of the unit.
• It is occasionally necessary to remove the glass tray for cleaning. Wash the tray in warm sudsy
water or in a dishwasher.
• The roller ring and oven cavity floor should be cleaned regularly to avoid excessive noise. Simply
wipe the bottom surface of the oven with mild detergent, water or window cleaner and dry. The roller
ring may be washed in mild sudsy water or dishwasher. Cooking vapors collect during repeated use
but in no way affect the bottom surface or roller ring wheels. When removing the roller ring from
cavity floor for cleaning, be sure to replace it in the proper position.
• Remove odors from your oven by combining a cup of water with the juice and skin of one lemon in a
deep microwavable bowl. Microwave for 5 minutes. Wipe thoroughly and dry with a soft cloth.
• When it becomes necessary to replace the oven light, please consult a dealer to have it replaced.
Page 16

16
PROBLEMS WITH YOUR APPLIANCE?
PROBLEM
POSSIBLE CAUSE
Appliance does not operate.
Not plugged in.
The door is not closed properly.
The light does not work.
section for the replacement procedure).
Vibrations.
Check to assure that the appliance is level.
800-323-5029
help is available.
delivered directly to your home by personal
check, money order, Master Card, or Visa.
know your appliance inside and out.
You can solve many com mon appliance problems easily, saving you the cost of a possible service call.
Try the suggestions below to see if you can solve the problem before calling the servicer.
TROUBLESHOOTING GUIDE
The circuit breaker tripped or a blown fuse.
The circuit breaker tripped or a blown fuse.
The appliance is unplugged.
The bulb has burned out (see the maintenance
SERVICE FOR YOUR APPLIANCE
We are proud of our cus tomer service organizat ion and the network of prof essional service technicians
that provide service on your Avanti appliances. W ith the purchase of your Avanti appliance, you can be
confident that if you ever need additional information or assistance, the Avanti Products Customer
Service team will be here for you. Just call us toll-free.
AVANTI PRODUCTS CUSTOMER SERVICES
Product Information
Whatever your questions a re about our product s,
Part Orders
800-220-5570
In-Home Repair Service
800-220-5570
You may order parts and a ccessories that will be
An Avanti Products authorized ser vice center will
provide expert repair s ervic e, sc hedule d at a t im e
that is convenient for you. Our trained servicers
Page 17

17
YOUR AVANTI PRODUCTS
Staple your sales receipt here. Proof of original purchase date
WHAT IS COVERED – LIMITED ONE-YEAR WARRANTY
LIMITED TWO YEAR WARRANTY
of the consumer.
WARRANTY EXCLUSIONS / WHAT IS NOT COVERED:
• A failure to comply with any applicable state, local, city, or county electrical, plumbing and/or building codes, regulations, or laws,
surrounding the appliance, and acts of God.
• Content losses of food or other content due to spoilage.
replacement of the unit.
• Repairs performed by unauthorized servicers.
In no event shall Avanti Products have any liability or responsibility whatsoever for damage to surrounding property, including
OUT OF WARRANTY PRODUCT
Warranty – Microwave Ovens
WARRANTY
Avanti Products warrants that the product is free from defects in materials and/or workmanship for a period of twelve (12) months
from the date of purchase by the original owner. The foregoing timeline begins to run upon the date of purchase, and shall not be
stalled, tolled, extended, or suspended for any reason whatsoever unless described in detail in the warranty document. For one
year from the date of purchase by the original owner, Avanti products will, at its option, repair or replace any part of the product
which proves to be defective in material or workmanship under normal use. Avanti Products will provide you with a reasonably
similar product that is either new or factory refurbished. During this period Avanti Products will provide all parts and labor necessary
to correct such defects free of charge, so long as the product has been installed and operated in accordance with the written
instructions in this manual. In rental or commercial use, the warranty period is 90 days. All Avanti appliances of 3.5 cubic feet
capacity or less must be brought/sent to the appliance service center for repair.
During the second year of use, Avanti Products will furnish, as needed a replacement part at no charge in exchange for any original
part, which fails due to a defect in material or workmanship. All labor and transportation charges are the responsibility of the
consumer.
LIMITED SEVEN YEAR WARR AN TY
For an additional 6-year period beyond the first year of the general coverage of this warranty, Avanti Products will replace a
magnetron tube, which fails due to a defect in material or workmanship. All labor and transportation charges are the responsibility
The warranty coverage described herein excludes all defects or damage that are not the direct fault of Avanti Products, including
without limitation, one or more of the following:
including failure to install the product in strict conformity with local fire and building codes and regulations.
• Any external, elemental and/or environmental forces and factors, including without limitation, rain, wind, sand, floods, fires, mud
slides, freezing temperatures, excessive moisture or extended exposure to humidity, lightni ng, power surges, struct ural fail ures
is needed to obtain service under warranty.
• Incidental or consequential damages
• Parts and labor costs for the following will not be considered
as warranty:
• Inner door panels, door shelves, door rails, and/or door
supports.
• Light bulbs and/or plastic housing.
• Plastic cabinet liners.
• Shipping and handling costs associated with the
cabinetry, floors, ceilings, and other structures and/or objects around the product. Also excluded from this warranty are scratches,
nicks, minor dents, and other cosmetic damages on external surfaces and exposed parts; Products on which the serial numbers
have been altered, defaced or removed; service visits for customer education, or visits where there is nothing wrong with the
product; correction of installation problems (you are solely responsible for any structure and setting for the product, including all
electrical, plumbing and/or other connecting facilities, for proper foundation/flooring, and for any alterations i ncl udi ng without
limitation cabinetry, walls, floors, shelving etc., as well as the resetting of breakers or fuses.
Avanti Products is under no obligation, at law or otherwise, to provide you with any concessions, including repairs, pro-rates, or
product replacement, once this warranty has expired.
• Service calls that are related to external problems, such as
abuse, misuse, inadequate electrical power, accidents, fire,
floods, or any other acts of God.
• Failure of the product if it is used for other than it intended
purpose.
• The warranty does not apply outside the Continental USA.
• Surcharges including but not limited to, any after hour,
weekend, or holiday service calls, tolls, ferry trip charges, or
mileage expense for service calls to remote areas.
Page 18

18
PARA REDUCIR EL RIESGO DE INCENDIO,
SIGA ESTAS INDICACIONES.
GUARDE LAS INSTR UC CIONES CERCA DE SU ALC AN C E.
INSTRUCCIONES EN ESPAÑOL
PRECAUCION
• LEA TODAS LAS INSTRUCCIONES ANTES DE USAR SU HORNO MICROONDAS.
• ALGUNOS PRODUCTOS TALES COMO HUEVOS ENTEROS Y ENVASES SELLADOS
(POR EJEMPLO, FRASCOS DE VIDRIO) PUEDEN EXPLOTAR, POR LO QUE NO DEBEN
SER CALENTADOS EN SU HORNO MICROONDAS.
• USE SU HORNO MICROONDAS SOLAMENTE PARA LO QUE SE INDICA EN ESTE
MANUAL.
• NO USE SUSTANCIAS QUIMICAS CORROSIVAS O GASES EN ESTE HORNO. ESTE
TIPO DE HORNO MICROONDAS ESTA DISEÑADO ESPECIFICAMENTE PARA
CALENTAR, COCINAR, Y DESHIDRATAR ALIMENTOS, NO ESTA DISEÑADO PARA USO
INDUSTRIAL O DE LABORATORIO.
• COMO CON TODO ELECTRODOMESTICO, ES NECESARIA LA SUPERVISION DE UNA
PERSONA ADULTA CUANDO SEA OPERADO POR NIÑOS.
• NO USE SU HORNO MICROON DAS SI TIENE EL CORDON O EL ENCHUFE DAÑADOS,
SI NO ESTA FUNCIONANDO APROPIADAMENTE, O SI ESTE SUFRIO UN GOLPE O UNA
CAIDA.
• PARA REDUCIR EL RIE SGO DE CHISPAS O FUEGO EN EL INTERIOR DEL HORNO
MICROONDAS:
• NO RECOCINE ALIMENTOS. ESTE PENDIENTE DE SU HORNO MICROONDAS
CUANDO COCINE ALIMENTOS QUE VENGAN CON ALGUN TIPO DE ENVOLTURA
COMO: PAPEL, PLASTICO, O MATERIAL QUE PUEDA SERVIR COMO
COMBUSTIBLE, PODRIA INICIAR UN INCENDI O.
• RETIRE EL ALAMBRE METALICO QUE SE UTILIZA PARA CERRAR LAS BOLSAS
ANTES DE COLOCAR EL ALIMENTO DENTRO DEL HORNO.
• SI ALGUNO DE LOS MATERIALES QUE ESTAN DENTRO DEL HORNO SE INCENDIA,
MANTENGA LA PUERTA DEL HORNO MICROONDAS BIEN CERRADA,
DESCONECTELO O APAGUE LA LLAVE GENERAL DE ELECTRICIDAD.
• NO ALMACENE OBJETOS, NI DEJE PAPELES, UTENSILIOS DE COCINA, O
ALIMENTOS DENTRO DE SU HORNO MICROONDAS.
• SOLO PERSONAL DE SERVICIO AUTORIZADO PUEDE BRINDAR SERVICIO TECNICO A
SU HORNO MICROONDAS. COMUNIQUESE CON EL SERVICIO TECNICO AUTORIZADO
MAS CERCANO PARA EXAMINAR, O REPARAR SU HORNO MICROONDAS.
• NO CUBRA NI OBSTRUYA NINGUN TIPO DE VENTILACION DE SU HORNO.
• NO USE SU HORNO MICROONDAS PARA CALENTAR SUSTANCIAS QUIMICAS
CORROSIVAS (POR EJEMPLO, SULFUROS Y CLORUROS), EL GAS DE DICHOS
QUIMICOS PUEDE INTERACTUAR CON LOS CONTACTOS Y RESORTES DE LA LLAVE
DE SEGURIDAD, DEJANDOLA INOPERABLE.
• NO SUMERJA EL CORDON NI EL ENCHUFE DENTRO DEL AGUA.
• MANTENGA SU HORNO MICROONDAS ALEJADO DE SUPERFICIES CALIENTES.
• NO DEJE EL CORDON COLGANDO EN EL BORDE DE MESAS O MOSTRADORES.
• NO LIMPIE SU HORNO MICROONDAS CON LIQUIDOS INFLAMABLES. LOS GASES QUE
ESTOS EMITEN PUEDEN OCASIONAR UNA EXPLOCION Y/O INCENDIO.
• NO ALMACENAR NI USAR GASOLINA, NINGUN TIPO DE GAS O LIQUIDO INFLAMABLE
CERCA DE SU HORNO MICROONDAS O DE OTR OS ELECTRODOMESTICOS, YA QUE
PUEDEN PRODUCIR UN INCENDIO Y DESENCADENAR UNA EXPLOSION.
ESTE USANDO SU HORNO MICROONDAS,
DESCARGA ELECTRICA, O DAÑO CUANDO
Page 19

19
INDICACIONES PARA LA INSTALACION
ANTES DE USAR SU HORNO MICROONDAS
• RETIRE LA ENVOLTURA EXTERIOR E INTERIOR
• VERIFIQUE QUE TENGA LAS SIGUIENTES PARTES:
• PLATO DE VIDRIO
• ARO GIRATORIO
• MANUAL DE USO
• VERIFICAR QUE EL HORNO MICROONDAS NO TENGA LOS SIGUIENTES DAÑOS:
• PUERTA MAL ALINEADA O DESCUADRADA
• PUERTA DAÑADA
• ABOLLADURAS O AGUJEROS EN LA PUERTA Y/O PANTALLA.
• ABOLLADURAS DENTRO DEL HORNO.
SI SU HORNO MICROONDAS MUESTRA ALGUNA DE LAS CARACTERISTICAS ARRIBA
MENCIONADAS, NO LO USE.
INSTALACION DE SU HORNO MICROONDAS
• DEBE UBICAR SU HORN O MICRO O NDAS EN UNA SUPERFIC I E PL AN A Y ES TABLE.
• NO OBSTRUYA NINGUN TIPO DE VENTILACION. SI ESTO SUCEDE MIENTRAS USTED OPERA
SU HORNO MICROONDAS OCASIONARA QUE ESTE SE RECALIENTE Y QUE
EVENTUALMENTE SE MALOGRE.
• COLOCAR EL HORNO MICROONDAS CERCA A SU TELEVISOR, RADIO, ANTENA O CABLES
DE LA ANTENA, PODRI A O CASI O N AR M A LA S EÑAL EN LA TELEVISION E INTERFERENCIA EN
LA RADIO. POR LO TANTO RECOMENDAMOS UBICAR SU HORNO MICROONDAS LO MÁS
ALEJADO POSIBLE DE ÉSTOS ARTEFACTOS.
• LIMPIE LA SUPERFICIE INTERIOR DEL HORNO MICROONDAS CON UN TRAPO SUAVE
HUMEDECIDO CON UN POCO DE AGUA TIBIA.
• MANTENGA SU HORN O MICR O O NDAS ALEJADO DEL AIR E CAL I ENTE, VAPOR O DE LAS
SALPICADURAS DE LÍQUIDOS CUANDO ESCOJA UN LUGAR DONDE UBICARLO, DE NO
HACERLO SU FUNCIONAMIENTO PODRIA SER AFECTADO.
• LOS RAYOS SOLARES DIRECTOS PODRIAN AFECTAR EL REVESTIMIENTO ACRILICO Y LAS
FUENTES DE CALOR PODRIAN INCREMENTAR EL CONSUMO ELECTRICO.
• CONECTE SU HORNO MICROONDAS A UN TOMACORRIENTE DE PARED EXCLUSIVO Y
APROPIADO. BAJO NINGUNA RAZON SE DEBE RETIRAR LA TERCERA PUNTA (CABLE DE
TIERRA) DEL ENCHUFE. CUALQUIER CONSULTA RESPECTO A LA CORRIENTE ELECTRICA
Y/O EL CABLE DE TIERRA, DEBE SER DIRIGIDA A UN ELECTRICISTA CERTIFICADO O A UN
CENTRO DE SERVICIOS AUTORIZADO POR AVANTI PRODUCTS.
• NO COLOQUE OBJETOS SOBRE SU HORNO MICROONDAS.
• PARA ASEGURAR UN A V EN T I LACI O N AP RO PIADA MANTENGA SU HORN O MIC RO O NDAS A
POR LO MENOS 5 PULGADAS DE LA PARED.
• NO REMUEVA EL EJE DEL MOTOR GIRATORIO.
MEDIDAS DE PRECAUCION
USO GENERAL
• NO INTENTE MANIPULAR, AJUSTAR O REPARAR LA PUERTA, EL PANEL DE CONTROL O
CUALQUIER PARTE DE SU HORNO MICROONDAS. NO REMUEVA EL PANEL DE CONTROL
DEL HORNO. LAS REPARACIONES DEBERAN SER REALIZADAS POR PERSONAL DE
SERVICIO CALIFI C AD O .
• NO UTILICE EL HORNO CUANDO ESTE VACIO. SI NO HAY ALIMENTOS O AGUA DENTRO DEL
HORNO MICROONDAS, QUE PUEDAN ABSORBER TODA LA ENERGIA DE LAS MICROONDAS,
ESTA SE REFLEJARA CONTINUAMENTE DENTRO EL HORNO.
• DE SUCEDER UN INCENDIO, PRESIONE LA TECLA START/STOP EN EL PANEL DE CONTROL
Y DEJE LA PUERTA CERRADA. DESCONECTE EL ENCHUFE O DESCONECTELO DE LA CAJA
GENERAL DE LA ELECTRICIDAD.
Page 20

20
• NO INTENTE SECAR ROPA, PERIODICOS, U OTRO TIPO DE MATERIALES EN EL HORNO.
ESTOS PODRIAN INCENDIARSE.
• NO USE PRODUCTOS DE PAPEL RECICLADO, ESTOS CONTIENEN IMPUREZAS QUE PUEDEN
CAUSAR CHISPAS Y FUEGOS CUANDO SON USADOS.
• NO GOLPEE EL PANEL DE CONTROL, PODRIA DAÑAR LOS CONTROLES.
UTENSILIOS
• NO USE ENVASES DE METAL O PLATOS CON BORDES METALICOS, PODRIAN OCASIONAR
CHISPAS.
• NO USE ALAMBRES METALICOS PARA CERRAR BOLSAS EN SU HORNO MICROONDAS.
• NO USE FRASCOS SELLADOS O BOTELLAS DE CUELLO ESTRECHO PARA COCINAR O
RECALENTAR. PODRIAN ROMPERSE.
• NO USE TERMOMETROS CONVENCIONALES EN EL MICROONDAS. SOLO USE LOS
LLAMADOS “MICROWAVE SAFE” (PARA USO EN MICROONDAS) SIGUIENDO SUS
INSTRUCCIONES.
• RETIRE LAS ENVOLTURAS PLASTICAS DE LOS ALIMENTOS ANTES DE COCINARLOS O
DESCONGELARLOS.
CONEXION ELECTRICA
ESTA UNIDAD DEBE SER CONECTADO A TIERRA. EN EL CASO QUE OCURRA UN CORTO
CIRCUITO, LA CONEXION A TIERRA REDUCIRA EL RIESGO DE RECIBIR UNA DESCARGA
ELECTRICA POR TENER UN ALAMBRE PARA EL ESCAPE DE LA CORRIENTE ELECTRICA. ESTE
HORNO MICROONDAS ESTA EQUIPADO CON UN ENCHUFE QUE POSEE UN CABLE DE TIERRA.
EL CABLE DEBE SER CONECTADO EN UN TOMACORRIENTE QUE ESTE APROPIADAMENTE
INSTALADO Y QUE POSEA UN RECEPTOR PARA CABLE DE TIERRA.
ADVERTENCIA
EL USO INAPROPIADO DEL CABLE DE TIERRA PUEDE RESULTAR EN UNA DESCARGA
ELECTRICA. C ONSU LTE A U N EL ECTRIC ISTA O PERSO NAL D E SERV ICIO CALIF ICADO SI TI ENE
ALGUNA DUDA SOBRE LAS INSTRUCCIONES DE INSTALACION DEL CABLE DE TIERRA.
EL CORDON DEL HORNO MICROONDAS ESTA EQUIPADO CON UN ENCHUFE DE TRES PUNTAS
EL CUAL ENCAJA PERFECTAMENTE EN UN TOMACORRIENTE DE PARED DE TRES PUNTAS
ESTANDAR PARA REDUCIR EL RIESGO DE UNA DESCARGA ELECTRICA.
BAJO NINGUNA CIRCUNSTANCIA CORTE O RETIRE LA TERCERA PUNTA DEL ENCHUFE YA QUE
ESTA ES LA CONEXION A TIERRA.
NO USE UNA EXTENSION ELECTRICA.
LA CORRIENTE ELECTRICA DE ESTE HORNO MICROONDAS ES DE 115 A 120 VOLTIOS, TIENE
UNA SALIDA ELECTRICA DE 60 HZ Y UN ENCHUFE DE TIERRA DE TRES PUNTAS QUE VA
CONECTADO AL TOMACORRIENTE DE PARED.
OPERANDO SU HORNO MICROONDAS
AUNQUE SU HORNO MICROONDAS ESTE EQUIPADO CON CARACTERISTICAS DE SEGURIDAD,
ES IMPORTANTE TOMAR NOTA DE LO SIGUIENTE:
• NO TRABE O FUERZE LOS SEGUROS INTERNOS.
• NO DEJE NINGUN OBJETO ENTRE LA CARA FRONTAL DEL HORNO Y LA PUERTA. NO DEJE
QUE SE ACUMULEN RESIDUOS EN LAS SUPERFICIES SELLADAS. LIMPIE DICHAS
SUPERFICIES FRECUENTEMENTE CON UN DETERGENTE SUAVE, ENJUAGUE Y SEQUELO.
NUNCA USE DETERGENTE EN POLVO O ESPONJAS ABRASIVAS.
• CUANDO LA PUERTA ESTE ABIERTA NO LA FUERZE DEMASIADO, POR EJEMPLO UN NIÑO
COLGANDOSE DE ELLA O UNA CARGA QUE CAUSE QUE EL HORNO SE CAIGA HACIA
DELANTE Y DE ESTA MA NERA DAÑE LA PUERTA
Page 21

21
• SI SU HORNO MICROONDAS ESTA MALOGRADO NO LO USE HASTA QUE HAYA SIDO
REPARADO POR PERSONAL DE SERVICIO CALIFICADO. ES IMPORTANTE QUE SU HORNO
MICROONDAS CIERRE APROPIADAMENTE Y QUE NO TENGA DAÑOS EN:
• PUERTA (DOBLADA)
• BISAGRAS Y MANIJAS (ROTAS O SUELTAS)
• SELLOS DE LAS PUERTAS Y SUPERFICIES S EL L A DAS
• SU HORNO MICROONDAS DEBE SER REPARADO SOLO POR PERSONAL DE SERVICIO
DEBIDAMENTE CALIFICADO
OPERACION
• CONECTE EL ENCHUFE A UN TOMACORRIENTE ESTANDAR DE 3 PUNTAS (120V AC 60 HZ,15
AMP).
• CUANDO EL HORNO SE CONECTA POR PRIMERA VEZ LA PANTALLA DEL PAN EL DE
CONTROL MOSTRARA EL MENSAJE “ENTER CLOCK TIME” (ENTRE LA HORA DEL RELOJ), SI
NO DESEA QUE SE MUESTRE LA HORA DEL RELOJ PRESIONE LA TECLA RESET.
• LUEGO DE COLOCAR LA COMIDA EN UN ENVASE ADECUADO ABRA LA PUERTA DEL HORNO
Y PONGALA SOBRE EL PLATO DE VIDRIO (ESTE Y EL ARO GIRATORIO DEBEN ESTAR
SIEMPRE EN SU LUGAR CUANDO EL HORNO ESTE TRABAJANDO).
• CIERRE LA PUERTA.
• SI PRESIONA LA TECLA START/STOP Y EL HORNO NO COCINA, ASEGURESE QUE LA
PUERTA ESTE BIEN CERRADA Y VERIFIQUE QUE NO TENGA OBSTRUCCIONES. EL HORNO
NO COMENZARA A COCINAR HASTA QUE LA PUERTA ESTE COMPLETAMENTE CERRADA Y
EL HORNO SE HAYA PROGRAMADO CORRECTAMENTE.
• CADA VEZ QUE UNA TECLA DEL PANEL DE CONTROL SEA MARCADA USTED ESCUCHARA
EL SONIDO DE UN TIMBRE (BEEP). USTED DEBERA MARCAR ALGUNA DE LAS TECLAS DE
FUNCIONES ANTES DE HACERLO CON LAS TECLAS NUMERICAS. DOS BEEP INDICARAN
QUE EL HORNO NO ACEPTA LA INDICACION DIGITADA, POR FAVOR VERIFIQUELA Y VUELVA
A INTENTARLO.
• EL HORNO COCINA AUTOMATICAMENTE CON LA POTENCIA MAS ALTA Y DESCONGELA
CON LA MAS BAJA.
• LA PUERTA DEL HORNO PUEDE ABRIRSE EN CUALQUIER MOMENTO AUNQUE ESTE EN
FUNCIONAMIENTO, EL HORNO SE APAGARA AUTOMATICAMENTE PERO TODA LA
INFORMACION QUEDARA RETENIDA. PARA REINICIAR SU FUNCIONAMIENTO CIERRE LA
PUERTA DEL HORNO Y PRESIONE LA TECLA START/STOP EN EL PANEL DE CONTROL.
• CUANDO PRESIONE LA TECLA START/STOP MIENTRAS EL HORNO MICROONDAS OPERA,
ESTE DEJARA DE COCINAR.
PANEL DE CONTROL (VE A PAGIN A 9)
A CONTINUACION LE INDICAMOS LAS INSTRUCCIONES PARA EL MANEJO DE LOS COMANDOS
DEL PANEL DE CONTROL:
POWER (POTENCIA)
SE USA PARA SELECC IO NAR EL NI V EL DE PO TENCIA
TIMER (MEDIDOR DE TIEMPO) PARA COMIDAS EXTERNAS
USTED PUEDE USAR ESTA FUNCION INDEPENDIENTEMENTE, AUN CUANDO EL HORNO ESTE
EN USO.
COOK (COCINAR)
SE USA PARA COCINAR EN ETAPAS Y POTENCIAS DISTINTAS. USTED PODRA
COCINAR A UNA POTENCIA POR UN PERIODO DE TIEMPO, LUEGO EL HORNO CAMBIARA
AUTOMATICAMENTE LA POTENCIA PARA EL RESTO DE LA COCCION (SEGUN HAYA SIDO
PROGRAMADO POR USTED)
Page 22

22
COOK BY WEIGHT (COCINAR SEGUN EL PESO)
CON SOLO DIGITAR EL PESO Y EL TIPO DE LA CARNE, EL HORNO FIJA AUTOMATICAMENTE EL
TIEMPO DE COCCION Y EL NIVEL DE POTENCIA
DEFROST BY WEIGHT (DESCONGELAR SEGUN EL PESO)
USTED SOLO DEBE INGRESAR EL PESO DE LA COMIDA A SER DESCONGELADA,
SEGUIDAMENTE EL HORNO DIVIDIRA Y FIJARA AUTOMATICAMENTE, EL TIEMPO E INTERVALOS
CON LOS QUE DESCONGELARA LOS ALIMENTOS, ALTERNANDO ETAPAS DE COCCION
(ENCENDIDO) Y RE PO SO (AP AG AD O) .
NUMBER PADS (0-9) (TECLADO NUMERICO)
EL TECLADO DE NUMEROS SIRVE PARA INGRESAR TIEMPOS Y CANTIDADES.
CLOCK (RELOJ)
SE USA PARA INGRESAR LA HORA ACTUAL EN EL RELOJ.
RESET (REINICIO)
REINICIA TODAS LAS PROGRAMACIONES SI SE MARCA ANTES DE COMENZAR A COCINAR.
START/STOP (COMENZAR/PARAR)
SE USA PARA INICIAR, DETENER O FINALIZAR EL FUNCIONAMIENTO DEL HORNO.
POP CORN (PALOMITAS DE MAIZ), BAKED POTATO (PAPA HORNEADA), PIZZA, BEVERAGE
(BEBIDAS), FROZEN DINNER (COMIDAS CONGELADAS), REHEAT (RECALENTAR)
SON FUNCIONES PRE-PROGRAMADAS. ESTAS OPCIONES LE PERMITIRAN COCINAR O
RECALENT AR ALIMENT OS AUTOMATICAMENTE SIN NECESIDAD DE INGRESAR LA POTENCIA
O EL TIEMPO DE COCCION.
TIMER (MEDIDOR DE TIEMPO)
• SE USA PARA PROGRAMAR EL TIEMPO DE COCINADO
• PERMITE PROGRAMAR HASTA 99 MINUTOS Y 99 SEGUNDOS
RESET (REINICIAR)
• CANCELA EL NIVEL DE POTENCIA, EL TIEMPO DE COCCION Y DESCONGELADO
PREVIAMENTE PROGRAMADOS.
• LA HORA DEL RELOJ NO PUEDE SER CANCELADA.
START/STOP (INICIAR/TERMINAR)
• INICIA, DETIENE O FINALIZA TODOS LOS PROGRAMAS.
• LA LUZ INDIC ADORA DE COCCION Y LA DEL HORNO SE ENCENDERAN Y EL VEN TILADOR
DE REFRIGERACION EMPEZARA A FUNCIONAR.
NOTA : AL TERMINO DE UNA FUNCION - LA PAN TALLA MOSTRARA EL MENSAJE “END”
• CUANDO ALGUNA FUNCION LLEGUE A SU T ERMINO, SU HORNO MICROO NDAS LE AVISARA
DE LA SIGUIENTE MANERA:
• ESCUCHARA TRES VECES EL SONIDO BEEP, LA LUZ INDICADORA DE COCCION SE
APAGARA Y DESPUES DE ABRIR LA PUERTA LA PANTALLA MOSTRARA NUEVAMENTE LA
HORA.
• LA LUZ DEL HORNO Y EL VENTILADOR DE REFRIGERACION SE APAGARAN
• EL HORNO EMITIRA AUTOMATICAMENTE, Y CADA DOS MINUTOS, TRES VECES EL SONIDO
BEEP HASTA QUE LA PUERTA DEL HORNO SE ABRA O SE TOQUE LA TECLA RESET
NOTA: INTERRUPCION DE UNA FUNCION - ABRA LA PUERTA DEL HORNO
• EL HORNO SE DETENDRA INMEDIATAMENTE.
• SI NO NECESITA SEGUIR COCINANDO PRESIONE LA TECLA RESET.
Page 23

23
• PARA CONTINUAR COCINANDO CIERRE LA PUERTA DEL HORNO Y PRESIONE LA TECLA
START/STOP. EL HORNO SEGUIRA COCINANDO.
SPEED DEFROST (DESCONGELADO RAPIDO)
• ESTA FUNCION SIRVE PARA DESCONGELAR COMIDA.
• ESTE CICLO COMIENZA CON UNA POTENCIA ALTA-MEDIA, LUEGO SE REDUCE A MEDIA-
BAJA AUTOMATICAMENTE, Y TERMINA EN LA POTENCIA MAS BAJA MIENTRAS LA COMIDA
TERMINA DE DESCONGELARSE.
• LA LUZ INDICADORA DE DESCONGELAMIENTO RAPIDO Y LA DE COCCION ESTARAN
PRENDIDAS DURANTE EL TODO EL CICLO.
CARACTERISTICAS ESPECIALES DE SU HORNO MICROONDAS
MINUTE TIMER (MEDIDOR DE TIEMPO POR MINUTOS)
SE USA PARA TOMAR EL TIEMPO A COSAS QUE SE HACEN FUERA DEL HORNO. CUANDO EL
TIEMPO PROGRAMADO HAYA TRANSCURRIDO EL HORNO EMITIRA CUATRO VECES EL SONIDO
BEEP. LA LUZ DEL HORNO Y EL VENTILADOR DE REFRIGERACION ESTARAN ENCENDIDOS
MIENTRAS EL MEDIDOR DE TIEMPO ESTE ACTIVO.
AUTO TIMER (MEDIDOR DE TIEMPO AUTOMATICO)
LUEGO DE TERMINAR LOS PROGRAMAS DE COCINADO O DESCONGELADO, EL HORNO
EMITIRA CUATRO VECES EL SONIDO BEEP CA D A DO S MI NU T O S HA ST A QU E SE AB RA LA
PUERTA O SE PRESIONE LA TECLA RESET.
CHILD PROOF LOCK (SEGURO PARA PREVENIR ACCIDENTES) PROVOCADOS POR NIÑOS
SU HORNO MICROONDAS CUENTA CON UNA FUNCION QUE PERMITE BLOQUEARLO, DE ESTA
MANERA EVITARA EL USO INDEBIDO Y ACCIDENTAL DEL MISMO. MIENTRAS ESTE
PROGRAMADO, EL INDICADOR CHILD PROOF LOCK ESTARA ENCENDIDO Y EL HORNO NO
PODRA OPERARSE.
COMO PROGRAMAR LOS CONTROLES DEL HORNO
SEÑALES DURANTE LA PROGRAMACION DEL HORNO
UNA SEÑAL (BEEP) Y EL HORNO ACEPTA LOS DATOS PARA LA PROGRAMACION.
DOS SEÑALES (BEEP) EL HORNO NO ACEPTA LA INDICACION DIGITADA, VERIFIQUELA E
INTENTE NUEVAMENTE.
PROGRAMANDO EL RELOJ
1. OPRIMA LA TECLA MARCADA CLOCK PARA UN RELOJ DE 12 HORAS
2. OPRIMA LA TECLA MARCADA CLOCK UNA VEZ MAS PARA UN RELOJ DE 24 HORAS
3. USE LAS TECLAS CON N UMER OS PARA PROGRAM AR LA H OR A CO R RECTA, SI USTED
SELECCCIONO EL RELOJ PARA EL SISTEMA DE 12 HORAS ESTE LE PERMITIRÁ UNA
SELECCIÓN DE 1:00 AM HAST 12:59 PM.
SI SELECCIONO EL RELOJ PARA 24 HORAS, LE PERMITIRA UNA SELECCIÓN DE 0:00 HASTA
23:59.
USTED DEBE DE PRESIONAR NO MENOS DE TRES NUMEROS PARA LA PROGRAMACION
DEL RELOJ. UN O PAR A LA S HO RA Y DOS PARA LOS MINUTOS.
4. OPRIMA LA TECLA MARCADA CLOCK DE NUEVO.
NOTA: ESTE ES UN RELOJ DE 12 HORAS.
CUANDO EL HORNO ES CONECTADO POR PRIMERA VEZ O CUANDO LA CORRIENTE RETORNE
LUEGO DE UNA INTERRUPCION, LA PANTALLA MOSTRARA EL MENSAJE “HR 12” (PROGRAME
LA HORA). SI NO DESEA PROGRAMARLA PRESIONE RESET. USTED PUEDE VER LA HORA DEL
RELOJ MIENTRAS COCINA PRESIONANDO LA TECLA CLOCK.
PROGRAMANDO EL MEDIDOR DE TIEMPO
1. PRESIONE LA TECLA TIMER
Page 24

24
2. PROGRAME EL TIEMPO USANDO LAS TECLAS NUMERICAS. EL TIEMPO ESTA EXPRESADO
TECLADO
NUMERICO
NIVEL DE
POTENCIA
9
90%
8
80%
7
70%
6
60%
5
50%
4
40%
3
30%
2
20%
1
10%
EN MINUTOS Y SEGUN D O S Y SE LEE D E IZQUIERDA A DERECHA. PU EDE PRESIONAR DE
UNO HASTA CUATRO NUMEROS (2405 PARA 24 MINUTOS, 5 SEGUNDOS)
3. PRESIONE LA TECLA START/STOP
NOTA: LA CUENTA REGRESIVA SE PODRA VER EN LA PANTALLA POR TRES SEGUNDOS ANTES
QUE EL RELOJ O EL TIEMPO DE COCCION RETORNEN A LA PANTALLA. PRESIONE TIMER Y
LUEGO RESET PARA CANCELAR EL MEDIDOR DE TIEMPO CUANDO ESTE ACTIVADO.
CONFIGURANDO UN PROGRAMA DE COCCION
A. ONE STAGE-COOKING (COCCION EN UNA SOLA ETAPA)
1. USE LAS TECLAS NUMERICAS PARA PROGRAMAR EL TIEMPO DE COCCION. SE PUEDE
PROGRAMAR TIEMPOS DE COCCION ENTRE 01 SEGUNDO(S) Y 99 MINUTOS CON 99
SEGUNDOS.
2. SI DESEA PROGRAMAR UN NIVEL DE POTENCIA DISTINTO DE 100% PRESIONE POWER
3. PRESIONE LAS TECLAS NUMERICAS PARA INGRESAR EL NIVEL DE POTEN CI A (D E 1 A 9),
USE SOLO UN DIGITO PARA PROGRAMAR EL NIVEL DE POTENCIA.
4. PRESIONE START/STOP PARA INICIAR LA COCCION.
B. TWO-STAGE COOKING (COCCION EN DOS ETAPAS)
ESTA FUNCION ES IDEAL PARA LAS RECETAS QUE REQUIEREN ETAPAS DE COCCION A
DISTINTAS TEMPERATURAS.
1. PROGRAMANDO LA ETAPA 1:
SIGA LOS PASOS 1 Y 2 DE “COC CIO N EN UN A SOLA ETAPA”. NO PRE SIO NE START/STO P.
2. PROGRAMANDO LA ETAPA 2:
PRESIONE COOK E INGRESE EL TIEMPO DE COCCION ADECUADO Y EL NUEVO NIVEL DE
POTENCIA (LA MAYORIA DE LAS RECETAS USAN EL NIVEL DE COCCION MAS BAJO PARA
LA SEGUNDA ETAP A).
3. PRESIONE START/STOP
NOTA: CUANDO EL TIEMPO DE COCCION HAYA FINALIZADO, EL HORNO EMITIRA CUATRO
VECES EL SONIDO BEEP Y EL MENSAJE END (FIN) APARECERA EN LA PANTALLA.
PRESIONE RESET O ABRA LA PUERTA DEL HORNO PARA QUE EL MENSAJE END
DESAPAREZCA ANTES DE INICIAR OTRA COCCION.
DESCONGELADO RAPIDO (SPEED DEFROST)
1. PRESIONE LA TECLA SPEED DEFROST
2. INTRODUZCA EL TIEMPO DE DESCONGELAMIENTO PRESIONANDO LAS TECLAS
NUMERICAS. USTED DEBERA MARCAR EL TIEMPO EN MINUTOS Y SEGUNDOS, DE
IZQUIERDA A DERECHA. PUEDE DIGITAR DE UNO (MARQUE 5 PARA 5 SEGUNDOS) HASTA
CUATRO DIGITOS (2405 PARA 24 MINUTOS, 5 SEGUNDOS)
3. PRESIONE START/STOP
Page 25

25
FRACCIONES DE
LIBRA
.01 HASTA .02
0
.03 HASTA .09
1
.10 HASTA .15
2
.16 HASTA .21
3
.22 HASTA .27
4
.28 HASTA .34
5
.35 HASTA .40
6
.41 HASTA .46
7
.47 HASTA .53
8
.54 HASTA .59
9
.60 HASTA .65
10
.66 HASTA .71
11
.72 HASTA .78
12
.79 HASTA .84
13
.85 HASTA .90
14
.91 HASTA .97
15
AUMENTAR UNA LIBRA MAS
NOTA: CUANDO EL TIEMPO DE COCCION HAYA FINALIZADO, EL HORNO HARA CUATRO VECES
EL SONIDO BEEP Y EL MENS AJ E EN D (F IN) A PARECERA EN LA PANT ALLA . PRESI ONE
RESET O ABRA LA PUERTA DEL HORNO PARA QUE EL MENSAJE END DESAPAREZCA
ANTES DE INICIAR OTRA COCCION.
DESPUES DE FIJAR EN EL HORNO LA FUNCION DE DESCONGELADO-RAPIDO USTED PUEDE
PROGRAMARLO PARA INTERCALARLA CON LAS FUNCIONES DE COCCION EN UNA O DOS
ETAPAS.
PARA USAR CONJUNTAMENTE LAS FUNCIONES DE DESCONGELADO-RAPIDO Y COCCION EN
UNA SOLA ETAPA, SIG A EST AS I NSTRUCCIONES:
1. SIGA LOS PASOS 1 Y 2 DE LA FUNCION DESCONGELADO-RAPIDO.
2. PRESIONE LA TECLA COOK E INGRESE EL TIEMPO DE COCCION Y NIVEL DE POTENCIA.
3. PRESIONE LA TECLA START/STOP.
PARA USAR LA FUNCION DE DESCONGELADO-RAPIDO Y COCCION EN DOS ETAPAS, SIGA
ESTAS INSTRUCCIONES:
1. SIGA LOS PASOS 1 Y 2 DE LA FUNCION DESCONGELADO-RAPIDO.
2. PRESIONE LA TECLA COOK E INGRESE EL TIEMPO DE COCCION Y NIVEL DE POTENCIA.
3. INGRESE LA PROGR AMACION PARA COCC IO N EN DOS ETAPAS
4. PRESIONE LA TECLA START/STOP.
DESCONGELAMIENTO POR PESO (DEFROST BY WEIGHT)
1. PRESIONE LA TECLA DEFROST BY WEIGHT.
2. INGRESE EL PESO USANDO EL TECLADO NUMERICO.
3. PRESIONE LA TECLA START/STOP
CONVIRTIENDO FRACCIONES DE LIBRAS A ONZAS.
ONZAS
.98 HASTA .99
LOS PESOS MENORES A 10 ONZAS DEBEN SER PROGRAMADOS ANTEPONIENDO UN CERO.
SI LA ETIQUETA DE LA COMIDA SOLO MUESTRA EL PESO EN LIBRAS, CONVIERTA LAS
FRACCIONES (DE HABERLAS) A ONZAS USANDO LA TABLA DE CONVERSION.
DELE LA VUELTA A LA CARNE CUANDO EL HORNO HAGA EL SONIDO BEEP DOS VECES,
Page 26

26
OPRIMA LA TECLA START/STOP PARA CONTINUAR COCINANDO.
CANTIDAD
TIEMPO DE COCCION
1 (3 OZ)
1 MIN 45 SEGUNDOS
2 (1.5 OZ)
1 MIN 35 SEGUNDOS
CANTIDADES
TIEMPO DE
COCCION
1 PAPA
3 MIN. 00 SEC.
2 PAPAS
5 MIN. 40 SEC.
3 PAPAS
8 MIN. 20 SEC.
4 PAPAS
11 MIN. 20 SEC.
CUANDO EL TIEMPO DE COCCION HAYA FINALIZADO, EL HORNO HARA CUATRO VECES EL
SONIDO BEEP Y EL MENSAJE END (FIN) APARECERA EN LA PANTALLA. PRESIONE RESET O
ABRA LA PUERTA DEL HOR NO PARA QU E EL MEN SAJE END D ESAPAR EZCA AN TES DE IN ICIAR
OTRA COCCION.
PROGRAMANDO PARA PREVENIR EL USO DE ESTE MI CROONDAS POR NIÑOS
ESTE SEGURO PREVIENE ACCIDENTES POR OPERACIONES INDEBIDAS PROVOCADAS POR
NIÑOS. PARA PROGRAMARLO MANTEN G A PRES IONADA LA TECLA RESET POR 3 SEGUNDOS.
EL MENSAJE LOCK (B LO QU EADO ) AP ARECERA EN LA PANT ALL A.
PARA CANCELAR LA FUNCION MANTENGA PRESIONADA LA TECLA RESET POR 3 SEGUNDOS,
EL MENSAJE LOCK (BLOQUEADO) DESAPARECERA DE LA PANTALLA.
PROGRAMACION DE LA FUNCION COCCI O N RA PIDA
ESTA FUNCION LE PERMITIRA COCINAR O RECALENTAR COMIDAS AUTOMATICAMENTE SIN
NECESIDAD DE INGRESAR EL NIVEL DE POTENCIA O EL TIEMPO DE COCCION.
PARA PORCIONES PEQUEÑAS, SIMPLEMENTE PRESIONE LA TECLA QUE APLIQUE PARA EL
TIPO DE COMIDA Y SEGUIDAMENTE LA TECLA START/STOP. PARA PORCIONES MAS GRANDES,
PRESIONE LA MISMA TECLA DOS VECES.
LAS TECLAS FROZEN DINNER (COMIDAS CONGELADAS), BAKED POTATO (PAPA AL HORNO) Y
BEVERAGE (BEBIDAS) LE PERMITEN COCINAR MUCHAS CANTIDADES DE LA MISMA COMIDA.
SIMPLEMENTE PRESIONE UNA VEZ LA TECLA APROPI A DA PA R A EL T IPO DE ALI M ENTO,
APARECERA EL MENSAJE ENTER AMT (INGRESE LA CANTIDAD) EN LA PANTALLA. INGRESE EL
NUMERO DE PORCIONES PRESIONE CON LAS TECLAS NUMERICAS, LUEGO PRESIONE
START/STOP.
TECLA PALOMITAS DE MAIZ (POPCORN)
1. OPRIMIR LA TECLA POPCORN
2. OPRIMA LA TECLA DE NUMERO ( 1 – 2 ) PARA SELECCIONAR LA CANTIDAD.
3. PRESIONE START/STOP
NOTA: PARA CAMBIAR EL TIEMPO PRE-PROGRA M ADO , PRESIONE LA TECLA POPCORN DOS
VECES. EL MENSAJE ENTER TIME (INGRESE EL TIEMPO) APARECERA EN LA PANTALLA.
INGRESE LOS MINUTOS Y SEGUNDOS USANDO LAS TECLAS NUMERICAS. PRESIONE
START/STOP. EN ADELANTE, CUANDO USE LA FUNCION POP CORN, EL NUEVO TIEMPO DE
COCCION INGRESADO PERMANECERA COMO PRE-PROGRAMADO.
TECLA PAPA AL HORNO (BAKED POTATO)
PARA PAPAS DE 3.5 A 5 ONZAS:
1. PRESIONE LA TECLA POTATO UNA VEZ
2. INGRESE EL NUMERO DE PAPAS, DE 1 A 4, USANDO LAS TECLAS NUMERICAS. LOS
TIEMPOS DE COCINADO PARA PAPAS DE TAMAÑO PEQUEÑO-MEDIANO SON LOS
SIGUIENTES:
3. PRESIONE START/STOP
Page 27

27
PARA PAPAS DE 6 A 8 ONZAS:
CANTIDADES
TIEMPO DE
COCCION
1 PAPA
4 MIN. 30 SEC.
2 PAPAS
8 MIN. 00 SEC.
3 PAPAS
11 MIN. 40 SEC.
4 PAPAS
15 MIN. 20 SEC.
TIEMPO DE
COCCION
1 TAZA
1 MIN. 00 SEC.
2 TAZAS
2 MIN. 00 SEC.
3 TAZAS
2 MIN. 50 SEC.
4 TAZAS
3 MIN. 50 SEC.
CANTIDADES
TIEMPO DE
COCCION
1 TAZA
1 MIN. 50 SEC.
2 TAZAS
3 MIN. 10 SEC.
3 TAZAS
4 MIN. 30 SEC.
4 TAZAS
5 MIN. 40 SEC.
1. PRESIONE LA TECLA POTATO DOS VECES
2. INGRESE EL NUMERO DE PAPAS, DE 1 A 4, USANDO LAS TECLAS NUMERICAS. LOS
TIEMPOS DE COCINADO PARA PAPAS DE TAMAÑO GRANDE SON LOS SIGUIENTES:
3. PRESIONE START/STOP
PIZZAS
RECALENTANDO UNA TAJADA DE PIZZA:
1. PRESIONE LA TECLA PIZZA UNA VEZ. LOS MENSAJES CODE (CODIGO) Y 0:55 (55
SEGUNDOS) APARECERAN EN LA PANTALLA.
2. PRESIONE START/STOP
CALENTANDO UNA PIZZA CONGELADA COMPLETA
1. PRESIONE LA T ECLA PIZ Z A DOS V EC ES. LO S MENSAJ ES CODE (CODIGO) Y 4:30 (4 MINUT O
Y 30 SEGUNDOS) APARECERAN EN LA PANTALLA.
2. PRESIONE START/STOP
BEBIDAS (BEVERAGE)
PARA ENVASES DE 4 A 6 ONZAS.
1. PRESIONE LA TECLA BEVERAGE UN VEZ.
2. INGRESE EL NUMERO DE ENVASES, DE 1 A 4, USANDO LAS TECLAS NUMERICAS. LOS
TIEMPOS DE COCINADO PARA BEBIDAS SON LOS SIGUIENTES:
CANTIDADES
3. PRESIONE START/STOP
PARA TAZAS DE CAFE DE 7 A 9 ONZAS:
1. PRESIONE LA TECLA BEVERAGE DOS VECES.
2. INGRESE EL NUMERO DE TAZAS, DE 1 A 4, USANDO LAS TECLAS NUMERICAS. LOS
TIEMPOS DE COCINADO SON LOS SIGUIENTES:
3. PRESIONE START/STOP
Page 28

28
CANTIDADES
TIEMPO DE
COCCION
1 PORCION
4 MIN. 15 SEC.
2 PORCIONES
7 MIN. 30 SEC.
CANTIDAD
TIEMPO DE
COCCION
1
0 min. 18 sec.
2
0 min. 35 sec.
3
0 min. 50 sec.
4
0 min. 55 sec.
5
1 min. 10 sec.
6
1 min. 30 sec.
7
2 min. 00 sec.
CANTIDADES
TIEMPO DE
COCCION
1 PORCION
8 MIN. 00 SEC.
2 PORCIONES
13 MIN. 30 SEC.
COMIDAS CONGELADAS (FROZEN DINNER)
PARA UNA O DOS COMIDAS CONGELADAS PEQUEÑAS (DE 5 A 7 ONZAS):
1. PRESIONE LA TECLA FROZEN DINNER UNA VEZ
2. PARA UNA PORC ION, PR ESION E STAR T/ STO P. PA RA 2 PO RCIO NES , PR ESI ON E EL “ 2” EN EL
TECLADO NUMERICO.
3. LOS TIEMPOS DE COCCION PARA COMIDAS CONGELADAS PEQUEÑAS SON LOS
SIGUIENTES:
4. PRESIONE START/STOP
PARA PORCIONES GRANDES (DE 8 A 10 ONZAS)
1. PRESIONE LA TECLA FROZEN DINNER DOS VECES.
2. PARA UNA PORC ION, SOLO PRESION E START /STOP. PAR A 2 PORCIO NES, DIG ITE EL “2” EN
EL TECLADO NUMERICO.
3. LOS TIEMPOS DE COCCION PARA COMIDAS CONGELADAS GRANDES SON LOS
SIGUIENTES:
4. PRESIONE START/STOP
NOTA: LA SEQU ENCIAS DE TIEMPO M OSTRADA EN LA TAB LA DE COCCION RAPI DA, PUDIERA
HABER SIDO C AMBIA DA O ACT UALIZ AD A, SI U ST ED P REFI ER E USE LO S T IEM POS MOST RAD OS
EN EL PANEL DE SU MICRO O ND AS COMO COR R EC T O S.
RECALENTAR (REHEAT)
1. OPRIMA LA TECLA REHEAT.
2. OPRIMA LAS TECLAS DE NUMEROS (1-7)
PARA SELECCIONAR LA CANTIDAD (3. OZ) DE COMIDA
3. OPRIMA LA TECLA START / STOP
Nota: Use platos o caserolas algo mas grande que la indicada continue repetidamente si
recalentamiento no es suficiente.
Nota:
Esta seleccion te permite recalentar platos de comidas frias con un buen resultado.
Page 29

29
CUIDADO Y MANTENIMIENTO
LIMPIEZA DE SU HORNO MICROONDAS
APAGUE Y DESCONECTE EL ENCHUFE DE PARED ANTES DE LIMPIAR SU HORNO.
MANTENGA EL INTERIOR DE SU HORNO MICROONDAS LIMPIO. LOS ALIMENTOS SALPICAN O
DERRAMAN PARTICULAS Y LIQUIDOS QUE SE ADH IEREN A LAS PAREDES DEL HO R N O, ES
RECOMENDABLE LIMPIARLAS CON UN PAÑO HUMEDO. PUEDE USAR UN DETERGENTE MUY
SUAVE SI EL HORNO SE ENCUENTRA MUY SUCIO. NO RECOMENDAMOS EL USO DE
DETERGENTES O ABRASIVOS FUERTES.
USTED DEBE LIMPIAR LAS PARTES EXTERNAS DE SU HORNO MICROONDAS CON UN PAÑO
HUMEDO. PARA PREVENIR DAÑOS EN LAS PARTES INTERNAS DE SU HORNO, EL AGUA NO SE
DEBE FILTRAR DENTRO DE LAS REJILLAS DE VENTILACION.
NO PERMITA QUE EL PANEL DE CONTROL SE MOJE. LIMPIELO CON UN PAÑO SUAVE Y
HUMEDO. NO USE DETERGENTES, ABRASIVOS O LIMPIADORES EN SPRAY.
CUANDO LIMPIE EL PANEL DE CONTROL DEJE LA PUERTA DEL HORNO ABIERTA PARA
PREVENIR QUE ESTE COMIENCE A FUNCIONAR ACCIDENTALMENTE.
SI SE ACUMULA VAPOR DE AGUA DENTRO O ALREDEDOR DE LA PUERTA DEL HORNO
MICROONDAS LIMPIELA CON UN PAÑO SUAVE. ESTO PUEDE OCURRIR CUANDO SU HORNO
MICROONDAS ESTA FUNCIONANDO DENTRO DE UN AMBIENTE HUMEDO, Y DE NINGUNA
MANERA SE DEBE DE INTERPRETAR COMO UN MAL FUNCIONAMIENTO DEL HORNO.
OCASIONALMENTE ES NECESARIO RETIRAR EL PLATO GIRATORIO DE VIDRIO PARA LAVARLO.
HAGALO CON AGUA TIBIA JABONOSA O EN LA LAVADORA DE PLATOS.
EL ARO GIRATORIO Y EL PISO INTERIOR DEL HORNO DEBEN SER LIMPIADOS REGULARMENTE
PARA EVITAR EL RUIDO EX C E SIVO . SIM P LE MENTE LIMPIE LA SUPERF I C I E INF ER IO R D E SU
HORNO CON UN PAÑO, DETERGENTE SUAVE, UN POCO DE AGUA O CON LIQUIDO PARA
LIMPIAR VIDRIOS Y LUEGO SEQUELO. EL ARO GIRATORIO PUEDE SER LAVADO EN AGUA
LIGERAMENTE JABONOSA O EN LA LAVADORA DE PLATOS.
DEBIDO AL USO REPETIDO DEL HORNO, ESTE ACUMULA VAPORES DE COCINA, ESTO NO
AFECTA EL PISO INTERIOR NI LAS RUEDAS DEL ARO GIRATORIO. CUANDO RETIRE EL ARO
GIRATORIO DE LA CAVIDAD INFERIOR PARA LIMPIARLO, ASEGURESE DE COLOCARLA
NUEVAMENTE EN L A POSI CIO N AP RO PI ADA.
SI SU HORNO MICROONDAS TIENE MAL OLOR, COMBINE EN UNA TAZA DE AGUA EL JUGO Y
LA CASCARA DE UN LIMON. PONGA EN MARCHA SU HORNO MICROONDAS POR 5 MINUTOS.
FROTE Y SEQUE COMPLETAMENTE TODO SU HORNO MICROONDAS CON UN PAÑO SUAVE.
POR FAVOR VISITE A UN REPRESENTANTE AUTORIZADO PARA QUE EFECTUE EL REEMPLAZO
DEL BOMBILLO CUANDO SEA NECESARIO.
Page 30

30
PROBLEMAS CON SU HORNO MICROONDAS?
PROBLEMA
SOLUCION
SU MICROONDA NO FUNCIONA
NO ESTA CONECTADO A LA CORRIENTE
APROPIADAMENTE
LA LUZ NO PRENDE
EL INTERRUPTOR SALTO O SE QUEMO UN
PROCEDIMIENTO DE REEMPLAZO)
VIBRACIONES
ASEGURESE QUE EL HORNO
LUGAR TOTALMENTE PLANO.
USTED PUEDE RESOLVER MUCHOS PROBLEMAS COMUNES DE SU HORNO MICROONDAS,
AHORRANDOLE EL GASTO DE UNA POSIBLE VISITA DEL SERVICIO TECNICO.
PRUEBE LAS SIGUIENTES SUGERENCIAS PARA VERIFICAR SI USTED PUEDE RESOLVER EL
PROBLEMA ANTES D E LL AMAR AL SERVICIO TEC N IC O.
GUIA PARA SOLUCIO N A R PRO BLE MA S
ELECTRICA.
EL INTERRUPTOR SALTO O SE QUEMO UN
FUSIBLE
LA PUERTA NO ESTA CERRADA
FUSIBLE
EL MICROONDA ESTA DESCONECTADO
EL FOCO SE QUEMO (LEA LA PAGINA DE
MANTENIMIENTO PARA VER EL
MICROONDAS ESTE UBICADO EN UN
Page 31

31
AIDEZ-NOUS AIDER ...
Lisez attentivement ce guide.
Il est destiné à vous aider à utiliser et entretenir
votre nouvelle micro-ondes correctement.
Gardez à portée de main pour répondre à vos
questions.
Si vous ne comprenez pas quelque chose ou
vous avez besoin de plus d'aide, s'il vous plaît
appelez:
Avanti Service à la clientèle
800-220-5570
Conserver une preuve de la date d'achat originale
(comme votre ticket de caisse) avec ce guide
pour établir la période de garantie.
SI VOUS AVEZ BESOIN DE SERVICE
Nous sommes fiers de notre service et voulons
que vous soyez heureux. Si pour quelque raison
vous n'êtes pas heureux av ec le service q ue vous
recevez, voici quelques étapes à suivre pour
obtenir de l'aide.
PREMIER, communiquez avec les gens qui ont
réparé votre four à micro-ondes. Expliquez
pourquoi vous n'êtes pas satis fait. Dans la plupar t
des cas, cela va résoudre le problème.
Notez le modèle et les numéros de série.
Vous les trouverez sur une étiquette située sur la
paroi arrière du four à micro-ondes.
S'il vous plaît écrire ces chiffres ici:
____________________________________
Date d'achat
____________________________________
Numéro de modèle
____________________________________
Numéro de série
Utilisez ces numér os dans toute correspondance
ou services appels concer nant votre four à m icroondes.
Si vous avez reçu un four micro-ondes
endommagé, contactez immédiatement le
revendeur (ou le constructeur) qui vous a vendu
le four à micro-ondes.
Gagnez du temps et de l'argent. Avant d'appeler
le service, consultez le Guide de dépannage. Il
répertorie les causes des problèmes de
fonctionnement mineurs que vous pouvez vous
corriger.
Ensuite, si vous n'êtes toujours pas satisfait,
écrire tous les détails, y compris votre numéro de
téléphone, et l'envoyer à:
Service Clients
Avanti Produits
10880 NW 30 Street
Miami, FL 33172 USA
Page 32

32
Pièces et caractéristiques
1
Système de verrouillage de
sécurité de porte
2
Fenêtre Four
3
Anneau de plateau tour nant
4
Bouton de sortie de la porte
5
Panneau de contrôle
6
Vent
7
Plateau en verre
5
4
6
7
1
2
3
Page 33

33
Consignes de sécurit é importantes
Pour réduire le risque d'incendie, de choc
votre appareil, suivre ces précautions de base:
• Lisez toutes les instructions avant d'utiliser l'appareil.
-Economisez Ces INSTRUCTIONS-
AVERTISSEMENT
• Précautions pour éviter une éventuelle exposition à l'énergie micro-ondes excessive.
• Cet appareil doit être mis à la terre. Connectez uniquement à prise de terre. INSTRUCTIONS DE
MISE À LA TERRE.
• Installer ou placer l'appareil conformément aux instructions d'installation fournies.
• Lors du nettoyage de surfaces de la porte et du four qui se réunit sur la porte de clôture, utiliser
seulement, des savons doux et non abrasif ou de détergents avec une éponge ou un chiffon doux.
• Les liquides tels que l'eau, le café ou le thé peuvent être surchauffés au-delà du point d'ébullition
sans sembler bouillir. Bouillonnement ou ébullition visible lorsque le récipient est retiré du four à
micro-ondes ne sont pas toujours présents. CELA POURRAIT CAUSER DES LIQUIDES TRÈS
CHAUDS DÉBORDEMENT lorsque le récipient est perturbé ou un UTENSIL est inséré dans le
liquide.
• Certains produits comme les oeufs entiers et Conteneurs étanche (par exemple, pots de verre
fermés) peuvent exploser et ne devraient pas être réchauffés au micro-ondes.
• Utilisez ce four uniquement pour son usage prévu, comme décrit dans ce manuel.
• Ne pas utiliser de produits chimiques corrosifs dans cet appareil. Ce type de four est
spécifiquement conçu pour chauffer, cuire ou sécher des aliments. Il n'a pas été conçu pour un
usage industriel ou de laboratoire.
• Comme pour tout appareil, une surveillance étroite est nécessaire lorsqu'il est utilisé par les
enfants.
• Ne pas faire fonctionner ce four si elle a un cordon ou une fiche endommagé, si elle ne fonctionne
pas correctement, ou si elle a été endommagé ou est tombé.
• Pour réduire le risque d'incendie dans la cavité du four:
• Ne pas trop cuire les aliments. Surveiller attentivement four micro-ondes si papier, plastique,
ou de matériaux combustibles sont placés à l'intérieur du four pour faciliter la cuisson.
• Retirer les attaches de sacs avant de les placer dans le four.
• Si les matériaux à l'intérieur du four prennent feu, garder la porte du four fermée, éteindre le
four à l'interrupteur mural, ou coupez le courant au panneau de fusibles ou des disjoncteurs.
• Ne pas utiliser la cavité à des fins de stockage. Ne laissez pas de produits en papier,
ustensiles de cuisine, ou de la nourriture dans la cavité lorsqu'il ne sert pas.
• Seul le personnel d'entretien qualifié doit réparer cet appareil. Contactez le centre de service
autorisé pour examen, réparation ou réglage.
• Ne pas couvrir ou bloquer les ouvertures de cet appareil.
• Ne pas utiliser ce four pour chauffer des produits chimiques corrosifs (par exemple, les sulfures et
chlorures). Les vapeurs de ces produits chimiques corrosifs peuvent interagir avec le contact et les
ressorts de la chaîne de sécurité des commutateurs les rendant ainsi inutilisable.
• Ne pas immerger le cordon ou la fiche dans l'eau.
• Éloignez le cordon des surfaces chauffées.
• Ne pas laisser le cordon pendre de la table ou du comptoir.
• Jamais pièces d'appareils de nettoyage avec des liquides inflammables. Les émanations peuvent
provoquer un risque d'incendie ou d'explosion.
• Ne pas stocker ou utiliser de l'essence ou d'autres vapeurs et liquides inflammables à proximité de
cet appareil ou de tout autre appareil. Les émanations peuvent provoquer un risque d'incendie ou
d'explosion.
• Ne stockez pas cet appareil à l'extérieur.
• Ne pas utiliser ce produit près de l'eau - par exemple, près d'un évier de cuisine, dans un sous-sol
humide, près d'une piscine, ou des endroits similaires.
électrique ou de blessure lors de l'utilisation de
Page 34

34
INSTRUCTIONS D'INSTALLATION
PRÉCAUTIONS POUR ÉVITER UNE EXPOSI TION AUX MICRO-ONDES
(e) Ne tentez pas de faire f onctionner ce f our avec la porte ou verte car le fonctionn ement de la por te
(h) Le four ne doit pas être réglé ou réparé par quiconque, sauf au personnel de service qualifié.
AVANT D'UTILISER VOTRE MICRO-ONDES
• Retirer l'emballage extérieur et intérieur.
• Vérifiez que vous disposez de tous les éléments suivants:
• Plateau en verre
• Assemblée Roller Platine (rouleaux ou Ring)
• Manuel d'instructions
• Inspectez le four après le déballage de tout dommage visuelle tels que:
• Misaligned porte
• Porte endommagée
• Dents ou des trous dans la fenêtre de porte et écran
• Dents dans la cavité
Si tout ce qui précède est visible, ne pas utiliser le four.
INSTALLATION DE VOTRE MICRO-ONDES
• Lors du positionnement du four à micro-ondes, il doit être réglé sur une surface plane et stable.
• Ne pas bloquer les évents. Si elles sont bloquées pendant le fonctionnement, le four peut
surchauffer et éventuellement causer l'échec du four.
• Réception de la télévision pauvres et des interférences radio peuvent survenir si le four est situé
à proximité d'une TV, radio, antenne, ou le fil de l'antenne. Placez le four aussi loin d'eux que
possible.
• Nettoyer la surface intérieure avec de l'eau tiède avec un chiffon doux.
• Gardez le four loin de l'air chaud, de la vapeur ou de liquides éclaboussures lors du choix d'un
endroit pour localiser, sinon, le fonctionnement de l'appareil peut être affecté, l'amenant à se
décomposer.
• Lumière directe du soleil peut affecter le revêtement acrylique et sources de chaleur peut
augmenter la consommation électrique.
• Branchez l'appareil dans une prise murale correctement installée à la terre exclusive. Ne pas en
aucun cas réduire ou supprimer le troisième pôle (terre) du cordon d'alimentation. Toute question
concernant la puissance et de terre ou doivent être adressées à un électricien certifié ou un
centre de service autorisé de produits Avanti.
• NE JAMAIS rien placer sur le dessus du four.
• Gardez le four au moins 5 pouces de deux flancs et loin de paroi arrière pour assurer la
ventilation adéquate.
• NE PAS retirer l'arbre d'entraînement table tournante.
PRÉCAUTIONS DE SÉCURITÉ
ouverte peut entraîn er une expos ition dangere use à l'énerg ie micro-ondes. Il est important de ne
pas entraver le fonctionnement des verrous de sécurité.
(f) Ne placez auc un objet entre la f ace avant du four et la porte ou perm ettent sol ou de r ésidus de
nettoyage accumuler sur les surfaces d'étanchéité.
(g) Ne pas faire foncti onner le four si elle es t endommagée. Il est particulièrement important que la
porte du four ferme correctement et qu'il n'y a aucun dommage à la: (1) la porte (tordue), (2)
charnières et verrous (brisés ou desserrés), (3) Joints de porte et surfaces d'étanchéité.
Page 35

35
• NE PAS tenter de falsifier ou de faire des ajustements ou des réparations à porte, panneau de contrôle ou
Usage général
Ustensiles
Aliments
toute autre partie du four. Ne pas enlever le panneau extérieur du four. Les réparations ne doivent être
effectuées par du personnel qualifié.
• NE PAS faire fonctionner le four à vide. L'énergie des micro-ondes pourraient se propa ger part ou t le four si
aucune nourriture ou l'eau est présente à absorber l'énergie.
• Si un incendie s e produit dans le four, appuyer sur la touche START / STOP et de laisser la porte fermée.
Débranchez le cordon d'al imentation, ou coupez le courant au panneau de fusibles ou des disjoncteurs.
• NE PAS tenter de sécher des vêtements, des journaux ou d'autres matériaux dans le four. Ils peuvent
prendre feu.
• NE PAS utiliser des produits de papier recyclé, car ils peuvent contenir des impuretés, qui peuvent
provoquer des étincelles et / ou des incendies lorsqu'ils sont utilisés.
• NE PAS frapper ou frapper panneau de commande. Dommages à des contrôles peut se produire.
• Récipients métalliques ou des plats avec des jantes métalliques ne doivent pas être utilisés. Arc électrique
peut survenir.
• Attaches métalliques ne peuvent être utilisés dans le four à micro-ondes.
• NE PAS utiliser des bocaux scellés ou Flacons à col étroit pour cuire ou réchauffer. Ils peuvent se briser.
• NE PAS utiliser Les thermomètres conventionnels dans le four à micro-ondes. Ils peuv ent prov oquer de s
étincelles. Utilisez uniquement ceux marqués "Micro-onde Coffre" et suivez toutes les directions. Vérifiez la
nourriture dans plusieurs endroits.
• Retirer emballages plastiques MAGASIN avant la cuisson ou la décongélation dans le four.
CONSEILLÉ
• Micro-ondes plat de brunissement - Utiliser à l'extérieur brune de petits objets tels que des steaks,
côtelettes ou les crêpes. Suivez les instructions fournies avec votre plat de brunissement.
• Pellicule de plas tique au micro-ondes - Utilisez pour retenir la vapeur. Laissez une petite ouverture pour un
peu de vapeur d'échapper et éviter de le placer directement sur la nourriture.
• Les serviettes de papier et serv iett es - Utili s ez pour le chauffage à court terme et de couverture; ceux-ci
absorbent l'excès d'humidité et éviter les éclaboussures. Ne pas utiliser des serviettes en papier recyclé, qui
peuvent contenir des métaux et pourrait enflammer.
• Ne jamais utilis er votre four à micro-ondes pour HOME Canni ng. Le four n'a pas été conçu pour permettre
la mise en conserve bon. Mal conserve peuvent gâcher et être dangereux à consommer.
• Temps de cuisson sont approximatifs. Les facteurs qui peuvent affecter la cuis son co mmen cent
température, l'altitude, le volume, la taille et la forme de nourriture et les ustensiles utilisés. Comme vous
familiariser avec le four, vous serez en mesure de tenir compte de ces facteurs.
• Il est préférable de CUIRE aliments PLUTÔT QUE cuire. Si la nourriture est cuit, il peut toujours être
retourné au four pour une cuisson ultérieure. Si la nourriture est trop cuit, rien ne peut être fait. Toujours
commencer avec des temps de cuisson minimum.
• Petites quantités de nourriture ou des aliments avec faible teneur en humidité peuvent brûler, sécher ou
prendre feu si elle est cuite trop longtemps.
• Ne pas faire bouillir les oeufs dans leur coquille. La pression peut s'accumuler et les œufs va exploser.
• Pommes de terre, les pommes, les jaunes d'œufs, courge poivrée ensemble et sauciss es sont des
exemples d'aliments avec SKINS POREUSE. Ceux-ci doivent être percés avant la cuisson pour empêcher
l'éclatement.
• POPCORN doit être sauté dans un popper micro-ondes de maïs. Micro-ondes maïs éclaté un rendement
inférieur à popping conventionnelle. NE PAS utiliser le four pour pop-corn à moins sauté dans un microondes pop-corn approuvé ustensile ou sauf s i elle est commercialement emballé et particulièrement
recommandé pour les fours à micro-ondes. NE PAS utiliser de l'huile sauf si spécifié par le fabricant.
• NE PAS tenter de faire de la friture dans votre four.
• Les liquides chauffé s peuvent éclat er si non mél angé à l'air. NE PAS chauffer les liq uid es d ans votr e four à
micro-ondes sans d'abord agitation.
Page 36

36
CONNEXION ÉLECTRIQUE
Attention
complètement comprises ou en cas de doute quant à savoir si l'appareil est correctement mis à la
INSTRUCTIONS DE MISE
Cet appareil doit être m is à la terre. Dans le cas d'un court -circuit électrique, la terr e réduit le risque de
choc électrique en fournissant un fil de fuite pour le courant électrique. Cet appareil est équipé d'un
cordon muni d'un fil de terre avec une fiche de terre. La fiche doit être branchée dans une prise
correctement installée et mise à la terre.
Une mauvaise utilisation de la prise de terre peut entraîner un risque de choc électrique. Consultez
un électricien ou personne service qualifié si les instructions de mise à la terre ne sont pas
Le cordon d'alimentati on de c et appareil est équipé d'une f iche à tr o is broches qui coopère a vec la nor me
trois prises murales broches afin de minimiser le risque de choc électrique.
Ne pas en aucun cas couper ou enlever la troisième broche de terre du cordon d'alimentation fourni.
Ne pas utiliser la rallonge. Si le cordon d' alimentation est trop court, d emandez à un électricien ou un
réparateur qualifié pour installer une prise près de l'appareil.
Cet appareil nécessite une prise électrique 115/120 Volts AC ~ / 60Hz standard avec terre à trois
broches.
Le cordon doit être f ixé derrière l'appareil et non la iss és expos és ou q ui pen dent pour é viter l es bless ures
accidentelles.
FONCTIONNEMENT DU FOUR
Bien que votre four est fourni avec des fonctionnalités de sécurité, il est important de respecter
les consignes suivantes:
• Il est important de ne pas entraver le fonctionnement de verrouillage de sécurité.
• Ne placez aucun objet entre la face avant du four et la porte ou laissez aucun résidu à accumuler sur
les surfaces d'étanchéité. Essuyez la zone d'étanchéité fréquemment avec un détergent doux, rincez
et essuyez. Ne jamais utiliser de poudres ou de tampons abrasifs.
• Lorsqu'il est ouvert, la porte ne doit pas être soumis à des contraintes, par exemple, un enfant
accroché à une porte ouverte ou toute charge qui pourrait entraîner la chute du four avant et causer
des blessures et endommager la porte. Ne pas faire fonctionner le four si elle est endommagée,
jusqu'à ce qu'il ait été réparé par une personne qualifiée. Il est particulièrement important que le four
ferme correctement et qu'il n'y a aucun dommage à la:
• La porte (tordue)
• Charnières et les loquets (brisés ou desserrés)
• Joints de porte et surfaces d'étanchéité
• Le four ne doit pas être réglé ou réparé par quiconque, sauf au personnel de service qualifié.
Page 37

37
PANNEAU DE CONTRÔLE
L'UNITÉ
Pomme de terre au four
Popcorn
Pizza
Boisson
Dîner Frozen
Réchauffer
Cuisson par poids
Décongeler par poids
Vitesse de dégivrage
Horloge: 12 heures
Minuterie de cuisine
CARACTERISTIQUES DE
L'UNITE
Consommation
d'énergie:
~ 120V 60Hz,
1050W
Sortie (Watts):
700W
Fréquence de
fonctionnement:
Unité
(LxHxP):
Four
P):
Capacité du
four:
Cuisson
Uniformité:
Poids net:
Env. 23.8 Lbs
Pré-programmé
Modes de cuisson
2450MHz
Dimensions
Dimensions de
la cavité (H xlx
105/16 x 17131716 x159 / 16
81/4 x 123/8 x123
/ 8
0,7 cu. Ft.
Plaque tournante
Page 38

38
PANNEAU DE FONCTION
LA DESCRIPTION
AFFICHER
Affichage électronique montre Temps de cuisson, Puissance de
présent.
POMME DE TERRE AU FOUR BOISSON / SOUPE PIZZA
ents sans entrer
automatiquement le niveau de puissance ou de temps.
DU POUVOIR
Utilisez pour régler le niveau de puissance
Touchez pour régler le poids de l'aliment à déco ngeler. Le four règle
et le niveau de
puissance.
Touchez pour régler le temps de dégivrage. Le four divise
automatiquement le temps de décongélation en périodes de
dégivrage alternatif et reposer fois par le vélo sur et en dehors.
Vous pouvez utiliser la fonction de minuter ie de façon indépendante,
même si un programme de cuisson qui se passe dans le four.
Touc h es numériques (0-9)
Touchez pour régler les temps ou les montants.
HORLOGE
Touchez pour régler l'horloge.
Efface tous les réglages précédents si vous les touchez avant la
cuisson commence.
COMMENCER ARRÊTER
Touchez pour lancer ou arrêter la cuisson.
Pré-programmé
Modes de cuisson
cuisson, le temps restant dans le cycle de cuisson et le temps
FRUITS DE MER POPCORN de repas congelé
LEGUMES FRAIS REHEAT
LÉGUMES SURGELÉS
Permettez-vous de réchauffer ou cuire les alim
DÉGIVRER EN POID S
SPEED DEFROST
MINUTEUR
RÉINITIALISER
automatiquement le temps de décongélation
PROCÉDURE D'OPÉRATION:
• Branchez le cordon d'alimentation dans un e prise standard Amps 3 fronts, 15 120 volts AC ~ /
60Hz.
• Après avoir placé la nourriture dans un récipient approprié, ouvrir la porte du four et le mettre
sur le plateau en verre. Le plateau en verre et le guide de rouleau doivent toujours être en
place pendant la cuisson.
• Ferme la porte. Assurez-vous qu'il est bien fermé.
• La porte du four peut être ouverte à tout moment pendant le fonctionnement en tirant sur la poignée
de porte ou pousser le bouton d'ouverture de porte. Le four se met automatiquement hors tension.
Pour redémarrer le four, fermez la porte et appuyez sur START / STOP.
• Chaque fois qu'un pad est touché, un signal sonore retentit à reconnaître au toucher. Un des
tampons de fonction doit être touché avant que les touches numériques. Deux bips indiquent le four
n'a pas accepter l'entrée, vérif ier et essayer à nouveau.
• Le four cuit automatiquement la puissance maximale et dégivre à faible puissance.
• Lorsque le four est branché pour la première, l'afficheur indique "HR 12", si vous préférez ne pas
avoir l'horloge affichée, appuyez sur reset ou attendre 15 secondes.
• Quand le pad START / STOP est touché au cours de l'utilisation du four, le four arrête la cuisson. Si
la porte du four est ouverte pendant le fonctionnement du four, toute l'information est conservée.
• Si le tampon / STOP START est touché et le four ne fonctionne pas, vérifiez la zone entre le joint de
porte et des obstructions et vérifiez que la porte est bien fermée. Le four ne sera pas commencer la
cuisson jusqu'à ce que la porte est complètement fermée et le programme a été défini.
Page 39

39
CARACTÉRISTIQUES FOUR SPÉCIAL
8. Appuyez de nouveau sur CLOCK.
synchronisation.
SPEED DEFROST: Utilisé pour décongeler les aliments congelés par le temps.
Ce cycle commence à moyenne - haute puissance, ensuite automatiquement réduit à moyen - bas et
puis de bas que les dégels alimentaires. SPEED DEFROST voyant et cuire témoin lumineux à la fois
venue pendant le cycle de dégivrage.
MINUTEUR: Utilisez pour chronométrer les choses sans les fonctions du four. Un long bip sonore
retentit à la fin du temps écoulé.
AUTO TIMER: Après un dégivrage ou PROGRAM Cook a achevé, le four sera automatiquement
continuera de sonner quatre bips tou tes les deux minutes jus qu'à ce que la p orte est ouver te ou le pavé
RESET est touché.
Sécurité enfants: Utilise z pour em pêcher le fonc tionnem ent du four sans survei llance par des enfants.
L'indicateur LOC K PREUVE DE L'ENFA NT sera allum é sur l'affichage et le f our ne peut pas être ut ilisé
pendant que le verrou enfant EPREUVE est sélectionné.
RÉGLAGE VERROUILLAGE ENFANT: Pour régler, appuyez Maintenez le bouton RESET pendant
3 secondes. LOCK est indiqué sur l'écran. Pour annuler, appuyez Maintenez le bouton RESET
pendant 3 secondes. Indication de verrouillage disparaît.
MINUTEUR: Utilisez pour régler le temps de cuisson. Vous permet de définir jusqu'à 99 minutes et 99
secondes
RÉINITIALISER: Touchez pour annuler le niveau de puissance sélectionné, cuisiner ou décongeler fois
précédemment programmés. Le temps de l'horloge journalière est pas annulé.
COMMENCER ARRÊTER: Touchez pour lancer le dégivrage ou cuire programmes. L'indicateur de
cuisson lumière et la lumière du four viendront et que le ventilateur de refroidissement fonctionnent.
NOTE: FIN DE exploitation- L'écran affichera "END".
• Quatre bips retentissent, le voyant de cuisinier sortir et se m ontrer "FIN" sur la fenêtre d'affichage
jusqu'à ce que la por te est ouverte et l' heure de la journée s era de re tour à la f enêtre d'af fichage. La
lumière et la cuisine ventilateur du four sera éteint.
• Le four sera automatiqu ement continuera de sonner q uatre bips toutes les deux minutes jusqu'à ce
que la porte est ouverte ou le pavé RESET est touché.
NOTE: Pour interrompre l'opération -Ouvert la porte du four.
• Le four arrête immédiatement.
• Si aucune autre cuisson est nécessaire, appuyer sur la touche RESET.
• Pour poursuivre la c uisson, ferm ez la porte du four et appu yer sur l a touche STAR T / STO P. Le four
va redémarrer.
Comment configurer la commandes du four
SIGNAUX SONORES
Pendant les réglages FOUR
UN SIGNAL: Four accepte l'entrée.
Deux signaux: Four ne pas accepter l'entrée, vérifier et essayer
à nouveau.
RÉGLAGE DE L'HORLOGE
5. Touchez touche CLOCK. Ceci est une horloge
de 12 heures.
6. Touchez CLOCK une fois de plus. Ceci est une
horloge de 24 heures.
7. Utilisez les touches numériques pour saisir
l'heure correcte. Si vous avez sélectionné 12
système de l'heure d'horloge, l'horloge
numérique vous permet de définir 01 heures
00-12:59. Si vous avez sélectionné 24 système
de l'heure d'horloge, l'horloge numérique vous
permet de définir à partir de 0:00 à 23: 59.You
doit toucher au moins trois chiffres pour régler
l'horloge (un pour l'heure et deux pour les
minutes).
RÉGLAGE DE LA MINUTERIE FOUR
4. Touchez TIMER.
5. Saisissez le montant de temps en touchant les
touches numériques. Temps de Digit est en
minutes et secondes et jeu de gauche à
droite. Définir un chiffre (5 pour 5 secondes)
ou jusqu'à quatre chiffres (2405 pour 24
minutes, 5 secondes).
6. Touchez START / STOP.
NOTE: Le temps compte à rebours peut être vu
dans l'affichage pendant 3 secondes avant de
l'horloge ou le temps de cuisson est retourné à
afficher.
Touchez TIMER puis appuyez sur RESET pour
annuler la minuterie pendant le processus de
Page 40

40
REMARQUE: Lorsque le four est branché pour la
première ou lorsque l'alimentation est rétablie après
Pavé
numérique
Puissance de
cuisson
9
90%
8
80%
7
70%
6
60%
5
50%
4
40%
3
30%
2
20%
1
10%
1 et 2 et appuyer sur START. Le four procéder
ip sonore,
Après le
temps total écoulé, 4 bips et END apparaît à
seulement, changer la fraction du livre en onces en
une coupure de courant, l'écran affiche «HR 12". Si
vous préférez ne pas avoir l'horloge affichée,
touchez Réinitialiser.
Vous pouvez vérifier le temps d'horloge pendant la
cuisson est en cours en appuyant sur la touche
CLOCK.
RÉGLAGE UN PROGRAMME DE CUISSON
A. cuisson en une étape
4. Utilisez les touches numériques pour régler un
temps de cuisson. Vous pouvez définir un
temps de cuisson d'une seconde à 99 minutes
et 99 secondes.
5. Si vous souhaitez définir un niveau de
puissance autre que 100% de puissance,
touchez PUISSAN C E, puis utilisez les touches
numériques pour entrer le niveau de
puissance. Vous pouvez régler le niveau
d'alimentation de 1 à 9.
Utilisez un seul chiffre pour définir un niveau de
puissance de cuisson:
6. Touchez START / STOP pour commencer la
cuisson.
B. multi-étapes de cuisson
Vous pouvez programmer le four po ur 4 étapes de
cuisson. Chaque étape peut être program mé avec
un niveau de puissanc e différent et le temps. Pour
programmer 2 étapes, 3 étapes de cuisson ou 4
étages, répéter la cuis son en une étape les étapes
automatiquement à la fin du stade de cuisson.
NOTE:
Après l'étape 1 est écoulée, un b
signalant le début de la phase 2.
l'écran. Pavé tactile RESET ou ouvrir la por te du
four pour effacer FIN a vant de commencer une
autre fonction de cuisson.
VITESSE DE DÉGIVRAGE
4. Speed Touch dégivrage.
5. Entrez le temps de dégivrage souhaitée par
des touches de chiffres corrects. Minuterie
numérique définit minutes et secondes de
gauche à droite donc un seul chiffre peut être
réglé (5 pour 5 secondes) ou jusqu'à 4 chiffres
(2 405 pour 24 minutes 5 secondes).
6. Touchez START / STOP.
DÉCONGELER PAR POIDS
4. Touchez la décongélation par PESERT
tampon.
5. Entrez le poids.
6. Touchez START / STOP.
Note:
Le poids doit être en livres et en onces.
Poids Ounce moins de 10 doivent être précédés
par un 0. Si l'étiquette donne le poids en livres
Page 41

41
NOTE:
Après le temps est écoulé quatre signaux sonore et
utilisant le tableau suivant (voir page 19).
Les paramètres QUICK COOK vous permettent de cuire ou réchauffer des aliments sans entrer
même nourriture. Il suffit de toucher pad une fois, et ENTRER AMT
2) pour
MONTANT
TEMPS DE
CUISSON
1 (3 oz.)
1 minute. 45 sec.
2 (1,5
once).
1 pomme de
terre
3 min. 00 sec.
2 pommes de
terre
5 min. 40 sec.
3 pommes de
terre
8 min. 20 sec.
4 pommes de
terre
11 min. 20 sec.
1 pomme de
terre
4 min. 30 sec.
2 pommes
de terre
8 min. 00 sec.
3 pommes
de terre
11 min. 40 sec.
4 pommes
de terre
15 min. 20 sec.
de chiffres de 1 à 4. Les temps de cuisson
STOP. Pour 2 entrées, appuyer sur la touche
END apparaît à l'écran. Pad RESET tactile ou une
porte ouverte pour effacer FIN avant de
commencer une autre fonction de cuisson.
CUISINIER RAPIDE (PRÉ-PROGRAMMÉE) PARAMÈTRES
automatiquement le niveau de puissance ou de temps.
Pour de plus petites portions, il suffit de toucher le pad applicable et commencer. Pour de plus grandes
portions, appuyez deux fois sur le pavé.
Repas congelé, cuit pomme de terre et BOISSONS vous permettent de cuire plusieurs quantités de la
MAÏS SOUFFLÉ
4. Touchez POPCORN.
5. Touches numériques tactiles (1-
sélectionner la quantité de nourriture.
POMME DE TERRE AU FOUR
Pour 3,5 à 5 oz les pommes de terres:
4. Touchez pomme de terre cuite fois.
5. Entrez le nombre de pommes de terre par des
touches de chiffres de 1 à 4. Les temps de
cuisson pour les petites et moyennes pommes
de terre sont comme suit:
1 minute. 35 sec.
6. Touchez START / STOP.
6. Touchez START / STOP.
PIZZA
Réchauffer une tranche (ou deux les minces) de
pizza:
3. Touchez PIZZA fois. CODE et 00h55 (55 sec.)
Apparaît.
4. Touchez START / STOP.
Pour les grandes 6 à 8 onces les pommes de
terres:
4. Touchez deux fois pomme de terre.
5. Entrez le nombre de pommes de terre par des
touches de chiffres de 1 à 4. Les temps de
cuisson pour les pommes de terre sont
grandes comme suit:
Chauffage toute une pizza congelée:
3. Touchez deux fois PIZZA. CODE et 04h30 (4
min. 30 sec.) Apparaît.
4. Touchez START / STOP.
6. Touchez START / STOP.
BOISSON
Pour 4 à 6 oz tasses de café:
4. Touchez BOISSON fois.
5. Entrez le nombre de tasses par des touches
Repas congelé
Pour un ou deux petits (5-7 oz) repas congelés:
4. Touchez repas congelé une fois.
5. Pour une entrée, il suffit de toucher START /
Page 42

42
sont les suivantes:
1 tasse.
1 minute. 00 sec
2 tasses.
2 min. 00 sec
3 tasses.
2 min. 50 sec
4 tasses.
3 min. 50 sec
6. Touchez START / STOP.
Pour les plus grands de 7 à 9 oz tasses à café:
1 tasse
1 minute. 50
sec.
2 tasses
3 min. 10 sec.
3 tasses
4 min. 30 sec.
4 tasses
5 min. 40 sec.
de chiffre "2". Les temps de cuisson pour les
1 entree
4 min. 15 sec.
2 entrées
7 min. 30 sec.
1 entree
8 min. 00 sec.
2 entrées
13 min. 30 sec.
7) pour
MONTANT
TEMPS DE
CUISSON
1
0 min. 18 sec.
2
0 min. 35 sec.
3
0 min. 50 sec.
4
0 min. 55 sec.
5
1 minute. 10 sec.
6
1 minute. 30 sec.
7
2 min. 00 sec.
Remarque: placer dans un plat ou un bol
variable et
l'heure si à la fin de capteur réchauffer la
Fractions de livre
Onces
Moins de 0,03
0
0,03 à 0,09
1
0,10 à 0,15
2
0,16 à 0,21
3
0,22 au 0,27
4
0,28 à 0,34
5
0,35 à 0,40
6
0,41 à 0,46
7
0,47 à 0,53
8
0,54 à 59
9
0,60 à 0,65
10
De 0,66 à 0,71
11
0,72 à 0,78
12
0,79 au 0,84
13
0,85 à 0,90
14
0,91 à 0,97
15
passez à la
prochaine même
4. Touchez deux fois BOISSON.
5. Entrez le nombre de tasses par des touches
de chiffres de 1 à 4. Les temps de cuisson
sont les suivantes:
6. Touchez START / STOP.
plats de petite taille sont les suivantes:
6. Touchez START / STOP.
Microwaving une grande (8-10 onces) le dîner
congelé:
4. Touchez deux fois repas congelé.
5. Pour une entrée, il suffit de toucher START /
STOP. Pour 2 entrées, appuyer sur la touche
de chiffre "2". Temps de cuisson pour les
grandes entrées sont comme suit:
6. Touchez START / STOP.
RÉCHAUFFER
4. REHEAT Touch.
5. Touches numériques tactile (1-
sélectionner le montant (3 oz) de nourriture.
6. Touchez START / STOP.
légèrement plus grand que le montant indiqué.
Continuer à chauffer à puissance
nourriture est pas suffisamment chaud.
NOTE:
Ce réglage vous permet de réchauffer un dîner
assiette de restes réfrigérés avec une bonne
résultats.
Conversion de fractions de livre en Onces
dessus de 0,97
Le poids maximum pour le dégivrage est de 5 lb 16
oz
Retournez les aliments lorsque le four signaux
deux fois. Touchez START / STOP pour reprendre
la décongélation.
Après un temps de décongélation totale, 4 des
signaux sonores et END apparaît à l'écran.
Touchez RESET ou ouvrir la porte du four pour
effacer FIN avant de commencer une autre
fonction de cuisson.
Page 43

43
LES TECHNIQUES DE CUISSON
Votre micro-ondes rend la cuisine plus facile que la cuisson traditionnelle, à condition de conserver ces
considérations à l'esprit.
En remuant
Remuez comme les casseroles et les légumes pendant la cuisson pour répartir la chaleur uniformément.
La nourriture à l'extérieur du plat absorbe plus d'énergie et chauffe plus rapidement, de sorte remuer de
l'extérieur vers le centre. Le four se met hors tension lorsque vous ouvrez la porte à remuer votre
nourriture.
Arrangement
Disposez les aliments de forme irrégulière, tels que des morceaux de poulet ou des côtelettes, avec les
partie la plus épaisse vers l'extérieur du plateau où ils reçoivent plus d'énergie à micro-ondes. Pour éviter
de trop cuire, placer les zones délicates, comme les pointes d'asperges, vers le centre du plateau
tournant.
Tournant
Tournez aliments plus à mi-cuisson pour exposer toutes les parties à l'énergie des micro-ondes. Cela est
particulièrement important avec de grandes aliments tels que des rôtis.
Permanent
Les aliments cuits au micro-ondes accumulent la chaleur interne et poursuivre la cuisson pendant
quelques minutes après l'arrêt de chauffage. Laissez reposer les aliments pour terminer la cuisson, en
particulier les aliments tels que les gâteaux et les légumes entiers. Rôtis ont besoin de ce temps pour
terminer la cuisson dans le centre sans trop cuire les zones extérieures. Tous les liquides, comme la
soupe ou un chocolat chaud, devraient être secoué ou agité lors de la cuisson est terminée. Laissez les
liquides reposer un moment avant de servir. Lors du chauffage des aliments pour bébé, bien mélanger à
l'enlèvement et de tester la température avant de servir.
Ajouter de l'humidité
Énergie micro-ondes est attirée par les molécules d'eau. La nourriture qui est inégale teneur en humidité
devrait être couvert ou laissé au repos afin que la chaleur se disperse uniformément. Ajouter une petite
quantité d'eau à la nourriture sèche pour les aider à cuire.
SOINS ET ENTRETIEN
NETTOYAGE DE VOTRE APPAREIL
• Éteindre le four et retirez la fiche d'alimentation de la prise murale avant de le nettoyer.
• Gardez l'intérieur du four propre. Lorsque éclaboussures de nourriture ou des liquides déversés
adhèrent aux parois du four, essuyez avec un chiffon humide. Détergent doux peut être utilisé si le
four est très sale. L'utilisation de détergents abrasifs ou est déconseillée.
• Les surfaces du four à l'extérieur doivent être nettoyées avec un chiffon humide. Pour éviter
d'endommager les pièces fonctionnant à l'intérieur du four, l'eau ne devrait pas être autorisé à
pénétrer dans les ouvertures de ventilation.
• Ne laissez pas le panneau de contrôle de devenir mouillé. Nettoyez-les avec un chiffon doux et
humide. Ne pas utiliser de détergents, abrasifs ou pulvérisation sur les nettoyants sur le panneau de
commande. Lors du nettoyage du panneau de commande, laissez la porte du four ouverte pour
éviter four d'allumer accidentellement.
• Si accumulation de vapeur ou à l'extérieur de la porte du four, essuyez avec un chiffon doux. Cela
peut se produire lorsque le four à micro-ondes fonctionne dans des conditions de forte humidité et
nullement indique un dysfonctionnement de l'appareil.
• Il est parfois nécessaire de retirer le plateau de verre pour le nettoyage. Lavez le plateau dans de
l'eau chaude savonneuse ou dans un lave-vaisselle.
• La bague de rouleau et la sole du four doivent être nettoyés régulièrement pour éviter le bruit
excessif. Il suffit d'essuyer la surface du fond du four avec un détergent doux, de l'eau ou de
nettoyant pour vitres et sec. La bague de rouleau peut être lavé à l'eau douce savonneuse ou lavevaisselle. Vapeurs de cuisson recueillent lors d'utilisations répétées, mais en aucun cas affecter les
roues de surface ou en anneau de rouleau de fond. Lors du retrait de l'anneau de roulement de
plancher de la cavité pour le nettoyage, assurez-vous de le remplacer dans la bonne position .
• Éliminer les odeurs de votre four en combinant une tasse d'eau avec le jus et la peau d'un citron
dans un bol au micro-ondes profonde. Micro-ondes pendant 5 minutes. Essuyez soigneusement et
séchez avec un chiffon doux.
• Quand il devient nécessaire de remplacer la lampe du four, s'il vous plaît consulter un
concessionnaire pour le faire remplacer.
Page 44

44
PROBLÈMES AVEC VOTRE APPAREIL?
PROBLÈME
CAUSE POSSIBLE
L'appareil ne fonctionne pas.
La porte est mal fermée.
La lumière ne fonctionne pas.
Le disjoncteur déclenché ou un fusible grillé.
L'ampoule a brûlé (voir la section de
maintenance pour la procédure de
remplacement).
Les vibrations.
Vérifiez pour assurer que l'appareil est de niveau.
800-323-5029
Quels que soient vos questions sont sur nos
produits, l'aide est disponible.
Vous pouvez commander des pièces et
Card, ou Visa.
un moment qui est commode pour vous. Nos
nt votre appareil
intérieur et l'extérieur.
Vous pouvez résou dre de nom breux problèmes de l'appare il com m un fac ilem ent, vous éparg nant le c oût
d'un appel d e ser vice possi ble. Essa yez les sugges tions ci-des sous pour voir si v ous p ouvez r ésoudr e le
problème avant d'appeler le réparateur.
GUIDE DE DÉPANNAGE
Non branché.
Le disjoncteur déclenché ou un fusible grillé.
L'appareil est débranché.
SERVICE POUR VOTRE APPAREIL
Nous sommes f ier s de notre organisation de s erv ic e à la cl ien tèl e et le r ésea u de techniciens d e s er vic es
professionnels qui of frent des services sur vos appareils Ava nti. Avec l'achat de vo tre appareil Avanti,
vous pouvez être sûr que si vous avez besoin d'informations supplémentaires ou d'aide, l'équipe de
service à la clientèle Avanti produits seront là pour vous. Il suffit d'appeler le numéro sans frais.
AVANTI PRODUIT S SER VICES CLIENTS
Information produit
Commandes de pièces
800-220-5570
In-Home Repair Service
800-220-5570
accessoires qui seront livr és directement à votre
domicile par chèque personnel, Mandat, Master
Un centre de service autor isé de produits Avanti
fournira un service de r ép a r ation exp er t, pr év ue à
réparateurs formés connaisse
Page 45

45
Staple votre reçu d'achat ici. Preuve de la date
service sous garantie.
CE QUI EST COUVERT - GARANTIE LIMITÉE DE UN AN
réparation.
GARANTIE LIMITÉE DE DEUX ANS
fabrication. Tous les frais de main-d'œuvre et de transport sont à la charge du consom mateur.
EXCLUSIONS DE LA GARANTIE / Ne sont pas couverts:
Avanti produits, y compris, sans limitation, un ou plusieurs des éléments suivants:
• Un non-respect de tout État applicable, locale, ville, comté ou électriques, de plomberie et / ou des codes du
entourent l'appareil , et les actes de Dieu.
• Pertes contenu de la nourriture ou d'autres contenus
• Les frais de transport et de manutention associés au
En aucun cas Avanti Products avoir aucune obligation ou responsabilité pour les dommages à la propriété
plancher / fondation, et pour toute modification y compris sans limitation les armoir es, les murs, les planchers, les
VOS PRODUITS AVANTI
GARANTIE
Avanti Products garantit que le produit est exempt de défauts de matériaux et / ou de fabrication pour une période de
douze (12) mois à compter de la date d'achat par le propriétaire initial. La période commence à courir à la date
d'achat, et ne sera pas retardée, restreinte, prolongée ou suspendu pour quelque raison que ce soit, sauf si décrit en
détail dans le document de garantie. Pendant un an à compter de la date d'achat par le propriétaire initial, produits
Avanti, à sa discrétion, réparer ou remplacer toute pièce du produit qui se révèle défectueux dans le matériel ou de
fabrication dans une utilisation normale. Avanti produits vous fournir un produit raisonnablement semblable nouveau
ou remis à neuf. Pendant cette période Avanti Products fournira toutes les pièces et la main-d'œuvre nécessaires
pour corriger ces défauts gratuitem ent, tant que le produ it a été installé et exploité conformément aux instructions
écrites dans ce manuel. En usage locatif ou commercial, la période de garantie est de 90 jours. Tous les appareils
Avanti de 3,5 pieds cubes la capacité ou moins doivent être t raduit s / envoy é au centre de serv ice de l'app arei l pour
Au cours de la deuxi èm e année d'utilisation, Avanti Products fournira, au besoin une partie de remplacement sans
frais en échange de toute pièce d'origine, qui échoue en raison d'un défaut de matériel ou de fabrication. Tous les
frais de main-d'œuvre et de transport sont à la charge du consommateur.
GARANTIE LIMITÉE de sept ans
Pendant une période supplémentaire de 6 ans au-delà de la première année de la couverture générale de cette
garantie, Avanti produits seront remplacer un tube magnétron, qui échoue en raison d'un défaut de matériel ou de
La couverture de la garantie décrite ici exclut tous les défauts ou les dommages qui ne sont pas la faute directe de
d'achat originale est nécessaire pour obtenir un
bâtiment, des règlements ou des lois, y compris le défaut d'installer le produit en stricte conformité avec incendie et
de construction des codes et règlements locaux.
• Toutes les forces externes, élémentaires et / ou de l'environnement et des facteurs, y compris mais sans s'y
limiter, la pluie, le vent, le sable, inondations, incendies, glissements de terrain, des températures glaciales, une
humidité excessive ou exposition prolongée à l'humidité, de la foudre, surtensions, défaillances structurelles qui
dues au gaspillage.
• Dommages indirects ou consécutifs
• Pièces et coût du travail pour les suivantes ne seront
pas considérées comme une garantie:
• Ampoules et / ou boîtier en plastique.
• Revêtements de la caisse en plastique.
environnante, y compris les armoires, planc hers, plafonds, et d'autres structures et / ou des objets autour du produit.
Sont également exclus de cette garantie sont les égratignures, les entailles, bosses mineures, et autres dommages
cosmétiques sur les surfaces ex ternes et les parties exposées; Produits dont les numéros de série ont été modifiés,
maquillé ou supprimé; visites de service pour l'éducation de la clientèle, ou des visites où il n'y a rien de mal avec le
produit; correction des problèmes d'installation (vous êtes seul responsable de toute structure et réglage du produit, y
compris tous les systèmes électriques, la plomberie et / ou d'autres installations de raccordement, pour le bon
remplacement de l'unité.
• Réparations effectué par un préposé non autorisées.
• Les appels de service qui sont liés à des problèmes
externes, tels que l'abus, l'alimentation électrique
inadéquate, les accidents, les incen die s, les
inondations, ou d'autres actes de Dieu.
• Une panne du produit si elle est utilisée pour autre
chose que son intention effet.
• La garantie ne couvre pas l'extérieur de la États-Unis
continentaux.
• Surtaxes y compris mais sans s'y limiter, toute après
heure, les appels week-e nd, ou de servic es de
vacances, les péages, les frais de voyage de
convoyage ou les frais de kilométrage pour les appels
de service dans les régions éloignées.
Page 46

46
étagères etc., ainsi que la remise à zéro de disjoncteurs ou fusibles.
Produit hors garantie
Avanti Products est sous aucune obligation, en droit ou autrement, de vous fournir toutes les concessions, y compris
les réparations, les pro-taux, ou le remplacement du produit, une fois la garantie expirée.
Garantie - Micro-ondes
Page 47

47
REGISTRATION INFORMATION
Thank you for purchasing this fine Avanti product. Please fill out this form and return it within 100 days of
purchase and receive these important benefits to the following address:
Avanti Products LLC,
P.O. Box 520604 - Miami, Florida 33152 USA
Protect your product:
We will keep the model number and date of purchase of your new Avanti product on file to help
you refer to this information in the event of an insurance claim such as fire or theft.
Promote better products:
We value your input. Your responses will help us deve lop produc ts desig ned to bes t m eet your
future needs.
--------------------------------------------------------(detach here)----------------------------------------------------------
Avanti Registration Form
__________________________________ ______________________________________
Name Model # Serial #
__________________________________ ______________________________________
Address Date Purchased Store/Dealer Name
__________________________________ ______________________________________
City State Zip Occupation
__________________________________ As Your Primary Residence, Do You:
Area Code Phone Number Own Rent
Did You Purchase An Additional Warranty: Your Age:
Extended None under 18 18-25 26-30
Reason For Choosing This Avanti Product: 31-35 36-50 over 50
Please indicate the most important factors Marital Status:
that influenced your decision to purchase Married Single
this product. Is This Product Used In The:
Price Home Business
Product Features How Did You Learn About This Product:
Avanti Reputation Advertising
Product Quality In Store Demo Personal Demo
Salesperson Recommendation Other________________________________
Friend/Relative Recommendation Comments_____________________________
Warranty ______________________________________
Other_______________________ ______________________________________
Page 48

48
MO7191TW / MO7192TB MT07K4R 01272016
PRINTED IN CHINA
 Loading...