

Page 1
Model Number:
M0629T
MICROWAVE OVEN
INSTRUCTION MANUAL
Q®®®
Q®®®
r-. ®
QCEZ3
CAUTION:
BEFORE USE, PLEASE READ AND FOLLOW ALL SAFETY RULES AND OPERATING
INSTRUCTIONS.
Avanti has a policy of continuous improvement on its products and reserves the right to change materials and
specifications without notice.
Avanti Products, A Division of The Mackle Co., Inc.
P.O. Box 520604 • Miami, Florida 33152
www.avantiproducts.com
Page 2

Warranty Information
Thank you for purchasing this fine Avanti product. Please fill out this card and
return it within 100 days of purchase and receive these
important benefits:
> Confirm your warranty:
Your prompt product registration confirms your right to the protection
available under the terms and conditions of your Avanti warranty.
Protect your product:
• We will keep the model number and date of purchase of your new
Avanti product on file to help you refer to this information in the
event of an insurance claim such as fire or theft.
^ Promote better products:
We value your input. Your response will help us develop products
designed to best meet your future needs.
-(detach here)
Avanti Registration Card
Name
•Address
City State
Area Code Phone Number
Did You Purchase An Additional
Warranty:
□ Extended □ Food Loss □ None
Reason For Choosing This Avanti
----------------------------
Product:
Please indicate the most important
factors that influenced your decisiori
to purchase this product.
□ Price
□ Product Features
□ Avanti Reputation
□ Product Quality
□ Salesperson Recommendation
□ Friend/Relative Recommendation
□ Warranty
□ Other
1---------------------------
Zip
----------------------
1-
Model #
Date Purchased Store/Dealer Name
Occupation
As Your Primary Residence, Do You:
□ Own
Your Age:
□ under 18 □18-25 □ 26-30
□ 31 -35 □ 36-50 □ over 50
Marital Status:
□ Married □ Single
□ Rent
Is This Product Used In The:
□ Home □ Business
Serial #
_____
How Did You Learn About This
Product:
□ Advertising □ Product Features
□ In Store Demo □ Personal Demo
□ Other
Comments
________________
_______________________
Page 3

HELP US HELP YOU...
Read this guide carefully.
It is intended to help you operate and maintain
your new appliance properly.
Keep it handy to answer your questions,
if you don't understand something or your
need more help, please call:
Avanti Customer Service
800-220-5570
Keep proof of original purchase date (such as
your sales slip) with this guide to establish the
warranty period.
Write down the modei and serial numbers.
You'll find them on a plate located on the back
of the appliance.
Please write these numbers here;
Date of Purchase
Model Number
Serial Number
Use these numbers in any correspondence or
service calls concerning your appliance.
if you received a damaged appliance,
immediately contact the dealer (or builder) that
sold you the appliance.
Save time and money. Before you cal! for
service, check the Troubleshooting Guide, it
lists causes of minor operating problems that
you can correct yourself.
IF YOU NEED SERVICE
We're proud of our service and want you to be
pleased. If for some reason you are not happy
with the service you receive, here are some
steps to follow for further help.
FIRST, contact the people who serviced your
appliance. Explain why you are not pleased. In
most cases, this will solve the problem.
NEXT, if you are still not pleased, write all the
details, including your telephone number, and
send to:
Customer Service
Avanti Products
10880 NW 30 Street
Miami, FL 33172
Page 4
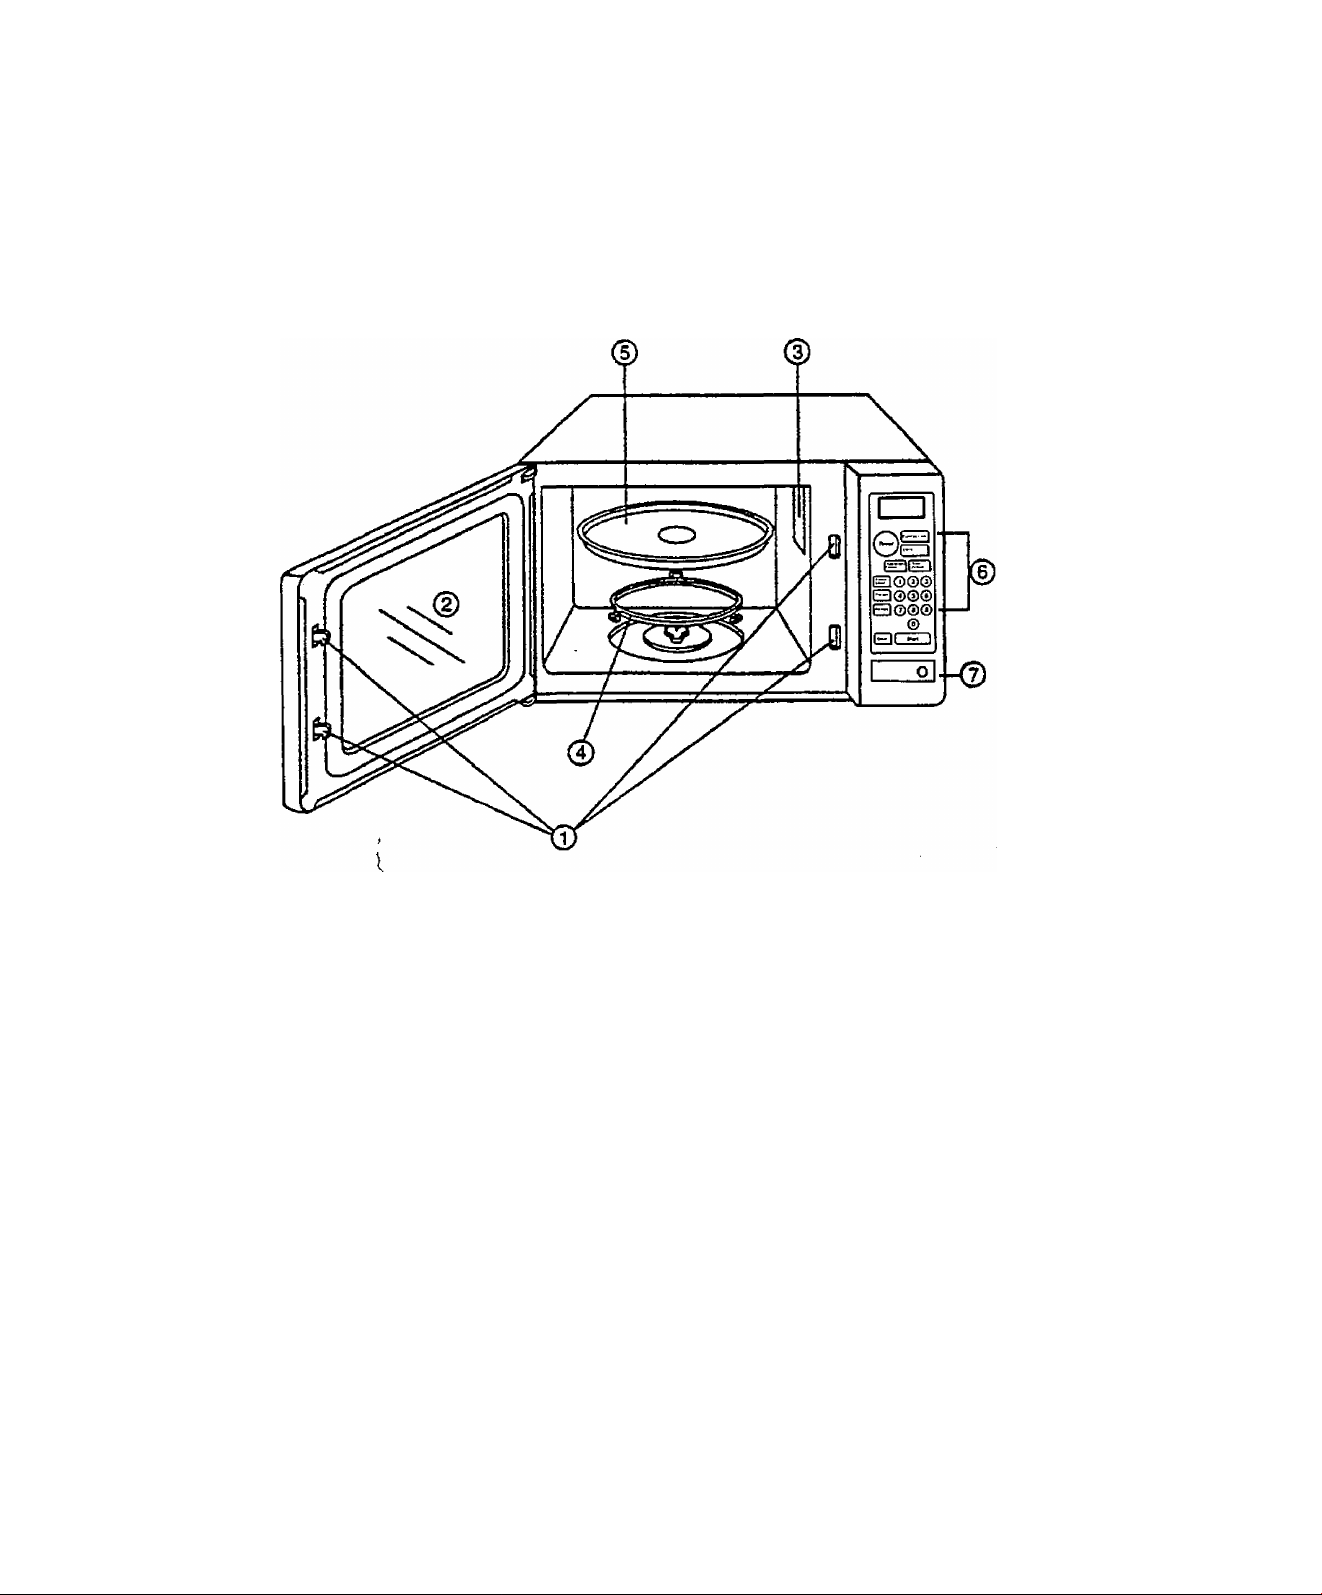
PARTS AND FEATURES
1. Door Safety Lock System
2. Oven Window
3. Oven Air Vent
4. Roller Ring
5. Glass Tray
6. Control Panel
7. Door Release Button
Page 5

Table of Contents
Warranty Information and Registration Card_
Help Us Help You
Parts and Features
important Safety instructions
Installation Instructions
Before Using Your Appliance .
installation of Your Appliance.
Safety Precautions
General Use
Utensils
Food
Electrical Connection
Operating Your Appliance.
Control Panel
Operation Procedure
Care and Maintenance
Cleaning Your Appliance
_______________________
__________
_______________
_____
Identifying The Oven Controls
Special Oven Features
How to Set the Oven Controls.
Troubleshooting Guide
Service For Your Appliance..
Your Avanti Products Warranty
Parts Breakdown
Parts List
Wiring Diagram.
_____________
_______
______
_____________
Page 6

Important Safety Instructions
AwARNINSy
Read ail Instructions before using the appliance.
Some products such as whole eggs and sealed container-(for example, closed glass
jars) may explode and should not be heated in microwave oven.
Use this microwave oven only for its intended use as described in this manual.
Do not use corrosive chemicals or vapors in this appliance. This type of oven is
specifically designed to heat, cook, or dry food. It is not designed for industrial or
laboratory use.
As with any appliance, close supervision is necessary when used by children.
Do not operate this microwave oven if it has a damaged cord or plug, if it is not
working properly, or if it has been damaged or dropped.
To reduce the risk of fire in the oven cavity:
• Do not overcook food. Carefully attend microwave oven if paper, plastic, or
combustible materials are placed inside the oven to facilitate cooking.
• Remove wire twist-ties from bags before placing bag in oven.
• If materials inside the oven should ignite, keep oven doo'r closed, turn oven off at
the wall switch, or shut off power at the fuse or circuit breaker panel.
• Do not use the cavity for storage purposes. Do not leave paper products,
cooking utensils, or food in the cavity when not in use.
Only qualified service personnel should service this appliance. Contact the nearest
authorized service facility for examination, repair or adjustment.
Do not cover or block any openings on this appliance.
Do not use this microwave oven to heat corrosive chemicals (for example, sulfides
and chlorides). Vapors from such corrosive chemicals may interact with the contact
and springs of the safety interlock switches thereby rendering them inoperable.
Do not immerse cord or plug in water.
Keep cord away from heated surfaces.
Do not let cord hang over edge of table or counter.
Never clean appliance^ parts with flammable fluids. The fumes can create a fire
hazard or explosion.
Do not store or use gasoline or any other flammable vapors and liquids in the vicinity
of this or any other appliance. The fumes can create a fire hazard or explosion.
To reduce the risk of fire, electrical shock,
or injury when using your appliance, follow
these basic precautions:
-Save these instructions-
Page 7

INSTALLATION INSTRUCTIONS
Before Using Your Appliance
• Remove the exterior and interior packing.
• Check to be sure you have all of the following parts:
• GiassTray
• Roller Ring
• instruction Manual
• inspect the oven after unpacking for any visual damage such as:
• Misaligned Door
• Damaged Door
• Dents or Holes in Door Window and Screen
• Dents in Cavity
if any of the above are visible, DO NOT use the oven.
> Installation of Your Appliance
When positioning the microwave oven, it should be set on a flat, steady surface.
Do not block air vents. If they are blocked during operation, the oven may overheat and
eventually cause oven failure.
Poor television reception and radio interference may result if the oven is located dose to a
TV, radio, antenna, or antenna wire. Position the oven as far from them as possible.
Clean the interior surface with lukewarm water using a soft cloth.
Keep the oven away form hot air, steam or splashing liquids when choosing a place to locate
it, otherwise, the unit’s operation may be adversely affected, causing it to break down.
Direct sunlight may affect the acrylic coating and heat sources may increase electrical
consumption.
Plug the appliance into an exclusive properly installed-grounded-wall outlet. Do not under any
circumstances cut or remove the third (ground) prong from the power cord. Any questions
concerning power and or grounding should be directed toward a certified electrician or an
authorized Avanti Products service center.
DO NOT place anything on the top of the oven.
Keep the oven at least 5 inches away from both sidewalls and away form rear wall to ensure
the proper ventilation.
DO NOT remove the turn-table drive shaft.
t
I
i
> General Use
Do NOT attempt to tamper with or make any adjustments or repairs to door, control panel or
any other part of the oven. Do NOT remove outer panel from oven. Repairs should only be
done by qualified service personnel.
Do NOT operate the oven empty. The microwave energy will reflect continuously throughout
the oven if no food or water is present to absorb energy.
Disconnect the power cord, or shut off power at the fuse or circuit breaker panel.
Do NOT attempt to dry clothes, newspapers or other materials in oven. They may catch on
fire.
^0 NOT use recycled paper products, as they may contain impurities, which may cause
sparks and/or fires when used.
Do NOT hit or strike control panel. Damage to controls may occur.
SAFETY PRECAUTIONS
Page 8

> utensils
• METAL CONTAINERS or dishes with metallic rims should not be used. Arcing may occur.
• METAL TWIST-TIES may not be used in the microwave oven.
• Do NOT use SEALED JARS or NARROW NECK bottles for cooking or reheating. They may
shatter.
• Do NOT use CONVENTIONAL THERMOMETERS in the microwave oven. They may cause
arcing.
• Remove PLASTIC STORE WRAPS before cooking or defrosting in the oven.
> Food
• Never use your microwave oven for HOME CANNING. The oven is not designed to permit
proper canning. Improperly canned food may spoil and be dangerous to consume.
• COOKING TIMES are approximate. Factors that may affect cooking are starting
temperature, altitude, volume, size and shape of food and utensils used. As you become
familiar with the oven, you will be able to adjust for these factors.
• it is better to UNDERCOOK RATHER THAN OVERCOOK foods. If food is undercooked, it
can always be returned to the oven for further cooking. If food is overcooked, nothing can be
done. Always start with minimum cooking times.
• SMALL QUANTITIES of food or foods with LOW MOISTURE content can burn, dry out or
catch on fire if cooked too long.
• Do NOT boi! eggs in their shell. Pressure may build up and the eggs will explode.
• Potatoes, apples, egg yolks, whole acorn squash and sausage are examples of food with
NONPOROUS SKINS. These must be pierced before cooking to prevent bursting.
• POPCORN must be popped in a microwave corn popper. Microwave popped corn produces
a lower yield^than conventional popping. DO not use oven for popcorn unless popped in a
microwave approved popcorn utensil or unless it’s commercially packaged and recommended
especially for microwave ovens. Do not use oil unless specified by the manufacturer.
• Do NOT attempt to deep fat fry in your oven.
• HEATED LIQUIDS can ERUPT if not mixed with air. Do not heat liquids in your microwave
oven without first stirring.
Page 9

> Electrical Connection
This appliance must be grounded. In the event of an electrical short circuit, grounding
reduces the risk of electrical shock by providing an escape wire for the electric current. This
appliance is equipped with a cord having a grounding wire with a grounding plug. The plug
must be inserted into an outlet that is properly installed and grounded.
/VWarningX
Improper use of the grounded plug can result in the risk of electrical shock. Consult a qualified
electrician or service person if the grounding instructions are not completely understood, or if
doubt exists as to whether the appliance is properly grounded.
The power cord of this appliance is equipped with a three-prong plug which mates with
standard three prong wall outlets to minimize the possibility of electrical shock.
Do not under any circumstances cut or remove the third ground prong from the power cord
supplied.
Use of extension cords is not recommended.
This appliance requires a standard 115/120 volt, 60Hz electrical outlet with three-prong
ground.
The cord should be secured behind the appliance and not left exposed or dangling to prevent
accidental injury.
I
When using a 3-pronged plug
3-pronged
Receptacle
plug Box Cover
When using a grounding adapter, make
sure the receptacle box Is fully grounded
Grounding lead
Receptacle
Grounding
Adapter
Receptacle
Box Cover
Page 10

OPERATING YOUR APPLIANCE
Although your oven is provided with safety features, it is important to observe the following:
• It is important not to defeat or tamper with safety interlocks.
• Do not place any object between the oven front face and the door or allow residue to accumulate
on sealing surfaces. Wipe the sealing area frequently with a mild detergent, rinse and wipe dry.
Never use abrasive powders or pads.
• When opened, the door must not be subjected to strain, for example, a child hanging on an
opened door or any load which could cause the oven to fall forward and cause injury and damage
the door. Do not operate the oven if it is damaged, until it has been repaired by a qualified
service person, it is particularly important that the oven closes properly and that there is no
damage to the:
• Door (bent).
• Hinges and latches (broken or loosened).
• Door seals and sealing surfaces.
• The oven should not be adjusted or repaired by anyone except properly qualified service
personnel.
> CONTROL PANEL
Follow the applicable instructions for operation and control, which are given in “HOW TO USE THE
OVEN CONTROLS"
FEATURES
__________________
Express Cook
I AvCi
I j Oofroit I
CLOCK
J
J
PRE-SET
TIME DEFROST
AUTO WEIGHT DEFROST
TIME COOKING POWER LEVEL
EXPRESS COOK
SPECIAL FEATURES
MINUTE TIMER
AUTO REMINDER
CHILD PROOF LOCK
E3®®©
Cancel
(7) ®@
Start
PROGRAMMING COMBINATION
PRESET
TIME DEFROST AUTO WEIGHT DEFROST
STAGE TIME AND POWER LEVEL COOKING
2"'°STAGE TIME AND POWER LEVEL COOKING
]
10
Page 11

OPERATION PROCEDURE
• Plug the power supply cord into a standard 3-pronged 16 Amp, 120v AC 60 Hz
• After placing the food in a suitable container, open the oven door and put it on the
glass tray. The glass tray and roller guide must always be in place during cooking.
• Shut the door. Make sure that it is firmly closed.
1.
When the oven door is opened, the light turns on.
2.
The oven door can be opened at any time during operation by pressing the door release button
on the control panel. The oven will automatically shut off. To restart the oven, close the door and
then touch START.
Each time a pad is touched, a BEEP will sound to acknowledge the touch. One of the function
3.
pads must be touched before the number pads. Therefore, no beep will sound if the numeral pad
is touched before the function pad.
The oven automatically cooks on high power and defrosts on low power.
4.
5.
The display will flash “1:01” when the oven is plugged in. After 1 minute, the display wilt change.
Time of day clock returns to the present time when the oven turns off.
6.
7.
When the CANCEL pad is touched during the oven operation, the oven stops cooking and all
information is erased. If the oven door is opened during the oven operation, all information is
retained.
8.
if the START pad is touched and the oven does not operate, check the area between the door
and door seal for obstructions and make sure the door is closed securely. The oven will not start
cooking until the door is completely dosed and the program has been set.
CARE AND MAINTENANCE
Cleaning Your Appliance
Turn the oven off and remove the power plug from the wall socket before deaning.
Keep the inside of the oven clean. When food splatters or spilled liquids adhere to oven wails,
wipe with a damp cloth. Mild detergent may be used if the oven gets very dirty. The use of harsh
detergent or abrasives is not recommended.
The outside oven surfaces should be cleaned with a damp cloth. To prevent damage to the
operating parts inside the oven, water should not be allowed to seep into the ventilation openings.
Do not allow the control panel to become wet. Clean with a soft, damp doth. Do not use
detergents, abrasives or spray-on cleaners on the control Panel, When deaning the control
Panel, leave oven door open to prevent oven from accidentally turning on.
If steam accumulates inside or around the outside of the oven door, wipe with a soft cloth. This
may occur when the microwave oven is operated under high humidity conditions and in no way
indicates malfunction of the unit.
it is occasionally necessary to remove the glass tray for deaning. Wash the tray in warm sudsy
water or in a dishwasher.
The roller ring and oven cavity floor should be cleaned regularly to avoid excessive noise. Simply
, wipe the bottom surface of the oven with mild detergent, water or window cleaner and dry. The
roller ring may be washed in mild sudsy water or dishwasher. Cooking vapors collect during
repeated use but in no way affect the bottom surface or roller ring wheels. V^fhen removing the
roller ring from cavity floor for deaning, be sure to replace it in the proper position.
Remove odors from your oven by combining a cup of water with the juice arid skin of one lemon
in a deep microwavable bowl. Microwave for 5 minutes. Wipe thoroughly and dry with a soft
cloth.
When it becomes necessary to replace the oven light, please consult a dealer to have it replaced.
f!
11
Page 12

IDENTIFYING THE OVEN CONTROLS
NUMERAL PADS {1,2....9,0)
• Use to enter the numbers, when setting the time, power level, etc.
POWER LEVEL
• Use to set the power level.
• This oven has 10 power levels. The power level selections are from 10% to 100% of
power output.
• The oven automatically cooks on power level “10" (high power) unless it is set for a lower
power level.
• To check power level during cooking, touch POWER LEVEL pad. The selected power
level will appear in the display window for 5 seconds. The oven will continue to operate.
After 5 seconds the remaining time will be displayed.
POWER LEVEL
> TIMER
> CLOCK
• Use to set the time of day or recall the time of day.
• The time of day will be displayed at all times except when the oven is operating.
• In the event of a power failure or if the oven is unplugged, the clock will have to be reset.
> CANCEL
• Touch to cancel the selected power level, cook or defrost times previously programmed.
% OF POWER OUTPUT
10
9
8
7 (70%)
6
5
4
3
2
1
0
Use to set cooking time.
Allows you to set up to 99 minutes and ^ seconds
The time of day clock is not cancelled.
(100%)
(90%)
(80%)
(60%)
(50%)
(40%)
(30%)
(20%)
(10%)
MINUTE TIMER
APPROXIMATE
700
630
560
490
420
350
280
210
140
70
0
> START
• Touch to start the defrost or cook programs.
• The cook indicator light and the oven light will come on and the cooling fan will operate.
NOTE: END OF OPERATION- Timer returns to "0”
• Three beeps will sound, the cook indicator light will go out and the time of day will return
• The oven will automatically continue to sound th^ee beeps every two minutes until the
NOTE: TO INTERRUPT OPERATION -Open the oven door.
• The oven immediately stops, however, the light will remain on.
m If no further cooking is required, touch the CANCEL pad.
• To continue cooking, dose the oven door and touch the START pad. The oven will
to the display window. The oven light and cooking fan wfill turn off.
oven door is opened or the CLEAR pad Is touched.
restart.
12
Page 13

> TIME DEFROST
• Use to defrost frozen foods by time.
• This cycle starts at medium - high power, then automatically reduces to medium - low
and then to low as the food thaws.
• TIME DEFROST Indicator light and cook indicator light will both come on during the defrost
cycle.
AUTO WEIGHT DEFROST
• Use to defrost frozen meat, poultry and seafood by weight.
• The defrosting time and power levels are automatically set once the food category and
the weight are programmed.
NOTE: The maximum allowable weight for each category is shown below.
AUTO WEIGHT
DEFROST
PROGRAM
1
2
3
• For foods exceeding these maximum weights, use the TIME DEFROST program.
• If you
operate properly.
>
EXPRESS COOK
• Use this feature to program the oven for 4 popular microwave timings.
• With each touch of the EXPRESS key you can program the oven for:
• 15 seconds - TOUCH ONCE
• 30 seconds - TOUCH TWICE
• 1 minute - TOUCH THREE TIMES
• 2 minutes - TOUCH FOUR TIMES
• The oven will operate at full power for EXPRESS PROGRAMS.
FOOD
CATEGORY
Meat
Poultry 8.8 lbs D2
Seafood
program weights in excess of the
MAXIMUM
WEIGHT DISPLAY
5 lbs
2 lbs
maximum recommended, the oven
D1
D3
will not
>
PRE-SET
• Use to set the oven to come on at a later time.
• The clock must be set before the pre-set function can be programmed.
• The Pre-set indicator blinks while the oven is in the PRE-SET position.
> MEMORY
• When programming the oven to cook by time, use the MEMORY PAD when setting both
a 1®* and 2™* cooking stage.
• The respective lights will come on to indicate which stage the oven is operating in.
SPECIAL OVEN FEATURES
> MINUTE TIMER
Use for timing things done outside the oven. Three beeps will sound at the end of the elapsed time.
The oven light and cooling fan will come on while the timer is operating but there are no microwaves
present.
> AUTO TIMER
After a DEFROST or COOK PROGRAM has completed, the oven will automatically continue to sound
three beeps every two minutes until the oven door is opened or the clear pad is touched.
-> CHILD PROOF LOCK------------------------------------------------------------------------------------------------------------------
Use to prevent unsupervised operation of the oven by small children. The CHILD PROOF LOCK
indicator will be lit on the display and the oven cannot be operated while the CHILD PROOF LOCK is
set.
13
Page 14

HOW TO SET THE OVEN CONTROLS
Each time a pad is touched, a beep will sound to verify the touch.
Setting the Clock
Example; 3 o'clock 45 minutes
1. Touch CLOCK pad
2. Touch CANCEL pad
3. Touch numeral pads 3 4 5
4. Touch CLOCK pad again
The two dots between the hour and the minutes will flash every other second.
Note: When the oven was plugged in, “1:01" should have appeared in the display window. To
reset the time of day repeat the steps given above. To check the time of day while the oven
is operating, touch the CLOCK pad and the time will be displayed for 5 seconds.
Time and Power Level Cooking
Example: Set the oven to cook for 1 minute at power level 6.
1. Touch TIME pad
Touch numeral pads 1 0 0
2. Touch POWER LEVEL pad
Touch numeral pad 6
3. Touch START pad
Note: Step 2 is not necessary for cooking at power level 10 (High Power)
> Pre-Set
Example: Set the oven to come on at 2:00 o’clock
1. Touch PRE-SET pad
2. Touch numeral pads 2 0 0
3. Set the cooking programs - -
4. Touch START pad and the oven will start cooking at 2:00
Note: Be sure the time of day dock is set at the correct time before programming PRE-SET.
> Express cook
Example: Set the oven to cook for 1:00 at HIGH power using the EXPRESS COOK feature
1. Touch the EXPRESS COOK pad 3 times.
1:00 appears in the display
2. Touch START pad
NOTE: Touch EXPRESS COOK pad:
1 time for 15 seconds
2 times for 30 seconds
3 times for 1 ;00 minute
4 times for 2:00 minutes
> Time Defrost
Example: Set the oven to TIME DEFROST for 5 minutes and 30 seconds.
1. Touch TIME DEFROST pad
2. Touch numeral pads 5 3 0
-------------3;—Touch START pad
Use TIME DEFROST to defrost foods that are not included in the AUTO WEIGHT DEFROST
categories, or when the weight exceeds the maximum recommendations for AUTO WEIGHT
DEFROST.
N
14
Page 15

> Auto Weight Defrost
Example: Set the oven to AUTO WEIGHT DEFROST eOOIbs shrimp.
1. Touch AUTO WEIGHT DEFROST pad 3 times “d3"
2. Touch numeral pads 6 0 0.
3. Touch START pad.
Note 1: See page 13 for Maximum Weight and Category program
Note 2: The oven will beep twice during the weight defrost program. This will take place at
approximately on third and two thirds into the program. Foods should be attended at this
time. Rearrange, shield, turn over or remove any pieces that may be defrosting more quickly
than others.
Program Cooking
The oven has the ability to be programmed to de several consecutive functions that are given
in the SPECIFICATION TABLE, and either the complete program or part of it can be used.
Remember
Always touch the “CANCEL" pad before programming.
Time Cooking Program
1. Touch CANCEL pad.
2. Repeat the TIME DEFROST instructions.
3. Repeat the TIME and POWER LEVEL instructions.
4. Touch MEMORY pad.
5. Repeat the TIME and POWER LEVEL instructions again.
6. Touch start pad.
Remember: TIME DEFROST and AUTO WEIGHT DEFROST can only be selected before the
cooking stage in a program. It can not be selected between or after stage 1 or stage 2.
Child Proof Lock
To set the CHILD PROOF LOCK
1. Touch CANCEL pad
2. Touch pads 5 and 7 at the same time.
A beep will sound and the child proof indicator will light. You can not operate the oven
while the CHILD PROOF LOCK is set.
To release the CHILD PROOF LOCK
1. Touch pads 5 and 7 at the same time.
A beep will sound and the child proof indicator will go out.
NOTE: Remember the oven can not be operated when the CHILD PROOF LOCK is set. If
the oven will not operate, before calling for service check to see if the CHILD PROOF LOCK
indicator is tit on the display.
Minute Timer
1. Touch TIMER pad
2. Touch numeral-pads to set the desired items.
3. Touch POWER LEVEL pad
4. Touch numeral pad 0
5. Touch START pad
15
Page 16

PROBLEMS WITH YOUR APPLIANCE?
You can solve many common appliance problems easily, saving you the cost of a possible service
call. Try the suggestions below to see if you can solve the problem before calling the servicer.
TROUBLESHOOTING GUIDE
PROBLEM POSSIBLE CAUSE
Appliance does not operate.
The light does not work.
Not plugged In.
The circuit breaker tripped or blown fuse.
The door is not closed properly.
The home circuit breaker or fuse has tripped.
The appliance is unplugged.
Vibrations.
Check to assure that the appliance is level.
16
Page 17

SERVICE FOR YOUR APPLIANCE
We are proud of our customer service organization and the network of professional service
technicians that provide service on your Avanti appliances. With the purchase of your Avanti
appliance, you can have the confidence that if you ever need additional information or assistance, the
Avanti Products Customer Service team will be here for you. Just call us toll-free.
AVANTI PRODUCTS CUSTOMER SERVICES
Product Information
800-323-5029
Part Orders
800-220-5570
In-Home Repair Service
800-220-5570
Whatever your questions are about our products,
help is available.
You may order parts and accessories that will be
delivered directly to your home.
You may order these items by personal check,
money order, Master Card, or Visa.
An Avanti Products authorized service center will
provide expert repair service, scheduled at a time
that is convenient for you. Our trained servicers
know your appliance inside and out.
17
1
'■f-'
M I'-
Page 18

YOUR Avanti Products WARRANTY
WHAT IS COVERED
LIMITED ONE-YEAR WARRANTY
For one year from the date of
purchase by the original owner, Avanti
Products will, at its option, repair or
replace any part of the appiiance
which proves to be defective in
materia! or workmanship under normal
use. During this period Avanti
Products will provide all parts and
labor necessary to correct such
defects free of charge, so long as the
appliance has been installed and
operated in accordance with the
written instructions in this manual. In
rental or commercial use, the warranty
period Is 90 days.
Staple your sales receipt here. Proof of
original purchase date is needed to obtain
service under warranty.
WHAT IS NOT COVERED
Incidental or consequentiai<damages.
Parts and labor costs for the following will
not be considered aS warranty;
Door springs, and/or frames.
Inner door panels, and/or door supports.
Light bulbs and/or plastic housing.
Repairs performed by unauthorized
servicers.
Service calls that do not involve defects in
material or workmanship ^ such as
custorner education, or proper installation.
Service calls that are related to external
problems, such as abuse, misuse,
inadequate electrical power, accidents,
fire, floods, or acts of God.
Replacement of house fuses or resetting
circuit breakers.
Failure of the product if it is used for other
than its intended purpose.
This warranty does not apply outside the
Continental USA.
18
Page 19

Page 20

PARTS LIST
PART
NO
PART NAME
Q’ TY
PART
NO
PART NAME
POl Oven Cavity I P33 Fan Blade
. P02
P03
Door 1 P34 Outer Viewing Barrier 1
Outer Enclosure 1
P35
Inner Viewing Barrier 1
P04 Base Enclosure 1 P36 Button Spring 1
P05 Air Guide 1 P37 Power Supply Cord
P06 Plastic Cover 1 P38 Wire Harness 1 set
P07 Upper Hinge 1
P08
-P09
Lower Hinge
Turntable
P39
1 P40 Fuse Holder
1
Insulating Film I
PIO Capacitor Holder 1 B50 Owner s Manual
Pll Control Panel 1 B51 Carton
P12 Touch Keyboard
P13 Door Release Level
P14
P15
Door Opening Button
Label
2 B52
1 B53 Plastic Bag
I B54 Plastic Film
10
B55
Foam Cushion
Wrapping N^l
Q' TY
1
1
1
1
1
6
2
1
12
P16 Lamp Bracket 1 B56 Tape
‘P17
Shock-Proof Rubber
P18 Microswitch Mounting'
Bracket
PI9
Fan Holder
P20 Roller Ring
P21
Ring Wheels
P22 Inner Rotary Arm 1 C65
P23 Outer Rotaiy Arm 1 C66
P24
Foot
P25 Foot Pin 4 C68
1
1
C61 Microswitch (P, S)
1 C62 Microswitch (M)
1
C63 Turntable
3 C64 PC Board
Fan Motor
Oven Lamp
4 C67 Transformer
H.V Capacitor
P26 Air Duct 1 C69 H.V Diode
P27
Turntable Gear
1 C70 Fuse
P28 Washer 1 C71 Magnetron
P29 Mica Sheet I C72
P30 Power Supply Cord Holder 2
C73
Thermostat KSD105
Thermostat KSD180
2
2
1
1
1
1
1
1
1
1
1
1
1
1
P31 Latch
DTO
1 C74
1
I
20
H.V Fuse
1
Page 21

 Loading...