

Page 1
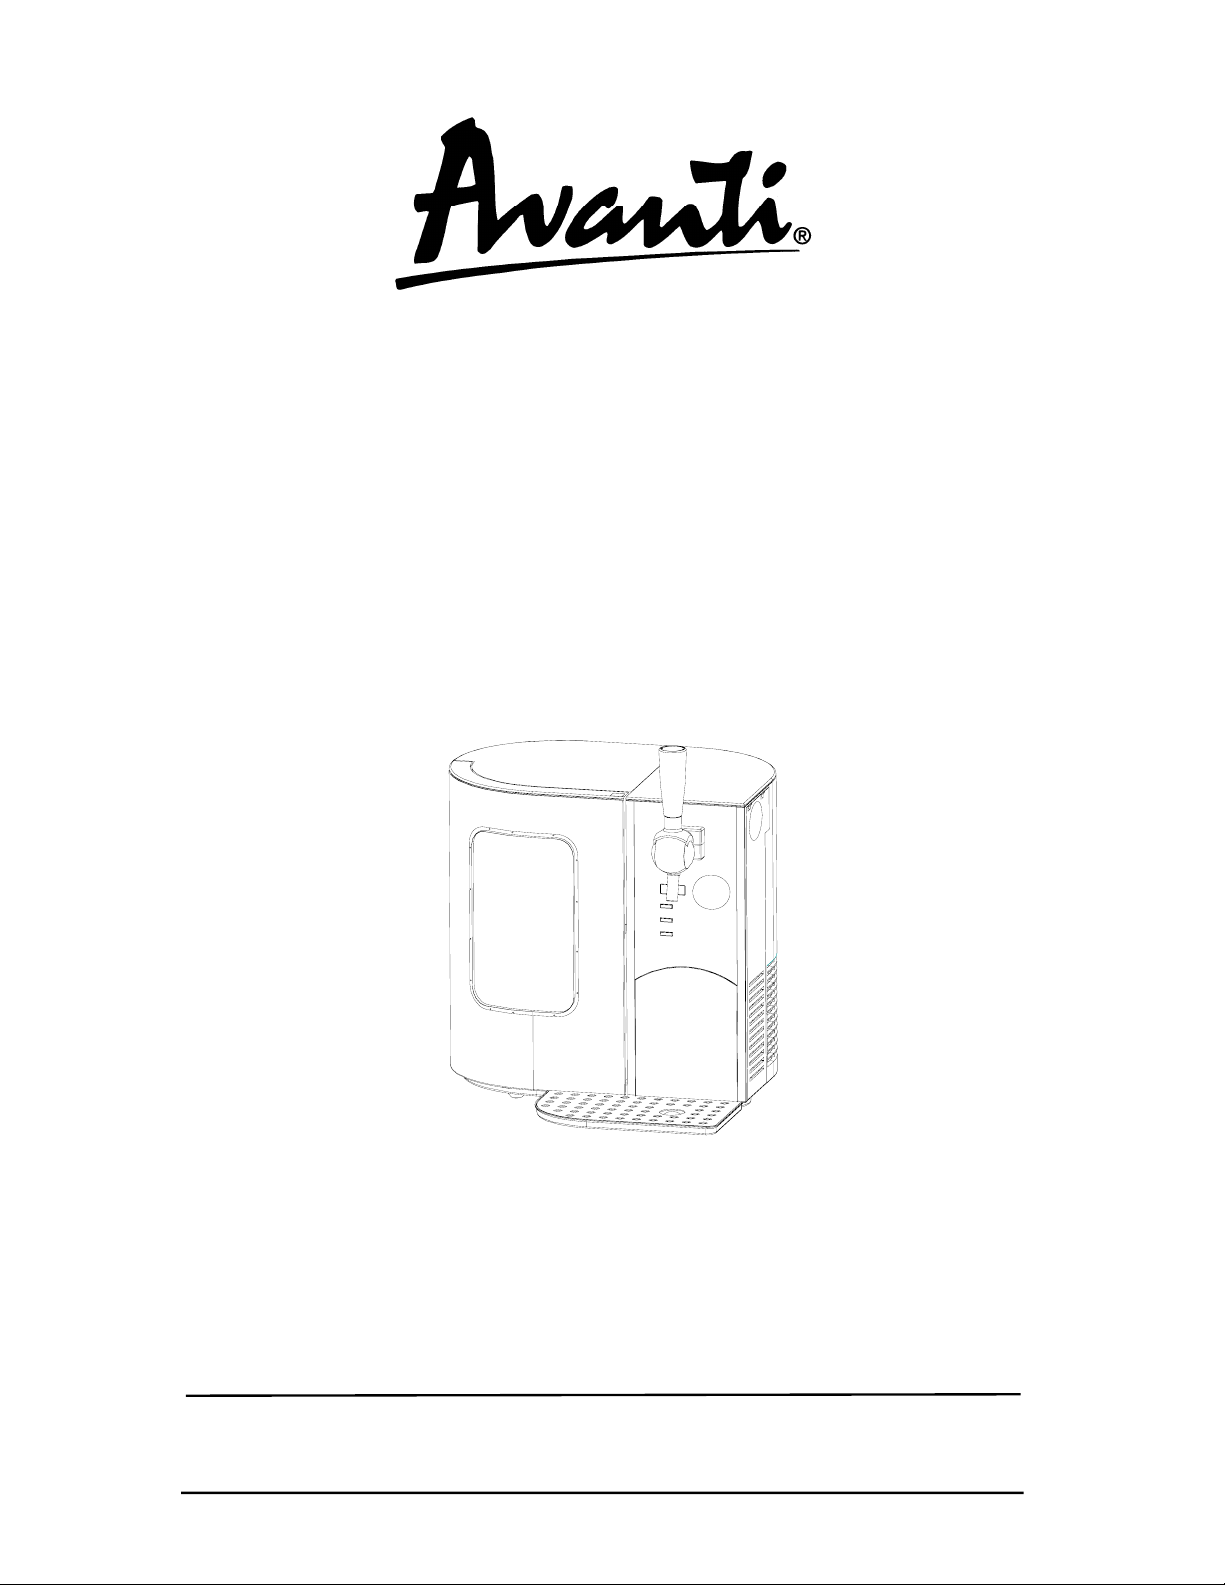
Mini Pub
INSTRUCTION MANUAL
MANUAL DE INSTRUCCIONES
Model Number / No. de Modelo:
MINI PUB (5L KEG)
DISPENSADOR DE CERVEZA (5L)
MBD5L
BEFORE USE, PLEASE READ AND FOLLOW ALL SAFETY RULES AND OPERATING
INSTRUCTIONS.
La sección en español empieza en la página 23
Avanti has a policy of continuous improvement on its products and reserves the right to change materials and specifications
without notice.
Avanti Products, A Division of the Mackle Co., Inc.
P.O. Box 520604 - Miami, Florida 33152
www.avantiproducts.com
Page 2

TABLE OF CONTENTS
Important Safety Instructions and Appliance Saf ety 3
Important Safeguides 4
Help Us Help You … 5
Parts and Features 6
Accessories Included with Your Mini Pub 6
Installation Instructions 7
Before Using Your Mini Pub 7
Electric al Connection 8
Installation of Your Mini Pub 9
Preparing the Keg 9 - 11
Setting up the Keg 11
Setting up the Gas Cartridge 11
Adjusting the Gas Pressure 12
Operating Your Mini Pub 13
Setting th e T em perature 13
Interior LED Light 13
LCD Temperature Display 13
Dispensing Your Beer 13
Care and Maintenance 14
Keg Removal and Cleaning the Unit 14
Storage 15
Troubleshooting Guide 15
Draught Beer Trouble Guide 16 - 20
Your Avanti Products Warranty 21
Service for Your Appliance 22
Wiring Diagram 22
Instrucciones en Español 23 – 35
Registration Information and Registration Card 37
2
Page 3
IMPORTANT SAFETY INSTRUCTIONS
aWARNINGa
• Read all instructions before using the Mini Pub.
• Never allow children to operate, play with, or crawl inside the appliance.
• Never clean the Mini Pub parts with flammable fluids. The fumes can create a fire
hazard or explosion.
• Do not store or use gasoline or any other flammable vapors a nd liquids in the vicinity
of this or any other appliance. The fumes can create a fire hazard or explosion.
• Do not repair or replace any part of the Mini Pub or attempt any servicing unless
specifically recommended in the user-maintenance instructions or in pub lished userrepair instructions. Replace the fuse with the same type
- Save these instructions -
APPLIANCE SAFETY
Your safety and the safety of others are very important.
We have provided many important safety messages in this manual for your appliance. Always read
and obey all safety messages.
This is the Safety Alert Symbol. This symbol alerts you to potential hazards that
can kill or injure you and others. All safety messages will follow the Safety
Alert Symbol and either the words” DANGER”, “WARNING” o r “CAUTION”.
Danger means that failure to heed this
Warning means that failure to heed this
or death.
Caution means that failure to heed this
All safety messages will alert to know what potential hazard is, tell you how to reduce the chance of
injury, and let you know what can happen if the ins tructions are not followed.
To reduce the risk of fire, electrical shock,
or injury when using your appliance, follow
these basic precautions:
safety statement may result in severe
personal injury or death.
safety statement may result in extensive
product damage, serious personal injury,
safety statement may result in minor or
moderate personal injury, property or
equipment damage.
3
Page 4
IMPORTANT SAFEGUIDES
Before the Mini Pub is used, it must be properly positioned and installed as
described in this manual, so read the manual carefully. To reduce the risk of fire,
electrical shock or injury when using the Mini Pub, follow basic precaution,
including the following:
• Plug into a grounded 3-prong outlet, do not remove grounding prong, do not use an adapter, and
do not use an extension cord.
• Replace all panels before operating.
• Never clean appliance parts with flammable fluids. These fumes can create a fire hazard or
explosion. And do not store or use gasoline or other flammable vapors and liquids in the vicinity of
this or any other appliance. The fumes can create a fire hazard o r explosion.
• Before proceeding with cleaning and maintenance operations, make sure the power line of the
unit is disconnected.
• Do not connect or disconnect the electric plug when your hands are wet.
• Unplug the refrigerat or or disc onnect power before cleani ng or servic ing. Failure to do so can
result in electrical shock or death.
• Do not attempt to repair or replace any part of your refrigerator unless it is specifically
recommended in this manual. All other servicing should be referred to a qualified technician.
FOLLOW WARNING CALL OUTS BELOW ONLY WHEN APPLICABLE TO YO UR MODEL
• To ensure proper ventilation for your Mini Pub, the front of the unit must be completely
unobstructed. Choose a well-ventilated area with temperatures above 60°F (16
90°F (32°C). This unit must be installed in an area protected from the element, such as wind, rain,
water spray or drips.
• The Mini Pub should not be located next to ovens, grills or other sources of high heat.
• The Mini Pub must be installed with all electrical connections in accordance with state and local
codes. A standard electrical supply (115 V AC only, 60 Hz), properly grounded in accordance with
the National Electrical Code and local codes and ordinances is required.
• Do not kink or pinch the power supply cord of the Mini Pub.
• The fuse (or circuit breaker) si ze should be 15 amperes.
• It is important for the Mini Pub to be leveled in order to work properly. You may need to make
several adjustments to level it.
• Make certain that the hoses are not pinched or kinked or damaged during installations.
• Check for leaks after connection.
• Never allow children to operate, play with or crawl inside the Mini Pub.
• Do not use solvent-based cleaning agents of abrasives on the interior. These cleaners may
damage or discolor the interior.
• Do not use this appliance for other than its intended purpose.
°
C) and below
4
Page 5
HELP US HELP YOU...
Read this guide carefully.
It is intended to help you operate and maintain
your new unit properly.
Keep it handy to answer your questions.
If you don't understand something or you need
more assistance, please call:
Avanti Customer Service
800-220-5570
Keep proof of original purchase date (suc h as
your sales slip) with this guide to establish the
warranty period.
CAUTION:
THIS UNIT IS NOT DESIGNED
FOR THE STORAGE OF
MEDICINE OR OTHER MEDICAL
PRODUCTS.
IF YOU NEED SERVICE
We're proud of our service and want you to be
pleased. If for some reason you are not happy
with the service you receive, here are some
steps to follow for further assistance.
FIRST, co ntact the people who s erviced your
unit. Explain why you are not pleased. In most
cases, this will solve the problem.
Write down the model and serial numbers.
You'll find them on a plate located on the rear
outside wall of the unit.
Please write these numbers here:
____________________________________
Date of Purchase
____________________________________
Model Number
____________________________________
Serial Number
Use these numbers in any correspondence or
service calls concerning your unit.
If you received a damaged unit, immediately
contact the dealer (or builder) that sold you the
unit.
Save time and money. Before you call for
service, check the Troubleshooting Gui de. It
lists caus es of minor oper a ting problem s that
you can correct yourself.
NEXT, if you are still not pleased, write all the
details, including your telephone number, and
send it to:
Customer Service
Avanti Products
10880 NW 30 Street
Miami, FL 33172 USA
5
Page 6
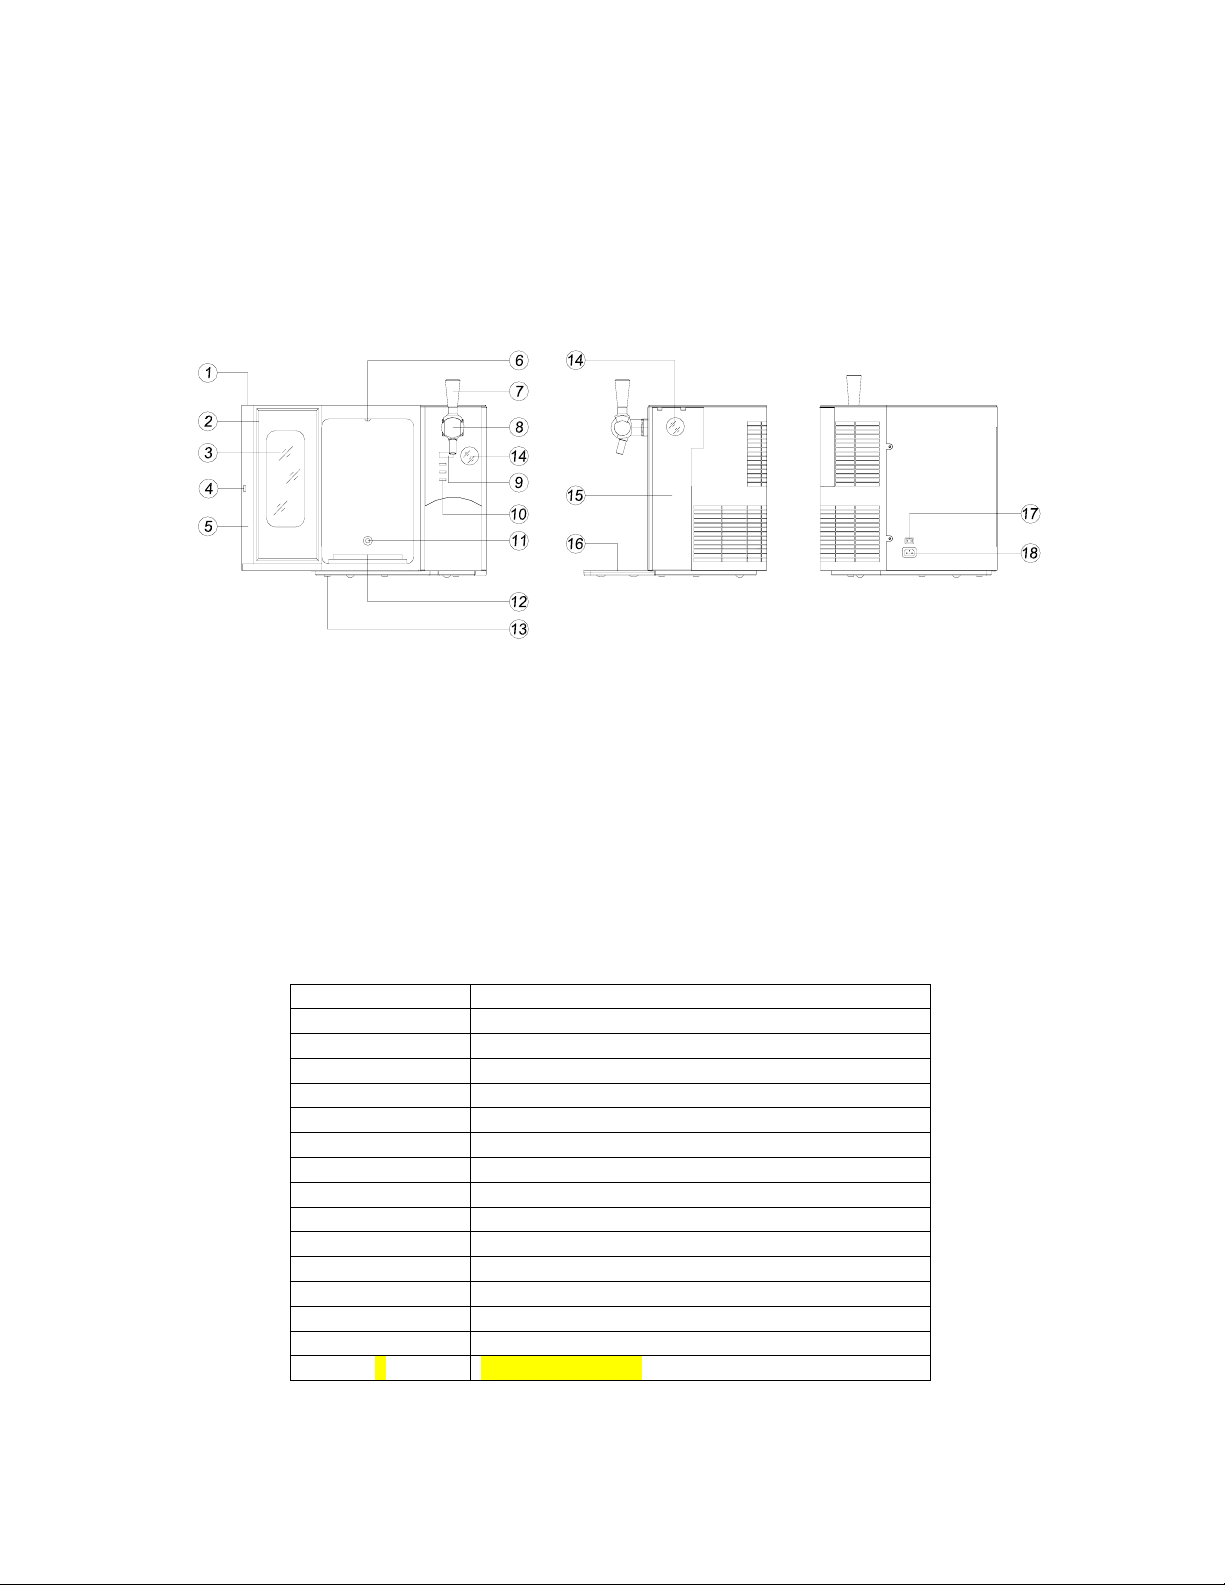
PARTS & FEATURES
1 Unlocking Push Button 7 Handle 13 Leg
2 Gasket (Seal) 8 Tap 14 Pressure Regulator Display (2)
3 Window 9 Temp. Display 15 Side Panel
4 Door Latch 10 Control Buttons 16 Drip Tray
5 Door 11 Sensor 17 DC Socket
6 Interior LED Light 12 Cooling Plate 18 AC Socket
ACCESSORIES INCLUDED WITH YOUR MINI PUB
Quantity Description
1 CO2 Regulator
1 AC Power Cord
1 DC Power Cord (with Built-in Fuse)
3 CO
1 CO2 Regulator Adapter (Top Portion)
1 CO2 Regulator Adapter (Bottom Portion)
1 CO2 Regulator Adapter Support / Stand
1 Drip Tray Assembly (Top and Bottom)
1 Cleaning Bottle
1 Dispensing Kit
1 CO2 Pressure Relief Valve
1 Heineken Type Keg Adapter
2 Yellow Keg Seal
1 Deco rative Insert for Regulator Display Window
1 Instructional DVD
Cylinders (16 Grams each)
2
6
Page 7

INSTALLATION INSTRUCTIONS
¾ Before Using Your Mini Pub
• Remove the exterior and interior packing.
• Check to be sure you have all of the accessories.
• Clean the interior surface with lukewarm water using a soft cloth.
• Prior to operating the appliance, read the following instructions:
• Do not use the appliance if the power supply cord is damaged. Should it be the case, it must
be replaced by a qualified person so as to avoid any shock hazard.
• This appliance is not designed for young children. Never leave unattended children use this
appliance.
• Prior to any cleaning, and in general when it is not operated, make sure that t he appliance is
disconnected.
• Make sure that your Mini Pub is set on a flat surface, protected from the sun and any other
heat source.
• This appliance should be operated at a room temperature between 12° - 25 °C / 53º - 77ºF.
• Do not move the appliance when it is full so as to prevent it from falling over.
• The power supply cable must be grounded. Never pull the cable directly to disconnect the
appliance. Always pull the plug out of the sock et.
• Never lift the appliance by the power supply cable or the dispensing tap. Lift the Mini Pub by
its stand.
• Keep the power supply cable away from heating surfaces.
• Do not try to repair, adjust this appliance or replace it s components by yourself. Should it not
operate correctly, contact Avanti Products Customer Service.
• This appliance is designed for household use only and not for an intensive profe ssional use.
Do not use the appliance for other uses than the one for which it is designed.
• Do not immerse the appliance or its power supply cord in water or any other liquid. Never
place it into the dishwasher.
• Do not cover the appliance or place anything on it.
• Do not insert any object into the ventilation spaces.
• Only use the gas cartridges provided for this appliance.
• Cartridges contain pressurised CO
• Do not throw away empty CO
• Prior to operating the Mini Pub, clean it complying with the instructions given in the "Keg
Removal and Cleaning the Unit" chapter.
• For optimum results and performance, you should clean the Mi ni Pub as indicated in the
“Keg Removal and Cleaning the Unit” chapter after each use.
. Keep them in a dry and cool place, away from heat.
2
cartridges into a fire or any other incendiary device.
2
7
Page 8

¾ Electrical Connection
Improper use of the grounded plug can result in the risk of electrical shock. If the power cord is
damaged, have it replaced by an authorized Avanti Products service center.
aWarninga
This unit should be properly grounded for your safety. The power cord of this unit is equipped with a
three-prong plug which mates with standard three prong wall outlets to minimize the possibility of
electrical shock.
Do not under any circumstances cut or remove the third ground pro ng from the power cord supplied.
For personal safety, this appliance must be properly grounded.
This unit requires a standard 115 Volt AC ~/60Hz electrical outlet with three-prong ground. Have the
wall outlet and circuit checked by a qualified electrician to make sure the outlet is properly grounded.
When a standard 2-prong wall outlet is encountered, it is your responsibility and obligation to have it
replaced with a properly grounded 3-prong wall outlet by a qualified technician.
The cord should be secured behind the unit and not left exposed or dangling to prevent accidental
injury.
The unit should always be plugged into its own individual electrical outlet which has a voltage rating
that matches the rating label on the appliance. This provides the best performanc e and also prevent
overloading house wiring circuits that could c ause a fire hazard from overheated. Never unplug the
unit by pulling the power cord. Always grip the plug firmly and pull straight out from the receptacle.
Repair or replace immediately all power cords t hat have become frayed or otherwise damaged. Do
not use a cord that shows cracks or abrasion damage along it s length or at either end. When moving
the unit, be careful not to damage the power cord.
8
Page 9
¾ Installation of Your Mini Pub
• Take the appliance out of its packaging (do not allow children to play with plastic parts, as this can
cause a possi ble choking hazard).
• Place your Mini Pub on a steady and horizontal flat surface, leaving at least 5 inches / 10 cm on
either side so as to allow correct ventilation of the appliance.
• Set the drip tray into the notch provided.
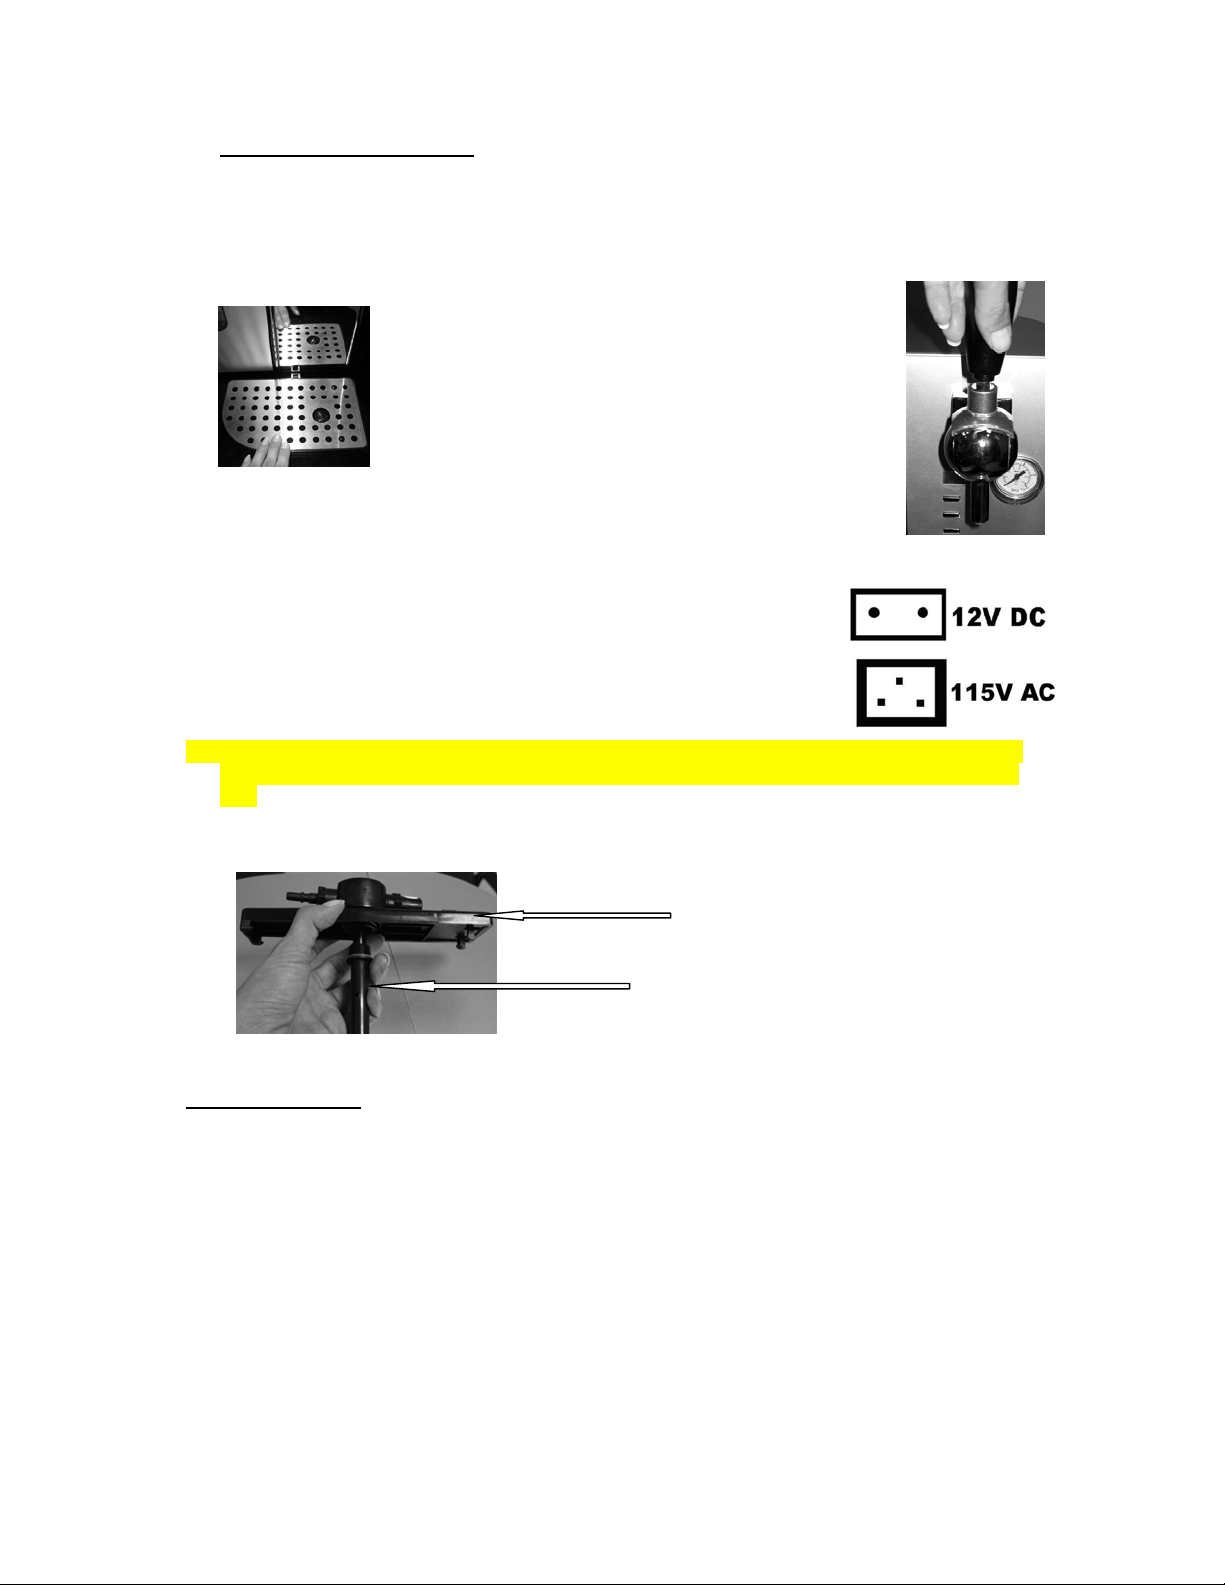
• Install the dispenser handle on the dispensing head, making sure that both end-
pieces perfectly fit together.
• Connect the appliance to the 115V AC or 12V DC power supply (ciga r ette-lighter adapter
supplied).
• The dis pensing unit supplied with your Mini Pub is preassemb led at the factory, in the event yo u
encounter problems with the assembly of the dispensing unit please c heck t hat the following are
true.
• Screw the piercing pin into the dispensing unit. Make sure that the transparent seal is properly
located on the pin before screwing, otherwise, fit it correctly.
Dispensing unit
Piercing pin
Preparing the keg
Your 5L Mini Pub will keep your 5L Keg cool for an almost indefinite period. We do, however,
suggest that you initially cool your chosen mini-keg for at leas t 12 hours in your refrigerator before
placing it into the Mini Pub. Once a pre-chilled keg has been inserted into the running Mini Pub, it
will maintain a nice, cool temperature. Remember to keep your Mini Pub out of direct sunlight and
away from any other direct sources of heat.
This appliance is designed for most 5-liter kegs.
Your Mini Pub can cool a 5-liter keg from 25°C to 5°C (77º to 41ºF) in 9 hours.
You can also place the keg in the refrigerator for 6 to 12 hours to expedite cooling.
Your Mini Pub is designed to refrigerate a 5-liter keg down to a 6 °C (43ºF) temperature within
10 hours.
Never put a keg into the freezer. The beer might freeze and the keg could burst.
9
Page 10
IMPORTANT:
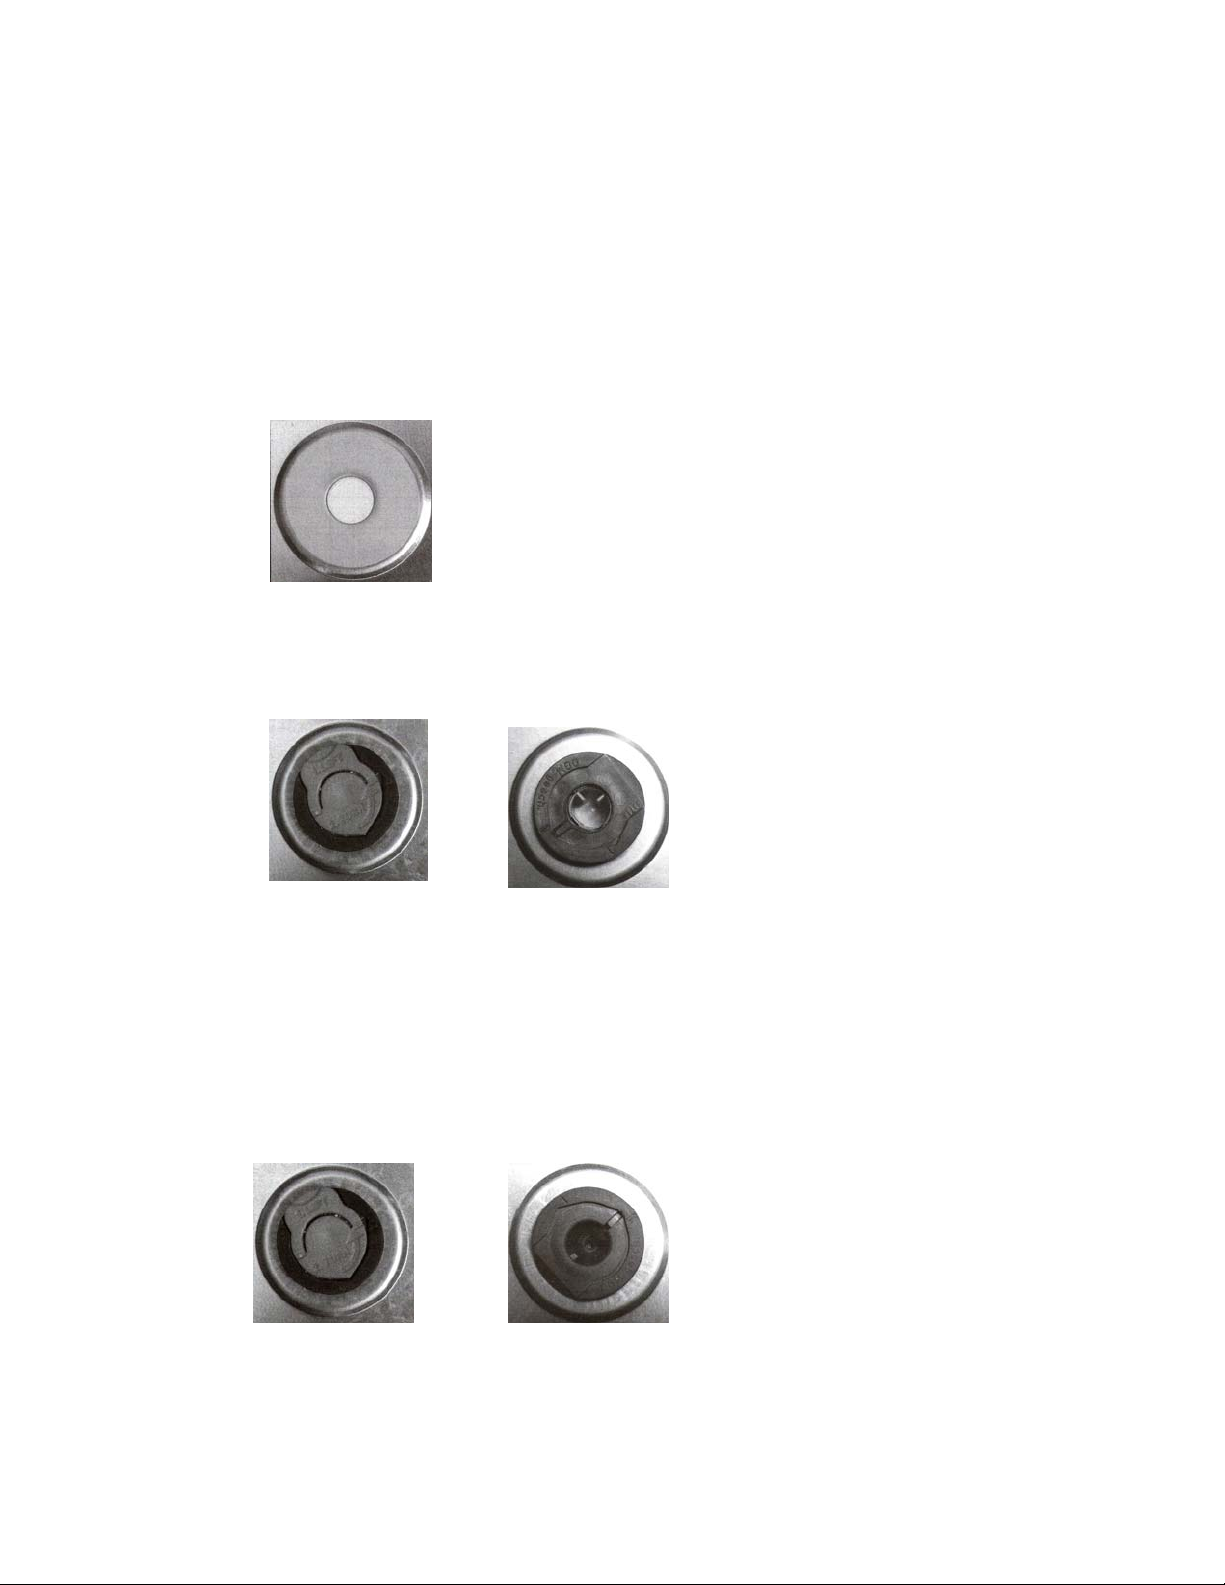
Before piercing the plug on the top of the keg, you must always follow the instructions marked
on the keg to eliminate the excess gas and ensure that the keg has rested long enough to
avoid foam coming out through the tap faucet.
a) Heineken keg:
When using the Heineken type keg:
Remove the spout that is supplied with the keg. Remove the adaptor from the keg.
Using the Heineken keg adapter supplied with your Mini-Pub attach to the dispensing end of the
spout. Proceed to install the spout and adapter as instructed by the instructions on your keg.
b) Keg with rubber plug:
This type of plug allows you to pierce the keg simply using the dis pensing kit.
c) Keg with combined plug:
This type of plug requires the excess air to be vented from the keg by complying with the instructions
indicated on the keg. Then, this part must be removed by vigorously pulling it so as to reveal the
second part of the plug which can be pierced as in example b).
d) Keg with vent plug:
Since both plugs are visually similar, it is impossible to dif ferentiate between a vent plug and a
combined plug.
With the vent plug, proceed as with the combined plug (see example c): open the plug and allow the
air to vent out (Follow the keg manufacturer’s guide as printed on the keg).
Then, you must remove the vent plug as follows:
Using a flat head screwdriver, place the screwdriver underneath the locking ring and lift up the plug. A
part of the plug will fall into the keg. This is normal and will not alter the beer's flavor.
Then, fit the all-purpose plug (orange keg seal) provided with your appliance into the opening where
the original plug used to be.
d) Other types of kegs:
Remove the plug's cover then cut the vent plug with the pliers or other tools.
plug (orange keg seal) provided with your appliance into the opening whe re the original plug used to
be.
Then, fit th e al l-purpose
10
Page 11
For the last two types of kegs, fit the orange all-purpose plug delivered with your appliance in the
existing keg hole further to cutting the plug.
CAUTION: allow the beer to rest before piercing the plug s o as to avoid projections.
When the keg is empty, remove the orange all-purpose plug and clean it with dishwashing liquid.
Carefully rinse the plug. It is then ready f or use with another keg.
f) Piercing pin:
For easier installation of the dispensing unit and the piercing pin, place it under running water
so that it is wet at the time of insertion.
Fit the bit vertically and drive it vigorously into the keg.
Then, secure the dispensing head on the keg, pull the locking latch outwards then release it. A
click should be heard, indicating that the dispensing head is correctly secured on the keg.
IMPORTANT:
Once the keg is pierced, the beer contained must be consumed within 28 days , provided that it
remains refrigerated.
Setting up the keg
• Open the door by depress ing the push butt on located over the door on the right.
• Place the keg on the refrigerating stand, making s ure that the female plug of the dispensing head
is on the right.
• Connecting the hoses: the female plug of the dispens ing head corresponds to the gas inlet. The
male plug corresponds to the beer outlet.
• Close the door .
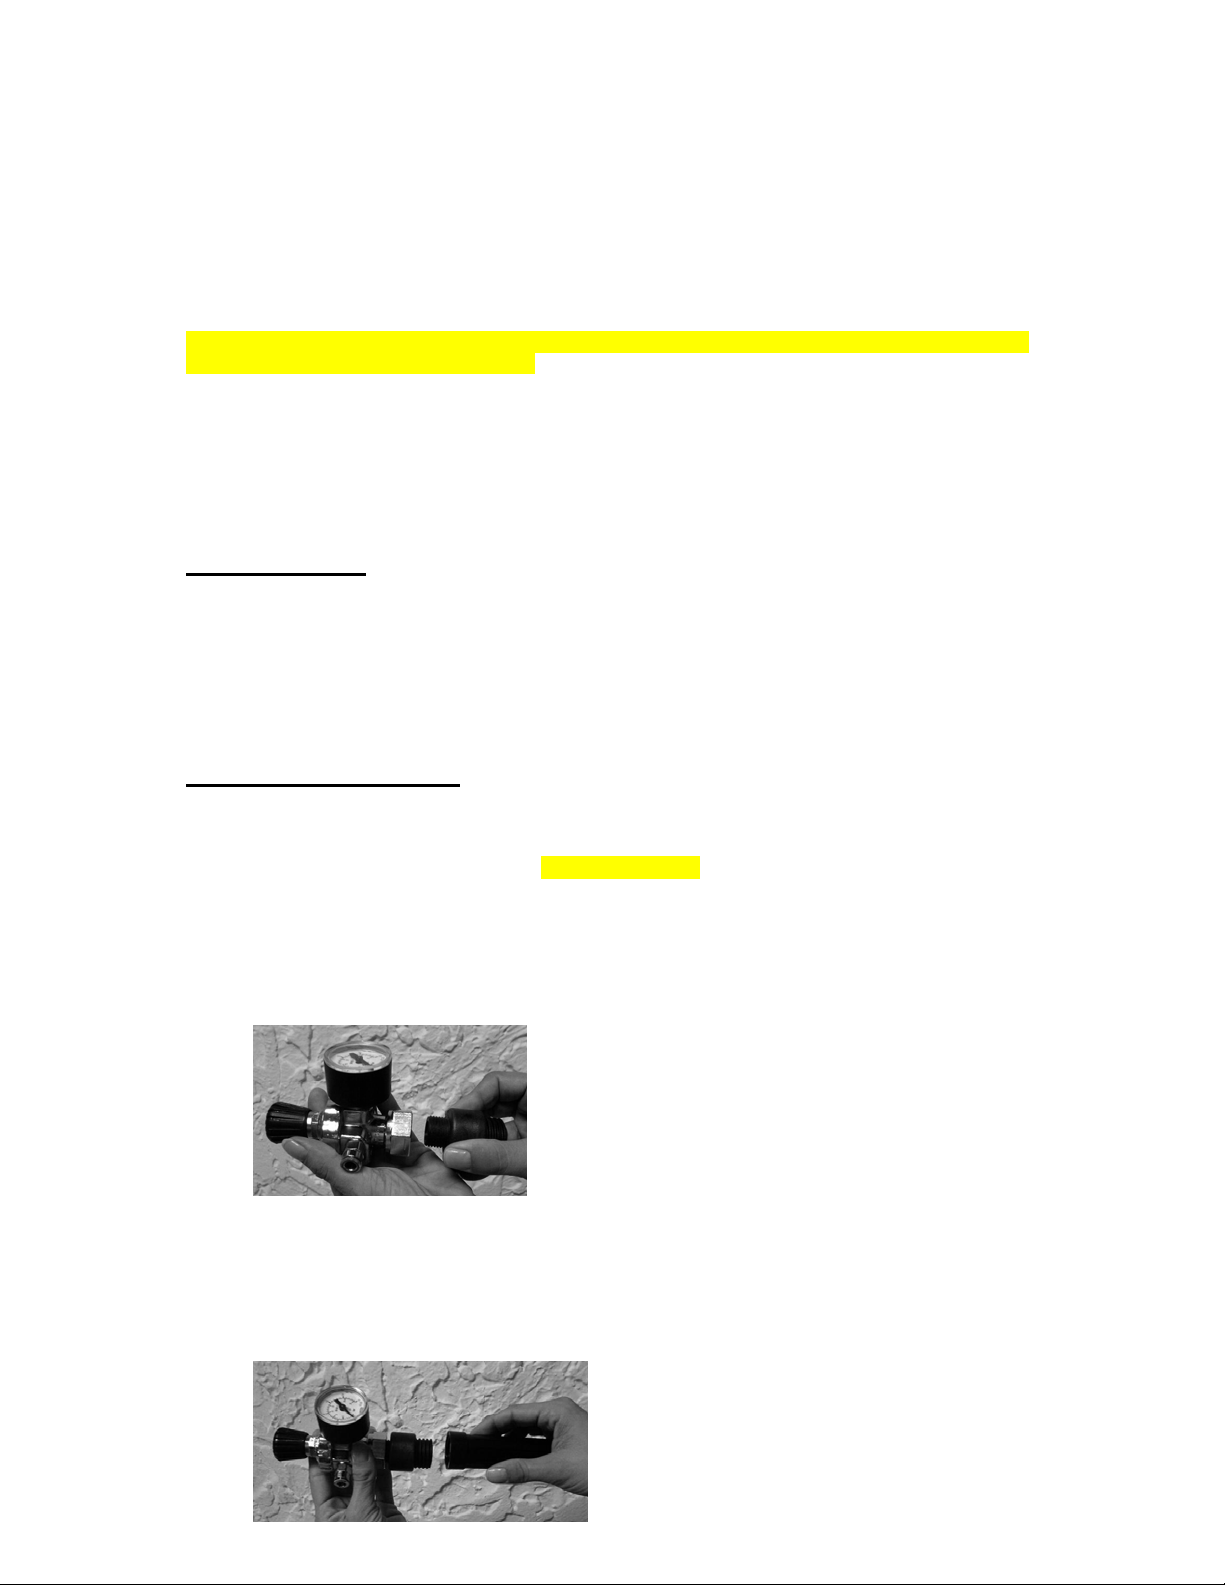
Setting up the gas cartridge
a) 16 gram cartridge (Three (3) cartridges are provided with your appliance).
• A 16 gram cartridge can dispense at least one 5L keg.
• Open the side panel compartment located on the righ t-hand side of your Mini Pub so as to
reveal the gas cartridge housing.
• Make sure that the pressure gauge valve is shut (to shut the valve, turn it
counterclockwise).
• Attach the pressure gauge on the end piece of the adapter, all the way unit it is completely
tight.
• Insert the 16 gram CO
• Screw the two parts of the adapter together until you hear a “CLICK”, this will indicate that the
cartridge seal has been pierced and the CO
parts toget h er until they make a tight f it t o avoid a CO
cartridge in the long part of the adapter.
2
gas will flow freely. Proceed to secure the two
2
leakage.
2
11
Page 12

• Connect the hose by inserting it into the hose outlet (to c heck that the hose is correctly
connected, try to remove it by slightly pulling it. Resistance indicates that the hose is correctly
connected. In order to disconnect the hose, push in the metallic collar on the hose outlet while
pulling the hose). See below.
• Place the entire assembly on the support base provided in the specific compartment on the
right-hand side of your Mini P u b.
b) 340 gram cylinder (Accessory item, sold separately)
• A 340 gram cylinder can be ordered and will dispense up to twenty 5L kegs.
• Open the side panel compartment located on the righ t-hand side of your Mini Pub so as to
reveal the gas cartridge housing.
• Make sure that the pressure gauge valve is shut (to shut the valve, turn it
counterclockwise).
• Screw the gas cartridge on the pressure gauge until fit is t ight and firm.
• Connect the hose by inserting it into the hose outlet (to check that the h ose is correctly
connected, try to remove it by slightly pulling it. Resistance indicates that the hose is correctly
connected. In order to disconnect the hose, push in the metallic collar on the hose outlet while
pulling the hose). See below.
• Place the assembly into the housing provided, making sure that the pressure gaug e dial is in
front of the window and close the hatch.
Adjusting the gas pressure
Beer type CO2 content in % Pressure in bar approx. 5°C
German beers +/- 0.5 +/- 0.4 à 0.5 bars
French beer s +/- 0.6 à 0.8 +/- 0.8 bars
Very fermented brown ale s + /- 0.6 à 0.8 +/- 0.8 à 1 bars
12
Page 13

OPERATING YOUR MINI PUB
¾ Setting the Temperature
You will need to set the temperature to best suit your taste.
The temperature can be set from 38º to 54ºF (3° to 12°C), using the temperature selec tors (
) located below the temperature display.
When you push the two buttons for the first time, the LCD readout will show the original temperature
set at previous time (the temperature preset at the factory is 42ºF (6ºC)).
You can select temperature display setting from Fahrenheit to Celsius degree by pressing and holding
button for approximately 5 seconds. Fahrenheit or Celsius degrees indicator will appear in
the
white color in the LCD temperature display window with blue background.
¾ Interior LED Light
The Mini Pub is also equipped with an interior LED light, that can be turned ON or OFF by pressing
the third button below the temperature display.
¾ LCD Temperature Display
If you wish to turn the temperature display ON or OFF, press and hold the light button for
approximately 5 seconds this will turn the display OFF and it will remain off until you
press any of the buttons again.
¾ Dispensing Your Beer
and
• Al ways use clean glass es rinsed with very cold water at the time of serving. Impurities prevent the
foam from forming in the glass.
• Hold the glass under the dispensing tap, making sure t hat its end-piece is not in contact with the
glass.
• Pull the dispensing tap handle towards you while holding the glass inclined at a slight angle. The
quantity of foam depends on the glass inclination. Set the glass upright as the beer level rises.
• Return the tap handle to its original position when the foam reaches the glass brim. The beer will
stop flowing.
13
Page 14

CARE AND MAINTENANCE
¾ Keg Removal and Cleaning the Unit
When the keg is empty, it is advisable to thoroughly clean the Mini P u b before
loading another keg. For optimum results and performance it is advisable to clean
the Mini Pub after each use.
a) To empty remaining beer from the beer line and remove the keg.
• Open the gas cartridge storage compartment and shut the valve (to shut
the valve, turn it counter clockwise).
• Place a container under the dispensing tap and drain by pulling the handle
towards you until nothing flows.
• Open the keg compartment door and disconnect the hoses from
the dispensing head.
• Empty the remaining gas using the relief valve
supplied as indicated in the photograph to the right.
You will hear a “hissing” sounds that will indicate that
all of the remaining gas is being expelled, continue
this step until you no longer here the “hissing” sound.
• Unlock the dispensing head from the keg by pushing the catch and
remove the piercing pin from the keg.
b) To clean the beer lines
• Fill the cleaning bottle supplied with your appliance half-way with lukewarm water. As
required, yo u ma y ad d a bi t of detergent. Push it fi rm l y onto the dispensing kit.
• Reconnect the hoses on the dispensing kit as indicat ed in section "Setting up the keg".
• Open the valve of the pressure gauge and set the pressure to 1.0 bar for 5 seconds and then
close the valve again immediately.
• Pull the tap handle towards you and allow the cleaning solution to flow completely.
• Once y ou have completely finished all of the cleaning solution, rinse the appliance using the
same method but with clean water.
• Pull on the tap handle to empty the cleaning bottle and release the remaining gas.
• The various Mini Pub access ories are not designed to be washed in a dishwasher.
14
Page 15

c) To clean the Mini Pu b exterior surfaces.
• Before cleaning the appliance, it is essential to turn off the main switch and then pull the plug
out of the socket.
• The drip t ray and cover can be removed from the unit either separately or together by pulling
it away from the unit. After cleaning the tray and cover can be returned to place in the
reverse manner.
CAUTION
Failure to unplug the Mini Pub could result in electri cal shock or personal injury.
¾ Storage
When the appliance is not used for a long period of time, remove the plug from the wall socket and
store the cable in the keg compartment of the unit. St ore the appliance in a dry place out of children’s
reach.
¾ Replacing the Beer Lines / Hoses
To change the factory installed beer lines / hoses with the replacement hoses supplied with your unit.
Open the side panel.
Pull down the tap to release the dispensing line (short hose). Pull the hose completely out of the
dispensing tap. Pull the feeder line (long hose) out of the unit completely.
Unscrew the hose coupler. Remove the hose from t he coupler.
Attach the new hose to the coupler by dipping the end in warm water to soften and attach to the
coupler. Screw the hose coupler together. Feed the dispensing line (short hose) into the tap and
secure by pulling down the tap handle.
PROBLEMS WITH YOUR APPLIANCE?
You can solve many common unit problems easily, saving you the cost of a possible service call. Try
the suggestions below to see if you can solve the problem before calling the servicer.
TROUBLESHOOTING GUIDE
PROBLEM POSSIBLE CAUSE
Unit does not operate.
Unit is not cold enough. Check the temperature control setting.
Vibrations. Check to assure that the unit is level.
The light does not work.
AC or DC adapter is not plugged in.
The circuit breaker tripped or a blown fuse.
External environment may require a higher
setting.
The door is opened too often.
The door is not closed completely.
The door gasket does not seal properly.
The unit does not have the correct clearances.
Abnormal voltage.
Not plugged in.
The circuit breaker tripped or a blown fuse.
The light button is “OFF”.
15
Page 16

DRAUGHT BEER TROUBLE GUIDE
CLOUDY BEER
When beer in glass appears hazy, and not clear.
Causes Corrections
1)
• Over chilling beverage cooler and/or
beverage lines.
2)
• Contaminated air source. If possible
change to CO2 gas as a pressure
source.
• Defective Thomas or tongue vents.
3)
• General conditions causing cloudy
beer.
1)
• Excessive low temperatures may cause hazy,
cloudy beer, particularly when beer lies in cold coil
for long periods of time. Make certain that lines are
thoroughly cleaned, and then raise temperature
slightly.
2)
• See flat beer, correcti on #7
• Always draw fresh air from an outside source to
compressor. Attach hair felt filter to the outside
intake, in addition to filter in line.
• Bacteria growth may result from beer backing up
through defective vents in air line, air pressure will
then carry this into beer barrel.
• Check and replace defective vents frequently, and
thoroughly clean air line.
3)
• See wild beer corrections #2, #5, #6, and #7, and
flat beer co rrections #5 , #7 , an d # 8.
FLAT BEER
Foamy head disappears quickly: beer lacks usual zestful brewery fresh flavor.
Causes Corrections
1)
• Greasy glass
2)
• Improper drawing of beer into glass.
1)
• Do not wash beer glasses together with glasses
that have contained milk or any other fatty
substance. Lipstick is a fatty substance.. Make
sure it is removed from glass.
• Excess amount of germicides build up and leav e
a fatty film on glass, which may cause flat beer.
• It is preferable to steam and sterilize glasses
where health laws permit.
• Wash glasses thoroughly with a good detergent.
• Do not use soap.
• Do not dry-wipe glasses. Permit glasses to air-
dry by placing them on wire or corrugated metal.
• Rinse in fresh cold water just before serving
beer. It is bes t t o se rve beer in a wet gl a s s .
2)
• Open faucet quickly and completely.
• Check and find the correct distance to hold
glass from faucet when drawing. Proper foam
should be a tight creamy head, and the collar on
the average glass should be ¾” to 1” high.
• Beer drawn without head has appearance of
being flat.
16
Page 17

3)
•
• Not enough pressure.
4)
• Defective Thomas and Tongue Vents.
• Pressure is shut off.
5)
• Pre-color, or beer system, too cold.
6)
• Sluggish pressure regulators.
7)
• Contaminated air source.
• Oil or greas e fumes.
8)
• Rapid movement of air.
Causes Corrections
• Large soap-like bubbles (sometimes
called fish eyes). Foam settles quickly.
3)
• Increase pressure if beer runs too slowly.
Correct flow is to fill
4)
• Check all washers frequently , particularly the air
vents. A clogged vent will obstruct the flow of air
or Co2.
• Check source of pressure. Check power source
when air compressor is used. Air compressor
should never be connected to light switch. Mak e
certain to have a separate electric plug outlet for
the compressor.
• Check CO
cover for proper procedure).
• When barrel is tapped, and proper pressure
applied, pressure must always remain on until
barrel is empty.
• If beer is started without first applying pressure
beer will be wild at the start, and flat towards the
end.
5)
• With an accurate thermometer, check
temperature in pre-cooler or box.
• Temperature at the faucet should always be
colder by at least two degrees than at the
precooler or bo x .
6)
• A regular seat, or the regulator diaphragm, may
require rep l acing.
• Also, check the same as you would for
Corrections 3 & 4.
7)
• Filter all air after it leaves compressor.
• Oil fume from compressor, of kitchen grease
fumes, pumped into beer, will cause Flat Beer.
• If possible CO
pressure source.
8)
• An air fan, or exhaust blower drawing air, or
blowing air, across the bar where beer is drawn,
may cause the dead of foam to fall quickly. Fans
or blowers should be located so that air
movement is not directly across from where
beer is drawn.
tank, if empty, replace (See inside
2
gas should be used as a
2
LOOSE FOAM
This is generally a Flat Beer condition: the Causes
and corrections for Flat Beer should be followed.
17
Page 18

OFF-TASTE BEER
Often bitter and bitey, sometimes completely odor, carrying an unpleasant taste.
Beer lines should be flushed after each barrel is empty. Maintain fresh, Clean, sanitary
conditions at bar. Smoke, kitchen odors, fly sprays, and disinfectants will harm the tast and
flavor of beer, making it unpalatable. These conditions, as described, may come from an air
source, or from actual contact with the glass at bar.
Causes Corrections
1)
• Contaminated Air Line. Defective
Thomas or Tongue Bents.
2)
• Hose will absorb and retain odors.
1)
• Air hoses, air lines and vents, should be examined,
and if contaminated, replaced.
• Dirty air lines should be washed with a good
cleaning compound, normally used for cleaning
coils, and then rinsed clean.
2)
• Rubber hose will absorb and retain odors. An
approved Vinyl tubing is best for air since it does not
absorb moisture, and is not affected by oily
substances.
• A fresh, outdoor, air line is imperative when air is
the source of pressure.
SOUR BEER
May taste and smell extremely yeasty, or moldy.
Cause Corrections
1)
• Contaminated Air Line.
2)
• Improper transportation of barrels
of beer, Beer delivered on open truck,
during high summer temperatures,
may be the cause for starting
secondary fermentation.
3)
• No refrigeration, and improper rotation.
1)
• See Cloudy Beer, Correction #3
• See Off-Taste Beer, Correction #2
• See Flat Beer, Correction #7
2)
• If at all possible, deliver beer barrels in closed body,
refrigerated truck. If open staked body truck is used,
cover barrels with a tarpaulin for protection against
summer heat, and circulating warm air.
• Truck s hould never be loaded t he night before morni ng
delivery, unless beer is refrigerated in truck.
3)
• The rule is first barrel in, first tapped.
• Refrigeration must be left on winter or summer.
• Sour beer is generated as a result of secondary
fermentation, above 45 degrees. Retail outlets that do
not have refrigeration should ice up barrels, or at least
cover barrels with tarpaulin or burlap bags.
• Best temperature for barrels is 38° to 40°.
18
Page 19

WILD BEER
Beer, when drawn, is all foam, or too much foam, and not enough liquid beer.
Cause Corrections
1)
• I m p r op er drawing be e r i nto glass.
1)
• Open faucet quickly and completely.
• Check and find the correct distance to hold glass
from faucet when drawing. Proper foam should b e
a tight, creamy head, and the collar on the
average glass should be ¾ “ to 1” high.
2)
• Yeast growth, or other obstructions in
faucet.
• Worn faucet parts and worn faucet
washers.
3)
• Kinks, dents, or twists in coils, or direct
draw lines: obstructions in line, near, or
behind faucet.
4)
• Sag, or trap in line.
5)
• Beer too warm at fauc et;
• Beer too warm in Coil System.
• Bee r too wa rm i n Air Shaft System.
6)
• Hot spots in line.
7)
• Pre-Cooler, or Direct Draw Dispenser,
too warm.
8)
• No cold storage space for delivered
beer; beer becomes warm in barrel.
2)
• Clean faucet spout with a good brush daily. Scour
all internal faucet parts at least once a week.
• Replace worn washers as required. If faucet does
not open wide, worn parts or entire faucet must be
replaced.
3)
• Check for, and replace kinked, dented, or twisted
line from barrel to faucet.
• Examine for frayed coupling washer behind faucet
that may cause obstruction.
4)
• Keep all metal beer lines straight from barrel to
faucet; never permit lines to sag, as this creates
traps that may cause wild beer.
5)
• Temperature at faucet must always be at least 2
degrees colder than at barrel.
• In sweet-water refrigerated, or ice-water system,
faucet shank must always be submerged.
• In Cold Air System, the coldest air from the blowe r
must first be directed to the faucet, and then
circulated back to pre-cooler.
6)
• Insulate all beer lines; a long beer run must be
constantly refrigerated. Insulation helps. But
insulation is not refrigeration.
• Keep all b eer li nes away f rom hot water pipes, hot
air ducts, and steam lines. A cold steam pipe in
the summer is a hot steam pipe in the winter.
7)
• It is always summer indo ors and in t he basement ,
therefore, maintain pre-cooler, and direct draw
dispenser temperature at 40° all year round. If
direct draw temperature cannot be lowered,
increase applied pressure; however, balance the
system by changing to smaller diameter length of
vinyl tubing or install a foam control faucet.
• Never shut off refrigeration – day or night.
8)
• Coil systems, and direct draw systems, must be
properly balanced in order to apply pressure
required for warmest temperature to which barrels
of beer will be exposed. A control beer faucet c an
be used in place of a restricted coil to balance
system.
19
Page 20

9)
•
•
• T oo much air pres sure.
10)
• Excess CO
11)
• Not enough pressure.
• No pressure.
12)
• Old Beer.
.
2
9)
• Check source of pressure. Adjust pressure to suit
properly balanced system. For correct beer flow,
fill a 10 oz. Glass in 4 seconds at proper
temperature.
• Check and replace a creeping regulator and
gauge.
10)
• Adjust pressure when using CO2 as low as
possible, however, remembering that the applied
pressure must be slightly higher than the internal
pressure of the beer (no more than 1 8 lbs. should
be applied.)
• The colder the beer and the higher the applied
pressure, the more rapid the absorption of
CO
2
CO2 by the beer. This over-carbonates the beer,
causing Wild Beer.
11)
• Check for defective air vents. (see Flat Beer,
Corrections #3 and 4.)
• Always turn pressure on before drawing beer.
12)
• Rotate stock. The oldest beer should be tapped
first; if beer has been allowed to stand in warm
temperature beyond 45° for any excessive length
of time, it may begin secondary fermentation.
Store beer at 40° all year round.
TAIL END BEER
Beer draws well at the beginning of the barrel. Towards the end of the barrel the beer is flat.
This is more likely to occur when beer turnover is slow.
Causes Corrections
• Where air is used as a pressure source,
air replac ed the C O
beer. Where beer is being drawn rapidly
this problem is not so evident.
in beer causing flat
2
Wherever possible CO2 Gas should be used as
pressure source.
• In high pressure systems where CO
be sued a banner air-gas Blender should be
installed. This introduces a small amount of CO
back into the beer, thus maintaining normal CO
content in beer.
gas cannot
2
2
2
20
Page 21

YOUR Avanti Products WARRANTY
WHAT IS COVERED
LIMITED ONE-YEAR
WARRANTY
For one year from the date of
purchase by the original owner, Avanti
Products will, at its option, repair or
replace any part of the unit, which
proves to be defective in material or
workmanship under normal use.
Avanti Products will provide you with a
reasonably similar replacement
product that is either new or factory
refurbished.
During this period Avanti Products will
provide all parts and labor necessary
to correct such defects free of c harge,
so long as the unit has been installed
and operated in accordance with the
written instructions in this manual. In
rental or commercial use, the warranty
period is 90 days. All Avanti
Appliances of 3.5 cubic feet capacity
or less must be brought/sent to the
appliance service shop for repair.
Staple your sales receipt here. Proof of
original purchase date is needed to obtain
service under warranty.
WHAT IS NOT COVERED
• Repairs performed by unauthorized
servicers.
• Service calls that do not involve defects in
material or workmanship such as
customer education, door reversal, or
proper installation.
• Service calls that are related to external
problems, such as abuse, misuse,
inadequate electrical power, accidents,
fire, floods, or acts of God.
• Shipping and handling costs associated
with the replacement of the unit.
• Surcharg es includi ng, but not limited to,
any after hour, weekend, or holiday
service calls, tolls, ferry trip charges, or
mileage expense for service calls to
remote areas, include the State of Alaska.
• Replacement of house fuses or resetting
circuit breakers.
• F ailure of the product if it is used for other
than its intended purpose.
• T his warranty does not apply outside the
Continental USA.
21
Page 22

SERVICE FOR YOUR APPLIANCE
We are proud of our customer service organization and the network of professional service
technicians that provide service on your Avanti refrigerato rs. With the purchase of your Avanti unit,
you can be confident that if you ever need additional information or assistance, the Avanti Products
Customer Service team will be here for you. Just call us toll-free.
AVANTI PRODUCTS CUSTOMER SERVICES
Product Information
800-323-5029
Part Orders
800-220-5570
In-Home Repair Service
800-220-5570
Whatever your questions are about our products,
help is available.
You may order parts and accessories that will be
delivered directly to your home, by personal
check, money order, Master Card, or Visa.
An Avanti Products authorized service center will
provide expert repair service, scheduled at a time
that is convenient for you. Our trained servicers
know your refrigerator inside and out.
WIRING DIAGRAM
22
Page 23

INSTRUCCIONES DE SEGURIDAD
ADVERTENCIA:
Para reducir el riesgo de incendio, choque eléctrico, o daños cuando use electrodomésticos, siga
estas precauciones:
Lea todas las instrucciones antes de usar su Dispensador de Cerveza.
Nunca limpie el Dispensador de Cerveza con líquidos inflamables. Los vapores pueden causar fuego
o explosión.
No almacene o use gasolina o cualquier otro líquido o material inflamable cerca de este o cualquier
otro electrodoméstico. Los vapores pueden causar f uego o explosión.
SEGURIDAD
Su seguridad y la de otros es muy importante.
En este manual hemos incluido varios mensajes de seguridad para su electrodoméstico. Siempre
leas y siga todos los mensajes de seguridad.
Este es el símbolo de Alerta de Seguridad. Este símbolo le indica cuando hay daño
potencial que podría herir o matar. Todos los mensajes de seguridad estarán
incluidos después de este símbolo así como las palabras “PELIGRO”,
“ADVERTENCIA” o “CAUTELA”.
“PELIGRO” Si no presta atención a este aviso de seguridad, podría causar grave daño o muerte.
“ADVERTENCIA” Si no presta atención a este aviso de seguridad, podría causar grave daño o
muerte además de dañar el producto.
“CAUTELA” Si no presta atención a este aviso de seguridad, podría caus ar daño moderado a
personas, propiedad o equipo.
Todos los mensajes de seguridad le explicaran cual es el peligro, así como t ambién como reducirlo e
informarle que podría pasar si no se siguen las instrucciones.
23
Page 24

GUIAS DE SEGURIDAD
Antes de usar el Dispensador de Cerveza, posiciónelo correctamente e instálelo como se describe
mas adelante; por favor lea el manual cuidadosamente. Para reducir el riesgo de fuego, choque
eléctrico o daños cuando use el Dispensador de Cerveza, siga prec auciones básicas, incluyendo las
siguientes:
PELIGRO
• Enchufe en un tomacorriente de 3 orificios, no remueva la tercera punta, no use un
adaptador ni use un cable de extensión.
• Reemplace todos los paneles antes de operar la unidad.
• Se recomienda que use un tomacorriente separado, solo para esta unidad. Use recipientes
que no se puedan apagar con un interruptor o cadena.
• No limpie el electrodoméstico con líquidos inflamables. Los vapores pueden causar fuego o
explosión.
• Antes de limpiar y darle mantenimiento a la unidad, asegúrese que este desenchufada. De
lo contrario podría causar un choque eléctrico o daños o muerte.
• No enchufe o desenchuf e el cable eléctr ic o cuando est e con las manos mojadas o húmedas.
• No intente reparar o reemplazar ninguna pieza del Dispensad or a no ser que sea indicado
específicamente en este manual. Cualquier reparación debe ser efectuada por un técnico
calificado.
ADVERTENCIA
• Siga las indicaciones que aplican a su Dispensador.
• Para asegurar ventilación adecuada a su Dispensador, el f rente de la unidad no debe tener
obstrucciones de ningún tipo. Escoja un área bien ventila da con temperaturas que no bajen
de 60º F (16º C) ni suban de 90º F (32º C). Esta unidad debe ser instalada en un área
protegida de viento, lluvia, rocío o goteras.
• El Dispensador no debe ser colocado cerca de hornos, parrillas u otras fuentes de calor.
• El Dispensador se debe instalar con todas las conexiones eléctricas de ac uerdo a los
códigos locales y de su estado. Se requiere un suministro eléctrico estándar (115 V AC, 60
Hz) correctamente instalado y de acuerdo al Código Nacional de Elec tricidad, así como los
códigos y ordenanzas locales.
• No enrosque ni apriete el cordón eléctrico del Dispensador.
• El fusible (o interruptor) debe ser de 15 amperios.
• Es import ante que el Dispensador esté nivelado para que funcione s correctamente.
Asegúrese que las mangueras no estén dobladas, ap retadas o dañadas durante la
instalación.
• Asegúrese que no hayan goteos después de la instalación.
• No permita que los niños operen la unidad, ni que jueguen con o dentro de ella.
• No use productos de limpieza con solventes o agentes abrasivos ya que estos limpiadores
pueden dañar o decolorar el interior.
• No use esta unidad para otra cosa que no sea su propósito.
24
Page 25

PARTES Y CARACTERISTICAS
Botón Para Abrir 7 Manija 13 Pata
1
2 Sello 8 Grifo 14 Ventana para Regulador de Presión (2)
3 Ventana 9 Indicador de Temperatura 15 Panel Lateral
4 Botón de la pue rta 10 Control de Temperatura 16 Bandeja de goteo
5 Puerta 11 Sensor 17
6 Luz Interior 12 Placa Enfriadora 18
Receptáculo DC
Receptáculo AC
Accesorios incluídos con su dispensador
Cantidad Descripción
1 Regulador de Presión de CO2
1 Cordón para corriente AC
1 Cordón y adaptador con fusible para corriente DC
3 Cilindro de CO2 (16 gramos)
1 Adaptador (parte superior) del cilindro de CO2
1 Adaptador (parte inferior) del cilindro de CO2
1 Soporte para el adaptador del cilindro de CO2
1 Bandeja de goteos
1 Recipiente plástico para limpiar
1 Juego de dispensador
2 Tapón de goma (Anaranjado)
1 Adaptador para barril tipo Heineken
1 Adaptador de plástico para escape o ventilación de CO2
1 Foto decorativa para la ventana del regulador.
25
Page 26

ANTES DE OPERAR EL DISPENSADOR, LEA LAS SIGUIENTES INSTRUCCIONES
• No use el electrodoméstico si el cable eléctrico esta dañado. Si es este el caso, debe ser
reemplazado por un técnico calificado para evitar cualquier peligro de choque eléctrico.
• Antes de conectar la unidad, verifique que el voltaje sea el correcto.
• Este electrodoméstico no esta diseñado para ser usado por niños. Siempre supervise a los
niños cuando estén cerca de la unidad.
• Antes de limpiar y cuando la unidad no este en funcionamiento, de sconéctela.
• Asegúrese que el Mini Pub (Dispensador de Cerveza) esté sobre una superficie plana,
protegido del sol y otras fuentes de calor.
• Dentro de lo posible, la unidad debe estar en una habitación donde la temperatura esté entre
los 12º - 25º C / 53º - 77º F.
• No mueva la unidad cuando este llena para prevenir que se caiga.
• El cable eléctrico debe ser con conexión de tierra. Nunca hale del cable para desconectar la
unidad. Siempre hale del enchufe.
• Nunca levante la unidad por el cordón o el grifo. Levante el Mini Pub por la base.
• Mantenga el cordón eléctrico alejado de las fuentes de calor.
• No intente reparar, ajustar la unidad o reemplazar los componentes Ud. mismo. Si la unidad
no funciona correctamente, contacte al Servicio al Cliente de Avanti Products.
• Esta unidad esta diseñada para ser usada dentro de la casa y no para uso intensivo
profesional. Use esta unidad solo para lo que fue diseñada.
• No sumerja la unidad o el cable eléctrico en agua o cualquier otro líquido.
• No c ubre la unidad ni coloque nada encima.
• No inserte objetos dentro de las ventanillas de ventilación.
• Solo use los cilindros de gas provistos para esta unidad.
• Los cilindros contienen CO2 contenido bajo presión. Manténgalos fuera del calor y en un
lugar seco y frió.
• No tire los cilindros vacíos de CO2 en el fuego o cualquier otro incendio.
• Antes de operar el Mini Pub, límpielo siguiendo las instrucciones del c apitulo “Limpieza”.
CONEXIÓN ELECTRICA
ADVERTENCIA
El uso incorrecto del enchufe de tierra puede ocasionar un choque eléctrico. Si el cable eléctrico esta
dañado, reemplácelo en un centro de servicio autorizado por Avanti Products.
Esta unidad debe estar conectada correctamente para su seguridad. El cable eléctrico de esta
unidad esta equipado con un enchufe de 3 puntas para ser usado en los enchufes de pared de 3
orificios para minimizar la posibilidad de choque eléctrico.
Bajo ninguna circunstancia corte o remueva la tercera punta del en chufe. Para seguridad personal,
esta unidad debe estar correctamente conectada a tierra.
Esta unidad requiere electricidad estándar de 115 Voltios AC/ 60 Hz a través de un enchufe de pared
de 3 orificios y con conexión a tierra. Haga que un electricista calificado verifique el enchufe de
pared y los circuitos para asegurar que la conexión esta correctamente conectada a tierra. Si solo
tiene un enchufe de pared de 2 orificios, es su responsabilidad y obligación reemplazarlos por un
enchufe de pared de 3 orificios.
El cable debe ser asegurado atrás de la unidad y no dejarlo exp uesto o colgando para prevenir daños
o accidentes.
La unidad debe ser conectada a un enchufe individual que tenga el voltaje requerido por la unidad el
cual esta en la etiqueta de la misma. Esto asegura el mejor f uncionamiento y también previene una
sobrecarga en los circuitos lo cual podría causar un incendio por el sobrecalentamiento. Nunca
desenchufe la unidad halando del cordón. Siempre sujete el enchufe firmemente y hálelo. Repare o
reemplace inmediatamente todos los cordones que estén deshil achados o dañados. Cuando mueva
la unidad tenga cuidado de no dañar el cordón.
I. INSTALACION
• Saque la unidad de la caja (no permita que los niños jueguen con las partes plásticas, esto puede
ocasionar el p e l igro de asfixi a o so f o c a ción).
26
Page 27

• Coloque el Mini Pub sobre una superficie plana y estable, dejando 5 pulgadas / 10 cm a cada
lado para permitir la correcta ventilación.
• Coloque la Bandeja de Goteo en la ranura.
• Coloque el cordón de 115V AC o 12V DC (adaptador de encendedor incluido) detrás de la
unidad.
II. PREPARANDO EL KEG (BARRIL)
El Dispensador mantendrá el barril de 5L frío por un tiempo indefinido. Sin embargo recomendamos
que la primera vez que enfríe el barril, lo haga en su refrigeradora po r un periodo de al menos 12
horas, antes de colocarlos en el Mini Pub. Una vez que el barril pre-enfriado haya sido colocado en
el Mini Pub (encendido), lo mantendrá a una temperatura fría. Recuerde mantener el Mini Pub fuera
de la luz solar directa y otras fuentes de calor.
Esta unidad esta diseñada para usar la mayoría de barriles de 5 Lt. Su Mini Pub puede enfriar un
barril de 5 Lt a una temperatura de 25º C a 5º C (77º a 41º F) en 9 horas. También puede c olocar el
barril en la refrigeradora por 6 a 12 horas para acelerar el enfriado. Su Mini Pub está diseñado para
refrigerar un barril de 5 Lt a una temperatura de 6º C (43º F) en 10 horas. Nunca coloque el barril en
la congeladora. La cerveza podría congelarse y el barril explotar.
IMPORTANTE
Antes de abrir el barril, siga siempre las instrucciones marc adas en éste para eliminar el exceso de
gas y asegurar que el barril ha reposado lo suficiente para evitar que la espuma salga por la
ventanilla de ventilación.
a. Barril con t apón de hule: Este tapón permite que hinque el barril solamente usando el jue go
del Dispensador.
b. Barril con tapón mixto: Este tapón requiere que el exceso de aire salga del barril para cumplir
con las instrucciones indicadas en éste. Después hale la tapa con fuerza para llegar al tapón
descrito en la parte a.
c. Barril con tapón ventilado: Como el tapón mixto y el tapón ventilado son visualmente
similares, es difícil diferenciarlos. Con el ventilado proceda como en el caso del combinado
(vea ej. b.): abra el tapón y permita que el aire salga (siga las guías del fabricante tal como
se indica en el barril). Después retire el tapón de la siguiente manera: Usando un
destornillador, colóquelo bajo el aro y levante el tapón. U na parte del tapón caerá dentro del
barril. Esto es normal y no alterar el sabor de la cerveza. Después, coloque el tapón
(amarillo) incluido.
d. Cerveza Heineken. Cuando use barriles de cerveza Heineken. Remueve el tubo de salida
del barril. Remueva el adaptador del barril. Instale el conector de Heineken (incluido) al
adaptador del barril. Instale de nuevo el adaptador junto con el conector al barril. Instale es
conector de la manguera que viene del grifo al extremo del conector. Ya puede disfrutar de
la cerveza.
e. Con aguja: Antes de instalar la aguja en el barril, mójela para facilitar su penetración a través
del tapón amarillo. Colóquela verticalmente y penetrela dentro del barril. Después as egure la
parte superior del juego de dispensador en la parte superior del barril, hale el seguro hacia
fuera y luego suéltelo. Cuando este correctamente asegurada en el barril oirá un “click”.
f. Una vez que la aguja esté insertada, la cerveza podrá ser consumida por aproxim adamente
28 días, siempre y cuando el barril se mantenga refrigerado.
III. COLOCANDO EL BARRIL
• Para abrir la puerta, presione el botón que se encuentra en borde superior derecho.
• Col oque el barril en la plataforma, asegurándose que el enchufe femenino de la cabeza
dispensadora esté al lado derecho.
• Conecte las mangueras: el enchufe femenino de la cabeza dispensadora corresponde a la
entrada del gas. El enchufe masculino corresponde a la salida de la cerveza.
• Cierre la puerta.
IV. COLOCANDO EL CILINDRO DE GAS
CO
a. 3 c i li n d r os de
• Inserte el cilindro de 16 gramos en la parte larga (inferior) del adaptador.
de 16 gramos vienen incluidos con la unidad.
2
27
Page 28

• Enrosque las dos partes del adaptador hasta que escuche “Pop”, este sonido in dica
CO
que se ha perforado el sello del cilindro y que el gas
asegurase de apretarlo firmemente para evitar fugas o escape de
• Conecte la manguera insertándola en la ranura (para verificar que la manguera esta
correctamente conectada, trate de halarla suavemente. Resistencia significa que la
manguera esta correctamente conectada. Para desconectarla, em puje el cuello
metálico en la salida de la manguera mientras la hala). Vea abajo.
• Ajust e el regulador rotando el botón. A favor de la rotación del relos hasta alcanzar .5
bars.
• Coloque el ensamblado completo en la base de soporte provista en el
compartimiento específico al lado derecho del Mini Pub.
b. Cilindro de 340 gramos
• Un cilindro de 340 gramos se puede instalar, el cual dispensara hasta 20 barriles de
cerveza.
• Abra el comp artimiento del lado derecho del Mini Pub para ver la localización designada
donde poner el cilindro de gas.
• Asegúrese que la válvula de presión esté cerrada (para cerrarla, gírela en sentido
contrario a la rotación del reloj).
• Enrosque el cartucho de gas en la válvula de presión hasta que este ajustado y firme.
o Conecte la manguera insertándola dentro de la salida de la manguera (para
verificar que la manguera está correctamente conectada, trate de halarla
suavemente. Resistencia significa que la manguera esta correctamente
conectada. Para desconectarla, empuje el cuello metálico en la salida de la
manguera mientras la hala). Vea abajo.
• Ajust e el regulador rotando el botón. A favor de la rotación del relos hasta alcanzar .5
bars.
• Coloque el ensamblado completo dentro de la unidad, asegurándose que la válvula de
presión quede al frente de la ventana y luego cierre el seguro.
V. AJUSTANDO LA PRESION DEL GAS
Tipo de cerveza Contenido de CO2 en % Presion de bar approx. 5º C
Alemanas +/- 0.5 +/- 0.4 a 0.5 bars
Francesas +/- 0.6 a 0.8 +/- 0.8 bars
Muy fermentadas, oscuras,
ales
VI. AJUSTANDO LA TEMPERATURA
Ajuste la temperatura de acuerdo a su gusto. Esta puede variar entre 3º a 12º C (38º a 54º F),
usando el selector de temperatura
El Dispensador de Cerveza también está equipado con una luz interior, que puede ser apagada o
encendida al presionar el tercer botón debajo del indicador de temperatura.
Si Ud. Desea encender o apagar el indicador de temperatura, presione el botón de luz por 5
segundos aproximadamente o hasta que el indicador se apague; éste se mantendrá apagado hasta
que presione cualquiera de los botones.
VII. DISPENSANDO LA CERVEZA
• Siempre use vasos limpios y enjuagados con agua fría antes de servir. Las impurez as evitan
que la espuma se forme en el vaso.
• Sostenga el vaso bajo el grifo dispensador, asegurándose qu e el e xtremo no este en
contacto con el vaso.
• Hal e la manij a del grifo dispensador hacia ud. Mientras sostiene el vaso inclinado en ángulo.
La cantidad de espuma depende de la inclinación del vaso. Enderece el vas o mientras lo
llena.
• Regrese la manija a la posición original cuando la espuma llegue al borde del vaso. La
cerveza parara de fluir.
+/- 0.6 a 0.8 +/- 0.8 a 1 bar
( y ) localizados bajo el indicador de temperatura.
fluirá libremente,
2
CO
2.
28
Page 29
VIII. LIMPIEZA
Cuando el barril este vacío, es aconsejable que limpie el Mini Pub antes de colocar otro barril.
a. Para vaci ar la cerveza que quede en la línea y remover el barril:
• Abra el c ompartimiento del cilindro de gas y cierre la válvula (para cerrarla, gírela en
sentido cont rario a las agu j as de l re loj).
• Coloque un envase bajo el grifo dispensador y drene halando la manija hacia Ud.
hasta que no salga más cerveza.
• Abra la p uert a del compartimiento del barril y desconecte las mangueras de la
cabeza dispensadora.
• Vacíe el gas restante usando la herramienta provista, tal como se indica en la
fotografía. Cuando escuche un siseo significa que todo el gas ha sido expulsado,
continúe este paso hasta que no oiga mas siseo.
• Retire la cabeza dispensadora del barril, empujando el sos tén y removiendo la aguja
del barril.
b. Para limpiar la líneas de cerveza
• Llene el recipiente plástico de limpieza incluida con esta unidad hasta la mitad con agua
tibia. Si es necesario agregue un poco de detergente. Presioné firmemente en el juego
del dispensador dentro del barril.
• Reconecte las mangueras al juego del dispensador tal como se indica en la sección III
COLOCANDO EL BARRIL.
• Abra la válv ula de pres ión y ajústela a 1.0 bar por 5 segundos y luego cierre la válvula
nuevamente.
• Hale la manija del grifo hacia ud. y deje que la solución limpiadora fluya completament e.
• Una vez que se termine la solución limpiadora, enjuague la línea siguiendo el mismo
método per o us ando agua limp i a .
• Hal e la manija del grifo para vaciar la botella de limpieza y suelte el gas restante.
• Los ac cesorios del Mini Pub no están diseñados para ser lavados en maquina lavadora.
c. Para limpiar las superficies exteriores del Mini Pub
• Antes de limpiar la unidad, apáguela y desenchúfela de la electricidad.
• La Bandej a de Goteo y la Cubierta se pueden sacar de la unidad separadas, o juntas
jalándolas. Después de limpiar la Bandeja y la Cubierta se pueden regresar a su sitio, en
forma inversa a como se sacaron.
IX. ALMACENAJE
Cuando la unidad no se usa por un periodo largo de tiempo, retire el enchufe de la pared y guarde el
cordón en el compartimiento del barril. Guarde la unidad en un lugar seco y fuera del alcance de los
niños.
PROBLEMAS COMUNES
Ud. Puede resolver muchos problemas comunes fácilmente, ahorrándole el costo de una visita del
Servicio Técnico. Pruebe estas sugerencias para ver si puede resolver el problema antes de llamar
al Servicio.
GUIA PARA SOLUCION DE PROBLEMAS
PROBLEMA CAUSA POSIBLE
La unidad no funciona. Verifique que la unidad esté conectada.
El interruptor está apagado o saltó un fusible.
Si está usando el corriente DC, Chequear el fusible del
adaptador de DC
Se enciende y apaga
frecuentemente.
Vibra. Verifique que la unidad esta nivelada.
La puerta no cierra correctamente. La unidad no esta nivelada.
La temperatura de la habitación es muy caliente.
La puerta de la unidad se abre con demasiada frecu encia.
La puerta no esta cerrada completamente.
EL control de temperatura no esta ajustado correctamente.
El sello de la puerta no cierra bien.
La unidad no tiene suficiente espacio de ventilación.
El sello esta sucio o doblado.
29
Page 30

•
PROBLEMAS CON LA CERVEZA
CERVEZA TURBIA
Cuando la cerveza parece opaca y no transparent e.
CAUSAS CORRECCIONES
1. La cerveza esta demasiado fría. Temperaturas excesivamente bajas pueden
causar cerveza turbia, nublada, especialmente
cuando la cerveza descansa sobre superficies
frías por largos periodos de tiempo.
Asegúrese que las líneas estén limpias y suba
la temperatura un poquito.
2. Sonido cuando se abre la salida
parcialmente.
3. Fuente de aire contaminado. De ser posible
cambie el gas CO2 como fuente de presión.
Ventanillas contaminadas.
4. Otras condiciones que causan cerveza
turbia.
5. Comida sin refrigerar colocada sobre el
barril de cerveza.
CERVEZA SIN CUERPO
La espuma desaparece rápidamente: a la cerveza le falta el sabor y chispa de frescura.
CAUSAS CORRECCIONES
1. Vaso grasoso.
Abra el grifo rápida y completamente.
Reemplace las arandelas y otras piezas del
grifo cuando sea necesario para permitir la
salida de cerveza con más fuerza.
Vea corrección # 7, cerveza sin cuerpo.
El compresor debe tener siempre aire fresco
proveniente de una fuente externa. Coloque el
filtro a la fuente externa y también a la línea
interna.
Crecimiento de bacterias puede suceder si
queda cerveza en la línea ventilación del aire,
la presión del aire llevara estas bacterias al
barril.
Revise y reemplace ventanillas de ventilación
frecuentemente.
Vea Correciones bajo Cerveza Demasiado
Espumosa #2,#5, #6 y #7 y bajo Cerveza sin
Cuerpo #5, #7 y #8.
Cuando productos sin refrigerar, tales como
carnes, vegetales, pescado o frutas se colocan
sobre el barril de cerveza fría, la cerveza se
torna tibia antes que los alimentos se enfríen.
Este cambio de temperatura ocasiona cerveza
turbia.
No lave los vasos de cerveza junto a
los vasos que han tenido leche u otra
sustancia con grasa. El lápiz labial es
una sustancia grasosa. Asegúrese de
limpiar bien los vasos.
• Cantidad excesiva de germicidas se
acumulan y dejan un residuo grasoso
en el cristal, lo que puede causar
cerveza sin cuerpo.
• Es preferible l impiar los vasos con
vapor y estilizarlos si las leyes de salud
lo permitan.
• Lave los vasos bien con un buen
detergente.
• No use jabón.
• No seque los vasos. Permita que
estos se sequen solos colocándolos en
un escurridor de metal.
• Enjuague con agua fría justo antes de
30
Page 31

2. Verter la cerveza incorrectamente.
•
3. No hay suficiente presión.
4. Ventanillas contaminadas. La presión esta
apagada.
5. Refrigeradora o el sistema de cerveza está
muy frío.
6. Reguladores de presion muy lentos.
7. Fuente de aire contaminado.
Vapores de aceite o grasa.
servir la cerveza. Es mejor servir la
cerveza en un vaso húmedo.
Abra el grifo rápida y completamente.
• Verifique y encuentre la distancia
correcta para sostener el vaso desde
el grifo cuando sirva la cerveza. La
espuma debe ser compacta y tener un
espesor de ¾” a 1” de alto.
• Cerveza sin suficiente espuma puede
aparecer sin cuerpo.
• Aumente la presión si la cerveza no
sale con suficiente fuerza.
• Verifique las arandelas
frecuentemente, especialmente en las
ventanillas. Una ventanilla tapada
obstruye el flujo de aire o de CO2.
• Verifique la fuente de presión.
Verifique la fuente de poder cuando el
compresor de aires se use. El
compresor de aire nunca debe estar
conectado al interruptor. Asegúrese
que tenga un enchufe de pared
separado para el compresor.
• Verifique el cilindro de CO2, si esta
vacío, re emplace lo (vea la parte
interna de la tapa para el
procedimiento correcto).
• Cuando el barril esta en uso y la
presión apropiada está ajustada, la
presión debe mantenerse hasta que el
barril esté vacío.
• Si empezó a verter cerveza sin aplicar
primero presión, al principio saldrá con
demasiada espuma y hacia el final
saldrá con poca espuma.
• Con un termómetro exacto, verifique la
temperatura de la refrigeradora.
• La temp eratura del grifo debe ser al
menos dos graos menos que en la
refrigeradora.
• El asiento regular o el reg ulador del
diafragma puede necesitar ser
reemplazado.
• Tambi en verifique los pasos 3. y 4.
• Filtre todo el aire después que sale del
compresor.
• Vapor de aceite del compresor, de
grasa de cocina, etc. que entre a la
línea de cerveza, causara cerveza sin
cuerpo.
• De ser posible, gas de CO2 debe ser
usado como una fuente de presión.
31
Page 32
•
•
ESPUMA SUELTA
CAUSAS CORRECCIONES
Burbujas grandes como de jabón (llamadas ojo
de pez). La espuma se asienta muy rápido.
CERVEZA CON SABOR EXTRAÑO
Cerveza amarga, con olor extraño, con sabor desagradable.
Las líneas de cerveza deben ser enjuagadas después que cada barril se termine. Mantenga el bar
limpio y fresco. Humo, olores de cocina, mata insectos y desi nfectantes pueden dañar el sabor de la
cerveza y darle mal sabor. Estas condiciones, tal como descritas, podrían ser causadas por una
fuente de aire o del contacto con el vaso en el bar.
CAUSAS CORRECCIONES
1. Línea de aire contaminada. Ventanillas
contaminadas.
2. Manguera de hule absorbe y retiene olores.
3. Aire sin filtro, el aire se siente muy húmedo
o grasoso.
CERVEZA AGRIA
Con sabor y olo r a l e v a d u ra o mohoso.
CAUSAS CORRECCIONES
1. Línea de aire contaminada.
2. Transporte inapropiado de los barriles.
Barriles entregados en un camión abierto,
expuestos a altas temperaturas, podría ser la
causa de una segunda fermentación.
3. Falta de refrigeración y rotación impropia.
Esta es una condición similar a la de cerveza
sin cuerpo. Seguir las correcciones para
cerveza si n cu e r p o .
• Las mangueras de aire, líneas para el
aire y ventanillas deben ser revisadas
y si están contaminadas deben ser
reemplazadas.
• Líneas para el aire sucias deben ser
lavadas con un buen producto de
limpieza y enjuagado.
• Las mangueras de hule absorben y
retiene olores. Un tubo de vinilo
aprobado es mejor para el aire ya que
no absorbe humedad, y no se afecta
por sustancias grasosas.
• Si el aire es la fuente de presión, una
línea de aire, fresco es imperativa.
El ai r e s iempre debe s er filtrado.
• Vea Cerveza sin Cuerpo, correcc ion #
8.
Vea Cerveza Turbia, corre c ci ón # 3.
• Vea Cerveza con Sabor Extraño,
corrección #2.
• Vea Cerveza sin cuerpo, Correc c ión #
7.
• De ser posible, la cerveza debe ser
entregada en un camión cerrado y
refrigerado. Si se usa un camión
abierto, cubra los barriles con alquitrán
para proteger del calor y la circulación
de aire caliente.
• El camión nunca debe ser cargado la
noche anterior a la entrega, a no ser
que la cerveza vaya en un camión
refrigerado.
• La regla es, el primer barril debe ser
abierto primero.
• La refrigeración debe continuar ya sea
verano o invierno.
• La cerveza agria se genera como
resultado de una fermentación
secundaria, por arriba de los 45º.
32
Page 33

Tiendas que no tienen refrigeración
•
•
•
•
deben mantener los barriles en hielo o
al menos cubrir los barriles con
alquitran y bolsas de yute.
• La temperatura optima para los barriles
es 38º a 40º.
CERVEZA CON DEMASIADA ESPUMA
Cuando se sirve la cerveza, ésta tiene demasiada espuma y no suficiente líquido.
CAUSAS CORRECCIONES
1. Servir la cerveza de manera incorrecta.
2. Levadura u otras obstrucciones en el grifo.
Partes del grifo o arandelas gastadas.
3.Cables retorcidos, hundidos, obstrucciones
en la línea cerca o detrás del grifo.
4.Obstrucción o deposito en la línea.
5.
• Cerveza tibia en el grifo.
• Cerveza t ibia en la línea de salida.
6.Puntos calientes en la línea.
7.Refrigerador o Dispensador tibio.
• Abra el grifo rápida y completamente.
• Verifique y encuentre la distancia
correcta entre el vaso y el grifo cuando
sirva. La espuma debe ser compacta,
cremosa y tener un espesor de ¾” a 1”
de alto.
• Limpie el pico del grifo con un buen
cepillo.
• Friegue todas las partes internas del
grifo por lo menos una vez por
semana.
• Reemplace las arandelas usadas. I el
grifo no abre lo suficiente, las partes
gastadas o el grifo completo deben ser
cambiados.
Revise y reemplace los cables
retorcidos, hundidos, dañados del
barril al grifo.
• Exami ne arandelas rotas detrás del
grifo ya que podrían causar una
obstrucción.
Mantenga las líneas de metal
derechas, desde el barrila al grifo,
nunca permita que las líneas se
retuerzan ya que esto puede crear
depósitos que causen Cerveza con
Demasiada Espuma.
La temperatura en el grifo siempre
debe estar dos grados mas baja que la
del barril.
• El grifo debe ser sumergido en agua
dulce refrigerada, o sistema de agua
fría.
• En el si stema de agua fría, el aire mas
frío debe ser dirigido primero al grifo y
después circulado a la refrigeradora.
• Aísle las líneas de cerveza, una línea
larga debe ser constantemente
refrigerada. El aislamiento ayuda pero
aislamiento no es refrigeración.
• Mantenga las líneas de cerveza
alejadas del tuberías de agua caliente,
ductos de aire caliente y líneas de
vapor. Una tubería de aire frío en el
verano es una tubería de aire caliente
en el invierno.
En interiores y en el sótano, la
temperatura es siempre caliente, por
33
Page 34

8.No hay suficiente espacio para almacenar el
•
barril. La cerveza se entibia en el barril.
9.Demasiada presión de aire.
10.Exceso de CO2.
11.No sufi c i ente presión o f a lta de presión.
12.Cerveza pasada.
tanto mantenga la refrigeradora a 40º
durante todo el año. Si la temperat ur a
no se puede bajar, incremente la
presión aplicada, sin embargo
balancee el sistema cambiando el tubo
de vinilo por uno de menor diámetro o
instale un grifo de control de espuma.
• No apague el refrigerador – día o
noche.
• Los sistemas de cables y alambres
deben estar correctamente
balanceados para aplicar la presión
requerida para la temperatura a que
los barriles serán expuestos. Un grifo
de control se puede usara en lugar de
un cable restringido, para balancear el
sistema.
Verifique la fuente de presión. Ajuste
la presión para que esté en balance
con el sistema. Un flujo apropiado de
cerveza llena un vaso de 10 oz. en 4
segundos.
• Verifique y reemplace el regulador y la
válvula.
• Ajuste la presión cuando use el CO2,
tan bajo como sea posible, recordando
que la presión aplicada debe ser un
poquito mas alta que la presión interna
de la cerveza (no aplique más de 18
lbs).
• Mientras más fría este la cerveza y
más alta sea la presión de CO2, la
cerveza absorberá el CO2 con mayor
rapidez. Esto sobre-carbona la
cerveza, causado demasiada espuma.
• Verifique ventanillas de aire
defectuosas (vea Cerveza sin Cuerpo,
Correcciones #3 y #4).
• Siempre encienda la presión antes de
servir cerveza.
• Rote el stock. La cerveza más antigua
deber ser abierta primero; si la cerveza
ha estado en temperaturas altas mas
allá de 45º por un periodo de tiempo
excesivo, podría empezar a
fermentarse ora vez.
• Almacene la cerveza a 40º durante
todo el año.
34
Page 35

CERVEZA CON POCA ESPUMA
•
La cerveza sale bien cuando recién se abre el barril. Hacia el final del barril la cerveza tiene poco
cuerpo y espuma. Esto generalmente ocurre cuando la cerveza no se sirve con frecuencia.
CAUSAS CORRECCIONES
Cuando se usa aire como fuente de presión, el
aire reemplaza el CO2 en la cerveza,
causando que esta quede sin cuerpo. Cuando
la cerveza fluye rápidamente este problema no
es tan evidente.
En lo que sea posible, gas de CO2
debe ser usado como fuente de
presión.
• En si stemas de alta presión, donde el
gas CO2 no se puede usar, una
mezcladora de aire/gas debe ser
instalada. Esta introduce pequeñas
cantidades de CO2 a la cerveza,
manteniendo el contenido normal de
CO2 en la cerveza.
35
Page 36

36
Page 37

REGISTRATION INFORMATION
Thank you for purchasing this fine Avanti product. Please fill out this card and return it within 100
days of purchase and receive these important benefits to the following address:
Avanti Products, A Division of The Mackle Co ., Inc.
P.O.Box 520604 – Miami, Florida 33152
¾ Protect your product:
We will keep the model number and date of purchase of your new Avanti product on file to
help you refer to this information in the event of an insurance claim such as fire or theft.
¾ Promote better products:
We value your input. Your responses will help us develop products designed to best meet
your future needs.
-------------------------------------------------(detach here)----------------------------------------------------------
Avanti Registration Card
__________________________________ _____________________________________
Name Model # Serial #
__________________________________ _____________________________________
Address Date Purchased Store/Dealer Name
__________________________________ ______________________________________
City State Zip Occupation
__________________________________ As Your Primary Residence, Do You:
Area Code Phone Number Own Rent
Did You Purchase An Additional Warranty:
Extended Food Loss None under 18 18-25 26-30
Reason For Choosing This Avanti Product:
Please indicate the most important factors Marital Status:
that influenced your decision to purchase Married Single
this product. Is This Product Used In The:
Price Home Business
Product Features How Did You Learn About This Product:
Avanti Reputation Advertising
Product Quality In Store Demo Personal Demo
Salesperson Recommendation Other_______________________________
Friend/Relative Recommendation Comments___________ _________________
Warranty _____________________________________
Other_______________________ _____________________________________
Your Age:
31-35 36-50 over 50
37
Page 38

PRINTED IN CHINA
38
 Loading...