

Page 1
1
INSTRUCTION MANUAL
MANUAL DE INSTRUCCIONES
MANUEL DE INSTRUCTIONS
Model Number:
No. de Modelo:
No. de Modèle:
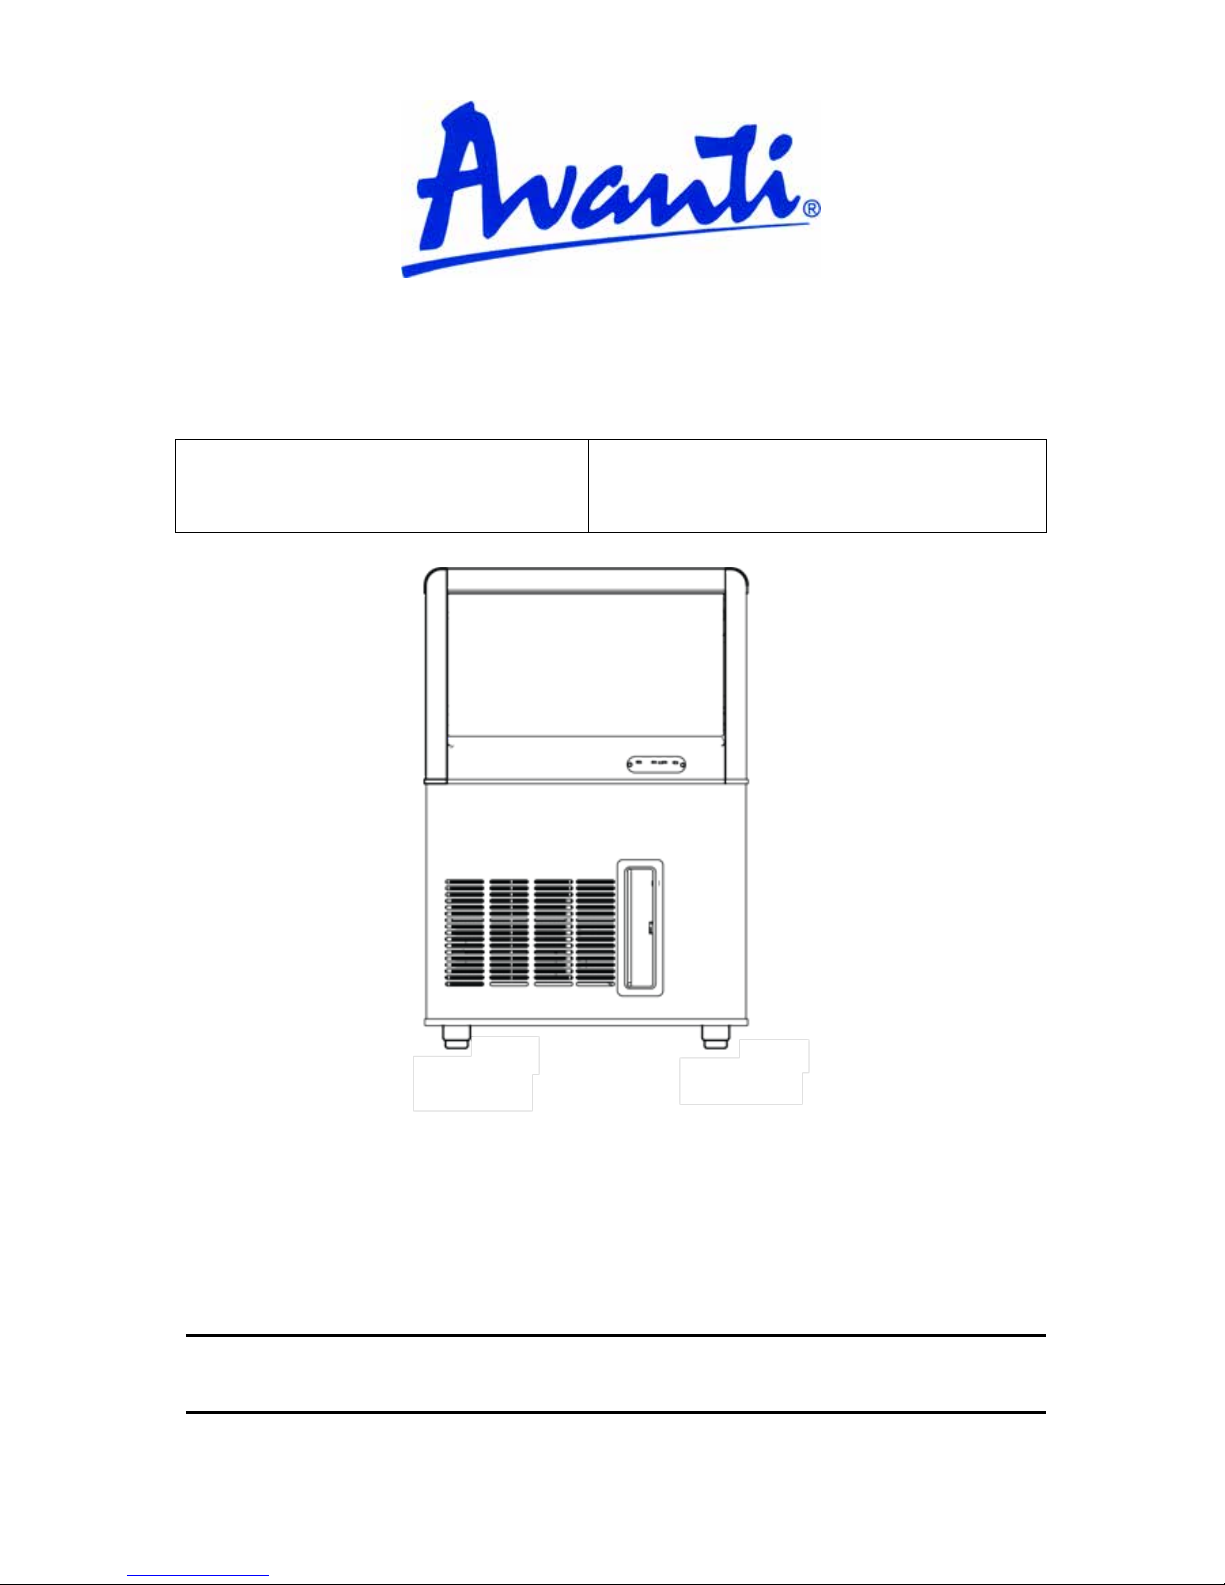
IMC132A3S
Actual unit appearance may vary
BEFORE USE, PLEASE READ AND FOLLOW ALL SAFETY RULES AND OPERATING INSTRUCTI ONS.
ANTES DE USAR, LEA Y SIGA TODAS LAS INSTRUCCIONES DE OPERACIÓN.
Avanti has a policy of continuous improvement on its products and reserves the right to change materials and specifications without notice.
La política de Avanti es la de continuar mejorando sus productos y se reserva el derecho de cambiar los materiales y especificaciones sin notificación alguna.
Avanti Products LLC
P.O. Box 520604 - Miami, Florida 33152
www.avantiproducts.com
Page 2

2
TABLE OF CONTENTS
Appliance Safety
3
Important Safeguides
4
Help Us Help You
5
Parts and Features
6
Important Safety Instructions
7
Installation Instructions
7
Electrical Connection
8
Installation of Your Icemaker
9
Leveling the Icemaker
10
Water Supply
11
Water Drain Connection
11
Operating Your Icemaker
12
Care and Maintenance
13
Preparing to Store the Icemak er
13
Cleaning the Icemaker
13
Exterior Cleaning
14
Interior Cleaning
14 – 15
Sanitizing the system
15
Condenser Filter Cleaning
15
Power Failure / Vacation Time
15
Troubleshooting Guide
16 – 17
Service for your Icemaker
18
Wiring diagram
18
Avanti Warranty
19
Instrucciones en Español
20 – 38
Instruction en Français
39 - 58
Registration Information
Last
Page
Page 3
3
APPLIANCE SAFETY
Your safety and the safety of others are very important.
We have provided many important safety messages in this manual for your icemaker. Always read
and obey all safety messages.
This is the Safety Alert Symbol. This symbol alerts you to potential hazards that
can kill or injure you and others. All safety messages will follow the Safety Alert
Symbol and either the words” DANGER”, “WARNING” or “CAUTION”.
Danger means that failure to heed this safety
statement ma y result in severe personal injur y
or death.
Warning means that f ailure to heed this safety
statement may result in extensive product
damage, serious personal injury, or death.
Caution means that failure to heed this safety
statement may result in minor or moderate
personal injury, property or equipment damage.
All safety messages will alert you to know what potential hazard is, tell you how to reduce the chance
of injury, and let you know what can happen if the instructions are not followed.
PROP. 65 WARNING FOR CALIFORNIA RESI DENTS
WARNING:
Cancer And Reproductive Harm
www.p65warnings.ca.gov
IMPORTANT SAFETY INSTRUCTIONS
WARNING: To reduce the risk of fire, electric shock or injury when using your icemaker,
follow these basic precautions:
• Plug unit into a grounded 3-prong outlet
• Do not remove the grounding prong.
• Do not use an adapter.
• Do not use and extension cord.
• Disconnect power before cleaning.
• Disconnect power before servicing.
• Replace all panels before operating.
• Use two or more people to move and install the ice maker
SAVE THESE INSTRUCTIONS
Page 4
4
IMPORTANT SAFEGUIDES
Before the icemaker is used, it must be properly positioned and installed as
described in this manual, s o read the manual carefully. T o reduce the risk of fire,
electrical shock or injury when using the icemaker, follow basic precaution,
including the following:
• Plug into a grounded 3-prong outlet, do not remove gr ound ing prong, do not use an adapter , and
do not use an extension cord.
• It is recommended that a separate circuit, serving only your icemaker be provided. Use
receptacles that cannot be turned off by a switch or pull chain.
• Never clean icemaker parts with flammable fluids. These fumes can create a fire hazard or
explosion. And do n ot store or use gasoli ne or other flamm able vapors and liquids in t he vicinit y
of this or any other icemaker. The fumes can create a fire hazard or explosion.
• Before proceeding with c leaning and maintenance operations , make sure the power line of the
unit is disconnected.
• Do not connect or disconnect the electric plug when your hands are wet.
• Unplug the icemaker or disconnect power before cleaning or servicing. Failure to do so can result
in electrical shock or death.
• Do not attempt to repair or replace any part of your icemaker unless it is specifically
recommended in this manual. All other servicing should be referred to a qualified technician.
FOLLOW WARNING CALL OUTS BELOW ONLY WHEN APPLICABLE TO YOUR MODEL
• Use two or more people to move and install icemaker. Failure to do so can resu lt i n bac k or other
injury.
• To ensure proper ventilation for your icemaker, the front of the unit must be completely
unobstructed. Choose a well-ventilated area with temperatures above 55°F (13
°
C) and below
90°F (32°C). This unit must be installed in an area protected from the element, such as wind, rain,
water spray or drips.
• The icemaker should not be located next to ovens, grills or other sources of high heat.
• The icemaker must be installed with all electrical, water and drain connections in accordance
with state and local codes. A standard electrical supply (115 V AC only, 60 Hz), properly
grounded in accordance with the National Electrical Code and local codes and ordinances is
required.
• Do not kink or pinch the power supply cord of icemaker.
• The fuse (or circuit breaker) size should be 15 amperes.
• It is important for the icemaker to be leve led in order to work properly. You may need to make
several adjustments to level it.
• All installation must be in accordance with local plumbing code requirements.
• Make certain that the pipes are not pinched or kinked or damaged during installations.
• Check for leaks after connection.
• Never allow children to operate, play with or crawl inside the icemaker.
• If you use the drain age container, you MUST set the D r ain Selec t switch to OFF or the water can
overflow from the drainage container
• Although the unit has been tested at the f actory, due to long-term transit and storage, the firs t
batch of cubes must be discarded.
• Do not use solvent-based cleaning agents of abrasives on the interior. These cleaners may
damage or discolor the interior.
• Do not use this apparatus for other than its intended purpose.
Page 5
5
HELP US HELP YOU...
Read this guide carefully.
It is intended to help you operate a nd maintai n
your new Icemaker properly.
Keep it handy to answer your questions. If you
don't understand som ething or you need more
assistance, please call:
Avanti Customer Service
800-220-5570
Keep proof of original p urchase date (such as
your sales slip) with th is guide to establis h the
warranty period.
Write down the model and serial numbers.
You'll find them on a plate located on the rear
wall of the Icemaker
Please write these numbers here:
____________________________________
Date of Purchase
____________________________________
Model Number
____________________________________
Serial Number
Use these number s in any correspondence or
service calls concerning your Icemaker
If you received a damaged Icemaker,
immediately contact the dealer (or b uilder) t hat
sold you the Icemaker
Save time and money. Before you call for
service, check the Troubleshooting Guide. It
lists causes of minor operating problems that
you can correct yourself.
If you need service
We're proud of our ser vice and want you to be
pleased. If for some r eason you are not happ y
with the service you receive, here are some
steps to follow for further assistance.
FIRST, contact the peo ple who serviced your
Icemaker. Explain wh y you are not pleased. In
most cases, this will solve the problem.
NEXT, if you are still not pleased, write all the
details, including your telephone number, and
send it to:
Customer Servic e
Avanti Products
10880 NW 30 Street
Miami, FL 33172 USA
CAUTION:
THE ICEMAKER IS NOT DESIGNED
FOR THE STORAGE OF MEDICINE OR
OTHER MEDICAL PRODUCTS.
Page 6
6
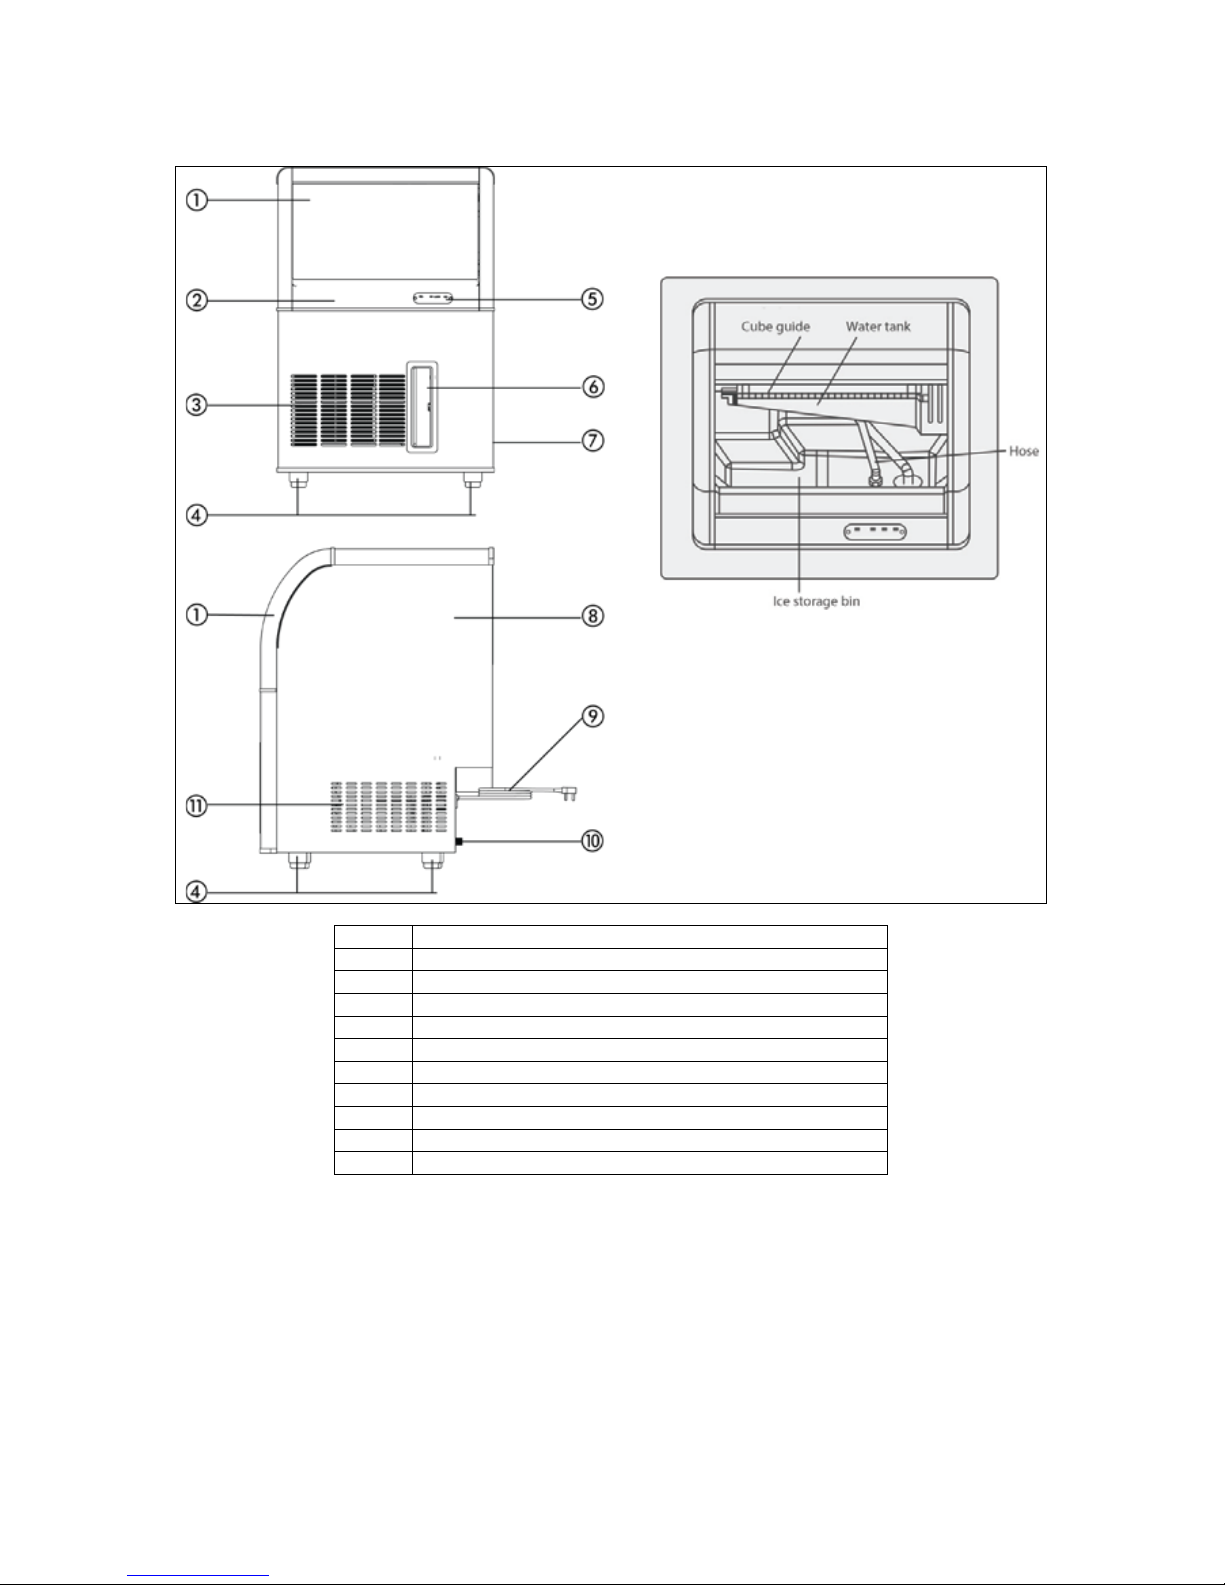
PARTS AND FEATURES
1
Sliding Access Door
2
Ice Storage Compartment
3
Air Intake Vent
4
Leveling Legs (4)
5
Control Panel
6
Condenser Air Filter Assembly
7
Power ON / OFF Button (Located at the rear)
8
Cabinet Body
9
Power Cord
10
Water Drain Outlet Connections
11
Exhaust Vents
Page 7
7
IMPORTANT SAFETY INSTRUCTIONS
− Read all instructions before using the icemaker.
− DANGER or WARNING: Risk of child entrapment. Child entrapment and suffocation are not problems
of the past. Junked or abandoned icemakers are still dangerous . . . even if they will “just sit in the
garage a few days”.
− Before you throw away your old icemaker: take off the doors.
− Never allow children to operate, play with, or crawl inside the icemaker.
− Never clean
icemaker parts with flammable fluids. The fumes can create a fire hazard or explosion.
− Do not store or use gasoline or any other flammable vapors and liquids in the vicinity of this or any other
icemaker. The fumes can create a fire hazard or explosion.
INSTALLATION INSTRUCTIONS
Before Using Your Icemaker
• Remove the exterior and interior packing.
• Check to be sure you have all of the following parts:
o 1 Ice Scoop
o 1 Water Supply Hose
o 1 Water Drain Hose
o 4 Adjustable Feet
o Instruction Manual
• Before connecting the unit to the power source, let i t stand upright for approxim ately 2 hours.
This will reduce the possibility of a malfunction in the cooling system from handling during
transportation.
• Clean the interior surface with lukewarm water using a soft cloth.
EXCESSIVE WEIGHT HAZARD
USE TWO OR MORE PEOPLE TO MOVE AND INSTALL THE ICEMAKER
FAILURE TO DO SO CAN RESULT IN BACK OR OTHER INJURY
~
WARNING
~
To reduce the risk of fire, electrical shock, or
injury when using your icemaker, follow these
basic precautions:
This Unit Is For Indoor Use Only
- SAVE THESE INSTRUCTIONS -
Page 8

8
Electrical Connection
This icemaker should be properly grounded for your safety. The power cord of this
icemaker is equipped with a three-prong plug which mates with standard three prong
wall outlets to minimize the possibility of electrical shock.
Do not under any c ircumstances cut or rem ove the thir d ground pro ng from the power cord s upplied.
For personal safety, this icemaker must be properly grounded.
This icemaker r equires a standard 115/120 Volt AC ~/60Hz electr ical ground outlet with thre e-prong.
Have the wall outlet a nd circuit check ed by a qualified e lectrician to m ake sure the outlet is properly
grounded. When a standard 2-prong wall outlet is encounter ed, it is your respo nsibility and obligat ion
to have it replaced with a properly grounded 3-prong wall outlet.
The cord should be secured behind the icemaker and not left exposed or dangling to prevent
accidental injury.
The icemaker should alwa ys be plugged into its own individual elec trical outlet which has a voltage
rating that matches the rat ing label on the icemaker. This provides the best pe rformance and also
prevent overloading house wiring circuits that could cause a fire hazard from overheated. Never
unplug the icemaker b y pulling the power cord. Alwa ys grip the plug firm ly and pull straight out fr om
the receptacle. Repair or r eplace immediatel y all power cords that hav e become frayed or ot herwise
damaged. Do not use a cor d that shows crack s or abrasion dam age along its len gth or at either en d.
When moving the icemaker, be careful not to damage the power cord.
Extension Cord
Because of potential saf ety hazards un der certain con ditions, it is stron gly recomm ended that you d o
not use an extension cord with this icemaker. However, if you must use an extension cord it is
absolutely necessary that it be a UL/CUL-Listed, 3-wire grounding type icemaker extension cord
having a grounding type pl ug and outlet and that the electrical rating of the cord be 115 volts and at
least 10 amperes.
Surge Protector
Most electrical icem akers use a series of electric contr ol boards to operate. These boards are very
susceptible to power surges and could be damaged or destroyed.
If the icemaker is going to be used in an area or if your city / country is prone to power surges /
outages; it is suggested th a t you use a p o wer s urge protector for all electrical devices / icem ak ers you
use. The surge protector that you select must have a surge block high enough to protect the
icemaker it is connect ed to. If you have any questio ns regard ing the t ype and siz e of surge pr otector
needed contact a licensed electrician in your area.
Damages due to po wer surges are not considered a m anufacturer covered defect and will void your
product warranty.
~WARNING~
Improper connection of the equipment-grounding can result in th e risk of electrical shock. If the
power cord of the range or icemaker is damaged, have it replaced by an authorized Avanti
Products service center.
Page 9
9
Installation of Your Icemaker
• THIS ICEMAKER MUST BE PROPERLY INSTALLED BY A QUALIFIED PROFESSIONAL
This icemaker SHOULD be installed with electrical and w ater connections in accordan ce
with all state and local codes.
• Place your icemaker on a floor that is strong enough to support the icemaker when it is fully
loaded. To level your icemaker, adjust the legs at the front of the icemaker.
• Allow a minimum of ¾ inch of space between the top and 3 inches at th e sides of the
icemaker and a minimum of 5 inches at the back, which allows the proper air circulation to
cool the compressor. Ensure the front of the unit is completely unobstructed.
• Locate the icemaker away from dir ect sunlight and so urces of heat (stove, heater, radiator, etc.) .
Direct sunlight may affect the acrylic coating and heat sources may increase electrical
consumption. Extrem e cold ambient temper atures may also cause the icemaker not to per form
properly.
• Choose a well ventilated area with temperatures above 50ºF (10ºC) and below 110ºF (43ºC).
This unit MUST be installed in an area protected from the elements.
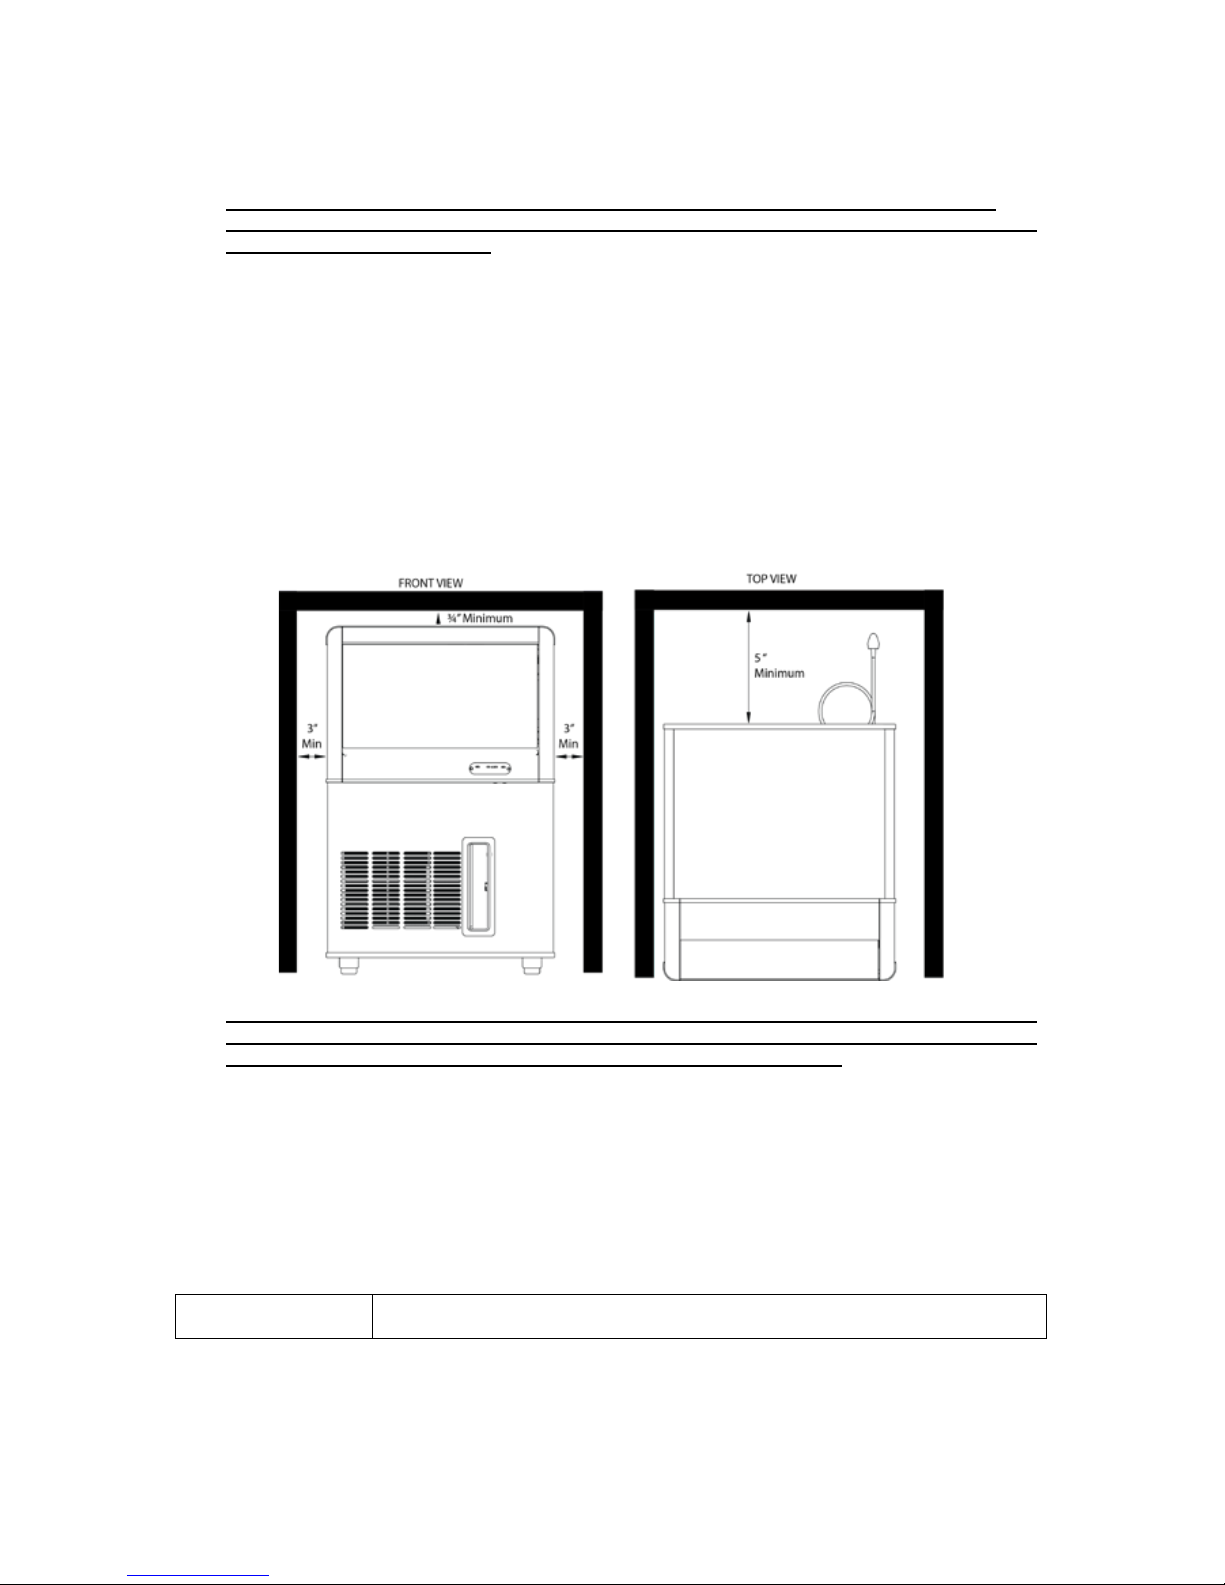
INSTALLATION CLEARANCES:
Allow a minimum of 3 inch of space between the sides, ¾” at the top of the icem aker and
a minimum of 5 inches at the back, which allows the proper air circulation to cool the
compressor. Ensure the front of the unit is com p letely unobstructed.
• The installation of this icemaker requires a cold water supply inlet of ¼” (6.35mm) soft copper tubing
with a shut off valve.
• The icemaker requires a continuous water supply with a minimum pressure of 14.5 psig and a static
pressure not to exceed 80 psig. The temperature of the water supply into the icemaker should be
between 41ºF (5ºC) and 77ºF (25ºC) for proper operation.
• It is strongly recommended that a water filter be used. A filter, if it is of the proper type, can remove
taste and odors as well as particles. Some water is very hard, and softened water may result in
white, mushy cubes that stick together. De-Ionized water is NOT recommended.
Warning
Operation of the icemaker for extended periods outside of the normal
temperature ranges as described above may affect product performance.
Page 10
10
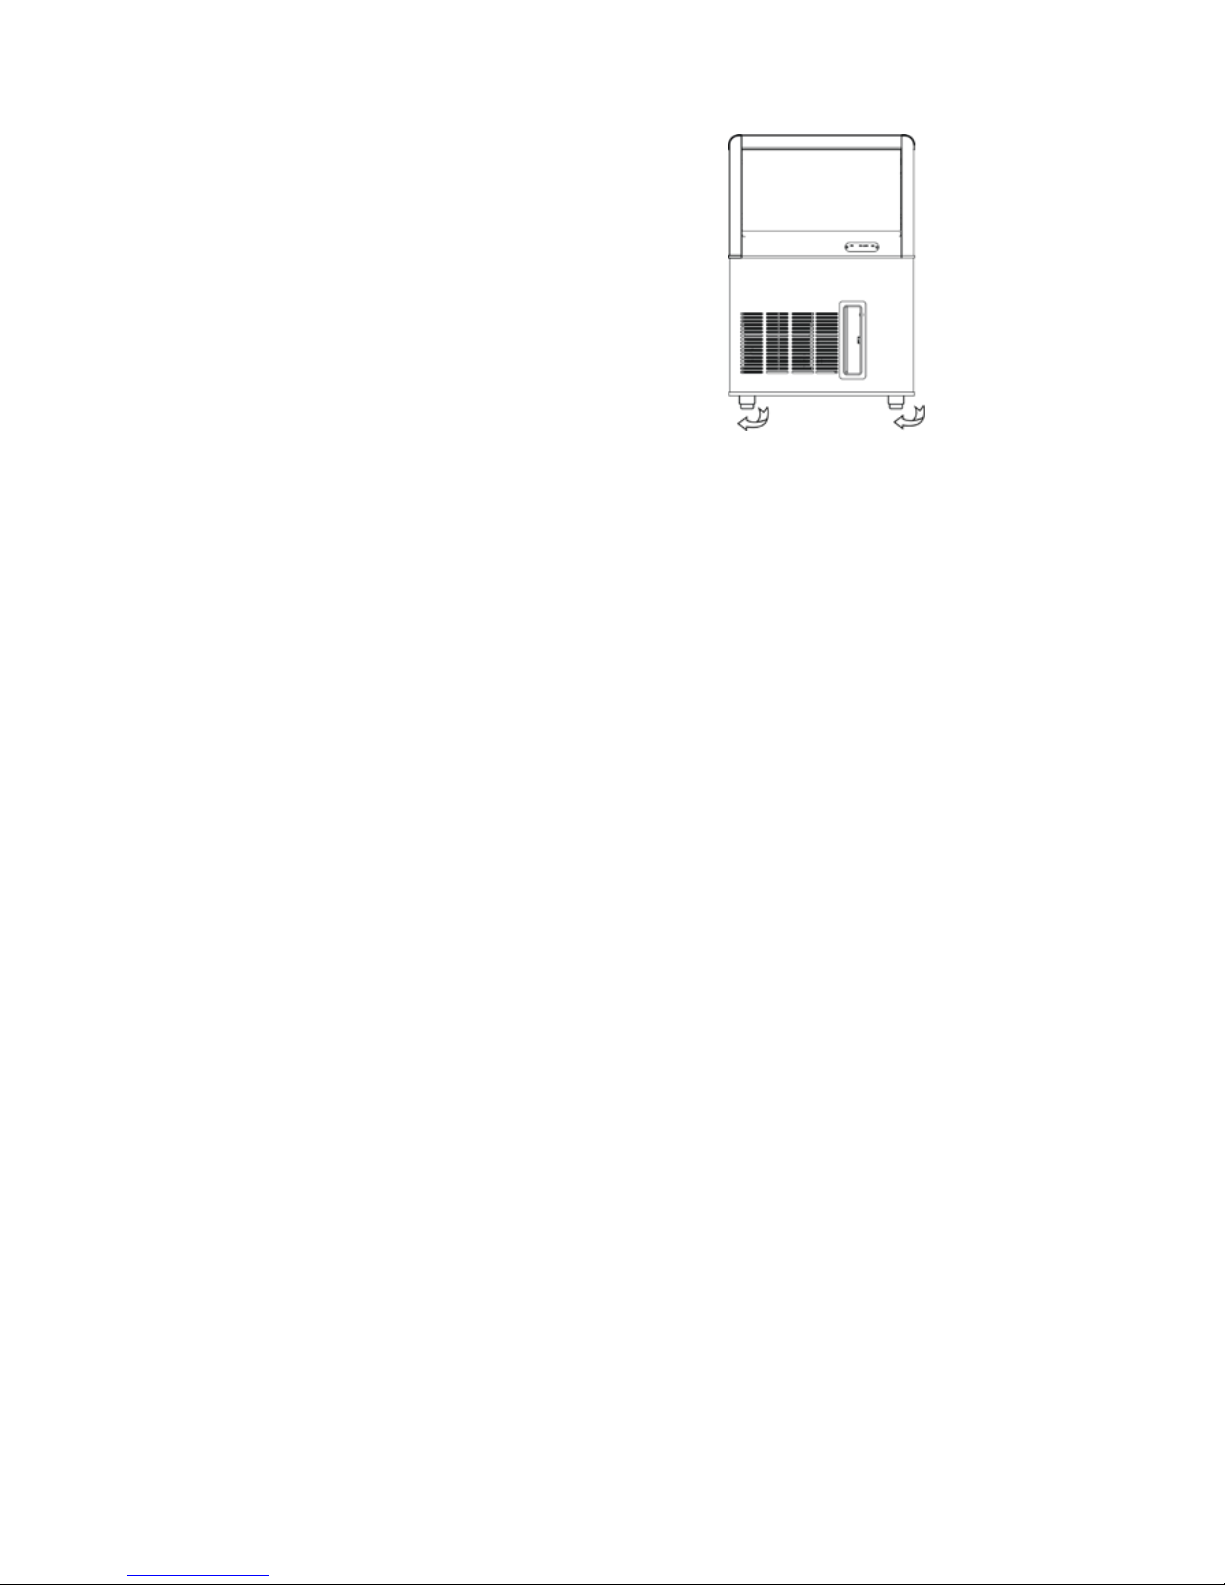
Leveling the ice maker
It is important for the icemaker to be leveled in order to
work properly. It can be raised or lowered by rotating
the plastic sheaths around each of the four feet on the
bottom of the machine. If you find that the surface is
not level, rotate the feet until the ice maker becomes
level. You may need to make several adjustments to
level it. We recommend using a carpenter’s level to
check the machine.
IMPORTANT: Once you are ready to install it in a cabinet or directly on the floor, you must adjust the
feet to level the ice maker. If the floor is level, just rotate the two front casters to touch the floor.
Page 11
11
Water Supply
The water supply should be ready at the
point of installation. The water supply
pressure should be a minimum of 15 psig
with a static pressure not more than 80
psig. (A wall outlet directly behind the ice
machine will make installation easier.)
IMPORTANT:
1. All installations must be in accordance with local plumbing code requirements. Professional
installation is REQUIRED.
2. Make certain the hoses are not pinched or kinked or damaged during installation.
3. Check for leaks after connection.
Tools required: ½-in. open-end wrench, Phillips s c rewdr iv er
Connecting the water line:
1. Turn off main water supply. Turn on the nearest faucet long enough to clear line of water.
2. Find a ½-in. to ¾-i n. vertic al cold-water pipe near the i nstallat ion locat ion. T he dis tance s hould be
less than 6 feet. The water supply hose provided with the ice maker is about 6 feet long.
3. A shut -off valve m ust be installed to t he main water supply. If the water p ipe has a pla in piece of
copper tubing, attach a ¼” O.D. compression union to the tubing and remove the nut.
4. Conn ect the nut of the water supply hose to the tap, and c onnect the other end with the water
inlet. Tighten firmly by hand, then one-ha lf turn with wrenc h.
5. Turn on main water supply and tap. Check for water supply connection leaks. Tighten every
connection (including connection at the water inlet).
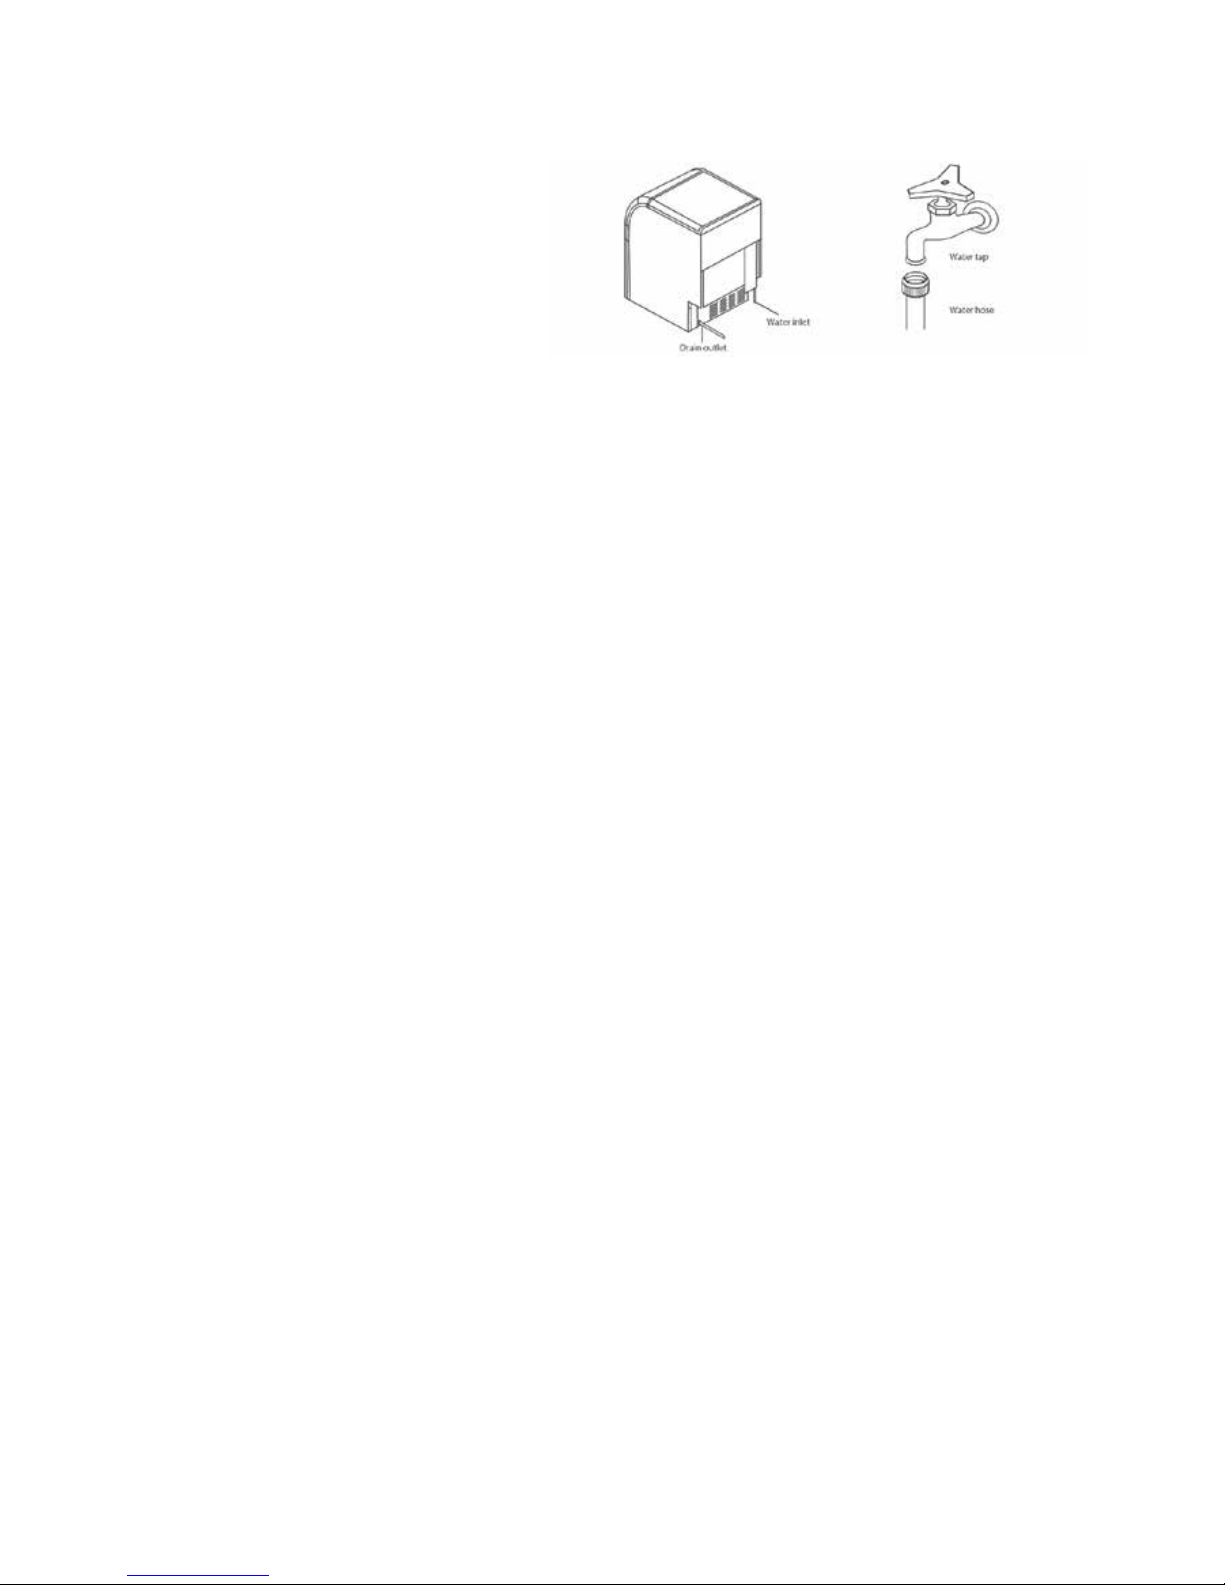
IMPORTANT: When you connect the water supply hose and the drain hose, pay
attention to the indications of “Water inlet” and “Drain outlet” on the machine.
Drain
You must connect the drain line before using the ice maker. Follow the steps outlined below.
Connecting the drain line:
NOTE: A drain pump system is used in this type of icemaker. If there is a drain line near the
ice maker, the best choice is to drain water to the drain line through the drain water
hose provided with ice maker.
1. Loc ate the floor drain near the ice maker. The distance should be less than 4.5 feet since the
length of the long drain water hose provided with the ice maker is about 4.85 feet.
2. Find the drain outlet on the back of ice maker. Connect the drain outlet to the water draining hose
and insert the other end of the hose into the drain line.
NOTE: Never allow the drain hose to hang or loop higher than the floor of the ice
storage bin.
3. Al l horizontal runs of drain lines must have a fall of ¼” per f oot. An air gap will lik ely be required
between the ice mak er drain tube and t he dra in/was te rec eptacle. A standpipe with a trap belo w it
would be acceptable for the drain/waste receptacle. A floor drain is also acceptable.
4. Pour 1 g allon of water into the ic e storage bin to chec k for leaks in the drainage system. Tighten
any connections that leak.
IMPORTANT: Infrequent drainage will cause a high rate of melting in the ice storage bin.
Page 12

12
OPERATING YOUR ICEMAKER
Description of LEDs and buttons:
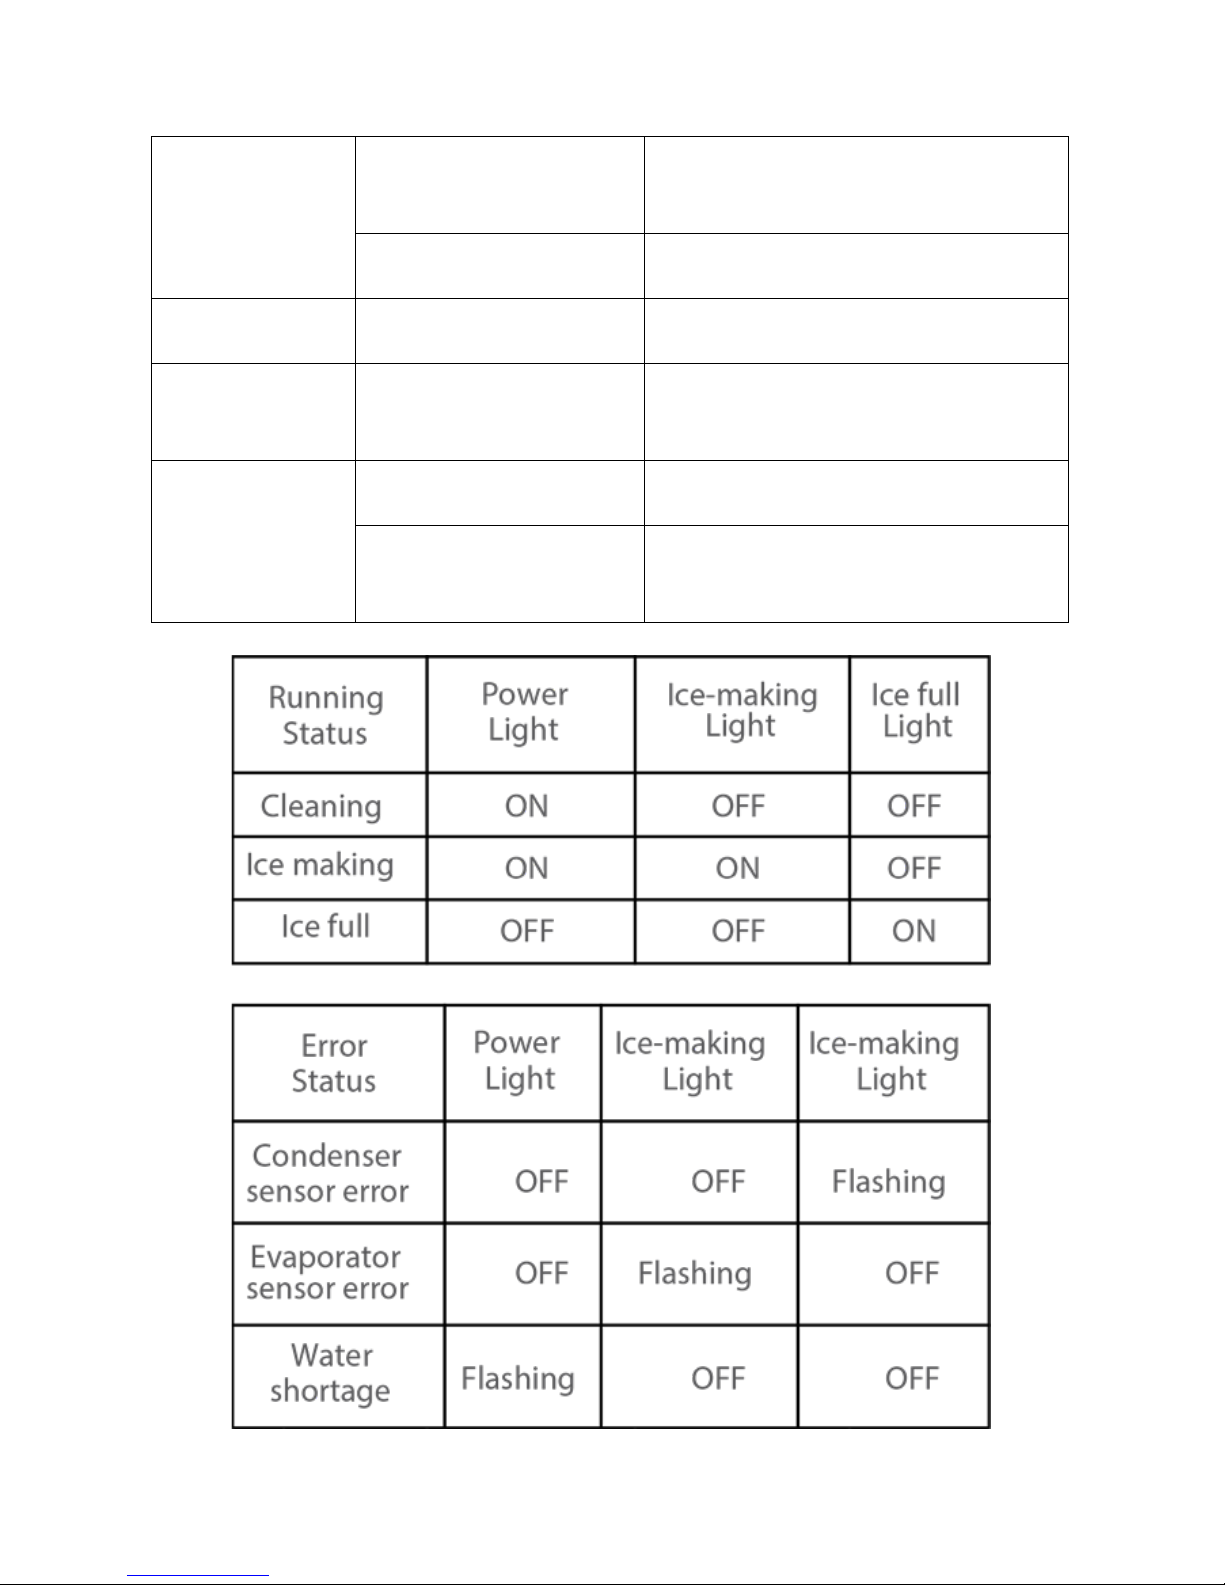
1. Ice Bin Full LED: Bin full indicator light
When it is lit, the ice storage bin is full of ice or there is something blocking the bin-full probe. The
unit will stop working. When ice cubes are removed from the ice storage bin, freeing the bin-full
probe, the LED will turn off and then the unit will restart and return to the ice making mode.
2. Ice Making LED: Ice making indicator light
When it is lit, the unit is working in the ice making mode controlled by a temperature probe on the
evaporator.
3. Clean button: When this butto n is pressed, the unit enters the “CLEANING” mode. The C lean
system will run through a f ull clean of the water s ystem and Evaporator. T he water used durin g
the clean mode will dra in th rough t he drai n hose . Onc e the clea n system is c om plete, it will retur n
to normal operation automatically.
4. Tim er Reset: This butt on is to r es e t t he “ Cle an Fi lter ” r eminder. After approximately 350 hour s of
compressor runs or ic e-making cycles, the u nit will emit a beep and al l (3) three indicator l ig hts will
flash (Power, Ic e-Making, Ice-Full) to remind you to clean th e condenser filter at the f ront of the
unit. Once you have rem oved the filter, cleaned it and returned it to its or iginal place. Pres s the
“Timer Reset” button to reset the reminder.
Operating method
Turn on the water tap, let the water trough fill, then press the ON/OFF button on the front
panel. The ice maker will start working automatically.
1. After 3 minutes, the machine will automatically go to the ice-making stage, and the sound of water
flowing will be heard.
3. When the batch of ice has been fully formed, ic e wil l aut omatically be harvested t o the ic e st ora ge
bin.
4. When the ice storage bin is full, the machine stops making ice automatically.
5. The unit will start making ice again after the ice cubes are removed.
IMPORTANT:
• Although the unit has been tested and cleaned at the factory, due to long-term transit and
storage, the first batch of cubes must be discarded.
• Never turn the water supply tap off when the ice maker is working.
• Never touch the evaporator when unit is running!
• Except to take ice from the unit, keep the door closed to reduce melting and insure proper ice
formation.
Page 13
13
CARE AND MAINTENANCE
Preparing the ice maker for long storage
If the ice maker will not be used for a long time, or is to be moved to another place, it will be
necessary to drain the water system.
1. Shut off the water supply at the main water source.
2. Disconnect the water supply line from the water inlet.
3. Shut off the electric supply at the main electrical power source.
4. Remove any remaining ice and water. Dry the bin thoroughly.
5. Leave the door open to allow for circulation and to prevent mold and mildew.
6. Leave water supply line and power cord disconnected until ready to reuse.
IMPORTANT:
• Do not touch the power plug when your hands are wet.
• Never unplug the unit by pulling on the cord. Grasp the plug and pull out firmly.
Cleaning The Icemaker
Periodic cleaning and proper maintenance will ensure efficiency, top performance, and long life. The
maintenance intervals listed are based on normal conditions. You may want to shorten the intervals if
you have pets, or there are other special considerations.
Important Note:
Never keep anything in the ice storage bin that is not ice: objects like wine and
beer bottles are not only unsanitary, but the labels may slip off and plug up the
drain.
If the ice maker is left unused for a long time, before the next use it
must be thoroughly cleaned. Follow carefully any instructions provided
for cleaning or use of sanitizing solutions. Do not leave any solution
inside the ice maker after cleaning.
Before proceeding with cleaning and maintenance operations, make sure the power
line of the unit is disconnected and the water line is shut off.
Page 14
14
The ice machine cleaner contains acids.
DO NOT use or mix with any other solvent-based cle aner pro ducts.
Use rubber gloves to protect hands. Carefully read the material safety instructions on the
container of the ice machine cleaner.
DISCARD the first batch of ice produced after cleaning.
Exterior cleaning
The door and cabinet may be cleaned with a mild detergent and warm water solution such as 1 oz. of
dishwashing liquid mixed with 2 gallons of warm water. Do not use solvent-based or abrasive
cleaners. Use a soft sponge and rinse with clean water. Wipe with a soft clean towel to prevent water
spotting.
Interior Cleaning
The ice storage bin should be sanitized occasionally. Clean the bin before the ice maker is used for
the first time and reused after stopping for an extended period of time. It is usually convenient to
sanitize the bin after the ice making system has been cleaned, and the storage bin is empty.
1. Disconnect power to the unit.
2. Open the door and with a clean cloth, wipe down the interior with a sanitizing solution made of
1 ounce (29.5ml) of household bleach or chlorine and 2 gallons (7.5L) of hot water 95ºF (35
ºC) to 115 ºF (46 ºC).
3. Rinse thoroughly with clear water. The waste water will be drained off through the drainpipe.
4. Reconnect power to the unit.
The ice scoop should be washed regularly. Wash it just like any other food container.
Minerals that are removed from water during the freezing cycle will eventually form a hard-scaly
deposit in the water system. Cleaning the system regularly helps remove the mineral scale buildup.
How often you need to clean the system depends upon how hard your water is. With hard water of 4
to 5 grains/liter, you may need to clean the system as often as every 6 months.
1. Turn off power to the ice maker. Keep the ice maker connected to the water supply and
drainpipe.
2. O pen the do or and scoop out all of the ice cubes. Either d iscard t hem or save them in an ice
chest or cooler.
3. Turn on the power to the ice maker. Pour 8 ounces of Nickel-Safe Ice Maker Cleaning
Solution into the water bin. Add 8 ounces of tap water . Af ter ab out 5 m inutes, pre ss down the
"clean" button on t he Contr ol Box. ( See figur e belo w and fol lowing s ection.) T he m achine wi ll
run the Automatic Clean Mode.
DO NOT use solvent cleaning agents or abrasives on the interior.
These cleaners may transmit taste to the ice cubes, or damage or
discolor the interior of the machine.
Page 15

15
NOTE:
THE BACK SIDE OF THE ICE MAKING MOULD MUST BE
CLEANED BY A PROFESSIONAL.
Sanitizing the Ice-Making System
1. Turn off power to the ice maker.
2. Remove all ice cubes from the storage bin.
3. Prepar e a s an iti zing s ol uti o n made of 1 ounce of household bleach an d 2 gallons of hot water
95ºF (35ºC) to115ºF (46 ºC).
4. Fill a spr ay b ottle with th e s aniti zing so lution an d spr a y all corn ers and e dges, m aking s ure to
cover all surfaces with the solution. Rinse w ith clea n water .
5. Keep the ice maker connected to the water supply. Turn on the power to the ice maker.
Within 5 minutes, press the CLEAN button. The machine will run the Automatic Clean mode.
6. A l l ow 30 minutes for proper cleaning.
7. The unit will begin the automatic ice making process when the clean cycle is complete.
8. Discard the first batch of ice.
Condenser filter cleaning
A dirty or clogged condenser prevents proper airflow, reduces ice making capacity, and causes higher
than recommended operating temperatures that may lead to component failure. Have the condenser
cleaned at least once every six months.
1. Turn the Power Switch to the OFF position.
2. Unplug the ice maker or disconnect power.
3. Gently pull out the front louver filter.
4. Remove dirt and lint from the filter with the brush attachment of a vacuum cleaner
.
5. Reinsert the front louver filter.
6. Plug in the ice maker and turn the power switch to the ON position.
Power Failure
Most power failures are corrected within a few ho urs and should not aff ect the temperature of your
icemaker if you minimize the num ber of times the door is opened. If the po wer is going t o be of f for a
longer period of time, you need to take the proper steps to protect your food.
Vacation Time
Short vacations: Leave the unit operating during vacations of less than three weeks.
Long vacations: If the icemaker will not be used for several months, remove all ic e cubes , dr a in t he n
unplug the power cord. Clean and dry the interior thoroug hly. To prevent odor and mold growth,
leave the door open slightly: blocki ng it open if necessary
Page 16
16
TROUBLESHOOTING
Before Calling for Service
If the unit appears to be malfunctioning, read through the OPERATION section of this manual first. If
the problem persists, check the Troubleshooting Guide on the following pages. Some of the problems
mentioned in the Guide can be solved easily without a service call.
Problem
Possible Cause
Probable Correction
The machine doesn’t
operate.
The ice maker is unplugged.
Plug the ice maker in.
The fuse is blown or breaker
has tripped.
Replace fuse. If it happens again, call for
service to check for a short circuit in th e unit.
The ice maker power button is
set at OFF.
Switch the ice maker power button to ON.
The ice storage bin is full of ice.
Remove some ice cubes. Be sure the ice-full
probe is free of ice.
The water doesn't
feed in after the
machine starts.
The water supply tap is turned
off.
Turn on the water supply tap.
The water supply pipe is not
properly connected.
Reconnect the water supply pipe.
Machine makes ice,
but bin does not fill
up with ice.
The condenser may be dirty.
Clean the condenser.
The air flow to the ice maker
may be obstructed.
Check the installation.
The ambient temperature and
water temperature are high, or
unit is near some heat source.
Check the installation.
Water is leaking out
of the unit.
Some water falls to the floor
when you open the door to
remove ice from storage bin.
Normal condensation on the door or some water
together with ice. Take care when you remove
ice.
Water supply connection is
leaking.
Tighten fitting. See Connecting the water line.
Cubes are partially
formed or are white
on the bottom.
Not enough water in the water
trough.
Check if the water supply pressure is below 15
psig.
Check water supply or filter may be restricted.
Check for a water leak at the water trough.
Noise during
operation
The feet are not leveled and
locked.
Level and lock the feet. See Leveling the Ice
Maker.
Certain sounds are normal.
See Normal Sounds.
The ice maker stops
The electricity is off.
Reconnect the power s upp l y line.
Page 17
17
suddenly while
making ice.
The room temperature is out of
the stated range.
Cut off the electricity and leave the ice maker
disconnected until the temperature returns to
within the stated range.
The ice storage bin is full of ice. Remove some ice cubes; make sure the ice-full
probe is free of ice.
The body of the ice
maker is electrified
The ground line isn't in the
socket.
Use a socket meeting the grounding
requirements.
Scaling occurs
frequently inside the
machine.
The hardness level of the water
is too high.
Install a water-softeni ng de vice in front of the
water inlet.
Water leaks from the
ice storage bin
The drain hole below the ice
storage bin is blocked.
Remove the ice storage bin and clean the drain
hole.
The drain hose is kinked or
improperly placed higher than
the floor of the ice storage bin.
Check the drain hose to be sure water can be
drained out unhindered.
Page 18

18
SERVICE FOR YOUR ICEMAKER
We are proud of our customer service organization and the network of professional service
technicians that provide s ervice on your Avanti Prod ucts icemakers. With the purchase of your Avanti
Products icemaker, you can be confident t hat if you ever need additional inf ormation or assistance,
the Avanti Products Customer Service team will be here for you. Just call us toll-free.
Avanti Products Customer Service
Product Information
800-323-5029
Whatever your questions are about our products,
help is available.
Part Orders
800-220-5570
You may order parts and accessories that will be
delivered directly to your hom e by personal
check, money order, Master Card, or Visa.
In-Home Repair Service
800-220-5570
An Avanti Products authorized service center will
provide expert repair service, scheduled at a time
that is convenient for you. Our trained servicers
know your icemaker inside and out.
WIRING DIAGRAM
Page 19

19
YOUR AVANTI PRODUCTS
WARRANTY
Staple your sales receipt here. Proof of
original purchase date is needed to
obtain service under warranty.
WHAT IS COVERED – LIMITED ONE-YEAR WARRANTY
Avanti Products warrants that the product is free from defects in materials and/or workmanship for a period of
twelve (12) months from the date of purchase by the original owner. The foregoing timeline begins to run upon
the date of purchase, and shall not be stalled, tolled, extended, or suspended for any reason whatsoever unless
described in detail in the warranty document. For one year from the date of purchase by the original owner,
Avanti products will, at its option, repair or replace any part of the product which proves to be defective in
material or workmanship under normal use. Avanti Products will provide you with a reasonably similar product
that is either new or factory refurbished. During this period Avanti Products will provide all parts and labor
necessary to correct such defects free of charge, so long as the product has been installed and operated in
accordance with the written instructions in this manual. All Avanti appliances of 4.2 cubic feet capacity or less
must be brought/sent to the appliance service center for repair.
LIMITED SECOND THROUGH FIFTH YEAR WARRANTY
For the second through the fifth year from the date of original purchase, Avanti Products will provide a
replacement compressor free of charge due to a failure. You are responsible for the service labor and freight
charges. Costs involved to move the product to the service center and back to the user’s home, as maybe
required, are the user’s responsibility.
WARRANTY EXCLUSIONS / WHAT IS NOT COVERE D:
The warranty coverage described herein excludes all defects or damage that are not the direct fault of Avanti
Products, including without limitation, one or more of the following:
•
A failure to comply with any applicable state, local, city, or county electrical, plumbing and/or building codes,
regulations, or laws, including failure to install the product in strict conformity with local fire and building codes
and regulations.
• Any external, elemental and/or environmental forces and factors, including without limitation, rain, wind, sand,
floods, fires, mud slides, freezing temperatures, excessive moisture or extended exposure to humidity,
lightning, power surges, structural failures surrounding the appliance, and acts of God.
•
Content losses of food or other content due to
spoilage.
• Incidental or consequential damages
• Parts and labor costs for the following will not be
considered as warranty:
• Evaporator doors, door springs, and/or frames.
• Inner door panels, door shelves, door rails,
and/or door supports.
• Light bulbs and/or plastic housing.
• Plastic cabinet liners.
• Punctured evaporator that voids the warranty on
the complete sealed system.
• The warranty does not apply outside the
Continental USA.
• Shipping and handling costs associated with the
replacement of the unit.
• Repairs performed by unauthorized servicers.
• Service calls that are related to external problems,
such as abuse, misuse, inadequate electrical
power, accidents, fire, floods, or any other acts of
God.
• Failure of the product if it is used for other than it
intended purpose.
• Surcharges including but not limited to, any after
hour, weekend, or holiday service calls, tolls, ferry
trip charges, or mileage expense for service calls to
remote areas.
In no event shall Avanti Products have any liability or responsibility whatsoever for damage to surrounding
property, including cabinetry, floors, ceilings, and other structures and/or objects around the product. Also
excluded from this warranty are scratches, nicks, minor dents, and other cosmetic damages on external surfaces
and exposed parts; Products on which the serial numbers have been altered, defaced or removed; service visits
for customer education, or visits where there is nothing wrong with the product; correction of installation problems
(you are solely responsible for any structure and setting for the product, including all electrical, plumbing and/or
other connecting facilities, for proper foundation/flooring, and for any alterations including without limitation
cabinetry, walls, floors, shelving etc., as well as the resetting of breakers or fuses.
OUT OF WARRANTY PRODUCT
Avanti Products is under no obligation, at law or otherwise, to provide you with any concessions, including
repairs, pro-rates, or product replacement, once this warranty has expired.
WARRANTY – REFRIGERATION - COMPRESSOR
Page 20

20
AVISOS DE SEGURIDAD
Su seguridad y la seguridad de los demás son muy importantes.
Hemos proporcionado muchos mensajes importantes de seguridad en este manual para su máquina
de hielo. Siempre lea y obedezca todos los mensajes de seguridad.
Éste es el símbolo de alerta de seguridad. Este símbolo le advierte sobre
peligros potenciales que pueden ocasionar la muerte o lesionar a usted y otros.
Todos los mensajes de seguridad seguirán el símbolo de alerta de seguridad
ya las palabras ”PELIGRO”, “ADVERTENCIA” o “PRECAUCIÓN”.
Peligro significa que el incumplimiento de es ta
medida de seguridad podría resultar en
lesiones graves o la muerte.
Advertencia significa qu e si no se respeta esta
medida de seguridad podr ía resultar en graves
daños al producto, lesione s personales graves
o la muerte.
Precaución significa que el incumplimiento de
esta medida de seguridad podría resultar en
lesiones personales, de propiedad o daños
materiales leves o moderadas.
Todos los mensajes de seguridad le alertará a saber qué peligro potencial, le dirán cómo reducir el
riesgo de lesiones, y le hará saber lo que puede suceder si no se siguen las instrucciones.
ADVERTENCIA PARA LOS RESIDENTES DE CALIFORNIA
ADVERTENCIA:
Cáncer y daños reproductivos
www.p65warnings.ca.gov
INSTRUCCIONES DE SEGURIDAD IMPORTANTES
ADVERTENCIA: Para reducir el riesgo de incendio, descargas eléctricas o lesiones personales
al usar su máquina de hielo, siga estas precauciones básicas:
• Enchufe la unidad en una toma de 3-conexión a tierra de
• No quite la clavija de puesta a tierra.
• No use un adaptador.
• No usar y cable de extensión.
• Desconecte la corriente antes de la limpieza.
• Desconecte la corri ent e eléct r ica ant es de dar se r v icio.
• Vuelva a colocar todos los paneles antes de o perar.
• Use dos o más personas para mover e instalar la máquina de hielo
GUARDA ESTAS INSTRUCCIONES
Page 21

21
AVISOS IMPORTANTES
Antes de usar la máquina de hielo, tiene que estar bien colocado e instalado como
se describe en este manua l, así que lea cuida dosamente el m anual. Para reducir
el riesgo de ince ndio, desc arga eléc trica o lesiones al util izar la m áquina de hiel o,
siga las precauciones básicas, incluyendo las siguientes:
• Enchufe en una toma de 3-de conexión a tierra, no retire la conexión a tierra, no utilice un
adaptador, y no utilizar un cable de extensión.
• Se recomienda que esté enchufado en un circuito separado , que preste servicio ún icamente a
su máquina de hielo. Utilice recipientes que no se puede apagar con un interruptor o cadena.
• Nunca limpia la máquina de hielo con líquidos inflamables. Estos vapores pueden crear un
riesgo de incendio o explosión. Y no se almacene o use gasolina u otros vapores y líquidos
inflamables cerca de este o cualquier otra máquina de hielo. Los vapores pueden crear un riesgo
de incendio o explosión.
• Antes de proceder con las operaciones de lim pieza y m antenimiento, aseg úrese de que la línea
de alimentación de la unidad se desconecta.
• No conecte o desconecte el enchufe eléctrico con las manos mojadas.
• Desconecte la máquina de hielo o desconecte la energía antes de la limpieza o el
mantenimiento. El no hacerlo puede provocar una descarga eléctrica o la muerte.
• No intente reparar o reemplazar cualquier parte de su máquina de hielo a menos que se
recomiende específicam ente en este manual. Cualq uier otro servicio debe ser real izado por un
técnico cualificado.
SIGA todas las advertencias a continuación.
• Use dos o más personas para mover e instalar la m áquina de hielo. No hacerlo pued e resultar
en lesiones.
• Para garantizar una ventilación adecuada para su máquina de hielo, la parte delantera de la
unidad debe estar completamente despejada. Elija un área bien ventilada con temperaturas
superiores 55ºF (13
°
C) y por debajo 90 ° F (32 ° C). Esta unidad debe ser i nstalada en un áre a
protegida del elemento, tales como viento, lluvia, rocío de agua o goteos.
• La máquina de hielo no debe colocarse cerca de hornos, parrillas u otras fuentes de calor.
• La máquina de hielo se debe insta lar con todas las conex iones eléctric as, de agua y de drenaj e
de acuerdo con los códigos estatales y locales. Se requiere un suministro estándar eléctrica
(sólo 115 V CA, 60 Hz), tierra adecuada de acuerdo con el Código Eléctrico Nacional y los
códigos y reglamentos locales.
• No doble ni apriete el cable de alimentación de la máquina de hielo.
• El tamaño del fusible (o interruptor automático) debe ser de 15 amperios.
• Es importante que la m áquina de hielo esté nivel par a funcionar correctam ente. Es posible que
tenga que hacer varios ajustes para nivelarla.
• Toda la instalación debe estar de acuerdo con los requerimientos locales de plomería y
electricidad.
• Asegúrese de que los tubos no se pellizcan o estén doblados o dañados durante las
instalaciones.
• Compruebe si hay fugas después de la conexión.
• Nunca permita que los niños operen, jueguen o se introduzcan en la máquina de hielo.
• Aunque la unidad ha sido probada en la fábrica, debido al tránsito y almac enamiento a largo
plazo, el primer lote de cubos debe ser desechado.
• Productos de limpieza a base de disolventes de abrasivos en el interior. Estos limpiadores
pueden dañar o decolorar el interior.
• No utilice este aparato para que no sea su finalidad.
Page 22

22
Ayúdenos a ...
Lea detenidamente esta guía.
Se pretende que a yudan a utilizar y m antener
su nueva máquina de hielo correctamente.
Tenga a la mano para responder a sus
preguntas. Si no entiende algo o si necesita
más ayuda, por favor llame a:
Avanti Servicio al Cliente
800-220-5570
Mantenga prueba de la fecha de compra
original (como el recibo de venta) con esta
guía para establecer el período de garantía.
Anote el modelo y número de serie.
Los encontrará en una placa situada en la
pared posterior de la máquina para hacer hielo
Por favor, escriba estos números aquí:
____________________________________
Fecha de compra
____________________________________
Número de modelo
____________________________________
Número de serie
Utilice estos números en cualquier
correspondencia o llamadas de servicio con
respecto a su máquina de hielo
Si ha recibido una máquina de hielo d añado,
póngase inmediatamente en contacto con el
distribuidor (o constructor) que le vendió la
máquina de hielo
Ahorrar tiempo y dinero. Antes de llamar al
servicio técnico, co nsulte la Guía de solución
de problemas. En él se e numeran las causas
de los problemas de func ionamiento de m enor
importancia que se puede corregir a sí mismo.
Si necesita servicio
Estamos orgullosos de nuestro servicio y
queremos que usted esté satisfecho. Si por
alguna razón usted no está s atisfecho con el
servicio que recibe, aquí h ay algunos pasos a
seguir para obtener más ayuda.
PRIMERA, con algun a de las personas q ue al
servicio de reparación de hielo. Explicar por
qué no está satisfecho. En la ma yoría de los
casos, esto va a resolver el problema.
A continuación, si usted todavía no está
contento, escribir todos los detalles,
incluyendo su número de teléfono, y enviarlo
a:
Servicio al cliente
Avanti Products
10880 NW 30 Street
Miami, Florida 33172
PRECAUCIÓN:
LA MÁQUINA DE HIELO NO ESTÁ
DISEÑADA PARA EL
ALMACENAMIENTO DE MEDICINA U
OTROS PRODUCTOS MÉDICOS.
Page 23

23
Partes y características
1
Puerta corrediza
2
Compartimiento de almacenamiento
3
Respiradero
4
Patas niveladoras (4)
5
Panel de control
6
Filtro de aire
7
Botón para encender / apagar (localizado en la parte trasera)
8
Gabinete
9
Cable de alimentación
10
Conexiones de agua (entrada y salida)
11
Aperturas de ventilación
Page 24

24
Instrucciones de seguridad importantes
− Lea todas las instrucciones antes de usar la máquina de hielo.
− PELIGRO o ADVERTENCIA: Riesgo de atrapamiento de niños. El atrapamiento y asfixia de niños no
son problemas del pasado. Las máquinas de hielo tiradas y abandonadas son un peligro. . . incluso si
van a “permanecer en el garaje por unos días”.
− Antes de deshacerse de su vieja máquina de hielo: quite las puertas.
− Nunca permita que los niños operen, jueguen, o se introduzcan en la máquina de hielo.
− Nunca limpie la máquina de hielo con líquidos inflamables. Los vapores pueden crear un riesgo de
incendio o explosión.
− No almacene o use gasolina u otros vapores y líquidos inflamables cerca de este o cualquier otra
máquina de hielo. Los vapores pueden crear un riesgo de incendio o explosión.
INSTRUCCIONES DE INSTALACIÓN
Antes de usar la máquina para hacer hielo
• Retire la envoltura interna y externa.
• Compruebe para asegurarse de que tiene todas las siguientes partes:
o 1 cuchara para retirar hielo
o 1 manguera de suministro de agua
o 1 manguera de drenaje
o 4 patas niveladoras ajustables
o Manual de instrucciones
• Antes de conectar la unidad a la fuente de alim entación, se deja reposar en posición vertical
durante aproximadam ente 2 horas. Esto reducirá la posibili dad de un mal funcionamiento en e l
sistema de refrigeración de la manipulación durante el transporte.
• Limpiar la superficie interior con agua tibia con un paño suave.
PELIGRO PESO EXCESIVO
UTILIZAR DOS O MÁS PERSONAS PARA MOVER E INSTALAR LA MÁQUINA DE HIELO
DE LO CONTRARIO PUEDE RESULTAR EN LESIONES EN LA ESPALDA U OTRO PARTES.
~
ADVERTENCIA
~
Para reducir el riesgo de incendio, descarga
eléctrica o lesiones al utilizar su máquina de
hielo, siga estas precauciones básicas:
Esta unidad es para uso en interiores
- Guarda estas instrucciones -
Page 25

25
Conexión eléctrica
Esta máquina de hielo requiere estar conectada a tierra adecuadamente para su
seguridad. El cable de alimentación de esta máquina de hielo está equipado con un
enchufe de tres clavijas que se acopla con tres enchufes de pared standard para
minimizar la posibilidad de choque eléctrico.
Bajo ninguna circunstancia corte o quite la tercera clavija de tierra del cable de alimentación
suministrado. Por su s eguri dad per sona l, esta m áqui na de hiel o debe estar c orre ctam ente c onectada
a tierra.
Esta máquina de hielo r equiere una tom a de tierra e léctrica 11 5/120 vo ltios de C A ~ / 60H z estándar
con de tres clavijas. Conecte la toma de corriente y el circuito por un electricista calificado para
asegurarse usar la toma de tierra adecuada. Cuando se encuentra una toma de corriente estándar de
2 patas, es su responsabilidad y obligación de reemplazarla por un tomacorriente de pared de 3
clavijas con conexión a tierra.
El cable debe estar asegurado detrás de la máquina de hielo y n o dejarlo expuesto para preveni r
lesiones accidentales.
La máquina de hielo siempre debe estar enchufada en un tomacorriente individual que tiene una
tensión nominal qu e coincide con la etiqueta de datos en la máquina de hielo. Esto proporciona el
mejor rendimiento y también previene la s obrec arga de los circuitos eléc tr icos de la casa que podría n
causar un riesgo de i ncendio por calentamiento. Nunca desconecte l a máquina de hielo tirando del
cable de alimentación. Siempre sujete firmemente el enchufe y tire en línea recta desde el
receptáculo. Reparar o reemplazar inmediatamente todos los cables eléctricos que se hayan
desgastado o dañado. No utilice un c able que m uestre grietas o daños por abra sión a lo lar go de su
longitud o en cualqu iera de los extremos . Cuando se mueve la máquin a de hielo, tenga cuidado d e
no dañar el cable de alimentación.
Cable de extensión
Debido a los peligros potenciales de seguridad bajo ciertas condiciones, se recomienda
encarecidamente que no s e utilize un cable de extensión con esta máquina para hacer hielo. Sin
embargo, si debe utilizar u n cable de extensión es absolut amente necesario que sea un UL / CU LListed, 3 hilos de co nexión a tierra máquina de h ielo cable de extensión que t iene un enchufe y la
toma de tierra y que la capacidad eléctrica del cable de ser de 115 voltios y al menos 10 amperios.
Protector contra sobretensiones
La mayoría de las máquinas de hielo eléctric os utiliza n una serie de placas de control e léctricos par a
operar. Estas placas son muy susceptibles a las subidas de tensión y podrían ser dañadas o
destruidas.
Si la máquina de h ielo se va a utilizar en un ár ea o si su ciudad / país es pro penso a subidas de
tensión / interrupci ones; se sugiere que utilice un pr otector contra sobretensiones de energía para
todos los dispositivos eléctricos / máquinas de hielo que utiliza. El protector de tensión que se
selecciona debe tener un bloqueo y aumento suf icientem ente alto com o para proteger la m áquina de
hielo donde está conectado. Si tiene alguna pr egunta relacionada con el tipo y tam año de contacto
necesario protector contra sobretensiones a un electricista autorizado en su área.
Los daños debidos a sobrecargas de energía no se consideran un fabricante cubierto defecto y
anulará la garantía del producto.
~ADVERTENCIA~
La conexión incorrecta d e la tierra del equipo pu ede res ultar en el ries go de des carga el éctrica. Si
el cable de alim entación de la m áquina de hielo ran go o es tá dañad o, haga q ue s ea reem plazado
por un centro de servicio autorizado de Avanti Products.
Page 26

26
Instalación de su máquina para hacer hielo
• Esta máquina de hielo requiere estar debidamente instalada por un profesional calificado
Esta máquina de hi elo se debe instala r con conexion es eléctricas y plomería de acuerd o
con todos los códigos estatales y locales.
• Coloque su máquina de hie lo en un p iso que s e a lo s uf icien temente fuerte como para sopor tar l a
máquina de hielo cua ndo está totalm ente cargad a. Para nivelar su máquina de hielo, ajuste las
(4) patas de la máquina de hielo.
• Permitir un mínimo de ¾ pulgada de espacio entre la parte superior y 3 pulgadas a los
lados de la máquina de hielo y un mínimo de 5 pulgadas en la parte posterior, que permite
la circulación de aire necesaria para enfriar el compresor. Asegúrese de que la parte
delantera de la unidad está completamente despejada.
• Ubicar la máquina de hielo fuera de la luz solar directa y de fuentes de calor (cocina,
calefacción, radiador, etc .). La luz solar dir ecta puede afect ar el recubrimiento a crílico y fuentes
de calor puede aum entar el cons um o eléctrico. t em peratur as am biente ex trem as de frío también
pueden provocar que la máquina no funcione correctamente.
• Elija un área bien ventilada con temperatur as por encim a de 50ºF (10ºC) y por d ebajo de 110ºF
(43ºC). Esta unidad debe ser instalada en un área protegida de los elementos.
Distancias de instalación:
Permitir un mínimo de 3 pulgadas de espacio entre los lados, ¾” en la p art e su perior de la
máquina de hielo y un mínimo de 5 pulgadas en la parte posterior, que permite la
circulación de aire necesaria para enfriar el compresor. Asegúrese de que la parte
delantera de la unidad es completamente despejada.
• La instalación de esta máquina de hielo requiere una entrada de suministro de agua fría de ¼”
(6.35mm) Tubo de cobre blando con una válvula de cierre.
• La máquina de hielo requiere un suministro continuo de agua con una presión mínima de 14,5 psig
y una presión estática que no exceda de 80 psig. La temperatura del suministro de agua en la
máquina de hielo debe estar entre 41ºF (5ºC) y 77ºF (25ºC) para una operación adecuada.
• Se recomienda encarecidamente que se utilice un filtro de agua. Un filtro, si es del tipo adecuado,
puede eliminar el sabor y olores así como partículas.
Advertencia
El funcionamiento de la máquina de hielo durante periodos prolongados fuera
de los intervalos normales de temperatura como se describe anteriormente
pueden afectar el rendimiento del prod uc to.
Page 27

27
IMPORTANTE: Una vez que esté listo para instalarlo abajo de un armario o directamente en el suelo,
debe ajustar los pies para nivelar la máquina de hielo. Si el suelo está desnivelado, simplemente girar
las dos ruedas delanteras a tocar el suelo.
Nivelación de la máquina de hielo
Es importante que la máquina de hielo esté nivelada para
funcionar correctamente. Las patas niveladoras se pueden subir o bajar
girando cada uno de los cuatro pies en el parte inferior de la máquina si
usted encuentra que la superficie está des-nivelada, gire los pies hasta que
la máquina de hielo esté nivelada; puede tener que realizar varios ajustes a
nivelarla. Recomendamos el uso de un nivel de carpintero para
comprobar que la máquina esté nivelada.
Suministro de agua
El suministro de agua debe estar listo en
el punto de instalación. La presión de
suministro de agua debe ser de un
mínimo de 15 psig con una presión
estática de no más de 80 psig. (Una
toma de corriente directamente detrás de la máquina para hacer hielo facilitar la instalación.)
IMPORTANTE:
1. Todas las instalaciones deben estar de acuerdo con los requerimientos locales de plomería. La
instalación profesional es requerida.
2. Asegúrese de que las mangueras no se pellizcan o esté dobladas o dañadas durante la
instalación.
3. Compruebe si hay fugas después de la conexión.
Herramientas necesarias:½ pulg. llave de extremo abierto, destornillador de estrella
Conexión de la línea de agua:
1. Cierre el suministro de agua principal.
2. Encuentre una tubería vertical de agu a fría cerc a (½ pulg. a ¾ de pulgada) de la ubicación de la
instalación. La distancia debe ser de menos de 6 pies. La manguera de suministro de agua
suministrada con la máquina de hielo es de aproximadamente 6 pies de largo.
3. Una v álvula de cierre debe estar instalada para el sum inistro de agua principal. Si la tu bería de
agua tiene una hoja de t ubería de cobre, adjunt e un ¼” unión de com presión OD a la tubería y
quite la tuerca.
4. Conec te la tuer ca de la manguera de s uministro de agua a la llave, y conecte el o tro ex tr emo a la
entrada de agua. Apriete firmemente con la mano, de una media vuelta con la llave.
5. Abra e l sum inistro de agu a. Com pruebe si ha y fugas de c onexión de s uministr o de agua. Apriete
cada conexión (incluyendo la conexión en la entrada de agua).
IMPORTANTE: Cuando se conecta la manguera de suministro de agua y la manguera de drenaje,
Page 28

28
prestar atención a las indicaciones de “entrada de agua” y “Orificio de drenaje” en la máquina.
Desagüe
Requiere conectar la línea de drenaje antes de utilizar la máquina de hielo. Siga los pasos que se
indican a continuación.
Conexión de la línea de drenaje:
Nota: Un sistema de bomba de drenaje se utiliza en este tipo de máquina de hielo. Si hay una
línea de drenaje cerca de la máquina de hielo, la mejor opción es para drenar el agua de
la tubería de drenaje a través de la manguera de agua de drenaje provisto con máquina
de hielo.
1. Busque el desagüe en el s uel o c erc a de la máquina de hielo. La distanc ia d ebe s er menos de 4.5
pies ya que la longitud d e la m anguera de agu a largo de dr enaje pro visto de la m áquina de hielo
es de aproximadamente 4.85 pies.
2. Encuentra la salida de drenaje en la parte posterior de la máquina de hielo. Conecte la salida de
drenaje a la manguera de drenaje de agua, e inserte el otro extremo de la manguera en la línea
de drenaje.
NOTA: No permita que la manguera de drenaje cuelgue o bucle más alto que el piso del depósito
de hielo.
3. Todos los tramos horizontales de las líneas de dren aje deben tener una caída de ¼” por pie. es
probable que se requiere un espacio de aire entre el tubo de drenaje máquina de hielo y el
receptáculo de drenaje / residuos. Un tubo vertical con una trampa a continuación sería
aceptable para el receptáculo de drenaje / residuos. Un desagüe en el suelo también es
aceptable.
4. Vierte 1 galón de agua e n el depósito de hielo para comprobar si hay fugas en el sistem a de
drenaje. Apriete cualquier conexión que tenga pérdidas.
IMPORTANTE: Drenaje infrecuente causará un alto índice de derretimiento en el depósito de
hielo.
Page 29

29
FUNCIONAMIENTO DE LA MÁQUI NA DE HIELO
Descripción de los LED y botones:
1. Depósito de hielo lleno (ICE FULL):
Cuando está encendido, el depósito de hielo está lleno de hielo o hay algo que bloquea el
sensor. La unidad dejará de funcionar. Cuando los cubos de hielo se retiran del depósito de
hielo, liberando la sonda, la luz se apagará y entonces la unidad se reiniciar á y vuelve al modo
de fabricación de hielo.
2. Producir Hielo (Ice-Making):
Cuando está encendida, la unidad está funcionando en el modo de fabricación de hielo
controlada por una sonda de temperatura en el evaporador.
3. Botón de limpieza (CLEAN): Cuando se oprime este botón, la unidad entra en el modo de
“LIMPIEZA”. El sistema de limpieza se ejecutará a través de una limpieza completa del sistema de
agua y del evaporador. El agua usada durante el modo de limpieza se drene a través de la
manguera de desagü e. U na vez e l c ic lo d e limpieza del sistema se haya completado, vol verá a s u
funcionamiento normal automáticamente.
4. Restauración de l contador (Timer Reset): Este b otón restablece e l recordatorio "Lim piar filtro".
Después de aproxim adamente 350 horas de func io na miento del compresor o cic l os de fabricación
de hielo, la unidad emitirá u n pit ido y todas las (3) tres luces indica dor as parpadearán (Power, IceMaking, Ice Ful l) para recordarle que limpie el filtro del c ondensador en la parte delantera de la
unidad. Una vez que ha ya eliminado el filtr o, límpielo y devuélva lo a su l ugar origin al. Presione el
botón "Restablecer contador" para restablecer el recordatorio.
Método de funcionamiento
Abre el grifo de agua, dejar que rellene el abrevadero, a continuación, oprime el botón ON /
OFF en el panel frontal. La máquina de hacer hielo comenzará a funcionar automáticamente.
1. Después de 3 m inutos, la m áquina pasará autom áticam ente a la e tapa de fabric ación de hielo, y
se escuchará el sonido del agua que fluye.
2. Cuando el lote de hielo se ha formado completamente, el hielo será cosechado automáticamente.
3. Cuando el depósito de hielo está lleno, la máquina dejará de fabricar hielo de forma automática.
4. La unidad comenzará a hacer hielo de nuevo después que los cubitos de hielo se retiran o
derriten.
Page 30

30
IMPORTANTE:
• Aunque la unidad ha sido probado y limpiado en la fábrica, debido al tránsito y almacenamiento a
largo plazo, el primer lote de cubos debe ser desechado.
• Nunca apague el suministro de agua cuando la máquina de hielo está funcionando.
• Nunca toque el evaporador cuando la unidad está funcionando!
• Excepto para retirar el hielo de la unidad, mantenga la puerta cerrada para reducir derretimiento y
asegurar la formación de hielo adecuado.
CUIDADO Y MANTENIMIENTO
Preparación de la máquina de hielo para un almacenamiento largo
Si no va a utilizar la máquina de hielo durante mucho tiempo, o se va a trasladar a otro lugar, será
necesario drenar el sistema de agua.
1. Cierre el suministro de agua en la fuente principal de agua.
2. Desconecte la línea de suministro de agua de la maquina.
3. Cierre el suministro de electricidad en la fuente principal de energía eléctrica.
4. Saque depósitos de hielo para eliminar cualquier resto de hielo y agua. Secar bien.
5. Deja la puerta abierta para permitir la circulación de aire y para prevenir la formación de moho.
6. Dej e la línea de sum inistro de agu a y el cable de a limentación des conectada hasta que esté listo
para volver a usar.
IMPORTANTE:
• No toque el enchufe con las manos mojadas.
• Nunca desenchufe la unidad jalando el cordón. Sujete el enchufe y jale con firmeza.
Limpieza de la máquina de hielo
La limpieza periódica y el mantenimiento adecuado garantizan una mayor eficacia, rend im iento y
larga vida. Los intervalos de mantenimiento indicados se basan en condiciones normales. Es posible
que desee acortar los intervalos si usted tiene mascotas, o hay otras consideraciones especiales.
Nota IMPORTANTE:
Nunca guarde nada en el depósito de hielo que no es de hielo: Los objetos como
botellas de vino y cerveza no sólo son insalubres, pero las etiquetas pueden
resbalar y tapar el desagüe.
Si la máquina de hielo no se utiliza duran te m uc ho ti em po, antes del
siguiente uso se debe limpiar a fondo. Siga cuidadosamente las
instrucciones proporcionadas para la limpieza o el uso de soluciones
desinfectantes. No deje ninguna solución en el interior de la máquina
de hielo después de la limpieza.
Page 31

31
Limpieza exterior
La puerta y el gabinete pueden ser limpiados con un detergente suave y agua caliente tal como 1
onza de líquido para lavar platos se mezcla con 2 litros de agua caliente. No utilice limpiadores
basados en disolventes o abrasivos. Utilice una esponja suave y enjuague con agua limpia. Utilice
una toalla suave y limpia para evitar las manchas de agua.
Limpieza de interiores
El depósito de hielo debe desinfectars e de vez en cuando. Limpie la papelera antes de que la
máquina de hielo se utiliza por primera vez y volver a utilizar después de parar durante un período
prolongado de tiempo. Por lo general es conveniente desinfectar la bandeja después de que el
sistema de fabricación de hielo ha sido limpiado, y el recipiente de almacenamiento está vacío.
1. Desc onec te la energí a a la unidad.
2. Retire todo el hielo del deposito de almacenamiento.
3. Abra la puerta y con un paño limpio, limpie el interior con una solución desinfectante hecha de
1 onza (29.5ml) de lejía o cloro y 2 galones (7.5L) de agua caliente 95ºF (35 ºC) A 115 ºF (46
ºC).
4. Enjuague bien con agua limpia. El agua residual se drena a través de la tubería de desagüe.
5. Vuelva a conectar la energía a la unidad.
La cuchara para retirar hielo también se debe lavar con regularidad. Lavarlo al igual que cualquier
otro recipiente de alimentos.
Antes de proceder con las operaciones de limpieza y mantenimiento, asegúrese de
que la línea de alimentación de la unidad se desconecta y la línea de agua esté
apagada.
NO use agentes de limpieza con disolventes o abrasivos en el
interior.
Estos limpiadores pueden transmitir el gusto a los cubos de hi el o, o
dañar o decolorar el interior de la máquina.
Page 32

32
El limpiador de máquina de hielo contiene ácidos.
NO utilice o mezclar con cualquier otro producto limpiador a base de
solventes.
Use guantes de goma para proteger las manos. Lea cuidadosamente las
instrucciones de seguridad del material en el recipiente del limpiador de la
Minerales que se remueven del agua durante el ciclo de congelación finalmente formarán un depósito
duro-escamosa en el sistema de agua. Limpieza del sistema regularmente ayuda a eliminar la capa
de minerales. ¿Con qué frecuencia es necesario limpiar el sistema, depende de lo duro que es el
agua. Con el agua dura de 4 a 5 granos / litro, es posible que tenga que limpiar el sistema con la
frecuencia que cada 6 meses.
1. Oprime el botón Power y apaga la máquina de hielo. Mantenga la máquina de hielo
conectada al suministro de agua y desagüe.
2. Abra la puer ta y retire todos los cubos de hielo.
3. Enciende el pod er de l a m áquina de h ielo. Vierte 8 onzas de soluc ión de l impie za de “NickelSafe” en el cubo de agua. Añadir 8 onzas de agua del gr ifo. Después de unos 5 minutos,
presione el botón CLEAN "limpiar" en el panel de control. La máquina func ionará el m odo de
limpieza automática.
NOTA:
EL LADO POSTERIOR DEL MOLDE QUE HACE EL HIELO DEBE
SER LIMPIADO POR UN PROFESIONAL.
Page 33

33
Desinfectar el sistema de fabricación de hielo
1. Desconecte la alimentación de la máquina de hielo.
2. Eliminar todos los cubos de hielo del recipiente de almacenamiento.
3. Prepar ar una soluc ión desinf ectante h echa d e 1 onza de lejía dom éstica y 2 galones de 95ºF
agua caliente (35ºC) to115ºF (46 ºC).
4. Llene una botella con la solución desinfectante y rociar todas las esquinas y bordes,
asegurándose de cubrir todas las superficies con la solución. Enjuague con agua limpia.
5. Mantenga la máquina de hielo conectada al suministro de agua. A su vez en el poder de la
máquina de hielo. Dentro de los 5 minutos, pulse el botón de limpieza. La máquina
funcionará el modo automático limpia.
6. 30 minutos para una limpieza adecuada.
7. La unidad comenzará el proceso de fabricación de hielo automático cuando el ciclo de
limpieza se ha completado.
8. Desechar el primer lote de hielo.
Limpieza del filtro de condensador
Un condensador sucio u obstruido impide la circulación de aire adecuada, reduce hielo capacidad de
cierre, y hace más alta que las temperaturas de funcionamiento recomendadas que pueden conducir
a fallo de componentes. Tener el condensador limpio al menos una vez cada seis meses.
1. Oprime el interruptor de encendido en la posición OFF.
2. Desenchufe la máquina de hielo o desconecte la alimentación.
3. Retire con cuidado el filtro de rejilla frontal.
4. Eliminar la suciedad y la pelusa del filtro con el accesorio del cepillo de una aspiradora.
5. Vuelva a insertar el filtro de rejilla frontal.
6. Enchufe la máquina de hielo y oprime el interruptor de encendido en la posición ON.
Fallo de alimentación
La mayoría de los cortes de energía regresan en unas pocas horas y no deben afectar a la
temperatura de la máquina de hielo si minimiza el número de veces que se abre la puerta. Si el poder
va a estar fuera por un período de tiempo m ás largo, es necesario tomar las medidas adecuadas
para almacenar el hielo en otros recipientes.
Tiempo de vacaciones
Vacaciones cortas: Deje la unidad funcionando durante las vacaciones de menos de tres semanas.
Unas largas vacacion es: Si no va a u ti lizar la máquina de hielo dur ant e varios meses, elimine todos
los cubos de hielo, escurrir a continuació n y desconecte el c able de alim entación. Limpia y seca bien
el interior. Para evitar el crecimiento de moho y mal olor, dejar la puerta ligeramente abierta.
Page 34

34
SOLUCIÓN DE PROBLEMAS
Antes de llamar al servicio técnico
Si la unidad parece no funcionar correctamente, leer a través de la sección de USO en primer lugar.
Si el problema persiste, consulte la Guía de solución de problemas en las páginas siguientes.
Algunos de los problemas mencionados en la Guía se pueden resolver fácilmente sin una llamada de
servicio.
Problema
Causa posible
corrección probable
La máquina no
funciona.
La máquina de hielo está
desconectada.
Enchufe el fabricador de hielo en.
El fusible está fundido.
Cambie el fusible. Si sucede otra vez, llame al
servicio técnico para comprobar si hay un
cortocircuito en la unidad.
El botón de encendido máquina
de hielo se fija en OFF.
Conmutar el botón de encendido máquina de
hielo en ON.
El depósito de hielo está lleno.
Retire unos cubitos de hielo. Asegúrese de que
la sonda llena de hielo está libre de hielo.
El agua no se
introduce después de
que la máquina
arranca.
El grifo de suministro de agua
está apagada.
Abrir el grifo de suministro de agua.
La tubería de suministro de
agua no está conectada
correctamente.
Vuelva a conectar el tubo de suministro de
agua.
Máquina hace hielo,
pero el depósito no
se llena con hielo.
El condensador puede estar
sucio.
Limpiar el condensador.
El flujo de aire a la máquina de
hielo puede estar obstruída.
Compruebe la instalación.
La temperatura ambiente y la
temperatura del agua son altas,
o la unidad está cerca de
alguna fuente de calor.
Compruebe la instalación.
Sale agua de la
unidad.
Un poco de agua cae al suelo
cuando se abre la puerta para
eliminar el hielo de la papelera
de almacenamiento.
condensación normal en la puerta o un poco de
agua junto con hielo. Tenga cuidado al quitar el
hielo.
toma de agua tiene una fuga. Apretar. Consulte Conexión de la línea de agua.
Los cubos son
parcialmente formada
No hay suficiente agua en el
abrevadero.
Compruebe si la presión de suministro de agua
está por debajo de 15 psig.
Page 35

35
o son de color blanco
en la parte inferior.
Compruebe el suministro de agua o el filtro
puede ser restringidos.
Compruebe si hay una fuga de agua en el
abrevadero.
Ruido durante la
operación
Las patas no están niveladas y
bloqueadas.
Nivel y bloquear las patas. Ver Nivelación de la
máquina.
Ciertos sonidos son normales.
Ver Sonidos normales.
La máquina de hielo
se para durante la
fabricación de hielo.
La electricidad está apagada.
Vuelva a conectar la línea de alim entac ió n.
La temperatura ambiente est á
fuera del rango establecido.
Cortar la electricidad y dejar la máquina de hielo
desconectada hasta que la temperatura vuelve
a dentro del rango establecido.
El depósito de hielo está lleno
de hielo.
Eliminar algunos cubitos de hielo; asegúrese de
que la sonda llena de hielo está libre de hielo.
El gabinete de la
máquina de hielo
está eléctrificada
La línea de tierra no está en la
toma de corriente.
Utilice una toma de cumplir con los requisitos
de puesta a tierra.
Depósitos minerales
se producen con
frecuencia dentro de
la máquina.
El nivel de dureza del agua es
demasiado alto.
Instalar un dispositivo de a bla ndamiento del
agua en frente de la entrada de agua.
Las fugas de agua
desde el depósito de
hielo
El orificio de drenaje por debajo
del depósito de hielo está
bloqueado.
Retire el depósito de hielo y limpiar el orificio de
drenaje.
El tubo de descarga está
doblado o mal colocado más
alto que el suelo de la bandeja
de almacenamiento de hielo.
Revise la manguera de drenaje para
asegurarse de agua puede ser drenada a cabo
sin obstáculos.
Page 36

36
Page 37

37
SERVICIO PARA SU MÁQUINA DE HIELO
Estamos orgullosos de nues tra organización de servicio al cliente y la red de t écnicos de servicios
profesionales que prest an servicio en sus máqui nas de hielo Avanti Pr oducts. Con la compra de s u
máquina de hielo de Avanti Produc ts, puede est ar seguro de que si alguna vez n ecesita informac ión
o asistencia adicional, el e quipo de Servicio al Cliente de Avanti Products esta rá aquí para usted.
Sólo tiene que llamar al número gratuito.
Avanti Productos Servicio al Cliente
Información del Producto
800-323-5029
Sean cuales sean sus preguntas son acerca de
nuestros productos, hay ayuda disponible.
pedidos de piezas
800-220-5570
Es posible pedir piezas y accesorios que serán
entregados directamente a su casa con un
cheque personal, giro postal, Master Card o Visa.
El servicio a domicilio Reparación
800-220-5570
Un centro de servicio Avanti Products
proporcionará el servicio de reparación experto,
programado a una hora que sea conveniente
para usted. Nuestros técnicos conocen máquina
de hielo dentro y por fuera.
DI AGRAMA DE CABLEADO
Page 38

38
SUS GARANTIA DE AVANTI PRODUCTS
Grapa su recibo de compra aquí. Se necesita un
comprobante de la fecha de compra original para obtener
servicio bajo garantía.
COBERTURA - GARANTÍA LIMITADA DE UN AÑO
Avanti Products garantiza que el producto está libre de defectos en materiales y / o mano de obra durante un período de doce
(12) meses desde la fecha de compra por el propietario original. El tiempo mencionado arriba comienza a ejecutarse a partir
de la fecha de compra, y no se puede detener, estar sujeto a derechos, extender o suspender por cualquier motivo no ser que
se describe en detalle en el documento de garantía. Durante un año a partir de la fecha de compra por el propietario original,
los productos de Avanti, a su elección, reparará o reemplazará cualquier parte del producto que resulta ser defectuosa en
material o mano de obra bajo condiciones normales de uso. Avanti Products le proporcionará un producto parecido al original,
ya sea nuevo o restaurado de fábrica. Durante este período de Avanti Products proporcionará todas las piezas y mano de obra
necesarias para corregir dichos defectos de forma gratuita, siempre y cuando el producto ha sido instalado y operado de
acuerdo con las instrucciones escritas en este manual. Todos los electrodomésticos de Avanti de 4.2 pies cúbicos de
capacidad o menos deben ser llevados / enviado al centro de servicio del electrodoméstico para su reparación.
SEGUNDO A TRAVÉS DE GARANTÍA LIMITADA DE QUINTO AÑO
Para el segundo hasta el quinto año desde la fecha de compra original, Avanti Products proporcionará un compresor de
reemplazo de forma gratuita debido a un fallo. Usted es responsable de las cargas de trabajo y de carga de servicio. Costos
involucrados para mover el producto al centro de servicio y de vuelta a la casa del usuario, como tal requiere, son
responsabilidad del usuario.
EXCLUSIONES DE LA GARANTÍA / ¿Qué no cubre?:
La cobertura de la garantía se describe aquí excluye todos los defectos o daños que no son la responsabilidad directa de los
productos de Avanti, incluyendo, sin limitación, uno o más de los siguientes:
• Un incumplimiento de cualquier estado, la localidad, ciudad, condado o instalaci ones eléct ric as, hi dráulic as y / o códigos de
construcción, reglamentos o leyes, incluyendo la falta de instalar el producto en estricta conformidad con los códigos y
reglamentos contra incendios y de construcción locales.
• Cualquier fuerzas y factores, incluyendo, sin limitación, la lluvia, el viento, la arena, inundaciones, incendios, deslizamientos
de lodo, temperaturas de congelación, humedad excesiva o la exposición prolongada a la humedad, rayos externos,
elementales y / o ambientales, sobretensiones, fallas estructurales alrededor del electrodoméstico y los actos de Dios.
• las pérdidas de contenido de alimentos o de otros
contenidos debido a su deterioro.
• Los daños incidentales o consecuentes
• Piezas y mano de obra para los siguientes no serán
consideradas como garantía:
• puertas del evaporador, resortes de la puerta, y / o
marcos.
• paneles interiores de puertas, estantes de la puerta, los
carriles de las puertas, y / o soportes de la puerta.
• bombillas y / o carcasa de plástico.
• revestimientos de plástico del gabinete.
• Pinchado evaporador que anula la garantía en el
sistema sellado completo.
La garantía no se aplica fuera de los EE.UU. continental.
• Costes de envío asociados a la sustitución de la unidad.
• Reparaciones realizadas por servicio sin autorizaci ón.
• Las llamadas de servicio que están relacionados con los
problemas externos, tales como abuso, mal uso,
suministro eléctrico inadecuado, accidentes, incendios,
inundaciones, o cualquier otro acto de Dios.
• Fallas del producto si se utiliza para otra cosa que tenía la
intención propósito.
• Recargos incluyendo pero no limitado a, cualquier tras
hora, llamadas de fin de semana o vacaciones de
servicios, peajes, pasajes de transporte o gastos de
kilometraje para llamadas de servicio a zonas remotas.
En ningún caso Avanti Products tener ninguna obligac i ón o responsabilidad al guna por daños a la propiedad cercana al
electrodoméstico, incluyendo gabinetes, pisos, techos y otras estructuras y / o objetos alrededor del producto. También se
excluyen de esta garantía los arañazos, golpes, abolladuras menores, y otros daños cosméticos en superficies externas y
partes expuestas; Productos en los que se han alterado los números de serie, dañado o eliminado; visitas de servicio para la
educación del cliente, o visitas donde no hay nada mal con el producto; corrección de problemas de instalación (usted es el
único responsable de cualquier estructura y entorno para el producto, incluyendo todas las instalaciones eléctric as, de
fontanería y / u otras instalaciones de conexión, para la cimentación / pisos adecuados y para alteraciones incluyendo sin
limitación gabinetes, paredes, pisos, estanterías etc., así como el reajuste de interruptores o fusibles.
A PARTIR DEL PRODUCTO GARANTÍA
Avanti Products no tiene ninguna obligación, por ley o de otro modo, para ofrecerle ninguna concesión, incluidas las
reparaciones, pro-tarifas, o el reemplazo del producto, una vez que esta garantía ha expirado.
GARANTÍA - REFRIGERACIÓN - COMPRESOR
Page 39

39
SÉCURITÉ DE L'APPAREIL
Votre sécurité et celle des autres sont très importantes.
Nous avons fourni de nombreux messages de sécurité importants dans ce manuel pour votre
machine à glaçons. Toujours lire et obéir à tous les messages de sécurité.
C'est le symbole d'alerte de sécurité. Ce symbole vous signale les dangers
potentiels qui peuvent tuer ou blesser vous et d'autres. Tous les messages de
sécurité suivront symbole de sécurité et soit la mention » DANGER », «
AVERTISSEMENT » ou « ATTENTION ».
Danger signifie que la non-respect de cette
déclaration de sécurité peut entraîner des
blessures graves ou la mort.
Attention signifie que le non-respect de cette
déclaration de sécurité peut entraîner des
dommages des produits, d es blessures graves
ou la mort.
Attention signifie que le non-respect de cette
déclaration de sécurité peut entraîner des
blessures mineures ou modérées, des
dommages matériels ou équipements.
Tous les messages de sécurité vous alerter de savoir ce danger potentiel, vous dire comment réduire
les risques de blessures, et que vous sachiez ce qui peut arriver si les instructions ne sont pas suivies.
PROP. 65 MISE EN GARDE POUR LES RÉSIDENTS DE
CALIFORNIE, ETATS UNIS
ATTENTION:
Cancer et troubles de la reproduction
www.p65warnings.ca.gov
CONSIGNES DE SÉCURITÉ IMPORTANTES
AVERTISSEMENT: Pour réduire le risque d'incendie, d'électrocution ou de blessure lors de
l'utilisation de votre machine à glaçons, suivez ces précautions de base:
• Brancher l'unité dans une prise à trois broches
• Ne retirez pas la broche de mise à la terre.
• N'utilise pas un adaptateur.
• Ne pas utiliser et rallonge.
• Débranchez l'alimentation avant le nettoy age.
• Débranchez l'alimentation électrique avant l'entretien.
• Remplacer tous les panneaux avant de faire fonctionner.
• Utilisez deux personnes ou plus pour déplacer et installer la machine à glaçons
CONSERVER CES INSTRUCTIONS
Page 40

40
IMPORTANT CONSEILS DE SÉCURITÉ
Avant la machine à glaçons est utilisé, il doit être correctement positionné et
installé comme décrit dans ce manuel, donc lire attentivement les instructions.
Pour réduire les risques d'incendie, d'électrocution ou de blessure lors de
l'utilisation de la m ac hine à glaçons, suive z les pr écautions de base, y com pr is les
éléments suivants:
• Brancher dans une prise à 3 broc hes mise à la terre, ne pas retirer la broche d e mise à la terre,
ne pas utiliser un adaptateur, et ne pas utiliser un câble de rallonge.
• Il est rec omm andé d'uti liser un circu it sé paré, ser va nt s eulement votre m ac hine à glaçons fourni.
Utiliser des emballages qui ne peuvent être rebutés par un interrupteur ou d'une chaîne de
traction.
• Jamais les pièces propres machine à glaçons avec des liquides inflammables. Ces vapeurs
peuvent créer un risque d'incendie ou d'explosion. Et ne pas stocker ni utiliser d'essence ou
d'autres vapeurs et liquides inflammables à prox imité de ce ou tout autre machine à glaç o ns. Les
vapeurs peuvent créer un risque d'incendie ou d'explosion.
• Avant de procéder à des opérations de nettoyage et d'entretien, assurez-vous que la ligne
d'alimentation de l'appareil est débranché.
• Ne pas brancher ou débrancher la prise électrique lorsque vos mains sont humides.
• Débrancher la machine à glace ou couper le courant ava nt le nettoyage ou l'entretien. Le n on-
respect peut entraîner des chocs électriques ou la mort.
• Ne tentez pas de réparer ou de remplacer une partie de v otre machine à glaçons à m oins qu'il
ne soit spécifiquem ent recomm andé dans ce m anuel. Toutes les au tres réparati ons doivent êtr e
confiées à un technicien qualifié.
SUIVRE AVERTISSEMENT APPEL MORTS SUIVANTES LORSQU'ELLES APPLICABLES À
VOTRE MODÈLE
• Utilisez deux personn es ou pl us pour dép lacer et ins taller la m achine à glaçons. Le non-respect
peut entraîner dans le dos ou d'autres blessures.
• Afin d'assurer une bonne aération de la machine à glaçons, l'avant de l'appareil doit être
complètement dégagée. C hoisisse z un endro it bien venti lé a vec des tem pératur es s upérieur es à
55F (13
°
C) et plus b as 90 ° F (32 ° C) . Cet appar eil do it être ins tallé dans une zo ne protégée d e
l'élément, tels que le vent, la pluie, de l'eau pulvérisée ou de gouttes.
• La machine à glaçons ne doit pas être situé à côté de fours, grilles ou d'autres sources de
chaleur.
• La machine à glaçons doit être installé avec tout es les connexions électriques, de l'eau et de
drain en conformité avec le s c odes d'état et locales . Une alim entatio n électr ique stand ard ( 115 V
CA seulement, 60 Hz), mise à la terre conformément au Code national de l'électricité et les
codes et règlements locaux est nécessaire.
• Ne pas plier ni pincer le cordon d'alimentation de la machine à glaçons.
• Le fusible (ou disjoncteur) doit être de 15 ampères.
• Il est important pour la machine à glaçons à être nivelé afin de f onctionner correctem ent. Vous
devrez peut-être faire plusieurs ajustements pour y arriver.
• Toute installation doit être conforme aux exigences du code de plomberie.
• Assurez-vous que les tuyaux ne sont pas pincé ou pliés ou endommagés au cours des
installations.
• Vérifier les fuites après la connexion.
• Ne jamais laisser les enfants utiliser, jouer avec ou ramper à l'intérieur de la machine à glaçons.
Page 41

41
• Si vous utilisez le conteneur de drainage, vous devez régler le drain Sélect ionnez sur OFF ou
l'eau peut déborder du récipient de drainage
• Bien que l'appareil a été testé à l'usine, en raison de transit à long terme et le stockage, le
premier lot de cubes doit être mis au rebut.
• Ne pas utiliser de produits de nettoyage à base de solvant s d'abrasifs à l' intérieur. Ces produits
de nettoyage peuvent endommager ou décolorer l'intérieur.
• Ne pas utiliser cet appareil pour d'autres fins que celles prévues.
AIDEZ-NOUS VOUS AIDER ...
Lisez attentivement ce guide.
Il est destiné à vous aider à utiliser et
entretenir votre nouvelle machine à glaçons
correctement.
Gardez à portée de m ain pour répondre à vos
questions. Si vous n e comprenez p as quelque
chose ou vous avez bes oin de plus d'aide, s 'il
vous plaît appelez:
Avanti Service à la clientèle
800-220-5570
Gardez la preuve de la date d'achat (tel que
votre bordereau de vente) avec ce guid e pour
établir la période de garantie.
Notez le modèle et le numéro de série.
Vous les trouverez sur une plaque située sur
la paroi arrière de la machine à glaçons
S'il vous plaît écrire ces chiffres ici:
____________________________________
Date d'achat
____________________________________
Numéro de modèle
____________________________________
Numéro de série
Utilisez ces numéros dans toute
correspondance ou des appels de service
concernant votre machine à glaçons
Si vous avez reçu une machine à glaçons
endommagé, contactez immédiatement le
revendeur (ou le constructeur) qui vous a
vendu la machine à glaçons
Gagnez du temps et de l'argent. Avant
d'appeler le service, consultez le Guide de
dépannage. Il énumère les causes des
problèmes de fonctionnement mineurs que
vous pouvez vous corriger.
Si vous avez besoin d'
Nous sommes fiers de notre service et
voulons que vous so yez heureux. Si po ur une
raison quelconque vous n' êtes pas satisfait du
service que vous recevez, voici quelques
étapes à suivre pour obtenir de l'aide.
FIRST, contacter l es pers onnes qui o nt répar é
votre machine à glaçons. Expliquez pourquoi
vous n'êtes pas satisf ait. Dans la plupart des
cas, cela résoudra le problème.
Ensuite, si vous n'êtes toujours pas satisfait,
écrire tous les détails, y compris votre numéro
de téléphone, et l'envoyer à:
Service Clients
Produits Avanti
10880 NW 30 Street
Miami, FL 33172 Etats-Unis
MISE EN GARDE:
L'APPAREIL N'A PAS ÉTÉ CONÇU
POUR LE STOCKAGE OU DE
MÉDECINE D'AUTRES PRODUITS
MÉDICAUX.
Page 42

42
PIÈCES ET CARACTÉRISTIQUES
1
Porte d'accès coulissante
2
Compartiment de stockage de glace
3
Vent d'admission d'air
4
Pieds réglables (4)
5
Panneau de contrôle
6
Assemblée d'admission du filtre à air
7
Bouton de puissance ON / OFF (situé à l'arrière)
8
Cabinet
9
Cordon d'alimentation
10
Drainage
11
Vents d'échappement
Page 43

43
IMPORTANT INSTRUCTIONS DE S ÉCURI TÉ S
− Lisez toutes les instructions avant d'utiliser la machine à glaçons.
− DANGER ou AVERTISSEMENT: Risque de piégeage des enfants. le piégeage des enfants et
asphyxie sont toujours du passé. appareil abandonnés sont toujours dangereux. . . même s'ils « rester
assis dans le garage quelques jours ».
− Avant de jeter votre ancien appareil: enlever les portes.
− Ne jamais laisser les enfants utiliser, jouer avec, ou ramper à l'intérieur du distributeur de glaçons.
− Ne jamais nettoyer
machine à glaçons pièces avec des liquides inflammables. Les vapeurs peuvent
créer un risque d'incendie ou d'explosion.
− Ne pas entreposer ni utiliser d'essence ou d'autres vapeurs et liquides inflammables à proximité de ce
ou tout autre machine à glaçons. Les vapeurs peuvent créer un risque d'incendie ou d'explosion.
INSTRUCTIONS D'INSTALL ATION
Avant d'utiliser votre machine à glaçons
• Retirez l'emballage extérieur et intérieur.
• Vérifiez que vous avez toutes les pièces suivantes:
o 1 Pelle d’glaçons
o 1 Approvisionnement en eau Tuyau
o 1 Eau tuyau de vidange
o 4 pieds réglables
o Manuel d'instructions
• Avant de connecter l'appar eil à la source d'alim entation, laissez-le tenir debout pendant environ
2 heures. Cela perm ettra de réduire la possibilité d'un d ysfonctionnement dans le système de
refroidissement de la manipulation pendant le transport.
• Nettoyer la surface intérieure à l'eau tiède avec un chiffon doux.
RISQUE DE POIDS EXCESSIF
UTILISER DEUX OU PLUS pour déplacer et installer la machine à glaçons
LE NON-RESPECT PEUT PROVOQUER RETOUR OU AUTRE BLESSURE
~
ATTENTION
~
Pour réduire les risques d'incendie,
d'électrocution ou de blessure lors de
l'utilisation de votre machine à glaçons, suivez
ces précautions de base:
Cette unité est à un usage intérieur
- Conservez ces instructions -
Page 44

44
Connexion électrique
Cette machine à glace doit être correctement mis à la terre pour votre sécurité. Le
cordon d'alimentation de la machine à glaçons est équipée d'une fiche à trois broches
qui coopère avec la norme trois broches prises murales pour réduire au minimum la
possibilité d'un choc électrique.
Ne pas en aucun cas c ouper ou enle ver la troisièm e broche de t erre du cordon d'alim entation fourni.
Pour votre sécurité, cette machine doit être correctement mis à la terre.
Cette machine à glace néc essite un e prise de t erre él ectrique s tandar d 115 /120 vo lts AC / 60 Hz avec
trois broches. Avoir la prise murale et le circuit par u n électricien qualifié pour vous as surer que la
prise est correctem ent mise à la terre. Q uand une prise m urale standard 2 broches est rencontré, il
est de votre responsabilité et l'obligation de la faire remplacer par une prise murale à 3 broches
correctement mise à la terre.
Le cordon doit être fixé derrière la machine à glaçons et non laissés exposés ou ballants pour
prévenir les blessures accidentelles.
La m achine à glaçons doit toujours être branché sur s a propre prise él ectrique qui a un e tension qui
correspond à l'étiquett e d e not at io n sur l a machine à glaçons. Cette offre les meilleures perf or mances
et aussi éviter une surc harge des circuits de câbla ge qui pourrait provoquer u n risque d'incendie de
surchauffe. Ne jamais débrancher la machine à glaçons en tirant sur le cordon d'alimentation.
Toujours saisir ferm ement la fiche et retirer directem ent à partir du récipient. Réparer ou rem placer
immédiatement tous les cordons d'alimentation qui se sont effilochés ou endommagés. Ne pas utiliser
un cordon présentant des fissures ou des dommages à l'abrasion sur sa longueur ou à chaque
extrémité. Lorsque vous déplacez la machine à glaçons, veillez à ne pas endommager le cordon
d'alimentation.
Rallonge électrique
En raison des risques potentiels pour la sécurité dans certaines conditions, il est fortement
recommandé de ne pas utiliser une ral longe avec cett e machine à glaç ons. Toutefois, s i vous devez
utiliser une rallonge, i l es t a bs olument nécessaire que ce s oit un e ex tens i on UL / C UL-Listed, de terre
3 fils icemaker cor don ayant une fiche de m ise à la terr e et à la sor tie et que l a ca pacité él ectriqu e du
cordon de 115 volts et au moins 10 ampères.
Surge Protector
La plupart des machines à glaçons électriques utilisent une série de panneaux de commande
électrique pour fonctionner. Ces panneaux sont très sensibles aux surtensions et pourraient être
endommagés ou détruits.
Si la machine à glaçons va être utilisé dans une zone ou si votre ville / pays est sujette à des
surtensions / pannes; i l est recomm andé d'uti liser un pr otecteur de s urtension p our tous les appare ils
électriques / mac hine à glace que vous utilisez. Le protecteur de surtension que vo us sélectionnez
doit avoir un bloc de poussée suffisamment élevé pour protéger la machine à glaçons, il est connecté.
Si vous avez des ques tions conc ernant le t ype et la taille du parasurt enseur contac t nécessaire à un
électricien agréé dans votre région.
Les dommages dus aux surtensions ne sont pas considérés comme un f abricant couvert défaut et
annulera la garantie du produit.
~ATTENTION~
Une mauvaise connexion de l'équipement de mise à la terre peut entraîner un risque de choc
électrique. Si le cor d on d' a limentation de la gam me ou icemaker es t end om magé, le remplacer par
un centre de service Avanti produits autorisés.
Page 45

45
Installation de votre machine à glaçons
• CE MACHINE À GLACE DOIT ÊTRE INSTALLÉ PAR UN PROFESSIONNEL QUALIFIÉ
Cette machine à glace DOIT être installé avec des connexions électriques et de l'eau,
conformément à tous les codes régionaux et loca ux.
• Placez votre machine à glaçons sur un sol qui est assez solide pour supporter la machine à
glaçons lorsqu'elle es t complètement chargée. P our mettre à niveau votre m achine à glaçons,
régler les pieds à l'avant de la machine à glaçons.
• Prévoir un minimum d e ¾ pouce d'espace entre le hau t et 3 pouces sur les côtés de la
machine à glaçons et un minimum de 5 pouces à l 'arrière, ce qui perm et la circulatio n de
l'air pour refroidir le compresseur. Assurez-vous à l'avant de l'appareil est complètement
dégagée.
• Localisez la machine à glaçons l'abri du soleil et des sources de chaleur (poêle, chauffage,
radiateur, etc.). lumière directe du soleil peut affecter le revêtement acrylique et sources de
chaleur peuvent augmenter la consommation électrique. Les températures ambiantes froides
extrêmes peuvent également causer la machine à glaçons ne pas fonctionner correctement.
• Choisissez un endro it bien ventilé avec des températ ures supérieures à 55 ° F (13 ° C) et au-
dessous 90ºF (32ºC). Cet appareil doit être installé dans une zone protégée contre les
intempéries.
AUTORISATIONS D'INSTALLATION:
Prévoir un minimum de 3 pouces de l'espace entre les cô tés, ¾” en h aut de la machine à
glaçons et un minimum de 5 pouces à l'arrière, ce qui permet la circulation de l'air pour
refroidir le compresseur. Assur ez -vous à l'avant de l'appareil est complètement dégagée.
• L'installation de cette machine à glaçons nécessite une entrée d'alimentation en eau froide de ¼”
(6.35mm) Un tube en cuivre doux avec une vanne d'arrêt.
• La machine à glaçons nécessite une alimentation continue en eau avec une pression minimale de
14,5 psi et une pression statique ne doit pas dépasser 80 psi. La température de l'alimentation en
eau dans la machine à glace doit être comprise entre 41 ° F (5 ° C) et 77 ° F (25 ° C) pour un
fonctionnement correct.
• Il est fortement recommandé d'utiliser un filtre à eau utilisé. Un filtre, si elle est du type approprié,
peut éliminer le goût et les odeurs ainsi que des particules. Un peu d'eau est très difficile, et l'eau
adoucie peut entraîner des cubes blancs putrides qui collent ensemble. l'eau déionisée est pas
recommandé.
Attention
Le fonctionnement de la machine à glace pour une longue période en dehors
des plages de températures normales telles que décrites ci-dessus peuvent
affecter les performances du produit.
Page 46

46
MISE À NIVEAU DE LA MACHINE À GLAÇONS
Il est important pour la machine à glaçons à être nivelé afin de
travaille correctement. Il peut être relevé ou abaissé par rotation
les gaines en matière plastique autour de chacun des quatre pieds sur le
en bas de la machine .Si vous trouvez que la surface est
pas de niveau, tournez les pieds jusqu'à ce que la machine à glaçons
devient niveau Vous devrez éventuellement faire plusieurs ajustements
niveler. Nous vous recommandons d'utiliser le niveau d'un charpentier
vérifier la machine.
IMPORTANT: Une fois que vous êtes prêt à l'installer dans une armoire ou directement sur le sol,
vous devez ajuster les pieds au niveau de la machine à glaçons. Si le sol est de niveau, juste tourner
les deux roues avant de toucher le sol.
Page 47

47
Approvisionnement en eau
L'alimentation en eau devrait être prêt au
moment de l'installation. La pression
d'alimentation en eau doit être un
minimum de 15 psi avec une pression
statique pas plus de 80 psi. (Une prise
murale directement derrière la machine à
glace faciliter l'installation.)
IMPORTANT:
1. Toutes les installations doivent être conformes aux exigences du code de plomberie. Une
installation professionnelle est nécessaire.
2. Assurez-vous que les tuyaux ne sont pas pincés ou pliés ou endommagés lors de l'installation.
3. Vérifier les fuites après la connexion.
Outils nécessaires: ½-in. Clé à fourche, un tournevis Phillips
Connexion de la ligne d'eau :
1. Coupez l'alimentation en eau principale. Allumez le robinet le plus proche assez longtemps
pour que la canalisation d'eau.
2. T rouvez une ½ po. ¾-in. vertical tu yau d'eau froide à prox imité du lieu d'installat ion. La distance
doit être inférieure à 6 pied s. Le tuyau d'a lim entation e n eau four ni avec l a m achine à glaç ons est
d'environ 6 pieds de long.
3. Une v anne d'arrêt doit être instal lé à l'alimentation en eau pri ncipale. Si la conduite d'eau a une
feuille de tube de cuivre, fixez un ¼” union de compression OD au tube et retirer l'écrou.
4. Connecter l'écrou du tuyau d'alimentation en eau au robinet, et l'autre extrémité avec l'entrée
d'eau. Serrez fermement à la main, puis un demi-tour avec une clé.
5. Allumez l'alimentation en eau principale et appuyez sur. Vérifier les fuites de connexion
d'alimentation en eau. Serrer chaque connexion (y compris la connexion à l'entrée de l'eau).
IMPORTANT: Lorsque vous vous connectez le tuyau d'alimentation en eau et le
tuyau de vidange, faites attention aux indications de « entrée d'eau » et « Trou de
vidange » sur la machine.
Page 48

48
Drainer
Vous devez connecter la ligne de vidange avant d'utiliser la machine à glaçons. Suivez les étapes
décrites ci-dessous.
Connexion de la ligne de drain:
REMARQUE: Un système de pompe de vidange est utilisé dans ce type de machine à glaçons.
S'il y a une ligne de drain près de la machine à glaçons, le meilleur choix est de drainer
l'eau à la conduite d'évacuation à travers le tuyau d'eau de vidange avec machine à
glaçons.
1. Loc alise z le drain de p lancher près de la m ac hine à glaçons. La distance do it être inf érieure à 4.5
pieds puisque la l ongueur du tuyau d'eau à long vidange avec la machine à glaçons est sur le
point 4.85 pieds.
2. Trouver la sortie de vidange à l'arrière de la machine à glaçons. Raccorder la sortie de vidange
au tuyau de vidange de l'eau, et insérer l'autre extrémité du tuyau dans la conduite de vidange.
REMARQUE: Ne laissez jamais le tuyau de vidange pour accrocher ou boucle supérieure que le
plancher du bac de stockage de glace.
3. Toutes les pistes horizontales de vidange doiven t avoir une chute de ¼” par pied. Un espace d'a ir
sera probablement néc essaire entre le tube de vidange de la m achine à glaç ons et le r éceptacle
de vidange / déchets. Un tube vertical avec un piège ci-dessous, il serait acceptable pour le
réceptacle de vidange / déchets. Un siphon de sol est également acceptable.
4. Versez 1 gallon d'eau dan s le bac de stockage de glac e pour vérifier les fuites dans le système
de drainage. Serrer tous les raccords qui fuient.
IMPORTANT: le drainage Infrequent provoque un taux élevé de fusion dans le bac de stockage
de glace.
Page 49

49
UTILISATION DE VOTRE MACHINE À GLAÇONS
Description des LED et boutons:
1. Bac à glace pleine LED (ICE FULL): Bin témoin lumineux complet
Quand il est allumé, le bac à glaçons es t ple in de g lace ou quelque chose b loq ue la s on de. L' u nit é
cessera de fonctionner. Lor sque des g laçons sont r etirés du bac à glaçons , libéra nt ainsi la so nde
pleine, la LED s’éteint puis l’unité redémarre et revient en mode de fabrication de glace.
2. Fabrication de glace LED (ICE MAKING): Glaçons voyant lumineux
Quand il est allumé, l'appareil fonctionne dans le mode de fabrication de glace contrôlé par une
sonde de température sur l'évaporateur..
3. Bouton nettoyer (CLEAN): Lorsque vous appuyez sur ce bouton, l'appareil entre en mode
"NETTOYAGE". Le système Clean passe par un nettoyage complet du système d’eau et de
l’évaporateur. L'eau utilisée pendant le mode de nettoyage s'écoulera par le tuyau de vidange.
Une fois le système propre terminé, il reprendra automatiquement son fonctionnement normal.
4. Réinitialisation du minuteur: Ce bouton permet de réinitialiser le rappel "Nettoyer le filtre". Après
environ 350 heures de fonctionnement du compresseur ou de cycles de fabrication de glace,
l’appareil émet un bip et t ous les trois (3) voyants clignotent (Power, Ice-Making, Ice Full) pour
vous rappeler de ne tto yer le f iltre du cond enseur à l’avan t de l'unité. Un e fois que v ous avez r etiré
le filtre, nettoyé et r emis à son em placement d'origine . Appuyez sur le b outon "Réinitialisati on du
minuteur" pour réinitialiser le rappel.
Page 50

50
Procédé d'exploitation
Allumez le robinet d'eau, laissez le remplissage de bac d'eau, puis appuyez sur le bouton ON /
OFF sur le panneau avant. La machine à glaçons commence ra à fonctionner
automatiquement.
1. Au bout de 3 m inutes, la machin e passe autom atiquement à l'étape de fabricatio n de glace, et le
bruit de l'eau qui coule sera entendu.
2. Lor sque le lot de glace a été entièrement formé, la glace sera automatiquement récolté dans le
bac de stockage de glace.
3. Lor sque le bac de stock age de glace est pleine, la machine cesse de faire autom atiquement la
glace.
4. L'unité va commencer à faire à nouveau la glace après les cubes de glace sont enlevés.
IMPORTANT:
• Bien que l'appareil a été testé et nettoyé à l'usine, en raison de transit à long terme et le
stockage, le premier lot de cubes doit être mis au rebut.
• Ne jamais couper l'alimentation en eau du robinet lorsque la machine à glaçons fonctionne.
• Ne touchez jamais l'évaporateur lorsque l'appareil est en marche!
• Sauf pour prendre la glace de l'unité, garder la porte fermée pour réduire la fusion et assurer la
formation de glace adéquate.
Page 51

51
ENTRETIEN
Préparation de la machine à glaçons pour le stockage à long
Si la machine à glaçons ne sera pas utilisé pendant une longue période, ou doit être déplacé vers un
autre endroit, il sera nécessaire de drainer le système d'eau.
1. Couper l'alimentation en eau à la source principale d'eau.
2. Déconnecter la ligne d'alimentation en eau à partir de l'entrée d'eau.
3. Couper l'alimentation électrique à la source principale d'alimentation électrique.
4. Sorte z le bac de stockage de glace pour enlever toute la glac e restante et de l'eau. Sécher le
bac.
5. Laissez la porte ouverte pour permettre la circulation et de prévenir la mois iss ur e.
6. Laiss er la ligne d'alimentation en eau et le cordon d'a limentation est coupée avant d'être prêt à
réutiliser.
IMPORTANT:
• Ne touchez pas la prise d'alimentation lorsque vos mains sont mouillées.
• Ne jamais débrancher l'appareil en tirant sur le cordon. Attrapez la fiche et tirez fermement.
Nettoyage La machine à glaçons
Un nettoyage périodique et l'entretien adéquat assureront l'efficacité, les performances optimales et
une longue vie. Les intervalles d'entretien indiqués sont basés sur des conditions normales. Vous
pouvez raccourcir les intervalles si vous avez des animaux, ou il y a d'autres considérations
particulières.
Note importante:
Ne jamais garder quoi que ce soit dans le bac de stockage de glace qui ne sont pas
de glace: des objets comme des bouteilles de vin et la bière sont non seulement
insalubre, mais les étiquettes peuvent glisser et boucher le drain.
Si la machine à glaçons reste inutilisé pendant longtemps, avant la
prochaine utilisation, il doit être nettoyé à fond. Suivez attentivement les
instructions pour le nettoyage ou l'utilisation de solutions de
désinfection. Ne laissez aucune solution à l'intérieur de la machine à
Avant de procéder à des opérations de nettoyage et d'entretien, assurez-vous que la
ligne d'alimentation de l'appareil est déconnecté et la ligne d'eau est coupée.
Page 52

52
Nettoyage extérieur
La porte et l'armoire peuvent être nettoyées avec un détergent doux et de l'eau chaude tels que 1 oz.
de liquide de lavage de vaisselle mélangé avec 2 litres d'eau chaude. Ne pas utiliser de produits
nettoyants à base de solvants ou abrasifs. Utilisez une éponge douce et rincer à l'eau claire. Essuyez
avec une serviette propre et doux pour éviter les traces d'eau.
Si le panneau de porte est en acier inoxydable, il peut se décolorer lorsqu'il est exposé au chlore
gazeux et de l'humidité. Nettoyez l'acier inoxydable avec un détergent doux et de l'eau chaude et un
chiffon humide. Ne jamais utiliser un agent de nettoyage abrasif.
Nettoyage intérieur
Le bac de stockage de glace doit être désinfecté de temps en temps. Nettoyez le bac avant que la
machine à glaçons est utilisé pour la première fois et réutilisé après l'arrêt pendant une longue
période de temps. Il est généralement pratique pour désinfecter le bac après que le système de
fabrication de glace a été nettoyé, et le bac de stockage est vide.
1. Coupez l'alimentati on électrique à l'appareil.
2. Ouvrez la porte et avec un chiffon propre, essuyer l'intérieur avec une solution désinfectante
en 1 once (29.5ml) d'eau de javel ou du chlore et 2 gallons (7.5L) D'eau chaude 95ºF (35 ºC) À
115 ºF (46 ºC).
3. Rincez abondamment à l'eau claire. Les eaux usées sera évacuée par le tuyau d'évacuation.
4. Remettre le courant à l'appareil.
La cuillère à glace doivent être lavés régulièrement. Lavez-le comme tout autre récipient alimentaire.
Les minéraux qui sont retirés de l'eau au cours du cycle de congélation finiront par former un dépôt
dur écailleuse dans le système d'eau. Nettoyage du système permet régulièrement éliminer
l'accumulation de tartre minéral. Combien de fois vous devez nettoyer le système dépend de la façon
dont l'eau est dure. Avec l'eau dure de 4 à 5 grains / litre, vous devrez peut-être nettoyer le système
aussi souvent que tous les 6 mois.
1. Coupez l'alimentation de la machine à glaçons. Gardez la machine à glaçons connecté à
l'alimentation en eau et tuyau d'évacuation.
2. O uvrez la porte et évider tous les cubes de glace. Soit jeter o u de les enregistrer dans u n
coffre de glace ou une glacière.
3. Allumez le pouvoir de la machine à glaçons. Pour 8onces de glace Nickel-Safe Maker
Solution de netto yage dans le bac à ea u. Ajouter 8 onc es d'eau du robinet. Après environ 5
minutes, appuyez sur le bo uton « pro pr e » du boît ier d e commande. (Voir figure ci-dessous et
la section suivante.) La machine exécutera le mode automatique propre.
Ne pas utiliser de solvants ou d'abrasifs nettoyage à l'intérieur.
Ces produits de nettoyage peuvent transmettre le goût aux cubes de
glace, ou endommager ou décolorer l'intérieur de la machine.
Page 53

53
Le nettoyeur de machine à glace contient des acides.
Ne pas utiliser ou mélanger avec d'autres produits de nettoyage à base de
solvants.
Utiliser des gants en caoutchouc pour protéger les mains. Lisez attentivement
les consignes de sécurité importantes sur le récipient du nettoyeur de
REMARQUE:
LE CÔTÉ ARRIÈRE DU MOULE À GLACE DOIT ÊTRE NETTOYÉ
PAR UN PROFESSIONNEL.
Désinfectante le système de fabrication de glace
1. Coup e z l'alimentation de la machine à glaçons.
2. Retirez tous les cubes de glace dans le bac de stockage.
3. Prépar er une soluti on désinfec tante en 1 once d'eau de Javel et 2 litres d'95ºF d'eau chau de
(35 ° C) to115ºF (46 ° C).
4. Rem plir un flacon pulvér isateur avec la sol ution désinfectante et pulvériser tous les coins et
les bords, en veillant à couvrir toutes les surfaces avec la solution. Rincer à l'eau propre.
5. Gardez la machine à glaçons connecté à l'alimentation en eau. Allumez le pouvoir de la
machine à glaçons. En moins de 5 minutes, appuyez sur la touche CLEAN. La machine
fonctionnera le mode automatique propre.
6. Prévoyez 30 minutes pour un bon nettoyage.
7. L'unité commencera le processus de fabrication de glace automatique lorsque le cycle de
nettoyage est terminé.
8. Jeter le premier lot de glace.
Nettoyage du filtre à condensat eu r
Un condenseur sale ou bouché empêche une bonne circulation de l'air, réduit la capacité de
fabrication de glace, et provoque plus que des températures de fonctionnement recommandées qui
peuvent conduire à l'échec du composant. Avoir le condenseur nettoyé au moins une fois tous les six
mois.
1. Mettez l'int err upt eur d' al imentation en position OFF.
2. Débranchez la machine à glaçons ou couper le courant.
3. Tirez doucement sur le filtre à persienne avant.
4. Enlever la saleté et les peluches du filtre avec la brosse d'un aspirateur.
5. Remettre en place le filtre à persienne avant.
6. Branchez la machine à glaçons et tourner l'interrupteur d'alimentation en posit ion O N.
Panne électrique
La plupart des pannes de courant sont corr igées en quelques heures et ne devraient pas af fecter la
température de votre m achine à glaçons s i vous réduis ez le nombre de f ois que la porte est ouv erte.
Si la puissance va être hors service pendant un e longue période de tem ps, vous devez prendr e les
mesures appropriées pour protéger vos aliments.
Page 54

54
DÉPANNAGE
Avant d'appeler
Si l'appareil semble mal fonctionner, lisez la section FONCTIONNEMENT de ce manuel d'abord. Si le
problème persiste, consultez le Guide de dépannage sur les pages suivantes. Certains des
problèmes mentionnés dans le Guide peuvent être résolues sans un appel de service.
Problème
Cause possible
correction probable
La machine ne
fonctionne pas.
La machine à glaçons est
débranché.
Branchez la machine à glaçons dans.
Le fusible est grillé.
Remplacer le fusible. Si cela se produit à
nouveau, appelez le service pour vérifier un
court-circuit dans l'unité.
Le bouton d'alimentation de la
machine à glaçons est réglé sur
OFF.
Mettez le bouton d'alimentation de la mac hine à
glaçons sur ON.
Le bac de stockage de glace
est pleine de glace.
Retirer des cubes de glace. Assurez-vous que
la sonde de glace complète est libre de glace.
L'eau ne se nourrit
pas après démarrage
de la machine.
Le robinet d'alimentation en eau
est coupée.
Ouvrez le robinet d'alimentation en eau.
Le tuyau d'alimentation en eau
ne soit pas correctement
connecté.
Reconnecter le tuyau d'alimentation en eau.
La machine fait la
glace, mais bin ne
remplit pas avec de
la glace.
Le condenseur peut être sale.
Nettoyer le condenseur.
Le débit d'air à la machine à
glaçons peut être obstruée.
Vérifiez l'installation.
La température ambiante et la
température de l'eau est élevé,
ou de l'unité se trouve à
proximité d'une source de
chaleur.
Vérifiez l'installation.
De l'eau sort de
l'unité.
Un peu d'eau tombe sur le sol
lorsque vous ouvrez la porte
pour enlever les glaçons du bac
de stockage.
condensation normale sur la porte ou un peu
d'eau avec de la glace. Faites attention lorsque
vous retirez la glace.
Raccordement de l'alimentation
en eau coule.
Serrer raccord. Consultez la section Connexion
de la ligne d'eau.
Les cubes sont
partiellement formés
Pas assez d'eau dans le bac à
eau.
Vérifiez si la pression d'alimentation en eau est
inférieure à 15 psi.
Page 55

55
ou sont blancs sur le
fond.
Vérifier l'alimentation en eau ou filtre peut être
limité.
Vérifier une fuite d'eau au creux de l'eau.
Le bruit lors du
fonctionnement
Les pieds ne sont pas nivelé et
verrouillés.
Niveau et verrouiller les pieds. Voir Mise à
niveau de la machine à glaçons.
Certains sons sont normaux. Voir Sons normaux.
La machine à
glaçons arrête
soudainement tout en
glace.
L'électricité est coupée.
Rebranchez la ligne d'alimentat ion.
La température ambiante est
hors de la fourchette indiquée.
Coupez l'électricité et laisser la machine à
glaçons débranché jusqu'à ce que la
température revienne dans la plage ind iqu ée.
Le bac de stockage de glace
est pleine de glace.
Retirer des cubes de glace; assurez-vous que la
sonde de glace complète est libre de glace.
Le corps de la
machine à glaçons
est électrifié
La ligne de masse se trouve
pas dans la prise.
Utilisez une prise répondant aux exigences de
mise à la terre.
Mise à l'échelle se
produit fréquemment
à l'intérieur de la
machine.
Le niveau de dureté de l'eau est
trop élevée.
Installer un dispositif d'adoucissement de l'eau
en face de l'entrée d'eau.
Les fuites d'eau du
bac de stockage de
glace
Le trou de vidange en dessous
du bac de stockage de glace
est bloqué.
Retirez le bac de stockage de glace et nettoyer
le trou de vidange.
Le tuyau d'évacuation est plié
ou mal placé plus haut que le
plancher de la caisse de
stockage de glace.
Vérifier le tuyau de vidange pour être de l'eau
que peut être évacuée sans entrave.
Page 56

56
Page 57

57
SERVICE DE VOTRE ICEMAKER
Nous sommes fiers de notre organisation de service à la clientèle et le réseau de techniciens de
services professionne ls qui offr ent des services sur votre Avant i Produits icem akers. Avec l' achat de
votre Avanti Products machine à glaçons, vous pouvez être sûr que si vous avez besoin
d'informations ou de l'aid e, l'équipe du ser vice à la clie ntèle Produits Avanti sera l à pour vous. Il s uffit
de nous appeler au numéro sans frais.
Avanti Produits Service à la clientèle
Information produit
800-323-5029
Quels que soient vos questions sont sur nos
produits, l'aide est disponible.
Commande de pièces
800-220-5570
Vous pouvez commander des pièces et
accessoires qui seront livrés directement à votre
domicile par chèque personnel, de l'argent,
Master Card ou Visa.
In-Home Repair Service
800-220-5570
Un centre de service Avanti Les produits
autorisés fournira un service de réparation
expert, prévue à un moment qui vous convient.
Nos réparateurs formés savent votre machine à
glaçons à l'intérieur et à l'extérieur.
SCHEMA
Page 58

58
VOS GARANTIE AVANTI PROD UCTS
Staple votre reçu de vente ici. Preuve de la date d'achat originale est
nécessaire pour obtenir un service sous garantie.
CE QUI EST COUVERT - GARANTIE LIMITÉE D'UN AN
Avanti Products garantit que le produit est exempt de défauts de matériaux et / ou de fabrication pour une période de douze
(12) mois à compter de la date d'achat par le propriétaire initial. La durée commence à courir à la date d'achat, et ne sera pas
retardée, restreinte, prolongée ou suspendu pour quelque raison que ce soit, sauf si décrit en détail dans le document de
garantie. Pendant un an à compter de la date d'achat par le propriétaire d'origine, les produits Avanti seront, à sa discrétion,
réparer ou remplacer toute partie du produit qui se révèle être un défaut de matériau ou de fabrication dans une utilisation
normale. Avanti Products vous fournira un produit raisonnablement semblable nouveau ou remis à neuf. Au cours de cette
période Avanti Products fournira toutes les pièces et la main-d'œuvre nécessaires pour corriger ces défauts gratuitement, aussi
longtemps que le produit a été installé et utilisé conformément aux instructions écrites dans ce manuel. Tous les appareils
Avanti de 4,2 pieds cubes la capacité ou moins doivent être traduits / envoyé au centre de service de l'appareil pour la
réparation.
DEUXIÈME LIMITÉE À LA CINQUIÈME ANNÉE GARANTIE
Pour la deuxième à la cinquième année à partir de la date d'achat originale, Avanti Products fournira un compresseur de
remplacement gratuit en raison d'un échec. Vous êtes responsable de la main-d'œuvre et de fret de service. Les coûts
impliqués pour déplacer le produit au centre de service et de retour à la maison de l'utilisateur, comme peut-être nécessaire,
sont à la charge de l'utilisateur.
EXCLUSIONS DE LA GARANTIE / NON COUVERTS:
La couverture de la garantie décrite ici exclut tous les défauts ou les dommages qui ne sont pas la faute directe de Avanti
Products, y compris, sans limitation, un ou plusieurs des éléments suivants:
• Un non-respect de tout État applicable, local, ville, ou du comté électricité, plomberie et / ou des codes du bâtiment, des
règlements ou des lois, y compris le défaut d'installer le produit en stricte conformité avec le feu et les codes du bâtiment et
les règlements locaux.
• Les forces externes, élémentaires et / ou l'environnement et les facteurs, y compris, sans s'y limiter, la pluie, le vent, le
sable, les inondations, les incendies, les coulées de boue, des températures de congélation, l'humidité excessive ou à une
exposition prolongée à l'humidité, la foudre, les surtensions, les défaillances structurel l es ent ourant l’ appareil, et les actes de
Dieu.
• Les pertes de contenu de la nourriture ou d'autres contenus
en raison de la détérioration.
• Les dommages accessoires ou consécutifs
• Pièces et coûts de main-d'œuvre pour les éléments suivants
ne seront pas considérés comme garantie:
• portes évaporateurs, ressorts de la porte, et / ou des
cadres.
• panneaux intérieurs de portes, des étagères de porte,
rails de porte, et / ou supports de porte.
• Les ampoules et / ou boîtier en plastique.
• Doublures d'armoires en plastique.
• Poncture évaporateur annule la garantie sur le système
scellé complet.
• Les frais de transport et de manutention associés au
remplacement de l'unité.
• Les réparations effectuées par réparateurs non
autorisés.
• Les appels de service qui sont liés à des problèmes
externes, tels que l'abus, l'alimentation électrique
inadéquate, les accidents, les incendies, les inondations,
ou tout autre acte de Dieu.
• Une panne du produit si elle est utilisée pour autre chose
que son intention but.
• Surtaxes, y compris mais sans s'y limiter, toute après
heure, les appels week-end, ou de services de
vacances, les péages, les frais de voyage de convoyage
ou les frais de kilométrage pour les appels de service
dans les régions éloignées.
• La garantie ne couvre pas en dehors de la
Continental USA / Estats Unis.
En aucun cas, Avanti Products toute responsabilité ou responsabilité pour les dommages aux biens environnants, y compris
les armoires, les planchers, les plafonds, et d'autres structures et / ou des objets autour du produit. Sont également exclus de
cette garantie sont les égratignures, les entailles, les bosses mineures, et d'autres dommages esthétiques sur les surfaces
externes et les parties exposées; Produits dont les numéros de série ont été modifiés, effacés ou supprimés; visites de service
pour l'éducation à la clientèle, ou des visites où il n'y a rien de mal avec le produit; correction des problèmes d'installation (vous
êtes seul responsable de toute structure et réglage pour le produit, y compris tous les systèmes électriques, de plomberie et /
ou d'autres installations de raccordement, pour le bon plancher / fondation, et pour toute modification, y compris sans s'y limiter
les armoires, les murs, les planchers, les étagères etc., ainsi que la remise à zéro des disjoncteurs ou fusibles.
HORS DE LA GARANTIE DU PRODUIT
Avanti Products est soumis à aucune obligation, en droit ou autrement, de vous fournir toutes les concessions, y compris les
réparations, les pro-taux, ou le remplacement du produit, une fois la garantie expirée.
GARANTIE - REFRIGERATION - COMPRESSEUR
Page 59

59
Registration Information
Thank you for purchasing this fine Avanti product. Please fill out this form and return it to the
following address within 100 days from the date of purchase and receive these important benefits:
Avanti Products, LLC.
P.O.Box 520604 – Miami, Florida 33152
Ø Protect your product:
We will keep the model number and date of purchase of your new Avanti product on file to
help you refer to this information in the event of an insurance claim such as fire or theft.
Ø Promote better products:
We value your input. Your responses will help us develop products designed to best m eet
your future needs.
-------------------------------------------------------(detach here)-------------------------------------------------------------
Avanti Registration Card
Name
Model # Serial #
Address
Date Purchased Store / Dealer Name
City State Zip
E-mail Address
Area Code Phone Number
Occupation
Did You Purchase An Additional Warranty
As your Primary Residence, Do You:
£ Extended
£ Own £ Rent
£ None
Your Age:
Reason for Choosing This Avanti Product:
Please indicate the most important factors
That influenced your decision to purchase
this product:
£ under 18 £ 18-25 £ 26-30
£ 31-35 £ 36-50 £ over 50
Marital Status:
£ Married £ Single
£ Price
£ Product Features
£ Avanti Reputation
£ Product Quality
£ Salesperson Recommendation
£ Friend / Relative Recommendation
£ Warranty
£ Other: _____________ ____ __
Is This Product Used In The:
£ Home £ Business
How Did You Learn About This Product:
£ Advertising
£ In-Store Demo
£ Personal Demo
Comments:
Page 60

60
IMC132A3S - 01172019
PRINTED IN CHINA
 Loading...