

Page 1
INSTRUCTION MANUAL
MANUEL D’INSTRUCTIONS
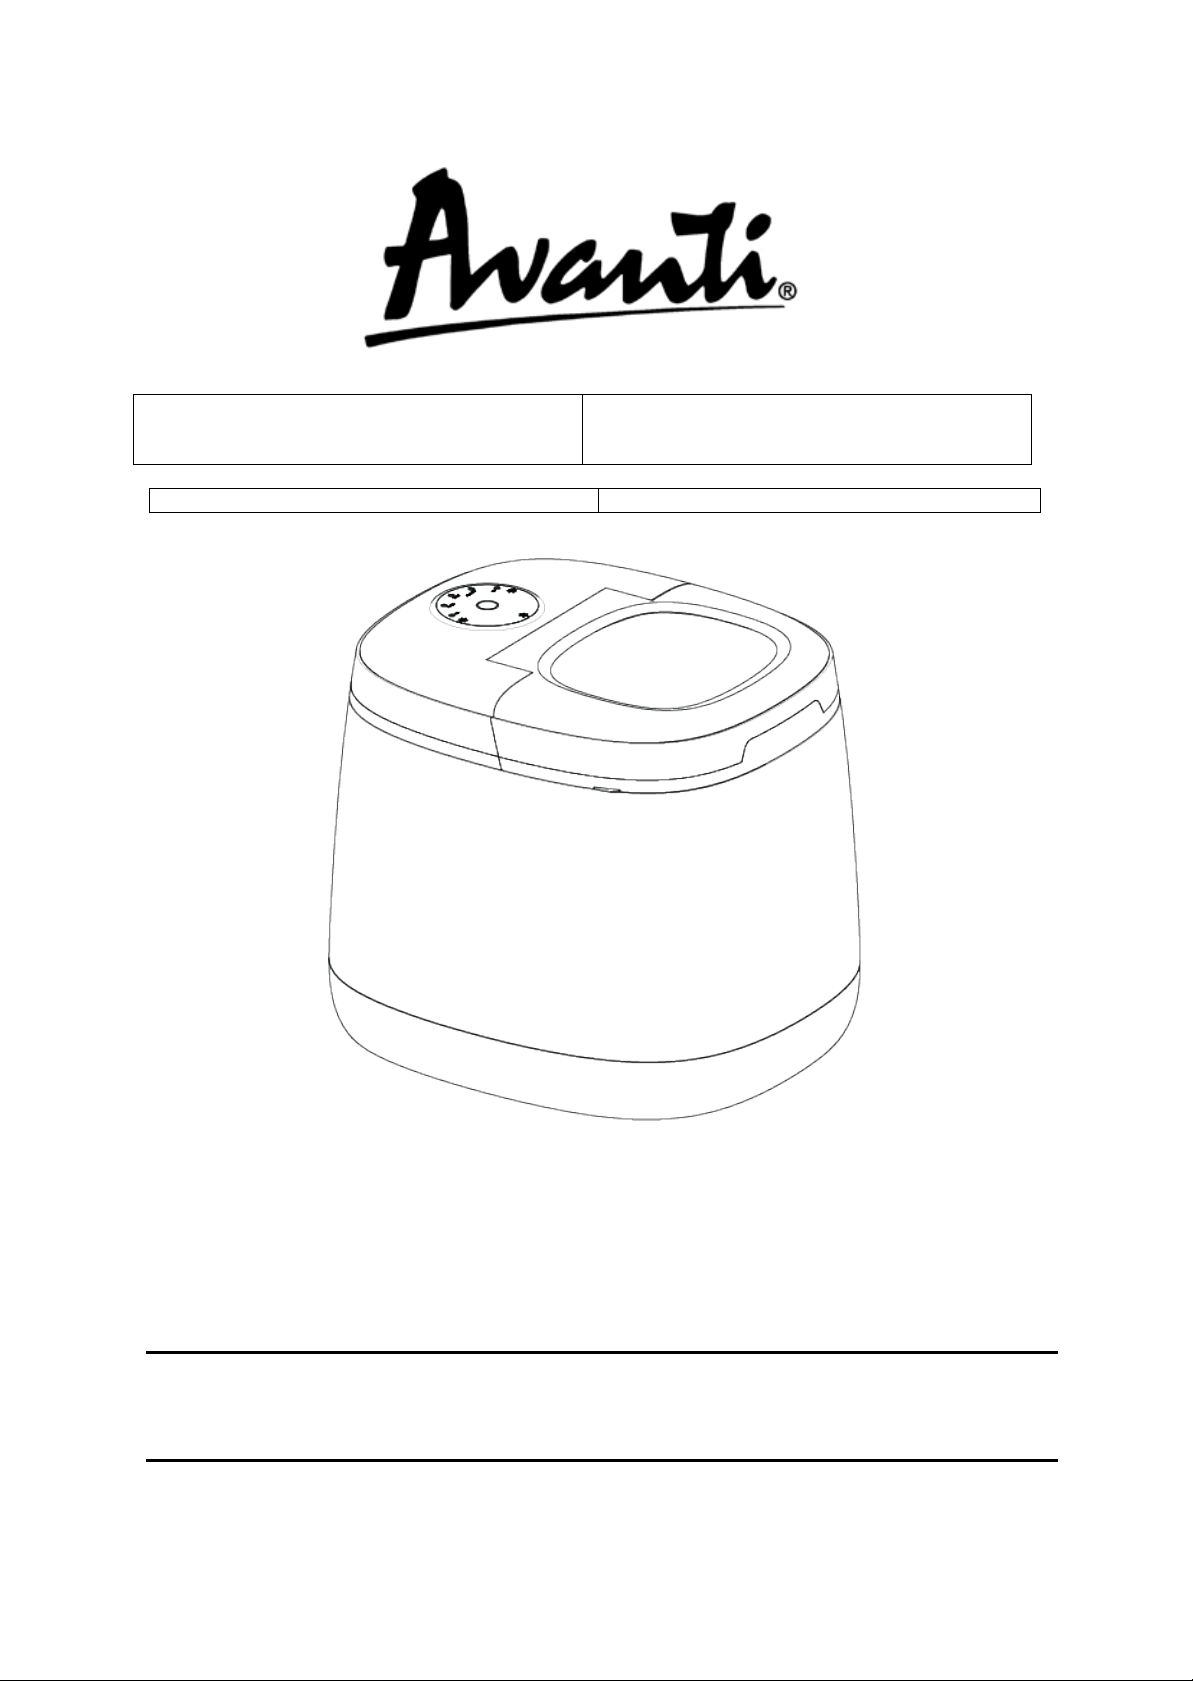
PORTABLE ICE MAKER
MACHINE DE GLAÇONS PORTABLE
MODEL / MODELO / MODÉLE
IM4520G-IS
MANUAL DE INSTRUCCIONES
MAQUINA DE HACER HIELO PORTABLE
BEFORE
USE, PLEASE READ AND FOLLOW ALL SAFETY RULES AND OPERATING
INSTRUCTIONS.
Avanti has a policy of continuous improvement on its products and reserves the right to change materials and specifications
without notice.
Avanti Products LLC
P.O. Box 520604 - Miami, Florida 33152
www.avantiproducts.com
1
Page 2

2
TABLE OF CONTENTS
Ice-Maker Safety
3
Important Safeguides
4
Help Us Help You
5
Parts and Features
6
Important Safety Instructions
7
Installation Instructions
7
Before Using Your Appliance
7
Installation of Your Applianc e
7
Electrical Connection
8
Operating Your Appliance
9
Control Panel Description
9
Operating Instructions
9
Getting Ice from Ice-bin
10
Care and Maintenance
10
Cleaning Your Appliance
10
Space Requirements
10
Power Failure
10
Troubleshooting Guide
11
Service for Your Appliance
11
Your Avanti Products Warrant y
12
Instrucciones en Español
13 - 17
Instructions en Français
18 – 28
Registration Information and Registration Card
Last
Page
Page 3
3
ICE MAKER SAFETY
YOUR SAFETY AND THE SAFETY OF OTHERS ARE VERY IMPORTANT.
We have provided many important safety messages in this manual for your appliance. Always read and
obey all safety messages.
This is the safety alert symbol. This symbol alerts you to
Potential hazards that can kill or injure you and others.
All safety messages will follow the safety alert symbol
And either the words” DANGER”, “WARNING” or “CAUTION”.
Danger means that failure to heed this safety
statement may result in severe personal
injury or death.
Warning means that failure to heed this
safety statement may result in extensive
product damage, serious personal injury, or
death.
Caution means that failure to heed this
safety statement may result in minor or
moderate personal injury, property or
equipment damage.
All safety messages will alert you to know what potential hazard is, tell you how to reduce the chance of
injury, and let you know what can happen if the instruc tions ar e not foll o wed .
Page 4
4
IMPORTANT SAFEGUIDES
Before the appliance is used, it must be properly positioned
and installed as described in this manual, so read the manual
carefully. To reduce the risk of fire, electrical shock or
injury when using the appliance, follow basic precaution,
Including the following:
• Plug into a groun ded 3-prong outlet, do not remove gr ounding prong, d o not us e an ada pter, and do not use a n
extension cord.
• It is recommended that a separate circuit, serving only your appliance be provided. Use receptacles that
cannot be turned off by a switch or pull chain.
• Never clean appliance parts w ith flam mable fl uids. T hese fu mes can crea te a fire h azard or ex plosion. An d do
not store or use gasoline or other flammable vapors and liquids in the vicinity of this or any other appl ian ce.
The fumes can create a fire hazard or explosion.
• Before proceeding with cleaning and maintenance operations, make sure the power line of the unit is
disconnected.
• Do not connect or disconnect the electric plug when your hands are wet.
• Unplug the appliance or disco nnect pow er bef ore clea ning or serv icing. Fa ilure t o do so ca n result in el ectr ica l
shock or death.
• Do not attempt to repair or replace any part of your appliance unless it is specifically recommended in this
manual. All other servicing should be referred to a qualified technician.
FOLLOW WARNING CALL OUTS BELOW ONLY WHEN APPLICABLE TO YOUR MODEL
• Use two or more people to move and install appliance. Failure to do so can result in back or other injury.
• To ensure proper ventilation fo r your applian ce, the f ront of the unit mu st be c omplete ly uno bstructe d. Choo se
a well-ventilated are a with tem peratur es above 60°f (16°c) and below 90°f (32°c). This unit must be installed in
an area protected from the element, such as wind, rain, water spray or drips.
• The appliance should not be located next to ovens, grills or other sources of high heat.
• The appliance must be installed with all electrical connections in accordance with state and local codes. A
standard electrical supply (115 v ac only, 60 hz), properly grounded in accordance with the national electrical
code and local codes and ordinances is required.
• Do not kink or pinch the power supply cord of appliance.
• The fuse (or circuit breaker) size should be 15 amperes.
• It is important for the appliance to be leveled in order to work properly. You may need to make several
adjustments to level it.
• Check for leaks after connection.
• Never allow children to operate, play with the appliance.
• Although the unit has been tested at the factory, due to long-term transit and storage, the first batch of cubes
must be discarded.
• Do not use solvent-ba sed cleaning agents of abr asives on t he interior. These clean ers may d amage or dis color
the interior.
• Do not use this apparatus for other than its intended purpose.
Page 5

5
Help us help you…
Read this guide carefully.
It is intended to help you operate and maintain
your new ice maker properly.
Keep it handy to answer your questions.
If you don't understand something or you need
more help, please call:
Avanti customer service
800-220-5570
Keep proof of original purchase date (such as
your sales slip) with this guide to establish the
warranty period.
If you need service
We're proud of our service and want you to be
pleased. If for some reason you are not happy
with the service you receive, here are some
steps to follow for further assistance.
First, contact the people who serviced your ice
maker. Explain why you are not pleased. In
most cases, this will solve the problem.
Next, if you are still not pleased, write all the
details, including your telephone number, and
send it to:
Write down the model and serial numbers.
You'll find them on a plate located on the rear
wall of the ice maker.
Please write these numbers here:
____________________________________
Date of purchase
____________________________________
Model number
____________________________________
Serial number
Use these numbers in any correspondence or
service calls concerning your ice maker.
If you received a damaged ice maker,
immediately contact the dealer (or builder) that
sold you the ice maker.
Save time and money. Before you call for
service, check the troubleshooting guide. It lists
causes of minor operating problems that you
can correct yourself.
Customer Servic e
Avanti Products
th
10880 NW 30
Miami, Fl 33172 USA
Street
Page 6
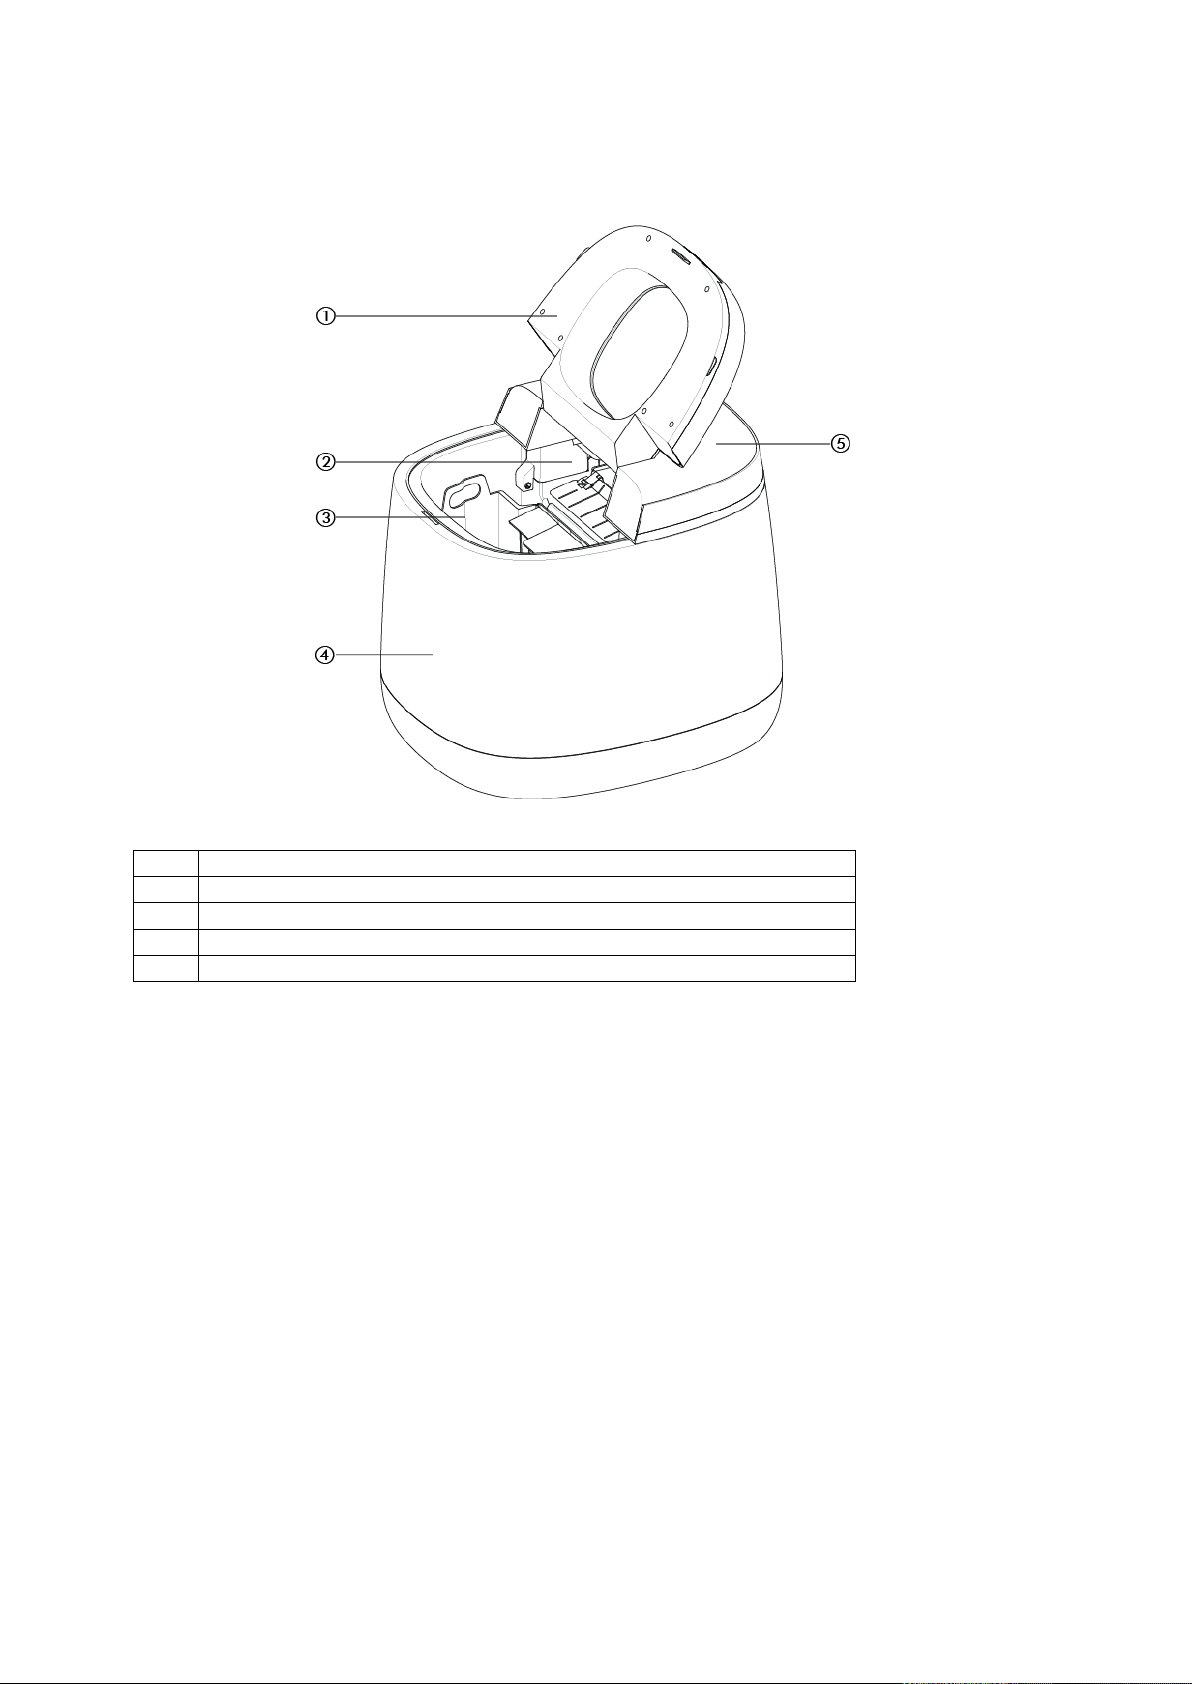
1
Top Lid
2
Ice Making System
3
Ice Basket
4
Cabinet
5
Control Panel
PARTS AND FEATURES
6
Page 7

IMPORTANT SAFETY INSTRUCTIONS
~
To reduce the risk of fire, electrical shock, or
basic precautions:
-save these instructions-
WARNING~
• Read all instructions before using the ice maker.
• Danger or Warning: Risk of child entrapment.
• Child entrapment and suffocation are not problems of the past. Junked or abandoned
appliances are still dangerous. . . Even if they will “just sit in the garage a few days.”
• Never allow children to operate, play with, or crawl inside the appliance.
• Never clean ice maker parts with flammable fluids. The fumes can create a fire hazard or
explosion.
• Do not store or use gasoline or any other flammable vapors and liquids in the vicinity of this
or any other ice maker. The fumes can create a fire hazard or explosion.
injury when using your ice mak er, follow these
INSTALLATION INSTRUCTIONS
Ø Before Using Your Ice Maker
• Remove the exterior and interior packing.
• Check to be sure you have all of the following parts:
• 1 Instruction Manual
• 1 Ice Scoop
• Before connecting the ice maker to the power source, let it stand u pright for approximately 2
hours. This will reduce the possibility of a malfunction in the cooling system from handling during
transportation.
• Clean the interior surface with lukewarm water using a soft cloth.
Ø Installation Of Your Ice Maker
• Locate the ice maker away from direct sunlight and sources of heat (stove, heater, radiator, etc.).
Direct sunlight may affect the painted coating and heat sources may increase electrical
consumption. Extreme cold ambient temperatures may also cause the ice maker not to perform
properly.
• Plug the ice mak er into an ex clusive properl y installed -grounded wall outlet. Do n ot under an y
circumstances cut or remove the third (ground) prong from the power cord. Any questions
concerning power and or grounding should be directed toward a certified electrician or an
authorized Avanti products service center.
IMPORTANT: Do not install t he I ce m aker n ear an oven, radiator, or other heat source.
7
Page 8

Ø ELECTRICAL CONNECTION
~Warning~
Improper use of the grounded plug can result in the risk of electrical shock. If the power cord is
damaged, have it replaced by an authorized Avanti Products service center.
This appliance should be p roperly grounded for your saf ety. The power cord of this appliance is
equipped with a three-prong plug which mates with standard three prong wall outlets to minimize the
possibility of electrical shock.
Do not under any circumstances cut or remove the third ground prong from the power cord supplied.
For personal safety, this appliance must be properly grounded.
This appliance requires a standard 115/120 Volt AC ~/60Hz electrical ground outlet with three-prong.
Have the wall outlet and circuit checked by a qualified electrician to make sure the outlet is properly
grounded. When a standard 2-prong wall outlet is encountered, it is your responsibility and obligation
to have it replaced with a properly grounded 3-prong wall outlet.
The cord should be secured behind the appliance and not left exposed or dangling to
prevent accidental injury.
The appliance should always be plugged into its own individual electrical outlet which has a voltage
rating that matches the rating l abel on t he appli ance. This provi des the bes t perf orm ance and also
prevent overloading house wiri ng circuits that could cause a fire hazard from overheated. Never
unplug the appliance by pulling the power cord. Always grip the plug firmly and pull straight out from
the receptacle. Repair or replace immediately all power cords that have become frayed or otherwise
damaged. Do not use a cord that shows cracks or abrasion damage along its length or at either end.
When moving the appliance, be careful not to damage the power cord.
Ø EXTENSION CORD
Because of potential safety hazards under certain conditions, it is strongly recommended that you
do not use an extension cord with this appliance. However, if you must use an extension cord it is
absolutely necessary that it be a UL/CUL-Listed, 3-wire grounding type appliance extension cord
having a grounding type plug and outlet and that the electrical rating of the cord be 115 volts and at
least 10 amperes.
Ø SURGE PROTECTOR
Most electrical appliances use a series of electric control boards to operate. These boards are very
susceptible to power surges and could be dam aged or destr o yed.
If the appliance is going to be used in an area or if your city / country is prone to power surges /
outages; it is suggested that you use a power surge protector for all electrical devices / appliances
you use. The surge protector that you select must have a surge block high enough to protect the
appliance it is connected to. If you have any questions regarding the type and size of surge protector
needed contact a licensed electrician in your area.
Damages due to power surges are not considered a manufacturer covered defect and will void your
product warranty.
8
Page 9
OPERATING YOUR ICE MAKER
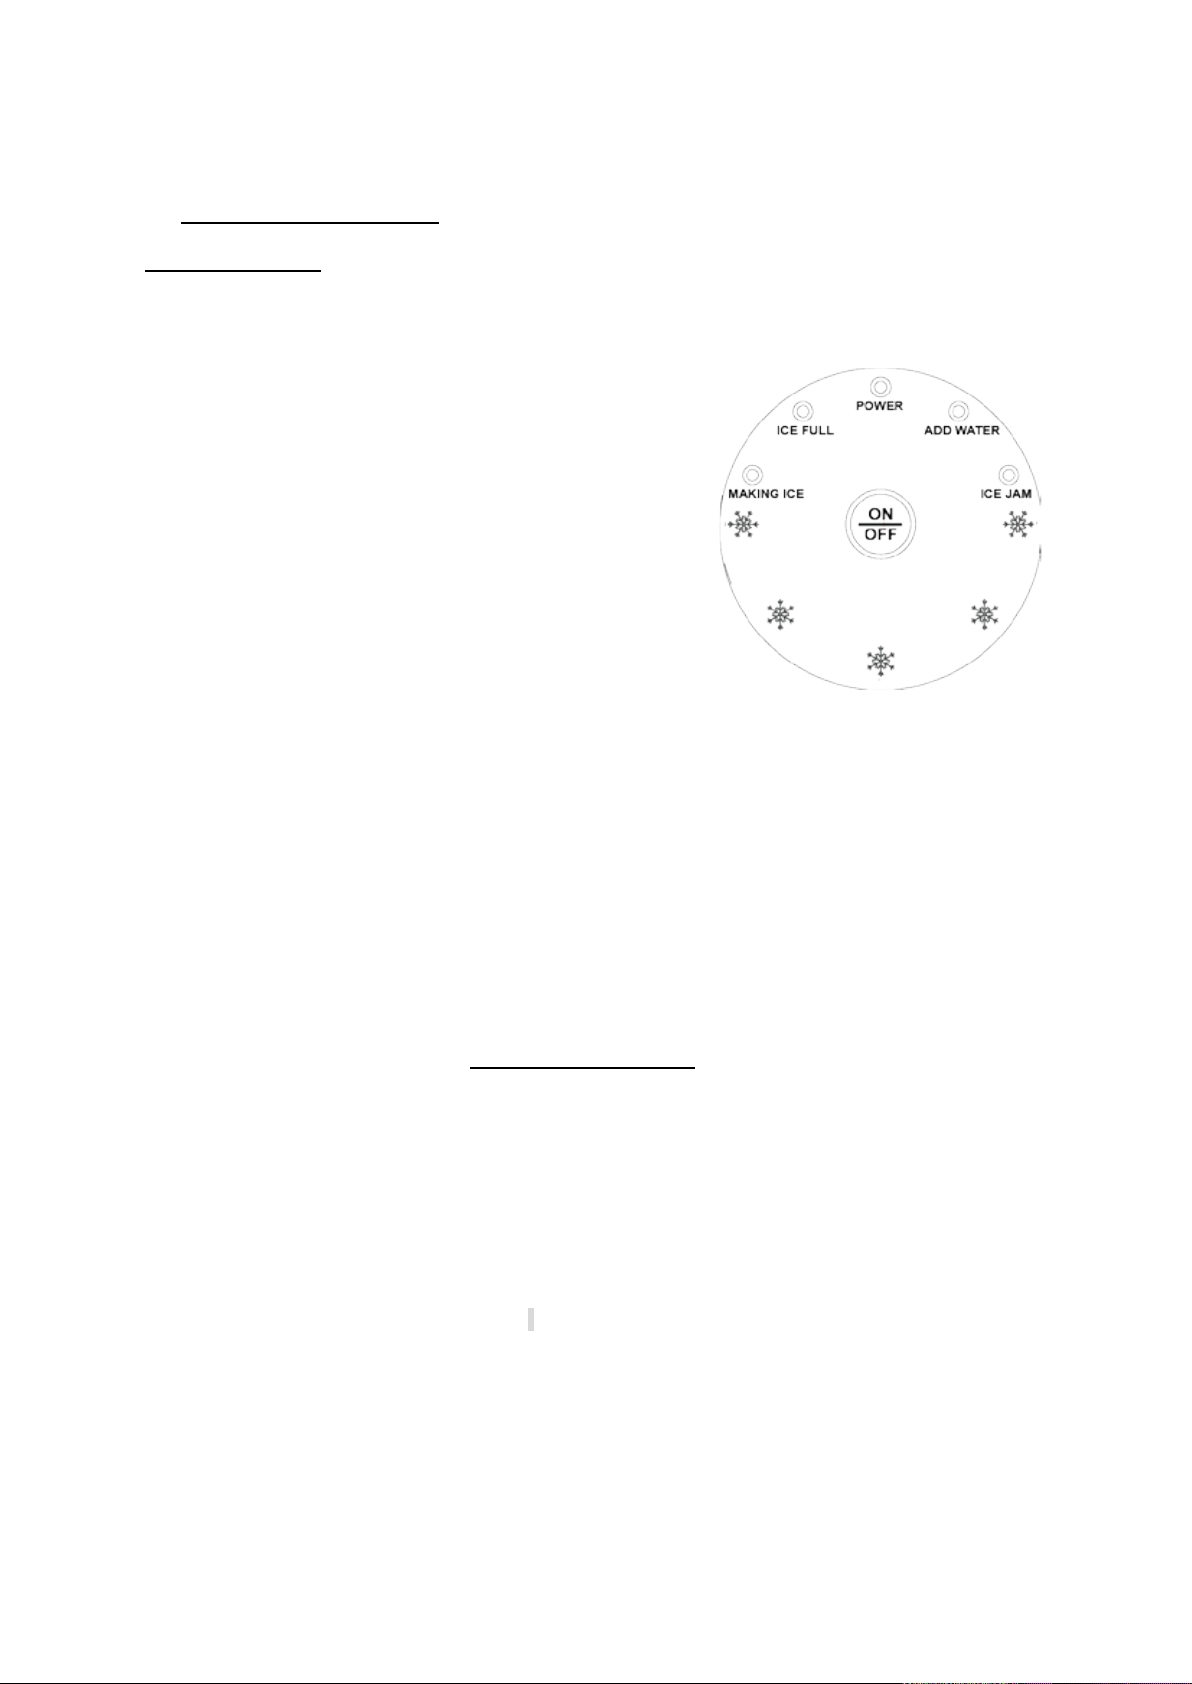
Ø Control Panel Des cription
LED INDICATORS
POWER INDICATOR
The indicator above the wor d POWER will illuminate when the unit is plugged i n.
It will be illuminat ed in RED when the u nit is turned on.
ADD WATER INDICATOR
The ice maker automatically chec ks the wat er lev el in the t ank .
If the water level is too low, the indicator will illuminate in
AMBER and will stop working automatically. Press the
ON/OFF button, add water to the unit and push the ON/OFF
button again the indicator will turn off and will resume normal
operation.
ICE FULL INDICATOR
When the ice-bin is full, the indicator wi l l illuminate in AMBER.
The indicator will remain l it until the ice in the bin either melts
away slowly or has been remov ed. The un it w ill st ay in a “Standby”
mode until ice has been remov ed / melted at which time the unit w il l
automatically star t oper at i on as normal.
MAKING ICE
When the system in the process of an ice making cycle, the light will illu m inate in BLUE during
the ice making process.
ICE JAM
If the ice cube shove l that moves the ice from the freezing area to the storage basket becomes
jammed with an ice cube, the I CE J AM light will illuminate in RED and will shut the ice making
system and cooling system down for approximately 10 minutes to allow the cube to melt.
After approximately 10 minutes the light will turn off and the system will return to working as
normal.
Operating Instructions
Starting your Ice maker
• Open the top cover and remove the ice basket.
• Remove any dust or objects that may be in the water tank
• Fill the water tank up to the area marked “MAX”.
• The ice-maker will automatically check the water level in the reservoir periodically . The ice maker
will detect any shortage of water and will stop the ice-making cycle, and then the ADD WA TER
indicator will be lit.
• Press the ON/OFF button and fill the reservoir with water, press the ON/OFF button again to
restart the ice-making cycle and the ADD WA TER indicator goes out as the ice-maker will begin
its normal operation cycle automatically.
• When the ice cubes are collected and reach the bin sensor, the ice maker will stop operating and
the ICE FULL indicator will be lit.
• WARNING:
Direct sunlight may affect the infrared sensors and cause the unit to malfunction.
If at any time the unit does not stop the ice-making operation even when the ice-bin is full, move
the unit to another location where it is out of direct sunlight.
9
Page 10

• For best per formance, water temperatur e should be between 7°C (45ºF) and 35°C (95ºF)
and ambient between 15°C (59ºF) and 25°C (77ºF).
• Actual ice m aking capacity w ill depend on the ambient temperature of the surroundings of
the ice maker as well as the temperature and quality of the water used to make the ice.
Getting Ice from the Ice-bin
• Open the top cover to access the ice basket.
• Remov e t he am ount of ice as desired and close the top.
CARE AND MAINTENANCE
Caution
Failure to unplug the ice maker could result in electrical shock or personal injury.
Ø Cleaning Your Ice Maker
• To ensure the cleanliness of the ice cubes, it is recommended that you use filtered water.
• Remove the drain plug to drain remaining water from the water reservoir when the ice maker will
not be used for long period of time. Put the drain plug back in place after the water has been
drained.
• Always change with fresh water before starting ice production at initial installation or after long
shut-off periods.
• Please clean your Ice maker regularly. When cleaning, unplug the unit and remove the ice
cubes. Use a diluted solution of water and vinegar to clean the inside and the outside surface of
the Ice maker. Do not spray Ice maker with chemicals or diluted agents such as acids, gasoline
or oil. Rinse thoroughly before starting.
Ø Space Requirements
• During transportation, the incline angle of the cabinet should not be over 45°
• Do not turn the Ice maker upside down. Problems could occur in the compressor and sealed
system.
• The Ice maker should be placed hor i zontal l y on a proper l y leveled surf ac e.
• To ensure proper ventilation for your Ice maker allow 6” of space at the top, the back and on
each side.
• Before using the Ice maker for the first time, please wait 2 hours after positioning it.
• Clean the inner liner, ice-bin, and water box.
IMPORTANT: Do not install t he I ce m aker n ear an oven, radiator, or other heat source.
Ø Power Failure
Most power failur es are cor rect ed with in a few h ours a nd sh ould not af fec t the t em peratur e of your
ice maker if you minimize the number of times the ice-bin is opened. If the power is going to be OFF
for a longer period of time, you need to take the proper steps to disconnect your appliance.
10
Page 11

PROBLEMS WITH YOUR ICE MAKER?
Problem
Possible Cause
Suggested Sol utions
The compressor works
Noise.
The voltage is lower than
Stop the ice maker and do not restart
Add Water indicator
There is not enough water in
Press the ON/OFF button, fill with water,
restart.
Ice full indicator light is on.
Ice storage cabinet is full to
the top.
Remove some of the ice.
Indicator lights are off.
Blown fuse/ no power/blown
breaker
Replace fuse / turn power on.
The ice made is too large
together.
The water temperature in the
low.
Stop the machine and reset the ice
turning it off.
Conditions for ice making
made.
Refrigerant leaks/ sealed
Contact customer service.
Ice Jam Indicator light
Motor or Control Panel issue.
Press the ON/OFF button and unplug
service.
Ice Full (Amber) and Add
Possible cooling system issue.
Press the ON/OFF button and unplug
customer service.
800-323-5029
help is available.
check, money order, master card, or visa.
know your ice maker inside and out.
You can solve many common ice maker problems easily, saving you the cost of a possible service
call. Try the suggestions below to see if you can solve the problem before calling the servicer.
TROUBLESHOOTING GUIDE
abnormally with a buzzing
Light is on.
and with pieces sticking
cycle are right but no ice is
turns on when first plugged
in.
Water (Amber) indicator
lights are on.
recommended.
the reservoir.
storage tray or ambient is too
system is blocked.
until the voltage is normal.
and press the power button again to
making cycle. Restart the machine after
the unit to reset the system.
If the problem persists conta ct custo mer
the unit to allow the system to reset.
Wait approximately 10 minutes before
connecting the unit and restarting the
ice making process.
If the problem persists, contact
We are proud of our customer service organization and the network of professional service
technicians that pro vide service on your Avanti ice m aker. With the purchase of your A vanti ice
maker, you can be confident that if you ever n eed additional information or assistance, the Avanti
Products Customer Service team will be here for you. Just call us toll-free.
Product information
Part orders
800-220-5570
In-home repair service
800-220-5570
Service For Your Ice Maker
Avanti Products Customer Services
Whatever your questions are about our products,
You may order parts and accessories that will be
delivered directly to your hom e, by personal
An Avanti Products authorized service center will
provide expert repair service, scheduled at a time
that is convenient for you. Our trained servicers
11
Page 12

Staple your sales receipt here. Proof of original
warranty.
WHAT IS COVERED – LIMITED ONE-YEAR WARRANTY
cubic feet capacity or less must be brought/sent to the appliance service center for repair.
LIMITED SECOND THROUGH FIFTH YEAR WARRANTY
product to the service center and back to the user’s home, as maybe required, are the user’s responsibility.
WARRANTY EXCLUSIONS / WHAT IS NOT COVERED:
Products, including without limitation, one or more of the following:
•
power surges, structural failures surrounding the appliance, and acts of God.
•
• Shipping and handling costs associated with the
In no event shall Av anti Produc ts have any lia bility or r esponsibility w hatsoever f or damage to surrounding property ,
shelving etc., as well as the resetting of breakers or fuses.
OUT OF WARRANTY PRODUCT
pro-rates, or product replacement, once this warranty has expired.
WARRANTY – REFRIGERATION - COMPRESSOR
YOUR AVANTI PRODUCTS
WARRANTY
Avanti Products warrants that the product is free from defects in materials and/or workmanship for a period of
twelve (12) months from the dat e of purch ase by the ori ginal owner . The for egoing ti meline begins to r un up on the
date of purchase, and shall not be stalled, tolled, extended, or suspended for any reason whatsoever unless
described in detail in the w arra nty document. For one y ear fr om the dat e of pur chase by the or iginal owner , Avanti
products will, at its option, repair or replace any part of the product which proves to be defective in material or
workmanship under normal use. Avanti Products will provide you with a reasonably similar product that is either
new or factory refurbished. D uring this period Avanti Product s w ill prov ide al l par ts a nd la bo r nece ssary to c or rec t
such defects free of cha rge, so long as the produ ct has been installed and operated in accor danc e with the written
instructions in this manual. In rental or commer cial use, the w arranty period is 90 day s. All Av anti appliances of 3. 5
For the second thr ough t he fif th y ear fr om t he date of origi nal purch ase, Av anti P rodu cts w ill provide a repl aceme nt
compressor free of charge due to a failur e. Y ou are re spons ible for the service labor and fre ight char ges. In rental
or commercial use, the limited compressor warranty is one year and nine months. Costs involved to move the
The warranty coverage described herein excludes all defects or damage that are not the direct fault of Avanti
A failure to comply with any applicable state, local, city, or county electrical, plumbing and/or building codes,
regulations, or laws, including failure to install the product in strict conformity with local fire and building codes
and regulations.
purchase date is needed to obtain service under
• Any external, elemental and/or environmental forces and factors, including without limitation, rain, wind, sand,
floods, fires, mud slides , freezi ng temper ature s, ex cessiv e moist ure or ex tended ex posure to hum idity, l ight ning,
Content losses of food or other content due to
spoilage.
• Incidental or consequential damages
• Parts and labor costs for the following will not be
considered as warranty:
• Plastic cabinet liners.
• Punctured evaporator that voids the warranty on
the complete sealed system.
including cabinetry , floors, ceil ings, and ot her structur es and/or obj ects aroun d the product. Also ex cluded from t his
warranty are scratches, nick s, minor dent s, and oth er co sme t ic dam age s on ex ternal surfaces and exposed parts;
Products on which the serial numbers have been altered, defaced or removed; service visits for customer
education, or visits where t here is nothin g wrong with the pr oduct; correctio n of installat ion problems (y ou are solely
responsible for any structure and setting for the product, including all electrical, plumbing a nd/or ot her co nne ctin g
facilities, for proper foundation/flooring, and for any alterations including without limitation cabinetry, walls, floors,
Avanti Products is under no obligation, at law or otherwise, to pr ov ide y ou with any concessions, in clu ding repairs,
replacement of the unit.
• Repairs performed by unauthorized servicers.
• Service calls that are related to external problems,
such as abuse, misuse, inadeq uate e lectri cal pow er,
accidents, fire, floods, or any other acts of God.
• Failure of the product if it is used for other than it
intended purpose.
• The warranty does not app ly o ut si de t he Continental
USA.
• Surcharges including but not limited to, any after
hour, weekend, or holiday service calls, tolls, ferry
trip charges, or mileage expense for service calls to
remote areas.
12
Page 13

~
Para reducir el riesgo de un incendio, choque
precauciones básicas.
-guarde estas instrucciones -
MEDIDAS DE PRECAUCION IMPORTANTES
ADVERTENCIA~
• Lea todas las instrucciones antes de usar la máquina de hacer hielo.
• Peligro o Advertencia: riesgo de niños atrapados.
• Los niños atrapados o sofocados no son un problema del pasado. Electrodomésticos
abandonados aún son peligrosos…aun cuando “solo estarán en el garaje un par de días”.
• Antes de botar su máquina de hacer hielo: Retire la bandeja de hielo.
• Nunca permita que los niños operen, jueguen con o se introduzcan en la máquina.
• Nunca limpie la máquina de hacer hielo o las piezas con líquidos inflamables. Los vapores
pueden causar peligro de fuego o explosión.
• No guarde ni use gasolina u otros vapores o líquidos inflamables cerca a este u otra
máquina de hacer hielo. Los vapores pueden causar peligro de fuego o explosión.
•
eléctrico o daños personales cuando use la
máquina de hacer hielo, siga estas
INSTRUCCIONES DE INSTALACION
Ø Antes de usar su Máquina de Hacer Hielo
• Retire el empaque interno y externo.
• Verifique que haya recibido las siguientes piezas:
• 1 Manual de Instrucciones
• 1 Paleta para cubitos de hielo
• Antes de conectar la máquina de hacer hielo a la corriente eléctrica, colóquela parada en
posición vertical por 2 horas aproximadamente. Esto reducirá la posibilidad de mal
funcionamiento en el sistema de enfriado, causado por el manejo y manipuleo durante el
transporte.
• Limpie la superficie interior con agua tibia, usando un trapito suave.
Ø Instalación de su máquina de hacer hielo
• Coloque la máquina de hacer hiel o fuera de la luz solar dir ecta y de fuentes de calor (cocina,
calentador, radiador, etc.). La lu z solar directa pu ede afectar la capa acrílica y las fuentes de
calor puede incrementar el consumo eléctrico. Las temperaturas de ambiente extremadamente
altas también podrían ocasionar que su máquina de hacer hielo no funcione correctamente.
• Conecte la máquina de hacer hielo a un receptáculo/enchufe de pared correctamente instalado,
de uso exclusivo p ara es ta. B ajo n ingun a circ unstanc ia c orte o r etire la ter cera punta (c able a
tierra) del cordón. Cualquier cons ulta que tenga ref erente a la electricidad y/o c able a tierra,
debe ser dirigida a un electricis ta certificado o a un centro de s ervicios autoriza do por Avanti
Products.
IMPORTANTE: No instale la máquina de hacer hielo cerca de un horno, radiador u otras
fuentes de calor.
13
Page 14

CONEXIÓN ELÉCTRICA
~ADVERTENCIA~
EL USO INAPROPIADO DEL ENCHUFE A TIERRA PUEDE OCASIONAR RIESGO DE UN
CHOQUE ELECTRICO. SI EL CORDON SE DAÑASE, LLEVELO A UN CENTRO DE SERVICIO
AUTORIZADO POR AVANTI PRODUCTS PARA QUE SE REEMPLACE.
• Para su seguridad, esta máquina de hacer hielo debe estar apropiadamente conectada a tierra.
El cordón eléctrico de esta máquina de hacer hielo está equipado con un enchufe de tres
puntas, el cual enc aja perfectamente en los receptáculos /enchufes de pared de tres puntas
estándar, para minimizar la posibilidad de un choque eléctrico.
• Bajo ninguna circunstancia corte o retire la tercera punta (cable a tierra) del enchufe del cordón
eléctrico.
• Nunca use un cable de extensión para conectar la unidad a la electricidad.
• Nunca use un adaptador con enchufe de solo 2 puntas.
• Si solo puede conectar la máquina de hacer hielo a un receptáculo/enchufe de pared de 2
puntas, comuníquese con un electricista calificado para que reemplace ese
receptáculo/enchuf e de par ed por uno de 3 pu ntas , d e ac uer do c o n los c ódig os de electricidad
aplicables.
• Esta máquina de hacer hielo requiere un receptáculo/enchufe de pared de tres puntas estándar
de 115/120 voltios a.c.~/60hz.
• Para prevenir cualquier daño físico o lesión, el cordón debe ser asegurado detrás de la máquina
de hacer hielo y no estar expuesto o colgando.
Ø Cable de Extensión
Debido al posible riesgo de seguridad causado bajo ciertas circunstancias, se recomienda
firmemente que no use un cable de extensión para este electrodoméstico. Sin embargo, si no tiene
otra opción más que usar un cable de extensión, asegúr ese que este sea un cable de ex tensión
para electrodomésticos que este listado bajo UL/CUL, que tenga enchufe y receptáculo para
enchufe de tres puntas (c a ble a t ier ra) y que la capacidad del c ordón eléctrico sea de 11 5 volt ios y
no menos de 10 amperios.
Ø Protector contra variaciones de cor riente eléctrica (Surge Protector).
La mayoría de electrod omésticos utilizan unas series de paneles de control para operar. Estos
paneles son muy susceptibles a las variaciones de corriente eléctrica, las cuales causan que estos
se dañen o destruyen.
Si vive en un área o ciudad done hay muchas variaciones de corriente o apagones, se recomienda
que utilice un protector contra variaciones de corriente para todos los electrodomésticos y aparatos
eléctricos. El protector que elija debe bloquear una variación de electricidad alta para poder
proteger el electrodoméstico al cual está conectado. Por favor contáctese con un electricista
licenciado en su área si tuviera preguntas en referencia al tipo y tamaño de protector que necesita.
Daños debido a variac iones de electricid ad no se consideran un defecto del fabricante y podrían
anular la garantía.
14
Page 15

OPERANDO SU MÁQUINA DE HACER HIELO
Ø Descripción del Panel de Cont r ol
INDICADOR DE ENCENDIDO
El indicador marcado POWER se iluminará en rojo cuando la unidad
esté enchufada.
AGREGAR INDICADOR DE AGUA
La fábrica de hielo verifica automáticamente el nivel del agua en
el tanque. Si el nivel de agua es demasiado bajo, el indicador se
iluminará en AMBAR y dejará de funcionar automáticamente.
Presione el botón ON / OFF, agregue agua a la unidad y presione
nuevamente el botón ON / OFF, el indicador se apagará y se
reanudará el funcionamiento normal.
ICE FULL INDICATOR
Cuando el depósito de hielo está lleno, el indicador se iluminará en
AMBAR.
El indicador permanecerá encendido hasta que el hielo en el recipiente se derrita lentamente o se
haya eliminado. La unidad permanecerá en el modo "En espera" hasta que se haya eliminado /
derretido el hielo, momento en el que la unidad comenzará a funcionar automáticamente de forma
normal.
HACIENDO HIELO
Cuando el sistema está en proceso de un ciclo de fabricación de hielo, la luz se iluminará en AZUL
durante el proceso de fabricación de hielo.
ICE JAM
Si la pala del cubo de hielo que mueve el hielo del área de congelación al cesto de almacenamiento
se atasca con un cubo de hielo, la luz ICE JAM se iluminará en ROJO y cerrará el sistema de
fabricación de hielo y el sistema de enfriamiento durante aproximadamente 10 minutos para permitir
que cubo para derretir
Después de aproximadamente 10 minutos, la luz se apagará y el sistema volverá a funcionar
normalmente.
Instrucciones de Operación
Iniciando el proceso con su máqui na de hacer hielo
• Levante la tapa de la unidad.
• Remuev a el p olvo o cualquier objeto que esté en el tanque de agua.
• Llena el tanque de agua hasta el ár ea marcada “MAX”.
• La máquin a de hacer hielo automáticament e verifica el nivel de agua en el tanque. Si el
nivel de agua en el t anqu e fuer a muy bajo, el i ndica dor p ara añadir agu a (A DD W ATER) se
iluminará en AMBAR y detendrá el funciona mient o.
• Llene el tanque de agua y presione el botón ON/OFF. El indicador rojo se apagará y
empezará a funcionar nor ma lmente.
• Cuando los cubos de hielo se van almacenando y llegan al tope del sensor, la máquina de
hacer hielo detendrá el fu ncionamiento y el indicador de IC E FULL (CICLO COMPL ETO) se
encenderá.
• Para mejor f uncionamiento, la temperatura del agua debe estar ent r e 7°C (45ºF) y 35°C
(95ºF) y la del ambiente entr e 15° C (59ºF) y 25°C (77ºF).
Sacando hielo del recipi ent e de hielo
• Levante la tapa de la unidad.
• Retire la ca nt id ad de hielo deseada, baje la t apa a su sitio original y cierre.
15
Page 16

CUIDADO Y MANTENIMIENTO
Precaución
Asegúrese de desconectar la máquina de hacer hielo de la electricidad antes de limpiarla, de
lo contrario puede ocasionar un choque eléctrico o daño personal.
Ø Limpiando su máquina de hacer hielo
• Para asegurar la higiene en los cubos de hielo, se recomienda llenar el tanque con agua filtrada.
• Cuando la máquina de hacer hielo no sea usada por un largo período de tiempo, retire el tapón
del drenaje para que el agua remanente del tanque sea descartada. Coloque el tapón del
drenaje nuevamente en su sitio después que toda el agua haya sido drenada.
• Siempre use agua fresca antes de empezar la producción de hielo durante la instalación inicial o
después de largos períodos de inactividad.
• Por favor limpie su máquina de hacer hielo regularmente. Cuando la limpie, desconecte la
unidad de la electricidad y retire los cubos de hielo. Use una solución diluída de agua y vinagre
para limpiar el interior y el exterior de la superficie de la máquina de hacer hielo. No rocíe la
máquina de hacer hielo con substancias químicas o agentes diluidos, tales como ácidos,
gasolina o aceite. Enjuague bien antes de empezar el funcionamiento.
Ø Requerimientos de espacio
• El ángulo de inclinación de la unidad durante el transporte no debe exceder los 45°
• No ponga la máquina de hacer hielo de cabeza ya que esto puede producir problemas en el
compresor y el sistema sellado.
• La máquina de hacer hielo debe ser colocada sobre una superficie correctamente nivelada.
• Para asegurar ventilación apropiada para su máquina de hacer hielo, deje 6” de espacio encima
de la superficie, la parte posterior y los lados.
• Antes de usar la máquina de hacer hielo por primera vez, por favor espere 2 horas después de
colocarla en su posición final.
• Limpie la superficie interna, el contenedor del hielo, el tanque de agua y el reservorio para
rellenar el tanque de agua con mucha frecuencia.
IMPORTANTE: No instale la máquina de hacer hielo cerca de un horno, radiador u otras
fuentes de calor.
Ø Falta de electricidad
Cuando la electricidad s e va, la mayoría de las vece s regresará en unas pocas horas y no debe
afectar la temperatura de su máquina de hacer hielo siempre y cuando Ud. minimice las veces que
se abra la puerta del c onte nedor del hielo. Si la el ectricida d va a es tar desconec tada por un lar go
período de tiempo, entonces debe tomar los pasos apropiados y desconectar la unidad.
16
Page 17

PROBLEMAS CON SU MÁQUINA DE HACER HIELO?
Problema
Causa Posible
Sugerencias
El compresor no funciona
El voltaje es menor que el
Apague la máquina de hacer hielo y
vuelva a la normalidad.
El indicador para añadir más
El tanque de agua no tiene
Presione el botón ON/OFF, llénelo de
botón START.
El indicador de recipiente de
hielo lleno está encendido.
El recipiente de hielo está lleno
hasta el tope.
Remueva un poco de hielo.
Las luces indicadoras están
Se voló un fusible / la máquina
electricidad / voló el interruptor.
Reemplace el fusible / verifique que
encienda la máquina.
Los cubos de hielo son muy
La temperatura del agua en el
Apague la máquina y reprograme el
vez.
La luz indicadora Ice Jam se
Problema del motor o del panel
Presione el botón ON / OFF y
Las luces indicadoras de
Posible problema del sistema
Presione el botón ON / OFF para
Todas las condiciones para
correctas pero no hay hielo.
Fuga o goteo de refrigerante /
bloqueado.
Reemplace la unidad.
Ud. puede resolver muchos problemas simples de máquina de hacer hielo fácilmente, ahorrándose
el costo de una visita del servicio técnico. Pruebe las sugerencias a continuación para ver si con
ellas puede resolver el problema antes de llamar al técnico.
GUIA PARA RESOLVER PROBLEMAS
normalmente, tiene un ruido.
agua está encendido.
apagadas.
grandes y se están pegando
unos a otros.
enciende cuando se enchufa
por primera vez.
Hielo Lleno (Ámbar) y
Agregar Agua (Ámbar) están
encendidas
recomendado.
suficiente agua.
no está conectada o no hay
recipiente de hielo o del
ambiente es muy baja.
de control
de enfriamiento
no la encienda hasta que el voltaje
agua, espere 3 minutos y luego
encienda la unidad presionando el
la máquina está enchufada /
ciclo de hacer hielo. Luego de
apagar la máquina enciéndala otra
desenchufe la unidad para
restablecer el sistema.
Si el problema persiste,
comuníquese con el servicio al
cliente.
desconectar la unidad y permitir que
el sistema se reinicie.
Espere aproximadamente 10
minutos antes de conectar la unidad
y reiniciar el proceso de fabricación
de hielo.
Si el problema persiste,
comuníquese con el servicio al
cliente.
el ciclo de hacer hielo están
.
el sistema sellado está
17
Page 18

SÉCURITÉ RELATIVE À L’APPAREIL
compte de ce signal de sécurité pourrait
entraîner des blessures corporelles ou la
pas tenir compte de ce signal peut causer
des dommages matériaux importants au
« Attention » signifie que le fait de ne pas
tenir compte de ce signal peut causer des
blessures corporelles mineures et des
Votre sécurité et celle des autres nous importent au plus haut point
.
Ce manuel ainsi qu e votre appareil contiennent des symboles de sécurité dont vous devez tenir
compte et que vous devez respecter en tout temps.
Voici le symbole de sécurité. Ce symbole vous prévient des dangers potentiels
susceptibles de vous tuer ou de vous blesser ainsi que votre entour age. Tous
les signaux de sécurité s eront précédés de ce symbol e ainsi que des termes
« DANGER », « AVERTISSEMENT » et « ATTENTION ».
« Danger » signifie que le fait de ne pas tenir
mort.
« Avertissement » s ignifie que le fait de ne
produit, des blessures c orporelles graves et
même la mort.
dommages à la propriété ou à l’équipement.
Les signaux de sécurité vous serviront à repérer les dangers potentiels, à réduire les risques de
blessure et à comprendre ce qui pourrait se produire si les instructions n’étaient pas suivies.
18
Page 19

CONSEILS DE SÉCURITÉ IMPORTANTS
Avant toute utilis ation, l’appareil doit être convenablem ent positionné et installé
comme il est décrit dans ce manuel, il est donc nécessaire de le lire
attentivement. Pour réduire les risques d’incendie, d’électrocution ou de blessure
lors de l’utilisation de l’appareil, nous vous recommandons de suivre les mesures
de sécurité suivantes :
• Branchez l’appareil à une prise triphasée mise à la terre, ne retirez pas la broche de masse,
ne pas utiliser d’adaptateur ni de rallonge.
• Replacez tous les panneaux avant de mettre en marche l’appareil.
• Il est recommandé de ne pas brancher cet appareil dans la prise d’un autre appareil ni dans
une prise qui peut être éteinte par un interrupteur ou par une chaîne de traction.
• Ne nettoyez jamais les pièces de l’a ppareil avec des liquides inflamm ables. Les vapeurs
provoquées par ces liquides risquent de déclencher un incendie ou une explosion
dangereuse.
• Ne placez pas l’appareil près d’essence ou de tout autre produit liquide ou vaporeux
inflammable. La f umée que ces produits d éga gen t p ourrait déclencher un i nc end ie ou une
explosion dangereuse.
• Évitez les risques d’électrocution en débranchant l’appareil avant de procéder à son
nettoyage ou à sa réparation.
• Lorsque vous branche z ou débranchez l’appareil, as surez-vous que vos mains sont bien
sèches.
• Ne tentez pas de répar er l’appareil ni d’en remplacer une pièce à moins que ce ne soi t
spécifiquement recom mandé dans ce manuel. Laisse r à un technicien qualifié le soin de
procéder à toute réparation non recommandée.
• Déplacez l’appareil à deux ou à plusieurs personnes afin d’éviter les blessures.
• Pour assurer la ventilation convenable de l’appareil, laissez-en le devant complètement
dégagé. Choisissez une pièc e bien aérée d’une températur e entre 16 à 32 °C, à l’ abri des
éléments tels que le vent et la pluie ainsi que l’eau pulvéris ée et en gouttes.
• Ne placez pas l’appareil à proximité d’un four, d’une cuisinière ou d e t out e a utr e s ourc e de
chaleur.
• Installez l’appareil avec tous les branchements électriques requis par les codes provinciaux.
Une alimentation électr ique standar d (115 Vo lts CA uniquem ent et 60H z) convenablem ent
reliée à la terre et conforme au Code canadien de l’électricité et aux codes et aux
ordonnances locaux est requise.
• L’intensité du fusible (ou du disjoncteur) doit être de 15 ampères.
• Il est important que l’appareil soit à niveau afin qu’il fonctionne correctement. Il se peut que
vous deviez faire plusieurs ajust ements pour y arriver.
• Ne laissez pas d’enfants jouer avec l’appareil.
• Pour nettoyer l’appareil, n’utilisez pas d’agents abrasifs à base de solvant qui pourraient en
endommager ou en décolorer les surfaces.
• N’utilisez l’appareil qu’aux fins auxquelles il a été conçu.
19
Page 20

Lisez attentivement le présent guide
Il a été conçu pour vous aider à utiliser et à
ou que vous avez besoin de renseignements
Inscrivez les numéros de modèle et de série
itué à
ros dans toute
Si vous avez reçu un appareil endommagé,
Économisez temps et argent. Avant de faire
s services, vérifiez la liste des
Nous sommes f iers de no tre s ervice et désiro ns
votre entière satisfaction. Si, pour une
service, voici quelques étapes à suivre pour
réparation avec lequel vous avez fait affaire.
Expliquez les raisons de votre insatisfaction.
upart des cas, cela résoudra le
Ensuite, si vous n’êtes toujours pas satisfait,
consignez tous les détails par écrit,
envoyez-les à :
ATTENTION!
AIDEZ-NOUS À VOUS AIDER...
d’utilisation.
entretenir votre nouvel appareil.
Conservez-le à portée de la main pour vous y
référer au besoin. Si quelque chose vous échappe
supplémentaires, écrivez-nous à :
Avanti Products
10880 NW 30 Street
Miami, FL 33172
Conservez une preuve originale de la date d’achat
(tel que le reçu d e caisse) avec le prés ent guide
afin de pouvoir établir la période de garantie.
CE L’APPAREIL N’EST PAS CONÇU POUR
L’ENTREPOSAGE DE MÉDICAMENTS OU DE
TOUT AUTRE PRODUIT PHARMACEUTIQUE.
Vous les trouverez sur un autocollant s
l’arrière de l’appareil.
Veuillez inscrire ces numéros ci-dessous :
____________________________________
____________________________________
____________________________________
Indiquez ces numé
correspondance ou lors de tout appel de s ervice
concernant votre appareil.
avisez-en immédiatement le détaillant qui vous a
vendu le l’appareil.
appel à no
problèmes de fonc tionnement mineurs faciles à
résoudre dressée dans le présent guide.
POUR TOUTE ASSISTANCE
Date d’achat
Numéro de modèle
Numéro de série
quelconque raison, v ous n ’ êtes p as s atis f aits du
obtenir une aide supplémentaire.
Tout d’abord, comm uniquez avec le service de
Dans la pl
problème.
accompagnés de votre numéro de téléphone, e t
Avanti – Servi ce à la clientèl e
10880 NW 30 Street
Miami, FL 33172 USA
1-800-220-5570
20
Page 21

1
COUVERCLE SUPÉRIEUR
2
SYSTÈME DE FABRICATION DE GLACE
3
PANIER À GLACE
4
CABINET
5
PANNEAU DE CONTRÔLE
PIÈCES ET CARACTÉRISTIQUES
21
Page 22

CONSIGNES DE SÉCURITÉ IMPORTANTES
~
~
Pour réduire le risque d'incendie, d'électrocution
base:
-save ces INSTRUCTIONS-
ATTENTION
• Lisez toutes les instructions avant d'utiliser la machine à glaçons.
• Danger ou Avertissement: Risque de piégeage des enfants.
• piégeage des enfants et la suffocation ne sont pas des problèmes du passé. appareils jetés
ou abandonnés sont toujours dangereux. . . Même s'ils vont "rester assis dans le garage
quelques jours."
• Ne jamais laisser les enfants utiliser, jouer avec l'appareil.
• Jamais parties propres de la machine à glaçons avec des liquides inflammables. Les
vapeurs peuvent créer un risque d'incendie ou d'explosion.
• Ne pas entreposer ou utiliser d'essence ou d'autres vapeurs et liquides inflammables à
proximité de cet appareil ou toute autre machine à glaçons. Les vapeurs peuvent créer un
risque d'incendie ou d'explosion.
ou de blessure lors de l'utilisation de votre
machine à glaçons, suivre ces précautions de
INSTRUCTIONS D'INSTALLATION
Ø Avant d'utiliser votre machine à glaçons
• Retirez l'emballage extérieur et intérieur.
• Vérifiez que vous avez toutes les pièces suivantes:
• 1 Mode d'emploi
• 1 Scoop
• Avant de brancher la machine à glaçons à la source d'alimentation, laissez-le tenir debout pendant
environ 2 heures. Cela permettra de réduire la possibilité d'un mauvais fonctionnement du système
de refroidissement lors de la manipulation durant le transport.
• Nettoyer la surface intérieure à l'eau tiède avec un chiffon doux.
Ø Installation de votre machine à glaçons
• Localisez la mac hine à glaçons l'abri du sol eil et des sources de chal eur (cuisinière, chauffage,
radiateur, etc.). La lumière solaire directe peut affecter le revêtement acrylique et sources de
chaleur peuvent augmenter la consommation électrique. Les températures ambiantes froides
extrêmes peuvent aussi causer la machine à glaçons ne pas fonctionner correctement.
• Branchez la machine à gl açons dans une prise m urale c orrec tem ent installée à la terr e exclus ive.
Ne pas en aucun cas réduire ou supprim er la troisième (terre) du cordon d'alimentation. Toute
question concernant le pouvoir et ou mise à la terre doivent être adressées à un électricien certifié
ou un centre de service produits Avanti autorisé.
IMPORTANT: Ne pas installer la machine à glaçons près d'un four, un radiateur ou autre
source de chaleur.
22
Page 23

CONNEXION ÉLECTRIQUE
~Attention~
Une mauvaise utilisation de la prise de terre peut entraîner un risque de choc électrique. Si le cordon
d'alimentation est endommagé, faites-le remplacer par un centre de service Avanti Produits autorisé.
Cet appareil doit êtr e corr ectement mis à la terre po ur vot re sécur ité. Le c ordon d'alim entation de cet
appareil est équipé d'une fiche à trois broches qui accouple avec trois standards prises murales
broches afin de minimiser le risque de choc électrique.
Ne pas en aucun cas co uper ou enlev er la troisièm e broche de ter re du cordon d'alimentatio n fourni.
Pour votre sécurité, cet appareil doit être correctement mis à la terre.
Cet appareil nécessite une prise de sol standard 115/120 Volt AC ~ / 60Hz électrique avec trois
broches. Avoir la prise m ur ale et le cir cui t par un é lect r ic ien q ua lifié p our vous as s urer que l a pris e est
correctement m ise à la t erre. Q uand une pr ise m ur ale standar d de 2 br oches est rencontrée, il est de
votre responsabilité et l'obligation de la faire remplacer par une prise murale à 3 broches correctement
mise à la terre.
Le cordon doit être fixé derrière l'appareil et non laissés exposés ou qui pendent pour prévenir
les blessures accidentelles.
L'appareil doit toujours être branché dans sa propre prise de courant qui a une tension qui correspond
à l'étiquette apposée sur l'appareil. Ceci permet d' obtenir les meilleures perform ances et éviter une
surcharge des circuits de câblage de la maison qui pourraient causer un risque d'incendie de
surchauffe. Ne jamais débrancher l'appareil en tirant sur le cordon d'alimentation. Toujours saisir
fermement la fiche et tire z tout droit sorti de la prise. Réparer ou rem placer immédiatement tous les
cordons d'alimentation qui sont devenus usés ou endommagés. Ne pas utiliser un cordon qui présente
des fissures ou des dommages à l'abrasion sur sa longueur ou à chaque extrémité. Lors du
déplacement de l'appareil, veillez à ne pas endommager le cordon d'alimentation.
Ø RALLONGE ÉLECTRIQUE
En raison des risques potentiels pour la sécurité dans certaines conditions, il est fortement
recommandé de ne pas utiliser une rallonge avec cet appareil. Toutefois, si vous devez utiliser une
rallonge, il est absolument nécessaire que ce soit un UL / CUL, 3 fils de terre appareil rallonge ayant
une fiche de mise à la terre et à la sortie et que la puissance électrique du câble est de 115 volts et au
moins 10 ampères.
Ø PARASURTENSEUR
La plupart des appareils électriques utilisent une série de tableaux de commande électriques pour
fonctionner. Ces cartes sont très sensibles aux surtensions et pourraient être endommagés ou détruits.
Si l'appareil va être utilisé dans une zone ou si votre ville / pays est sujette à des surtensions / coupures;
il est suggéré que vous utilisez un dispositif de protection contre les surtensions pour tous les dispositifs
/ appareils électriques que vous utilisez. Le protecteur de surtension que vous sélectionnez doit avoir
un bloc de poussée suffisamment élevé pour protéger l'appareil, il est connecté. Si vous avez des
questions concernant le type et la taille d'un protecteur de surtension contact nécessaire à un
électricien agréé dans votre région.
Les dommages dus à des surtensions ne sont pas considérés comme un fabricant couvert défaut et
annulera la garantie du produit.
23
Page 24

UTILISATION DE VOTRE ICE MAKER
Ø Panneau de commande
INDICATEURS LED
INDICATEUR DE PUISSANCE
L'indicateur au-dessus du mot POWER s'allume lorsque l'appareil est
branché.
Il s'allume en ROUGE lorsque l'appareil est allumé.
AJOUTER UN INDICATEUR D'EAU
La machine à glaçons vérifie automatiquement le niveau d'eau
dans le réservoir. Si le niveau d'eau est trop bas, l'indicateur
s'allumera en AMBRE et cessera de fonctionner
automatiquement. Appuyez sur le bouton ON / OFF, ajoutez de
l'eau à l'appareil et appuyez à nouveau sur le bouton ON / OFF.
L'indicateur s'éteindra et reprendra son fonctionnement normal.
INDICATEUR COMPLET GLACE
Lorsque la glacière est pleine, l'indicateur s'allume en AMBRE. L'indicateur restera allumé jusqu'à ce
que la glace dans le bac soit fond lentement ou ait été enlevée. L'appareil restera en mode «attente»
jusqu'à ce que la glace ait été retirée / fondue, moment auquel l'appareil commencera automatiquement
à fonctionner normalement.
FAIRE DE LA GLACE
Lorsque le système est en cours de cycle de fabrication de glace, la lumière s'allume en BLEU pendant
le processus de fabrication de la glace.
ICE JAM
Si la pelle à glaçons qui transporte la glace de la zone de congél ation ver s le pani er de rangem ent se
coince avec un glaçon, le voyant ICE JAM s'allume en ROUGE et ferme le système de fabrication de
glaçons et le système de refroidissement pendant environ 10 minutes. cube à faire fondre.
Après environ 10 minutes, la lumière s'éteindra et le système retournera au fonctionnement normal.
24
Page 25

Mode d'emploi
À partir de votre machine à glaçons
• Ouvr ez le capot supérieur et retirez le p ani er de glaçons.
• Enlever la poussière ou des objets qui peuvent être dans le réserv oir d'eau
• Remplir le réservoir d'eau jusqu'à la z one marquée "MAX".
• Le fabricant de glaçons vérifie autom at iq uement le niveau d'eau dans le réser voir
périodiquement. La mac hi ne à glaçons permet de détecter t out e pénurie d'eau et arrêter le
cycle de fabrication de glaçons, puis l'indicateur EAU ADD sera allumé
• Remplir le réservoir avec de l'eau et appuie sur le bouton ON / OFF pour redémarrer le cycle
de fabrication de glaçons et l'indicateur EAU ADD va comme le fabricant de glaçons va
commencer son cycle de f onc t i onnement normal.
• Lorsque les cubes de glaçons sont collectés et atteignent le capteur de bac, la
machine à glaçons cessera de fonctionner et l'indicateur FULL ICE sera allumé
• ATTENTION:
La lumière solaire directe peut affecter les capteurs infrarouges et provoquer un mauvais
fonctionnement.
Si à tout moment l'unité ne cesse de l'opération de fabrication de glaçons, même lorsque le glaçon
bac est plein, déplacer l'appareil à un autre endroit où il est hors de la lumière solaire directe.
• Pour des perf or mances o pti males, la t emp érature de l'ea u doit être comprise entre 7 ° C (45 °
F) et 35 ° C (95 ° F) et la température ambiante entre 15 ° C (59 ° F) et 25 ° C (77 ° F).
Obtenir les glaçons de la glaçons-bin
• Ouvr ez le capot supérieur pour accéder au panier de glaçons.
• Retirer la qu ant it é de glaçons que désiré et fer m er l a partie supérieure.
25
Page 26

SOINS ET ENTRETIEN
Prudence
Ne pas débrancher la machine à glaçons pourrait entraîner un choc électrique ou de blessure.
Ø Nettoyage de votre machine à glaçons
• Pour assurer la propreté des glaçons, il est recommandé d'utiliser de l'eau filtrée.
• Retirez le bouchon de vidange pour évacuer l'eau restant dans le réservoir d'eau lorsque la
machine à glaçons ne sera pas utilisée pendant une longue période de temps. Retourner le
bouchon de vidange en place après que l'eau a été vidangée.
• Toujours changer à l'eau douce avant de com mencer la production de glaçons lors de
l'installation initiale ou après de longu es périodes d'arrêt.
• S'il vous plaît nettoyer votre machine à glaçons régulièrement. Lors du nettoyage,
débranchez l'appareil et retirez les cubes de glaçons. Utilisez une solution diluée d'eau et
de vinaigre pour nettoyer l'intérieur et la surface extérieure de la machine à glaçons. Ne pas
vaporiser machine à glaçons avec des produits chimiques ou des agents dilués tels que
des acides, de l'essence ou de l'huile. Rincer soigneusement avant de commencer.
Ø Espace requis
• Pendant le transport, l'angle d'inclinaison de l'armoire ne doit pas être de plus de 45 °
• Ne pas mettre la machine à glaçons à l'envers. Des problèmes pourraient se produire dans
le compresseur et système scellé.
• La machine à glaçons doit être placée horizontalement sur une surface bien nivelée.
• Pour assurer une bonne ventilation pour votre machin e à glaçons permet 6 "d'espace en
haut, l'arrière et de chaque côté.
• Avant d'utiliser la machine à glaçons pour la première fois, s'il vous plaît attendre 2 heures
après son positionnement.
• Nettoyer la doublure intérieure, de la glaçons-bin, boîte à eau, tasse de l'eau fréquemment.
IMPOR TANT: Ne pas installer la machine à glaçons près d'un four, un radiateur ou autre
source de chaleur.
Ø Panne électrique
La plupart des pannes de courant sont corrigé es en quelques heures e t ne devraient pas af fecter la
température de votre machine à glaçons si vous réduisez le nombre de fois que le glaçon bin est ouvert.
Si la puissance va être OFF pour une longue période de temps, vous devez prendre les mesures
appropriées pour déconnecter votre appareil.
26
Page 27

PROBLÈMES AVEC VOTRE ICE MAKER?
Problème
Cause possible
Solutions suggé rées
Le compresseur
Bruit.
La tension est inférieure à
Arrêtez la machine à glaçons et ne
indicateur de pénurie d'eau
Il n'y a pas assez d'eau dans le
Appuie sur le bouton ON / OFF, remplir
pour redémarrer.
Ice indicateur pleine
armoire de stockage de
Retirez une partie des glaç ons .
Les voyants sont éteints.
Fusible grillé / pas de
puissance / disjoncteur soufflé
Remplacer le fusible / mettre sous
tension.
La glaçons faite est trop
ensemble.
La température de l'eau dans
basse.
Arrêter la machine et réinitialiser le cycle
service client.
Conditions pour le cycle de
glaçons est fait.
les fuites de fluide frigorigène /
Remplacer l'unité.
800-323-5029
produits, l'aide est disponible.
maître, ou un visa.
l'intérieur et à l'extérieur.
Vous pouvez résoudre de nombreux problèmes de machine à glaçons commune facilement, vous
permet d'économiser le coût d'un appel de service possible. Essayez les suggestions ci-dessous pour
voir si vous pouvez résoudre le problème avant d'appeler le réparateur.
GUIDE DE DÉPANNAGE
fonctionne anormalement
avec un bourdonnement
conseillé.
redémarre pas jusqu'à ce que la tension
soit normale.
La lumière est sûre.
lumière est allumée.
réservoir.
glaçons est pleine vers le haut.
d'eau, attendre 3 minutes et appuyez à
nouveau sur le bouton d'alimentation
grande et avec des
morceaux collent
Le témoin de bourrage de
glace s'allume lors de la
première connexion.
fabrication de glaçons sont
à droite, mais pas de
le bac de stockage ou à
température ambiante est trop
Problème de moteur ou de
panneau de commande
système scellé est bloqué.
de fabrication de glaçons. Redémarrer
la machine après l'avoir éteint.
Appuyez sur le bouton ON / OFF et
débranchez l'appareil pour réinitialiser le
système.
Si le problème persiste, contactez le
Service pour votre machine à glaçons
Nous sommes fiers de notre organisation de service à la clientèle et le réseau de techniciens de
services profession nels qui offrent des s ervices sur votre Avanti m achine à glaçons. A vec l'achat de
votre Avanti ice maker, vous pouvez être sûr que si vous avez besoin d'inform ations ou de l'aide,
l'équipe du service à la clientèle Avanti Products sera là pour vous. Appelez-nous sans frais.
Avanti Products Services clients
Information produit
Quelles que soient vos questions sont sur nos
commandes de pièces
800-220-5570
Dans la maison de service de réparation
800-220-5570
Vous pouvez commander des pièces et
accessoires qui seront livrés directement à votre
domicile, par chèque personnel, mandat, carte
Un centre de service Avanti Produits autorisé
fournira un service de réparation expert, prévue à
un moment qui vous convient. Nos réparateurs
formés connaissent votre machine à glaçons à
27
Page 28

Staple votre reçu de v ente ic i. Pr euve de la date d' acha t
garantie.
CE QUI EST COUVERT - GARANTIE LIMITÉE D'UN AN
envoyé au centre de service de l'appareil pour la réparation.
DEUXIÈME LIMITÉE À LA CINQUIÈME ANNÉE GARANTIE
nécessaire, sont à la charge de l'utilisateur.
EXCLUSIONS DE LA GARANTIE / NON COUVERTS:
Avanti Products, y compris, sans limitation, un ou plusieurs des éléments suivants:
• Un non-respect de tout État applicable, local, ville, ou du comté électricité, plomberie et / ou des codes du
entourant l’appareil, et les actes de Dieu.
• les pertes de contenu de la nourriture ou d'autres
• Les réparations effectuées par réparateurs non
En aucun cas, Avanti Product s toute re spon sab ilité ou responsabilité pour l es do m mage s au x biens env iro nna nt s,
planchers, les étagères etc., ainsi que la remi se à zéro des di sjon cte urs ou fusi ble s.
HORS DE LA GARANTIE DU PRODUIT
compris les réparations, les pro-taux, ou le remplacement du produit, une fois la garantie expirée.
GARANTIE - REFRIGERATION - COMPRESSEUR
VOS PRODUITS AVANTI
GARANTIE
Avanti Products garantit que le produit est exempt de défauts de matériaux et / ou de fabrication pour une période
de douze (12) mois à compter de la date d'achat par le propriétaire initial. La durée commence à courir à la date
d'achat, et ne sera pas retardée, restreinte, prolongée ou suspendu pour quelque raison que ce soit, sauf si décrit
en détail dans le document de gar antie. Pendant u n an à compter de la date d' achat par le propriét aire d'origi ne, les
produits Avanti seront, à sa di s créti on, r ép arer ou remplacer toute partie d u prod uit qui se révèle être un défaut de
matériau ou de fabrication dans une utilisation normale. Av an ti P rodu cts v ou s fourn ir a un pr oduit r a is onna ble me n t
semblable nouveau ou remis à neuf. Au cours de cette période Avanti Products fournira toutes les pièces et la
main-d'œuvre nécessaires pour corriger ces défauts gratuitement, aussi longtemps que le produit a été installé et
utilisé conformément aux instructions écrites dans ce manuel. En usage locatif ou commercial, la période de
garantie est de 90 jours. Tous les appareils Avanti de 3,5 pieds cubes la capacité ou moins doivent être traduits /
Pour la deuxième à la cinquième année à partir de la date d'achat originale, Avanti Products fournira un
compresseur de remplacement gratuit en raison d'un échec. Vous êtes responsable de la main-d'œuvre et de fret
de service. En usage locatif ou com mercial , la gar antie du compre sseur es t limité e à un an et neuf moi s. Les co ûts
impliqués pour déplacer le produit au centre de service et de retour à la maison de l'utilisateur, comme peut-être
La couverture de la garantie décrite ici exclut tous les défauts ou les dommage s qui ne sont pas la faut e directe de
originale est nécessaire pour obtenir un service sous
bâtiment, des règlements o u des lo is, y co mpris le d éfaut d' instal ler le pr oduit en stri cte conf ormité av ec le feu et
les codes du bâtiment et les règlements locaux.
• Les forces externes, élémentaires et / ou l'environnement et les facteurs, y compris, sans s'y limiter, la pluie, le
vent, le sable, les inondations, les incendie s, les coulées de boue, des températures de congélation, l'humidité
excessive ou à une exposition prolongée à l'humidité, la foudre, les surtensions, les défaillances structurelles
contenus en raison de la détérioration.
• Les dommages accessoires ou consécut ifs
• Pièces et coûts de main-d'œuvre pour les éléments
suivants ne seront pas considérés comme garantie:
• portes évaporateurs, ressorts de la porte, et / ou
des cadres.
• panneaux intérie urs de portes, des étagères de
porte, rails de porte, et / ou supports de porte.
• Les ampoules et / ou boîtier en plastique.
• Doublures d'armoires en plastique.
• Poncture évaporateur annule la garantie sur le
système scellé complet.
• Les frais de transp ort et de ma nutention associés au
remplacement de l'unité.
•
y compris les armoires, les planchers, les plafonds, et d' autr e s str u cture s et / o u des objets autour du pr odu it. Sont
également exclus de cette gar antie sont le s égratignures, le s entailles, l es bosses mineur es, et d'autre s dommages
esthétiques sur les surfaces externe s et les parties exposées; Produits dont les numéro s de série ont été modifiés,
effacés ou supprimé s; v i site s d e s erv ice po ur l'éducation à la clie ntè le, ou des visites où il n' y a rie n d e mal avec le
produit; correction des problèmes d'installation (vous êtes seul responsable de toute structure et réglage pour le
produit, y compris tous les système s éle ctri ques, de plomberie et / ou d'autres insta llat ion s de ra ccor de men t, pou r
le bon plancher / fondation, et pour toute modification, y compris sans s'y limiter les armoires, les murs, les
autorisés.
• Les appels de service qui sont liés à des problèmes
externes, tels que l'abus, l'alimentation électrique
inadéquate, les accidents, les incendies, les
inondations, ou tout autre acte de Dieu.
• Une panne du produit si elle est utilisée pour autre
chose que son intention but.
• La garantie ne couvre pas en dehors de la
Continental USA.
• Surtaxes, y compris m ais sans s'y limi ter, toute apr ès
heure, les appels week-e nd, ou de servic es de
vacances, les péages, les frais de voyage de
convoyage ou les frais de kilométrage pour les
appels de service dans les régions éloignées.
Avanti Products est soumis à aucune obligation, en droit ou autrement, de vous fournir toutes les concessions, y
28
Page 29

29
Page 30

30 31
Page 31

Registration Information
---------------------------------------------------(detach here)-----------------------------------------------------------------
Name
Model # Serial #
Address
Date Purchased Store / Dealer Name
City State Zip
E-mail Address
Area Code Phone Number
Occupation
Did You Purchase An Additional Warranty
As your Primary Residence, Do You:
£ Extended
£ Own £ Rent
£ None
Your Age:
Reason for Choosing This Avanti Product:
product:
under 18 £ 18-25 £ 26-30
£ Married £ Single
Price
£ Other: _____________ ______
Comments:
Thank you for purchasing this fine Avanti product. Please fill out this form and return it to the following
address within 100 days from the date of purchase and receive these important benefits:
Avanti Products LLC
P.O.Box 520604 – Miami, Florida 33152
Ø Protect your product:
We will keep the model number and date of purchase of your new Avanti product on file to help
you refer to this information in the event of an insurance claim such as fire or theft.
Ø Promote better products:
We value your input. Your responses will help us develop products designed to best meet your
future needs.
Avanti Registration Card
Please indicate the most important factors
That influenced your decision to purchase this
£
£ Product Features
£ Avanti Reputation
£ Product Quality
£ Salesperson Recommendation
£ Other: ___________________
£ Friend / Relative Recommendation
£ Warranty
£
£ 31-35 £ 36-50 £ over 50
Marital Status:
Is This Product Used In The:
£ Home £ Business
How Did You Learn About This Product:
£ Advertising
£ In-Store Demo
£ Personal Demo
Page 32

IM4520G - 11142017
PRINTED IN CHINA
32
 Loading...