

Page 1
ICE MAKER/MAQUINA DE HACER HIELO
INSTRUCTION MANUAL/MANUAL DE INSTRUCCIONES
Model Number / No. de Modelo:
IM15SS
BEFORE
USE, PLEASE READ AND FOLLOW ALL SAFETY RULES AND OPERATING
INSTRUCTIONS.
La sección en español empi eza en la página 15.
Avanti has a policy of continuous improvement on its products and reserves the right to change materials and specifications
without notice.
Avanti Products, A Division of The Mackle C o ., Inc.
P.O. Box 520604 - Miami, Florida 33152
www.avantiproducts.com
Page 2

2
Table of contents
ICE-MAKER SAFET Y
3
IMPORTANT SAFEGUIDES
4
HELP US HELP YOU
5
PARTS AND FEATURES
6
IMPORTANT SAFETY INSTRUCTIONS
7
INSTALLATION INSTRUCTIONS
7
BEFORE USING YOUR APPLIANCE
7
INSTALLATION OF YOUR APPLIANCE
7
ELECTRICAL CONNECTION
8
REVERSING THE DOOR SWING OF YOUR APPLIANCE
8
OPERATING YOUR AP PLI ANCE
9
INITIAL START-UP ICE MAKING OPERATION
9
INSTALLING THE SAFETY LATCH
9
CARE AND MAINTENANCE
10
CLEANING YOUR APPLIANCE
10
POWER FAILURE
10
VACATION TIME
10
MOVING YOUR APPLI ANCE
10
ENERGY SAVING TIPS
10
SAFETY DOOR LATCH
10
TROUBLESHOOTING GUIDE
11
SERVICE FOR YOUR AP P LIANCE
12
WIRING DIAGRAM
12
YOUR AVANTI PRODUCTS WARRANTY
13
INSTRUCCIONES EN ESPAÑOL
15 – 18
REGISTRATION INFORMATION
19
Page 3
3
ICE MAKER SAFETY
YOUR SAFETY AND THE SAFETY OF OTHERS ARE VERY IMPORTANT.
We have provided many important safety messages in this manual for your appliance. Always read and
obey all safety messages.
This is the safety alert symbol. This symbol alerts you to
Potential hazards that can kill or injure you and others.
All safety messages will follow the safety alert symbol
And either the words” danger”, “warning” or “caution”.
Danger means that failure to heed this safety
statement may result in severe personal
injury or death.
Warning means that failure to heed this
safety statement may result in extensive
product damage, serious personal injury, or
death.
Caution means that failure to heed this
safety statement may result in minor or
moderate personal injury, property or
equipment damage.
All safety messages will alert you to know what potential hazard is, tell you how to reduce the chance of
injury, and let you know what can happen if the instruc tions ar e not foll o wed .
Page 4
4
IMPORTANT SAFEGUIDES
Before the appliance is used, it must be properly positioned
and installed as described in this manual, so read the manual
carefully. To reduce the risk of fire, electrical shock or
injury when using the appliance, follow basic precaution,
Including the following:
• Plug into a grounded 3-prong outlet, d o not r emove gr ounding prong, do n ot use a n adapt er, and do not u se an
extension cord.
• It is recommended that a separate circuit, serving only your appliance be provided. Use receptacles that
cannot be turned off by a switch or pull chain.
• Never clean appliance parts with f lammable fl uids. T hese fu mes can crea te a fire h azar d or ex plosion. An d do
not store or use gasoline or other flammable vapors and liquids in the vicinity of this or any other appliance.
The fumes can create a fire hazard or explosion.
• Before proceeding with cleaning and maintenance operations, make sure the power line of the unit is
disconnected.
• Do not connect or disconnect the electric plug when your hands are wet.
• Unplug the applianc e or disconnect power before cleaning o r serv icing. Fa ilure t o do so ca n result in el ectr ical
shock or death.
• Do not attempt to repair or replace any part of your appliance unless it is specifica lly recom mend ed in this
manual. All other servicing should be referred to a qualified technician.
FOLLOW WARNING CALL OUTS BELOW ONLY WHEN APPLICABLE TO YOUR MODEL
• Use two or more people to move and install appliance. Failure to do so can result in back or other injury.
• To ensure proper venti lation f or your app liance, the f ront of the unit must b e comp letely unobstru cted. Choos e
a well-ventilated are a with tem peratur es above 60°f (16
an area protected from the element, such as wind, rain, water spray or drips.
• The appliance should not be located next to ovens, grills or other sources of high heat.
• The appliance must be installed with all electrical, water and drain connections in accordance with state and
local codes. A standard electrical supply (115 v ac only, 60 hz), properly grounded in accordance with the
national electrical code and local codes and ordi nan ce s is require d.
• Do not kink or pinch the power supply cord of appliance.
• The fuse (or circuit breaker) size should be 15 amperes.
• It is important for the appliance to be leveled in order to work properly. You may need to make several
adjustments to level it.
• All installation must be in accordance with local plumbing code requirements.
• Make certain that the pipes are not pinched or kinked or damaged during installations.
• Check for leaks after connection.
• Never allow children to operate, play with or crawl inside the appliance.
• If you use the dr aina ge co ntain er, you must set the dra in sele ct switch to off or the water can overfl ow from th e
drainage container
• Although the unit has been tested at the factory, due to long-term transit and storage, the first batch of cubes
must be discarded.
• Do not use solvent-ba sed cleaning agents of abr asives on t he interior. These cleaner s may damag e or discolo r
the interior.
• Do not use this apparatus for other than its intended purpose.
°
c) and below 90°f (32°c). This unit must be installed in
Page 5
5
CAUTION:
Help us help you…
Read this guide carefully.
It is intended to help you operate and maintain
your new ice maker properly.
Keep it handy to answer your questions.
If you don't understand something or you need
more help, please call:
Avanti customer service
800-220-5570
Keep proof of original purchase date (such as
your sales slip) with this guide to establish the
warranty period.
THIS ICE MAKER IS NOT
DESIGNED FOR THE STORAGE
OF MEDICINE OR OTHER
MEDICAL PRODUCTS.
If you need service
We're proud of our service and want you to be
pleased. If for some reason you are not happy
with the service you receive, here are some
steps to follow for further assistance.
First, contact the people who serviced your ice
maker. Explain why you are not pleased. In
most cases, this will solve the problem.
Next, if you are still not pleased, write all the
Write down the model and serial numbers.
You'll find them on a plate located on the rear
wall of the ice maker.
Please write these numbers here:
____________________________________
Date of purchase
____________________________________
Model number
____________________________________
Serial number
Use these numbers in any correspondence or
service calls concerning your ice maker.
If you received a damaged ice maker,
immediately contact the dealer (or builder) that
sold you the ice maker.
Save time and money. Before you call for
service, check the troubleshooting guide. It lists
causes of minor operating problems that you
can correct yourself.
details, including your telephone number, and
send it to:
Customer Servic e
Avanti Products
10880 NW 30
Miami, Fl 33172 USA
th
Street
Page 6
6
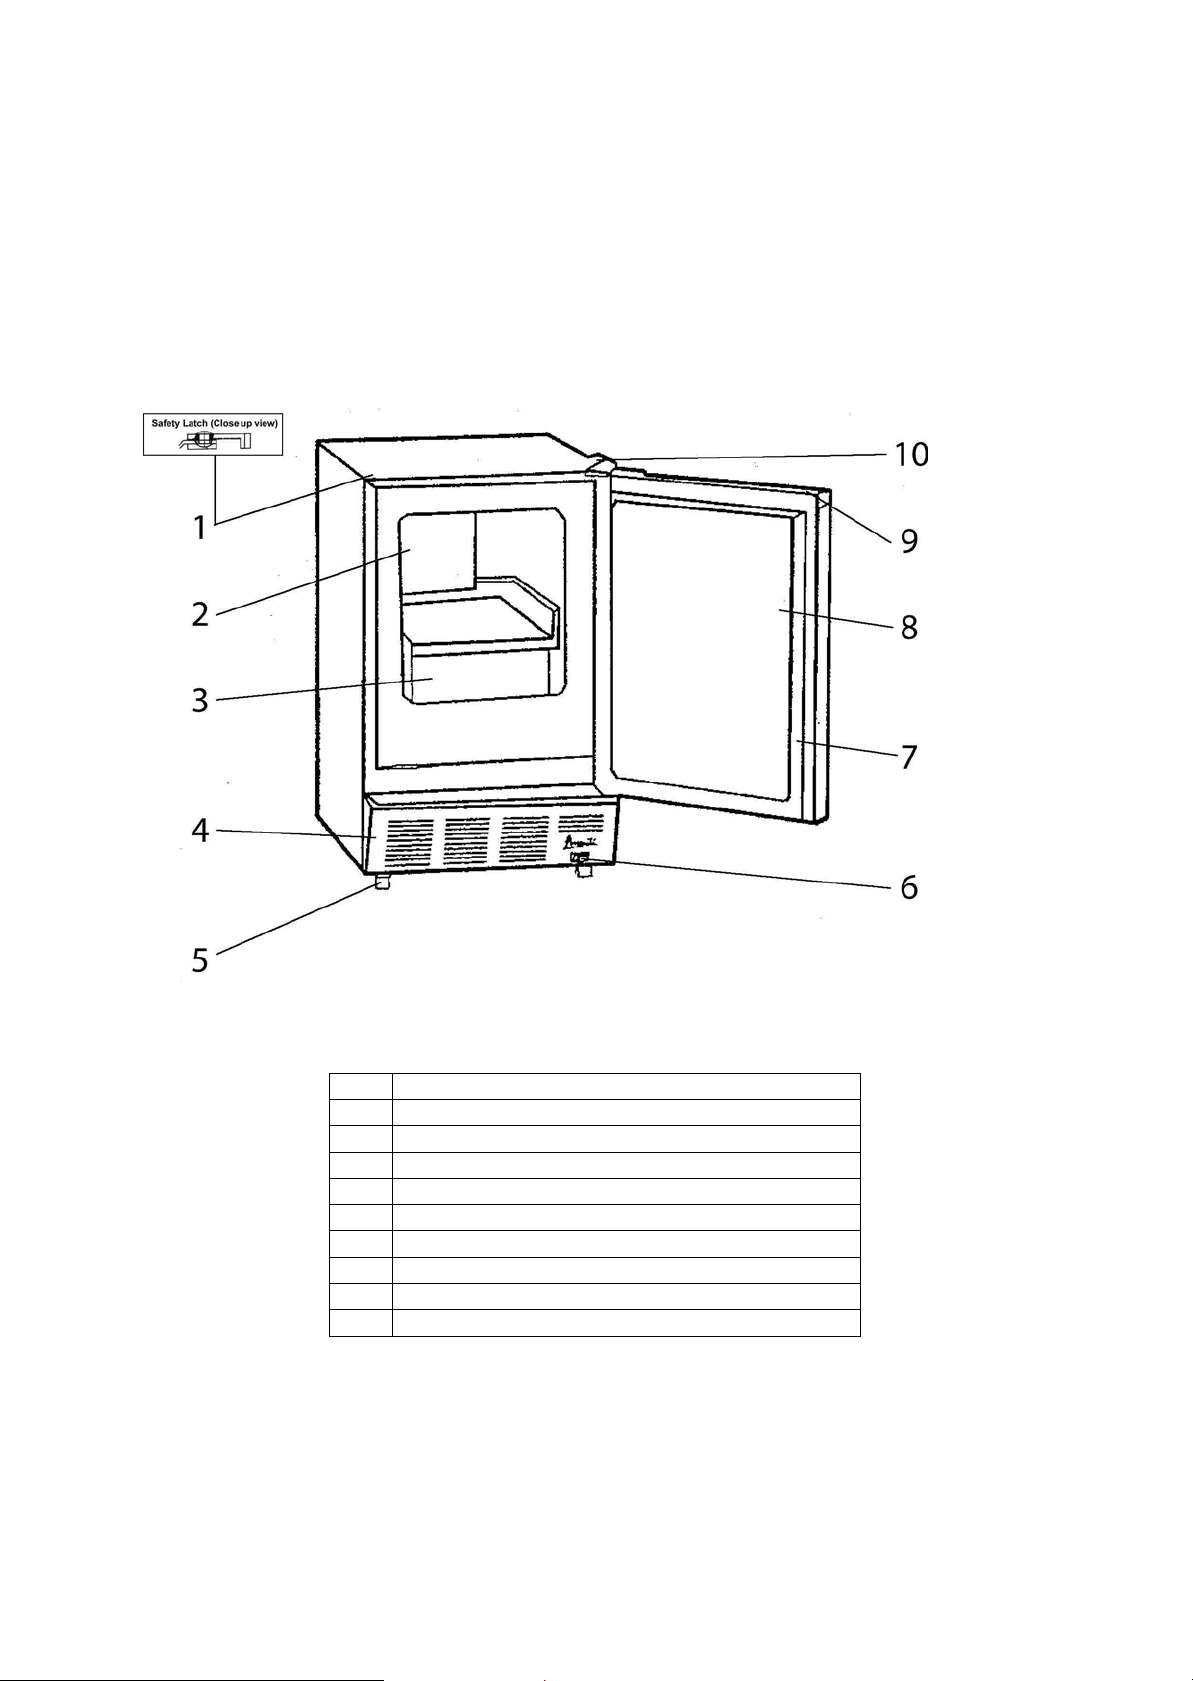
1
Safety Latch
2
Ice-maker mechanism
3
Ice bucket
4
Stainless steel grille
5
Leveling leg
6
ON / OFF switch
7
Door gasket
8
Stainless steel door
9
Integrated door handle
10
Upper door hinge
Parts and Features
Page 7

7
basic precautions:
-save these instructions-
Important safety instructions
WARNING
• Read all instructions before using the ice maker.
• Danger or warning: risk of child entrapment.
child entrapment and suffocation are not problems of the past. Junked
or abandoned appliances are still dangerous. . . Even if they will “just sit
in the garage a few days.”
• Before you throw away your ice maker: take off the door. Leave the shelves in place so that
children may not easily climb inside.
• Never allow children to operate, play with, or crawl inside the appliance.
• Never clean ice maker parts with flammable fluids. The fumes can create a fire hazard or
explosion.
• Do not store or use gasoline or any other flammable vapors and liquids in the vicinity of this or
any other ice maker. The fumes can create a fire hazard or explosion.
To reduce the risk of fire, electrical shock, or
injury when using your ice mak er, follow these
Installation instructions
Before using your ice maker
• Remove the exterior and interior packing.
• Check to be sure you have all of the following parts:
• 1 ice bucket
• 1 plastic scoop
• 25 ft. Hose
• 1 Safety Latch Assembly
• 1 instruction manual
• Before connecting the ice maker to the power source, let it stand upright for approximately 2 hours.
This will reduce the possibility of a malfunction in the cooling system from handling during
transportation.
• Clean the interior surface with lukewarm water using a soft cloth.
Installation of your ice maker
• This appliance is designed to be recessed or built-in (fully recessed).
• Place your ice maker on a f loor that is strong enough to support the ice maker when it is f ully
loaded. Remember that the unit will be significantly heavier once it is fully loaded. To level your ice
maker, adjust the leg at the front of the ice maker.
• Locate the ice mak er away from direct sunlight an d sources of heat (stove, heater , radiator, etc .).
Direct sunlight may affect the acrylic coating and heat sources may increase electrical
consumption. Extrem e cold ambient temperatures m ay also cause the ice maker not to perform
properly.
• Avoid locating the ice m aker in mois t areas. Too m uch moisture in th e air will cause f rost to form
quickly on the evaporator requiring more frequent defrosting of the ice maker.
• Plug the ice maker into an exclusive properl y installed-grounded wall outlet. Do not under any
circumstances cut or remove the third (ground) prong from the power cord. Any questions
concerning power and or grounding should be directed toward a certified electrician or an
authorized Avanti Products service center.
Page 8

8
REVIEW STATE AND LOCAL PLUMBING CODES BEFORE INSTALLATION
Electrical connection
IMPROPER USE OF THE GROUNDED PLUG CAN RESULT IN THE RISK OF ELECTRICAL
SHOCK. IF THE POWER CORD IS DAMAGED, HAVE IT REPLACED BY AN AUTHORIZED
AVANTI PRODUCTS SERVICE CENTER.
WARNING
• This ice maker should be p roperly grounde d for your saf ety. The power c ord of this ice m aker is
equipped with a three-prong plug which mates with standard thr ee prong wall outlets to minim ize
the possibility of electrical shock.
• Do not under any circumstances cut or remove the third ground prong from the power cord
supplied.
• Never use an extension cord to connect power to the unit.
• Never use a two-prong grounding adapter.
• Where a two-prong wall receptacle is encountered, contact a qualified electrician to have it replaced
with a 3-prong receptacle in accordance with applicable electrical codes.
• This ice maker requires a standard 115/120 volts a.c.~/60hz electrical outlet with three-prong
ground.
• The cord should be s ecured behind the ice maker and not lef t exposed or dangling to prevent
accidental injury.
Extension cord
Because of potential saf ety hazards und er certain con ditions, it is strong ly recomm ended that you do
not use an extension cord with this appliance. However, if you must use an extension cord it is
absolutely necessary that it be a ul/cul-listed, 3-wire grounding type appliance extension cord having a
grounding type plug and o utlet and that the electric al rating of the cord be 115 volts and at least 10
amperes.
Connecting the water supply
• All the necessary hardwar e is not pro vided for instal lation s o it is necessar y to hire a prof essional
licensed plumber to complete the installation.
• Connect tubing (supplied with unit) to the nearest cold water source. Connect sufficient tubing to the
unit to allow the applianc e to be moved freely for clea ning and service. Also m ake sure that the
tubing is not pinched or damaged during transportation.
• Position unit to allo w free air flow thro ugh the f ront gri ll (see s k etch 1). W ipe out inside of unit and
ice bucket with a damp cloth.
Reversing the door swing of your ice maker
This appliance has the capability of the door opening from either the left or right side. The unit is
delivered to you with the door opening from the left side. Should you desire to reverse the opening
direction, please call customer service for reversal instructions.
IMPROPER WATER LINE CONNECTION MAY RESULT IN FLOODING
YOU MUST USE A LICENSED PLUMBER
WARNING
SKETCH 1
Page 9

9
Operating your ice maker
SKETCH 2
LATCH
PIN
Initial start-up operation
1. Plug the appliance into a 115/120v polarized and grounded wall electrical outlet.
2. Place the on-off switch in the “on” position.
3. Make sure the water supply is on. As soon as the inner mechanism reaches the proper
temperature, the icemaker mechanism will fill the mold with water.
4. The first cubes may be small because of air in the water line. Later cubes will be of standard
crescent moon type size.
5. Approximate time for the first cycle is between 30-4 0 minutes.
6. Each cycle approximately will take 140 ml of water so you should have a full tray, after 11 hours.
Important: throw away all ice cubes made d u ring the first 3 hours of operation.
• When the ice bucket is full, the ice making mechanism will automatically shut off.
However the system will continue to cool and maintain the cubes supply.
• Ice delivery may be interr upted b y raising th e m etal arm into an upright posit ion
(see sketch 2)
• If the icemaker is not used regu larly, it is rec ommended that the ice buck et be
emptied periodically to insure fresh ice.
• Sometimes the cubes m ay appear c loud y. This is cause of no conc ern and has
nothing to do with the taste or chemical mak e-up of the water.
• The front grill should be kept free of dust and lint to permit free airflow.
• This unit should be defrosted approximately every 4-6 weeks or when frost on the ice maker walls is
excessive or ¼” thick. T o defros t, turn the uni t off , remove cubes and keep door open at l east t wo
inches.
Installing the Safety Door Latch (Optional)
Affix the safety door latch to the unit by attaching the
assembly to the unit using the screws included (see
diagram).
Remove the plastic hole covers from the top left hand side
of the unit.
Attach the safety latch a rm to the unit by inserting the two
(2) flat head screws in the top two (2) screw holes on the
top left hand side of the unit.
Remove the plastic hole cover from the top left hand side
of the door and insert the safety pin.
Adjust the latch by moving either one or both flat screws used on the top left hand of the unit
until latch locks firmly.
Page 10

10
Care and maintenance
Cleaning your ice maker
• Turn the switch control to "off", unplug the ice maker and remove bucket.
• Wash the inside with a warm water and baking soda solution. The solution should be about 2
tablespoons of baking soda to a quart of water.
• Wash the bucket with a mild detergent solution.
• The outside of the ice maker should be cleaned with mild detergent and warm water.
• The condenser coils should be vacuumed when they are dusty or dirty.
Caution
Failure to unplug the ice maker could result in electrical shock or personal injury.
Power failure
Most power failures ar e corrected within a fe w h ours a nd s hou ld not af f ec t the te mperature of your ice
maker if you minimize the number of times the door is opened. If the power is going to be off for a longer
period of time, you need to take the proper steps to disconnect your appliance.
Vacation time/storage
1. Shut off water supply at the main water valve.
2. Disconnect the water supply line from valve.
3. Allow unit to run for an hour or two until all remaining ice cubes have been ejected.
4. Disconnect unit from main power source.
5. Dry out excess water from ice maker assembly
6. Leave the door open at least two inches.
Moving your ice maker
• Securely tape down all loose items inside your ice maker.
• Turn the leveling screws up to the base to avoid damage.
• Tape the door shut.
• Be sure the ice maker stays in the upright position during transportation.
Energy saving tips
• The ice maker should be located in the coolest area of the room, away from heat producing
appliances or heating ducts, and out of the direct sunlight.
Page 11

11
Problem
Possible cause
The ice maker power switch is set at "off".
Ice maker has excessive frost build up.
Compressor turns on and off frequently.
The room temperature is hotter than normal.
clearances.
Vibrations.
Check to assure that the ice maker is level.
The ice maker seems to make too much noise.
The ice maker is not level.
The door will not close properly.
The bucket is out of position.
Ice cubes are melted together
Ice maker door is opened too often.
Problems with your ice maker?
You can solve many common ice maker problems easily, saving you the cost of a possible service call.
Try the suggestions below to see if you can solve the problem before calling the servicer.
Troubleshooting guide
Ice maker does not operate.
Not producing ice
Not plugged in.
The circuit breaker tripped or a blown fuse.
Airflow to front grill blocked.
The ice maker arm is set to the off position.
Water supply is turned off.
Water line is crimped.
The door is opened too often.
The door is not closed completely.
The door gasket does not seal properly.
The ice maker does not have the correct
The rattling noise may come from the flow of the
refrigerant, which is normal.
As each cycle ends, you may hear gurgling
sounds caused by the flow of refrigerant in your
ice maker.
Contraction and expansion of the inside walls may
cause popping and crackling noises.
The ice maker is not level.
The door is reversed and not properly installed.
The gasket is dirty.
Page 12

12
Service for your ice maker
We are proud of our customer service organization and the network of professional service technicians
that provide service o n your avanti ic e maker. With the pur chas e of your avanti ic e maker, you can be
confident that if you ever need additional information or assistance, the avanti products customer
service team will be here for you. Just call us toll-free.
Avanti products customer service s
Product information
800-323-5029
Part orders
800-220-5570
In-home repair service
800-220-5570
wiring diagram
Whatever your questions are about our products,
help is available.
You may order parts and accessories that will be
delivered directly to your hom e, by personal
check, money order, master card, or visa.
An avanti products authorized service center will
provide expert repair service, scheduled at a time
that is convenient for you. Our trained servicers
know your ice maker inside and out.
Page 13

13
Your Avanti Products warranty
Staple your sales receipt here. Proof of
service under warranty.
WHAT IS NOT COVERED
original purchase date is needed to obtain
What is covered limited one-year
Warranty
For one year from the date of purchase by the
original owner, Avanti Products will, at its
option, repair or replace any part of the ice
maker which proves to be defective in material
or workmanship under normal use. During this
period Avanti Produc ts will provide all parts and
labor necessary to correct such defects free of
charge, so long as the ice maker has been
installed and operated in accordance with the
written instructions in this manual. Avanti
Products will provide you with a reasonably
similar replacement product that is either new
or factory refurbished. In rental or commercial
use, the warranty period is 90 days. All Avanti
appliances of 3.5 cubic feet capacity or less
must be brought/sent to the appliance service
shop for repair.
Limited second through
Fifth year warranty
For the second through the fifth year from date of
original purchase, Avanti Products will provide a
replacement compressor free of charge due to a
failure. You are respo ns ible for the service labor an d
freight charges. In rental or commercial use, the
limited compressor warranty is one year and nine
months. Cost to move the i ce mak er to t he serv icers ’
shop and back to the user's home, as may be
required, are the user's responsibility.
• INCIDENTAL OR CONSEQUENTIAL
DAMAGES.
• PARTS AND LABOR COSTS FOR THE
FOLLOWING WILL NOT BE CONSIDERED AS
WARRANTY:
• DOOR SPRINGS AND/OR FRAMES.
• INNER DOOR PANELS AND/OR DOOR
SUPPORTS.
• CHEST ICE MAKER LID LINERS.
• PLASTIC CABINET LINERS.
• SHIPPING
ASSOCIATED WITH THE REPLACEMENT OF
THE UNIT.
• SURCHARGES
TO, ANY AFTER HOUR, WEEKEND, OR
HOLIDAY SERVICE CALLS, TOLLS, FERRY
TRIP CHARGES, OR MILEAGE EXPENSE FOR
SERVICE CALLS TO REMOTE AREAS,
INCLUDING THE STATE OF ALASKA.
AND HANDLING COSTS
INCLUDING, BUT NOT LIMITED
• REPAIRS PERFORMED BY UNAUTHORIZED
SERVICERS.
• SERVICE
DEFECTS IN MATERIAL OR WORKMANSHIP SUCH
AS CUSTOMER EDUCATION, DOOR REVERSAL,
OR PROPER INSTALLATION.
• SERVICE CALLS THAT ARE RELATED TO
EXTERNAL PROBLEMS, SUCH AS ABUSE,
MISUSE, INADEQUATE ELECTRICAL POWER,
ACCIDENTS, FIRE, FLOODS, OR ACTS OF GOD.
• REPLACEMENT OF HOUSE FUSES OR
RESETTING CIRCUIT BREAKERS.
• FAILURE
OTHER THAN ITS INTENDED PURPOSE.
• THIS
CONTINENTAL U.S.A.
CALLS THAT DO NOT INVOLVE
OF THE PRODUCT IF IT IS USED FOR
WARRANTY DOES NOT APPLY OUTSIDE THE
Page 14

14
(THIS PAGE LEFT BLANK)
Page 15

15
Instrucciones en españ o l
, o daño cuando use su
, siga las siguientes
- guarde estas instrucciones.-
Para reducir el riesgo de incendio, descarga
Precaución
• Lea todas las instrucciones antes de usar su electrodoméstico.
• Peligro o precaución: existe el riesgo que los niños queden atrapados.
• Niños atrapados o sofoca miento no son un problema del pasado. Los electrodomésticos
son peligrosos aun si solo los deja en el garaje por un par de días.
• Antes de desechar s u máquina de hac er hielo o refriger ador usado: quítele las puertas.
Deje las repisas en su lugar para evitar que los niños se queden atrapados.
• No permita que los niños manejen, jueguen o entren dentro del electrodoméstico.
• No limpie su electrodoméstico con líquidos inflamables. Los gases pueden ocasionar
fuego o una explosión.
• No guarde ni use gaso lina u otros líquidos i nflamables c erca de este o d e cualquier otro
electrodoméstico. Los vapores pueden ocasionar fuego o explosión.
eléctrica
electrodoméstico
precauciones.
Instrucciones para la instalación
Antes de usar su equipo
• Retire la envoltura interna y externa.
• Verifique que tenga las siguientes partes: 1 canasta de hielo, 1 pestillo de seguridad, 1 manual de
instrucciones, 1 recogedor de hielo plástico, y 25 pies de línea de agua.
• Antes de conectar su electrodoméstico a la corriente eléctrica, ubíquelo en una superficie plana por
lo menos por 2 horas. Esto reducirá la posibilidad de malfuncionamiento en el sistema de
enfriamiento por la manipulación durante el transporte.
• Limpie la superficie interior con agua tibia usando un paño suave.
Instalación de su máquina de hacer hielo
• Ubique su máquina de hacer hielo en un pis o que s ea lo sufic ientem ente f uerte, para sop ortar s u
peso cuando esté totalm ente lleno o carga do. Par a ni velar la máquina de hacer hielo, ajuste l as
patas delanteras.
• No es necesario dejar espacio entre la parte trasera y los costados de su electrodoméstico.
• Mantenga su máquina de hacer hielo alejado del aire caliente, vapor o líquidos que puedan
salpicarlo, ya que la unidad podría averiarse.
• Los rayos solares directos pueden dañar la capa acrílica, y las fuentes de calor pueden ocasionar
un aumento en el cons umo eléctrico. Manténgalo lo más alejado posible del ag ua para preve nir
algún choque eléctrico. Evite los sit ios húmedos y los ambientes extremadamente fríos ya que
esto puede afectar la eficiencia del enfriamiento de su máquina de hacer hielo.
• Evite ubicar su máquina de hacer hielo en aéreas mojadas o muy húmedas. Mucha humedad en el
aire puede causar la formación de escarcha rápidamente y necesitara descongelar su máquina de
hacer hielo más frecuentemente.
• Conecte la máquina de hacer hielo a un enchuf e de pared exclus ivo e instale el c able de tierra.
Bajo ninguna razón se debe retirar la tercera punta del enchufe. Cualquier consulta con respecto a
la energía y/o cable de tierra debe ser dirigida a un electricista certificado o autorizado por el
servicio técnico de avanti products.
Conexion eléctricaEste electrodoméstico deb e ser conect ado a tierra. En el caso que o curr a un corto cir cuito , la
conexión a tierra reduce el riesgo de recibir un choque eléctrico ya que cuenta con un alambre
para el escape de la co rriente eléctrica. Este electrodoméstico está equipado con un enchufe
que consta de tres puntas, la tercera punta es la conexión a tierra. Este enchufe debe ser
insertado a un enchufe de pared que este correctamente instalado con la conexión a tierra.
Page 16

16
Advertencia
ASI COMO VERIFICAR LOS CODIGOS LOCALES Y ESTATALES
• El uso inapropiado d el enchufe a tierra puede dese ncadenar un choque eléctrico. Consulte el
personal autorizado de avanti products si tiene alguna duda sobre las instrucciones o si tiene
alguna consulta s i el electrodoméstico esta correctam ente instalado a la corriente eléctrica y a
tierra. Si el cordón del enchuf e del electrodoméstico se encuentra dañado , deb e ser r eemplazado
por el servicio técnico de Avanti Products.
• El cordón del enchufe está equipado con tres puntas que encajan perfectamente en un enchufe de
pared estándar para reducir el riesgo de un choque eléctrico.
• Bajo ninguna circunstancia corte o saque la tercera punta del enchufe, ya que este es para que
vaya conectado a tierra.
• No use una extensión.
• El voltaje de este electrodoméstico es de 120 voltios ac, tiene una salida eléctrica de 60 hz. Y
consta de un enchufe de tres puntas que va conectado al enchufe de pared.
• El cordón del enchufe debe ser asegurado atrás del electrodoméstico y no dejarlo expuesto para
evitar accidentes.
Conexión a fuente de agua
ADVERTENCIA
PARA LA CONEXION A LA FUENTE DE AGUA
SE REQUIERE UTIL IZAR UN
PLOMERO PROFESIONAL Y ACREDITADO (CON LICENCIA),
• Antes de instalar la unidad verifique los códigos de plomería en s u estado. R ecom endamos que
para la instalación use un plomero profesional y con licencia.
• conecte el tubo (incluido) a la fuente de agua fría más cercana.
Instale suficiente tubería a la uni dad par a perm itirle m ovim iento libre
durante la limpieza y el ser vicio. Asegúrese que la tubería no sea
aplastada o dañada durante el transporte.
• Coloque la unidad de m anera que permita la circulación del aire a
través de la rejilla delantera (dibujo 1). Con un trapo limpio y húmedo
limpie la unidad por dentro y el depósito de hielo.
DIBUJO 1
Operación inicial
1. Conecte el aparato a un enchufe de pared de 120v ac, polarizado y con salida a tierra.
2. Encienda la unidad colocando el interruptor en la posición “on”.
3. Verifique que la fuente de agua este abierta. El agua entrara al mecanismo de hacer hielo cuando
la unidad alcance la temperatura apropiada.
4. Los primeros cubos de hielo podrían salir pequeños d ebido al aire en la entrada del agua. Los
siguientes cubos tendrán el tamaño normal en forma de media luna.
5. El primer ciclo tomara aproximadamente 30-40 minutos.
6. Para llenar el depósito se requieren 140 ml de agua y aproximadamente 11 horas.
Importante: deshágase de los cubos de hielo hechos durante las 3 primeras horas de operación.
Page 17

17
DIBUJO 2
• Cuando el depósito de hielo este lleno, el mecanismo para hacer hielo se
detiene automáticamente. Sin embargo el motor continúa enfriando y
mantiene los cubos de hielo congelados.
• Para detener la caída de cubos al depósito, levante el brazo de metal (dibujo
2).
• Si la máquina de hacer hielo no es usada regularmente, recomendamos que
vacié el depósito del hielo periódicamente para asegurar que tenga hielo
fresco.
• A veces los cubos pueden salir blancos o nubosos, esto es normal y no afecta el sabor o
composición del agua.
• La rejilla delantera debe estar libre de polvo o pelusas para permitir la libre circulación del aire.
• La unidad debe ser descongelada aproximadamente cada 4-6 semanas o cuando vea escarcha de
más de ¼” (7 m m) de espesor en las paredes. Para des congelar, apague la unidad, vacié el
depósito de hielo y mantenga la puerta abierta por lo menos 2” (5 cm).
Instalando el pestillo de seguridad de la puerta (En
caso necesario)
Ajuste el pestillo de seguridad de la puerta a la unidad,
coloque el ensamble a la unidad usando los tornillos
incluídos (vea el diagrama).
Remueva las tapitas plásticas de los orificios en la
superficie izquierda de la unidad
Coloque el pestillo a la unidad, insertando los dos (2)
tornillos Phillips en los dos orificios de la superficie
izquierda de la unidad.
Retire la tapita plastic del orificio en la superficie
izquierda de la puerta e inserte el pin de seguridad.
Ajuste el pestillo moviendo cualquiera de los dos (2) tornillos usados en la parte superior
izquierda has que el pestillo quede firme.
Como cambiar la direccion de apertura de la puerta
En caso de que necesite cambiar el lado de apertura de la puerta, por favor consulte al servicio
pos-venta de su localidad.
Advertencia
No use agua hirviendo porque dañara las partes de plástico. Tampoco use puntas o
instrumentos metálicos para retirar la escarcha ya que dañara el espiral de enfriamiento y
cancelara la garantía. Le recomendamos usar una espátula de plástico.
Page 18

18
Cuidado y mantenimiento
Problema
Solución
El control está en “off”
Descongelar inmediatamente.
Vibración.
Asegúrese que la máquina de hacer hielo esté ubicada en un
lugar totalmente plano.
ocasionar sonidos como crujidos.
el cierre de la puerta.
Limpiando su máquina de hacer hielo
• Empuje el control a “0ff”. Desconecte el aparto y retire los hielos.
• Lave el interior con agua tibia y un paño suave remojado en una solución de bicarbonato de sodio.
La solución consiste en 2 cucharadas de bicarbonato de sodio en un litro de agua.
• Lave la canasta de almacenaje con un detergente suave.
• Las partes externas de su máquina deben ser limpiadas con un detergente suave y agua tibia.
• El espiral del condensador debe ser limpiado cuando este sucio o tenga polvo.
AVISO
Asegúrese de descon ectar la máquina de hacer hielo d e la corriente eléctrica. Si no lo hace,
puede ocasionar un choque eléctrico o herirse.
Si falla el suministro eléctrico
Usualmente la electric idad regr esa en unas pocas horas sin afec tar la tem peratur a de su máquina de
hacer hielo, siem pre qu e la puerta no s e abr a m u y frecuentem ente. Si le va falta r el ectricida d por un
periodo de tiempo más largo, usted debe tomar los pasos apropiados para proteger su
electrodoméstico.
Guía para solucionar problemas
Su electrodoméstico no funciona No está conectado a la corriente eléctrica.
El interruptor salto o se quemo un fusible
El compresor se enciende y se apaga
frecuentemente
Sonido de burbujeo, goteo, como agua
que hierve o crujidos.
La puerta no cierra completamente La máquina de hacer hielo no está totalmente nivelada.
La temperatura de la habitación es más caliente de lo normal.
La puerta permanece abierta mucho tiempo.
La puerta no quedo completamente cerrada.
La empaquetadura de la puerta no está sellada
adecuadamente.
La máquina de hacer hielo no tiene el suficiente espacio libre.
Hay mucha escarcha.
Esto es normal. Es el refrigerante (usado para enfriar la
máquina de hacer hielo) que está circulando a través del
sistema.
La contracción y expansión de las paredes internas puede
La dirección de apertura de la puerta fue invertida pero
instalada incorrectamente.
El sellador de la puerta está sucio.
La canasta de almacenaje está fuera de su sitio obstaculizando
Page 19

19
REGISTRATION INFORMATION
Thank you for purchasing this fine Avanti product. Please fill out this form and return it within 100 days
of purchase to receive these important benefits to the following address:
Avanti Products, A Division of The Mackle C o ., Inc.
P.O. Box 520604 - Miami, Florida 33152 USA
PROTECT
We will keep the model number and date of purchase of your new Avanti product on file to help
you refer to this information in the event of an insurance claim such as fire or theft.
PROMOTE
We value your input. Your responses will help us develop products designed to best meet your
future needs.
-----------------------------------------------------(DETACH
__________________________________ _____________________________________
NAME MODEL # SERIAL #
_______________________________
ADDRESS DATE
______________________________
CITY STATE ZIP OCCUPATION
________________________________
AREA
CODE PHONE NUMBER OWN RENT
DID
YOU PURCHASE AN ADDITIONAL WARRANTY: YOUR AGE:
EXTENDED NONE UNDER
REASON
PLEASE
THAT
THIS
PRICE HOME BUSINESS
PRODUCT
AVANTI
PRODUCT
SALESPERSON
FRIEND/RELATIVE
WARRANTY _____________________________________
OTHER_______________________ _____________________________________
FOR CHOOSING THIS AVANTI PRODUCT: 31-35 36-50 OVER 50
INDICATE THE MOST IMPORTANT FACTORS MARITAL STATUS:
INFLUENCED YOUR DECISION TO PURCHASE MARRIED SINGLE
PRODUCT. IS THIS PRODUCT USED IN THE:
REPUTATION ADVERTISING
YOUR PRODUCT:
BETTER PRODUCTS:
HERE)--------------------------------------------------------
AVANTI
___ ______________________________ _______
____ ___________________________________ ___
__ AS YOUR PRIMARY RESIDENCE, DO YOU:
FEATURES HOW DID YOU LEARN ABOUT THIS PRODUCT:
QUALITY IN STORE DEMO PERSONAL DEMO
RECOMMENDATION OTHER______________________________
RECOMMENDATION COMMENTS____________________________
REGISTRATION FORM
PURCHASED STORE/DEALER NAME
18 18-25 26-30
Page 20

20
PRINTED IN CHINA
 Loading...