

Page 1

/wHití
INSTRUCTION MANUAL
MANUAL DE INSTRUCCIONES
Model Numbers: FF-97R
No. de Modelo: FF-97R
DELUXE FROST FREE
REFRIGERATOR/FREEZER
(REFRIGERADOR/CONGELADOR)
CAUTION:
BEFORE USE, PLEASE READ AND FOLLOW ALL SAFETY RULES AND OPERATING INSTRUCTIONS.
AvantI has a policy of continuous improvement on its products and reserves the right to change materials
and specifications without notice.
Avanti Products, A Division of The Mackle Co., Inc.
P.O. Box 520604-Miami, Florida 33152
_______
www.avantiproducts.com
DA68-00431E REV(0.1)
Page 2

Warranty Information
rii- ^
Thank you for purchasing this fine Avanti product Piease fiii out this card and return it within 100
days of purchase and receive these important benefits:
Confirm your warranty:
Your prompt product registration confirms your right to the protection available under the terms and conditions of
your Avanti warranty.
> Protect your product:
We will keep the model number and date of purchase of your new Avanti product on file to help you refer to this
information in the event of an insurance claim such as fire or theft.
> Promote better products:
We value your input. Your responses will help us develop products designed to best meet your future needs.
Avanti Registration Card
Name
Address
City
State
Zip
Model #
Date Purchased Store/Dealer Name
Occupation
As Your Primary Residence, Do YOU:
Area Code Phone Number
□ Own
Did You Purchase An Additional Warranty: Your Age:
□ Extended □ Food Loss □ None
Reason For Choosing This Avanti Product:
Please indicate the most important factors
that influenced your decision to purchase
this product.
0 Price
□ Product Features
□ Avanti Reputation
3 Product Quality
O Salesperson Recommendation
□ Friend/Relative Recommendation
□ under 18
□ 31-35
Marital Status:
□ Married □ Single
Is This Product Used In The:
□ Home □ Business
How Did You Learm About This Product:
□ Advertising
□ In Store Demo
□ Other
_______
Comments
J Warranty
'J Other
_______________________
Serial #
□ Rent
□ 18-25
□ 36-50
□ 26-30
□ over 50
□ Product Features
□ Personal Demo
Page 3

Help us Help fou
Bead this guide carefuiiy.
!t is intended to help you operate and maintain
your new refrigerator property.
Keep it handy to answer your questions,
if you don't understand something or your need
more help, please call:
Avanti Customer Service
800-220-5570
Keep proof of original purchase date (such as
your sales slip) with this guide to establish the
warranty period.
CAUTION:
THIS REFRIGERATOR IS NOT
DESIGNED FOR THE STORAGE
OF MEDICINE OR OTHER
MEDICAL PRODUCTS.
Write down the model and
serial numbers.
You'll find them on a plate located on the bottom
outside wail of the refrigerator.
Please write these numbers here:
Date of Purchase
Model Number
Serial Number
Use these numbers in any correspondence or
service calls concerning your refrigerator.
if you received a damaged refrigerator,
immediately contact the dealer (or builder) that
sold you the refrigerator.
Save time and money. Before you call for sen/ice,
check the Troubleshooting Guide. It lists causes
of minor operating problems that you can correct
yourself.
■4
■--j
IF YOU NEED SERVICE
We’re proud of our service and want you to be pleased. If
for some reason you are not happy with the service you
receive, here are some steps to follow for further help.
FIRST, contact the people who serviced your refrigerator.
Explain why you are not pleased.
In most cases, this will solve the problem.
NEXT, if you are still not pleased, write all the details,
including your telephone number, and send to;
Customer Service
Avanti Products
10880 NW 30 Street
Miami, FL 33172
Page 4

Page 5

Contents
: r-' ■.
♦ WARRANTY INFORMATION AND REGISTRATION CARD............................. 2
♦ HELP US HELP YOU......................................................................................... 3
♦ SAFETY PRECAUTIONS.................................................................................. 5
♦ BECOMING FAMILIAR WITH YOUR NEW REFRIGERATOR/FREEZER
■ ■ Main Features......................................................................................... 6
♦ INSTALLING YOUR NEW REFRIGERATOR/FREEZER
' '•
I Choosing Where To Install Your Refrigerator/Freezer
■ Earthing The Refrigerator/Freezer
■ Preparing Your Refrigerator/Freezer For Use
..........................................................
.........................................
■ Adjusting The Feet................................................................................... 8
............................
■ Arranging The Accessories...................................................................... 9
♦ USING YOUR REFRIGERATOR
■ Controlling the Refrigerator Temperature.............................................. 10
■ Storing Food.......................................................................................... 10
■ Using The Chiller Compartment........................................................... 11
■ Using The Vegetable Bin
......................................................................
♦ USING YOUR FREEZER
■ Controlling The Freezer Temperature
■ Freezing Food
.......................................................................................
...................................................
■ Making ice Cubes.................................................................................. 13
♦ LOOKING AFTER YOUR REFRIGERATOR/FREEZER
■ Cleaning The Refrigerator/Freezer........................................................ 14
■ Changing The Light Bulb(s)................................................................... 15
■ Problems and Solutions......................................................................... 16
♦ VIEW OF YOUR REFRIGERATOR/FREEZER.............................................. 17
7
7
8
11
12
12
♦ METHODS OF EXCHANGING REVERSIBLE DOOR
♦ HUMIDITY CONTROL
♦ REVERSING THE DOOR SWITCH
4
SERVICE FOR YOUR REFRIGERATOR/FREEZER
4
YOUR AVANTI PRODUCTS WARRANTY...................................................... 23
4
SPANISH SECTION.........................................................................................24,25
.....................................................................................
................................................................
..................................
......................................
18, 19
20
21
22
Page 6
Safety Precautions
.J
Before using your refrigerator/freezer, read the safety precautions below and the instructions in
the rest of the manual. Keep the Instruction Manual in a handy place for future reference and
remember to hand it over to the subsequent owner, if you ever sell the appliance.
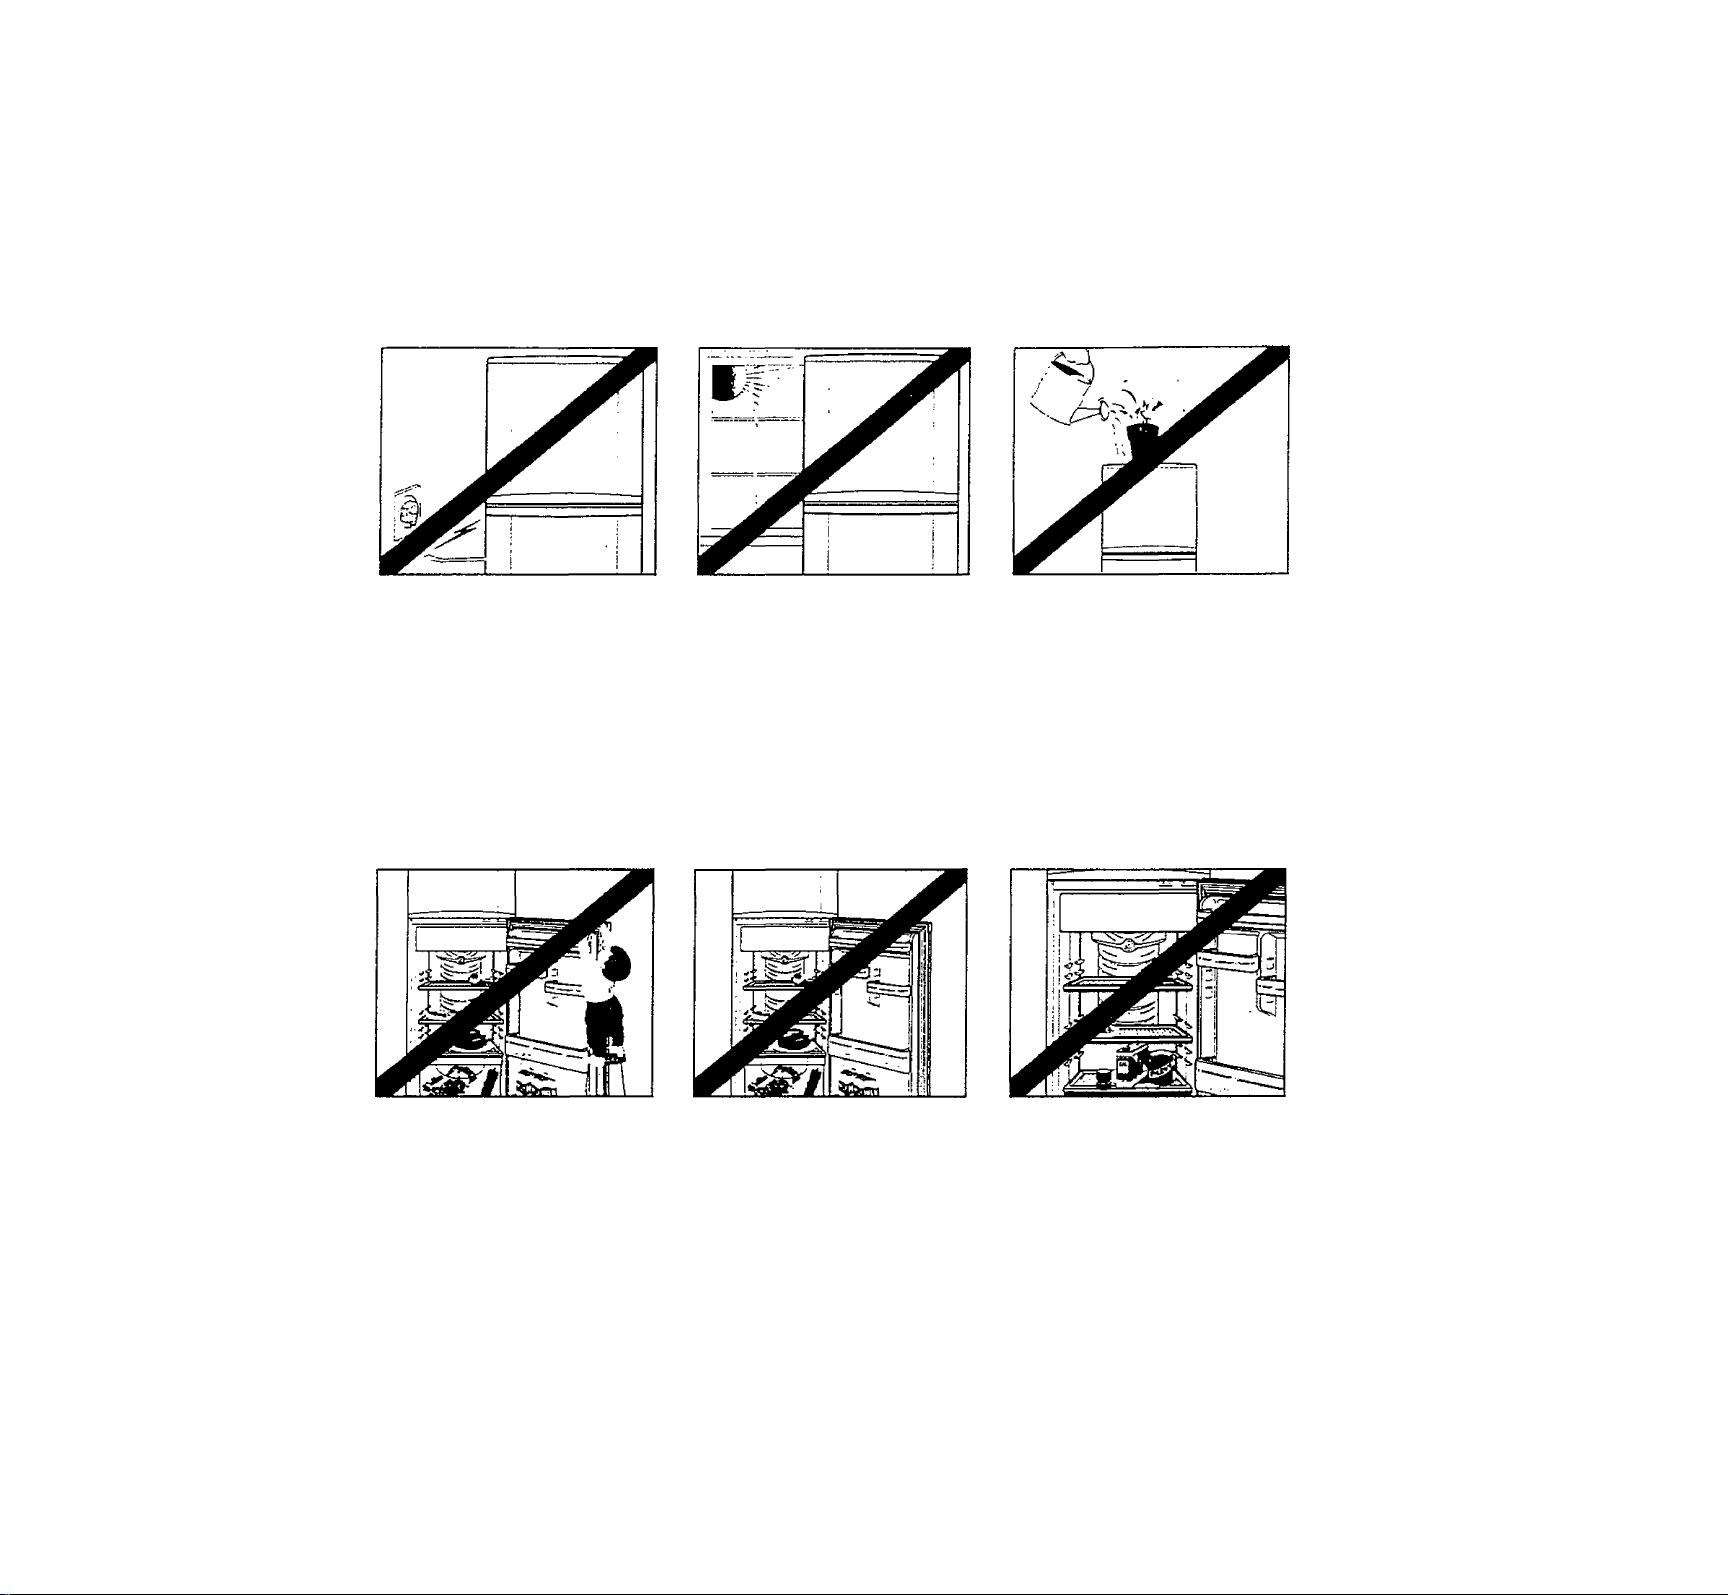
DO NOT use the
refrigerator/freezer if it is faulty or
damaged. Unplug it from the
power supply and call your local
service centre.
If the power cord is damaged,
have it replaced by the manu
facturer, an approved service
centre or a qualified electrician.
DO NOT allow children to:
♦ Play in or around the
refrigerator/freezer
♦ Hang on the refrigerator door
Children may be injured and the
appliance may be damaged.
DO NOT expose the refrigerator/
freezer to direct sunlight.
DO NOT install it next to a
source of heat (oven, radiator).
If you must install the
refrigerator/freezer near a source
of heat, ensure that there is
sufficient insulation between the
two appliances.
To maintain the efficiency of your
refrigerator/freezer, DO NOT leave
the doors open for any longer than
necessary.
Make sure that the doors are
carefully pushed closed at all times.
DO NOT allow water to splash or
run on to the back of the
refrigerator/freezer.
Water impairs the insulation of the
electrical parts and may cause an
electric short circuit or risk of
electric shock.
DO NOT store volatile chemicals,
such as ether and benzene, in
the refrigerator/freezer. Besides
damaging the food, the fumes
can build up and cause an
explosion.
DO NOT use flammable sprays,
such as lacquer or paint, near
the refrigerator/freezer.
-.1
Page 7

Important Safety Instructions
To reduce the risk of fire, electrical shock, or
l\ WARNING
♦ Read all instructions before using the appliance.
♦ DANGER or WARNING : Risk of child entrapment.
♦ Child entrapment and suffocation are not problems of the past. Junked or abandoned appliances are still
dangerous...even if they will “just sit in the garage a few days."
♦ Before you throw away your old refrigerator or freezer; Take off the doors.
Leave the shelves in place so that children may not easily climb inside.
♦ Never allow children to operate, play with, or crawl inside the appliance.
♦ Never clean appliance parts with flammable fluids. The fumes can create a fire hazard or explosion.
♦ Do not store or use gasoline or any other flammable vapors and liquids in the vicinity of this or any other
appliance. The fumes can create a fire hazard or explosion.
'Save these instructions-
injury when using your refrigerator, follow these
basic precautions;
Main Features
Your refrigerator/freezer is fitted with several useful features, to help you store food as
efficiently and as hygienically as possible.
Feature Description
Auto-defrost
Chiller compartment
Adjustable shelves
and containers
When sufficient frost has accumulated in the refrigerator/freezer, the auto-defrost
feature starts up automatically. The frost is thawed and the thaw water is collected in
an evaporation tray, which allows it to evaporate.
This operation is fully automatic and requires no intervention by you.
The chiller compartment freezes only the surface of the food to help;
♦ Preserve the taste of the food
♦ Prolong the freshness
The accessories inside your refrigerator/freezer can be placed in the positions that
best suit your requirements and the food to be stored. The specially large
compartments in the bottom of the door are very practical when chilling bottles of
drinks for example.
Page 8
Choosing Where to Install Your Refrigerator/Freezer
Various factors must be taken into account when choosing where to install your refrigerator/freezer.
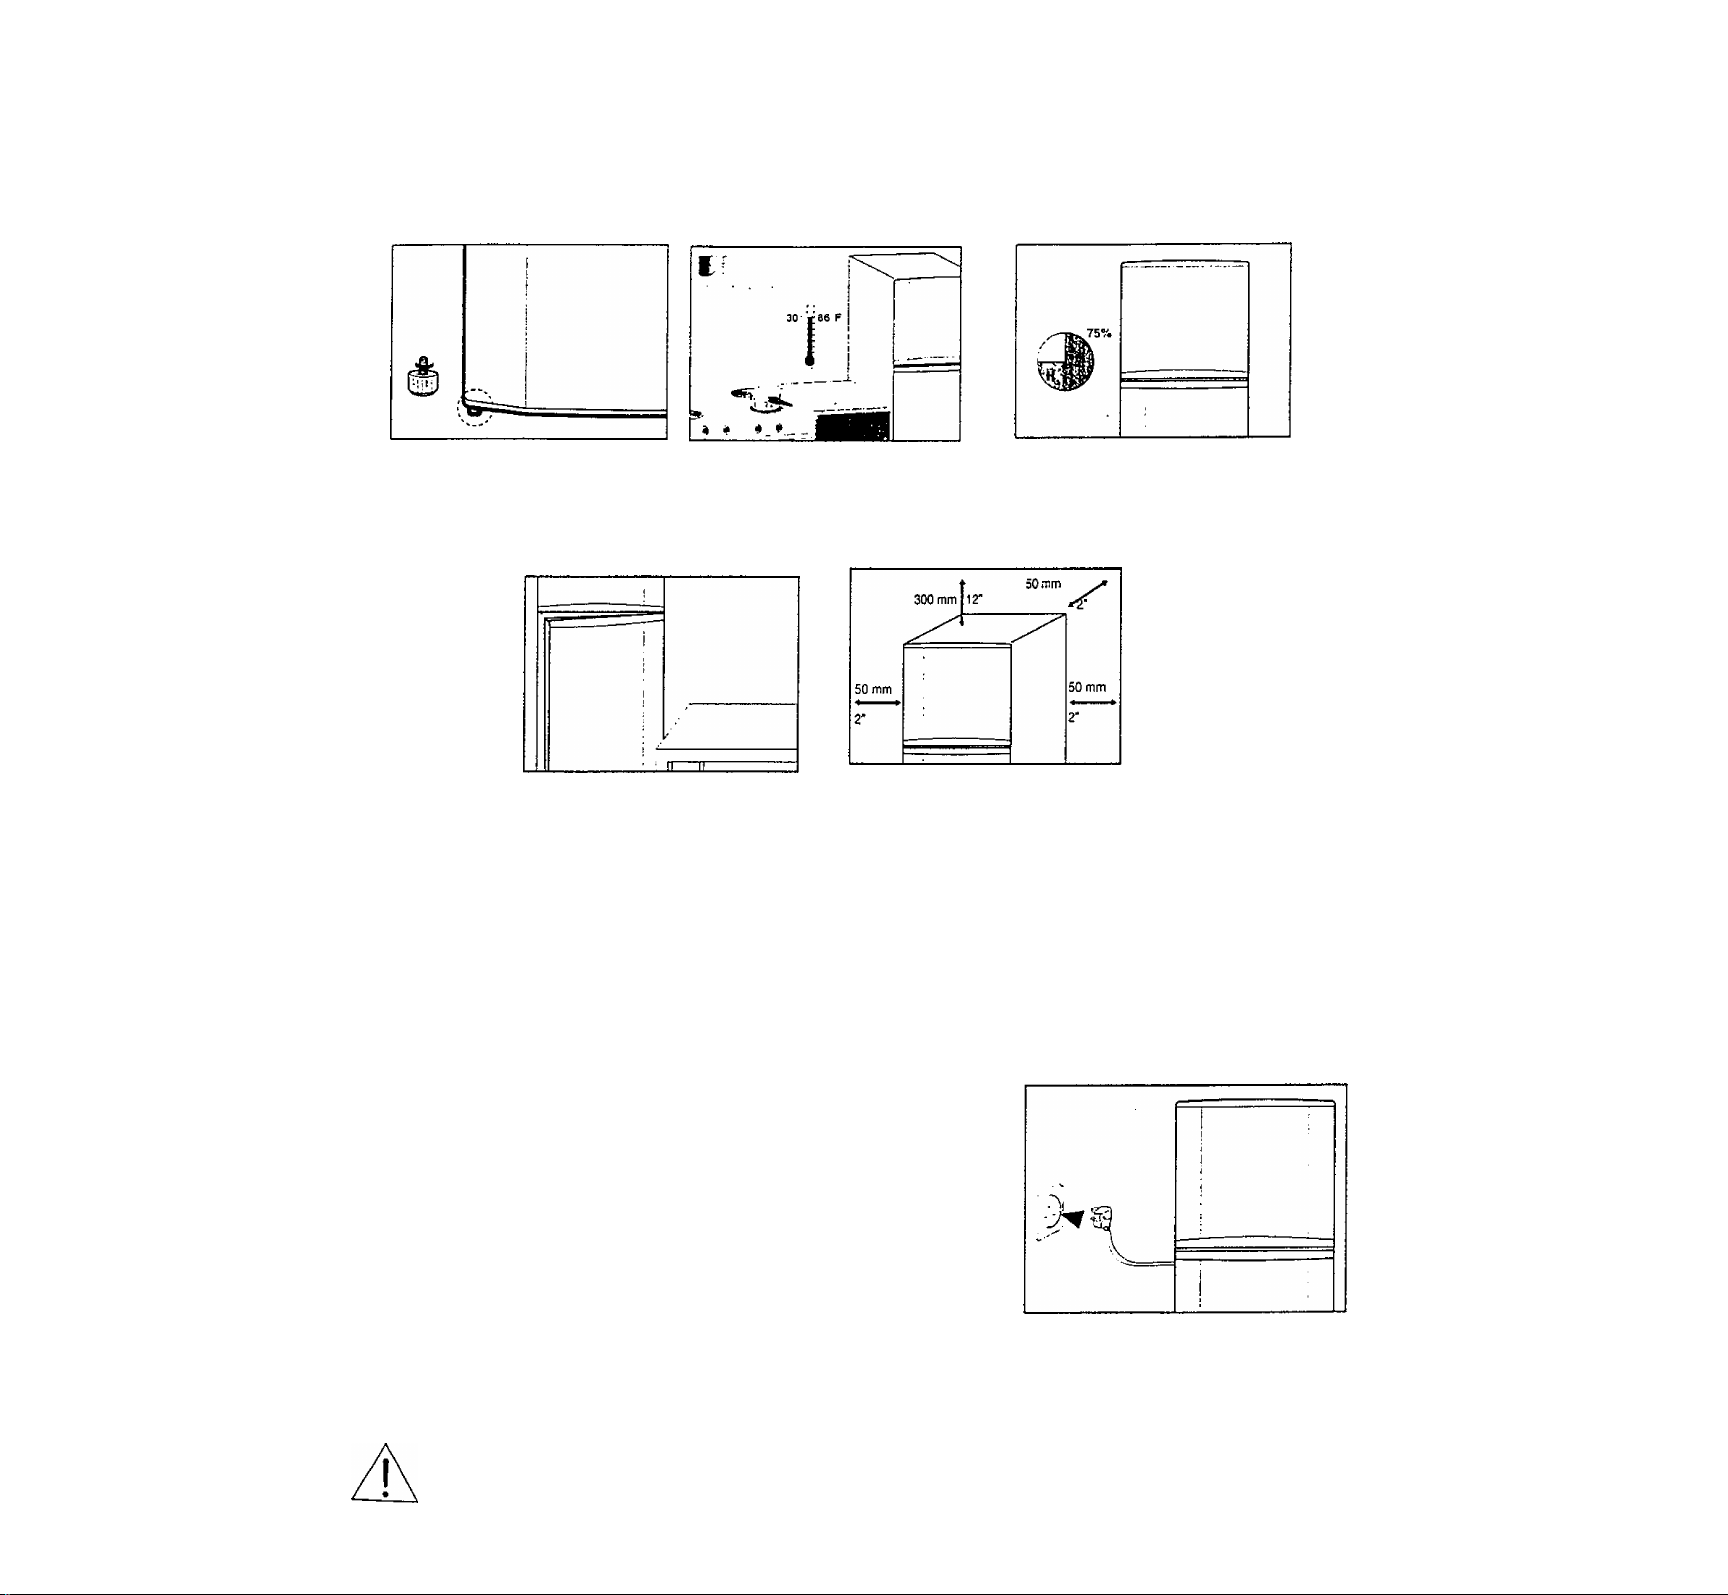
Install the refrigerator/freezer on
a stable, flat surface. Adjust the
feet if necessary, referring to
page 8 for further details.
Make sure that you can open the
doors freely and without hin
drance.
Avoid locations in direct sunlight or
near to heaters, radiators, ovens or
cookers.
Grounding the Refrigerator/Freezer
For the persona! safety of you and your family, your
refrigerator/freezer must be:
Avoid locations affected by
draughts or dampness.
Allow the following clearances
around the refrigerator/freezer:
♦ 50 mm (2 inches) on all sides
♦ 300 mm {12 inches) above
the fridge/freezer
' }
"'4
■ .1
•-!
■;'i
.1
♦ Plugged into its own individual wall outlet with the
correct voltage and frequency, as indicated inside
the refrigerator door
♦ Properly grounded (do not ground the
refrigerator/freezer with a telephone line, gas pipe,
and so on)
To minimise the possibility of electric shocks from the
appliance, the wall outlet must also be grounded; have it
checked by a qualified electrician. If it is not grounded, it is
your personal responsibility and obligation to have it replaced
with a properly grounded outlet, or use a different power point.
If the power cord is damaged :
♦ Immediately unplug it from the wall outlet
♦ Have it repaired by a qualified electrician
Page 9
Preparing Your Refrigeratcr/Freezer for Use
Once you have chosen the position of your
refrigerator/freezer and checked that the wail outlet is
correctly grounded, proceed as follows.
1 Make sure that the refrigerator/freezer is unplugged from the wall
outlet.
2 Wipe the appliance clean inside and out with a soft cloth and
warm, soapy water.
3 Allow the refrigerator/freezer to stabilise for at least one hour
before plugging it in for the first time.
w
■Vj'.'..
i
■■
j
1
'
i
Adjusting the Feet
To compensate for an uneven floor surface, you can adjust
the feet on the front of the refrigerator/freezer.
If the refrigerator/freezer
leans to the...
4 Plug the power cord into the appropriate grounded wail outlet.
5 Set the refrigerator and freezer temperatures, referring to pages
10 and 12, respectively for further instructions.
6 Wait for 2-3 hours for the freezer to reach the required tem
perature, before placing frozen food in the freezer.
Then turn the...
—^
, &
Left
Right
Left foot anti-ciockwise until the
refrigerator/ freezer is level.
Right foot anti-clockwise until the
refrigerator/ freezer is level.
Page 10

Arranging the Accessories
The shelves and compartments inside the refrigerator can be
rearranged for greater convenience.
To change the
Then.
position of...
A crystal shelf/
A tempered glass shelf
A wire shelf ♦ Tilt the front of the shelf up
An adjustable door
pocket
♦ Pull the shelf towards you until it reaches the
stop
♦ Tilt the front of the shelf up and continue
pulling the shelf towards you
♦ Slide the shelf back into its new position
♦ Pul! the shelf out towards you
♦ Slide the shelf back into its new position
♦ Lift the compartment upwards to release
the tabs
♦ Remove the compartment from the door
♦ Align the tabs in the new position
♦ Push the compartment down into place
Arrangement Example for the Refrigerator
Accessory Suggested Use
Top shelf
Chiller compartment Meats and fish
Bottom shelf
Vegetable bin Fruit and vegetables
Egg Tray
Adjustable door pocket
Bottle pocket
Desserts, such as yogurts
Ready-prepared meals
Eggs
Cheese, butter
Milk, sodas, other drinks
в
'1
Page 11

Controiling the Refrige<‘ator Temperature
When setting the refrigerator temperature, you must take into
account the foiiowing factors:
♦ The amount of food to be stored
♦ The temperature of the room in which the
refrigerator/freezer is placed
To store... Then set the temperature to...
A large amount of food 9
{refrigerator full)
An average amount of food 5
A small amount of food 1
(refrigerator relatively empty)
Depending on the room temperature, you may need to
turn the refrigerator up or down slightly. If it is very low
set the refrigerator temperature to Minimum.
storing Food
If there is a large amount of food in the fresh food
compartment, specially in summer, turn the freezer
temperature dial to “2'-3” to direct more cold air into the
fresh food compartment and the refrigerator temperature
dial to “7^8”.
Setting at “5~6” of the freezer temperature dial, the fresh
food ompartment will not be cold enough.
Follow the recommendations below when storing food in the
refrigerator.
1 Put food in containers with lids or in plastic bags or cover it with
plastic film to prevent:
♦ The food from drying up
♦ Smells from permeating other items of food
2 Allow hot food or drinks to cool before placing them in the
refrigerator,
3 Leave sufficient room between the items and in front of the
ventilation slots to enable the cool air to circulate freely.
4 Try and maintain easy access to the temperature dial in case you
need to adjust the temperature,
5 If you have washed any fruit or vegetables, dry them before
storing them in the vegetable bin.
Page 12

Using the chiller Compartment
L
The chiller compartment freezes only the surface of the food to help:
♦ Preserve the taste of the food
♦ Prolong the freshness
Use the chiller compartment to store cheese, meat, fish or any
frozen food to be used quickly.
J
To...
Open the chiller
compartment
Then...
Pull the chiller compartment towards you.
Result: ♦ The compartment is moved fonA/ard
for easy access.
♦ The cover opens automatically.
Close the chiller Push the chiller compartment back as far as it
compartment wiil go.
Result: The cover closes automatically.
^ Make sure, however, that the cover is correctly closed before shutting the refrigerator door.
Using the Vegetable Bin
The vegetable bln maintains the moisture and freshness of fruit and vegetables by:
♦ Protecting the items from direct draughts of cold air
♦ Maintaining sufficient humidity to prevent the fruit
and vegetables from drying out
♦ The vegetable bin divider allows you separately to
store the fruit and vegetables. (Option).
The vegetable bin is not suitable for tropical fruit
(bananas, pineapple and so on), which is too fragile:
the fruit is damaged and flavour is lost.
To...
Open the vegetable bin Pull it towards you.
Close the vegetable bin
Then...
Push it back into place.
Page 13

Controlling the Freezer Temperature
When setting the freezer temperature, you must take into account
the following factors:
♦ The amount of food to be frozen
♦ The temperature of the room in which the
refrigerator/freezer is placed
To... Then set the temperature to...
Freezing Food
♦ Store large quantities
of food (freezer full)
♦ Make ice cubes
♦ Fast-freeze food
Store an average amount
of food
Store a small amount of food
(freezer relatively empty)
Depending on the room temperature, you may need to
turn the freezer up or down slightly.
6
3
1
Follow the recommendations below when storing food in the
freezer.
1 Store food in small quantities or as individual servings, so that you
can defrost as much or as little as you like.
2 Do not refreeze food that has already been frozen and then
defrosted.
3 Put the food to be frozen in containers with lids or in airtight plastic
freezer bags, removing any excess air in the bags.
4 Respect the maximum storage times indicated on pre-packed
frozen food.
5 Do not place food on top of the evaporation slots.
6 Try and maintain easy access to the temperature dial in case you
need to adjust the temperature.
7 Leave the door open for as little time as possible. Make sure that it
is properly closed after use.
Page 14

ing Ice Oubes
L!
TWIST ÍCE MAKER
Making Ice Cubes
1 Remove the ice cube tray by pulling it towards you.
2 Fill the tray with water up to the maximum water level marked on
the rear of the tray.
3 Slide the tray back into the holder, taking care not to spill the
water.
4 Wait until the ice cubes are formed.
Freezing time: It is recommended that you wait for about one hour
with the temperature set to QUICK FREEZING for
the ice cubes to form.
Removing, the ice Cubes
1 Make sure that the ice cube storage bin is in place under the ice
cube tray. If not, slide it into place.
2 Twist one of the levers firmly in the clockwise direction until the
tray twists slightly.
Result: The ice cubes fail into the storage bin.
3 Repeat Step 2 for the other half of the tray, if necessary.
4 Remove the storage bin by;
♦ Lifting it slightly
♦ Pulling it towards you
Page 15

r^eanin the F efrigerator/Free^^j*
The following parts of your refrigerator/freezer should be
cleaned regularly to prevent food particles from building up:
♦
inside and outside surfaces
♦
Doors and door seals
♦
Accessories (shelves, compartments and ice tray)
ALWAYS ensure that;
♦ The door seals are clean
♦ The doors close properly
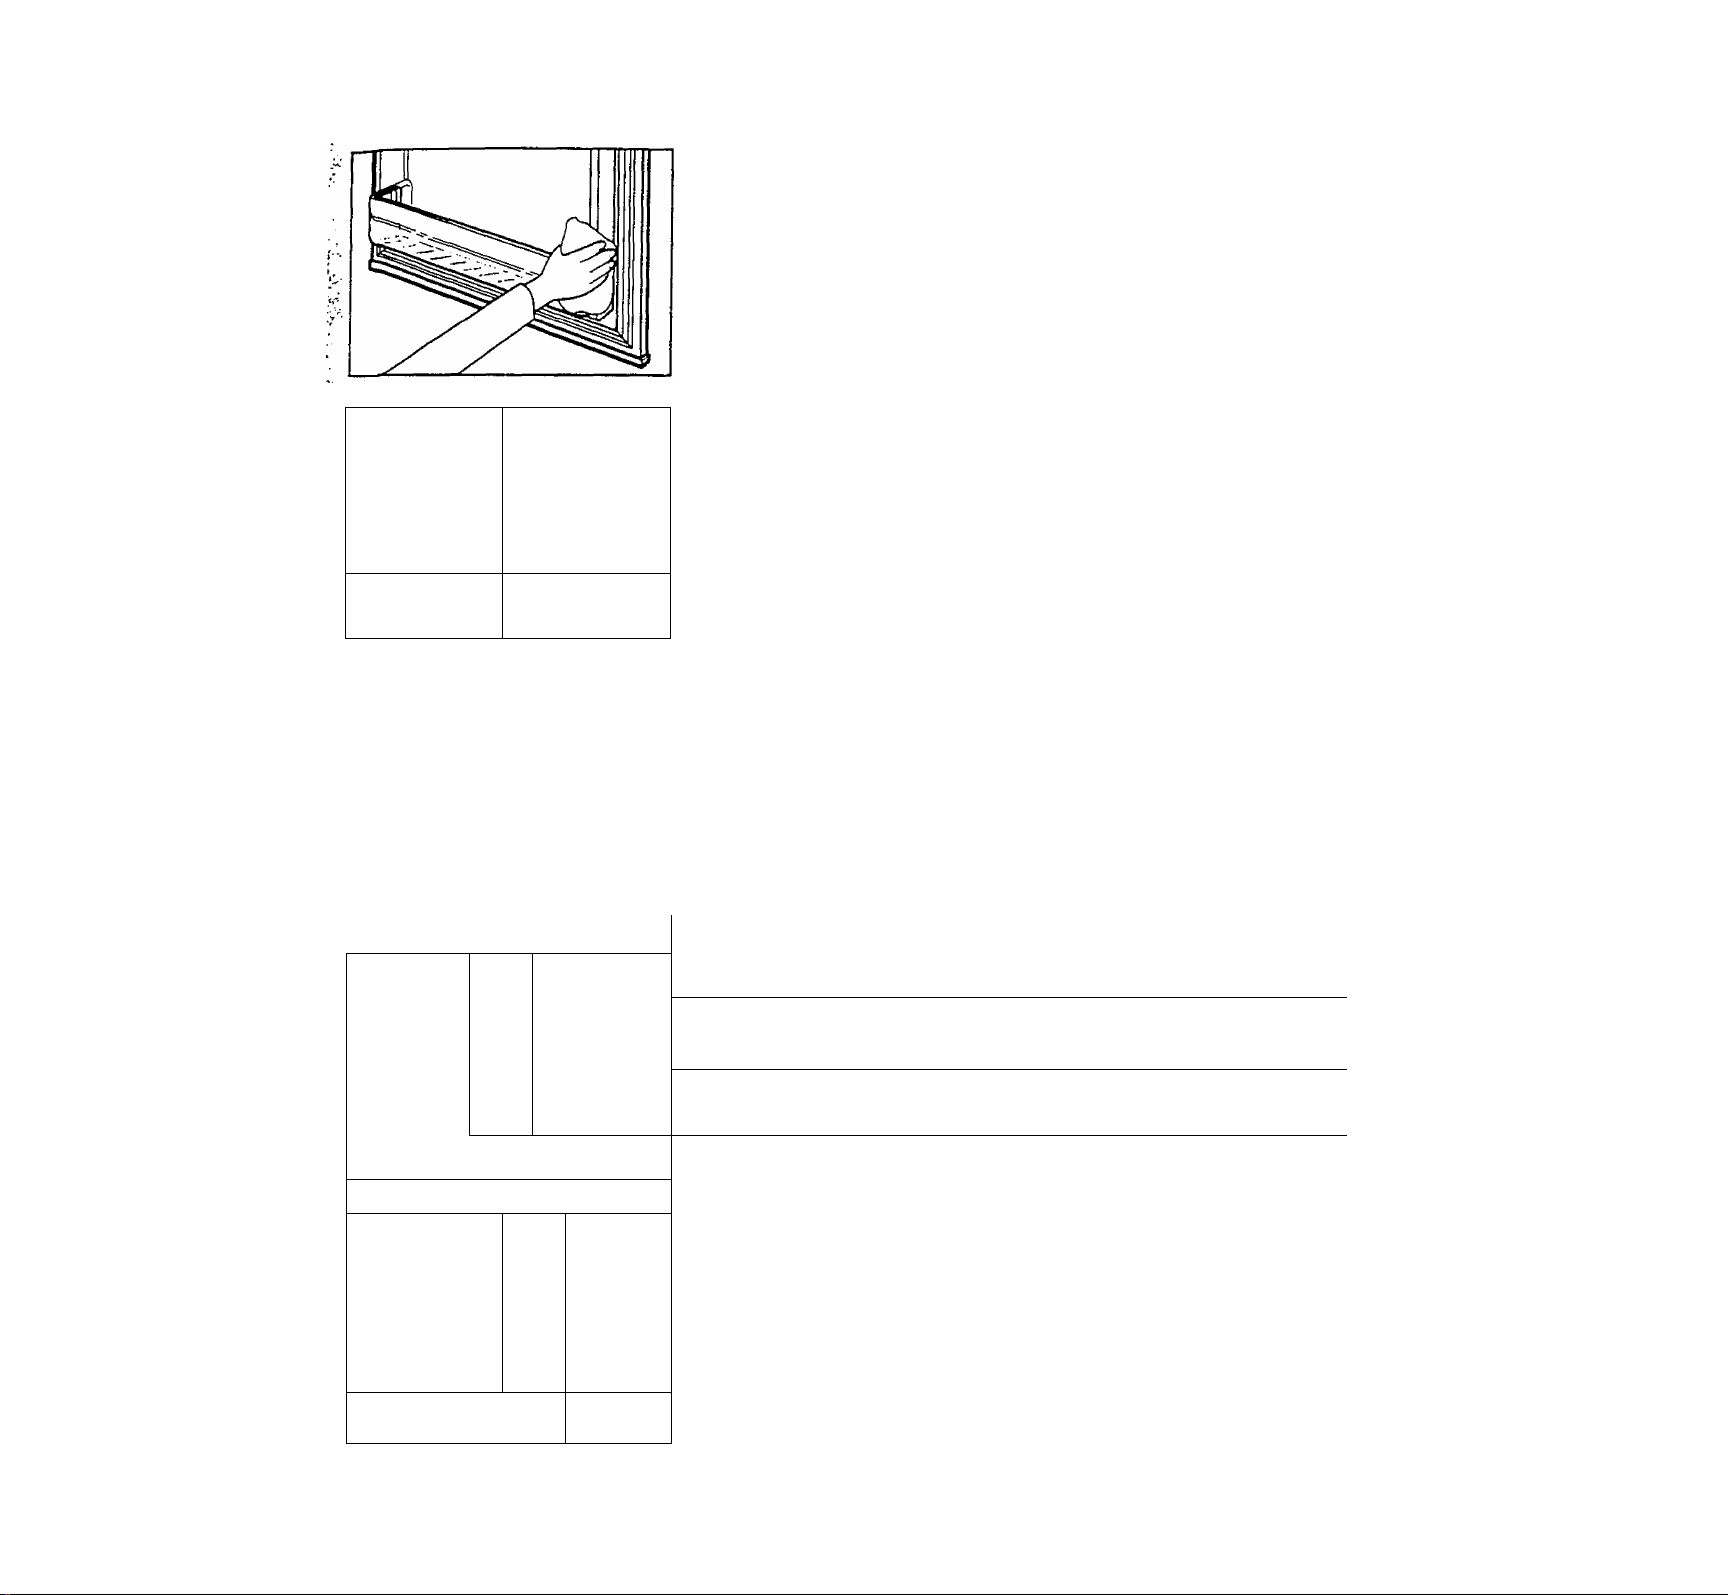
1 Whenever possible, unplug the refrigerator/freezer before cleaning
it. If this is not possible, wring any excess moisture out of your
sponge or cloth before cleaning around the:
♦ Lights
♦ Temperature dials
2 Clean the outside surfaces with a soft cloth and warm, soapy
water. Rinse and dry.
3 Remove the accessories, referring to page 9 for further details, if
necessary. Wash them with a soft cloth or sponge and warm,
soapy water. Rinse and dry them.
If the refrigerator has an unpleasant smell;
♦ Remove the bio-deodorizer
♦ Soak the catalyst in pure water
♦ Dry it naturally in sunlight
♦ Put it back into position
5 Wipe the evaporation slots in the freezer with a clean, dry, soft
cloth.
DO NOT allow any food particles to clog up these openings
or frozen food to cover them.
6 Wipe the inside of the refrigerator/freezer with a soft cloth and
warm, soapy water. Rinse and dry.
7 Carefully clean the door seals with a soft cloth and warm, soapy
water. Rinse and dry.
DO NOT damage the seals in any way and make sure that
no food particles on the seals prevent the door from closing
properly as:
♦ The temperature will not be maintained correctly
♦ Electricity will be wasted
Page 16

Changing the Light Buib(s)
when you open the refrigerator door, a light comes on to
help you find what you are looking for more easily. If you
need to replace the bulb, proceed as follows.
Remove the chiller compartment by;
♦ Removing the chiller compartment
♦ Pulling it towards you until it meets the stop
♦ Tilting the front up slightly and continuing to pull the
compartment towards you
With a flat-bladed screwdriver, prise out the upper part of the light
cover. Pull the cover free.
Unscrew and remove the light bulb.
insert new bulb (maximum of 15 W, E14 small screw base).
Replace the light cover by pushing it until it clicks back into place.
Replace the chiller compartment and door by sliding it back into
position.
■ 3
erg
1
Page 17

Pr^bletr.3 and Solutions
Before contacting the after-sales service, perform the following simple checks. They may save you the
time and expense of an unnecessary call.
Problem
The refrigerator/freezer is not operating ♦
at all and the light does not come on ♦
when you open the refrigerator door
Food in the freezer does not freeze
correctly
Food freezes in the refrigerator
The refrigerator/freezer makes unusual
noises
There is a bad smell in the
refrigerator or freezer
Explanation/Solution
Check that the refrigerator/freezer is correctly plugged in.
Check that the wall outlet is switched on and working correctly.
Is the temperature set correctly? If ice cream in the freezer is too soft,
turn the temperature dial towards "MAX”; if it is too hard, turn the dial
towards “MIN".
Is the room temperature too high? Is the appliance exposed to
direct sunlight or a source of heat? Change its position if possible.
Is thè temperature set to “MAX"? Tum thè temperature diai towards
♦ Is the room temperature too low? If it is very low, the thermostatic
controls may function incorrectly, increase the temperature in the room
or move the refrigerator/freezer to another position.
Check that the refrigerator/freezer is installed on a level, stable surface
with sufficient space around it; adjust the front feet if necessary
(see page 6 for further details).
Are there any objects behind or under the refrigerator/freezer?
Is the noise coming from the compressor or does it sound like
running water (refrigerant circulating)? These noises are normal.
Is an item of food going bad?
Is all food stored in sealed containers or covered?
Has dew developed in the vegetable bin? Clean and dry the bin.
Are the evaporation slots at the front of the freezer clogged?
Clean and dry them carefully.
Dew develops in the refrigerator
Frost develops in the freezer
The rear or sides of the refrigerator/
freezer are warm
♦ Have you left the door open for a long time?
♦ Is something preventing the door from closing properly?
Carefully clean and dry the door seals.
♦ Have you stored food or liquids in a container without a cover?
Leave all food and liquids to cool before placing them in the
refrigerator and keep them covered.
♦ Have you left the door open for a long time?
♦ Is something preventing the door from closing properly?
Carefully clean and dry the door seals.
♦ Are the evaporation slots at the front of the freezer clogged?
Clean and dry them carefully.
♦ Have you left enough room for the air to circulate? Space the food
out as evenly as possible.
Is the room temperature too high or is the refrigerator/freezer exposed to a
direct source of heat, causing the refrigerator/freezer to operate intensively?
Move the refrigerator/freezer to a better position if possible.
Is there an excessively high humidity level in the room? Move the
refrigerator/freezer to a better position if possible.
If you cannot solve the problem, note:
♦ The nature of the problem and any warranty information
♦ The type and model indicated on the centre of the refrigerator/freezer
Then contact your local dealer or nearest A vanti after-sales service.
Page 18

View of Your Refrigerator/Freezer
FREEZER TEMPERATURE DIAL
TWIST ICE MAKER & ICE
STORAGE BIN
FREEZER SHELF
CHILLER COMPARTMENT
REFRIGERATOR LIGHT
REFRIGERATOR SHELVES
VEGETABLE BIN
DOOR POCKET
DOOR OPEN/CLOSE CONTACT
(light switch for refrigerator
EGG TRAY
REFRIGERATOR
TEMPERATURE DIAL
ADJUSTABLE DOOR
POCKET
JUMBO DOOR POCKET
À
REFRIGERATOR
BOTTLE POCKET
yj*, ' ^-i • * V; '
Page 19

Changing The Reversible Door
This refrigerator has been built with the door hinges on the
right. If you wish to change the opening direction, follow the
instructions below:
Unplug the refrigerator from its electrical outlet.
Empty everything in the refrigerator, including shelves,
food, etc.
1. Remove the hinge cover on the right top of the cabinet.
2. Remove the three screws that holds the top hinge to the
cabinet. Keep these screws and washers for later use.
3. Lift the top hinge straight up to free door.
4. Lift the freezer door and place it on a padded surface to
prevent scratching it.
5. Remove the plug button from the upper left holes as illustrated
and transfer it to the uncovered holes at the right side. Be sure
to press the plug button firmly into the hole.
6. Remove the three screws that hold the door stopper to the
cabinet. Keep these screws and washers for later use.
7. Lift the refrigerator door and place it on a padded surface to
prevent scratching it.
Page 20

í-'
Changing The Reversible Door
8. Remove the stopper and place it on the opposite side (left).
9. Remove the door switch plug on the left.
10. Remove the door switch and insert it into the wire connector
at the left (see illustration).
11. Insert the door switch plug previously removed in step 9 in the
uncovered hole at the right side.
12. Remove the lower hinge at the bottom of the refrigerator.
Replace the refrigerator door making sure to secure the
bottom hinge at the bottom left side. Do not tighten the screws
until the top of the door is leveled with the cabinet.
13. Replace the freezer door and make sure is leveled with the
cabinet top.
14. Replace the hinge cover.
Page 21

i-*: ■
Exchange method of door switch
W'
BEFORE CHANGE
COVER DOOR SWITCH Disassembly
♦ Remove the door switch cover by pulling it forward using (-)
screwdriver as illustrated.
DOOR SWITCH Disassembly
♦ Disengage switch connector by pulling it out and reconnect it to
the opposite side after removal of door switch cover(plastic cap)
at the left.
Replace door switch cover (plastic cap)at the uncovered hole
to the right
AFTER CHANGE
Page 22

Humidity control method
------------------------------'
♦ In controls the internal humidity of the vegetable compartment. Adjust the control dial by turning It clockwise to
set a lower humidity level. If you turn ir counter clockwise the humidity level will be higher.
'■ ' ■ ■ .T v; ^ V ‘ 'Vp' ’/"V ' "
Page 23

Service for ^our refrigerator
We are proud of our customer service organization and the network of professional service
technicians that provide service on your Avanti refrigerators. With the purchase ofyourAvanti
refrigerator, you can have the confidence that if you ever need additional information or assistance,
the Avanti Products Customer Service team will be here for you. Just call us toll-free.
AVANTI PRODUCTS CUSTOMER SERVICES
Product Information
800-323-5029
Part Orders
800-220-5570
In-Honie Repair Service
800-220-5570
Whatever your questions are about our products, help is
available.
You may order parts and accessories that will be
delivered directly to your home.
You may order these items by personal check, money
order, Master Card, or Visa.
An Avanti Products authorized service center will provide
expert repair service, scheduled at a time that is
convenient for you. Our trained servicers know your
refrigerator inside and out.
Page 24

‘ YOUR Avanti Products WARRANTY
staple your sales receipt here. Proof of origin:il purchase
date is needed to obtain service under warranty.
WHAT IS COVERED
" LIMITED'ONE-YEAR
WARRANTY
For one year from the date of
purchase by the original owner, Avanti
Products will, at its option, repair or
replace any part of the refrigerator
which proves to be defective in
material or workmanship under norma)
use. During this period Avanti
Products will provide ail parts and
tabor necessary to correct such
defects free of charge, so long as the
refrigerator has been installed and
operated in accordance with the
written instructions in this manual. In
rental or commercial use, the warranty
period is 90 days.
LIMITED SECOND THROUGH
FIFTH YEAR WARRANTY
For the second through the fifth year
from date of original purchase, Avanti
Products will provide a replacement
compressor free of charge due to a
failure. You are responsible for the
service labor and freight charges, in
rental or commercial use, the limited
compressor warranty is one year and
nine months. Cost to move the
refrigerator to the servicers’ shop and
back to the user’s home, as may be
required, are the user’s responsibility.
WHAT IS NOT COVERED
Content losses of food due to spoilage. •
Incidental or consequential damages. •
Parts and labor costs for the following will not be
considered as warranty:
Evaporator doors, door springs, and/or frames. •
inner door panels, door shelves, door rails, and/or
door supports.
Chest refrigerator lid liners. •
Vegetable crispers.
Light bulbs and/or plastic housing. •
Plastic cabinet liners.
Punctured evaporator that voids the warranty on •
the complete sealed system.
Repairs performed by unauthorized servicers.
Service calls that do not involve defects in
material or workmanship such as customer
education, door reversal, or proper installation.
Service calls that are related to external problems,
such as abuse, misuse, inadequate electrical
power, accidents, fire, floods, or acts of God.
Replacement of house fuses or resetting circuit
breakers.
Failure of the product if it is used for other than its
intended purpose.
This warranty does not apply outside the
Continental USA.
Page 25

> INSTRUCCIONES PARA LA CONEXION A TIERRA
Este aparato electrodoméstico debe estar conectado a tierra. En caso de un cortocircuito eléctrico, la conexión a tierra
reduce el riesgo de choque eléctrico proporcionando un cable de escape para la corriente eléctrica. Este aparato viene
equipado con un cordón que posee un cable a tierra con un enchufe de conexión a tierra. Este enchufe debe estar
conectado en un tomacorriente instalado correctamente y conectado a tierra.
> ADVERTENCIA
El uso inadecuado del enchufe de conexión a tierra puede resultar en un riesgo de choque eléctrico.
Consulte con un electricista si no comprende bien las instrucciones de conexión a tierra o si existe
alguna duda sobre si el aparato está conectado a tierra correctamente.
> NO USE UN CORDON DE EXTENSION ELECTRICA
Use un tomacorrientie de pared exclusivo. No conecte su refrigerador a cordones de prolongación eléctrica o junto a
cualquier otro electrodoméstico en el mismo tomacorriente de pared.
> ADVERTENCIA IMPORTANTE:
Un refrigerador vacío es una atracción muy peligrosa para los niños. Quite ios sellos magnéticos, puertas o cerraduras de
todo electrodoméstico no que esté en uso.
> INSTALACION
Retire los accesorios de empaque (plásticos protectores, cartón y tiras engomadas). Limpie e! exterior con un trapo suave y
seco, y el interior con un trapo húmedo y tibio.
> UBICACION
1. Seleccione un lugar con un piso firme y nivelado.
2. Su refrigerador requiere ventilación. Deje un espacio mínimo de 6" hacia arriba y espacio suficiente en el respaldo para
permitir la circulación de aire.
3. Evite luz directa del sol o calor. La luz directa del sol puede afectar la capa de pintura. Las fuentes de calor en su
proximidad causarán un consumo mayor de electricidad.
4. Para compensar cualquier desigualdad del suelo, ajuste el equilibrio de! refrigerador girando las patas delanteras
ajusíables del borde frontal del aparato en sentido de las agujas del reloj o en sentido contrario.
> OPERACION
Para evitar vibraciones, la caja debe estar bien nivelada. Para encender el refrigerador, gire el control de temperatura a la
posición que corresponda al enfriamiento deseado. Bajo condiciones normales mueva el control a la posición "MED”.
> CONTROL DE TEMPERATURA
Ponga el refrigerador en ei nivel "MAX 9''; si tiene muchos alimentos que conservar, si desea hacer hielo o si necesita una
refrigeración/congelación rápida.
Ponga ei refrigerador en el nivel "MED 5", entre “MAX 9” y "MIN Г, para una refrigeración o congelación normal.
Ponga el refrigerador en el nivel “MIN Г si tiene pocos alimentos que conservar en el refrigerador o congelador.
Nota. Coaadc la lemoeratura este oor oenaic de 5 c ponga el refrigerador a un nivel MIN para evitar ía congelación.
> REEMPLAZANDO LA BOMBILLA
Antes de cambiar ia bombilla, desconecte el refrigerador de la pared.
1. Extraiga la parte inferior de la tapa de la lámpara y quítela.
2. Retire ia lámpara destornillando en el sentido contrario a las agujas del reloj y sustituyala por una nueva.
3. Vuelve a colocar la tapa de ia lámpara.
Page 26

>- COMO HACER EL HIELO
1. Extraiga !a cubetera hacia ef exterior.
2. Llene ¡a bandeja de cubitcs de hieio con agua hasta el nivel señalado en la parte posterior de la bandeja.
3. Coloque la bandeja en la parrilla del congelador asegurándose de no derramar e! agua.
4. Espere a que se formen los cubitos de hielo.
Ncia 3e 'ecomienda aue Ud escer° zor Lina hora 'a temperatura del corgelador en la posición 'MAX 9".
>- RETIRADA DEL HIELO
1. Saque los cubitos torciendo suavemente la bandeja.
2. Colóquelos en la cubetera.
3. Repita ei mismo paso para !a otra bandeja si es necesario.
^ COMPARTIMIENTO PARA LAS VERDURAS
Mantiene la humedad y frescura de tos vegetales gracias ya que el aire frío no loca directamente los vegetales.
PRECAUCION: No es adecuado para conservar frutas tropicales como plátanos, pinas,
BANDEJA DEL REFRIGERADOR
Extraiga la parüla hacia el exterior hasta su tope y levántela ligeramente. Puede cambiar la posición de la parrilla
dependiendo del tamaño de los recipientes que vaya a usar.
OTROS COMPARTIMIENTOS
Levántelos un poco para retirarlas. Las posición de esta sujeción puede subirse o bajarse sujeto a ía cantidad de
alimentos que se vayan a almacenar.
SOPORTE PARA COMPARTIMIENTO DE BOTELLAS
Levántelos ligeramente para retirarlos.
> COMPARTIMIENTO DE FRIO
PARA ABRIR: Extraiga el compartimiento de frío hacia el exterior. La tapa se abre automáticamente.
PARA CERRAR: empuje ei compartimiento de frío todo lo que de para atrás, pero asegúrese que la tapa esté cerrada
completamente antes de cerrar la puerta de! refrigerador.
> BANDEJA DE EVAPORACION
Afloje los tornillos y extraiga la bandeja hacia el exterior. Vacíe la bandeja y limpíela antes de volver a colocaría.
> CUIDADOS EN LOS PERIODOS DE AUSENCIA
• Para cortos períodos de ausencia (menos de 21 días) el congelador podrá quedar funcionando.
Coloque el botón de control de temperaturas en la posición mínima.
• En períodos de ausencia más largos, se aconseja dejar el refrigerador limpio y desconectado.
• Retire todo lo que tenga adentro del refrigerador y haga la limpieza general. También retire las cubeteras, limpíelas
bien y séquelas internamente.
• Deje la puerta entreabierta para que penetre el aire y así evitar la formación de olores.
> ECONOMIA DE ENERGIA
• Evite dejar por mucho tiempo la puerta abierta.
• Evite aperturas frecuentes de la puerta.
• Nunca coloque alimentos calientes dentro del refrigerador. Espere que estén a una temperatura ambiental.
• Coloque el botón de control de temperaturas en la posición adecuada.
> SI USTED SE MUDA
• Desconecte el refrigerador del tomacorriente y limpie el refrigerador bien, incluyendo ía bandeja de! congelador.
• Saque todas las partes movibles y empaquételas para que no se muevan durante la transportación.
• Cierre la puerta de! refrigerador y séllela con cinta adhesiva.
• Asegúrese que el refrigerador va parado durante el viaje y cúbralo con una frazada.
PRINTED !N KOREA
 Loading...