

Page 1
Model / Modelo / Modelé: FF4D15H3S
INSTRUCTIONS.
Avanti has a policy of continuous improvement on its products and reserves
the right to change materials and specifications without notice.
Avanti Products LLC
www.avantiproducts.com
REFRIGERATOR / FREEZER
REFRIGERADOR / CONGELADOR
RÉFRIGÉRATEUR / CONGÉLATEUR
INSTRUCTION MANUAL
MANUAL DE INSTRUCCIONES
MANUEL D’INSTRUCTIONS
BEFORE USE, PLEASE READ AND FOLLOW ALL SAFETY RULES AND OPERATING
P.O. Box 520604
Miami, FL 33152
Page 2

2
TABLE OF CONTENTS
Appliance Safety
3
Important Safeguides
4
Help Us Help You
5
Parts and Features
6
Important Safety Instructions
7
Installation Instructions
7
Before Using Your Appliance
7
Installation of Your Appliance
7
Electrical Connection
8
Operating Your Appliance
9-11
Care and Maintenance
12
Cleaning Your Appliance
12
Power Failure / Vacation Time, Moving Your Appliance
12
Energy Saving Tips
12
Troubleshooting Guide
13
Service for Your Appliance
14
Your Avanti Products War rant y
15
Instrucciones en Español
17 – 22
Instructions en Français
23 - 36
Registration Information and Registration Card
Last
Page
Page 3
3
APPLIANCE SAFETY
Your safety and the safety of others are very important.
We have provided many important safety messages in this manual and on your
appliance. Always read and obey all safety messages.
Warning means that failure to heed
personal injury, or death.
Caution means that fail ur e to heed
property or equipment damage.
All safety messages will alert you to what the potential hazard is, tell you how to
are not followed.
This is the Safety Alert Symbol. This
symbol alerts you to potential
hazards that can kill or injure you
and others.
All safety messages will follow the
Safety Alert Symbol and either the
wards” DANGER”, “WARNING” or
“CAUTION”.
Danger means that fail ur e to heed
this safety statement may result in
severe personal injury or death.
this safety statement may result in
extensive product damage, serious
this safety statement may result in
minor or moderate personal i njury, or
reduce the chance of injury, and let you know what can happen if the instructions
Page 4

4
IMPORTANT SAFEGUARDS
Plug into a grounded 3-prong outlet, do not remove grounding prong, do not use an adapter, and do
this material. All other servicing should be referred to a qualified technician.
• Use two or more people to move and install the appliance. Failure to do so can result in back or other
• Do not use this apparatus for other than its intended purpose.
Before the beverage cooler is used, it must be properly positioned and installed
as described in this manual, so read the manual carefully. To reduce the risk of
fire, electrical shock or injury when using the beverage cooler, follow basic
precautions, including the following:
•
not use an extension cord
• Replace all panels before operating
• It is recommended that a separate circuit, serving only your beverage cooler, be provided. Use
receptacles that cannot be turned off by a switch or pull chain
• Never clean appliance parts with flammable fluids. These fumes can create a fire hazard or explosion.
And do not store or use gasoline or other flammable vapors and liquids in the vicinity of this or any
other appliance. The fumes can create a fire hazard or explosion.
• Before proceeding with cleaning and maintenance operations, make sure the power line of the unit is
disconnected.
• Do not connect or disconnect the electric plug when your hands are wet
• Unplug the appliance or disconnect the power before cleaning or servicing. Failure to do so can result
in electrical shock or death.
• Do not attempt to repair or replace any part of your appliance unless it is specifically recommended in
injury.
• To ensure proper ventilation for your appliance, the unit must be completely unobstructed. Choose a
well-ventilated area with temperatures above 55
installed in an area protected from the elements, such as wind, rain, water spray or sunlight.
• The appliance should not be located next to ovens, grills or other sources of high heat.
• The appliance must be installed with all electrical, water and drain connections in accordance with
state and local codes. A standard electrical supply (115 V AC only, 60 Hz), properly grounded in
accordance with the National Electrical Code and local codes and ordinances is required.
• Do not kink or pinch the power supply cord of the appliance.
• The fuse (or circuit breaker) size should be 15 amperes.
• It is important for the appliance to be leveled in order to work properly. You may need to make several
adjustments to level it.
• All installation must be in accordance with local plumbing code requirements.
• Make certain that the pipes are not pinched or kinked or damaged during installation.
• Check for leaks after connection.
• Never allow children to operate, play with or crawl inside the appliance
• Do not use solvent-based cleaning agents or abrasives on the interior. These cleaners may damage or
discolor the interior.
0
F (130C) and below 900F (32 0C). This unit must be
Page 5
5
HELP US HELP YOU...
IF YOU NEED SERVICE
We're proud of our service and want you to be
NEXT, if you are still not pleased, write all the details,
CAUTION:
Read this guide carefully.
It is intended to help you operate and maintain
your new appliance properly.
Keep it handy to answer your questions.
If you don't understand something or you need
more help, please call:
Avanti Customer Service
800-220-5570
Keep proof of original purchase date (such as
your sales slip) with this guide to establish the
warranty period.
THIS APPLIANCE IS NOT
DESIGNED FOR THE STORAGE
OF MEDICINE OR OTHER
MEDICAL PRODUCTS.
Write down the model and serial numbers.
You'll find them on a plate located on the rear outside
wall of the appliance.
Please write these numbers here:
_____________________________________
Date of Purchase
_____________________________________
Model Number
_____________________________________
Serial Number
Use these numbers in any correspondence or service
calls concerning your appliance.
If you received a damaged appliance, immediately
contact the dealer (or builder) that sold you the
appliance.
Save time and money. Before you call for service, check
the Troubleshooting Guide. It lists causes of minor
operating problems that you can correct yourself.
pleased. If for some reason you are not happy
with the service you receive, here are some
steps to follow for further assistance.
FIRST, contact the people who serviced your
appliance. Explain why you are not pleased. In
most cases, this will solve the problem.
including your telephone number, and send it to:
Customer Service
Avanti Products
10880 NW 30 Street
Miami, FL 33172 USA
Page 6
6
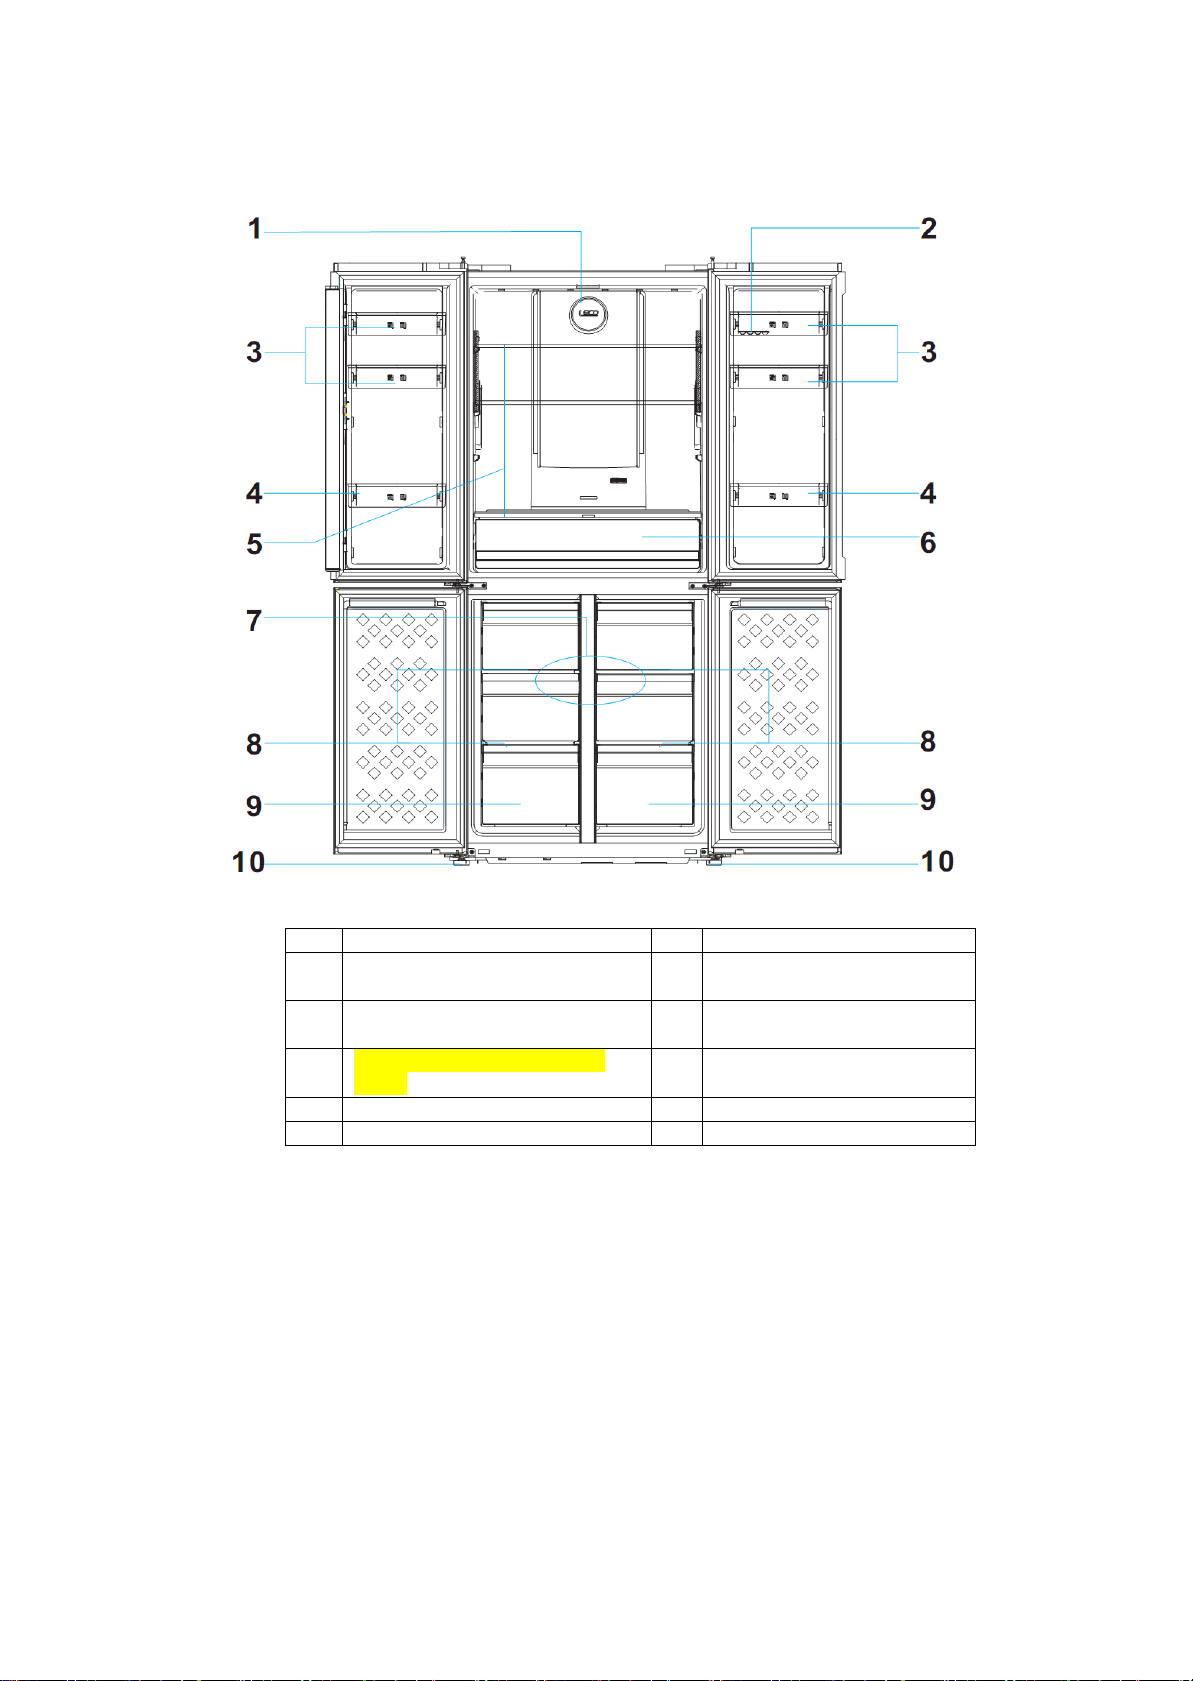
PARTS AND FEATURES
1
Interior Light
7
Freezer Sections
2
Egg Tray
8
Glass Shelves
Total 4 (2 each section)
3
Door Bins (2 Each Door)
9
Freezer Bins
Total 6 (3 each section)
4
Gallon Bottle Bins((1 Each
Door)
5
Refrigerator Section
6
Crisper Bin with Glass Cover
10 Leveling Legs
Page 7

7
To reduce the risk of fire, electrical shock,
-freezer, follow these basic precautions:
• Read all instructions before using the refrigerator-freezer.
-Save these instructions-
2 Refrigerator Shelves
1 Vegetable Crispers
1 Glass Crisper Cover
4 Freezer Shelves (Glass)
6 Freezer Drawer Bins
6 Refrigerator Door Bins
IMPORTANT SAFETY INSTRUCTIONS
WARNING
or injury when using your refrigerator
• DANGER or WARNING: Risk of child entrapment.
Child entrapment and suffocation are no t problems of the past. J unked or abandoned
refrigerator-freezers are still dangerous. . . even if they will “just sit in the garage a few
days.”
• Before you throw away your old refrigerator-freezer: Take off the doors. Leave
the shelves in place so that children may not easily climb inside.
• Never allow children to operate, play with, or crawl inside the refrigerator-freezer.
• Never clean refrigerator-freezer parts with flammable fluids. The fumes can create a
fire hazard or explosion.
• Do not store or use gasoline or any other flammable vapors and liquids in the vicinity of
this or any other refrigerator-freezer. The fumes can create a fire hazard or explosion.
INSTALLATION INSTRUCTIONS
Before Using Your Appliance
Remove the exterior and interior packing.
Check to be sure you have all the following parts:
1 Instruction Manual
• Before connecting the u nit to the po wer source, let it s tand upright for appr oximatel y 2 hours.
This will reduce the possibility of a malfunction in the cooling system from handling during
transportation.
• Clean the interior surface with lukewarm water using a soft cloth.
Installation of Your Appliance
• Place your refrigerator-freezer on a floor that is strong enough to support the refrigerator-
freezer when it is fully loaded. To leve l your refrigerator-f r eezer, a dj us t th e le ve ling legs at the
bottom of unit.
• ALLOW 5 INCHES OF SPACE BETWEEN THE BACK AND SIDES OF T HE UNIT, WHICH
ALLOWS THE PROPER AIR CIRCULATION TO COOL THE COMPRESSOR AND
CONDENSER.
• Locate the unit awa y from direct sunlight and sources of heat (stove, heater, radiator, etc.).
Direct sunlight may affect the acrylic coating and heat sources may increase electrical
consumption. Extreme cold ambient temperatures may also cause the refrigerator- freezer not
to perform properly.
• Avoid locating the unit in moist areas.
• Plug the unit into an exclusive properly installed-grounded wall outlet. Do not under any
circumstances cut or remove the third (ground) prong from the power cord. Any questions
concerning power and/or grounding should be directed toward a certified electrician or an
authorized Avanti Products service center.
Page 8

8 Electrical Connection
Warning
Improper use of the grounded plug can result in the risk of electrical shock. If the power cord is
damaged, have it replaced by an authorized Avanti Products service center.
This appliance should be properly grounded for your safety. The power cord of this
qualified electrician or service technician install an outlet near the appliance.
EXTENSION CORD
Because of potential safety hazards under certain conditions, it is strongly
outlet and that the electrical rating of the cord be 115 volts and at least 10 amperes.
SURGE PROTECTOR
Most electrical appliances use a series of electric control boards to operate. These
electrician in your area.
Damages due to p ower s urges ar e not c onsid ered a manufactur er cov ered de fect an d
will void your product warranty.
appliance is equipped with a three-prong plug which mates with standard three prong
wall outlets to minimize the possibility of electrical shock.
Do not under any cir cumstanc es cut or re move the thi rd g roun d pron g from th e power
cord supplied.
This appliance requires a standard 115Volts~/60Hz electrical outlet with three-prong
ground.
The cord should be secured behind the appliance and not left exposed or dangling to
prevent accidental injury.
Never unplug the appl i ance by pulling the power cord. Always grip the pl ug fir mly and
pull straight out from the receptacle.
Do not use an extensio n cord with t his appliance. If the pow er cord is too shor t, have a
recommended that you do not use an extension cord with this unit. However, if you
must use an extension cord it is absolutely necessary that it be a UL/CUL-Listed,
3-wire grounding type appliance extension cord having a grounding type plug and
boards are very susceptible to power surges and could be damaged or destroyed.
If the appliance i s goin g to be us ed in an area or if y our city / countr y is prone to pow er
surges / outages; it i s s ugg ested tha t y ou use a pow er surg e protec to r for al l el ectri cal
devices / appliances you use. The surge protector that you select must have a surge
block high enough to protect the appliance it is connected to. If you have any
questions regarding the type and size of surge protector needed contact a licensed
Page 9

9
OPERATING YOUR APPLIANCE
Temperature Control Panels
Refrigerator Temperature Control
Setting the Temperature Control
• Your refrigerator has one control for regulating the temperature. The temperature control is located
on the outside of the refrigerator compartment door.
• The first time you turn the unit on, the unit will start at the default temperature set at the factory, 38ºF
in the refrigerator section and -08ºF in the freezer section.
• The first time you tur n the unit on, adjust t he tem perature in t he ref rigerator c ompartm ent to 34ºF
and run for at least 4 hours before placing foods inside. T his will ensure the freezer cabinet is
thoroughly chilled and th e refrigerator com partment will be stabil ized before food i s placed. Then
adjust the temperature setting to your desired setting that best suits your needs.
To adjust the temperature in each zone, press the Temp Zone button, the selected zone will flash
on and off.
Press the Temp button to select the desired temperature and then press the OK button to activate
the setting. (Temperature will cycle in 1ºF increments with each press of the button).
Refrigerator temperature range: OFF – 43ºF
Freezer temperature range: -8 – 3ºF
Page 10

10
PREPROGRAMMED FUNCTIONS:
• SABBATH MODE
The Sabbath mode is designed or those whose religious observances require turning off the lights.
All interior lights and control panel indicators will be disabled.
To enable the SABBATH MODE, press the function button until the SABBATH MODE icon is
flashing and press the OK button to activat e. T he c o ntr ol pane l and interior lights will turn off and
will remain in the SABBATH MODE until it is deactivated on the control panel
To disable the SABBATH MODE, press and hold the function button for appr oxim ately 5 secon ds
until the control panel lights up again. Press the function button until the SABBATH MODE icon is
flashing and press the OK button to deactivate. The icon will turn off and all lights and indicators will
return to the normal operation.
• FAST FREEZE MODE
This mode will set the f ree zer tem per ature to -26ºF for quick tem per ature drop when s toring large
amounts of warm or room temperature foods in the freezer.
The unit will remain in FAST FREEZE mode until the temperature reaches -26ºF and will then return
to the original setting or until the function is turned off at the control panel.
To enable the FAST FREEZE mode, press the function button until the FAST FREEZE icon is
flashing and press the OK button to activate. The icon will remain illuminated.
To disable the FAST FREEZE mode, press the func tion button until the FAST FREEZE icon is
flashing and press the OK button to deactivate. The icon will turn off.
• VACATION MODE
Use this mode when leaving for long periods of time, where you will remove the large majority of the
content from the refrigerator section but leave the freezer content.
The Vacation mode will automaticall y set the refrigerator section at 57ºF and t he freezer section
remain at your current setting.
The unit will remain in the VACATION MODE until it is deactivated at the control panel.
To enable the VACATION MODE, press the funct ion button until the VACATION MODE icon is
flashing and press the OK button to activate. The icon will remain illuminated.
To disable the VACATION MODE, press the function button until the VACATION MODE icon is
flashing and press the OK button to deactivate. The icon will turn off.
• SMART (AUTOMATIC) MODE
Use this mode to automatically set the unit at normal average operating temperatures.
The SMART MODE will automatically set the refrigerator section at 38ºF and the freezer section at
-02ºF. The unit will remain in the SMART MODE until it is deactivated at the control panel.
The temperatures cannot be adjusted when in the SMART (AUTOMATIC) MODE.
T o enable the SMART MODE, press the function button until the SMART MODE icon is flashing and
press the OK button to activate. The icon will remain illuminated.
To disable the SMART MODE, press the function but ton until the SMART MODE icon is flashing
and press the OK button to deactivate. The icon will turn off.
Once you have disabled the SMART MODE, set the temperature manually as indicated previously
Page 11

11
in this manual to a temperature that better suits your needs.
• CONTROL PANEL – CHILD LOCK
The CONTROL PANEL LOCK is designed to prevent any changes to the settings to the refrigerator.
T o enable the CHILD LOCK, press and hold the OK button for approximately 3 seconds, the CHILD
LOCK icon will turn on. The control panel will be locked until unlocked at the control panel or there
is a loss of power.
To disable the CHILD LOCK, press and hold the OK button for appr oximately 3 s econds until the
CHILD LOCK icon turns off and the control panel is working in normal operation mode.
• CONTROL PANEL – STANDBY
The CONTROL PANEL will do dark after approximately 5 minutes of no activity
To activate the control panel, press and hold the OK button for approximately 3 seconds, the
CONTROL PANEL AND CHILD LOCK icon will turn on. The control panel will be locked until
unlocked at the control panel or there is a loss of power.
To disable the CHILD LOCK, press and hold the OK button f or approxim ately 3 seconds un til the
CHILD LOCK icon turns off and the control panel is working in normal operation mode.
NOTE:
• IF THE UNIT IS UNPLUGGED, HAS LO ST POW ER, OR IS TURNED OFF, YOU MUST WAIT 3
TO 5 MINUTES BEFOR E RESTARTING THE UNIT. IF YOU AT T EMPT TO REST ART BEF ORE
THIS TIME DELAY, THE REFRIGERATOR-FREEZER WILL NOT START.
NOTE:
WE DO NOT RECOMMEND THE INSTALLATION OF THE RE F RIGERATOR
WHERE THE TEMPERATURE WILL DROP BELOW 50ºF (13ºC) OR RISE ABOVE
110ºF (43ºC). THE COMPRESSOR WILL NOT BE ABLE TO MAINTAIN PROPER
TEMPERATURES INSIDE THE REFRIGERATOR.
FOR INSTALLATIONS WHERE THE TEMPERATURES WILL DROP BELOW 50º
SET THE FREEZER TEMPERATURE CONTROL TO THE “COLDEST” SETTING.
THIS WILL IMPROVE THE OPERATIONS OF THE REFRIGERATOR UNDER
THESE CONDITIONS.
Adjusting the Temperature in the Fresh Zone / Crisper
To adjust the temperature in the Fresh Zone / Crisper, simply move the temperature control (located at
the back of the unit just above the crisper) left to right. Temperature range is MAX to MIN.
MAX is the coldest
MIN is the Warmest
Page 12

12
CARE AND MAINTENANCE
Cleaning Your Appliance
• Unplug the unit, and remove the food and baskets.
• Wash the inside with a warm water and baking soda solution. The solution should be about 2
tablespoons of baking soda to a quart of water.
• Wash the baskets with a mild detergent solution.
• The outside of the unit should be cleaned with mild detergent and warm water.
CAUTION
Failure to unplug the refrigerator-freezer could result in electrical shock or personal injury.
Power Failure
Most power failures are corrected within a few hours and should not affect the temperature of your
refrigerator-freezer if you minimize the number of times the door is opened. If the power is going to be
off for a longer period of time, you need to take the proper steps to protect your food.
Vacation Time
Short vacations: Leave the unit operating during vacations of less than three weeks.
Long vacations: If the appliance will not be used for severa l m onths, rem ove all f ood and un plug th e
power cord. Clean and dr y the interi or thoroug hly. T o prevent od or and m old gro wth, lea ve the d oor
open slightly: blocking it open if necessary
Moving Your Appliance
• Remove all the food.
• Securely tape down all loose items inside your unit.
• Turn the leveling screws up to the base to avoid damage.
• Tape the door shut.
• Be sure the unit stays in the upright position during transportation.
Energy Saving Tips
• The unit should be located in the coolest area of the room, away from heat producing appliances or
heating ducts, and out of direct sunlight.
• Let hot foods cool to room temperature before placing them in the unit. Overloading the unit forces
the compressor to run longer. Foods that freeze too slowly may lose quality, or spoil.
• Be sure to wrap foods properly, and wipe containers dry before placing them in the unit. This cuts
down on frost build-up inside the freezer.
• Organize and label food to reduce door openings and extended searches. Remove as many items
as needed at one time, and close the door as soon as possible.
Page 13

13
PROBLEMS WITH YOUR APPLIANCE?
PROBLEM
POSSIBLE CAUSE
Unit does not operate.
Not plugged in.
Compressor turns on and off frequently.
The room temperature is hotter than normal.
clearances.
Vibrations.
Check to assure that the refrigerator - f reezer is
level.
The unit seems to make too much noise.
The unit is not level.
The door will not close properly.
The baskets are out of position.
You can solve many common refrigerator-freezer problems easily, saving you the cost of a possible
service call. Try the suggestions below to see if you can solve the problem before calling for service.
TROUBLESHOOTING GUIDE
The circuit breaker tripped or there is a blown fuse.
A large amount of food has been added to the
refrigerator - freezer.
The door is opened too often.
The door is not closed completely.
The temperature control is not set correctly.
The door gasket does not seal properly.
The refrigerator -freezer does not have the correct
The rattling noise may come from the flow of the
refrigerant, which is normal.
As each cycle ends, you may hear gurgling
sounds caused by the flow of refrigerant in your
refrigerator - freezer.
Contraction and expansion of the inside walls may
cause popping and crackling noises.
The unit is not level.
The door is reversed and not properly installed.
The gasket is dirty.
Page 14

14
SERVICE FOR YOUR APPLIANCE
Customer Service team will be here for you. Just call us toll-free.
AVANTI PRODUCTS CUSTOMER SERVICES
800-323 5029
help is available.
You may order parts and accessories that will be
money order, Master Card, or Visa.
know your appliance inside and out.
WIRING DIAGRAM
We are proud of our customer service organization and the network of professional service technicians
that provide service on your Avanti appliances. With the purchase of your Avanti appliance, you can
have the confidence that if you ever need additional information or assistance the Avanti Products
Product Information
Part Orders
800-220 5570
In-Home Repair Service
800-220 5570
Whatever your questions are about our products,
delivered directly to your home.
You may order these items by personal check,
An Avanti Products authorized service center will
provide expert repair service, scheduled at a time
that is convenient for you. Our trained servicers
Page 15

15
Staple your sales receipt here. Proof of original
warranty.
WHAT IS COVERED – LIMITED ONE-YEAR WARRANTY
cubic feet capacity or less must be brought/sent to the appliance service center for repair.
LIMITED SECOND THROUGH FIFTH YEAR WARRANTY
product to the service center and back to the user’s home, as maybe required, are the user’s responsibility.
WARRANTY EXCLUSIONS / WHAT IS NOT COVERED:
Products, including without limitation, one or more of the following:
•
power surges, structural failures surrounding the appliance, and acts of God.
•
• Shipping and handling costs associated with the
In no event shall Avanti Products have any liability or responsibility whatsoever for damage to surrounding
walls, floors, shelving etc., as well as the resetting of breakers or fuses.
OUT OF WARRANTY PRODUCT
pro-rates, or product replacement, once this warranty has expired.
WARRANTY – REFRIGERATION - COMPRESSOR
YOUR AVANTI PRODUCTS
WARRANTY
Avanti Products warrants that the product is free from defects in materials and/or workmanship for a period of
twelve (12) months from th e dat e of purch ase by the ori ginal owner . The for egoing ti meline begins to r un up on the
date of purchase, and shall not be stalled, tolled, extended, or suspended for any reason whatsoever unless
described in detail in the w arra nty document. For one y ear fr om the dat e of pur chase by the origin al owner , Avanti
products will, at its option, repair or replace any part of the product which proves to be defective in material or
workmanship under normal use. Avanti Products will provide you with a reasonably similar product that is either
new or factory refurbished. D uring this period Avanti Product s w ill prov ide all p ar ts a nd la bo r nece ssary t o c orrec t
such defects free of ch arge, so long as the produ ct has been installed an d o perat ed in accordance with the written
instructions in this manual. In rental or commer cial use, the w arranty period is 90 day s. All Av anti appliances of 4. 2
For the second thr ough t he fif th y ear fr om t he date o f origi nal purch ase, Av anti P rodu cts w ill provide a replacement
compressor free of charge due to a failur e. Y ou are re spons ible for the servic e labor a nd fre ight charg es. In rent al
or commercial use, the limited compressor warranty is one year and nine months. Costs involved to move the
The warranty coverage described herein excludes all defects or damage that are not the direct fault of Avanti
A failure to comply with any applicable state, local, city, or county electrical, plumbing and/or building codes,
regulations, or laws, including failure to install the product in strict conformity with local fire and building codes
and regulations.
purchase date is needed to obtain service under
• Any external, elemental and/or environmental forces and factors, including without limitation, rain, wind, sand,
floods, fires, mud slide s, freezi ng temper ature s, ex cessiv e moist ure or ex tended exposure to humidity , light ning,
Content losses of food or other content due to
spoilage.
• Incidental or consequential damages
• Parts and labor costs for the following will not be
considered as warranty:
• Evaporator doors, door springs, and/or frames.
• Inner door panels, door s helv e s, door rails, and/or
door supports.
• Vegetable crispers.
• Light bulbs and/or plastic housing.
• Plastic cabinet liners.
• Punctured evaporator that voids the warranty on
the complete sealed system.
property, including cabinetry, f l oors, ce ilings, and other structures and/or objects around the product. Also
excluded from this warranty are scratches, nicks, minor dents, and other cosmetic damages on external surfaces
and exposed parts; Pr oducts o n which the serial numbers have be en alter ed, deface d or rem oved; serv ice vis its for
customer education, or visits where t here is n othing w rong wit h the produc t; corre ction of i nstallation problems (you
are solely responsible for any structure and setting for the product, including all electrical, plumbing and/or other
connecting facilities, for proper foundation/flooring, and for any alterations including without limitation cabinetry,
Avanti Products is u nder no obligation, at law or otherwise, to prov ide y ou with any concessions, in clu ding repairs,
replacement of the unit.
• Repairs performed by unauthorized servicers.
• Service calls that are related to external problems,
such as abuse, misuse, inadeq uate e lectri cal power,
accidents, fire, floods, or any other acts of God.
• Failure of the product if it is used for other than it
intended purpose.
• The warranty does not app ly o ut si de t he Continental
USA.
• Surcharges including but not limited to, any after
hour, weekend, or holiday serv ice calls, tolls, fer ry
trip charges, or mileage expense for service calls to
remote areas.
Page 16

16
PRECAUCIÓN
Para reducir el riesgo de incendio, descarga
precauciones.
• Lea todas las instrucciones antes de usar su electrodoméstico.
- Guarde estas instrucciones-
INSTRUCCIONES EN ESPAÑOL
• Peligro o Precaución: Existe el riesgo que los niños queden atrapados.
• Niños atrapados o sof ocam ient o no s o n un pr ob lema del pasado. L os el ectr odomésticos
son peligrosos aún si solo los deja en el garaje por un par de días.
• Antes de desechar su electrodoméstico o refrigerador usado: quítele las puertas. Deje las
repisas en su lugar para evitar que los niños se queden atrapados.
• No permita que los niños manejen, jueguen o entren dentro del electrodoméstico.
• No limpie su electrodoméstico con líquidos inflamables. Los gases pueden ocasionar
fuego o una explosión.
• No guarde ni use gasoli na u otros líq uidos inflam ables cerca de este o de cua lquier otro
electrodoméstico. Los vapores pueden ocasionar fuego o explosión.
INSTRUCCIONES PARA LA INSTALACIÓN
Antes de usar su equipo
• Retire la envoltura interna y externa.
• Verifique que tenga las siguientes partes: 1 manual de instrucciones, 2 parillas en el refrigerador, 4
parillas en e l congelador, 6 band ejas en el congela dor y 1 band eja con una tapa de vidrio para
vegetales.
• 2 piezas plásticas para cubrir agujeros (puerta reversible).
• Antes de conectar su electrodoméstico a la corriente eléctrica, ubíquelo en posición vertical sobre
una superficie plana por lo menos por 2 horas. Esto reducirá la pos ib ilida d de malfuncionamiento
en el sistema de enfriamiento por el manipuleo durante el transporte.
• Limpie la superficie interior con agua tibia usando un trapo suave.
Instalación de su electrodoméstico
• Ubique su electrodom éstico en un piso que sea lo suf icientemente fuerte p ara soportar su p eso
cuando esté totalmente lleno o cargado. Para nivelar el electrodoméstico, ajuste las patas
delanteras.
• Deje aproximadamente 5 pulgadas de espacio entre la parte trasera y los costados de su
electrodoméstico, así permitirá la circulación de aire necesaria para enfriar el compresor.
• Mantenga su electrodoméstico alejado del aire caliente, vapor o líquidos que puedan salpicarlo, ya
que la unidad podría averiarse.
• Los rayos solares directos pueden malograr la capa acrílica, y las fuentes de calor pueden
ocasionar un aumento en el consumo eléctrico. Manténgalo lo más alejado posible del agua para
prevenir algún choque eléctrico. Evite los sitios húmedos y los ambientes extremadamente fríos ya
que esto puede afectar la eficiencia del enfriamiento de su electrodoméstico.
• Evite ubicar su electrodoméstico en áreas mojadas o muy húmedas.
• Conecte el electrodoméstico a un enchufe de pared exclusivo con conexión a tierra. Bajo ninguna
razón se debe retirar la tercera punta del enchufe. Cualquier consulta con respecto a la energía y/o
cable de tierra debe ser dirigida a un electricista certificado o autorizado por el Servicio Técnico de
Avanti Products.
eléctrica, o daño cuando use su
electrodoméstico, siga las s iguientes
Page 17

17
Conexión eléctrica
Este electrodoméstico debe ser conectado a tierra. En el caso que ocurra un corto circuito, la
conexión a tierra reduce el riesgo de recibir un choque eléctrico ya que cuenta con un alam bre
para el escape de la corrien te eléctrica. Este el ectrodomést ico está equipa do con un ench ufe
que consta de tres puntas, la tercera punta es la conexión a tierra. Este enchufe debe ser
insertado a un enchufe de pared que este correctamente instalado con la conexión a tierra.
ADVERTENCIA
• El uso inapropiado del enchuf e a tierra puede desencadenar un choque eléctrico. Consulte a
personal autorizado por Avanti Products si tiene alg una duda sobre las instruc ciones o si tiene
alguna consulta s i el electrodoméstico está c orrectamente instalado a la corriente eléctrica y a
tierra. Si el cordón del enc h uf e del e lect rod oméstico se encuentra da ñad o, de be ser reemplazado
por el Servicio Técnico de Avanti Products.
• El cordón del enchufe está equipado con tres puntas que encajan perfectamente en un enchufe de
pared standard para reducir el riesgo de un choque eléctrico.
• Bajo ninguna circunstancia corte o saque la tercera p unta del enchufe que le pr oveemos ya que
este es para que vaya conectado a tierra.
• No use una extensión.
• La corriente de este electrodoméstico es de 115/120 voltios, tiene una salida eléctrica de 60 Hz. y
consta de un enchufe de tres puntas que va conectado al enchufe de pared.
• El cordón del enchufe debe s er asegurad o atrás del electrodom éstico y no dejarlo expu esto para
evitar accidentes.
COMO CAMBIAR LA DIRECCION DE APERTURA DE LA PUERTA
En caso de que necesite cambiar el lado de apertura de la puerta, por favor consulte al servicio
pos-venta de su localidad.
ADVERTENCIA
No use agua hirviendo porque dañará las partes de plástico.
• Retire los alimentos del e lectrodoméstico y colóquel os en una caja térmica para c onservarlos y
protegerlos.
Page 18

18
FUNCIONAMIENTO DEL APARATO
Control de la temperatura del refrigerador
Ajuste del control de temperatura
• Su refrigerador tiene un mando para regular la temperatura. El control de temperatura se encuentra
en el exterior de la puerta del compartimiento refrigerador.
• La primera vez que encien da la unidad, la unidad com enzará a la temperatura predeterm inada
establecida en la fábrica, en la sección 38ºF refrigerador y -08ºF en la sección de congelados.
• La primera vez que encienda la unidad, ajustar la temperatura en el compartimiento del
refrigerador a 34ºF y una duración de por lo menos 4 horas antes de introducir los alimentos. Esto
asegurará que el congelador está muy frío y el compartimiento del refrigerador se estabilice antes
de colocar los a limentos. A cont inuación, ajustar la temperatura a la configuración deseada que
mejor se adapte a sus necesidades.
Para ajustar la tem peratura en cada zona de prens a el botón de zona de tem peratura, la zona
seleccionada se encenderá y se apagará.
Pulse el botón TEMP para seleccionar la temperatura deseada y pulse el botón OK para activar el
ajuste. (Ciclo de voluntad de temperatura en inc rementos de 1 ° F con cad a pulsación del
botón).
Rango de temperatura del refrigerador: OFF - 43ºF
Congelador rango de temperatura: -8 - 3 ºF
Page 19

19
Page 20

20
Funciones pre-programadas:
• MODO DE SABBATH
El modo de reposo está diseñado o aquellos cuyas prácticas religiosas requieren apagar las luces.
Todas las luces interiores y los indicadores del panel de control serán desactivados.
Para habilitar la Modo Sabbath, pulse el botón de función hasta que el icono de modo de reposo es
centelleante, luego pulse el botón OK para activar. El panel de contr ol y las luces interiores se
apagarán y permanecerán en el modo Sabbath hasta que se desactive en el panel de control
Para desactivar e l MODO DE REPOSO, pulse y man tenga pulsado el b otón de función dur ante
aproximadamente 5 segundos hasta que el panel de control se ilumina de nuevo. Presione el botón
de función hasta que el icono de modo Sabatino parpadea y pulse el botón OK para desactivar. El
icono se apagará y todas las luces e indicadores volverá al funcionamiento normal.
• MODO DE CONGELACIÓN RÁPIDA
Este modo ajustar la tem peratura del c ongelador a -26ºF para la caída ráp ida de la tem peratura
cuando el almacenamiento de grandes cantidades de alimentos calientes o temperatura de
habitación en el congelador.
La unidad permanecerá en el modo de congelación rápida hasta que la temperatura llega a -26ºF y
entonces volverá a la configuración original o hasta que la función se apaga en el panel de control.
Para activar el modo de congelación rápida, pulse el botón de función hasta que el icono de
congelación rápida parpadea y pulse el botón OK para activar. El icono permanecerá iluminado.
Para desactivar e l modo de congel ación rápida, pu lse el botón de f unción hasta q ue el icono d e
congelación rápida parpadea y pulse el botón OK para desactivar. El icono se apagará.
• MODO VACACIONES
Utilice este modo al salir por largos períodos de tiempo, en las que se eliminará la gran mayoría del
contenido de la sección del refrigerador, pero deja el contenido del congelador.
El modo de vacaciones ajustará automáticamente la sección de refrigerador a 57ºF y la sección del
congelador permanecer en su configuración actual.
La unidad permanecerá en el modo de vacaciones hasta que se desactive en el panel de control.
Para activar el m odo de vacaciones, pulse el bot ón de función hasta que el ic ono de modo de
vacaciones parpadea y pulse el botón OK para activar. El icono permanecerá iluminado.
Para desactivar el modo de vacaciones, p uls e el bot ón de f unc i ón has ta qu e el icono de modo d e
vacaciones parpadea y pulse el botón OK para desactivar. El icono se apagará.
• INTELIGENTE (AUTOMÁTICO) MODO
Use este modo para establecer automáticamente la unidad a temperaturas medias de
funcionamiento norm ales.
El modo Smart ajustará automáticamente la sección de refrigerador a 38ºF y la sección de
congelador a -02ºF. La unidad permanecerá en el modo Smart hasta que se desactive en el panel
de control.
Las temperaturas no se pueden ajustar en el modo de SMART (automático).
Para activar el m odo Smart, pulse el botón de función h asta que el icono inteligente de modo
parpadea y pulse el botón OK para activar. El icono permanecerá iluminado.
Para desactivar el m odo Smar t, pulse el botón de f unción hasta que el icono inteligent e de m odo
Page 21

21
parpadea y pulse el botón OK para desactivar. El icono se apagará.
Una vez que haya desacti vado el modo Sm art, ajustar la temperatur a manualmente com o se ha
indicado anteriormente en este manual a una temperatura que mejor se adapte a sus necesidades.
• PANEL DE CONTROL - CHILD LOCK
El panel de control BLOQUEO está diseñado para evitar cualquier cambio en la configuración en el
refrigerador.
Para activar el bloqueo para niñ os, mantenga pulsado el bot ón OK durante aproximadam ente 3
segundos, el icono C HILD LOCK se encender á. El panel de control se b loqueará hasta que se
desbloquea al panel de control o hay una pérdida de potencia.
Para desactivar el bloqu eo para niños, m antenga pulsado el bo tón OK durante u nos 3 segundos
hasta que el icono CHILD LO CK se apaga y el panel de control está func ionando en e l modo de
funcionamiento norm al.
• PANEL DE CONTROL - EN ESPERA
El panel de control hará oscura después de aproximadamente 5 minutos de inactividad
Para activar el panel de control, pulse y mantenga pulsado el botón OK durante aproximadamente
3 segundos, el Panel de control y el icono CHILD LOCK s e encenderá. El panel de control se
bloqueará hasta que se desbloquea al panel de control o hay una pérdida de potencia.
Para desactivar el bloqu eo para niños, m antenga pulsado el bo tón OK durante u nos 3 segundos
hasta que el icono CHILD LO CK se apaga y el panel de control está func ionando en e l modo de
funcionamiento norm al.
NOTA:
• SI LA UNIDAD EST Á DESCONECTADA, HA PERDIDO POTENCIA O ESTÁ A PAGADO, DEB E
ESPERAR 3 A 5 MINUTOS ANTES DE REINICIAR LA UNIDAD. SI INTENTA REINICIAR ANTES
DE ESTE TIEMPO, EL REFRIGERADOR-CONGELADOR NO SE INICIARÁ.
NOTA:
NO RECOMENDAMOS la instalación del refrigerador donde la temperatura
caerá por debajo de 50ºF (13ºC) OR elevarse por encima de 110ºF (43ºC). El
compresor no ser capaz de mantener la temperatura adecuada dentro del
refrigerador.
Para instalacione s d ond e Las temp erat ur as caen por d ebaj o d e los 5 0º aj uste el
control de temperatura del congelador al ajuste “COLDEST”. Esto mejorará la
OPERACIONES de la nevera en estas condiciones.
Ajuste de la temperatura en la zona Fresh / Crisper
Para ajustar la temperatura en la zona Fresh / Crisper, basta con mover el control de la temperatura
(que se encuentra en la parte posterior de la unidad justo encima de la fruta y verdura) de izquierda a
derecha. Rango de temperatura es MAX a MIN.
MAX es el más frío
MIN es el más cálido
Page 22

22
CUIDADO Y MANTENIMIENTO
Limpiando su electrodoméstico
• Desconecte el electrodoméstico y retire los alimentos.
• Lave el interior con agua tibia y un trapo suave remojado en una solución de Bicarbonato de Sodio.
La solución consiste en 2 cucharadas del referido compuesto químico y un litro de agua.
• Lave la canasta de almacenaje con un detergente suave.
• Las partes externas de su elec tr od oméstico deben ser lim piadas co n un detergente suave y ag u a
tibia.
ADVERTENCIA
Asegúrese de desconect ar el electrodomést ico de la corriente eléct rica. Si no lo hace, p uede
ocasionar un choque eléctrico o herirse.
Si falla el suministro eléctrico
Usualmente la electricidad regresa en unas pocas horas sin afectar la temperatura de su
electrodoméstico, s iempre que la puerta no se abra m uy frecuentemente. Si le v a a f altar e lectr ici dad
por un período de tiempo más largo, usted debe tomar los pasos apropiados para proteger sus
alimentos.
Si usted sale de vacaciones
Retire todos los alimentos si va a estar ausente por un período largo; desconecte y limpie su
electrodoméstico.
Deje la puerta del electrodoméstico ligeramente abierta para evitar la formación de mal olor y moho.
Para mover su electrodoméstico
• Retire los alimentos.
• Asegúrese de colocar cinta adhesiva a todo lo que se puede caer dentro de su
electrodoméstico.
• Retire las patas para prevenir que se dañen.
• Selle las puertas con cinta adhesiva.
• Asegúrese que el electrodoméstico se mantenga parado durante el traslado.
Consejos para ahorrar energía
• Su electrodoméstico debe estar ubicado en el área más fría de la habitación, alejado de
electrodomésticos que produzcan calor o conductos de aire caliente y lejos de los rayos
solares.
• Los alimentos calientes deben estar a temperatura ambiental antes de colocarlos en el
electrodoméstico. S i sobrecarga su electr odoméstico forzará al com presor a funcionar más
tiempo del normal. Los alimentos que se congelan lentamente pierden calidad y se malogran.
• Asegúrese de envolver adecuadamente los alimentos y de secar los empaques o
contenedores antes d e col oc ar los de ntr o d el electr o d oméstico. Colocarlos mojados ocasiona
escarcha en el electrodoméstico.
• La canasta de almacenaje de s u electrodoméstico no debe ser f orrada con papel aluminio,
papel de cera o papel toalla ya que esto interfiere con la circulación del aire frío restando
eficiencia a su electrodoméstico.
Page 23

23
APPAREIL SÉCURITÉ
Votre sécurité et celle des autres sont très importantes.
Nous avons fourni de nombr eux messag es de sécurité i mportant s dans ce manuel
et sur votre appareil. Toujours lire et obéir à tout message de sécurités.
Warning signifie que le non-respect
Caution signifie que le non-respect
Tout message de sécurités vous alertera à quel est le danger potentiel et vous
peut arriver si les instructions ne sont pas suivies.
C'est le symbole d' alert e de sécuri té.
Ce symbole vous signale les
dangers potentiels peut tuer ou
blesser vous et d'autres. Tout
sécurité messages suivra la sécurité
symbole d'alerte et s oit les quar tiers"
DANGER","ATTENTION" ou
"PRUDENCE".
Danger signifie que le non-respect
de cette déclaration de sécur i té peu t
entraîner des blessures ou la mort.
de cette déclaration de sécur i té peu t
entraîner des dommages importants
du produit, des blessures graves ou
la mort.
de cette déclaration de sécur i té peu t
entraîner des mineures ou
modérées blessures, ou des biens
ou des dommages matériels.
disent comment réduire le risque de blessure, et vous permettent de savoir ce qui
Page 24

24
APPAREIL SÉCURITÉ
•Brancher sur une 3 broches mise à la terre sortie, faire pas enlever la terre broches, faire pas utiliser un
un technicien qualifié.
• Utilisation deux personnes ou plus pour déplacer et installer l’appareil. Ne pas le faire peut entraîner
• Ne pas utiliser cet appareil pour d'autres fins que celles prévues.
Avant le refroidisseur de breuvages est utilisé, il doit être correctement
positionné et installé comme décrit dans ce manuel, afin de lire attentivement le
manuel. Pour réduire le risque d'incendie, choc ou de blessure électrique lors de
l'utilisation du refroidisseur de breuvages, Suivez les précautions de bases,
comprenant les éléments suivants:
adaptateur, et ne pas utiliser une rallonge
• Remplacer tous les panneaux avant exploitation
• Il est recommandé d'utiliser un circuit distinct, qui sert uniquement votre refroidisseur de breuvages,
fournir. Utilisez des récipients cette ne peut pas être désactivé par une chaîne de traction interrupteur
où
• ne jamais nettoyer appareil pièces avec des liquides inflammables. Ces vapeurs peuvent créer un
risque d'incendie or explosion. Et ne pas stocker ou utiliser de l'essence ou d'autres vapeurs et
liquides inflammables à proximité de cet appareil ou de tout autre appareil. Les vapeurs peuvent
créer un risque d'incendie ou d'explosion.
• Avant de procéder à des opérations de nettoyage et d'entretien, assurez-vous que la ligne
d'alimentation de l'appareil est débranchée.
• Faire pas brancher ou débrancher la prise électrique lorsque vos mains sont humides
• Débranchez l’appareil où déconnecter l’alimentation avant le nettoyage ou l'entretien. Ne pas le faire
peut entraîner un choc électrique ou la mort.
• Faire pas tenter de réparer ou de remplacer une partie de votre appareil à moins qu'il ne soit
spécifiquement recommandé dans ce matériau. Toutes les autres réparations doivent être confiées à
dans le dos ou d'autres blessures.
• Pour assurer une bonne ventilation de votre appareil, l'appareil doit être complètement dégagé.
Choisissez un endroit bien aéré avec des températures supérieures à 55ºF (13ºC) et au-dessous
90ºF (32ºC). Cet appareil doit être installé dans une zone protégée de l’élément, Comme le vent, la
pluie, de l'eau pulvérisée ou lumière du soleil.
• l’appareil ne doit pas être situé à côté de fours, grilles ou autres sources de chaleur élevée.
• L’appareil doit être installé avec toutes les connexions électriques, d'eau et d'évacuation,
conformément à codes étatiques et locaux. Une alimentation électrique standard (115 V CA
seulement, 60 Hz), mise à la terre conformément au Code national de l'électricité et les codes et
règlements locaux est nécessaire.
• Faire pas plier ou pincer le cordon d'alimentation de l’appareil.
• Le fusible (ou disjoncteur) doit être de 15 ampères.
• Il est important pour l'appareil soit à niveau afin de fonctionner correctement. Vous devrez peut-être
faire plusieurs ajustements à niveler.
• Toute installation doit être conforme aux exigences du code de plomberie locale.
• Assurez-vous que les tuyaux ne sont pas pincés ou pliés ou endommagés au cours installation.
• Vérifier les fuites après connexion.
• Ne jamais laisser les enfants utiliser, jouer avec ou crawl à l'intérieur de l'appareil
• Faire pas utiliser de produits de nettoyage à base de solvants or abrasifs sur l'intérieur. Ces nettoyants
peuvent endommager ou décolorer l'intérieur.
Page 25

25
AIDEZ-NOUS À VOUS AIDER ...
SI VOUS AVEZ BESOIN DE SERVICE
Nous sommes fiers de notre service et nous
Ensuite, si vous n'êtes toujours pas satisfait, écrivez
PRUDENCE:
Lisez attentivement ce guide.
Il est destiné à vous aider à utiliser et à
maintenir votre nouvel appareil
correctement.
Gardez-le à portée de main pour répondre à
vos questions.
Si vous ne comprenez pas quelque chose où
vous avez besoin de plus d'aide, s'il vous
plaît appelez:
Avanti Service à la clientèle
800-220-5570
Gardez preuve de la date d'achat d'origine
(tel que votre bordereau de vente) avec ce
guide pour établir la période de garantie.
CET APPAREIL N’EST PAS
CONÇU POUR LE STOCKAGE
DE MÉDECINE OU D'AUTRES
PRODUITS MÉDICAUX.
Écrire le modèle et le numéro de série.
Vous les trouverez sur une plaque située sur la paroi
extérieure arrière de l'appareil.
S'il vous plaît écrire ces chiffres ici:
___________________________________
__
Date d'achat
___________________________________
__
Numéro de modèle
___________________________________
__
Numéro de série
Utilisez ces numéros dans toute correspondance ou
appels de service concernant votre appareil.
Si vous avez reçu un appareil endommagé, contactez
immédiatement le revendeur (ou le constructeur) qui
vous a vendu l'appareil.
Gagnez du temps et de l'argent. Avant d'appeler le
service, consultez le Guide de dépannage. Il énumère
les causes des problèmes de fonctionnement mineurs
que vous pouvez vous corriger.
voulons que vous soyez heureux. Si pour
une raison quelconque vous n'êtes pas
satisfait du service que vous recevez, voici
quelques étapes à suivre pour obtenir de
l'aide.
FIRST, contacter les gens qui ont réparé
votre appareil. Expliquez pourquoi vous
n'êtes pas satisfait. Dans la plupart des cas,
cela va résoudre le problèm e.
tous les détails, y compris votre numéro de téléphone,
et l'envoyer à:
Service Clients
Avanti Produits
10880 NW 30 Street
Miami, FL 33172 USA
Page 26

26
PIÈCES ET CARACTÉRISTIQUES
1
Section congélateur
7
Pied nivelant
2
Tablette
8
Porte
3
Contrôle de la température
Congélateur
9
Paniers
4
Contrôle de la température
Réfrigérateur
10
Porte
5
Tablette Réfrigérateur
11
Paniers
6
Bacs légumes (2)
Avec couvercle en verre
Page 27

27
Pour réduire le risque d'incendie,
Congelé, suivre ces précautions de base:
• Lisez toutes les instructions avant d'utiliser le réfrigérateur-congélateur.
-Enregistrez Ces INSTRUCTIONS-
2 étagères Réfrigérateur
1 Congélateur tablette
2 Bac végétales
1 Mode d'emploi
1 couvercle en verre
CONSIGNES DE SÉCURITÉ IMPORTANTES
ATTENTION
d'électrocution ou de blessure lors de
l'utilisation de votre réfrigérateur
• DANGER ou AVERTISSEMENT: Risque de piégeage des enfants.
Piégeage des enfants et la suffocation ne son t pas des problèmes du p assé. Jetés ou
abandonnés réfrigérateurs-congélateurs sont toujours dangereux . . . même si elles
vont "rester assis dans le garage quelques journées."
• Avant de jeter votre vieux réfrigérateur-congélateur: Enlever les portes. Laissez
les étagères en place afin que les enfants ne puissent pas grimper facilement à
l'intérieur.
• Ne jamais laisser les enfants utiliser, jouer avec, ou ramper à l'intérieur du
réfrigérateur-congélateur.
• Jamais pièces propre réfrigérateur-congélateur avec des liquides inflammables. Les
vapeurs peuvent créer un risque d'incendie ou d'explosion.
• Ne pas entreposer ou utiliser d'essence ou d'autres vapeurs et liquides inflammables
à proximité de cet appareil ou tout autre réfrigérateur-congélateur. Les vapeurs
peuvent créer un risque d'incendie ou d'explosion.
INSTRUCTIONS D'INSTALLATION
Avant d'utiliser votre appareil
Retirez l'emballage extérieur et intérieur.
Vérifiez que vous avez toutes les pièces suivantes:
• Avant de connecter l'appareil à la source d'alimentation, laissez-le tenir debout pendant environ
2 heures. Cela permettra de réduire la possibilité d'un mauvais fonctionnement du système de
refroidissement lors de la manipulation durant le transport.
• Nettoyer la surface intérieure à l'eau tiède avec un chiffon doux.
Installation de votre appareil
• Placez votre réfrigérateur-congélateur sur un sol qui est assez solide pour supporter le
réfrigérateur-congélateur quand il est complètement chargé. Pour mettre à niveau votre
réfrigérateur-congélateur, réglez les pieds de nivellement au bas de l'unité.
• PERMETTRE 5 POUC ES L'ESP ACE ENTRE LE FO ND ET LES CÔ TÉS DE L'APP AREIL,
CE QUI PERMET LA CIRCULATION DE L'AIR POUR REFROIDIR LE COMPRESSEUR ET
LE CONDENSEUR.
• Éloignez l'appareil des rayons du soleil et des sources de chaleur (cuisinière, chauffage,
radiateur, etc.). La lum ière solaire directe peut affecter le re vêtement acr ylique et sourc es de
chaleur peuvent a ugmenter la consom mation électriqu e. Les tem pératures am biantes fr oides
extrêmes peuvent également provoquer le réfrigérateur-congélateur ne pas fonctionner
correctement.
• Éviter de placer l'appareil dans les zones hum ides .
• Branchez l'appareil dans u ne prise m urale correc tement ins tallée à l a terre ex clusive. Ne pas
en aucun cas réduire ou supprimer la troisième (terre) du cordon d'alimentation. Toute question
concernant le pou vo ir et / o u mise à la terre doi ven t ê tr e adr es s ées à un électricien certif ié ou
un centre de service Avanti Produits autorisé.
Page 28

28 Connexion électrique
Attention
Une mauvaise utilisation de la prise de terre peu t entraîner un risque de choc électrique. Si le
Products autorisé.
Cet appareil doit être correctement mis à la terre pour votre sécurité. Le cordon
Ne pas en aucun cas couper ou enlever la troisième broche de terre du cordon
prise près d’appareil.
RALLONGE ÉLECTRIQUE
En raison des risques potentiels pour la sécurité dans certaines conditions, il est
puissance électrique du câble est de 115 volts et au moins 10 ampères.
Parasurtenseur
La plupart des appareils électriques utilisent une série de tableaux de commande
nécessaire à un électricien agréé dans votre région.
Les dommages dus à des surtensions ne sont pas considérés comme un fabricant
couvert défaut et annulera la garantie du produit.
cordon d'alimentation est endommagé, faites-le remplacer par un centre de service Avanti
d'alimentation de c et appareil est équipé d' une fiche à trois broch es qui accouple avec
trois standards pri s es murales broches a fin d e minimiser le ris q ue d e c h oc él ectr i q ue.
d'alimentation fourni .
Cet appareil nécessite une prise électrique standard 115Volts ~ / 60Hz avec le sol à
trois broches.
Le cordon doit être fixé derrière l ’ ap par eil et n on l ai ss és exposés ou qui pend ent pour
prévenir les blessures accidentelles.
Ne jamais débrancher l'appareil en tirant sur le cordon d'alimentation. Toujours saisir
fermement la fiche et tirez tout droit sorti de la prise.
Ne pas utiliser une rallonge avec cet appareil. Si le cordon d'alimentation est trop
court, demandez à un électricien qualifié ou un technicien de service installer une
fortement recom ma nd é d e ne pas utiliser une rallonge avec ce t a p par ei l . To ute foi s , s i
vous devez util iser une rallonge, i l est absolu ment nécess aire que ce soit un UL / CU L,
3 fils de terre appar eil ral longe ayant u ne fiche de mise à la ter re et à l a sortie et q ue la
électriques pour fonctionner. Ces cartes sont très sensibles aux surtensions et
pourraient être endommagés ou détruits.
Si l'appareil va être utilisé dans une zone ou si votre ville / pays est sujette à des
surtensions / coupures; il est suggéré que vous utilisez un dispositif de protection
contre les surtensions pour tous les dispositifs / appareils électriques que vous
utilisez. Le protecteur de surtension que vous sélectionnez doit avoir un bloc de
poussée suffisamm ent élevé pour prot éger l'appareil, i l est connecté. Si vous avez des
questions concernant le type et la taille d'un protecteur de surtension contact
Page 29

29
UTILISATION DE VOTRE APPAREIL
Panneaux de contrôle de la température
Réglage de la commande de température
• Votre réfrigérateur a une c ommande pour r éguler la tem pérature. Le co ntrôle de tem pérature est
situé à l'extérieur de la porte du compartiment de réfrigération.
• La première fois que vous mettez l'appareil en marche, l'appareil commencera à la température par
défaut réglée en usine, 38ºF dans la section réfrigérateur et -0 8ºF dans la parti e c ongé late ur.
• La première fois que vous mettez l'appareil en marche, régler la température dans le compartiment
réfrigérateur pour 34 ºF et fonc tionner pendant au moins 4 heur es avant de placer les alim ents à
l'intérieur. Cela perm ettra d'assurer le congélateur e st complètement refroidi et le compartiment
réfrigérateur sera stabilisé avant de placer la nourriture. Réglez ensuite le réglage de la
température au réglage désiré qui convient le mieux à vos besoins.
Pour régler la température dans chaque pression de la zone Temp bouton Zone, la zone
sélectionnée clignote et hors tension.
Appuyez sur le bouton Temp pour sélectionner la température désirée, puis appuyez sur le bouton
OK pour activer le r égla ge. (C ycle de volont é d e la te m pératur e par inc rém ents 1ºF à chaq ue
pression du bouton).
Plage de température du réfrigérateur: OFF - 43ºF
Congélateur plage de température: -8 - 3ºF
Page 30

30
FONCTIONS: préprogrammées
• MODE SABBATH
Le mode Sabbat es t conçu ou ce ux do nt les pr atiq ues religieus es ex igent d' éte indre l es lum ières .
Toutes les lumières intérieures et les indicateurs du panneau de commande seront désactivés.
Pour activer la SABBATH MODE, appuyez sur la touche de fonction jusqu'à ce que l'icône
SABBATH MODE clignote et appuyez sur le bouton OK pour valider. Le panneau de commande et
l'éclairage intérieur éteindront et resteront en MODE SABBATH jusqu'à ce qu'il soit désactivé sur le
panneau de commande
Pour désactiver la SABBATH MODE, appuyez sur la touche de fonction pendant environ 5
secondes jusqu'à ce que le panneau de commande s'allume à nouveau. Appuyez sur la touche de
fonction jusqu'à ce que l'icône SABBATH MODE clignote et appuyez sur le bouton OK pour
désactiver. L'icône s'éteint et t outes les lum ières et les ind icateurs retour nera au fonc tionnement
normal.
• MODE DE CONGELATION RAPIDE
Ce mode régler la température du congélateur à -26ºF pour une chute rapide de la température lors
du stockage de grandes quantités d'aliments de chaud ou salle dans le congélateur.
L'unité reste en mode FAST FREEZE jusqu'à ce que la température atteigne -26ºF et ensuite
revenir au réglage d'origine ou jusqu'à ce que la fonction soit désactivée au niveau du panneau de
commande.
Pour activer le mode FAST FREEZE, appuyez sur la touche de fonction jusqu'à ce que l'icône FAST
FREEZE clignote et appuyez sur le bouton OK pour valider. L'icône reste allumée.
Pour désactiver le mode FAST FREEZE, appuyez sur la to uc he de fonction jusqu'à c e que l' ic ôn e
FAST FREEZE clignote et appuyez sur le bouton OK pour désactiver. L'icône s'éteint.
• MODE VACANCES
Utilisez ce mode lorsque vous quittez penda nt d e l ong ues péri odes de temps, où vous retirere z l a
grande majorité du contenu de la section du réfrigérateur, mais laisser le contenu du congélateur.
Le mode de vacances conf igurera aut omat iquement la s ection du réf rigérateur à 57ºF et la partie
congélateur reste à votre réglage actuel.
L'appareil restera en mode vacances jusqu'à ce qu'il soit désactivé sur le panneau de commande.
Pour activer le mode vacances, appuyez sur la touche de fonction jusqu'à ce que l'icône MODE DE
VACANCES clignote et appuyez sur le bouton OK pour valider. L'icône reste allumée.
Pour désactiver le mode vacances, appuyez sur la touche de fonction jusqu'à ce que l'icône MODE
DE VACANCES clignote et appuyez sur le bouton OK pour désactiver. L'icône s'éteint.
• SMART (AUTOMATIQUE) MODE
Ce mode permet de régler automatiquement l'appareil à des températures moyennes de
fonctionnement normales.
Le MODE SMART définit automatiquement la section du réfrigérateur à 38 ° F et la section
congélateur à -02ºF. L'appareil reste en mode SMART jusqu'à ce qu'il soit désactivé au niveau du
panneau de commande.
Les températures ne peuvent pas être réglées en mode SMART (AUTOMATIQUE).
Pour activer le m ode SMART, appuyez sur la touche de fonction j usqu'à ce que l'icône SMA RT
MODE clignote et appuyez sur le bouton OK pour valider. L'icône reste allumée.
Pour désactiver le mode SMART, appuyez sur la touche de fonction jusqu'à ce que l'icône SMART
MODE clignote et appuyez sur le bouton OK pour désactiver. L'icône s'éteint.
Page 31

31
Une fois que vous av ez désac tivé le MODE SMART, régler la température manuellement c omme
indiqué précédemment dans ce manuel à une température qui convient le mieux à vos besoins.
• PANNEAU DE COMMANDE - BLOCAGE DES ENFANTS
Le panneau de comm ande LOC K est c o nç u po ur empêcher toute modific atio n de s param ètr es au
réfrigérateur.
Pour activer le verrouillage parental, appuyez et maintenez le bouton OK pendant environ 3
secondes, l'icône CHILD LOCK s'allume. Le panneau de commande est verrouillé jusqu'à
déverrouillé au niveau du panneau de commande ou il y a une perte de puissance.
Pour désactiver le verrouillage parental, app uyez et maintenez le bouton OK pendant environ 3
secondes jusqu'à ce que l' ic ône CHIL D LOC K s’éteint et le panneau de com m ande fonc tionne en
mode de fonctionnement normal.
• PANNEAU DE COMMANDE - VEILLE
Le panneau de commande fera noir après environ 5 minutes d'activité
Pour activer le pann eau de commande, appuyez et maintenez enfoncer le bou ton OK pendant
environ 3 secondes, la PANNEAU DE COMMANDE ET icône VERROUILLAGE s'allument. Le
panneau de commande est verrouillé jusqu'à déverrouillé au niveau du panneau de commande ou
il y a une perte de puissance.
Pour désactiver le verrouillage parental, app uyez et maintenez le bouton OK pendant environ 3
secondes jusqu' à ce que l' ic ône CHIL D LOC K s’éteint et le panneau de com m ande fonc tionne en
mode de fonctionnement normal.
REMARQUE:
• SI L'APPAREIL EST UNPLUGGED, A PERDU DE PUISSANCE OU EST ÉTEINT, VOUS DEVEZ
ATTENDRE 3 À 5 MINUTES AVANT REMETTRE L'APPAREIL. SI VOUS ESSAYEZ DE
REDÉMARRER AVANT CE RETARD, LA REFRIGERATEUR-CONGEL ATEUR NE DÉMARRE
PAS.
REMARQUE:
NOUS NE L'INSTALLATION DE CONSEILLONS RÉFRIGÉRATEUR OÙ LA
TEMPÉRATURE DESCEND AU-DESSOUS DE 50 ºF (13ºC) OU CI-DESSUS 110ºF
RISE (43ºC). LE COMPRESSEUR NE POURRA PAS DE MAINTENIR
APPROPRIÉS À L'INTÉRIEUR DU TEMPÉRATURES FRIGORIFIQUE.
INSTALLATIONS POUR LE CAS OU LES TEMPÉRATURES CI-DESSOUS 50º DE
LA COMMANDE DE SET TEMPERATURE DE CONGELATEUR DE RÉGLAGE «
COLDEST ». CELA LES OPÉRATIONS DE AMELIORER RÉFRIGÉRATEUR
DANS CES CONDITIONS.
Réglage de la température dans la zone Frés / Crisper
Pour régler la température dans la zone fraîche / Crisper, déplacez simplement le contrôle de la
température (situé à l'arrière de l'appareil juste au-dessus du bac à légumes) de gauche à droite. Plage
de température est MAX à MIN.
MAX est le plus froid
MIN est la plus vive
Page 32

32
REMARQUE:
• SI L'APPAREIL EST UNPLUGGED, A PERDU LE P OUVOIR OU EST ÉTEINT, VOUS D EVEZ
ATTENDRE 3 À 5 MINUTES AVANT REDÉMARRAGE DE L'UNITÉ. SI VOUS ESSAYEZ DE
REDÉMARRER A VA N T L E MO MENT DE RETARD, L E RÉFRIGÉRATEUR-CONGÉLATEUR NE
DÉMARRE PAS.
REMARQUE:
NOUS NE RECOMMANDONS L'INSTALL ATION DU RÉFRIGÉRATEUR où la
température descend en dessous de 50ºF (13ºC) OU élevons au-dessus 110ºF
(43ºC). LE COMPRESSEUR NE POURRA PAS maintenir la température
appropriée dans le réfrigérateur.
Pour les installations où les températures descendent en dessous de 50º
RÉGLER LA COMMANDE CONGELATEUR TEMPÉRATURE AU "COLDEST"
PARAM. Cela permettra d'améliorer LE FONCTIONNEMENT DU
RÉFRIGÉRATEUR DANS CES CONDITIONS.
Congélation Aliments Frais
• L'utilisation correcte d e l'appareil, l'em ballage des alim ents, la températur e correcte et en tenant
compte des préca utions d'hygiène va influe ncer sensiblement la qua lité de la congélation de la
nourriture ou de stockage des aliments surgelés.
• Ce compartiment est conçu pour le stockage à long terme des produits surgelés.
• La durée de conservation des aliments congelés varie et le temps de stockage recommandé ne doit
pas être dépassé.
• Préemballés alimentaire commercialement congelé doit être conservé conformément aux
instructions du fabr icant d'aliments surge lés pour un trois étoi les compartiment de stock age des
aliments congelés ou à la maison congélateur.
• Placez les aliments surgelés dans le congélateur le plus rapidement possible après l'achat. S'il y a
des instructions sur le paquet, suivez attentivement les instructions concernant les temps de
stockage.
• Soigneusement sélectionner les aliments que vous souhaitez geler, il devrait être de qualité
suffisante et appropriée pour la congélation.
• Utiliser un emballage correct et envelopper serrer.
• L'emballage doit être étan che à l'air et ne doit pas fuir car cela pourrait entraîner une perte de
vitamine importante et la déshydratation des aliments.
• Foils et sacs doivent être assez pour bien doux envelopper les aliments.
• Lors de la préparation des aliments à congeler, envisager des précautions sanitaires.
• Mark paquets avec les données suivantes: type et la quantité d'aliments et la date du chargement.
• Il est extrêmement emportant que la nourriture est congelée aussi rapidement que possible.
• Si la quantité de charge est trop importante, la qualité du gel est réduite, ce qui affecte la qualité des
aliments congelés.
Page 33

33
SOINS ET ENTRETIEN
Inverser la porte battante de votre appareil
Ce réfrigérateur-congélateur a la capacité de l'ouverture de porte depuis le côté gauche ou côté droit.
L'appareil est livré avec l'ouverture de la porte du côté gauche. Si vous désirez inverser le sens
d'ouverture, s'il vous plaît appelez le service pour obtenir des instructions d'inversion.
Nettoyage de votre appareil
• UN plug l'unité, et enlever la nourriture et des paniers.
• Laver l'intérieur avec une solution d'eau et de bicarbonate de soude chaude. La solution devrait
être d'environ 2 cuillères à soupe de bicarbonate de soude à un litre d'eau.
• Laver les paniers avec une solution de détergent doux.
• L'extérieur de l'appareil doit être nettoyé avec un détergent doux et de l'eau chaude.
PRUDENCE
Ne pas débrancher le réfrigérateur-congélateur pourrait entraîner un choc électrique ou de
blessure.
Panne électrique
La plupart des pannes de courant sont corrigées en quelques heures et ne devraient pas affecter la
température de votre réfrigérateur-congélateur si vous réduise z le nom br e de fois que la porte es t
ouverte. Si la puissance va être hors service pendant une longue période de temps, vous devez
prendre les mesures appropriées pour protéger votre nourriture.
Période de vacances
Courts séjours: Laissez l'appareil fonctionner pendant des congés de moins de trois semaines.
Longues vacances: Si l'appareil ne sera pas utilisé pendant plusieurs mois, retirez tous les aliments et
débranchez le cordon d'alimentation. Nettoyer et sécher soigneusement l'intérieur. Pour éviter les
odeurs et la croissance des moisissures, laisser la porte entrouverte: blocage ouverte si nécessaire
Déplacement de votre appareil
• Retirez tous les aliments.
• Solidement ruban adhésif vers le bas tous les articles en vrac à l'intérieur de l'appareil.
• Tournez les vis de réglage jusqu'à la base pour éviter tout dommage.
• Collez la porte fermée.
• Assurez-vous que l'appareil reste en position verticale pendant le transpor t.
Économiser de l'énergie
• L'appareil doit être situé da ns la zone la p lus fr oide de la pièce, loin de la ch aleur prod uisant des
appareils ou des conduits de chauffage, et hors de la lumière solaire directe.
• Laissez refroidir les alim ents chauds à la tempér ature ambiante avant de les placer dans l'unit é.
Surcharge l'unité oblige le compresseur à fonctionner plus longtemps. Les aliments qui gèlent trop
lentement peuvent perdre la qualité, ou gâter.
• Assurez-vous d'emballer les aliments et es suyez les conte nants avant de les placer dans l'un ité.
Cela réduit l'accumulation de givre à l'intérieur du congélateur.
• Organiser et la nourriture de l'étiquette pour réduire les ouvertures de porte et les recherches
prolongées. Retire z autant d'articles que nécessaire à un moment do nné, et ferm er la porte dès
que possible.
Page 34

34
PROBLÈMES AVEC VOTR E APPAREIL?
PROBLÈME
CAUSE POSSIBLE
L'appareil ne fonctionne pas.
Non branché.
Compresseur allume et éteint fréquemment.
La température ambiante est plus chaude que la
autorisations correctes.
Vibrations.
Vérifiez pour assurer que le réfrigérateur congélateur est de niveau.
L'unité semble faire trop de bruit.
Le bruit de cliquetis peut provenir de l'écoulement
L’unité n’est pas de niveau.
La porte ne se ferme pas correctement.
L’unité n’est pas de niveau.
Les paniers sont hors de position.
Vous pouvez résoudre de nombreux problèmes réfrigérateur-congélateur commun facilement, vous
permet d'économiser le coût d'un appel de service possible. Essayez les suggestions ci-dessous pour
voir si vous pouvez résoudre le problème avant d'appeler le service.
GUIDE DE DÉPANNAGE
Le disjoncteur est déclenché ou il y a un fusible
grillé.
normale.
Une grande quantité de nourriture a été ajouté au
réfrigérateur - congélateur.
La porte est ouverte trop souvent.
La porte ne se ferme pas complètement.
Le contrôle de la température ne soit pas correct.
Le joint de la porte ne se referme pas
correctement.
Le congelé réfrigérateur ne possède pas les
du fluide frigorigène, ce qui est normal.
Comme chaque cycle se termine, vous pouvez
entendre des gargouillis causés par l'écoulement
du réfrigérant dans votre réfrigérateur congélateur.
Contraction et expansion des parois internes
peuvent provoquer des craquements et des.
La porte est inversée et pas correctement installé.
Le joint est sale.
Page 35

35
SERVICE POUR VOTRE APPAREIL
service à la clientèle Avanti Products sera là pour vous. Appelez-nous sans frais.
AVANTI PRODUITS SERVICES CLIENTS
800-323 5029
produits, l'aide est disponible.
personnel, mandat, Master Card ou Visa.
l'extérieur.
SCHEMA CAB LAGE
Nous sommes fiers de notre organisation de service à la clientèle et le réseau de techniciens de
services professionnels qui offrent des services sur vos appareils Avanti. Avec l'achat de votre appareil
Avanti, vous pouvez avoir la certitude que si vous avez besoin d'informations ou de l'aide de l'équipe de
Information produit
Les commandes de la pièce
800-220 5570
In-Home Repair Service
800-220 5570
Quelles que soient vos questions sont sur nos
Vous pouvez commander des pièces et
accessoires qui seront livrés directement à votre
domicile.
Vous pouvez commander ces articles par chèque
Un centre de service Avanti Produits autorisé
fournira un service de réparation expert, prévue à
un moment qui vous convient. Nos réparateurs
formés connaissent votre appareil à l'intérieur et à
Page 36

36
Staple votre reçu de vente ici. Preuve de la date
service sous garantie.
CE QUI EST COUVERT - GARANT IE L IMITÉE D'UN AN
envoyé au centre de service de l'appareil pour la réparation.
DEUXIÈME LIMITÉE À LA CINQUIÈME ANNÉE GARANTIE
nécessaire, sont à la charge de l'utilisateur.
EXCLUSIONS DE LA GARANTIE / NON COUVERTS:
Avanti Products, y compris, sans limitation, un ou plusieurs des éléments suivants:
•
entourant l’appareil, et les actes de Dieu.
•
• Les frais de transport et de m anutent ion associé s au
En aucun cas, Avanti Pr od uct s toute responsabilité ou re spon sabi lit é pour les dommages aux biens environnants,
planchers, les étagères etc., ainsi que la remise à zéro des disjoncteurs ou fusibles.
HORS DE LA GARANTIE DU PRODUIT
compris les réparations, les pro-taux, ou le remplacement du produit, une fois la garantie expirée.
GARANTIE - REFRIGERATION - COMPRESSEUR
VOS PRODUITS AVANTI
GARANTIE
Avanti Products garantit q ue l e produit est exempt de dé fauts de matériaux et / ou de fabr ic at ion pour u ne période
de douze (12) mois à compter de la date d'achat par le propriétaire initial. La durée commence à courir à la date
d'achat, et ne sera pas retardée, restreinte, prolongée ou suspendu pour quelque raison que ce soit, sauf si décrit
en détail dans le document de garantie. Pe ndant un an à com pter de la date d'a chat par le pr opriétaire d'orig ine, les
produits Avanti seront , à sa dis créti on, ré parer ou remplacer toute p arti e du pr od uit qui se révèle être un d éf au t de
matériau ou de fabrication dans une utilisat ion norm ale. A v an ti P rod uct s v ous fournira un produit rai son nabl em ent
semblable nouveau ou remis à neuf. Au cours de cette période Avanti Products fournira toutes les pièces et la
main-d'œuvre nécessaires pour corriger ces défauts gratuitement, aussi longtemps que le produit a été installé et
utilisé conformément aux instructions écrites dans ce manuel. En usage locatif ou commercial, la période de
garantie est de 90 jours. Tous les appareils de Avanti 4,2 pieds cubes la capacité ou moins doivent être traduits /
Pour la deuxième à la cinquième année à partir de la date d'achat originale, Avanti Products fournira un
compresseur de remplacement gratuit en raison d'un échec. Vous êtes responsable de la main-d'œuvre et de fret
de service. En usage lo catif ou commer cial, l a gar antie du compre sseur e st limi tée à un an et neuf m ois. Le s coûts
impliqués pour déplacer le produit au centre de service et de retour à la maison de l'utilisateur, comme peut-être
La couverture de la garanti e décrite ici exclut tous le s défaut s ou les do mmage s qui ne s ont pas l a faut e directe d e
Un non-respect de tout État applicable, local, ville, ou du comté électricité, plomberie et / ou des codes du
bâtiment, des règlement s ou d es lois , y co mpris le défaut d'in stal ler le pro duit en stri cte con for mité av ec le f eu et
les codes du bâtiment et les règlements locaux.
d'achat originale est nécessaire pour obtenir un
• Les forces externes, élémentaires et / ou l'environnement et les facteurs, y compris, sans s'y limiter, la pluie, le
vent, le sable, les inondations, les incendies, les coulées de boue, des températures de congélation, l'humidité
excessive ou à une exposition prolongée à l'humidité, la foudre, les surtensions, les défaillances structurelles
Les pertes de contenu de la nourriture ou d'autres
contenus en raison de la détérioration.
• Les dommages accessoires ou consécutifs
• Pièces et coûts de main-d'œuvre pour les éléments
suivants ne seront pas considérés comme garantie:
• Portes évaporateurs, ressorts de la porte, et / ou
des cadres.
• Panneaux intérieurs de portes, des étagères de
porte, rails de porte, et / ou supports de porte.
• Bacs végétaux.
• Les ampoules et / ou boîtier en plastique.
• Doublures d'armoires en plastique.
• Punctured évaporateur annule la garantie sur le
système scellé complet.
y compris les armoires, les p lancher s, l es plafo nds, et d' autre s stru ctures et / ou de s objet s autour du pro duit. S ont
également exclus de ce tte garantie sont les égr atignures, les entailles, les bosses mineures, et d' autres domm ages
esthétiques sur les surfac es ex terne s et les parties ex posées; Produ its do nt les numér os de série ont été modifiés,
effacés ou supprimés; visite s de ser vice pour l'éduca tio n à la clie ntèle, ou d es visi tes où il n' y a rien de mal ave c le
produit; correction des problèmes d'installation (vous êtes seul responsable de toute structure et réglage pour le
produit, y compris tous les syst ème s éle ctr i que s, de plo mber ie et / ou d'autres installat ion s de r ac cord eme nt, p our
le bon plancher / fondation, et pour toute modification, y compris sans s'y limiter les armoires, les murs, les
remplacement de l'unité.
• Les réparations effectuées par réparateurs non
autorisés.
• Les appels de service qui sont liés à des problèmes
externes, tels que l'abus, l'alimentation électrique
inadéquate, les accidents, les incendies, les
inondations, ou tout autre acte de Dieu.
• Une panne du produit si elle est utilisée pour autre
chose que son intention but.
• La garantie ne couvre pas en dehors de la
Continental USA.
• Surtaxes, y compris mais sans s'y limiter, toute
après heure, les appels week-end, ou de services de
vacances, les péages, les frais de voyage de
convoyage ou les frais de kilométrage pour les
appels de service dans les régions éloignées.
Avanti Products est soumis à aucune obligation, en droit ou autrement, de vous fournir toutes les concessions, y
Page 37

37 38
Page 38

Page 39

39
-------------------------------------------------------(detach here)------------------------------------------------------------
Name
Model # Serial #
Address
Date Purchased Store / Dealer Name
City State Zip
E-mail Address
Area Code Phone Number
Occupation
Did You Purchase An Additional Warranty
As your Primary Residence, Do You:
Extended
Own Rent
None
Your Age:
Reason for Choosing This Avanti Product:
product:
under 18 18-25 26-30
Married Single
Price
Other: _____________ ______
Comments:
REGISTRATION INFORMATION
Thank you for purchasing this fine Avanti product. Please fill out this form and return it to the following
address within 100 days from the date of purchase and receive these important benefits:
Avanti Products LLC.
P.O.Box 520604 – Miami, Florida 33152
Protect your product:
We will keep the model number and date of purchase of your new Avanti product on file to help
you refer to this information in the event of an insurance claim such as fire or theft.
Promote better products:
We value your input. Your responses will help us develop products designed to best meet your
future needs.
Avanti Registration Card
Please indicate the most important factors
That influenced your decision to purchase this
Product Features
Avanti Reputation
Product Quality
Salesperson Recommendation
Other: ___________________
Friend / Relative Recommendation
Warranty
31-35 36-50 over 50
Marital Status:
Is This Product Used In The:
Home Business
How Did You Learn About This Product:
Advertising
In-Store Demo
Personal Demo
Page 40

40
FF4D15H0W FF4D15H3S 09152017
PRINTED IN CHINA
Page 41

41
 Loading...