

Page 1
Modelé
Actual design / color may vary./ Diseño / color puede variar / Design / Couleur peut varier
INSTRUCTIONS.
Avanti has a policy of continuous improvement on its products and reserves the
right to change materials and specifications without notice.
Avanti Products LLC
www.avantiproducts.com
ELECTRIC COOKTOP
COCINA ELECTRICA
CUISINIÈRE ÉLECTRIQUE
INSTRUCTION MANUAL
MANUAL DE INSTRUCCIONES
MANUEL D’INSTRUCTIONS
Model
Modelo
BCT115J1B-IS
BEFORE USE, PLEASE READ AND FOLLOW ALL SAFETY RULES AND OPERATING
P.O. Box 520604
Miami, FL 33152
1
Page 2

Help Us Help You …
3
Appliance Safety
Important Safeguides
Parts and Features
Important Safety Instructions
Installation Instructions
Before Using Your Electric Cooktop
Important Precautions and Recommendations
Installation of Your Electric Cooktop
Electrical Connection
Operating Your Electric Cooktop
13
Control Panel
Cookware Tips
14
Care and Maintenance
Troubleshooting Guide
Service for Your Appliance
Wiring Diagram
Your Avanti Products Warranty
Instrucciones en Español
Instructions en Français
Registration Information and Registration Card
TABLE OF CONTENTS
4
5
6
7 - 8
9
9
10
11
12
14
15
15
16
16
17
18 – 31
32 - 46
Last Page
2
Page 3
HELP US HELP YOU...
IF YOU NEED SERVICE
We're proud of our service and want you to be
NEXT, if you are still not pleased, write all the details,
CAUTION:
Read this guide carefully.
It is intended to help you operate and
maintain your new appliance properly.
Keep it handy to answer your questions.
If you don't understand something or you need
more help, please call:
Avanti Customer Service
800-220-5570
Keep proof of origina l purchase date (such as
your sales slip) with this guide to establish the
warranty period.
THIS APPLIANCE IS NOT
DESIGNED FOR THE STORAGE
OF MEDICINE OR OTHER
MEDICAL PRODUCTS.
Write down the model and serial numbers.
You'll find them on a plate located on the rear o utside
wall of the appliance.
Please write these numbers here:
_____________________________________
Date of Purchase
_____________________________________
Model Number
_____________________________________
Serial Number
Use these numbers in any correspondence or service
calls concerning your appliance.
If you received a damaged appliance, immediately
contact the dealer (or builder) that sold you the
appliance.
Save time and money. Before you call for service,
check the Troubleshooting Guide. It lists causes of
minor operating problems that you can correct yourself.
pleased. If for some reason you are not happy
with the service you receive, here are som e
steps to follow for further assistance.
FIRST, contact the people who ser viced your
appliance. Explain why you are not pleased. In
most cases, this will solve the problem.
including your telephone number, and send it to:
Customer Service
Avanti Products
10880 NW 30 Street
Miami, FL 33172 USA
3
Page 4
This is the Safety Alert Symbol.
Danger means that failure to heed this safety
or death
Warning means that failure to heed this safety
damage, serious personal injury, or death.
Caution means that failure to heed this safety
personal injury or property or equipment damage.
APPLIANCE SAFETY
Your safety and the safety of others are very important.
We have provided many important safety messages in this manual and on your appliance. Always
read and obey all safety messages.
This symbol alerts you to potential hazards that can kill or injure you and others.
All safety messages will follow the Safety Alert Symbol and either the words
“DANGER”, “WARNING” or “CAUTION”. These words mean:
statement may result in severe personal injury
statement may result in extensive product
statement may result in minor or moderate
All safety messages will alert you to what the potential hazard is, tell you how to reduce the chance of
injury, and let you know what can happen if the instructions are not followed.
PROP. 65 WARNING FOR CALIFORNIA RESIDENTS
WARNING:
Cancer And Reproductive Harm
www.p65warnings.ca.gov
4
Page 5
IMPORTANT SAFEGUIDES
Before the appliance is used, it must be properly positioned and installed as
described in this manual, so read the manual carefully. To reduce the risk of fire,
electrical shock or injury when using the appliance, follow basic precaution,
including the following:
• It is recommended that a separate circuit, serving only your appliance be provided.
• Never clean appliance parts with flammable fluids. These fumes can create a fire hazard or
explosion. And do not store or use gasoline or other flammable vapors and liquids in the vicinity of
this or any other appliance. The fumes can create a fire hazard or explosion.
• Before proceeding with cleaning and maintenance operations, make sure the power line of the
unit is disconnected.
• Disconnect power to the appliance before cleaning or servicing. Failure to do so can result in
electrical shock or death.
• Do not attempt to repair or replace any part of yo ur a p p liance unless it is specifically
recommended in this manual. All other servicing should be referred to a qualified
technician.
• This appliance shall not be used for space heating. The surface unit should not be operated
without cookware. This information is based on safety considerations.
• Keep appliance area clear and free from combustible materials, gasoline, and other flammable
vapors.
• Do not obstruct the flow of ventilation air.
• Disconnect the electrical supply to the appliance before servicing.
• When removing appliance for cleaning and/or service:
• Disconnect AC power supply.
• It is important for the appliance to be leveled in order to work properly. You may need to make
several adjustments to level it.
• Never allow children to operate, play with or sit on the appliance.
• Electrical Grounding Instructions - The appliance must be installed and grounded by a qualified
technician in accordance with the National Electrical Code ANSI/NFPA No. 70 (Latest Edition)
and local electrical code requirements.
• Replacement Parts – Only authorized replacement parts may be used in performing service on
the appliance. Replacement parts are available from factory authorized parts distributors.
Contact the
nearest Avanti service center in your area.
5
Page 6
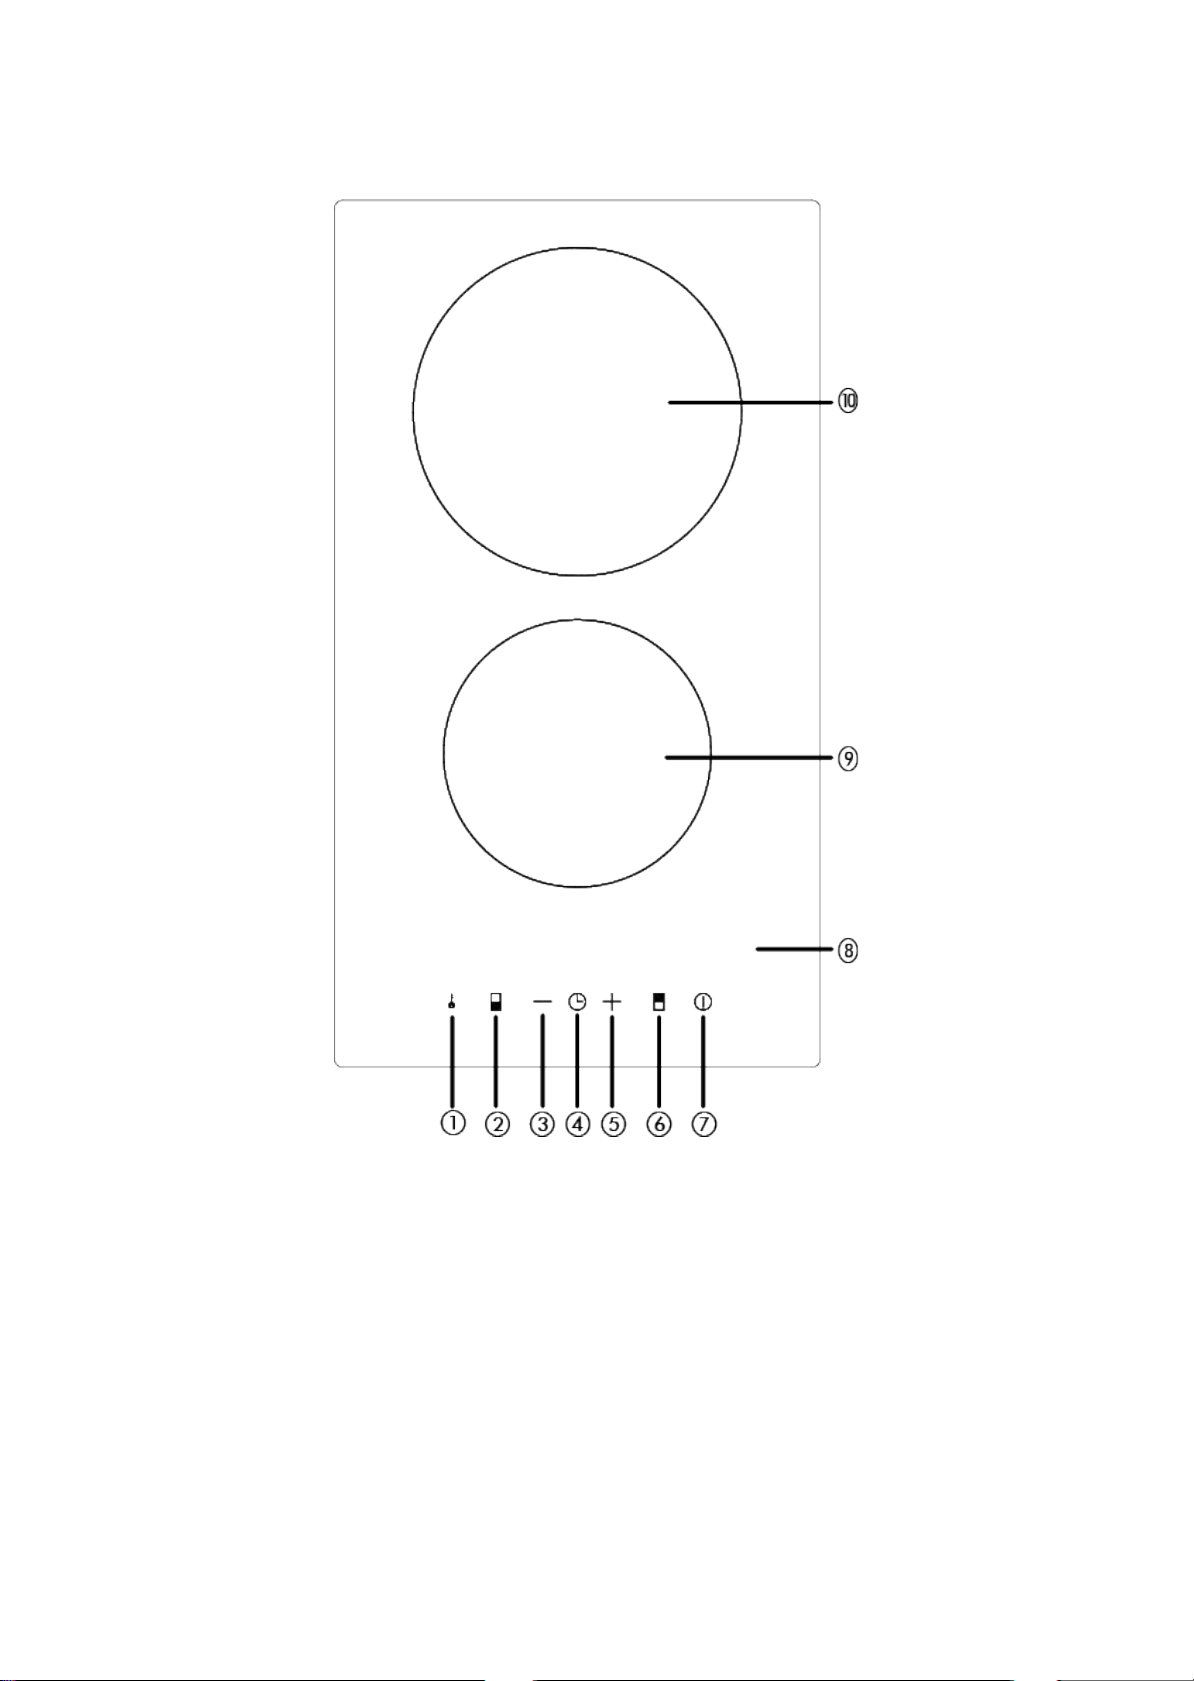
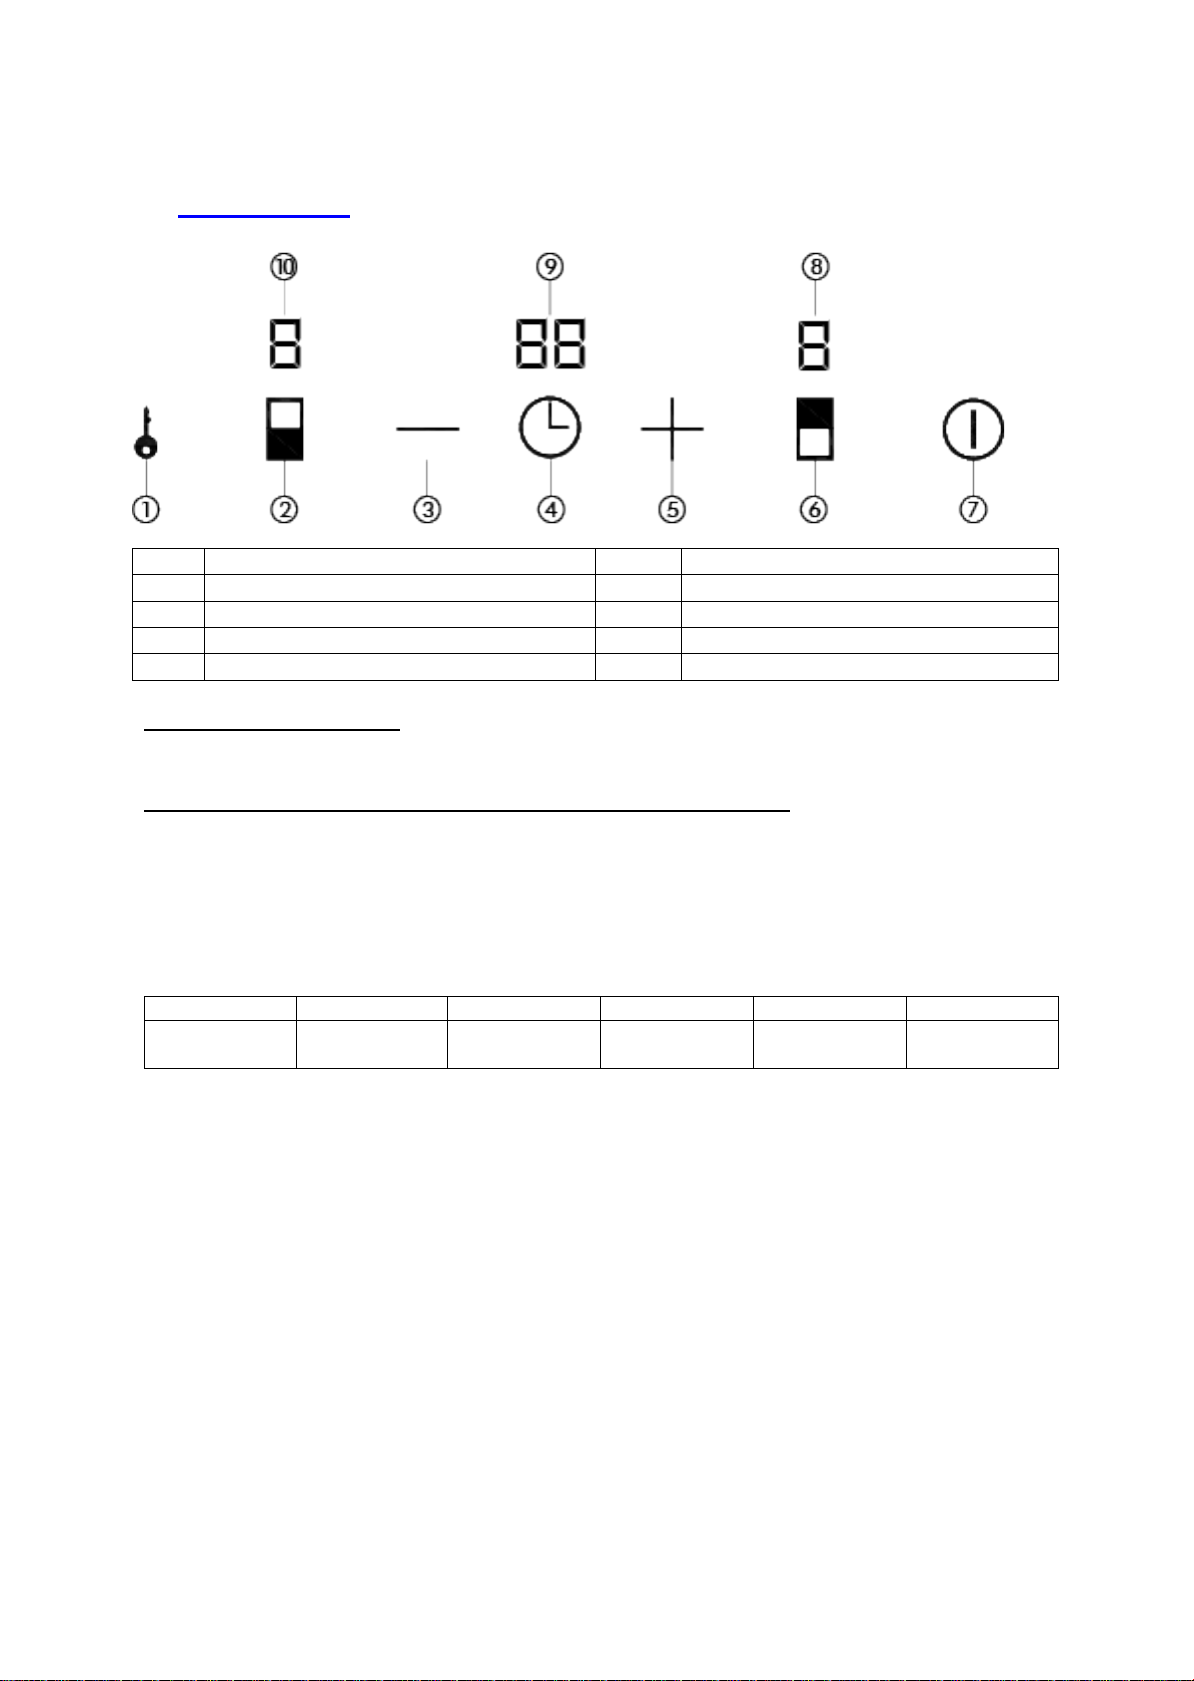
2.
Front Burner Selector Button
3.
Reduce / Decrease ( - ) Button
4.
Timer Selector Button
5.
Add / Increase ( + ) Button
6.
Rear Burner Selector Button
7.
Power ON / OFF Button
8.
Cooktop Surface
9
Front Burner (1200 Watts)
10
Rear Burner (1800 Watts)
PARTS & FEATURES
1. Control Panel Lock Button
6
Page 7
• Read all instructions before using the appliance.
IMPORTANT SAFETY INSTRUCTIONS
WARNING
• Proper Installation - Be sure the appliance is properly installed and grounded by
a qualified technician.
• Installation, repair and maintenance work should be performed by a qualified
service technician. Work by unqualified persons could be dangerous and may
void the warranty.
• Install the appliance so that the power cord does not come into contact with any portion
of the unit which may become hot during use.
• In the event of any damage to the appliance, it must be turned off immediately and
disconnected from the main power supply. Do not use the appliance until it has been
repaired.
• Never use your appliance for warming or heating the room.
• Do Not Leave Children Alone - Children should not be left alone or unattended in area
where the appliance is in use. They should never be allowed to sit or stand on any part
of the appliance.
• Do not store items of interest to children in cabinets above the appliance. Children
climbing on the appliance to reach these items could be injured.
• The appliance is hot during use and remains so for some time after being switched
off. Keep children away from the appliance.
• Ensure that all packing material is disposed of safely and kept out of the reach of
children. Danger of suffocation!
• Wear Proper Apparel - Loose fitting or hanging garments should never be worn while
using the appliance.
• User Servicing - Do not repair or replace any part of the appliance unless specifically
recommended in the manual. All other servicing should be referred to a qualified
technician.
• Storage in or on Appliance - Flammable materials should not be stored near the
surface units.
• Do Not Use Water on Grease Fires - Smother fire or flame or use dry chemical or foamtype extinguisher.
• Use Only Dry Potholders - Moist of damp potholders on hot surfaces may result in burns
from steam. Do not let potholder touch hot heating elements. Do not use a towel or
other bulky cloth.
• Use Proper Pan Size - This appliance is equipped with one or more surface units of
different size. Select utensils having flat bottoms large enough to cover the surface unit
heating element. The use of undersized utensils will expose a portion of the heating
element to direct contact and may result in ignition of clothing. Proper relationship of
utensil to burner will also improve efficiency.
• Never Leave Surface Units Unattended at High Heat Settings – Boil over causes
smoking and greasy spillovers that may ignite.
• Glazed Cooking Utensils - Only certain types of glass, glass/ceramic, ceramic,
earthenware, or other glazed utensils are suitable for appliance top service without
breaking due to sudden change in temperature.
• Utensil Handles Should Be turned Inward and Not Extend Over Adjacent Surface Units
– To minimize burns, ignition of flammable materials, and spillage due to unintentional
contact with the utensil, the handle of a utensil should be positioned so that it is turned
inward, and does not extend over adjacent surface units.
To red uce the r isk of fire, electrical shock, or
injury when using the appliance, follow these
basic precautions:
7
Page 8

• Do Not Cook on Broken Cook-top – If cook-top should break, cleaning solutions and
spillovers may penetrate the broken cook-top and create a risk of electric shock. Contact
a qualified technician immediately.
• Clean Cook-top With Caution – If a wet sponge or cloth is used to wipe spills on a hot
cooking area, be careful to avoid steam burn. Some cleaners can produce noxious
fumes if applied to a hot surface.
• Use Care When Opening Door – Let hot air or steam escape before removing or
replacing food.
• Do Not Heat Unopened Food Containers – Build-up of pressure may cause container to
burst and result in injury.
• Keep Oven Vent Ducts Unobstructed.
• Placement of Oven Racks – Always place oven racks in desired location while oven is
cool. If rack must be moved while oven is hot, do not let potholder contact hot heating
element in oven.
• Do Not Touch Surface Units, Heating Elements, Interior Surfaces of Oven or Areas Near
Units - Surface units and heating elements may be hot even though they are dark in
color. Area near surface and interior surfaces of an oven become hot enough to cause
burns. During and after use, do not touch, or let clothing or other flammable materials
contact surface units, areas near units or interior surfaces of oven until they have had
sufficient time to cool. Other surfaces of the appliance may become hot enough to
cause burns – among these surfaces are oven vent openings and surfaces near these
openings, oven doors, and window of oven doors.
This Unit Is For Indoor Use Only
-SAVE THESE INSTRUCTIONS-
8
Page 9

INSTALLATION INSTRUCTIONS
WARNING
HAVE THIS APPLIANCE INSTALLED BY A QUALIFIED INSTALLER.
Improper installation, adjustment, alteration or maintenance can c ause injury or property
damage.
Consult a qualified installer or service agency.
IMPORTANT – SAVE FOR THE LOCAL ELECTRICAL INSPECTOR’S USE.
Ø BEFORE USING YOUR ELECTRIC COOKTOP
• Remove the exterior and interior packing.
• Check to be sure you have all of the following parts:
• 1 Instruction Manual
• 1 Installation Bracket Assembly Kit (4 Brackets in total).
(Packed in the Styrofoam packing – DO NOT DISCARD)
• Clean the cooktop surface with lukewarm water using a soft cloth or sponge.
• Have your appliance installed and properly grounded by a qualified installer in accordance
with
the installation instructions.
• Do not attempt to repair or replace any part of your appliance unless it is specifically
recommended in this manual.
• Do not remove permanently affixed labels, warnings, or plates from the product. This may
void the warranty.
• The installer should leave these instructions with the consumer who should retain for local
inspector’s use and for future reference.
• Please observe all local and national codes and ordinances.
IMPORTANT:
This cooktop is designed a nd manufactured solely for the cook ing of domestic (household) f ood
and
is not suitable for any non-domestic application and therefore should not be used in a
commercial
The appliance warran t y will be void if the cooktop is used within a non-domestic environment i.e.
a semi
environment.
commercial, commercial or communal environment.
9
Page 10

Ø IMPORTANT PRECAUTIONS AND RECOMMENDATIONS
After having unpacked the appliance, check to ensure that it is not damaged and all accessories or
items included were received. In case of doubt, do not use it and consult your supplier or a
professionally qualified
technician.
Packing elements (i.e. plastic bags, polystyrene foam, packing straps, etc.) should not be left around
within easy reach of children, as these may cause serious injuries.
The appliance has been thoroughly tested for safe and efficient operation. However, as with any
appliance, there are specific installation and safety precautions that must be followed to ensure safe
and satisfactory operation.
• Do not attempt to modify the technical characteristics of the appliance as this may become
dangerous to use.
• Do not carry out cleaning or maintenance operations on the appliance without having
previously disconnected it from the electric power supply.
• After use, ensure that the controls are in the position.
• Never touch the appliance with wet hands or feet.
• Do not operate the appliance barefooted.
• Do not allow children or other incapable people to use the appliance without supervision.
• During and after use of the appliance, certain parts will become very hot. Do not touch hot
parts.
• Keep children away from the appliance when it is in use.
• Fire Risk! Do not store flammable materials in the oven or in the bottom drawer.
• Fire Risk! Do not attempt to dry clothing or any other type of textile in the oven or in the
bottom drawer.
• Make sure that electrical cables connecting other appliances in the proximity of the
appliance
cannot come into contact with the hob or become entrapped in the oven door.
• The manufacturer declines all liability for injury to persons or damage to property caused by
incorrect or improper use of the appliance.
• To avoid any possible hazard, the appliance m us t be installed b y qual if ied pers on nel only.
Any repairs by unqualified persons may result in electric shock or short circuit. In order to
avoid possible injuries to your body or to the appliance, do not attempt ant repairs by
yourself.
Such work should be carried out by qualified service personnel only.
• Burn Hazard! The appliance may become very hot during operation. Make sure children
are kept out of reach and warn them accordingly. To avoid burns use
clothes and gloves
when handling hot parts or utensils.
• Stand away from the appliance when operating. Hot air or steam which escapes can cause
burns to hands, face, and/or eyes.
• Never clean the oven with any high-pressure steam cleaning devices, as it may provoke a
short circuit.
• This appliance is intended for household use. Never use the appliance for any other
purpose.
• If you should decide not to use the appliance any longer (or decide to substitute an older
model),
manner
particular that
children who could
before disposing of it, it is recommended that it be made inop er ati ve in an appro priat e
in accordance to health and environmental protection regulations, ensuring in
all potentially hazardous parts be made harmless, especially in relation to
play with old appliances. Remove the door before disposal to prevent
entrapment.
10
Page 11
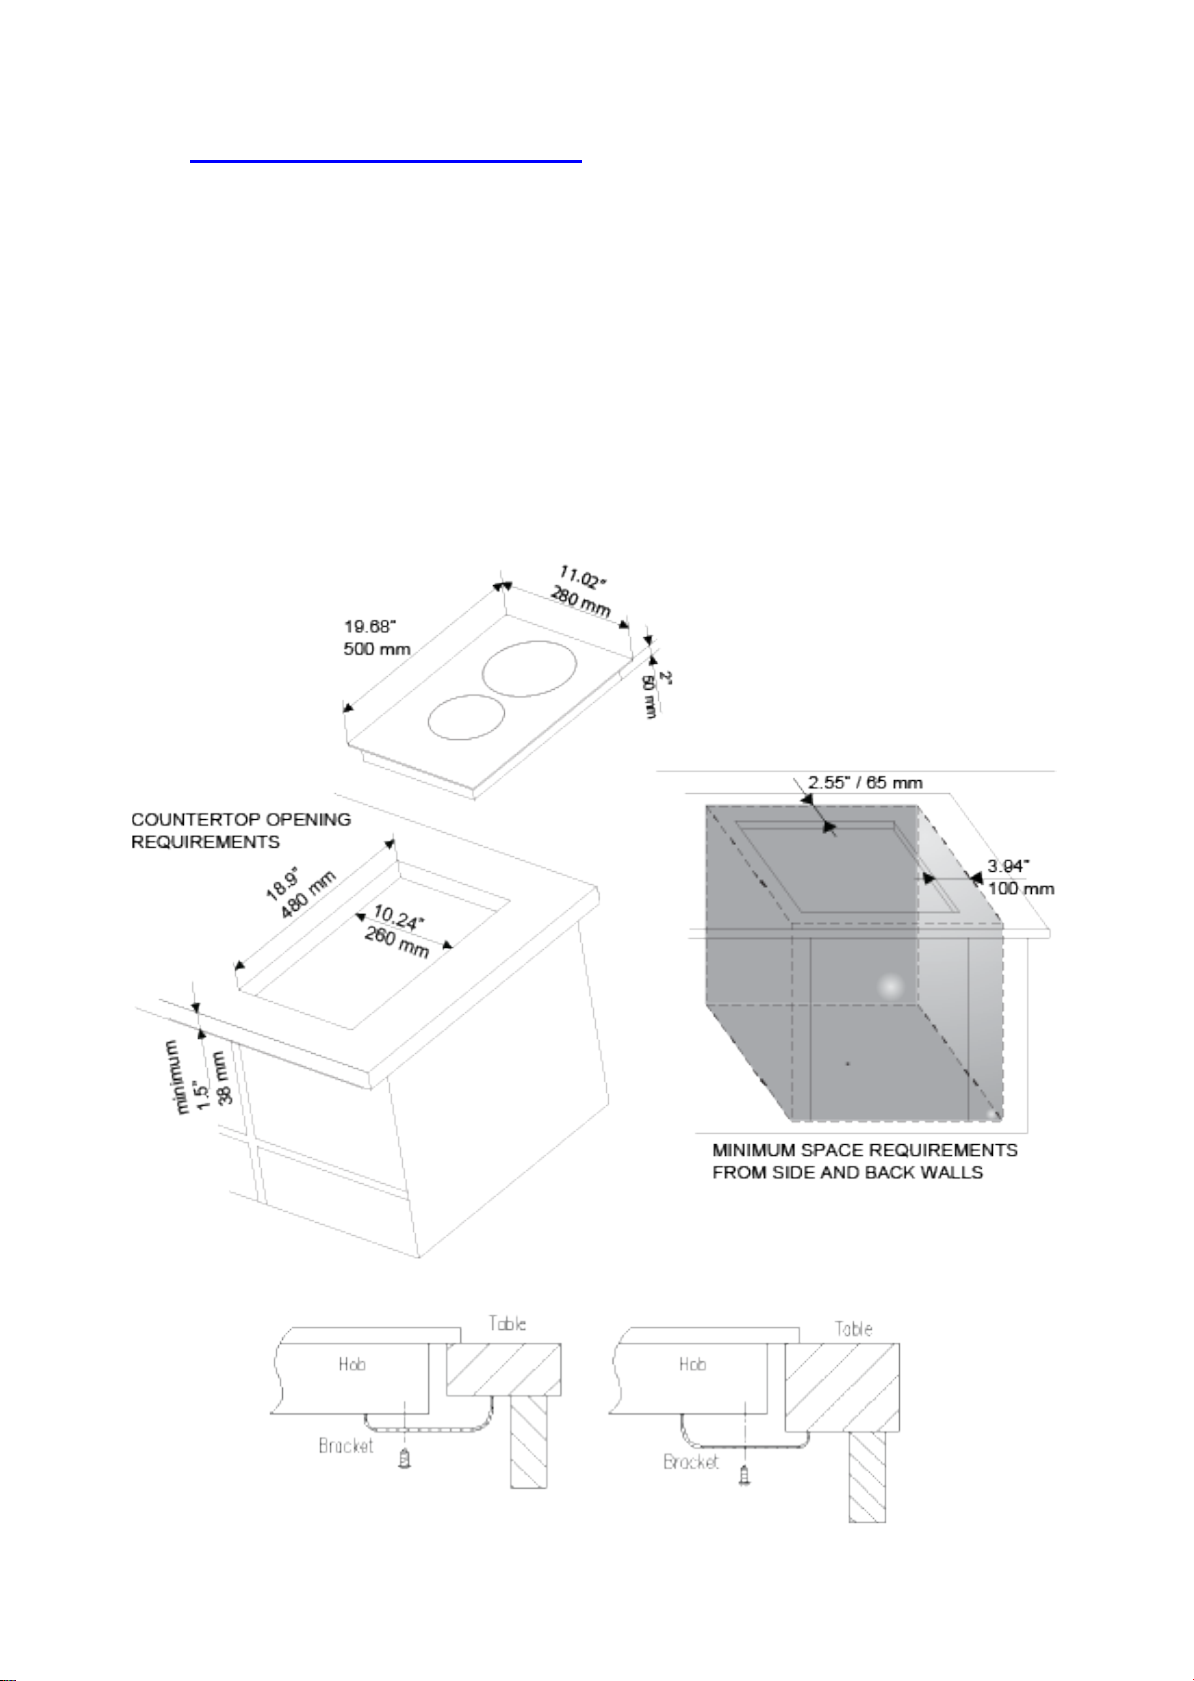
Ø INSTALLATION OF ELECTRIC COOKTOP
• The electric cooktop must be installed by a qualified technician. Make sure you have everything
necessary for correct installation. It is the installer’s responsibility to comply with installation
clearances specified in the manual.
• Cabinet opening dimensions that are shown below must be used. Given dimensions are
minimum clearances. The minimum spacings must be maintained between the appliance
cooking surface and the horizontal surface above the cooking top.
• 30 inches is the minimum clearance bet w een th e t op o f the cooking surf ac e an d t he bottom of
an unprotected wood or metal cabinet
• To eliminate the risk of burns or fire by reaching over heated surface units, cabinet storage
space located abo ve th e s u rf ac e units should be avoid ed. If cabinet storage is to be provided,
the risk can be reduced by installing a vent hood that projects horizontally a minimum of 5
inches beyond the bottom of the cabinets.
• Avoid locating the unit in moist areas. As this may result in the risk of electrical shock.
11
Page 12
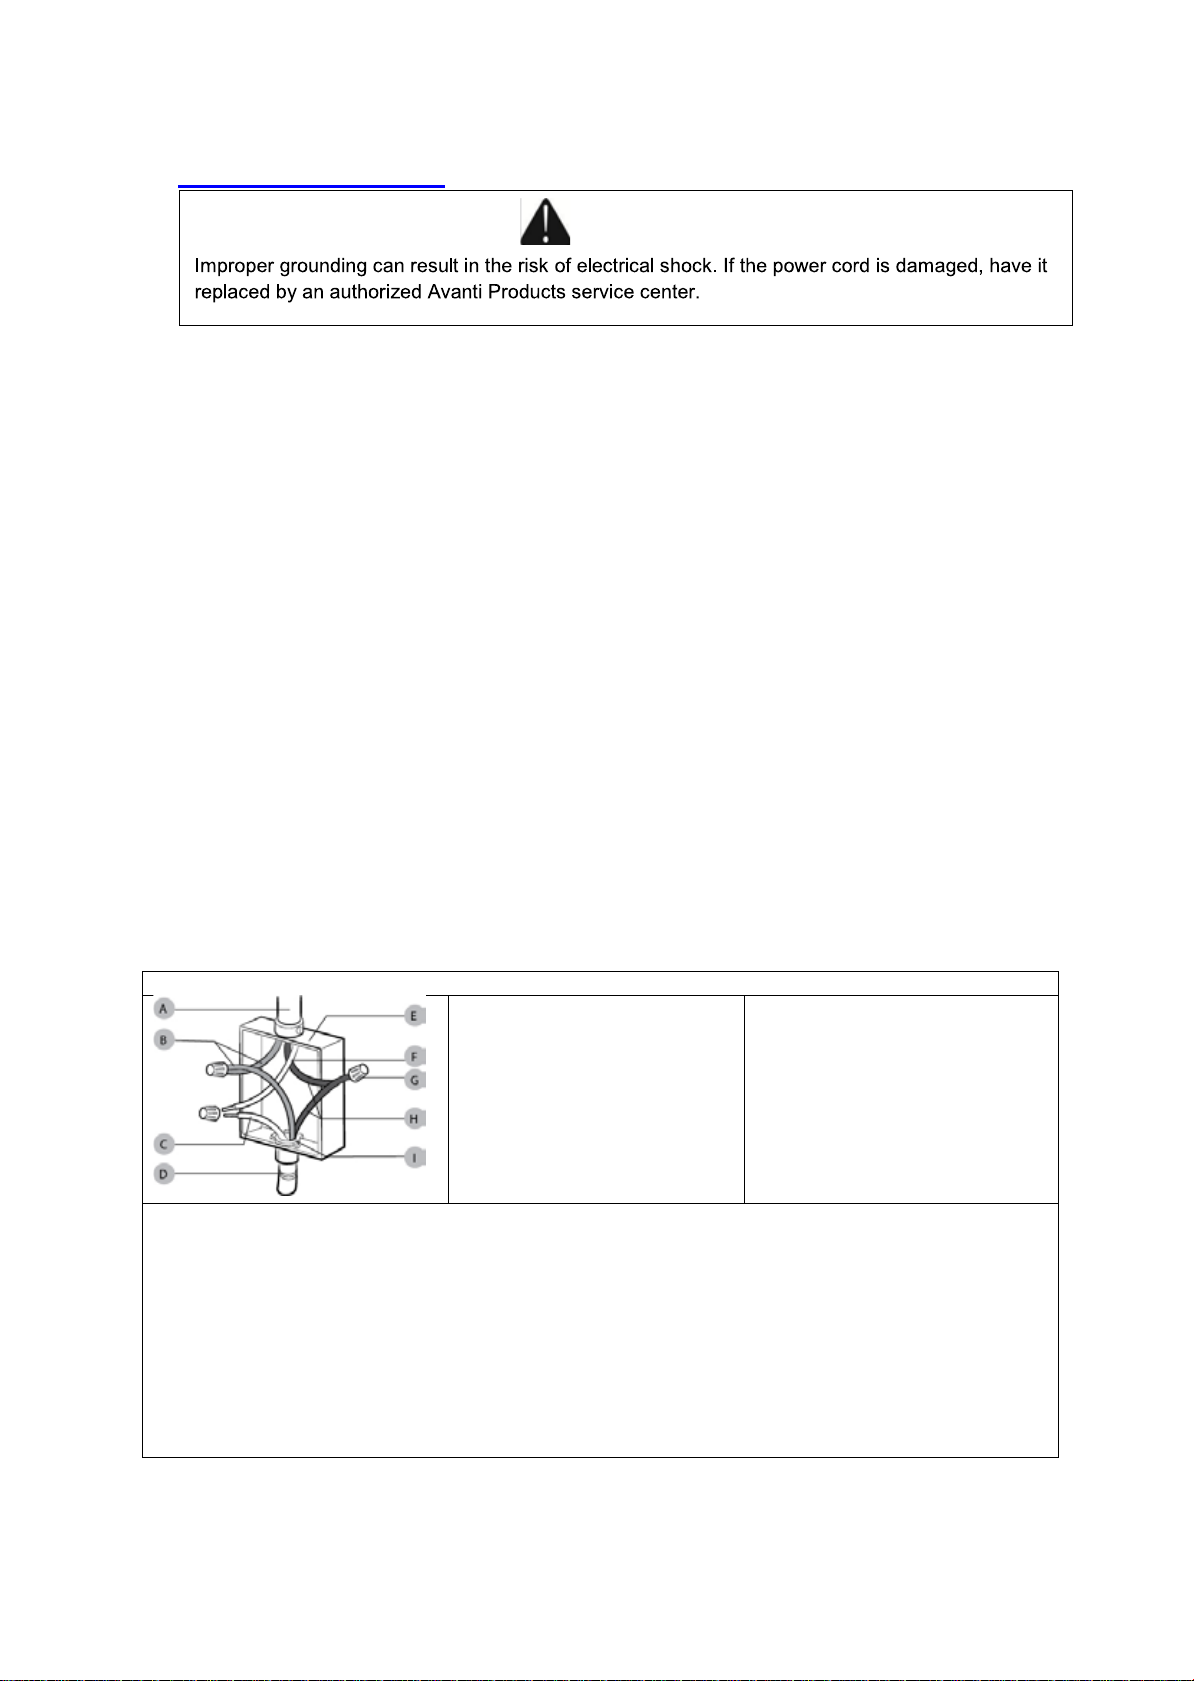
INSTALLATIO N MUST BE D ON E B Y A LICE SN SED PROFESSION AL
A – 3-wire cable from the
E – Junction Box
F – Neutral wire
1. Disconnect Main Power Supply
9. Reconnect power.
Ø ELECTRICAL CONNECTION
WARNING
The appliance must be properly installed and grounded by a qualified technician in accordance, with the
National Electrical Code ANSI / NFPA No. 70 (Latest Edition) and local electrical code requirements.
Installation should be made by a licensed electrician.
The appliance may be connected by means of permanent “Hard Wiring” or “Power Supply Cord Kit”.
The cooktop must be connected to the proper electrical voltage and frequency as specified on the rating
label. Note: Unit must be connected to an independent 20 Amp circuit.
The cooktop can be connected directly to the fused disconnect (or circuit breaker box) through flexible,
armored or non-metallic sheathed, copper cable (with grounding wire). Allow two to
the line so that it can be moved if servicing is ever necessary.
FOR PERSONAL SAFETY, THE COOKTOP MUST BE PROPERLY GROUNDED.
Remove house fuse or open circuit breaker before beginning installation.
Do not attempt to repair or replace any part of the appliance unless it is specifically recommended in this
manual. All other servicing should be referred to a qualified technician.
To minimize the possibility of electric shock, disconnect this appliance from the A/C power supply before
attempting any maintenance.
NOTE: Turning the appliance off does not disconnect the appliance from the power
supply. We recommend having a qualified technician service your appliance.
three feet of slack in
2. Remove junction box cover, if present.
3. Connect the flexible cable conduit from the cooktop to the junction box using a UL listed or
CSA approved conduit connector.
4. Tighten screws on conduit connector, if present.
5. Connect the two L2 wires together using the UL listed wire connectors
6. Connect the two L1 wires together using the UL listed wire connectors
7. Connect the Ground (G) or bare ground wire from the cooktop cable to the Ground (G) or bare
ground wire (in the junction box) using UL listed wire connectors.
8. Install junction box cover
main power supply
B – L1 Wires
C – Ground (G) or bare
ground wire (from
cooktop)
D – 3-Wire cable from the
cooktop
12
(from power supply)
G – UL listed wire connector
H – L2 wires
I – UL listed or CSA approved
conduit connector
Page 13
1
Control Panel Lock Button
6
Rear Burner Selector Button
2
Front Burner Selector Button
7
Power ON / OFF Button
3
Reduce / Decrease ( - ) Button
8
Rear Burner Control Display
4
Timer Selector Button
9
Timer Control Display
5
Add / Increase ( + ) Button
10
Front Burner Control Display
0
1 – 2
3 – 4
5 – 6
7 – 8
9
No Heat
Low Heat
Medium
Low Heat
Medium
Heat
Medium
High Heat
High Heat
Ø CONTROL PANEL
OPERATING YOUR APPLIANCE
POWER ON / OFF BUTTON
Push this button to turn the cooktop power on or off,
BURNER SELECTOR BUTTONS (FRONT BURNER / REAR BURNER)
Press the appropriate button for the desired burner.
Once pressed the burner display will show the default setting ( 5 = Medium), adjust to the desired
cook temperature using the ( - ) or ( + ). The temperature setting ranges from 0 – 9. The setting will
blink or flash in the display indicating it is in setting mode. Once you have selected the desired
temperature simply press the button for the selected burner or leave the control panel alone for
approximately for 3 seconds, the setting will stop blinking in the display window.
Example of comparable temperature ranges:
AUTOMATIC SHUT OFF TIMER
Press to set a pre-set c ook time, press the T im er butto n and the n s et th e desired cook tim e us ing th e
( - ) or ( + ) buttons. The default time is 10 minutes.
Press the button for the desired burner (front or rear), then select the desired cook temperature setting
using the ( - ) or ( + ) buttons.
Press the timer butto n (10 will appear in the displa y window as 10 minutes is the def ault), set the
desired cook time by pressing the ( - ) or ( + ) buttons (time ranges between 0 – 99 minutes).
The ( • ) next to the temperature setting in each w indow will turn on to ind icat e t h e timer has been set
for that burner.
Once set, the unit will automatically shut off after the cook time has expired.
HOT SURFACE INDICATOR
After the burner is used and turned off, the display will flash ( H ) to warn that the surface is still hot.
Once the burner and surface has cooled down the ( H ) indicator will turn off automatically.
Each burner will show the ( H ) warning respectively.
13
Page 14
CONTROL PANEL LOCK:
When the control panel lock is activated, the display will flash LO. This is a safety system that will
automatically lock the controls after no activity on the control panel for approximately 1 minute. To
deactivate the control panel lock, simply press and hold the button for approximately 3 seconds, the
indicator light will turn off and the controls will work as normal.
To activate the lock, simply press and hold the button for approximately 3 seconds and the control
panel will be lock and will not allow any changes.
Ø COOKWARE TIPS
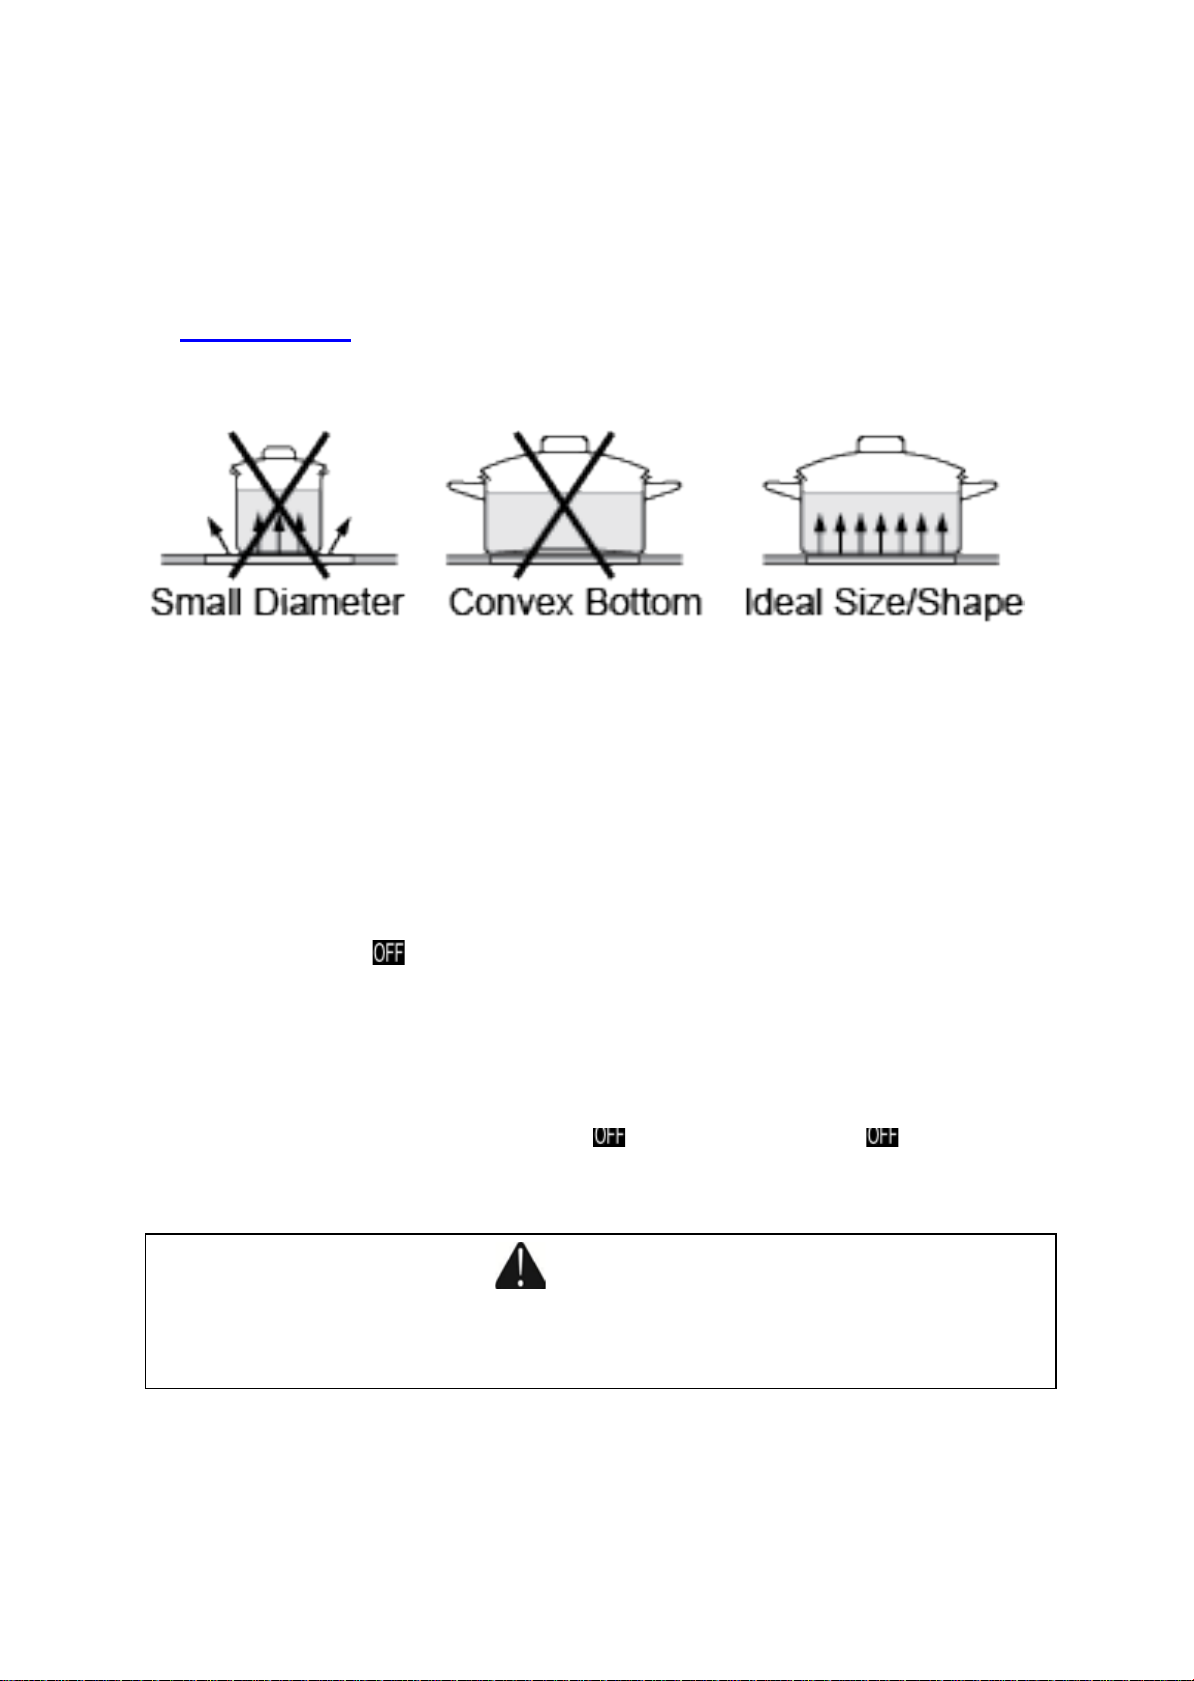
The physical characteristics of pots and pans influence the performance of any cooking systems.
Therefore, emphasis must be placed on the importance of using proper cookware.
• Use cooking vessels with flat bottoms and tight-fitting lids to conserve energy and shorten cooking
times.
• Only certain types of glass, glass/ceramic, ceramic, earthenware or other glazed utensils are
suitable for cooktop. Manufacturers suggest using low to medium heat selections when using
glass cookware.
• Pan size should match the element size. A slightly larger pan covers the entire element and
prevents spillovers from contacting the heat surface and burning in. Using a smaller pan than the
element is a waste of energy.
• To avoid spattering and to maximize efficiency, pan bottoms should be clean and dry before
coming in contact with the elements.
• Wipe spills off the elements with a damp cloth as soon as they cool to cut down on clean up time.
Be sure the control is .
If a surface unit stays red for a long time, the bottom of the pan is not flat enough or is too small for
the surface unit. Prolonged usage of incorrect utensils could result in damage to the surface unit,
cooktop, wiring and surrounding areas. To prevent damage use correct utensil, start cooking on
position HI and turn control down to continue cooking.
Never leave an empty utensil, or one which has boiled dry, on a hot surface unit. The utensil could
overheat and damage the utensils or surface unit.
Always be sure that all control knobs are turned to and the ind icator li ghts are when you are
not cooking.
WARNING
Make sure that the handles of cookware do not stick out over the edge of the appliance,
to avoid them being knocked over by accident. This also makes it more difficult for children
to reach the cooking pots/pans.
14
Page 15
PROBLEM
POSSIBLE CAUSE
Surface units will not maintain a rolling boil or
• You must use pans that are absolutely flat.
diameter of the surface unit selected.
Foods cook slowly
• Improper cookware being used.
Surface units do not operate
Controls will not respond to touch.
• The control panel lock is activated.
CAR E AND MAINTENANCE
Ø GENERAL INFORMATION
• CAUTION: Before any operation of cleaning and maintenance disconnect the appliance
from the electrical supply.
• It is advisable to clean when the appliance is cold and especially for cleaning the glass cooktop.
• Avoid leaving alkaline or acidic substances (lemon juice, vinegar, etc.) on the surfaces.
• Avoid using cleaning products with a chlorine or acidic base.
• The cooktop should always be cleaned after every use.
Ø CLEANING YOUR APPLIANCE
• Disconnect the A/C from the main power box or designated circuit breaker, turn off the cooktop,
make sure all surface units are off and cool before removing proceeding.
• The cooktop surface should be cleaned with mild detergent and warm water.
• Wring excess water out of the sponge or cloth when cleaning area of the controls, or any electrical
parts.
• Wipe dry with a clean soft cloth.
• Do not use steel wool or steel brush on the cooktop.
PROBLEMS WITH YOUR APPLIANCE?
You can solve many common appliance problems easily, saving you the cost of a possible service
call. Try the suggestions below to see if you can solve the problem before calling the servicer.
TROUBLESHOOTING GUIDE
frying rate is not fast enough
• Pan bottoms should closely match the
• You have blown a household fuse or tripped
a circuit breaker.
• You have not set the temperature control
correctly.
• Deactivate the control panel lock as
previously described in this manual
15
Page 16

800-323-5029
help is available.
check, money order, Master Card, or Visa.
know your appliance inside and out.
SERVICE FOR YOUR APPLIANCE
We are proud of our customer service organization and the network of professional service technicians
that provide service on you r Avanti appliances. With the purchase of your Avanti
have the confidence that if you ever need additional inf ormation or assistance, the
Customer Service team will be here for you. Just call us toll-free.
appliance, you can
Avanti Products
AVANTI PRODUCTS CUSTOMER SERVICES
Product Information
Whatever your questions are about our products,
Part Orders
800-220- 5570
In-Home Repair Service
800-220-5570
You may order parts and accessories that will be
delivered directly to your home by personal
An Avanti Products aut horized service center will
provide expert repair s er vice, scheduled at a time
that is convenient for you. Our trained servicers
WIRING DIAGRAM
16
Page 17

Staple your sales r eceipt here. Proof of original
WHAT IS COVERED – LIMITED ONE-YEAR WARRANTY
center for repair.
FULL 30 – DAY WARRANTY
From the date of purchase on glass parts and finish of porcelain enamel, painted, or bright metal finished parts.
WARRANTY EXCLUSIONS / WHAT IS NOT COVERED:
•
lightning, power surges, structural failures surrounding the appliance, and acts of God.
•
In no event shall Avanti Products have any liability or responsibility whatsoever for damage to surrounding
OUT OF WARRANTY PRODUCT
WARRANTY – RANGES / TOASTER OVENS
YOUR AVANTI PRODUCTS
WARRANTY
Avanti Products warrants that the product is free from defects in materials and/or workmanship for a period of
twelve (12) months from the date of purchase by the original owner. The foregoing timeline begins to run upon
the date of purchase, and shall not be stalled, tolled, extended, or suspended for any reason whatsoever unless
described in detail in the warranty document. For one year from the date of purchase by the original owner,
Avanti products will, at its option, repair or replace any part of the product which proves to be defective in
material or workmanship under normal use. Avanti Products will provide you with a reasonably similar product
that is either new or factory refurbished. During this period Avanti Products will provide all parts and labor
necessary to correct such defects free of charge, so long as the product has been installed and operated in
accordance with the written instructions in this manual. In rental or commercial use, the warranty period is 90
days. All Avanti appliances of 4.4 cubic feet capacity or less must be brought/sent to the appliance service
The warranty coverage described herein excludes all defects or damage that are not the direct fault of Avanti
Products, including without limitation, one or more of the following:
A failure to comply with any applicable state, local, city, or county electrical, plumbing and/or building codes,
regulations, or laws, including failure to install the product in strict conformity with local fire and building codes
and regulations.
purchase date is needed to obtain service under
warranty.
• Any external, elemental and/or environmental forces and factors, including without limitation, rain, wind, sand,
floods, fires, mud slides, freezing temperatures, excessive moisture or extended exposure to humidity,
Content losses of food or other content due to
spoilage.
• Incidental or consequential damages
• Parts and labor costs for the following will not be
considered as warranty:
• Light bulbs and/or plastic housing.
• Failure of the product if it is used for other than it
intended purpose.
• Shipping and handling costs associated with the
replacement of the unit.
property, including cabinetry, floors, ceilings, and other structures and/or objects around the product. Also
excluded from this warranty are scratches, nicks, minor dents, and other cosmetic damages on external surfaces
and exposed parts; Products on which the serial numbers have been altered, defaced or removed; service visits
for customer education, or visits where there is nothing wrong with the product; correction of installation problems
(you are solely responsible for any structure and setting for the product, including all electrical, plumbing and/or
other connecting facilities, for proper foundation/flooring, and for any alterations including without limitation
cabinetry, walls, floors, shelving etc., as well as the resetting of breakers or fuses.
Avanti Products is under no obligation, at law or otherwise, to provide you with any concessions, including
repairs, pro-rates, or product replacement, once this warranty has expired.
• Repairs performed by unauthorized servicers.
• Service calls that are related to external problems,
such as abuse, misuse, inadequate electrical
power, accidents, fire, floods, or any other acts of
God.
• Surcharges including but not limited to, any after
hour, weekend, or holiday service calls, tolls, ferry
trip charges, or mileage expense for service calls to
remote areas.
• The warranty does not apply outside the
Continental USA.
17
Page 18

AVISO DE SEGURIDAD
Su seguridad y la seguridad de los demás son muy importantes.
Nosotros h an inc lu ido muchos mensajes importantes de seguridad en este manual y en su
electrodoméstico. Siempre lea y obedezca todos los mensajes de seguridad.
Éste es el símbolo de alerta de seguridad.
Este símbolo le advierte sobre peligros potenciales que pueden ocasionar la
muerte o lesionar a usted y otros. Todos los mensajes de seguridad seguirán el
símbolo de alerta de seguridad y las palabras “PELIGRO”, “ADVERTENCIA” o
“PRECAUCIÓN”. Estas palabras significan:
Peligro significa que el incumplimiento de
esta medida de seguridad podría resultar
en lesiones graves o la muerte.
Advertencia significa que si no se respeta
esta medida de seguridad podría resultar
en graves daños al producto, lesiones
personales graves o la muerte.
Precaución significa que el incumplimiento de
medida de seguridad podría resultar en
esta
menor o lesiones moderadas, o daños a la
propiedad o equipo.
Todos los mensajes de seguridad que le avise a cuál es el peligro potencial, le dirán cómo reducir el
riesgo de lesiones, y le hará saber lo que puede suceder si no se siguen las instrucciones.
18
Page 19

AVISO DE SEGURIDAD IMPORTANTE
Antes de usar el aparato, tiene que estar bien posicionada e instalada como se
describe en este manual, así que lea cuidadosamente el manual. Para reducir el
riesgo de incendio, descarga eléctrica o lesiones al utilizar el aparato, siga las
precauciones básicas, incluyendo las siguientes:
• Se recomienda que un circuito separado, que preste servicio únicamente su aparato.
• Nunca limpie partes de electrodomésticos con líquidos inflamables. Estos vapores pueden crear
un riesgo de incendio o explosión. Y no se almacene o use gasolina u otros vapores y líquid os
inflamables cerca de este o cualquier otro electrodoméstico. Los vapores pueden crear un riesgo
de incendio o explosión.
• Antes de proceder con las operaciones de limpieza y mantenimiento, asegúrese de que la
línea de alimentación de la unidad se desconecta.
• Desconecte la alimentación del aparat o ant es de la lim pie za o el mantenimiento. El no hacerlo
puede provocar una descarga eléctrica o la muerte.
• No intente reparar o reemplazar cualquier parte de su aparato a menos que se
recomiende específicamente en este manual. Cualquier otro servicio debe ser
realizado por un técnico cualificado.
• Este aparato no se utiliza para la calefacción del espacio. La unidad de superficie no debe
ser operado sin utensilios de cocina. Esta información se basa en consideraciones de
seguridad.
• Mantenga el área del aparato despejada y libre de materiales combustibles, gasolina y otros
vapores inflamables.
• No obstruya el flujo de aire de ventilación.
• Desconectar la alimentación eléctrica del aparato antes de dar servicio.
• Al retirar el aparato para la limpieza y / o servicio:
• Desconectar la fuente de alimentación AC.
• Es importante que el aparato se puede nivelar con el fin de funcionar correctamente. Es
posible que tenga que hacer varios ajustes para nivelarla.
• Nunca permita que los niños operen, jueguen o se sientan en el aparato.
• Instrucciones de conexión eléc tric a a tierr a - El aparato debe estar conectado a tierra por un
técnico calificado de acuerdo con el Código Eléctrico Nacional ANSI / NFPA No. 70 (última
edición) y los requisitos de los códigos eléctricos locales.
• Piezas de repuesto - Sólo las piezas de repuesto autorizadas se pueden usar en la realización
de servicio en el aparato. Las piezas de repuesto están disponibles en los distribuidores de
piezas autorizado por la fábrica. Póngase en contacto con el centro de servicio más cercana
Avanti en su área.
19
Page 20

2.
Botón selector para la hornilla delantera
3.
Botón para Reducir / Disminuir (-)
4.
Botón selector para el reloj
5.
Botón para Añadir / Aumentar (+)
6.
Botón selector para la hornilla trasera
7.
Botón para encender / apagar
8.
Superficie de la cocina
9
Hornilla delantera (1200 vatios)
10
Hornilla trasera (1800 vatios)
PIEZAS Y CARACTERÍSTICAS
1. Botón del bloqueo del panel de control
20
Page 21

• Lea todas las instrucciones antes de usar el aparato.
desconectado de la fuente de alimentación principal. No utilice el aparato hasta que haya
adyacentes.
INSTRUCCIONES DE SEGURIDAD IMPORTANTES
Para reducir el riesgo de incendio, descarga
ADVERTENCIA
• Instalación correcta - Asegúrese de que el aparato está correctamente instalado
y conectado a tierra por un técnico calificado.
• trabajos de mantenimiento de la instalación, reparación y deben ser realizadas
por un técnico cualificado. El trabajo por personal no cualificado podría ser
peligroso y podría anular la garantía.
• Instalar el aparato de modo que el cable de alimentación no entre en contacto con
cualquier parte de la unidad que puede calentarse durante el uso.
• En caso de cualquier daño en el aparato, se debe apagar inmediatamente y
sido reparado.
• Nunca utilice su aparato para calentar la habitación.
• No deje a los niños solos - Los niños no deben ser dejados solos o sin vigilancia en el
área donde el aparato está en uso. Nunca se les debe permitir sentarse o pararse en
ninguna parte del aparato.
• No almacene artículos de interés para los niños en los armarios que están sobre el
aparato. Los niños que se suban a la estufa para alcanzar estos artículos podrían ser
dañados.
• El aparato está caliente durante el uso y permanece así durante algún tiempo
después de la desconexión. Mantenga a los niños alejados del aparato.
• Asegúrese de que todo el material de embalaje está dispuesto de forma segura y
que se mantengan fuera del alcance de los niños. Peligro de asfixia!
• Use ropa adecuada - suelta o prendas colgadas Nunca se deben usar durante el
uso del aparato.
• Servicio del usuario - No repare o reemplace ninguna parte del aparato a menos
que se recomiende específicamente en el manual. Cualquier otro servicio debe ser
referido a un técnico cualificado.
• Almacenamiento en o sobre dispositivos - materiales inflamables no debe ser
almacenado cerca de las unidades de superficie.
• No utilice agua para apagar un fuego- - apagar un incendio o fuego o usar químico
seco o un extinguidor de espuma-.
• Utilice sólo agarradores en seco - Agarradores húmedos en superficies calientes
pueden provocar quemaduras de vapor. No use una toalla u otro paño voluminoso.
• El uso apropiado Tamaño Pan - Este aparato está equipado con una o más unidades
de superficie de diferente tamaño. Elija utensilios con bases planas lo suficientemente
grandes para cubrir el elemento calefactor de la unidad de superficie. El uso de
utensilios expondrá una porción del elemento de calefacción para el contacto directo y
puede ocasionar quemaduras de las prendas de vestir. La relación apropiada entre el
utensilio y el quemador también mejorará la eficiencia.
• Nunca descuide las unidades superficiales trabajando a altas temperaturas Hervir causa humo y derrames grasosos que pueden encenderse.
• Utensilios vidriados de cocina - Sólo ciertos tipos de vidrio, vidrio / cerámica, cerámica,
loza de barro, u otros utensilios de vidrio son adecuados para el servicio de la parte
superior del aparato debido al cambio repentino de temperatura.
• Mangos de los utensilios deben colocarse hacia adentro y no deben extenderse hasta
las unidades exteriores adyacentes
- Para minimizar quemaduras, el encendido de materiales inflamables y derrames
debido a contacto accidental con el utensilio, el mango de un utensilio debe colocarse
de modo que se gira hacia adentro, y no se extiende sobre las unidades de superficie
eléctrica o lesiones al utilizar el aparato, siga
estas precauciones básicas:
21
Page 22

• No cocine en un aparato defectuoso - Si el aparato se rompe, soluciones de limpieza y
derrames pueden penetrar en la quebrada encimera y crear un riesgo de descarga
eléctrica. Póngase en contacto con un técnico cualificado de inmediato.
• Limpia el aparato con precaución - una esponja húmeda o un paño para limpiar
derrames en una superficie caliente, tenga cuidado para evitar quemaduras por
vapor. Algunos limpiadores pueden producir humos nocivos si se aplican a una
superficie caliente.
• No caliente envases de comida sin abrir - La acumulación de presión puede hacer
estallar el recipiente y ocasionar heridas.
• Mantenga conductos de ventilación despejada.
• No toque las unidades de superficie, elementos de calefacción o las áreas cercanas a
las unidades - Las unidades de superficie y elementos de calefacción puede estar
caliente a pesar de que son de color oscuro. Area cerca de la superficie se calientan lo
suficiente para causar quemaduras.
Esta unidad es para uso en interiores
-GUARDA ESTAS INSTRUCCIONES-
22
Page 23

INSTRUCCIONES DE INSTALACIÓN
ADVERTENCIA
ESTE APARATO REQUIERE INSTLACION POR UN INSTALADOR
CALIFICADO.
La instalación, ajuste, modificación o mantenimiento inadecuados pueden causar lesiones o
daños materiales.
Consulte a un instalador o servicio agencia calificada.
IMPORTANTE - GUARDAR PARA EL USO DEL INSPECTOR LOCAL DE ELECTRICIDAD.
Ø ANTES DE USAR LA CUBIERTA ELECTRIC
• Retire la envoltura interna y externa.
• Compruebe para asegurarse de que tiene todas las siguientes partes:
• 1 Manual de instrucciones
• 1 Juego de Instalación de soporte de montaje (4 soportes en total).
(Empacado en el embalaje de espuma - NO DESCARTAR)
• Limpiar la superficie de cocción con agua templada y un paño suave o una esponja.
• Tenga su aparato instalado y conectado a tierra adecuadamente por un instalador calificado
de acuerdo con las instrucciones de instalación.
• No intente reparar o reemplazar cualquier parte de su aparato a menos que se recomiende
específicamente en este manual.
• No retirar las etiquetas adheridas de forma permanente, advertencias o placas del producto.
Esto puede anular la garantía.
• El instalador debe dejar estas instrucciones con el consumidor que debe conservar para el
uso del inspector local y para referencia futura.
• Por favor, observe todos los códigos y reglamentos locales y nacionales.
IMPORTANTE:
Esta cocina está diseñada y fabricada exclusivamente para la cocción de alimentos de hogar y no
es adecuada para cualquier aplicación no doméstica y por lo tanto no debe utilizarse en un entorno
comercial.
La garantía del aparato será nula si la cocina se utiliza dentro de un entorno no doméstico es
decir, un entorno comercial, comercial o semi-comercial.
23
Page 24

Ø PRECAUCIONES Y RECOMENDACIONES IMPORTANTES
Después de haber desembalado el aparato, compruebe que no está dañado y se recibieron todos
los accesorios o elementos incluidos. En caso de duda, no lo use y consulte a su proveedor o un
técnico cualificado profesionalmente.
elementos de relleno (es decir, bolsas de plástico, espuma de poliestireno, cintas para embalaje,
etc.) no deben dejarse alrededor de alcance de los niños, ya que pueden causar lesiones graves.
El aparato ha sido probado a fondo para un funcionamiento seguro y eficiente. Sin embargo, como
con cualquier aparato, existen precauciones de instalación y seguridad específicos que deben
seguirse para garantizar un funcionamiento seguro y satisfactorio.
• No intente modificar las características técnicas del aparato ya que esto puede llegar a
ser peligroso para su uso.
• No llevar a cabo las operaciones de limpieza y mantenimiento en el aparato sin
haber previamente desconectado de la fuente de alimentación eléctrica.
• Después de su uso, asegúrese de que los controles estén en la posición.
• No tocar el aparato con las manos o los pies mojados.
• No haga funcionar el aparato descalzo.
• No permita que los niños u otras personas incapaces utilizar el aparato sin vigilancia.
• Durante y después del uso del aparato, algunas partes se volverán muy caliente. No toque
las partes calientes.
• Mantenga a los niños alejados del aparato cuando esté en uso.
• Asegúrese de que los cables eléctricos que conectan otros aparatos en las
proximidades del aparato no pueden entrar en contacto con la placa de cocción.
• El fabricante declina toda responsabilidad por daños a personas o daños a la propiedad
causados por el uso incorrecto o impropio del aparato.
• Para evitar cualquier peligro posible, el aparato debe ser instalado por personal
cualificado. Cualquier reparación realizada por personas no cualificadas pueden provocar
una descarga eléctrica o un cortocircuito. Con el fin de evitar posibles lesiones en su
cuerpo o en el aparato, no intente reparar por sí mismo de hormigas. Este tipo de trabajo
debe ser realizado únicamente por personal cualificado.
• Peligro de quemaduras! El aparato puede llegar a ser muy caliente durante el
funcionamiento. Asegúrese que los niños se mantienen fuera del alcance y les advierten
en consecuencia. Para evitar quemaduras, tenga ropa y guantes para la manipulación de
piezas calientes o utensilios.
• Párese lejos del aparato cuando se opera. El aire caliente o el vapor que se escapa puede
causar quemaduras en las manos, la cara y / o los ojos.
• Nunca limpiar con los dispositivos de limpieza de vapor de alta presión, ya que puede
provocar un cortocircuito.
• Este aparato está destinado para el uso doméstico. No utilizar el aparato para ningún otro
propósito.
• Si decide no utilizar más el aparato (o deciden sustituir un modelo antiguo), antes de
deshacerse de él, se recomienda que se haga inoperante de forma adecuada de acuerdo
con las normas sanitarias y de protección del medio ambiente, garantizando, en particular
que todas las partes potencialmente peligrosas pueden hacer inofensiva, especialmente en
relación con los niños que pueden jugar con los viejos aparatos.
24
Page 25

Ø INSTALACIÓN DEL AP ARAT O
• El aparato debe ser instalada por un técnico cualificado. Asegúrate de que tienes todo lo
necesario para una instalación correcta. Es responsabilidad del instalador cumplir con los
requisitos de instalación especificadas en el manual.
• Deben utilizarse dimensiones de la cubierta de apertura que se muestran a continuación.
Dimensiones dadas son las distancias mínimas. Las separaciones mínimas deben ser
mantenidos entre la su perfic ie de aparato de c occión y la superf icie horizont al por enc ima de
la superficie de cocción.
• 30 pulgadas es la distancia mínima entre la parte superior de la superficie de cocción y la parte
inferior de una madera sin protección o armario metálico
• Para eliminar el riesgo de quem adur as o incen dio al to car unidades d e superf icie calentadas ,
espacio de almacenam iento del armario, ubicado por encima de las unidades de superf icie
debe ser evitado.
• Evitar la localización de la unidad en áreas húmedas. Ya que esto puede resultar en el riesgo
de descarga eléctrica.
25
Page 26

LA INSTALACIÓN DEBE SER REALIZADA POR UN PROFESIONAL CON LICENCIA
A - cable de 3 hilos del
E - Caja de conexiones
F - Cable neutro
1. Desconecte la fuente de alimentación principal
9. Conecta la electricidad.
Ø CONEXIÓN ELÉCTRICA
ADVERTENCIA
El aparato debe estar correctamente instalado y conectado a tierra por un técnico calificado de
acuerdo con el Código Eléctrico Nacional ANSI / NFPA No. 70 (última edición) y los requisitos del
código eléctrico local. La instalación debe hacerla un electricista autorizado.
El cable de alimentación no se suministra, pero está disponible a través de su casa de suministro
eléctrico loca l.
Use sólo 3-conductor o cable de 4 conductores gama UL nominal de 40 amperios con 125 / 250V gama
de voltaje mínimo. Estos cordones pueden estar provistos de alivio de tensión o conector de conducto.
La placa de cocción debe estar conectada a la tensión eléctrica adecuad a y la frec uenci a como se
especifica en la etiqueta. Nota: La unidad debe es tar conec tad a a un circu ito ind epen di ente de 20
amperios.
La placa de cocción se puede conectar directamente a la de fusibles (o caja de disyuntor) a través
flexible, armado o no metálico envainado, cable de cobre (con el alambre de conexión a tierra). Permitir
dos a tres pies de holgura en la línea para que se pueda mover fácilmente, si alguna vez es necesario.
PARA SEGURIDAD PERSONAL, La estufa debe conectarse a tierra correctamente.
Quite el fusible o interruptor de circuito abierto antes de comenzar la instalación.
No intente reparar o reemplazar cualquier parte del aparato a menos que se recomiende
específicamente en este manual. Cualquier otro servicio debe ser realizado por un técnico cualificado.
Para minimizar la posibilidad de descarga eléctrica, desconectar el aparato de la fuente de alimentación
A / C antes de realizar cualquier mantenimiento.
NOTA: Poniendo el aparato en OFF no desconecta el aparato de la fuente de alimentación. Se
recomienda tener un técnico calificado para servir su unidad.
2. Retire la cubierta de la caja de conexiones, si está presente.
3. Conecte el conducto del cable flexible desde la cubierta a la caja de conexiones usando un
conector de conducto aprobado por UL o CSA.
4. Apriete los tornillos en el conector del conducto, si está presente.
5. Conecte los dos cables L2 juntos usando los conectores de cables aprobados por UL
6. Conecte los dos cables L1 juntos usando los conectores de cables aprobados por UL
7. Conecte la conexión a tierra (G) o el cable de conexión a tierra desde el cable de la cubierta a
la conexión a tierra (G) o al cable de conexión a tierra (en la caja de conexiones) utilizando
los conectores de cables aprobados por UL.
8. Instalar la tapa de la caja de conexiones
fuente de alimentación
principal
B - Alambres L1
C - Tierra (G) o cable de
tierra desnuda (desde la
superficie de cocción)
D - Cable de 3 hilos desde la
cubierta
26
(desde el suministro de
energía)
G - conector de cable listado
por UL
H - L2 cables
I - Conector de conducto
homologado UL o CSA
Page 27

1
Botón selector del bloqueo del contro l
de panel
6
Botón selector – hornilla trasera
2
Botón selector – hornilla delantera
7
Botón para encender / apagar
3
Botón para Reducir / Disminuir (-)
8
Pantalla indicadora para la
hornilla trasera
4
Botón selector del reloj
9
Pantalla indicadora del reloj
5
Botón para Añadir / Aumentar (+)
10
Pantalla indicadora para la
hornilla delantera
0
1 - 2
3 - 4
5 - 6 En
7 - 8
9
Sin calor
Fuego lento
Medio Bajo
Fuego
medio
Fuego
medio-alto
Fuego Alto
Ø PANEL DE CONTROL
FUNCIONAMIENTO DEL APARATO
POWER ON / OFF
Pulse este botón para encender o apagar el aparato.
Botón selector para las hornillas (Delantera / Trasera)
Presione el botón apropiado para la hornil la desea da.
Una vez que se presiona, la pantalla de la hornilla mostrará la configuración predeterminada (5 = Medio),
ajústela a la temperatura de cocción des ea da usando (-) o (+). La configuración de temperatura oscila
entre 0 y 9. El ajuste parpadeará en la pantalla para indic ar que se enc ue ntra en el m odo de
configuración. Una vez que haya seleccionado la temperatura deseada simplemente presione el botón de
la hornilla para la seleccionar o deje el panel de control solo por aproximadamente 3 segundos, la
configuración dejará de parpadear en la pantalla y la hornilla se calentar a.
Ejemplo de intervalos de temperatura comparables:
Reloj
Presione para establecer un tiempo de cocción predeterminado, presione el botón del reloj y luego
configure el tiempo de cocción deseado con los botones (-) o (+). El tiempo predeterminado es 10 minutos.
Presione el botón para la hornilla deseada (frontal o trasera), luego seleccione la configuración deseada
de temperatura de cocción usando los botones (-) o (+).
Presione el botón del reloj (10 aparecerá en la pantalla como 10 minutos es el predeterminado), configure
el tiempo de cocción deseado presionando los botones (-) o (+) (el tiempo oscila entre 0 - 99 minutos).
El (•) a la derecha de la configuración de temperatura en cada pantalla se encenderá para indicar que el
reloj se ha configurado para esa hornilla.
Una vez configurada, la unidad se apagará automáticamente después de que el tiempo de cocción haya
expirado.
INDICADOR DE SUPERFICIE CALIENTE
Después se utilizar la hornilla, la pantalla indicará (H) para advertir que la superficie está caliente. Una
vez que la hornilla y la superficie se haya enfriado el indicador (H) se apagará automáticamente.
Cada hornilla mostrará el aviso (H), respectivamente.
27
Page 28

BLOQUEO DEL PANEL DE CONTROL:
Cuando el bloqueo del panel de control está activado, la pantalla mostrará LO. Este es un sistema de
seguridad que bloqueará automáticamente los control es despu és de que no ha ya activi dad en el panel de
control durante aproximadamente 1 minuto. Para desactivar el bloqueo del panel de control, simplemente
presione y mantenga presionado el botón durante aproximadamente 3 segundos, la luz indicadora se
apagará y los controles funcionarán normalmente.
Para activar el bloqueo, simplemente mantenga presionado el botón durante aproximadamente 3
segundos y el panel de control se bloqueará y no permitirá ningún cambio
Ø UTENSILIOS DE COCINA
Las características físicas de las ollas y sartenes influyen en el rendimiento de los sistemas de cocción.
Por lo tanto, se debe hacer hincapié en la importancia del uso de los utensilios correctos.
.
• Utilice recipientes de cocción con fondos planos y tapas herméticas para conservar la energía y
acortar cocción
veces.
• Sólo ciertos tipos de vidrio, vidrio / cerámica, cerámica, loza de barro u otros utensilios de vidrio son
adecuados para estuf a. Los fabr icantes sugieren el uso de bajos a medianos a l utilizar rec ipientes
de vidrio.
• Tamaño de recipiente debe coincidir con el tamaño del elemento. Una cacerola ligeramente más
grande cubre todo el elemento y
evita los efectos secundarios de contacto con la superficie de calor. El uso de una cacerola más
pequeña que el elemento es un desperdicio de energía.
• Para evitar salpicaduras y para maximizar la eficiencia, el fondo de recipientes debe estar limpios
y secos antes de entrar en contacto con los elementos.
• Limpiar los derrames fuera de los elementos con un paño húmedo, tan pronto como se enfrían para
reducir el tiempo de limpieza. Asegúrese de que el control es .
Si una unidad de superficie permanece en rojo durante mucho tiempo, el fondo de la olla no es lo
suficientemente pla na o es demasiado pequeño p ara l a un id ad de s uper f icie puede prov oc ar daños a la
unidad de superficie, su perficie de cocción, el cab lea d o y las zonas circundantes. Para e vit ar dañ os use
utensilios correctos, em pezar a cocinar en la pos ición HI y gire el contr ol hacia abajo para c ontinuar la
cocción.
Nunca deje un utensilio vacío, o uno que ha calentado, en una unidad de superficie caliente. El utensilio
podría sobrecalentar y dañar los utensilios o unidad de superficie.
Asegúrese siempre de que todas las perillas de control hacia y el indicador son cuando no estás
concinando.
ADVERTENCIA
Asegúrese de que las manijas de los utensilios de cocina no sobresalgan del borde del
electrodoméstico para e vitar que se vuelquen accidentalmente. Esto también hace que sea
más difícil para los niños alcanzar a las ollas / sartenes.
28
Page 29

PROBLEMA
CAU SA POSIBLE
Las unidades de superficie no mantendrán
es lo suficientemente rápida
• Debe utilizar las cacerolas que sean
• el fondo de recipientes deben
Los alimentos se cocinan lentamente
• Se utilizan utensilios de cocina incorrecto.
Las unidades de superficie no funcionan
Los controles no responden al tacto.
• El bloqueo del panel de control se
control como se describió anteriormente
CUIDADO Y MANTENIMIENTO
Ø INFORMACIÓN GENERAL
• PRECAUCIÓN: Antes de cualquier operaci ón de limpieza y mantenimiento desconecte el
aparato de la red eléctrica.
• Es aconsejable limpiar cuando el aparato esté frío y, especialm ente, par a la lim pi e za de la cubierta
de vidrio.
• Evitar dejar sustancias alcalinas o ácidas (jugo de limón, vinagre, etc.) en las superficies.
• Evitar el uso de productos de limpieza con un cloro o base ácida.
• La placa de cocción siempre debe limpiarse después de cada uso.
Ø LIMPIEZA DEL APARATO
• Desconectar el A / C de la caja de alimentación principal o interruptor de circuito designada, apague
la estufa, asegúrese de que todas las unidades de la superficie son apagada y frías antes de retirar
de proceder.
• La superficie de la cubierta debe limpiarse con un detergente suave y agua tibia.
• Escurrir el exceso de la entrada de agua de la esponja o paño para limpiar el área de los controles,
o cualquieras partes eléctricas.
• Seque con un paño suave y lim pio.
• No utilice lana de acero o un cepillo de acero sobre la superficie de cocción.
PROBLEMAS CON SU ELECTRODOMÉSTI CO?
Puede solucionar muchos problemas comunes del aparato con facilidad, que le ahorra el coste
de una posible llamada de servicio. Pruebe las siguientes sugerencias para ver si puede resolver
el problema antes de llamar al servicio técnico.
GUÍA PARA RESOLVER PROBLEMAS
una ebullición progresiva o la tasa de freír no
absolutamente plana.
• Se ha quemado un fusible de la casa o se
ha disparado un disyuntor.
• No se ha establecido el control de la
temperatura correctamente.
activa.
• Desactivar el bloqueo del panel de
29
Page 30

producto 800-323-
nuestros productos, hay ayuda disponible.
Un centro de servicio Avanti Products
SERVICIO PARA SU APARATO
Nosotros estamos orgullosos de nuestra organizació n de servicio al cliente y la red de técnic os de
servicios profesionales que prestan servicio en sus electrodomésticos Avanti. Con la compra del
aparato, Avanti, usted puede tener la confianza de que si alguna vez necesita información o asistencia
adicional, el equipo de Servicio al C liente de Avant i Products est ará aquí para usted. Sólo tie ne que
llamar al número gratuito.
PRODUCTOS DE CLIENTE AVANTI
Información del
Sean cuales sean sus preguntas acerca de
Pedidos de piezas
800-220- 5570
In-Home Repair
Service 800-220-5570
Es posible pedir piezas y accesorios que serán
entregado directamente a su casa con un
cheque personal, giro postal, Master Card
o Visa.
proporcionará el ser vicio de reparación experto,
programado a una hora que sea conveniente para
usted. Nuestros administradores capacitados
conocen su aparato dentro y por fuer a.
DIAGRAMA DE CABLEADO
30
Page 31

Grapa su recibo de compra aquí. Se requiere
COBERTURA - GARANTÍA LIMITADA DE UN AÑO
comercial, el periodo de garantía es de 90 días. Todos los aparatos de Avanti de 4.4 pies cúbicos de
COMPLETO 30 - Días de garantía
A partir de la fecha de compra de las piezas de vidrio y el acabado de esmalte de porcelana, pintado, o partes
EXCLUSIONES DE LA GARANTÍA / ¿Qué no cubre:
•
humedad, rayos externos, elementales y / o ambientales, sobrecargas de energía, fallas estructurales
•
En ningún caso Avanti Products tener ninguna obligación o responsabilidad alguna por daños a la propiedad
OUT DE PRODUCTOS GARANTÍA
Garantía - valores de rango / hornos tostadores
GARANTÍA
AVANTI PRODUCTS
Avanti Products garantiza que el producto está libre de defectos en materiales y / o mano de obra durante un
período de doce (12) meses desde la fecha de compra por el propietario original. El tiempo mencionado arriba
comienza a ejecutarse a partir de la fecha de compra, y no se puede detener, sujeto a derechos, extender o
suspender por cualquier motivo a no ser que se describe en detalle en el documento de garantía. Durante un
año desde la fecha de compra por el propietario original, los productos de Avanti, a su elección, reparará o
reemplazará cualquier parte del producto que resulta ser defectuosa en material o mano de obra bajo
condiciones normales de uso. Avanti Products le proporcionará un producto parecido al original, ya sea nuevo
o restaurado de fábrica. Durante este período de Avanti Products proporcionará todas las piezas y mano de
obra necesarias para corregir dichos defectos de forma gratuita, siempre y cuando el producto ha sido
instalado y operado de acuerdo con las instrucciones escritas en este manual. En el uso de alquiler o
La cobertura de la garantía se describe aquí excluye todos los defectos o daños que no son la
responsabilidad directa de Avanti Products, incluyendo, sin limitación, uno o más de los siguientes:
Un incumplimiento de cualquier estado, locales, munici pal es o de condado instal ac ione s el éctri ca s,
hidráulicas y / o códigos de construcción, reglamentos o leyes, entre ellas la falta de instalar el producto en
estricta conformidad con los códigos y reglamentos contra incendios y de construcción locales.
prueba de la fecha de compra original para
obtener el servicio de gara ntía.
• Cualquier fuerzas y factores, incluyendo, sin limitación, lluvia, viento, arena, inundaciones, incendios,
deslizamientos de lodo, temperaturas de congelación, humedad excesiva o exposición prolongada a la
las pérdidas de contenido de alimentos o de
otros contenidos debido a su deterioro.
• Los daños incidentales o consecuentes
• Piezas y mano de obra para los siguientes no
serán consideradas como garantía:
• Las bombillas y / o carcasa de plástico.
• Fallas del producto si se utiliza para otra cosa
que tenía la intención propósito.
• Costes de envío asociados a la sustitución de la
unidad.
cercana al aparato, incluyendo gabinetes, pisos, techos y otras estructuras y / o objetos alrededor del producto.
También se excluyen de esta garantía los arañazos, golpes, abolladuras menores, y otros daños cosméticos en
superficies externas y partes expuestas; Productos en los que se han alterado los números de serie,
desfigurado o eliminado; visitas de servicio para la educación del cliente, o visitas donde no hay nada mal con el
producto; corrección de problemas de instalación (usted es el único responsable de cualquier estructura y
entorno para el producto, incluyendo todas las instalaciones eléctricas, de fontanería y / o otras facilidades de
conexión, para la fundación / pisos adecuados y para alteraciones incluyendo, sin limitaciones, gabinetes,
Avanti Products no tiene ninguna obligación, por ley o de otro modo, para ofrecerle ninguna concesión,
incluidas las reparaciones, pro -tarifas, o el reemplazo del producto, una vez que esta garantía ha
expirado.
• Reparaciones realizadas por serv icio sin
autorización.
• Las llamadas de servicio que están relacionados
con los problemas externos, tales como abus o,
mal uso, suministro eléctrico inadecuado,
accidentes, incendios, inundaciones o cualquier
otro acto de Dios.
• Recargos incluyendo pero no limitado a, cualquier
tras hora, llamadas fin de semana, vacaciones o
de servicio, peajes, pasajes de transporte o gastos
de kilometraje para llamadas de servicio a zona s
remotas.
• La garantía no se aplica fuera de los
EE.UU. continental.
31
Page 32

AIDEZ NOUS À VOUS AIDER ...
SI VOUS AVEZ BESOIN DE SERVICE
Nous sommes fier s de notre service et nous
service que vous recevez, voici quelques
satisfait. Dans la plupart des cas, cela va
Ensuite, si vous n'êtes touj ours pas s atisf ait, écr ivez tous
les détails, y compris votre numéro de téléphone, et
PRUDENCE:
Lisez attentivement ce guide.
Il est destiné à vous aider à utiliser et à
maintenir votre nouvel appareil correctement.
Gardez-le à portée de m ain pour répondre à
vos questions.
Si vous ne com prenez pas que lque chos e ou
vous avez besoin de plus d'aide, s'il vous plaît
appelez:
Avanti Service à la clientèle
800-220-5570
Gardez preuve de la date d'achat d'origine (tel
que votre bordereau de vente) avec ce guide
pour établir la période de garantie.
CET APPAREIL EST PAS
CONÇU POUR LE STOCKAGE
DE MÉDECINE OU D'AUTRES
PRODUITS MÉDICAUX.
Notez le modèle et le numéro de série.
Vous les trouverez sur une plaque située sur la paroi
extérieure arrière de l'appareil.
S'il vous plaît écrire ces chiffres ici:
_____________________________________
Date d'achat
_____________________________________
Numéro de modèle
_____________________________________
Numéro de série
Utilisez ces numéros dans toute correspondance ou
appels de service concernant votre appareil.
Si vous avez reçu un app areil endommagé, contactez
immédiatement le revendeur (ou le constructeur) qui
vous a vendu l'appareil.
Gagnez du temps et de l'argent. Avant d'appeler le
service, consultez le Guide de dépannage. Il énumère
les causes des problèmes de fonctionnement mineurs
que vous pouvez vous corriger.
voulons que vous soyez heureux . Si pour une
raison quelconque vous n'êtes pas satisfait du
étapes à suivre pour obtenir de l'aide.
FIRST, contacter les gens qui ont réparé votre
appareil. Expliquez pourqu oi vous n'êtes pas
résoudre le problème.
l'envoyer à:
Service Clients
Avanti Produits
10880 NW 30 Street
Miami, FL 33172 USA
32
Page 33

APPAREIL SÉCURITÉ
Votre sécurité et celle des autres sont très importantes.
Nous avons fourni de nombreux messages de sécurité importants dans ce
manuel et sur votre appareil . To ujour s lir e et obéi r à tout mess ag e d e sécur i tés.
Tout message de sécurités vous alertera à quel est le danger potentiel et vous
peut arriver si les instructions ne sont pas suivies.
C'est le symbole d'alerte de sécurité.
Ce symbole vous signale les
dangers potentiels peut tuer ou
blesser vous et d'autres. Tout
sécurité messages suivra la sécurité
symbole d'alerte et soit les quartiers"
DANGER","ATTENTION" ou
"PRUDENCE".
Danger signifie que le non-respect
de cette déclaration de sécur i té peu t
entraîner des blessures ou la mort.
Attention signifie que le non-respect
de cette déclaration de sécur i té peu t
entraîner des dommages importants
du produit, des blessures graves ou
la mort.
Attention signifie que le non-respect
de cette déclaration de sécur i té peu t
entraîner des mineures ou
modérées blessures, ou des biens
ou des dommages matériels.
disent comment réduire le risque de blessure, et vous permettent de savoir ce qui
33
Page 34

APPAREIL SÉCURITÉ
Avant le appareil est utilisé, il doit être correctement positionné et installé
•Brancher sur une 3 broches mise à la terre sortie, faire pas enlever la terre broches, faire pas utiliser
à un technicien qualifié.
• Utilisation deux personnes ou plus pour déplacer et installer l’appareil. Ne pas le faire peut entraîner
• Ne pas utiliser cet appareil pour d'autres fins que celles prévues.
comme décrit dans ce manuel, afin de lire attentivement le manuel. Pour
réduire le risque d'incendie, choc ou de blessure électrique lors de l'utilisation
du l’appareil, Suivez les précautions de bases, comprenant les éléments
suivants:
un adaptateur, et ne pas utiliser une rallonge
• Remplacer tous les panneaux avant exploitation
• Il est recommandé d'utiliser un circuit distinct, qui sert uniquement votre refroidisseur de breuvages,
fournir. Utilisez des récipients cette ne peut pas être désactivé par une chaîne de traction
interrupteur ou
• Ne jamais nettoyer appareil pièces avec des liquides inflammables. Ces vapeurs peuvent créer un
risque d'incendie or explosion. Et ne pas stocker ou utiliser de l'essence ou d'autres vapeurs et
liquides inflammables à proximité de cet appareil ou de tout autre appareil. Les vapeurs peuvent
créer un risque d'incendie ou d'explosion.
• Avant de procéder à des opérations de nettoyage et d'entretie n, assur e z-vous que la ligne
d'alimentation de l'appareil est débranchée.
• Faire pas brancher ou débrancher la prise électrique lorsque vos mains sont humides
• Débranchez le appareil ou déconnecter la alimentation avant le nettoyage ou l'entretien. Ne pas le
faire peut entraîner un choc électrique ou la mort.
• Faire pas tenter de réparer ou de remplacer une partie de votre appareil à moins qu'il ne soit
spécifiquement recommandé dans ce matériau. Toutes les autres réparations doivent être confiées
dans le dos ou d'autres blessures.
• Pour assurer une bonne ventilation de votre appareil, l'appareil doit être complètement dégagé.
Choisissez un endroit bien aéré avec des températures supérieures à 55ºF (13ºC) et au-dessous
90ºF (32ºC). Cet appareil doit être installé dans une zone protégée de l’élément, Comme le vent, la
pluie, de l'eau pulvérisée ou lumière du soleil.
• l’appareil ne doit pas être situé à côté de fours, grilles ou autres sources de chaleur élevée.
• L’appareil doit être installé avec toutes les connexions électriques, d'eau et d'évacuation,
conformément à codes étatiques et locaux. Une alimentation électrique standard (115 V CA
seulement, 60 Hz), mise à la terre conformément au Code national de l'électricité et les codes et
règlements locaux est nécessaire.
• Faire pas plier ou pincer le cordon d'alimentation du appareil.
• Le fusible (ou disjoncteur) doit être de 15 ampères.
• Il est important pour l'appareil soit à niveau afin de fonctionner correctement. Vous devrez peut-être
faire plusieurs ajustements à niveler.
• Toute installation doit être conforme aux exigences du code de plomberie locale.
• Assurez-vous que les tuyaux ne sont pas pincés ou pliés ou endommagés au cours installation.
• Vérifier les fuites après connexion.
• Ne jamais laisser les enfants utiliser, jouer avec ou crawl à l'intérieur de l'appareil
• Faire pas utiliser de produits de nettoyage à base de solvants or abrasifs sur l'intérieur. Ces
nettoyants peuvent endommager ou décolorer l'intérieur.
34
Page 35

Bouton de verrouillage du panneau de commande
2.
Bouton de sélection du brûleur avant
3.
Bouton Réduire / Diminuer (-)
4.
Bouton de sélection de la minuterie
5.
Bouton Ajouter / Augmenter (+)
6.
Bouton de sélection du brûleur arrière
7.
Bouton d'alimentation ON / OFF
8.
Surface de cuisson
9
Brûleur avant (1200 Watts)
10
Brûleur arrière (1800 Watts)
PIÈCES ET CARACTÉRISTIQUES
1.
35
Page 36

précautions de base:
• Lisez toutes les instructions avant d'utiliser l'appareil.
- Pour minimiser les brûlures, inflammation des matériaux inflammables et de
CONSIGNES DE SÉCURITÉ IMPO RTANTES
ATTENTION
• Installation correcte - Assurez-vous que l'appareil est correctement installé et
mis à la terre par un technicien qualifié.
• Installation, réparation et travaux d'entretien doivent être effectués par un
technicien qualifié. Le travail par des personnes non qualifiées peuvent être
dangereux et peut annuler la garantie.
• Installer l'appareil de sorte que le cordon ne soit pas en contact avec une partie
quelconque de l'appareil qui peut devenir chaud pendant l'utilisation.
• En cas de dommages à l'appareil, il doit être mis immédiatement hors tension et
débranché de l'alimentation principale. Ne pas utiliser l'appareil jusqu'à ce qu'il ait été
réparé.
• Ne jamais utiliser votre appareil pour réchauffer ou chauffer la pièce.
• Ne pas laisser les enfants seuls - Les enfants ne doivent pas être laissés seuls ou
sans surveillance dans la zone où l'appareil est utilisé. Ils ne devraient jamais être
autorisés à rester assis ou debout sur une partie de l'appareil.
• Ne pas stocker les articles d'intérêt pour les enfants dans les armoires au-dessus de
l'appareil. Les enfants qui grimpent sur l'appareil pour atteindre ces articles pourraient
être blessés.
• L'appareil est chaud pendant son utilisation et reste pendant un certain temps après
avoir été mis hors circuit. Gardez les enfants éloignés de l'appareil.
• Assurez-vous que tous les matériaux d'emballage sont éliminés en toute sécurité et
hors de la portée des enfants. Risque d'étouffement!
• Porter des vêtements appropriés - en vrac ou des vêtements de montage
suspendus ne doivent jamais être portés pendant l'utilisation de l'appareil.
• Entretien de l'utilisateur - Ne pas réparer ou remplacer une partie de l'appareil à
moins spécifiquement recommandé dans le manuel. Toutes les autres réparations
doivent être effectuées à un qualifié
technicien.
• Stockage dans ou sur l'appareil - Des matériaux inflammables ne doit pas être
stocké à proximité des unités de surface.
• Ne pas utiliser l'eau sur un feu de graisse - Étouffer le feu ou les flammes ou utiliser un
extincteur à poudre chimique ou à mousse.
• Utiliser uniquement des mitaines sèches - humides maniques humides sur des surfaces
chaudes peuvent causer des brûlures par la vapeur. Ne laissez pas les éléments
chauffants tactiles manique. Ne pas utiliser une serviette ou un tissu épais.
• Utiliser la taille de casserole - Cet appareil est équipé d'une ou plusieurs unités de
surface de différentes tailles. Choisir les ustensiles ayant un dessous plat
suffisamment large pour recouvrir l'élément de chauffage par unité de surface.
L'utilisation d'ustensiles trop exposer une partie de l'élément de chauffage à contact
direct et peut entraîner une inflammation des vêtements. L'utilisation d'ustensiles de
brûleur améliore aussi l'efficacité.
• Ne laissez jamais la surface allumés à haute température - Faire bouillir sur le
tabagisme cause et renversements de corps gras qui peuvent prendre feu.
• Ustensiles de cuisson vitrifiés - Seulement certains types de verre, verre / ustensiles en
céramique, en céram ique, en terre cuite ou émaillés peuvent être utilisés pour le
service haut de l'appareil sans casser en raison du changement brusque de
température.
• Les poignées des ustensiles doivent être tournées vers l'intérieur et non surplomber les
éléments adjacents de surface
Pour réduire les risques d'incendie,
d'électrocution ou de blessure lors de
l'utilisation de l'appareil, suivez ces
36
Page 37

• Ne pas faire cuire sur Broken Cook-top - Si cuisson supérieure brisée, les solutions
nettoyantes et les éclaboussures peuvent pénétrer dans la cuisson supérieure brisée et
créer un risque de choc électrique. Contactez immédiatement un technicien qualifié.
• Clean Cook-top avec prudence - Si une éponge ou un chiffon humide pour essuyer
les renversements sur une zone de cuisson chaude, éviter les brûlures causées à la
vapeur. Certains nettoyants peuvent produire des vapeurs nocives si elles sont
appliquées sur une surface chaude.
• Soyez prudent en ouvrant la porte - Laisser l'air chaud ou échapper la vapeur
avant de retirer ou de remplacer la nourriture.
• Ne pas chauffer des contenants fermés - L'accumulation de pression peut faire
exploser le contenant et causer des blessures.
• Ne pas toucher les éléments de surface, éléments de chauffage ou zones près - unités
de surface et éléments chauffants peuvent être chauds même si elles sont de couleur
foncée. Autour de surfaces de surface deviennent assez chaudes pour provoquer des
brûlures. Pendant et après l'utilisation, ne pas toucher ou laisser des vêtements ou
d'autres unités de surface de contact des matériaux inflammables, les zones à proximité
des unités ou des surfaces jusqu'à ce qu'ils aient eu suffisamment de temps pour
refroidir. D'autres surfaces de l'appareil peuvent devenir suffisamment chaudes pour
provoquer des brûlures - entre ces surfaces et les surfaces proches de ces ouvertures.
Cette unité est à un usage intérieur
-GUARDES CEUX-CI INSTRUCTIONS-
37
Page 38

INSTRUCTIONS D'INSTALLATION
ATTENTION
AVOIR CET APPAREIL INST ALLÉ PAR UN INSTALLATEUR.
Une mauvaise installation, le réglage, la modification ou l'entretien peuvent causer des
dommages corporels ou matériels.
Consulter un organisme d'installation ou d ' un service qualifié.
IMPORTANT - CONSERVER POUR L'UTILISATION DU INSPECTEURS LOCAUX.
Ø AVANT D'UTILISER LE COOKTOP
• Retirez l'emballage extérieur et intérieur.
• Vérifiez que vous avez toutes les pièces suivantes:
• 1 Mode d'emploi
• 1 Installation Support Kit d'assemblage (4 crochets au total).
(Emballé dans l'emballage en polystyrène expansé - NE PAS JETER)
• Nettoyer la surface de cuisson à l'eau tiède à l'aide d'un chiffon doux ou une éponge.
• Demandez à votre appareil installé et correctement mis à la terre par un installateur qualifié
conformément aux instructions d'installation.
• Ne tentez pas de réparer ou de remplacer une partie de votre appareil à moins qu'il ne soit
spécifiquement recommandé dans ce manuel.
• Ne retirez pas les étiquettes apposées de façon permanente, des avertissements ou des
plaques du produit. Cela peut annuler la garantie.
• L'installateur doit laisser ces instructions au consommateur qui doit conserver pour
l'inspecteur local et pour référence ultérieure.
• S'il vous plaît respecter tous les codes locaux et nationaux et ordonnances.
IMPORTANT:
Cette table de cuisson est conçu et fabriqué uniquement pour la cuisson des aliments domestiques
(ménages) et ne convien t pas pour toute applicat ion non-dom estique et ne devrait donc pas être
utilisé dans un environnement commercial.
La garantie de l'appareil sera annulée si la table de cuisson est utilisé dans un environnement
non-domestique-à-dire un environnement semi commercial, commercial ou communautaire.
38
Page 39

Ø PRÉCAUTIONS IMPORTANTES ET RECOMMANDATIONS
Après avoir déballé l'appareil, vérifiez qu'il ne soit pas endommagé et tous les accessoires ou
éléments inclus ont été reçus. En cas de doute, ne pas l'utiliser et consultez votre fournisseur ou un
technicien professionn el qualif ié .
éléments d'emballage (par exemple des sacs en plastique, mousse de polystyrène, des rubans
d'emballage, etc.) ne doivent pas être laissés autour facilement accessibles des enfants, car ceux-ci
peuvent causer des blessures graves.
L'appareil a été soigneusement testé pour un fonctionnement sûr et efficace. Cependant, comme
tout appareil, il y a des précautions d'installation et de sécurité spécifiques qui doivent être suivies
pour assurer un fonctionnement sûr et satisfaisant.
• Ne tentez pas de modifier les caractéristiques techniques de l'appareil, car cela pourrait
devenir dangereux à utiliser.
• Ne pas effectuer des opérations de nettoyage ou d'entretien sur l'appareil sans avoir
préalablement débranché à partir de l'alimentation électrique.
• Après utilisation, assurez-vous que les contrôles sont dans la position.
• Ne touchez jamais l'appareil avec les mains ou les pieds mouillés.
• Ne pas faire fonctionner l'appareil nu-pieds.
• Ne laissez pas les enfants ou d'autres personnes incapables d'utiliser l'appareil sans
surveillance.
• Pendant et après l'utilisation de l'appareil, certaines parties deviendront très chaud. Ne pas
toucher les pièces chaudes.
• Gardez les enfants loin de l'appareil lorsqu'il est utilisé.
• Assurez-vous que les câbles électriques reliant d'autres appareils à proximité de
l'appareil ne peut pas entrer en contact avec la table de cuisson.
• Le fabricant décline toute responsabilité pour les dommages corporels ou dommages
matériels causés par une utilisati on inc orr ec te de l'ap p ar eil.
• Pour éviter tout risque possible, l'appareil doit être inst allé par un person nel qual if ié.
Toute réparation par des personnes non qualifiées peuvent entraîner un choc électrique
ou un court-circuit. Afin d'éviter d'éventuelles blessures à votre corps ou à l'appareil, ne
tentez pas de réparations de fourmis par vous-même. Ces travaux devraient être
effectués par du personnel de service qualifié.
• Risque de brûlure! L'appareil peut devenir très chaud pendant le fonctionnement.
Assurez-vous que les enfants sont hors de la portée et les avertir en conséquence. Pour
éviter les brûlures utiliser des vêtements et des gants lors de la manipulation des pièces
ou des ustensiles chauds.
• Se tenir éloignés de l'appareil pendant le fonctionnement. air chaud ou de la vapeur qui
échappe peut causer des brûlures aux mains, le visage et / ou les yeux.
• Ne jamais nettoyer avec tous les dispositifs de nettoyage à la vapeur à haute pression,
car elle peut provoquer un court-circuit.
• Cet appareil est destiné à un usage domestique. Ne jamais utiliser l'appareil à d'autres fins.
• Si vous décidez de ne pas utiliser l'appareil plus longtemps (ou décider de remplacer un
ancien modèle), avant d'en disposer, il est recommandé qu'il soit mis hors service de manière
appropriée conformément à la réglementation santé et de protection de l'environnement, en
veillant notamment à que toutes les pièces soient rendues inoffensives, notamment en ce qui
concerne potentiellement dangereux pour les enfants qui pourraient jouer avec de vieux
appareils. Retirez la porte avant de l'éliminer pour éviter l'emprisonnement.
39
Page 40

Ø INSTALLATION DE LA TABLE DE CUISSON
• La table de cuisson él ectrique doit être ins tallé par un technicien q ualifié. Assurez-vous que
vous avez tout le nécessaire pour une installation correcte. Il incombe de respecter les
autorisations d'installation spécifiées dans le manuel de l'installateur.
• les dimensions d'ouverture du Cabinet qui sont présentés ci-dessous doivent être utilisés. Étant
donné les dimensions sont les distances minimales. Les distances minimales doivent être
maintenus entre la surface de cuisson de l'appareil et la surface horizontale au-dessus du plan
de cuisson.
• 30 pouces est la distance m inimale entre le somm et de la surface de cuisson et le f ond d'un
bois non protégé ou armoire métallique
• Pour éliminer le risque de brûlure ou d'incendie en atteignant sur les unités de surface
chauffées, espace de rangement des armoires au-dessus des unités de surface doit être évité.
Si le stockage de l'armoire doit être fournie, le risque peut être réduit en installant une hotte de
ventilation horizontalement sur un minimum de 5 pouces au-delà du fond des armoires.
• Éviter de placer l'appareil dans les zones humides. Comme cela peut entraîner un risque de
choc électrique.
40
Page 41

L'INSTALLATION DOIT ÊTRE EFFECTUÉE PAR UN PROFESSIONNEL SOUS LICENCE
A - Câble à 3 fils du
E - Boîte de jonction
F - Fil neutre
1. 1. Débrancher l'alimentation principale
9. 9. Reconnectez l'alimentation.
Ø CONNEXION ÉLECTRIQUE
ATTENTION
L'appareil doit être correctement installé et mis à la terre par un technicien qualifié conformément au
Code national de l'électricité ANSI / NFPA n ° 70 (dernière édition) et aux exigences du code
électrique local. L'installation doit être faite par un électricien agréé.
Utiliser seulement trois conducteurs ou le câble de gamme UL 4 conducteurs nominale de 40 ampères
avec une plage de tension minimum 125 / 250V. Ces cordons peuvent être fournis avec décharge de
traction ou connecteur de conduit.
La plaque de cuisson doit être connecté à la bonne tension électrique et la fréquence comme spécifié
sur la plaque signalétique. Remarque: L'unité doit être connectée à un circuit indépendant de 20
ampères.
La plaque de cuisson peut être connecté directement au sectionneur à fusibles (ou de la boîte du
disjoncteur) par l'intermédiaire flexible, gainé blindé ou non métallique, un câble en cuivre (avec un fil de
mise à la terre). Laisser deux à trois pieds de mou dans la ligne afin qu'il puisse être déplacé si le
service est toujours nécessaire.
POUR VOTRE SÉCURITÉ, LA TABLE DE CUISSON DOIT ÊTRE MIS À LA TERRE
CORRECTEMENT.
Retirer le fusible ou disjoncteur ouvert avant de commencer l'installation.
Ne tentez pas de réparer ou de remplacer une partie de l'appareil à moins qu'il ne soit spécifiquement
recommandé dans ce manuel. Toutes les autres réparations doivent être confiées à un technicien
qualifié.
Pour réduire les risques de choc électrique, débranchez cet appareil de l'alimentation A / C avant
l'entretien.
REMARQUE:Mise de l'appareil ne débranche pas l'appareil de l'alimentation. Nous vous
recommandons d'avoir un service de technicien qualifié votre appareil.
alimentation principale
B - Fils L1
C - Fil de terre (G) ou f il d e
terre nu (de la table de
cuisson)
D - Câble à 3 fils de la table
de cuisson
2. 2. Retirez le couvercle de la boîte de jonction, le cas échéant.
3. 3. Connectez le conduit de câble flexible de la table de cuisson à la boîte de jonction à l'aide
d'un connecteur de conduit homologué UL ou homologué CSA.
4. 4. Serrez les vis du connecteur de conduit, le cas échéant.
5. 5. Connectez les deux fils L2 ensemble en utilisant les connecteurs de fils listés UL
6. 6. Connectez les deux fils L1 ensemble en utilisant les connecteurs de fils listés UL
7. 7. Branchez le fil de mise à la terre (G) ou dénudé du câble de la table de cuisson au fil de
mise à la terre (G) ou à la terre dénudée (dans la boîte de jonction) à l'aide des connecteurs
homologués UL.
8. 8. Installez le couvercle de la boîte de jonction
41
(à partir de l'alimentation)
G - Connecteur de câble
H - Fils L2
I - Connecteur de conduit
homologué UL ou CSA
homologué UL
Page 42

1
Panneau de configuration Bouton
de verrouillage
6
Brûleur arrière Bouton de
sélection
2
Brûleur avant Bouton de sélection
7
Power ON / OFF Bouton
3
Réduire / Diminution (-) Bouton
8
Affichage du brûleur arrière
Contrôle
4
Minuterie Bouton de sélection
9
Affichage de contrôle minuterie
5
Ajouter / Augmentation (+) Bouton
10
Affichage commande du brûleur
avant
0
1 - 2
3 - 4
5 - 6
7 - 8
9
Pas de
À feu doux
Moyenne
température
Température
moyenne
Moyenne
température
Forte
Ø PANNEAU DE CONTRÔLE
UTILISATION DE VOTRE APPAREIL
MARCHE / ARRÊT BOUTON
Appuyez sur ce bouton pour mettre l'appareil de cuisson sous ou hors tension,
Les boutons de sélection de brûleur (BUR NER AVANT / ARRIÈRE BURNER)
Appuyez sur le bouton approprié pour le brûleur dés iré.
Une fois appuyé sur l'écran du brûleur affiche le réglage par défaut (5 = moyenne), ajuster à la
température de cuisson désirée à l'aide de la (-) ou (+). Le réglage de la température varie de 0 à 9.
Exemple de plages de température comparables:
chaleur
basse
de cuisson
haute
chaleur
MINUTERIE AUTOMATIQUE
Appuyez sur pour régler une durée de cuisson prédéfinie, appuyez sur la touche Timer, puis réglez la
durée de cuisson souhaitée à l'aide des boutons (-) ou (+). La durée par défaut est de 10 minutes.
Appuyez sur le bouton du brûleur souhaité (avant ou arrière), puis sélectionnez le réglage de température
de cuisson souhaité à l'aide des boutons (-) ou (+).
Appuyez sur le bouton de la minuterie (10 apparaîtra dans la fenêtre d'affichage comme 10 minutes est la
valeur par défaut), réglez la durée de cuisson désirée en appuyant sur les touches (-) ou (+) (plage de
temps comprise entre 0 et 99 minutes).
Le (•) à côté du réglage de la température dans chaque fenêtre s'allume pour indiquer que la minuterie a
été réglée pour ce brûleur.
Une fois réglé, l'appareil s'éteindra automatiquement une fois le temps de cuisson écoulé.
42
Page 43

INDICATEUR DE SURFACE CHAUD
Une fois le brûleur utilisé et éteint, l'affichage clignote (H) pour avertir que la surface est encore chaude.
Une fois que le brûleur et la surface ont refroidi, l'indicateur (H) s'éteint automatiquement.
Chaque brûleur affichera l'avertissement (H) respectivement
VERROUILLAGE DU PANNEAU DE COMMANDE:
Lorsque le verrouillage du panneau de commande est activé, l'affichage clignote LO. Il s'agit d'un système
de sécurité qui verrouille automatiquement les commandes après aucune activité sur le panneau de
commande pendant environ 1 minute. Pour désactiver le verrouillage du panneau de commande, appuyez
simplement sur le bouton et maintenez-le enfoncé pendant environ 3 secondes, le voyant s'éteindra et les
commandes fonctionneront normalement.
Pour activer le verrouillage, appuyez simplement sur le bouton et maintenez-le enfoncé pendant environ 3
secondes. Le panneau de commande se verrouille et ne permet aucun changement.
Ø CONSEILS USTENSILE
Les caractéristiques physiques des casseroles influencent les performances de tous les systèmes de
cuisson. Par conséquent, l'accent doit être mis sur l'importance d'utiliser des ustensiles appropriés.
• Utilisez des récipients de cuisson à fond plat et couvercles étanches pour économiser l'énergie et
réduire la cuisson
fois.
• Seuls certains types de verre, verre / céramique, ustensiles en céramique, en terre cuite ou émaillés
peuvent être utilisés pour l a table de cuisson. Les fabricants s uggèrent d'utiliser faible à m oyenne
sélections de chaleur lors de l'utilisation batterie de cuisine en verre.
• Pan taille doit correspondre à la taille de l'élément. Une casserole légèrement plus grand couvre
l'élément entier et
empêche les retombées de contact avec la surface de la chaleur et de la combustion. À l'aide d'une
petite casserole que l'élément est un gaspillage d'énergie.
• Pour éviter les éclaboussures et de maximiser l'efficacité, de fonds de casseroles doivent être
propres et secs avant
venir en contact avec les éléments.
• Essuyez les déversements au large des éléments avec un chiffon humide dès qu'ils refroidissent
pour réduire le temps de nettoyage. Assurez-vous que le contrôle est .
Si une unité de s urface r este ro uge p endant un e long ue période, le f ond de la cass erole ne s uffit pas à
plat ou est trop petit pour l' unité de surf ace. L'utilisa tion pr olongée d'ust ensiles in correc te peut entraîn er
des dommages à l'unité de surface, plaque de cuisson, le câblage et les zones environnantes. Pour
empêcher l'utilisation de dommages ustensile correct, commencer la cuisson sur HI position et tourner la
commande vers le bas pour continuer la cuisson.
Ne pas laisser un ustensile vide, ou une bouillie qui a sec, sur une unité de surface chaude. L'ustensile
pourrait surchauffer et endommager les ustensiles ou unité de surface.
Assurez-vous toujours que tous les boutons de commande sont tournés vers et les voyants sont
lorsque vous êtes
pas de cuisson.
43
Page 44

PROBLÈME
CAUSE POSSIBLE
Les éléments de surface ne maintiendront
pas assez rapide
• Vous devez utiliser des casseroles qui sont
• Pan fonds devraient suivre de près
Faites cuire les aliments lentement
• ustensiles de cuisine non conforme utilisé.
Les éléments de surface ne fonctionnent pas
Les contrôles ne répondent pas au toucher.
• Le verrouillage du panneau de
commande comme décrit précédemment
ATTENTION
Assurez-vous que les poignées des c asseroles ne dépassent pas du bord de l'appar eil pour
éviter qu'elles ne tombent accidentellement. Cela rend également plus difficile pour les enfants
d'atteindre les marmites / casseroles.
ENTRETIEN
Ø INFORMATIONS GÉNÉRALES
• ATTENTION: Avant toute opération de nettoyage et d'entretien débrancher l'appareil de
l'alimentation électrique.
• Il est conseillé de nettoyer lorsque l'appareil est froid et en particulier pour le nettoyage de la table
de cuisson en verre.
• Évitez de laisser des substances alcalines ou acides (jus de citron, vinaigre, etc.) sur les surfaces.
• Éviter d'utiliser des produits de nettoyage avec un atome de chlore ou d'une base acide.
• La table de cuisson doit toujours être nettoyé après chaque utilisation.
Ø NETTOYAGE DE VOTRE APPAREIL
• Déconnecter le A / C dans la zone d'alimentation principal ou un d isjoncteur désigné, éteindre la
table de cuisson, ass ur er que tous les él éments de surfac e sont ét ei ntes et ref r oi dir a v ant de r et irer
procédure.
• Il faut nettoyer la surface de cuisson avec un détergent doux et de l'eau chaude.
• Essorer l'excès d'eau de l'éponge ou d'un chiffon avant de nettoyer des commandes ou des
composants électriques.
• Essuyer avec un chiffon doux et propre.
• Ne pas utiliser de laine d'acier ou d'une brosse en acier sur la table de cuisson.
PROBLÈMES AVEC VOTRE APPAREIL?
Vous pouvez résoudre de nombreux problèmes de l'appareil commun facilement, vous
permettant d'économiser le coût d'un appel de service possible. Essayez les suggestions cidessous pour voir si vous pouvez résoudre le problème avant d'appeler le prestataire de service.
GUIDE DE DÉPANNAGE
pas un gros bouillons ou le taux de friture est
tout à fait plat.
• Vous avez pété un fusible ou déclenché un
disjoncteur.
• Vous n'avez pas défini le contrôle de la
température correctement.
commande est activé.
• Désactiver le verrouillage du panneau de
44
Page 45

produit 800-323-
produits, l'aide est disponible.
formés
SERVICE DE VOTRE APPAREIL
nous sont fiers d e notre or ganisat ion de s ervice à la clie ntèle et le rése au de tec hniciens de ser vices
professionnels qui off rent des s ervices s ur vos appar eils Avanti. A vec l'acha t de votr e apparei l Avant i,
vous pouvez avoir la cer titude qu e si vous ave z bes oin d' inform ations ou de l'aide, l'équipe du s ervic e
à la clientèle Produits Avanti sera là pour vous. Il suffit de nous appeler au numéro sans frais.
AVANTI PRODUITS SERVICES CLIENTS
Information sur le
Quels que soient vos questions sont sur nos
Commande de pièces
800-220- 5570
Service à domicile de
réparation 800-2205570
Vous pouvez commander des pièces et
accessoires qui seront
livré directement à votre domicile par
Un centre de service Avanti Les produits autorisés
fournira un service de réparation expert, prévue à
un moment qui vous convient. Nos réparateurs
SCHEMA
45
Page 46

Agrafez votre reçu de vente ici. Preuve de la date
CE QUI EST COUVERT - GARANT IE L IMITÉE D'UN AN
ou moins doivent être portées / envoyé au centre de service de l'appareil pour la réparation.
COMPLET 30 - GARANTIE JOUR
A partir de la date d'achat sur les pièces en verre et finition de l'émail en porcelaine, peint, ou de pièces finies en
EXCLUSIONS DE LA GARANTIE / EXCLUSIONS DE LA GARANTIE:
•
l'humidité excessive ou à une exposition prolongée à l'humidité, la foudre, les surtensions, les défaillances
•
En aucun cas Avanti Les produits ont toute responsabilité pour les dommages aux biens environnants, y compris
HORS DE PRODUIT GARANTIE
GARANTIE - Portées / FOURS TOASTER
VOTRE GARANTIE
AVANTI PRODUCTS
Avanti Products garantit que le produit est exempt de tout défaut de matériaux et / ou de fabrication pendant
une période de douze (12) mois à compter de la date d'achat par le propriétaire initial. La période comme nce à
courir à la date d'achat, et ne sera pas retardée, restreinte, prolongée ou suspendu pour quelque raison que ce
soit, sauf si décrit en détail dans le document de garantie. Pendant un an à compter de la date d'achat par le
propriétaire initial, les produits Avanti, à sa discrétion, de réparer ou de remplacer une partie du produit qui se
révèle un défaut matériel ou de fabrication en utilisation normale. Avanti Produits vous fournira un produit
raisonnablement semblable nouveau ou remis à neuf. Au cours de cette période Avanti Products fournira
toutes les pièces et la main-d'œuvre nécessaires pour corriger ces défauts gratuitement, tant que le produit a
été installé et utilisé conformément aux instructions écrites dans ce manuel. En location ou l'utilisation
commerciale, la période de garantie est de 90 jours. Tous les appareils Avanti de 4,4 capacité de pieds cubes
La couverture de la garantie décrite aux présentes exclut tous les défauts ou les dommages qui ne sont pas
la faute directe de Avanti produits, y compris, sans s'y limiter, un ou plusieurs des éléments suivants:
Un non-respect de tout État applicable, local, ville ou comté électricité, plomberie et / ou des codes du
bâtiment, des règlements ou des lois, y compris le défaut d'installer le produit en stricte conformité avec les
codes et les règlements incendie et de construction.
d'achat est nécessaire pour obtenir le service
sous garantie.
• Toutes les forces et les facteurs externes, élémentaires et / ou l'environnement, y compris sans s'y limiter, la
pluie, le vent, le sable, les inondations, les incendies, les coulées de boue, des températures glaciales,
Les pertes de contenu ali men tair e ou tout
autre contenu en raison de la détérioration.
• Dommages accidentels ou indirects
• Pièces et coût du travail pour les éléments
suivants ne seront pas considérées comme une
garantie:
• Les ampoules et / ou boîtier en matière plastique.
• Une panne du produit si elle est utilisée pour
autre que son intention objectif.
• Frais d'expédition et de manutention associé s au
remplacement de l'unité.
les armoires, les pla n che rs, les plafonds et autres structures et / ou des objets autour du produit. Sont également
exclus de cette garantie sont des rayures, des entailles, des petites bosses et autres dommages esthétiques sur
les surfaces externes et les parties exposées; Produits sur lesquels les numéros de série ont été modifiés,
illisible ou enlevé; visites de service pour l'éducation à la clientèle, ou des visites où il n'y a rien de mal avec le
produit; correction des problèmes d'installation (vous êtes seul responsable de toute structure et réglage du
produit, y compris tous les systèmes électriques, de plomberie et / ou d'autres installations de raccordement,
pour un plancher / fondation appropriée, et pour toute modification, y compris sans armoires de limitation, les
Avanti Products est pas tenu, par la loi ou autrement, pour vous fournir toutes les concessions, y compris
les réparations, pro-taux, ou le remplacement du produit, une fois la garantie expirée.
• Les réparations effectuées par des services de non
autorisées.
• Les appels de service qui sont liés à des
problèmes externes, tels que l'abus, une
mauvaise utilisation, une alimentation électrique
inadéquate, les accidents, les incendies, les
inondations, ou tout autre acte de Dieu.
• Y compris les supplé ments, mais sans s'y limi ter ,
une heure après, le week-end ou des appels de
service, les péages, les vacances frais de voyage
en ferry ou les frais de kilométrage pour les appels
de service dans les régions éloignées.
• La garantie ne couvre pas en dehors
des États-Unis continentaux.
46
Page 47

Name
Model # Serial #
Address
Date Purchased Store / Dealer Name
City
State
Zip
E-mail Address
Area Code Phone Number
Occupation
Did You Purchase An Additional Warranty
As your Primary Residence, Do You:
Extended
Own
Rent
None
Your Age:
Reason for Choosing This Avanti Product:
this product:
under 18
18-25
26-30
Married
Single
Price
£ Other: ___________________
Comments:
Registration Information
Thank you for purchasing this fine Avanti product. Please fill out this form and return it to the
following address within 100 days from the date of purchase and receive these important benefits:
Avanti Products LLC
P.O.Box 520604 – Miami, Florida 33152
Ø Protect your product:
We will keep the model number and date of purchase of your new Avanti product on file to
help you refer to this information in the event of an insurance claim such as fire or theft.
Ø Promote better products:
We value your input. Your responses will help us develop products designed to best meet
your future needs.
-------------------------------------------------------(detach here)--------------------------------------------------------------
Avanti Registration Card
£
£
Please indicate t he most important factors
That influenced your decision to purchase
£
£ Product Features
£ Avanti Reputation
£ Product Quality
£ Salesperson Recommendation
£ Other: ___________________
£ Friend / Relative Recommendation
£ Warranty
£
£
£ 31-35 £ 36-50 £ over 50
£
£
£
Marital Status:
£
£
Is This Product Used In The:
£ Home £ Business
How Did You Learn About This Product:
£ Advertising
£ In-Store Demo
£ Personal Demo
47
Page 48

BCT115J1B-IS 06222018
PRINTED IN CHINA
48
 Loading...