

Page 1
AVANTI PRODUCTS DIVISION OF THE MACKLE CO. INC.
RO. BOX 520604 - MIAMI FLORIDA 33152
CONSUMER INFORMATION SERVICE
IF YOU NEED ASSISTANCE, CALL TOLL FREE
FROM ANYWHERE IN THE UNITED STATES
{800) 220 - 5570.
USER'S GUIDE
SINGLE DOOR REFRIGERATOR
Record serial number and model number of this
appliance in space provided below.
Serial Number
Model Number
Retain these numbers for reference.
Page 2

Indice
Safety Instructions
Notes on disposal
Parts and Features
Electrical connection
installation
Pretaration and operation
Setting the Controls
Use of the ice cube trays
Defrosting
Drip tray
Changing the Light Bulb
Vacation and Moving Care
Cleaning Your Refrigerator
Avoid unnecessary service calls
2
2
3
4
4
4
4
4
5
5
5
6
6
7
Changing Reversible Doors
Warranty
8-9
10
Page 3

Important Safety Instructions
To reduce the risk of fire, electrical shock, or injury when
AWARNING
using your refrigerator, follow these basic precautions:
' Read all instructions before using the
refrigerator.
' Child entrapment and suffocation are
not problems of the past. Junked or
abandoned refrigerators are still
dangerous... even if they will 'just sit in
the garage a few days',
if you are getting rid of your old
refrigerator, do it safely. Please read
the safety booklet from the Association
of Home Appliance Manufacturers.
Help prevent accidents.
* Never allow children to operate, play
with, or crawl inside the refrigerator.
* Never dean refrigerator parts with
flammable fluids. The fumes can create
a fire hazard or explosion.
* FOR YOUR SAFETY*
DO NOT STORE OR USE GASOLINE
OR OTHER FLAMMABLE VAPORS AND
LIQUIDS IN THE VICINITY OF THIS OR
ANY OTHER APPLIANCE. THE FUMES
CAN CREATE A FIRE HAZARD OR
EXPLOSION.
DANGER
Risk of child entrapment. Before you throw away your
old refrigerator or freezer:
Take of the doors
Leave the shelve in place so that children may not
easily climb inside
- SAVE THESE INSTRUCTIONS -
Notes on disposal
Old appliances still have some resudual
value. An environment-friendly method of
disposal will ensure that valuable raw
materials can be recovered and used again.
Unplug your old appliance, cut through the
mains cable and throw away cable and plug
together.
The refrigerant used in freezers and
refrigerators and the gases in the insulation
material require special disposal procedures.
Ensure that none of the pipes running
through the appliance are damaged prior to
disposal.
Your new appliance was protected by
adequate packaging while it was on Its way
to you. All mateials used, for this purpose
are environ me nt-friendly^and suitable for
recycling. Please contribute to protecting the
environment by disposing of the packaging
appropriately.
Do not allow children to play with any
parts of the packaging. There is a risk of
suffocation by the cardboard boxes and
plastic wrapping.
Up-to-date information concerning options
for disposing of your old appliance and the
packaging from the new one can be
obtained from your retailer or local council
office.
r
r"
Page 4
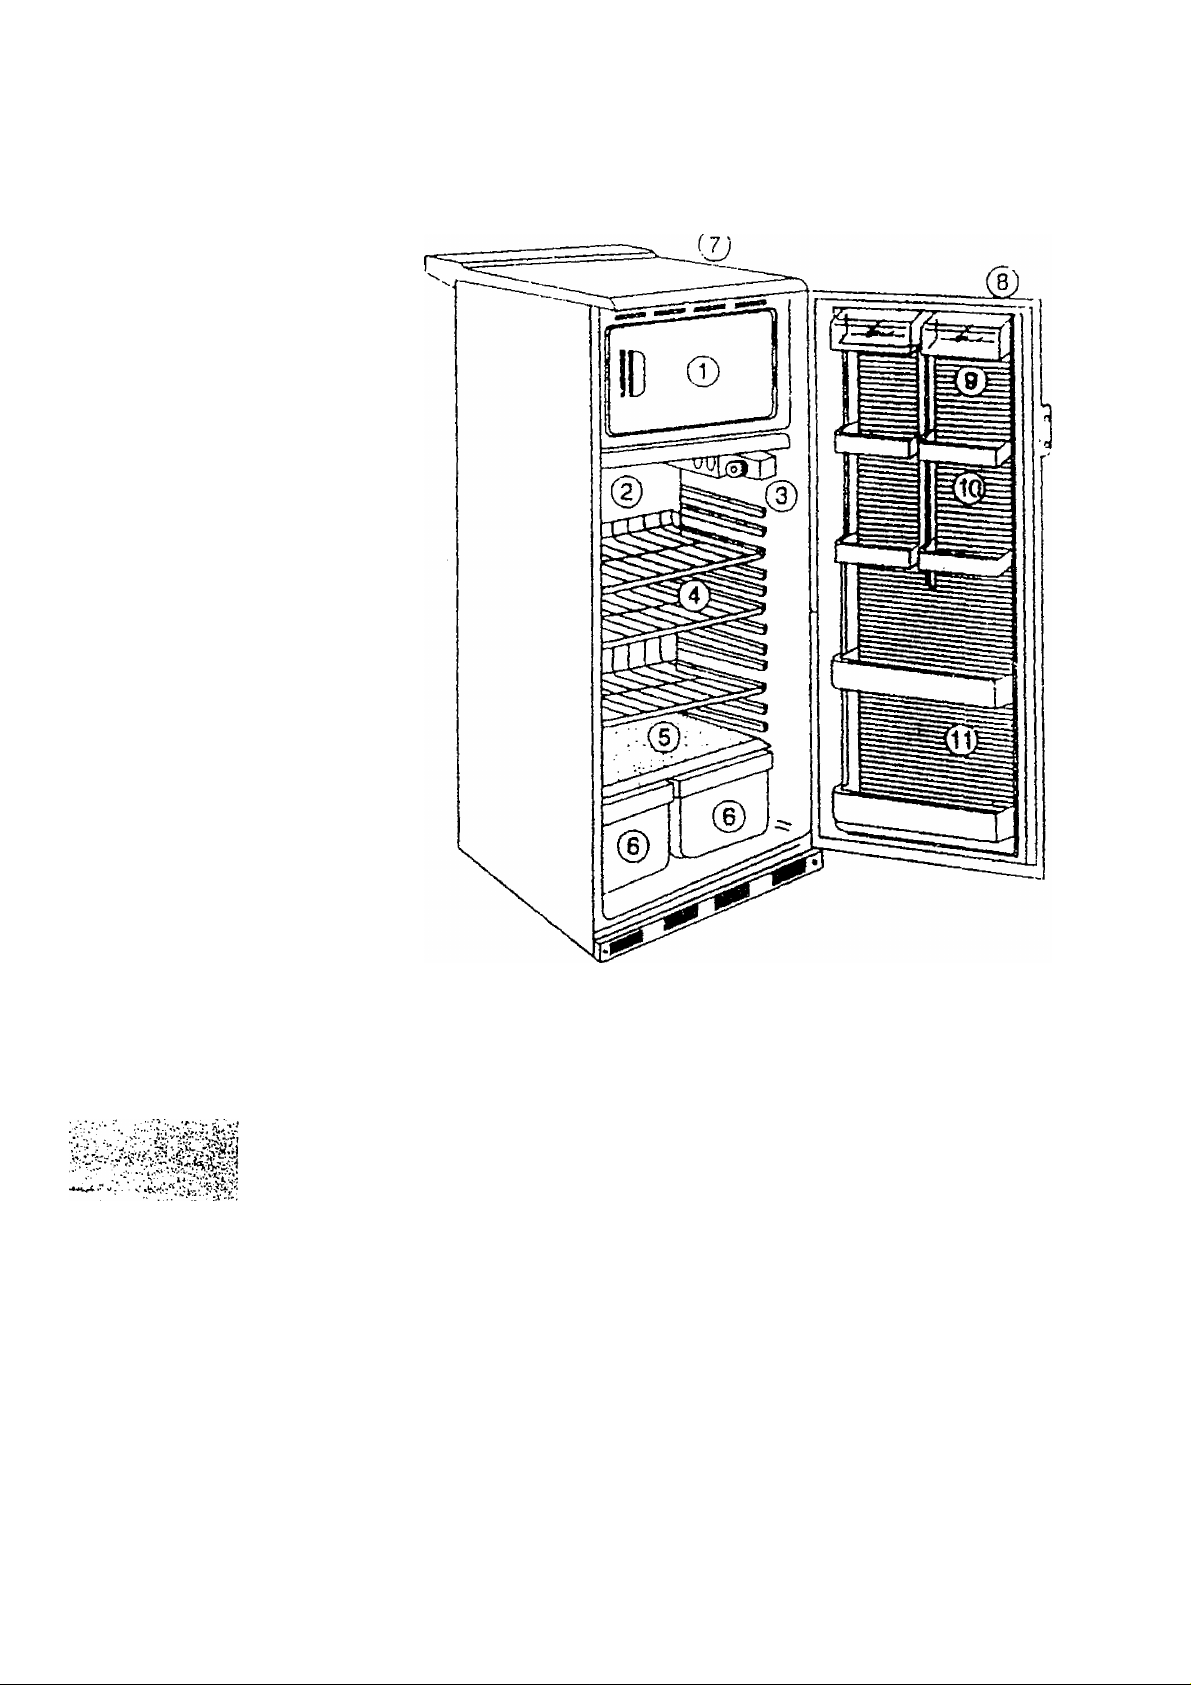
FIGURE 1
1. Freezer Door
2. Water Collection Tray
3. Thermostat box
4. WireSheif
5. Transparent Vegetable Shelf
6. Vegetable Storage Compartment
7. Upper Plate
8. Refrigerator Door
9. Dairy Compartments
10. Door Shelf
11. Bottle Shelves
Page 5

ELECTRICAL CONNECTION
SETTING THE CONTROLS
RECOMMENDED GROUNDING METHODS
This appliance should be properly grounded
for your safety.
The power cord of this appliance is
equipped with a three-prong plug which
mates with standard three prong wall outlet
to minimize the possibility of electric shock
hazard from this appliance.
* Do not, under any circumstances, cut or
remove the third ground prong from power
cord supplied with this appliance.
* Use of extension cords are not
recommended.
The location you choose should be away
from heat sources like stove, heater, or
radiator.
Avoid installing your refrigerator in humid
places (like next to sinks).
LEVELING
Place your refrigerator on a floor strong
enough to support it when fully loaded.
Make your refrigerator stand level by
adjusting the legs provided in case of
uneven floors.
Your refrigerator has only one control for
regulating the temperature in the fresh food
and in the freezer compartment. It is
located on the upper right side of the lower
section.
When the refrigerator is plugged in for the
first time, set the control to 3. Temperature
control adjustments range from 1 (warmest)
to 6 (coldest).
In a day or two, you may decide if the
control is set correctly. The setting indicated
above should be correct for normal,
household refrigerator usage. If you usé the
freezer section often, set the control to 6.
The number six setting is recommended for
short term usage only. The controls will be
set correctly when milk or juice is as cold as
you like and when ice cream is firm.
USE OF THE ICE CUBE TRAYS
An ice box is supplied together with an ice
tray. For your Ice requirements, fill
approximately 3/4 of the tray after having
washed it.
To eject ice cubes into the bucket provided,
insert the ice tray and twist slightly until the
pieces of ice fall.
Preparation and Operation
Before loading foods in your refrigerator:
1. Place all the racks and any kind of
vessels on their proper places,.
2. if required, perform necessary cleaning.
3. Open the door of your refrigerator and
any covers inside it for a period ot
time so as to aerate it.
4. Plug in the unit before checking for
current presence in the socket.
5. Set the thermostat button to the
highest position, then close the door
and the covers.
6. Keep the unit operational in this setting
for not less than one hour.
7. Then you can place foods inside the unit.
8. Afterwards, set can the thermostat
button to any position you require.
In doing this, consilder information in
the section titled "Temperature
adjustment" (Setting the controls).
If cubes are not used, they may shrink. The
longer cubes are stored, the smaller they
get.
¿aw
FIGURE 2
Page 6

DEFROSTING
For the most efficient operation and
mininum energy consumption, defrost
freezer compartment when there is
excessive frost one the wall of the freezer
section (or reaches a quarter inch thick). If
defrosting is not done for a long period of
time (longer than 2 weeks) and the ice layer
on the freezer wall reaches over a quarter
inch '1/4) thick, remove food stored in
freezer compartment and keep door open in
order to defrost faster.
To start defrosting, push button at the
center of the temoerature control knob. The
compressor will stop running and will
automatically re-start once ice is melted.
During the defrost operation, you may let
the water fall into a pot (see sketch below)
by pulling the red discharge tab under the
defrost pan. In this case, you do not have to
remove the drip tray.{Figure 3)
FIGURE B
The drip tray should be set to the
“Open" position for normal function.
To change the flap setting (if required)
simply pull out the drip tray (Fig. C).
-f . >i
viJ’' * - ■ *v _
After the defrost operation, clean the water
in the drio trav.
FIGURES
The flap on the rear of the drip tray
has two different settings;
"Open" and "Close" (Figs.A and B).
FIGURE C
After changing the flap setting, please do
NOT forget to reinsert the drip tray !
CHANGING THE LIGHT BULB
Before removing the light bulb, either
unplug the refrigerator or disconnect the
electricity leading to the refrigerator at the
main power supply. Failure to do so could
result In electrical shock or personal injury.
To change the refrigerator light:
1 -Remove the bulb cover in front of the
thermostat box. Notice there is a screw
holding this cover.
2- Remove bulb.
3- Repiace with a 15 watt appliance bulb.
4- Reconnect refrigerator to power supply.
Note: Be sure to replace bulb with one of
the same size and shape.
FIGURED
Page 7

VACATION AND MOVING CARE
VACATION
Be sure refrigerator stays in upright position
during actual moving and in van. Protect
outside of refrigerator with blanket.
When you get to your new home, refer to
page 3.
Remove all the food if you are going for a
month or more. Unplug the refrigerator and
clean it. Rinse well and dry. Keep doors
open far enough for air to get in. This will
keep odor and mold from building up.
MOVING
Remove ail food. Pack frozen in dry ice.
Unplug the refrigerator and clean it
thoroughly.
Take out ai! removable parts. Wrap all parts
and tape them together so they do not shift
and rattle. Screw in the leveling legs and
tape the doors shut.
PART WHAT TO USE
Removabie parts
(shelves, crisper, etc.)
Outside
Sponge or cloth with mild
detergent and warm water
Sponge, cloth or paper
towel with mild detergent,
warm water and an
appliance wax (or good
auto paste wax)
CLEANING YOUR REFRIGERATOR
Your unit should be cleaned about once a
month to prevent odors from building up.
Spills should be wiped out right away.
To clean your refrigerator, turn the
temperature control to off, unplug it and
take out all removable parts, according to
the following instructions.
HOW TO CLEAN
' Hand wash, rinse and dry thoroughly.
* Wash outside of cabinet. Do not use abrasive or harsh
cleaners.
* Rinse and dry thoroughly.
* Wax painted metal surfaces at least twice a year. Apply
wax with a clean soft cloth. Waxing painted metal surfaces
provides rust protection. Do not wax plastic parts.
Inside walls (freezer
should be allowed’10
warm up so doth
won't stick)
Door liners and
gaskets
Plastic parts
(covers and panels)
Condenser coils Vacuum cleaner with
Floor under
refrigerator
Sponge, soft cloth or paper
towel with baking soda or
mild detergent and warm
water
Sponge, soft cloth or paper
towel with mild detergent
and warm water
Sponge, clean sponge or
soft, clean cloth with mild
detergent and warm water
extended narrow
attachment
Floor cleaners * Roll refrigerator out only as far as the water supply tine
' Wash with mixture of warm water and
- mild detergent or
- baking soda f2 tablespoons (26 g) to
1 quart (.95 L) of water).
’ Rinse and dry thoroughly.
* Wash, rinse and dry thoroughly.
DO NOT USE cleaning waxes, concentrated detergents,
bleaches or cleaners containing petroleum on plastic
parts.
* Wash, rinse and dry thoroughly.
DO NOT USE paper towels, window sprays, scouring
cleaners, or flammable fluids. These can scratch or
damage material.
’ Vacuum coils when dusty or dirty.
Coils may need to be cleaned as often as every other
month.
allows.
* Clean floor.
' Roll refrigerator back into place.
* Check to see if the refrigerator is level
Page 8

AVOID UNNECESSARY SERVICE CALLS
Before calling a serviceman, check the chart below for problems you can fix without difficult
and save you the cost of a service call.
PROBLEM POSSIBLE CAUSE
Your reirioeratcr will
cot operate
The pov/er supply cord is not plugged
into a live circuit with proper voltage.
A household fuse has blown cr circuit
breaker tripped.
The Refrigerator Conirci is not set
correctly.
Unfamiliar sounds or a
ratting/iingiing noise.
There is something on top of or behind
the refrigerator.
The sounds are normal. New features on your new refrigerator make
The lights do not work.
A household fuse has blown or circuit
breaker tripped.
The power supply cord is not plugged
into a live circuit with proper voltage.
The bulb is burned out. Replace bulb.
The motor seems to
The condenser coils are dirty.
run too much.
It is hot outside or in the room.
SOLUTION
Firmly plug power cord into a live circuit with
proper voltage.
Replace household fuse or reset circuit
breaker.
Set 'Refrigerator' Control to a numbereo
setting.
Remove item from on top of or behind the
refrigerator.
new sounds.
Replace houshold fuse, or reset circuit
breaker.
Firmly plug power cord into a live circuit with
proper voltage.
Clean the coils.
On hot days, or if the room is too warm, the
motor naturally runs longer.
■. “ *■ ■ ■ ' \it i ■*>. y*^' ■ >" i? r ^'*.4
' -V "'■-' -• '* 1.. r / X'' I. i’- *“ * ■?1'^ ¿"‘i ’
-. ■ w. •■ ■■ , ■ vii?v'.;.'.:
'V V' .. -. ^V.v'
The door has been opened frequently.
A large amount of food has been put in
at one time.
Open the door as few times as possible.
The motor will run longer in order to cool
down the interior when food is added.
Page 9

Changing Reversible Doors:
This rerngerator has been built with the door hinges on the right. It you wish to change
the Qpenrng direction, follow instructions below.
1- Remove the upper rounded top !■;). Using a sharp object, pry out the (2) plug buttons
and rernove the 2 PHILLIPS screws (2). Remove the 2 PHiLLIPS screws (3) which con
nect the uppeer hinges to the upper rounded top and place it on a padded surface to
orevent scratching.
2- Remove the bolts f4; of the upper hinge. Carefully lift the door (5) and place it on a
padded surface to prevent scratching.
Before changing the direction of the evaporetor lid. remove the meat keeper and the
drip tray. After completing this operation replace the drip tray and the meat keeper to
their places.
3- Push the shaft of the freezer section door up by means of a screwdriver.
4- At this position take the freezer section, door out (6).
5- Place the freezer section door (7) in its new place by turning it opposite of the pre
vious position.
6- Change the places of plastic pops from right to left, (to the opposite side)
Not on all model
7- Remove the kick plate (8) by taking out the screws at each side of it with a Phillips
screwdriver.
- If the lower hinges of your refrigerator is of the broad type, after changing the hinges
remove the hinge pin and fix it to the opposite side (Not on all models)
8- Remove the lower hinge (9) from the right side and transfer it to the left end.
9- Fit the kick plate (10) into its place.
10- Remove the door handle (11) by taking out the screws. Remove the plug buttons
and transfer them to the other side (12).
11 - Mounth the door handle (13) to the other side.
12- Set the door (14) to its place making sure the hinge pin enters the bushing in the
door bottom section.
13- While holding the door in the closed position, loosely secure the upper hinge (15)
using the bolts removed in STEP 2.
14- Before tightening these bolts, make sure the top of the door is level with the cabinet
tp. Avoid over-tightening these bolts. Tighten both until they are just snug, then turn an
other one-half turn.
15- Replace the upper rounded top (16).
16- Tighten the upper rounded top screws (17) and press the plug buttons (18).
17- Fit and tighten the screws (19) which connect the upper hinges to the upper round
ed top.
18- Check the gasket, it shouldn’t be creased and it s.hould seal well.
8
r'
Page 10

■ ■ villi':-
Page 11

REFRIGERATOR AND FREEZER PRODUCT WARRANTY
FULL ONE YEAR WARRANTY
For the iirsi year aiter purchase and use within
the ccncnentai ur^itea States by the origmai
consumer. Avanit Product, inc,. will at its
option, repair or replace any party of the
AVANTI Refrigerator or Freezer which proves
to be defective in material or v/orkmanship
under norma! use. in commercial or rental
application the warranty period is ninety f90)
days. During this period Avanti Products will
provide all parts and labor .necessary to correct
such defects free of charge, so long as the
appliance has been installed and operated in
accordance with the written instructions
furhisned with the appliance.
The customer will be responsible for cost of
service calls resulting from problems
considered Normal Responsibilities of User
(See paragraph so entitled)
To obtain service on your Avanti Refrigerator or
Freezer refer to the Directory of Avanti
Authorized Appliance Service Stations and call
the closest company for inspection and repair
of the appliance under the terms of this
warranty.
All Avanti Appliances of 3.5 cubic foot capacity
or less must be brought/sent to the applicable
service shop for repair.
LIMITED SECOND THROUGH
FIFTH YEAR COMPRESSOR
WARRANTY
For the second through fifth years of use Avanti
Products will make available a replacement
compressor as may be required due to failure.
In commercial or rental use this additional
limited compressor warranty in one (1) year and
nine months. Any and all labor charges for
determination of cause of failure, installation of
the replacement compressor and
transportation / handling charges for shipment
of the replacement compressor will be the
responsibility of the user.
Cartage charges for moving the appliance to a
service shop (as may be required ) and back to
the user's home will also be the user's
responsibility.
EXCLUSIONS
■Avanti products shall not be responsible for
content fosses food or othen/v:se incidental or
ccn.sequentiai damages resulting from the
failure of the product to conform to any express
or implied warranty. In addition. Avanti Prod
ucts is not responsible for ser/ice calls which
do not involve defects in material or work
manship or other external causes such as
abuse, misuse, inadequate power supply or
Acts of God.
Therefore, cost of replacement or repair of the
iolfo'.ving items, parts or labor, will not be
considered w'arranty repairs:
1 - Evaporator doors.
2- Evaporator door springs and / or frames.
3' Inner door panels {Includes plastic door
shelves ) and chest freezer (id liners.
4- Door shelf rails and /or supports.
5- Vegetable crispers.
6- Vegetable crisper covers (glass or plastic).
7- Light bulbs and/or plastic housing.
8- Plastic cabinet liners.
9- Punctured evaporators which will void the
warranty on the complete
refrigerating system, i.e. compressor,
condenser, evaporator and related tubing.
This warranty does not apply in Hawaiian
Island, U.S, Virgin Islands, Puerto Rico and/or
any foreign country.
NORMAL RESPONSIBILITIES OF
USER
1- Proper installation and use of the
appliance in accordance with instructions
supplied with the Refrigerator or Freezer.
2- Replacement of light buibs.
3- Repair of damage to finish.
4- Proper connection to power supply of
sufficient voltage.
5- Replacement of blown fuses.
6- Repair of loose connections or defect in
house wiring.
7- Accessibility of the appliance to the
service technician for repairs.
The user must keep a copy of the Bill of Sale,
or Payment Record verifying the purchase date
to validate this warranty.
AVANTI PRODUCTS, DIVISION
OFTHEMACKLE CO., INC.
P.O. BOX 520604-MlAMI
FLORIDA 33152
10
 Loading...