

Page 1
User Manual
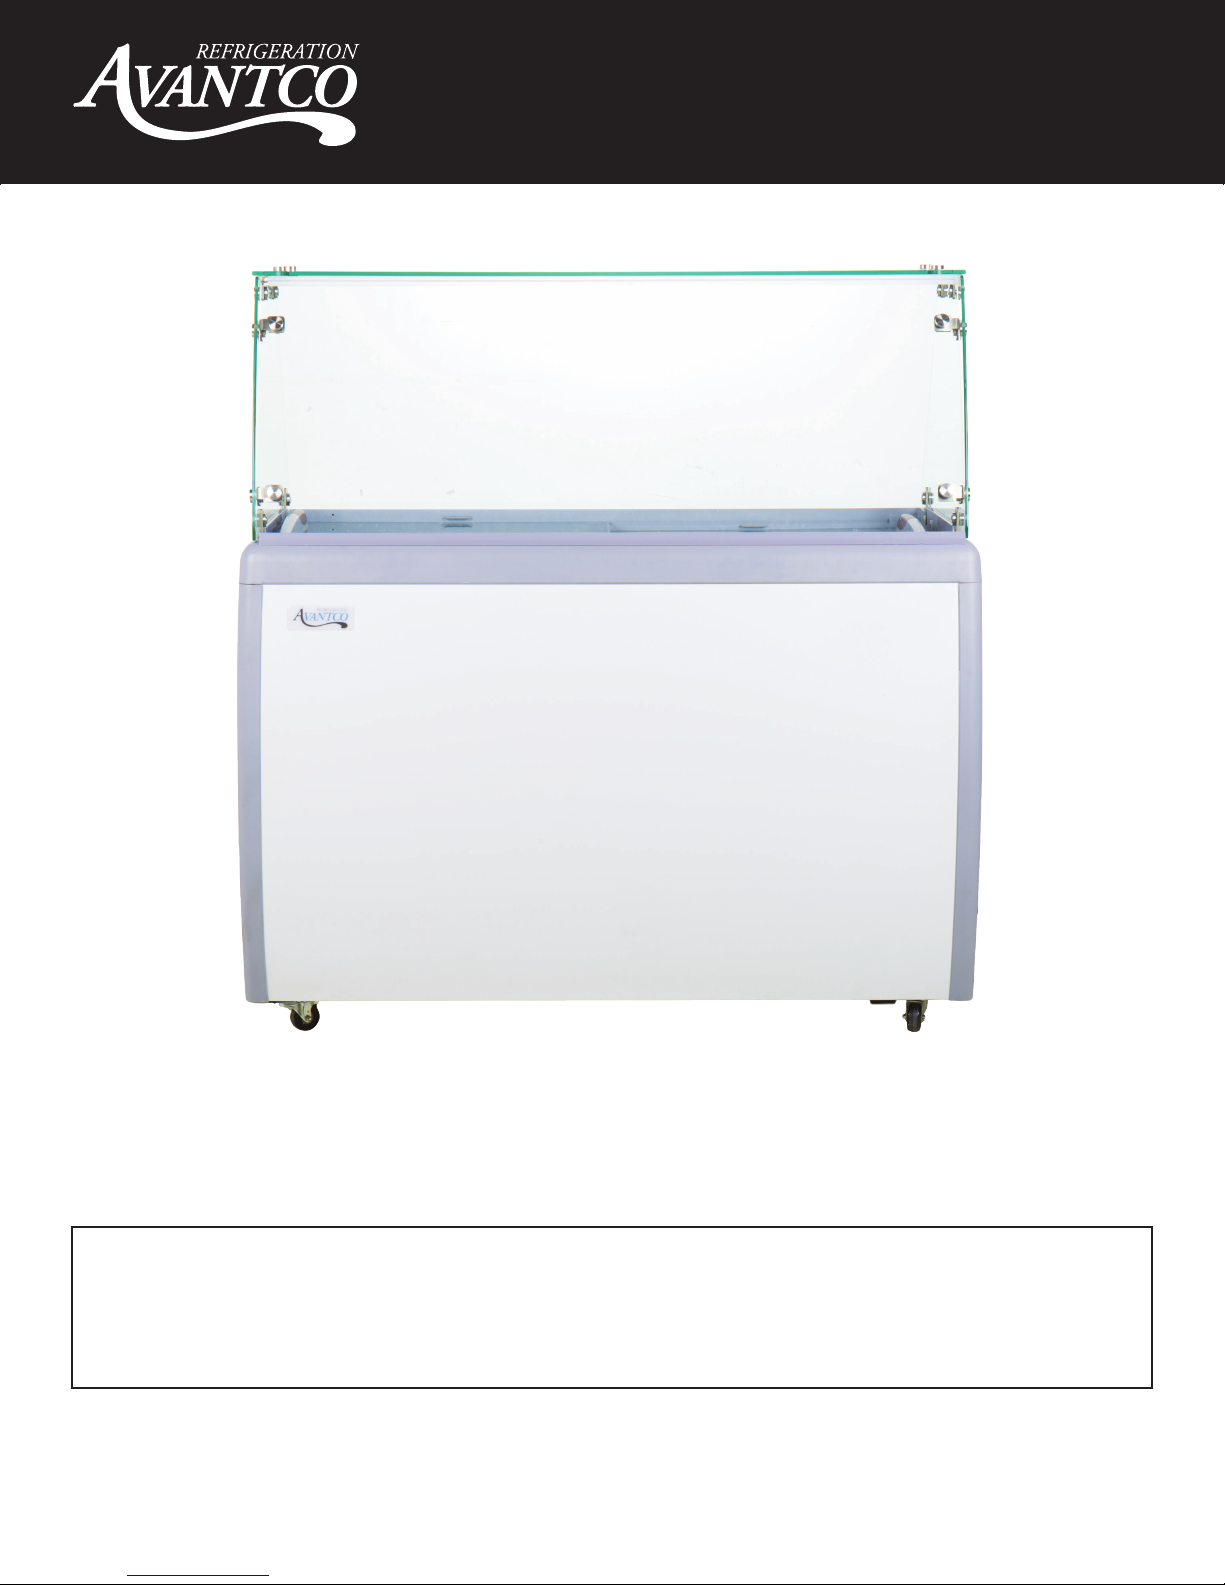
Ice Cream Dipping Cabinet
User’s Manual
360ADC4HC, 360ADC4CHC, 360ADC4FHC
360ADC8HC, 360ADC8CHC, 360ADC8FHC
Please read the manual thoroughly prior to equipment set-up,
operation and maintenance.
03/2018
- 1 -
Page 2

User Manual
Warning
DANGER – RISK OF FIRE OR EXPLOSION. FLAMMABLE REFRIGERANT USED. TO BE REPAIRED
ONLY BY TRAINED SERVICE PERSONNEL. DO NOT PUNCTURE REFRIGERANT TUBING.
DANGER – RISQUE DE FEU OU D’EXPLOSION. LE FRIGORIGÈNE EST INFLAMMABLE. CONFIER
LES RÉPARATIONS À UN TECHNICIEN SPÉCIALISÉ. NE PAS PERFORER LA TUBULURE
CONTENANT LE FRIGORIGENE.
CAUTION – RISK OF FIRE OR EXPLOSION. FLAMMABLE REFRIGERANT USED. CONSULT REPAIR
MANUAL/OWNER’S GUIDE BEFORE ATTEMPTING TO SERVICE THIS PRODUCT. ALL SAFETY
PRECAUTIONS MUST BE FOLLOWED.
ATTENTION – RISQUE DE FEU OU D’EXPLOSION. LE FRIGORIGÈNE EST INFLAMMABLE.
CONSULTER LE MANUEL DU PROPRIÉTAIRE/GUIDE DE RÉPARATION AVANT DE TENTER UNE
RÉPARATION. TOUTES LE MESURES DE SÉCURITÉ DOIVENT ÊTRE RESPECTÉES.
CAUTION – RISK OF FIRE OR EXPLOSION DUE TO PUNCTURE OF REFRIGERANT TUBING;
FOLLOW HANDLING INSTRUCTIONS CAREFULLY. FLAMMABLE REFRIGERANT USED.
ATTENTION – RISQUE DE FEU OU D’EXPLOSION SI LA TUBULURE CONTENTANT LE
FRIGORIGÈNE EST PERFORÉE; SUIVRE LES INSTRUCTIONS DE MANUTENTION AVEC SOIN. LE
FRIGORIGÈNE EST INFLAMMABLE.
CAUTION – RISK OF FIRE OR EXPLOSION DUE TO FLAMMABLE REFRIGERANT USED. FOLLOW
HANDLING INSTRUCTIONS CAREFULLY IN COMPLIANCE WITH LOCAL GOVERNMENT
REGULATIONS.
ATTENTION – RISQUE DE FEU OU D’EXPLOSION SI LE FRIGORIGÈNE EST INFLAMMABLE.
SUIVRE LES INSTRUCTIONS DE MANUTENTION AVEC SOIN CONFORMÉMENT AUX
RÈGLEMENTATION GOUVERNEMENTALE LOCAUX.
- 2 -
Page 3

User Manual
Transportation and Installation
Please read this manual thoroughly prior to equipment set-up, operation and maintenance.
• To prevent compressor or system damage, do not transport the unit on an incline of more than 45
degrees.
• Do not use the condenser, lid, or hinges as loading or unloading points.
• Before use, remove all packing material.
• Ensure the freezer is placed on a stable surface to avoid vibration and noise.
• Install the freezer in a well ventilated area with 4” clearance between the surrounding walls and the
cabinet wall for proper air circulation.
• The freezer should be installed in a dry place. Do not use it in direct sunlight.
Cautions
• In the event of damage to the electric wires or plug, please contact the after-sales service. Do not
attempt to repair it yourself.
• If the voltage is unstable, please choose the suitable automatic voltage regulator.
• The temperature control may need to be adjusted based on the amount of food in the freezer and the
ambient room temperature. More food or a higher room temperature may require a lower temperature
setting (higher number).
• Before placing food into the freezer, adjust the temperature control to the lowest point (highest number)
and let it run for several hours. Put the food in, and after 12 hours adjust the temperature control to the
normal point.
• Never put hot food directly in the freezer. Food should be cold or frozen before placing it inside.
• Do not fill the freezer full of product. For best results, meats and other large items should be divided into
smaller parts, and you should leave space between items so cold air can properly circulate and maintain
safe temperatures.
• If power is cut off, wait at least 5 minutes before turning on again to avoid damage to the compressor
• Non-packaged foods should be packed in plastic bags for proper safety.
• Never store flammable, explosive, or corrosive products in the freezer, and keep the freezer away from
such materials.
- 3 -
Page 4

User Manual
Adjusting the Temperature
The temperature in the cabinet can be adjusted with the control knob.
If your unit has a numbered control knob:
Setting between “4” and “5” is standard for storage and service of ice cream. If a different
temperature is needed nob may be adjusted to a lower number (warmer) or a high
number (colder).
Defrost System
To ensure optimal performance, unit should be placed into a defrost when the thickness of the ice on
the cabinet wall reaches 1/4”. To defrost, turn the temperature control knob to the lowest setting (the
lowest number, on numbered controllers) for 5 - 6 hours before defrosting. Power the freezer off and
remove all product. Remove the ice buildup (DO NOT USE SHARP TOOLS). After defrosting, clean
the wall with a dry cloth and then turn the power back on.
Please Note:
• The sound of water flowing during operation is normal; this is the refrigerant.
• When the humidity is high, condensation may form on the surface of the freezer.
• When the freezer is running, the condenser and compressor will be hot.
- 4 -
Page 5
User Manual
Operation/Maintenance
NOTE: We strongly recommend that any servicing be performed by an authorized service technician.
Loading Product
• In order to save energy, limit the number of times the lid is opened and the length of time the lid is open.
• Do not place heavy or hot things on top of the freezer; this can damage it.
• Be sure to power the freezer off before cleaning it.
• Use a soft cloth with some moderate detergent and warm water to clean the freezer.
• Use warm water to clean oil or fruit juice stains on the gasket in order to keep its elasticity. Apply some
talcum powder to it to prolong its life.
• The freezer should not be left unused for a long period of time. If you plan to stop using the freezer, power it
off, then clean the inside and keep the door open for 2-3 days to let it dry.
Attention
• Children should not operate this machine
• Children should not play around this equipment.
• We have the right to change materials and specifications without notice. Please find the specific parameters
on the rated label of the product.
Trouble Shooting
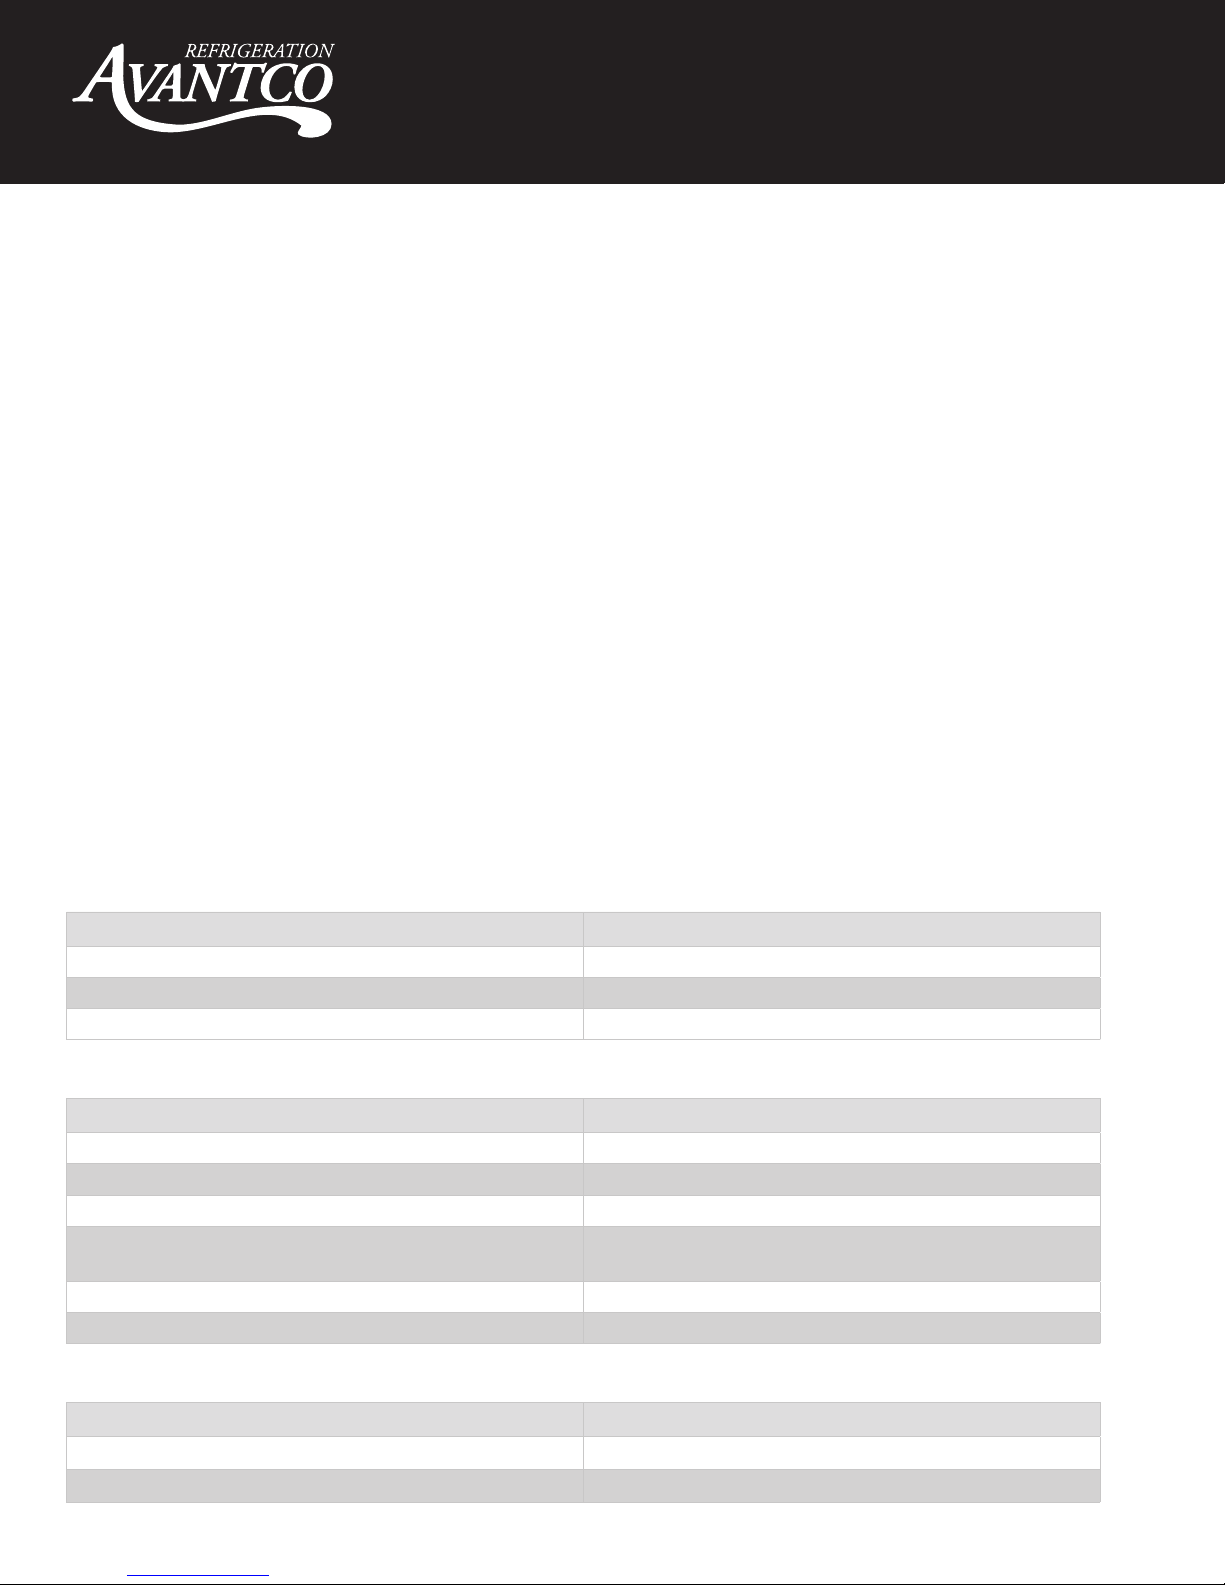
Freezer Keeps Unfreezing
Potential Issue How to Fix
Temperature control is set to the highest point. Adjust the temperature.
The plug is not properly plugged in. Make sure the plug is connected properly.
The fuse is broken off. Replace the fuse.
Compressor Does Not Shut Off
Potential Issue How to Fix
Temperature control is set to the lowest point. Adjust the temperature.
There is too much product in the freezer. Remove some product from the freezer.
There is ice buildup. Defrost the freezer.
The doors are being opened and shut too often. Reduce the amount of time the door on the freezer is
opened and shut.
The freezer is too close to a wall. Place the freezer away from the wall (at least 4").
The freezer is located too close to a heat source. Move the freezer away from the heat source.
Loud Noises
Potential Issue How to Fix
The freezer is on an uneven surface. Relocate the freezer to a level surface.
The refrigeration tubes are touching each other. Make sure the tubes are not touching each other.
- 5 -
Page 6
User Manual
Glass Canopy Assembly
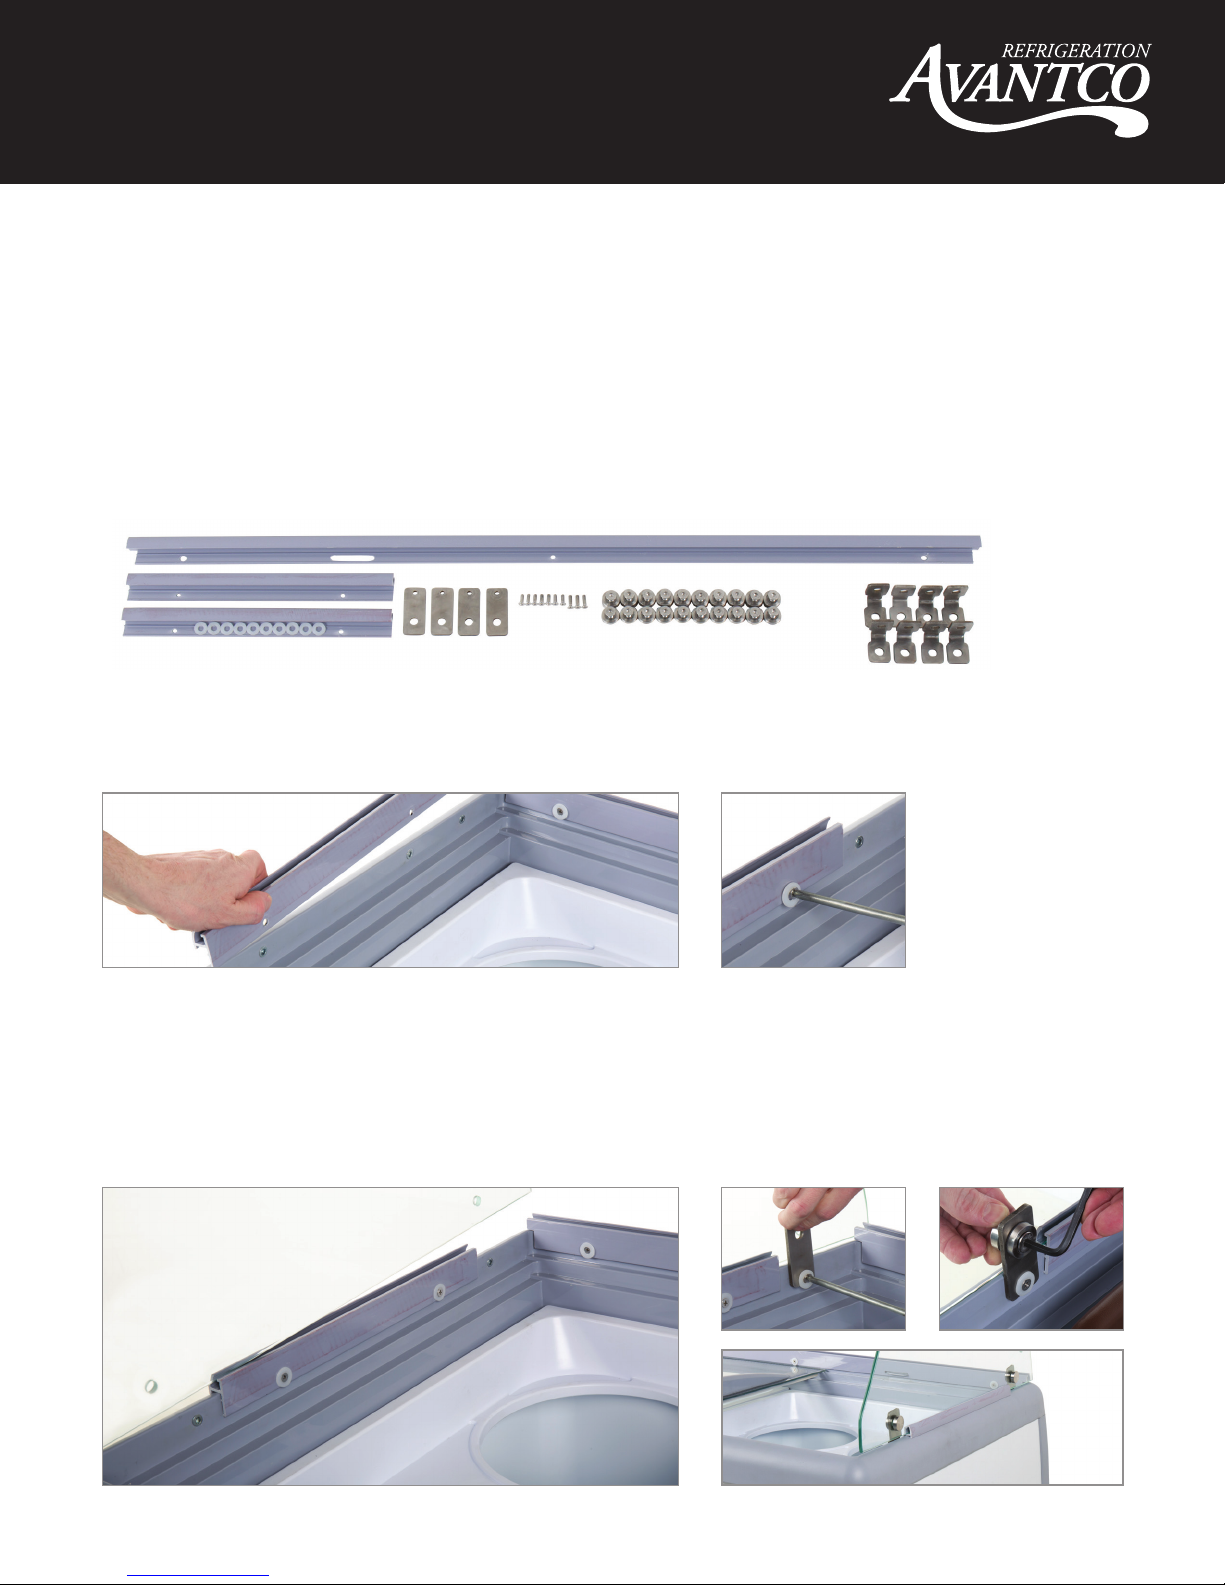
INCLUDED HARDWARE
• (1) 360BARFRNT front rail
• (2) 360BARSIDE side rail
• (4) 360PLATE metal plate for side rails
• (8) 360CORNER L-shaped bracket
• (11) 360SCREW small screws for rails
• (20) 360GLSSCREW large screw for glass panels
1) Install the 3 plastic channels along the sides and front of the cabinet using the
Phillips screws and white washers.
A short channel should be installed on each side, and the long channel should be installed on the front.
2) Insert the side glass panel into the side channel. Attach a metal plate to the cabinet
at both ends of the channel, using the Phillips screws and white washers.
Then, attach each of the metal plates to the side glass panel using the socket head
screws, white washers, metal washers, and associated metal fasteners.
Repeat this step on the other side of the cabinet.
- 6 -
Page 7
User Manual
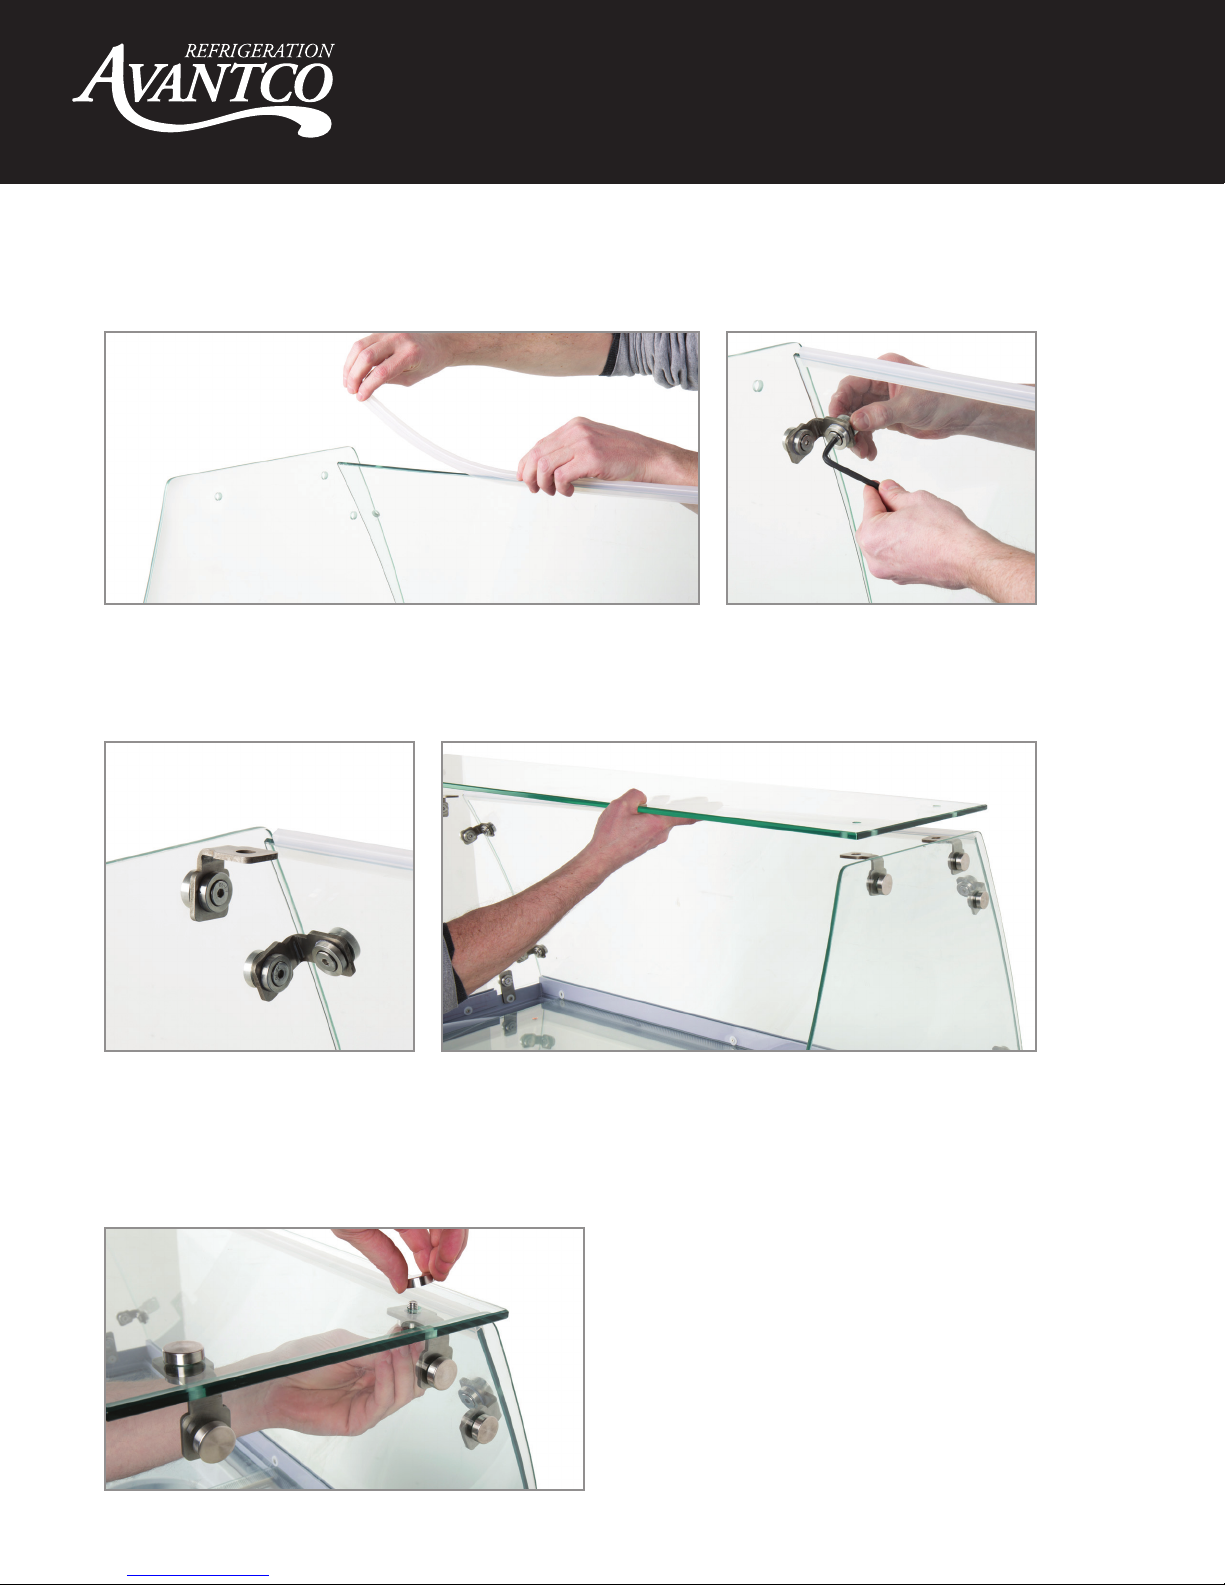
3) Insert the front glass panel into the front channel. Then, use the L-shaped brackets and
the fasteners that are pictured to attach the front glass panel to each of the side panels.
There are two bracket mounting locations on each side; one at the top, and one at the bottom.
4) Install the gasket on the top edge of the front glass panel, and place top glass
panel atop the front and side panels.
5) Use the style of L-shaped brackets and fasteners referenced in Step 3 to attach the
top glass panel to each of the side glass panels.
There are two bracket mounting locations on each side; one at the front, and one at the back.
- 7 -
Page 8

User Manual
Warranty Information
1 Year Limited Replacement Warranty - Valid only in the United States
Unless otherwise stated, Avantco Refrigeration warrants to the original purchaser of new, qualified Avantco
Refrigeration units (and all parts thereof), that such equipment will be free from defects in material and
workmanship for a period of 1 year from the date of delivery.
If a qualified product is found to be defective during this period, Avantco Refrigeration will repair the defective
unit, replace any defective parts, or replace the defective unit.
What This Warranty Does Not Cover:
Avantco Refrigeration will not warrant coverage for component failure or other damages that arise under the
following conditions:
• Failure to install and/or use the unit within proper operating conditions specified by Avantco
Refrigeration.
• Failure to properly maintain the unit. This includes, but is not limited to, basic preventative maintenance
like cleaning the condenser coil.
• Products sold or used outside of the United States.
• Any damage that occurs as a result of negligence or improper handling.
• Overloading or improper loading of the unit in a manner that prevents proper airflow.
Additionally, no claims can be made against this warranty for spoilage of products, loss of sales or profits, or
anyother consequential damages.
Normal wear type parts, such as light bulbs and gaskets, are not included in warranty coverage.
For Warranty Inquiries or Service:
To obtain warranty service, contact the location where you purchased the product:
www.WebstaurantStore.com:
Call 717-392-7472. You must have your order number ready when contacting.
The Restaurant Store:
If you purchased this unit from your local store location, please contact your store directly.
www.TheRestaurantStore.com:
If you purchased this unit online, call 717-392-7261. You must have your order number ready when
contacting.
Failure to contact the designated location prior to obtaining equipment service may void your warranty.
- 8 -
 Loading...