


1
AVTMCOOKVAA
ThermoCook Multifunction Kitchen Cooking
Machine

2
PACKAGE CONTENTS
1. Stainless Steel Bowl
2. Cover
3. Basket
4. Butterfly
5. Blade Guard
6. Measuring Cup
7. Food Steamer
8. Spatula
In the box
1. ThermoCook Body
2. Stainless Steel Bowl + Cover
3. Cooking Basket
4. Butterfly attachment
5. Blade Guard
6. Measuring Cup
7. Steamer and Lid
8. Spatula

3
IMPORTANT SAFEGUARDS
For your own safety read the following instructions carefully before attempting to connect this unit
to mains power:
You should only plug the appliance into a 220V-240V AC, 50Hz supply. Connecting it to other power
sources will damage the appliance.
1. Please carefully read the instructions and check components before operating.
2. This appliance is intended for household use only.
3. Do not use the appliance other than intended or specified purposes.
4. Make sure the voltage mark on the appliance corresponds to the voltage in your home before
plugging in the power cord in order to avoid damage to the appliance.
5. To protect against electrical shock, do not place cord, plug, or base unit in water or other
liquids. Don’t operate machine with wet hand or place on a wet working place. Do not let the
cord hang over the edge of the table or counter or touch hot surfaces.
6. If the supply cord is damaged, it must be replaced by the manufacturer, its service agent or
similarly qualified persons in order to avoid a hazard.
7. Unplug from outlet when not in use or before cleaning any part of the appliance.
8. It is prohibited to plug or unplug with wet hands to avoid electric shock.
9. To disconnect, remove plug from the electric outlet.
10. This appliance is not intended for use by persons (including children) with reduced physical,
sensory or mental capabilities, or lack of experience and knowledge, unless they have been
given supervision or instruction concerning use of the appliance by a person responsible for
their safety.
11. Children should be supervised to ensure that they do not play with the appliance.
12. Do not use outdoors or in damp conditions
13. Do not place the appliance on or near a hot gas or electric burner or in a heated oven.
Ensure that the power cord does not touch any hot surface and that it does not overhang
the edge of your work surface
14. Do not use attachments or accessories which are not recommended by the manufacturer.
This may cause malfunction or injury.
15. Do not attempt to replace the power cord on this appliance. This should only be carried out
by authorized service personnel with specialist tools
16. The Stirring blade on this unit is SHARP and should be handled with care if dismantling or
reassembling.
17. Food capacity in the Bowl should not exceed 2L
18. Do not remove the cover of the bowl until the machine has stopped stirring, especially when
the speed is greater than 5
19. When heating or taking out the bowl after heating avoid touching the stainless steel body to
prevent scaling.
20. When opening the bowl cover or steamer cover, be careful to avoid vapor scalding. Do not
touch the cover when heating.
21. Please press the measuring cup when the speed is above 5 or when crushing frozen food
using “Turbo”

4
22. This machine may move under heavy operation. To prevent this ensure the machine is on a
steady surface and is a safe distance from the edge to avoid it falling.
23. Ensure there is adequate space around the unit when in use.
24. Overload protection will automatically be enable if overheating. In the event this occurs keep
the unit off for 15 minutes, unplugged from the power socket.
Waste electrical products should not be disposed of with household waste. Please recycle where
facilities exist. Check with your local authority for recycling advice.
SAVE THESE INSTRUCTIONS FOR HOUSEHOLD USE ONLY
Any servicing should be performed by an authorized service representative.
REQUIREMENTS
Voltage: 220-240V.A.C Hertz: 50Hz Power: 1400W (Machine), 600W
(Motor), 1300W (Heating) Capacity of Unit: 2L Speed: 200 – 10000 RPM
INTRODUCTION
The ThermoCook is the ultimate all-in-one Kitchen device. Work smarter in the kitchen and spend
less time preparing and more time doing what you love. This Food Processer will chop, beat, mix,
knead, blend, cook, steam, stir and melt – What more could you ask for!
The easy to use controls and stylish design make this the perfect addition to any kitchen. Cook
like a Masterchef today with the Avancer ThermoCook!
Before First Use
1. Remove all packaging material such as carton and foils.
2. Check that the appliance is not damaged and all parts are present.
3. Before using the ThermoCook for the first time, clean the Bowl thoroughly.
4. After cleaning assemble the bowl. Match the gap in the bowl cover to the front of bowl and
press down the jar lid so that it locks into the handle locking hole.
5. Put the bowl into the housing in the right direction and hold the handle and turn anticlockwise till it matches the lock
6. Plug in the power cord and press the switch on the back of the housing.
7. Set time, temperature and speed on the control panel and then press Start/Stop to start the
machine.

5
Tips before using
Taking the Bowl off correctly
1. Press Start/Stop button to stop the machine.
2. Hold handle of bowl and turn clockwise slowly. You can then remove the bowl from the
housing.
3. Press the cover release button and the cover should be unlocked.
4. You can then remove the cover

6
Using the LCD Display
1. Turn on the device
2. If the Bowl or cover is not well placed then the LCD will display an error.
3. If the Bowl or cover is placed correctly then the LCD will display 00:00
4. In that situation you can adjust the time, temperature and speed
Note: If the cover is not placed correctly it will not lock into the handle correctly. Thus the safety
mechanism won’t be disabled. It is important to place the cover correctly and not force it in place.
Dismantling the Blade assembly
1. Use one hand to reach into the bowl and hold the semicircle part on the blade assembly.
2. Then turn the nut in an anti-clockwise direction and pull out the blade assembly.
Caution: The stirring blade is very sharp. Please do not touch the edge directly when dismantling
to avoid any injury. Hold the upper part when removing the blade assembly to avoid the blade
assembly falling off and leading to an accident.
Using the accessories
Measuring Cup – This can be used to cover the bowl cover and for measuring liquid
Basket – This is a multifunction accessory that can be used to filter fruit and vegetable juice. You
can also cook vegetables such as potato, tomato, onion, etc
Spatula – Can scrape off ingredients from the inner wall of the bowl. Can also be used to fix the

7
basket in place when filtering juicer
Butterfly – This must be used with Blade guard. It allows for continuous blending and can ensure
a better mixing result as well as avoiding sticking when heating milk, making butter pudding or
fruit sauce.
To assemble aim the two half-circles of the blade guard and insert the butterfly to cover this. Then
rotate clockwise down. To disassemble hold the bowl with one hand whilst remove the blade
guard top to pull the butterfly off.
Note: Use Speed 4 max with this attachment.
Blade guard: Blend & mix soft, solid or liquid food. Before assembling, take off the blade
assembly from bowl. Put the blade guard cover on the top of the blade and while twisting slightly
push down until assembled in the bowl. Screw down the bottom nut.
Note: Use Speed 4 max with this attachment.
Steaming pot: This accessory includes the steaming pot, steaming disc, and steaming cover. It
could be used to steam a large quantity of food such as vegetable, potato, meat, fish etc.
8
Caution: Please pay attention to avoid being scalded by vapor.
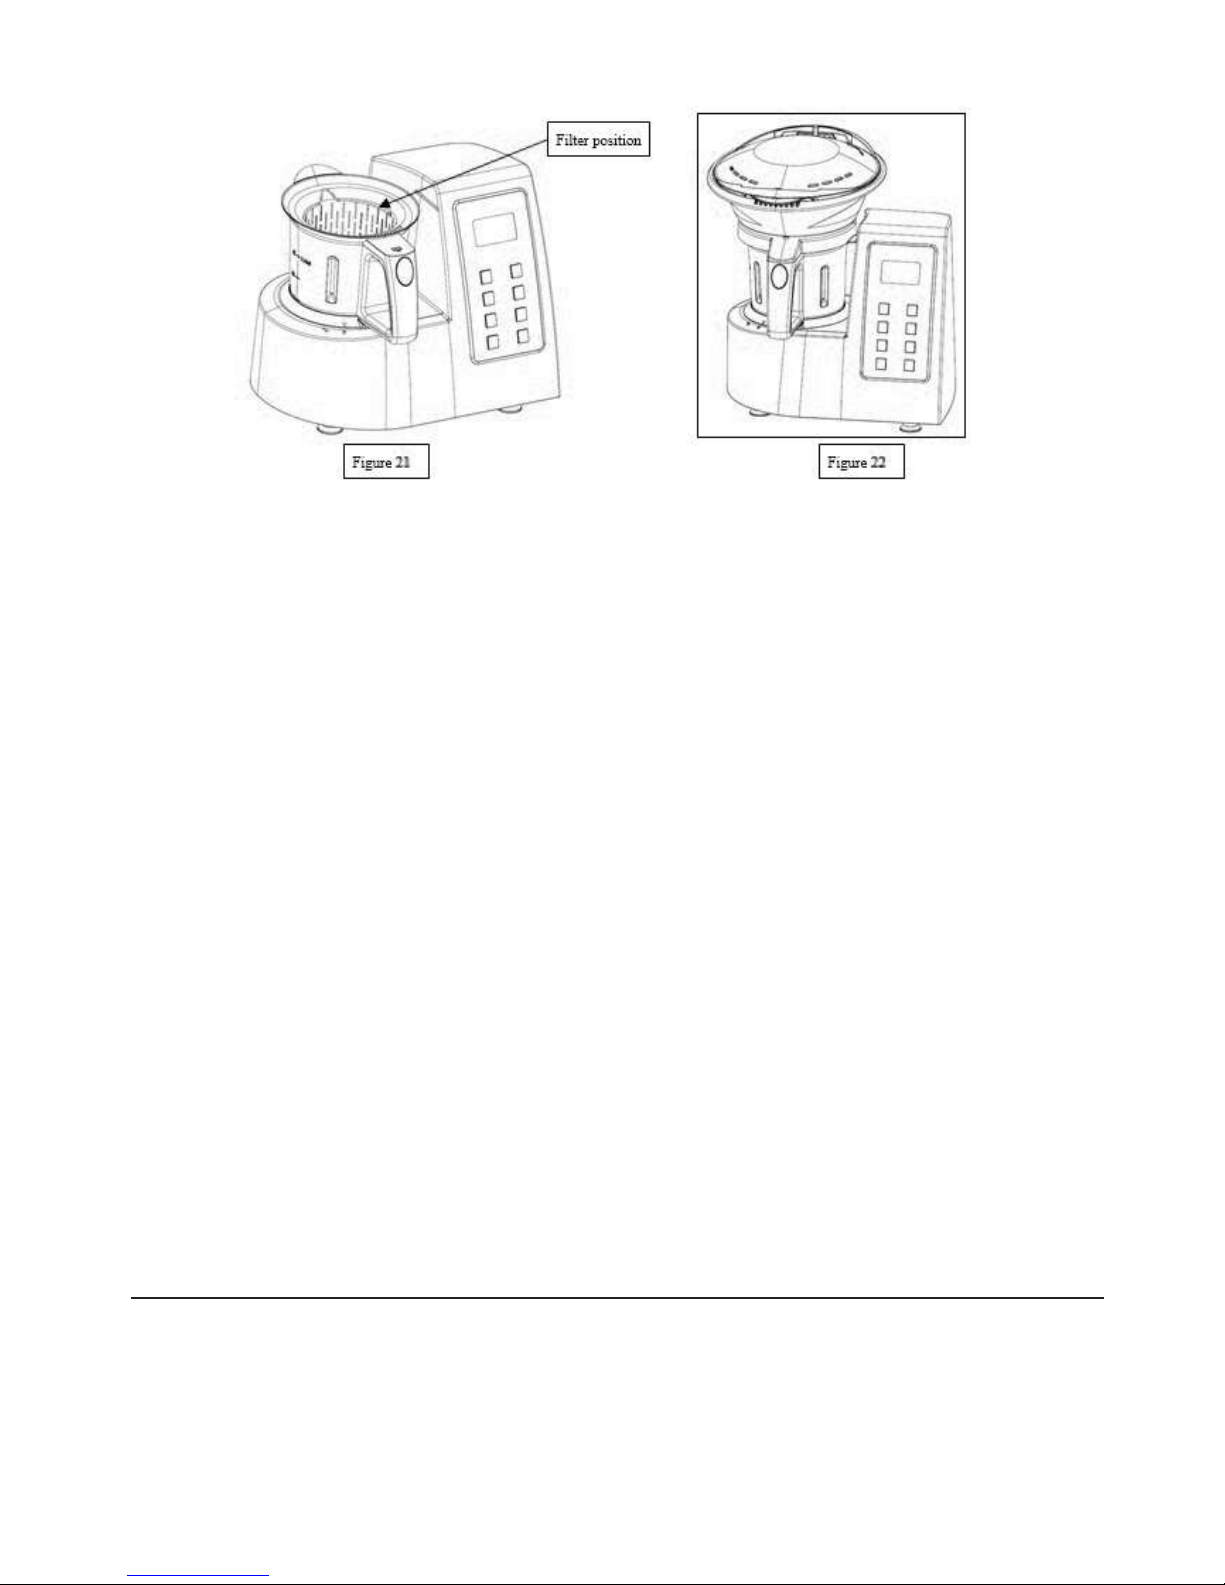
1. Put 500ml water in the bowl. If you need to use with the filter, please put filter into bowl first.
Then put (such as rice and potato) in filter, put cover and ensure the bottom being fastened
well and twisted in the right place.
2. Put steaming pot on the bowl in the correct location. Put food in steaming pot and put the
easily cooked food on bottom, the not easily cooked food on top.
3. Cover the steaming pot to ensure steaming air won’t be released
Important reminder:
1. When the steaming pot is used, please don’t leave measuring cup on bowl.
2. When the steaming pot is used, please ask children to keep distance with machine and
notify them of the danger.
3. When the steaming pot is used, please choose low speed. This should be Speed 1 to 3.
High speed set-up may lead to food or soup spillage.
Operation:
1. Set up the time, steaming temperature and speed on control panel. Then press Start/Stop
button to commence cooking.
2. The vapor will go to the steaming pot through holes in the cover of the bowl and cook the
food.
3. Open the steam cover. Ensure you pitch the cover slightly so that vapor exits from the rear
and cooled water can flow into the steaming pot.
4. Turn the cover and put on the table-board. Lift the steaming pot and hold for a few seconds,
letting cooled water drip into the stainless steel bowl cover. Then put the steaming pot in the
steaming cover.
OPERATION

9
Using the Control Panel
Time: Will allow you to change the timer
Temp: Will allow you to choose the temperature
Speed: Will allow you to change the speed
Dough: Will allow you to make bread dough
+: Increase time, temperature and speed
-: Decrease time, temperature and speed
Start/Stop: Start or stop the ThermoCook
Heating Mode
1. Set the time (max 90mins)
a. Press time button and “Time” characters will indicate.
b. Press “+” and “-“ to change the time. Hold for quicker increase/decrease steps.
c. Pressing Time once will change minutes and pressing Time twice will allow you to set
seconds. Time can be changed in intervals of 1 minute or 1 second respectively.
2. Set the temperature (30-120 degrees Celsius)
a. Before cooking choose the cooking temperature. If you don’t need heat, please go
to step 3.
b. Press Temp button and the indicator will be activated.
c. Press “+” and “-“ to change the temperature. Hold for quicker increase/decrease
steps. Temperature can be changed in intervals of 10 degrees Celsius.
3. Set the stirring speed for the blade assembly (200 – 10000 RPM)
a. Press “Speed” button and the indicator will be activated.
b. Press “+” and “-“ to change the speed. Hold for quicker increase/decrease steps.
c. When blending, adjust speed to 1-5. When making items like a fruit sauce, adjust

10
speed to 5-9.
4. Press “Start/Stop” button
a. After pressing “Start/Stop” button, you can hear operation of the machine begin.
b. After starting, the set-up time would count down till “00:00”, and the machine would
beep when the work finished. In operation mode, press “Start/Stop” again, the
machine will stop work.
Important Note:
1. When not in heating mode. If you do not set the time you can just set the stirring speed and
the machine will start in auto-timer mode. This will continue for 20 minutes MAX and then
the machine will stop automatically and beep.
2. When in heating mode. You must set the time and speed then start cooking. If you don’t set
the time but only the temperature the machine will not work. When heating is finished the
machine will stop heating but the blade inside the bowl will continuously stir for 10 minutes
and stop with a beep to avoid food scorching if not poured immediately.
3. In heating mode you can only set maximum speed to 5.
4. Once the program has finished the machine will beep and if ignored it will do a reminder
beep after 5 minutes.
Dough Mode
The ThermoCook can be used to make yeast or bread dough.
1. Set the time and press the Dough button and then Start/Stop
2. This will set the device into a pre-set program, working in speed 3 for 3 seconds and then
stopping for 4 seconds and repeating.
Example Program:
1. Put 500g flour into the Bowl and ensure that the bowl is dry.
2. Put the Bowl onto the ThermoCook.
3. Press 3 minutes for time, then press Dough button and press Start
a. The machine will begin the pre-set program
4. Pour 300ml of Water slowly into the bowl within the first minute.
5. Ensure you keep a proportion of 5:3 between flour and water, never exceeding 500g of
flour and 300ml of water.
Caution: Avoid the sharp blade after the dough is made and ensure the device cannot move or
fall from an edge.
Turbo (Pulse) Mode
There is no need to set the time and stirring speed. Simply press the Turbo button continuously
and the machine will operating in maximum speed and count time automatically. The device will
stop when you release the button. You can use this mode to crush hard food such as ice.
Note: Cannot be used during Dough mode
Caution: Do not use for more than 1kg of food and ensure the measuring cup is in place to avoid
spillage of food.

11
Recipe Examples:
When preparing food consider the order of each item
Caution: Please ensure the stainless steel bowl capacity doesn’t exceed 2L. Do not exceed 1.5L
when used as a blender.
Cooking Food
1. Set time 45 minutes
2. Choose temperature 120°
3. Set speed 3
4. Press “Start/Stop” button.
Chopping Vegetable
1. Set time 30 seconds
2. Set speed 6
3. Press “Start/Stop” button.
Crushing Ice Cube
1. Do not exceed 300g ice cube in bowl.
2. Set time 1 minute
3. Set speed 9
4. Press “Start/Stop” button.
Blending Carrot Juice
1. Do not exceed 400g carrot in bowl, 600ml water
2. Set time 1 minute
3. Set speed 9
4. Press “Start/Stop” button.
Coffee grinding
1. Do not exceed 200 gram coffee beans
2. Set time 2 minutes
3. Set speed 9
4. Press “Start/Stop” button.
Cleaning and Maintenance
First read the instructions in the section titled “IMPORTANT SAFEGUARDS”.
Before first use, the machine should be thoroughly cleaned, including all food-contactable
accessories.
Cleaning the stainless steel bowl and cover
1. Disassemble blade assembly and sealing ring first.
2. Use hot water or dishwasher to clean stainless steel bowl internal part and housing

12
(excluding the blade)
3. You can also clean the spatula, butterfly, blade guard, filter, measuring cup, cover and
steamer at same time.
Note: When there is sticky and un-easily cleaned matter on stainless steel bowl or stainless steel
accessory, please consider using a stainless steel cleaner or detergent.
How to clean blade assembly:
1. Hold blade assembly bottom and place it under tap to flush.
2. You can use a brush or clean it in the dishwasher
Note: Please pay attention when dismantling the blade assembly to avoid injuring your hand.
How to clean steamer:
Please use a dishwasher to clean steamer and cover. A soft cloth and detergent could also be used.
How to clean housing:
Use soft cloth or detergent to clean. Please do not use water directly on the unit to avoid water
damaging the internals. Always remove the plug before cleaning.
Warranty
In the event of a problem with your item please contact support@avancer.com.au
This product is guaranteed against manufacturing defects for a period of 1 years.
This does not cover the product where the fault is due to misuse, abuse, use in contravention of
the instructions, or where the product has been the subject of unauthorised modifications or
alterations, or has been the subject of commercial use.
If the ThermoCook is shown to have had an inherent defect present at the time of sale, Avancer
will provide you with a replacement.
According to the Waste Electrical and Electronic Equipment (WEEE) directive, WEEE should be
separately collected and treated. The above symbol on the product or its packaging indicates that
this product is not to be handled as normal household waste but is to be taken to a recycling
collection point for electrical and electronic goods. By correctly disposing of this product you are
contributing to the protection of the environment and to the health of your fellow human beings.
Improper disposal endangers health and the environment. Further information about the recycling
of the product may be obtained from your local council, refuse collection department or the store
where you purchased the product.
 Loading...