

Page 1

EPC-BYT2
Intel® Celeron® SoC Processor Fanless Box PC
Quick Reference Guide
1st Ed – 23 February 2016
Copyright Notice
Copyright 2016 Avalue Technology Inc., ALL RIGHTS RESERVED.
Part No. E2017CA91A0R
Page 2

EPC-BYT2
FCC Statement
THIS DEVICE COMPLIES WITH PART 15 FCC RULES. OPERATION IS
SUBJECT TO THE FOLLOWING TWO CONDITIONS:
(1) THIS DEVICE MAY NOT CAUSE HARMFUL INTERFERENCE.
(2) THIS DEVICE MUST ACCEPT ANY INTERFERENCE RECEIVED INCLUDING
INTERFERENCE THAT MAY CAUSE UNDESIRED OPERATION.
THIS EQUIPMENT HAS BEEN TESTED AND FOUND TO COMPLY WITH THE LIMITS
FOR A CLASS "A" DIGITAL DEVICE, PURSUANT TO PART 15 OF THE FCC RULES.
THESE LIMITS ARE DESIGNED TO PROVIDE REASONABLE PROTECTION AGAINST
HARMFUL INTERFERENCE WHEN THE EQUIPMENT IS OPERATED IN A
COMMERCIAL ENVIRONMENT. THIS EQUIPMENT GENERATES, USES, AND CAN
RADIATE RADIO FREQUENCY ENERGY AND, IF NOT INSTATLLED AND USED IN
ACCORDANCE WITH THE INSTRUCTION MANUAL, MAY CAUSE HARMFUL
INTERFERENCE TO RADIO COMMUNICATIONS.
OPERATION OF THIS EQUIPMENT IN A RESIDENTIAL AREA IS LIKELY TO CAUSE
HARMFUL INTERFERENCE IN WHICH CASE THE USER WILL BE REQUIRED TO
CORRECT THE INTERFERENCE AT HIS OWN EXPENSE.
A Message to the Customer
Avalue Customer Services
Each and every Avalue’s product is built to the most exacting specifications to ensure
reliable performance in the harsh and demanding conditions typical of industrial
environments. Whether your new Avalue device is destined for the laboratory or the factory
floor, you can be assured that your product will provide the reliability and ease of operation
for which the name Avalue has come to be known.
Your satisfaction is our primary concern. Here is a guide to Avalue’s customer services. To
ensure you get the full benefit of our services, please follow the instructions below carefully.
Technical Support
We want you to get the maximum performance from your products. So if you run into
technical difficulties, we are here to help. For the most frequently asked questions, you can
easily find answers in your product documentation. These answers are normally a lot more
detailed than the ones we can give over the phone. So please consult the user’s manual
first.
To receive the latest version of the user’s manual; please visit our Web site at:
http://www.avalue.com.tw/
2 EPC-BYT2 Quick Reference Guide
Page 3

Quick Reference Guide
Content
1. Getting Started ............................................................................................................ 4
1.1 Safety Precautions ................................................................................................ 4
1.2 Packing List ........................................................................................................... 4
1.3 System Specifications ........................................................................................... 5
1.4 System Overview ................................................................................................... 7
1.4.1 Front View .......................................................................................................................... 7
1.4.2 Rear View ........................................................................................................................... 7
1.5 System Dimensions ............................................................................................... 9
1.5.1 Front & Top View .................................................................................................................... 9
2. Hardware Configuration ........................................................................................... 10
2.1 EPC-BYT2 connector mapping............................................................................ 11
2.1.1 Serial Port 1 connector (COM1) .............................................................................................11
2.1.2 VGA connector (VGA) ............................................................................................................11
2.2 Installing Hard Disk & Memory (EPC-BYT2)........................................................ 12
EPC-BYT2 Quick Reference Guide
3
Page 4
EPC-BYT2
1. Getting Started
1.1 Safety Precautions
Warning!
Always completely disconnect the power cord from your
chassis whenever you work with the hardware. Do not
make connections while the power is on. Sensitive
electronic components can be damaged by sudden power
surges. Only experienced electronics personnel should
open the PC chassis.
Caution!
Always ground yourself to remove any static charge before
touching the CPU card. Modern electronic devices are very
sensitive to static electric charges. As a safety precaution,
use a grounding wrist strap at all times. Place all electronic
components in a static-dissipative surface or static-shielded
bag when they are not in the chassis.
1.2 Packing List
1 x EPC-BYT2 Intel® Celeron® SoC Processor Fanless Box PC
1 x DVD-ROM contains the followings:
— QRG in PDF file
— Ethernet driver and utilities
— VGA drivers and utilities
— Audio drivers and utilities
— Chipset drivers and utilities
Other major components include the followings:
— Screw kit
— Adapter
— Power Cord
4 EPC-BYT2 Quick Reference Guide
Page 5
Quick Reference Guide
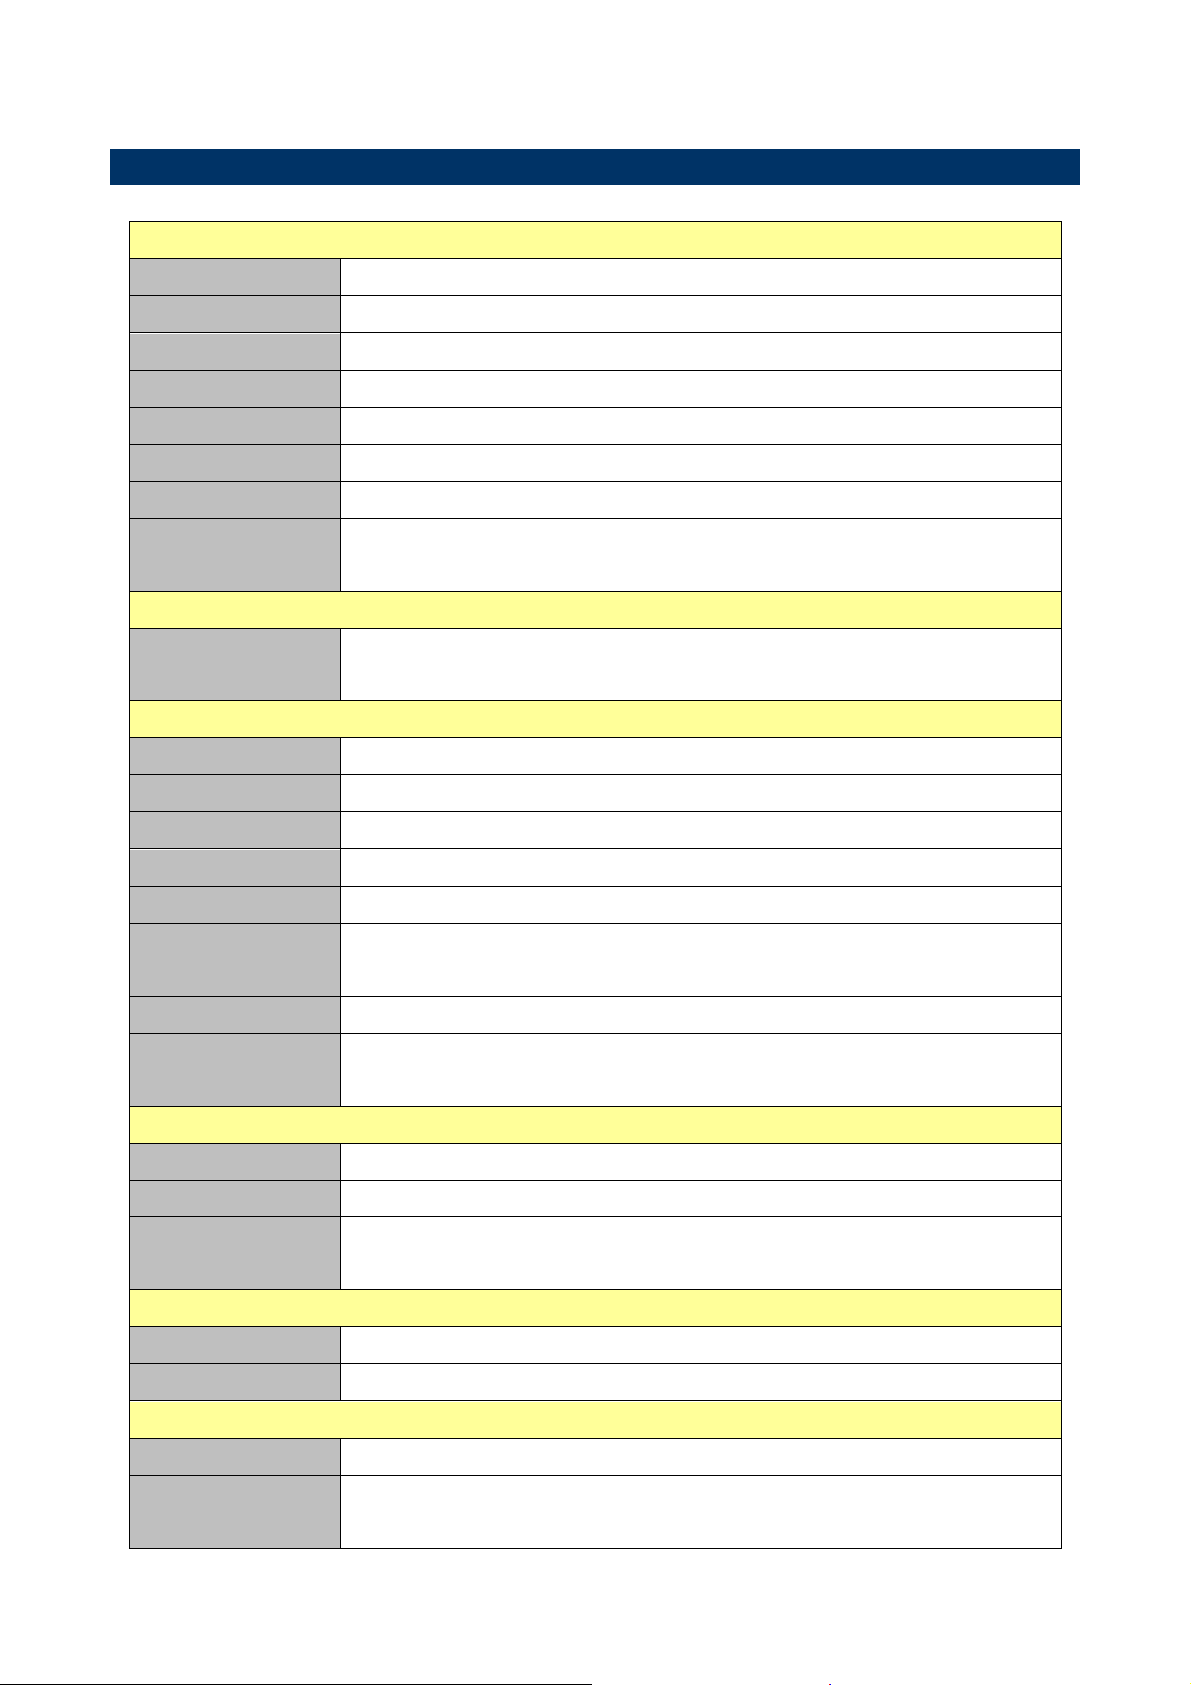
1.3 System Specifications
System
Board ECM-BYT2
CPU Intel® Celeron® Processor J1900 Family
BIOS AMI uEFI BIOS, 64Mbit SPI Flash ROM
System Chipset Valleyview D SoC Integrated
I/O Chipset EC ITE IT8528E
System Memory One 204-pin SODIMM Socket Up to 8GB DDR3L 1333MHz SDRAM
Watchdog Timer H/W Reset, 1sec. ~ 65535sec./1sec.step
H/W Status
Monitor
Monitoring System Temperature, Voltage with Auto Throttling Control
Storage
Solid State Drive
1 x mSATA
1 x 2.5” Drive Bay
External I/O
COM Port 1 x RS-232
USB Port 4 x USB (1 x USB 3.0, 3 x USB 2.0)
Video Port 1 x VGA, 1 X HDMI
LAN Port 2 x RJ45
Switch 1 x Power on/off membrane w/ LED
Indicator Light
Antenna 2 x Antenna mounting
Expansion Slots
1 x Power on/off LED on rear side
1 x Storage LED on rear side
1 x Full Size Mini PCIe (mSATA supported)
1 x Half Size Mini PCIe
Display
Chipset Intel® Celeron® SoC Integrated Graphics
Multiple Display Dual Display, VGA + HDMI
VGA Mode: 2560 x 1600 @ 60Hz
Resolution
HDMI Mode: 1920 x 1200 @ 60Hz
Ethernet
Chipset 2 x Realtek RTL8111E Gigabit Ethernet
Ethernet Interface 10/100/1000 Base-Tx Gigabit Ethernet Compatible
Mechanical
Power Type +12 ~ 26Vdc (Lockable DC Jack)
Single Power ATX Support S0, S3, S4, S5
ACPI
ACPI 3.0 Compliant
EPC-BYT2 Quick Reference Guide
5
Page 6

EPC-BYT2
Power Mode AT/ATX (ATX is the default setting)
Operating
Temperature
-10 ~ +45°C (w/mSATA & SSD), Ambient w/Air Flow
0 ~ 40°C (32 ~ 104°F) (w/HDD), Ambient w/Air Flow
Storage
Temperature
-40 ~ 75°C (-40 ~ 167°F)
Relative Humidity 0% ~ 90% Relative Humidity, Non-condensing
Vibration
Protection
With CF/SSD: 1.5Grms, IEC 60068-2-64, Random, 5 ~ 500Hz, 30min/axis
Shock Protection With CF/SSD: 10G, IEC 60068-2-27, Half Sine,11ms
Certification CE, FCC Class A
Dimension (W x D x
H)
175mm x 110mm x 40mm
Color Black
Fanless YES
Note: Specifications are subject to change without notice.
6 EPC-BYT2 Quick Reference Guide
Page 7
1.4 System Overview
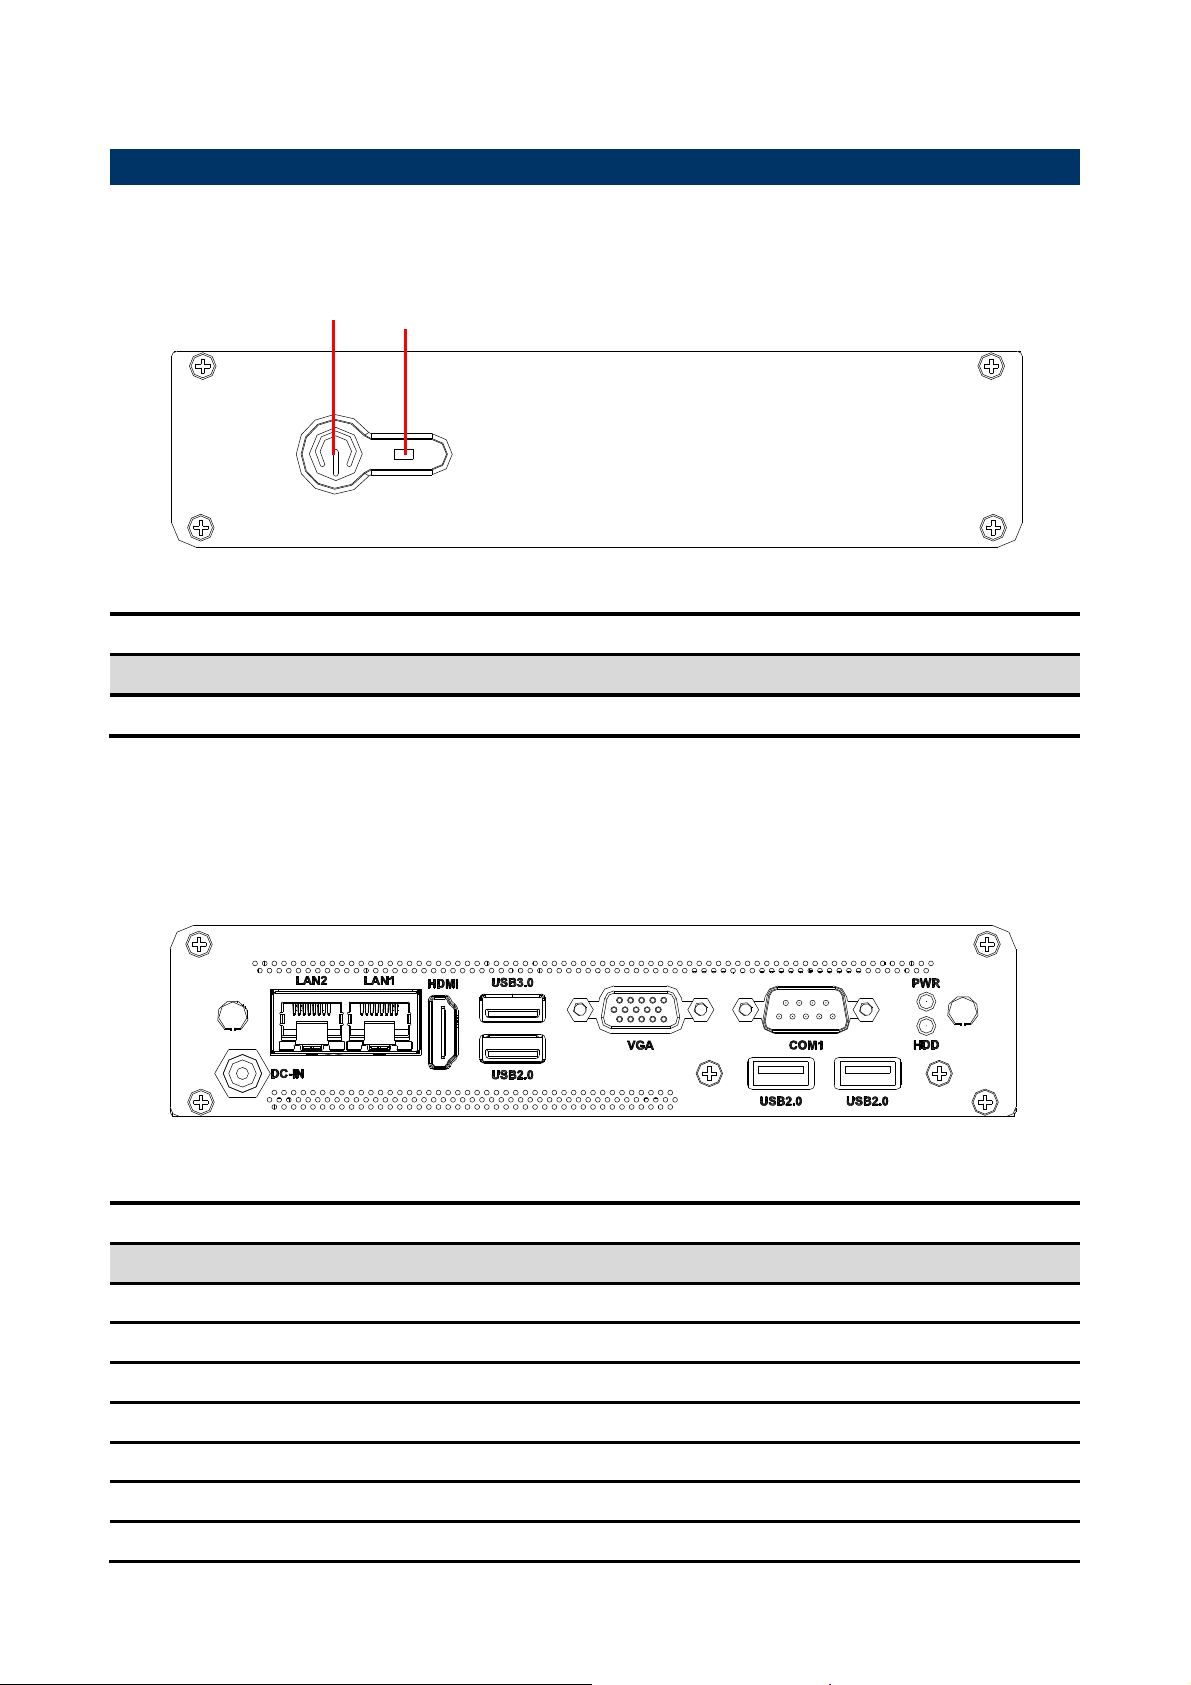
1.4.1 Front View
POWER
LED
Connectors
Quick Reference Guide
Label Function Note
POWER Power on button
1.4.2 Rear View
Connectors
Label Function Note
COM1 Serial port 1 connector
HDD HDD indicator
LAN1/2 RJ-45 Ethernet 1/2
PWR System power indicator
USB2.0 USB 2.0 connector x 3
USB3.0 USB 3.0 connector
VGA VGA connector DB-15 female connector
EPC-BYT2 Quick Reference Guide
D-sub 9-pin, male
7
Page 8

EPC-BYT2
HDMI HDMI connector
DC-IN DC Power-in connector
8 EPC-BYT2 Quick Reference Guide
Page 9
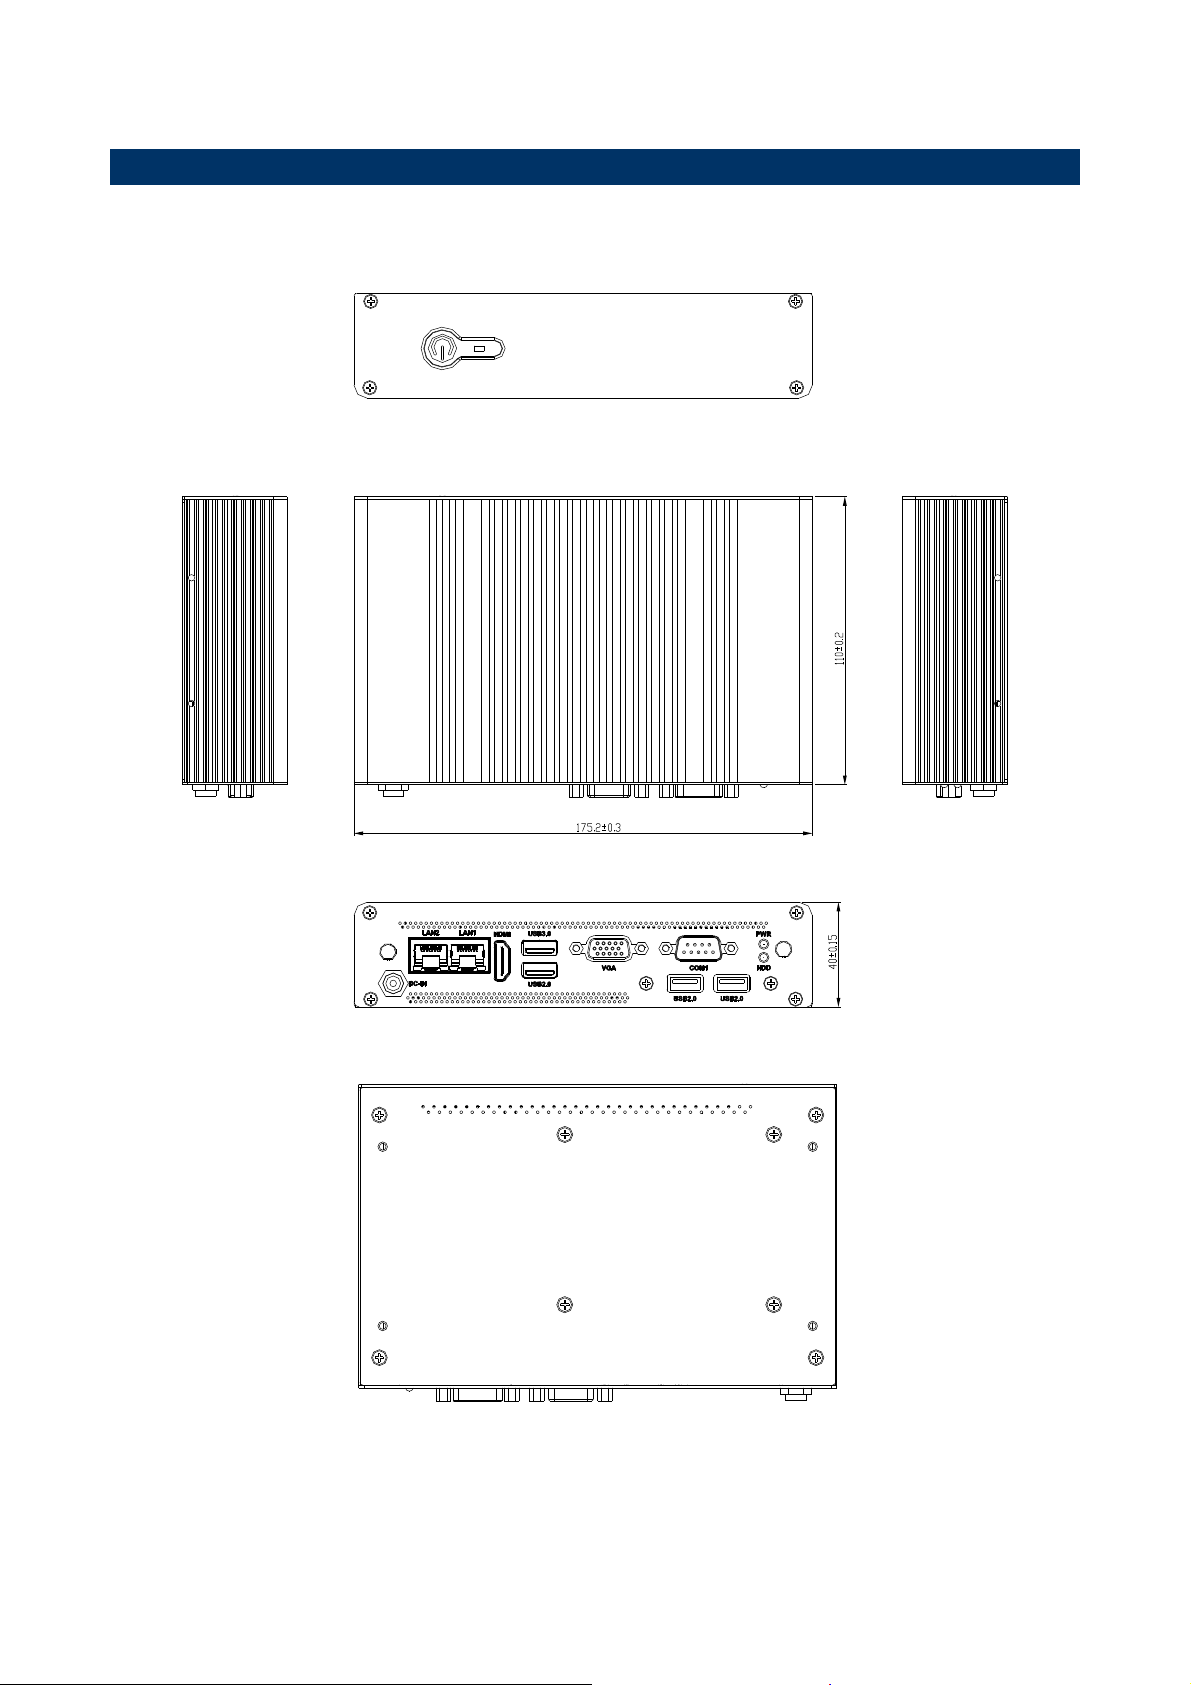
1.5 System Dimensions
1.5.1 Front & Top View
Quick Reference Guide
EPC-BYT2 Quick Reference Guide
(Unit: mm)
9
Page 10

EPC-BYT2
2. Hardware
Configuration
For advanced information, please refer to:
1- ECM-BYT2 User’s Manual
Note: If you need more information, please visit our website:
http://www.avalue.com.tw
10 EPC-BYT2 Quick Reference Guide
Page 11
1
3
4
5
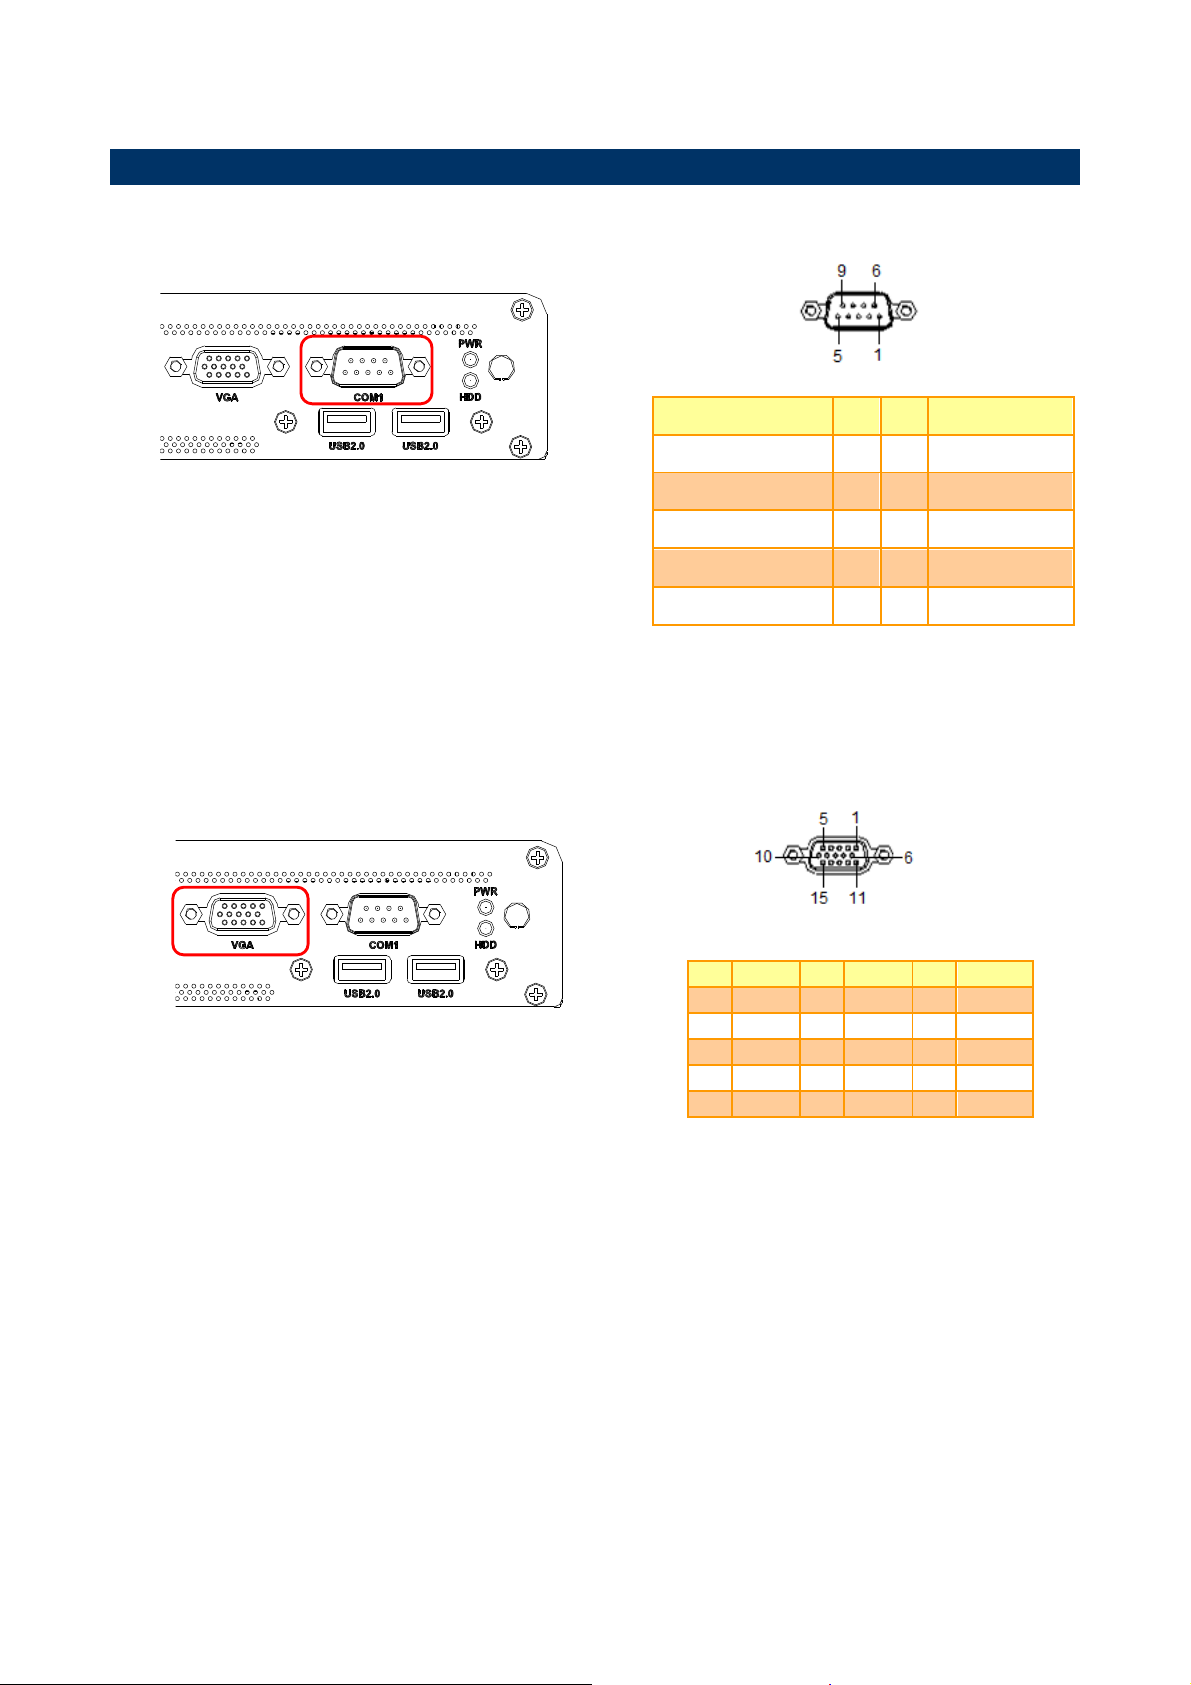
2.1 EPC-BYT2 connector mapping
2.1.1 Serial Port 1 connector (COM1)
Quick Reference Guide
Signal PIN PIN
Signal
2.1.2 VGA connector (VGA)
NDCD# 1 6
NRXD 2 7
NTXD 3 8
NDTR# 4 9
GND 5
PIN Signal PIN Signal PIN Signal
R 6 GND 11 NC
2
G 7 GND 12 DATA
B 8 GND 13 HSYNC
NC 9 +5V 14 VSYNC
GND 10 GND 15 CLK
NDSR#
NRTS#
NCTS#
NRI#
EPC-BYT2 Quick Reference Guide
11
Page 12
EPC-BYT2
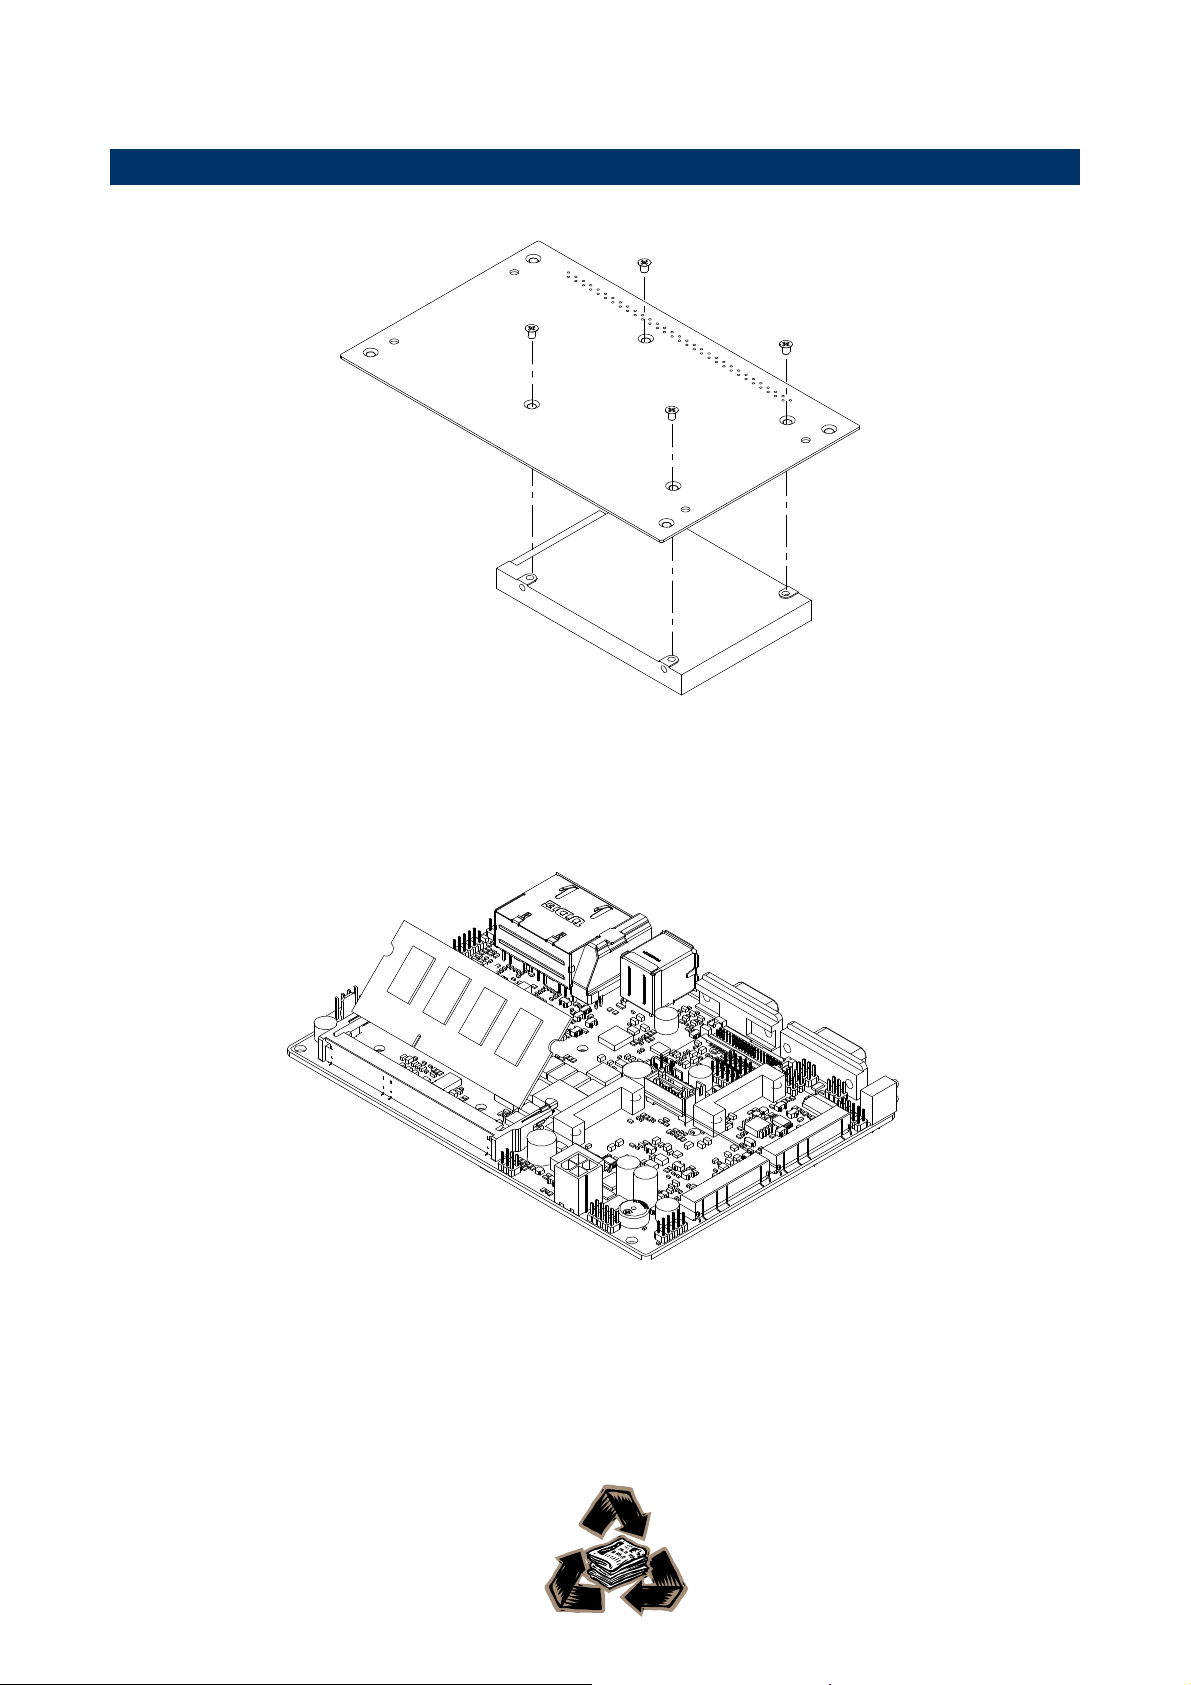
2.2 Installing Hard Disk & Memory (EPC-BYT2)
Step1. Fix HDD using the 4 screws in the Accessory Kit.
Step2. Properly install the memory module and press until properly seated.
12 EPC-BYT2 Quick Reference Guide
 Loading...