

Page 1

ENX-US15WP
Intel® Atom™ Processor Nano ITX Motherboard
User’s Manual
Ver. 1.04
Page 2

ENX-US15WP
Contents
Safety Information ..........................................................................................................4
Safety Declaration ...........................................................................................................5
Technical Support ............................................................................................................5
Conventions Used in This Guide....................................................................................5
Packing List.......................................................................................................................6
Revision History ...............................................................................................................7
Specifications Summary..................................................................................................8
Block Diagram................................................................................................................. 11
Production Introduction ...............................................................................................13
1.1 Before you Proceed ................................................................................................13
1.2 Motherboard Overview............................................................................................14
1.2.1 Placement Direction ....................................................................................................................... 14
1.2.2 Screw Holes ................................................................................................................................... 14
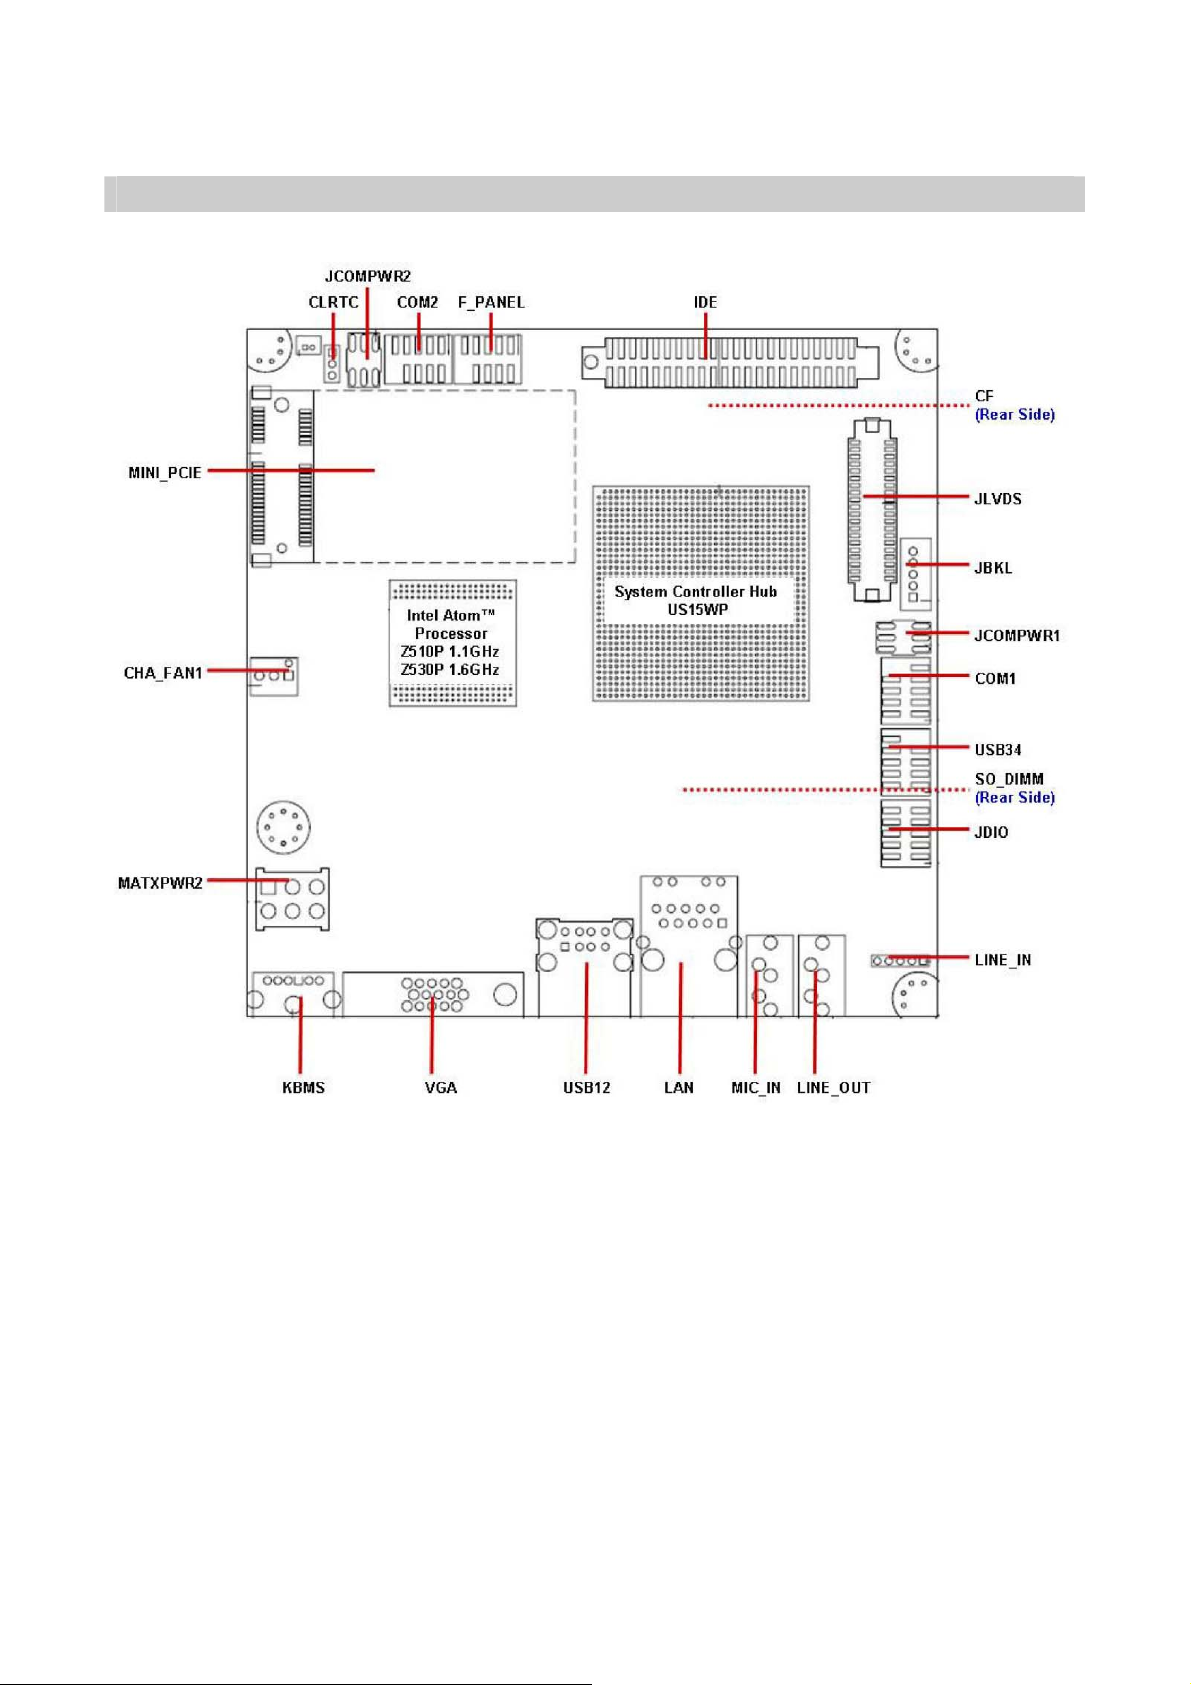
1.3 Motherboard Layout ................................................................................................15
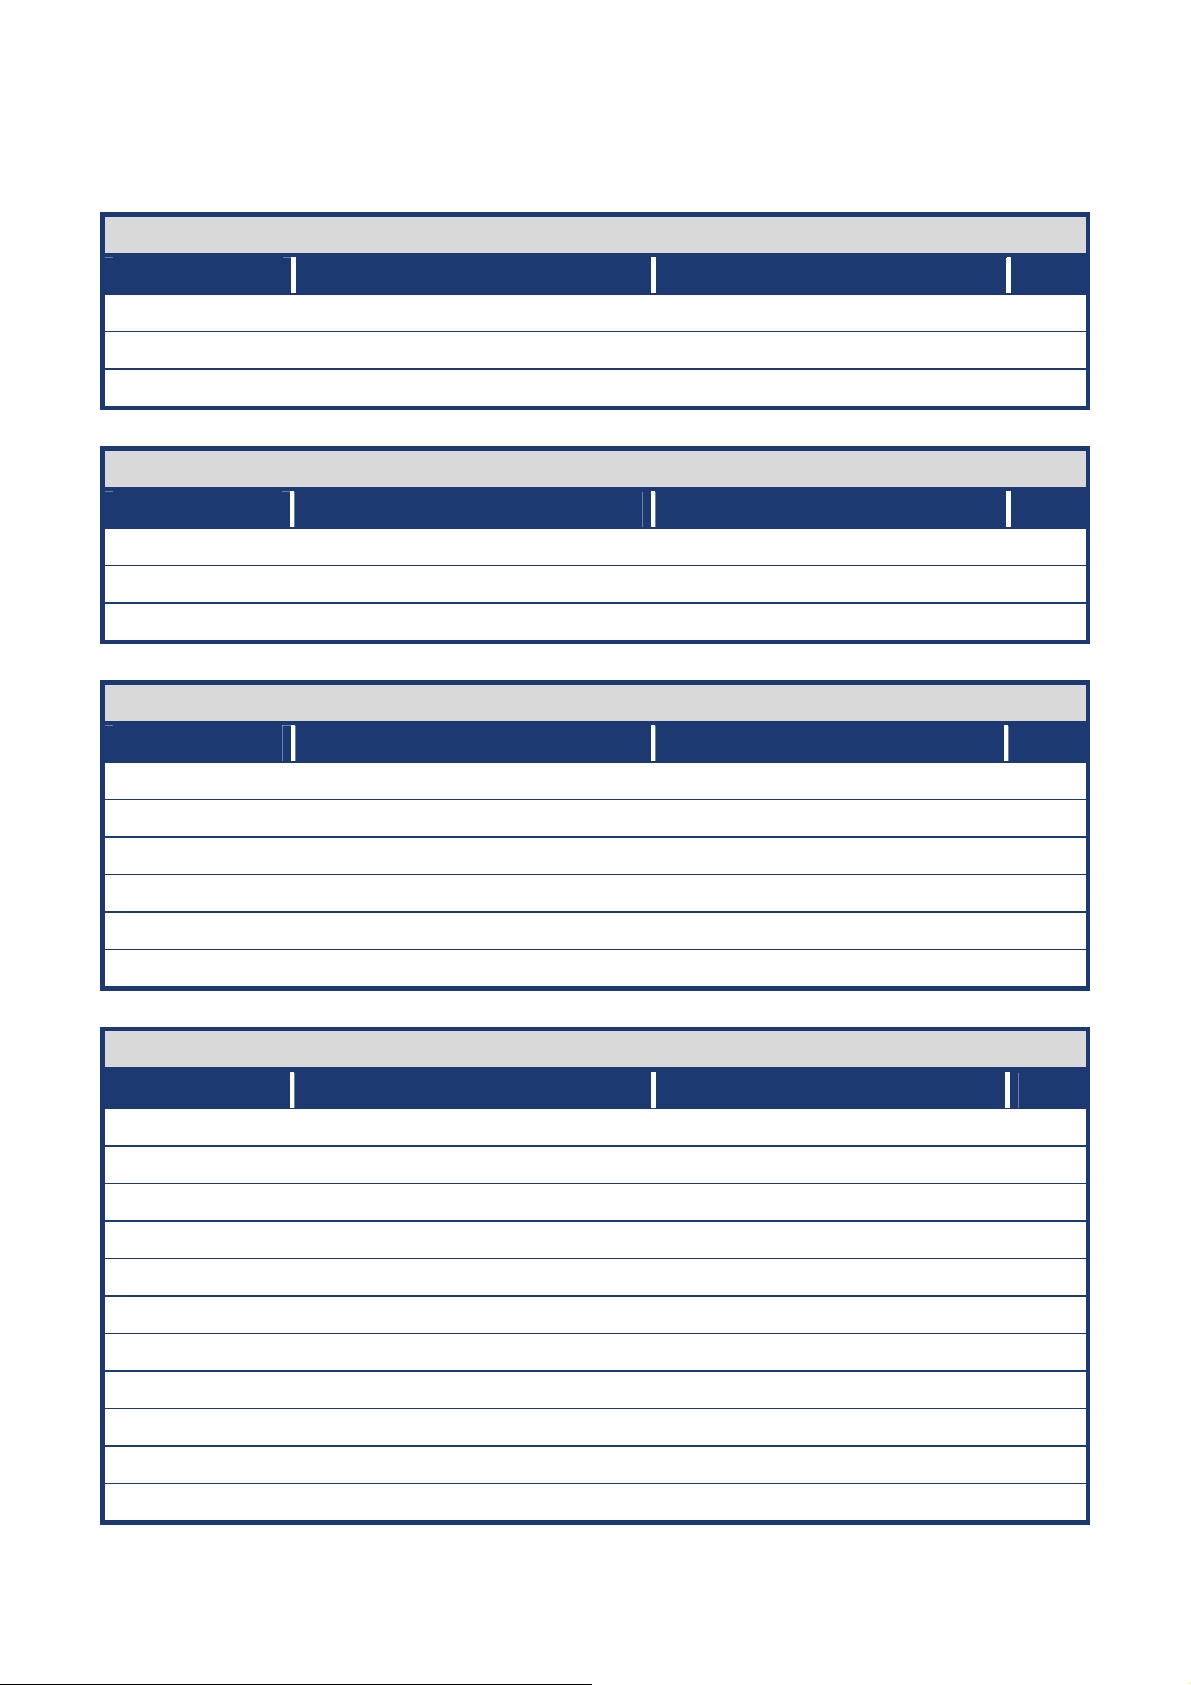
1.3.1 Layout Content List ........................................................................................................................ 16
1.4 System Memory ......................................................................................................17
1.4.1 DIMM Sockets Location ................................................................................................................. 17
1.4.2 Memory Configurations .................................................................................................................. 18
1.4.3 Installing a DDR2 DIMM................................................................................................................. 19
1.4.4 Removing a DDR2 DIMM............................................................................................................... 20
1.5 Jumpers ..................................................................................................................21
1.5.1 Clear CMOS (CLRTC).................................................................................................................... 21
1.5.2 COM1 RI/+5V/+12V Select (JCOMPWR1) .................................................................................... 22
1.6 Connectors..............................................................................................................23
1.6.1 Rear Panel Connectors.................................................................................................................. 23
1.6.2 Chassis Fan Connector (CHA_FAN1) ........................................................................................... 24
1.6.3 Serial Port Connector 1 (COM1) .................................................................................................... 24
1.6.4 System Panel Connector (F_PANEL) ............................................................................................ 25
1.6.5 Primary EIDE Connector (IDE) ...................................................................................................... 26
1.6.6 LCD Inverter Connector (JBKL) ..................................................................................................... 27
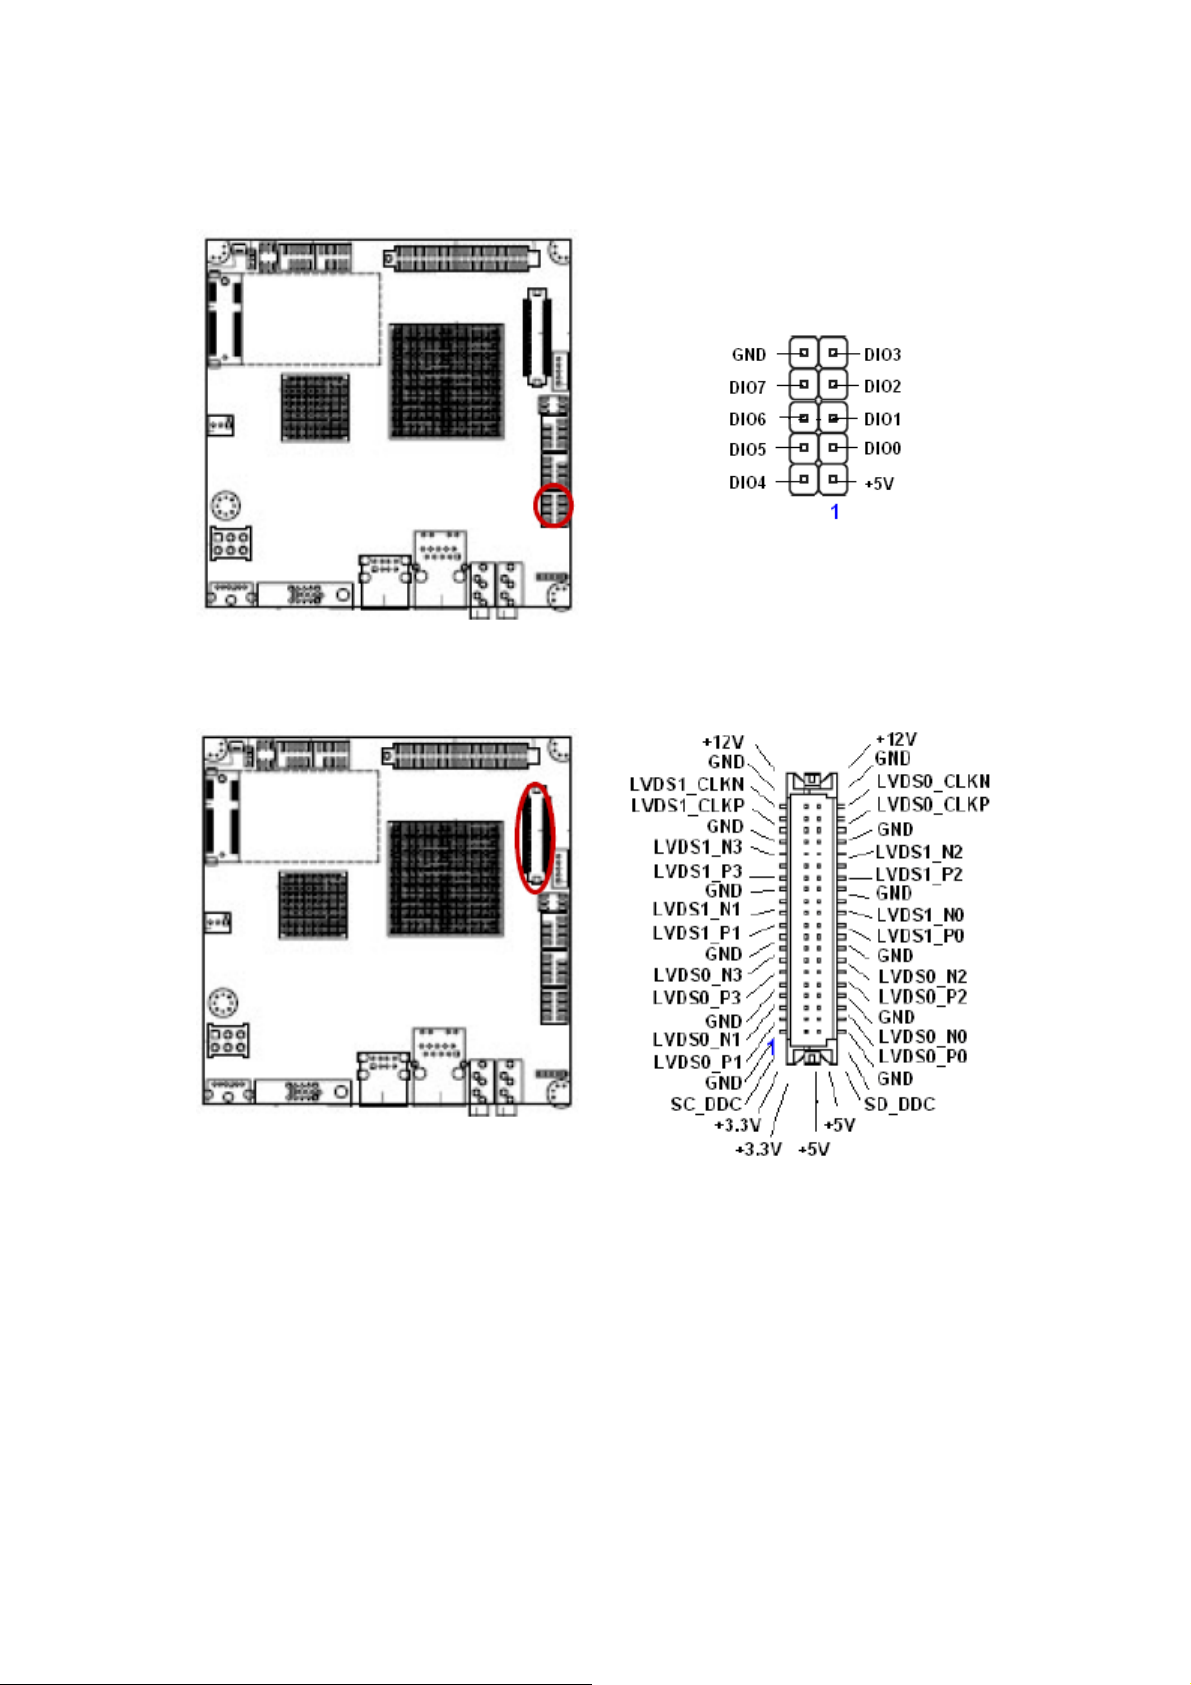
1.6.7 Digital I/O Connector (JDIO) .......................................................................................................... 28
1.6.8 LVDS Connector (JLVDS).............................................................................................................. 28
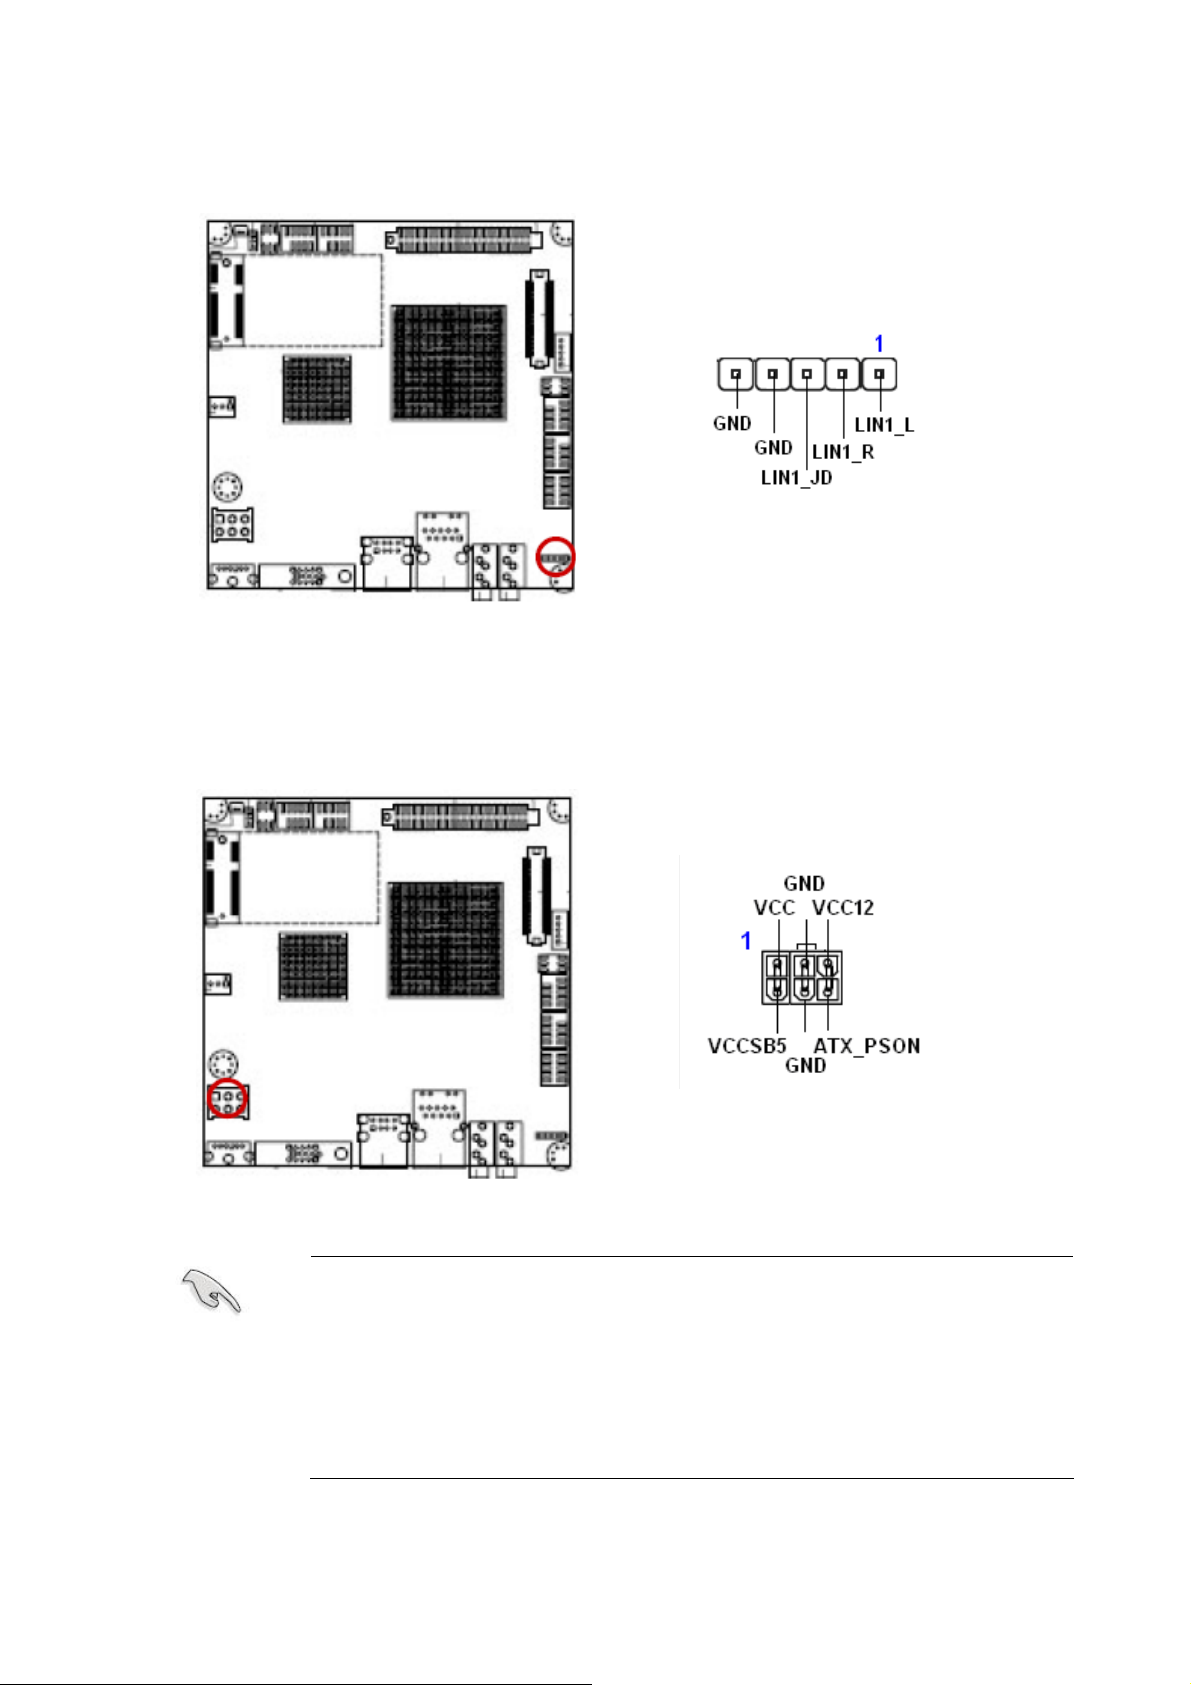
1.6.9 Audio Line-In Connector (LINE_IN) ...............................................................................................29
1.6.10 ATX Power Connector (MATXPWR2) ....................................................................................... 29
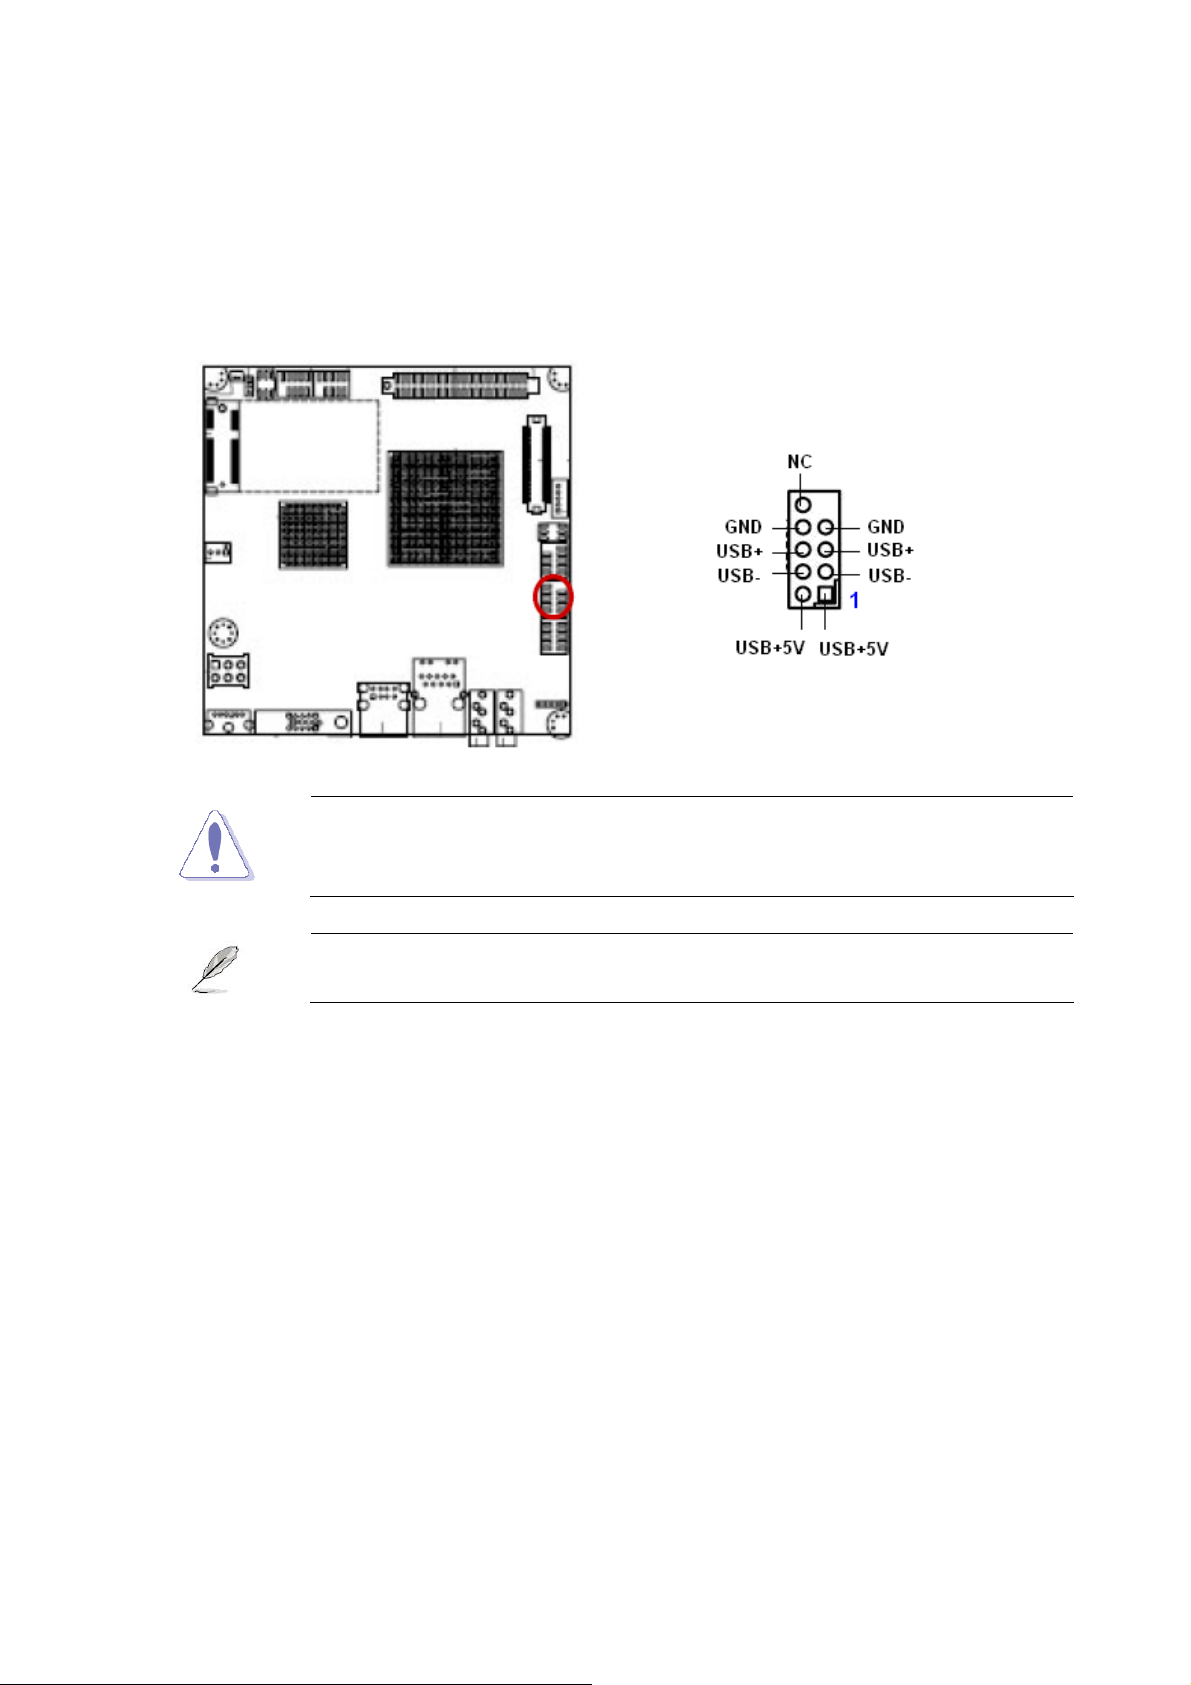
1.6.11 USB 2.0 Connector (USB34) ..................................................................................................... 30
2
Page 3

User’s Manual
Contents
BIOS Setup......................................................................................................................32
2.1 BIOS Setup Program ..............................................................................................32
2.1.1 Legend Box .................................................................................................................................... 33
2.1.2 List Box........................................................................................................................................... 33
2.1.3 Sub-menu....................................................................................................................................... 33
2.2 BIOS Menu Screen .................................................................................................34
2.2.1 Standard CMOS Features.............................................................................................................. 35
2.2.2 Advanced BIOS Features .............................................................................................................. 37
2.2.3 Advanced Chipset Features........................................................................................................... 41
2.2.4 Integrated Peripherals.................................................................................................................... 43
2.2.5 PnP/PCI Configurations ................................................................................................................. 48
2.2.6 PC Health Status............................................................................................................................ 50
2.2.7 Load Setup Defaults....................................................................................................................... 51
2.2.8 Set Supervisor Password............................................................................................................... 52
2.2.9 Set User Password......................................................................................................................... 53
2.2.10 Save and Exit Setup .................................................................................................................. 54
2.2.11 Exit Without Saving.................................................................................................................... 55
ENX-US15WP
3
Page 4

ENX-US15WP
Safety Information
Electrical safety
z To prevent electrical shock hazard, disconnect the power cable from the electrical
outlet before relocating the system.
z When adding or removing devices to or from the system, ensure that the power cables
for the devices are unplugged before the signal cables are connected. If possible,
disconnect all power cables from the existing system before you add a device.
z Before connecting or removing signal cables from the motherboard, ensure that all
power cables are unplugged.
z Seek professional assistance before using an adapter or extension cord. These
devices could interrupt the grounding circuit.
z Make sure that your power supply is set to the correct voltage in your area. If you are
not sure about the voltage of the electrical outlet you are using, contact your local
power company.
z If the power supply is broken, do not try to fix it by yourself. Contact a qualified service
technician or your retailer.
Operation safety
z Before installing the motherboard and adding devices on it, carefully read all the
manuals that came with the package.
z Before using the product, make sure all cables are correctly connected and the power
cables are not damaged. If you detect any damage, contact your dealer immediately.
z To avoid short circuits, keep paper clips, screws, and staples away from connectors,
slots, sockets and circuitry.
z Avoid dust, humidity, and temperature extremes. Do not place the product in any area
where it may become wet.
z Place the product on a stable surface.
z If you encounter technical problems with the product, contact a qualified service
technician or your retailer.
4
The symbol of the crossed out wheeled bin indicates that the product
(electrical and electronic equipment) should not be placed in
municipal waste. Check local regulations for disposal of electronic
products.
Page 5
User’s Manual
Safety Declaration
This device complies with the requirements in Part 15 of the FCC rules. Operation is
subject to the following two conditions:
z This device may not cause harmful interference.
z This device must accept any interference received, including interference that may
cause undesired operation.
Technical Support
If a problem arises with your system and no solution can be obtained from the user’s
manual, please contact your place of purchase or local distributor. Alternatively, please try
the following help resources for further guidance. Visit the Avalue website:
http://www.avalue.com.tw
Conventions Used in This Guide
To make sure that you perform certain tasks properly, take note of the following symbols
used throughout this manual.
DANGER/WARNING: Information to prevent injury to yourself when
trying to complete a task.
CAUTION: Information to prevent damage to the components when
trying to complete a task.
IMPORTANT: Instructions that you MUST follow to complete a task.
NOTE: Tips and additional information to help you complete a task.
ENX-US15WP
5
Page 6

ENX-US15WP
Packing List
Before you begin installing your single board, please make sure that the following materials
have been shipped:
z 1 x ENX-US15WP Nano ITX Main board
z 1 x CD-ROM contains the followings:
• User’s Manual in PDF file
• Drivers
z 1 x Cable Kit
• 1 x COM Cable w/o Bracket (9P/2.00mm)
• 1 x IDE Cable (44P-44P)
• 1 x MD6M to MD6F*2 Cable
• 1 x ATX Power Cable (6P-20P)
z 1 x Startup Manual
If any of the above items is damaged or missing, please contact your
retailer.
6
Page 7

Revision History
Revision Revision History Date
V 1.00 First release for PCB 1.00 May 18, 2009
V1.01 Corrections of pin header pitch at Page 16 September 28, 2009
V1.02 Correction of RJ45 LED status at Page 23 December 18, 2009
V1.03 Adjust Connectors direction of Pin#1 January 4, 2010
V1.04 Add internal 2nd COM port header May 1, 2010
User’s Manual
ENX-US15WP
7
Page 8

ENX-US15WP
Specifications Summary
System
Features
CPU
Chipset
Memory
Display
Audio
LAN
Expansion
I/O
Others
Intel® Atom™ processor Z510P 1.1GHz/Z530P 1.6GHz
(400/533 MT/s MHz FSB)
Intel® System Controller Hub US15WP
1 x 200-pin SODIMM 2 GB DDR2 400/533 org.x16 SDRAM
1 x VGA (By Chrontel CH7317), 1 x LVDS
Realtek ALC 888 7.1 Channel High Definition Audio Codec
(co-lay ALC 888VC)
Realtek RTL 8111C Gigabit LAN
1 x Mini PCIe, 1 x CF
4 x USB (2 x connectors , 1 x pin header)
1 x COM port w/ power header
1 x PATA interface
1 x Chassis Fan header
8bit GPIO (4 in, 4 out), Clock (CK540)
CPU
FSB
BIOS
System Chipset
I/O Chipset
Memory
Watchdog Timer
H/W Status Monitor
Expansion Slots
DIO
S3 / S4
Wake up on LAN or
Ring
SmartFan Control
Intel® Atom™ processor Z510P 1.1GHz/Z530P 1.6GHz
400/533 MHz
Award 8 Mb FHW BIOS
Intel® System Controller Hub US15WP
Winbond W83627DHG
1 x 200-pin SODIMM 2 GB DDR2 400/533 org.x16 SDRAM
Reset: 1 sec.~255 min. and 1 sec. or 1 min./step
Monitoring CPU temperature, voltage, and cooling fan status. Auto throttling
control when CPU overheats
1 x Mini PCIe, 1 x CF
8-bit General Purpose I/O for 4 DI and 4 DO
S3/S4
Both (PXE / RPL / WOR)
Support 3 modes (Silent/Optimal/Performance)
8
Page 9
Specifications Summary
Display
User’s Manual
Chipset
Display Memory
Max. Resolution
Dual Display
VGA
LVDS
LVDS Backlight Power
Audio
Audio Codec
Audio Interface
Ethernet
LAN1
Back I/O Port
Intel® System Controller Hub US15WP
Intel® Graphics Media Accelerator 500 (Intel® GMA 500)
LVDS Display : 1366 x 768 @85 MHz
Ext Display: 1280 x 1024 @ 85 Hz maximum resolution
Yes, LVDS+VGA
Yes
Yes, 18/24 bit Single Channel
Yes
Realtek ALC 888 (co-lay ALC 888VC)
Mic in , Line out (2 jack) , Line in pin header
Realtek RTL 8111C Gigabit LAN
1 x PS2 (KB+MS)
1 x VGA port
Back Panel
Internal I/O Connector
Internal I/O
2 x USB 2.0/1.1
1 x LAN RJ45 port
1 x Audio Mic in (1 jack)
1 x Audio Line out (1 jack)
1 x USB connectors support additional 2 USB ports
1 x 6-pin ATX Power connector
1 x COM port w/ power pin header
1 x LVDS connector
1 x Chassis FAN connector
1 x GPIO connector
1 x PATA interface
1 x Audio Line in
ENX-US15WP
9
Page 10

ENX-US15WP
Specifications Summary
Mechanical & Environmental
Power Requirement
Power Type
Operating Temperature
Operating Humidity
Size (L x W)
Weight
* Specifications are subject to change without notice.
36W
ATX Power
0-60℃ (32 ~ 104 )℉
0%~90% relative humidity, non-condensing
4.72" x 4.72" (120 mm x 120 mm)
0.3 lbs (0.14Kg)
10
Page 11
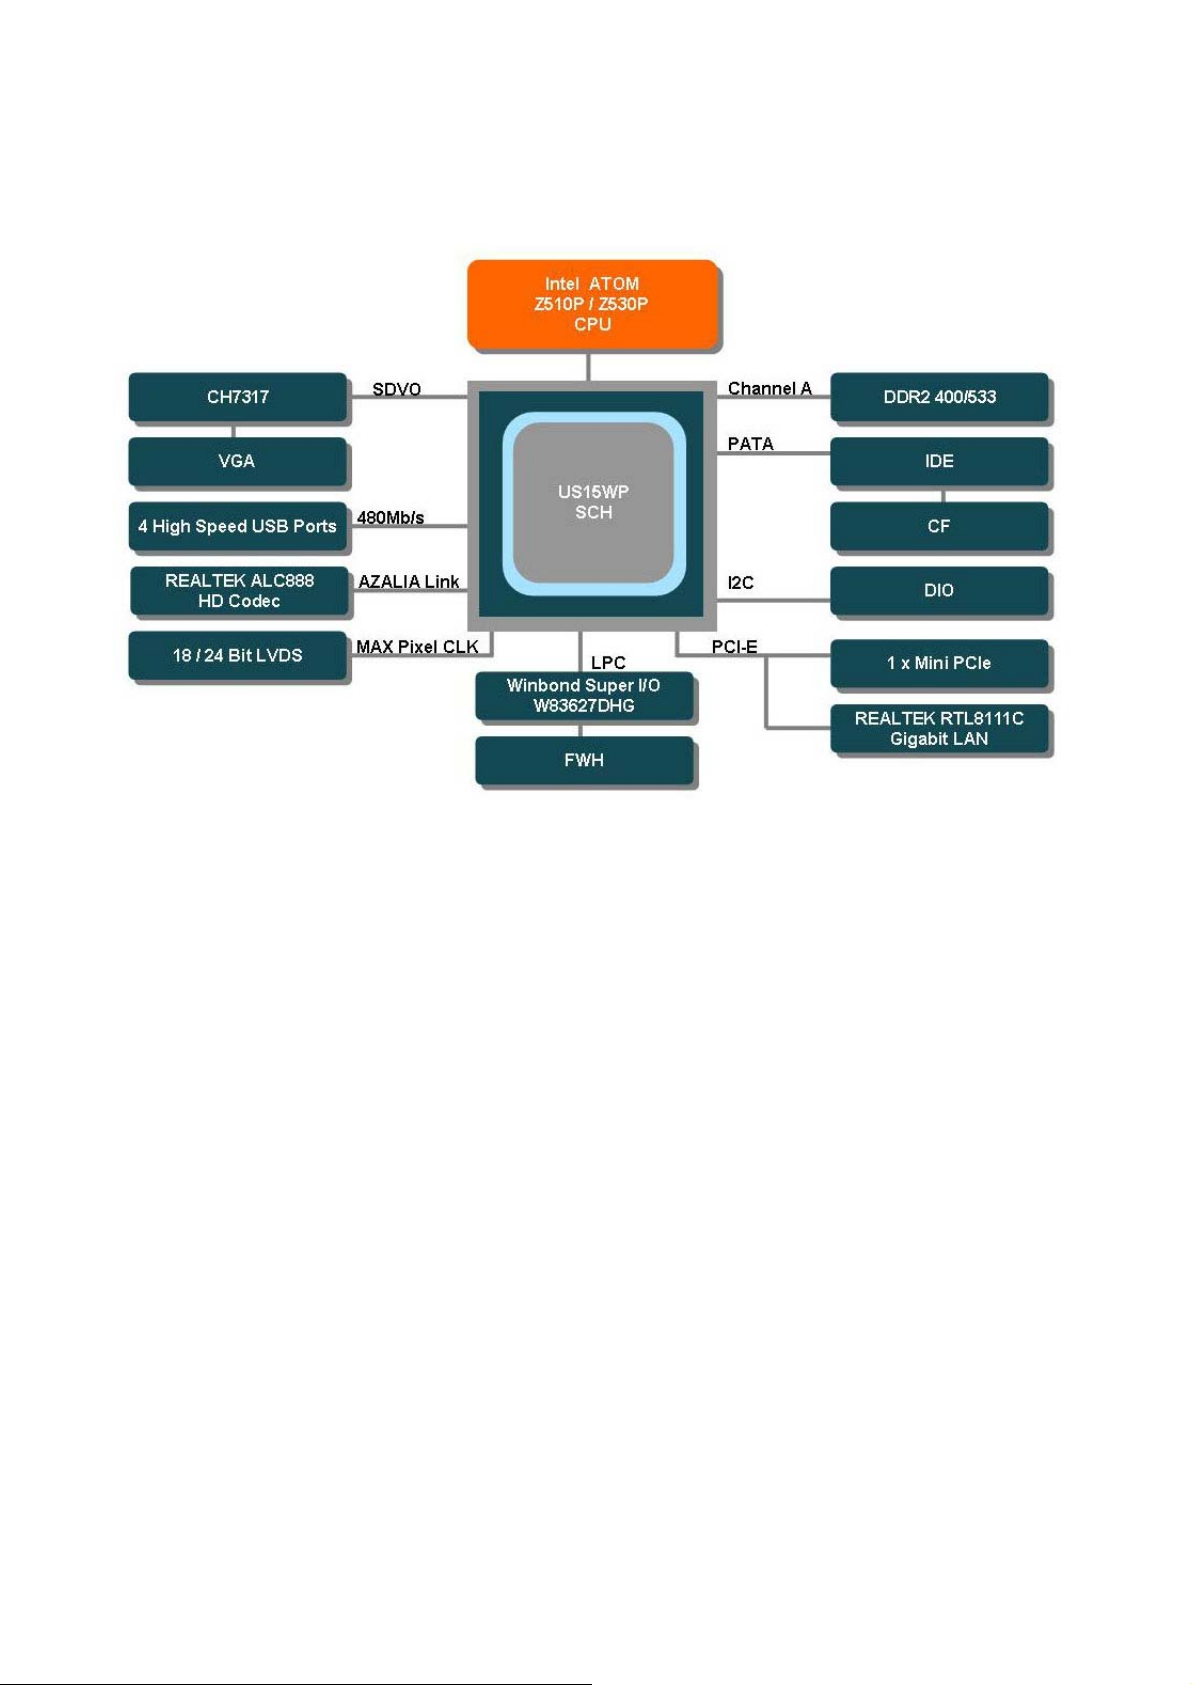
Block Diagram
User’s Manual
ENX-US15WP
11
Page 12

ENX-US15WP
This chapter describes the main board
features and the new technologies
it supports.
12
Product
Product
1
introduction
introduction
1
Page 13

User’s Manual
Production Introduction
1.1 Before you Proceed
Take note of the following precautions before you install motherboard components or
change any motherboard settings.
z Unplug the power cord from the wall socket before touching any
component.
z Use a grounded wrist strap or touch a safely grounded object or a
metal object, such as the power supply case, before handling
components to avoid damaging them due to static electricity
z Hold components by the edges to avoid touching the ICs on
them.
z Whenever you uninstall any component, place it on a grounded
antistatic pad or in the bag that came with the component.
z Before you install or remove any component, ensure that the ATX
power supply is switched off or the power cord is detached from
the power supply. Failure to do so may cause severe damage to
the motherboard, peripherals, and/or components.
ENX-US15WP
13
Page 14
ENX-US15WP
1.2 Motherboard Overview
Before you install the motherboard, study the configuration of your chassis to ensure that
the motherboard fits into it. Refer to the chassis documentation before installing the
motherboard.
Make sure to unplug the power cord before installing or removing the
motherboard. Failure to do so can cause you physical injury and
damage motherboard components.
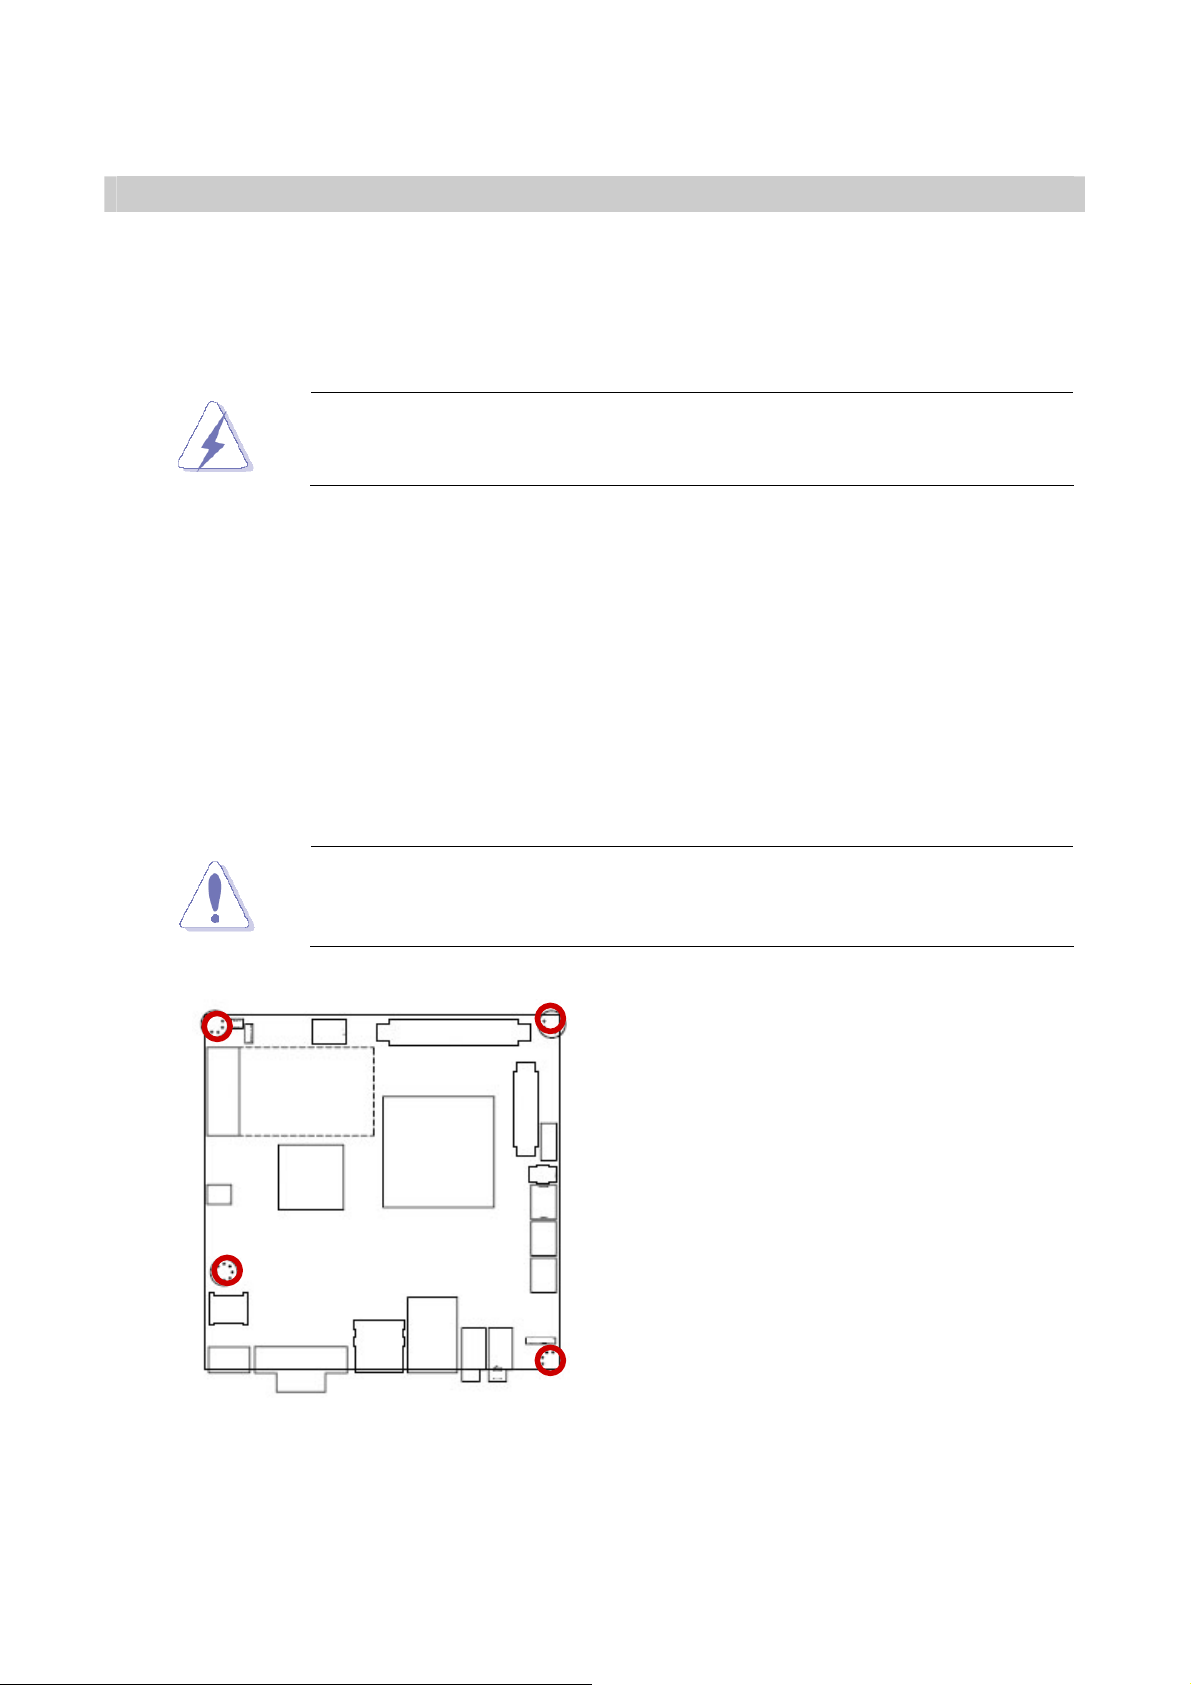
1.2.1 Placement Direction
When installing the motherboard, make sure that you place it into the chassis in the correct
orientation. The edge with external ports goes to the rear part of the chassis as indicated in
the image below.
1.2.2 Screw Holes
Place four (4) screws into the holes indicated by circles to secure the motherboard to the
chassis.
Do not over tighten the screws! Doing so can damage the
motherboard.
Place this side towards the rear of the
chassis
14
Page 15
1.3 Motherboard Layout
User’s Manual
ENX-US15WP
15
Page 16
ENX-US15WP
1.3.1 Layout Content List
Slots
Label Function Note Page
CF Compact Flash Card (Rear side) N/A
MINI_PCIE Mini PCI-e Slot N/A
SO_DIMM 200-pin DDR2 SODIMM slot (Rear side) N/A
Jumpers
Label Function Note Page
CLRTC Clear CMOS 3 x 1 header, pitch 2.54mm 21
JCOMPWR1 COM1 RI/+5V/+12V Select 3 x 2 header, pitch 2.54mm 22
JCOMPWR2 COM2 RI/+5V/+12V Select 3 x 2 header, pitch 2.00mm 22
Rear Panel Connector
Label Function Note Page
KBMS PS/2 keyboard and mouse 6-pin Mini-Din 23
VGA VGA Connector D-sub 15-pin, female 23
USB12 USB Connector x 2 23
LAN RJ-45 Ethernet Connector 23
MIC_IN Microphone Port 23
LINE_OUT Line-out Port 23
Internal Connector
Label Function Note Page
CHA_FAN1 Chassis Fan Connector 3 x 1 wafer, pitch 2.54mm 24
COM1 Serial Port Connector 1 5 x 2 header, pitch 2.54mm 24
COM2 Serial Port Connector 2 5 x 2 header, pitch 2.54mm 24
F_PANEL System Panel Connector 5 x 2 header, pitch 2.54mm 25
IDE Primary EIDE Connector 20 x 2 header, pitch 2.54mm 26
JBKL LCD Inverter Connector 5 x 1 header, pitch 2.00mm 27
JDIO Digital I/O Connector 5 x 2 header, pitch 2.54mm 28
JLVDS LVDS Connector HIROSE DF13S-40DP-1.25V 28
LINE_IN Line-In Connector 5 x 1 header, pitch 2.54mm 29
MATXPWR2 ATX Power Connector 3 x 2 header 29
USB34 USB 2.0 Connector 5 x 2 header, pitch 2.54mm 30
16
Page 17
User’s Manual
1.4 System Memory
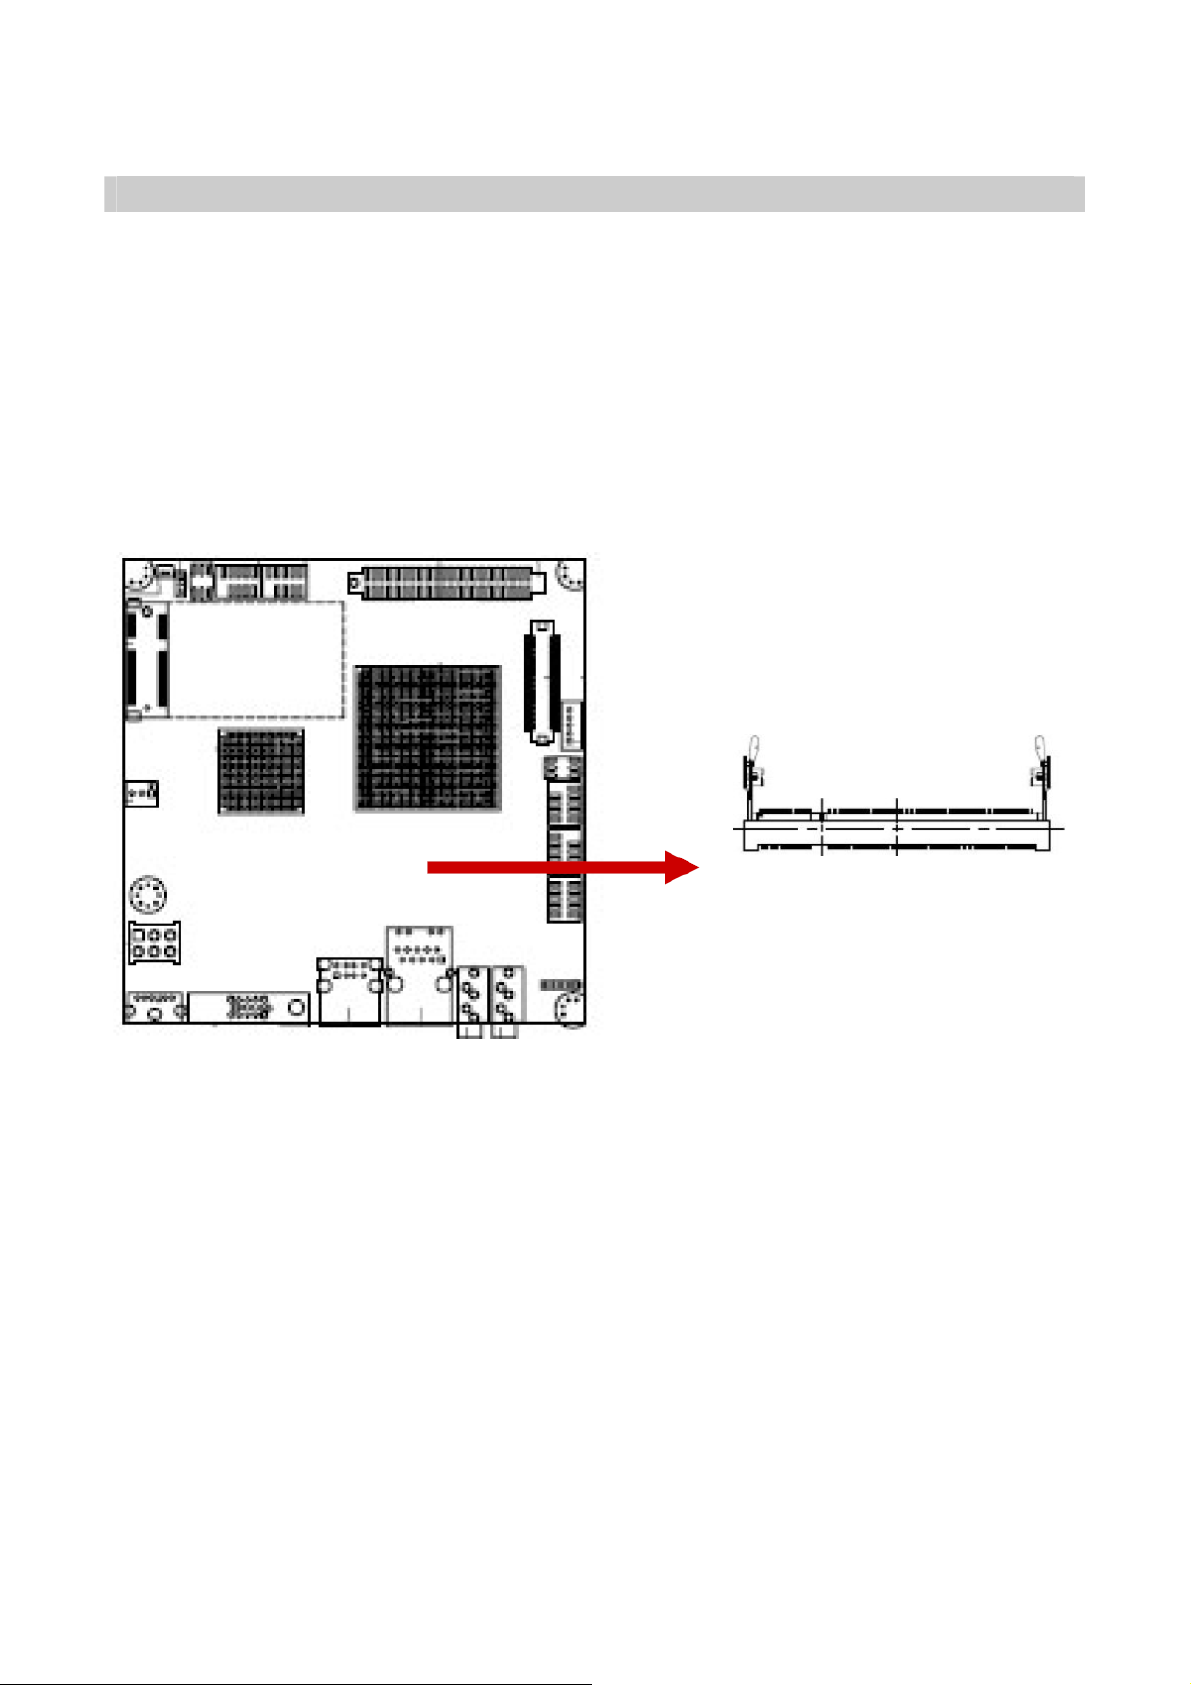
1.4.1 DIMM Sockets Location
The motherboard comes with two 200-pin Double Data Rate 2 (DDR2) SODIMM sockets.
A DDR2 module has the same physical dimensions as a DDR DIMM but has a 200-pin
footprint compared to the 184-pin DDR DIMM. DDR2 DIMMs are notched differently to
prevent installation on a DDR DIMM socket. The following figure illustrates the location of
the sockets:
ENX-US15WP
17
Page 18

ENX-US15WP
1.4.2 Memory Configurations
You can install 256MB, 512MB, 1GB and 2GB DDR2 SDRAM DIMMs into the SODIMM
sockets using the memory configurations in this section.
z Installing DDR2 DIMM other than the recommended
configurations may cause memory sizing error or system boot
failure. Use any of the recommended configurations.
z Due to chipset resource allocation, the system may detect less
than 1 GB system memory when you installed one 1 GB DDR2
memory modules.
z This motherboard does not support memory modules made up of
128 Mb chips or single-sided x8 memory modules.
Make sure that the memory frequency matches the CPU FSB
(Front Side Bus). Refer to the Memory frequency/CPU FSB
synchronization table.
18
Page 19
User’s Manual
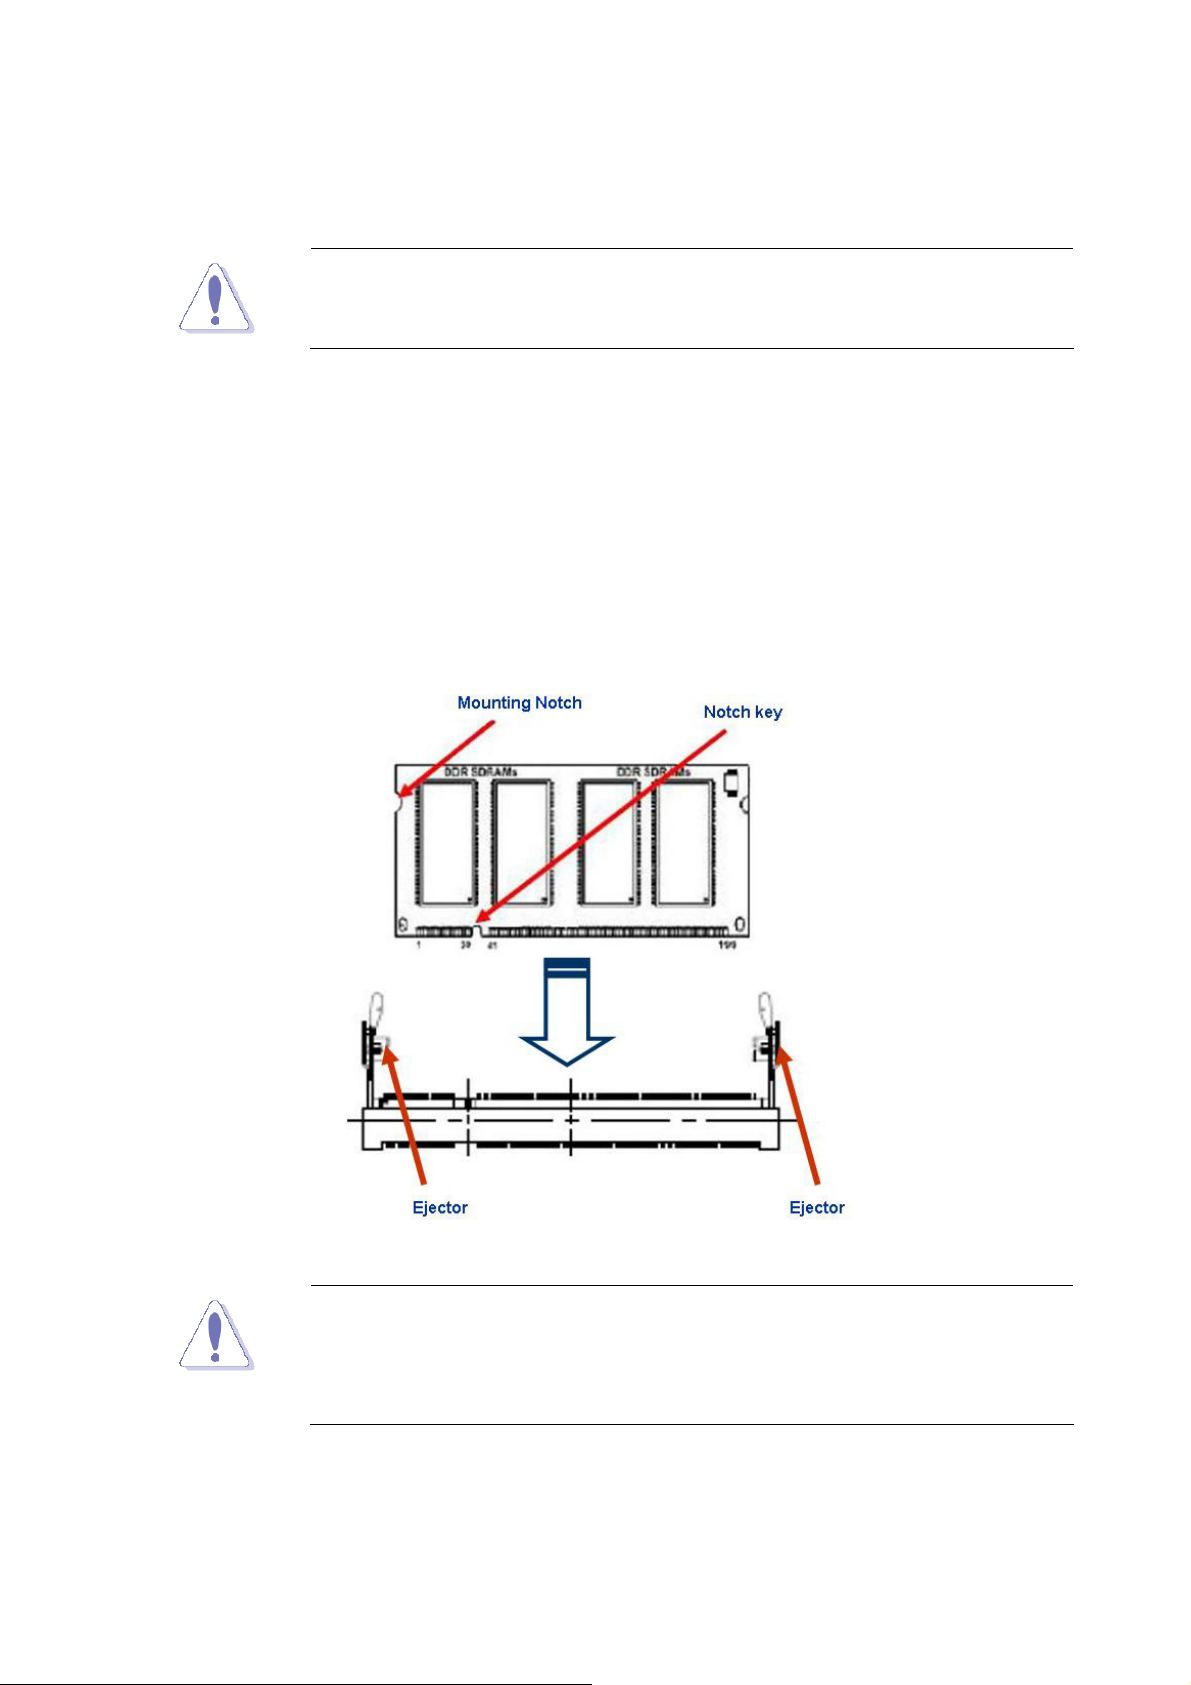
1.4.3 Installing a DDR2 DIMM
Make sure to unplug the power supply before adding or removing
DIMMs or other system components. Failure to do so may cause
severe damage to both the motherboard and the components.
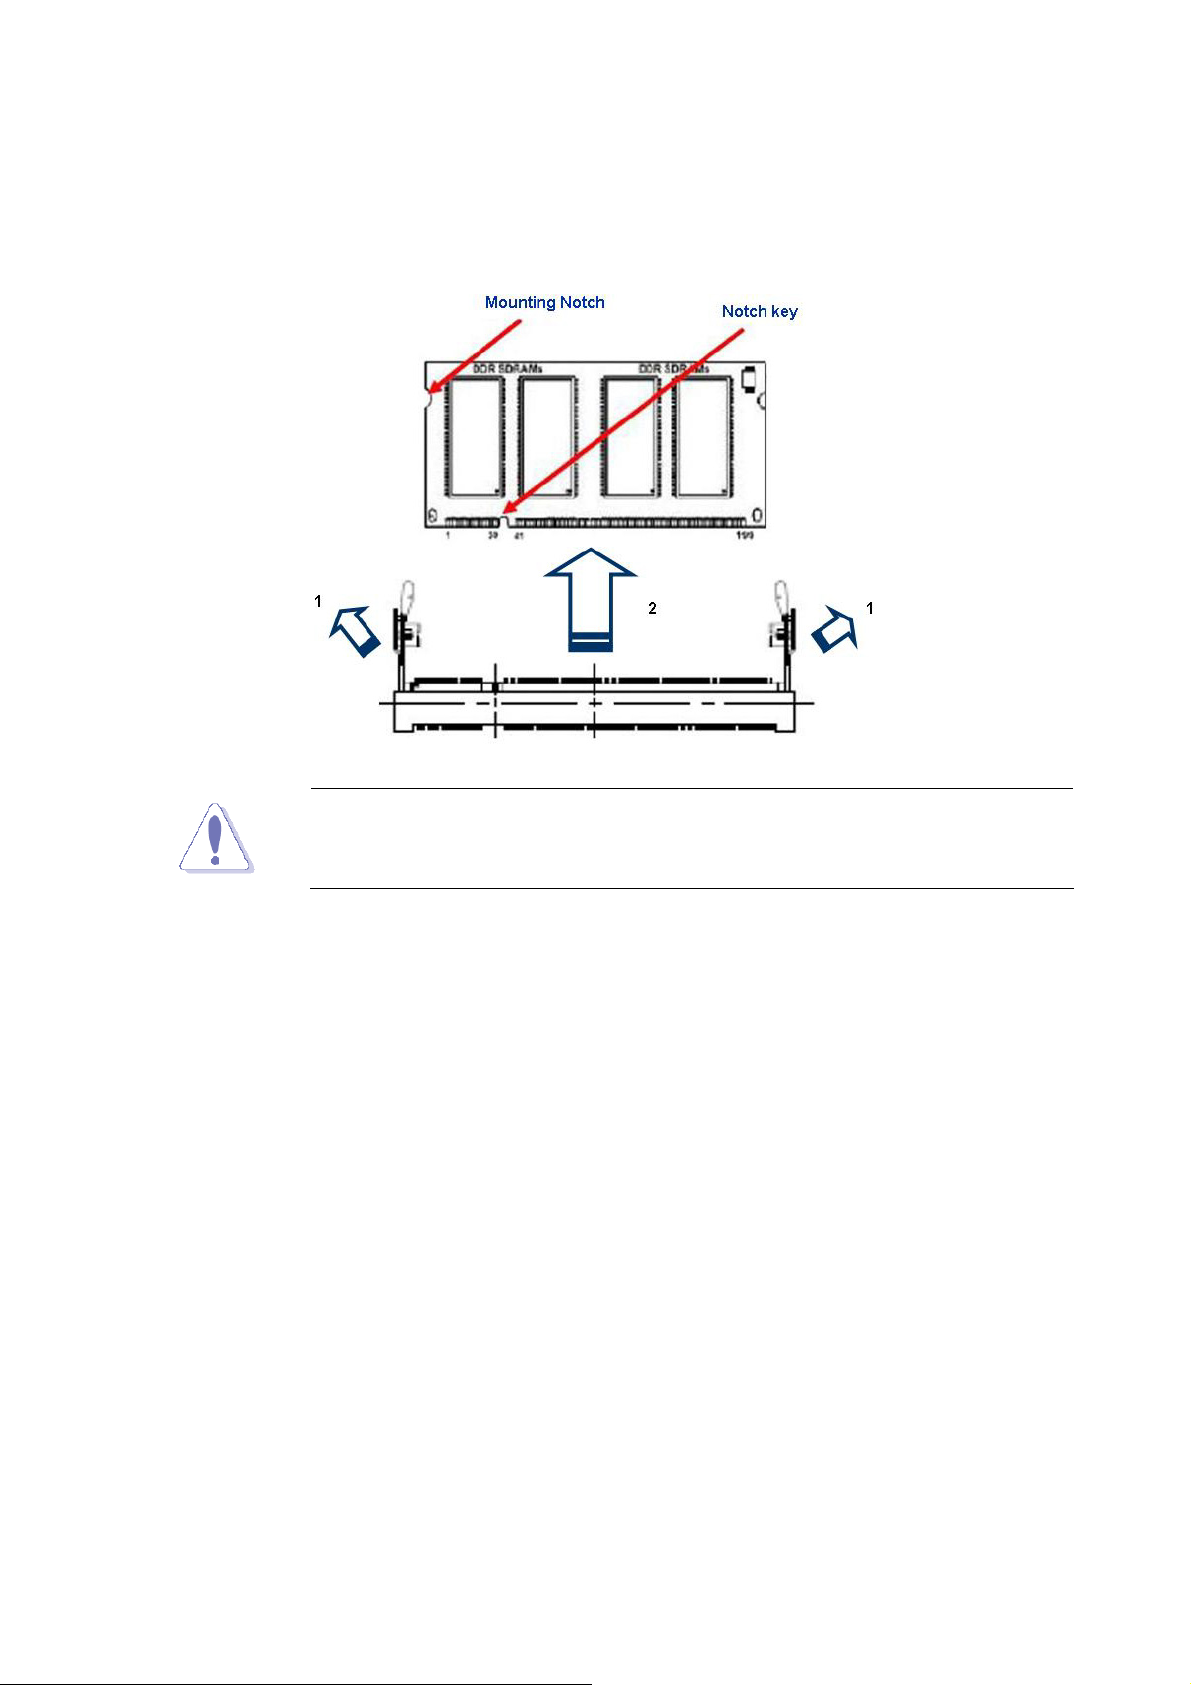
1. Locate the DIMM socket on the board.
2. Hold two edges of the DIMM module carefully, and keep away of touching its
connectors.
3. Align the notch key on the module with the rib on the slot.
4. Firmly press the modules into the socket automatically snaps into the mounting notch.
Do not force the DIMM module in with extra force as the DIMM module only fit in one
direction.
z A DDR2 DIMM is keyed with a notch so that it fits in only one
direction. DO NOT force a DIMM into a socket to avoid damaging
the DIMM.
z The DDR2 DIMM sockets do not support DDR DIMMs. DO NOT
install DDR DIMMs to the DDR2 DIMM socket.
ENX-US15WP
19
Page 20
ENX-US15WP
1.4.4 Removing a DDR2 DIMM
1. Press the two ejector tabs on the slot outward simultaneously, and then pull out the
DIMM module.
Support the DIMM lightly with your fingers when pressing the ejector
tabs. The DIMM might get damaged when it flips out with extra force.
20
Page 21
User’s Manual
1.5 Jumpers
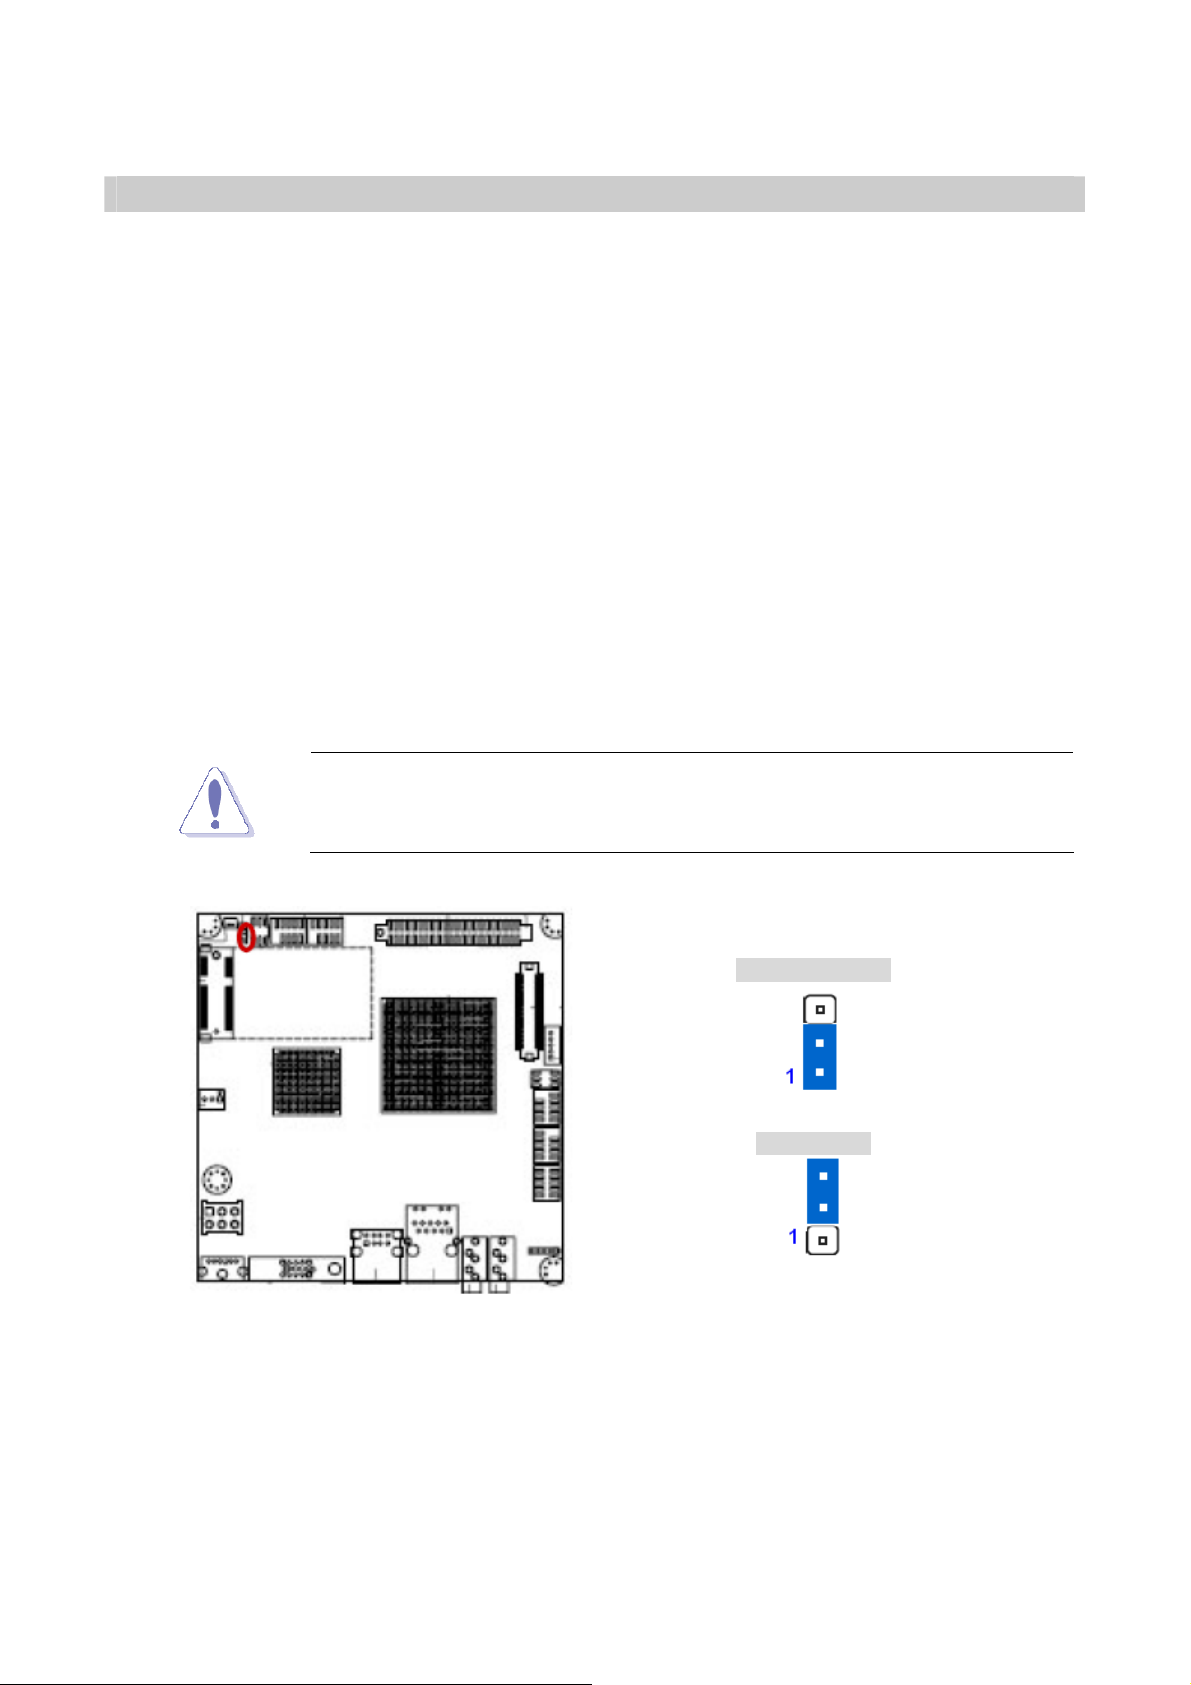
1.5.1 Clear CMOS (CLRTC)
This jumper allows you to clear the Real Time Clock (RTC) RAM in CMOS. You can clear
the CMOS memory of date, time, and system setup parameters by erasing the CMOS RTC
RAM data. The onboard button cell battery powers the RAM data in CMOS, which include
system setup information such as system passwords. To erase the RTC RAM:
1. Turn OFF the computer and unplug the power cord.
2. Remove the onboard battery.
3. Move the jumper cap from pins 1-2 (default) to pins 2-3. Keep the cap on pins 2-3 for
about 5~10 seconds, then move the cap back to pins 1-2.
4. Re-install the battery.
5. Plug the power cord and turn ON the computer.
6. Hold down the <Del> key during the boot process and enter BIOS setup to re-enter
data.
Except when clearing the CMOS, never remove the cap on CLRTC
jumper default position. Removing the cap will cause system boot
failure!
Normal (Default)
Clear CMOS
ENX-US15WP
21
Page 22
ENX-US15WP
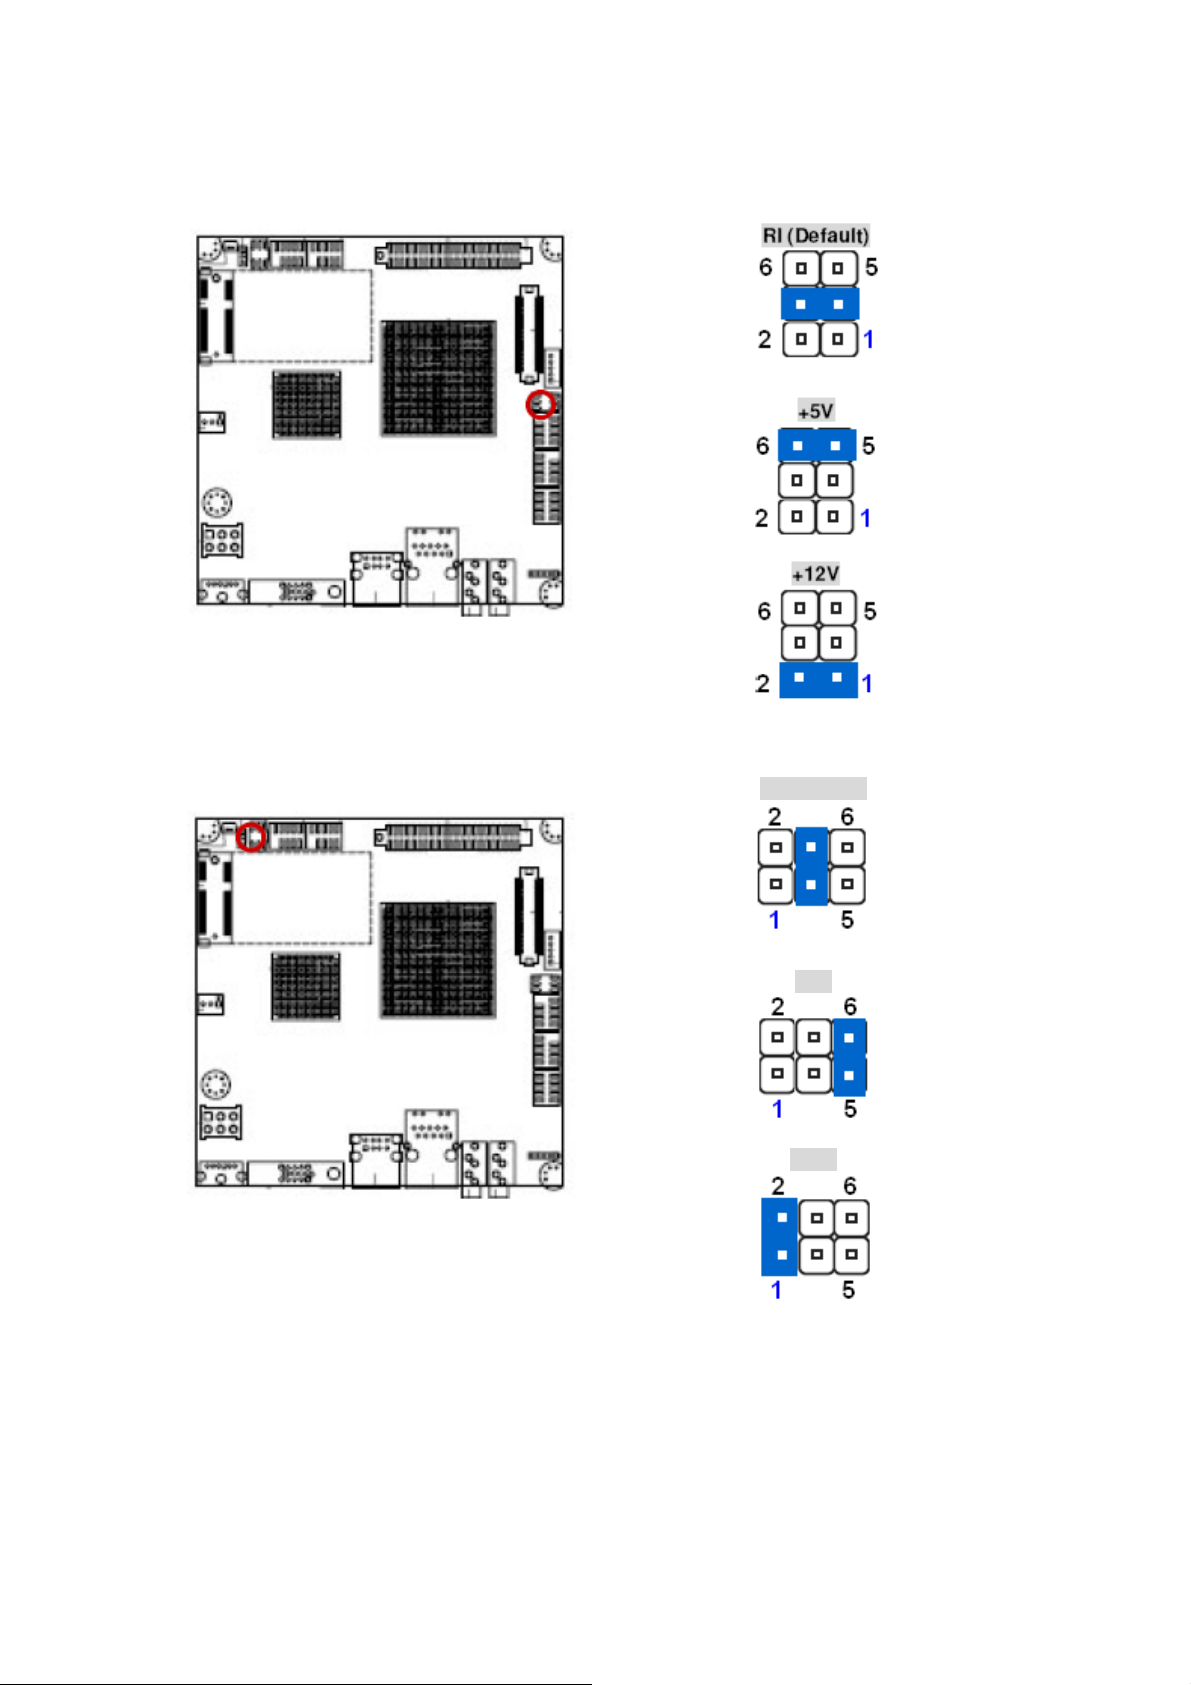
1.5.2 COM1 RI/+5V/+12V Select (JCOMPWR1)
1.5.3 COM2 RI/+5V/+12V Select (JCOMPWR2)
RI (Default)
+5V
+12V
22
Page 23
User’s Manual
1.6 Connectors
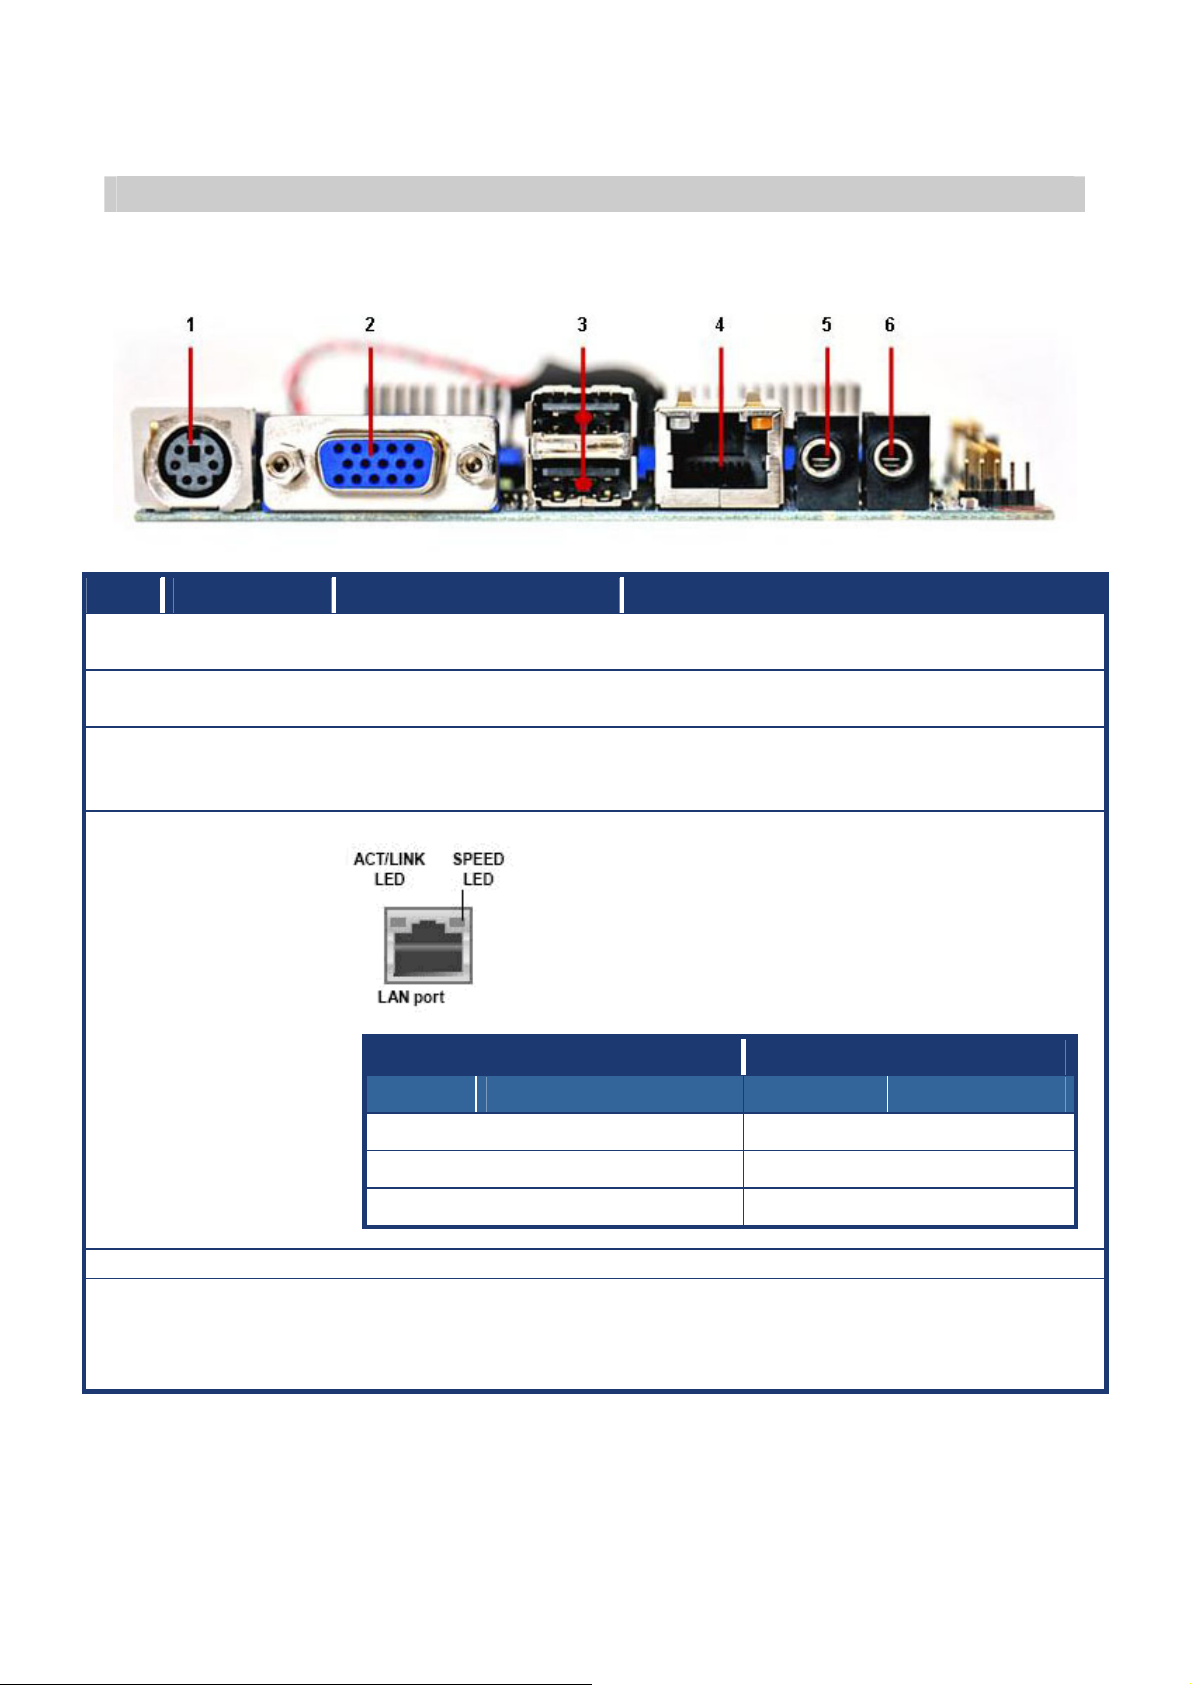
1.6.1 Rear Panel Connectors
No Label Function Description
1 KBMS PS/2 mouse connector The standard PS/2 mouse DIN connector is
for a PS/2 mouse.
2 VGA VGA port This 15-pin port is for a VGA monitor or
other VGA-compatible devices.
3 USB12 USB 2.0 connector These two 4-pin Universal Serial Bus (USB)
ports are available for connecting USB 2.0
devices.
4 LAN
LAN (RJ-45) connector
This port allows Gigabit connection to a
Local Area Network (LAN) through a
network hub. Refer to the table below for
the LAN port LED indications. The optional
10/100 Mbps LAN controller allows 10/100
Mbps connection to a Local Area Network
(LAN) through a network hub.
ACT / LINK LED SPEED LED
Status Description Status Description
OFF 10Mbps connection OFF No link
Orange 100Mbps connection ORANGE Linked
Blinking 1Gbps connection GREEN Data activity
5 MIC_IN Microphone port This port connects a microphone.
6 LINE_OUT Line-Out port (Lime) This port connects a headphone or a
speaker. In 4-channel, 6-channel, and
8-channel configuration, the function of this
port becomes Front Speaker Out.
ENX-US15WP
23
Page 24
ENX-US15WP
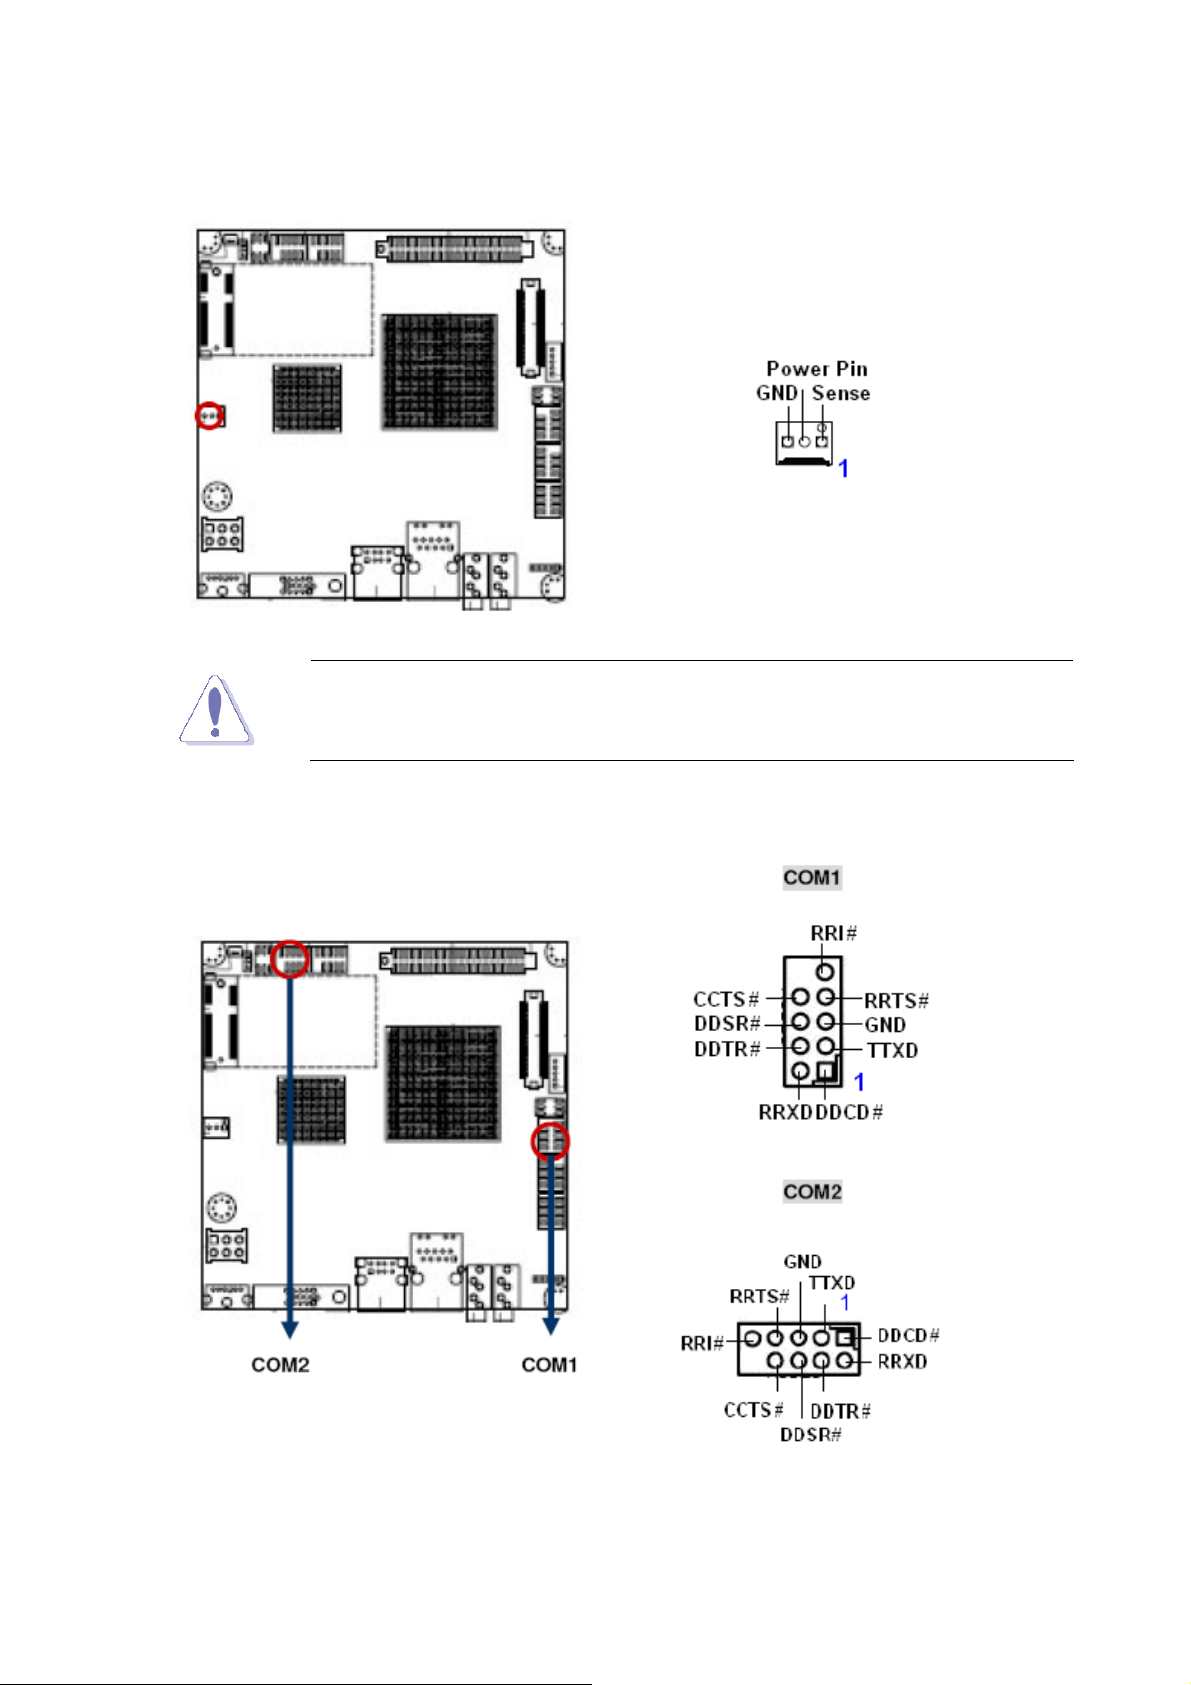
1.6.2 Chassis Fan Connector (CHA_FAN1)
z These are not jumpers! DO NOT place jumper caps on the fan
connectors.
1.6.3 Serial Port Connector 1, 2 (COM1, COM2)
24
Page 25
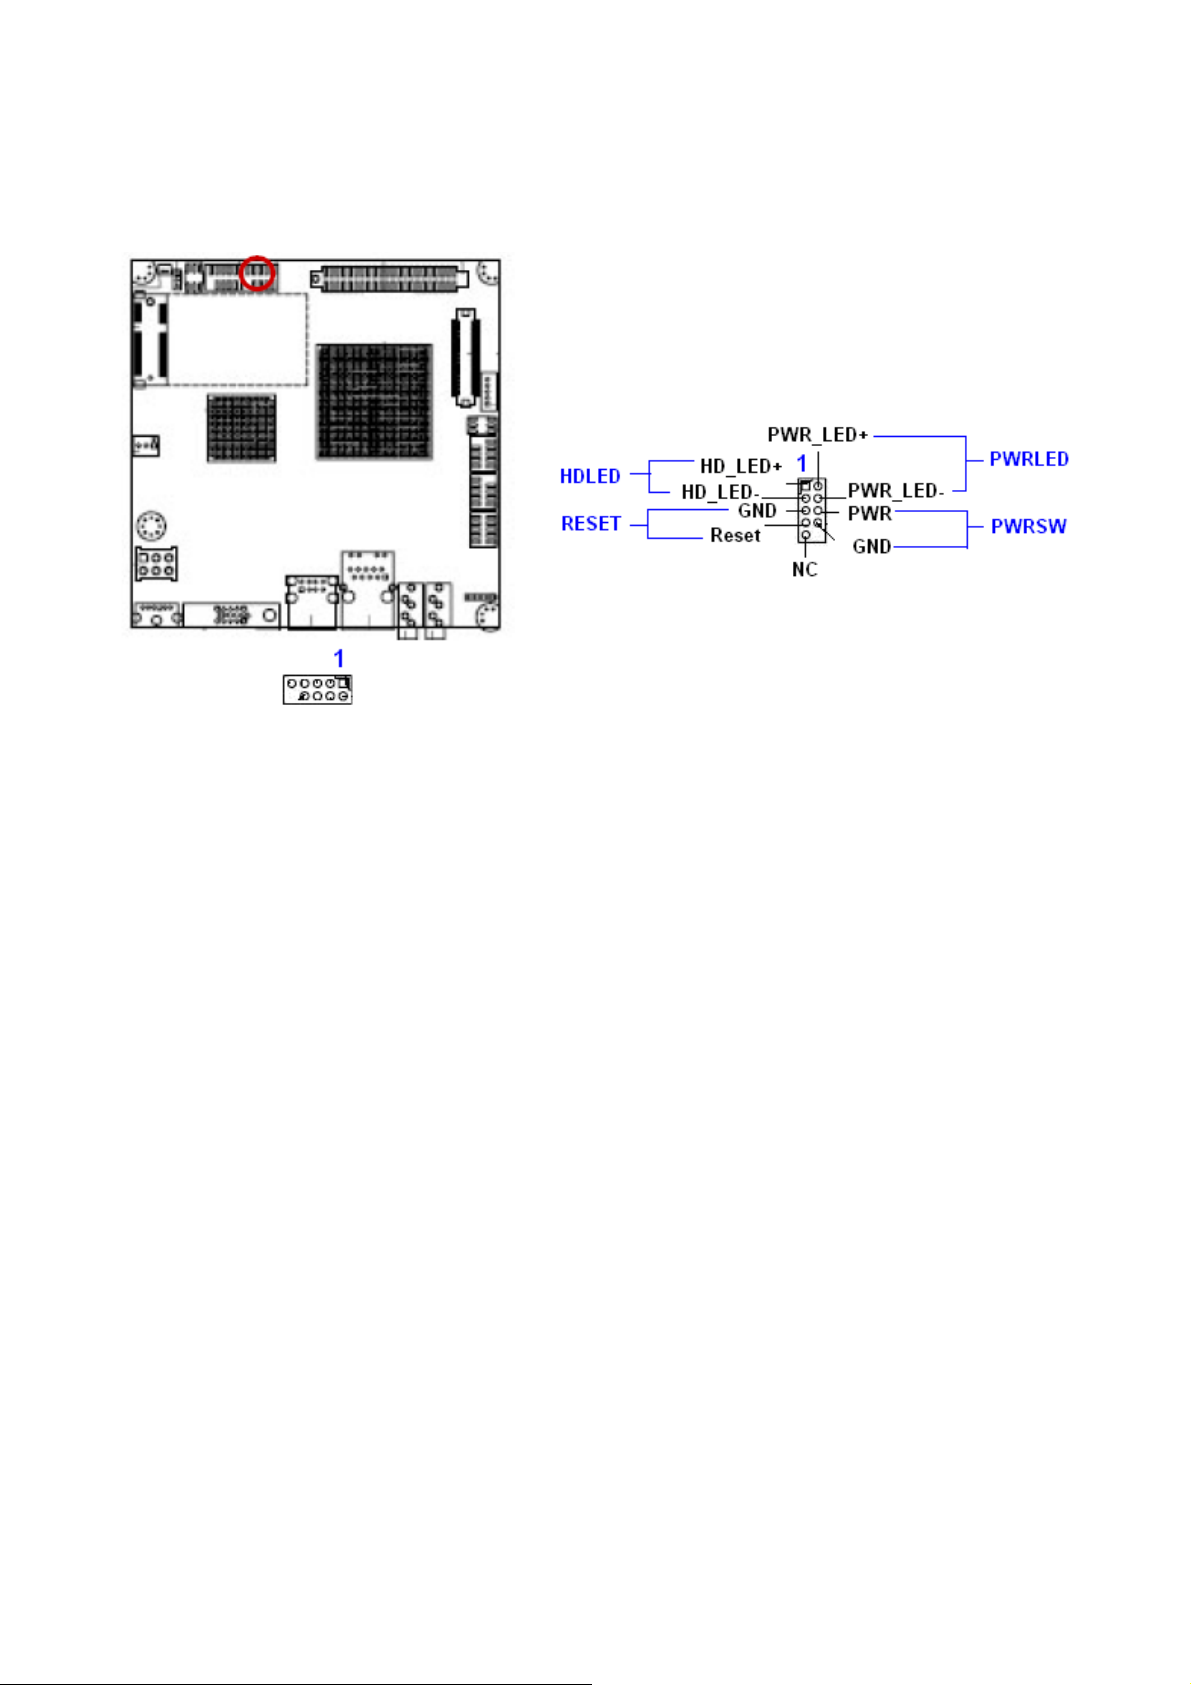
1.6.4 System Panel Connector (F_PANEL)
This connector supports several chassis-mounted functions.
User’s Manual
z System Power LED (2-pin PWRLED)
This 2-pin connector is for the system power LED. Connect the chassis power LED
cable to this connector. The system power LED lights up when you turn on the system
power, and blinks when the system is in sleep mode.
z ATX Power Button/Soft-off Button (2-pin PWRSW)
This connector is for the system power button. Pressing the power button turns the
system on or puts the system in sleep or soft-off mode depending on the BIOS settings.
Pressing the power switch for more than four seconds while the system is ON turns the
system OFF.
z Hard Disk Drive Activity LED (2-pin HDLED)
This 2-pin connector is for the HDD Activity LED. Connect the HDD Activity LED cable
to this connector. The IDE LED lights up or flashes when data is read from or written to
the HDD.
z Reset Button (2-pin RESET)
This 2-pin connector is for the chassis-mounted reset button for system reboot without
turning off the system power.
ENX-US15WP
25
Page 26
ENX-US15WP
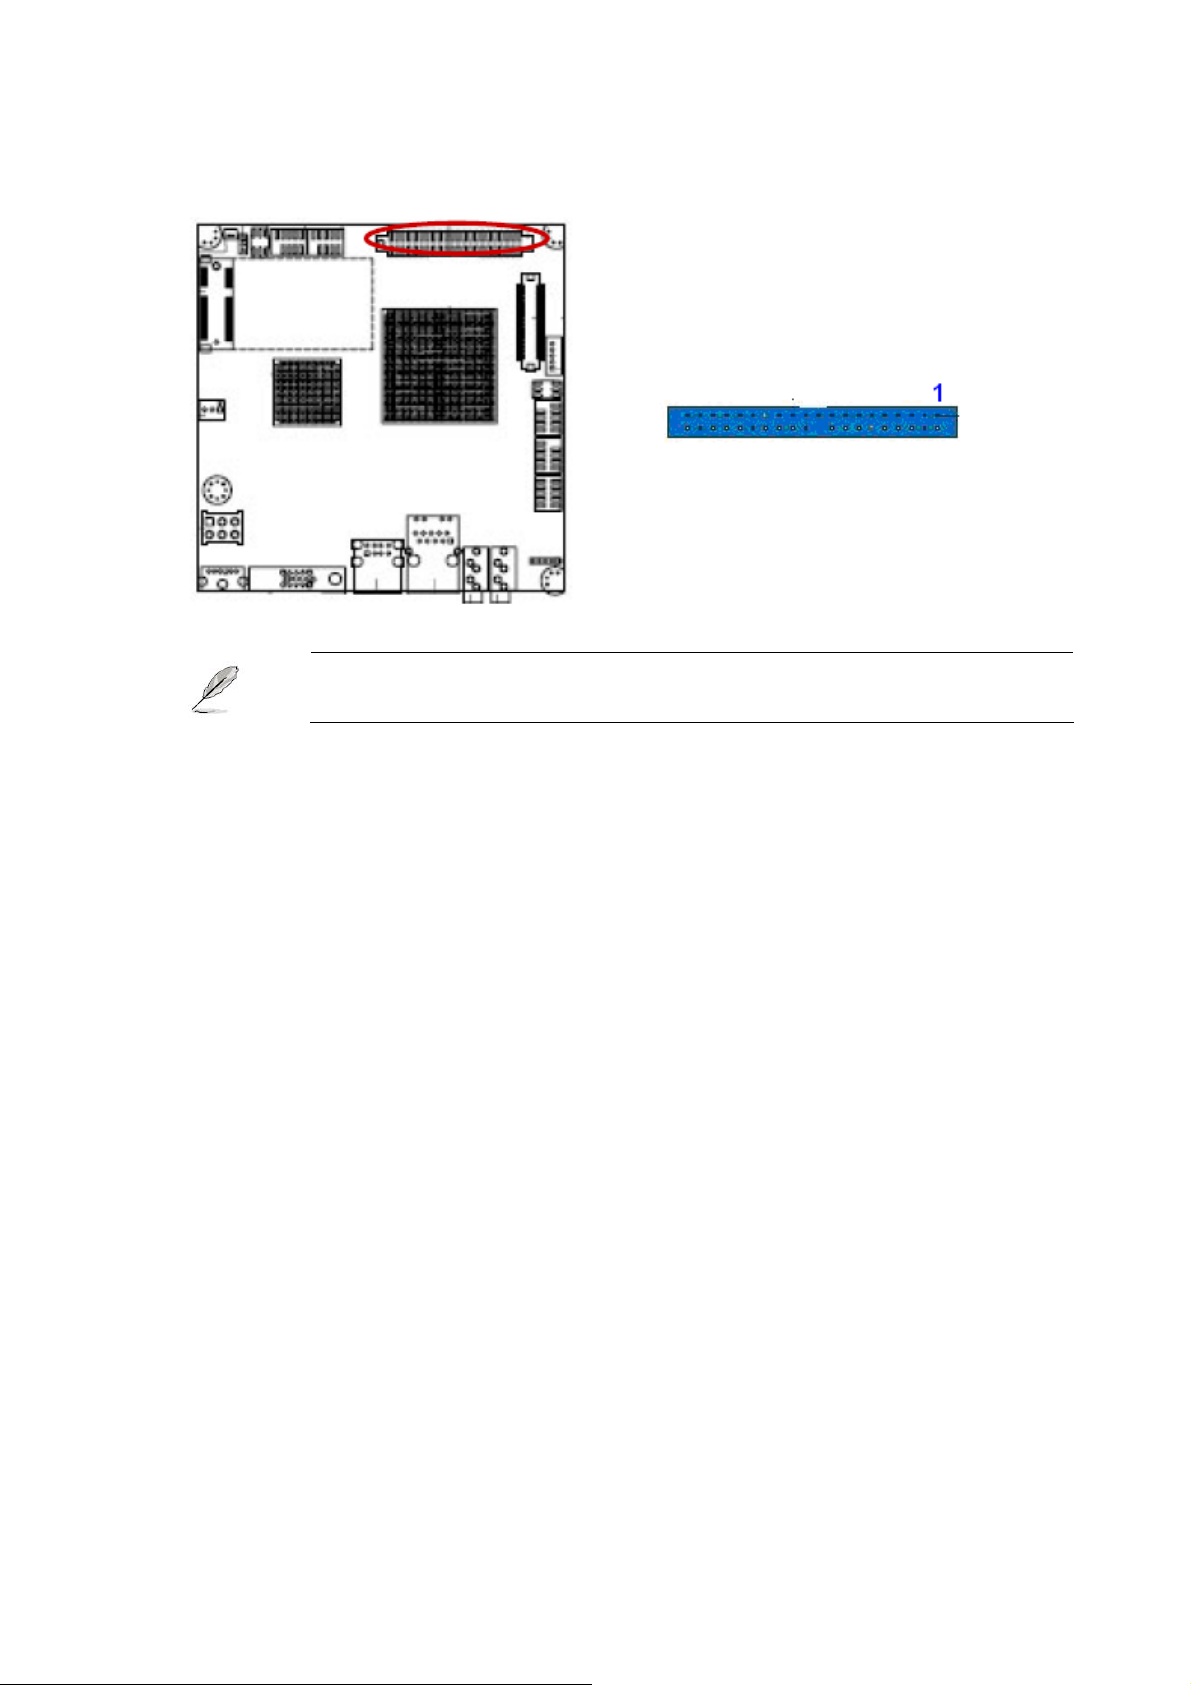
1.6.5 Primary EIDE Connector (IDE)
z Orient the red markings (usually zigzag) on the IDE cable to Pin
1.
26
Page 27
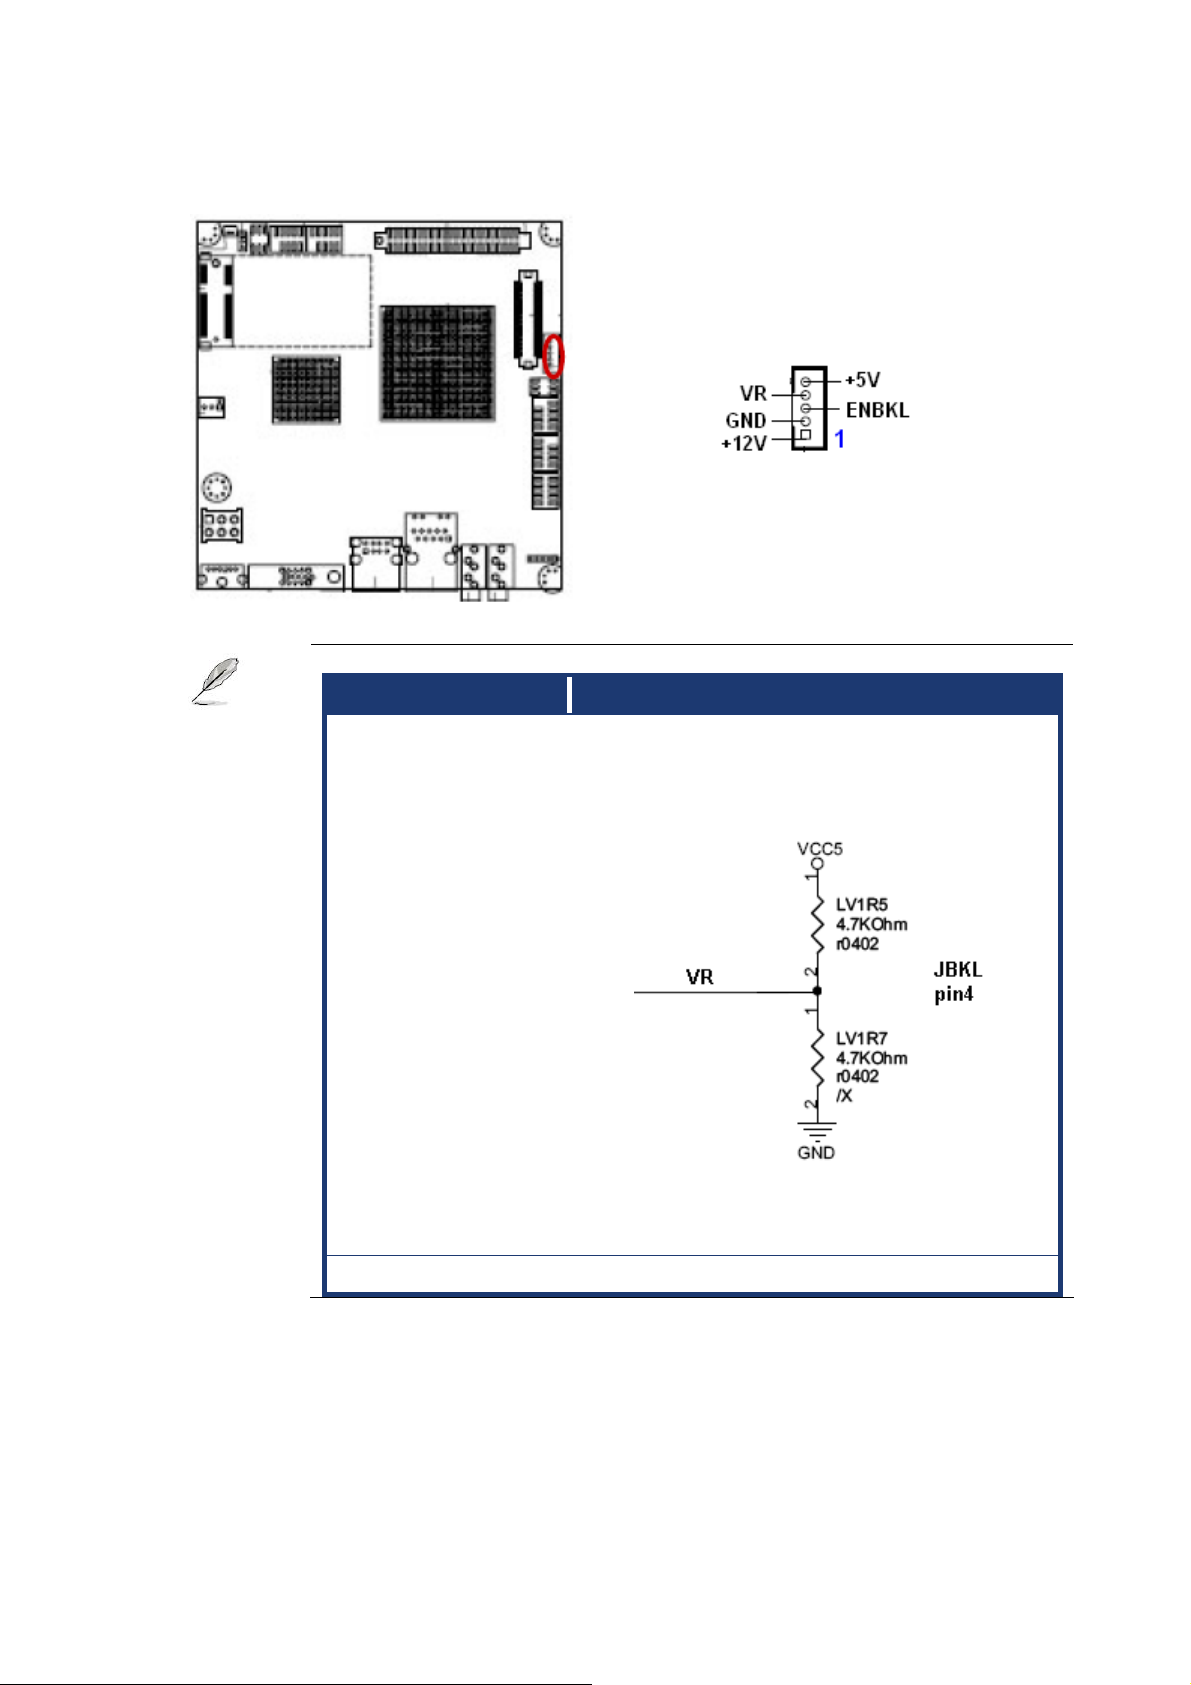
1.6.6 LCD Inverter Connector (JBKL)
z Signal Description
User’s Manual
Signal Signal Description
VR For inverter with adjustable Backlight
function, it is possible to control the LCD
brightness through the VR signal.
Vadj=0.75V ~ 4.25V
(Recommended: 4.7KΩ, > 1/16W)
ENBKL LCD backlight ON/OFF control signal
ENX-US15WP
27
Page 28
ENX-US15WP
1.6.7 Digital I/O Connector (JDIO)
1.6.8 LVDS Connector (JLVDS)
28
Page 29
1.6.9 Audio Line-In Connector (LINE_IN)
1.6.10 ATX Power Connector (MATXPWR2)
User’s Manual
This connector is for ATX power supply plugs. The power supply plugs are designed to fit
this connector in only one orientation. Find the proper orientation and push down firmly until
the connectors completely fit.
Important notes on the Motherboard Power Requirements
z Make sure that your ATX 12V power supply can provide 5A on
the +12V lead and at least 2A on the +5-volt standby lead
(+5VSB). The minimum recommended wattage is 36W, or 65W
for a fully configured system. The system can become unstable
and might experience difficulty powering up if the power supply is
inadequate.
z You must install a PSU with a higher power rating if you intend to
install additional devices.
ENX-US15WP
29
Page 30
ENX-US15WP
1.6.11 USB 2.0 Connector (USB34)
This connector is for USB 2.0 ports. Connect the USB/GAME module cable to any of these
connectors, and then install the module to a slot opening at the back of the system chassis.
This USB connector complies with USB 2.0 specification that supports up to 480 Mbps
connection speed.
Never connect a 1394 cable to the USB connectors. Doing so will
damage the motherboard!
The USB module is purchased separately.
30
Page 31

User’s Manual
This chapter tells how to change
the system set tings through the BIOS
setup menus. Detailed descriptions
of the BIOS parameters are also provided.
BIOS setup
BIOS setup
2
2
ENX-US15WP
31
Page 32

ENX-US15WP
BIOS Setup
2.1 BIOS Setup Program
This motherboard supports a programmable firmware chip that you can update using the
provided utility. Use the BIOS Setup program when you are installing a motherboard,
reconfiguring your system, or prompted to “Run Setup.” This section explains how to
configure your system using this utility.
Even if you are not prompted to use the Setup program, you can change the configuration
of your computer in the future. For example, you can enable the security password feature
or change the power management settings. This requires you to reconfigure your system
using the BIOS Setup program so that the computer can recognize these changes and
record them in the CMOS RAM of the firmware hub.
The firmware hub on the motherboard stores the Setup utility. When you start up the
computer, the system provides you with the opportunity to run this program. Press <Del>
during the Power-On-Self-Test (POST) to enter the Setup utility; otherwise, POST
continues with its test routines.
If you wish to enter Setup after POST, restart the system by pressing <Ctrl+Alt+Delete>, or
by pressing the reset button on the system chassis. You can also restart by turning the
system off and then back on. Do this last option only if the first two failed.
The Setup program is designed to make it as easy to use as possible. Being a menu-driven
program, it lets you scroll through the various sub-menus and make your selections from
the available options using the navigation keys.
z The default BIOS settings for this motherboard apply for most
conditions to ensure optimum performance. If the system
becomes unstable after changing any BIOS settings, load the
default settings to ensure system compatibility and stability.
Select the Load Optimized Defaults from the BIOS menu
screen.
z The BIOS setup screens shown in this section are for reference
purposes only, and may not exactly match what you see on your
screen.
z Visit the system builder’s website to download the latest BIOS file
for this motherboard
32
Page 33
User’s Manual
2.1.1 Legend Box
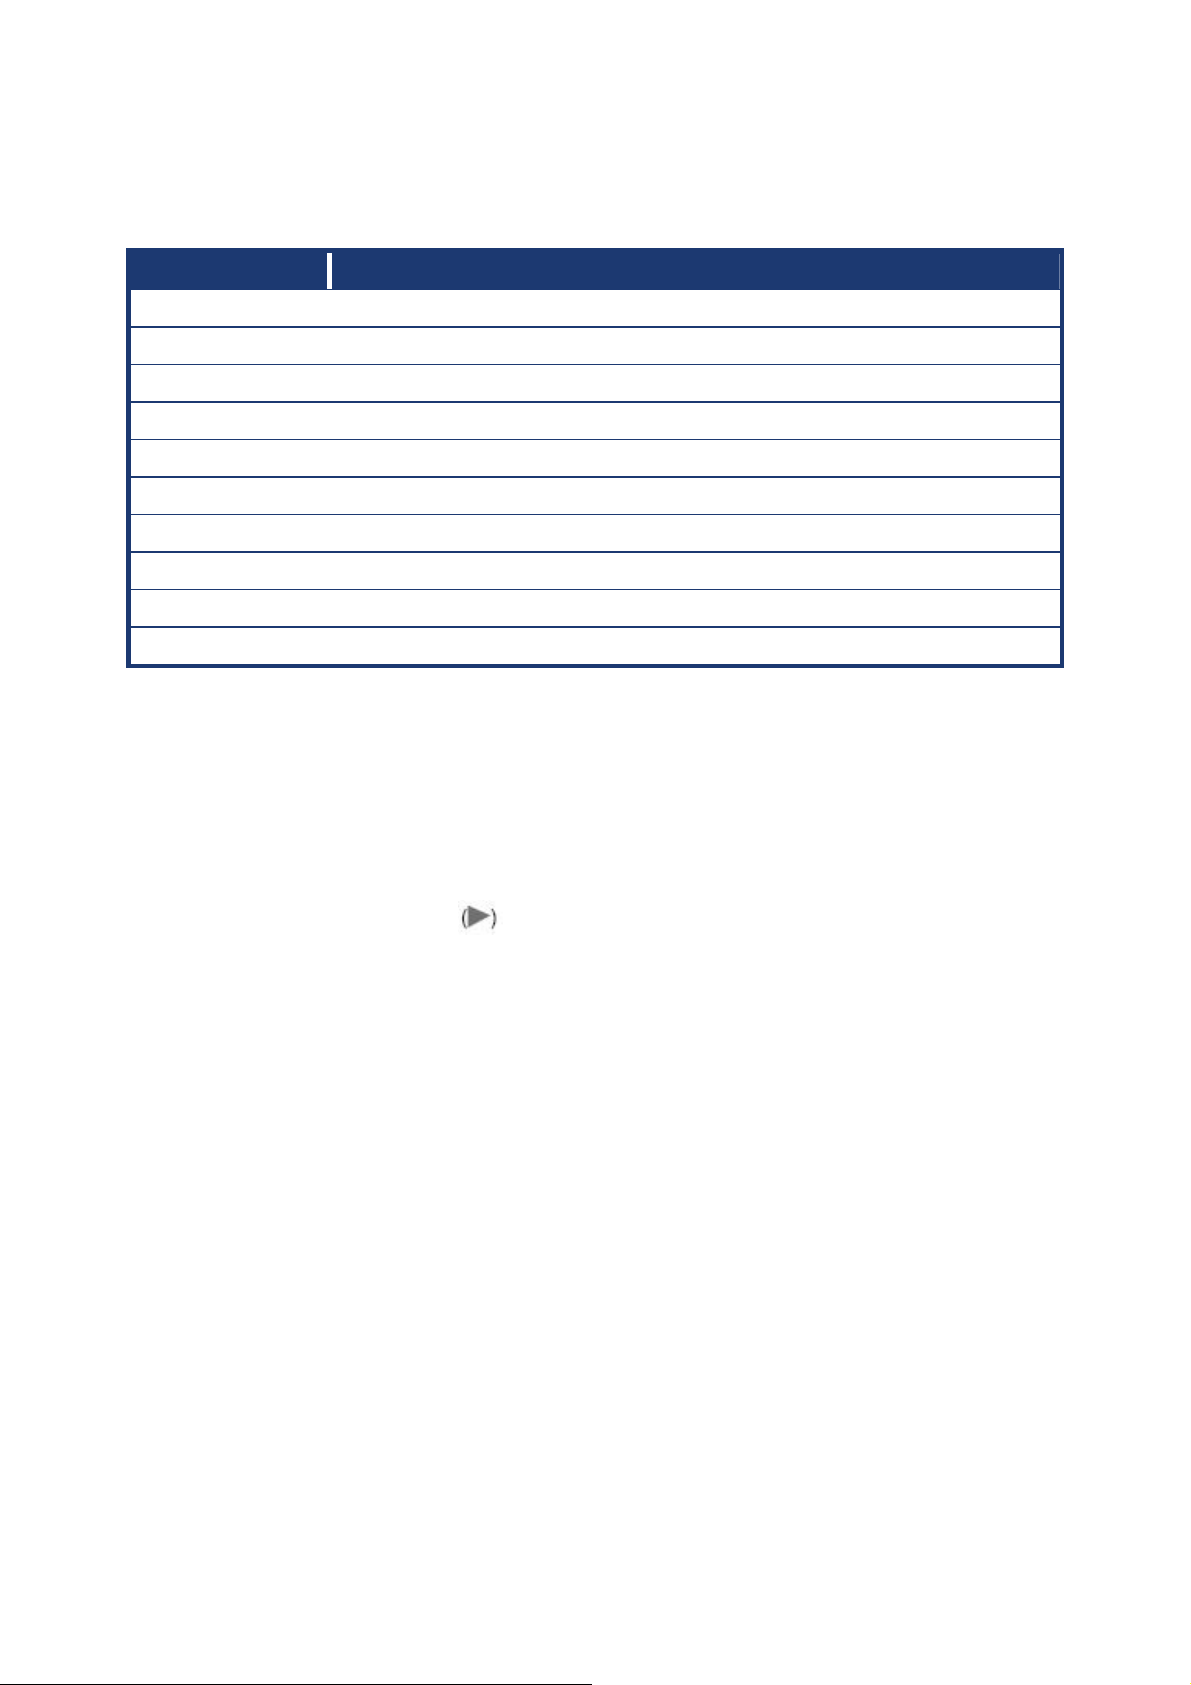
The keys in the legend bar allow you to navigate through the various setup menus
Key(s) Function Description
↑↓→←
Enter Select
+ / - / PU / PD Value
ESC Exit
F1 General Help
F2 Item Help
F5 Previous Values
F7 Setup Defaults
F9 Menu in BIOS
F10 Save
2.1.2 List Box
This box appears only in the opening screen. The box displays an initial list of configurable
items in the menu you selected.
2.1.3 Sub-menu
Move
Note that a right pointer symbol appears to the left of certain fields. This pointer
indicates that you can display a sub-menu from this field. A sub-menu contains additional
options for a field parameter. To display a sub-menu, move the highlight to the field and
press <Enter>. The sub‑menu appears. Use the legend keys to enter values and move
from field to field within a sub-menu as you would within a menu. Use the <Esc> key to
return to the main menu.
Take some time to familiarize yourself with the legend keys and their corresponding
functions. Practice navigating through the various menus and submenus. If you
accidentally make unwanted changes to any of the fields, press <F7> to load the Set up
default values. While moving around through the Setup program, note that explanations
appear in the Item Specific Help window located to the right of each menu. This window
displays the help text for the currently highlighted field.
ENX-US15WP
33
Page 34
ENX-US15WP
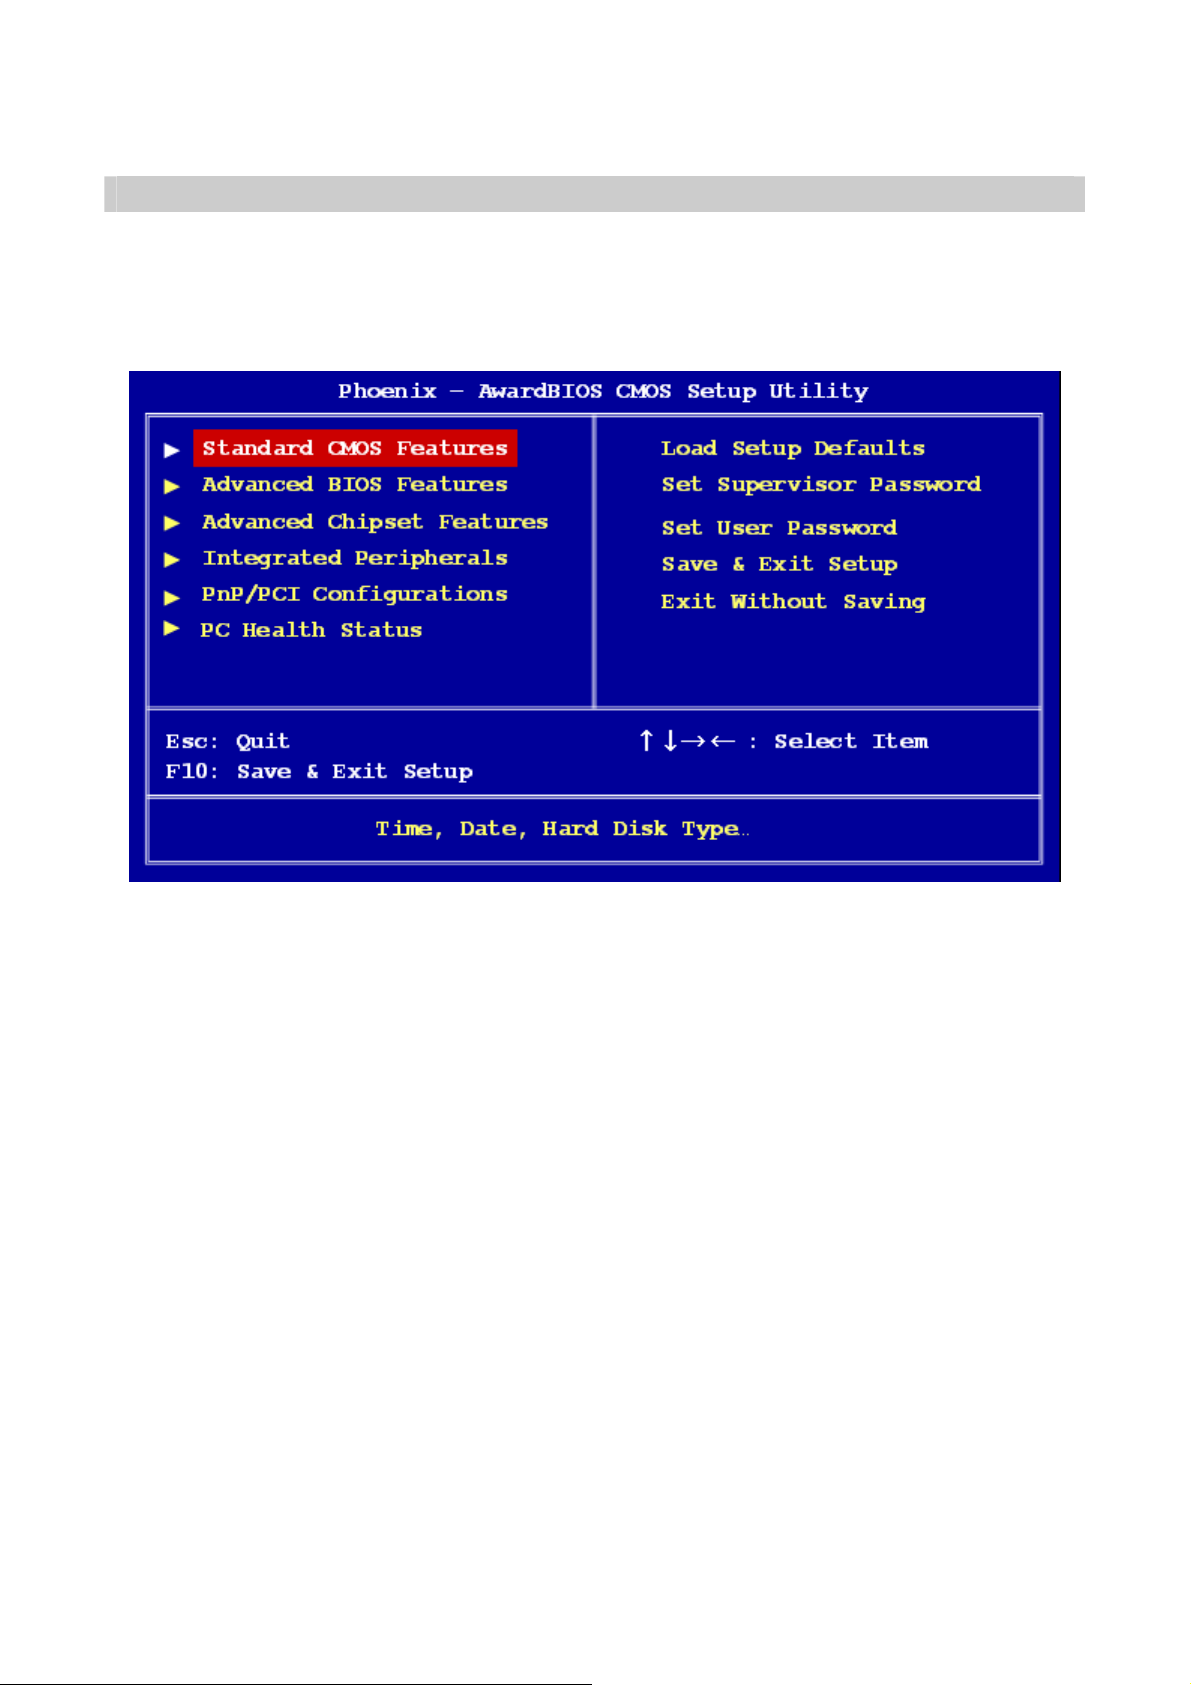
2.2 BIOS Menu Screen
When you enter the BIOS, the following screen appears. The BIOS menu screen displays
the items that allow you to make changes to the system configuration. To access the menu
items, press the up/down/right/left arrow key on the keyboard until the desired item is
highlighted, then press [Enter] to open the specific menu.
34
Page 35
User’s Manual
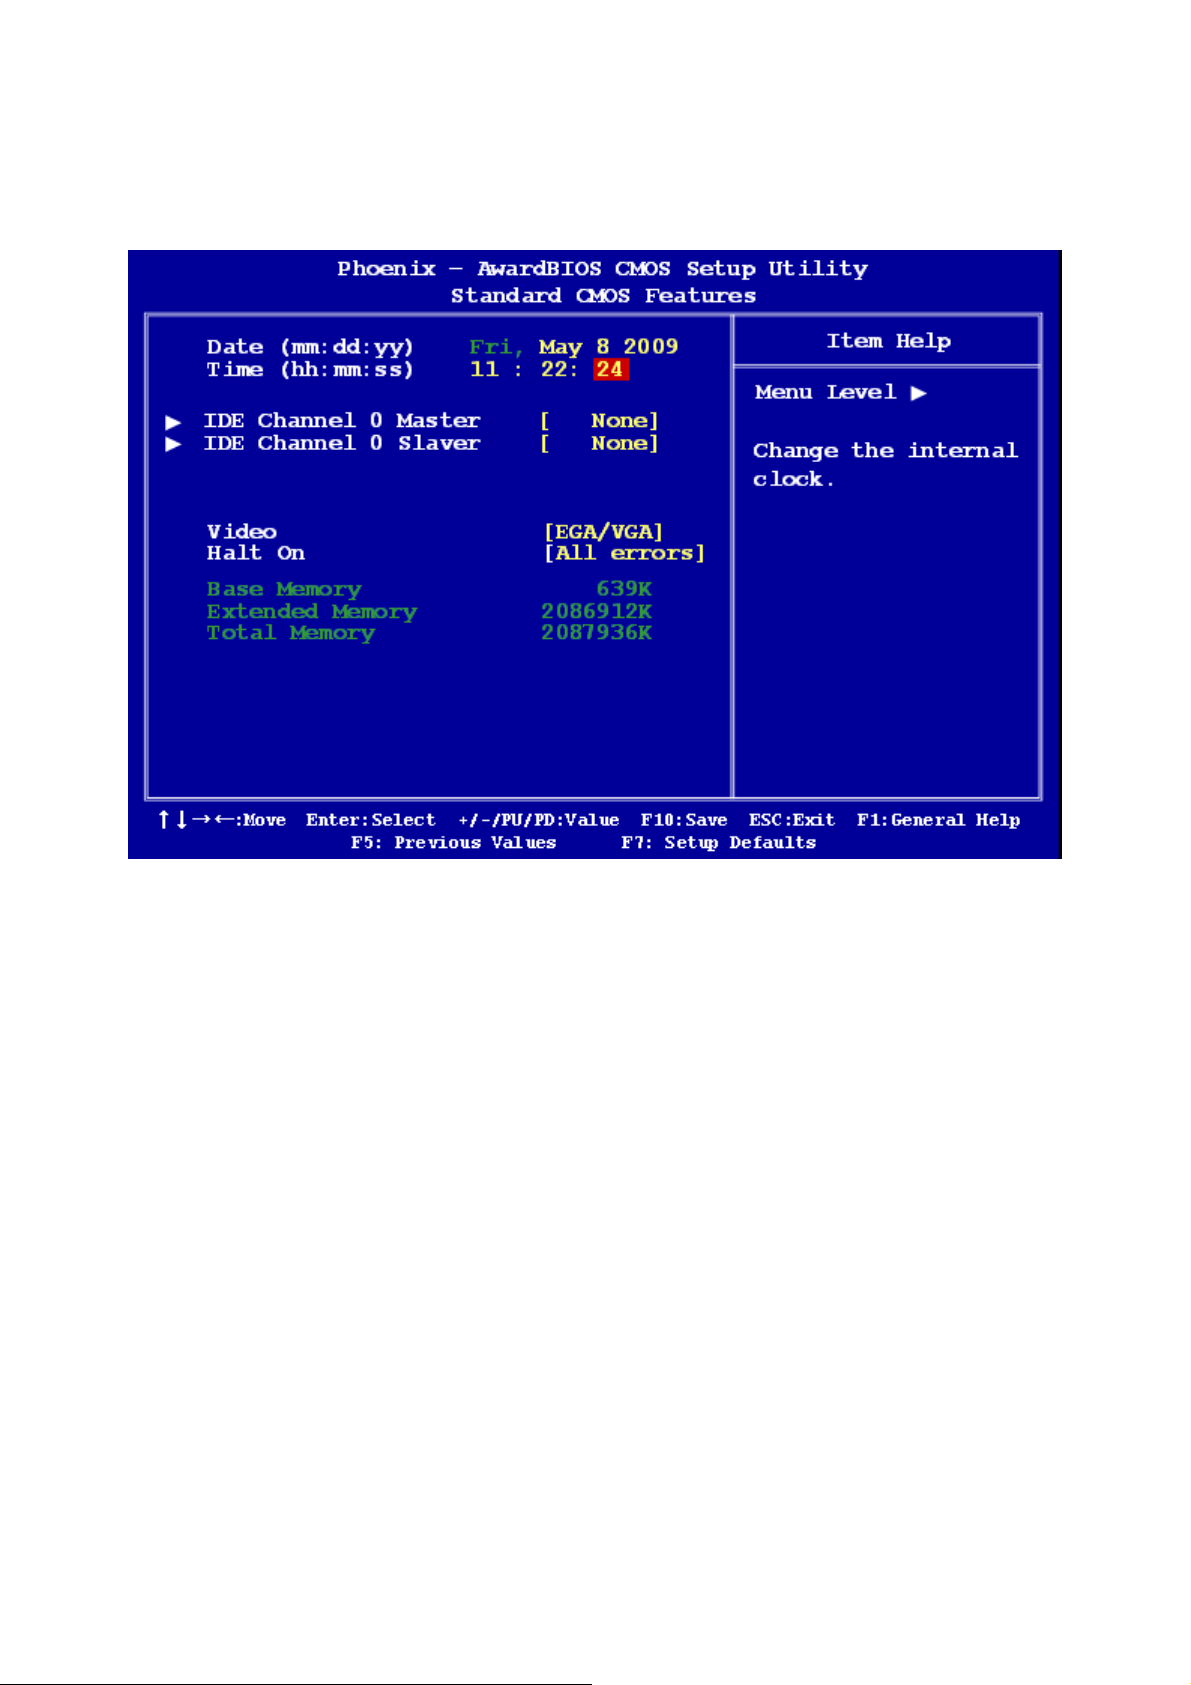
2.2.1 Standard CMOS Features
The Standard CMOS Features screen gives you an overview of the basic system.
2.2.1.1 Date [Day, xx/ xx/ xxxx]
The date format is <week>, <month>, <day>, <year>.
2.2.1.2 Time [xx : xx : xx]
The time format is <hour><minute><second>, based on the 24-hour clock.
ENX-US15WP
35
Page 36

ENX-US15WP
2.2.1.3 IDE Channel 0 Master / Slave
z IDE HDD Auto-Detection
[Press Enter]
to select this option for automatic device detection.
z IDE Channel 0 Master
[None]: Select this when no IDE device is used. The system will skip the auto-detection
setup to make system start up faster.
[Auto]: Automatically detects IDE devices during POST
[Manual]: User can manually input the correct settings.
z Access Mode: The options are CHS/LBA/Large/Auto
z Capacity: Capacity of currently installed hard disk
z Cylinder: Number of cylinders
z Head: Number of heads
z Precomp: Write precomp
z Landing Zone: Landing zone
z Sector: Number of sectors
2.2.1.4 Video
This category detects the type of adapter used for the primary monitor that must match your
video display card and monitor.
z EGA / VGA: Enhanced Graphics Adapter/Video Graphics Array. For EGA, VGA, SVGA,
or PGA monitor adapters.
z CGA 40: Color Graphics Adapter, power up in 40 column mode.
z CGA 80: Color Graphics Adapter, power up in 80 column mode.
z MONO: Monochrome adapter includes high resolution monochrome adapters.
2.2.1.5 Halt On
Set the system to halt on errors according to the system functions specified in each option.
Configuration options: [All Errors] [No Errors] [All, But Keyboard]
36
Page 37
User’s Manual
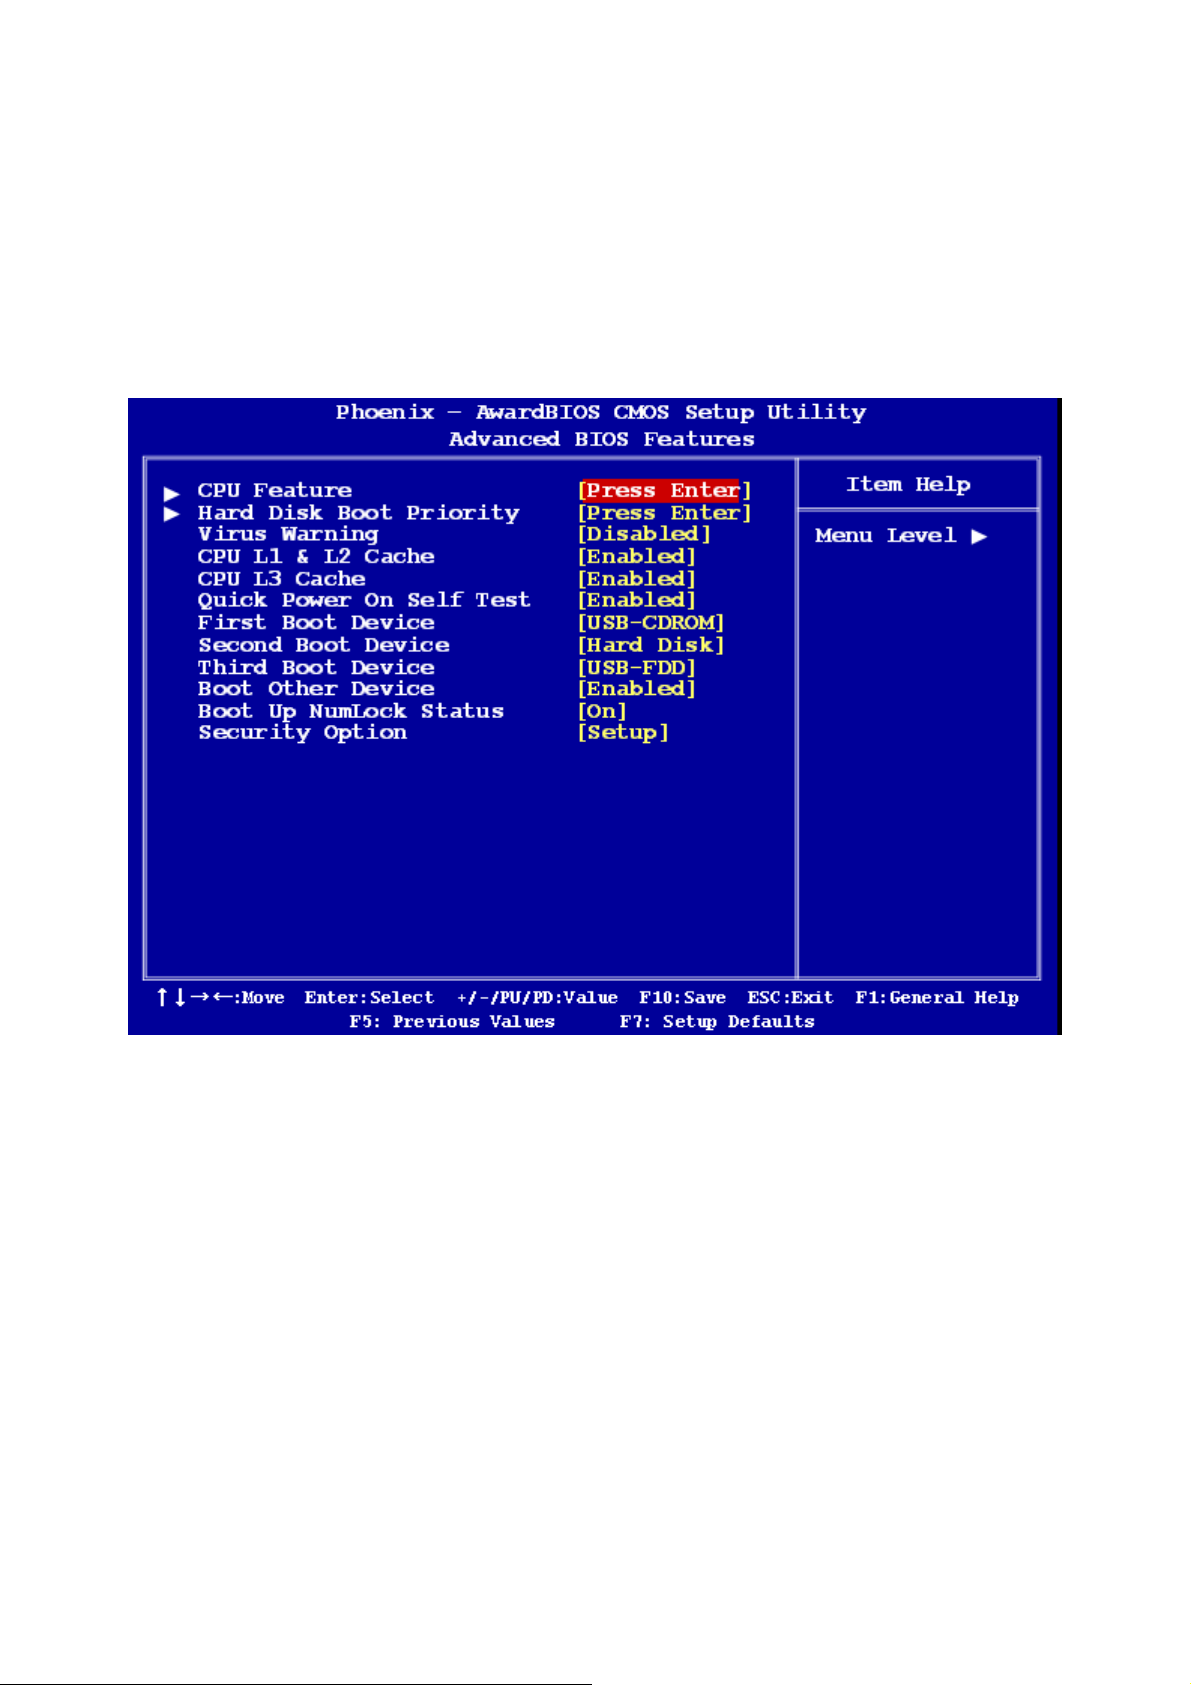
2.2.2 Advanced BIOS Features
The “Advanced BIOS Features” screen appears when choosing the “Advanced BIOS
Features” item from the “Initial Setup Screen” menu. It allows the user to configure the
motherboard according to his particular requirements. Below are some major items that are
provided in the Advanced BIOS Features screen. A quick booting function is provided for
your convenience. Simply enable the Quick Booting item to save yourself valuable time.
ENX-US15WP
37
Page 38
ENX-US15WP
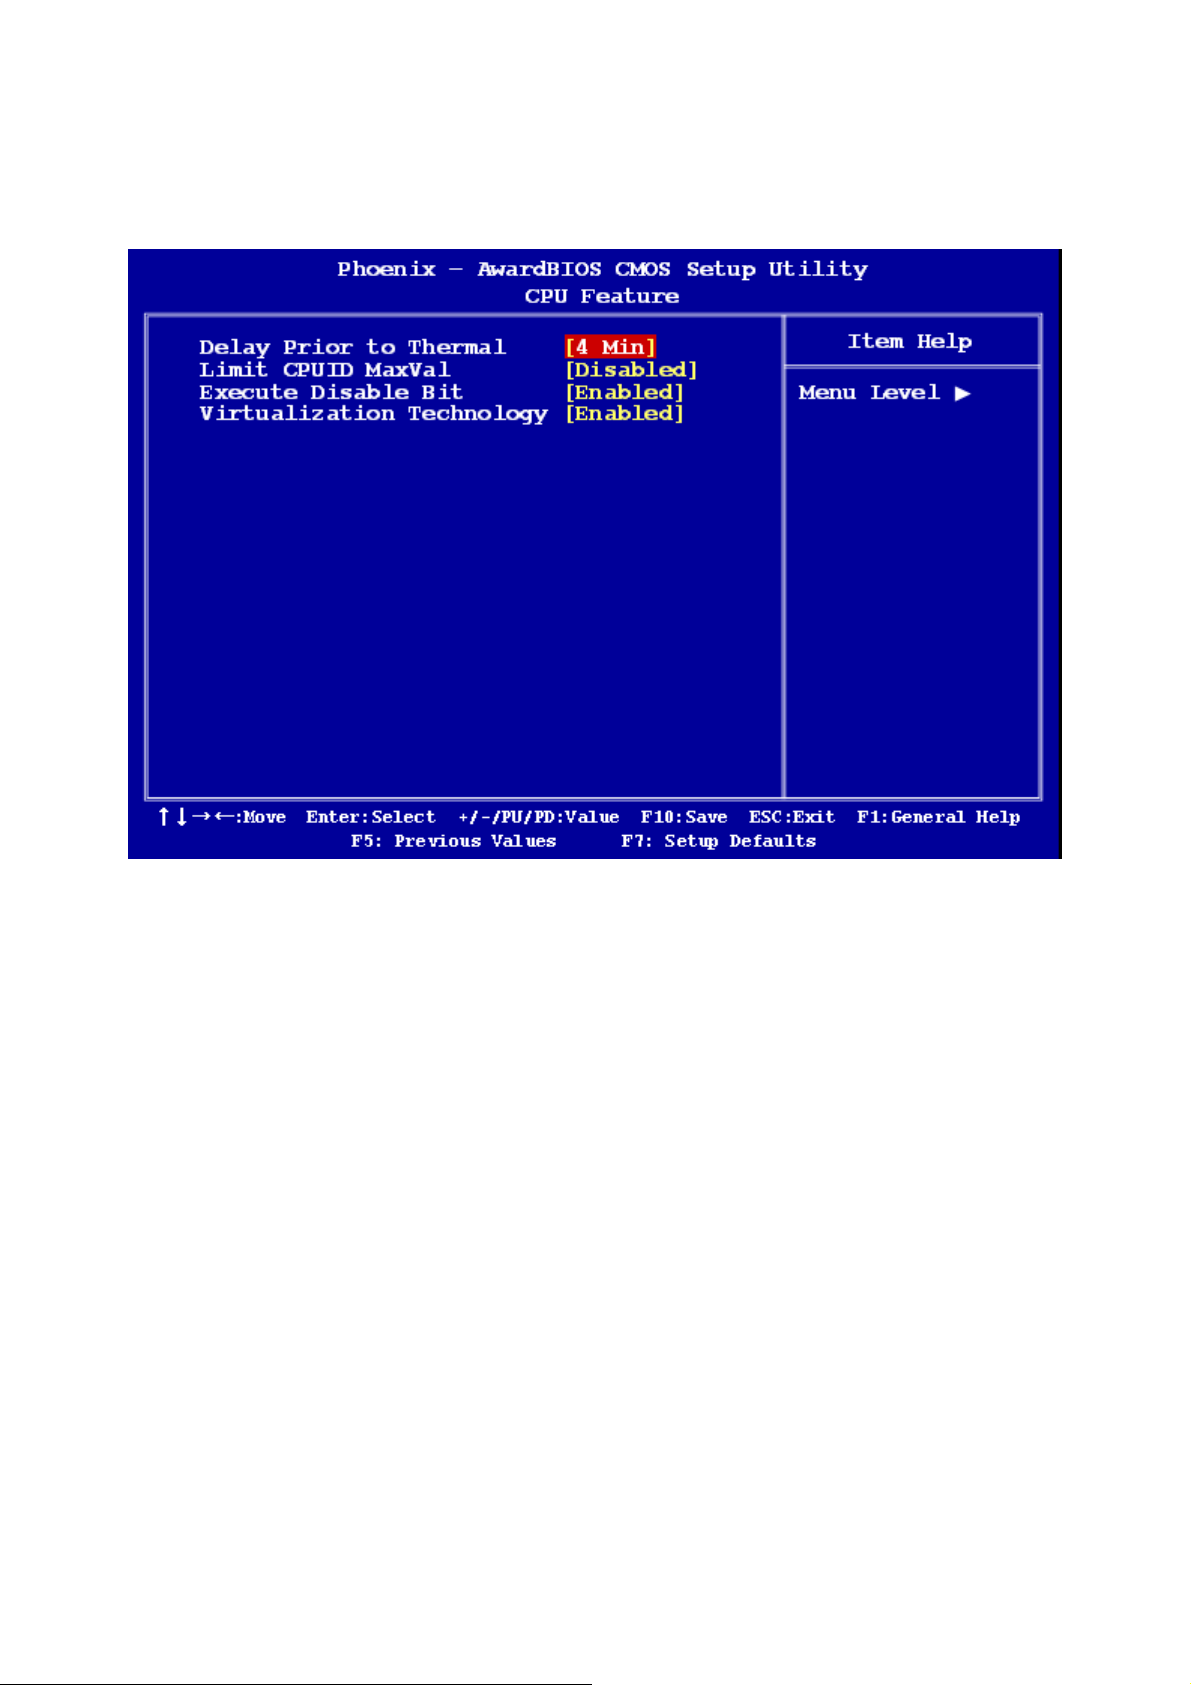
2.2.2.1 CPU Features
This item allows you to setup the CPU thermal management function.
z Delay Prior to Thermal
With the default value of 16 Minutes, the BIOS activates the Thermal Monitor in automatic
mode 16 minutes after the system starts booting up
The options: [4 Min], [8 Min], [16 Min], [32 Min].
z Limit CPUID MaxVal
Sets Limit CPUID MaxVa1 to 3. This should be disabled for WinXP.
z Execute Disabled Bit
When disabled, forces the XD feature flag to always return 0
z Virtualization Technology
When enabled, a VMM can utilize the additional hardware capabilities provided by Vander
pool Technology.
38
Page 39
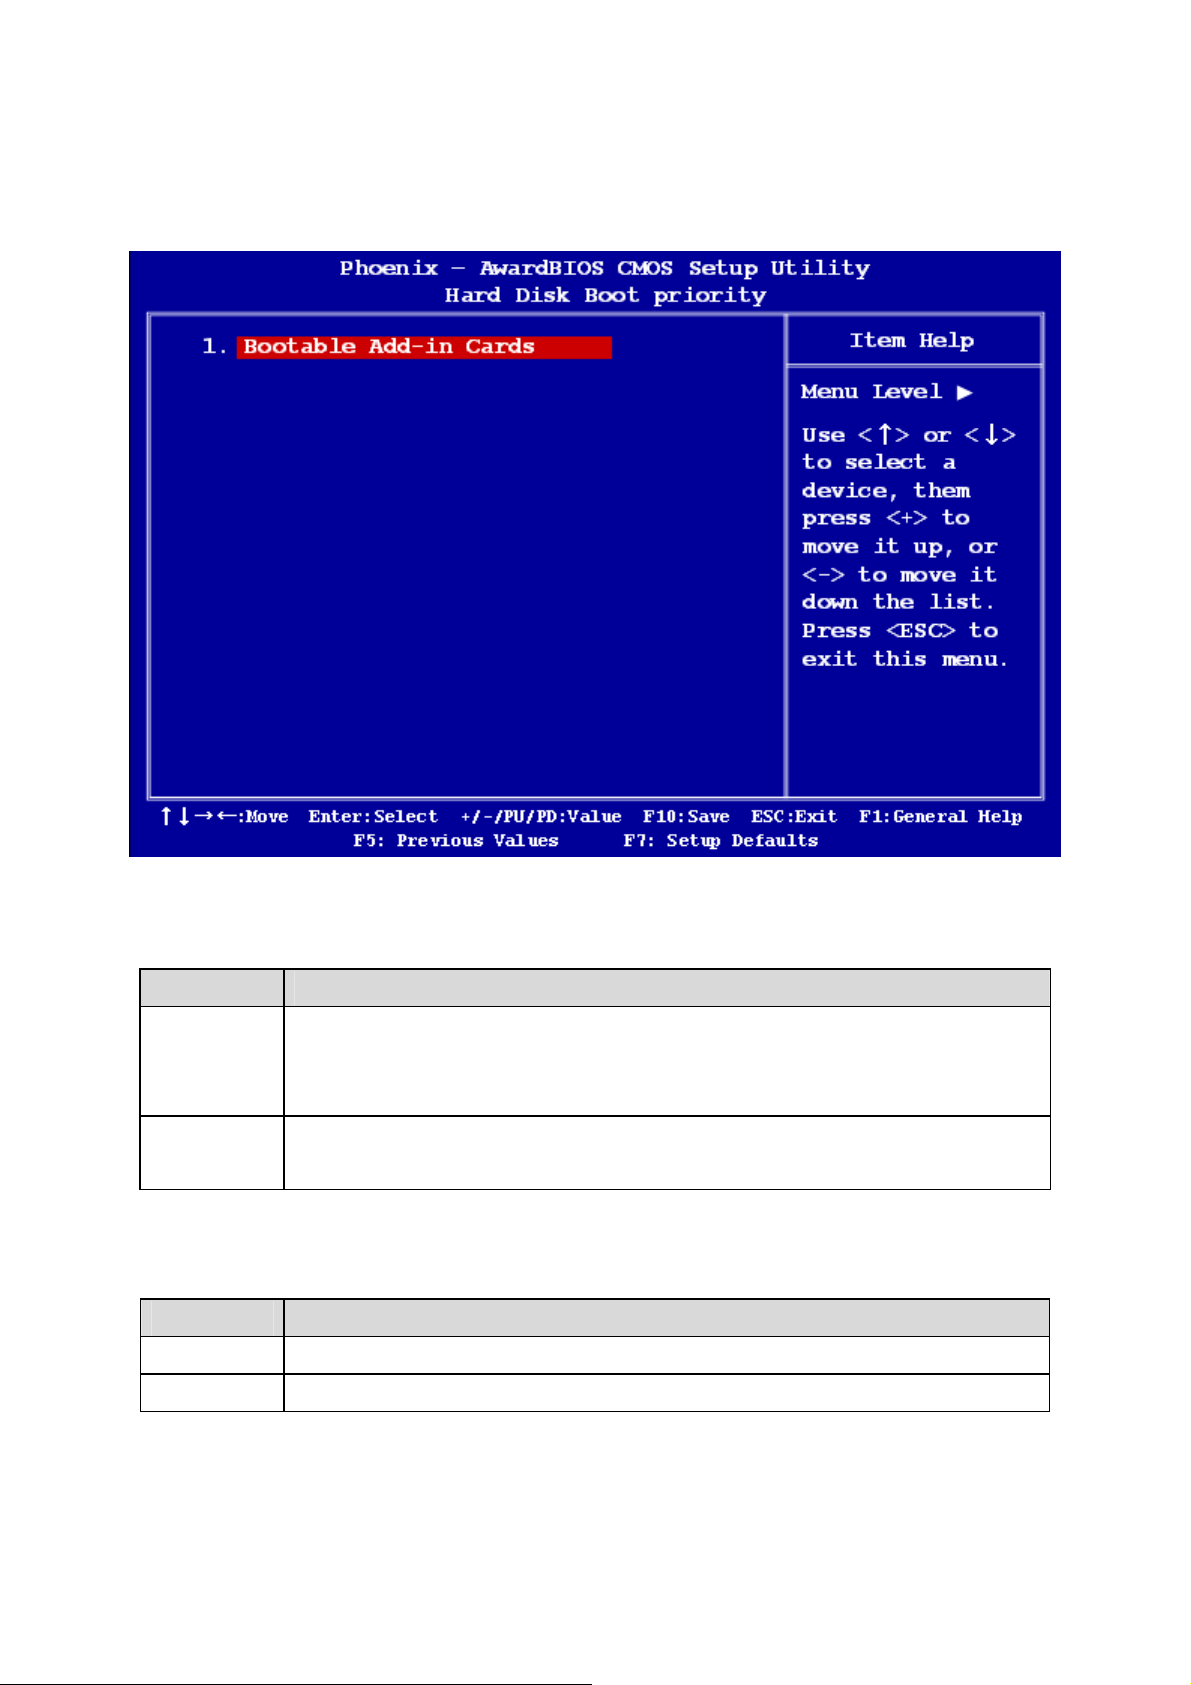
2.2.2.2 Hard Disk Boot Priority
Set hard disk boot device priority.
User’s Manual
2.2.2.3 Virus Warning
Enables or disables the virus warning.
Item Description
Activates automatically when the system boots up causing a warning
Enabled
message to appear when anything attempts to access the boot sector
or hard disk partition table.
No warning message will appear when anything attempts to access the
Disabled
boot sector or hard disk partition table.
2.2.2.4 CPU L1 & L2 & L3 Cache
Enabling this feature speeds up memory access.
Item Description
Enabled Enable cache
Disabled Disable cache
ENX-US15WP
39
Page 40
ENX-US15WP
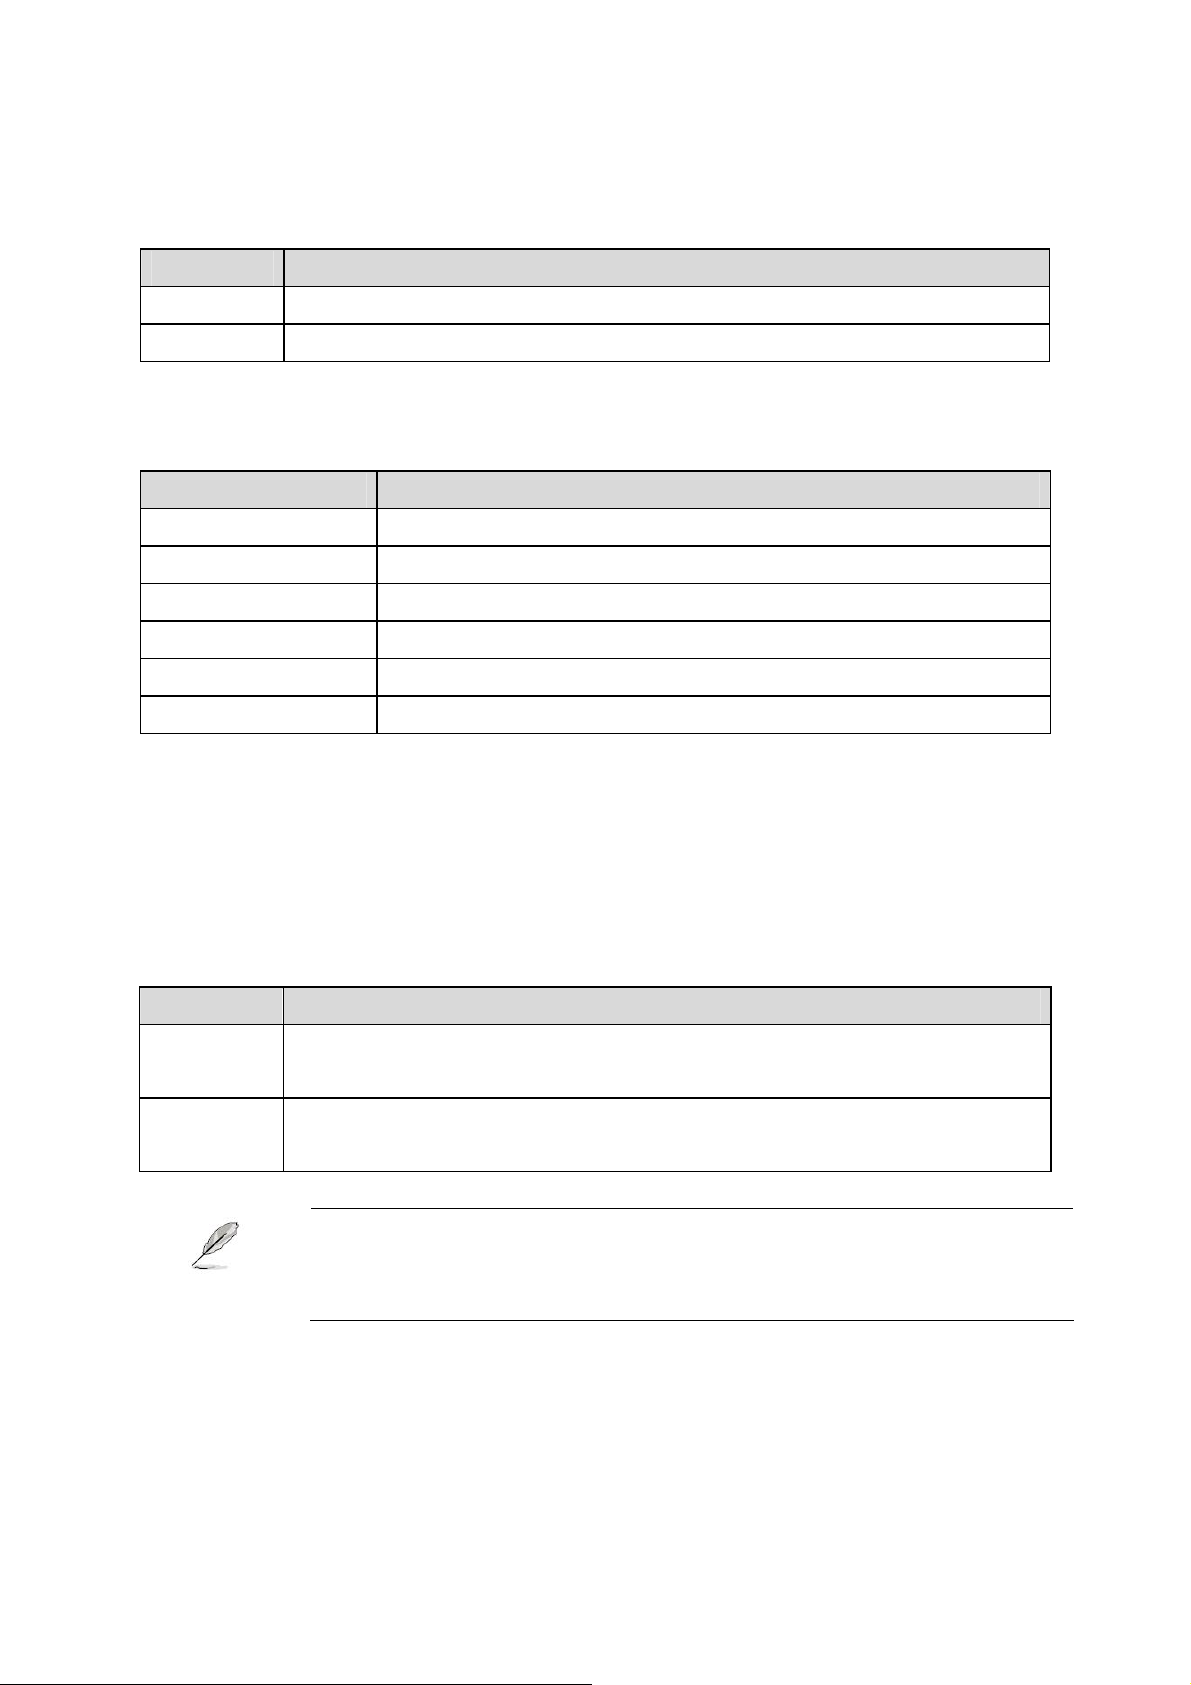
2.2.2.5 Quick Power On Self Test
This allows the system to skip certain tests to speed up the boot-up procedure.
Item Description
Disabled Normal POST
Enabled Enable quick POST
2.2.2.6 First / Second / Third Boot Device
The BIOS tries to load the OS from the devices in the sequence set here. The options are:
Item Description
Hard Disk Hard Disk Device
CDROM CDROM Device
USB-FDD USB Floppy Device
USB-ZIP USB ZIP Device
USB-CDROM USB CDROM Device
Disabled Disabled any boot device
2.2.2.7 Boot Other Device
Use this to boot another device. The options: Disabled, Enabled.
2.2.2.8 Security Option
This category determines whether the password is required when the sys- tem boots up or
only when entering setup. The options are:
Item Description
The system will not boot and access to Setup will be denied if the
System
correct password is not entered at the prompt.
The system will boot, but access to Setup will be denied if the correct
Setup
password is not entered at the prompt.
To disable security, select Set Supervisor Password at Main Menu
and then you will be asked to enter password. Do not type anything
and just press <Enter>, it will disable security. Once the security is
disabled, the system will boot and you can enter Setup freely.
40
Page 41
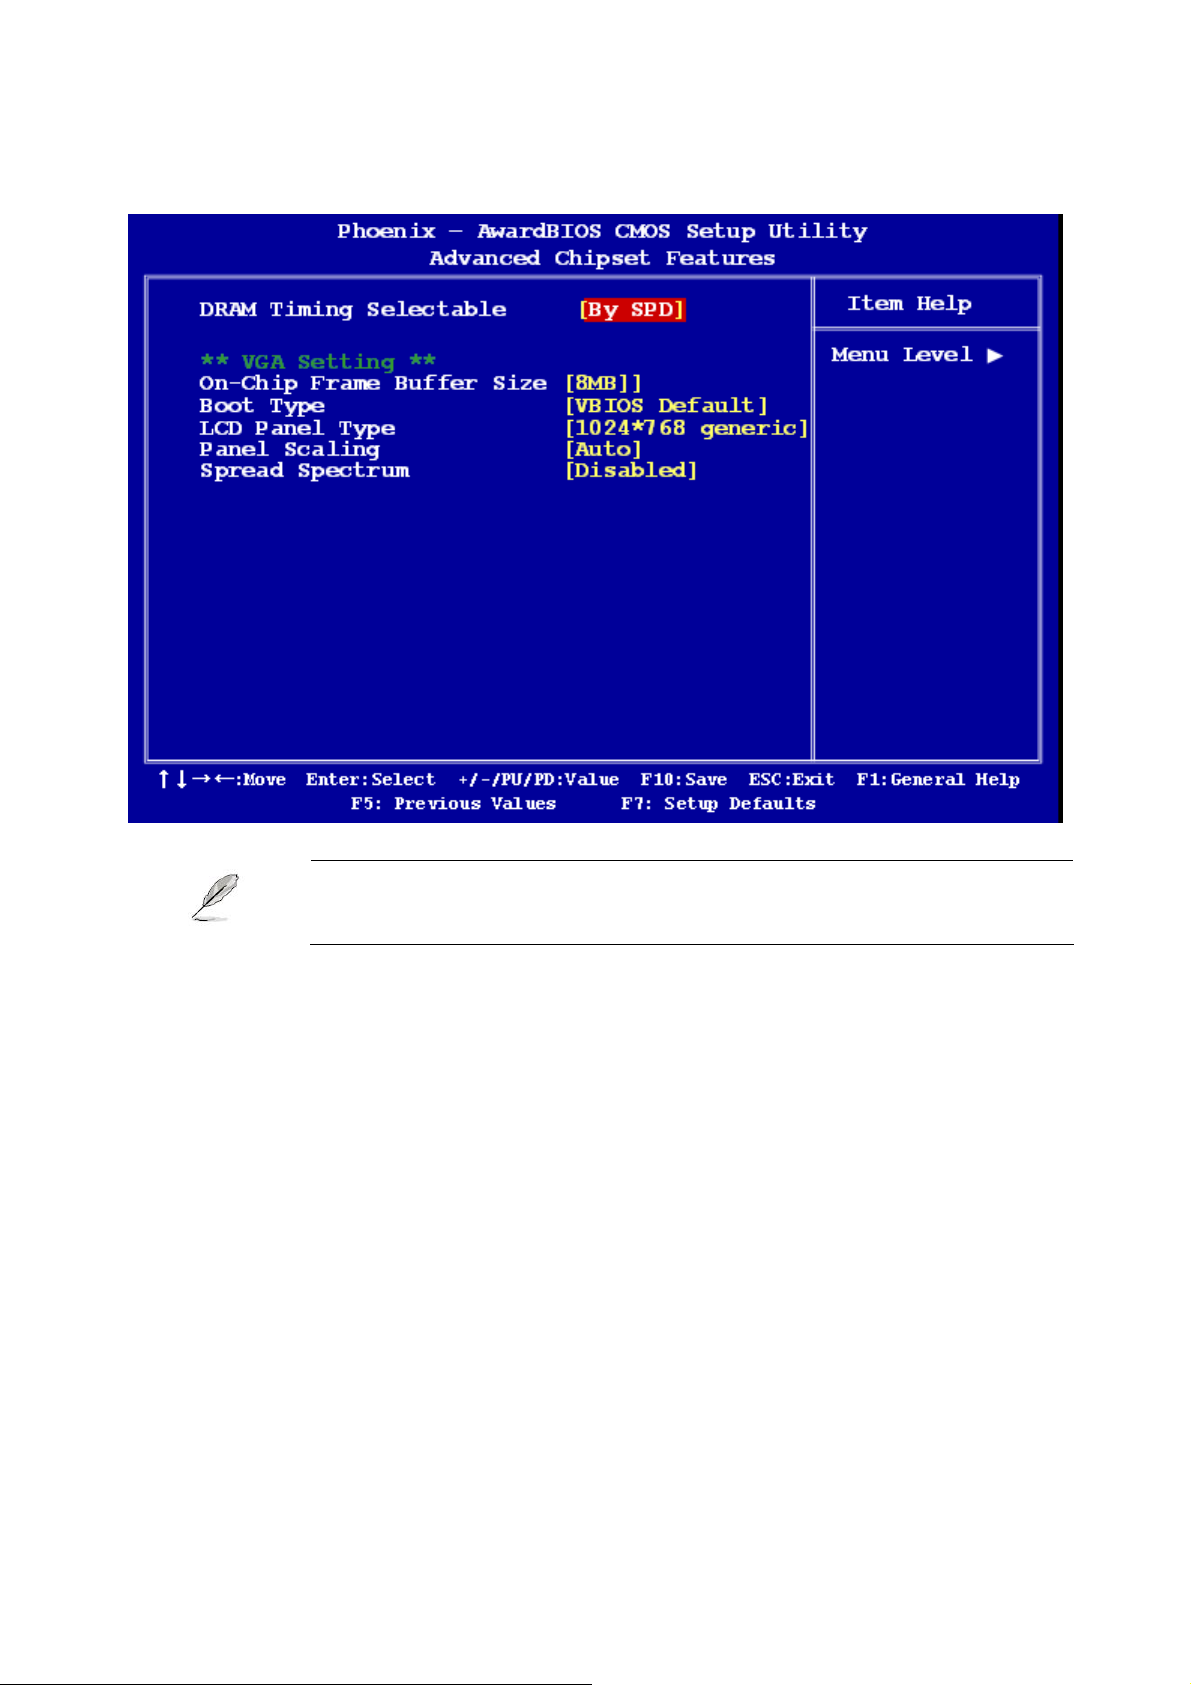
2.2.3 Advanced Chipset Features
User’s Manual
DRAM default timings have been carefully chosen and should ONLY
be changed if data is being lost. Please first contact technical support
2.2.3.1 DRAM Timing Selectable
This item shows the DRAM timing value by SPD data or Manual.
2.2.3.2 On-Chip Frame Buffer Size
The On-Chip Frame Buffer Size can be set to 1 MB or 8 MB. This memory is shared with
the system memory.
2.2.3.3 Boot Type
The options: VBIOS Default, CRT, LFP.
ENX-US15WP
41
Page 42

ENX-US15WP
2.2.3.4 LCD Panel Type
The options:
640x480 generic
800x600 generic
1024x768 generic
640x480 NEC 8.4”
800x480 NEC 9”
1024x600 TMD 5.61”
1024x600 Samsung 4.8”
1024x768 Samsung 15”
1024x768 Sharp 7.2”
1280x800 Samsung 15.4”
2.2.3.5 Panel Scaling
The options: Auto, Force, Off
2.2.3.6 Spread Spectrum
The options: Disabled, Enabled.
42
Page 43
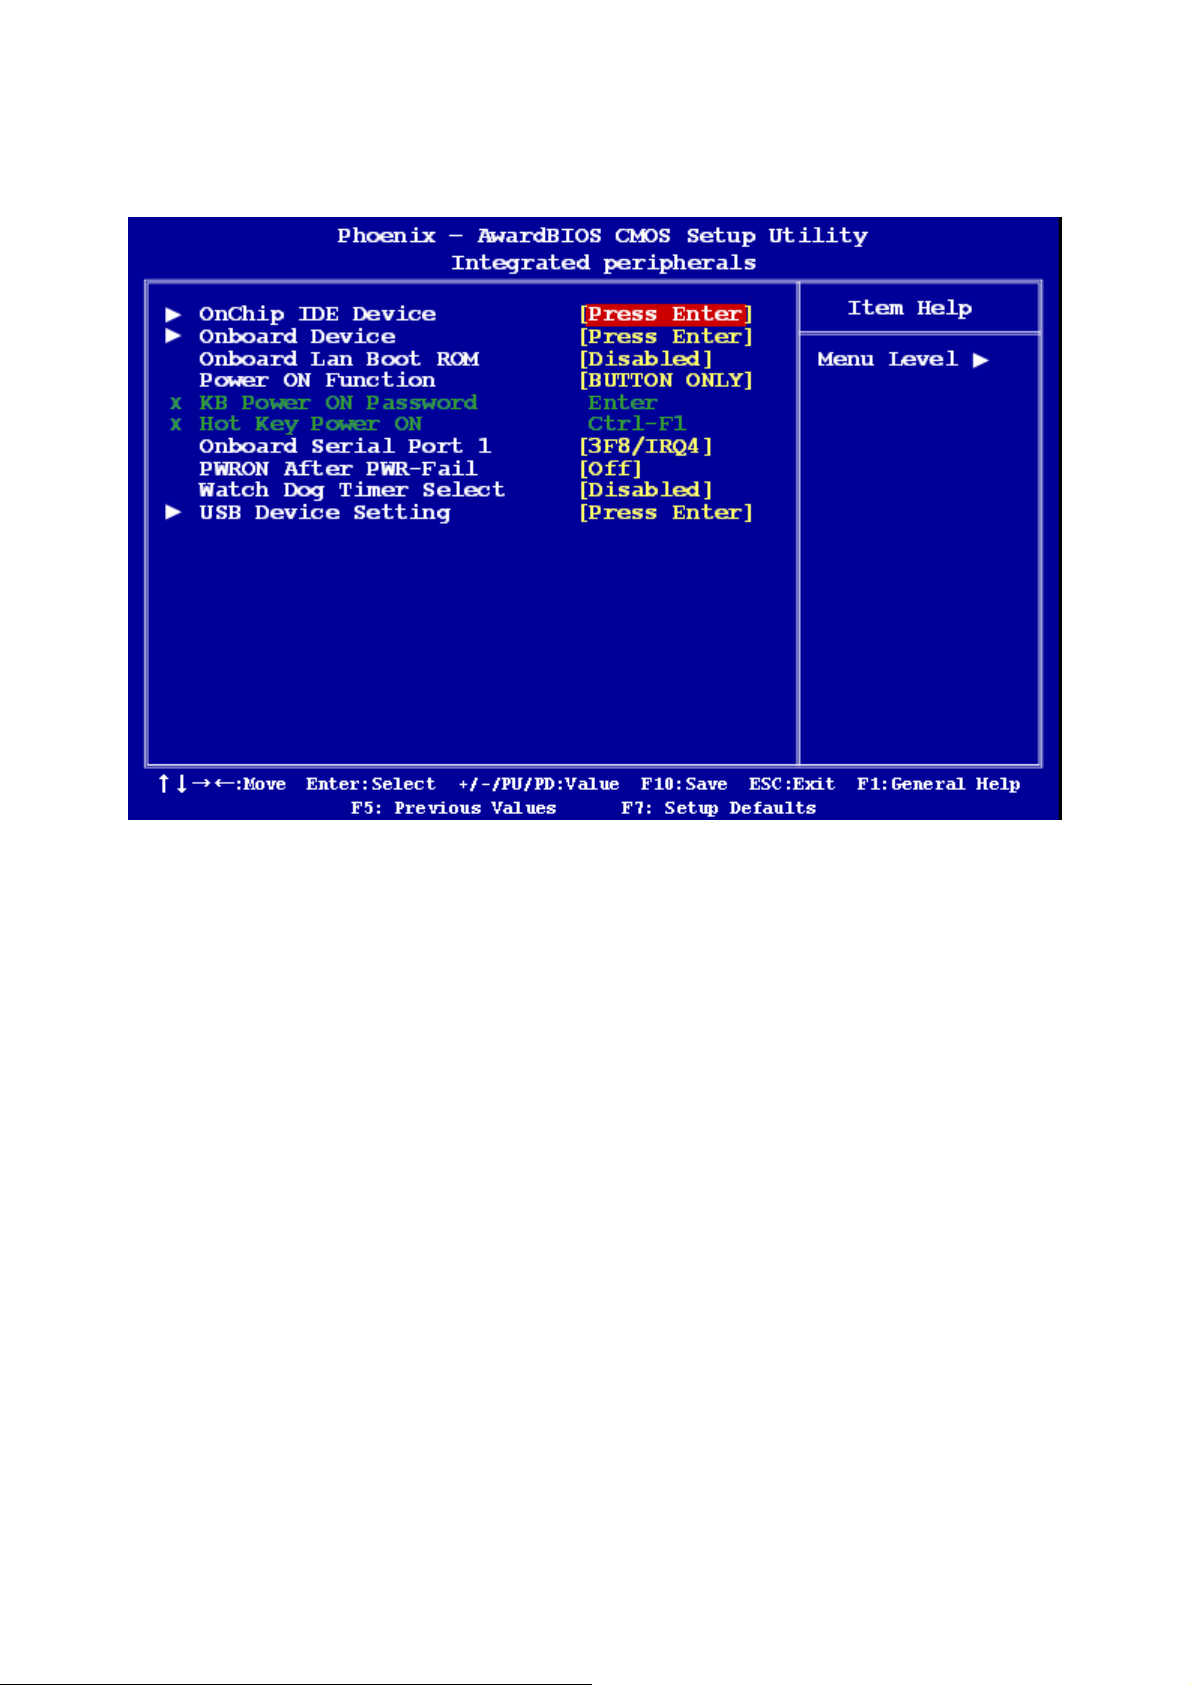
2.2.4 Integrated Peripherals
Use this menu to specify your settings for integrated peripherals.
User’s Manual
ENX-US15WP
43
Page 44
ENX-US15WP
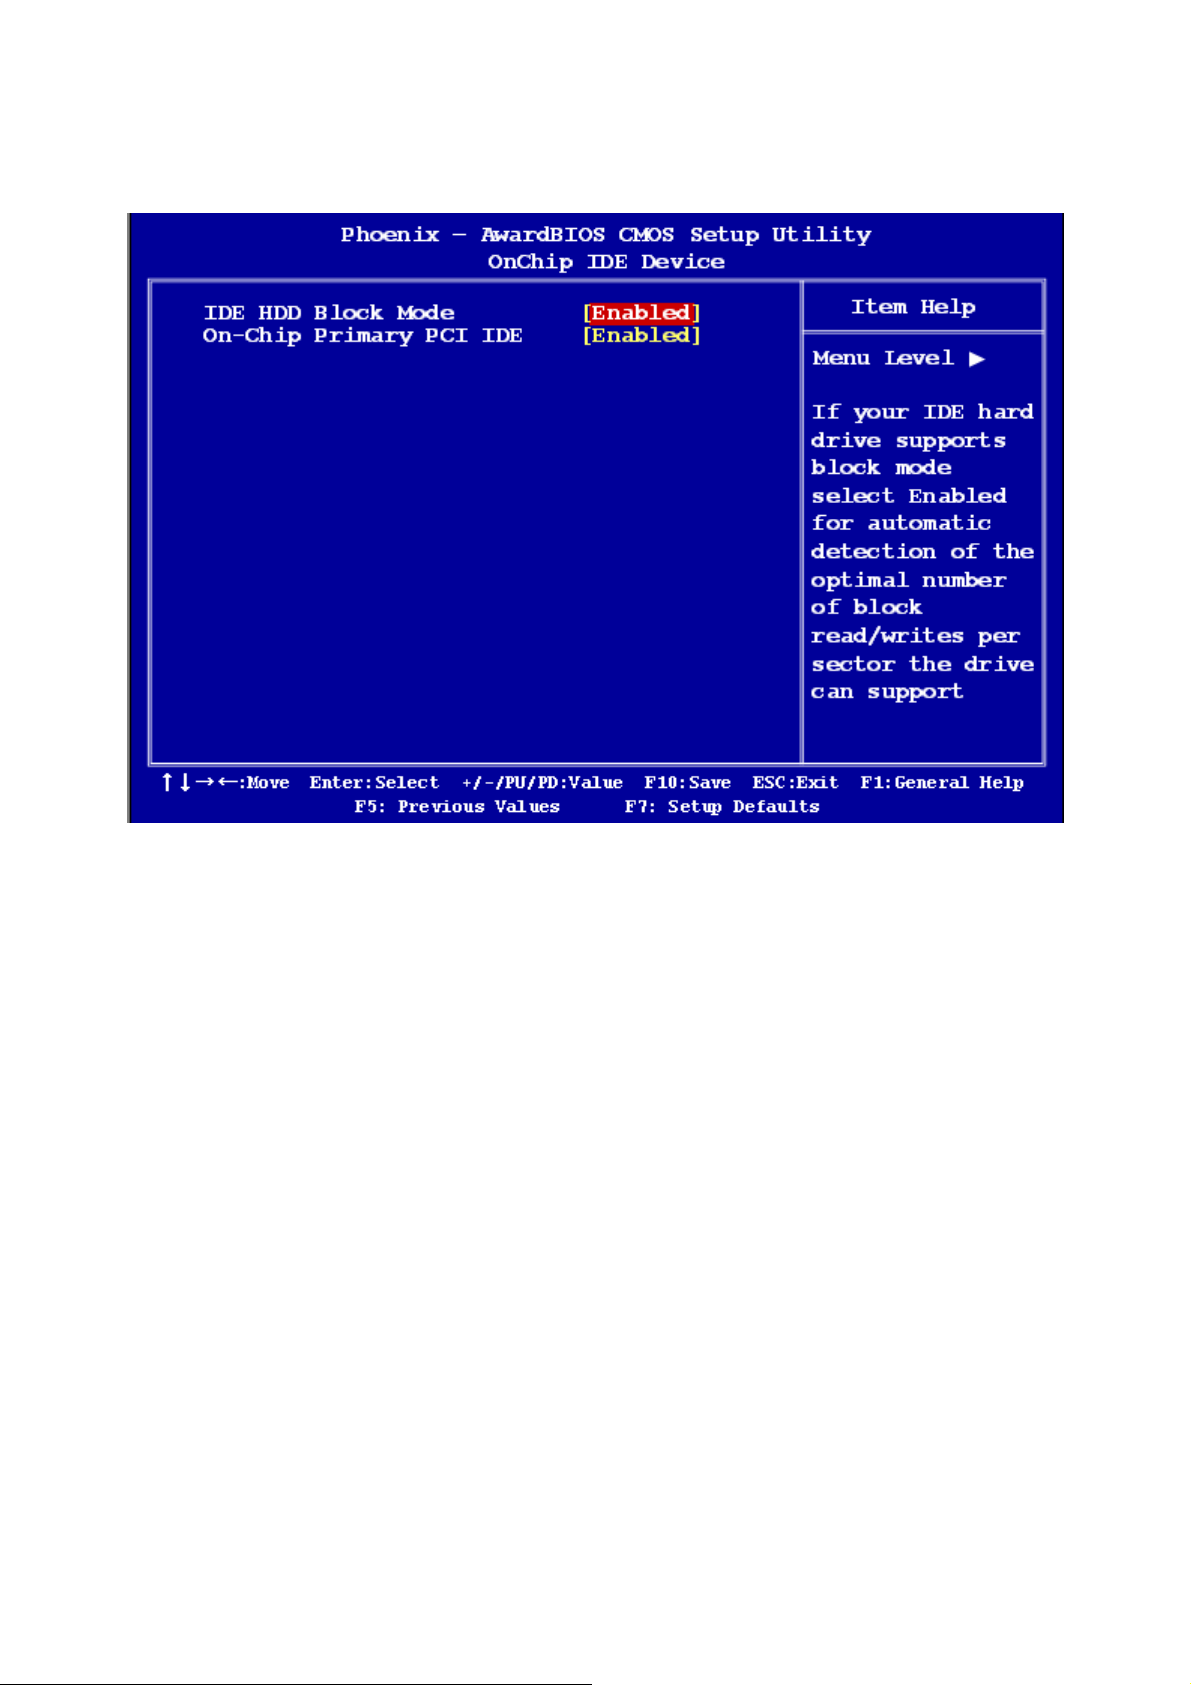
2.2.4.1 OnChip IDE Device
z IDE HDD Block Model
If the IDE hard drive supports block mode select Enabled for automatic detection of the
optimal number of block read/writes per sector the drive can support.
z On-Chip Primary PCI IDE
The chipset contains a PCI IDE interface with support for two IDE channels. Select Enabled
to active the primary/secondary IDE interface. Select Disabled to deactivate this interface.
The options: Disabled, Enabled.
44
Page 45
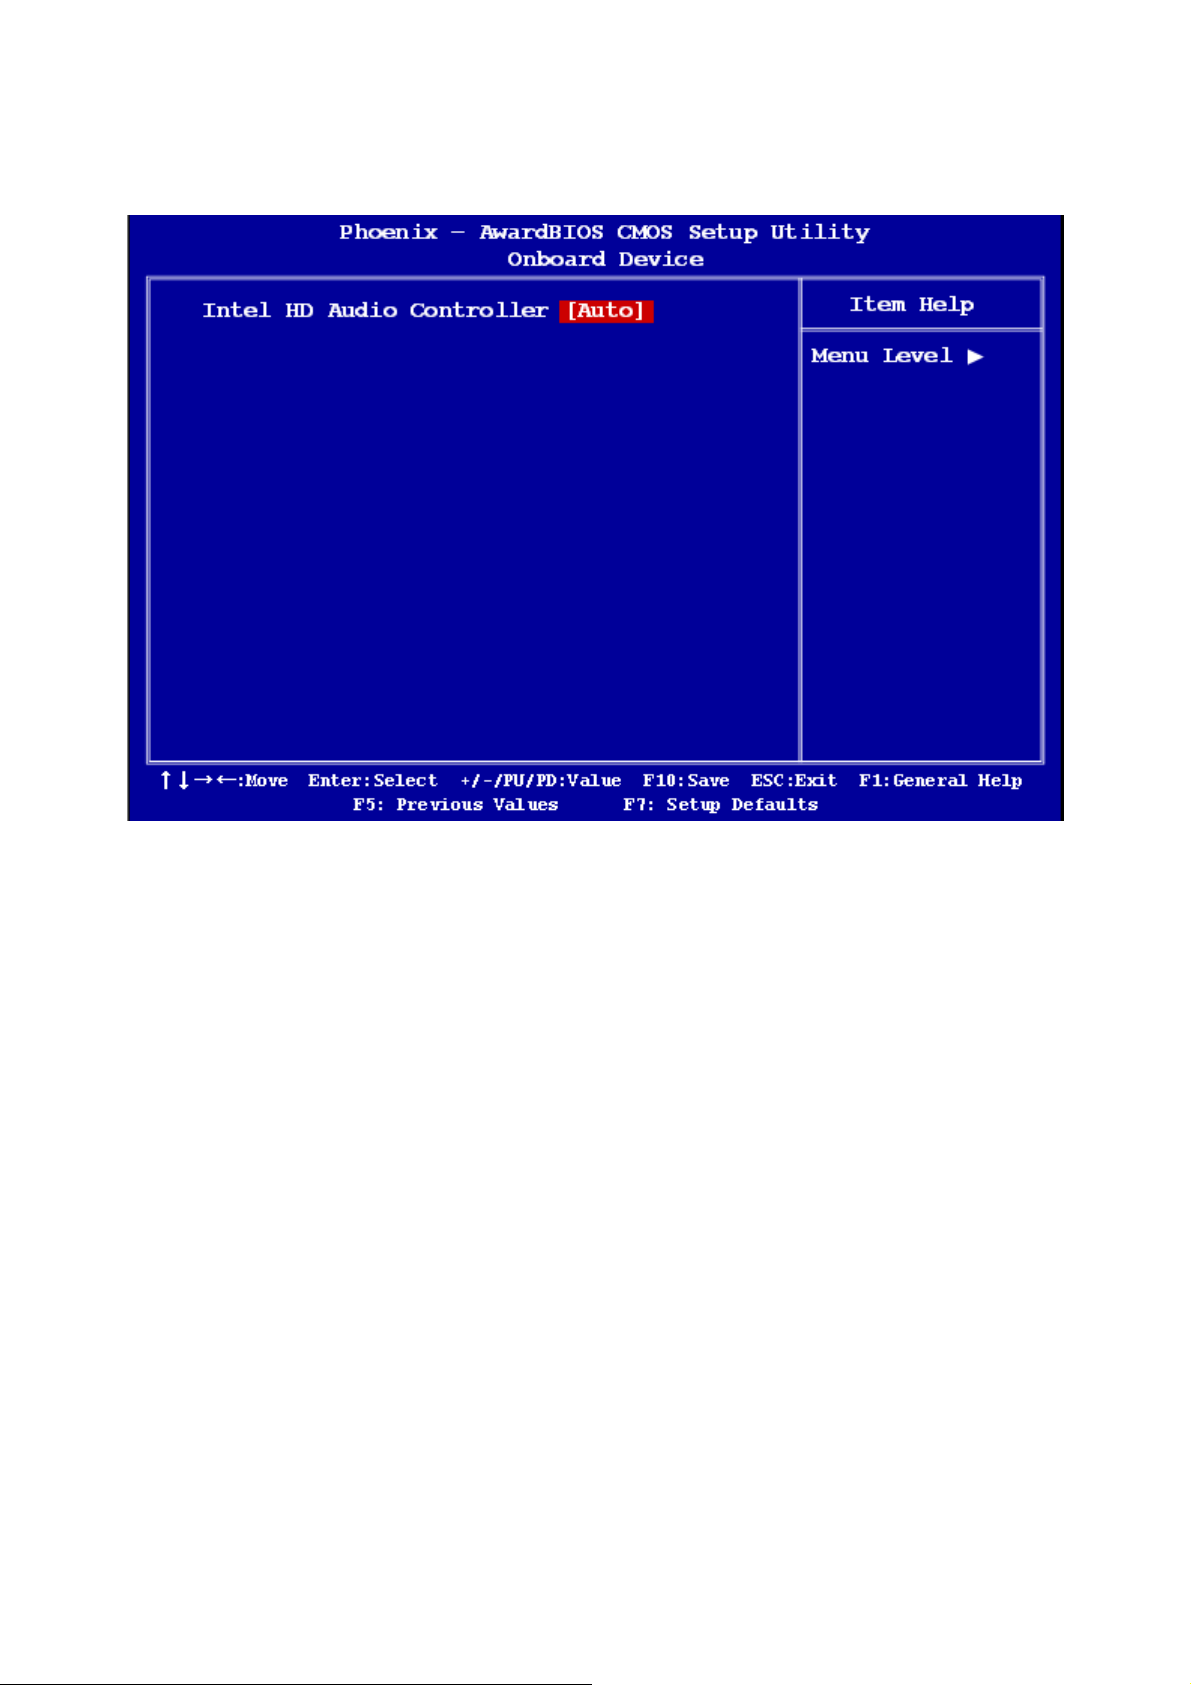
2.2.4.2 Onboard Device
User’s Manual
z Intel HD Audio Controller
The options: Auto, Disabled.
ENX-US15WP
45
Page 46
ENX-US15WP
2.2.4.3 Onboard LAN Boot ROM
The options: [Enabled], [Disabled].
2.2.4.4 Power ON Function
This feature allows you to wake up the system using any of the listed options.
The options: [Password], [Hot Key], [Mouse Left], [Mouse Right], [Any KEY], [Button Only],
[Keyboard 98].
2.2.4.5 Onboard Serial Port 1
Select an address and corresponding interrupt for the first and second serial ports.
The choice: [Disabled], [3F8/IRQ4], [2F8/IRQ3], [3E8/IRQ4], [2E8/IRQ3], [Auto]
2.2.4.6 PWRON After PWR-fail
The options are [off], [on], [Former-Sts].
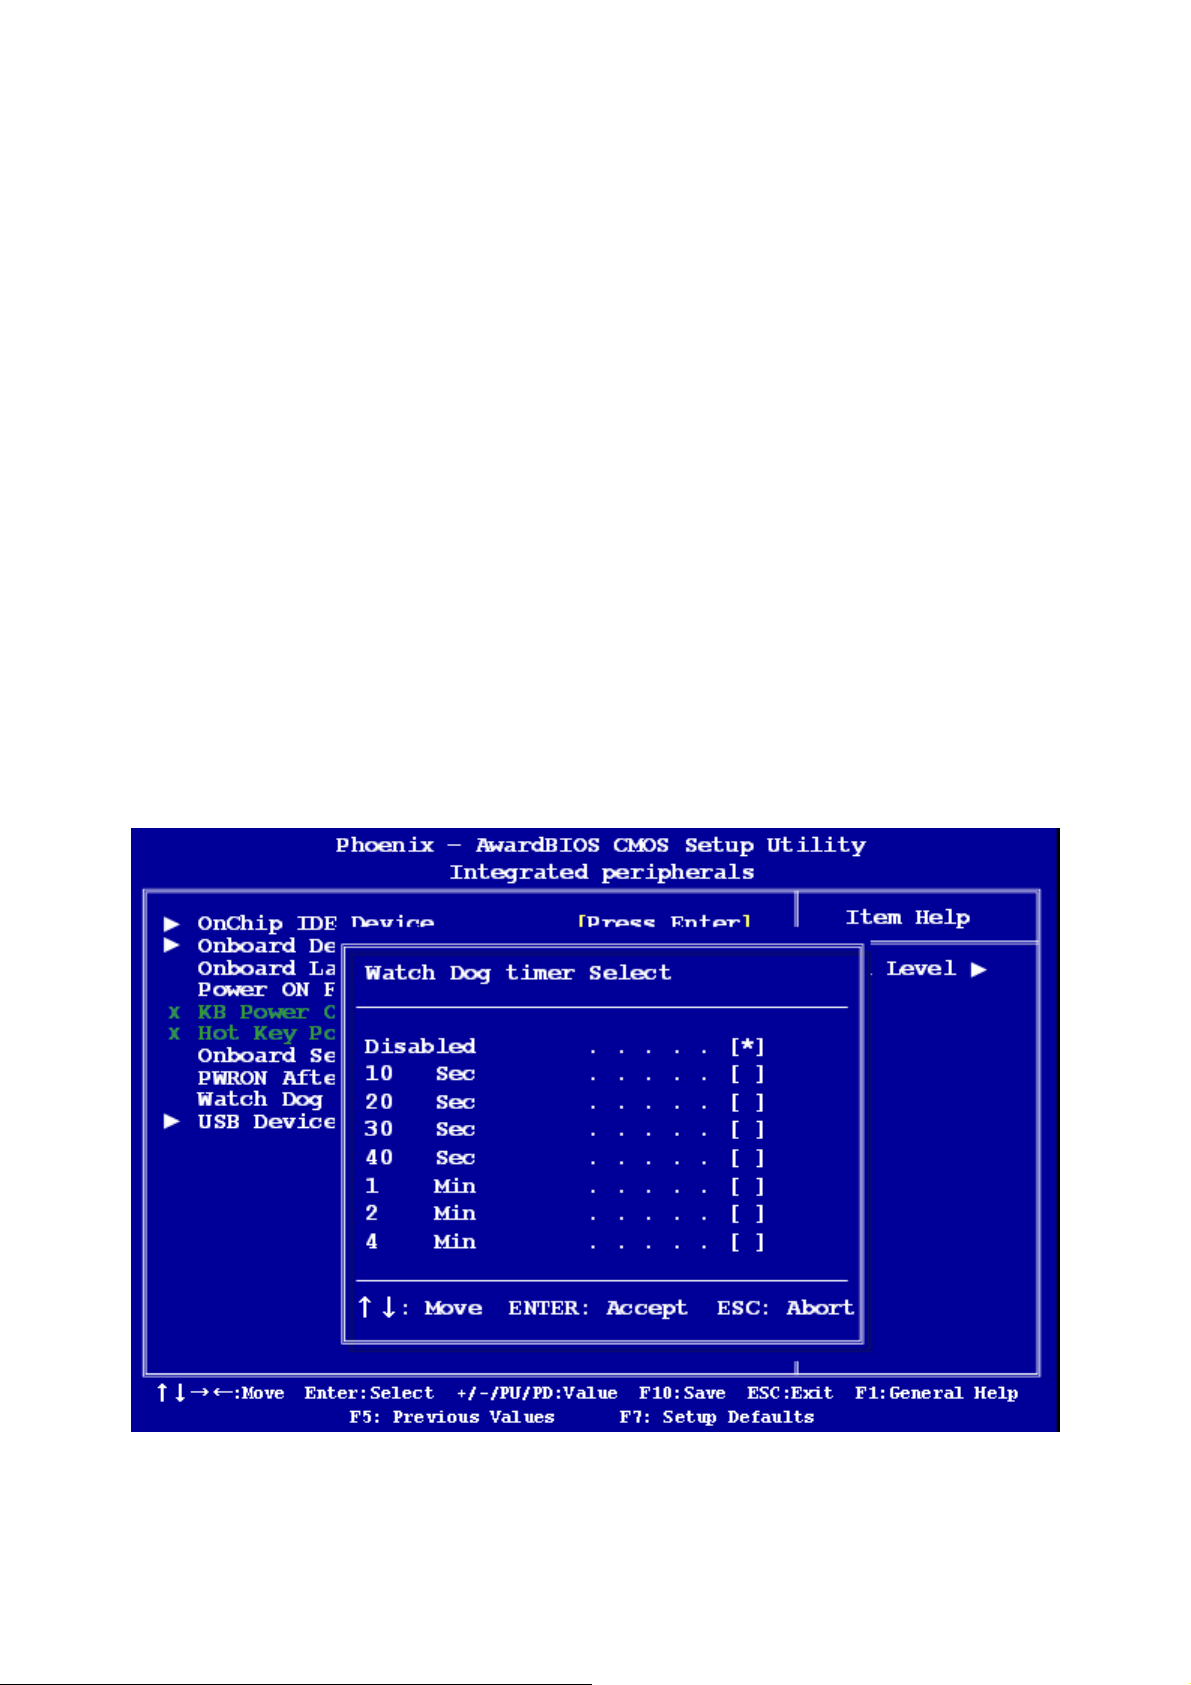
2.2.4.7 Watch Dog Timer Select
This option will determine watch dog timer. The choices: Disabled, 10, 20, 30, 40 Sec. 1, 2,
4 Min.
46
Page 47
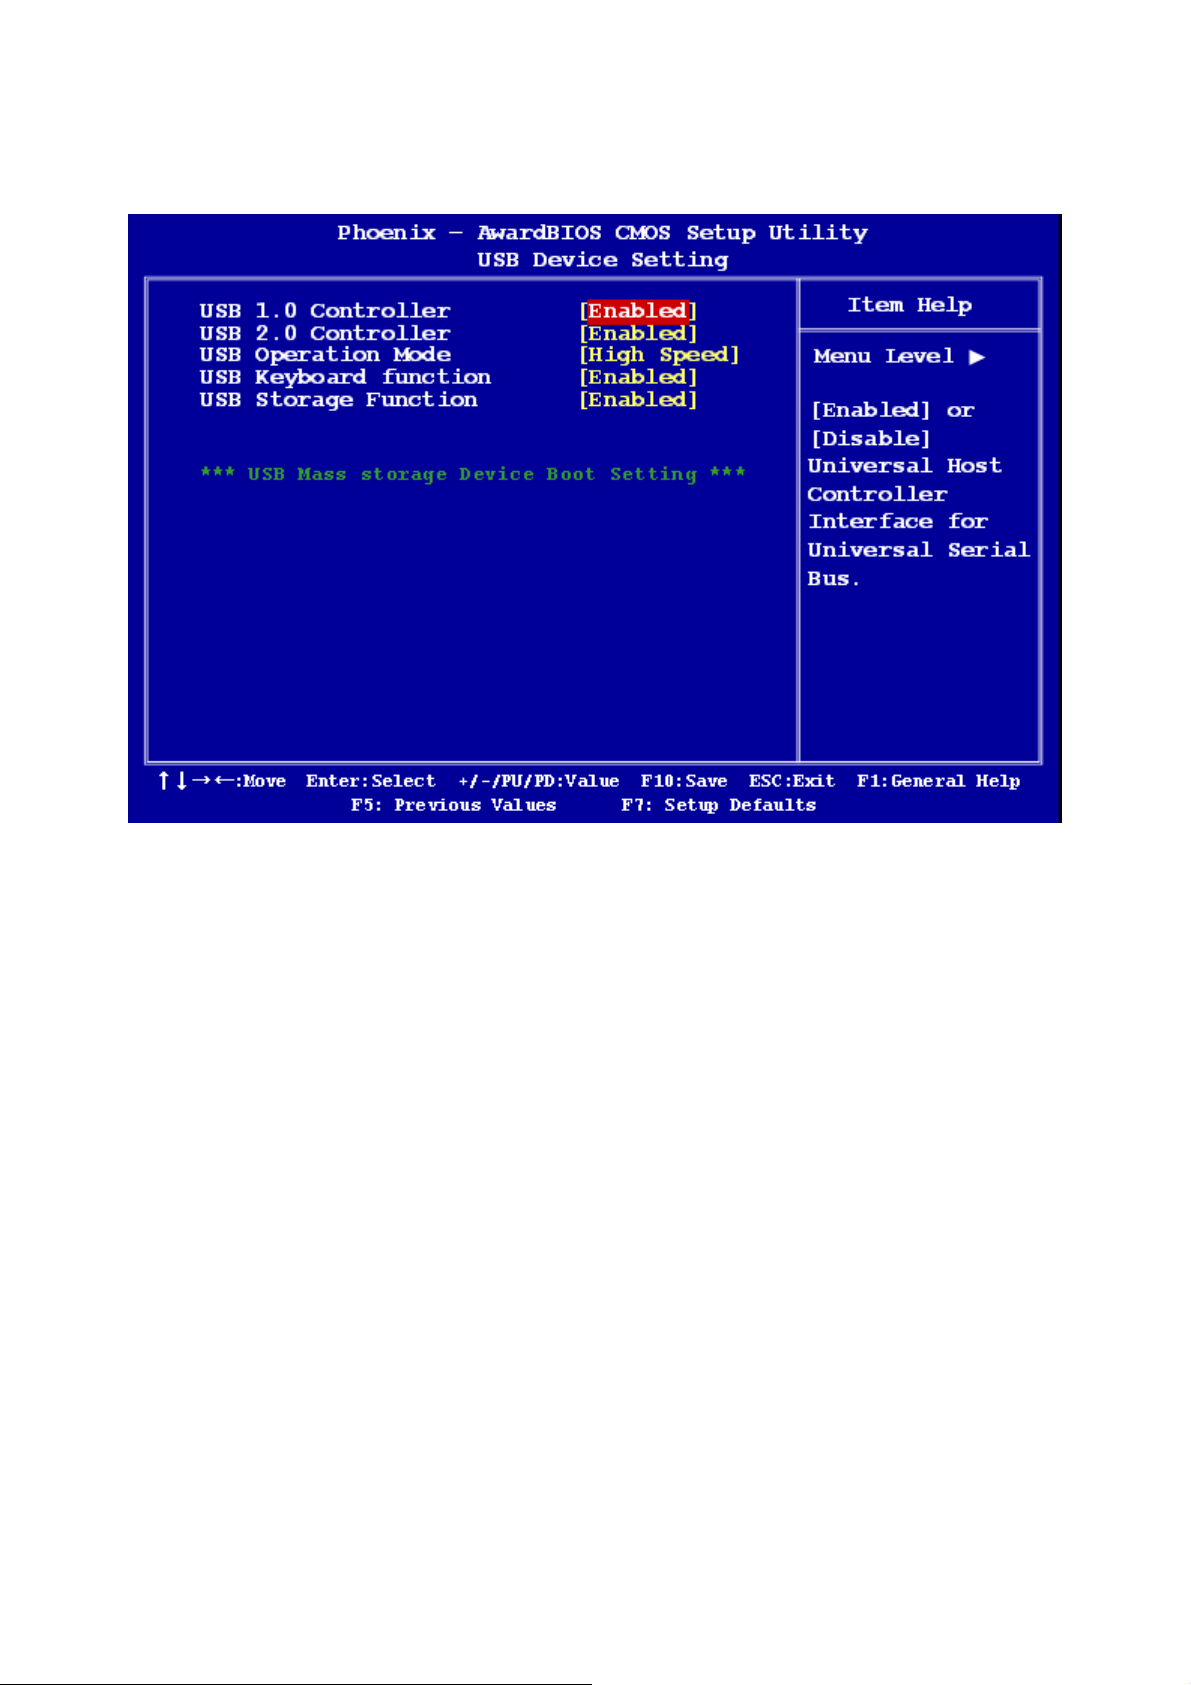
2.2.4.8 USB Device Setting
User’s Manual
z USB 1.0 / 2.0 Controller
The choices: Disabled, Enabled.
z USB Operation Mode
Allows you to configure the USB 2.0 controller in HiSpeed (480 Mbps) or Full Speed (12
Mbps). Configuration options: [Full/Low Speed] [HiSpeed]
z USB Keyboard Function
The choices: Disabled, Enabled.
z USB Storage Function
The choices: Disabled, Enabled.
ENX-US15WP
47
Page 48
ENX-US15WP
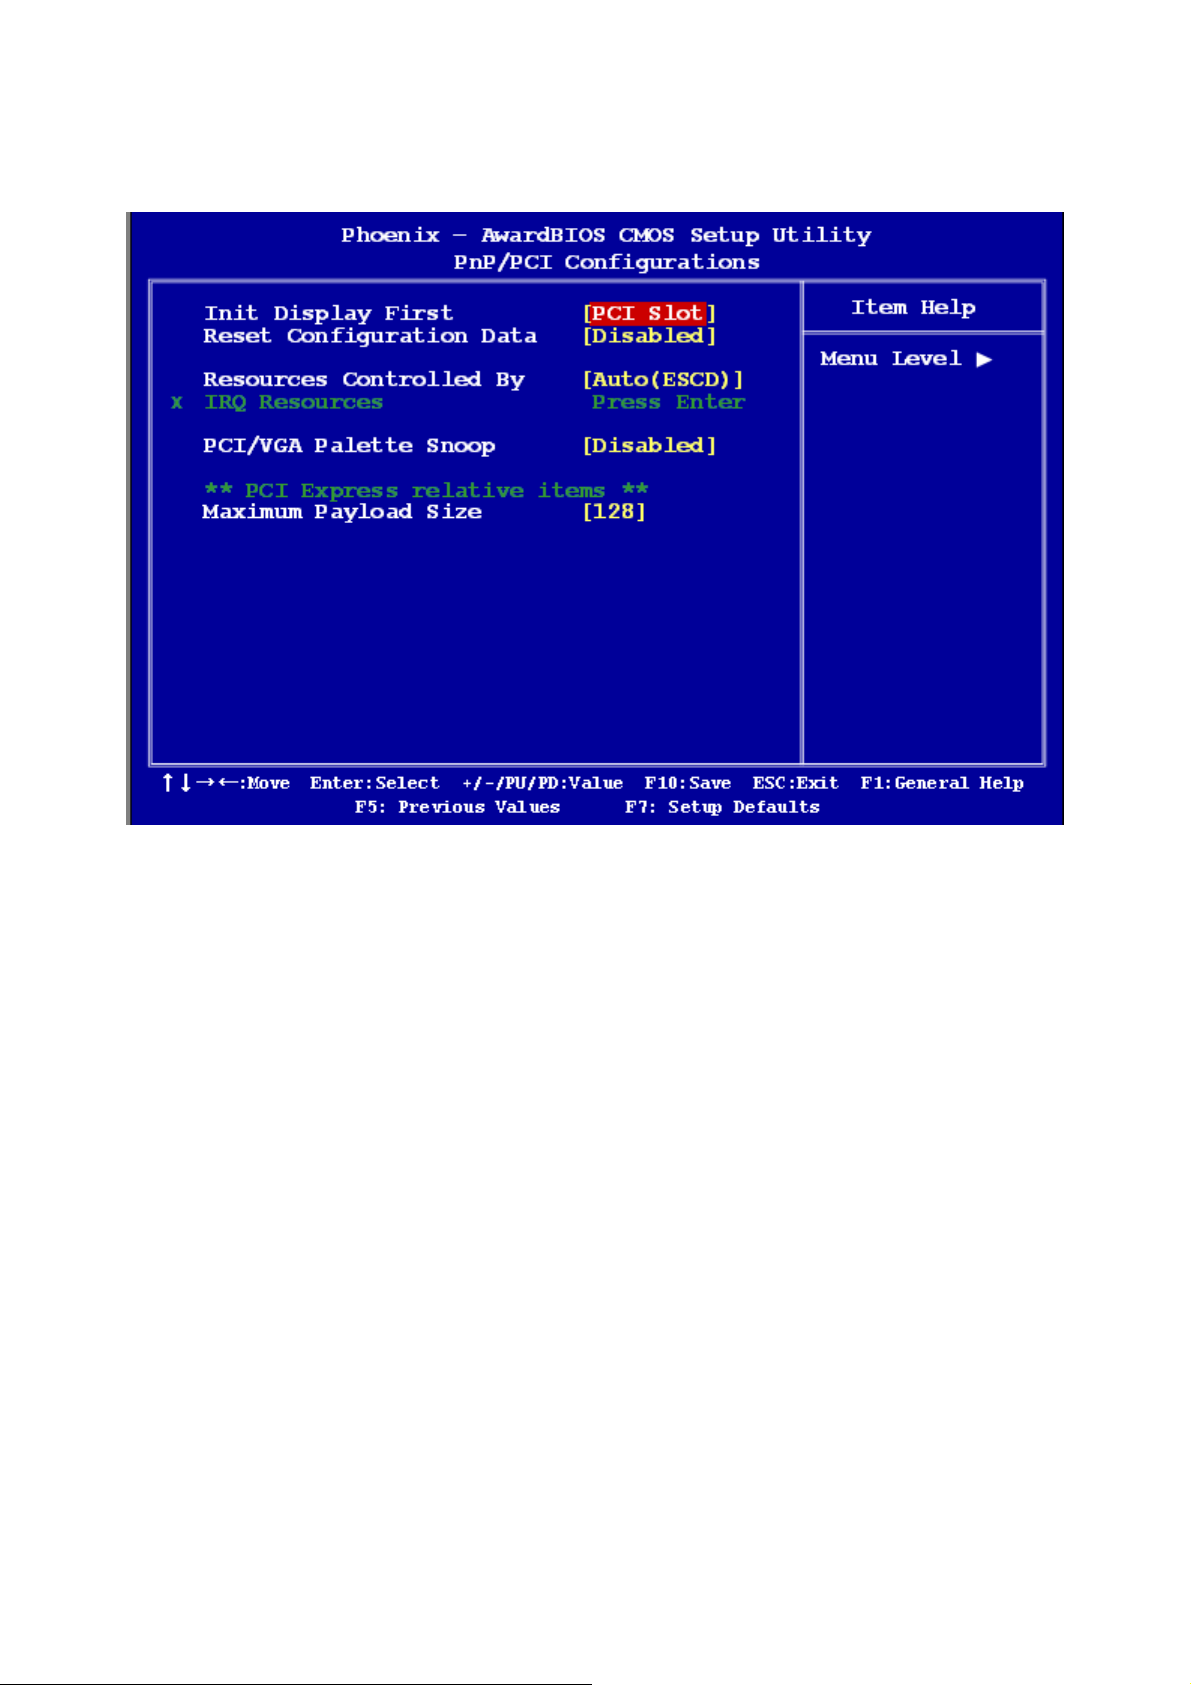
2.2.5 PnP/PCI Configurations
2.2.5.1 Init Display First
The options are: [PCI slot], [Onboard], [PCIEx].
2.2.5.2 Rest Configuration Data
The default is “Disabled”. Select Enabled to reset Extended System Configuration Data
(ESCD) if you have installed a new add-on card, and system reconfiguration has caused
such a serious conflict that the OS cannot boot.
2.2.5.3 Resource Controlled By
The commands here are “Auto(ESCD)” or “Manual”. Choosing “Manual” requires you to
choose resources from the following sub-menu.
“Auto(ESCD)” automatically configures all of the boot and Plug and Play devices, but you
must be using Windows 95 or above.
48
Page 49

User’s Manual
2.2.5.4 PCI/VGA Palette Snoop
This is set to “Disabled” by default. The options: [Disabled], [Enabled].
2.2.5.5 Maximum Payload Size
This allows you to set the maximum TLP payload size for PCI Express devices.
The option: [128 bytes].
ENX-US15WP
49
Page 50
ENX-US15WP
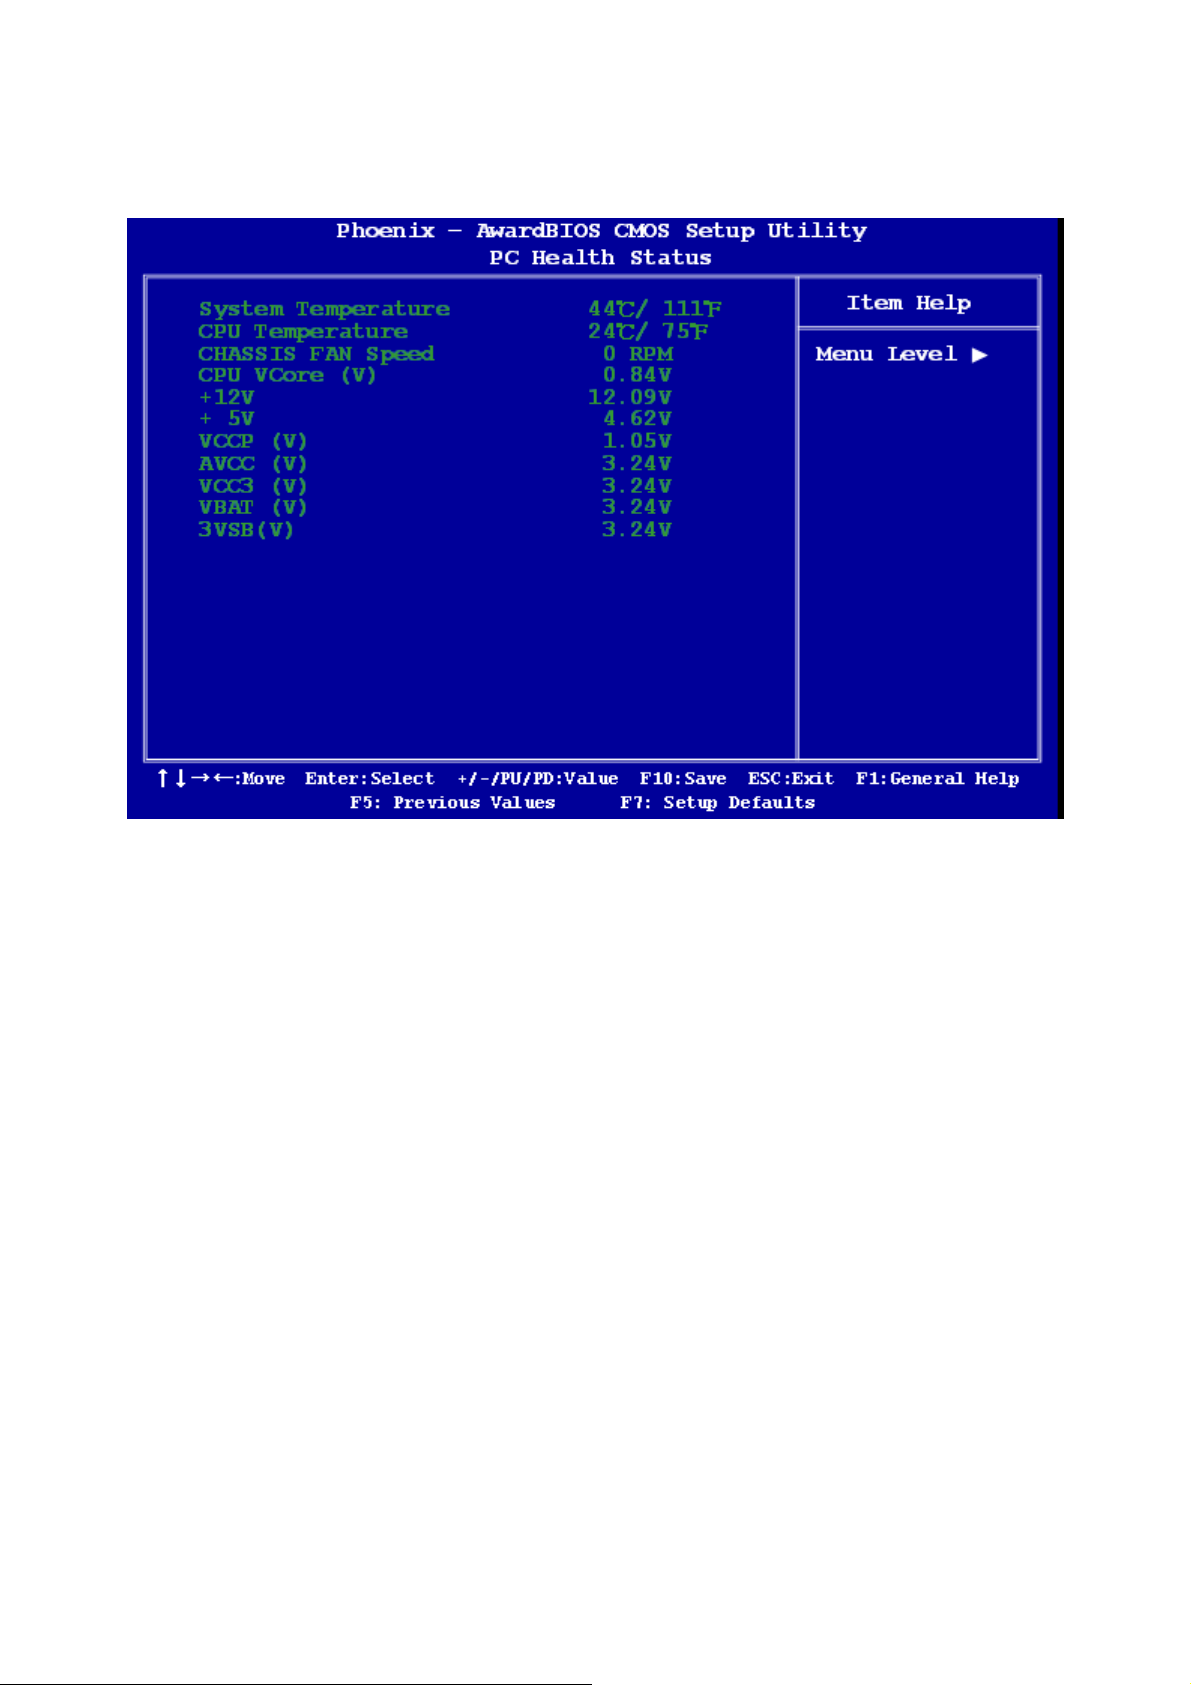
2.2.6 PC Health Status
2.2.6.1 System Temperature
This shows you the current temperature of system.
2.2.6.2 CPU Temperature
This shows the current CPU temperature.
2.2.6.3 Chassis FAN Speed
This shows the Chassis FAN Speed (RPM).
2.2.6.4 VCore and Others Voltage
This shows the voltage of VCORE, +12V, +5V, VCCP(V), AVCC(V), VCC3(V), VBAT(V),
and 3VSB(V).
50
Page 51
User’s Manual
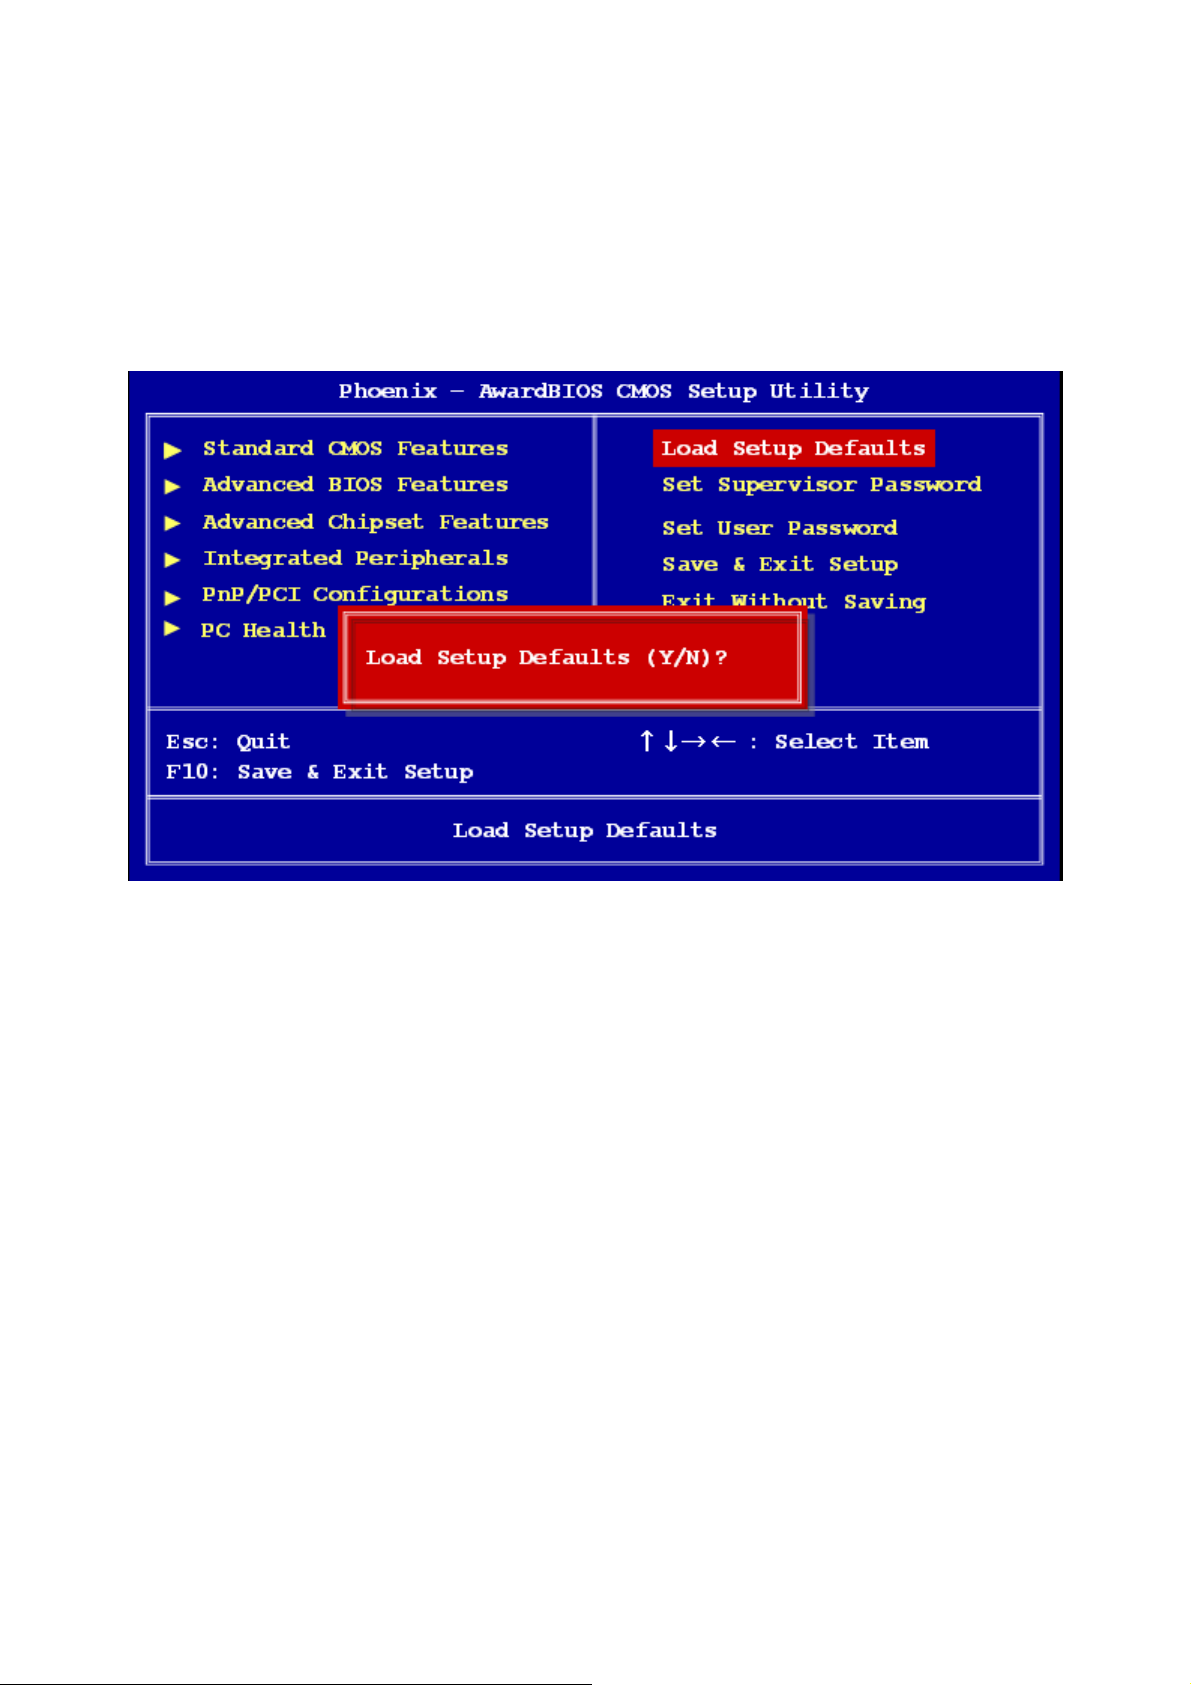
2.2.7 Load Setup Defaults
Use this menu to load the BIOS default values that are factory settings for optimal
performance system operations. While Award has designed the custom BIOS to maximize
performance, the factory has the right to change these defaults to meet their needs.
Press <Y> to load the default values setting for optimal performance system operations.
ENX-US15WP
51
Page 52
ENX-US15WP
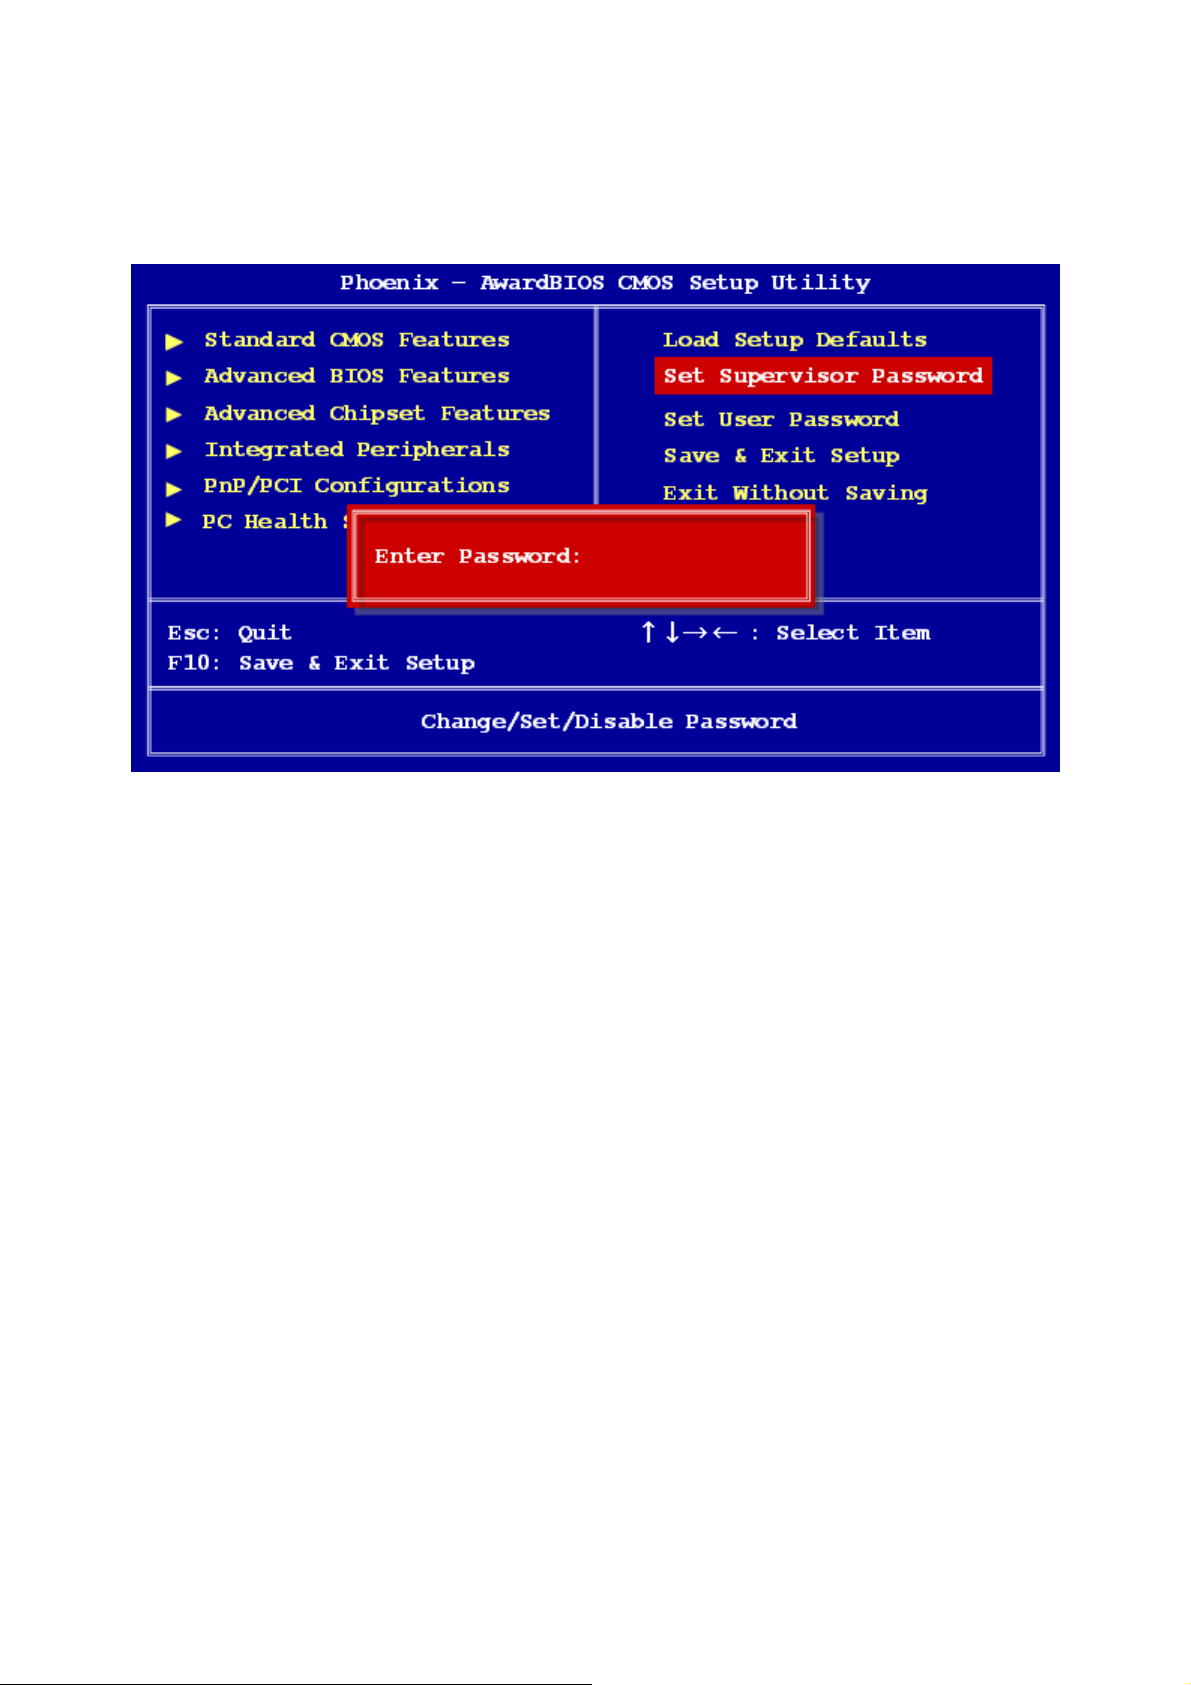
2.2.8 Set Supervisor Password
You can set supervisor password. It is able to enter/change the options of setup menus.
Follow these steps to change the password.
z Choose the “Set Supervisor Password” option from the “Initial Setup Screen” menu
and press <Enter>. The screen displays the following message:
z Please <Enter Password>
z Press <Enter>.
z If the CMOS is good and this option has been used to change the default password,
the user is asked for the password stored in the CMOS. The screen displays the
following message:
Confirm Password
z Type the current password and press <Enter>.
z After pressing <Enter> (ROM password) or the current password (user-defined), you
can change the password stored in the CMOS. The password must be no longer than
eight (8) characters. Remember, to enable the password setting feature, you must first
select either “Setup” or “System” from the “Advanced BIOS Features” menu.
52
Page 53
User’s Manual
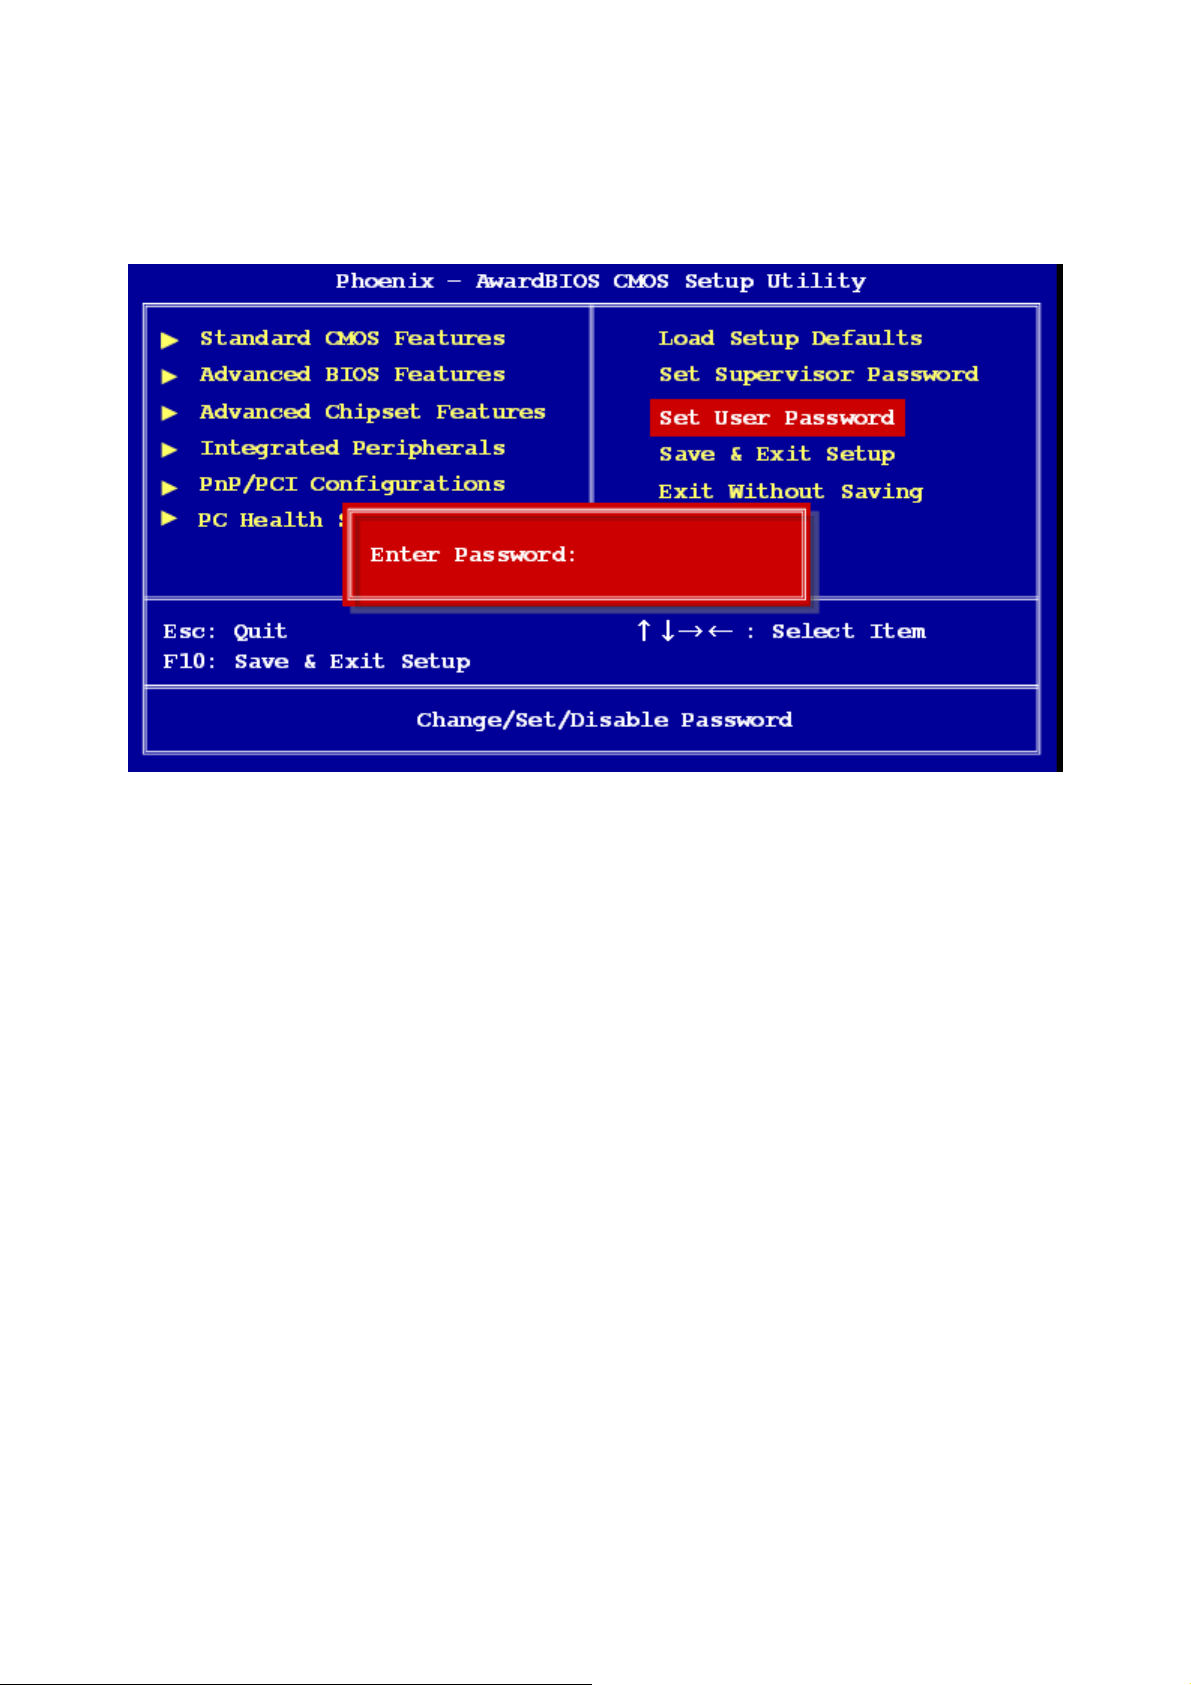
2.2.9 Set User Password
You can set user password. It is able to enter/change the options of setup menus.
Follow these steps to change the password.
z Choose the “Set User Password” option from the “Initial Setup Screen” menu and
press <Enter>. The screen displays the following message:
z Please < Enter Password >
z Press <Enter>.
z If the CMOS is good and this option has been used to change the default password,
the user is asked for the password stored in the CMOS. The screen displays the
following message:
Confirm Password
z Type the current password and press <Enter>.
z After pressing <Enter> (ROM password) or the current password (user-defined), you
can change the password stored in the CMOS. The password must be no longer than
eight (8) characters. Remember, to enable the password setting feature, you must first
select either “Setup” or “System” from the “Advanced BIOS Features” menu.
ENX-US15WP
53
Page 54
ENX-US15WP
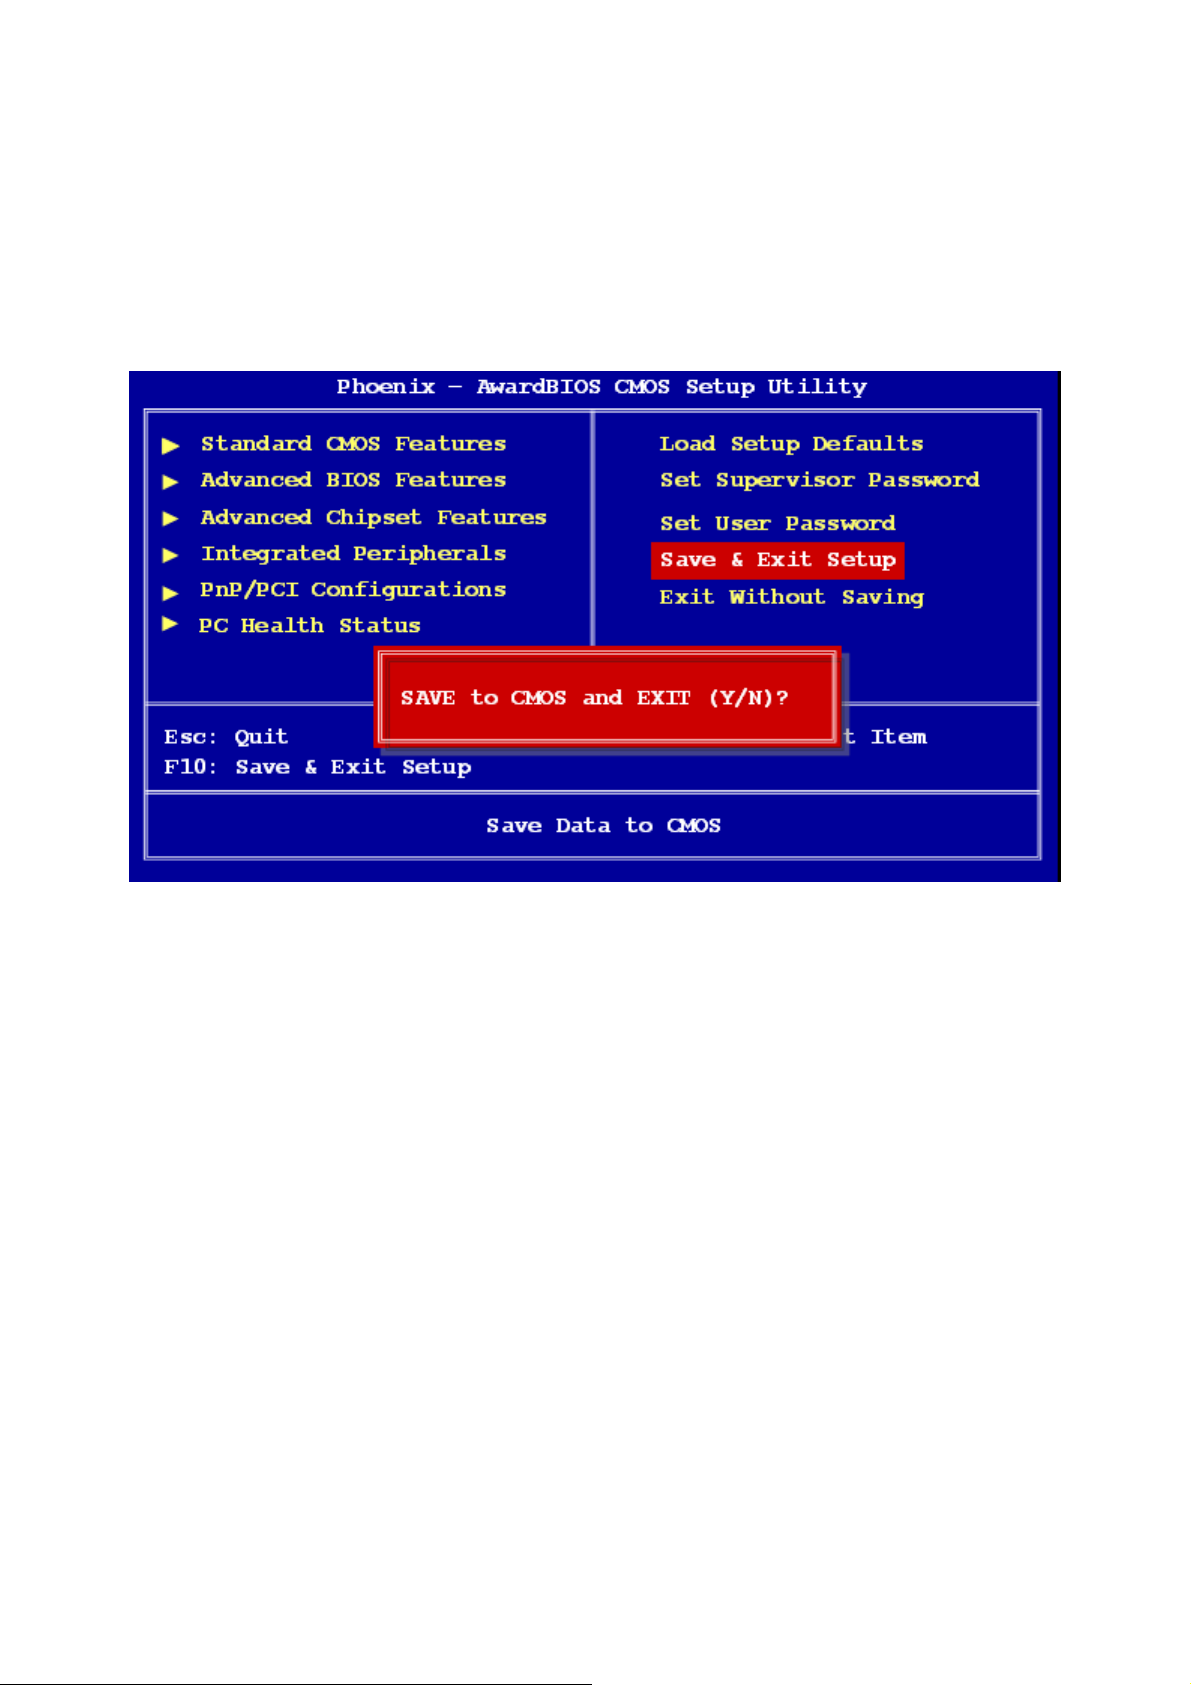
2.2.10 Save and Exit Setup
If you select this and press <Enter>, the values entered in the setup utilities will be recorded
in the CMOS memory of the chipset. The processor will check this every time you turn your
system on and compare this to what it finds as it checks the system. This record is required
for the system to operate.
54
Page 55
User’s Manual
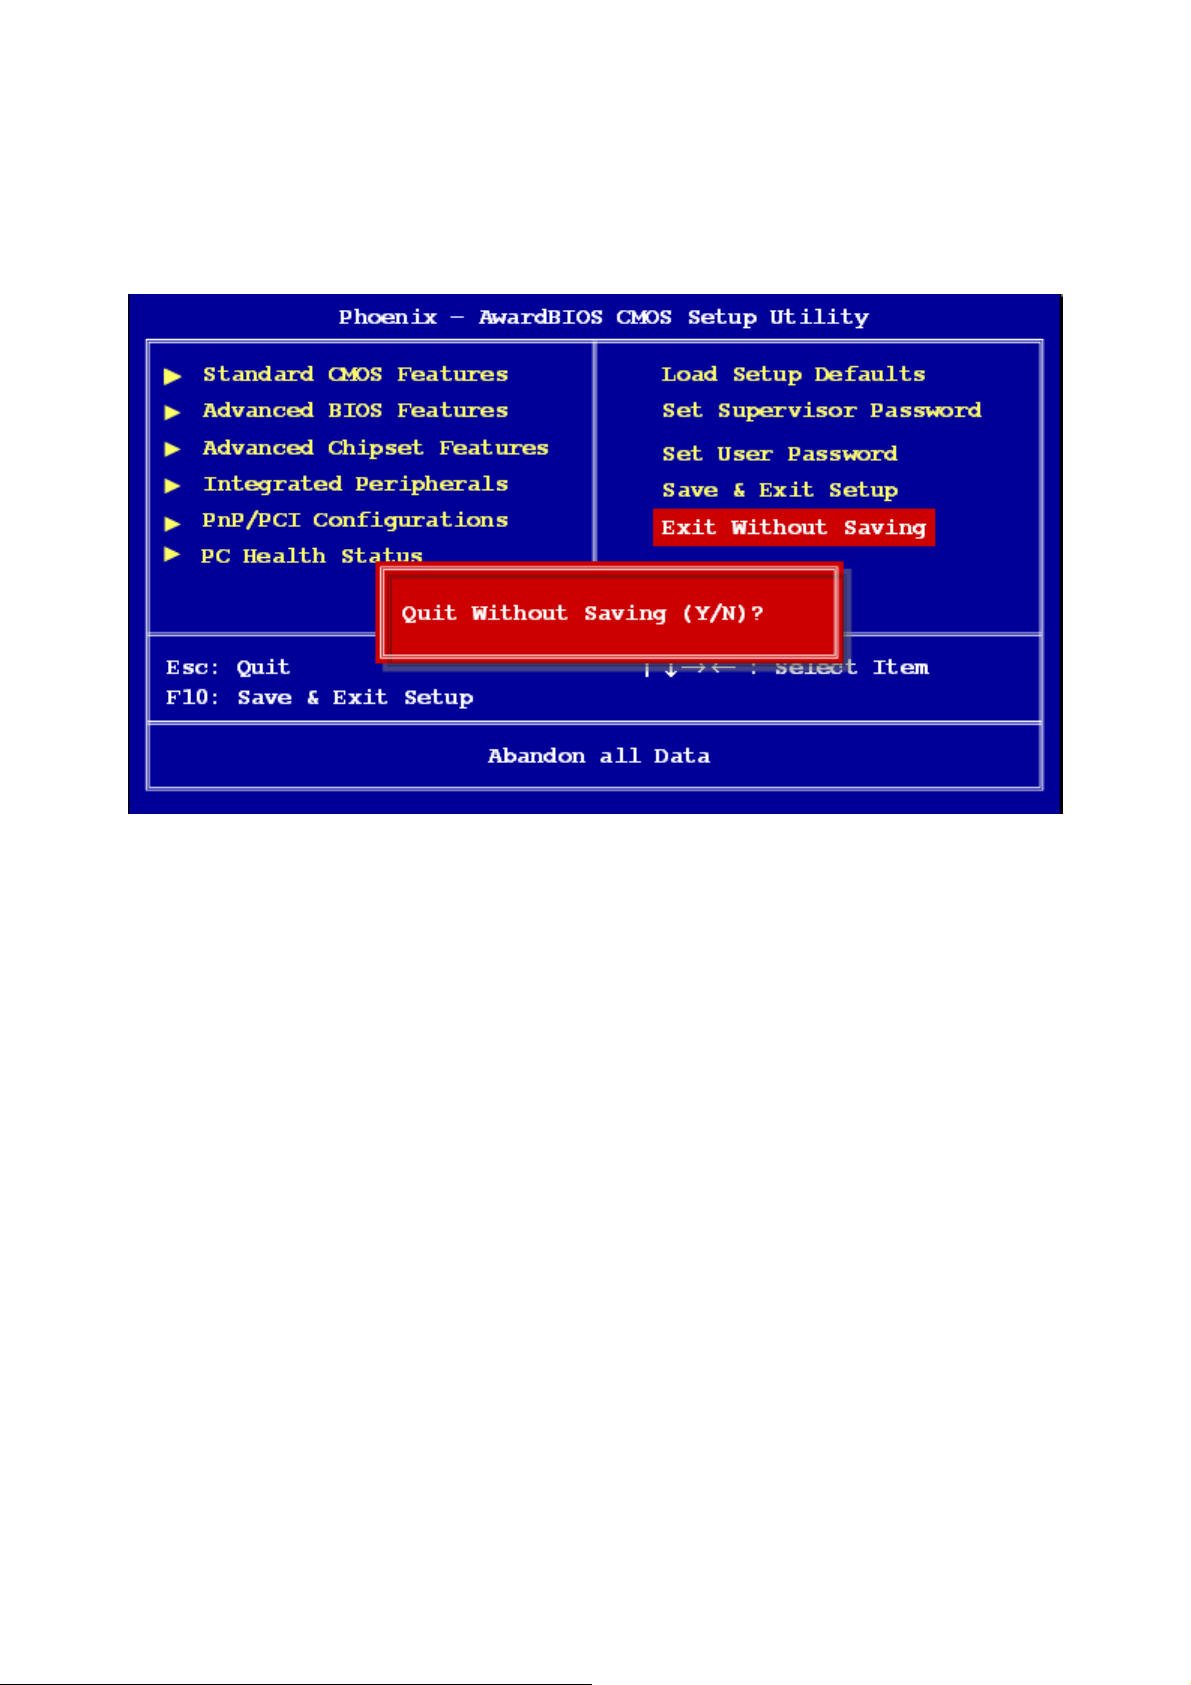
2.2.11 Exit Without Saving
Selecting this option and pressing <Enter> lets you exit the setup program without
recording any new values or changing old ones.
ENX-US15WP
55
 Loading...