

Page 1
864 HO NB Diamond-Fyre Burner
Compatibility
864 HO NB
Additional Items Required
864 HO NB Diamond-Fyre Firebacks
(96100832 Stainless, 96100833 Black Enamel, or 96100834 Black Painted)
Driftwood Log Set “B” (94500572) or Fyre-Stone Set “C” (94700764)
Crushed Glass (94500580 Platinum, 94500581 Bronze, or 94500582 Cobalt)
Installation Warnings
Make sure electricity to the fireplace is shut off prior to servicing. Disable the circuit
breaker or disconnect the electrical hookup before proceeding.
Make sure the gas control valve is OFF and the heater is cool before servicing.
Failure to position the parts in accordance with these diagrams or failure to use only parts
specifically approved with this appliance may result in property damage or personal injury.
The burner must be correctly positioned before installing the media. Make sure the burner
is fully seated and the pilot is properly aligned.
Installation Instructions (sku: 96900142)
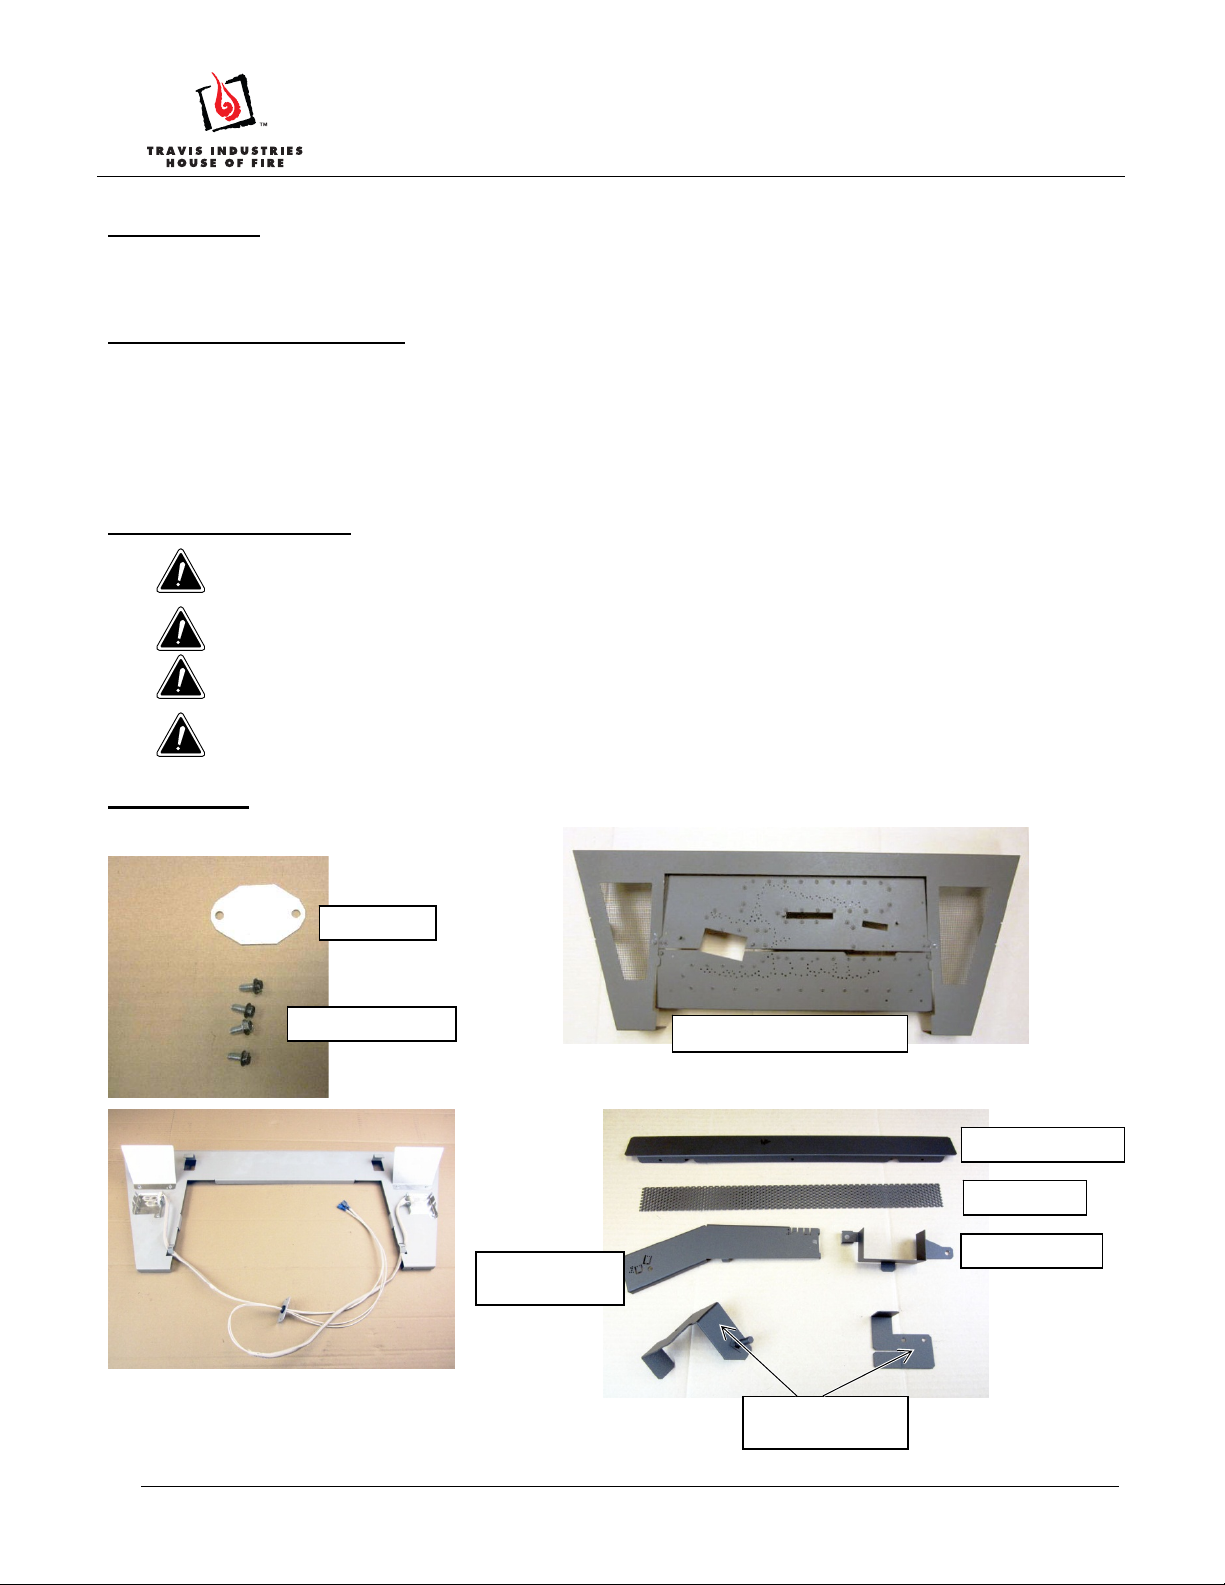
Packing List
(4) #8 3/8” Screws
Light Tray
Cover Plate
Burner and media tray
NOTE: The media tray is shipped attached to the burner.
Front Burner Skirt
Air Deflector
Log Support
(Driftwood only)
Pilot Air Shield
Burner Brackets
(Driftwood only)
Page 1 of 13 17601700 — 2/27/14 © Travis Industries, Inc.
Page 2
864 HO NB Diamond-Fyre Burner
Installation Instructions (sku: 96900142)
Installation Tips
If using propane (LP), convert the appliance before installing the burner.
Burner Installation
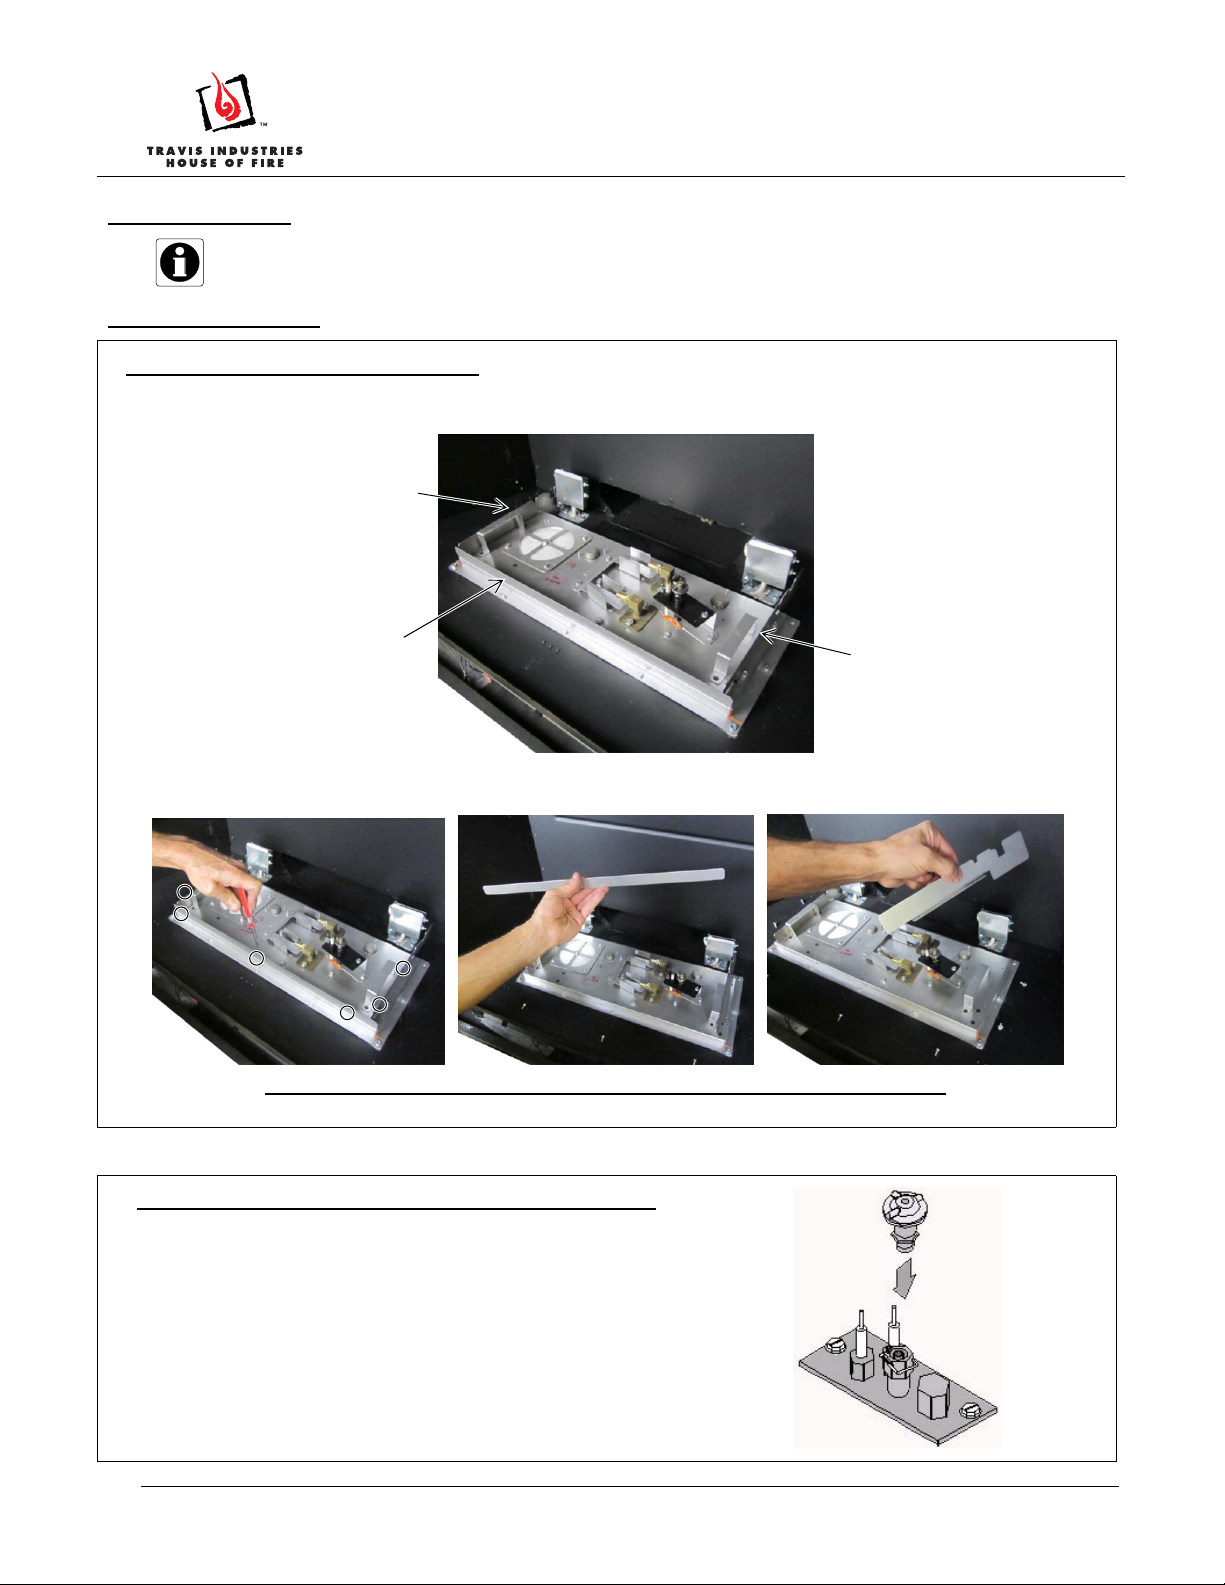
NOTE FOR OLDER 864 HO NB UNITS
Older units were shipped with front and side burner skirts pre-installed. Remove these skirts before
proceeding.
Side Burner Skirt
Front Burner Skirt
Side Burner Skirt
Remove the 7 screws holding the front and side burner skirts in place. The skirts may be discarded (keep
the screws).
Make sure to replace the 4 screws (2 on each side) that hold the side burner skirts in place (plugging the
holes in the valve tray).
NOTE FOR OLDER UNITS WITH SIT PILOT ASSEMBLY
If you have an older unit with a SIT pilot assembly (see picture to
the right), you will need to replace the 2-way pilot hood with a SIT
3-way pilot hood (order part # 250-02205).
Page 2 of 13 17601700 — 2/27/14 © Travis Industries, Inc.
Page 3
864 HO NB Diamond-Fyre Burner
Installation Instructions (sku: 96900142)
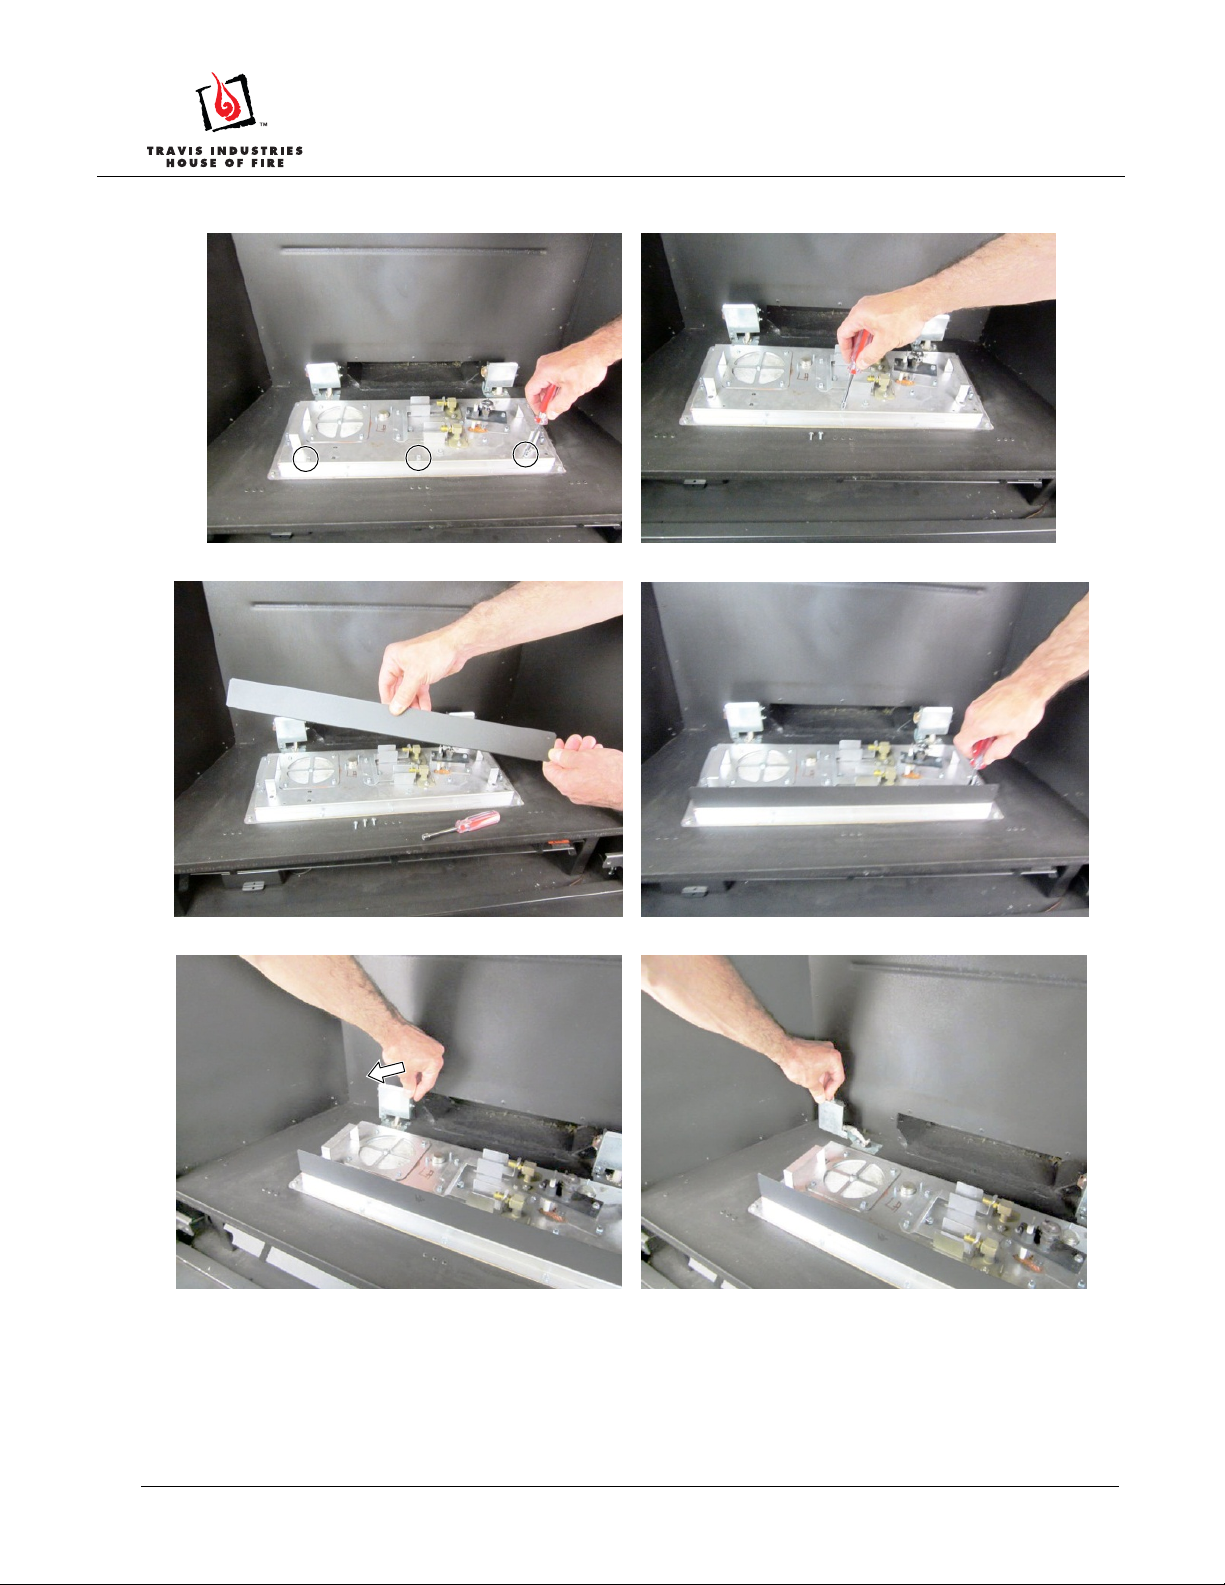
1. Remove the 3 screws from the burner tray (if not already removed – see previous page).
2. Install the burner skirt included with this kit using the 3 screws removed earlier.
3. Bend the left side accent light to the side.
Page 3 of 13 17601700 — 2/27/14 © Travis Industries, Inc.
Page 4
864 HO NB Diamond-Fyre Burner
Installation Instructions (sku: 96900142)
4. Remove the 2 screws securing the accent light to the floor. Lift the accent light away from the floor.
5. Use wire-cutters to cut the 2 wires leading to the accent light. The accent light and wiring may be
discarded (we suggest you keep the bulb as a spare).
NOTE: Keep the gasket underneath the accent light – it will be re-used.
6. Repeat steps 3 through 5 for the right-side accent light.
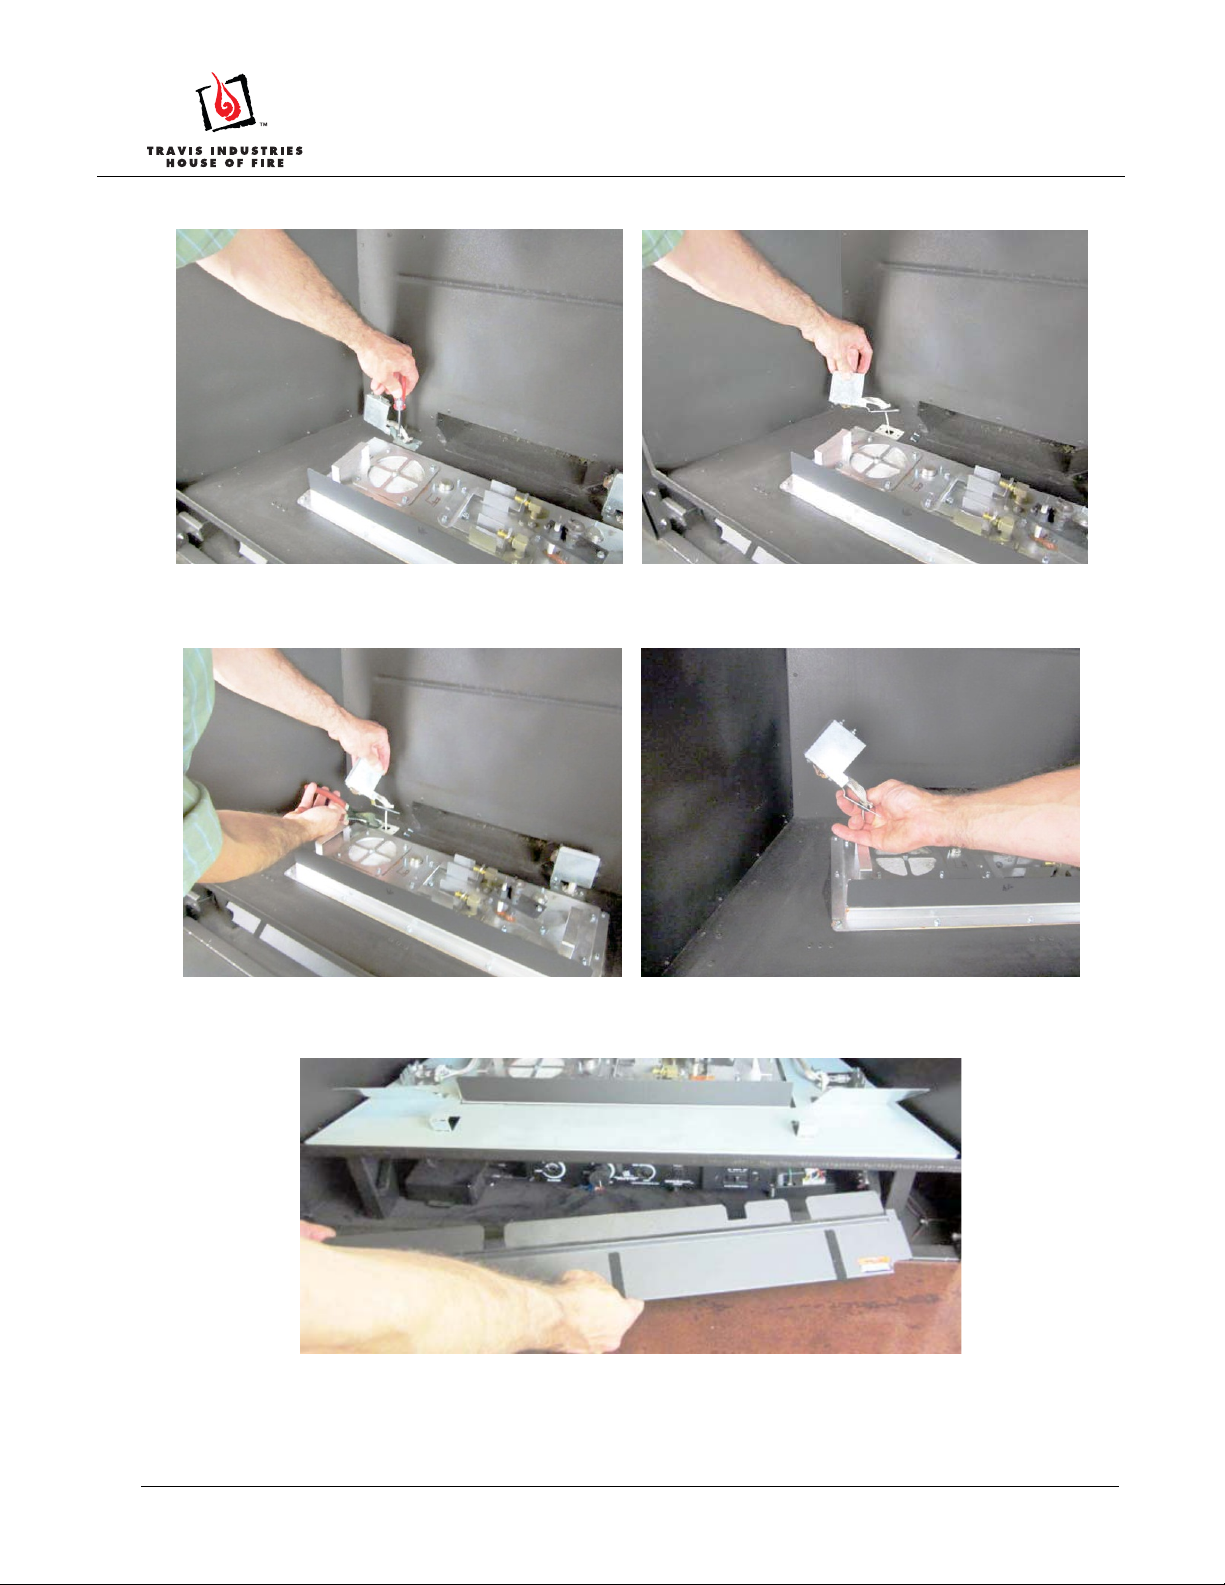
7. Remove the concealment cover from the front of the fireplace.
Page 4 of 13 17601700 — 2/27/14 © Travis Industries, Inc.
Page 5

864 HO NB Diamond-Fyre Burner
Installation Instructions (sku: 96900142)
8. Remove the control panel to expose the wiring (keep the screws).
9. Disconnect the wires that led to the accent light.
NOTE: You may need to cut wire ties to access the wires.
10. Remove and discard the wires that led to the accent lights.
Page 5 of 13 17601700 — 2/27/14 © Travis Industries, Inc.
Page 6

864 HO NB Diamond-Fyre Burner
Installation Instructions (sku: 96900142)
11. Attach the cover plate included with this kit to the firebox floor where the left accent light was secured
(use the screws removed earlier). Make sure the existing gasket remains in place.
12. Place the light tray in the firebox. Insert the 2 wires from the tray through the hole where the right accent
light hood was located.
13. Attach the cover plate on the light tray wiring to the firebox floor where the right accent light was secured
(use the screws removed earlier). Make sure the existing gasket remains in place.
Page 6 of 13 17601700 — 2/27/14 © Travis Industries, Inc.
Page 7

864 HO NB Diamond-Fyre Burner
Installation Instructions (sku: 96900142)
14. Route the wires under the valve tray to the front of the fireplace. Make sure to route the wires under the
gas control valve. The wiring must not contact hot or moving surfaces. Make sure to pull all of the slack
out of the wires so they do not contact the bottom of the burner.
15. Connect the wires from the light tray to the terminals disconnected earlier from the back of the rheostat.
16. Replace the control panel (shown in step 8 above). Use lock-ties, if necessary, to keep wiring from
contacting hot or moving components.
17. Replace the concealment cover (shown in step 7 above).
Page 7 of 13 17601700 — 2/27/14 © Travis Industries, Inc.
Page 8

864 HO NB Diamond-Fyre Burner
Installation Instructions (sku: 96900142)
18. Install the firebacks as shown below.
a) Remove the side fireback clips from the firebox ceiling near the front (both sides). The side fireback
clips have a keyhole slot and can be removed by loosening the screw and sliding the clip out.
b) Install the rear fireback.
c) While holding the rear fireback in place, install the side firebacks (both sides).
NOTE: The notch on the side fireback is on the bottom side, facing forward.
d) Replace the clips removed in step (a) to secure the firebacks.
Page 8 of 13 17601700 — 2/27/14 © Travis Industries, Inc.
Page 9

864 HO NB Diamond-Fyre Burner
Installation Instructions (sku: 96900142)
19. Remove the 2 screws holding the media tray to the burner (keep the screws).
DRIFTWOOD MEDIA
Use the 4 screws included with this kit to secure the two brackets (also included with this kit) to the back of
the burner.
Install the air deflector (included with this kit) into the brackets as shown below.
IMPORTANT: See page 13 after installing the burner for the final steps critical for correct setup.
Page 9 of 13 17601700 — 2/27/14 © Travis Industries, Inc.
Page 10

864 HO NB Diamond-Fyre Burner
Installation Instructions (sku: 96900142)
FYRE-STONE MEDIA
Use the 4 screws included with this kit to secure the two brackets (included with the Fyre-Stone kit) to the
back of the burner.
Install the air deflector (included with this kit) into the brackets as shown below.
IMPORTANT: See page 12 after installing the burner for the final steps critical for correct setup.
Page 10 of 13 17601700 — 2/27/14 © Travis Industries, Inc.
Page 11

864 HO NB Diamond-Fyre Burner
Installation Instructions (sku: 96900142)
20. Install the burner. Make sure it is fully seated (pushed to the right) and level with the fireback floor.
21. Install the media tray into the firebox and attach it to the burner with the screws removed in step 20.
22. Install the burner skirt (included with the firebacks).
Page 11 of 13 17601700 — 2/27/14 © Travis Industries, Inc.
Page 12

864 HO NB Diamond-Fyre Burner
Installation Instructions (sku: 96900142)
FYRE-STONE MEDIA
Install the stone grids included with the stone kit. After the stone grids are in place, but before installing the
stones, place the pilot shield over the right stone grid as shown below.
Page 12 of 13 17601700 — 2/27/14 © Travis Industries, Inc.
Page 13

864 HO NB Diamond-Fyre Burner
Installation Instructions (sku: 96900142)
DRIFTWOOD MEDIA
Install the pilot shield (included with this kit) as shown below.
Bend up the two tabs on the log plate (included with this kit).
NOTE: The tabs for the Driftwood are not labeled. The tabs for the Dancing-Fyre are labeled “1”.
Place the left log plate on the burner as shown.
Install the media (see instructions included with the Driftwood Log Set for details).
Page 13 of 13 17601700 — 2/27/14 © Travis Industries, Inc.
 Loading...