

Page 1
564 HO DancingFyre Burner
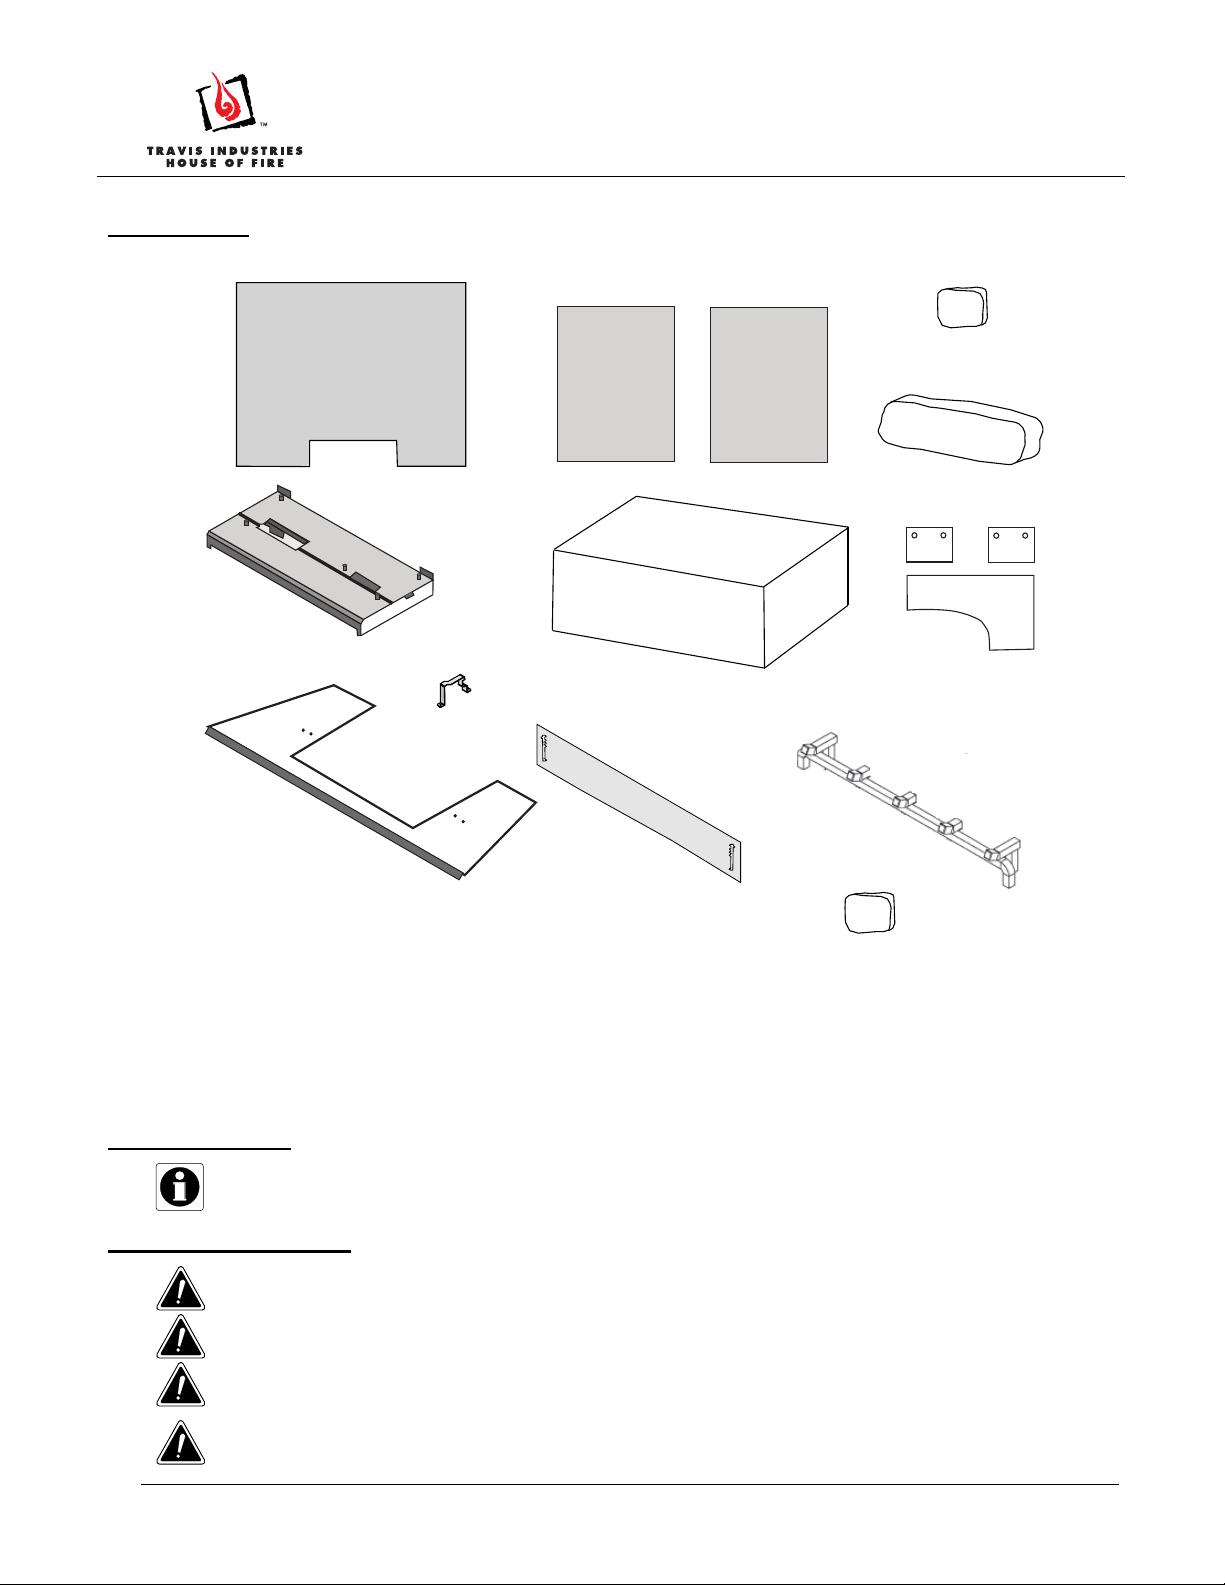
Packing List
Rear Fireback
Burner
Burner Support Bracket
Fireback Floor
Installation Instructions (sku: 96900114)
Side Firebacks
LS-43 Log Kit
Intake Restrictor
Rockwool
Embers
Log Spacers
Grate Assembly
The log set includes:
Rear Log
Left Log
Right Log
Left Twig
Right Twig
Center Twig
Installation Tips
If using propane (LP), convert the appliance before installing the burner.
Installation Warnings
The logs are fragile, especially after being exposed to heat.
Make sure the gas control valve is OFF and the heater is cool before servicing.
Failure to position the parts in accordance with these diagrams or failure to use only parts
specifically approved with this appliance may result in property damage or personal injury.
The burner must be correctly positioned before installing the logs. Make sure the burner is
fully seated and the pilot is properly aligned.
Andiron Clips
Page 1 of 11 17601661 — 9/22/11 © Travis Industries, Inc.
Page 2

564 HO DancingFyre Burner
Installation Instructions (sku: 96900114)
Andiron Clips
NOTE: Two andiron clips are included for those installations using andirons. See direction s b elow to install.
11/32" Nutdriver
a
b
5/32 Hex
Wrench
c
Figure 1: Andiron Clips Installation
Page 2 of 11 17601661 — 9/22/11 © Travis Industries, Inc.
Page 3
564 HO DancingFyre Burner
Installation Instructions (sku: 96900114)
Burner Installation
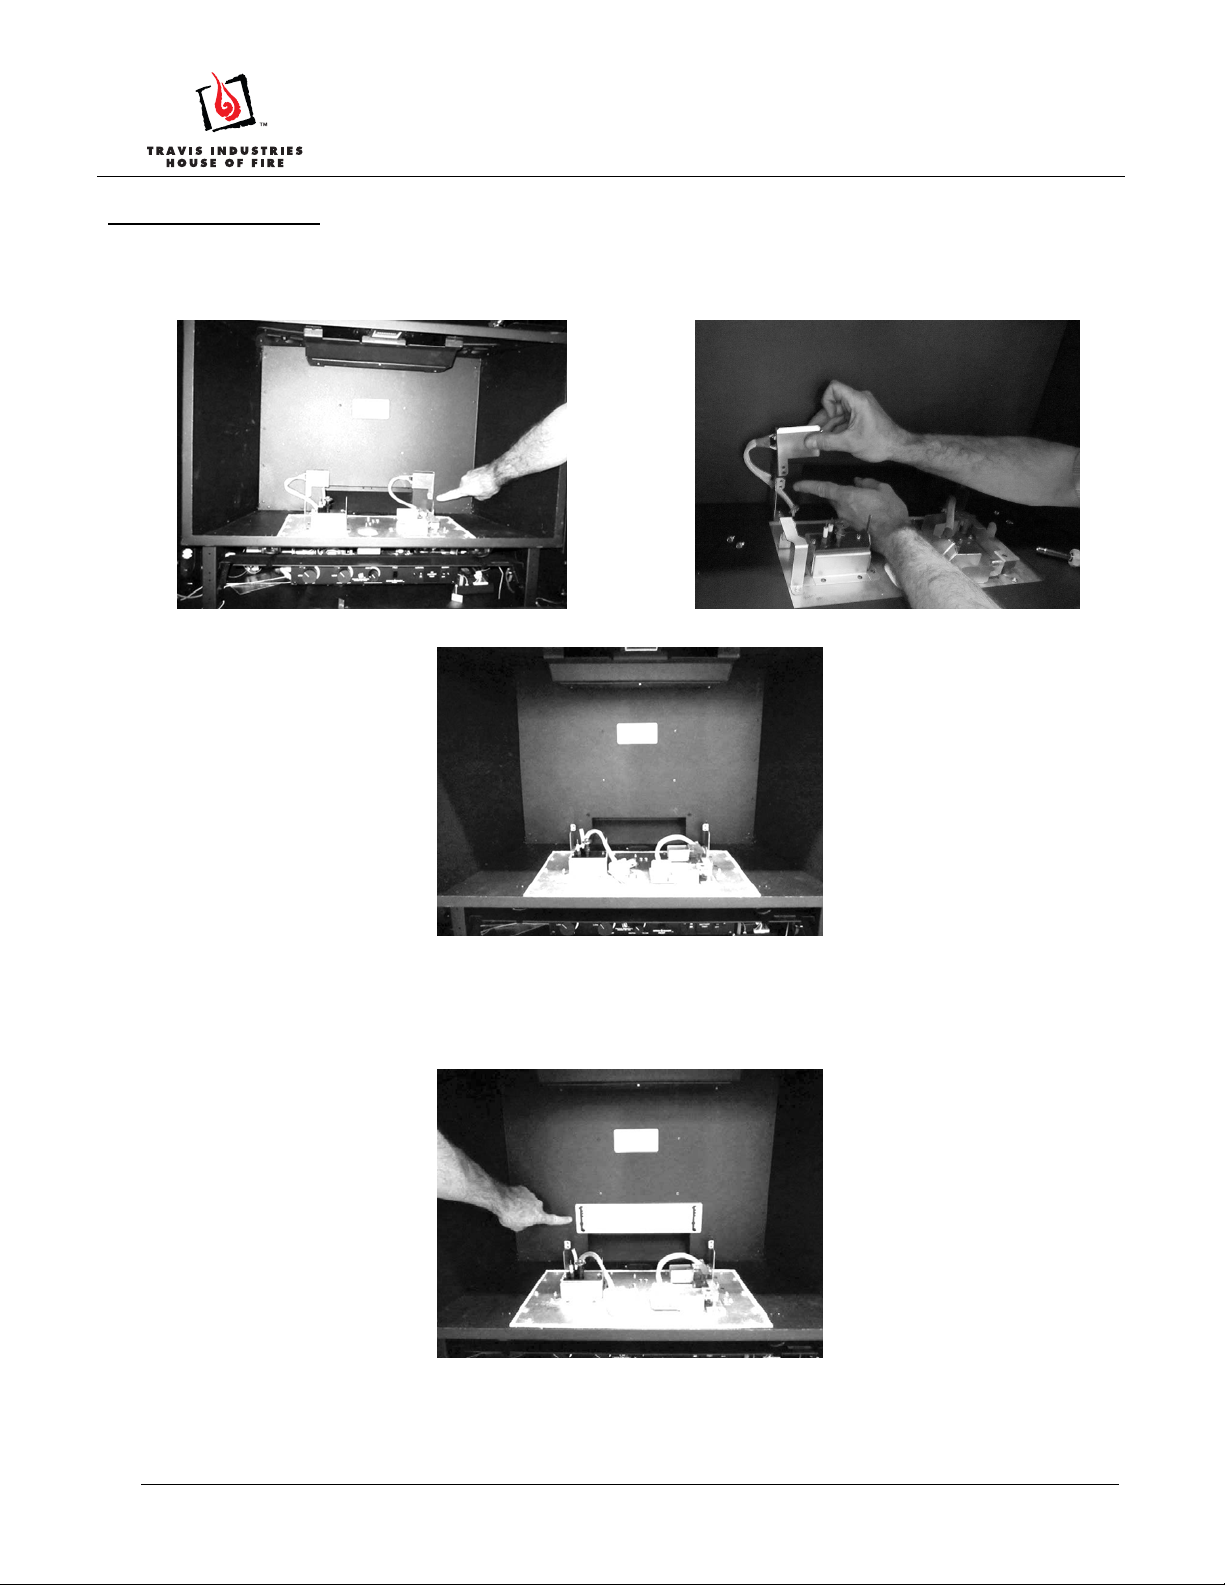
1. Remove both accent light assemblies from the brackets at the rear of the firebox (save the screws).
Place the accent light assemblies in the center of the firebox floor, as shown below.
NOTE: Do not touch the bulbs.
Figure 2: Accent light bracket screws location
Figure 3: Accent lights placed on firebox floor
2. Install the intake restrictor as shown below, using the existing screws on the rear wall of the firebox.
Set the intake restrictor to the correct setting for the vent configuration. See the installation manual for
details.
Figure 4: Intake restrictor installed, showing location of screws
Page 3 of 11 17601661 — 9/22/11 © Travis Industries, Inc.
Page 4
564 HO DancingFyre Burner
Installation Instructions (sku: 96900114)
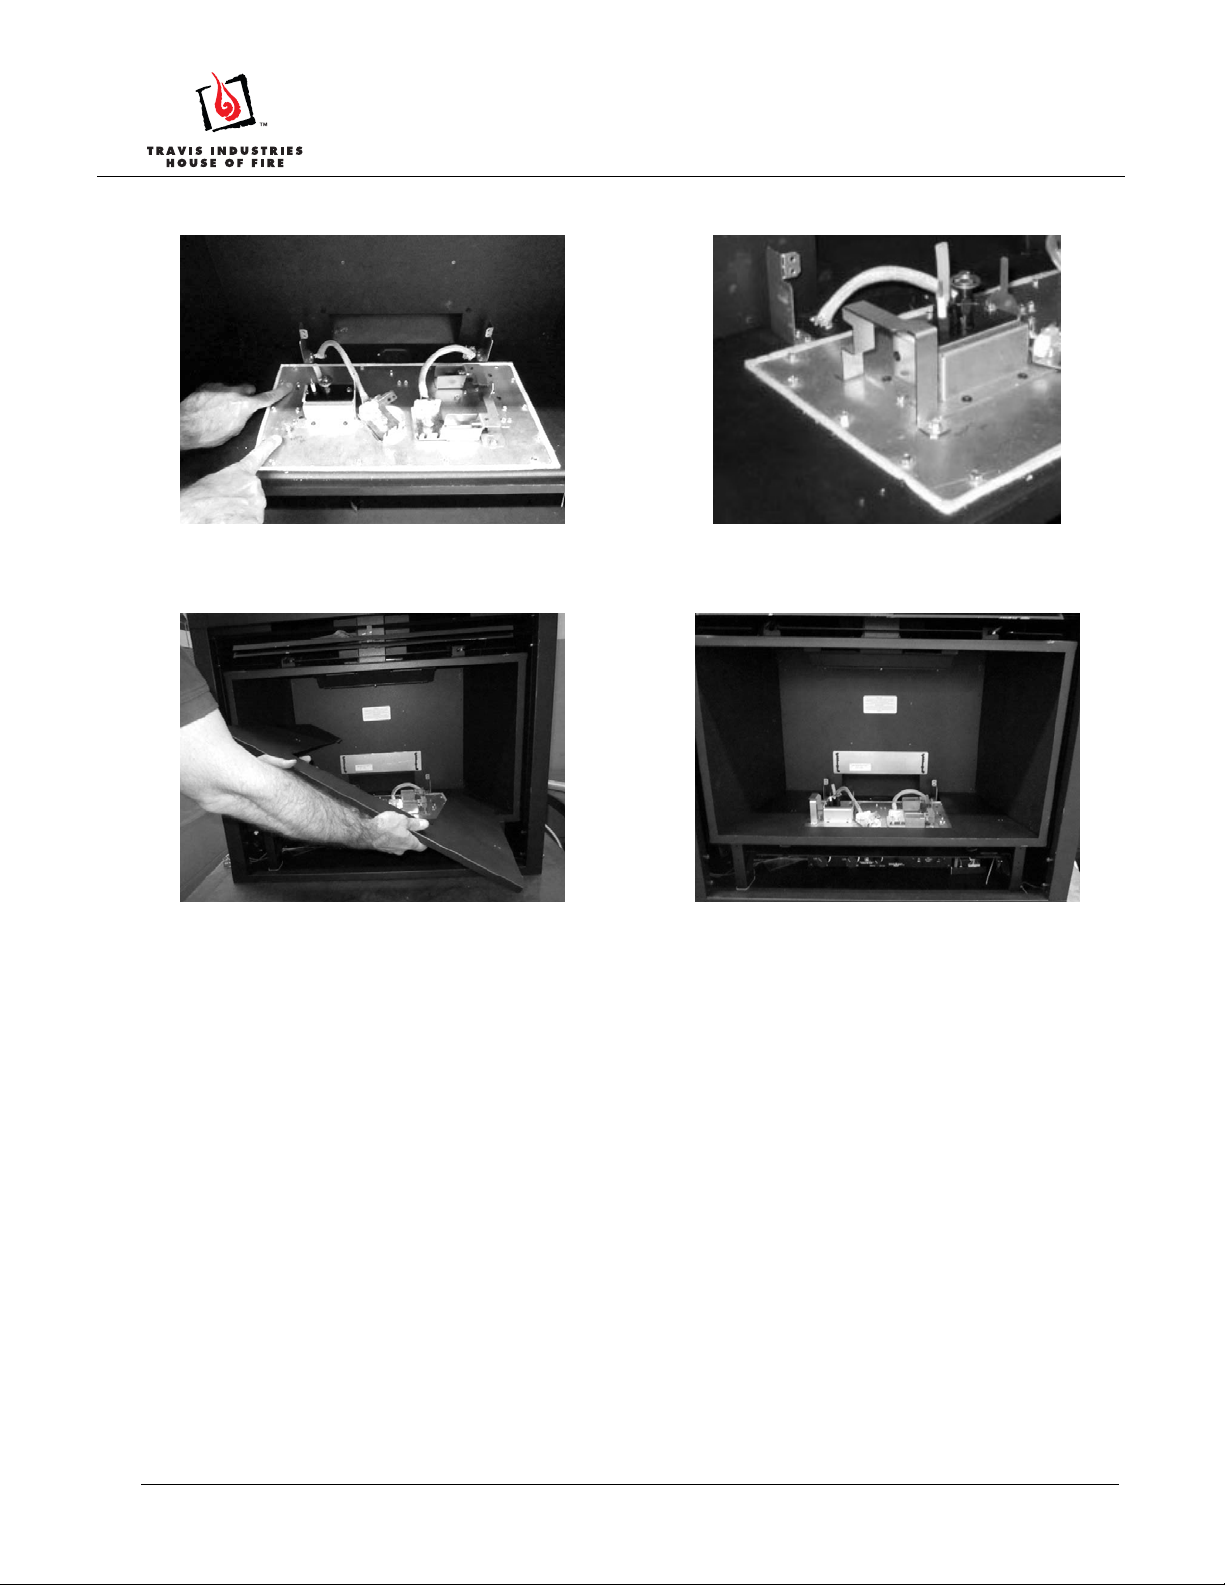
3. Install the burner support bracket at the left side of the firebox, as shown below.
Figure 5: Burner support bracket screws location
Figure 6: Burner support bracket installed
4. Install the fireback floor into the firebox, as shown below.
Page 4 of 11 17601661 — 9/22/11 © Travis Industries, Inc.
Page 5

564 HO DancingFyre Burner
Installation Instructions (sku: 96900114)
5. Install the rear, left, and right firebacks as shown below.
Remove the clip located on the
a
firebox ceiling near the front (both
sides). The side fireback clip has
a keyhole slot. It can be removed
by loosening the screw and
sliding the clip out.
1/4” Nutdriver
Replace the fireback clips shown in step “a” after installing the firebacks.
Page 5 of 11 17601661 — 9/22/11 © Travis Industries, Inc.
Page 6

564 HO DancingFyre Burner
Installation Instructions (sku: 96900114)
6. Re-attach the accent lights to the brackets at the rear of the firebox.
Figure 7: Accent lights screws location
Figure 8: Accent lights attached
7. Install the burner inside the firebox. Make sure the burner is fully seated and level with the fireback floor.
8. Install the grate into the firebox as shown below.
Page 6 of 11 17601661 — 9/22/11 © Travis Industries, Inc.
Page 7

564 HO DancingFyre Burner
9. Install the logs into the firebox, following the instructions below.
Installation Instructions (sku: 96900114)
Log Installation
Log Spacers Placement
1. Place the right log spacer on the burner as shown below.
2. Place the rear log spacers on the burner as shown below.
Rear Log Placement
3. Place the rear log on the rear log spacer with the cut-outs over the two pins, as shown below.
Page 7 of 11 17601661 — 9/22/11 © Travis Industries, Inc.
Page 8

564 HO DancingFyre Burner
Left Log Placement
4. Place the left log as shown below, with the two holes in the bottom fitting over the pin on the burner and
metal bracket attached to the pilot assembly.
Installation Instructions (sku: 96900114)
Right Log Placement
5. Place the right log on the front right log spacer as shown below. The right log has two holes in the bottom
that fit over the two pins on the burner.
Page 8 of 11 17601661 — 9/22/11 © Travis Industries, Inc.
Page 9

564 HO DancingFyre Burner
Left Twig Placement
6. Place the left twig as shown below, with the twig pointing toward the center of the firebox. The left twig
has a single hole on the bottom that fits over the pin on the rear log.
Installation Instructions (sku: 96900114)
Right Twig Placement
7. Place the right twig as shown below, with the twig pointing toward the center of the firebox. The right twig
has a single hole on the bottom that fits over the pin on the rear log.
Page 9 of 11 17601661 — 9/22/11 © Travis Industries, Inc.
Page 10

564 HO DancingFyre Burner
Center Twig Placement
8. Place the center twig directly on the burner as shown below. Make sure it does not cover any burner holes.
Installation Instructions (sku: 96900114)
Rock Wool Installation
9. Place the included rock wool on top of the burner to enhance the glow from the burner.
NOTE: The rock wool works best when it is applied in a very thin, porous layer. The best method for
applying the rock wool is to brush it on to the burner. Compress a clump of rock wool between your thumb
and forefinger. Use a stiff brush to apply a thin layer of rock wool fibers onto the burner. Do not use the
entire bag of rock wool. Use only a small amount and save the remainder. Over-use of rock wool will
diminish the glow and may cause sooting or other adverse conditions.
Page 10 of 11 17601661 — 9/22/11 © Travis Industries, Inc.
Page 11

564 HO DancingFyre Burner
Installation Instructions (sku: 96900114)
Ember Placement
10. Place a layer of embers along the edges of the burner, rivets, and fireback floor to enhance the aesthetics
of the firebox. Do not place embers over any burner holes. See the photos below.
Page 11 of 11 17601661 — 9/22/11 © Travis Industries, Inc.
 Loading...