

Page 1
AVALON
HI LO HIGH CHAIR
IMPORTANT:KEEP THESE INSTRUCTIONS FOR FUTURE REFERENCE
Series SY802
INSTRUCTION BOOK
Page 2
ALWAYS FOLLOW THE MANUFACTURERS INSTRUCTIONS.
READ ALL INSTRUCTIONS CAREFULLY BEFORE ASSEMBLY AND USE
OF THIS HIGH CHAIR.
THE CORRECT USE AND MAINTENANCE OF THIS PRODUCT IS
ESSENTIAL.
WARNINGS
02
www.babylove.com.auwww.babylove.com.au
WARNING: THE CHILD SHOULD BE SECURED IN THE
HIGH CHAIR AT ALL TIMES BY THE HARNESS, EITHER IN THE
RECLINING OR UPRIGHT POSITION. THE TRAY IS NOT
DESIGNED TO HOLD THE CHILD IN THE CHAIR. IT IS
RECOMMENDED THAT THE HIGH CHAIR BE USED IN THE
UPRIGHT POSITION ONLY BY CHILDREN CAPABLE OF RELIABLY
AND CONSISTENTLY SITTING UPRIGHT UNASSISTED.
WARNINGS: TO PREVENT SERIOUS INJURY OR
DEATH:
• FOLLOW THE MANUFACTURER’S INSTRUCTIONS.
• DO NOT LEAVE CHILDREN UNATTENDED.
• THE HARNESS MUST ALWAYS BE USED AND CORRECTLY FITTED.
- MOST INJURIES FROM THE HIGH CHAIR ARE CAUSED BY FALLS.
• POSITION THE HIGH CHAIR AWAY FROM SOLID STRUCTURES AND
BENCHES TO AVOID INJURIES CAUSED BY FALLS AND ACCESS TO
DANGEROUS ITEMS.
• Double check assembly before placing child into high chair.
• The weight of the child using this product is not to exceed 15kg.
• Always keep your child in view whilst using the high chair.
• Always apply the brakes when not moving the high chair.
• Do not allow children to stand on the seat.
• Use on a flat , even and horizontal floor and never use near stairs.
• Do not elevate the high chair on any structure or table.
• Do not allow child to stand on the seat.
Page 3

WARNINGS:
03
www.babylove.com.auwww.babylove.com.au
WARNINGS
• Never carry the high chair with the child in it.
• Do not use the high chair without the tray and always ensure the
tray is secure on the arm rests. The tray is not designed to hold the
child in the chair.
• When making adjustments to the high chair, ensure that you and
Your child’s body, fingers and toes are clear of any moving parts on
the high chair, otherwise they may be injured.
• Position the high chair away from furniture, walls, hot surfaces and
liquids, window covering cords, electrical cords and position the
high chair away from furniture when the chair is not being used at a
table.
THIS PRODUCT IS NOT INTENDED FOR COMMERCIAL USE.
Page 4
04
www.babylove.com.auwww.babylove.com.au
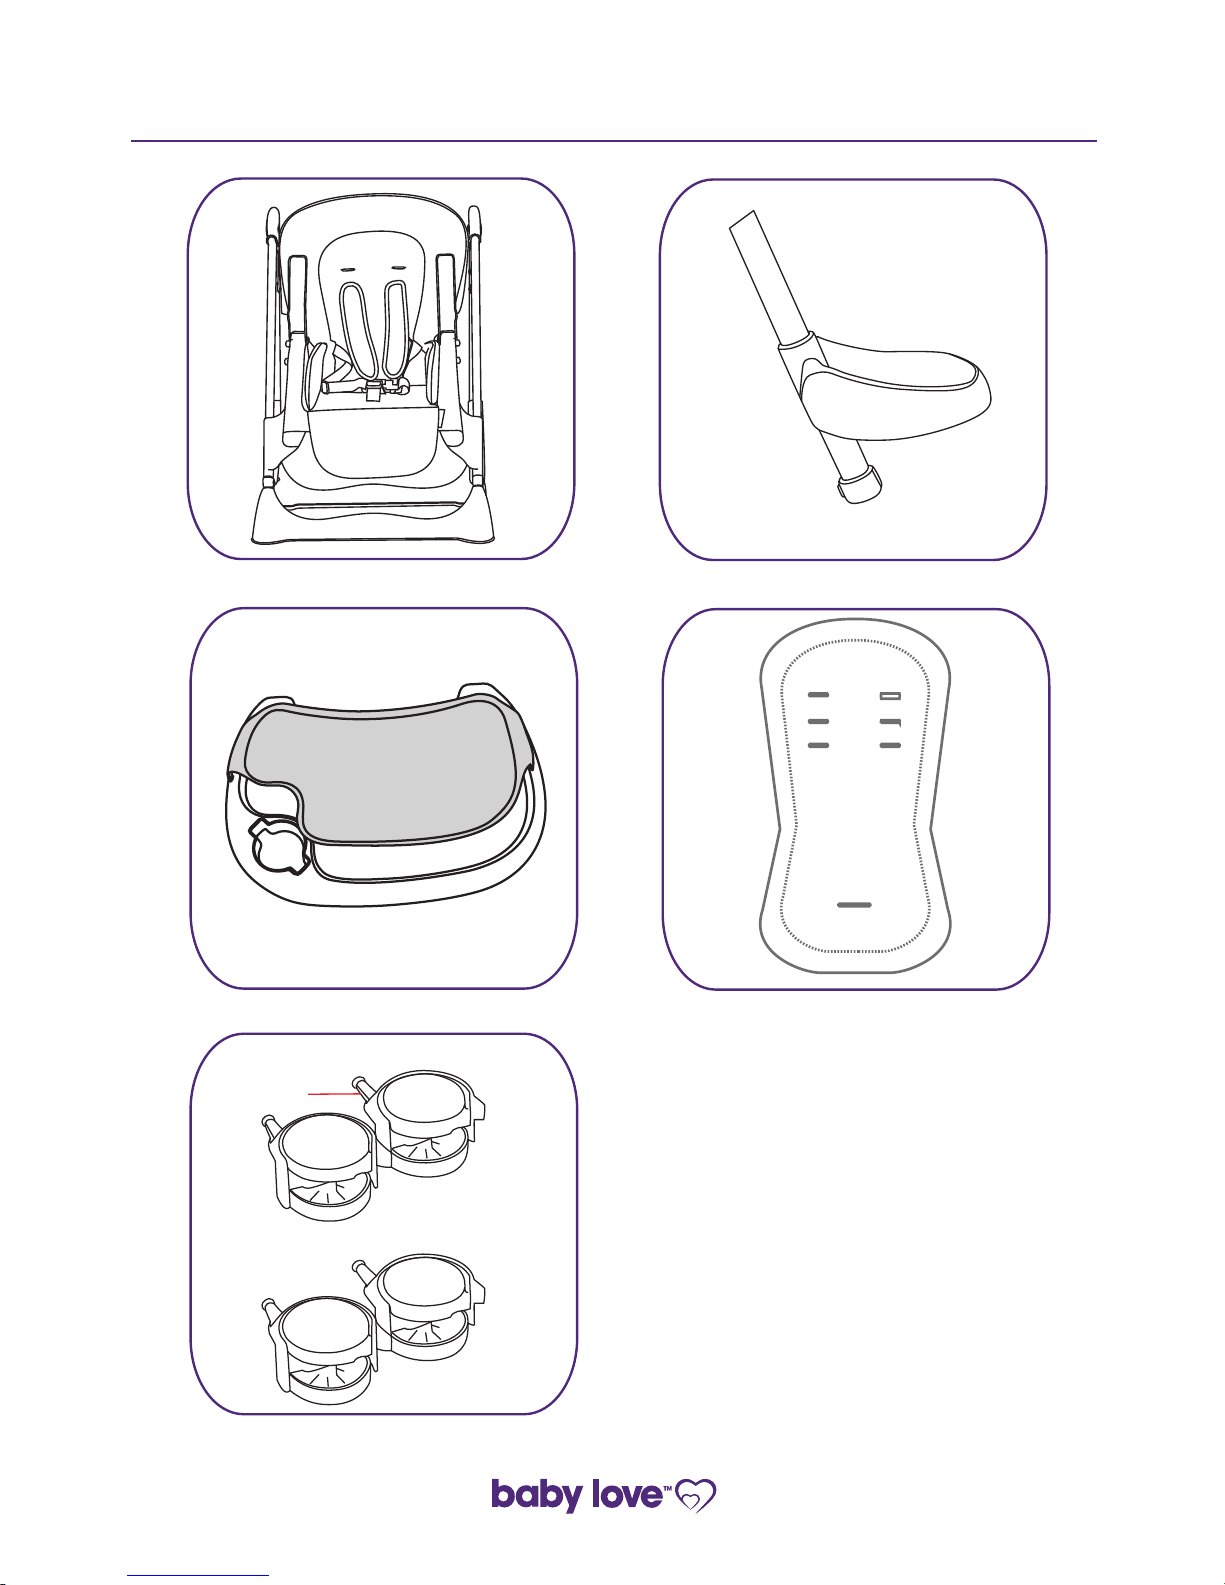
PARTS LIST
C 1 x Tray & Tray Insert
D 1 x Seat Insert
A 1 x High Chair Frame & Seat
B 1 x Footrest
E
4 x Castors
Rear Castors
Front Castors
Raised rib
on metal pin
Page 5
05
www.babylove.com.auwww.babylove.com.au
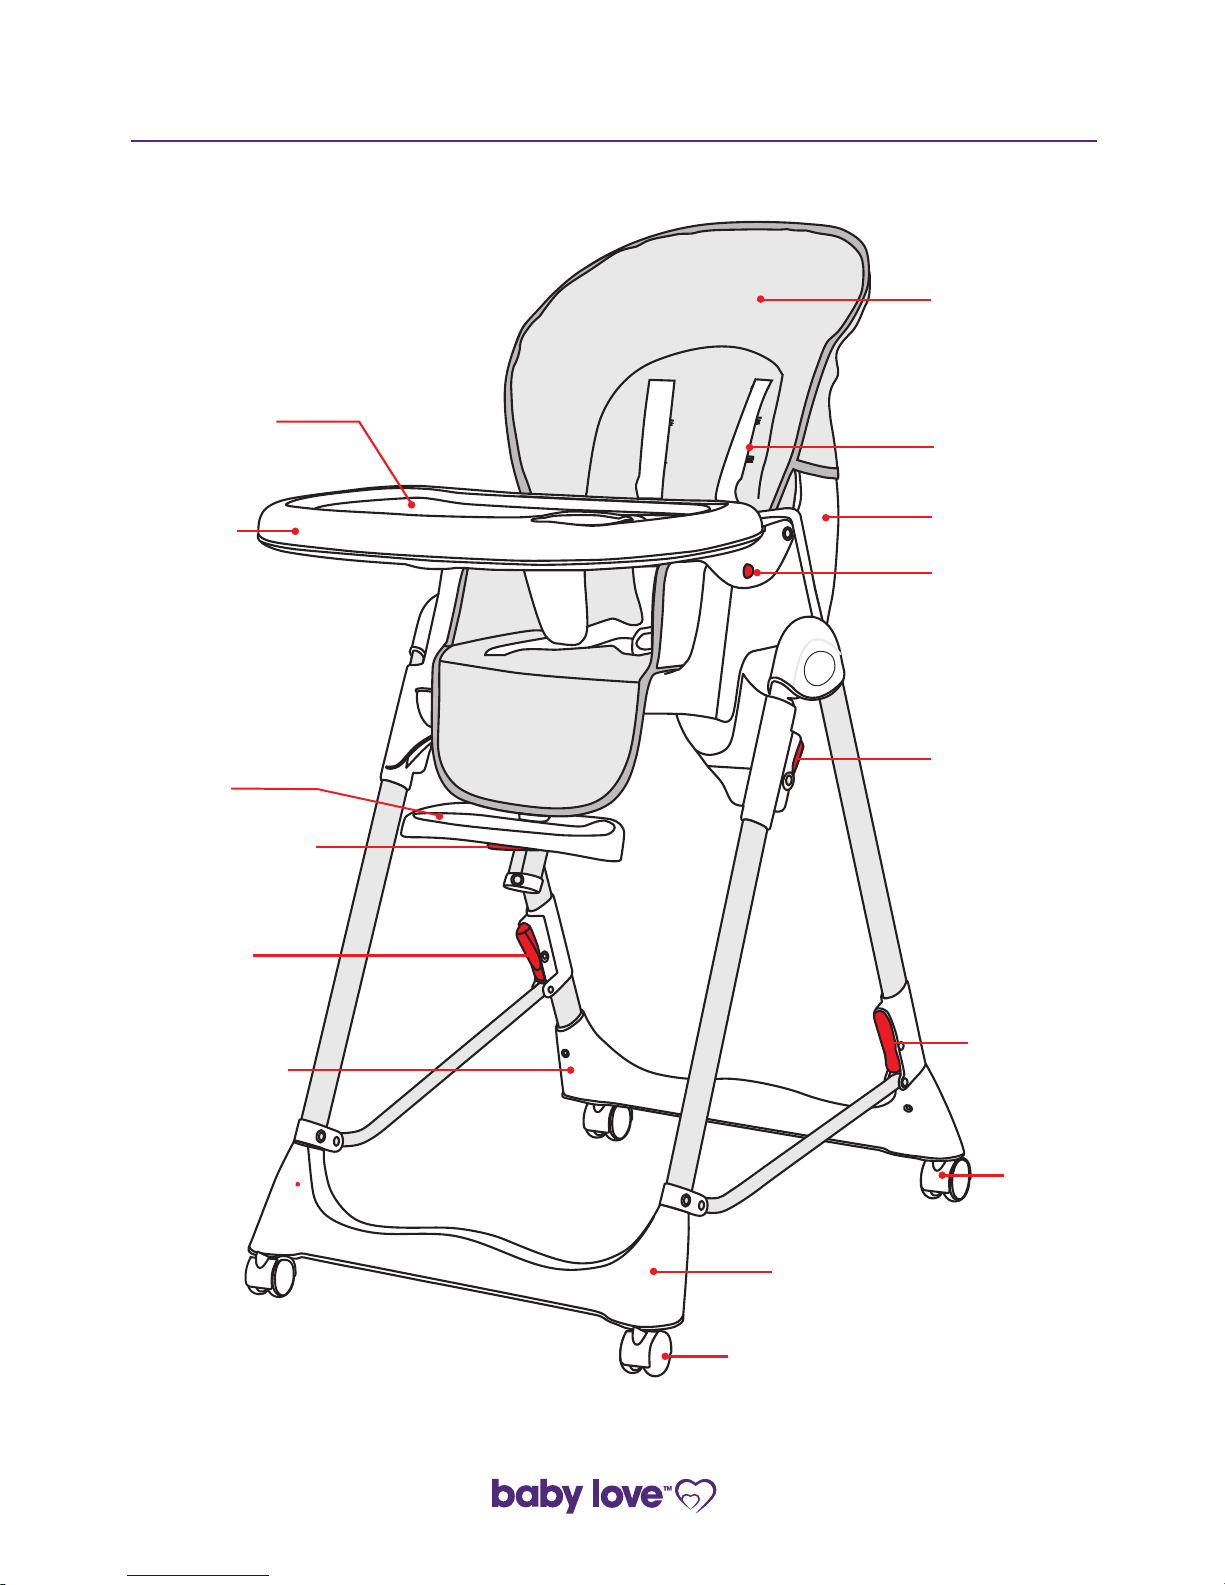
ASSEMBLED HIGH CHAIR PARTS LIST
Main Tray
Second Tray
Footrest
Footrest
Adjuster button
Folding
Lever
Rear
Castors
Folding
Lever
Height
Adjustment
Lever
Front Castors
Rear Lower
Leg Moulding
Front Lower
Leg Moulding
Seat
Harness
Seat Pad
Tray Arm
Release Button
Page 6
06
www.babylove.com.auwww.babylove.com.au
1. TO ASSEMBLE THE HIGH CHAIR
A To attach the footrest, push the footrest tube into the socket located
on the front edge of the seat until you hear an audible ‘click’ which
indicates the pin on the tube has locked into the socket.
click
B To attach the wheels, two of the wheel assemblies have a raised rib on
the pin and are to be inserted into the rear wheel mouldings.
Insert the pin of each wheel assembly into the corner of the leg
mouldings and push in until you hear an audible ‘click’ which indicates
they are locked in.
click
1
2
Page 7
07
www.babylove.com.auwww.babylove.com.au
2. TO FIT THE SEAT INSERT
A To fit the seat insert, place the insert on the high chair seat and thread
the harness shoulder straps through the corresponding slots in the seat
insert. Feed the crotch buckle through the lower slot in the seat insert.
To remove the insert, perform the above actions in the reverse order.
IMPORTANT NOTE:
ENSURE THAT THE SHOULDER STRAPS ARE FITTED THROUGH THE
APPROPRIATE HARNESS SLOTS TO SUIT YOUR CHILD’S SEATED
SHOULDER HEIGHT.
Page 8

08
www.babylove.com.auwww.babylove.com.au
3. TO APPLY THE BRAKES
WARNING: ALWAYS APPLY THE BRAKES EXCEPT
WHEN MOVING THE HIGHCHAIR.
A Press the brake lever down on the wheel assemblies to lock the brakes.
B Push the brake lever up on the wheel assemblies to unlock the brakes.
Please Note: The brakes should always be applied to the wheels when a
child is seated in the high chair and the wheels should only be unlocked
when moving the high chair.
Page 9

09
www.babylove.com.auwww.babylove.com.au
1
1
2
4. TO SECURE YOUR CHILD IN THE
HARNESS
WARNING: USE THE HARNESS AT ALL TIMES.
A
A five point harness is provided to restrain your child.
To secure your child in the harness please follow the steps below
carefully.
Push buckle (A) and (B) into the buckle housing (C) until the buckle
prongs snap into position.
Carefully adjust the harness by pulling the slider (D) until the desired fit
is achieved in the lap, shoulder and crotch straps.
Always adjust the harness when changing the seating position of the
child.
To remove the child, release the buckle by squeezing the top and
bottom prongs, remove the shoulder straps and lift the child out of the
high chair.
Page 10

10
www.babylove.com.auwww.babylove.com.au
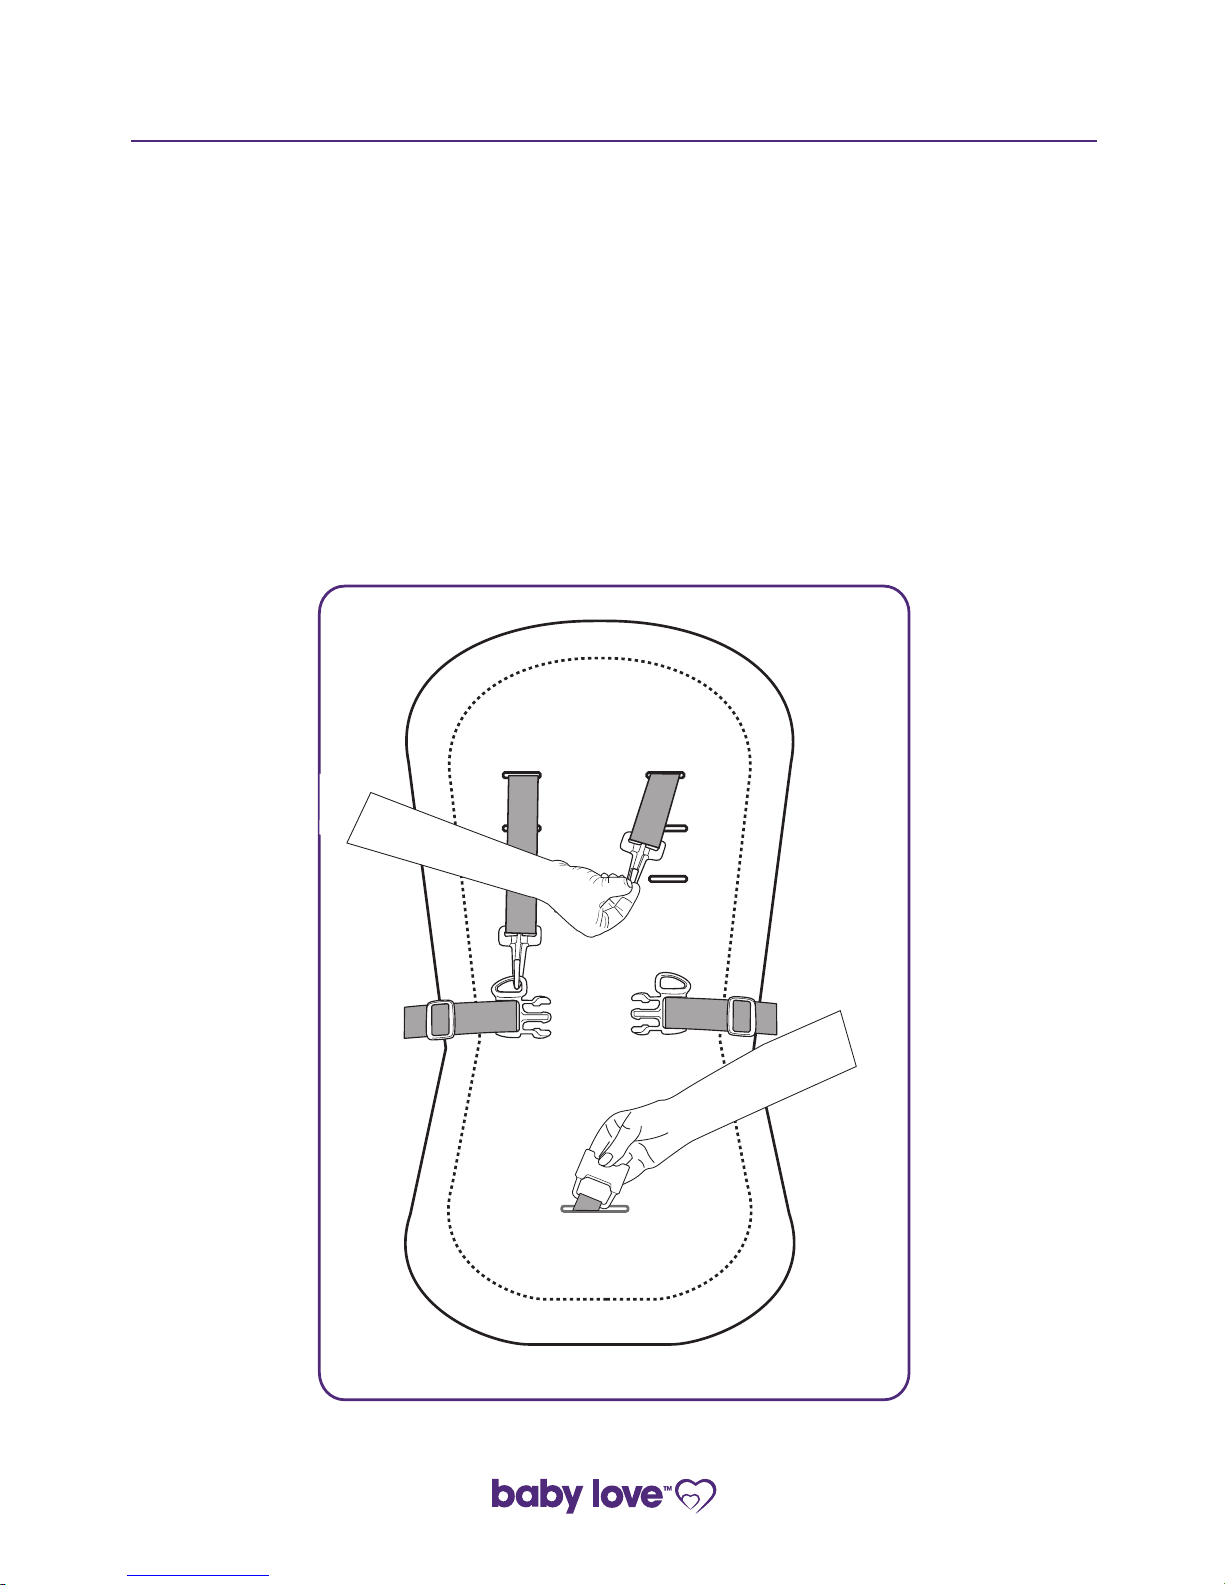
B The highchair seat has 3 harness slots at different heights to
accommodate the child. The shoulder straps must be positioned near
the child’s shoulders. To change the shoulder harness height, unclip the
shoulder harness straps from the waist harness straps and push the
shoulder harness tongue out of the current harness slot and through
the back of the seat pad and then pull the shoulder harness buckle
tongue through the desired slot. Clip the shoulder harness straps and
waist straps back together.
4. TO SECURE YOUR CHILD IN THE
HARNESS
Page 11

11
www.babylove.com.auwww.babylove.com.au
A Ensure both side arms are lowered and locked into place by pressing
each RED release button in on both sides (one at a time) as you lower
the arms. You hear an audible ‘click’ which indicates the side arms are
locked in.
WARNING: THE TRAY IS NOT DESIGNED TO HOLD
THE CHILD IN THE HIGHCHAIR. THE CHILD IS TO BE SECURED
BY THE SAFETY HARNESS AT ALL TIMES WHILE IN THE
HIGHCHAIR.
CAUTION: Ensure the child’s hands are free from moving parts when
the tray is being attached or removed to avoid pinching or
entrapment. Before using the tray, check it is securely locked onto the
arm rests by pulling on the tray.
5. TO ATTACH AND USE THE TRAY
click
Page 12

12
www.babylove.com.auwww.babylove.com.au
B Pull the RED release latch forward located under the front edge of the
tray. Align both tray slots with the side arms and slide the tray back
onto the arms to the desired position and release the tray latch
ensuring it has locked into position. The position of the tray can be
adjusted by pulling the release latch forward and sliding the tray to the
desired position.
C The tray features a removable second tray for convenient cleaning.
Remove by releasing both tabs on the left and right sides of the tray.
5. TO ATTACH AND USE THE TRAY
Second Tray tab
1
2
Page 13

13
www.babylove.com.auwww.babylove.com.au
D To remove the main tray, pull the RED release latch forward and pull
the tray towards you to remove from the side arms.
E The tray can be folded up whilst attached to the side arms. Press the
RED release button in on each side arm and push the tray upwards. To
fold the tray down refer to Step 5A.
5. TO ATTACH AND USE THE TRAY
1
2
Page 14

F When the tray is not in use you can store the tray by sliding it onto the
pegs located on the rear legs.
5. TO ATTACH AND USE THE TRAY
14
www.babylove.com.auwww.babylove.com.au
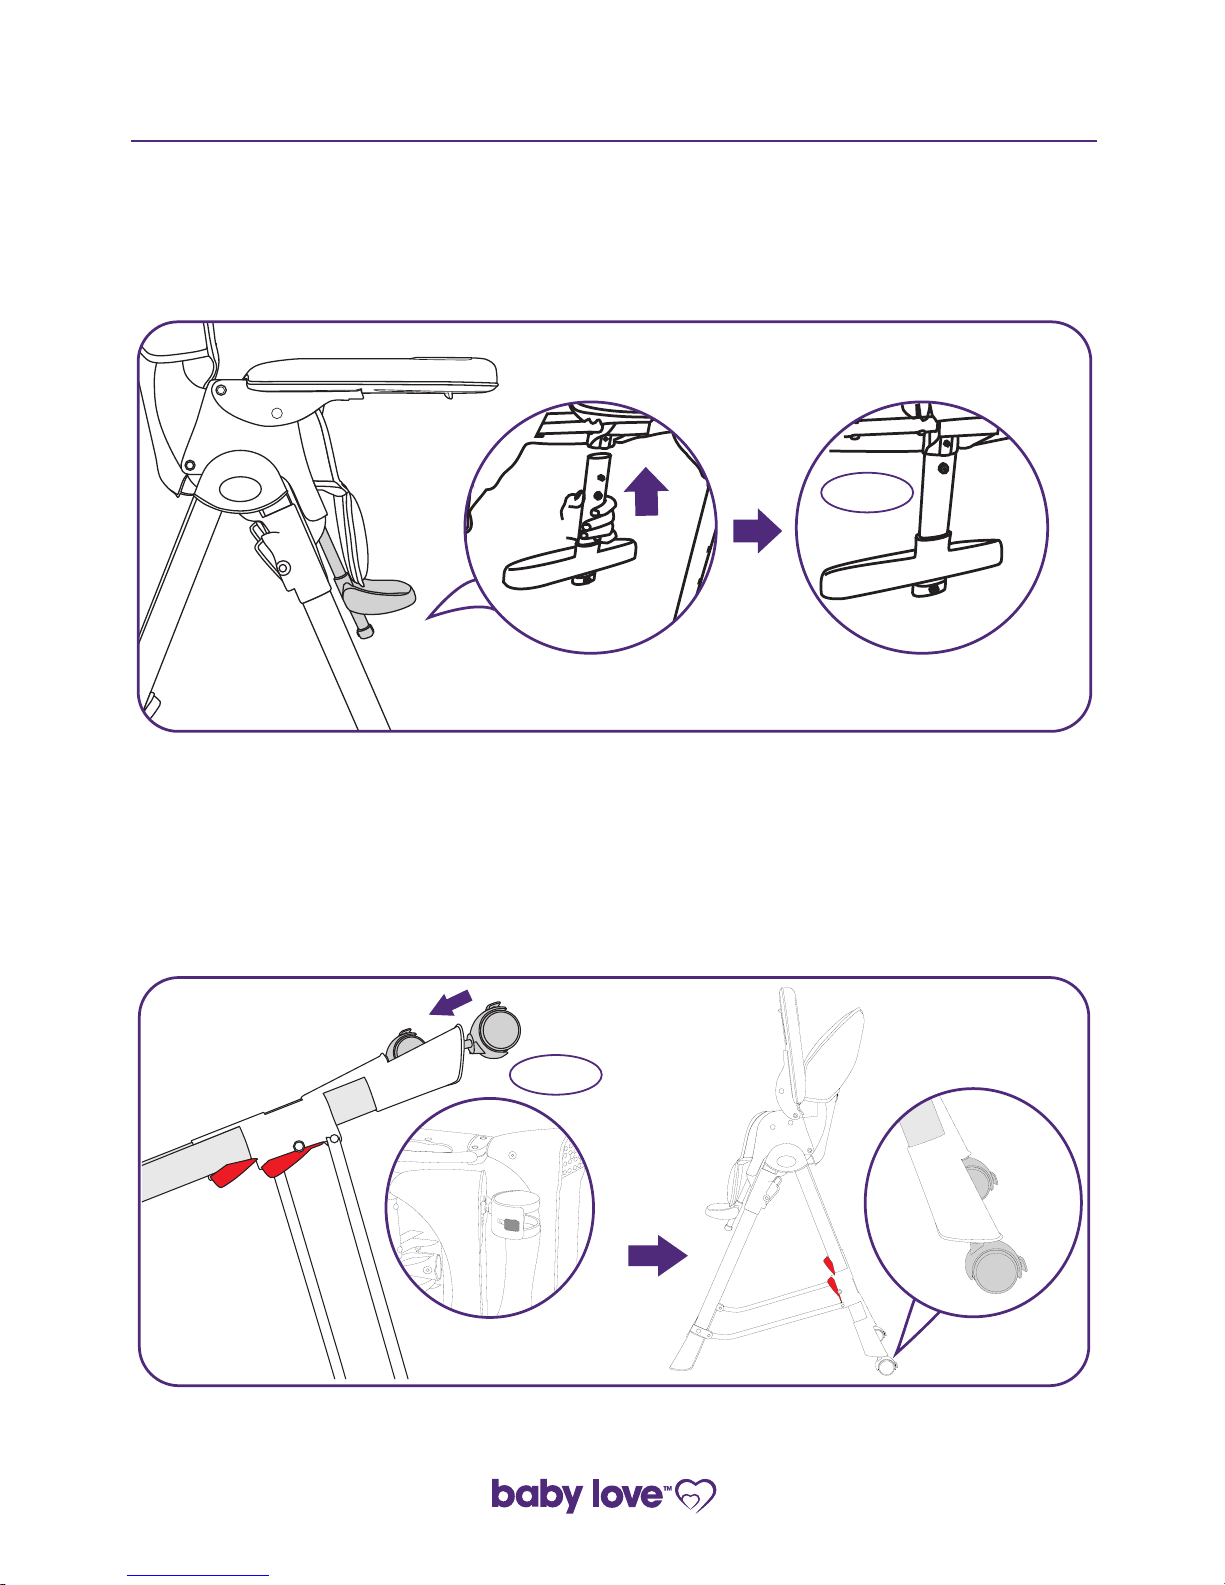
A To adjust the height of the footrest, press the RED lever in located
under the footrest and slide the footrest up or down the metal tube to
the desired position.
6. TO ADJUST THE FOOTREST
1
2
Page 15

15
www.babylove.com.auwww.babylove.com.au
ALWAYS REMOVE YOUR CHILD FROM THE HIGH CHAIR BEFORE
ADJUSTING THE HEIGHT OF THE HIGH CHAIR.
A Remove the child and tray from the high chair.
B There are five adjustable height positions. Stand at the front of the high
chair and press in and hold the height adjustment levers on both sides
and push the chair up or down to the desired height and then release
the levers. You should hear an audible ‘click’ when the seat assembly
is locked into place
WARNING: DO NOT ADJUST WITH THE CHILD IN THE
CHAIR.
IMPORTANT NOTE:
7. TO ADJUST THE HEIGHT OF THE
HIGH CHAIR
click
1
2
Page 16

16
www.babylove.com.auwww.babylove.com.au
A There are three recline positions. Lift and hold the recline latch located
on the back of the seat and tilt the seat forwards or backwards to the
desired position.
WARNING: DO NOT ADJUST WITH THE CHILD IN
THE CHAIR.
IMPORTANT NOTE:
ALWAYS REMOVE YOUR CHILD FROM THE HIGH CHAIR BEFORE
RECLINING THE SEAT ASSEMBLY.
8. TO ADJUST THE BACK REST
Page 17

17
www.babylove.com.auwww.babylove.com.au
8. TO FOLD/UNFOLD THE HIGH CHAIR
A Remove the child and tray from the high chair. Raise the side arms
by pressing in the RED release button in on each side and push the
arm upwards.
B Stand behind the chair and press the RED folding levers in and slide
them up until they lock into position. Attach the tray to the rear legs as
shown in Step 5F.
WARNING: DO NOT ADJUST WITH THE CHILD IN
THE CHAIR.
1
1
2
Page 18

18
www.babylove.com.auwww.babylove.com.au
8. TO FOLD/UNFOLD THE HIGH CHAIR
C Stand behind the chair and press the RED folding levers in and slide
them down until they lock into position.
D Lower the side arms (Refer to Step 5A).
E Attach the tray to the side arms (Refer to Step 5B).
2
1
CAUTION: Always store the high chair so it cannot be pulled or fall on
children.
Page 19

9. TO USE THE HIGH CHAIR
19
www.babylove.com.auwww.babylove.com.au
• Place the high chair on a horizontal, flat and even floor ensuring all
wheels are in contact with the floor.
• The high chair must not be placed on a table or similar surface to
elevate the child.
• The highchair is fitted with brakes on all castors. Ensure the brakes
are applied when the child is in the high chair and only release the
brakes to move the high chair.
• If pushing the high chair on carpet, be careful that the high chair is not
pushed over as the castors may not roll easily on the carpet.
• Position the high chair away from potential hazards and other
furniture or structures that the child may be able to grasp or push.
• Keep away from walls, kitchen benches, hot surfaces, hot liquids and
electrical cords.
Page 20

20
www.babylove.com.auwww.babylove.com.au
• To prolong the life of your high chair keep it clean and do not leave it in
the direct sunlight for extended periods of time.
• Removable fabric covers and trims may be cleaned using warm water
with household soap or mild detergent. Allow it to dry fully, preferably
away from the direct sunlight.
• Non removable fabric covers and trims may be spot cleaned using a
damp sponge with soap or a mild detergent. Allow it to dry completely
before folding or storing it away.
• In some climates the covers and trims may be affected by mould and
mildew. To help prevent this occurring, do not fold or store the product
if it is damp or wet. Always store the product in a well ventilated area.
• To maintain the safety of your nursery product, seek prompt repairs for
bent, torn, worn or broken parts. Use only those parts and accessories
approved by Steelcraft.
• Always check parts regularly for tightness of screws, nuts and other
fasteners - tighten if required.
• If the high chair is not working correctly stop using the high chair and
seek repair.
THIS PRODUCT IS NOT INTENDED FOR COMMERCIAL USE.
CARE AND MAINTENANCE
Page 21

NOTES
21
www.babylove.com.auwww.babylove.com.au
Page 22

Customer Service Ph: 1300 131 477 Email: info@babylove.com.au
Distributed by:
Nursery Elegance Pty. Ltd.
ACN: 122 443 387
6 Thorpe Street,
Sunshine, Victoria, 3020, Australia
Due to our continuing program of development, Nursery Elegance
reserves the right to alter the specifications, colour or design without any
further notice.
The Babylove trademark is the property of Nursery Elegance Pty. Ltd.
Due to the variations in the style and design of our products the
illustrations used in this instruction book are generic.
This product is designed to comply with Australian Standard AS4684-2009.
2015 Copyright Nursery Elegance Pty. Ltd. Australia
Art No. 4800341
www.babylove.com.auwww.babylove.com.au
22
 Loading...