

Page 1
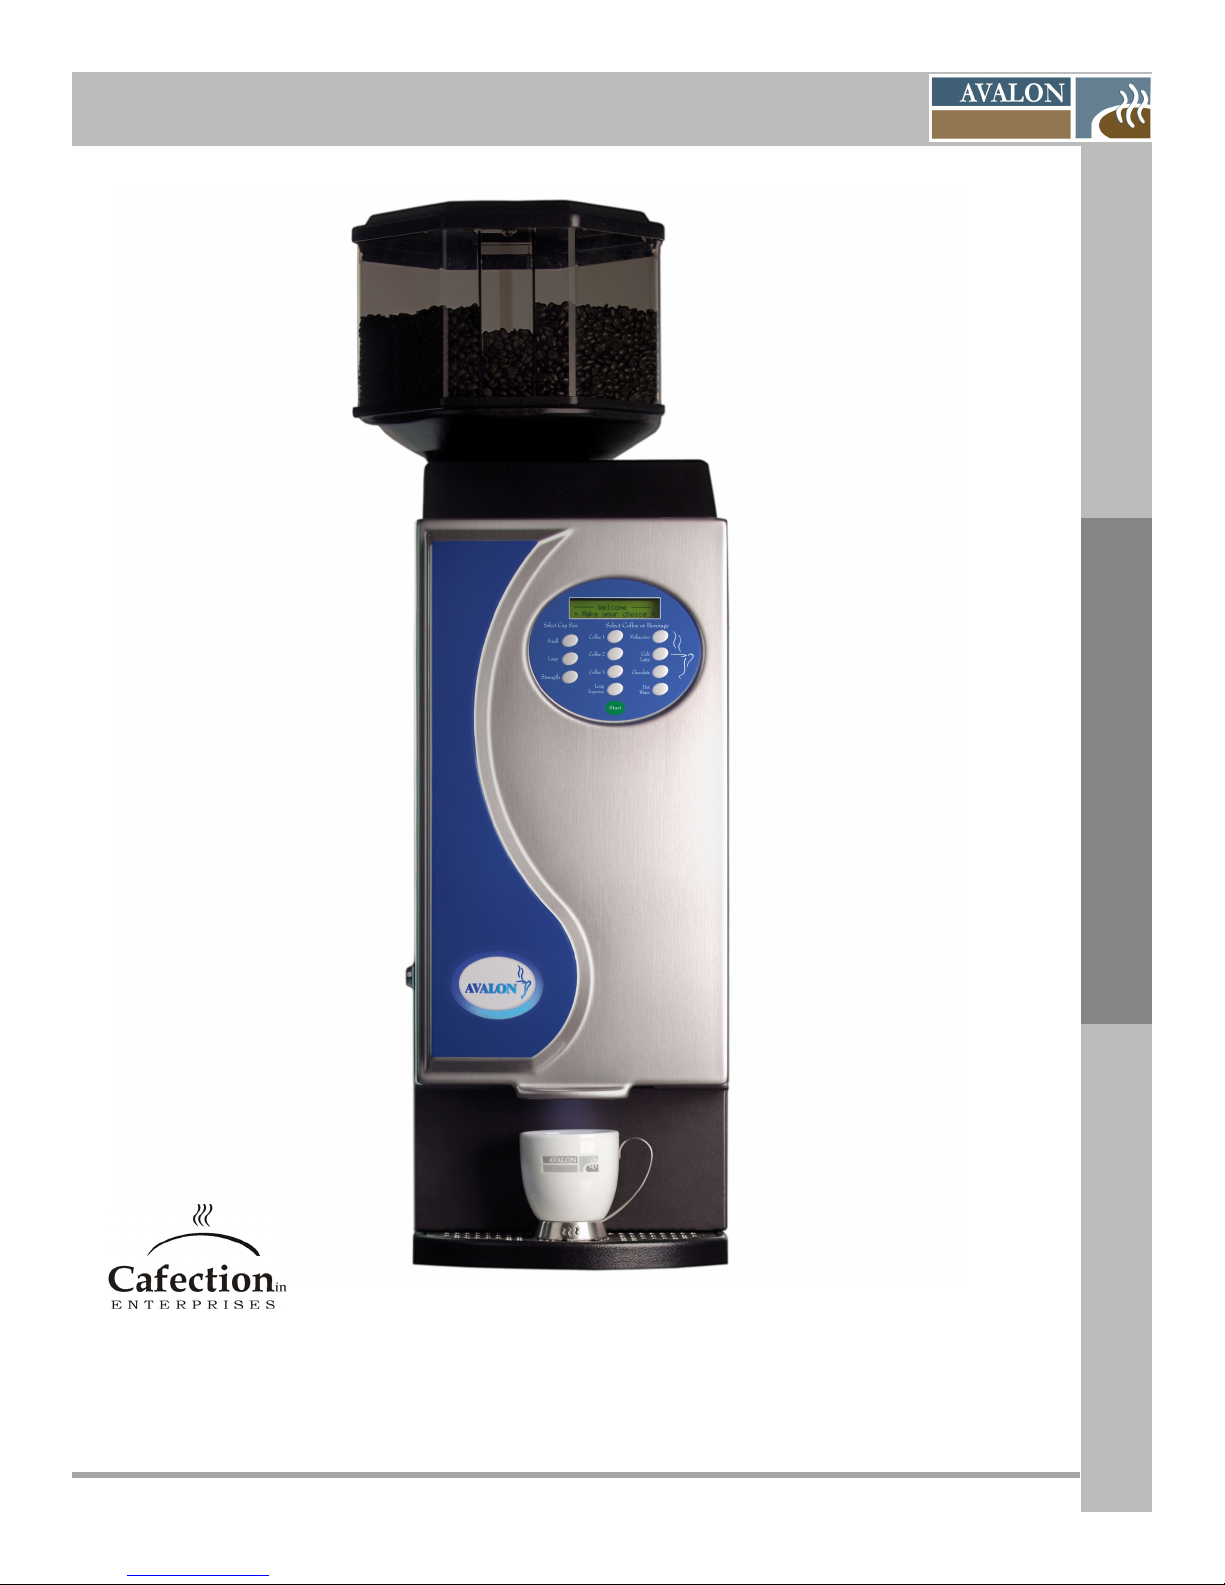
SERVICE MANUAL AVALON La Petite-X Single-Cup Brewer
SERVICE MANUAL
Manufactured by:
Cafection Enterprises Inc.
2355, Dalton, Quebec, (Quebec) G1P 3S3 Canada
Tel.: 1-800-561-6162 Fax: 1-800-463-2739
avalon@cafection.com www.cafection.com
The Petite-X Revision B 03/2010
Page 2

SERVICE MANUAL AVALON La Petite-X Single-Cup Brewer
The Petite-X Revision B 03/2010
Page 3

SERVICE MANUAL AVALON La Petite-X Single-Cup Brewer
Table of Contents
1 INTRODUCTION .........................................................................................................5
2 SAFETY INSTRUCTIONS............................................................................................6
3 WARRANTY .................................................................................................................7
3.1 Warranty Policy ......................................................................................... 7
3.2 Returning Products ................................................................................... 7
3.3 Returned Product Procedures .................................................................. 8
4 REFERENCE DRAWINGS ........................................................................................... 9
4.1 External View .............................................................................................. 9
4.2 Rear View .................................................................................................. 10
4.3 Internal View ............................................................................................. 11
4.4 Membrane Keypad ................................................................................... 12
4.5 Brewer Assembly ..................................................................................... 13
4.6 Brewing Process ...................................................................................... 14
4.7 Hot Water Tank .........................................................................................15
4.8 Main Board (PCB)..................................................................................... 16
4.8.1 Main Board (PCB) Descriptions ............................................. 17
Table of Contents
5 CONTROLS & FEATURES ........................................................................................18
5.1 Features & Benets ................................................................................. 18
5.2 Specications ........................................................................................... 19
5.3 Automatic Safety Features ...................................................................... 20
5.4 Brewing Instructions ............................................................................... 21
6 INITIAL SETUP .......................................................................................................... 22
6.1 Installation site requirements ................................................................. 22
6.1.1 Clearances ............................................................................... 23
6.2 Unpacking ................................................................................................ 24
6.3 Levelling the Equipment.......................................................................... 25
6.4 Hot Water Tank Preparation ...................................................................25
6.4.1 Tank Lid Preparation ............................................................... 25
6.4.2 Adjusting the Tank Overow Float ........................................ 26
6.5 3 Beans canister installation .................................................................. 26
6.5.1 Install the 3 Beans Canister ...................................................26
6.5.2 Lock the 3 Bean canister ........................................................ 27
6.5.3 Install the Plastic Top tting part ........................................... 27
6.5.4 Install the Plastic Top ............................................................27
6.6 Water Line Connection ............................................................................ 28
6.7 Electrical Connection .............................................................................. 29
6.8 Water Temperature ................................................................................... 30
6.9 Loading Products..................................................................................... 31
6.10 Chute System Installation ....................................................................... 32
6.11 Filter Paper Installation ........................................................................... 33
6.12 Installation Testing ...................................................................................34
The Petite-X Revision B 03/2010
3
Page 4

SERVICE MANUAL AVALON La Petite-X Single-Cup Brewer
Table of Contents Continued
7 SERVICE SOFTWARE............................................................................................ 35
7.1 Conguration: ....................................................................................... 35
7.1.1 Dictionnary ........................................................................... 36
7.2 Product Conguration .......................................................................... 36
7.3 Counter Display..................................................................................... 41
7.4 Counter Tracking Sheet ........................................................................ 42
7.5 Setting Tracking Sheet ......................................................................... 43
7.6 Product Values ...................................................................................... 44
8 CLEANING AND SANITIZING ................................................................................ 45
8.1 Cleaning and Sanitizing Instructions .................................................. 45
8.2 Recommended Cleaning Tools ............................................................ 45
8.3 Cleaning and Sanitizing Schedule ...................................... 46
8.4 Overall Cleaning ................................................................................... 47
8.5 Exterior Cleaning .................................................................................. 47
8.5.1 Cleaning the drip tray .......................................................... 47
8.5.2 Emptying the waste bin ....................................................... 48
8.6 Interior Parts Cleaning & Sanitizing .................................................... 49
8.6.1 Coffee Canisters ................................................................... 49
8.6.2 Soluble Canisters ................................................................. 50
8.6.3 Coffee Brewer ....................................................................... 51
8.6.4 Fan ......................................................................................... 52
8.6.5 Stainless coffee chute ......................................................... 53
8.6.6 Plastic chute of the 3 bean canister ................................... 54
9 PREVENTIVE MAINTENANCE .............................................................................. 55
9.1 Preventive Maintenance (PM) Schedule ............................................. 55
Table of Contents
10 SERVICING PARTS ................................................................................................ 59
11 TROUBLESHOOTING ............................................................................................ 64
OTHER RELATED DOCUMENTS
A - Parts Manual
B - User Card
C - Service Card
D - Order Form
E - Parts Return Form
9.2 Brewer Assembly ................................................................................. 56
9.3 Water Outlet Valves .............................................................................. 57
9.4 Hot Water Tank ...................................................................................... 58
10.1 Draining the Hot Water Tank ................................................................ 59
10.2 Shutdown / Storage .............................................................................. 60
10.2.1 Storing the Brewer Assembly ............................................. 60
10.3 Brewer Assembly ................................................................................. 61
10.4 Microcontroller (EPROM) ..................................................................... 62
10.5 Main Board............................................................................................. 63
10.6 Keypad Membrane ................................................................................ 63
11.1 “Error” Appearing on the LCD Screen ............................... 64
11.2 Other Message Possibilities on the LCD Screen ............................... 65
11.3 Particular Cases .................................................................................... 66
4
The Petite-X Revision B 03/2010
Page 5

SERVICE MANUAL AVALON La Petite-X Single-Cup Brewer
1 INTRODUCTION
Cafection manufactures the AVALON La Petite-X Brewer based on its original Avalon single-cup
technology and is complemented with the coffee of your choice!
The Avalon family of brewers are designed and engineered based on Cafection’s 35 year experience
in the ofce Coffee Service industry. This convenient, reliable and user friendly system assures fresh-
tasting gourmet coffee, delicious hot chocolate and succulent cappuccinos whipped to perfection,
every time, any time.
The Avalon La Petite-X brewer offers 3 choices of whole bean coffee that can be mixed with soluble
products upon request as well as gourmet hot chocolate, americano and hot water.
All products are available in 2 adjustable cup sizes;
Small and Large; from 5 to 12 oz.
In the following pages, you will nd clearly illustrated and easy-to-follow instructions regarding:
· Safety Instructions
· Reference Drawings
· Controls and Features
· Initial Setup
· Service Software
· Cleaning and Sanitizing
· Preventive Maintenance
· Servicing Parts
· Troubleshooting
Introduction
BEFORE YOU START
These brewers have been manufactured to comply with the highest sanitation, safety and performance
standards. To maintain this degree of safety and performance, it is important that the installation and
maintenance be performed in accordance with the recommendations made in this service manual. Any
changes to the construction or wiring can be hazardous to the user. The brewer must not be altered
in any way and only genuine replacement parts from Cafection must be used for the preventive
maintenance and repair.
This document refers to the specications, parameters and user interface of the Avalon
La Petite-X Brewer and may differ from the previous Avalon models.
The steps outlined in “Initial Set-Up” of this manual must be completed before
plugging in the Brewer!!!
The Petite-X Revision B 03/2010
5
Page 6
SERVICE MANUAL AVALON La Petite-X Single-Cup Brewer
2 SAFETY INSTRUCTIONS
Basic safety precautions should always be followed when using electrical appliances.
Read all instructions before using this brewing equipment.
Food-Contact Parts
We recommend that you clean and sanitize all food-contact parts prior to installation and use.
See the cleaning and sanitizing section for more details
Warnings
· To minimize the risk of re or electric shock, do not expose this equipment to rain or moisture.
· Do not immerse this equipment in water; it could lead to electric shock or other malfunctions.
· Do not use this equipment other than for its intended use.
· This equipment contains hot water; never move when full.
· This brewing equipment is intended for indoor installation only.
Power supply
· Always use a grounded 120V AC 60Hz socket outlet rated for 15Amps service.
· Each piece of brewing equipment must have its own electrical outlet, on a dedicated circuit.
· Extension cords must not be used.
· This equipment is equipped with a polarized alternating current line plug (one blade wider than the
other). Only use this plug with an outlet in which the prongs can be fully inserted. Avoid any exposure
of the prongs on the polarized plug.
Disconnect the equipment if:
Safety Instructions
· Damage is done to the power cord;
· The equipment doesn’t work properly;
· The temperature of the power cord or plug increases dramatically during use;
· Unusual conditions occur.
FAILURE TO COMPLY CAN CAUSE EQUIPMENT DAMAGE.
6
The Petite-X Revision B 03/2010
Page 7

SERVICE MANUAL AVALON La Petite-X Single-Cup Brewer
3 WARRANTY
Procedures and Conditions for Goods Returned
All warranty claims and products returns processed by our technical department is available Monday
through Friday from 8:30 to 17:00 or alternatively by email service@cafection.com
3.1 Warranty Policy
Cafection provides a warranty period as follow unless otherwise conrmed in writing:
· All parts in contact with water (release valve, heating element, thermostat, sensor, valve
· water inlet and tank eet) 3 months after the invoice date.
· All other parts of the coffee brewer: 12 months from the invoice date.
The warranty covers any malfunction due to manufacturing defects and does not cover defects
resulting from negligence, improper installation or misuse of the product or equipment failure due to
excessive mineral deposits or the quality of local water. Any damage, alteration of serial #, date or
codes will void the warranty.
Obtaining a Return Merchandise Authorization number (RMA)
Before obtaining a return number, you should rst contact our Technical Department to discuss the
disruption and conrm that the product should be returned for further testing.
You will need to provide the following information:
· Company name and contact;
· Invoice #, product #;
· Quantity;
· Serial #;
· Detailed description of the problem.
Our Technical Department will then send you a return form with an RMA number and product (s)
authorized for return.
The return numbers are valid for 30 days after the date issued. Any RMA number over 30 days must
be revalidated with our Technical Department.
3.2 Returning Products
After obtaining a RMA number, you must ship the product or products to the following address:
Cafection Enterprises Inc.
Attn: Service Department
2355 Dalton
Quebec (Quebec) G1P 3S3
Canada
Warranty
The Petite-X Revision B 03/2010
7
Page 8
SERVICE MANUAL AVALON La Petite-X Single-Cup Brewer
The return shipping charges will be assumed by us for products guaranteed (only under authorization
of the Technical Department). If we paid for the transportation and the product is not covered under
warranty, you will be charged back the freight.
All products must be packaged carefully to avoid damage during transportation. Whenever possible,
please use the original packaging. Any product damaged in transit or received in unsatisfactory conditions
will not be covered by the warranty.
Cafection will not be held responsible for any loss or damage incurred during shipment.
All products must be accompanied by the return form with the valid return number and the return number
must be clearly indicated on the outside of the package.
3.3 Returned Product Procedures
The RMA number does not guarantee the product will be accepted under guarantee.
Depending on the nature of the problem, after testing the defective product, we will authorize the repair or
replacement by identical or equivalent specications. It will then be determined whether there will be full
or partial refund of the product.
Warranty
If the product is no longer covered under warranty or returned damaged, we can get your item repaired or
placed at a price that will be determined depending on the product.
If the product is returned in unsatisfactory conditions, it will be subject to management fees of $35 and the
guarantee may be refused.
All returned products involving no malfunction will be subject to administrative fees and test of
$35, plus the freight charges associated with the return.
Advance Replacement
You can also request an advance replacement. In this case, it will be necessary to send an order for the
anticipated replacement and follow the procedure explained above to return the defective product. You
will receive an invoice for the advance replacement.
After testing, if the product is found defective, we will send you a credit.
Cafection Enterprises Inc
2355, Dalton
Quebec, (Quebec) G1P 3S3 Canada
Tel.: 1-800-561-6162
Fax: 1-800-463-2739
E-mail order@cafection
www.cafection.com
Cafection is committed to providing prompt and efcient service and an excellent customer service. Our intention is to
process all returns within 15 days after the date of receipt to ensure the ongoing satisfaction of our customers.
8
Last update, March 2010, G.A.
The Petite-X Revision B 03/2010
Page 9
SERVICE MANUAL AVALON La Petite-X Single-Cup Brewer
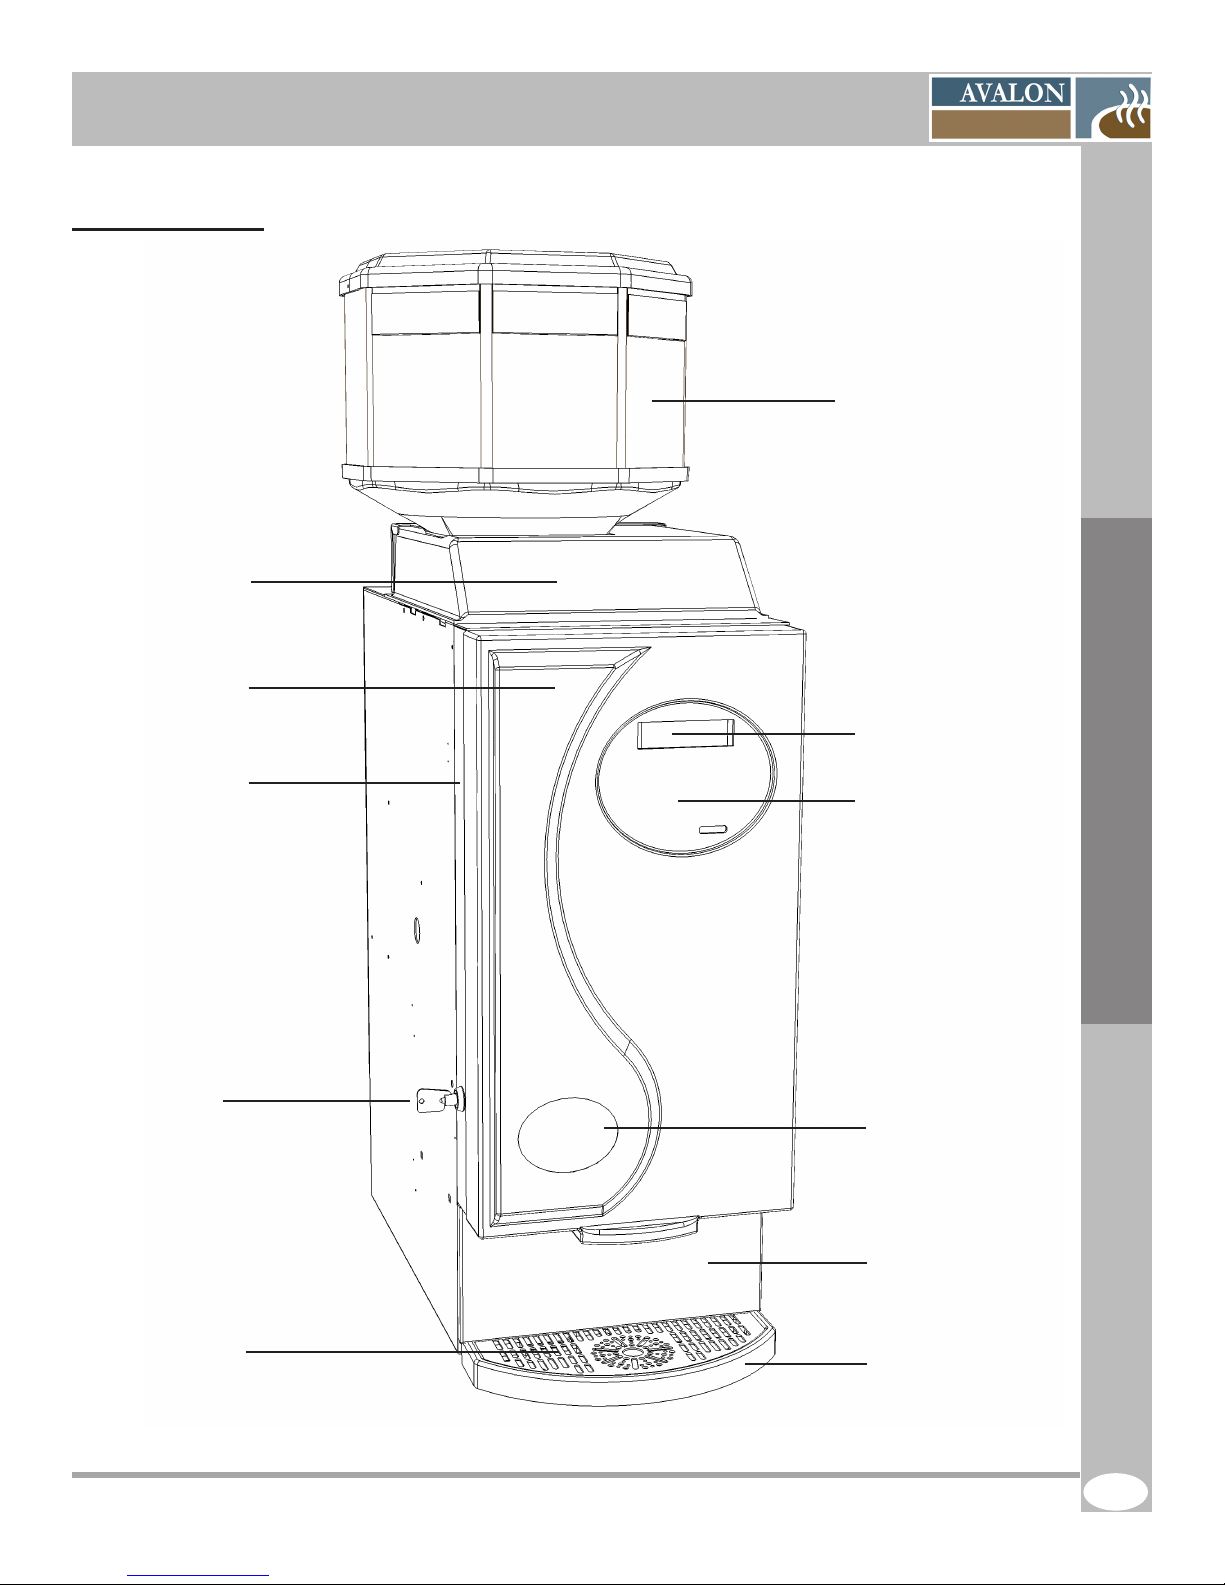
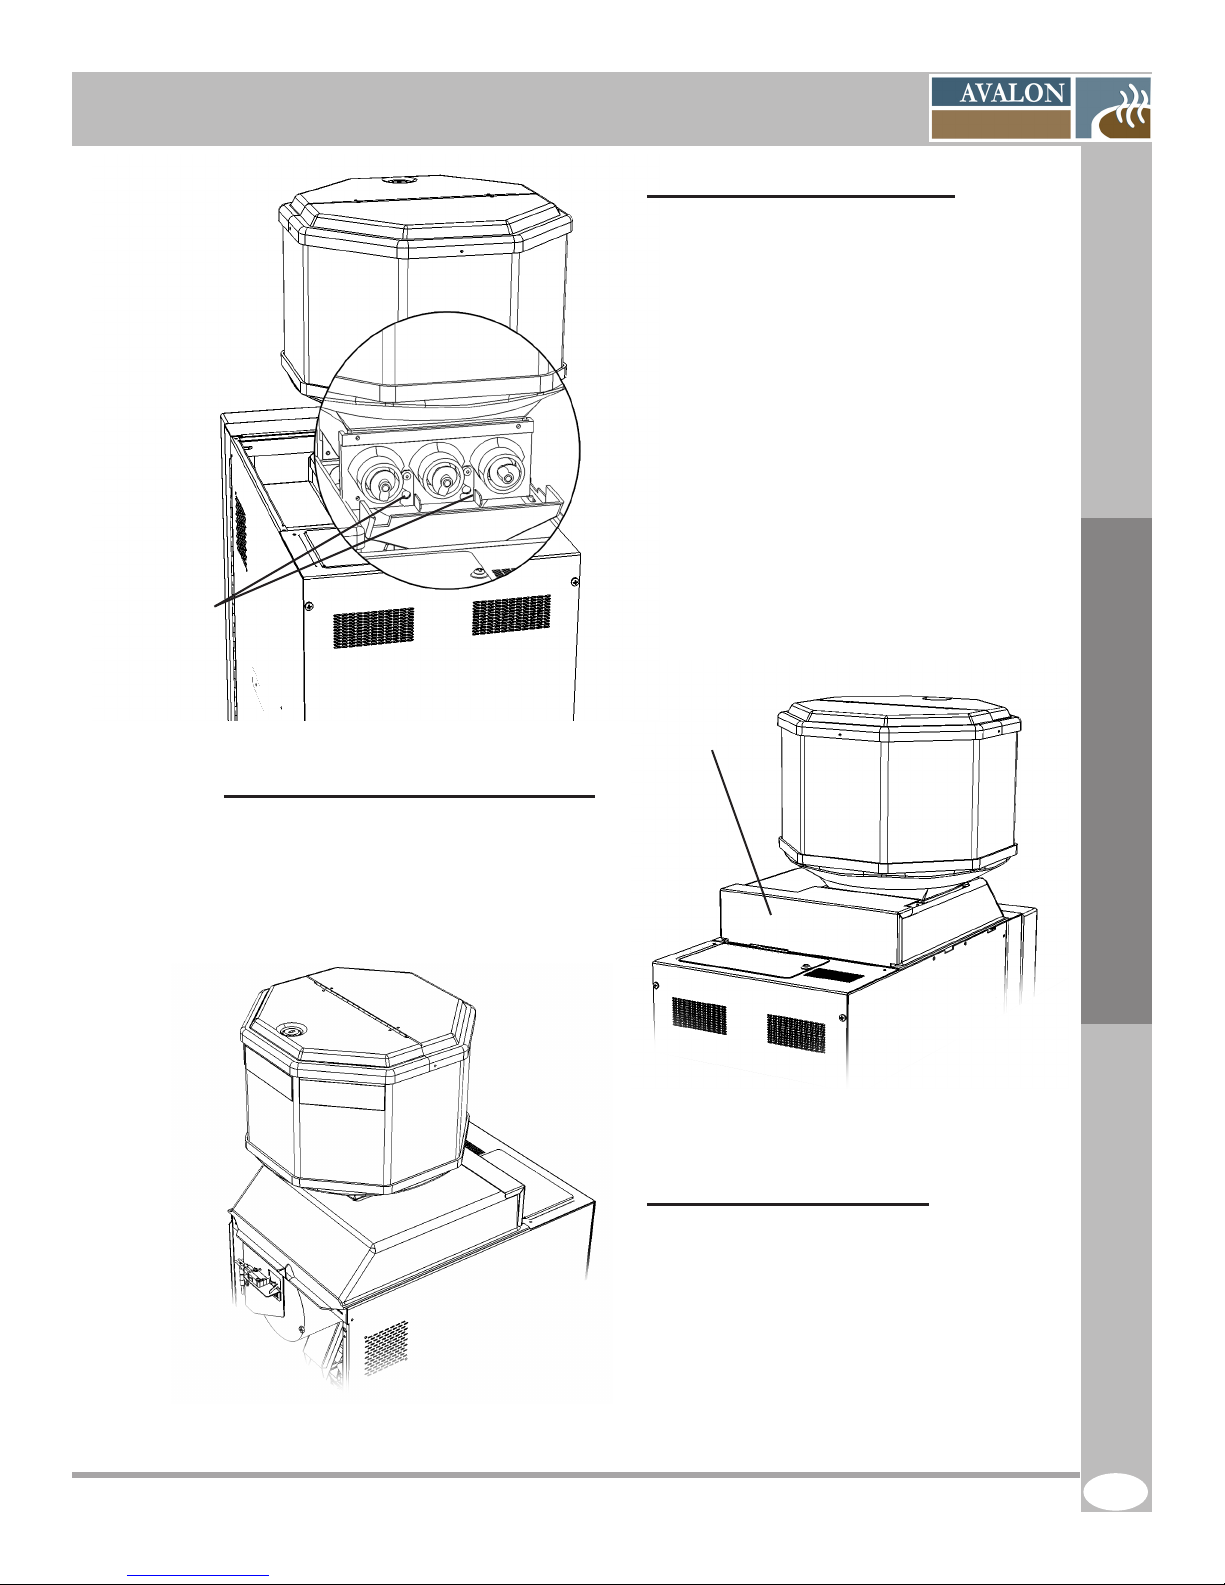
4 REFERENCE DRAWINGS
4.1 External View
Plastic Top Lid
Plastic Front
(Fascia)
Metal Door
3 Whole Bean
Canister
Reference Drawings
Message Display
(LCD)
Membrane Keypad
Door Lock
Drip Tray Grill
The Petite-X Revision B 03/2010
Light
Back Splash
Drip Tray
9
Page 10
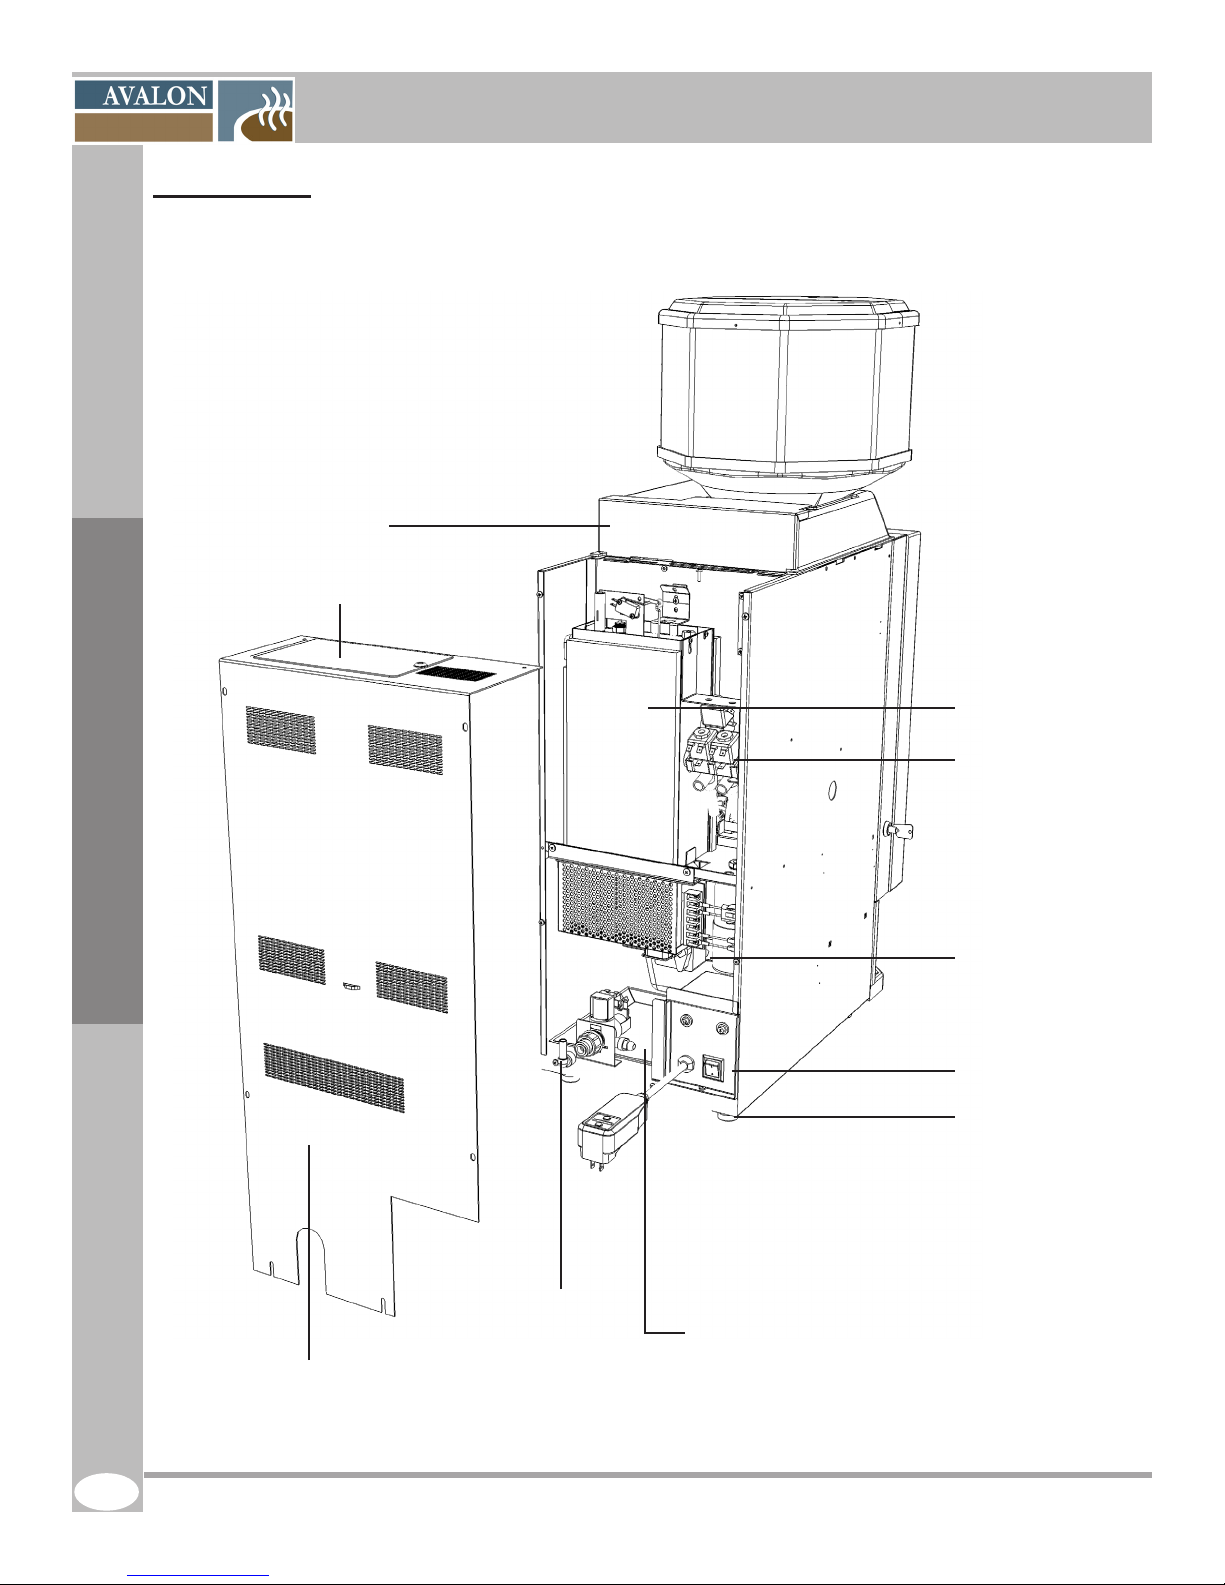
4.2 Rear View
Plastic top tting part
Door for easy tank access
SERVICE MANUAL AVALON La Petite-X Single-Cup Brewer
Reference Drawings
Water Tank
Outlet Valve
Overow Cup
Breaker Box
Level Glides
Back Panel
10
Water Inlet
Overow Tray
The Petite-X Revision B 03/2010
Page 11
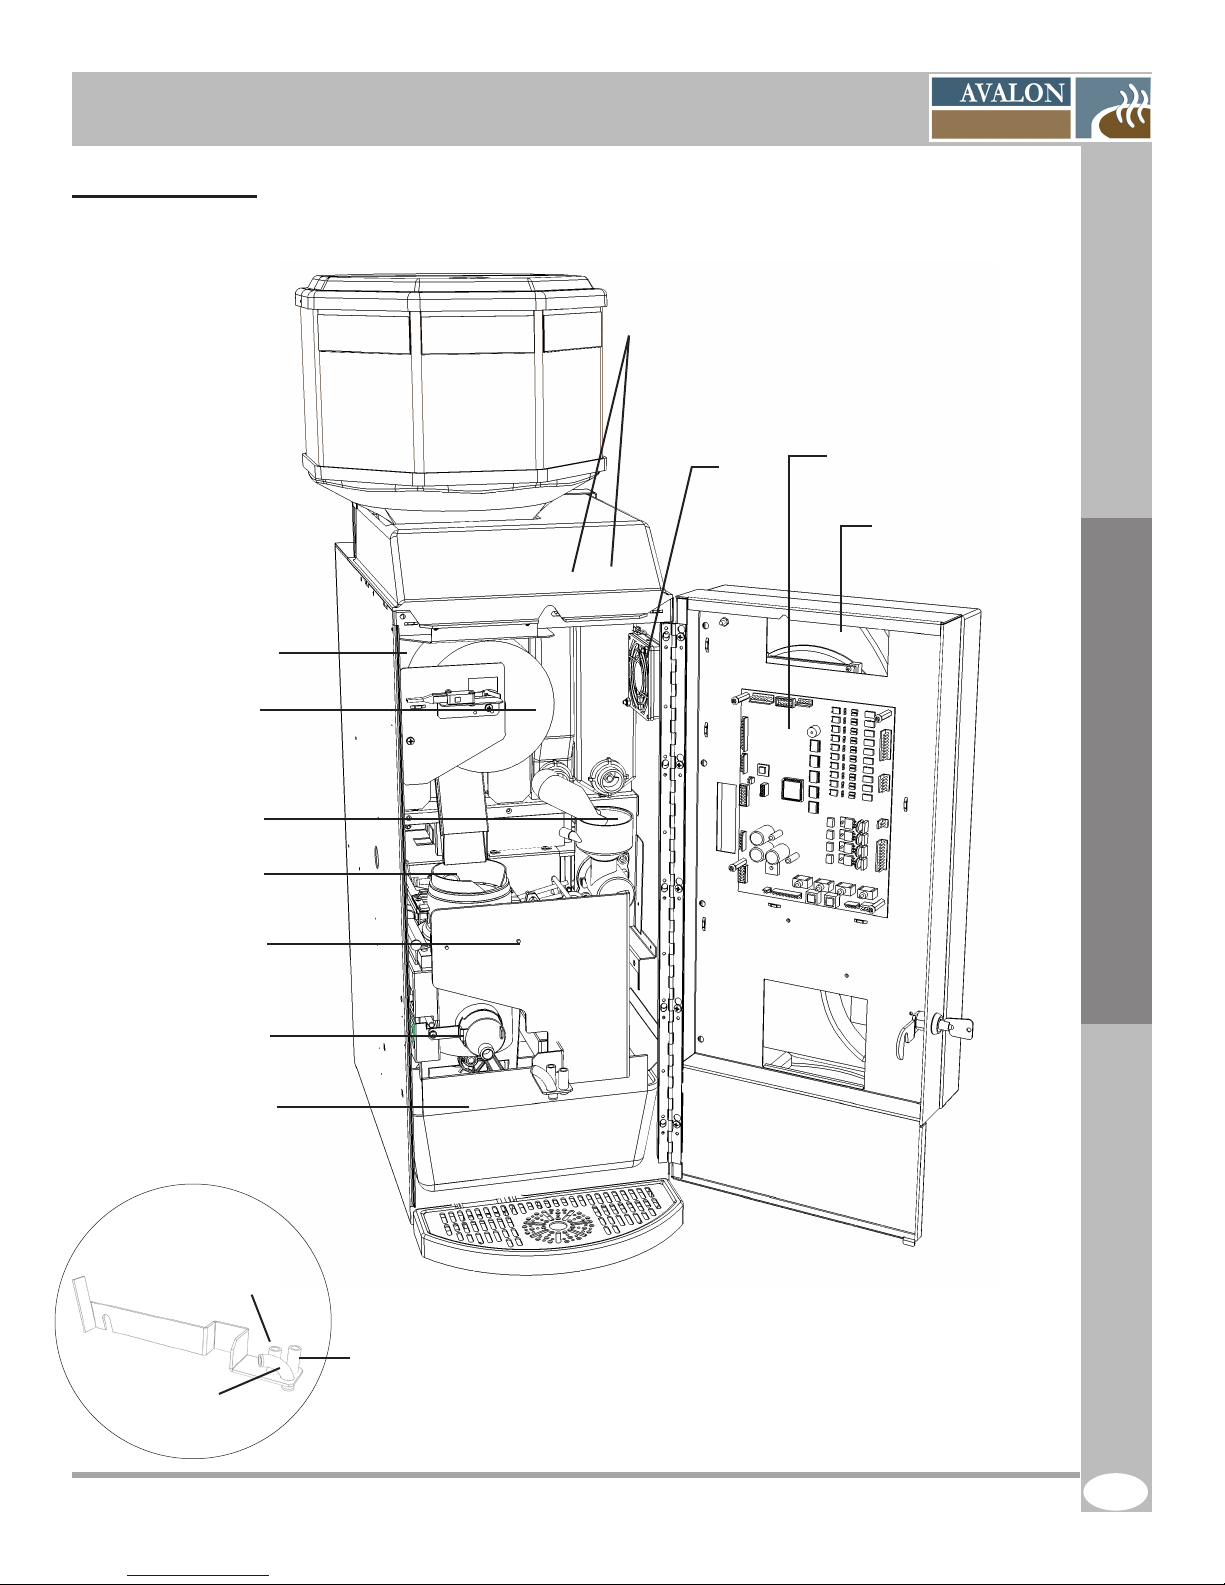
SERVICE MANUAL AVALON La Petite-X Single-Cup Brewer
4.3 Internal View
Soluble Canisters
Fan
Main Board
(See P. 16)
Display (back)
Coffee Grinder
(Behind the protector)
Filter Paper
Soluble Mixing
Chamber
Brewer
Front Panel
Spout
Waste Basket
Reference Drawings
Hot Water
Soluble Products
#1 and #2
Coffee
The Petite-X Revision B 03/2010
11
Page 12
SERVICE MANUAL AVALON La Petite-X Single-Cup Brewer
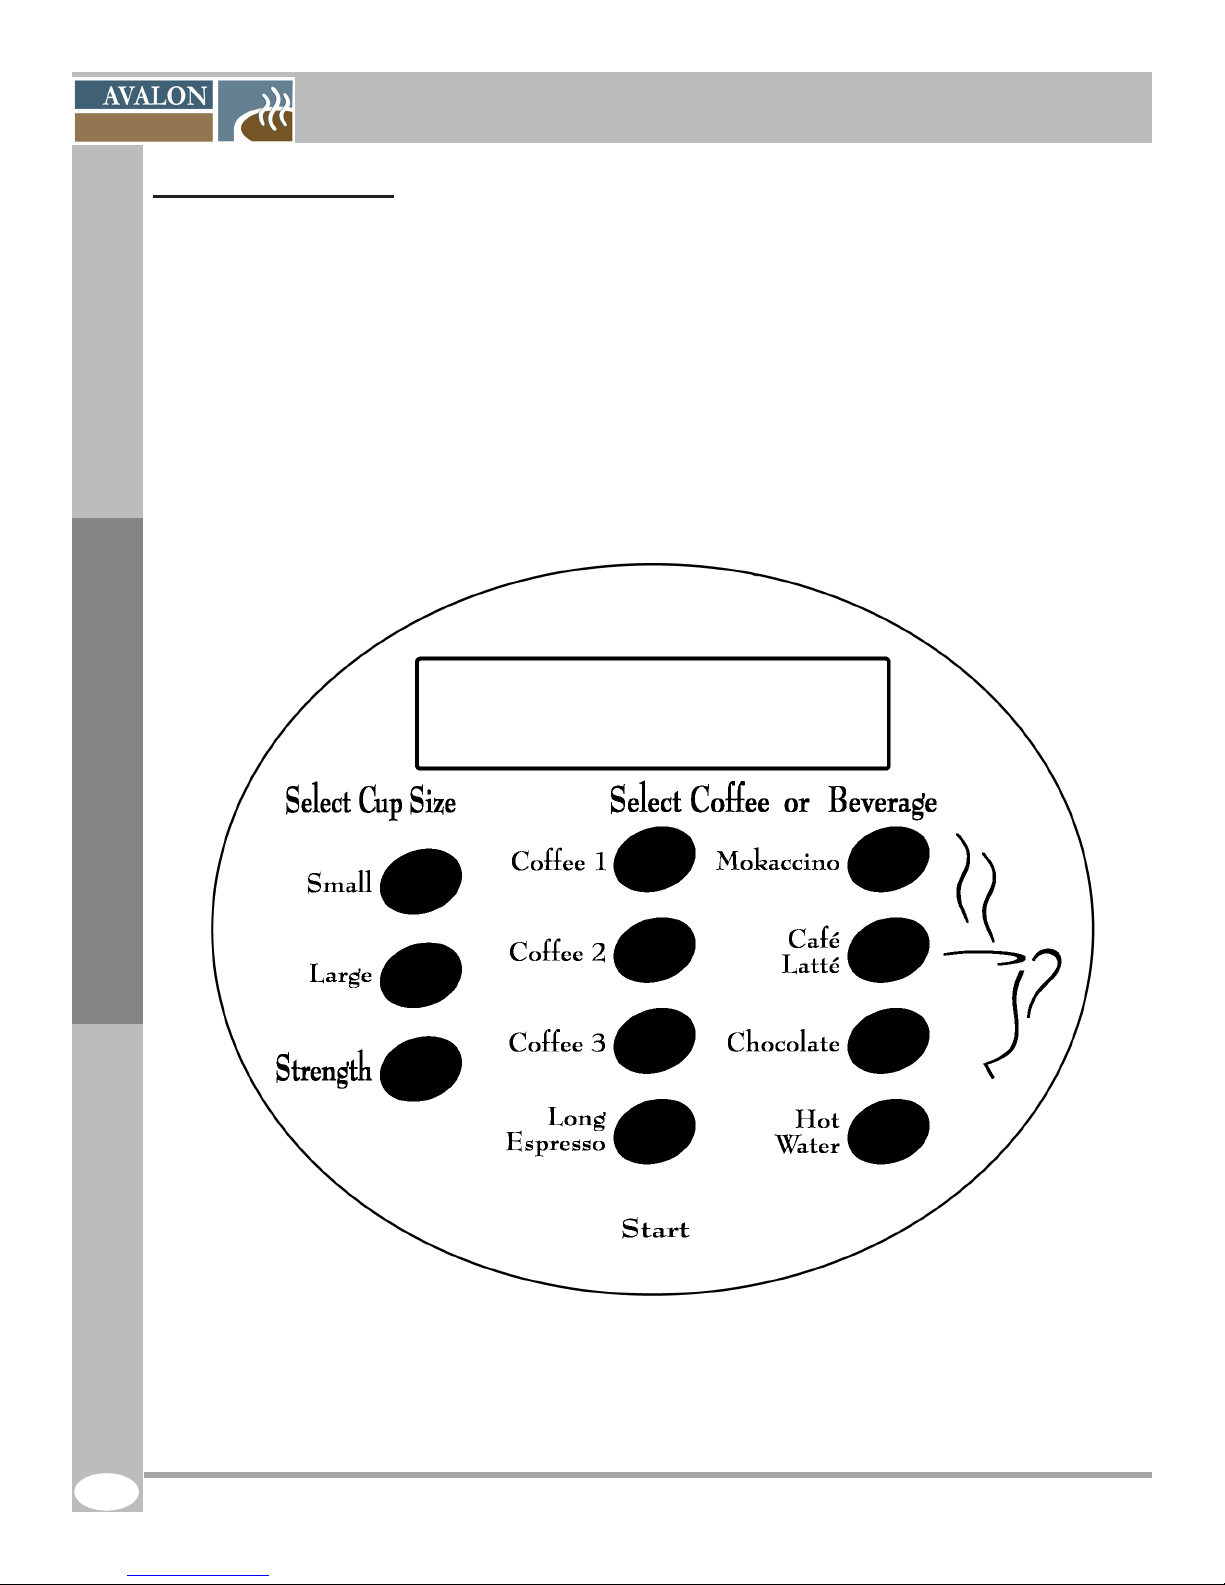
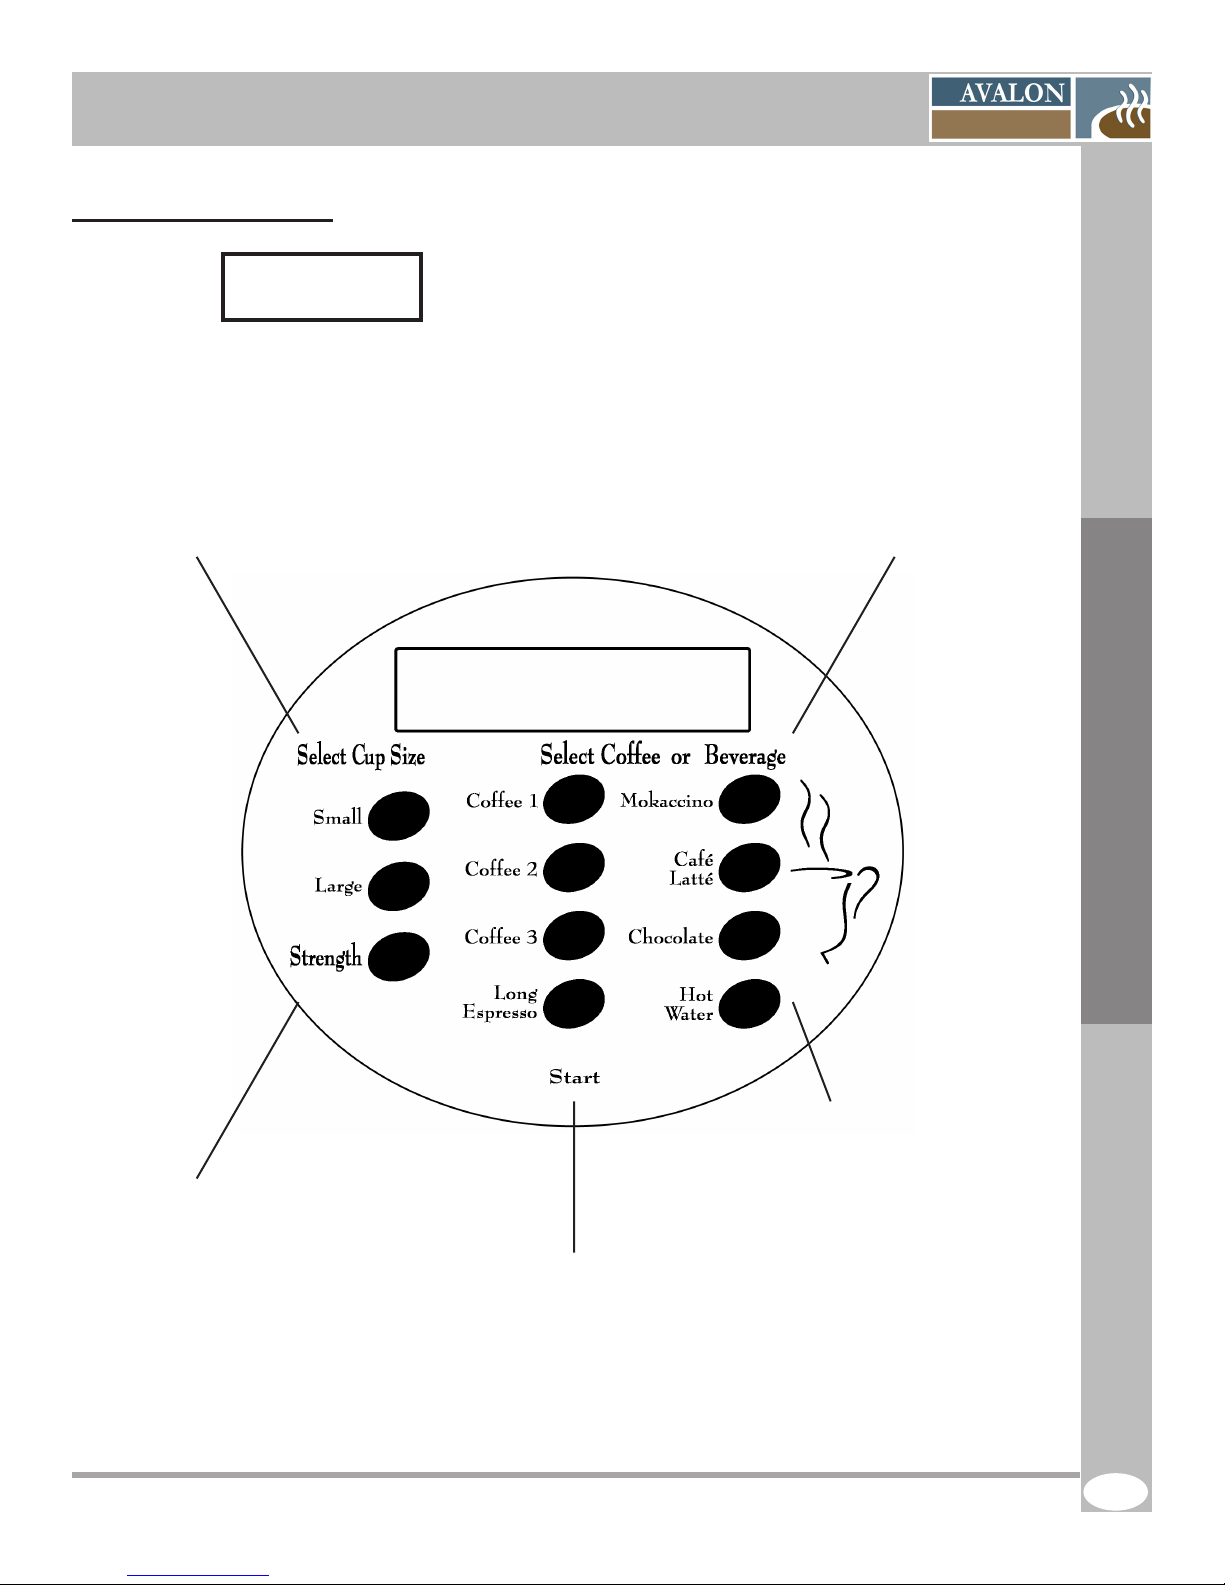
4.4 Membrane Keypad
The user-friendly membrane keypad buttons are clear
and simple:
1. Place your cup
2. Choose a size
3. Choose a beverage
4. Choose your strength
5. Press Start to brew
The LCD will indicate the steps and communicate
messages.
Reference Drawings
12
The Petite-X Revision B 03/2010
Page 13
SERVICE MANUAL AVALON La Petite-X Single-Cup Brewer
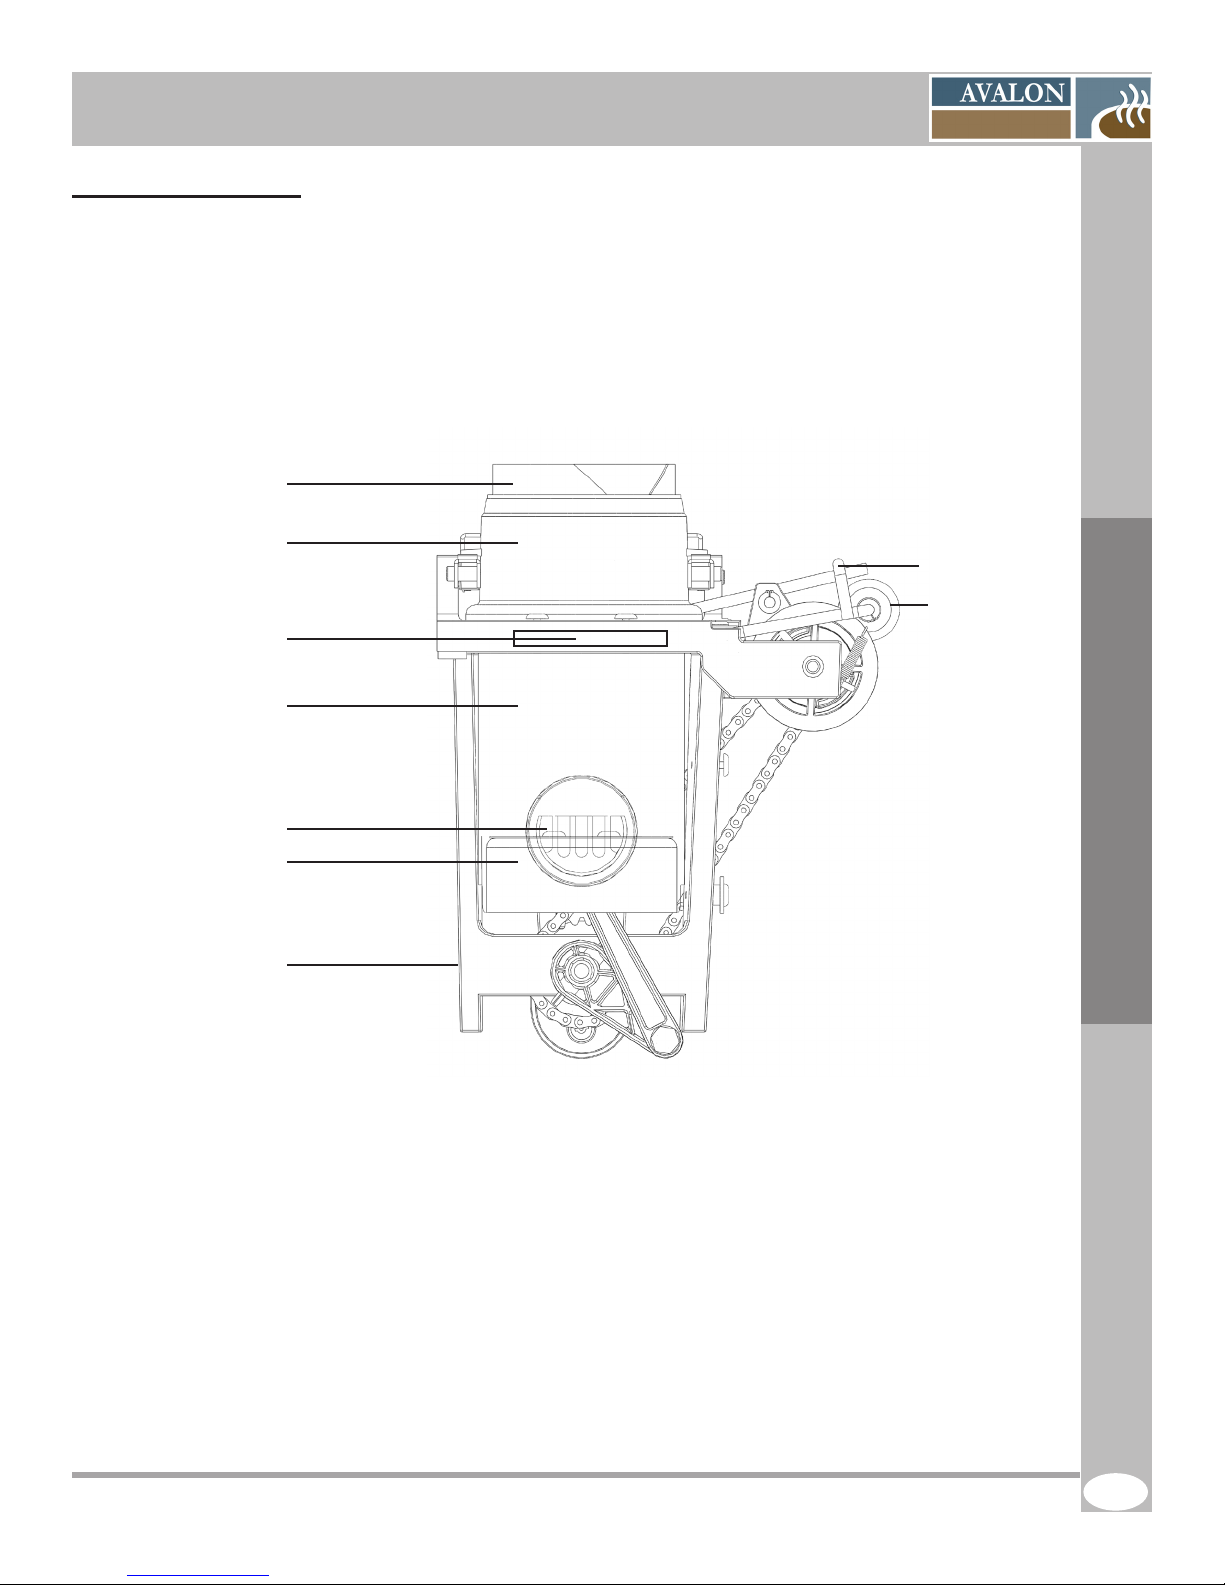
4.5 Brewer Assembly
The platinum brewing system is in a class of it’s own in the single cup coffee business and is
specically designed for Avalon units. Its vacuum extraction process, joined with a high quality lter
paper, brews a coffee of unsurpassed quality to meet the taste prole of the most dicerning coffee
drinkers. Best of all, this is available for every cup of coffee at any time of day. See the following page
for the description of the brewing process.
Brewer funnel
Brew chamber
Serial number
Yoke
Wheel
Reference Drawings
Cylinder
Coffee exit
Piston
Aluminum frame
The Petite-X Revision B 03/2010
13
Page 14
SERVICE MANUAL AVALON La Petite-X Single-Cup Brewer
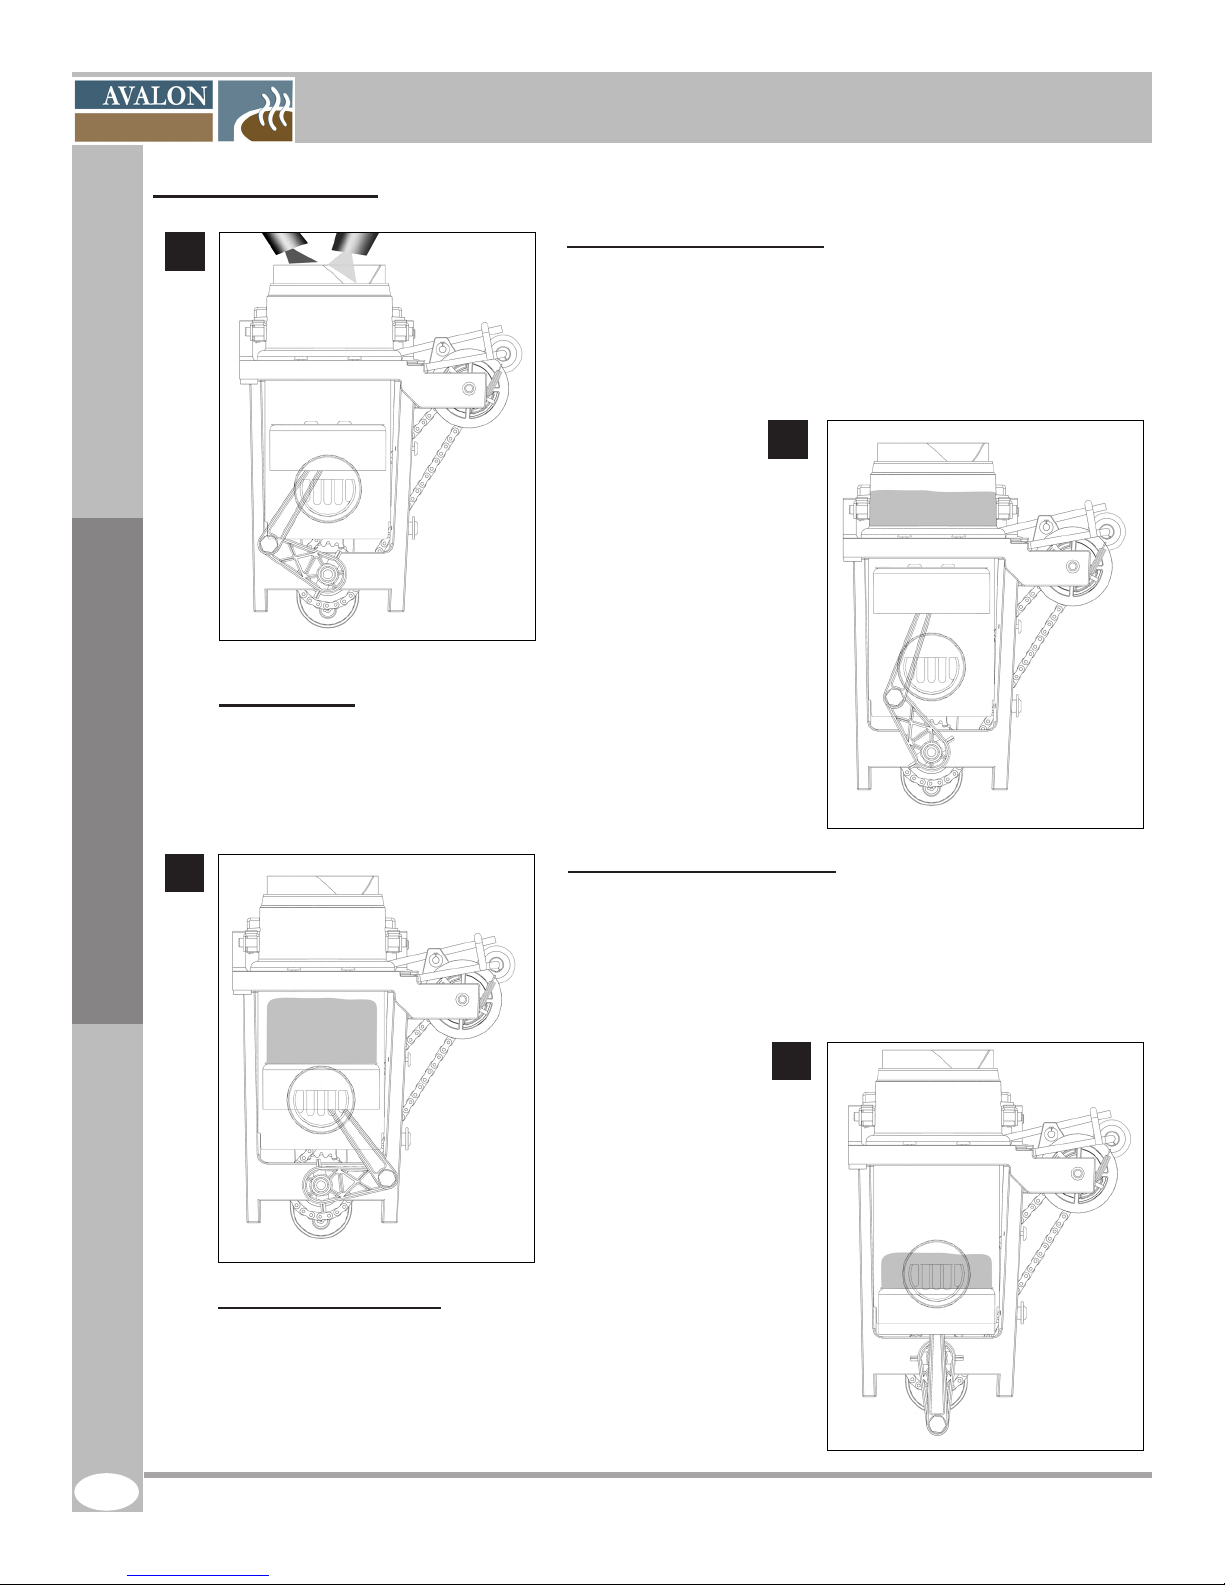
4.6 Brewing Process
1
Step 2 Pauses
Once the piston has reached its top dead point, it will pause to
allow the coffee to brew to the appropriate strength. There will
be one shot of water before the descent to rinse the chamber.
Step 1 Ascent of the piston
The ground coffee and the water are dispensed into the
brew chamber during the ascension of the piston. This
compresses the air in the cylinder and forces it through the
coffee mixture in the brew chamber thereby agitating the
brewing coffee.
2
3
Reference Drawings
Step 4 Product delivery
The piston follows its course heading to its low dead point.
Distribution of coffee through the spout begins once the piston is
below the coffee exit. Meanwhile, the brew chamber lifts to allow
the paper to advance thereby discarding the spent grounds into
the waste chute.
Step 3 Descent of the piston
The descent of the piston will create a vacuum thereby extracting
the coffee from the grounds through the lter paper and into the
cylinder. One last pause will be to allow all the coffee to drip from
the brew chamber.
4
14
The Petite-X Revision B 03/2010
Page 15
SERVICE MANUAL AVALON La Petite-X Single-Cup Brewer
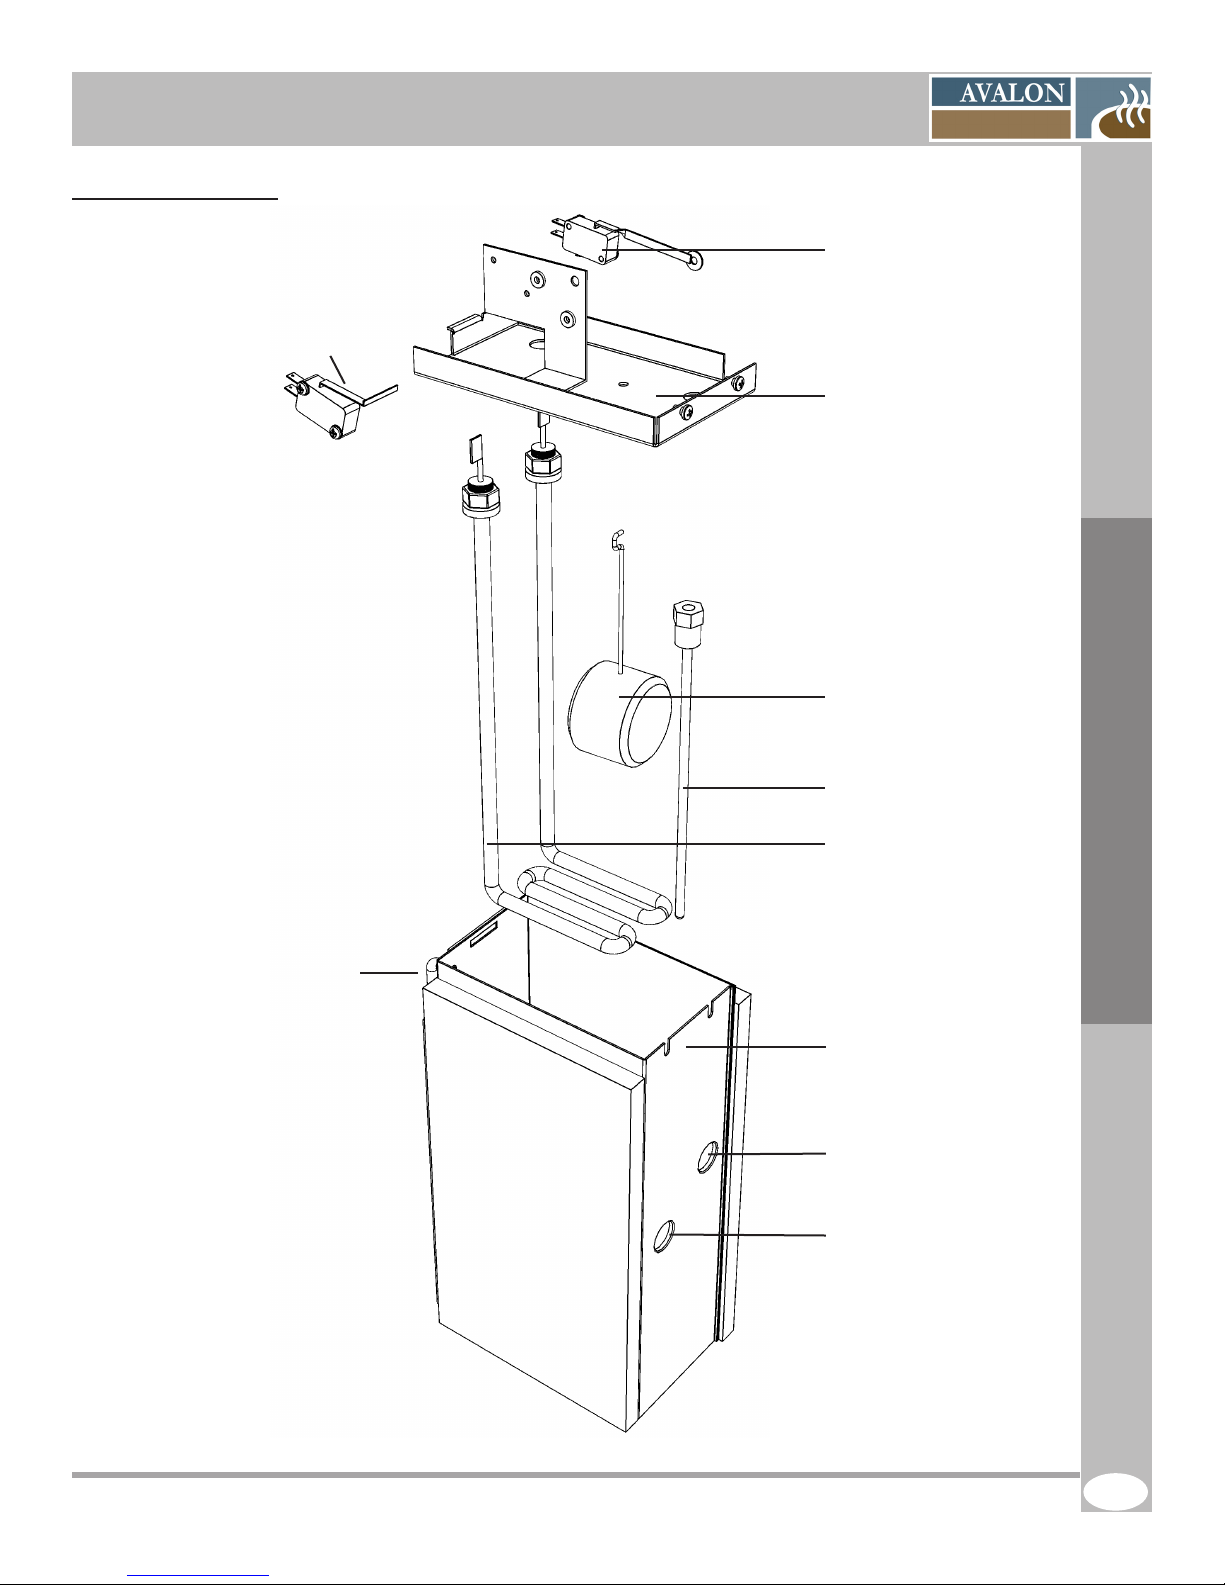
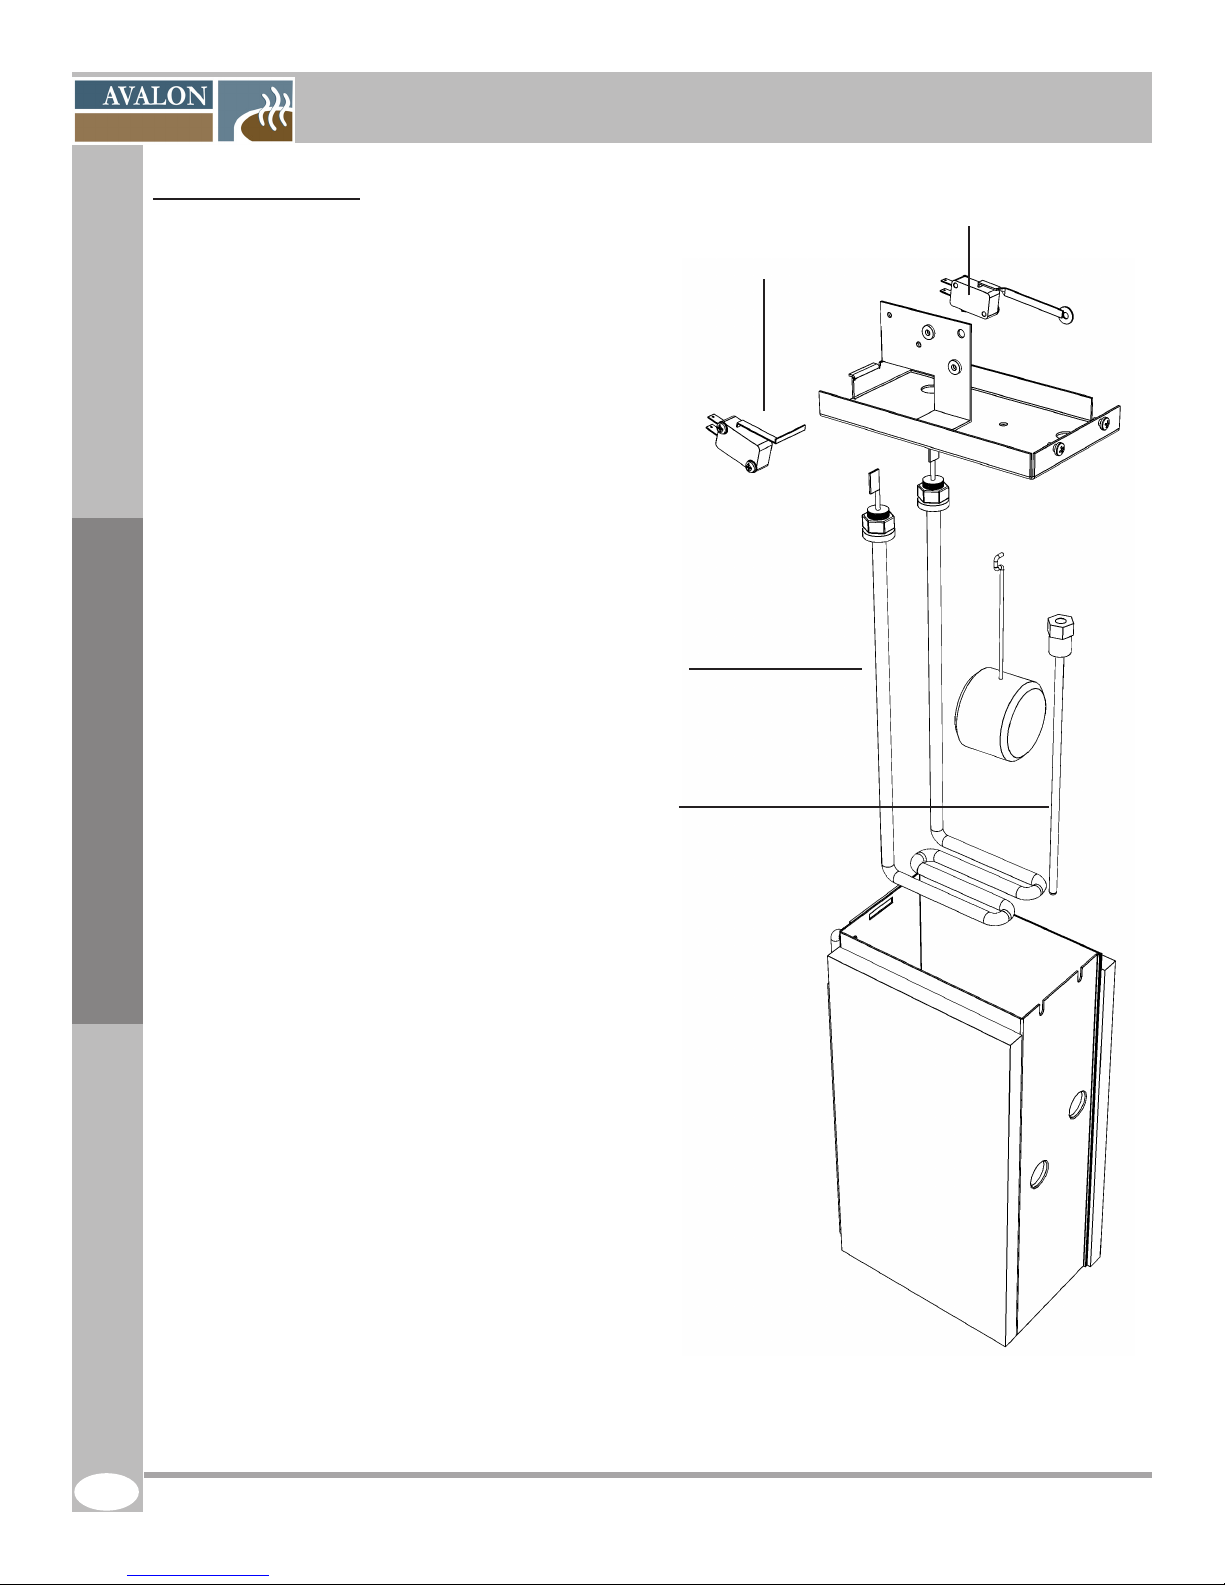
4.7 Hot Water Tank
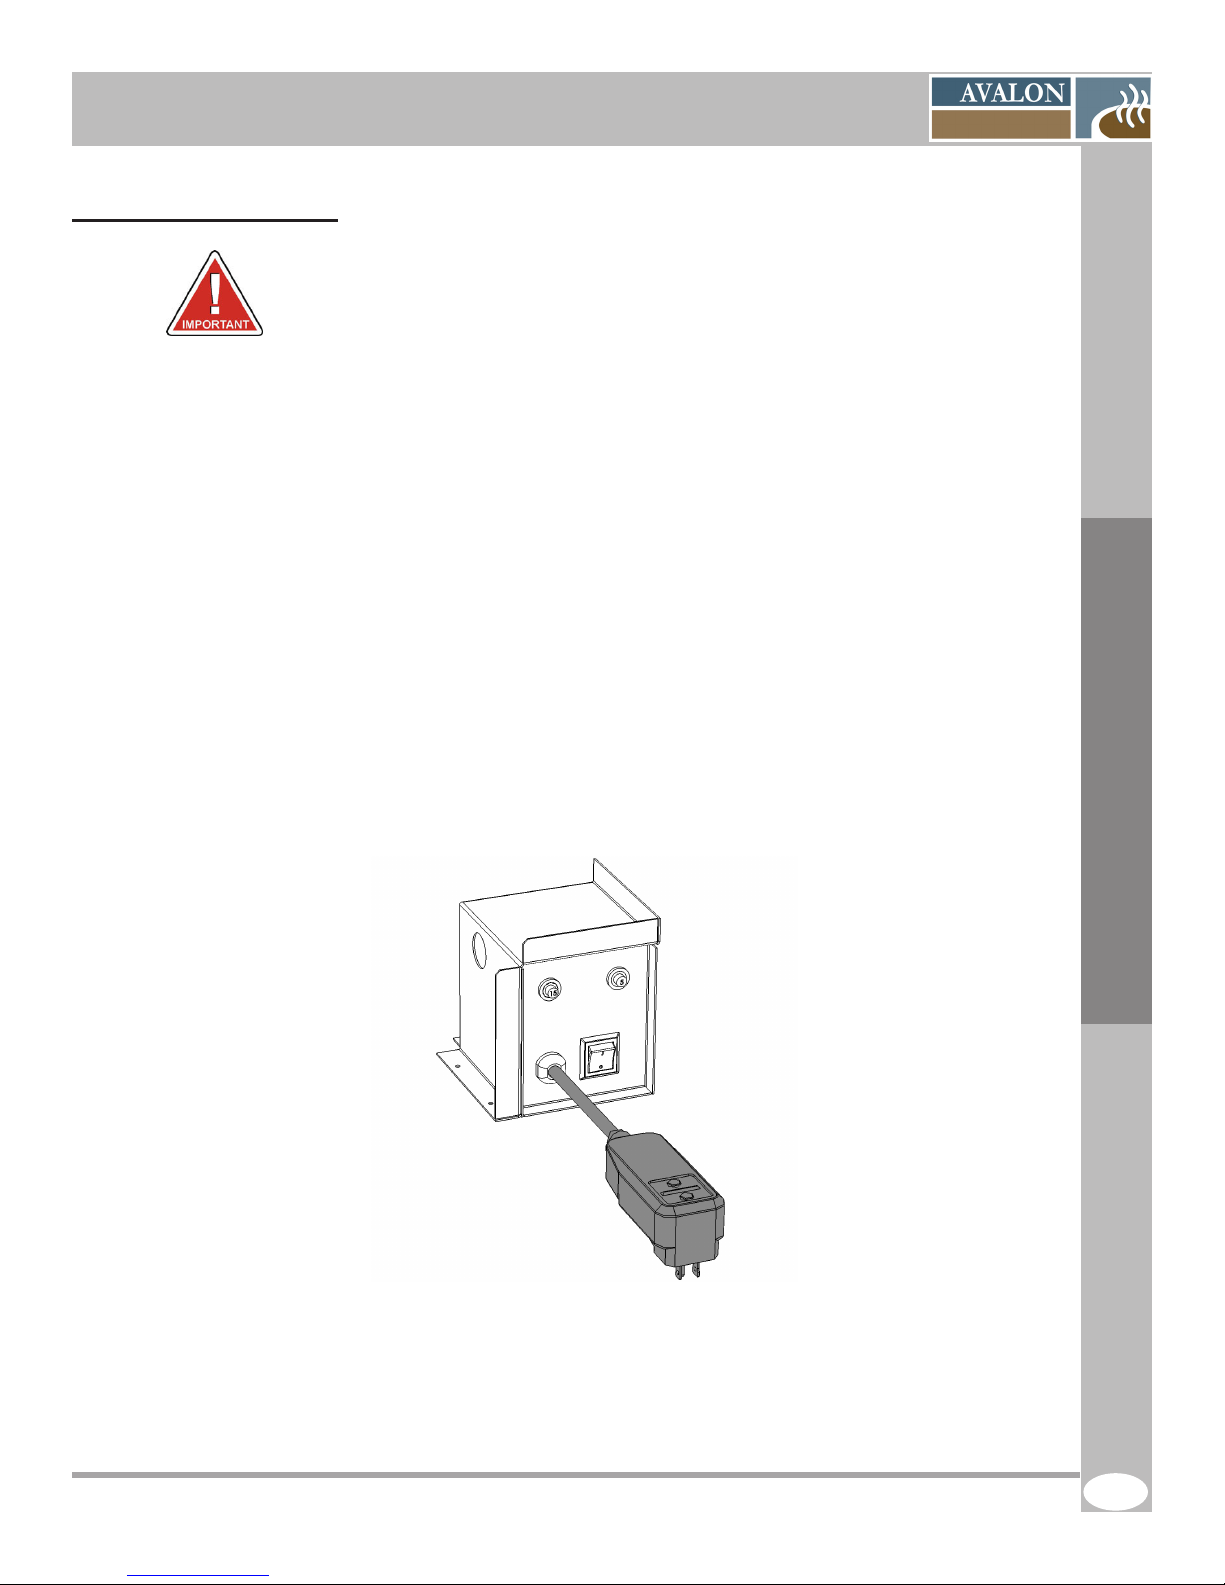
Heater Safety Switch
Water Level Switch
Water Tank Lid
Reference Drawings
Overow Exit
Water Float
Thermostat Probe
Heating Element
Tank
Valve Exit
Silicone Plug
The Petite-X Revision B 03/2010
15
Page 16
SERVICE MANUAL AVALON La Petite-X Single-Cup Brewer
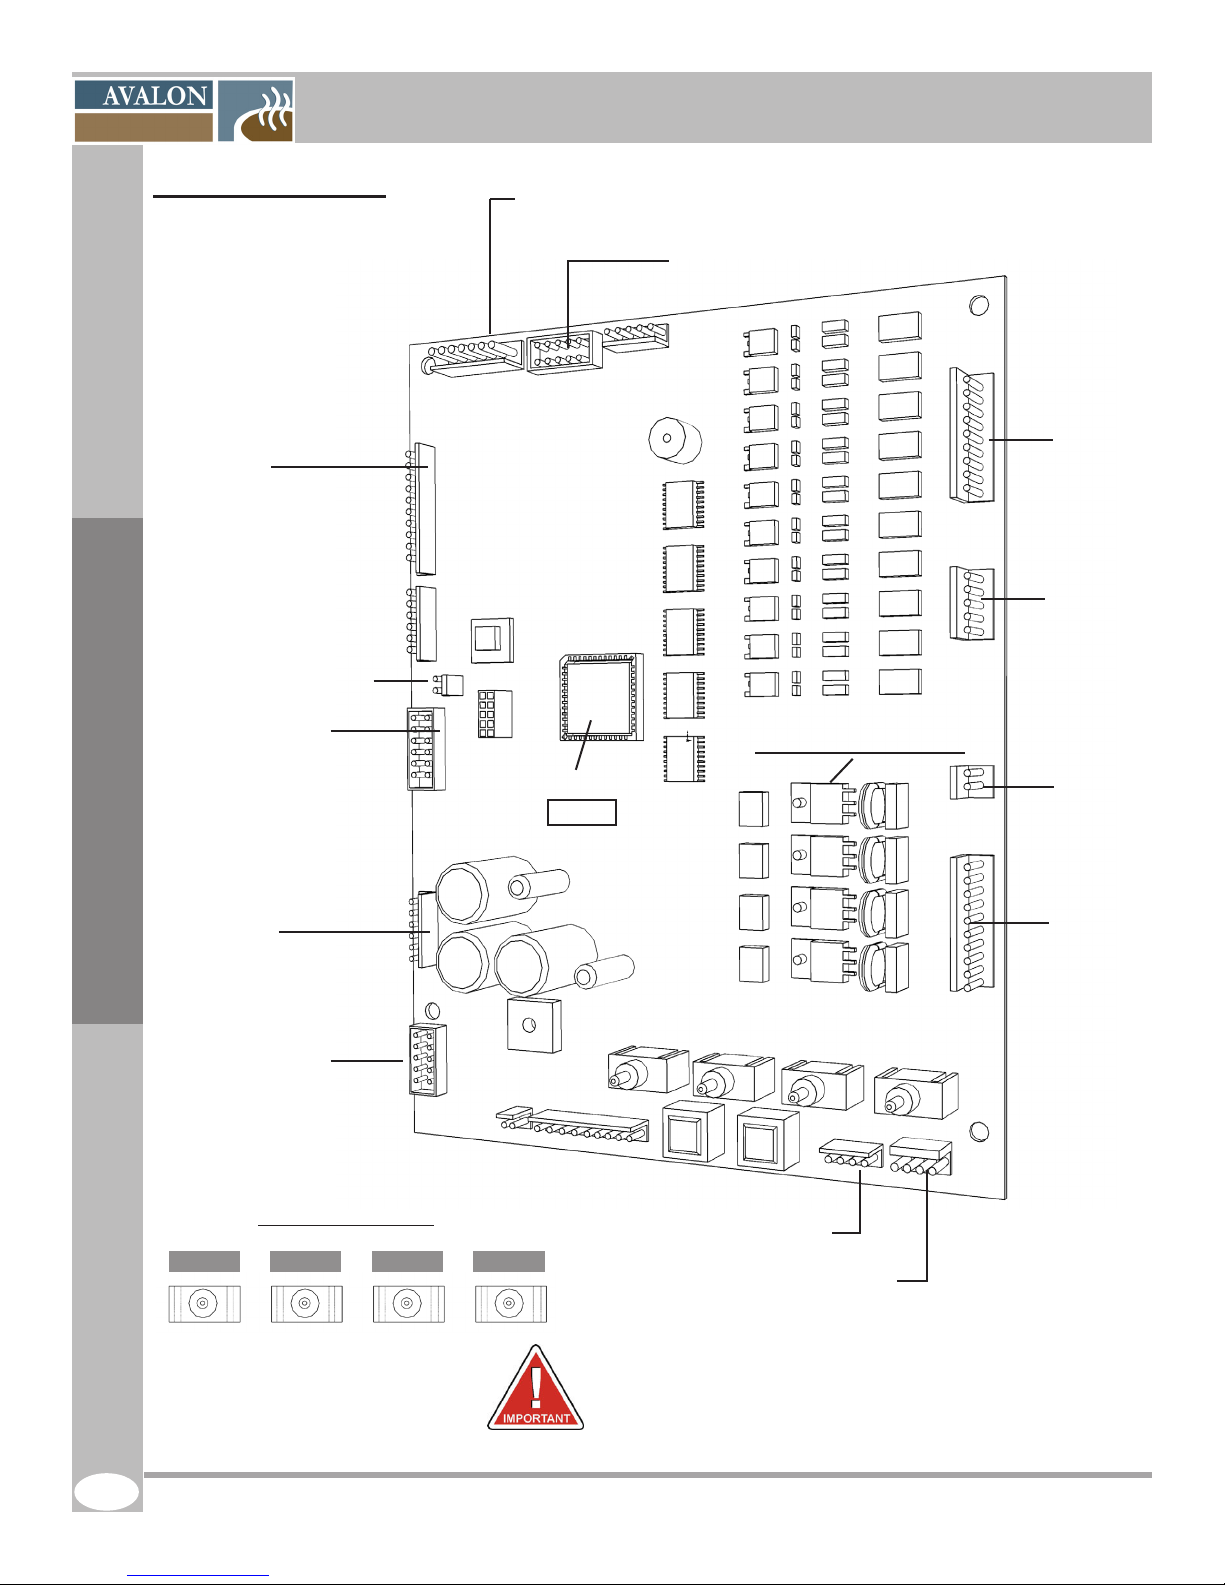
4.8 Main Board (PCB)
J10 Numeric Input
J8 - LED
J24 LCD Display
J11 - MDB port - Coinchanger / bill acceptor
Expansion #2 - Thermostat board
Reset
HIGH VOLTAGE AREA
Microcontroller
SN #
J18 - 24V
Output
J27 - 24V
Output
J12 - 120V
Input
Reference Drawings
J16 Keypad Membrane
J14 - N/A
Switch identication
FREE VEND BREWER INGREDIENT
J19 - 120V
Output
J6 - 24V DC Output
WATER
J3 - 24V AC Input
This is a schematic reference drawing only. Not to
scale.
The equipment should always be unplugged from the
electrical outlet before servicing any components within
this main board assembly.
16
The Petite-X Revision B 03/2010
Page 17
SERVICE MANUAL AVALON La Petite-X Single-Cup Brewer
4.8.1 Main Board (PCB) Descriptions
Interactive switches and buttons
1. Reset Button (Red)
Pressing this button initializes the 3 Bean
Brewer (same as the on/off switch)
2. Counter Button (SW1) White
Pressing this button gives you access to the tally
counter data.
3. Setup Button (SW2) Black
Allows access to the product and brewer software
parameters.
4. Free Vend Switch (SW3)
ON, this switch allows users to have free
beverages.
5. Brewer Switch (SW4)
ON, the switch lifts the brewer head to allow the
lter paper replacement. The switch must be in
the OFF position for default user mode. This will
reset the bin counter if activated.
6. Ingredient Switch (SW5)
Allows the neutralization of the ingredient
dispensing motors. At OFF, the motors will not
dispense ingredients.
7. Water Switch (SW6)
Allow the neutralization of the 4 water dispensing
valves. At OFF, the valves will not dispense water.
Interactive switches and buttons Green LEDs
The green leds will illuminate to indicate the
alarm that has been triggered.
DS18 - Drip tray overow
DS13 - Cam switch
DS14 - Filter paper required
DS15 - Water level switch ON
DS19 - Water level switch OFF
DS16 - N/A
DS17 - N/A
DS20 - N/A
DS25 - N/A
DS27 - N/A
DS26 - N/A
DS24 - N/A
DS23 - N/A
Red LEDs
The red leds will illuminate to indicate
the part is in use.
DS2 - Coffee #1 motor
DS3 - Coffee #2 motor
DS4 - Soluble #1 motor
DS5 - Soluble #2 motor
DS6 - Coffee hot water
DS7 - Soluble hot water
DS21 - Chute Solenoïde
DS22 - Brewer motor
DS10 - Inlet valve
DS8 - Hot water
DS9 - Brewer motor
DS12 - N/A
DS11 - Grinder
DS29 - Whipper
DS31 - Coffee #3
Reference Drawings
The Petite-X Revision B 03/2010
17
Page 18
SERVICE MANUAL AVALON La Petite-X Single-Cup Brewer
5 CONTROLS & FEATURES
5.1 Features & Benets
We understand the need for individuality, that’s why we offer you all the possibilities, and you choose
the coffee - whether you prefer organic coffee, big brand names or locally roasted coffee, that choice is
yours with Avalon.
FEATURE BENEFIT
Electronically adjustable settings and features
Adjust the brewing settings to suit your
customer’s taste prole and the brand of coffee
they have chosen.
3 whole bean coffee selections
Multi-pricing capabilities
2 premium soluble selections
State of the art brewing technology
Control & Features
Interface
Service software
Offer 3 different Whole bean coffee varieties or
3 different brands, all in one unit.
Suit all your consumers’ needs - free vend,
vending.
Experience Hot Chocolate, Mokaccino, and
Café Latte whipped to perfection
any time a day.
The brewing system is in a class of it’s own in
the single cup business offering an unsurpassed
coffee beverage quality to meet the taste prole
of the best coffee connoisseurs.
Brewing steps and selection buttons are well
identied to guide the user through the ordering
process.
Allows the Operator to control features of the
machines, diagnostic messages and keep track
of all user data.
18
The Petite-X Revision B 03/2010
Page 19
SERVICE MANUAL AVALON La Petite-X Single-Cup Brewer
5.2 Specications
Beverage Selections
· 3 Whole Bean coffee selections
· Hot Chocolate
· Café Latte (50% coffee of your choice + 50% Powdered Milk)
· Mokaccino (50% coffee of your choice + 50% Hot Chocolate)
· Hot water
Canisters Capacities
Whole Bean Hopper 1: 4lbs
Whole Bean Hopper 2 : 2 lbs
Whole Bean Hopper 3 : 4 lbs
Soluble Hot chocolate: 2.50 lbs
Soluble Powdered Milk : 0.70 lbs
Machine Dimensions Optional Stand Dimensions Total Dimensions
Height: 39.75” 31’’ 70.75’’
Width: 13.5” 24’’ 37.50’’
Depth: 23” 26’’ 49’’
Weight: 90 lbs
Water Tank
Capacity: 0.8 gallon us (3.0 l)
Water valves: 1 simple valve ; 1 double valve
Heating element: 1250 watts
Electrical requirements
110 VAC
15 amp circuit
60 Hz
Control & Features
The Petite-X Revision B 03/2010
INTENDED FOR INDOOR USE ONLY
19
Page 20

SERVICE MANUAL AVALON La Petite-X Single-Cup Brewer
5.3 Automatic Safety Features
There are various safety mechanisims on this brewing equipment to prevent a machine malfunction
resulting in material damages.
Water Level Switch and Heater Safety Switch
The water level switch and the heater safety switch work together to ensure that the heating element is
deactivated if there is insufcient water in the tank. The water level switch is controlled by a oat and will
shut off the inlet valve when the tank is full. If the level in the tank gets too low, the heater safety switch
will be triggered and the heating element will be turned off.
Overow Switch
If the water were to boil, the tank water would go into the overow cup and all machine functions would
be turned off. This is a fatal error. This could also be triggered if the oat in the tank was defective or if the
machine was moved while the tank was full. The unit would appear Off.
Overow Drip Tray
This will be triggered if the drip tray is full or if something is leaking inside the unit. This will deactivate the
water inlet valve thereby preventing the element to heat. The unit would indicate “Drip tray full’.
Software Safety Features
At the time of the rst tank ll, the water inlet valve will close after 4.5 minutes of continuous demand. This
is the amount of time necessary to completly ll the tank. After the initial tank ll, the inlet valve will close
after 20 seconds of continuous demand. This safety mechanism is designed to prevent water from owing
Control & Features
continuously into the machine due to a mechanical malfunction. The unit will indicate “Low water level”
If the low water level switch is triggered but not the heater safety switch, the element will automatically be
shutoff. This is in the event of a mechanical failure of the heater safety switch.
20
The Petite-X Revision B 03/2010
Page 21
SERVICE MANUAL AVALON La Petite-X Single-Cup Brewer
5.4 Brewing Instructions
Hi!
Make Your Choice
Step 1: Place your cup:
Paper Cup or mug
Make sure you verify the capacity of your cup and center it on the cup stand.
Step 2: Choose a size:
This screen is always on when the equipment is in the default user mode.
Step 3: Choose a beverage:
Control & Features
Step 4: Choose the strength of the beverage:
The Petite-X Revision B 03/2010
Hot Water
To order Hot water, choose
a size, press the hot water
selection and conrm by
pressing the START button.
Step 5: Brew:
Push START to begin the brew cycle.
While brewing, the brewer light will ash to indicate it
is in process. No other features are available during
the brewing process!
21
Page 22

SERVICE MANUAL AVALON La Petite-X Single-Cup Brewer
6 INITIAL SETUP
Before you install the brewer on location, we strongly suggest that it be unpacked, inspected and bench
tested before you leave your warehouse.
Overview of Installation Steps
6.1 Installation site requirements
6.2 Unpacking
6.3 Leveling the Equipment
6.4 Hot Water Tank Preparation
6.5 3 Beans Canister Installation
6.6 Water Line Connection
6.7 Electrical Connection
6.8 Water Temperature
6.9 Loading Products
6.10 Chute System Installation (optional)
6.11 Filter Paper Installation
6.12 Installation Testing
6.1 Installation site requirements
Operating environment
For indoor use only
Power Supply
Initial Setup
Ensure that this unit will have its own electrical circuit and located within 6 feet of the dedicated electrical
outlet.
Use only a polarized grounded receptacle.
Domestic 115 VAC / 60 Hz - 15 Amp Circuit
Water Supply
Should be a plastic 1/4” or 3/8’’ O.D. dedicated line branched off a larger line. An easily accessible shut off
valve up stream of the unit is highly recommended for ease of installation.
Water pressure should be at least 20 PSI and no more than 80 PSI.
Tools Required
#2 Philips screw driver
Regular medium pliers
Adjustable wrench
Level indicator
Other tools may be required depending on the type of water supply tubing and location.
22
The Petite-X Revision B 03/2010
Page 23

SERVICE MANUAL AVALON La Petite-X Single-Cup Brewer
6.1.1 Clearances
Unit Clearances Allowance for:
Height: 39.75” 13 1/4” Open the top of themachine.
Width: 13.50’’ 6”
Depth: 23’’ 11 1/2” Front when the door is open.
6”
Chute
TOP VIEW
Per side. Key access on one side and door swing on the other.
You need 12’’ clearance to open the coin acceptor (optional)
Clearance of water hookup, hoses, water ltration system and
adequate air circulation.
Hole for the chute
Levellers positionLevellers position
Drip tray
Initial Setup
The Petite-X Revision B 03/2010
23
Page 24

6.2 Unpacking
To remove the unit from the box, carefully cut the straps holding the box in place on the skid
and then lift the box up. Inspect the unit to see if any damage has occurred in shipment.
For each brewing equipment kit you should have the following 3 boxes: the brewer,the
accessories (in the brewer box) and the 3 bean canister.
The parts and accessories that are packed separately need to be installed on your equipment.
In each box, you should nd the following items:
SERVICE MANUAL AVALON La Petite-X Single-Cup Brewer
1. Drip Tray Grill
2. Plastic Drip Tray
3. Waste Basket
4. 1/4” or 3/8’’
Inlet Kit Fitting
5. Plastic Top tting part
Initial Setup
6. Plastic Top
7. Front Panel
8. Filter Paper
9. Chute Base (optional)
10. Chute (optional)
11. 3 Bean Canister
(individualy packaged)
* The keys for the unit are attached to the back panel of the unit.
24
The Petite-X Revision B 03/2010
Page 25

SERVICE MANUAL AVALON La Petite-X Single-Cup Brewer
6.3 Levelling the Equipment
For optimal performance of the equipment, it is important to ensure that it is leveled. Avoiding to do so
can create variations in product delivery.
1. Place a level on the top of the machine;
2. Adjust the 4 threaded level glides or legs of the equipment to reach a leveled position.
6.4 Hot Water Tank Preparation
Make sure equipment is unplugged!
6.4.1 Tank Lid Preparation
3. Open the door of the equipment;
4. Remove the back panel or small tank lid;
5. Locate the water tank and remove the twist-tie securing the oat of the water tank;
6. Remove the silicone tubing on the heating element;
7. Connect the white wire to the prong on the heating element;
8. Replace the top lid and close door.
Initial Setup
* You can easily access to the switches by opening the door on the top of the back panel
Heater safety switch
Heating element
wire
Water level switch
(oat)
Left side view
Water level switch
(oat)
Heater
safety switch
The Petite-X Revision B 03/2010
Right side view
25
Page 26
SERVICE MANUAL AVALON La Petite-X Single-Cup Brewer
6.4.2 Adjusting the Tank Overow Float
It is important to verify that the oat is positioned appropriately in
the overow cup since it can move around in transportation. If this
oat is not in place the switch will not be activated and the unit will
automatically shut down sensing an overow situation.
It is important to verify that the overow cup is in place with the
highest side in the front and secured with the tape. If you need
to remove this cup, please make sure that you replace it with
the highest section facing the front and the overow tube in the
cup. This will ensure that the oat will “oat” and will activate the
overow switch if there is a problem.
6.5 3 Beans canister installation
3 Beans canister
Initial Setup
Transmissions
Motors
6.5.1 Install the 3 Beans Canister
Unpack the 3 beans canister.
Remove the tape from transmission.
Install the canister on the shelf by aligning
the 3 transmissions of the canister with the
3 motors already xed on the shelf.
26
The Petite-X Revision B 03/2010
Page 27
SERVICE MANUAL AVALON La Petite-X Single-Cup Brewer
6.5.2 Lock the 3 Bean canister
Pivot the 2 locks vertically,
so they clip on the metal
pins.
Lock
Plastic top
tting part
Initial Setup
6.5.3 Install the Plastic Top tting part
Place the piece on the back of the
3 beans canister with a 6-32 screw.
6.5.4 Install the Plastic Top
Simply place the plastic top
on the top of the machine as
illustrated.
The Petite-X Revision B 03/2010
27
Page 28

SERVICE MANUAL AVALON La Petite-X Single-Cup Brewer
6.6 Water Line Connection
This equipment must be installed in compliance with applicable Federal, State and/or
Municipal plumbing codes having jurisdiction.
Make sure that the equipment is unplugged before proceeding with the water supply
installation. Also verify that the incoming water pressure is greater than 20 psi and no more
than 80 psi.
1. Prior to installing the unit, ush out the water line by running approximately 1 gal. of water into a
pail. This will ensure no sediment from a new installation can get in the unit;
2. The incoming water supply should have a shut-off valve connected in-line. Water supply should be
a plastic 1/4” or 3/8” O.D. dedicated line branched off a larger supply line;
3. Make sure your water source is turned off. Secure the inlet tting rmly onto the inlet valve. Do not
overtighten;
4. Make sure the equipment is unplugged. Connect the water line to the quick connect inlet tting;
5. Turn the water valve on, sending water to the brewer. If there are any leaks, tighten connections to
stop leakage.
This procedure does not take into consideration the installation of a water ltration system.
Initial Setup
Please refer to the water lter manufacturer installation instructions and incorporate them into
the above.
28
The Petite-X Revision B 03/2010
Page 29
SERVICE MANUAL AVALON La Petite-X Single-Cup Brewer
6.7 Electrical Connection
This equipment must be installed in compliance with applicable Federal, State and/or
Local electrical codes having jurisdiction.
Make sure:
- The equipment is OFF before plugging it in,
- The equipment has its own electrical outlet and
- An extension cord is not used.
1. Make sure that the power switch in the back of the unit is in the OFF position before plugging in
the unit;
2. Locate the unit’s 6 foot power cord and plug it into its own grounded electrical outlet;
3. Reach to the back of the brewer and toggle the power switch to the On position. The front lights
will go on, and water will automatically enter the brewer. The tank will ll in 2-3 minutes from the
moment the brewer is turned on;
4. Once the tank is full, it will take 15-20 minutes to heat the water to brewing temperature. ;
5. Once the brewing equipment is ready, the LCD will indicate “Hi! Make Your Choice”.
Initial Setup
The main power switch turns the equipment off and on. This switch should be turned OFF when
servicing any (AC line voltage) electrical components on the equipment.
The Petite-X Revision B 03/2010
29
Page 30

SERVICE MANUAL AVALON La Petite-X Single-Cup Brewer
6.8 Water Temperature
This equipment has a coffee brewing setpoint of 202 F water temperature to offer a consistent beverage
quality for the users. There is a +/- 2 degree F tolerance.
This is an average and is not what you would get from a manual temperature measure. The actual
water temperature uctuates since cold water enters the tank after every beverage delivery and time is
required to heat the incoming water up to the setpoint.
You can also take the water’s brewing temperature manually by ordering a cup of hot water and
measuring its temperature with a thermometer. There may be a slight difference from the tank reading.
This is normal.
If you are experiencing large temperature differences, verify that your tank is clean and not obstructed by
mineral deposits and scale.
Unit safety measures
In the event of a temperature probe failure, the tank may start to boil. This will cause it to overow into the
“Overow Cup” and will automatically shut off the unit.
Initial Setup
Electronic
thermostat
30
The Petite-X Revision B 03/2010
Page 31

SERVICE MANUAL AVALON La Petite-X Single-Cup Brewer
6.9 Loading Products
1. Unlock the main door
2. Remove the plastic top
3. Remove the cap of the canister
4. Do not overll the canister
For the 3 beans canister:
Unlock the cover of the canister and
open the plastic top cap.
Do not overll the canister.
Initial Setup
The Petite-X Revision B 03/2010
31
Page 32

SERVICE MANUAL AVALON La Petite-X Single-Cup Brewer
6.10 Chute System Installation
Initial Setup
1. Open the door of the equipment;
2. Insert the chute base through the chute hole of the cabinet;
3. Remove the hose support from brewer assembly;
4. Insert the large waste chute into the chute base;
5. Reinstall the hose support on the brewer assembly;
6. Intall the front panel by aligning the metal bracket behind the front panel with the metal bracket on the
brewer assembly.
Front Panel
Waste
Chute
Chute Base
32
The Petite-X Revision B 03/2010
Page 33

SERVICE MANUAL AVALON La Petite-X Single-Cup Brewer
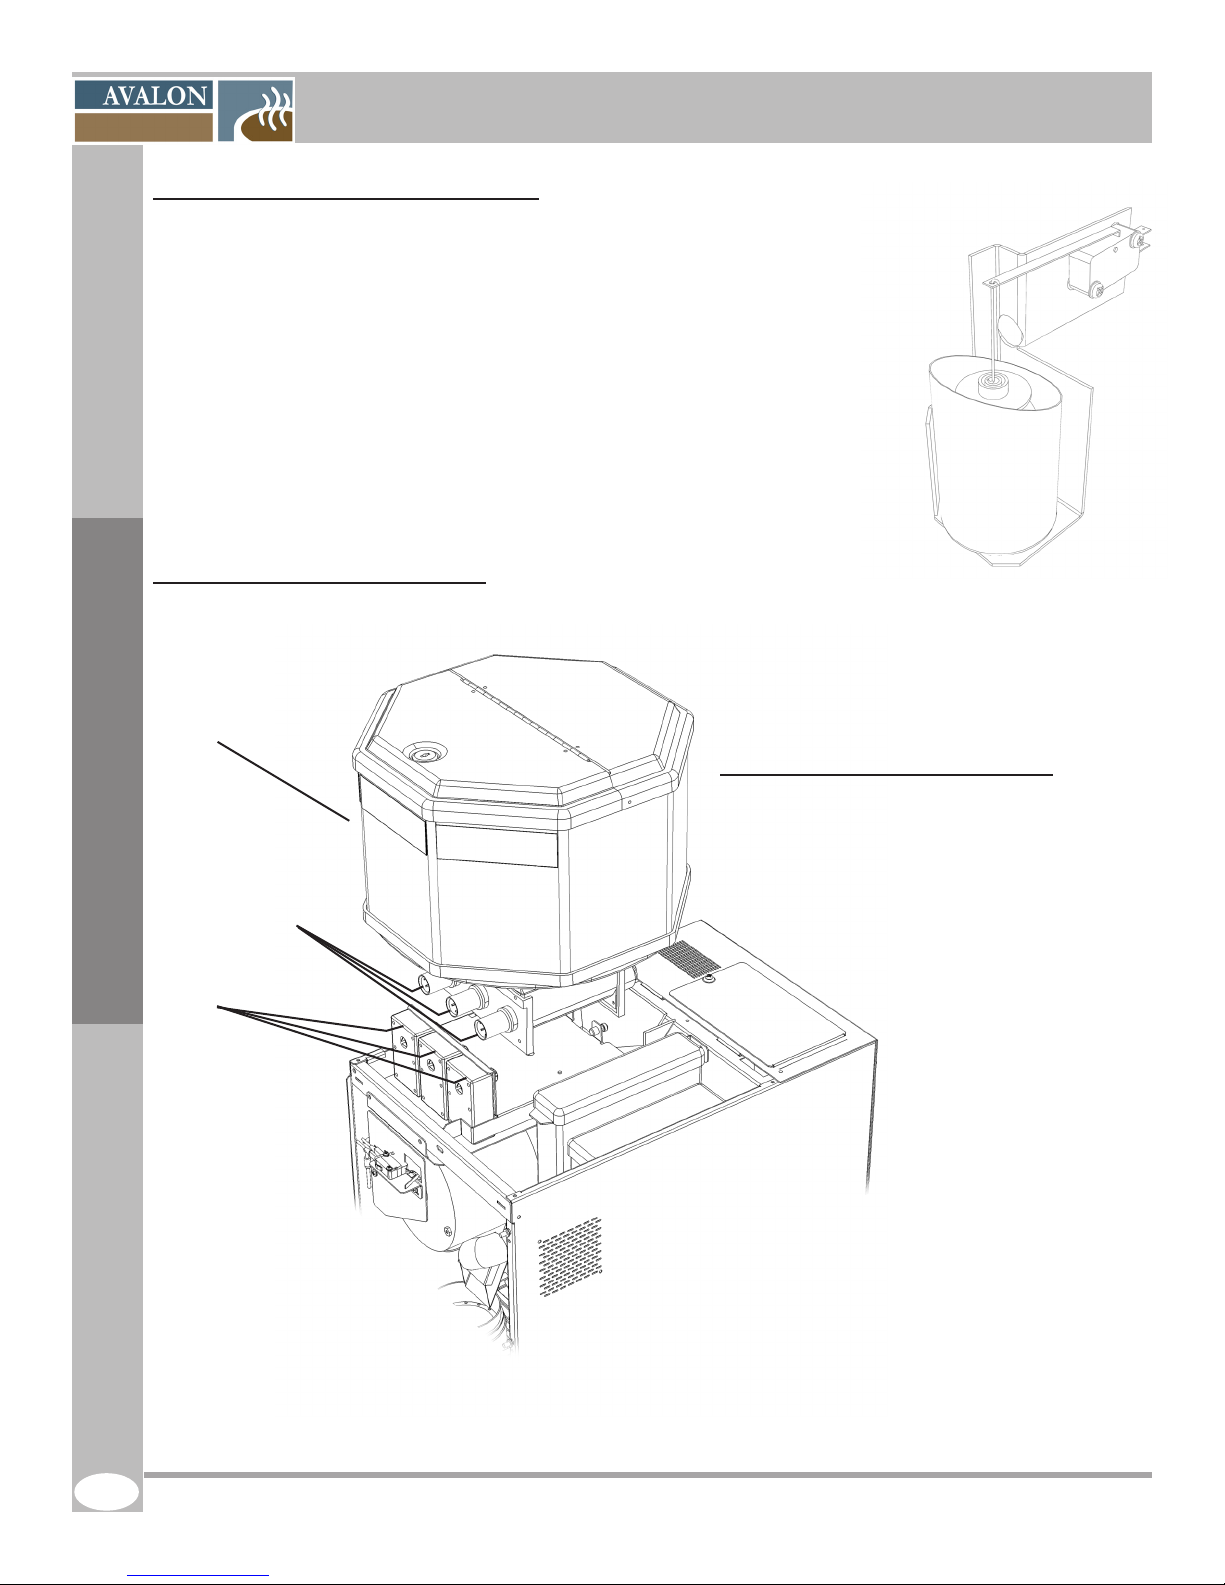
6.11 Filter Paper Installation
1. Make sure the unit is ON;
2. Place the roll on the paper support bracket
so that it dispenses on the left hand side; (See the
diagram inside the brewer)
3. Toggle the brewer paper switch to ON (SW4
on the main board, see page 16), the brew chamber
will rise;
Note: the brew chamber will not rise if the switch
does not sense the lter paper
4. Pass it under the left guide bracket of the
brew group, under the brew chamber and
under the wheel guides by gently lifting them
by the yoke;
5. Pull on the paper and route it through the
cabinet chute hole and into the waste bin;
6. Make sure that it is feeding straight. Verify
that it stays within the rst guide. Improperly
placed lter paper will cause a vacuum
leak and may cause grounds to spill off
into the machine.
7. Toggle the brewer paper switch back to the
OFF position (SW4 on the main board);
8. The lter paper will advance while
the brewer assembly cycles and
the brew chamber comes down on
the paper, ready for the next cup.
INGREDIENT
SWITCH
Initial Setup
The Petite-X Revision B 03/2010
33
Page 34

SERVICE MANUAL AVALON La Petite-X Single-Cup Brewer
6.12 Installation Testing
It is important to have the unit perform several cycles before completing the installation by ordering each
product selection twice to insure that the machine is operating as per the specications laid out in this
manual. During this process, review the check list as a reminder.
You need to be sure that each machine is clean, safe and functioning when you leave it.
What to check Remedy, if it is not Pg.#
Inlet valve is free from leaks Verify that it is secure and not overtighten 29
Brew chamber is empty of coffee Verify that the unit is leveled 26
Initial Setup
Filter paper feeds without resistance and
goes straight into the waste bin
Soluble mixing bowl is free of leaks Verify that it is on straight and tube is secure 53
Water temperature is acceptable See water temperature 31
Products are loaded Load the product 32
Brewer and area are clean and tidy Please tidy up 48
Free vend switch is in the right position Toggle on or off 17
Programming is complete Refer to programming section in this manual 37
Verify that the chute is properly installed 33,
Repeat the installation procedure 34
34
The Petite-X Revision B 03/2010
Page 35

SERVICE MANUAL AVALON La Petite-X Single-Cup Brewer
7 SERVICE SOFTWARE
The software allows you to control the machine parameters and retrieve user data from the equipment.
To access the machine parameters:
1. Unlock and open the door of the equipment
2. Press the black SET UP button located on the lower section of the main board (#SW2)
The LCD will indicate:
To access the user data:
1. Unlock and open the door of the equipment
2. Press the white COUNTER button located on the lower section of the main board (#SW1)
The LCD will indicate:
Machine Parameters Menu
Café Latté: - / No
Mokaccino: + / Yes
Hot Water: Move window
Start:
Move character
/ Exit and save
Setup mode
Press START to exit
Display TOTAL
Press START to exit
Service Software
The START button is also used to conrm a
changein a conguration, if it is not pushed
after a change, the modication will not be
kept in memory.
7.1 Conguration:
Open the main door and press the black SETUP ( # SW2) button on the main board. Hit the strenght
button on the selection membrane and the conguration menu will appear. Scroll through the options
using the hot water button and keep in mind that the café latté button equals no and the Mokaccino
button equals yes. Follow the menu from left to right.
Choose your
language English
Setup dictionnary
no
Detailled counter?
yes
You also have the
choice of French
as a language.
This is a list of popular
names for beverages.
Press START to see
the menu. (See next
page for list)
If option NO is
selected you
will only see the
general total
screens.
Active buzzer
y/n? yes
12 oz cup
no
The option YES will let
you have access to the
double infusion function
(For large cup only)
Cntr before
cleaning
00000
Option NO will disable the sound signal.
You should
leave this
Overow detection?
yes
option on YES,
Option NO
can lead to an
error message
in case of an
overow .
This option is a meter that counts the
number of servings before cleaning is
needed
Purchase required
no
The Petite-X Revision B 03/2010
Option YES will
force a purchase
to receive change.
Thermostat
000 degree F
This option is a meter for the thermostat
temperature
35
Page 36

SERVICE MANUAL AVALON La Petite-X Single-Cup Brewer
7.1.1 Dictionnary
1. Coffee #1
2. Coffee #2
3. Coffee #3
4. Chocolate
Press the button of the selection you wish to detail with a word from the dictionnary.
7.2 Product Conguration
The shaded selections should not be changed without calling the manufacturer.
Selection Coffee #1 (from left to right)
Sm Coffee #1 Rg
Price $0.00
Lg Coffee #1 Rg
Product available
Sm Coffee #1 Sg
Quantity 000
Pause 1B time
Service Software
Quantity 000
Water large Coffee
Quantity 000
Sm Coffee #1 Rg
Product available
Lg Coffee #1 Rg
Quantity 000
Lg Coffee #1 Sg
Price $0.00
Delay before pause
#2 Quantity 000
Short Grinder time
Quantity 000
Sm Coffee #1 Rg
Quantity 000
Sm Coffee #1 Sg
Price $0.00
Lg Coffee #1 Sg
Product available
Pause time #2
Quantity 000
Tall Grinder time
Quantity 000
Lg Coffee #1 Rg
Price $0.00
Sm Coffee #1 Sg
Product available
Lg Coffee #1 Sg
Quantity 000
Water small Coffee
Quantity 000
36
The Petite-X Revision B 03/2010
Page 37

SERVICE MANUAL AVALON La Petite-X Single-Cup Brewer
Selection Coffee #2 (from left to right)
Sm Coffee #2 Rg
Price $0.00
Lg Coffee #2 Rg
Product available
Sm Coffee #2 Sg
Quantity 000
Selection Coffee #3 (from left to right)
Sm Coffee #3 Rg
Price $0.00
Lg Coffee #3 Rg
Product available
Sm Coffee #2 Rg
Product available
Lg Coffee #2 Rg
Quantity 000
Lg Coffee #2 Sg
Price $0.00
Sm Coffee #3 Rg
Product available
Lg Coffee #3 Rg
Quantity 000
Sm Coffee #2 Rg
Quantity 000
Sm Coffee #2 Sg
Price $0.00
Lg Coffee #2 Sg
Product available
Sm Coffee #3 Rg
Quantity 000
Sm Coffee #3 Sg
Price $0.00
Lg Coffee #2 Rg
Price $0.00
Sm Coffee #2 Sg
Product available
Lg Coffee #2 Sg
Quantity 000
Service Software
Lg Coffee #3 Rg
Price $0.00
Sm Coffee #3 Sg
Product available
Sm Coffee #3 Sg
Quantity 000
Lg Coffee #3 Sg
Price $0.00
Lg Coffee #3 Sg
Product available
Lg Coffee #3 Sg
Quantity 000
The Petite-X Revision B 03/2010
37
Page 38

SERVICE MANUAL AVALON La Petite-X Single-Cup Brewer
Selection Americano (from left to right)
Long Expresso
Price $0.00
Selection Chocolate (from left to right)
Sm Chocolate Rg
Price $0.00
Lg Chocolate Rg
Product available
Sm Chocolate Sg
Quantity 000
Water Sm Chocolate
Quantity 000
Service Software
Americano
Product available
Sm Chocolate Rg
Product available
Lg Chocolate Rg
Quantity 000
Lg Chocolate Sg
Price $0.00
Water Lg Chocolate
Quantity 000
Qty Coffee
Americano
Quantity 000
Sm Chocolate Rg
Quantity 000
Sm Chocolate Sg
Price $0.00
Lg Chocolate Sg
Product available
Qty Water
Americano
Quantity 000
Lg Chocolate Rg
Price $0.00
Sm Chocolate Sg
Product available
Lg Chocolate Sg
Quantity 000
38
The Petite-X Revision B 03/2010
Page 39
SERVICE MANUAL AVALON La Petite-X Single-Cup Brewer
Selection Mokaccino (from left to right)
Sm Mokaccino Rg
Price $0.00
Sm Mokaccino Sg
Price $0.00
Small coffee MOKA
Quantity 000
Small choco MOKA
reg
Quantity 000
Water Sm. choco
MOKA
Quantity 000
Sm Mokaccino Rg
Product available
Sm Mokaccino Sg
Product available
Large coffee MOKA
Quantity 000
Large choco MOKA
reg
Quantity 000
Water Lg. choco
MOKA
Quantity 000
Lg Mokaccino Rg
Price $0.00
Lg Mokaccino Sg
Price $0.00
Water Sm Coffee
MOKA
Quantity 000
Sm choco MOKA
Strong
Quantity 000
Mokacoffee choice?
Coffee #0
Lg Mokaccino Rg
Product available
Lg Mokaccino Sg
Product available
Water Lg Coffee
MOKA
Quantity 000
Lg choco MOKA
Strong
Quantity 000
Service Software
The Petite-X Revision B 03/2010
39
Page 40

SERVICE MANUAL AVALON La Petite-X Single-Cup Brewer
Selection Café Latté (from left to right)
Sm Café Latté Rg
Price $0.00
Sm Café Latté Sg
Price $0.00
Qty Soluble Small
Reg Quantity 000
Water soluble small
Quantity 000
** Coffee part is preset by Mokaccino setting
Selection Hot Water(from left to right)
Small Hot water
Price $0.00
Sm Café Latté Rg
Product available
Sm Café Latté Sg
Product available
Qty Soluble Large
Reg
Quantity 000
Water soluble large
Quantity 000
Small Hot water
Product available
Lg Café Latté Rg
Price $0.00
Lg Café Latté Sg
Price $0.00
Qty Soluble Small Sg.
Quantity 000
Mokacoffee choice?
Coffee #0
Small Hot water
Quantity 000
Lg Café Latté Rg
Product available
Lg Café Latté Sg
Product available
Qty Soluble Large
Sg.Quantity 000
Large Hot water
Price $0.00
Service Software
Large Hot water
Product available
Large Hot water
Quantity 000
40
The Petite-X Revision B 03/2010
Page 41

SERVICE MANUAL AVALON La Petite-X Single-Cup Brewer
7.3 Counter Display
To see the counter display, unlock and open the front door and press the white COUNTER button.
The screen should show this:
Display TOTAL
Press START to exit
To scroll through this menu, use the START button. Below are the
screens that will be shown:
Selection Coffee #1 (from left to right)
Coffee #1 Sold
Small # 000000
Coffee #1 Sold
# 000000 $ 000000
Coffee #1 Free
Large $ 000000
Coffee #1 Sold
Small $ 000000
Coffee #1 Free
Small # 000000
Coffee #1 Free
# 000000 $ 000000
Coffee #1 Sold
Large # 000000
Coffee #1 Free
Small $ 000000
Coffee #1 TOTAL
# 000000 $ 000000
Coffee #1 Sold
Large $ 000000
Coffee #1 Free
Large # 000000
Water Lg Coffee
MOKA
Quantity 000
**This menu is exactly the same for Coffee #2, Coffee #3, Americano, Chocolate, Café Latté,
Mokaccino and Hot Water, only the name of the selection changes.
To see the total quantity and amount counter, unlock and open the front door of your unit, press on the
white button and press the strenght. To scroll through the menu use the hot water button counter and
press START to exit.
Service Software
TOTAL Sold
# 000000 $ 000000
Cumulative TOTAL
# 000000 $ 000000
The Petite-X Revision B 03/2010
TOTAL Free
# 000000 $ 000000
This selection will
never be erased.
TOTAL
# 000000 $ 000000
Erase Counters?
NO
or option YES
41
Page 42

SERVICE MANUAL AVALON La Petite-X Single-Cup Brewer
7.4 Counter Tracking Sheet
Use this sheet to record the data of the unit.
** sm = Small, lg = Large
Beverage type Qty Sold $ Free # Total# Total $
Coffee #1 - sm
Coffee #1 - lg
Coffee #2 - sm
Coffee #2 -lg
Coffee #3 - sm
Counter data
Coffee #3 - lg
Americano
Chocolate - sm
Chocolate - lg
Service Software
Mokaccino -sm
Mokaccino -lg
Café latté - sm
Café latté - lg
Hot water - sm
Hot water - lg
GRAND TOTAL
Location: S/N#:
Customer signature: Date:
42
The Petite-X Revision B 03/2010
Page 43
SERVICE MANUAL AVALON La Petite-X Single-Cup Brewer
7.5 Setting Tracking Sheet
Use this sheet to record the data of the unit.
Beverage type Small regular Large regular Small strong Large strong
Coffee #1
Water coffee
Coffee #2
Coffee #3
Americano
Setting data
Qty Price Qty Price Qty Price Qty Price
Water americano
Chocolate
Water chocolate
Mokaccino
Coffee mokaccino
Watercoffee moka
Choco mokaccino
Water choco moka
Café latté
Soluble café latté
Water café latté
Hot water
Service Software
Location: S/N#:
Customer signature: Date:
The Petite-X Revision B 03/2010
43
Page 44

7.6 Product Values
Settings for La Petite-X
For So ftware V2.06 and later
Ingredients values
Cup size 8oz 12oz
Liquid 7oz (207ml) 10oz (296ml)
Coffee 1-2-3 Reg 049 10,5 070 15
Coffee 1-2-3 Strong 056 11,9 079 17
Americano 075 16
Hot Chocolate Reg 046 19,6 065 28
Hot Chocolate Strong 052 22,4 075 32
Café Latté
Ingr.#1
Coffee --- --- --- --Ingr.#2
Chocolate Reg 046 19,6 065 28
Chocolate Strong 052 22,4 075 32
SERVICE MANUAL AVALON La Petite-X Single-Cup Brewer
Small size Large Size
Setting Grams Setting Grams
Mokaccino
Ingr.#1
Coffee 052 11,2 075 16
Ingr.#2
Chocolate Reg 046 19,6 065 28
Chocolate Strong 052 22,4 075 32
Service Software
Liquid level values
Cup size 8oz 12oz
Liquid 7oz (207ml) 10oz (296ml)
Coffe 1-2 120 174
Americano 86
Hot Chocolate 96 161
French Vanilla 80 132
Café Latté
Ingr.#1 Coffee --- --Ingr.#2 Vanilla 035 060
Mokaccino
Ingr.#1 Coffee 045 070
Ingr.#2 Chocolate 040 077
Hot Water 108 162
Cycles settings
Pause time #1B 40
Delay before pause 2 118
Pause time 2 150
Small size Large Size
Setting Setting
Grinder times
Small coffee 120
Large Coffe 170
44
The Petite-X Revision B 03/2010
Page 45

SERVICE MANUAL AVALON La Petite-X Single-Cup Brewer
8 CLEANING AND SANITIZING
8.1 Cleaning and Sanitizing Instructions
It is important to clean and sanitize this equipment on a regular basis in order to maintain the highest
beverage quality.These regulations require that all parts in contact with food be cleaned and sanitized
regularly and that hands be cleaned before handling these parts or other commodities such as cups
and stirs.
Cleaning and sanitizing should be done in separate steps as prescribed by health regulations and
good industry practice.
Cleaning: Cleaning means “Making free of visible soil, stains or impurities”. This also means
removing food soils, oil or mineral deposits that could alter the beverage taste or
appearance and therefore, its quality.
Sanitizing: Sanitizing means application of measures designed to protect public health. This is
done by removing bacteria remaining on the surface after it has been cleaned.
There are two sanitation methods:
1. Chemically, the part can be treated with a bactericidal compound to remove bacteria;
2. With water of at least 212 F, the bacteria can be killed if the temperature of the part is raised high
enough.
Cleaning & Sanitizing
Always unplug the unit before using water on electrical parts of the machine.
For the sanitation process to work effectively, the part must be cleaned and free of all visible food soil,
completely rinsed and preferably air dried. Wiping with towels or cloths can recontaminate cleaned
food-contact surfaces. Therefore, we recommend to air dry sanitized food - contact surfaces and not
wipe dry.
FREQUENCY:
There are two important variables that need to be considered when evaluating cleaning and sanitizing
frequencies:
· Product consumption
· Water quality
Since the expected customer usage may vary for one location to another, the cleaning and
maintenance is recommended upon the given time lines or cycle counts, which ever comes rst. Note
that these are intended as a guideline to ensure a part does not go without cleaning. We recommend
you verify each part listed in this section upon each visit and that they be cleaned as needed.
8.2 Recommended Cleaning Tools
In order to perform the following cleaning procedure effectively, we recommend that you have at least
the following tools:
- Pail or bucket
- Small tube brush suitable for food-contact surfaces
- Medium size long and exible brush, suitable for food-contact surfaces
- Medium brush for coffee grounds, suitable for food-contact surfaces
- Disposable towels, wet-strength and lint-free
- Mild nonabrasive detergent for exterior cleaning
- Urn cleaner packets for coffee parts
- Spare parts if extensive cleaning is to be done at the shop
- Garbage bags for the waste bin
The Petite-X Revision B 03/2010
45
Page 46

SERVICE MANUAL AVALON La Petite-X Single-Cup Brewer
8.3 Cleaning and Sanitizing Schedule
The cleaning schedule and instructions outlined in this manual must be followed to honor the warranty
and ensure consistent product quality and maintain health safety levels.
All parts should be visually inspected upon each visit and cleaned as needed.
Exterior
Waste bin Inspect Clean
Canisters
(3 beans canister)
Drip tray Clean
Unit + Stand Clean
Interior /
Food Contact Parts
Brewer assembly Sanitize Clean Treatment
Brew chamber Sanitize Clean
Whipper & mixing
bowls
Fan Inspect Clean
Cleaning & Sanitizing
Soluble canister Sanitize
3 Beans canister Clean
Daily Weekly Monthly Quarterly As needed
Inspect Clean
Daily Weekly Monthly Quarterly As needed
Sanitize Clean
Stainless coffee chute Clean
3 Beans canister
plastic chute
Rinse cycle Process
These recommendations are based on 1,000 cycles per month, medium blend coffee and superior water
quality levels . The above recommendations will need to be adjusted if the beverage volume, coffee
blends used and water quality differ.
46
Clean
The Petite-X Revision B 03/2010
Page 47

SERVICE MANUAL AVALON La Petite-X Single-Cup Brewer
8.4 Overall Cleaning
It is important to keep the brewer and its surroundings clean and tidy. Inspect your brewer both inside
and out upon each visit and clean where needed. Please make sure that the unit is clean, safe and
functioning before you leave.
8.5 Exterior Cleaning
Frequency: Daily
To minimize scratching and preserve appearance, we recommend using a clean damp sponge or soft
cloth lightly treated with a nonabrasive detergent for cleaning the exterior of the unit and the base
cabinet. After removing all food soils, thoroughly dry with a clean, soft cloth.
Non food-contact parts to be veried and wiped clean
Metal Top Cap Stand (optionnal)
Metal Cabinet
Plastic Door
Exterior parts requiring additional cleaning instructions
(see below)
Drip Tray
Waste Bin
Parts for this brewer are NOT dishwasher safe!
8.5.1 Cleaning the drip tray
Frequency: Daily or as needed
The drip tray is not hooked up to a drain therefore it should be inspected and emptied periodically.
Use caution and keep it level to avoid spilling. Remove the drip tray by simply lifting gently and pulling
it out from underneath the door. Rinse both parts under water and dry thoroughly with a clean dry cloth
or towel. Reinstall the drip tray onto the brewer and make sure that it is stable.
Cleaning & Sanitizing
WARNING, drip tray may be full.
The Petite-X Revision B 03/2010
47
Page 48

SERVICE MANUAL AVALON La Petite-X Single-Cup Brewer
8.5.2 Emptying the waste bin
Frequency: Daily or every 200 cycles*
After each coffee cycle, the spent grounds and used lter paper are automatically discarded into the
waste bin located in the stand. To prevent the bin from overowing there is an automatic function which
stops the brewer and shows the following message on the LCD screen:
Needs Service
Activate Brewer
The maximum setting = 399
The minimum setting = 0
Setting it to 0 will disable the automatic function and will cause an overow problem if the bin is full.
The equipment will not dispense beverages until the bin is emptied and the counter is reset. To reset
the counter, the brewer switch (#SW4) needs to be activated by being turned on and off. This factory set
counter can be adjusted to the waste bin size used. See the machine parameters for more instructions on
changing the setting.
How to empty the stand waste bin:
1. Open the stand door located directly below the brewer;
2. Cut the lter paper 4“ below the drum with scissors or tear gently; DO NOT YANK ON THE PAPER!
3. Remove the lled plastic bag from the spent grounds bin and replace with a new one;
4. Activate the brewer switch (#SW4) by turning it on and off (right then left).
How to empty the brewer internal waste bin*:
1. Open the brewer door;
2. Take the front panel off;
Cleaning & Sanitizing
3. Activate the brewer switch (#SW4) by turning it on (to the right);
4. Cut the lter paper 4” below the drum with scissors or tear gently; DO NOT YANK ON PAPER!
5. Activate the brewer switch (#SW4) by turning it off (to the left);
6. Replace the front panel and close the door.
It is very important not to yank on the lter paper. Doing so may prevent the brewer from functioning
properly.
* If you are using the internal waste bin provided with the unit, we recommand to set the counter to 15
cycles.
48
The Petite-X Revision B 03/2010
Page 49

SERVICE MANUAL AVALON La Petite-X Single-Cup Brewer
8.6 Interior Parts Cleaning & Sanitizing
For sanitary reasons, do not use soap or detergent inside the brewer. Use hot water for on-site
sanitation or suitable chemical products in the shop. Wiping with towels or cloths can recontaminate
sanitized food-contact surfaces. Therefore, we recommend to air dry sanitized food-contact surfaces
and not wipe dry. Allow sufcient time for the parts to dry thoroughly before closing the door.
Use a medium size brush dedicated for coffee grounds and a small dust pan to easily
brush away coffee grounds and dust inside the brewer before cleaning with water.
Interior Parts to be cleaned
Canisters
Coffee brewer
Coffee funnel
Fan
Stainless coffee chute
3 Beans hopper plastic chute
8.6.1 Coffee Canisters
Removing canisters for cleaning
Frequency: Monthly or every 1,000 cycles
Coffee Bean Hopper
1. Unscrew and remove the plastic top tting part behind the top cap;
2. Remove the top cap of the machine;
3. Unlock the 3 bean canister;
4. Remove the 3 bean canister;
5. Clean and sanitize under hot water and air dry completely;
6. Reinstall all parts in the reverse order.
7. Order a coffee to conrm that all parts or switches have
been replaced.
Cleaning & Sanitizing
Caution! The rinse water is HOT. Be careful not to get any on you while proceeding
with the above steps.
The Petite-X Revision B 03/2010
49
Page 50

SERVICE MANUAL AVALON La Petite-X Single-Cup Brewer
8.6.2 Soluble Canisters
Sanitizing the whipping assembly
Frequency: Weekly or every 200 cycles
This will prevent residue from attaching to the sides of the funnel.
Caution! The rinse water is HOT
1. Place a large cup or other suitable container below the dispensing
nozzle to catch the HOT rinse water;
2. Toggle the ingredient switch to Off (SW5);
3. Order several beverages for the hot water to ow through the system;
4. Toggle the ingredient switch back to ON;
5. Order a large beverage to conrm that all parts or switches have been
replaced.
Removing whipping assembly for cleaning
Frequency: Weekly or every 200 cycles
If there is residue, remove the assembly for manual cleaning under hot water:
1. Remove the tube from the base;
2. Lift off the funnel and twist off the whipper base;
3. Rinse thoroughly under hot water and use tube brush if necessary for
tubing area;
4. Air dry completely;
5. Reinstall all parts in the reverse order.
6. Order a large beverage to conrm that all parts or switches have been
replaced.
INGREDIENT
SWITCH
Cleaning & Sanitizing
Removing canisters for cleaning
Frequency: Monthly or every 1,000 cycles
To ensure a consistent product quality, we recommend removing and
emptying the canisters on a monthly basis. This will ensure that the
product does not adhere to the walls of the canister.
1. Unlock the door;
2. Remove the top cap of the machine;
3. Pull the canister up through the top of the brewer to disengage it from the
motor and transmission;
4. Clean and sanitize under hot water and air dry completely;
5. Reinstall all parts and reload products in the reverse order.
6. Order a beverage to conrm that all parts or switches have been replaced.
50
The Petite-X Revision B 03/2010
Page 51

SERVICE MANUAL AVALON La Petite-X Single-Cup Brewer
8.6.3 Coffee Brewer
Rinsing the Brew Chamber:
Frequency: Weekly or every 200 cycles
1. Place a large cup or other suitable container below the
dispensing nozzle to catch the HOT rinse water;
2. Toggle the ingredient switch to Off (SW5 see main board);
3. Order several coffees for the hot water to ow through the
system;
4. Toggle the ingredient switch back ON;
5. Remove the hose and remove the brew chamber’s
funnel to dislodge coffee residue trapped underneath it
and rinse it out;
6. Replace it and align the opening with the brown water
hose so that it is against the wall to form a circular water
motion around the funnel;
7. Order a large coffee to conrm that all parts have been
replaced correctly.
Brewer Funnel
Frequency: As needed or weekly
Brewer Funnel
Brewer Chamber
Hose Support
Brew Chamber
Cleaning & Sanitizing
If there are coffee grounds accumulated, remove the assembly for manual cleaning under hot water:
1. Remove the brown water hose;
2. Lift off the funnel and pull out of the brew chamber;
3. Rinse thoroughly under hot water;
4. Air dry completely;
5. Reinstall all parts in the reverse order.
6. Order a large coffee to conrm that all parts have been replaced correctly.
Brewer Assembly Cleaning
Frequency: Monthly or every 1,000 cycles
In order to maintain optimal performance of the brewer
assembly, we recommend that it be removed
from the unit and cleaned / rinsed with hot water.
(see page 61 for instructions on removing the brewer)
1. Rinse thoroughly under hot water to remove visible soil;
2. Lift off the funnel and pull out of the brew chamber;
3. Rinse thoroughly under hot water;
4. Air dry completely;
5. Reinstall all parts in the reverse order.
6. Order a large coffee to conrm that all parts have
been replaced correctly.
The Petite-X Revision B 03/2010
51
Page 52

SERVICE MANUAL AVALON La Petite-X Single-Cup Brewer
Brewer Assembly Sanitizing Treatment
Frequency:Quarterly or Every 3,000 Cycles
Regular sanitation treatments of the brewer assembly prevents residue from affecting
the vacuum in the brewer mechanism and altering taste in the beverage delivered.
1. Place a large cup or other suitable container below the dispensing
nozzle to catch the HOT liquid;
2. Pour 1 portion of commercial urn cleaner (brand such as Urnex as
directed by manufacturer) into the brew chamber;
3. Toggle the ingredient switch to Off (SW6 on the main board);
4. Select a small regular coffee on the membrane keypad and hit start;
5. Once the brew chamber is lled with water, turn the brewer OFF via
the main switch at the back and wait for 5 minutes;
6. After 5 minutes, turn the brewer back ON to complete the brew cycle;
7. To rinse, make at least 5 brewing cycles of coffee with the ingredients
set to “OFF”;
8. Toggle the ingredients switch (SW6) back ON;
9. Make 2 more coffee selections to complete the rinsing cycle of the
brewer.
8.6.4 Fan
Frequency: Quarterly or as needed
Visually inspect the fan located directly to the right.
If it requires cleaning:
Cleaning & Sanitizing
1. Turn off the unit and unplug it to stop the fan;
2. Remove the guard for access;
3. Wipe clean with a dry disposable towel;
4. Replace parts in the reverse order.
5. Tighten gently
Fan
52
The Petite-X Revision B 03/2010
Page 53

SERVICE MANUAL AVALON La Petite-X Single-Cup Brewer
8.6.5 Stainless coffee chute
Frequency: Monthly or every 1,000 cycles
1. Open the door of the machine;
2. Remove the lter paper;
3. Remove the grinder protector;
4. Unplug the 2 connectors from the solenoid;
5. Remove the stainless chute by removing the screw;
6. Clean the stainless chute by rinsing with hot water;
Make sure it is dry before reinstalling.
Repeat the steps in reverse order after cleaning
for the reinstallation.
Grinder protector
Cleaning & Sanitizing
Stainless coffee
chute
Stainless
coffee chute
screw
Black
connector
Red
connector
The Petite-X Revision B 03/2010
53
Page 54

SERVICE MANUAL AVALON La Petite-X Single-Cup Brewer
8.6.6 Plastic chute of the 3 bean canister
Frequency: Monthly or every 1,000 cycles
1. Open the door of the machine;
2. Remove the plastic top cap;
3. Unscrew and remove the plastic top tting part accessing by the rear;
4. Unlock the 3 bean canister;
5. Remove the 3 bean canister;
6. Clean the interior of the plastic chute (accessible by the rear).
Repeat these steps in reverse order when the cleaning is done.
Cleaning & Sanitizing
54
The Petite-X Revision B 03/2010
Page 55

SERVICE MANUAL AVALON La Petite-X Single-Cup Brewer
9 PREVENTIVE MAINTENANCE
All major parts of this unit need to be maintained as per the schedule to honor the warranty and to
prevent
it from failing. With adequate maintenance you will extend the life of your unit and deliver a consistent
high quality beverage.
The preventive maintenance schedule and instructions below must be followed
9.1 Preventive Maintenance (PM) Schedule
All parts should be visually inspected upon each visit and cleaned as needed.
Parts Monthly Quarterly 10,000 25,000 60,000 100,000
Brewer Inspect Replace
to honor the warranty.
Preventive Maintenance
Outlet Valves Inspect PM
Water Tank Inspect PM
The Petite-X Revision B 03/2010
55
Page 56

SERVICE MANUAL AVALON La Petite-X Single-Cup Brewer
9.2 Brewer Assembly
Preventive Maintenance (PM): Yearly or every 25,000 coffee cycles
The brewer is the heart of the equipment and is responsible for the taste of the beverage. It needs to
be replaced or refurbished to maintain the quality of the beverages served. We recommend having your
brewer assembly replaced every 25,000 coffee cycles.
Contact 1-800-561-6162 for parts and additional information.
Inspection
The following are signs of the vacuum is not functioning adequately and that your brewer may be due
for preventive maintenance:
· if the seal is damaged;
· if air gets into the cylinder and creates bubbles in the coffee;
· if there are coffee grounds in the delivered product;
· if the spent coffee grounds remain wet.
Screen and Seal
Preventive Maintenance
Cylinder
Brew
Chamber
Teon Seal
56
The Petite-X Revision B 03/2010
Page 57

SERVICE MANUAL AVALON La Petite-X Single-Cup Brewer
9.3 Water Outlet Valves
Quarterly or as needed
To avoid any problems related to mineral deposits over time, we recommend to inspect the 3 valves.
Leaking valve
a. Identify the leaking valve and replace it
b. If the leak comes from under the body of the valve or from the tank exit, try simply changing the
conical mounting seal.
Removing and installing the valves
1. Turn off the machine;
2. Unplug the lid (g.1.1) and the valves (g. 1.2);
3. Drain the water from the water tank completely (see p.56);
4. Remove the tubes;
5. Unscrew the tank guard to remove the tank;
6. Tilt the tank towards you to have access to the valves;
7. Remove the valve;
8. Reinstall by repeating in the reverse order
Preventive Maintenance
Caution water is hot!
Disconnect
these connectors
Tank guard
Valves
Tank Lid Fig. 1.1
Double valve
Valves Fig. 1.2
Simple valve
If you choose to install a water ltration system, it is recommended that the lter be checked on a
monthly basis.
The Petite-X Revision B 03/2010
57
Page 58
SERVICE MANUAL AVALON La Petite-X Single-Cup Brewer
9.4 Hot Water Tank
PM: every 60,000 cycles, quarterly inspection
To avoid any problems related with mineral deposits
over time, we recommend having the water tank
assembly delimed to remove all scale in the unit.
Upon visual inspection, you may wish to replace the
element, probe and the water level and heater safety
switch.
Use a scale remover product such as Scale Kleen
by Everpure.
See the manufacturer instructions for more details.
Water level switch
Heater switch
Element
Preventive Maintenance
Probe
58
The Petite-X Revision B 03/2010
Page 59
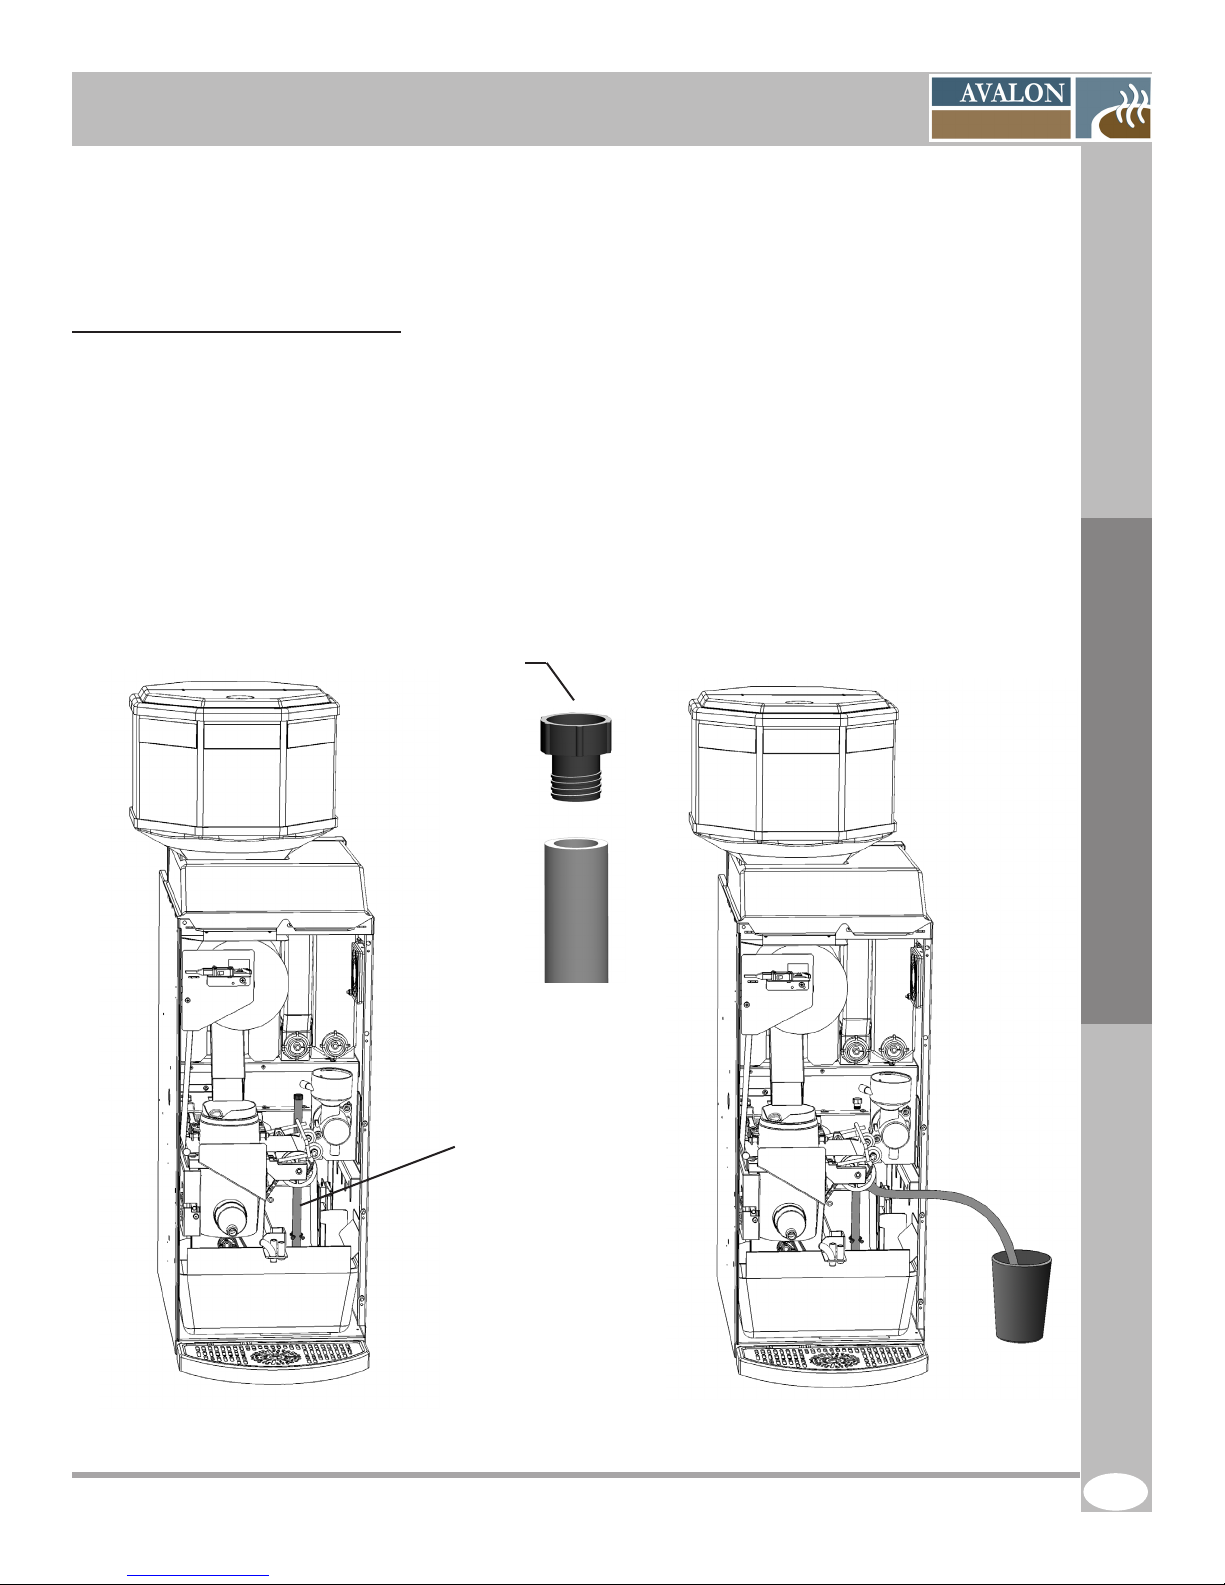
SERVICE MANUAL AVALON La Petite-X Single-Cup Brewer
10 SERVICING PARTS
This section is intended to assist you in servicing various parts of the unit.
10.1 Draining the Hot Water Tank
We recommend allowing 3 hours for the hot water to cool prior to emptying the tank. Make sure you
have a 0.8 gallon container suitable for holding hot water.
1. Turn off and unplug the brewer;
2. Turn off the main water supply of the machine;
3. Remove the back panel;
4. Locate the drain tube with a red plug;
5. Direct the tube into the pail and remove the red plug. Warning, water may be hot!;
6. Drain the water from the water tank completely;
7. Reinstall by repeating these steps in the reverse order.
Red plug
Drain tube
Servicing Parts
The Petite-X Revision B 03/2010
59
Page 60

SERVICE MANUAL AVALON La Petite-X Single-Cup Brewer
10.2 Shutdown / Storage
If you need to store this brewing equipment for an extended period of time, follow this procedure to avoid
any risk of injury or damage to the equipment.
1. Turn the unit off and unplug from the power outlet;
2. Drain the hot water tank (see instructions);
3. Empty the soluble canisters and the 3 bean canister;
4. Clean all parts of the unit before storing (see cleaning instructions)
5. Disconnect the white double wire from the heating element (see installation diagram)
6. Tie down the water level switch’s arm with a “tie-wrap” to keep the oat from pulling down on
the switch during transportation. “Do not overtighten”, this may damage the switch; this is
simply to keep the oat from bouncing up and down on the switch.
10.2.1 Storing the Brewer Assembly
The brewer assembly is the heart of the equipment and is responsible for the taste of the coffee. It is
therefore
important that you store it properly when it is not in the unit. Always disengage your brewer clutch
by using a pair of pliers and turning the pin located on the back clockwise until the brew chamber lifts
up. This will release the pressure on the screen and seal. Your brewer must be on its back or its left
side while on a table top. Do not sit the brewer on its right side (wheels and yoke) or straight up as
these positions are not sturdy and could cause it to fall.
Servicing Parts
60
The Petite-X Revision B 03/2010
Page 61

SERVICE MANUAL AVALON La Petite-X Single-Cup Brewer
10.3 Brewer Assembly
Removing the brewer
1. Open the machine door;
2. Toggle the brewer switch (SW4 ) to
release the lter
paper and cut the lter paper;
3. Remove the coffee spout and the hose
support bracket
from the right side of the brewer assembly;
4. Support the brewer assembly by holding
the aluminum shaft on the right side of the
brewer assembly;
5. With your left hand, slide the retaining pin
over to the right and then down;
6. Pull the brewer assembly straight towards
you.
Servicing Parts
Installing the brewer
1. Make sure that the dog drive pin in the
back of the brewer is at 1 o’clock;
2. Align the left edge of the brewer on the left
bracket support;
3. Push the brewer back completely into the
dog drive motor;
4. Slide the brewer’s retaining pin up and
then left.
The Petite-X Revision B 03/2010
Pin
Dog
drive
61
Page 62
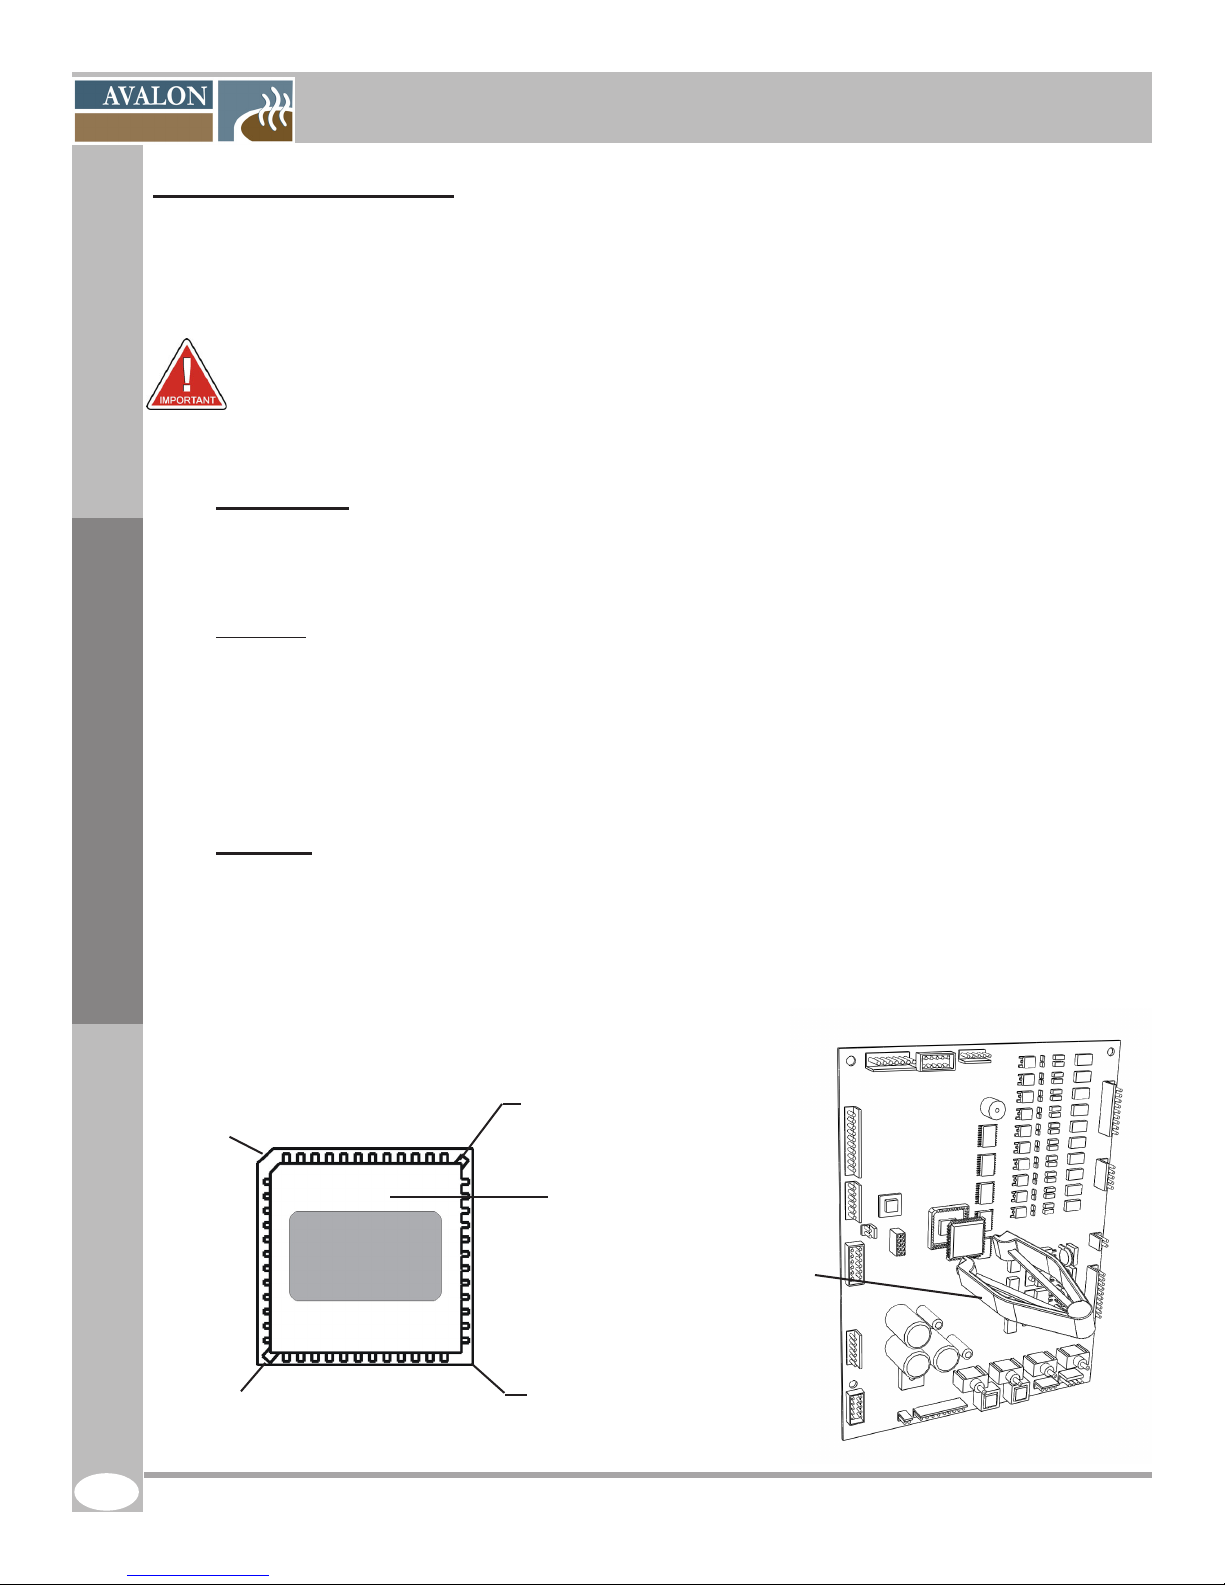
SERVICE MANUAL AVALON La Petite-X Single-Cup Brewer
10.4 Microcontroller (EPROM)
The microcontroller, also known as the Eprom, can be swapped to incorporate new improvements to the
programming such as new settings or new functions.
· Please take all counter readings before changing the microcontroller because all data
· will be reset.
· Use the necessary precautions for handling static sensitive devices.
· Do not attempt to pry the chip out of the socket with anything. This will damage the
· casing.
Tool required:
You will need to purchase a PLCC Extractor as showed in the diagram below. This can be
found in most electronics stores or via the Internet. Without this tool, you may damage the
casing for the microchip and damage the board.
Removing
1. Retrieve all your data;
2. Turn off the machine and unplug from the outlet;
3. Open the door and remove the lexan plate via the 4 screws;
4. Locate the microcontroller (the black square piece in the middle of the board with a white label);
5. Using the extractor, carefully insert the prongs in the top right and bottom left corner slots of
the casing and grab the microcontroller;
6. Lift out from the socket gently.
Replacing
Servicing Parts
1. Align the notched corner of the microcontroller with the notched corner of the empty socket;
2. Make sure that all contacts are aligned with the appropriate slots on the socket;
3. Push the microcontroller rmly, straight down until the top of the chip is ush with the top of the
socket;
4. Replace remaining parts in the reverse order;
5. Plug the machine in and turn on the unit;
6. At start-up, the LCD will indicate the microchip version #;
7. Test the new features outlined in the documentation
supplied with the new microcontroller.
Notch
Slot
Version #
Slot
Microcontroller
PLCC
Extractor
Casing
62
The Petite-X Revision B 03/2010
Page 63

SERVICE MANUAL AVALON La Petite-X Single-Cup Brewer
10.5 Main Board
Like all electronic main boards, they are very susceptible to power surges in the building. If this is your
reason for changing the main board and this persists, verify your power source. Use the necessary
precautions for handling static senistive devices.
Removing
1. Retrieve all your data;
2. Turn off the machine and unplug from the outlet;
3. Open the door and remove the lexan plate via the 4 screws;
4. Unplug the connections:
(Clockwise from the top left corner);
- MDB Port (if coinco)
- Main board: J11, J12, J18, J27, J2, J19, J3, J6, J16,
J24, J8, J22
5. Unscrew 4 plastic 1” posts;
6. Remove the board.
Replacing
1. Replace the board and fasten with the 4 posts;
2. Plug the connections and refer to the board diagram
for full size view;
3. Verify that all is in place, the board will fail if the
connections are reversed or in the wrong place;
4. Replace all parts in the reverse order;
5. Plug in the brewer and turn it on;
6. Verify on the LCD that all is functioning.
Servicing Parts
10.6 Keypad Membrane
Refer to the picture below to see which way the membrane should be placed.
Replacing
1. Turn off the machine;
2. Unlock and open the main door;
3. Remove the lexan plate via the 4 screws;
4. Unplug the connection J16;
5. Unstick the keypad membrane;
6. Slide the membrane cable through the door carefully ;
7. Install the new keypad membrane, be careful to center it;
8. Plug the connection J16 as it was (see picture below for the right position);
9. Replace the lexan plate;
10. Close and lock the main door;
11. Turn on the machine.
N.B. To make sure you installed the keypad membrane correctly run a few beverage cycles.
All cables must be replaced in the correct order and direction before turning the
power on or the board will fail and be damaged.
The Petite-X Revision B 03/2010
63
Page 64

SERVICE MANUAL AVALON La Petite-X Single-Cup Brewer
11 TROUBLESHOOTING
11.1 “Error” Appearing on the LCD Screen
Overow Drip Tray
SOLUTION
Inspect the overow drip tray underneath the machine to make sure it is clean and dry.
Low Water Level!
SOLUTION
1. Check if the water gets in the tank. If so, the message on the LCD screen should disappear in a
few minutes.
2. Check if the entrance of the water is working (main water source is on, inlet valve is not obstructed,
etc.)
3. Inspect the overow drip tray and make sure it is clean and dry. Even if your overow detection is
not activated, the inlet valve (DS10) won’t work and it will indicate this message.
4. Check the water level switch. If there is chocolate and/or coffee on the top of the lid it might keep
the switch from working properly.
5. Make sure the water level switch is properly adjusted.
Troubleshooting
Brewer Error
Error
Error
Error
This message indicates that there is water in the overow drip tray of the
machine.
This message indicates that the water level in the tank is too low.
This message indicates that the coupling (dog drive) is not at its starting
position.
64
SOLUTION
1. This situation might arrive when the inside of the machine is soiled and the brewer switch gets wet.
Clean the switch and make sure it is dry. When you will turn the machine back ON,
it will reset itself.
2. Check the coupling (dog driver). If the safety pin is still in place and properly installed.
3. Make sure the brewer switch stops when the little roller of the brewer switch gets in the
coupling hole. If it is not you may have to readjust the arm with pointed-nose pliers.
Change lter paper
Filter paper empty
SOLUTION
Make sure the lter paper roll is correctly placed. Put a new roll if it is too low.
(It is normal to have 1/6 to 1/8 of paper left on the roll).
This message indicates that the lter paper roll is empty.
The Petite-X Revision B 03/2010
Page 65

SERVICE MANUAL AVALON La Petite-X Single-Cup Brewer
11.2 Other Message Possibilities on the LCD Screen
Change Filter Paper This message indicates that the brewchamber is lifted up.
SOLUTION
Deactivate the brewer/paper switch on the power supply board.
Coinco not ready Bill not detetected (These two messages scroll one after the other.)
This message indicates that the main board does not recognize the coin changer.
SOLUTION
1. Shut OFF the machine. Make sure the Coinco and bill accpetor are well plugged in.
Turn the machine back ON.
2. If the coin changer still doesn’t work try with another coin changer.
3. Check the J1 plug on the main board with a tester.
This question appears when you press on the MOKACCINO or CAFÉ LATTÉ
Make Coffee Choice
Needs service
Activate Brewer
SOLUTION
To reset everything you have to put the brewer switch ON. Empty the waste basket and clean your
machine thouroughly and then turn the switch OFF again.
Insert exact change This message indicates that the coin changer’s tubes are empty.
buttons. The machine gives you 3 seconds to select the type of coffee you
want. Otherwise, it takes the programmed default coffee.
This message appears when a number of cups have been setup on the
maintenance counter.
Troubleshooting
SOLUTION
Fill the tubes with change and this message will disappear.
The Petite-X Revision B 03/2010
65
Page 66

SERVICE MANUAL AVALON La Petite-X Single-Cup Brewer
11.3 Particular Cases
Back-up, chamber ood, bad extraction, etc.
1. Check if you are using the appropriate lter paper: Filter Paper 106 for the Platinum “La Petite-X”
brewer.
2. If the problem appears with only one coffee selection, empty the canister and try another coffee
batch of the same blend.
3. Check if the brew chamber or the cylinder are cracked. In this case, the piston would pull more air
than liquid.
4. If water comes out on both sides (left and right) of the brew chamber for more than 3/4 inches, you
have to readjust the tension.
Element not heating
1. Check the connectors and make sure they are connected properly.
2. If the tank lid is soiled of coffee and chocolate it can affect the switches and keep them from
operating correctly. In this case, change the heater safety switch.
3. Verify the condition of the element by taking out the complete tank lid.
Machine is off (doesn’t work while it is turned on)
1. Check if the unit is plugged in.
2. Check if the light is ON on the plug. (Press on the Reset button if not)
3. Check if the two breakers near of the ON/OFF switch are pushed in.
4. Check and empty if necessary the overow cup inside the machine. If the cup lls up with water
again, check the water level switch. It might be because the water level switch is dirty or because it
needs a little adjustment. To adjut it, slightly bend down the switch’s arm (app. 1/6” should be
Troubleshooting
sufcient).
Quantity of liquid too low (in cup)
Verify the machine’s settings and make sure they correspond to the values given in the programming
manual. Make sure the outlet valves are clean and not clogged up of lime.
66
The Petite-X Revision B 03/2010
Page 67

SERVICE MANUAL AVALON La Petite-X Single-Cup Brewer
Notes . . .
NOTE
The Petite-X Revision B 03/2010
67
 Loading...