

Page 1

A few simple steps to ensure
perfect water, every time.
Page 2

Use and Care Guide
MODELS: A5BOTTLELESS
Registration
Please visit the website below to register your new water cooler within the first
30 days of purchase. Registration within the first 30 days will activate your one
year warranty.
www.avalonh2o.com/register-my-avalon-cooler
Please keep your model number, order number and purchase date
for future support. You can reach us at 1-800-256-0695.
Model Number
Order Number
Purchase Date
This product conforms to NSF/ANSI 42 and 53 for the reduction of
Chlorine taste and odor, nominal particulate class I, lead and cysts.
Page 3

Contents
About Your Water Cooler
Meet Your Avalon Product
Part Names
Indicator Lights
Tech Specs
Filter Function Introduction
Getting Started
Unpacking
Installation (Under the Sink)
Installation (Refrigerator Water Line)
Flushing Filters
Finishing Water Cooler Installation
Activating Heating and Cooling
Installing and Removing the Drip Tray
1-2
3-4
5
6
7
9
10-11
12
13-14
15-16
17
18
Page 4

Contents
User Guide and Maintenance
Dispensing Water
Replacing the Filters
Leak Detection
Cleaning
Activating Self-Cleaning Function
Rinsing, Cleaning, and Draining
Cleaning
Troubleshooting
Safety
20
21-23
24
26
27-29
30-31
33-34
36-37
Page 5
About Your Water Cooler
Meet Your Avalon Product
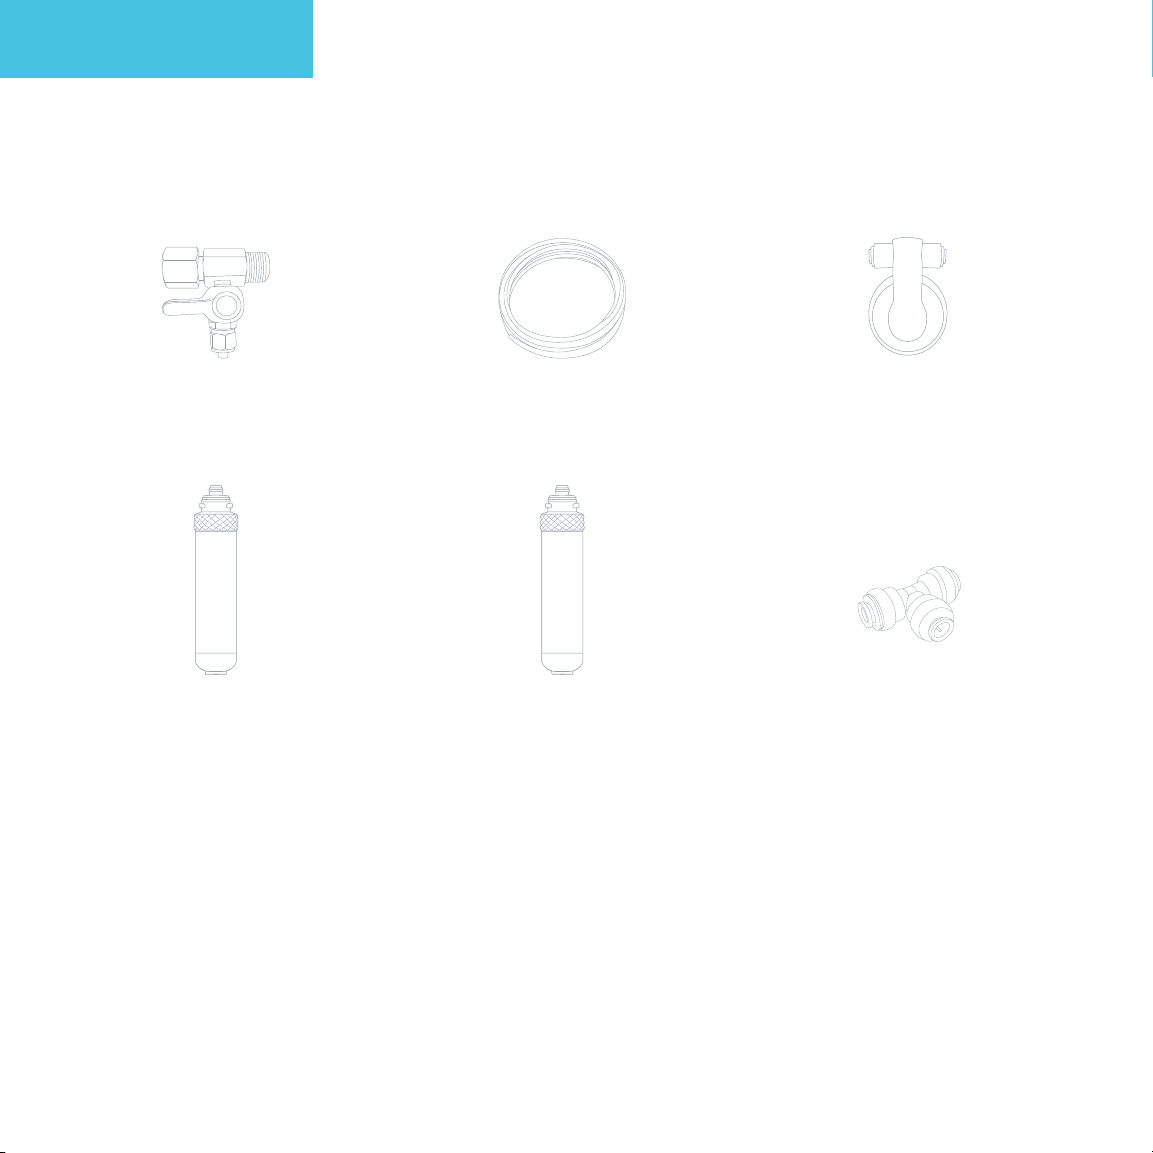
Inside the box, you’ll find:
Metal Adapter with Valve
Carbon Block Filter Sediment Filter Three Way
PE Tubing (20')
Filter
Flushing Adapter
Plastic Adapter
1
Page 6

Meet Your Avalon Product
About Your Water Cooler
Attractive Design
Attractive stainless
steel design with 3
water spouts
NSF Certified Filters Energy Star ApprovedUL Listed Child Safety Feature
We meet strict
standards for public
health protection
Custom Temperature
Piping hot,
room temperature,
or crisp cold water
We design
& manufacture
with your safety
in mind
Dual Stage Filtration
Double the filtration
for twice the peace
of mind
Saves the
environment
& your wallet
Worry-Free Cleaning
Self-cleaning
ozone function
for longer lasting
water purification
Ensures safe hot
water flow for the
entire family
Built-in Nightlight
Makes late night
water trips a breeze
2
Page 7
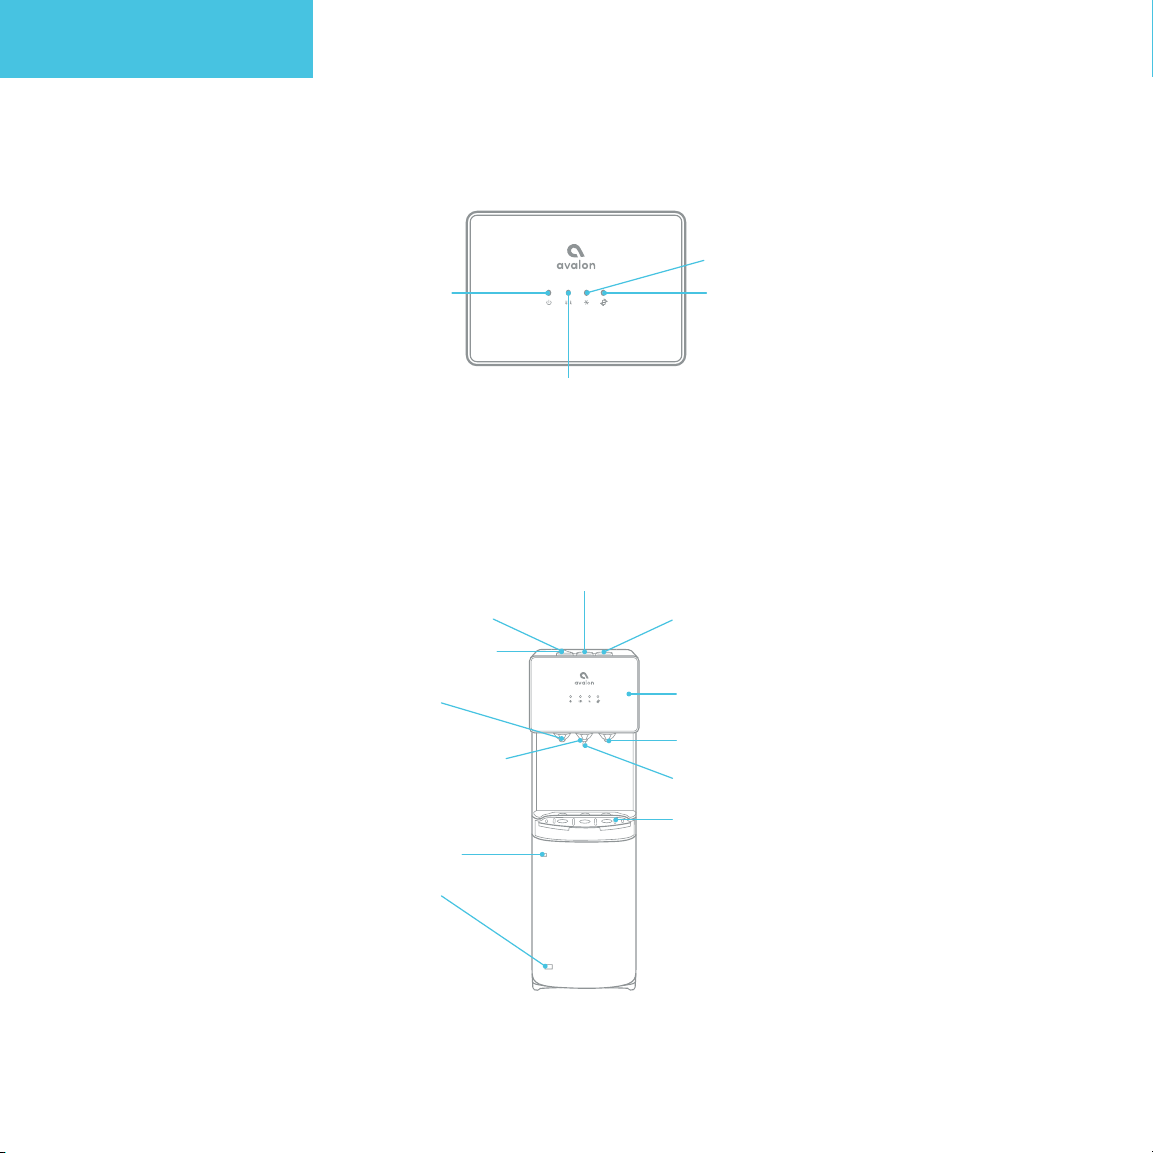
About Your Water Cooler
Part Names
3. Cooling Indicator Light
1. Power/Self-Cleaning
Indicator Light
5. Hot Water
Push Button
6. Child Safety Lock
10. Hot Water Spout
11. Room Temp Spout
15. Filter Reset Button
4. Filter Indicator Light
2. Heating Indicator Light
7. Room Temperature
Water Push Button
8. Cold Water
Push Button
9. Panel
12. Cold Water Spout
13. Nightlight
14. Drip Tray
16. Filter Valve
3
Page 8
Part Names
17. Self-Cleaning Switch
About Your Water Cooler
18. Nightlight Switch
19. Cooling Switch
20. Heating Switch
21. Power Cord
22. Drain Outlet
23. Condenser
24. Water Inlet
Push Connect Ring
4
Page 9

About Your Water Cooler
Indicator Lights
Power/Self-Cleaning Indicator Light
This light will remain steady on to indicate that the unit is plugged in and the
power is on. When the unit is placed into self-cleaning mode this indicator light will
blink until the cycle is complete. When the cycle is complete the light will return to
steady on.
Heating Indicator Light
This light will indicate when the water is heating. The light will remain on while the
water is heating and will turn o when it has reached the correct temperature of
185°F. As the water is dispensed the hot tank will refill and the water will heat. As
the water reheats this indicator light will turn on.
Cooling Indicator Light
This light will indicate when the water is cooling. The light will remain on while the
water is cooling and will turn o when it has reach the correct temperature of 47°F.
As the water is dispensed the cold tank will refill and the water will cool. As the
water cools this indicator light will turn on.
Filter Indicator Light
This light will be red when the filter needs to be replaced. This light will begin to
blink red as a warning that the filter will need to be changed soon. When the life of
the filter is expired this indicator light will remain steady on and the unit will beep
to alert you that it needs to be changed right away.
5
Page 10

Tech Specs
About Your Water Cooler
Model
Hot/Cold/Room Temp Output
Hot Water Capacity
Hot Tank Volume
Cold Water Capacity
Cold Tank Volume
Applicable Water Pressure
Applicable Water
Stage 1 Filtration
Stage 2 Filtration
Product Size
Packing Size
Net Weight/Gross Weight
Voltage/Frequency
Cooling Method
Heating Method
A5BOTTLELESS
1.2L/min / 1.2L/min / 1.0L/min
4 L/H (≥ 185°F)
1.16 Liters
2.5 L/H ( ≤ 50°F)
3.6 Liters
0.1-0.4 MPa
Tap Water
Sediment
Carbon Block
13”(L)x12”(W)x41”(H)
16”(L)x15”(W)x45”(H)
36.15 lb/46.5 lb
115V 60Hz
Compressor
Internal Element
Heating Watts/Cooling Watts
Power Consumption
420W/100W
520W
6
Page 11

About Your Water Cooler
Filter Function Introduction
Stage
Stage 1
Stage 2
Filter
Sediment Filter
Carbon Block Filter
Function
Course filtration of raw water to
remove rust, dirt and sediment
Removes the water odor, residual
chlorine, organic matter,
and lead to improve taste
7
Page 12

Getting Started
8
Page 13

Getting Started
Unpacking Your Avalon Water Cooler
Locating Dispenser
• Do NOT plug in the power cord yet.
• Place dispenser upright on a hard and level surface in a cool and shaded location near a
grounded wall outlet. Position the dispenser so there is about 4 inches of clearance from
the wall on the back and both sides.
Locating Accessories
• Unpack the product and install the drip tray by inserting it into place, see page 18.
• Take out the installation parts and follow the installation instructions below.
9
Page 14

Installation (Under the Sink)
Installing the Metal Adapter with Valve
Getting Started
1. Turn o the current cold water supply
that is the source of water to your sink.
3. Connect the Metal Adapter with
Valve between the cold water
supply line and cold water valve.
2. Disconnect the current cold
water supply line under your sink.
10
Page 15

Getting Started
Installation (Under the Sink)
Installing the Metal Adapter with Valve
4. Remove the nut from the Metal Adapter with
Valve and insert the PE Tubing through the nut.
Slide the PE Tubing onto the protruding part of
the Adapter where the nut was located
until it reaches the threading.
5. Screw the nut tightly into place to keep the
PE Tubing securely connected to the Metal
Adapter with Valve. Make sure the Valve is
in the o position (perpendicular to the PE
Tubing).
11
Page 16

Installation (Refrigerator Water Line)
Installing the Three Way Plastic Adapter
Getting Started
1. Turn o the current cold water supply
that is the source of water to your
refrigerator line.
3. Insert each cut end of the existing ¼”
Tubing into one of the holes of the Three
Way Plastic Adapter.
2. Cut the current ¼” Tubing that
is connected to the back of your
refrigerator or ice maker near the
end of it that is currently inserted
into the refrigerator.
4. Insert one end of the PE Tubing that is
supplied with the water cooler into the third
opening of the Three Way Plastic Adapter.
(Refrigerator
Water Line)
(Water
Source)
(Water Cooler)
12
Page 17

Getting Started
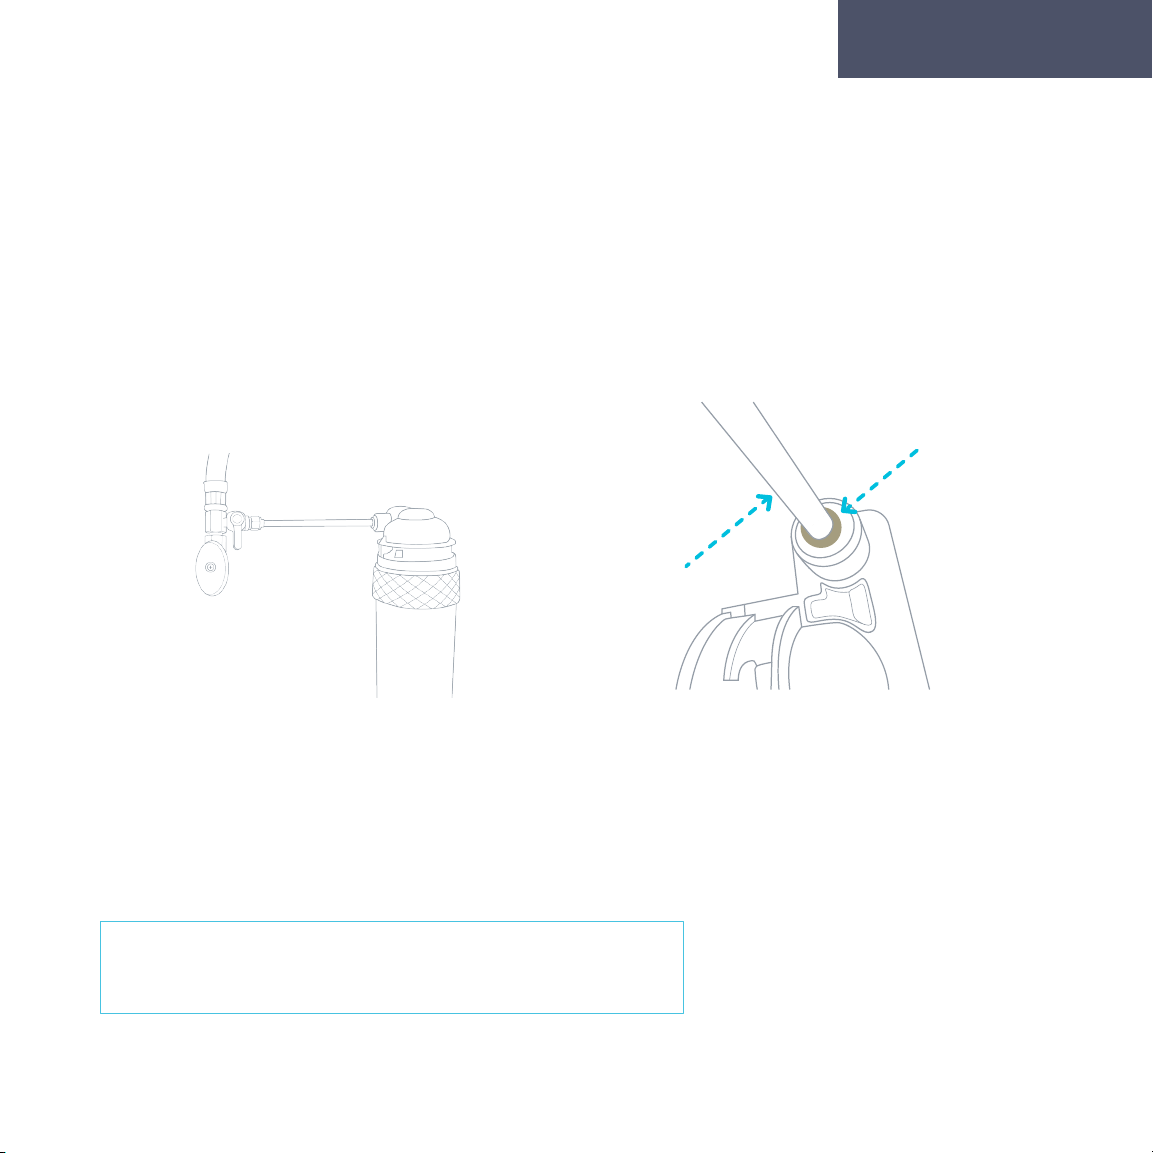
Flushing Filters Prior to Use
Before continuing with installation, it is recommended
that you flush both filters for approximately 2 minutes.
1. Twist the filter into the provided Filter
Flushing Adapter by rotating it clockwise.
3. Hold the filter with the Filter Flushing
Adapter in place over a sink. Turn the Valve
of the Metal Adapter at the water source to
the on position (the on position is parallel
to the PE Tubing) and allow the water to
flow through the Adapter and the filter for
approximately 2 minutes to flush the new filter.
2. Take the open end of the PE Tubing
that is now connected to your water
supply and insert it into the left inlet
hole on the Filter Flushing Adapter in
the direction of the arrow.
13
Page 18
Flushing Filters Prior to Use
Getting Started
4. Turn the Valve of the Metal Adapter at
the water source back to the o position,
remove the filter from the Filter Flushing
Adapter.
5. Remove the end of the PE Tubing
from the Filter Flushing Adapter by
pressing in on the push connect ring
and pulling out the PE Tubing.
Repeat steps 1-5 for flushing the Carbon Block Filter.
14
Page 19

Getting Started
Finishing the Water Cooler Installation
Once you have flushed the filters and removed the filters and PE Tubing from
the Filter Flushing Adapter, you are ready to complete the installation process.
1. Remove the plug from the water inlet (#24)
located on the back of the unit. To do this press
on the push connect ring that is behind the
plug. Push the open end of the PE Tubing into
the water inlet (#24). Make sure the PE Tubing
is tight and secure.
3. Turn the Valve for the water source back on
(the on position is parallel to the PE Tubing).
2. Open the cabinet door of the unit. Twist
the filters into the filter heads in the cabinet
by rotating them clockwise. The Sediment
Filter should be on the left and the Carbon
Block Filter should be on the right.
15
Page 20

Finishing the Water Cooler Installation
Getting Started
4. Turn on the Valve that is located to the
left of the filters inside of the cabinet (the
on position is parallel to the PE Tubing).
5. After installation of the water line and
filter is complete, plug the power cord into
a grounded wall outlet and begin to use
the machine. Please allow the machine
about 10-15 minutes for the water to fill
in the tanks before use. Continue on for
instructions on usage.
10-15
min
16
Page 21

Getting Started
Activate Heating and Cooling
Before turning on the heating (#20) or cooling (#19) switches, ensure water is already filling
inside the inner tanks by dispensing a drop of water from the hot (#10) and cold (#12) spouts.
To activate the cold water, push the cooling switch (#19) into the on (I) position by
pushing the top of the switch in. If you do not wish to have cold water you can leave
the switch in the o (O) positon.
To activate the hot water, push the heating switch (#20) into the on (I) position by pushing
the top of the switch in. If you do not wish to have hot water you can leave the switch
in the o (O) position.
Please allow 15 minutes for the hot water to be heated. During this time the heating indicator
light (#2) will be steady. The light will turn o when the heating process is complete. Please allow
1 hour for the cold water to be cooled. During this time the cooling indicator light (#3) will be
steady. The light will be turned o (O) when the cooling process is complete. If any error occurs
in the heating or cooling process, the indicator light will blink.
17
Page 22

Installing and Removing the Drip Tray
No external drain is needed, the overflow will collect here. The red float will rise to
indicate when the drip tray needs to be emptied.
Getting Started
1. To install the drip tray, simply slide
it into the area at the top of the door
until it snaps into place.
3. Gently pull the drip tray toward
you to release it. Once it has been
released you can remove the drip
tray from the door of the cooler to
empty it.
2. To remove the drip tray, place your
fingers in the grid of thte drip tray with
one hand and hold the door of the
cooler shut with the other.
18
Page 23

User Guide and Maintenance
19
Page 24

User Guide and Maintenance
Dispensing Water
Cold Water
Once you have turned the cooling switch (#19) into the on (I) position it will take initially
1 hour for the water to cool. During this time the cooling indicator light (#3) above the cold
water icon will be steady. During this time the compressor could run continuously. This is
normal. The light will be turned o when the cooling process is complete.
1. Position a bottle, glass, pitcher or cooking pot below the cold water spout (#12).
2. Depress the cold water push button (#8) downward to begin the flow of water.
3. Once the desired fill level is achieved release the cold water push button (#8).
Room Temperature Water
1. Position the bottle, glass, pitcher or cooking pot below the room temperature spout (#11).
2. Depress the room temperature water push button (#7) downward to begin the flow of
water.
3. Once the desired fill level is achieved release the room temperature push button (#7).
Hot Water
Once you have turned the heating switch (#20) into the on (I) position it will take
initially 15 – 20 minutes for the water to heat up. During this time the heating
indicator light (#2) above the hot water icon will be steady. The light will be turned
o when the heating process is complete.
1. Position a bottle, glass, pitcher or cooking pot below the hot water spout (#10).
2. Slide the red child safety lock (#6) to the left and depress the hot water push button
(#5) downward to begin the flow of water. You must hold the child safety lock (#6)
and push the button at the same time.
3. Once the desired fill level is achieved release the hot water push button (#5).
20
Page 25

User Guide and Maintenance
Replacing the Filters
1. When lifetime of the filter is near its end,
either by means of water flow or by means
of 6 months time, the filter indicator light (#4)
on the right side of the front panel will blink
red as a warning. When the filter lifetime is
up, the indicator light will be steady red and
the machine will beep to let you know that the
filter needs to be changed.
2. Shut o the Valve located at the
connection to the water source or the
Valve located to the left of the filters
inside of the cabinet.
21
Page 26

Replacing the Filters
User Guide and Maintenance
3. Twist the expired filters to remove
them. Insert the new filters into the
Filter Adapters by twisting them into
place and rotating them clockwise.
4. Turn on the Valve that was
previously shut o. This Valve
will be located at the connection
to the water source or located to
the left of the Sediment Filter.
22
Page 27

User Guide and Maintenance
Replacing the Filters
5. After replacing the filters, press
and hold the Filter Reset Button (#15)
located on the upper left side of the
cabinet. Press and hold this button until
the filter indicator light (#4) turns o.
(inside the
cabinet)
6. In order to flush the new filters, allow
the water to flow from the cold water
spout (#12) for approximately 2 minutes.
2 min
23
Page 28

Leak Detection
User Guide and Maintenance
Our machines are equipped with a high-tech leak detector that will alert you of any
potential leak. At the same time the machine will automatically shut o any intake of water to
prevent a potential flood. In the event of a possible leak, the heating indicator light (#2), cooling
indicator light (#3) and filter indicator light (#4) will start blinking and a beep will sound. Please
check around the machine for any leaking water and determine the source of it. If you find the
source of the leak, you can call our support line for assistance in fixing it. If you do not find the
source of this leak, it may have been caused by accidental spillage of water or from a filter
change. The leak detector is located on the lower back left corner of the cabinet. Unplug your
water cooler and ensure the area around this sensor is completely dry including the notch.
Once the area and sensor are dry, plug the machine back in and the beeping and blinking
indicator lights will stop and the machine will be ready to use as normal again.
24
Page 29

Cleaning
25
Page 30

Activating Self-Cleaning Function
It is recommended that the self-cleaning feature is used once a week to
sanitize the tanks and water lines.
1. To activate, press the self-cleaning switch (#17) and hold in the on position for 5
seconds and release. The switch will immediately go back into the o position.
2. The power/self-cleaning indicator light (#1) will begin to blink. This indicates the
self-cleaning cycle is underway.
3. Ozone will be produced and injected into the water system, it will kill bacteria
and bio-films typically found in water dispensers. By the end of the cleaning cycle
the ozone will convert into harmless oxygen and will be emitted into the air.
4. When the self-cleaning cycle is complete the power/self-cleaning indicator light
(#1) will stop blinking and will be steady.
Cleaning
Please Note: This self-cleaning cycle will take 90 minutes to complete. During
this time do not dispense and drink the water. We recommend you do this during
a period of time when the unit will not be in use for example overnight. During
the cycle you may smell some of the ozone, this is normal.
26
Page 31

Cleaning
Rinsing, Cleaning, and Draining
To prolong the lifetime of the machine, it is recommended that the unit be cleaned
and sanitized manually about every six months.
To clean the outside of the unit
Use a disinfectant of your choice to wipe down the outside of the machine.
Disinfectant does not come with this unit. It can be purchased separately from
a local store.
To rinse the inside of the unit
The machine has been disinfected prior to departing from the factory. However, it
is recommended to rinse and drain the unit prior to installation.
1. Before cleaning, make sure that the cooling switch (#19) and heating switch (#20)
are in the o (O) position and unplug the machine.
2. Remove the two screws located on the back (at the top, in line with the switches) of
the cooler. Remove the top cover by lifting at an angle and pull o. Remove the white
cold water tank cover and the separator.
27
Page 32

Rinsing, Cleaning, and Draining
Cleaning
3. Pour 0.6 gallons of clean water into the
cold tank. (The cold water tank is the open
cylinder that the white cover was removed
from).
4. Place a large bucket beneath the drain
outlet (#22) located on the back of the unit.
Remove the drain cover and allow the water
to drain from the unit. Water will start flowing
as soon as the drain cover is removed.
Caution: The dispenser will heat water to a temperature of approximately 185°F.
It can cause severe burns if not handled carefully. Please use caution while operating
and cleaning. Please allow ample time for any hot water inside the machine to cool
down before draining it.
28
Page 33

Cleaning
Rinsing, Cleaning, and Draining
5. Once water is completely drained, reposition the drain cover, cold tank cover
and the top cover. Ensure that the pipes and wires are connected properly and
you may use the dispenser as normal.
29
Page 34

Cleaning
To remove mineral deposits that may have built up inside the the cold tank, mix 4 L of
water with 200 g of citric acid crystals (not included) or cleaning solution of your choice.
1. Unscrew the top cover and lift o the cold tank lid.
Cleaning
2. Put the mixture into the machine's cold tank and make sure the water can flow
out of the hot water spout (#10).
30
Page 35

Cleaning
Cleaning
3. Plug in the power cord and turn on
(I) the heating switch (#20). Allow the
water to heat for 15 minutes.
15 min 20 min
5. Drain the liquid from the drain outlet (#22),
then flush with water two or three times
by following the rinsing instructions above.
Only disassemble parts mentioned to avoid
damaging the machine.
4. Turn o (O) the heating switch
(#20) and allow the liquid mixture to
cool down for 20 minutes.
31
Page 36

Troubleshooting
32
Page 37

Troubleshooting
Troubleshooting
If you are having trouble with your water cooler please see the following
solutions. You can also view our trouble shooting videos at the website below.
Please feel free to contact us with any questions.
1-800-256-0695
support@avalonh2o.com
www.avalonh2o.com
33
Page 38

Troubleshooting
Troubleshooting
Indicator lights are flashing and unit is beeping
If indicator lights #2, #3, #4 are flashing and the unit is making a slow beeping
sound, it is alerting you that there may be a leak in the unit. Please refer to page 23.
Water leaking from unit
• Check to make sure that pipes are contact properly
• Inspect the adapter to ensure the proper connection
• Water pipe may need to be replace
Water not dispensing at a hot or cold temperature
This could be caused by an over consumption of water in a short period of time causing
the tanks to empty. Please allow 5 to 10 minutes for the water cooler tanks to refill. Allow
the proper time for the water to heat and cool.
This could be caused by an interruption in the power supply. Please ensure that the
power cord is connected to an outlet. Please make sure that the heating (#20) and
cooling (#19) switches are in the on (I) position.
34
Page 39

Safety
35
Page 40

Safety
Safety
To reduce risk of injury and property damage, user must read this entire guide
before assembling, installing and operating the dispenser.
Failure to execute the instructions in this manual can cause personal injury or
property damage.
This product dispenses water at very high temperatures. Failure to use this properly can
cause personal injury.
When operating this dispenser, always exercise basic safety precautions, including the
following:
• Prior to use, this dispenser much be properly assembles and installed in
• accordance with this manual.
• This dispenser is intended for water dispensing only. Do NOT use other liquids. Do NOT
use for other purposes. Never use any other liquid in the dispenser other than known
microbiologically safe tap water.
• For indoor use only. Keep water dispenser in a dry place away from direct sunlight. Do
NOT use outdoors.
• Install and use only on a hard, flat and level surface.
• Do NOT place dispenser in an enclosed space or cabinet.
• Do NOT operate the dispenser in the presence of explosive fumes.
• Position back of dispenser no closer than 20 cm from wall and permit free airflow
between wall and dispenser. There must be at least 20 cm clearance on the sides of the
dispenser to permit airflow.
• Use only properly grounded outlets.
• Do not use and extension cord with your water dispenser.
• Always grasp plug and pull straight out from outlet. Never unplug by pulling on power
cord.
• To protect against electric shock, do NOT immerse cord, plug or any other part of the
dispenser in water or other liquid.
36
Page 41

Safety
Safety
• Ensure dispenser is unplugged prior to cleaning.
• Never allow children to dispense hot water without proper and direct supervision.
Unplug unit to prevent unsupervised use by children.
• Service should be performed only by a certified technician.
• Warning: Do not damage the refrigerant circuit.
• This appliance can be used my children aged from 8 years and above if they have
been given supervision or instruction concerning use of the appliance in a safe way
and if they understand the hazards involved. Cleaning and user maintenance shall not
be made by children unless they are older than 8 and supervised. Keep the appliance
and its cord out of reach of children less than 8 years.
• Appliances can be used by persons with reduced physical, sensory or mental
capabilities or lack of experience and knowledge if they have been given supervision
or instruction concerning use of the appliance in a safe way and understand the
hazards involved. Children shall not play with the appliance.
• This appliance is intended to be used in a household and similar applications such as:
kitchen area in shops, oces and other working environments, bed and breakfast type
environments, catering and similar non-retail applications.
• Do not store explosive substances such as aerosol cans with flammable propellant in
this appliance.
• If the supply cord is damaged, it must be replaced by a special cord assembly
available from the manufacturer or its service agent.
• Never turn the machine upside down or lean it more than 45°.
• Thermostat has been adjusted. There is no need to adjust it by yourself. When the
matching is below the freezing point and blocked by ice, the cooling switch should be
turned o for 4 hours before turning it on again to continue its operation.
• This machine should not be plugged back in until 3 minutes after it has been
unplugged.
37
 Loading...