

Page 1
!
USER’S!GUIDE
!
Installation,!Operation,!and!Maintenance!for!your!product.!
!
!
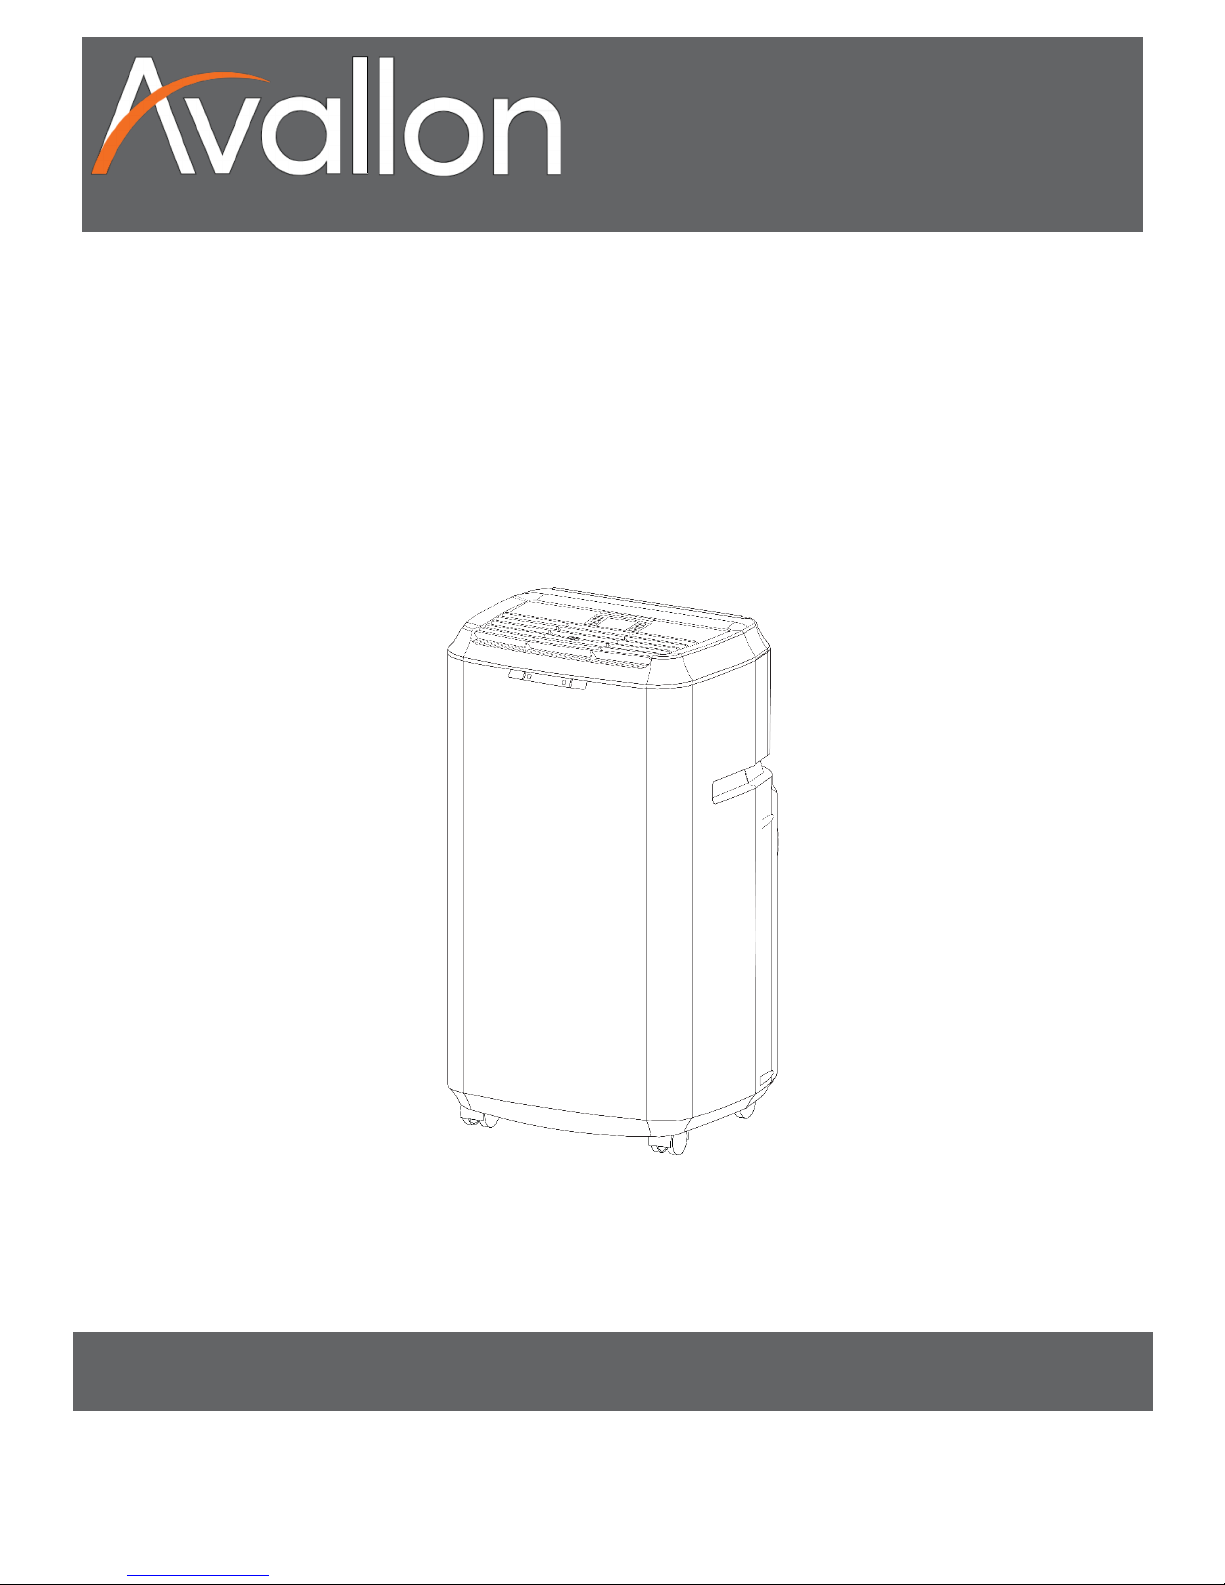
Portable!Air!Conditioner!with!Heater!
Model!–!APAC140HC!
www.avallon.com!!! !
!
!
!
!
V2.2-12012017!
Page 2
ii!
!
!
Important!Safety!Information!
!
Improper!handling!can!cause!serious!damage!to!the!Avallon!Portable!Air!Conditioner!and!/!or!injury!to!the!
user.!!!
This!portable!air!conditioner!is!not!intended!for!use!by!children.!Children!should!be!supervised!to!ensure!
that!they!do!not!play!with!this!product.!
!
! !!!ELECTRICAL!SAFETY
!
•
This!unit!is!designed!for!indoor!use!only.!
•
Do!not!use!the!unit!in!extremely!humid!or!wet!environments.!
•
Do!not!wet!the!housing!or!control!panel.!
•
Do!not!pull!the!unit!by!the!cord.!
•
Always!turn!the!unit!off!and!unplug!it!from!the!socket!when!cleaning.!
•
Unplug!the!unit!if!it!is!not!going!to!be!used!for!a!long!period!of!time.!!
•
Do!not!operate!the!unit!with!a!damaged!plug!or!a!loose!socket.!
•
Use!only!the!correct!power!supply!with!appropriate!amperage.!
•
If!the!power!cord!is!damaged,!it!must!be!replaced!by!the!manufacturer,!a!service!agent,!or!a!qualified!
technician.!!
• Do!not!remove!any!part!of!the!casing!unless!you!are!instructed !to!do!so!by!an!authorized!technician.!
!
GENERAL!SAFETY! !
•
This!portable!air!conditioner!is!not!intended!to!be!used!by!children.!
•
Do!not!allow!children!to!play!with!the!controls!or!drop!any!objects!into!the!air!outlets!or!vents.!!
•
Do!not!place!objects!or!let!any!person!sit!on!top!of!the!unit.!!
•
Only!use!in!the!upright!position!on!a!flat,!level!surface!and!provide!at!least!20!inches!of!clearance!from!any!
walls!or!objects.!!
•
Route!the!power!cord!carefully!to!avoid!a!tripping!hazard.!!
•
This!unit!is!intended!for!domestic!and!light!commercial!use!only.!Do!not!use!the!portable!air!conditioner!for!
industrial!purposes.!Any!other!use!may!invalidate!the!warranty.!
Page 3
iii!
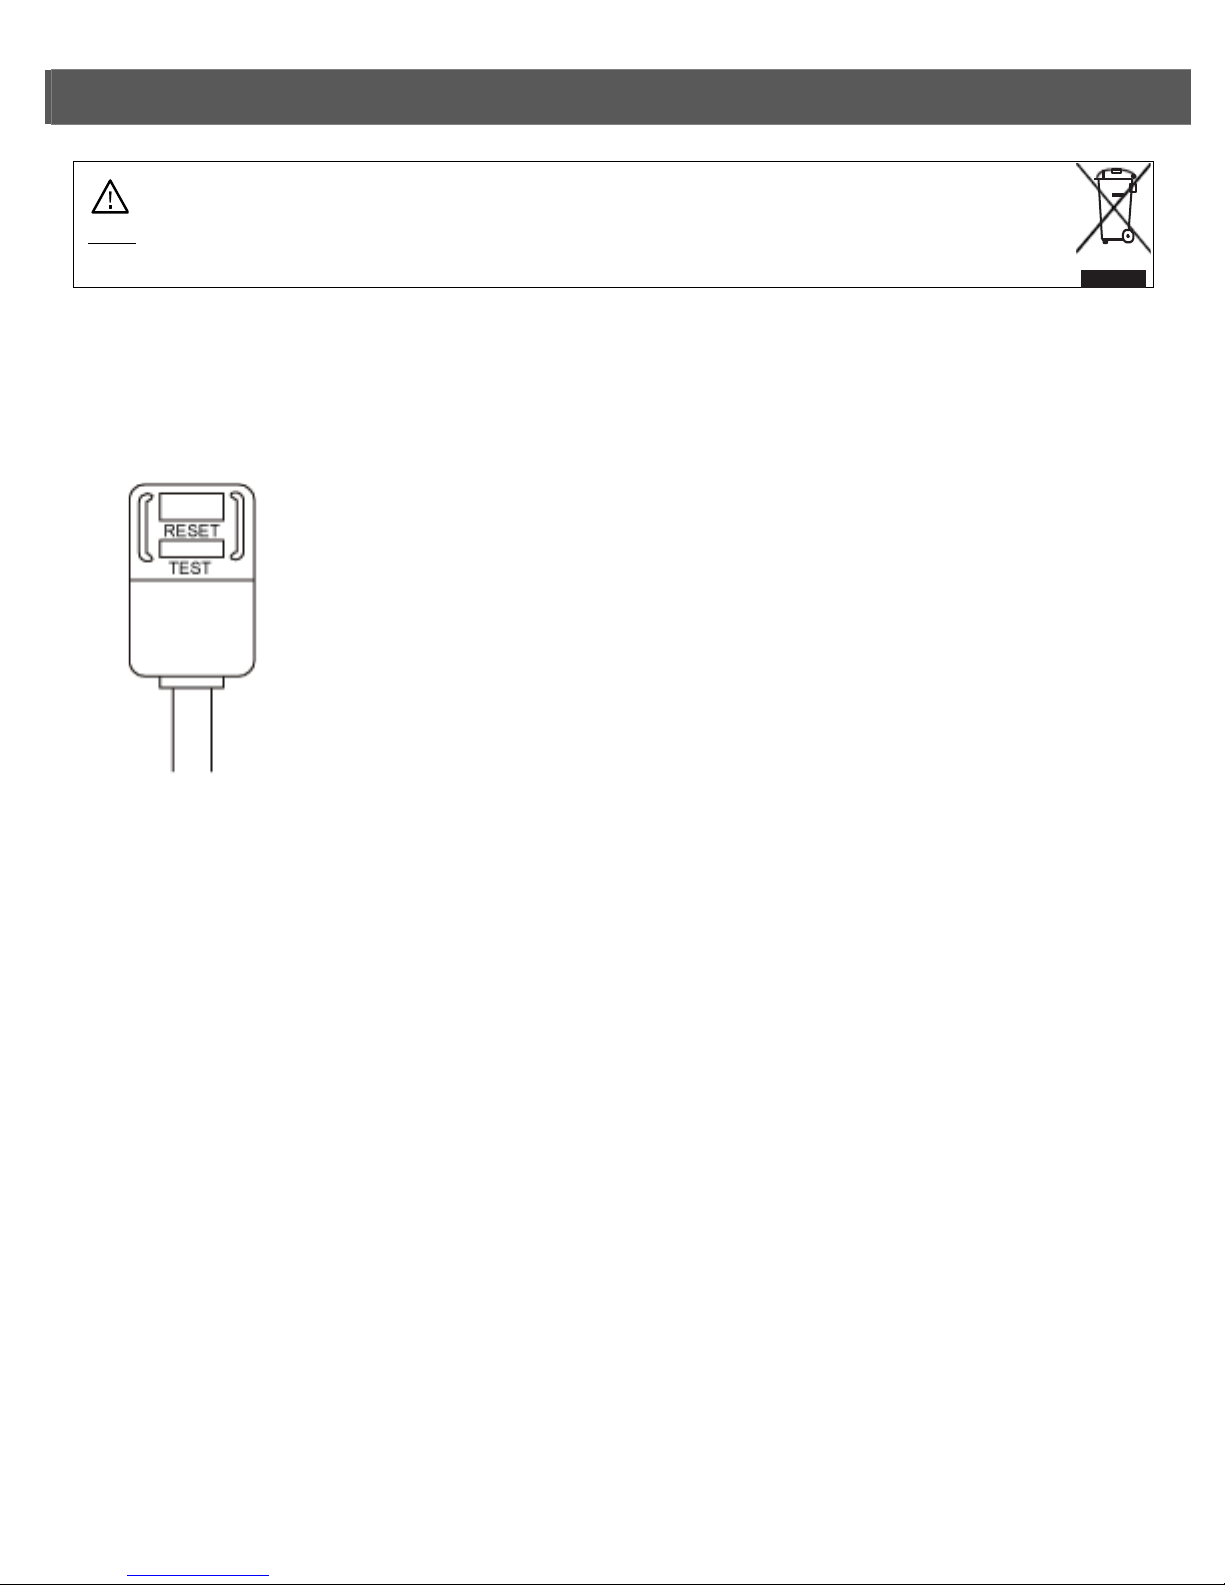
Operation!of!Safety!Plug!
!
Your!portable!air!conditioner!is!supplied!with!a!Leakage-Current!Detection!and!Interruption!(LCDI)!safety!
plug.!This!device!provides!protection!to!reduce!the!risk!of!fire!due!to!arcing!faults!in!the!power!supply!cord.!
Before!using!your!portable!air!conditioner,!follow!the!instructions!below!to!ensure!that!the!LCDI!plug!is!
working!properly:!!
1. Plug!the!power!cord!into!a!grounded!outlet.!
2. Press!the!TEST!button!on!the!LCDI!plug.!This!should!trip!the!plug!and!cut!the!power!to!the!air!
conditioner.!If!the!plug!does!not!trip!and!you!are!able!to!turn!on!the!unit,!please!contact!Avallon!
support.!
DO!NOT!USE!YOUR!PORTABLE!AIR!CONDITIONER!IF!THE!TEST!FAILS.!
Press!the!RESET!button!to!start!using!your!air!conditioner.!
Do!not!use!the!TEST!and!RESET!buttons!as!an!ON/OFF!switch.!
!
Note:!Electrical!products!should!not!be!disposed!of!with!household!waste.!Please!contact!your!local!
recycling!center!for!more!information!about!how!to!recycle!electronic!waste.!
Page 4

iv!
Table!of!Contents!
!
Important!Safety!Information!..........................................................................................................................!ii!
Operation!of!Safety!Plug!.................................................................................................................................!iii!
Introduction!.....................................................................................................................................................!1!
Parts!Identification!...........................................................................................................................................!2!
Front!View!.....................................................................................................................................................!2!
Back!View!......................................................................................................................................................!2!
Window!Kit!Installation!Instructions!................................................................................................................!3!
Preparations!for!Installing!the!Window!Kit!...................................................................................................!3!
Window!Kit!Parts!List!....................................................................................................................................!3!
Parts!for!Continuous!and!Misting!Drainage!..................................................................................................!3!
Installation!Location!......................................................................................................................................!4!
Notes!About!the!Exhaust!Hose!.....................................................................................................................!7!
Draining!the!Unit!..............................................................................................................................................!8!
Drainage!Options!..........................................................................................................................................!8!
Operation!.......................................................................................................................................................!11!
Remote!Control!Overview!..........................................................................................................................!11!
Remote!Control!LCD!Indicators!...................................................................................................................!12!
Operating!the!Remote!Control!...................................................................................................................!13!
Auto-Restart:!..............................................................................................................................................!13!
Front!Panel!Lights!and!Controls!..................................................................................................................!16!
Cleaning!and!Maintenance!............................................................................................................................!16!
Cleaning!the!Unit!........................................................................................................................................!16!
Cleaning!the!Pre-Filter!................................................................................................................................!17!
Preparation!for!Storage!..............................................................................................................................!17!
Energy!Saving!Guide!......................................................................................................................................!17!
Troubleshooting!.............................................................................................................................................!18!
Specifications!.................................................................................................................................................!20!
New!Portable!Air!Conditioner!BTU’s!..............................................................................................................!21!
What!is!SACC?!.............................................................................................................................................!21!
Avallon!Product!Warranty!.............................................................................................................................!22!
Page 5

v!
First!Time!Operating!Instructions:!
Before!use,!make!sure!all!packaging!labels!and!materials!are!removed!from!the!unit.!Be!sure!to!keep!
track!of!all!included!parts!and!pieces!before!discarding!packaging!materials.!It!is!advised!that!you!keep!
the!original!box!and!packaging!materials!in!case!you!need!to!move!or!ship!the!appliance!in!the!future.!
This!owner’s!manual!is!provided!for!reference!use!only.!Specifications!may!change!without!prior!notice.!!
Refer!to!the!product!label!on!your!portable!air!conditioner!for!the!latest!technical!information.!
Page 6

Introduction!
Thank!you!for!purchasing!your!Avallon!portable!air!conditioner.!!Avallon!is!dedicated!to!developing!products!
that!will!enhance!your!lifestyle!with!superior!quality!and!distinctive!features.!!Please!visit!www.avallon.com!
for!more!information!on!your!product!and!other!Avallon!products.!
This!manual!contains!important!information!regarding!the!proper!installation,!use,!and!maintenance!of!your!
portable!air!conditioner.!!Following!this!manual!will!ensure!that!your!product!will!work!at!its!peak!
performance!and!efficiency.!
Please!save!the!original!product!packaging!in!case!you!need!to!safely!transport!your!portable!air!conditioner.!
For!Your!Records:!
Please!write!down!the!model!number!and!serial!number!below!for!future!reference.!!Both!numbers!are!
located!on!the!rating!label!on!the!back!of!your!unit!and!are!needed!to!obtain!warranty!service.!!You!may!
also!want!to!staple!your!receipt!to!this!manual!as!it!is!the!proof!of!your!purchase,!and!is!also!needed!for!
service!under!your!warranty.!
!
Model!Number:!
Serial!Number:!
Date!of!Purchase:!
To!better!serve!you,!please!do!the!following!before!contacting!customer!service:!
•!! If!you!received!a!damaged!product,!immediately!contact!the!retailer!or!dealer!that!sold!you!the!
product.!
• Read!and!follow!this!instruction!manual!carefully!to!help!you!install,!use,!and!maintain!your!portable!
air!conditioner.!
•!! Read!the!troubleshooting!section!of!this!manual!as!it!will!help!you!diagnose!and!solve!common!
issues.!
• Visit!us!on!the!web!at!http://www.avallon.com!to!download!product!guides,!additional!
troubleshooting!resources,!and!up-to-date!information.!
• If!you!need!warranty!service,!our!friendly!customer!service!representatives!are!available!via!email!at!
service@avallon.com!or!by!telephone!at!1!(866)!471-7427.!
Page 7

2!
Parts!Identification! !
!
!
Front!View!
Back!View!
!
!
!
Caution:!Make!sure!the!drain!plug!is!firmly!installed!before!using!the!unit!to!prevent!leaking.!
!
Note:!The!LCD!display!on!top!of!this!model!is!the!remote!control!and!is!removable.!
Page 8
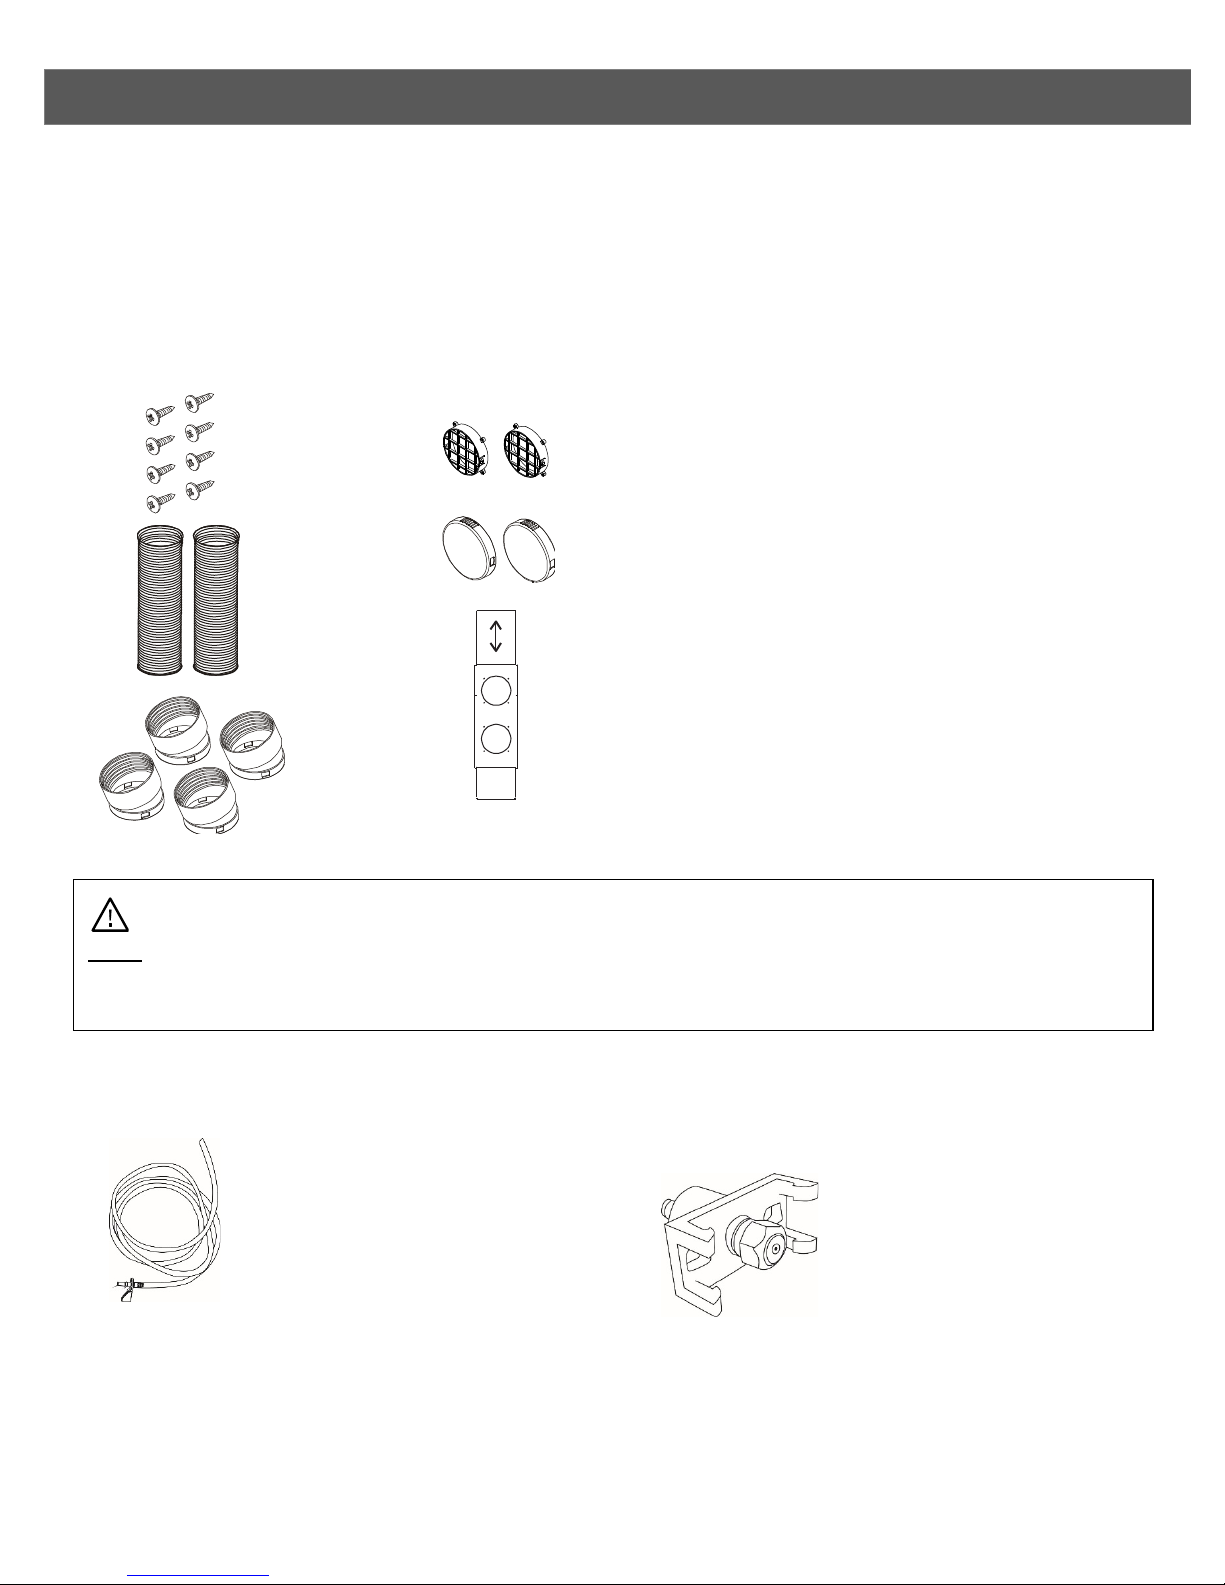
3!
4!Duct!
Connectors!
!
Window!Kit!Installation!Instructions!
Preparations!for!Installing!the!Window!K it!
You!must!vent!your!portable!air!conditioner!when!running!it!in!cooling!mode!or!heat!mode!(certain!models).!
Your!unit!includes!a!window!exhaust!kit!that!can!be!used!to!vent!the!unit!out!of!a!window.!Before!you!begin,!
make!sure!you!have!all!the!parts!necessary!for!installation.!!
Window!Kit!Parts!List!
!
Parts!for!Continuous!and!Misting!Drainage!
!
Note:!There!is!one!duct!connector!that!includes!an!opening!for!the!water!line!for!use!in!the!misting!drain!
operation.!This!connector!must!be!installed!to!the!exhaust!outlet!on!the!unit.!Please!review!pages!8-10!for!
more!details.!
8!Screws!
2!Exhaust!
Hoses!
!
2!Grated!
Adapters!
2!Exhaust!
Covers!
2!Window!Kit!Plates!
•
1!Window!Kit!
Plate!with!Holes!
1!Water!Line!
1!Misting!Nozzle!
Page 9
4!
Installation!Location!
If!you!have!multiple!windows,!choose!one!that!is!near!an!electrical!outlet!that!will!be!able!to!provide!
sufficient!power!to!your!unit.!See!the!power!requirements!listed!on!the!product!label!printed!on!the!side,!or!
on!the!back!of!your!portable!air!conditioner.!
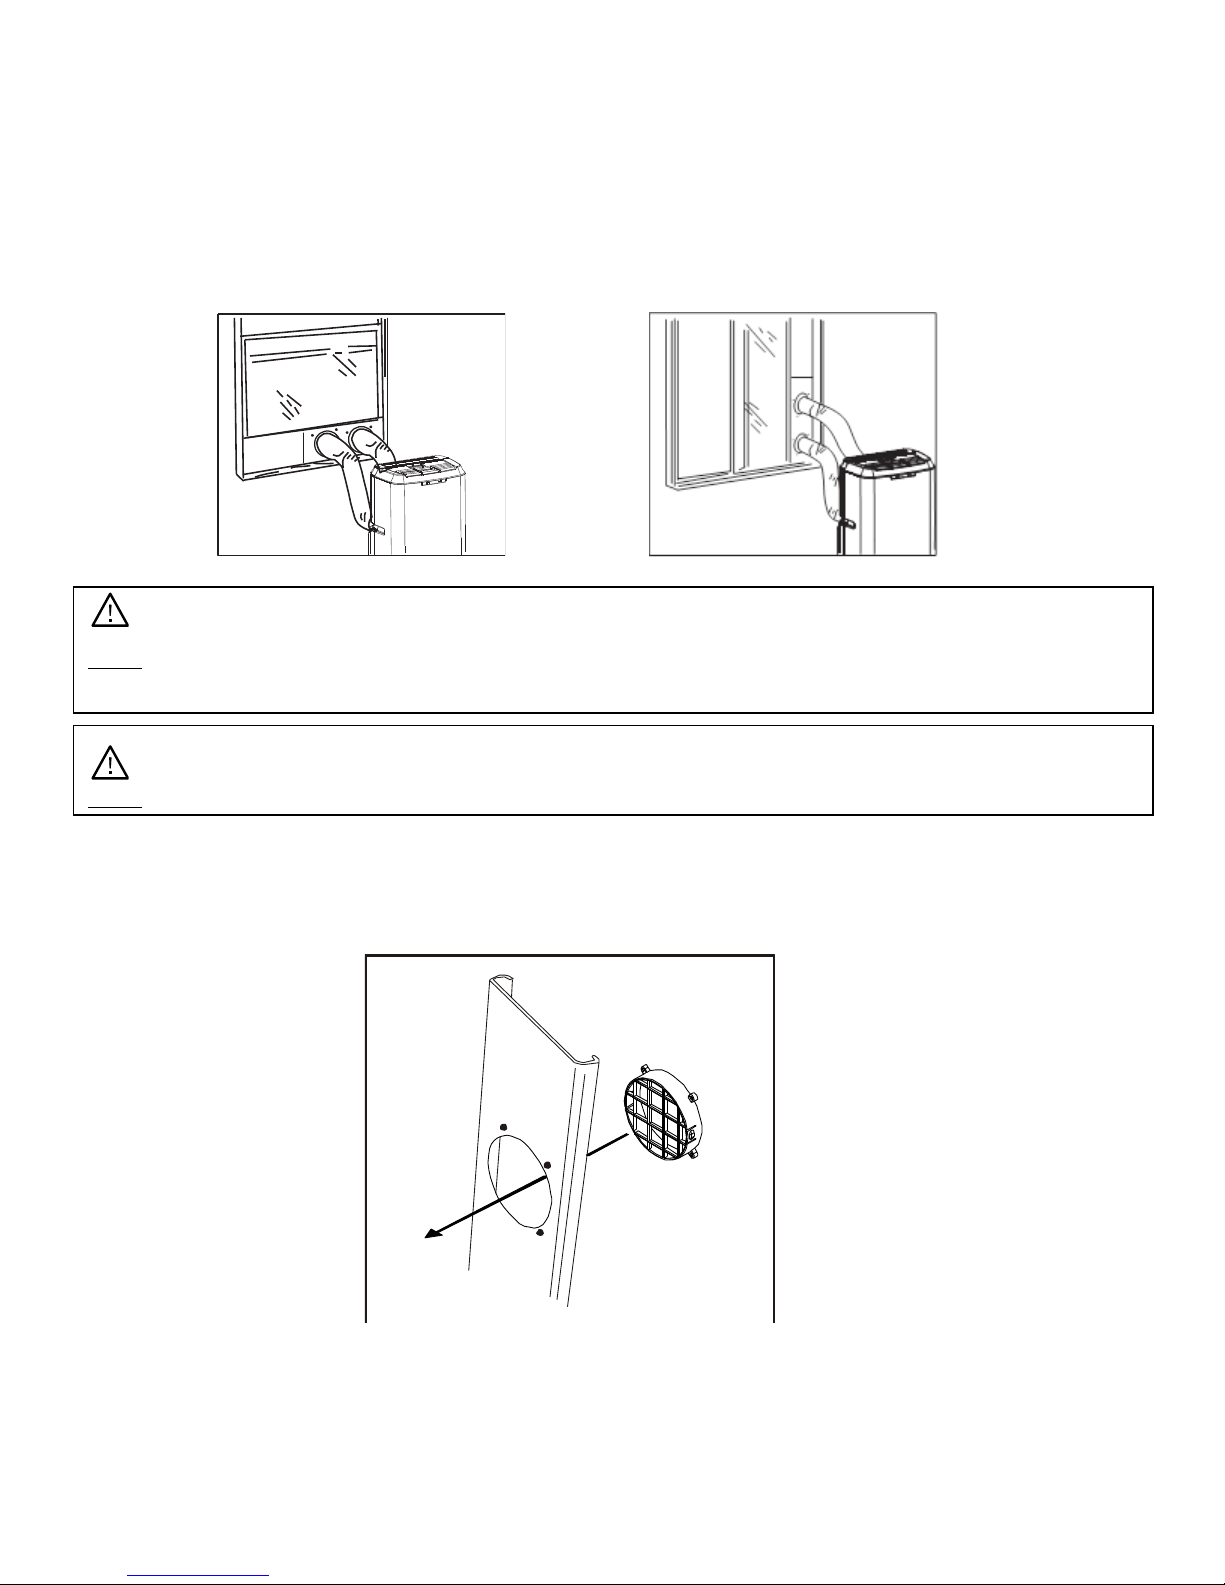
Your!window!kit!can!be!installed!on!a!horizontal!or!vertical!sliding!window!as!shown!in!the!following!
pictures:!
Installing!the!Grated!Adapter!
1. Insert!the!round!grated!adapters!through!the!back!grooved!side!of!the!window!kit!plate!with!holes.!!
!
Note:!Exhaust!Covers!may!be!attached!to!the!Grated!Adapters.!You!may!need!to!twist!and!pull!apart!to!
separate!them.!
!
Note:!You!may!need!to!contact!your!electrician!if!your!room’s!circuit!is!not!able!to!power!your!unit.!
Page 10

5!
!
!
!
2. Secure!the!grated!adapters!by!fastening!the!screws!from!the!flat!side!of!the!window!kit!plate!to!the!holes!
on!the!grated!adapter.!
Installing!the!Window!Plates!
3. Open!your!window!and!place!the!window!kit!on!the!window!sill!with!the!grooved!side!facing!outward.!
Then,!slide!the!window!kit!plate!to!fit!the!width!of!the!window.!You!can!use!screws!to!secure!the!window!
kit!plate!from!sliding.!
4. Lower!the!window!to!secure!the!window!kit!in!place.!You!may!need!to!use!duct!tape!to!better!secure!the!
window!kit.!
Page 11

6!
A.
B.
2
0
”
Attaching!the!Duct!Connectors!to!the!Exhau st!H ose !
5. Attach!the!connectors!to!the!hose.!
A.!!!Extend!the!ends!of!the!exhaust!hose!
B.!!!Thread!the!duct!connector!on!by!turning!it!clockwise!until!it!stops.!
!
6. Roll!the!unit!towards!the!window!kit.!Leave!a!space!that!is!at!least!20!inches!to!the!wall.!
Connecting!the!Duct!Connector!to!the!Unit!
7. Align!the!slots!on!the!duct!connector!to!the!tabs!and!snap!the!duct!connector!into!the!back!of!the!unit.!
In!order!to!use!the!misting!drain!feature!you!will!need!to!attach!the!duct!connector!with!an!opening!for!
the!water!line!to!the!exhaust!outlet!on!the!unit.!!
Page 12

7!
Do not lengthen the
exhaust hose by adding
additional hoses or
attachments.
Connecting!the!Duct!Connector!to!the!Grated!Adapter!
8. Align!the!slots!on!the!duct!connector!to!the!tabs!on!the!grated!adapter!and!snap!the!duct!connector!into!
place.!
After!you!have!installed!the!exhaust!hose!and!window!kit,!you!can!plug!in!your!portable!air!conditioner!and!
start!using!it.!
Notes!About!the!Exhaust!Hose!
Your!portable!air!conditioner!is!designed!to!exhaust!condensate!water!that!is!collected!from!the!air.!This!
water,!in!either!gaseous!or!droplet!form,!will!be!expelled!out!of!the!exhaust!port!of!the!unit.!Please!take!this!
into!account!when!deciding!how!to!vent!it.!
1. The!exhaust!hose!supplied!with!the!portable!air!conditioner!can!be!extended!up!to!48!inches;!however,!
for!maximum!efficiency,!use!the!shortest!length!possible.!
2. Try!to!prevent!any!kinks!or!bends!in!the!exhaust!hose.!Kinks!or!bends!may!trap!exhaust!air!which!can!
radiate!heat!into!the!room!or!potentially!cause!the!portable!air!conditioner!to!overheat!and!shut!itself!
off.!
3. The!exhaust!hose!supplied!with!the!portable!air!conditioner!has!been!specifically!designed!for!this!air!
conditioner.!Do!not!lengthen!the!hose!by!adding!additional!hoses!or!attachments!or!replace!it!with!any!
other!hose.!
!
Warning:!Longer!hoses!are!not!recommended.!
Page 13

8!
Draining!the!Unit!
When!the!portable!air!conditioner!is!in!cooling!mode,!dehumidify!mode,!or!heat!mode!on!certain!models,!it!
will!remove!moisture!from!the!air.!The!condensed!water!from!the!air!will!be!collected!in!an!internal!
reservoir!and!will!be!evaporated!and!exhausted!out!of!the!exhaust!hose.!However,!in!very!humid!conditions,!
the!internal!reservoir!may!fill!completely.!This!causes!the!air!conditioner!to!turn!off!to!avoid!overflowing!the!
internal!reservoir.!The!WATER!indicator!will!light!up!on!the!Control!Panel.!
Drainage!Options!
Your!Avallon!portable!air!conditioner!comes!with!several!different!options!for!draining!the!water!
accumulated!during!operation.!The!most!common!will!be!the!self-evaporative!mode.!The!unit!will!do!this!
automatically.!This!mode!will!be!sufficient!for!most!environments.!If!you!are!operating!the!unit!in!an!
environment!with!higher!levels!of!humidity!you!may!choose!one!of!the!other!drainage!options!to!help!
remove!the!excess!water.!
Direct!Drainage!
1. Remove!the!rubber!drain!plug!from!the!drain!port.!
2. Connect!a!drain!hose!to!the!drain!port.!
The!portable!air!conditioner!will!now!drain!through!the!drain!hose.!
Continuous!Drain!
This!unit!has!the!capacity!for!continuous!drainage.!It!includes!an!internal!pump!to!help!remove!water.!
This!means!the!unit!will!push!the!water!to!the!drain!instead!of!relying!on!gravity!to!bring!the!water!to!
the!drain.!If!there!is!an!obstacle!in!between!the!unit!and!the!drain,!the!pump!will!push!the!water!over!
that!obstacle!and!through!the!water!line.!In!order!to!run!the!continuous!drain!function,!you!will!need!to!
do!the!following:!
1. Connect!the!included!water!line!to!the!unit.!You!will!need!to!attach!the!quick!connect!adapter!on!the!
end!of!the!water!line!to!the!back!of!the!unit.!
!
2. Place!the!other!end!of!the!water!line!(drainage!end)!into!a!drain.!The!unit!will!recognize!that!the!
quick!adapter!is!attached!and!will!automatically!engage!the!water!pump.!The!pump!will!turn!on!once!
the!water!reservoir!becomes!full.!!
Page 14

9!
Misting!Drain!
Your!unit!also!includes!the!unique!Misting!Drain!option.!If!a!drain!is!not!present!this!option!will!allow!
the!unit!to!remove!the!excess!moisture!out!of!the!exhaust!hose!through!a!mist!nozzle.!The!mist!nozzle!
MUST!be!setup!in!the!exhaust!hose!and!NOT!the!intake!hose.!In!order!to!run!the!misting!drain!option,!
you!will!need!to!do!the!following:!
1. Connect!the!included!water!line!to!the!unit.!You!will!need!to!attach!the!quick!connect!adapter!on!the!
end!of!the!water!line!to!the!back!of!the!unit.!
!
2. Run!the!remaining!water!line!into!the!exhaust!hose!through!the!opening!in!the!exhaust!hose!adapter.!
This!adapter!MUST!be!installed!on!the!exhaust!outlet!of!the!unit.!If!the!adapter!is!not!installed!in!this!
position!you!will!need!to!adjust!the!adapters.!Run!the!excess!water!line!into!the!cavity!of!the!exhaust!
hose.!
3. Connect!the!mist!nozzle!to!the!end!of!the!water!line.!Ensure!the!water!line!is!attached!securely!to!the!
mist!nozzle.!
!
Note:!The!water!line!quick!connect!includes!a!trigger!to!let!the!unit!know!a!water!line!is!attached.!The!unit!
will!not!pump!water!out!of!this!drainage!hole!unless!the!quick!connect!water!line!is!attached.!
!
Caution:!The!water!line!will!contain!some!water!if!the!pump!has!been!in!use.!If!you!are!going!to!detach!the!
water!line!from!the!unit!be!sure!to!keep!the!end!of!the!water!line!elevated!once!it!is!detached!to!avoid!
water!spilling.!Drain!the!remaining!water!in!the!water!line!if!you!are!preparing!for!storage!of!the!unit.!
Page 15

10!
4. Attach!the!mist!nozzle!to!the!grated!adapter.!Make!sure!the!mist!nozzle!is!directed!to!mist!outside!of!
the!window!and!not!back!into!the!exhaust!hose.!
The!unit!will!now!automatically!mist!any!excess!water!to!the!outside.!Installing!the!mist!system!in!the!
exhaust!hose!ensures!all!of!the!moisture!is!pushed!completely!away!from!the!window.!
!
!
!
!
!
!
!
!
!
!
!
!
!
!
!
!
!
!
Note:!It!is!recommended!to!attach!the!misting!nozzle!in!a!vertical!position!on!the!grated!adapter.!
Page 16

11!
!
!
Operation!
Remote!Control!Overview!
!
!
!
!
!
!
Button!
Function!
!Power!
This!button!powers!the!unit!on!or!off.!
!Fan!Speed!
This!button!sets!the!fan!speed.!The! !Automatic,! !High,! !Medium,!or! !Low!
indicator!will!appear!depending!on!the!mode!you!set.!
!Mode!
This!button!sets!the!mode.!The! !Automatic,! !Cool,! !Dehumidify,! !Fan,!or!
!heat!indicator!will!appear!depending!on!the!mode!you!set.!!
!(Down)!
This!button!decreases!the!Temperature,!Timer,!or!Clock!settings.!
!(Clock)!
This!button!is!used!to!set!the!remote!control!clock!
!Timer!
This!button!is!used!to!enable!the!timer.!
!C/F!
This!button!switches!the!temperature!between!Celsius!/!Fahrenheit!!
!(Up)!
This!button!increases!the!Temperature,!Timer,!or!Clock!settings.!!
!
Note:!To!use!the!remote,!reach!directly!behind!the!display!and!pull!up!and!out!to!detach!it!from!the!unit.!
Page 17

12!
Installing!the!Batteries!
1. Remove!the!cover!on!the!back!of!the!remote!control.!!
2. Insert!the!batteries!with!the!(+)!and!(-)!ends!pointing!in!the!correct!direction.!
3. Slide!the!cover!back!on.!
!
!
!
Remote!Control!LCD!Indicators!
Indicators!
!
Transmitter!
This!indicator!appears!when!the!Power!or!Timer!button!is!signaling!the!unit.!
Fan!Speed!
This!indicator!shows!the!set!fan!speed!between! !Automatic,! !High,!!!!!!!!!!!!!!
!Medium,!and! !Low.!
Mode!
This!indicator!shows!the!set!mode!between! !Automatic,! !Cooling,!!!!!!!!!!!!!!!!
!Dehumidify,! !Fan!Only,!and! !Heat.!
Temperature!Setting!
This!indicator!shows!the!set!temperature.!
Fahrenheit!and!Celsius!
This!indicator!shows!if!the!set!temperature!is!in!Fahrenheit!or!Celsius.!
Clock!
This!indicator!shows!the!Clock’s!time.!The!remote!control!has!a!24-Hour!clock.!
Timed!Hours!
This!indicator!shows!the!number!of!timed!hours!when!the!Timer!is!enabled.!
Timer!
This!indicator!shows!if!the!On!Timer!or!Off!Timer!is!enabled.!
Mode!Indicator!
Function!
!Automatic!
The!unit!will!cool,!dehumidify,!or!heat!(some!models)!depending!on!the!ambient!
temperature.!The!mode!and!fan!speed!changes!automatically.!The!front!panel!lights!
will!change!to!reflect!the!running!mode.!
!Cooling!
The!unit!will!cool.!The!front!panel!lights!will!be!blue.!
!Dehumidify!
The!unit!will!remove!moisture!from!the!air.!The!front!panel!lights!will!be!yellow.!
!Fan!Only!
The!unit!will!run!as!a!fan!and!circulate!air.!The!front!panel!lights!will!be!green.!
!Heat!!
Available!on!certain!models.!The!unit!will!heat.!The!front!panel!lights!will!be!red.!
!
Caution:!Use!only!AAA!batteries.!Remove!the!batteries!if!the!remote!control!will!not!be!used!for!one!month!
or!longer.!Do!not!attempt!to!recharge!batteries!not!designed!to!be!recharged.!All!batteries!should!be!
replaced!at!the!same!time.!Do!not!mix!old!and!new!batteries.!Do!not!dispose!of!batteries!in!a!fire!as!they!
may!explode.!
Page 18

13!
Operating!the!Remote!Control!
Power!
Use!the! !Power!button!to!turn!the!portable!air!conditioner!on!and!off.!!
By!default!when!you!first!use!the!power!button,!the!unit!will!begin!to!operate!in!cooling!mode!and!the!
front!panel!will!be!illuminated!in!blue.!The!unit!will!remember!the!last!used!mode!/!settings!if!you!shut!
down!and!restart.!!
Auto-Restart:!If!power!to!the!unit!is!interrupted,!the!air!conditioner!will!restart!itself!in!its!last!used!
mode!/!settings!once!power!is!restored.!The!compressor!will!restart!after!3!minutes.!!
Cooling!Mode!
Cooling!mode!cools!and!dehumidifies!the!air.!If!the!ambient!temperature!drops!below!the!temperature!
you!selected,!the!compressor!turns!off!and!the!unit!functions!with!the!fan!only.!When!the!temperature!
rises!above!the!temperature!you!selected,!the!compressor!turns!on!again.!The!front!panel!lights!will!be!
blue.!Whether!your!desired!temperature!can!actually!be!reached!depends!on!the!ambient!conditions.!
The!room!temperature!remaining!above!the!set!temperature!is!normal.!
To!operate!the!unit!in!cooling!mode:!
1. Make!sure!the!power!cord!is!plugged!into!a!power!outlet.!
2. Press!the! !Power!button!on!the!remote!control.!
3. Press!the! !Mode!button!until!the! !cooling!indicator!is!selected.!
4. Select!the!fan!speed!by!using!the! !Speed!button.!
5. Set!the!thermostat!by!using!the! !Up!and! !Down!buttons.!The!thermostat!is!adjustable!
between!61°F!-!89°F!in!one!degree!increments.!You!can!switch!between!Fahrenheit!and!Celsius!by!
pressing!the! !button.!
Dehumidifying!Mode!
During!the!Dehumidifying!mode,!the!unit!will!condense!water!out!of!the!air!and!exhaust!it!through!the!
exhaust!hose.!The!ambient!temperature!in!the!room!will!probably!drop!by!a!few!degrees!while!using!the!
Dehumidifying!mode.!The!front!panel!lights!will!be!yellow.!
To!operate!the!unit!in!dehumidifying!mode:!!
1. Make!sure!the!power!cord!is!plugged!into!a!power!outlet.!!
2. Press!the! !Power!button!on!the!remote!control.!
3. Press!the! !Mode!button!until!the! !dehumidify!indicator!is!selected.!
!
!
Note:!The!exhaust!hose!must!be!used!in!Cooling!mode!in!order!to!cool!a!room.!
!
Notes:!If!the!room!temperature!is!below!77°F,!the!fan!will!always!run!on!low!speed!in!this!mode.!If!you!do!
not!use!the!exhaust!hose!in!Dehumidify!Mode,!you!must!manually!drain!the!water!from!the!unit.!
Page 19

14!
Heat!Mode!!
Only!available!on!certain!models!
This!mode!allows!the!unit!to!run!as!a!heat!pump.!The!unit!must!be!vented!for!it!to!expel!the!cold!air!out!
of!the!exhaust.!!
To!operate!the!unit!in!heat!mode:!!
1. Press!the! !Mode!button!until!the! !heat!indicator!is!selected.!!!
2. Set!the!thermostat!by!using!the! !Up!and! !Down!buttons.!The!thermostat!is!adjustable!
between!61°F!–!77°F!in!one!degree!increments.!
!
Fan!Only!Mode!
Fan!Only!mode!is!used!to!circulate!the!air!in!your!room.!No!temperature!setting!is!needed.!The!front!
panel!lights!will!be!green.!
To!operate!the!unit!in!Fan!Only!mode:!!
1. Make!sure!the!power!cord!is!plugged!into!a!power!outlet.!!
2. Press!the! !Power!button!on!the!remote!control.!
3. Press!the! !Mode!button!until!the! !Fan!Only!indicator!is!selected.!
4. Press!the! !Speed!button!to!select!the!fan!speed.!You!can!choose!between! !Automatic,!!!!!!!!!!!!!
!High,! !Medium,!and! !Low.!!
Automatic!Mode!
In!Automatic!mode,!the!unit!will!cool,!dehumidify,!or!heat!(certain!models)!depending!on!the!ambient!
temperature.!As!the!temperature!in!the!room!changes,!the!mode!and!fan!speed!will!change!
automatically.!The!front!panel!lights!will!change!depending!on!the!mode.!!
To!operate!the!unit!in!Automatic!mode:!!
1. Make!sure!the!power!cord!is!plugged!into!a!power!outlet.!!
2. Press!the! !Power!button!on!the!remote!control.!
3. Press!the! !Mode!button!until!the! !Automatic!indicator!is!selected.!!
Fan!Speed!
The! !Fan!Speed!button!is!used!to!change!the!fan!speed!while!in!Cooling!and!Fan!Only!modes.!!
Press!the! !Fan!Speed!button!to!select!the!fan!speed.!The! !Automatic,! !High,! !Medium,!or! !Low!
indicator!can!be!selected.!
!
Note:!Fan!Only!mode!does!not!require!that!the!exhaust!hose!be!attached.!
!
Note:!You!will!not!be!able!to!change!the!fan!speed!if!the!unit!is!in!Automatic!or!Dehumidify!mode.!
Page 20

15!
Clock!
The! !Clock!button!is!used!to!set!the!Clock.!
To!set!the!Clock:!
1. Press!and!hold!the! !Clock!button!until!the!Clock!indicator!starts!blinking.!
2. Set!the!time!by!using!the! !Up!and! !Down!buttons.!Holding!down!the!buttons!longer!than!1!
second!will!change!the!time!in!fast!mode.!The!clock!is!a!24-Hour!clock!so!if!it!is!6:00!PM!you!would!
set!the!time!to!be!18:00.!
3. To!save!your!settings!press!and!hold!the! !Clock!button!until!the!Clock!indicator!stops!blinking.!
Use!the!Chart!below!to!set!the!24-hour!clock:!
!
!
!
!
!
!
!
!
!
!
Timer!
The!timer!can!be!used!to!either!turn!the!unit!on!or!off!after!a!number!of!elapsed!hours.!The!timer!is!
adjustable!between!1-24!hours!in!one!hour!increments.!
How!to!set!the!unit!to!automatically!turn!on:!
1. Press!the! !Timer!button!while!the!unit!and!remote!are!powered!off.!The!On!Timer![ ]!
indicator!will!be!selected!and!the!timed!hour!indicator!will!be!blinking.!
2. Use!the! !Up!and! !Down!buttons!to!set!the!number!of!hours!you!want!to!pass!before!the!
unit!turns!on.!!
3. Press!the! !Timer!button!again!to!set!the!timer.!The!timed!hour!indicator!will!stop!blinking.!After!
the!selected!time!passes,!the!unit!will!automatically!turn!on.!
How!to!set!the!unit!to!automatically!turn!off:!
1. Press!the! !Timer!button!while!the!unit!and!remote!are!powered!on.!The!Off!Timer![ ]!
indicator!will!be!selected!and!the!timed!hour!indicator!will!be!blinking.!
2. Use!the! !Up!and! !Down!buttons!to!set!the!number!of!hours.!!
3. Press!the! !Timer!button!again!to!set!the!timer.!The!timed!hour!indicator!will!stop!blinking.!The!
unit!will!automatically!turn!off!after!the!selected!time!elapses.!
12-Hour!
24-Hour!
1:00!PM!
2:00!PM!
3:00!PM!
4:00!PM!
5:00!PM!
6:00!PM!
7:00!PM!
8:00!PM!
9:00!PM!
10:00!PM!
11:00!PM!
12:00!AM!
13:00!
14:00!
15:00!
16:00!
17:00!
18:00!
19:00!
20:00!
21:00!
22:00!
23:00!
00:00!
!
Note:!To!cancel!the!timer,!press!the! !Power!button!or!set!the!timer!to!“00”.!
Page 21

16!
Front!Panel!Lights!and!Controls!
Front!Panel!Lights!
Your!portable!air!conditioner!has!a!front!panel!that!lights!up!different!colors!depending!on!the!mode!it!is!
running!in.!!
Cooling!mode!will!display!a!blue!light.!
Dehumidify!mode!will!display!a!yellow!light.!
Fan!mode!will!display!a!green!light.!
Heating!mode!(on!certain!models)!will!display!a!red!light.!
Automatic!mode!will!display!the!color!of!the!current!mode!that!has!been!automatically!selected.!!
If!the!unit!flashes!a!red!light!and!the!unit!stops!cooling,!this!indicates!that!the!internal!water!reservoir!is!
full.!Place!a!pan!under!the!unit,!and!remove!the!drain!plug!to!drain!the!unit.!!
If!the!lights!flash!from!left!to!right!and!the!unit!does!not!work,!contact!customer!service.!!
!
Front!Panel!Controls!!
!The!front!panel!has!an!emergency!power!switch.!The!power!switch!can!be!used!when!the!unit!
needs!to!be!shut!off!or!turned!on!without!the!remote!control.!
!You!can!turn!off!the!front!panel!lights!by!pressing!the!Lamp!Off!switch.!!
Cleaning!and!Maintenance!!
Clean!the!air!conditioner!and!filters!regularly!to!maximize!performance!and!efficiency,!and!prolong!the!unit’s!
life.!Always!be!sure!to!unplug!the!air!conditioner!from!the!power!outlet!before!cleaning.!
Cleaning!the!Unit!
Use!a!soft!dry!cloth!to!wipe!the!body!clean.!If!necessary,!use!lukewarm!water!to!dampen!a!cloth!to!clean!the!
unit.!
Use!a!soft!bristle!brush!to!clean!between!the!vents.!!
Carefully!use!a!vacuum!cleaner!to!clean!the!condenser!coils!
Never!use!abrasive!chemicals,!volatile!substances,!gasoline,!detergents,!chemically!treated!cloths,!or!other!
cleaning!solvents!that!may!damage!the!cabinet!exterior.!
Never!spray!water!directly!on!the!unit.!
!
!
!
!
!
!
!
Page 22

17!
!
!
Cleaning!the!Pre-Filter!
To!clean!the!pre-filter,!follow!the!steps!below:!
1. Power!off!the!unit!and!remove!the!pre-filter.!!
2. Use!a!vacuum!cleaner!or!tap!the!filter!lightly!to!remove!loose!dust!and!dirt,!then!rinse!thoroughly!under!
lukewarm!running!water!(below!104°F).!You!may!use!a!mild!soap!and!water!solution!if!needed.!Allow!the!
pre-filter!to!air!dry!in!a!cool!and!shaded!place.!Dry!the!pre-filter!thoroughly!before!reinstalling!it.!!
Clean!the!pre-filter!periodically.!If!the!unit!is!used!in!a!dusty!environment!you!may!need!to!clean!it!on!a!
weekly!basis.!!
!
!
!
Preparation!for!Storage!
If!you!are!not!going!to!be!using!the!unit!for!an!extended!period!of!time,!follow!the!instructions!below!before!
storing!your!unit:!
1. Drain!all!the!water!from!the!unit’s!reservoir.!Operate!the!unit!in!fan!mode!for!a!few!hours!to!thoroughly!
dry!any!moisture!left!on!the!coils!inside!the!unit.!!
2. Power!off!the!unit,!and!clean!or!change!the!filter.!
3. Unplug!and!carefully!wind!the!power!cord.!
4. Remove!the!exhaust!hose!and!duct!connectors!and!keep!them!in!a!safe!place.!
!
Energy!Saving!Guide!!
Read!and!follow!the!guide!below!to!get!the!best!performance!and!efficiency!from!your!portable!air!
conditioner:!
• Do!not!cover!the!air!outlet!(exhaust)!while!the!unit!is!in!use.!
• Do!not!place!the!unit!in!front!of!curtains!or!drapes!to!ensure!that!the!air!intake!is!not!obstructed.!
• Minimize!the!length!of!the!exhaust!hose.!
• Make!sure!the!exhaust!hose!is!as!straight!as!possible!and!avoid!kinks!or!bends.!
• Keep!curtains,!blinds,!or!drapes!closed!during!the!sunniest!part!of!the!day.!
• Use!the!timer!to!operate!the!unit!before!it!is!needed.!For!example,!set!the!timer!to!turn!on!the!unit!in!
cooling!mode!for!3!or!more!hours!to!cool!the!room!before!you!arrive.!You!may!want!to!operate!the!unit!
all!day!if!you!live!in!a!warmer!climate.!
• Minimize!the!heat!sources!(direct!sunlight,!computers,!servers,!people,!etc.)!in!the!room.!
• Close!all!windows!and!doors.!
• Use!the!unit!in!a!contained!room.!For!example,!use!the!unit!in!a!room!with!four!walls!and!a!ceiling,!
instead!of!a!partitioned!studio,!or!warehouse.!
• Make!sure!the!unit!is!on!a!level!surface.!
• Minimize!the!amount!of!humidity!in!the!room.!For!example,!run!the!unit!as!a!dehumidifier.!
• To!prolong!the!compressor's!life,!please!wait!at!least!3!minutes!before!turning!the!unit!back!on!after!
shutting!it!off.!
• Inspect!and!clean!the!pre-filters!regularly.!
• Perform!routine!maintenance.!
!
Warning:!Never!operate!the!unit!without!the!filter.!
Page 23

18!
Troubleshooting!
Follow!the!troubleshooting!guide!below!to!resolve!common!issues.!
ISSUE!
POSSIBLE!CAUSE!
SOLUTION!
My!air!conditioner!is!not!
functioning!at!all.!
The!unit!is!not!receiving!power.!
Make!sure!the!unit!is!plugged!in.!
The!LCDI!power!cord!is!tripped.!
Press!the!Reset!button!on!the!
LCDI!cord.!
There!is!insufficient!power!to!the!
unit.!
Move!the!unit!to!another!outlet.!
Check!your!circuit!breaker.!(Refer!
to!the!rating!label!on!the!back!of!
the!unit!to!determine!the!
Amperage!draw.)!
The!water!reservoir!is!full.!
Drain!the!unit!and!restart!it.!
The!control!panel!is!disconnected.!
If!no!indicator!lights!turn!on,!
contact!customer!service.!
My!remote!control!does!not!work!
and!the!indicator!symbols!on!the!
remote!do!not!appear.!
The!batteries!are!not!installed.!
Install!new!batteries.!
The!batteries!in!the!remote!are!
bad.!
Replace!the!batteries.!
The!batteries!were!installed!
incorrectly.!
Reinstall!the!batteries!correctly.!
The!remote!control!is!defective.!
Contact!customer!service.!
My!air!conditioner!is!making!a!
loud!noise.!
The!unit!is!not!level.!!
Make!sure!the!unit!is!on!a!level!
surface.!
A!foreign!object!has!jammed!the!
fan.!
Remove!the!object!from!the!fan.!
The!floor!below!the!unit!is!
uneven.!
Move!the!unit!to!a!level!surface.!
My!air!conditioner!is!making!a!
continuous!metallic!knocking!or!
pinging!sound.!
The!unit!may!have!been!shipped!
on!its!side.!
Shut!off!the!unit.!Let!the!unit!sit!
on!a!level!surface!for!at!least!24!
hours!and!restart!it.!
The!compressor!is!damaged.!!
Contact!customer!service.!
My!air!conditioner!is!leaking.!
The!drain!plug!is!removed.!
Attach!the!drain!plug.!
The!base!pan!is!cracked.!
Contact!customer!service.!
My!air!conditioner!runs!for!a!little!
while!and!then!it!trips!the!power!
cord!or!the!circuit!breaker.!
The!air!conditioner!may!be!
plugged!into!an!outlet!that!cannot!
supply!the!correct!amount!of!
current.!
Contact!an!electrician!if!the!unit!
works!in!a!different!room!or!
circuit.!
The!front!control!panel!lights!blink!
red.!
Your!water!reservoir!is!full.!
Drain!your!unit.!
Page 24

19!
ISSUE!
POSSIBLE!CAUSE!
SOLUTION!
My!air!conditioner!is!not!cooling!
at!all.!
The!unit!is!not!operating!in!
cooling!mode.!
Set!the!unit!to!be!in!cooling!mode,!
and!lower!the!set!temperature!
(pg.!13).!
!The!compressor!is!not!on.!
The!compressor!may!take!up!to!3!
minutes!to!turn!on,!or!longer!if!it!
is!too!warm.!
The!ambient!temperature!is!too!
high.!
Lower!the!room!temperature!to!
be!below!90°F.!
The!filter!may!be!dusty!or!
blocked.!
Clean!the!filter!(pg.!17).!!
The!exhaust!port!is!blocked.!
Remove!any!obstructions!in!the!
exhaust!hose!and!port.!
My!air!conditioner!blows!cold!air,!
but!does!not!lower!the!room!
temperature.!
The!unit!is!not!vented.!
The!unit!must!be!vented.!
The!area!of!the!room!is!too!large.!
Minimize!the!size!of!the!area!to!be!
cooled,!i.e.!adding!a!drop!ceiling.!
Use!more!than!one!unit!to!cool!
the!area,!or!use!a!larger!unit.!
There!are!open!windows!and!
doors.!
Close!any!open!doors!and!
windows.!
There!are!too!many!heat!sources.!
Remove!or!shut!off!additional!
heat!sources!such!as!radio!
equipment,!servers,!etc.!
The!room!/!garage!may!be!
inadequately!insulated.!
Properly!insulate!the!room!to!be!
cooled,!i.e.!using!fiberglass.!
The!ambient!temperature!is!too!
high.!
The!unit!may!not!work!if!the!room!
temperature!is!above!90°F.!
Direct!sunlight!is!heating!the!
room.!
Close!curtains!or!pull!down!blinds!
to!minimize!the!amount!of!direct!
sunlight!entering!the!room.!
The!filter!is!dusty!or!blocked.!
Clean!the!filter!and!replace!it!if!
necessary.!
The!condenser!coils!are!dirty.!
Carefully!vacuum!the!coils!clean.!
The!air!intake!or!exhaust!ports!are!
obstructed.!
Remove!anything!blocking!the!
ports.!
!
Note:!If!the!ambient!temperature!is!above!90°F!the!unit!may!not!blow!cold!air.!
!
Tip:!Run!the!unit!before!it!is!needed.!For!example,!run!the!unit!in!the!morning!before!the!area!gets!hot,!and!
continue!to!run!the!unit!all!day!long!in!order!to!maintain!a!low!temperature.!
Page 25

20!
Specifications!
DESCRIPTION!OF!PRODUCT!
Portable!Air!Conditioner!with!Heater!
MODEL! !
APAC140HC!
VOLTAGE!/!FREQUENCY!
115!V!/!60!Hz!
INPUT!POWER!
1250!W!
CURRENT!
10.8!A!
COOLING!CAPACITY!(SACC)!
8300!BTU!
COOLING!CAPACITY!(ASHRAE)!
14000!BTU!
COLOR!
Silver!and!Grey!
COOLANT!
R410A!
TIMER!
24!Hour!!
DIMENSIONS!
(HEIGHT!X!WIDTH!X!DEPTH)!
33!11/16”!X!19!1/2”!X!15!11/16”!
WEIGHT!
75!Pounds!
!!
!
!
!
!
!
!
!
!
!
!
Note:!Technical!data!and!performance!information!are!provided!for!reference !only.!Specifications!are!
subject!to!change.!Check!the!rating!label!on!the!portable!air!conditioner!for!the!most!accurate!information.!
Page 26

21!
!New!Portable!Air!Conditioner!BTU’s!!
!
You!may!notice!that!the!cooling!capacities!(in!British!Thermal!Units!or!BTU’s)!labeled!on!portable!air!
conditioners!(PAC’s)!are!now!lower!than!on!models!produced!prior!to!October!1,!2017.!This!is!because!
the!labeling!on!new!productions!of!PAC’s!must!follow!a!new!federal!test!standard!that!was!established!by!
the!Department!of!Energy:!10!CFR!430,!subpart!B,!appendix!CC.!
The!SACC!rating!shown!on!your!new!PAC!is!a!result!of!this!new!standard.!Models!manufactured!before!
2017!were!tested!under!a!different!standard!(ASHRAE)!that!produced!a!higher!cooling!capacity!output.!
While!the!SACC!BTU’s!are!lower!than!the!previous!ASHRAE!BTU’s,!the!construction!and!cooling!capacity!of!
this!model(s)!remains!unchanged.!Both!the!SACC!and!ASHRAE!ratings!are!included!for!consumer!
comparison.!
!
What!is!SACC?!
SACC,!or!the!Seasonally!Adjusted!Cooling!Capacity,!is!a!rating!in!BTU/hour!that!represents!the!weighted!
average!performance!of!a!PAC!in!a!number!of!test!conditions,!some!of!which!may!be!more!extreme!than!
the!average!use!case,!which!is!then!adjusted!to!account!for!the!effect!of!infiltration!air!and!duct!heat!
transfer.!The!factors!included!in!the!SACC!calculation!are!why!the!ratings!appear!lower,!even!though!the!
model(s)!has!not!changed.!
!
Page 27

!
!
Avallon!Product!Warranty!
Warranty!Period:!
Avallon!will!be!responsible!for:!
Consumer!will!be!responsible!for:!
1st!year!
All!costs!for!repairing!or!replacing!parts!and/or!unit!that!
proves!to!be!defective.!All!transportation!costs!in!the!first!90!
days.!
All!transportation!costs!after!90!days.!
Limited!2nd-5th!year!
(compressor!only)!
Repairing!or!replacing!any!compressor!that!proves!to!be!
defective.!(Labor!not!included.)!
Labor!and!all!transportation!costs.!
This!product!is!warranted!by!Avallon!and!is!subject!to!any!conditions!set!forth!as!follows:!
WHAT!IS!COVERED:!
WHAT!IS!NOT!COVERED-!The!following!limitations!apply!to!the!
coverage!of!this!warranty.!This!warranty!does!not!cover:!
One Year Parts and Labor: For one year from the date of original retail
purchase, Avallon will repair or replace any part free of charge
including labor that fails due to a defect in materials or workmanship.
Avallon will be responsible for all transportation costs for the first 90 days
from original purchase date, after 90 days the consumer will be
responsible. Labor will be performed free of charge at an authorized
Avallon repair facility and will supply new, rebuilt, or refurbished parts
free of charge. Avallon may request a defective part be returned in
exchange for the replacement part. After the 12-month period, Avallon
will no longer be responsible for labor charges incurred or replacement
parts. All defective products and parts covered by this warranty will be
repaired or replaced on a mail-in basis to an Avallon authorized repair
facility.
Five Year Limited Warranty (Compressor– Labor Not Included): In the
second through fifth year from the date of original retail purchase,
Avallon will replace the compressor free of charge. The consumer will
be responsible for all transportation and labor costs. Avallon will supply a
new, rebuilt, or refurbished compressor and may request for the
defective compressor to be returned in exchange. This limited 5-Year
warranty is for the compressor only and does not include labor.
All warranties apply to the original purchaser only, and only covers
defects in workmanship experienced during operation of the product
under normal service, maintenance, and usage conditions. This
warranty applies to the purchase and use of this product in residential
settings within the United States of America. All products and parts
replaced by Avallon under warranty service become the property of
Avallon. All defective products and parts covered by this warranty will
be repaired or replaced on a mail-in basis to an Avallon authorized
repair facility.
Exceptions: Commercial or Rental Use Warranty: 90 days labor and
parts from date of original purchase. No other warranty applies.
Labor charges for installation, setup, or training to use the
product. Shipping damage, and any damage caused by
improper packaging for shipment to an authorized service
center, and any damage caused by improper voltage or any
other misuse, including abnormal service, handling, or usage.
Cosmetic damage such as scratches and dents. Normal wear
and tear on parts or replacement of parts designed to be
replaced, e.g. filters, cartridges, batteries. Service trips to deliver,
pick-up, or repair, install the product, or to instruct in proper
usage of the product. Damages or operating problems resulting
from misuse, abuse, operation outside environmental
specifications, uses contrary to instructions provided in the
owner’s manual, accidents, acts of God, vermin, fire, flood,
improper installation, unauthorized service, maintenance
negligence, unauthorized installation or modification, or
commercial use. Labor, service transportation, and shipping
charges for the removal and replacement of defective parts,
beyond the initial 12-month period. Products that have been
modified to perform outside of specifications without the prior
written permission of Avallon. Products lost in shipment, or theft.
Products sold AS IS or from an unauthorized reseller. Products that
have had their serial numbers removed, defaced, or with serial
numbers that have been invalidated. Damage from other than
normal household use. Replacement or repair of household fuses,
circuit breakers, wiring or plumbing. Damage to personal
property from use of product. Damage from service other than
from an authorized Avallon repair facility. Hoses, knobs, lint trays
and all attachments, accessories and disposable parts. Any
service charges not specifically identified as normal such as
normal service area or hours. Any special or consequential
damages arising out of
the use of the product.
OBTAINING WARRANTY SERVICE: If you believe your product is defective, contact Avallon Customer Support for troubleshooting assistance and
warranty service at www.avallon.com or call 1-866-471-7427. Before contacting Customer Support, you are required to have your model
number, serial number and proof of purchase available upon request. Once an Avallon authorized representative has confirmed that your
product is defective and eligible for warranty service, the product must be returned to an Avallon authorized repair facility. Avallon is not
responsible for damage resulting from shipper mishandling or improper packaging. Do not return a defective product to the place of purchase.
Products received without a return authorization number will be refused.
THIS WARRANTY IS IN LIEU OF ANY OTHER WARRANTY, EXPRESS OR IMPLIED, INCLUDING WITHOUT LIMITATION, ANY WARRANTY OF
MERCHANTABILITY OR FITNESS FOR A PARTICULAR PURPOSE. TO THE EXTENT ANY IMPLIED WARRANTY IS REQUIRED BY LAW, IT IS LIMITED IN
DURATION TO THE EXPRESS WARRANTY PERIOD ABOVE. NEITHER THE MANUFACTURER NOR ITS DISTRIBUTORS SHALL BE LIABLE FOR ANY
INCIDENTAL, CONSEQUENTIAL, INDIRECT, SPECIAL, OR PUNI- TIVE DAMAGES OF ANY NATURE, INCLUDING WITHOUT LIMITATION, LOST REVENUES
OR PROFITS, OR ANY OTHER DAMAGE WHETHER BASED IN CONTRA CT, TORT, OR OTHERWISE. IN NO EVENT AND UNDER NO CIRCUMSTANCE OF
ANY TYPE OR KIND SHALL THE SELLER, MANUFACTURER AND/OR DISTRIBUTOR BE LIABLE FOR ANY REASON, UNDER ANY THEORY, FOR MORE THAN
THE BASIC COST OF THE PRODUCT TO THE PURCHASER OR END USER. SOME STATES DO NOT ALLOW THE EXCLUSION OF INCIDENTAL OR
CONSEQUENTIAL DAMAGES, SO THE ABOVE EXCLUSION MAY NOT APPLY TO YOU. THIS WARRANTY GIVES YOU SPECIFIC LEGAL RIGHTS. YOU MAY
HAVE OTHER RIGHTS THAT VARY FROM STATE TO STATE.!
 Loading...