

Page 1

AvaLAN
WIRELESS
High
Security
Supplement
User Manual Supplement
forAvaLAN Wireless Radios
with FIPS 140-2 Security
Industrial-grade, long-range wireless Ethernet systems
AW900FS
USER’S MANUAL
Page 2
High Security Supplement
If you have an AvaLAN radio with FIPS 140-2 Security, this supplement to the User Manual provides
instructions for setting up the encryption. Please disregard the AES Encryption instructions in the regular
manual: This supercedes them. A feature of the level of security provided is that there is no way to
change the encryption method or key through the radio's interface. A separate port must be used.
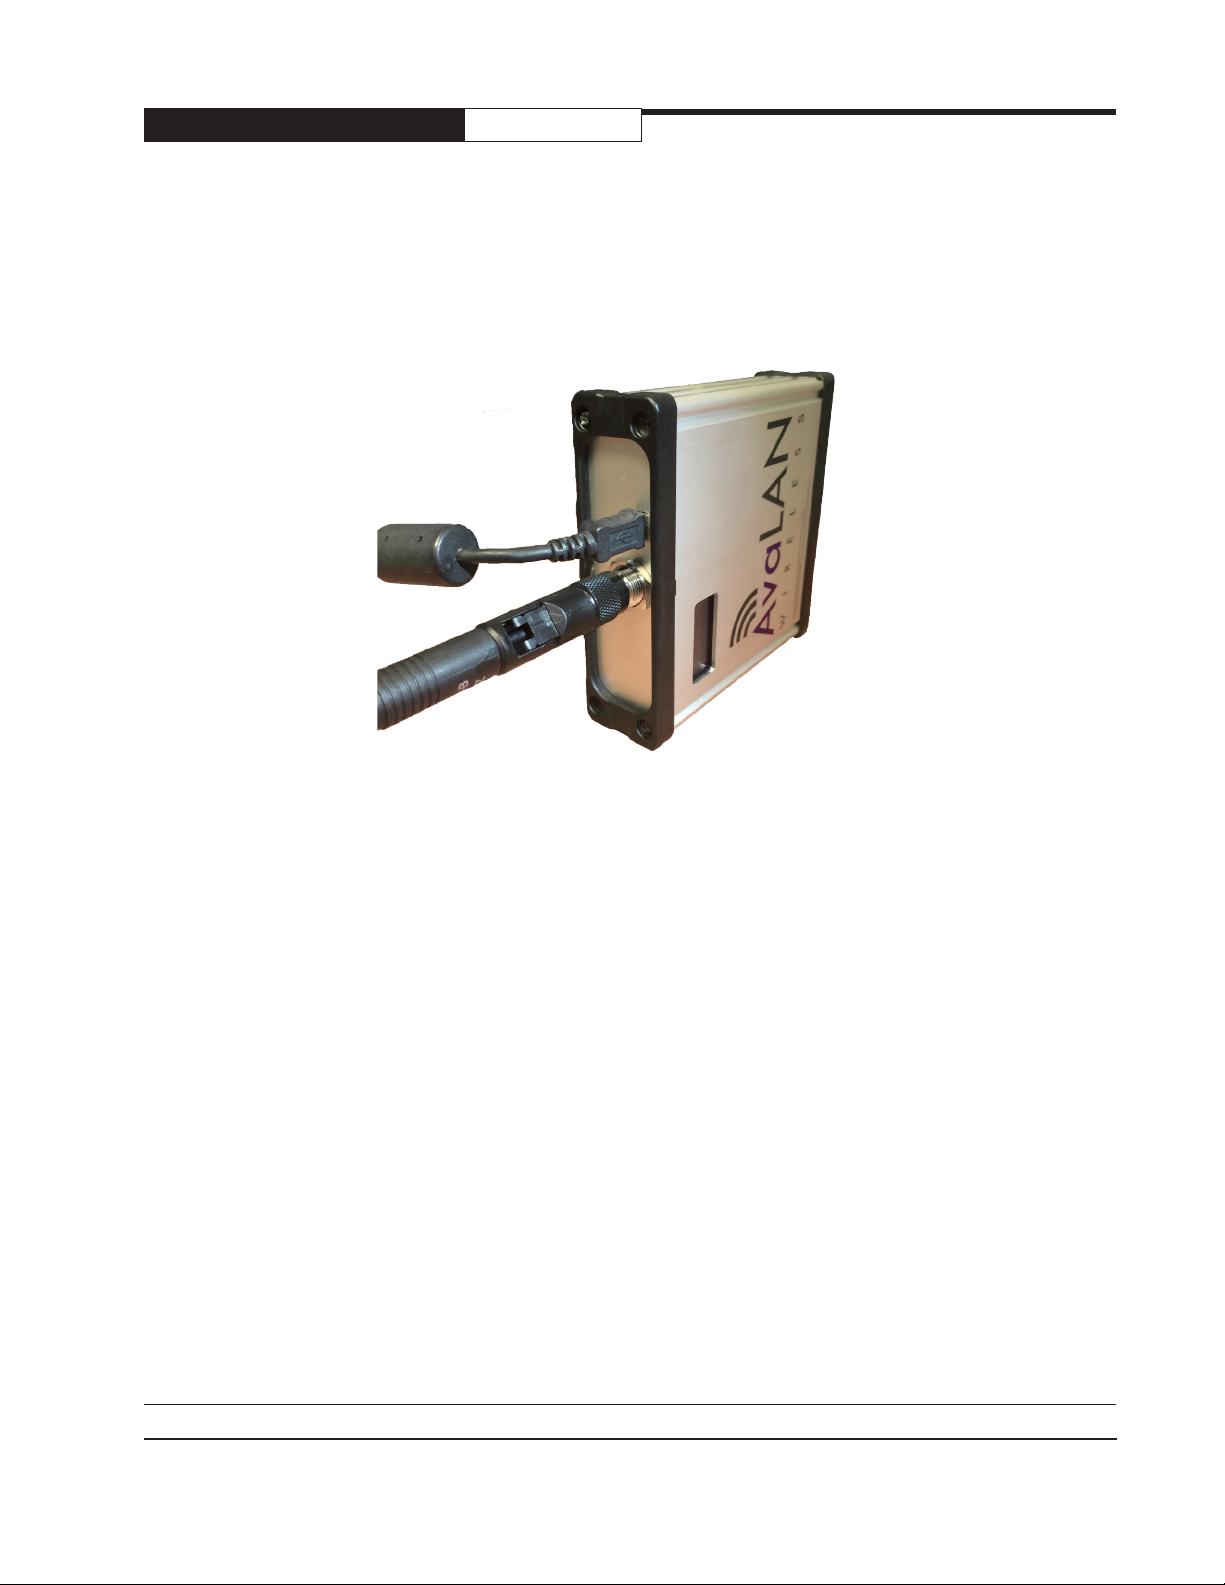
To program the encryption characteristics of your AvaLAN radio, a PC must be connected to the USB
port on the side of the case:
User’s Manual
The PC must have two critical pieces of software installed:
1. A driver that provides a virtual COM port through the USB connection. Such a driver is already
included with Windows XP, Vista or 7 and should automatically be located and loaded when the
USB connection is rst made.
2. A Crypto Module Interface utility that can be downloaded from our website, www.avalanwireless.
com. Look for it on the Downloads page under the Support tab. The le is a zip archive containing
an installer for the utility. Unzip and run it to install the utility on your PC.
If you prefer to use a computer with a non-Windows operating system, it is also possible to program
the module with a virtual COM port driver and a generic terminal emulator. Contact AvaLAN Technical
Support for help with this feature.
The person having access to the programming interface is referred to by the FIPS 140-2 Standard as
the Crypto Ocer. As the Crypto Ocder, part of the responsibility for data security rests with your
choice of a strong login password and encryption key. You should program the encryption modules in
both radios of your wireless link at the same time and on the bench prior to deployment. (This is much
more convenient than climbing a pole with a laptop strapped around your neck.) Make sure you do
not lose the login password and encryption key because they cannot be retrieved from the modules
in any fashion.
Technical Support (650) 384-0000
PAGE 2
www.avalanwireless.com
Page 3
High Security Supplement
User’s Manual
Step by step programming procedure:
1. Turn o the power for the radio and connect the AW140 module's USB port to your computer using a USB mini
B cable.
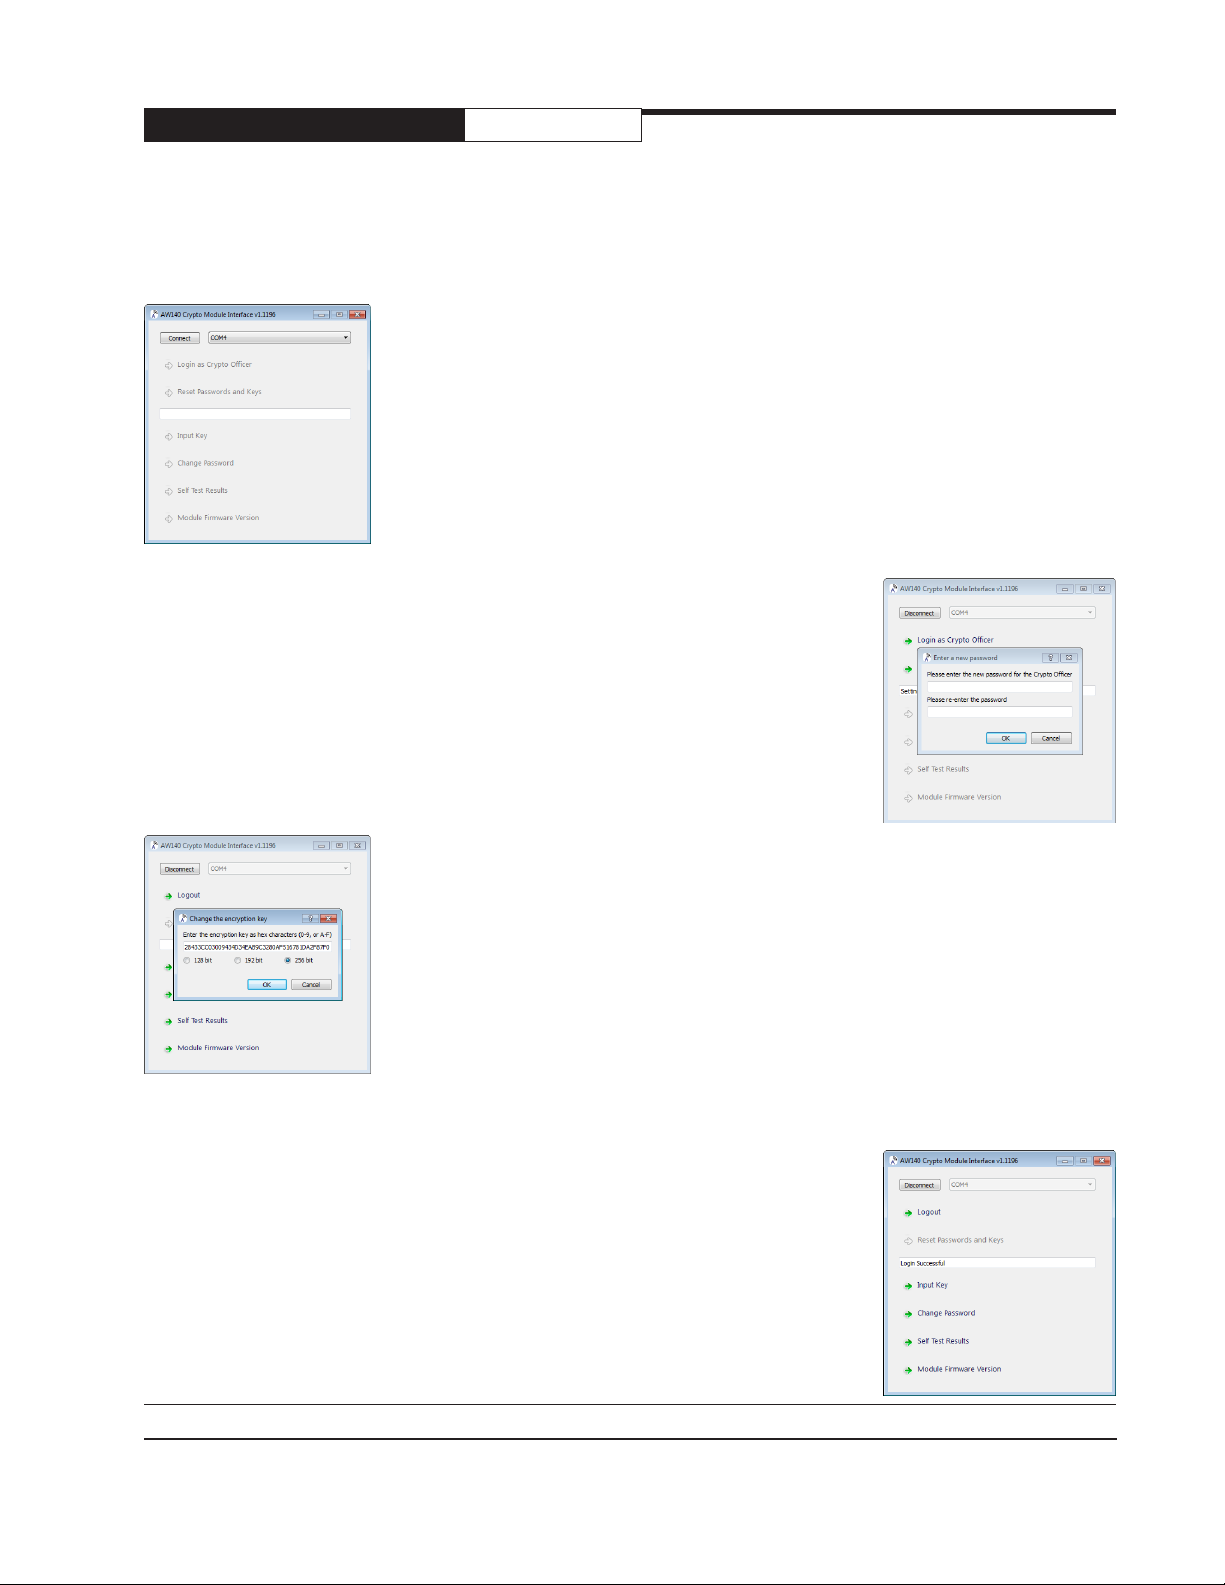
2. Run the Crypto Module Interface utility on your PC. You should see a startup
window like this, with everything greyed out except the Connect button and a
dropdown list of COM ports. Usually there will be just one. If there are more, repeat
Step 1 to determine which COM port applies to this radio by seeing it disappear and
reappear in the list.
3. Choose the correct COM port and press the Connect button. The utility window
will then show a successful connection by activating the Login and Reset choices and
displaying "Module Connected" in the status box.
4. If you know the Crypto Ocer password and want to change the encryption key,
choose Login. if you are initializing the module for the rst time or wish to reset
both the password and key, choose Reset. After a warning popup, you will be able
to enter a new Crypto Ocer password. This must be between 8 and 32 characters
and may include letters, numbers and symbols and is case-dependent. If you forget
the password, there is no way to retrieve it. You will need to reset the module and
begin again. If you know the password and have logged in, you may change it by
clicking "Change Password."
5. Next, you will be provided with a popup to enter the encryption key and method
(128, 192 or 256-bit). (You will be forced here if you are resetting, or can choose
"Input Key" after logging in. The encryption key is a hexadecimal number, 32 digits
for 128-bit encryption, 48 digits for 192-bit and 64 digits for 256-bit. Enter the digits
as 0 - 9 and a - f or A - F (case independent). If you enter fewer than the specied
number of digits (not recommended), the remainder will be padded with zeros.
6. Once the encryption module has been programmed, you may login to access the other features. "Self Test
Results" will simply display "Self Test Passed" in the status box. If it does not, contact AvaLAN Technical Support.
Module Firmware Version displays that information in the status box and may be
useful to the aforementioned AvaLAN Technical Support sta.
7. When you are nished with the conguration of the encryption module, disconnect
the USB cable.
Technical Support (650) 384-0000
PAGE 3
www.avalanwireless.com
Page 4
AvaLAN
WIRELESS
900 MHz Industrial Wireless Ethernet Radios
Industrial-grade, long-range wireless Ethernet systems
AW900FS
USER’S MANUAL
Page 5

AW900FS
Thank you for your purchase of the AW900FS Indoor Wireless Ethernet Radio.
The AW900FS includes:
(1) AW900FS radio in extruded aluminum box
(1) AW2-900 2.5dBi omnidirectional antenna
(1) AW-12VPS 12 VDC Power Supply (USA plug only)
(1) USB Cable
TABLE OF CONTENTS
Quick Start Guide . . . . . . . . . . . . . . . . . . . . . . . . . . . . . . . . . . . .4
Operational Summary Page . . . . . . . . . . . . . . . . . . . . . . . . . . . . . . . .5
Physical Setup Page . . . . . . . . . . . . . . . . . . . . . . . . . . . . . . . . . . . .5
Digital Setup Page . . . . . . . . . . . . . . . . . . . . . . . . . . . . . . . . . . . .6
LCD Display . . . . . . . . . . . . . . . . . . . . . . . . . . . . . . . . . . . . . . 11
Technical Specications . . . . . . . . . . . . . . . . . . . . . . . . . . . . . . . . . 13
Radio Status Information . . . . . . . . . . . . . . . . . . . . . . . . . . . . . . . . 14
Antenna Alignment Guide . . . . . . . . . . . . . . . . . . . . . . . . . . . . . . . . 15
Transmitter to Reciever Placement . . . . . . . . . . . . . . . . . . . . . . . . . . . . 17
Abbreviation Guide . . . . . . . . . . . . . . . . . . . . . . . . . . . . . . . . . . . 17
User’s Manual
Professional installation is required. The radio equipment described in this guide
emits radio frequency energy. Although the power level is low, the concentrated
energy from a directional antenna may pose a health hazard. Do not allow people
to come closer than 23 cm (9 inches) to the antenna when the transmitter is
operating in indoor or outdoor environments. More information on RF exposure is
on the Internet at www.fcc.gov/oet/info/documents/bulletins
If you have any questions when conguring your AvaLAN system, the best place to get answers is
to visit www.avalanwireless.com. You will also nd the latest updates there. If more assistance is
needed, send email to support@avalanwireless.com.
To speak to a live technician, please call technical support at the number below during normal
business hours.
© by AvaLAN Wireless Systems Inc. All rights reserved.
Revision 09.5.2014
125A Castle Drive
Madison, AL 35758
Sales and Technical Support: (650) 384-0000
Technical Support (650) 384-0000
PAGE 5
www.avalanwireless.com
Page 6

AW900FS
User’s Manual
Compatible Accessories
Antennas
AW11-900
900 MHz Directional 11 dBI
YAGI Antenna
AW5M-900
900 MHz Omnidirectional
5 dBI Magnetic Antenna
Accessories
AW15-900
900 MHz Directional 15 dBI
YAGI Antenna
AW5P-900
900 MHz Omnidirectional
15 dBI Pole Antenna
AW-12VA
Auto Adapter Lightning Arrestor
AW-RFx900
x = 4ft, 10ft, 25ft or 50ft
900 MHz Antenna Extension
Cable
Technical Support (650) 384-0000
AW-LA
Warranty
AW-Warranty-900
These items can be found on our website,
www.avalanwireless.com
PAGE 6
www.avalanwireless.com
Page 7

AW900FS
User’s Manual
Quick Start Guide
PROGRAMMING:
Step 1. Gather the AvaLAN radios, power supplies, 2x CAT5 cables and a computer with an RJ45
Ethernet interface.
Step 2. Set the 128-256bit encryption key. Use this key for all radios in the group. Refer to pages 1-3
for instructions to complete this step.
Step 3. Connect the radios one at a time directly to the PC via an Ethernet cable. Set your computer
to an IP address of 192.168.17.1 (refer to page 6 for detailed instructions). Enter the radio’s default
IP address* of 192.168.17.17 into a web browser.
Step 4. Enter the password and click login. The default password is “password”.
Step 5. Toggle to select the device type - Access Point or Subscriber Unit. An access point (AP) can
communicate with up to 4 Subscriber Units (SU).
• For each SU:
• Record the Radio Address (Ex. 00.17.3A) for the AP steps below. The Radio Address is shown
for 5 seconds on the LCD display during of the boot up of the radio and is also displayed on
the Browser interface in Device Information section.
• Click the Subscriber Unit button.
• Set the Subscriber’s ID as 1,2,3 or 4. Record this ID for the AP steps below.
• Set the Transmit Power to the LEGAL level with respect to the Antenna Gain and Cable length
– See page 11 for instructions to congure per FCC/IC power limits.
• Set the administrator Password.
• Set the IP address to a unique value (Ex. 192.168.17.20). This IP address is only used to
manage the radio but all other Ethernet packets will transparently pass through the radios
regardless of their subnet.
• For the AP:
• Enter the Radio Address (see prior steps above) of each SU into the matching Subscriber ID
eld that was assigned in the prior step.
• Click the check box of each SU that will be active in the network (this is typically checked
for all SUs but can be unchecked to increase throughput when an SU is known to be inactive.
• Set the Transmit Power to the LEGAL level with respect to the Antenna Gain and Cable length
– See page 11 for instructions to congure per FCC/IC power limits.
• Set the administrator Password.
• Set the IP address to a unique value (Ex. 192.168.17.30). This IP address is only used to
manage the radio but all other Ethernet packets will transparently pass through the radios
Technical Support (650) 384-0000
PAGE 7
www.avalanwireless.com
Page 8

AW900FS
regardless of their subnet.
Step 5: Bench Testing
Power up the units on the bench before deploying in the eld. It is important to keep the radios
at least 20 feet apart using the 2dBi omni antennae and Transmit power set to 10dBm to prevent
over driving of radio’s receiver (permanent damage can occur).
User’s Manual
• Power on all the radios with the computer wired directly to the AP.
• Open a web browser to the IP addresses assigned in the prior steps to view the operation of
all the radios.
• Perform PING testing to simulate network data and observe overall performance.
INSTALLATION:
Every installations is dierent, however radio performance is typically best at shorter distances
using directional antennae with unobstructed paths in low noise environments. It can be challenging
to determine the best approach for a unique installation. The radio’s browser interface has a link
performance statistics that is helpful for troubleshooting radio interference noise levels.
Please call AvaLAN Technical Support for assistance as needed.
Technical Support (650) 384-0000
PAGE 8
www.avalanwireless.com
Page 9

AW900FS
User’s Manual
Operational Summary
The AW900FS Radio allows the user to create a long-range, wireless Ethernet network with up to
4 subscriber units per access point.
Conguring a wireless link with the AW900FS requires the establishment of six elements:
• Each radio must know whether it is to be an access point (AP) or subscriber unit (SU).
• Each radio must have an IP address that is unique among all others on the same network.
• The AP must know how many SUs are expecting communication.
• The SU must be assigned a unique subscriber ID to specify which time division slot it will use
when communicating with the AP.
• The AP and any given SU must share a common 128/256-bit encryption key and each radio’s
unique 64-bit Radio Address.
The access point (AP) automatically scans to locate the other radios in the group, encrypts Ethernet
data received from the network, and transmits it wirelessly to the correct subscriber unit (SU).
Any 10/100 BaseT Ethernet client device (ECD) can be connected to an AW900FS subscriber
unit. Each SU encrypts Ethernet trac received from the attached ECD and transmits the data
wirelessly to its AP. Each SU can be plugged directly into an ECD without adding drivers or loading
software. Essentially, once the AP/SU is congured and running, it behaves like a transparent
Ethernet cable that encrypts and then passes all trac including VLANs.
Note: Every SU should be placed at least 50 feet from the AP to avoid overloading the radio’s
receiver. If two AP units are installed very close to one another, they may interfere with each
other causing degraded throughput and range. Locate APs at least 25 feet apart (see antenna
guide on page 16).
Physical Setup
1. Before placing the radio in its nal location, it may be best to perform the digital setup procedure
described in the next section.
2. Connect the AW900FS’s RP-TNC RF connector to a suitable antenna. A 2 dBI omni-directional dipole
antenna (AW2-900) is included and is suitable for testing and general applications. Application specic
antennas are available if greater range and/or directionality is required. Choose one of our other
antenna models that can be found on our website at www.avalanwireless.com.
3. Power is provided to the unit by means of the 120 VAC to 12 VDC wall power supply.
Technical Support (650) 384-0000
PAGE 9
www.avalanwireless.com
Page 10
AW900FS
User’s Manual
Digital Setup
1. Digital conguration is done by means of the AW900FS’s built in browser interface. It should be
powered on and connected at least temporarily to a network containing a computer that can run a
conventional web browser.
2. Download the AvaLAN IP Discovery Utility from our website and extract
ipnder.exe from the zip archive, placing it on your desktop or in a convenient folder.
http://www.avalanwireless.com/marketing_resources/downloads/ipnder.zip
Note: This utility only runs on Microsoft Windows, not linux or MAC. If you must use a non-Windows
computer for conguration, make sure your subnet mask allows your computer to see 192.168.17.17.
Connect to that default IP address with your web browser and continue the setup procedure with
step 6.
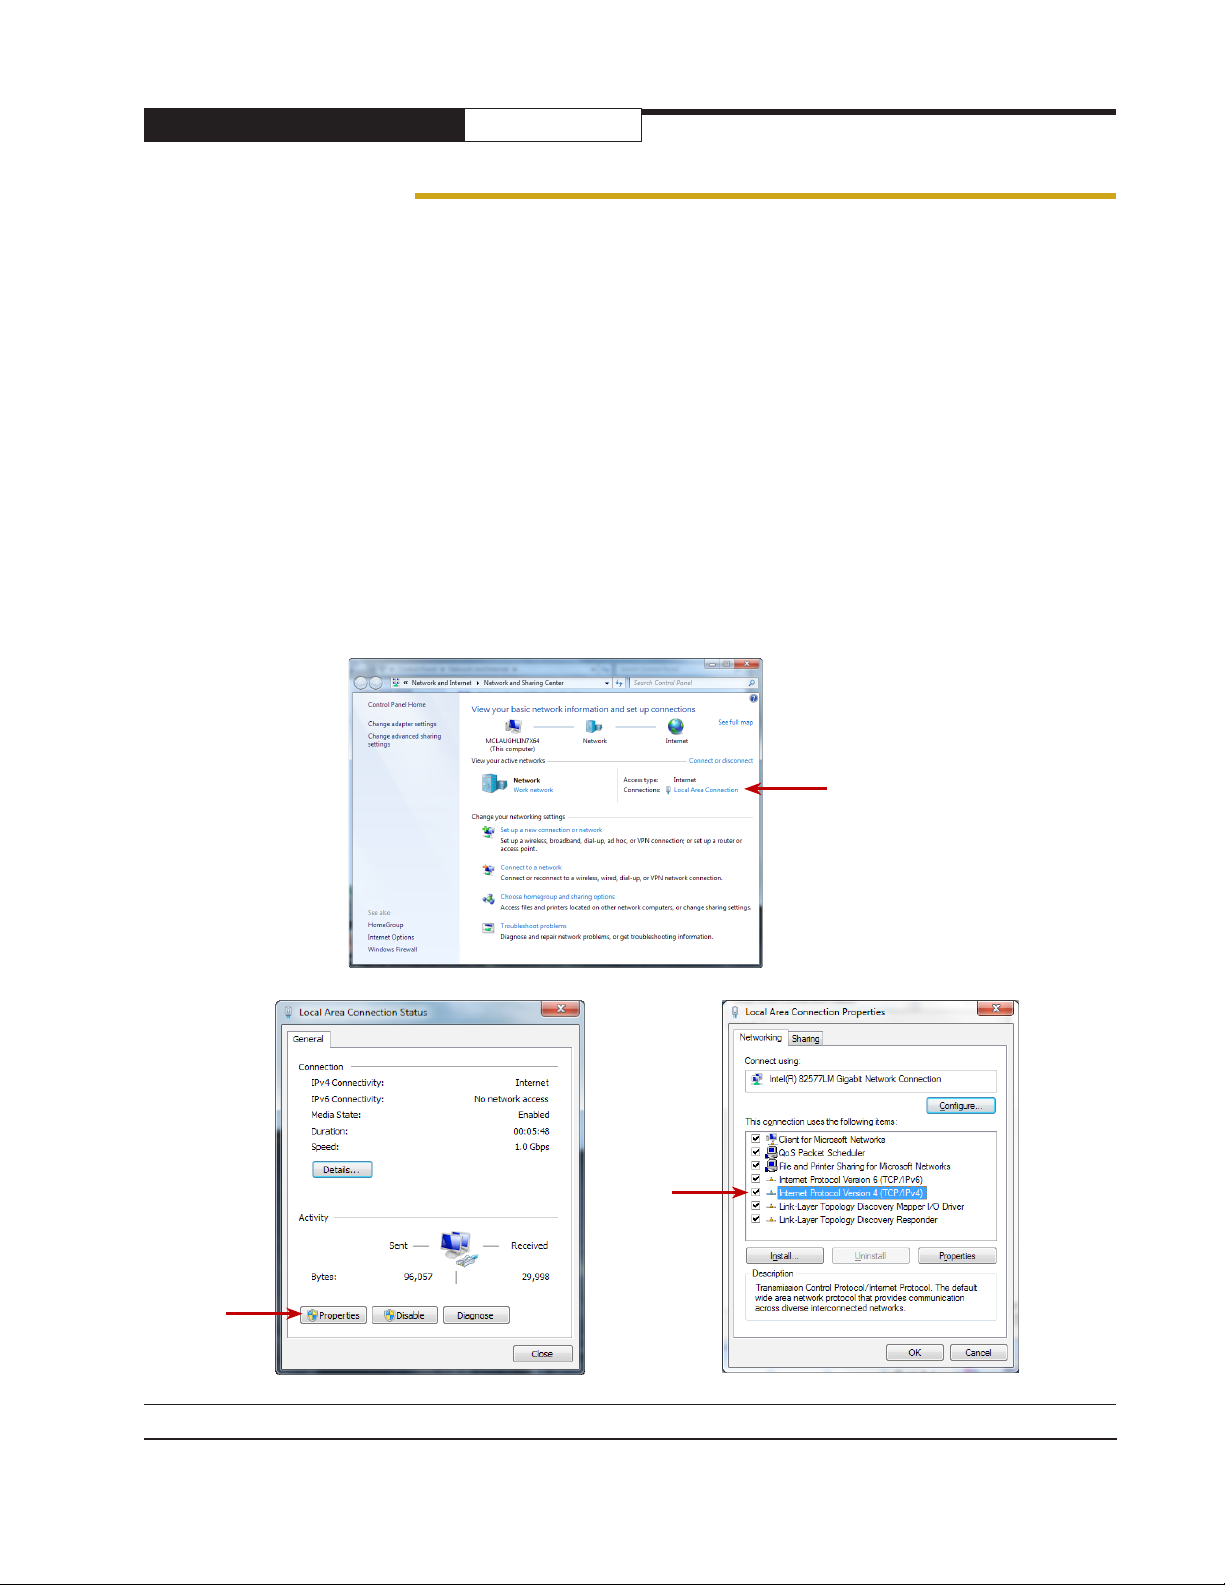
How to congure static IP address for Windows 7.
Start > Control Panel > Network and Internet > Network and Sharing Center
Click
Properties
Click local area
connection
Double Click
Internet
Protocol
Version 4
(TCP/IPv4)
Technical Support (650) 384-0000
PAGE 10
www.avalanwireless.com
Page 11

AW900FS
User’s Manual
Click “Use the following IP address”
Populate the following information:
IP address: 192.168.17.200
Subnet mask: 255.255.255.0
Default gateway: leave blank
Click OK
Click OK
Click Close
3. Run the IP Discovery Utility, ipnder.exe
and you should see a window similar to the
view on the next page.
The AW900FS should appear in the list at the default IP address of 192.168.17.17. If it does not, click
“Search” to regenerate the list. If it still does not appear, it may be a connection issue and need to
re-examine the cabling or you may have a subnet or rewall issue on your computer.
Technical Support (650) 384-0000
PAGE 11
www.avalanwireless.com
Page 12

AW900FS
User’s Manual
4. Double click the list item that refers to the AW900FS being congured. You should see a second
window that is similar to this:
Your computer’s
current IPV4
Ethernet address
Current IP of
AvaLAN Radio
The information on the left is the current status of the radio, while the boxes on the right allow
you to change it. It is important that the IP address of the AW900FS is in the same subnet as your
computer. For example, if the subnet mask is 255.255.255.0, the rst three number groups of the IP
address must match. Choose the desired parameters and click “Apply.”
5. Make note of the chosen IP address and password, then click “Go to Device Web Page.” This will
cause your default web browser to launch with the device IP address in the browser address bar. Or
you may launch the browser on your own and enter the web page address manually: http://[the IP
address you just set]. Note: You are not assigning a password, you’re matching the password that
the unit has built into it.
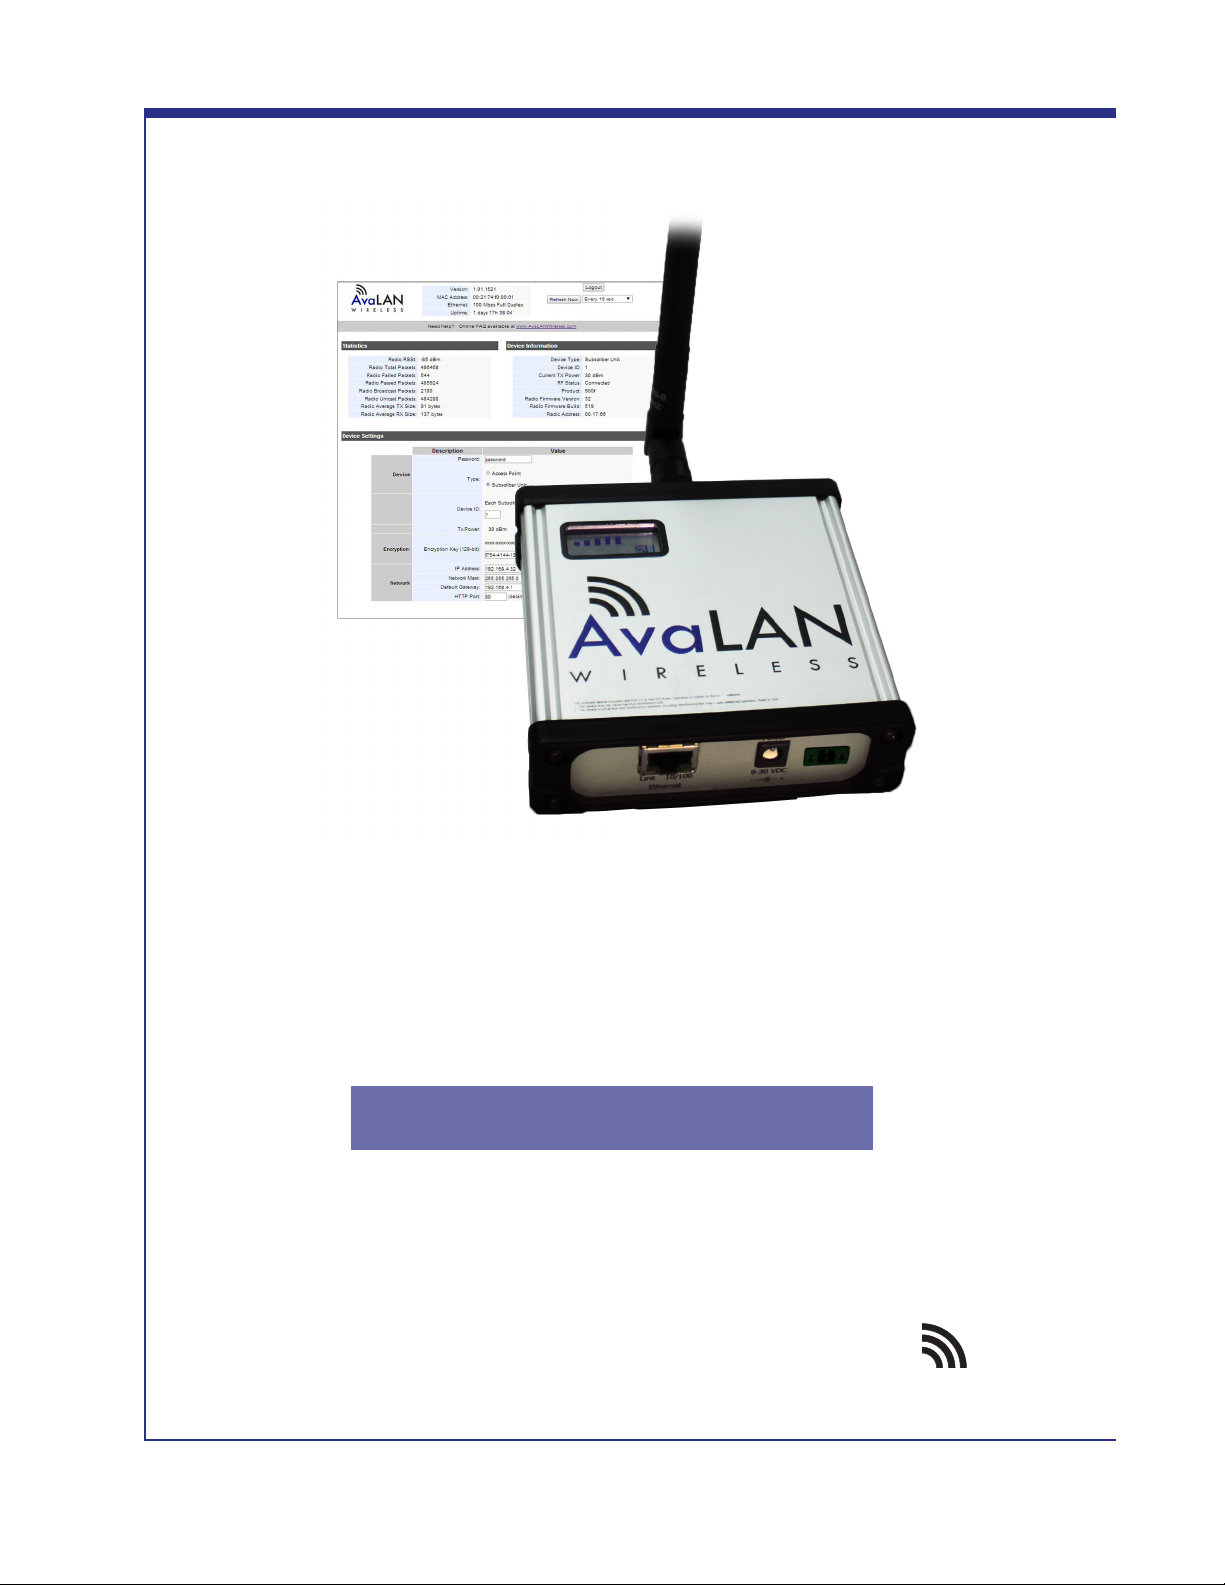
6. The browser page that loads rst shows the current device information and provides a login in the
upper right. Log in using the password you just specied (or “password” if you kept the default). If
the login succeeds, you will see an admin page similar to this:
The Device Settings section is where the password, output power, network parameters
are dened and/or recongured.
Technical Support (650) 384-0000
PAGE 12
www.avalanwireless.com
Page 13

AW900FS
7. The admin page has sections similar to the login page showing radio statistics and device
information plus it adds several new sections. The Device Settings section allows setting the network
information.
Scroll down in the Admin browser page to see these additional sections:
1. A section to be used if an update to the AW900FS’s rmware is required
8. On the web browser
• Choose Device Type: Access Point or Subscriber Unit.
• For Subscriber Units, assign unique ID numbers in numeric order from 1 to 4.
• For an Access Point, rst list the number of subscriber units in the box. Then enter the Radio
address for each Subscriber Unit in the Connection List
User’s Manual
After entering the parameters, click the “Apply” button to save them to the radio.
Subscriber Screen ShotAccess Point Screen Shot
Technical Support (650) 384-0000
PAGE 13
www.avalanwireless.com
Page 14

AW900FS
User’s Manual
9. When all of the radios are keyed and operating, connect them to your network and Ethernet devices
as desired and cycle the radio’s power to begin normal operation. Now, browser mamagement of the
SUs can be performed over the wireless network. Note: Avoid plugging actively linked radios into the
same switch because this will corrupt the switch’s routing table and may cause network problems just
as if you had plugged a CAT5 cable directly between two ports of a switch (commonly called a loop
back). Power cycle the radios and switch if this happens.
Setup Rules
The transceiver must be installed by a professional installer, or factory technicians. The authority
to operate the transceiver in the USA and Canada will be void if the radio’s transmit power is set
above the restricted limits below or by the use of antennae and cables from manufacturers other
than AvaLAN Wireless.
The maximum allowable transmit power must follow BOTH rules below.
FCC RULE 1: Transmit Power at the product’s output connector must not exceed 1 Watt [30dBm]
NOTE: The radio cannot be congured to exceed this limit.
FCC RULE 2: The radio system must not exceed 4 watts Eective Isotropic Radiated Power [36dBm EIRP]
NOTE: This rule only applies to antennae with over 6dBi of gain. AvaLAN’s Yagi Directional antenna
(AW15-900 and AW11-900) must use this rule to determine the LEGAL output power.
ANTENNA GAIN - AvaLAN’s approved antenna:
AW11-900 11.0dBi
AW15-900 15.0dBi
CABLE LOSS - AvaLAN’s approved cables:
AW4-900 0.5dB
AW10-900 1.2dB
AW25-900 2.0dB
AW50-900 4.1dB
MAXIMUM TRANSMIT POWER = 36dB – ANTENNA GAIN + CABLE LOSS
MAXIMUM TRANSMIT POWER ANTENNA APPROVED CABLES
24
24
24
24
27
18
18
18
18
24
30
30
30
30
30
AW11-900
AW15-900
AW5P-900
AW5S-900
AW2-900
1 ft cable (included)
AW-RF4
AW-RF10
AW-RF25
AW-RF50
1 ft cable (included)
AW-RF4
AW-RF12
AW-RF25
AW-RF50
1 ft cable (included)
AW-RF4
AW-RF10
AW-RF25
AW-RF50
Technical Support (650) 384-0000
PAGE 14
www.avalanwireless.com
Page 15

AW900FS
LCD Display
User’s Manual
During boot up:
1. Current Version
2. Radio Address:
3. Serial Number
After boot up LCD will display:
Searching for Subscriber radios
Link Quality/Active
Device type: AP or SU
4. IP Address*
Technical Support (650) 384-0000
PAGE 15
www.avalanwireless.com
Page 16

AW900FS
User’s Manual
Limited Warranty
This product is warranted to the original purchaser for normal use for a period of 360 days from the
date of purchase. If a defect covered under this warranty occurs, AvaLAN will repair or replace the
defective part, at its option, at no cost. This warranty does not cover defects resulting from misuse
or modication of the product.
Technical Support (650) 384-0000
PAGE 16
www.avalanwireless.com
Page 17

AW900FS
User’s Manual
Technical Specications
PARAMETER SPECIFICATION
RF Data Rate 200 kbps
Throughput 120kbps total throughput shared between all radios in the group
Frequency Range 902.75 MHz to 927.25 MHz
Transmit Power Selectable from 1 mW to 1 W
Receiver Sensitivity -98 dBm at 10-5 BER
Security Validation NIST FIPS 140-2 Level 2 Validated by CMVP Certicate No. 1452
Access Scheme TDMA, up to 4 Subscriber Units per Access Point with deterministic
latency
Modulation/Spreading FSK - FHSS
Range Line-of-sight range up to 60 miles with directional antennas, 5 miles
with included omnidirectional antenna
Browser Management
Tools
Data Security 128/256-bit AES
Operating Environment -40ºC to +80ºC
Mounting DIN rail clip
Ethernet Data Interface 10/100baseT
Connectors RJ-45 for Ethernet, P5
Power System 802.3af POE and 9-30 VDC through power connectors
Power Consumption When transmitting at +30 dBm: 4 Watts
Package Size 110 mm wide, 120 mm high, 32 mm thick, weight 0.2 kg
Antenna RPTNC Connector, 50 Ohm Impedance. 2.5 dBi exible
Warranty 1 Year Parts & Labor, XTRa-Care Extended Warranty 2 Year Extension
Certication FCC, IC certied, C1D2 certication pending
Data Communication Statistics, Network Settings, Transmit Power
When receiving: 1.8 Watts
omnidirectional antenna included.
available at nominal cost
Technical Support (650) 384-0000
PAGE 17
www.avalanwireless.com
Page 18

AW900FS
User’s Manual
Radio Status Information
The Login or Admin pages of the radio’s built-in web browser interface provide many useful pieces of
information that let you know how well the wireless link is working:
Top of Web Page
Version Current version of the radio’s Ethernet interface.
MAC Address Radio’s hardware MAC Address.
Ethernet Status of Ethernet connection: 10 Mbps or 100 Mbps, full or half du-
plex, connected or disconnected.
Uptime Total time radio has been active since last power cycle or hardware
reset.
Device Information
Device Type Access Point (master) or Subscriber Unit (client)
# of Subscriber Units For Access Point only, up to 4 permitted.
Subscriber ID For Subscriber Unit only, the ID selected for this radio.
Current TX Power The output power from 0dBm to 30dBm
RF Status Connected or Searching
Product 900fs
Radio Firmware Version 32
Radio Firmware Build 519
Radio Address XX.XX.XX (ex. 00.17.5d)
Statistics
Radio RSSI Received Signal Strength Indicator. The radios operate best with this
value between -30 and -95 dBm
Radio Total Packets # of Ethernet packets received since last reset.
Radio Failed Packets # of packets unsuccessfully transmitted.
Radio Passed Packets # of packets successfully transmitted.
Radio Broadcast Packets Trac simultaneously addressed to all devices on the network.
Radio Unicast Packets Trac sent to a single destination.
Radio Average TX Size Average bytes per packet transmitted.
Radio Average RX Size Average bytes per packet received.
Technical Support (650) 384-0000
PAGE 18
www.avalanwireless.com
Page 19
AW900FS
User’s Manual
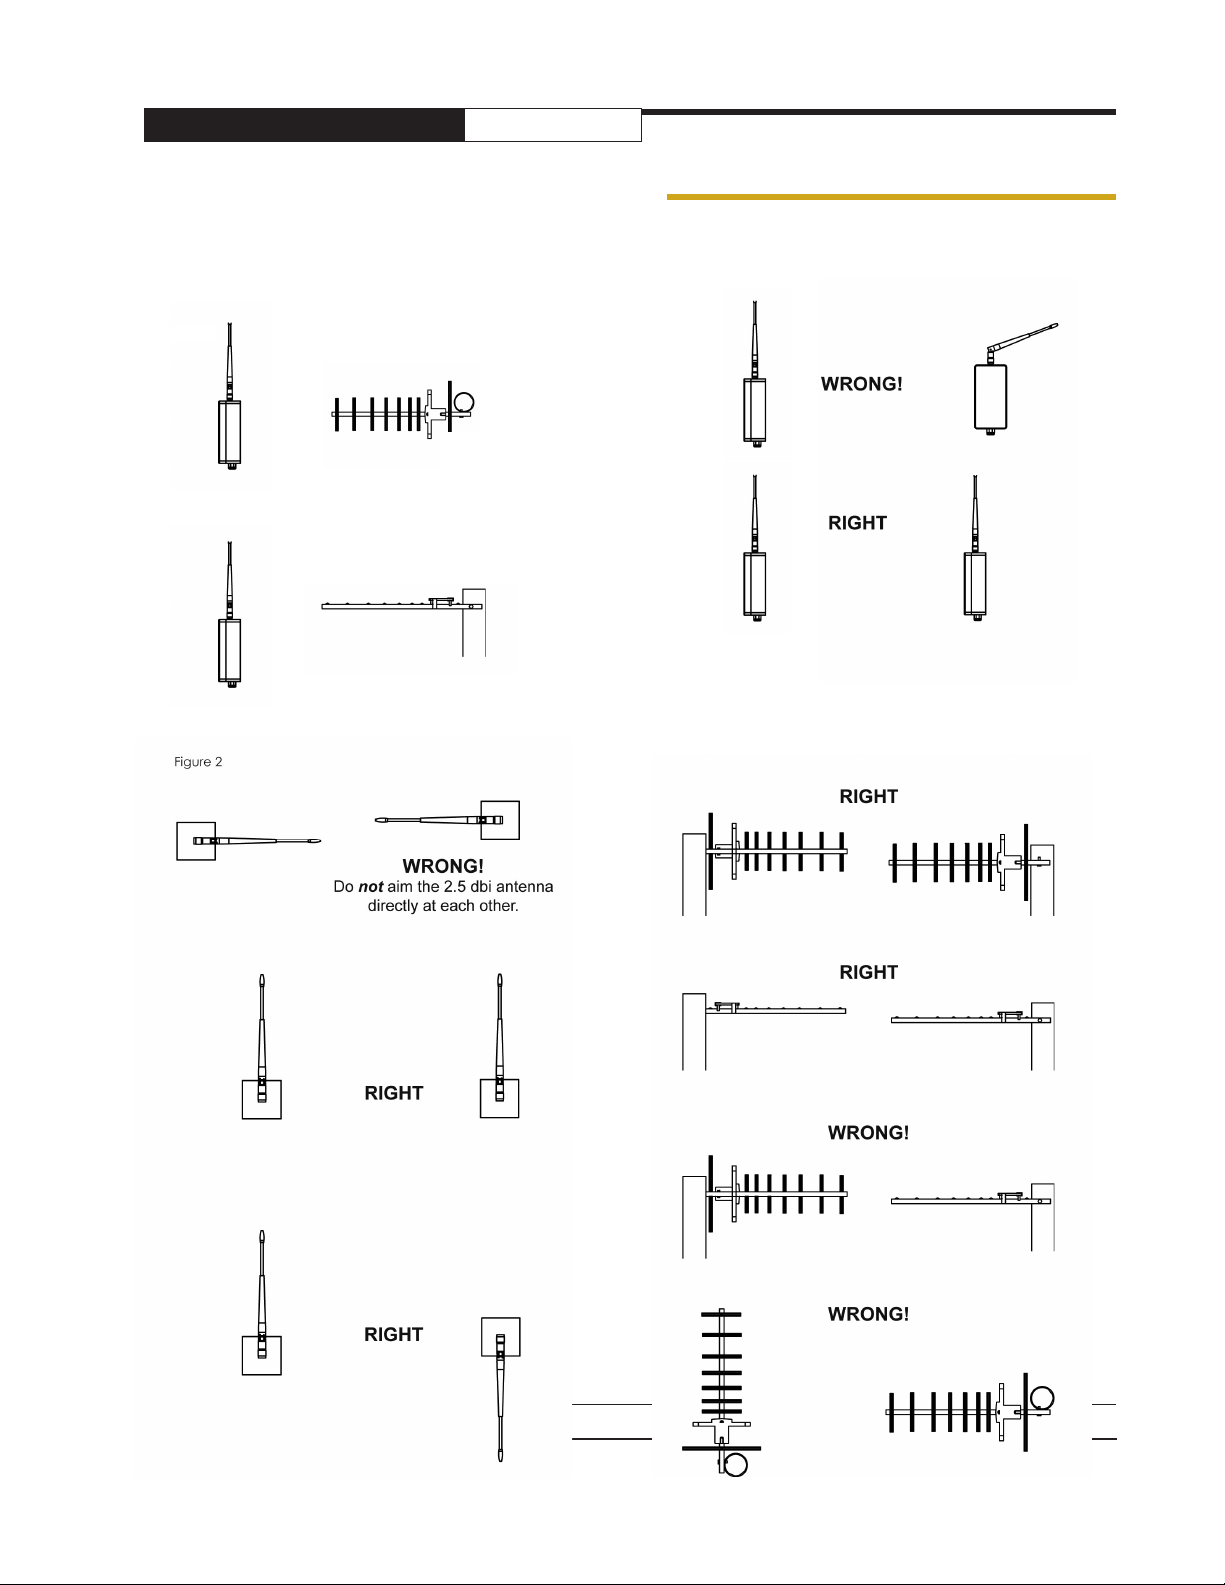
Antenna Alignment Guide
Please be sure to consider the following when installing antennae from AvaLAN:
Vertical polarization for directional antennas
Omni-antenna
Horizontal polarization for directional antennas
Figure 2
Do not aim the omni-antennae
directly at each other
Figure 1
11 dBi antenna
Technical Support (650) 384-0000
PAGE 19
www.avalanwireless.com
Page 20

AW900FS
User’s Manual
ATTENTION: When multiple antennas dened as Access Points are installed in one area and face the
same direction, antennas should be spaced a minimum of 25 feet apart. When multiple antennas are
installed in one area and face dierent directions, antennas should be spaced a minimum of 15 feet
apart.
Horizontal polarization
0-deg. separation
45-deg.
separation
15 ft physical
separation
Vertical polarization
Technical Support (650) 384-0000
PAGE 20
25 ft physical
separation
www.avalanwireless.com
Page 21

AW900FS
User’s Manual
Transmitter to Reciever Placement
If radios are installed either indoors or outdoors at distances closer than recommended, antennas can
overpower each other and cause undesired eects. If testing radios within one or two feet, remove both
antennas. The radios will still be able to signal each other at close distances. This applies to both indoor
and outdoor units.
ANTENNA
AW2-900
AW3x-900
AW5-900
AW10-900
AW11-900
AW15-900
RANGE
Maximum line-of-sight * Maximum non-line-of-sight
2 miles
2 miles
3.5 miles
20 miles
25 miles
60 miles
Abbreviation Guide
AP: Access Point
SU: Subscriber Unit
RF: Radio Frequency
RX: Recieve
TX: Transmit
LCD: Liquid-Crystal Display
ECD: Ethernet Client Device
RP: Reversed Polarity
TNC: RF Connector
IP: Internet Protocol
6 walls / 450 ft
6 walls / 450 ft
7 walls / 500 ft
1,500 feet w/ trees
1,750 feet w/ trees
2,000 feet w/ trees
Technical Support (650) 384-0000
PAGE 21
www.avalanwireless.com
 Loading...